How to Set a Static IP Address on Raspberry Pi
Make sure your Pi has the same IP every time you boot.

If you're trying to access a Raspberry Pi on your local network, there are times when you'll really need its IP address. Sure, you can usually SSH or VNC into a Pi by using its hostname, but for something like port forwarding on a router (which you'll use to create an externally-accessible Minecraft server or web server), an actual IP v4 address may be needed. The problem: every time you reboot your Pi, the IP address can change, based on what the router decides to assign at the moment.
Fortunately, there's a simple way to make sure that your Raspberry Pi always gets the same IP address on your local network or, at least, always tries to get the same address on your local network. It almost goes without saying that if, at the time it boots, another device that's powered on is already using the address in question, your Pi will either have no IP v4 address at all or (if you configured it as such) it will choose an alternative one. So keep that in mind.
Note that this tutorial assumes you already have a Raspberry Pi that's connected to your network. If not, please see our tutorials on how to set up a Raspberry Pi and how to set up a headless Raspberry Pi (no monitor required).

How to Assign a Static IP to a Raspberry Pi
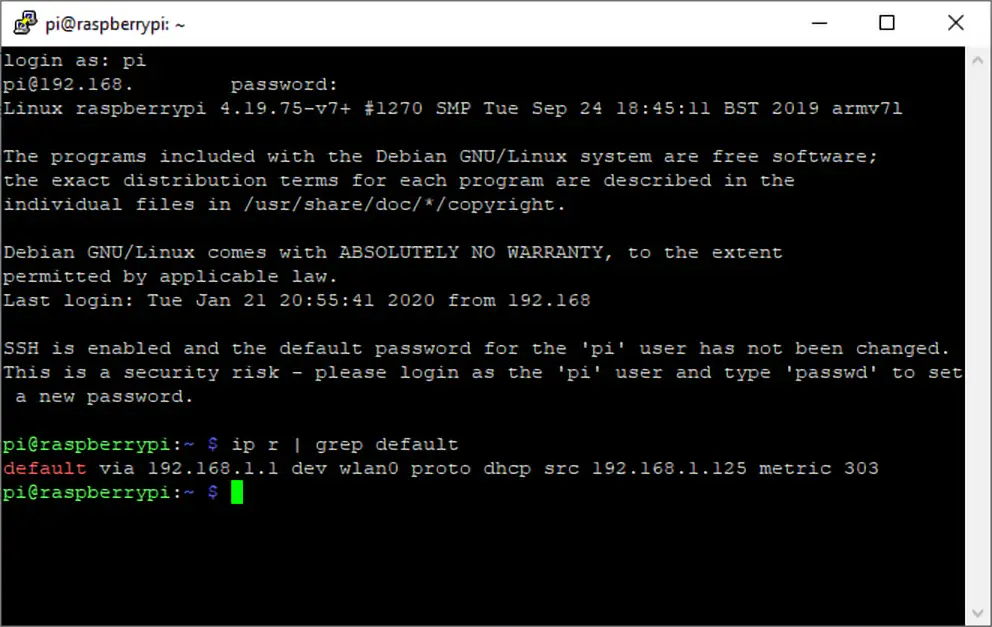
1. Determine your Raspberry PI's current IP v4 address if you don't already know it. The easiest way to do this is by using the hostname -I command at the command prompt. If you know its hostname, you can also ping the Pi from a different computer on the network.

2. Get your router's IP address if you don't already know it. The easiest way to do this is to use the command ip r and take the address that appears after "default via."

3. Get the IP address of your DNS (domain name server) by enter the command below. This may or may not be the same as your router's IP.

Now that you have the IP address your Pi is currently using, the router's IP address and the DNS IP address, you can edit the appropriate configuration file.
Stay On the Cutting Edge: Get the Tom's Hardware Newsletter
Get Tom's Hardware's best news and in-depth reviews, straight to your inbox.
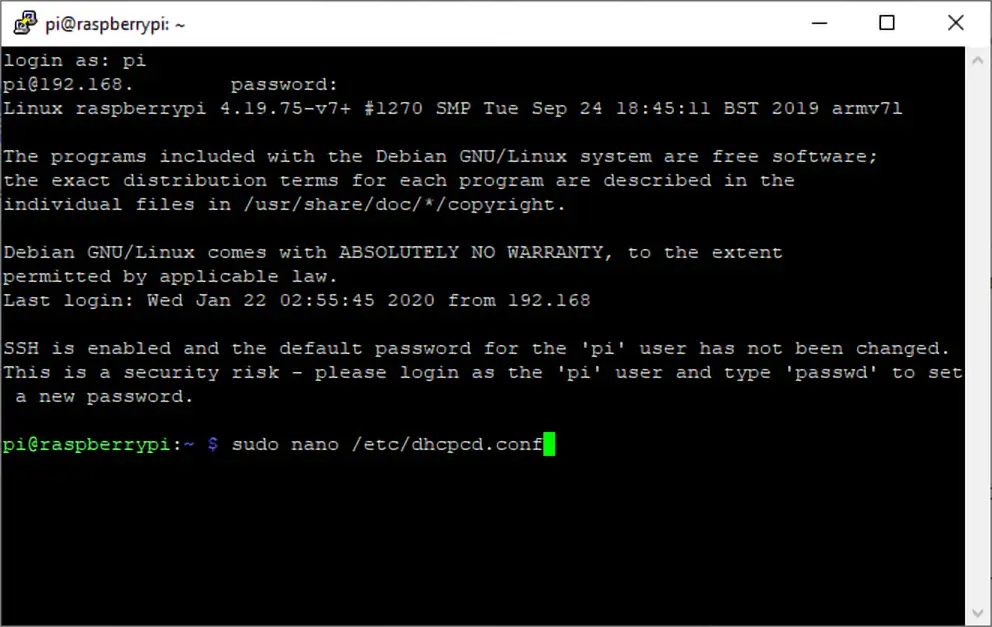
4. Open /etc/dhcpcd.conf for editing in nano.
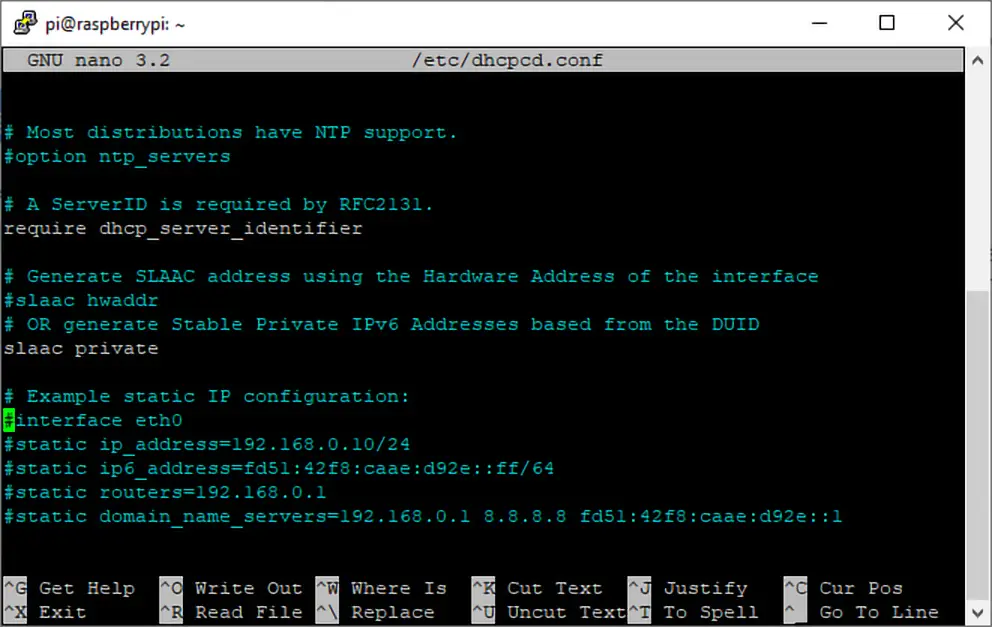
5. Add the following lines to the bottom of the file. If such lines already exist and are not commented out, remove them.
Replace the comments in brackets in the box below with the correct information. Interface will be either wlan0 for Wi-Fi or eth0 for Ethernet.
In our case, it looked like this.
You may wish to substitute "inform" for "static" on the last line. Using inform means that the Raspberry Pi will attempt to get the IP address you requested, but if it's not available, it will choose another. If you use static, it will have no IP v4 address at all if the requested one is in use.
6. Save the file by hitting CTRL + X and reboot .
From now on, upon each boot, the Pi will attempt to obtain the static ip address you requested.
Using the Raspberry Pi OS Guide to Set a Static IP
If you already have all the information about your router's IP and DNS IP, you can configure the static IP address using the Network Preferences menu instead of editing the dhcpcd.conf file.
1. Right click on the network status icon and select the Wireless & Wired Network Settings.

2. Select the appropriate interface . If you're configuring a static IP for Wi-FI, choose wlan0. For Ethernet, choose eth0.

3. Enter the IP addresses into the relevant fields. Your desired IP address will be in the IPv4 field, followed by a /24. Your router's IP and DNS server's IP will be in the fields named after them.

4. Click Apply , close the window and reboot your Pi.
Your Pi will now attempt to use your desired IP address at each boot. However, the Network Preferences menu sets this as a preference, not an absolute. So, if the IP address you asked for is not available, it will use another.
The new MultiPi console sports a Raspberry Pi CM4 and GPIO cartridge slot
Best Raspberry Pi Accessories of 2024
Ukraine war fuels rise of killer AI robots — report details rapid evolution using consumer drones and Raspberry Pi
- AusMatt Typo: grep "namesever" /etc/resolv.conf Should read: grep "name r sever" /etc/resolv.conf Reply
- alan tracey wootton With an Arduino that is serving a web page one can use mDns instead of keeping track of the local IP address. Add this to your Setup(): if (MDNS.begin("esp32")) { MDNS.setInstanceName("count server demo"); MDNS.addService("http", "tcp", 80); MDNS.addServiceTxt("http","tcp","counter","true"); }Then that webpage is available locally in chrome and safari as: http://esp32.local./I didn't test the other browsers. I'm sure this works for a Pi also even though I haven't tried it yet. mDns might be on by default. The url would be http:// raspberrypi .local./To check, try this command: dns-sd -B _http._tcpWhen I do that I find that both of my printers are serving http (a supply level page) in addition to the microcontroller. Reply
- wl84 When I run the nameserver command I get two results back - 192.168.11.1 and 192.168.68.1. I tried both in the config and I can't connect to anythign with either. I'm trying to setup pihole Reply
- View All 3 Comments
Most Popular

3 Easy Ways To Set A Static IP Address On Raspberry Pi
When you plug a Raspberry Pi into the network and boot it, it will generally get a “random” IP from the DHCP server. This IP address might change almost every time you use it, which is not convenient at all. Let’s see how to set a fixed IP address, so the Raspberry Pi always use the same one.
There are three ways to set a static IP address on Raspberry Pi: assign an IP address to your Raspberry Pi in the router configuration, set a static IP in the desktop environment, or change the network configuration manually to always use the same IP.
We’ll explore these 3 methods, but first, let’s make sure you understand your current network, it’s an important prerequisite to avoid any IP address conflicts or network malfunctions.
If you’re looking to quickly progress on Raspberry Pi, you can check out my e-book here . It’s a 30-day challenge where you learn one new thing every day until you become a Raspberry Pi expert. The first third of the book teaches you the basics, but the following chapters include projects you can try on your own.
Prerequisites: Understand the network configuration
I put the word “random” in quotation marks in my introduction because there is nothing truly random with computers. Before picking an IP address and trying to configure it on the Raspberry Pi, we need to take a few minutes to study the current network.
Get the IP address of your router
On most networks, especially at home, the main router is your Internet provider box. It provides Internet access for all devices and is often the DHCP server too (the main equipment in charge of assigning IP addresses to all devices).
By accessing its web interface, you can generally get a clearer overview of the network configuration.
The IP address of the router is mentioned as the gateway when you check the network configuration of any device connected to it.
From a Raspberry Pi or Linux computer, you can use this command to find the IP address: route -n

In my case, my router IP address is 192.168.222.1 (because I configured it). But in most cases, it will be 192.168.1.1 or 192.168.1.254.
On Windows, you can use the system settings, or start a command prompt, and type: ipconfig

Once you have the IP address, you can try to access the web interface via your web browser. It will be password protected, so you may need to find your Internet provider documentation to access it.
Once connected, I recommend doing two things to make sure you don’t do anything wrong by using one of the three methods mentioned in the article:
- Find the DHCP range for the clients , meaning the list of IP addresses that can be assigned automatically by your router (if possible, your static IP should be outside this range).
- Find the already used IP addresses , to avoid any conflict.
I’ll show you how to do this now.
Get the DHCP range
First, you need to find the DHCP range. In general, you have a network that goes from 192.168.1.1 to 192.168.1.254, but the DHCP range is maybe only from 1.100 to 1.150. This will be useful to avoid any conflict.
We don’t want to set the Raspberry Pi IP address to 1.110 if the DHCP may assign it to your computer.
You can also find this information in your DHCP server configuration (so your Internet provider router in most cases). For me, it looks like this:
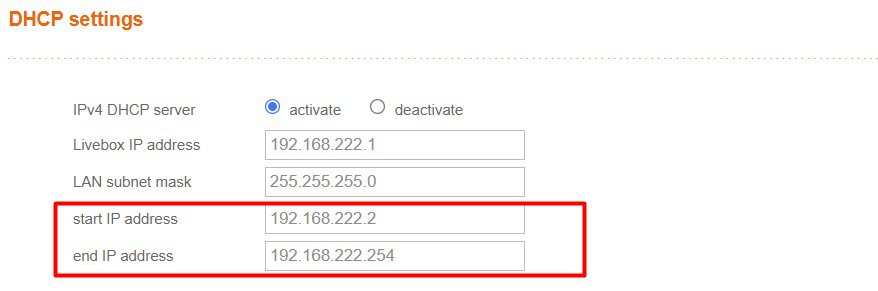
Well, I guess my configuration is not typical, as it covers all the IP addresses, probably because I changed it. A smart move, if you have something similar, would be to reduce the range (from 222.2 to 222.100 for example).
If you find that your DHCP range is from 1.100 to 1.150 for example, we’ll just avoid picking an IP address in this range. You can, for example, use 1.160 if it’s not taken by another device with a static IP.
How do you know? That’s the last step before changing the Raspberry Pi configuration.
Get a list of the currently used IP addresses
To be safe, it’s a good practice to get a list of the IP addresses that are currently used on the network. This can be done from the router interface directly, or via a network scan.
On the router configuration page, you may have access to a list of all the computers and other devices connected to your network, with their current IP addresses. Not only the one assigned by the DHCP server but all of them.
This will give a good overview of the current state of the network. If you can’t find this, don’t worry, you can also do a network scan.
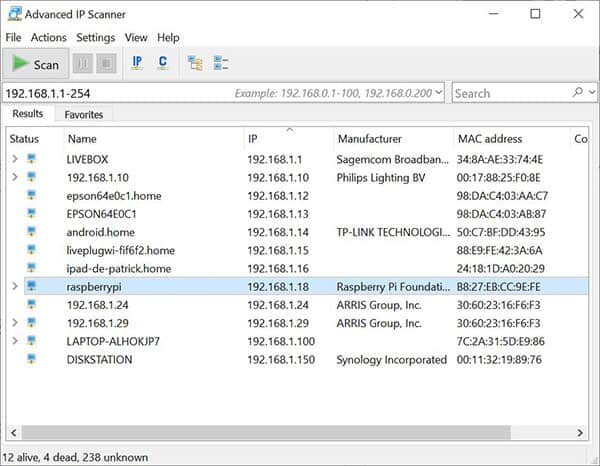
From a Windows computer, you can also use the Advanced IP Scanner tool, which will give you something like:
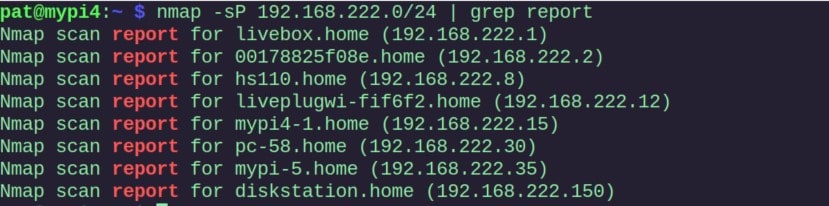
And on Linux, you can install nmap with: sudo apt install nmap And use it to do a network scan: nmap -sP <network> | grep report So, for example:
The grep command is used as a filter, to only show the lines we are interested in ( more details here ).
In most cases, your DHCP server assigns IP addresses at the beginning of the range . In both examples, all IP addresses are given between 2 and 40. IP addresses 100 and 150 are static IPs. So, if I pick something like 200 for my Raspberry Pi, it should be safe (192.168.222.200).
At this point, you should know which IP address you’ll configure on your Raspberry Pi. I’ll give you 2 methods, one from the desktop environment, and the other one in the command lines.
Are you a bit lost in the Linux command line? Check this article first for the most important commands to remember and a free downloadable cheat sheet so you can have the commands at your fingertips.
Set a static IP for the Raspberry Pi on the router
The easiest way to set a static IP address for the Raspberry Pi is to assign it a static lease in the DHCP server configuration (most likely your Internet router).
The interface will be slightly different for each provider and router brand, but in my case, it looks like this:
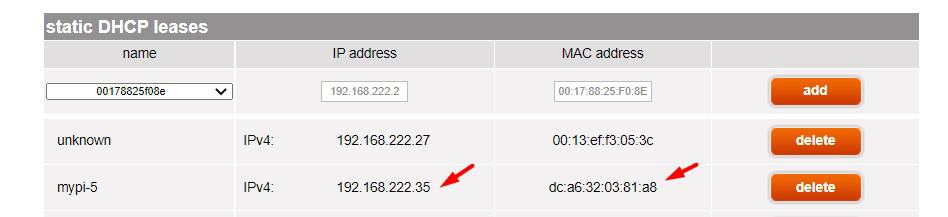
I can pick the name of any device on my network, and set a static IP address. I can also enter a MAC address if the device is not listed (here is how to find the MAC address on Raspberry Pi ).
If you can find something similar on your router, it would be the easiest solution. Nothing to change on the Raspberry Pi, and even when you reinstall the Raspberry Pi, it will stay with the same IP address.
It will also avoid most issues as it’s configured directly on the DHCP server.
Set a static IP on Raspberry Pi OS Desktop
On Raspberry Pi OS Desktop, a static IP address can be set manually by editing the wireless and wired network settings. Click on the network icon in the top-right panel, open the settings and fill the configuration manually.
Here are the exact steps:
- Click on the network icon in the right corner of the top panel.
- Take a free IP address to put in the “Address” field. If possible, try to pick something outside the DHCP range. But in general, DHCP servers are smart enough to not assign an IP address that is already taken. The network mask (“netmask”) is generally 24 on most networks.
- The gateway is the router IP address we got earlier with: route -n
- And the DNS server is often the same for a home network. You can either check your current configuration with: cat /etc/resolv.conf And use the same IP. Or use a public DNS server, like the one offered by Google (8.8.8.8) or OpenDNS (208.67.222.222). If you use Pi-Hole or AdGuard , you obviously need to adjust this and set it to the other Raspberry Pi IP address.
- Click “Save” to apply the changes , and then close everything.
To really apply the changes, you need to restart the network by using one of these methods: reboot the Raspberry Pi (main menu > Shutdown > Reboot), unplug/plug the network cable, or disable/enable the Wi-Fi interface.
After the reboot or reconnection, you can put your mouse over the network icon to find out if your IP address has changed to the configured static IP address ( more details here ).
Note : This tutorial has been updated for Raspberry Pi OS Bookworm, the steps might be slightly different on older versions. And the next section, via the command line, is not working with older versions (you have to edit /etc/dhcpcd.conf in this case).
Set a static IP via the command line
If you don’t have access to the desktop interface, or want to use command lines, you can do the same thing via the network manager configuration tool.
Here are the steps to follow:
- Open Network Manager UI with: sudo nmtui
- Choose “Edit connection”
- On the next window, scroll the cursor to the “IPv4 Configuration” line and select “Automatic” .
- Scroll to the bottom of the form to find the “Ok” button to save and exit the tool (press “ESC” several times after that).
As with the previous solution, the change will only apply on the next connection. You can either disconnect/reconnect your network cable, Wi-Fi or simply reboot the Raspberry Pi: sudo reboot
And that’s it. Once the network is reconnected, the IP address should now be the new one you just set:

Once, you have a good idea of your network configuration and know where to change the Raspberry Pi configuration, it’s not that complicated.
I hope this article was useful, and if you want to learn more about network administration, you should check these other tutorials on the website:
- How to use Raspberry Pi to monitor network?
- Network Boot With Raspberry Pi: Everything you need to know
- How to use your Raspberry Pi as a DNS Server (And Speed Up Internet)
Want to chat with other Raspberry Pi enthusiasts? Join the community , share your current projects and ask for help directly in the forums.
- Remote access your Pi from anywhere (best apps)
- Auto start any program when the Raspberry Pi boots up
- Create an image of your SD card (safety first!)
- 57 Raspberry Pi commands you need to know
- Master Raspberry Pi in 30 days with this
Does a Raspberry Pi need a static IP?
Using a static IP on Raspberry Pi is convenient, but not mandatory. Its utility is minimal for desktop use. For servers, a unique hostname serves the same purpose as a static IP address in most cases.
For specific network servers (DNS, DHCP, ad-blocker, etc.) where you use the IP address in the clients configuration, it’s recommended to set a static IP. But when the hostname can be use, or a quick scan done, it’s not mandatory.
How to set a static IP address before booting?
The easiest way to set a static IP address before booting is to assign a reserved IP address in the DHCP server configuration. The MAC address is the only information required, the system doesn’t matter.
You can follow the instructions given in the first method listed in this article to know how to do this on your router.
What’s the difference between a public and private IP addresses?
Public IP addresses identify devices on the internet, enabling global access to the Raspberry Pi. Private IP addresses are used within local networks, like home setups, allowing communication with devices such as your main computer.
If your goal is to give access to your Raspberry Pi via Internet from anywhere in the world, you should probably read this: How to Install and Use No-IP on Raspberry Pi? (Dynamic DNS) .
Whenever you’re ready, here are other ways I can help you: The RaspberryTips Community : If you want to hang out with me and other Raspberry Pi fans, you can join the community. I share exclusive tutorials and behind-the-scenes content there. Premium members can also visit the website without ads. Master your Raspberry Pi in 30 days : If you are looking for the best tips to become an expert on Raspberry Pi, this book is for you. Learn useful Linux skills and practice multiple projects with step-by-step guides. The Raspberry Pi Bootcamp : Understand everything about the Raspberry Pi, stop searching for help all the time, and finally enjoy completing your projects. Master Python on Raspberry Pi : Create, understand, and improve any Python script for your Raspberry Pi. Learn the essentials step-by-step without losing time understanding useless concepts. You can also find all my recommendations for tools and hardware on this page .

I'm the lead author and owner of RaspberryTips.com. My goal is to help you with your Raspberry Pi problems using detailed guides and tutorials. In real life, I'm a Linux system administrator with web developer experience.
Similar Posts

Discover Sonic Pi: Install and Code Music on Raspberry Pi
Sonic Pi is a fun project for your Raspberry Pi that lets you create music with lines of code. However, the initial setup and understanding of how to write your first lines can be a bit intimidating. That’s why I’ve created this beginner’s guide for you! A package for Sonic Pi is available on the…

How to install FreeBSD on Raspberry Pi? (step-by-step guide)
FreeBSD is an original operating system you can install on Raspberry Pi to experiment a bit outside Linux. But the process is not always easy if you are used to working on Debian-like systems.Today, we’ll see how to install it on a Raspberry Pi, to configure it and use it like almost like any other…

Raspberry Pi: What is cmdline.txt and how to use it?
When you create a new SD card for your Raspberry Pi, it not only includes the system files for Raspberry Pi OS (or any other distribution ), but also some less known configuration files, like config.txt and cmdline.txt. In this article, I’ll introduce the cmdline.txt. In most cases, you don’t need to edit it, but it…

How to install Fail2ban on your Raspberry Pi?
When you use a Raspberry Pi in a company or have open ports on it, it’s a good idea to think a little about security.You may not be worried about a Raspberry Pi compromised, but it can become a door to access your entire network.Fail2ban is a software that detect malicious access attempts to a…

Turn Your Raspberry Pi Into A Torrent Box (The 3 best apps)
If you already have a Raspberry Pi running 24/7, adding a torrent service on top of your existing project(s) is another great use for this device. I know, with the rise of streaming providers, torrents aren’t as popular as they used to be, but it’s still handy to have an app with a nice web…

How to Auto Start a Program on Raspberry Pi? (4 ways)
Starting a script on boot is not really intuitive, whatever your system.It’s a question I often hear, so I created an entire post about it.You’re probably trying to start a script or an app, that’s mandatory in your setup, automatically on boot.It’s not so complicated, you have several ways, I’ll show you everything. On Raspberry…
Every Raspberry Pi User’s Secret? This Downloadable Linux Command Cheat Sheet!
Set Static IP Address on Raspberry Pi

Recently, I set up Jellyfin media server on my Raspberry Pi. My Pi is wirelessly connected to the router and one problem I faced with this setup is accessing the media server on the TV or other devices.
Why? Because the Pi got assigned a random IP address at times between reboots. And since I was trying to access the media server running on Raspberry Pi though the IP address, it became an issue.
I had to manually enter the IP address on the TV every time the IP address changed. Finding the IP address of the Raspberry Pi was another challenge.
This is where static IP comes into play. If you Pi uses static IP, the IP address remains the same between the reboots.
This is one of the many scenarios where you are better off with a static IP assigned to your Pi. And in this tutorial, I'll discuss how you can achieve that.
Assigning static IP on Pi device vs on the router
Yes! There are two approaches for your Pi to have a static IP.
- You can set static IP on the Raspberry Pi itself
- You can have your router assign a static IP to the Pi
Both methods have their pros and cons.
Let's say you set the static IP on the Raspberry Pi . Your Pi will always seek the same IP address from the router (let's say 192.168.1.51). That's fine as long as the router remains the same. If you change your router and the new router insists on using a different subnet (let's say in the 172.16.12.0/32 range), then your PI won't be connected to WiFi like before. You'll have to manually update the network settings on the Pi again to use the new IP range. This could work when you just a couple of Pi devices and you can directly login to them (instead of SSH) or connect to them via Ethernet cable. For a fleet of Pis in random locations in the house.
Let's say you want to assign the Pi a static IP from the router . This way, you are changing nothing on the Pi. If you change the router, the Pi will get an IP address assigned automatically through the DHCP server. The problem is that it's not easy to assign static IP to devices on all the routers. Some internet companies provide routers with very little scope of configuration changes.
I cannot show how to assign static IP to different devices on the router, as it depends on what kind of router you have. So, I'll discuss how you can set static IP on the Raspberry Pi itself.
Setting static IP on Raspberry Pi
The procedure comprises the following four steps:
- Get the current IP address of the Pi (if you want to use this one as static IP)
- Get the gateway IP (router's IP)
- Get the DNS server address (optional)
- Use the above information to change network configuration
The first three steps can be easily done in the command line. The third step can be done easily in both the command line and GUI.
Step 1: Get the IP address of Pi
If you want to use the current IP address as the static IP,
This is very simple. In the terminal, type the following command:
You may also use this command:
Both will give you the current IP address of the Raspberry Pi.

As you can see in the screenshot above, my Raspberry Pi's IP address is 192.168.1.34.
Step 2: Get the gateway IP
This is also quite simple. To get the gateway IP address (your router's IP address), use this command:
As you can see in the screenshot below, the gateway IP in my case is 192.168.1.1.

Step 3: Get the DNS server details (optional)
Some people like to keep the same DNS server which is currently being used on the system. I think you can do without that as well. Most home users have the DHCP server handle it automatically anyway.
Still, if you want, you can get the DNS server address with:

Step 4 (Terminal Method): Change network configuration to set static IP
If you are accessing Raspberry Pi via SSH or if you prefer the command line, you can use the nmtui (network manager in terminal) tool.
Run this command:
You'll see an interface like this. Here, select Edit a connection and press Enter.

It will show the connections you have had in the past on your Pi. I believe you want to set the static IP for the currently connected network. Move down to the appropriate network. Now press tab a couple of times to select the Edit option and press enter.

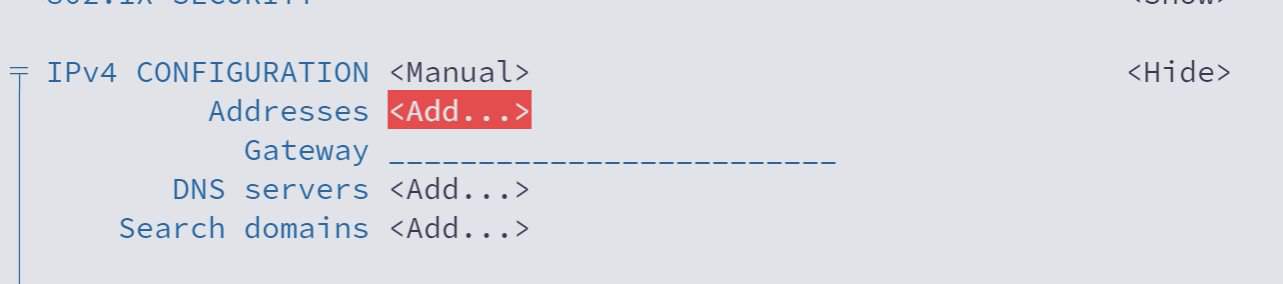
Use the arrow key to scroll down to the IPv4 CONFIGURATION option. Change it from Automatic to Manual .

Next, select the Show option of IPv4 CONFIGURATION line.

Use the arrow keys to move down again and reach the IPv4 CONFIGURATION section again. This time you'll see option to add Address, Gateway and DNS servers.

Go to the Addresses line and click enter key. It may take you to the beginning. Scroll down back again.

Fill all the details such as IP address with mask, Gateway IP and DNS.

If you notice above, I used the gateway IP in DNS too. I also added 1.1.1.1, DNS of Cloudflare as an alternative.
After filling all the details, scroll down to the bottom, select OK and press enter.
Your changes are saved. You can exit the nmtui interface the same way (press Back and then Quit options).
Restart your Pi for the changes to take effect. You have successfully set up static IP on Raspberry Pi.
Step 4 (GUI Method): Change network configuration to set static IP
The same can be achieved from the graphical interface of Raspberry Pi OS.
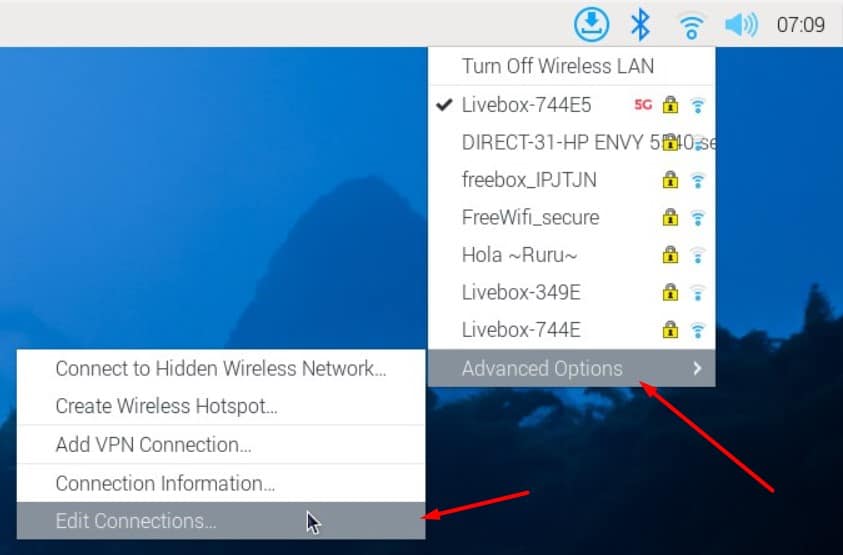
First, click on the network icon and then go to the Advanced options and click Edit connections.

Here you go to IPv4 Settings, set it to manual and then add all the details such as IP address, mask, gateway IP, DNS server etc. You have all the details.

Restart your system and you can see that the static IP is now set on your Pi.
Going back to non static IP
If you don't want to use static IP anymore on Raspberry Pi, you can easily revert the steps and go back to dynamic IP.
How? Simply edit the network connection in question again. This time, change the IPv4 configuration to 'automatic' and save your changes. And that's it. You don't have to provide IP address, gateway IP etc anymore.
As I mentioned at the beginning of this tutorial, you should use a static IP from the router end specially if your Pi won't be easily accessed physically.
But if your device is in your hands all the time, you have the liberty of accessing and changing its configuration.
I hope you find this tutorial on setting a static IP on Raspberry Pi helpful. Please let me know if you have any questions.
Abhishek Prakash
Created It's FOSS 11 years ago to share my Linux adventures. Have a Master's degree in Engineering and years of IT industry experience. Huge fan of Agatha Christie detective mysteries 🕵️♂️
Can You Use Raspberry Pi 5 as a Desktop Computer?
Turn your raspberry pi into a nas using samba (smb) server, setting up jellyfin media server on raspberry pi, using a usb serial adapter (uart) to help debug your raspberry pi, run llms locally on raspberry pi using ollama ai, become a better linux user.
With the FOSS Weekly Newsletter, you learn useful Linux tips, discover applications, explore new distros and stay updated with the latest from Linux world

Great! You’ve successfully signed up.
Welcome back! You've successfully signed in.
You've successfully subscribed to It's FOSS.
Your link has expired.
Success! Check your email for magic link to sign-in.
Success! Your billing info has been updated.
Your billing was not updated.
Set up a static IP-address on the Raspberry Pi
By default, the Raspberry Pi will get a dynamically allocated IP-address, meaning it changes as you restart it or potentially when new devices are added to the network. To make it easier to connect and have a more stable connection I recommend to set up a static IP address.
Table of contents
Get a static ip-address, setting-up using the desktop, setting-up with the terminal, prioritising internet interface, disabling static ip-address.
To get a static IP-address that works, it will need to be within the range provided by the router. We will therefore first need to find the router’s ip address. This tends to be written on the bottom of the router. If not, simply open a terminal window and type in netstat -nr . Now look under Gateway :

You can also use the command ip route | grep default | awk '{print $3}' .
In this example it is 192.168.0.1 . Using the router’s ip address we can choose a static ip address in the range between 1 and 255, which will become the last number of your ip-address, e.g. 192.168.0.40 .
Determine if you want a static ip address over WiFi or Ethernet. The interfaces are called respectively wlan0 and eth0 .
It is very simple to set up your static ethernet address. Simply right-click on the Wi-Fi icon in the menu bar (top-right on the left of the speaker icon) and select the Wireless & Wired Network Settings .
Now click the empty dropdown menu and select the network interface you want to configure. Now for IPv4 Address enter your chosen ip address, for Router the IP address of the router. AS DNS Servers add 8.8.8.8 . When wanting to add multiple DNSs make sure to add them one after another separate by a space. Finally, click the Disable IPv6 option.
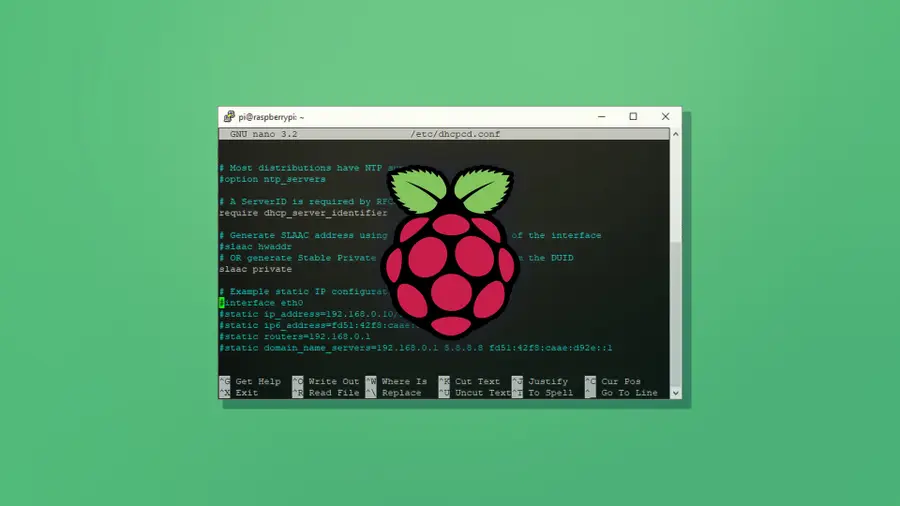
One can also set up a static IP-address via the terminal. For this we need to change the dhcpcd.conf file:
Now scroll to the bottom, and add the following text:
replacing the words in capital by what is desired. Now save the file by pressing ctrl+x then y to exit.
When you are using multiple internet interfaces, such as Ethernet over Wifi, it is important to make sure the internet interface has priority over the other such that you get a working internet connection. To do so, we need to add a metric number to each, with the higher metric being prioritised first. Open the dhcpcd.conf file:
And add the metrics. For example:
Now finally reboot your Raspberry Pi for the changes to be incorporated:
Once your raspberry pi has finished restarting, connect to it locally to verify the static IP address hostname -I or ping from it on a networked computer ping YOURSTATICIP .
In many cases you may not want your Raspberry Pi set to use a static IP address. You can change the network configuration back by editing dhcpcd.conf again ( sudo nano /etc/dhcpcd.conf and removing all the lines you added in the previous steps.
You'll Need 1
How to Configure a Static IP Address on the Raspberry Pi
What you'll need

Posted in these interests:

Raspberry Pi
The network capabilities on the Raspberry Pi make it possible to create some really fun projects. Once in a while, you’ll come across a project that could benefit from a static IP address. If you’re using your Raspberry Pi for storage as a NAS device, an FTP server—or any other kind of server for that matter—a static IP address can be a big help.
1 – Update Raspberry Pi OS

This guide should work with any Raspberry Pi using Raspberry Pi OS (formerly Raspbian). Make sure your copy of is up to date. If you’re not sure where to begin, visit our guide on how to update Raspberry Pi OS .

How to Install Raspberry Pi OS on Your Raspberry Pi Get the new official Raspberry Pi OS on your Pi.
2 – Find your router IP address
We’ll need both your router IP address and name server IP. We can find this information by running a few commands in a terminal on the Pi. Remote into the Pi using SSH or open a terminal window from within Raspberry Pi OS.

How to Connect to a Raspberry Pi Remotely via SSH The preferred (and most common) method of connecting to your Pi to run commands.
To find your router IP address, enter the following command:
The router IP address will appear after the text “default via”—take note of it. The name server can be found in the resolv.conf file. Open it using the following command.
Take note of the name server IP address and close the file with CTRL + X .
3 – Edit the dhcpcd file on the Raspberry Pi
The static IP is set by adding it to a file on the Raspberry Pi. In the terminal window, run the following command to edit the dhcpcd.conf file.
4 – Set the static IP address
This document has a few lines of code that can be activated by removing the # to the left of each line. Use the following ledger to properly set your static IP address.
- Network = If you’re using a wired connection, set this to eth0 . If you’re using a wireless connection, set this to wlan0 .
- Static_IP = This is the static IP address you want to assign to the Raspberry Pi.
- Router_IP = This is the IP address for the router.
- Name_Server = This is the name server address. You can use another DNS IP here if you’d like.
Enter your information into the file, be sure to remove the <> brackets. Check the screenshot for an example.
When that’s completed, save the file using CTRL + X .
5 – Test the static IP address
When the changes have been made, restart the Raspberry Pi. Now is a good time to test your project and make sure the IP address isn’t changing. Disconnect and reconnect your Pi from the network. If the IP address changes, verify the information in the previous step saved properly. If it stays the same, congratulations! You’ve set a static IP on the Raspberry Pi.
How to Run a Minecraft Server on the Raspberry Pi

There are several ways to go about running a Minecraft server on the Raspberry Pi. In this guide, I’ll cover how to install Nukkit—a cross-platform Minecraft server that’s super easy to set up on the Raspberry Pi. This server should work with PCs, consoles, and tablets running Minecraft 1.14. I’ll be using a Raspberry Pi
In these interests
Raspberry pi pi • 92 guides, share this guide.
467 guides
Introducing Howchoo, an enigmatic author whose unique pen name reflects their boundless curiosity and limitless creativity. Mysterious and multifaceted, Howchoo has emerged as a captivating storyteller, leaving readers mesmerized by the uncharted realms they craft with their words. With an insatiable appetite for knowledge and a love for exploration, Howchoo's writing transcends conventional genres, blurring the lines between fantasy, science fiction, and the surreal. Their narratives are a kaleidoscope of ideas, weaving together intricate plots, unforgettable characters, and thought-provoking themes that challenge the boundaries of imagination.
Related to this guide:
There are several ways to go about running a Minecraft server on the Raspberry Pi. In this guide, I&

HeaterMeter: Control your Grill Using a Raspberry Pi!
With summer right around the corner, it’s time to fire up the grill! But who will watch the gr

How to Set Up a New Raspberry Pi
So you just got your brand new Raspberry Pi. Awesome! This guide will show you how to set up a brand

RetroPie scrapers: what they are and how to use them
You’ve put so much work into setting up RetroPie or EmulationStation. You load it up

Power Your Raspberry Pi Zero with a Battery Using the JuiceBox Zero
The Raspberry Pi Zero is an incredible tool for building a wide variety of IoT devices. And until la
How do I connect my Raspberry Pi to my computer?
There are many reasons you may want to connect your Raspberry Pi to your computer, and there are a f

How to Set Up Homebridge on a Raspberry Pi
Home automation is growing in popularity, but one of the biggest hurdles is compatibility betwe

Build Your Own Raspberry Pi Car Computer, or “Carputer”, with AutoPi
Have you ever wanted to add an entertainment system to your car, only to find that most units are ex

The Best Raspberry Pi HATs for Your Next Project (2022)
There are so many cool HAT extensions for the Raspberry Pi to make your next project literally sing

How to Choose the Best Camera for OctoPrint (including USB)
OctoPrint is a platform designed for the Raspberry Pi that makes it possible to monitor and control
Discover interesting things!
Explore Howchoo's most popular interests.
How Do I Set a Static IP Address on Raspberry Pi?

Your changes have been saved
Email Is sent
Please verify your email address.
You’ve reached your account maximum for followed topics.
6 Smartphone Camera Apps That Will Lead to Better Photos
9 cool things you can do with adobe express, 6 android features ios 18 still doesn't have.
If you’re using your Raspberry Pi as a home server or often need to access it remotely from another device, setting a static IP address for it is a very good idea. This means you’ll be able to find it at the same Raspberry Pi static IP address every time, rather than a new address being set dynamically whenever it is rebooted. This is also useful to avoid confusion when you have multiple Raspberry Pi devices connected to your network.
Fortunately, once you know how, it's a fairly simple and quick process to set a Raspberry Pi static IP address. We’ll show you how to change the IP address in Raspberry Pi OS / Raspbian to make it permanent.
What Is an IP Address?
An Internet Protocol (IP) address is used to uniquely identify each device on a computer network, or the network itself on the internet – more on that later. The IP address is normally written in ‘dot-decimal’ notation: four decimal numbers, each ranging from 0 to 255, separated by dots. An example is 192.168.1.107 .
By default in Raspberry Pi OS, which is a Linux-based operating system, your Raspberry Pi’s IP address is reconfigured automatically each time you reboot it, so it may well change. Naturally, this is not ideal when you need a reliable address at which to connect to the Raspberry Pi from another device, such as when using it as a server. So it’s better to set a static IP address on Raspberry Pi.
Private vs. Public IP
A public IP address is used to identify your local network on the wider internet. This typically changes every time your router connects to the internet, although you may be able to make it static depending on your internet service provider.
You can find the public IP address on a Linux system such as Raspberry Pi OS by entering a special Terminal command, or simply by doing a web search for "What's my IP?". It is only required if you intend to connect to a device from outside your network, which we won’t cover here.
Instead, we are looking at the private IP addresses used to identify each device on your own local network. While it may be possible to reserve a certain IP address for your Raspberry Pi in your wireless router’s settings for the same purpose, here we’ll be showing you how to set a static IP from the Raspberry Pi itself.
1. DHCP Configuration
Raspberry Pi OS (formerly known as Raspbian) uses DHCP (Dynamic Host Configuration Protocol) to assign an IP address to the Raspberry Pi automatically whenever it is rebooted. You can find out more in our guide to DHCP .
To change Raspberry Pi OS's behavior so that it uses the same static IP address each time, you will need to modify the configuration file for the DHCP client daemon, dhcpcd.conf .
Before that, you will need some information on your current network setup so that you can add the required details to the configuration file. You will require the following info:
• Type of network connection: This is either wlan0 if your Raspberry Pi is connected to the router wirelessly, or eth0 if it’s connected using an Ethernet cable.
• Raspberry Pi’s currently assigned IP address: it’s safest to reuse this for the Raspberry Pi static IP so that you can be sure the latter hasn’t already been to another device on the network. If not, make sure another device isn't already using it.
To find the Raspberry Pi’s current IP address, enter the following command in a Terminal window:
• Your router’s gateway IP address: this is the one used to contact it from the local network, not its public IP. It varies depending on the router model, but typically starts with 192.168.
To find it, enter the following command and note the first IP address given:

• Your router’s DNS (Domain Name System) IP address: This is typically the same as its gateway address, but may be set to another value to use an alternative DNS – such as 8.8.8.8 for Google, or 1.1.1.1 for Cloudflare.
To find the current DNS IP address, enter the command:

Note the IP address after nameserver – that's the DNS address – and then press Ctrl + X to close the file.
2. Add Static IP Settings
Now you have found all your network connection information, it’s time to edit the dhcpcd.conf configuration file to add the settings you need to set up a static IP address for your Raspberry Pi:
If you haven’t edited the file previously, it will mainly contain various comment lines preceded by a hash (#) symbol. At the bottom, add the following lines, replacing the emboldened names with your own network details:
Replace the emboldened names as follows:
- NETWORK – your network connection type: eth0 (Ethernet) or wlan0 (wireless).
- STATIC_IP – the static IP address you want to set for the Raspberry Pi.
- ROUTER_IP – the gateway IP address for your router on the local network.
- DNS_IP – the DNS IP address (typically the same as your router’s gateway address).
Here is an example configuration to set the static IP to 192.168.1.120 with a wireless connection to a router at 192.168.1.254:

Once you have entered the settings, press Ctrl + X and then Y and ENTER to close and save the modified configuration file.
3. Reboot the Raspberry Pi
With the dhcpcd.conf configuration file modified, restart your Raspberry Pi to effect the changes and set the static IP address for it:
Rather than using an address assigned automatically by DHCP, the Raspberry Pi will now attempt to connect to the router using the new static IP address that you set in the dhcpcd.conf file.
To check that it is working correctly, enter the following command:
You should now see the static IP address that you set in the dhcpcd.conf configuration file.

Set a Static IP Address: Success
Congratulations: you have set up a static IP address on your Raspberry Pi, and it should now retain that address automatically whenever it boots up. Now you can go ahead and use your Pi system as a NAS, media or game server, and connect to it reliably at the same Raspberry Pi static IP address every time.
- Raspberry Pi
How to Setup a Raspberry Pi Static IP Address
In this tutorial, we will show you how to configure your Raspberry Pi to utilize a static IP address.

We will force the Pi to use a static IP by modifying the Raspberry Pi’s DHCP client daemon or using the network tools. The network software controls the way the operating system handles IP addresses.
By modifying the DHCPCD config file, we can tell the software the local IP address to use when connecting to a network. In modern Raspberry Pi OS versions, we will need to use network tools instead of editing the DHCPCD file.
In addition to defining the static IP address on your Raspberry Pi, we recommend that you also set it on your router. Setting it on the router helps ensure that your router doesn’t assign the IP address to a different device before your Raspberry Pi connects.
You can also change the MAC address of the Raspberry Pi . This change can be handy in a variety of scenarios.
In this tutorial, we use the Raspberry Pi operating system. You may or may not be able to set a static IP on other operating systems using these instructions.
As of Raspberry Pi OS Bookworm, you are unable to use the DHCP method and will need to set a static IP using the network manager instead. So, if you are using Bookworm, follow our network manager section otherwise follow the DHCP section .
Equipment List
Here is a list of all the pieces of equipment that I made use of for this Raspberry Pi Static IP address tutorial.
Recommended
- Raspberry Pi ( Amazon | SunFounder )
- Micro SD Card ( Amazon | SunFounder )
- Power Supply ( Amazon | SunFounder )
- Ethernet Cable ( Amazon ) or Wi-Fi ( Amazon | SunFounder )
- HDMI Cable ( Amazon | SunFounder )
- Monitor ( Amazon | SunFounder )
- USB Keyboard ( Amazon | SunFounder )
- USB Mouse ( Amazon | SunFounder )
- Raspberry Pi Case ( Amazon | SunFounder )
Retrieving the Router IP Address
1. Before we begin setting up a static IP address on our Raspberry Pi, we will first need to retrieve some information about our current network setup.
Let’s first retrieve the currently defined router for your network by running the following command.
Using this command, you should get a result similar to the one we have below.
Make a note of the first IP mentioned in this string.
For example, the IP that we will make a note of from this command is 192.168.0.1 . This IP address is the current router address.
You may also want to get the current DNS server, which you can do by following the next section. Otherwise, move on to using network tools for Raspberry Pi OS Bookworm or DHCP for old versions of the OS.
Retrieving the Current DNS Server
1. Let us retrieve the current DNS server.
We can do this by opening the resolv.conf configuration file by running the following command.
Below is the output that you should see from the above command.
Make a note of the IP next to nameserver .
Exit the nano editor by pressing CTRL + X .
You should now have the router IP and the nameserver IP. You can now move to network tools for Raspberry Pi OS Bookworm or DHCP for old versions of the OS.
Static IP Address Using the Network Manager CLI
This section will go through the steps of setting a static IP address on your Raspberry Pi if you are running the latest version of Raspberry Pi OS. If you have an older version of the OS, please use the old DHCP method .
1. To begin, you will need to retrieve the router IP address and the current DNS server IP address if you haven’t already done so.
2. You can use either nmcli or nmtui to access the network manager tools on your Raspberry Pi. We will use nmtui as it offers a text-based GUI that is a bit easier to understand and navigate than the nmcli (Command Line) version.
Enter the following command to bring up the network tools in your terminal.
3. On the first screen, you will be greeted with three options. Select edit a connection.

4. On this page, you will see all your possible network connections.
Navigate to the one that you wish to have the static IP. In our case, it is HOME_LINK , which is a Wi-Fi connection.

5. You will now see a range of information about the connection you selected. To set a static IP address, you will want to navigate to <Automatic> next to IPv4 CONFIGURATION and change this to <Manual> .

Now navigate across to <SHOW> and press enter .
You should see a range of fields that you need to fill out. We will cover each of these fields in the next step.

6. You will need to fill in the following fields with the relevant information.
Addresses (1): Enter the IP address you want to assign to your Raspberry Pi. Ensure this is not an IP that could be easily attached to another device on your network.
Gateway (2): Enter the router IP address you retrieved earlier in this tutorial.
DNS Servers (3): Enter the IP of the domain nameserver you want to utilize. This address is the nameserver IP you wrote down from earlier in this tutorial. Alternatively, you can use a third-party one such as Google’s “ 8.8.8.8 ” or Cloudflare’s “ 1.1.1.1 “.

7. Navigate down the edit connection and select <OK> .

8. Now select the <BACK> option.

9. On the last page, you will want to select Quit .

10. For our changes to take effect, you will need to restart the network manager. Luckily, this is as simple as running the following command.
You will lose the network connection for a few seconds, but the connection should recover.
11. You can now proceed to testing the static IP address .
Static IP Address using DHCP
If you use Raspberry Pi OS 12, please follow the network manager section .
1. To begin, we will need to first retrieve the router IP address and the current DNS IP address .
2. Now that we have retrieved both our current “ router ” IP and the nameserver IP, we can proceed to modify the “ dhcpcd.conf ” configuration file by running the command below.
This config file allows us to modify the way the Raspberry Pi handles the network.
3. Within this file, enter the following lines.
First, you have to decide if you want to set the static IP for your “ eth0 ” (Ethernet) connector or your “ wlan0 ” (Wi-Fi) connection. Decide which one you want and replace “ <NETWORK> ” with it.
Ensure you replace “ <STATICIP> ” with the IP address that you want to assign to your Raspberry Pi. Make sure this is not an IP that could be easily attached to another device on your network.
Replace “ <ROUTERIP> ” with the IP address that you retrieved earlier in this tutorial
Finally, replace “ <DNSIP> ” with the IP of the domain nameserver you want to utilize. This address is either the IP you got earlier in this tutorial or another such as Google’s “ 8.8.8.8 ” or Cloudflare’s “ 1.1.1.1 “.
Now save the file by pressing CTRL + X , then Y , followed by ENTER .
4. Now that we have modified our Raspberry Pi’s DHCP configuration file to utilize a static IP address, we need to go ahead and restart the Raspberry Pi.
Restarting the Raspberry Pi will allow our configuration changes to be loaded in and the old ones flushed out.
Upon rebooting, the Raspberry Pi will attempt to connect to the router using the static IP address we defined in our “ dhcpd.conf ” file.
Run the following command to restart your Raspberry Pi.
Testing the Static IP
1. Once your Raspberry Pi has rebooted, you should be able to connect using the IP address you specified.
If you are connecting locally and want to verify that the static IP address is set correctly, you can run the hostname command .
From this command, you should now be able to see your new static IP address. If it is the IP you expected, you have successfully set up a static IP address on your Raspberry Pi.
Using a static IP will come in handy when you need to remember the IP, such as when using FTP or setting it up to act as a NAS .
I hope this Raspberry Pi static IP tutorial has helped you achieve your task. If you have any feedback on this tutorial, please don’t hesitate to leave a comment.
Receive our Raspberry Pi projects, coding tutorials, Linux guides and more!
Thank you for subscribing

26 Comments
Hi – I have a raspberry pi4 with a recent (may 2024) install of debian and all updates. I have used the raspberry pi installer to do this. However, when I follow the nmtui method, it will not take due to permissions. But i created the install with my credentials on the setup function for the card and it will not work. Anyway to get around this? I want to use the the Pi for piHole
Try using sudo with the nmtui method, this should avoid any permission errors. sudo nmtui
I don’t think this is how to change DHCP reservation anymore.
I’ve now tried it on 2 different Pi’s (4B and 5) on two types of OS and this never works as dhcpcd.conf is always empty.
I’ve seen another way using mtui command
Thank you for pointing this issue out. We have updated the tutorial so that it covers using the nmtui (Network Manager) to set a static IP. Please let us know if you have any issues!
Hi, thank you for this tutorial. Can I set up two different Static IPs at the same time. One to access via wlan0 and one via eth0? or would that create a conflict?
I can’t see how this will a problem if each interface has a unique static IP address.
Step #3 does not work for me? I don’t get a file with the list of items that i need to changes in step #4.
Is the file completely empty? If so, what operating system are you running on your Raspberry Pi?
If it’s not empty then that should be correct, you will be adding lines to the bottom of this file rather than changing ones inside it.
Cheers, Emmet
Excellent tutorial, simple and accurate. Thankyou.
Chalk me up also to a BIG Thanks! Very nicely done and very easy to follow along! No more IP changes to the Pi now at random intervals!
Thanks for your work in providing this and other tutorials. It is greatly appreciated!
thank you really much, i needed to check 3 tutorials and yours finally say that it should be “wlan0” and not “wlan” like by other tutorials
I have a R Pi 4 with 8G ram and loaded with 64 bit OS. I have just run these steps and it still works great with 64 bit.
A lot has changed recently on Rasbian OS & Buster. This is no longer the way to configure the network, but I don’t understand the new way yet!
These steps should continue to function with Raspberry Pi OS (Raspbian) Buster.
There has been no major changes in the way OS handles its DHCP client.
I did this on the new raspberry pi os (raspberry pi 4 4gb ram) and it worked perfectly fine
Thank you very much for this easy to understand tutorial! The vertical bar was some search for my azerty windows keyboard (on the pi) lol. For anyone interested you have to hold down “altgr” and press the “& 1” key.
Great guide, easy to follow and fixed my issue. Thanks!
Great tutorial, worked immediately! Thanks
hello, How can i get back to DHCP.
Remove the lines we added in step 4 from the dhcpcd.conf file, and reboot. That should revert you back to your original settings.
At step Nr 2 for the command ‘sudo nano /etc/resolv.conf’ I get: # Generated by resolvconf nameserver 104.145.255.226 nameserver 104.145.255.227 I did not get “domain home” as the first line (after # Generated…) Which IP address to use? Or does it matter? Can you explain why two IP addresses? –Thank you and regards, Larry
All you need is the two IP’s mentioned next to nameserver. There is two defined as one is used as a fallback if the first fails.
In Step 7 when replacing you are able to add multiple IP’s as long as they are seperated by a space. So for your case you would end up with.
Something I have to do all the time and never remember. Thanks for the easy to follow tutorial!
I noticed quite a few different angels of the same Pi case on here. Could you tell me where to get that case?
That is the Raspberry Pi 3 case from KKSB cases . They’re pretty cool designs, and their new Pi 4 case is nice as well.
Leave a Reply Cancel reply
Your email address will not be published. Required fields are marked *
- PHOENIXNAP HOME
- Colocation Overview
- Data Center as a Service Solutions for Digital Transformation
- Hardware as a Service Flexible Hardware Leasing
- Meet-Me Room The Interconnectivity Hub
- Schedule a Tour Guided Virtual Data Center Tour
- Data Center Locations Global Data Center Footprint
- Platform Overview
- Rancher Deployment One-Click Kubernetes Deployment
- Intel Xeon E-2300 Entry-Level Servers
- 4th Gen Intel Xeon Scalable CPUs Boost Data-Intensive Workloads
- Alliances Technology Partnerships
- Object Storage S3-Compatible Storage Solution
- Dedicated Servers Overview
- FlexServers Vertical CPU Scaling
- Intel Xeon-E Servers Intel Xeon 2200 Microarchitecture
- GPU Servers Servers with NVIDIA Tesla GPUs
- Dedicated Servers vs. BMC Compare Popular Platforms
- Promotions See Available Discounts
- Buy Now See All Servers
- Managed Private Cloud (MPC) Highly Customizable Cloud
- Data Security Cloud Secure-By-Design Cloud
- Hybrid Cloud Multi-Platform Environment
- Edge Computing Globally Distributed Servers
- Object Storage S3 API Compatible Storage Service
- Bare Metal Cloud API-Driven Dedicated Servers
- Alternative Cloud Provider Overcome Public Cloud Limitations
- Backup Solutions Veeam-Powered Services
- Disaster Recovery VMware, Veeam, Zerto
- Veeam Cloud Connect Backup and Replication
- Managed Backup for Microsoft 365 Veeam-Powered Service
- Data Security Cloud Secure-by-Design Cloud
- Encryption Management Platform (EMP) Cryptographic Key Management
- Confidential Computing Data-in-Use Encryption
- Ransomware Protection Data Protection and Availability
- DDoS Protection Network Security Features
- CONTACT SUPPORT
- Network Overview Global Network Footprint
- Network Locations U.S., Europe, APAC, LATAM
- Speed Test Download Speed Test
- Blog IT Tips and Tricks
- Glossary IT Terms and Definitions
- Resource Library Knowledge Resources
- Events Let's Meet!
- Newsroom Media Library
- Developers Development Resources Portal
- APIs Access Our Public APIs
- GitHub Public Code Repositories
- Search for:
How to Set Up Static IP Address for Raspberry Pi
Home » Networking » How to Set Up Static IP Address for Raspberry Pi
Introduction
Setting up a static IP address on Raspberry Pi facilitates access and management (e.g., over SSH ) by ensuring the device's private IP address does not change. Since most networks use DHCP to dynamically assign IP addresses to clients, setting up a static IP on Raspberry Pi is necessary to avoid access issues.
This tutorial shows you how to set up a static IP address on Raspberry Pi.

Setting Up Static IP for Raspberry Pi
Raspberry Pi runs the Debian-based Raspberry Pi OS, so the network configuration options are similar to those in other Debian-based Linux distributions .
Follow the steps below to collect the necessary information about the network and configure a static IP address on a Raspberry Pi system.
Step 1: Obtain Current IP Address
Using the system's current private IP address as a new static IP is the easiest way to prevent conflicts with other network devices. To find out the current IP address of the Raspberry Pi system, use the hostname command with the -I option.
Write down the IP address displayed in the command output.

Note : Skip this step if you want to use another private IP address.
Step 2: Identify Default Network Interface
Computers can have multiple network interfaces active at the same time. To properly configure a static IP address, you must identify the default interface .
1. Use the ip command to find out the IP address of the default interface.
The output displays the router's address.

2. To obtain the name of the network interface, use the following command:
The command uses grep regex to extract the interface name from the larger output.

Step 3: Obtain DNS Address
The last necessary piece of information is the router's Domain Name System (DNS ) address. Find it in the resolv.conf file located in the / etc directory .
Open the file in a text editor, such as Nano :
Look for the line that starts with the word nameserver and write down the DNS IP address.

Step 4: Edit Network Settings
Once you have all the necessary information, set up a static private IP address on your Raspberry Pi by employing one of the two methods described below.
Set up Static IP Address via CLI
The command-line interface method for static IP setup involves editing the DHCP configuration file.
1. Open the dhcpcd.conf file in a text editor .
2. Scroll to the bottom of the file and add the lines below with the information you obtained in the previous steps of this tutorial.
The screenshot below shows an example configuration.

Save the file and exit.
3. Reboot Raspberry Pi by typing:
Set up Static IP Address via GUI
You can also set the static private IP address for your system through the Raspberry Pi OS GUI. The steps below demonstrate the GUI procedure.
1. Right-click the network adapter icon on the right side of the top panel.
2. Select the Wireless & Wired Network Settings item to open Network Preferences .

3. Select the default network interface in the drop-down menu.
4. Type in the desired static IP address in the IPv4 Address field. Follow the address with the CIDR suffix.
5. Enter the router's IP address in the Router field.
6. Type the DNS address in the DNS Servers section.
7. Select Apply .

8. Reboot the system.
Testing the Static IP
After the system boots up, test the configuration by executing the hostname command.
Check if the IP address in the output is the address you configured as the static IP.

Note: Refer to our article on how to monitor network traffic on Raspberry Pi that features two different methods.
The article provided the command-line and GUI methods for IP configuration on the Raspberry Pi operating system. After you complete the tutorial, your Raspberry Pi system will be configured to use a static IP address for communication with the rest of the network.

Home » Linux » Raspberry Pi » Raspberry Pi Static Ip

Setting a Static IP Address on a Raspberry Pi [With Screenshots]
If you followed our article on how to SSH to your Raspberry Pi so that you can control it over a network, you might be tired of having to run the commands to find out what its current IP address is on your network.
Most networks assign IP addresses dynamically , which means each device on the network is assigned an IP address from a pool of available IP addresses. The address for a specific device may change over time if it is rebooted or the address is automatically reassigned for some reason. This is called DHCP – Dynamic Host Configuration Protocol .
Giving your Raspberry Pi a static IP address on your network means that it will always have the same address for you to connect to.
This article assumes you are running Raspberry Pi OS.
Step 1 – SSH to Your Raspberry Pi (or Attach a Screen & Keyboard)
If you don’t have a screen and keyboard attached to your Raspberry Pi, you will need to SSH to get things set up.
It’s highly recommended that you set a static IP address using a screen and keyboard just in case you make a mistake – you may not be able to reconnect if the network configuration isn’t valid.
Step 2 – Find Out Which Interface is Connected
The ip command can tell us all we need to know about the current state of the network on your Raspberry Pi.
Run the following in your terminal to see what interfaces are connected:
Which will output something that looks like this:

Here you can see the connected network interfaces . Each entry in the above output represents an interface – each entry taking the format
The interface named lo is the LOOPBACK interface, used for the computer to communicate with itself. It’ll always be there on most systems.
Below is the only other connected network interface wlan0 , the wireless network connection on this Raspberry Pi. We can tell it is connected as it says UP in the block of information next to it!
If the wired ethernet connection were connected rather than the wireless, you’d see eth0 instead of wlan0 . It’s possible but unlikely on a default installation of Raspberry Pi OS that your network interfaces will have different names than those shown here.
Step 3 – Finding your Network and Gateway
You will probably want to assign your Raspberry Pi an IP address on the network it’s already connected to. To do so, we will need to know what network addresses we should use to talk to other devices already there.
Finding the Network
This current IP address assigned to your Raspberry Pi is visible in the previous step’s output.
The IP address following inet will tell you the current IP. Yours will be different but will be for a local IP address range.
To find out more about IP addresses, check out our article on IP Addresses and Subnets.
Finding the Gateway
For your Raspberry Pi to talk to the outside world, it will also need to know the address of your gateway – your internet modem/router. Run the following to do so:
This will output the current network routes configured on your system:

We are interested in the default route on the first line. This tells us that by default, traffic is routed via 192.167.1.254 – now we know the gateway’s address.
Finding Your DNS Servers
You will also need to know what DNS servers you are currently using (if any) if you wish to access the internet. These can be found by running:
Which will output the contents of the resolv.conf file as generated by your system.

Here you can see the default nameserver assigned is your router – 192.168.1.254 .
Step 4 – Finding an Available IP Address
This step is dependent on the brand and configuration of the router you have.
When DHCP assigns an IP address automatically, your router will choose one from a range of IP addresses defined in its configuration. We should not assign the Raspberry Pi a static address that falls into that range, as otherwise, it may conflict if another device receives that address automatically.
You’ll have to check your router configuration or user manual to find out what this range is so that you can make sure you avoid using an address from it.
Step 5 – Assigning the IP Address to the Connected Interface
My network has a DHCP range of 192.168.100 to 192.168.200, from which addresses will be automatically assigned, so I will assign my Raspberry Pi the address:
This is to make sure that it doesn’t conflict with an existing IP (or the router’s IP address, which is 192.168.1.254).
Assigning a Static IP Address Temporarily
To assign a static IP address until the next reboot, just run:
Replacing 192.168.1.201 with the IP address you wish to assign and wlan0 with the interface’s name to assign it to.
To find out more about IP addresses and the format they are displayed above, check out our article on IP Addresses and Subnets.
Assigning a Static IP Address Permanently
The network configuration will need to be edited to assign an address permanently. Edit the relevant configuration file by running:
The configuration file(s) which you will need to edit will differ depending on your Linux distribution – this method is tested on Raspberry Pi OS in its default state
Add the following lines to the end of the file:
- Lines beginning with # are comments and are not read as configuration entries
- interface is the name of the connected interface and tells the configuration that the configuration lines following it will be applied to that interface – for this example, it is wlan0
- static ip_address is the static IP address you wish to assign to this interface – 192.168.1.201 in this case
- static routers is the IP address of the gateway/router on your network. 192.168.1.254 is the IP address of the router for this example.
- static domain_name_servers are the DNS servers we wish to use for this network. As seen above, mine is 192.168.1.254 as my router acts as the DNS server. I’ve added a second DNS server separated from the first by a single space. 8.8.8.8 is Google’s DNS server, which will act as a second/fallback DNS server.
To apply these changes, save the document by pressing CTRL + X and pressing Y to save. Then, reboot.
Your Raspberry Pi now has a Static IP!
- Setting up a LAMP Stack on Ubuntu 20.04 (And Raspberry Pi)
- TwisterOS For Raspberry Pi Does It All [Screenshots/Review]
- How to Install Ubuntu MATE 2020.10 on a Raspberry Pi (With…
- How to Install OSMC Media Center on Raspberry Pi…

1 thought on “Setting a Static IP Address on a Raspberry Pi [With Screenshots]”
I gave this a shot on ubuntu server 20.04, adapting it a bit where needed, and I just couldn’t get it to stick between restarts. Ended up using netplan with success so far.
Either way, great guide! I had fun tinkering, and I’ll back back in a few weeks when I grab a pi.
Leave a Comment Cancel reply
Save my name, email, and website in this browser for the next time I comment.
Privacy Overview

- Raspberry Pi
- DIY Electronics
- Programming
Select Page
How to Set Up a Static IP on the Raspberry Pi
Posted by Scott Campbell | Raspberry Pi | 31

Have you ever tried logging in to your Raspberry Pi via SSH and were denied because the IP address couldn’t be found? Do you have to scan your network every time you connect to find your local IP address? If the IP address of your Raspberry Pi changes all the time, it’s because you’re using a dynamic IP address . If you want your Pi to have an IP address that doesn’t change automatically, assign it a static IP address . With a static IP, you can be sure that the same IP will work each and every time.

In this tutorial, I’ll show you how to configure a static IP address using a clean installation of Raspbian Jessie and Raspbian Jessie Lite. There are pros and cons to each type of IP though, so let’s first talk about why you would want a static IP over a dynamic IP.
Static IP vs. Dynamic IP
Dynamic IP’s are good to use if you’re concerned about security. If a hacker gets access to your IP address, you’ll be less vulnerable to attack since your IP changes frequently. A dynamic IP can change every time you log in, or only at certain intervals. A program installed on your network router called the dynamic host configuration protocol (DHCP), automatically changes and assigns new dynamic IP addresses to computers on your network.
A static IP (as you could probably tell by the name) is one that doesn’t change. This makes it more reliable when using services that depend on a stable internet connection, like online gaming, VOIP, or remote desktop applications. With a static IP, you’ll be able to use the same IP address every time you connect to your Pi.
Setting up a Static IP on the Raspberry Pi
Before starting, make sure you’ve already set up and configured a way to access the command prompt. Check out our tutorials How to Set Up WiFi on the Raspberry Pi and How to Set Up a Raspberry Pi Without a Monitor or Keyboard to see how to do that if you haven’t already.
In this tutorial we’ll set up static IP’s for both WiFi and ethernet connections. If you only need one or the other, just omit the code below for the connection you don’t need.
Find Out Your Network Information
The first step is to find out your default gateway IP . This is the local IP address of your network router. The computers on your network use it to communicate with the router and access the internet. If you already know what it is, just skip this step. If not, do continue…
Power up and log into your Raspberry Pi via WiFi or ethernet, then enter route -ne at the command prompt to see your network routing information:

Under the “Gateway” column, you can see your default gateway IP (10.0.0.1 in my case). The “Iface” column lists the names for each connection – ethernet (eth0) and WiFi (wlan0). Write down your default gateway IP, we’ll need it in a minute.
Now we need to find out the IP addresses of your domain name servers. Your Pi sends the domain names you enter into your browser (i.e. www.google.com) to domain name servers, which convert the domain names to IP addresses (i.e. 8.8.8.8). Your Pi then uses the IP address to access the website’s server.
Enter cat /etc/resolv.conf at the command prompt to find the list of domain name servers:

Copy these IP addresses to a text editor on your PC or write them down for later.
Configure the Network Settings
Now we’re ready to configure the network settings. By default the Pi is configured with a dynamic IP address. To assign it a static IP address, you need to add your static IP, default gateway IP, and domain name servers to the dhcpcd.conf file.
At the command prompt, enter sudo nano /etc/dhcpcd.conf to edit the dhcpcd.conf file:

Now, without changing anything else in the file, add this code at the bottom of the dhcpcd.conf file, replacing the IP addresses with your own IP addresses found above:
- static ip_address : This is the static IP address you’ll use to SSH or remotely connect to your Pi. Take your default gateway IP (found in the steps above), and change the last number to any other number between 0 and 255.
- static routers : This is your default gateway IP address.
- static domain_name_servers : These are the IP’s we found in the resolv.conf file above. Separate each IP with a single space.
For example, my default gateway IP address is 10.0.0.1. To get the static ip_address for my ethernet connection (eth0), I replaced the 1 with 100 to get 10.0.0.100. To get the static ip_address for my WiFi connection (wlan0), I replaced the 1 with 99 to get 10.0.0.99. I’ll use these IPs to log in to my Pi from now on.
The file should look like this (with your own IP addresses):

Once you’ve replaced the IP addresses in the example code with your own IP addresses, press Ctrl-X and Y to exit and save the dhcpcd.conf file. Now enter sudo reboot to reboot the Pi. Log in with your new static ethernet IP or static WiFi IP:

To check that everything is working correctly and the Pi has access to the internet, let’s ping Google. Enter sudo ping www.google.com at the command prompt:

Press Ctrl-C to stop the pinging. If the connection is successful, you’ll see the packets that have been sent and received. If your connection isn’t successful, you will get a “Network is unreachable” error:

You should probably test the connection by pinging Google with both ethernet and WiFi static IP’s.
You can watch me set this up step by step in this video:
Now that you have a static IP set up, your Pi’s connection to the internet will be a lot more reliable. But another really useful way to connect to your Pi is with a direct ethernet connection to your laptop or desktop. A direct connection is extremely fast and stable. If you connect to your Pi via SSH a lot, I would definitely recommend setting this up. Check out our article, How to Connect to a Raspberry Pi Directly with an Ethernet Cable to learn how.
Thanks for reading! Let me know in the comments if you have any questions about setting up your static IP, and I’ll do my best to help. And be sure to subscribe! We send out a quick email each time we publish new articles.

Related Posts

Raspberry Pi Zero USB/Ethernet Gadget Tutorial
July 25, 2016

How to Setup an I2C LCD on the Raspberry Pi
March 25, 2016

42 of the Most Useful Raspberry Pi Commands
January 22, 2015

How to Run Linux Commands With Python on the Raspberry Pi
December 10, 2020
31 Comments
Great article. Just a few weeks too late for me as I finally figured it out…
It can be as simple. Lots of articles about fixed ip on the web, read at least 10 of them. All of them wrong or at least outdated (no jessie). Yours worked in no time. Mni thanks for that!
Thanks a Lot on How to setup static ip address, I looked few web site and most had wrong information.
Thank you, many “so called current” info on this on the web but all seem outdated, this is 100% correct. Thank you again.
works fine in setting static address but when trying to ping Google I get “unknown host http://www.google.com ” If I comment out the added lines the ping works fine I use TightVNC to connect to the PI – router address is 192.168.1.1
@JarJarGeek Very nice guide, I would use this for server, but for general Pi;s I find avahi-deamon more flexible.
When i type in the cat for either files or even sudo nano it either says that te file or directory doesn’t exist or the document comes up blank (implying that it doesn’t exist).
i am using a raspberry pi 3 and am using the latest raspbian os as of may 15th 2016.
please help that way i don’t end up having to set my pi up every time i want to use it.
nevermind. got it working.
had to share this on my @RebelMouse. Thank you! https://t.co/6mLwym7uQO
When I tried this it fails to connect. I think the problem is in the static router address. As per your instructions I came up with 0.0.0.0…
pi@VIDraspberrypi:~ $ route -ne Kernel IP routing table Destination Gateway Genmask Flags MSS Window irtt Iface 0.0.0.0 192.168.1.1 0.0.0.0 UG 0 0 0 wlan0 169.254.0.0 0.0.0.0 255.255.0.0 U 0 0 0 eth0 192.168.1.0 0.0.0.0 255.255.255.0 U 0 0 0 wlan0
Oops… rebooted a second time and now ALL works! THANK YOU FOR WRITING (AND VIDEO RECORDING) SIMPLE, CONCISE AND UP TO DATE INSTRUCTIONS!!!!!!!!!!!
will this allow graphics from a python program running on pi like pygame? or is the screen functionality merely a window into the terminal?
How will you ensure that the DHCP won’t assign this address to another device?. If my understanding is correct the DHCP does not know about this static IP and can therefore assign it to something else. If this happens there will be an IP conflict. is there anyway out of this ?
Most dhcp servers will try to ping address before assigning it to a client. But if your static IP device is switched off, the address still may be used by dhcp, and conflict will happen when you switch it on.To avoid this, you have to exclude address from your dhcp server’s address distribution range. Or you can make a reservation for that address in dhcp. In some cases reservation is even an alternative to static IP.
How can I set network mask to? Because this way it gives me mask of 255.0.0.0 which is not correct in my case, Also I need to set additional classless route for 10.10.0.0/16 via another gateway.
In fact I don’t need static address. If I do, I’d rater prefer to setup a dhcp reservation. I came to your article finding solution to a problem I have: My raspbian jessie / pi3B does not get default gateway from DHCP. It receives normaly everything else – IP address, default domain, dns and ntp servers, additional classless routes but not default gateway! What can be wrong? The DHCP server is Windows 2012 R2, if that does mater.
With Raspian Jessie (2016/09/23) a need to add “routers” and “domain_name_servers” BOTH under eth0 and wlan0:
interface eth0 static ip_address=192.168.x.x/24 static routers=192.168.x.x static domain_name_servers=x.x.x.x
interface wlan0 static ip_address=192.168.x.x/24 static routers=192.168.x.x static domain_name_servers=x.x.x.x
Thanks for the update! I’ll add this to the post.
i share with you a video on youtube how to configure your ip from dhcp to static. https://www.youtube.com/watch?v=3uixbMXZeNs&t=4s
When i run “sudo ifdown wlan0, sudo ifup wlan0” i get “ifdown: interface wlan0, not configured”. what is the fix for this ?
Amazing! Its truly amazing article, I have got much clear idea concerning from this piece of writing.
wicd-curses
Hi, we have the products of raspberry pi and arduino components, and very interest in working with you.
How do i make it so the ip is the same on any network?? Working on a project and need a way to ping the pi on any network it goes to.
Great article, thank you so much for explaining each of the lines in the dhcpcd.conf file. so many articles tell you to “just add this” without explaining what it means and why. Led to me following several and losing SSH access to the pi until I reverted it.
Doesn’t get much easier that that. Thanks.
Thanks, confirming this worked for me using Raspbian Buster in January 2019
Thank you so much, this helped me a lot. May 2020
I have set static IP in Pi and check by ping and it is working fine but when I enter static IP in putty for ssh getting network error connection time out. I have checked SSH is enabled in pi as well. Can anyone please help me why getting this error?
Worked like a charm. Thank you!
Hello Your tutorial is really helpful. But I have a problem. It seems that I have mistype my static IP address so I can’t connect with my RPi. The static ip_address should be “192.168.1.xxx” but I typed it “192.168.201.xxx” Is there any way I could fix it? Thank you
I am having a strange issue where my resolve.conf file keeps resetting upon reboot or shutdown and I have to do the setup again!!! The requirement for the static IP is because I am running my own VPN server with OpenVPN and the client I am using on the other end for connecting is Orbot for PC. I don't want to start from scratch hence the reset is not a choice. I did try changing the user and also chmod to 775 giving full permissions or locking it down, without much luck. Any guidance is appreciated.
Leave a reply Cancel reply
Your email address will not be published. Required fields are marked *
Save my name, email, and website in this browser for the next time I comment.
Notify me of follow-up comments by email.
Notify me of new posts by email.
For security, use of Google's reCAPTCHA service is required which is subject to the Google Privacy Policy and Terms of Use .
I agree to these terms (required).
Get new tutorials sent to your inbox!

Quick Start Guide for Setting Up a Static IP on the Raspberry Pi
Enter your name and email and I'll send it to your inbox:
Consent to store personal information: I agree to let Circuit Basics store my personal information so they can email me the file I requested, and agree to the Privacy Policy
Email me new tutorials and (very) occasional promotional stuff: Yes No
Check your email to get the PDF!
- Helldivers 2
- Dragon’s Dogma 2
- Wuthering Waves
- Genshin Impact
- Counter Strike 2
- Honkai Star Rail
- Lego Fortnite
- Stardew Valley
- NYT Strands
- NYT Connections
- Apple Watch
- Crunchyroll
- Prime Video
- Jujutsu Kaisen
- Demon Slayer
- Chainsaw Man
- Solo Leveling
- Beebom Gadgets
How to Set a Static IP Address on Raspberry Pi
Set a Static IP Address on Raspberry Pi
Set a static ip address using raspberry pi’s terminal.

3. After that, execute the below command to open the dhcpcd.conf file via Nano editor. Keep in mind that Nano is a keyboard-based editor , so you can’t use your mouse to move between lines and edit the file.

8. That’s it. You have assigned a static IP address to your Raspberry Pi in a few easy steps. Now, your router will only use the static IP address you have set for your Raspberry Pi.
Using the Router Settings to Set Static IP on Raspberry Pi

4. Click on “Add” and enter the IP address of Raspberry Pi in the “Reserved IP Address” field. You can find the IP address of your RPi board by entering hostname -I in the Terminal. To find the MAC address of your RPi , scroll down and look for the client list mentioned on the same admin page. Next, give a name in the “Description” field and turn on the “Enable This Entry” checkbox. Finally, click on “Save”. It will reserve Raspberry Pi’s current IP address, making it a static IP.

Assign a Static IP Address to Raspberry Pi in a Few Easy Steps!

Passionate about Windows, ChromeOS, Android, security and privacy issues. Have a penchant to solve everyday computing problems.
WTF… This is all WIFI! What if I have my RPi connected to my router via a 1000MHz ethernet cable? You shd be more general, and not assume everyone connects thru ther wifi.
Add new comment

- Relays & Sockets
- Vacuums & Cleaners
- Sonoff/eWeLink
- Xiaomi MiHome
- IKEA Trådfri
- Works with Alexa
- Made for Google Home
- Getting started with RPI
- Raspberry Pi Tutorials
- Raspberry Pi Projects
- Raspberry Pi Accessories
- ESP8266/ESP32
- Portable Displays
- Computer Accessories
- Phone Accessories
- Laser Engravers
- Featured Tasker
- Tasker Tutorials
- Tasker Projects
- Tasker Plugins
How to: Raspberry PI static IP & Terminal network setup
No need for a keyboard, screen or mouse. Just the terminal access.

Since the Raspberry Pi Jessie update, my older guide on networking became outdated. This Raspberry PI static IP guide should explain the changes and allow you to set the raspberry pi again within your network. While this guide is valid on its own, I would recommend you to read the 4 step setup guide: How to connect RPI to a PC . It will take you only extra 5 min, and you won’t be confused about my IP number choices in the Ethernet setup.
Raspberry PI static IP guide
First of all, there is no need to modify the interfaces.d file anymore. The config should be OK for the majority of the cases. There are other files responsible for the Ethernet and WIFI set up. If you already played with this file and you wish to restore it to the default config please use this configuration:
WIFI config from a Terminal

You no longer have to modify the interfaces.d file to connect to the WIFI. The config for this is included in the file:
The setup is fairly straightforward, copy the file details below and fill in the SSID and PASSWORD with the relevant details (keep “” symbols). Save the file and reboot your RPI if the changes have not been applied automatically. Multiple SSIDs can be added in a similar fashion. The template below contains 2 entries. Each one is responsible for a different SSID.
Static IP can be assigned to both interfaces eth0 (ethernet) and wlan0 (WIFI), you can benefit from having a fixed IP for each interface. This will make it easier to forward the ports and find your device on the network. Find the interface names using:
Bear in mind that interface names have changed since Raspbian Stretch and to get the old names back again you have to follow the steps from this guide . Both interfaces can be configured in the same file. Navigate to:
and edit the files accordingly. If you want to assign the static IP to both interfaces just type one interface after another.

Ethernet manual DHCP
For this example, I will be using my preconfigured PC (see the guide), if you are using a router, just use the router’s respective values. Otherwise, make sure your PC’s IPv4 is also configured in a similar way.
To check what IP addresses you have linked to each interface use:
The static ip_address should be the same one you have used in the previous guide. This is the IP of your Raspberry PI. The 192.168.137.255 is the IP of the PC which acts as a router.
WIFI manual DHCP
In the similar fashion static IP is assigned to the WIFI connection.
The static ip_address is the IP you want your Raspberry Pi to have (pick any not used on the network). This is the IP of your Raspberry Pi. The 192.168.1.1 is the IP of my router.
In both cases, it is recommended that you reserve the chosen IP on your router (or manually assign it to the PC if you are connecting to one instead) to preventing other devices highjacking the lease when the device is offline. Log in to your router, go to the DHCP settings and reserve the IP of the RPI for the WIFI and wired connections. If you’ve followed the 4 step guide, you may now delete the IP value from the cmdline.txt on the SD card.
And you can start playing with services that require your Raspberry to have a static IP address.
Nothing says "Thank you" better than keeping my coffee jar topped up!
Support me on Patreon and get an early access to tutorial files and videos.
Bitcoin (BTC)
Use this QR to keep me caffeinated with BTC: 1FwFqqh71mUTENcRe9q4s9AWFgoc8BA9ZU
- raspberry pi
- raspberry pi connectivity
- raspberry pi network
- raspberry pi static IP
Programable, ESP32 based awesome dev platform with 4.7 e-ink display by M5Stack
Argon One M.2
Enclose Raspberry Pi 4 inside this great case with custom I/O, cooling and GPIO and M.2 SSD support
More cases on
Best raspberry pi projects.
How to use Raspberry PI as WOL (wake on lan) server
Slow Internet Warning
Raspberry Pi NAS: (NAS-pi) Network attached storage under $21* #part1
How fast Raspberry Pi NAS is?
Argon18: Argon ONE SSD modification
It took me 2 months to boot cm4 from nvme, raspberry pi zero 2 w vs other zero boards, c/c++ and micropython sdk for raspberry pi pico on windows, a comprehensive guide to grafana & influxdb, how to boot raspberry pi 4 from usb, editor picks, i used chatgpt to invent tasker projects and the results were..., sleek cable management: kyy x90a, i wish i had known about the smlight zigbee/thread coordinators sooner, popular posts, tuya sdk for beginners: intro to tuya cloud api, nest your old thermostat under $5, making remarkable2 custom templates & boot screens, popular category.
- Home Automation 286
- Raspberry Pi 144
- Featured Raspberry Pi 105
- Featured Tasker 99
- Smart Devices 91
- Privacy Overview
- Strictly Necessary Cookies
This website uses cookies so that we can provide you with the best user experience possible. Cookie information is stored in your browser and performs functions such as recognising you when you return to our website and helping our team to understand which sections of the website you find most interesting and useful.
Strictly Necessary Cookie should be enabled at all times so that we can save your preferences for cookie settings.
If you disable this cookie, we will not be able to save your preferences. This means that every time you visit this website you will need to enable or disable cookies again.
How to set a static IP address on a Raspberry Pi
The Raspberry Pi is a fine addition to your home for a crazy number of reasons, but you'll probably need a static IP for it first.

The Raspberry Pi continues to be one of the most impressive computers on the planet. Not for its power, but for the possibilities. This thing can be programmed with a mind-boggling number of purposes, from small servers and NAS to controlling your home automation or even just a small Linux computer to learn some new IT skills.
Whatever you want to use it for, it's a pretty solid bet that you'll need a static IP for it. Unless you're using something like the Raspberry Pi 400 hooked up to a display, you're likely using it headless. That is, without a GUI. In the case of the Raspberry Pi Zero, this is even more likely.
Setting a static IP for your Pi is really easy, and doesn't have to involve your home router which sometimes can mess it up anyway. Case in point, the last Raspberry Pi I set up on my home network I assigned a static IP in the router settings, and it just sort of forgot about it and assigned a totally different IP to my ad blocker so it didn't actually work properly. That's why you should follow these steps and set it up on the Pi itself for the best results.
Setting up your Raspberry Pi

This guide assumes that your Raspberry Pi is already set up and you've flashed it with the Raspberry Pi OS already. If you haven't and need a helping hand, we have a guide on setting up a headless Raspberry Pi using nothing but your Windows PC.
Before you can set a static IP for your Raspberry Pi you will need to know what IP address it's currently on. At this point, the quickest method is probably to log into your router's software and grab it there, especially if you're doing a headless setup. You'll need the IP address to connect over SSH and do the rest.
With the IP address in hand, open a terminal (WSL or PowerShell is fine), and connect with the following command:
Accept the fingerprint by typing yes and hitting enter. If this is the first boot you'll need to log in with the default password, which is raspberry . It's a good idea to change this, but for the purposes of what we're doing here you don't need to and can just carry on with the next step.
Get the Windows Central Newsletter
All the latest news, reviews, and guides for Windows and Xbox diehards.
How to set a static IP on your Raspberry Pi
To set the static IP properly you'll need a few things. The first is the current IP of the Pi which you've already got, the next is your router's gateway IP and the current DNS IP address. We can get these last two from the Raspberry Pi terminal.
Router gateway IP address
Enter this command into the terminal:
Note down the first IP address given as this is the one you want.
Router DNS IP address
Again in the terminal, enter this command:
This will open a file in the nano text editor and the IP address you're looking for is immediately after nameserver . Note this down and press Ctrl + X to close out.
Setting the static IP address

The final step is to set the static IP address for your Raspberry Pi. It involves appending some details to the end of a configuration file. You must make sure you either use the IP address already given to your Raspberry Pi or that you're using an address that is currently vacant.
To begin, enter this command:
This will open up the dhcpcd.conf file in the nano text editor. Use your cursor keys to navigate all the way to the bottom.
Make sure not to change any of the existing items in this file, then at the bottom, you'll be entering a block of text following this template:
You'll replace the terms in capitals with the following:
- NETWORKTYPE — Type either eth0 for ethernet or wlan0 for wireless.
- YOURSTATICIP — Whatever static IP you want to assign to the Raspberry Pi.
- YOURROUTERIP — The gateway IP address acquired above.
- YOURDNSIP — The DNS IP address acquired above.
When finished you'll end up with something that looks a bit like this:
Now, press Ctrl + X followed by Y to close and save the file. You'll need to reboot the Pi for the changes to take effect, which you can do with this command.
Give it a minute to reboot, reconnect over SSH, and then use this command.
This will confirm the IP address matches what you set above. It should match, and now your Raspberry Pi should retain this IP any time it boots. Ensure you don't assign anything to this IP address, either manually or through your router settings, and you should be good to go!
Richard Devine is a Managing Editor at Windows Central with over a decade of experience. A former Project Manager and long-term tech addict, he joined Mobile Nations in 2011 and has been found on Android Central and iMore as well as Windows Central. Currently, you'll find him steering the site's coverage of all manner of PC hardware and reviews. Find him on Mastodon at mstdn.social/@richdevine
- 2 Dead Space is back! Sort of...
- 3 The First Descendant: How to earn free loot with Twitch Drops
- 4 We've never seen a bigger discount on Dell's XPS 16 with an OLED display and RTX 4060
- 5 Halo Infinite's newest update adds some Elite-inspired cosmetics and one really cool new mode
Set static IP on Raspberry Pi
Setting a static IP address for your Raspberry Pi will ensure that the device can always be accessible at the same IP address on your network, since it will never change. This is ideal for a Raspberry Pi being used to host a service such as a gaming server, web server, etc. It makes it more convenient when applying network configurations, since you know that the Raspberry Pi can always be found at the same, predictable IP address. The opposite of a static IP address would be a dynamic IP address. A dynamic IP address is handed out from the DHCP server (typically the router in most home networks), and has a tendency to change frequently. If you ever tried to check the IP address on your Raspberry Pi before, and noticed that it changes after system reboot, then you have the device configured to receive a dynamic IP address.
In this tutorial, you will see how to set a static IP address on a Raspberry Pi. This can be done via both command line and desktop GUI on the Raspberry Pi OS , without installing any extra software. Follow along with our step by step instructions below to get started.
In this tutorial you will learn:
- How to set a static IP address on Raspberry Pi via command line
- How to set a static IP address on Raspberry Pi via desktop GUI

| Category | Requirements, Conventions or Software Version Used |
|---|---|
| System | Raspberry Pi |
| Software | N/A |
| Other | Privileged access to your Linux system as root or via the command. |
| Conventions | – requires given to be executed with root privileges either directly as a root user or by use of command – requires given to be executed as a regular non-privileged user |
How to set static IP on Raspberry Pi step by step instructions
We will cover two methods below, both command line and GUI. If you are currently remotely connected to your Raspberry Pi, such as with a VNC connection or an SSH connection, then you may lose the connection to your Raspberry Pi, at least temporarily, when configuring a new IP address. Therefore we recommend being physically in front of the Raspberry Pi when carrying out this type of configuration.
Set Static IP Address via Command Line
Follow the steps below to set a static IP address on your Raspberry Pi via commmand line:
Find current IP address of Raspberry Pi:
Find the default gateway (the IP address of the router, on home networks):
Find the IP address of the DNS server:

- Next, edit the following file with root permissions. We will use nano but feel free to use a different editor of your choice: $ sudo nano /etc/dhcpcd.conf
We have used interface eth0 above. If, instead, you need to configure a static IP address for the wireless interface, then use wlan0 . We have chosen an IP address that is on the same /24 network as the router / default gateway so that the Raspberry Pi will be able to access it, and then filled out the default gateway and DNS info with the same that we retrieved earlier.
- After making your edits to the file, save changes and exit the file. Then reboot your Raspberry Pi for the changes to take effect: $ sudo reboot
- When the device reboots, you can check to make sure the changes were successful: $ hostname -I 192.168.198.20
Set Static IP Address via Desktop GUI

Closing Thoughts
In this tutorial, we saw how to set a static IP address on a Raspberry Pi system. This included a command line method and GUI desktop method, depending on whether you use your device as command line only or usually have a monitor connected. It is always a good idea to be physically next to the Raspberry Pi when configuring network settings, since a slight mishap could lead to losing connection.
Related Linux Tutorials:
- Best Linux Distro for Gaming
- Cloud Gaming with GeForce NOW on Ubuntu / Debian Linux
- Reviving Retro Games: Using Raspberry Pi for Emulation
- Decoding Raspberry Pi: Which OS to Choose?
- An Introduction to Linux Automation, Tools and Techniques
- Raspberry Pi as Minecraft Server
- Raspberry Pi Kali Linux headless setup
- Things to do after installing Ubuntu 22.04 Jammy…
- Mastering Bash Script Loops
- How to configure static IP address on Ubuntu 22.04…
How to Set a Static IP Address on a Raspberry Pi 5
This tutorial explains how to set a static IP address on a Raspberry Pi 5 using nmcli
nmcli vs. dhcpcd
Setting the static ip, my ip address changed but ping 8.8.8.8 doesn't work.
Ideally you already have your Raspberry Pi set up and connected to a network that has assigned you an IP address using DHCP. In my case, the network I will be modifying was set up when I imaged the Raspberry Pi OS to my SD card (the Wi-Fi connection).
A lot of tutorials you may find for setting a static IP address on a Raspberry Pi will mention dhcpcd. As discussed here , dhcpcd was replaced with nmcli in the newer releases.
First, we need to find the name of the configuration to update. Run nmcli con show to show all connections, this will output something like this:
I want to update the configuration associated with Wi-Fi which is device wlan0 - this means the configuration I need to update is "preconfigured".
Next set the the IPv4 address, you will need to substitute your configuration name and IPv4 address in CIDR notation in this command: nmcli con mod <configuration name> ipv4.addresses <ip address> . So I would run,
Next set the IPv4 gateway, for a lot of people, this will be the IP address of your router,
Next set the DNS, again, you could use your router but you could also use another like 8.8.8.8 ,
Next set the addressing from DHCP to static,
Restart the connection to pick up these changes,
Check your new IP address with ip addr show wlan0 (or whatever device you are using). Lastly check your network connectivity by doing a quick ping using ping 8.8.8.8 .
Potential Issues
If you can see the Raspberry Pi has the new IP address but it cannot talk to the internet, you may have forgotten to set the DNS or have set it to something that isn't a DNS.
- Feature image
Stack Exchange Network
Stack Exchange network consists of 183 Q&A communities including Stack Overflow , the largest, most trusted online community for developers to learn, share their knowledge, and build their careers.
Q&A for work
Connect and share knowledge within a single location that is structured and easy to search.
How do I set up networking/WiFi/static IP address on Raspbian/Raspberry Pi OS?
I have followed (any one of hundreds) tutorial, and it does not work.
How do I set up networking/WiFi/static IP address on the Raspberry Pi?
After the Foundation introduced the dhcpcd networking system to Raspbian in May 2015 there were hundreds of questions (partly because the Foundation didn't produce any documentation). After answering dozens of questions I decided to produce a canonical answer. This proved to be more difficult than anticipated - especially as the implementation keeps changing - hopefully I have continued to keep it up-to-date.
(Originally I referred to this as a Dorothy Dixer , but this is apparently an Australian idiom.)
- raspbian-buster
- raspberry-pi-os
- raspberry-pi-os-bullseye
- 2 FYI: You are probably aware of this, but ICYI the RPi PTB have decided to dump dhcpcd in favor of NetworkManager – Seamus Commented Sep 14, 2022 at 0:58
7 Answers 7
Raspberry pi os bookworm uses network manager by default so this answer is no longer current..
This tutorial describes how to setup networking using the default network manager dhcpcd included in Raspbian since 2015-05-05 and Raspberry Pi OS . It applies to the Foundation releases of Raspberry Pi OS -Bullseye , Raspberry Pi OS -Buster , Raspbian Buster , Raspbian Stretch , Raspbian Jessie and the last Raspbian Wheezy . Bullseye & Buster settings are identical to Stretch.
How to setup Raspbian Networking
If you are using an Ethernet connection with a router there should be no configuration required and it should work out of the box. The Pi3B+ and Pi4 have Gigabit Ethernet interfaces and will only work on a Gigabit Ethernet (1000BASE-T) router if a 8 wire CAT 5E cable is used. Earlier Pi models which only supported 100BASE-T work over 6 wire cable.
NOTE The Pi3/Pi Zero W inbuilt WiFi does not support 5GHz networks, and may not connect to Ch 12,13 on 2.4GHz networks until wireless regulatory domain is set.
WiFi on 5GHz enabled devices is disabled until wireless regulatory domain is set (Pi4B, Pi3B+, Pi3A+)
The domain can be set through Raspberry Pi Configuration (rc_gui), raspi-config or by setting country= to an appropriate ISO 3166 alpha2 country code in /etc/wpa_supplicant/wpa_supplicant.conf .
If you use the latest Raspberry Pi Imager there are advanced options, invoked by the magic key sequence: Ctrl-Shift-X . These enable you to set many initial options; hostname, username, password, ssh, WiFi Country Code etc during imaging. This should enable you to setup a headless system, without the need to edit any files.
If you are using WiFi and the GUI set up by following Using the Desktop
If you are using WiFi from the Command Line set up by following Using the Command Line This is the only way to set up a network which does not broadcast SSID .
This can also be used to setup a 'Headless' system e.g. using a serial console cable, but it MUCH easier if you can borrow a monitor and keyboard for setup. See below for another possible method using an Ethernet cable to a PC.
For most users READ NO FURTHER
The following are advanced options, headless raspbian wifi setup.
Raspbian , since May 2016, checks the contents of the boot directory for a file called wpa_supplicant.conf , and will copy the file into /etc/wpa_supplicant , replacing any existing wpa_supplicant.conf file that may be there. The file in the boot directory is then removed. This can be used to enable headless setup, using the wpa_supplicant.conf settings detailed below or Setting up a Raspberry Pi headless (You will probably want to enable ssh as well.)
NOTE the links to raspberrypi.org suggest using ifconfig - this is deprecated use ip a; ip r instead.
NOTE If you use the latest Raspberry Pi Imager the advanced options Ctrl-Shift-X make the above unnecessary.
What is my IP Address?
If you just want to know the IP Address your Pi is using enter hostname -I on the command line.
As of the November 2016 release, Raspbian has the SSH server disabled by default. You will have to enable it manually.
Enter sudo raspi-config in the terminal, first select advanced options , then navigate to ssh , press Enter and select Enable or disable ssh server.
For headless setup, SSH can be enabled by placing a file named 'ssh', without any extension, onto the boot partition of the SD card.
Networking Files
If you are running a recent Raspbian /etc/network/interfaces should be as below. If you have changed it PUT IT BACK. (Or on Stretch just delete it - it effectively does NOTHING.)
The file /etc/wpa_supplicant/wpa_supplicant.conf will be created/modified by the recommended setup methods, but can be setup by hand. Recent Raspbian have an option in raspi-config to enter SSID and Password. It should contain something like the following:-
If you need to connect to a private network (i.e. no broadcast SSID ) include the line scan_ssid=1 inside network={⋯} .
NOTE If you want to connect to different networks (e.g. at work or home) you can include multiple network={⋯} entries.
If you have access to multiple networks and want to connect to a specific network, include the line priority=100 inside the network={⋯} entry. You can select a different priority for each network, the highest priority accessible network will be selected; the default is 0.
There are many other options which can be used see man wpa_supplicant.conf .
Notes on obsolete Operating Systems
Jessie does not include the 10-wpa_supplicant hook to manage WiFi interfaces, so links to wpa_supplicant are needed. These settings are incompatible with Predictable Network Interface Names.
The /etc/network/interfaces used by Jessie should be:-
NOTE calling dhcp in /etc/network/interfaces will disable dhcpcd .
Predictable Network Interface Names
Stretch introduced 1 predictable network interface names which have been used in other distributions for some time.
Network interfaces will have names formed from a prefix en — Ethernet or wl — wlan followed by x indicating MAC and the MAC e.g. enxb827eb123456 or wlx00c140123456 . The onboard WiFi of the Pi4, Pi3 and PIZeroW which is connected over sdio will however use the name wlan0
This can be beneficial to those using multiple network interfaces, however for most Pi users, with a single Ethernet and WiFi interface will make little difference. The previous names eth0 and wlan0 can be restored if you pass net.ifnames=0 on the kernel command line in /boot/cmdline.txt .
There is an option in raspi-config to enable predictable network interface names.
1. For some incomprehensible reason the Foundation decided to "Disable predictable network interface names for Ethernet devices" only 3 weeks after introducing the long-awaited feature. There is an option under Advanced Options of raspi-config to toggle this setting.
Setup a Static IP Address
If you want your Pi to be assigned a predictable IP Address you can either reserve one in your router OR request the DHCP server to assign one. E.g. the following will request an address on wlan0 .
request [address] Request the address in the DHCP DISCOVER message. There is no guarantee this is the address the DHCP server will actually give. If no address is given then the first address currently assigned to the interface is used.
If you request an IP Address within the range managed by the DHCP server which is available this should be honoured, otherwise the DHCP server will allocate an address as normal.
If you want an IP Address outside the range managed by the DHCP server e.g. if you have a range of addresses reserved use the inform directive.
inform address[/cidr[/broadcast_address]] This does not get a lease, just notifies the DHCP server of the address in use. You should also include the optional CIDR network number in case the address is not already configured on the interface.
If you REALLY need a static IP Address see separate answer Static IP Address
Advanced dhcpcd Configuration
Raspbian, by default, uses dhcpcd to manage network interfaces. This is automatic, and most users need do no more than specify the SSID and password for wireless networks.
It is possible to configure how dhcpcd works by entering options in /etc/dhcpcd.conf ; see man dhcpcd.conf .There is a good article on dhcpcd at https://wiki.archlinux.org/index.php/dhcpcd
The following describe some of the more common configurations:-
Fallback profile
It is possible to configure a static profile within dhcpcd and fall back to it when DHCP lease fails. This is useful particularly for headless machines, where the static profile can be used as "recovery" profile to ensure that it is always possible to connect to the machine. The static profile is setup as any other Static IP Address
Prevent dhcpcd from configuring an interface
This is often done to enable the Pi to act as an Access Point ( link removed from raspberrypi.com ) (which needs to be configured using other files), while allowing normal DHCP configuration on other interfaces.
Add denyinterfaces wlan0 to the end of the file (but above any other added interface lines).
Prevent dhcpcd from configuring a gateway on an interface
If you want an interface to not install any default routes (often used in conjunction with a static IP address) specify
Host Specific Configuration
dhcpcd can configure interfaces dependent on the host network. This uses the Address Resolution Protocol (ARP) to probe hosts based on MAC or IP address before attempting DHCP resolution.
You can speed up DHCP by disabling ARP probing if you are not using these features and have a simple network.
Use different wpa_supplicant files
It is possible to configure dhcpcd to use different wpa_supplicant.conf files for a specific wireless interface.
Create a file named wpa_supplicant-"$interface".conf in /etc/wpa_supplicant/ e.g. wpa_supplicant-wlan0.conf will only be used by wlan0
/etc/wpa_supplicant/wpa_supplicant.conf will be used for any other wireless interfaces.
Connecting a Computer to the Pi
Recent versions of Raspbian (which use dhcpcd ) allow ssh to work over a link-local address and avahi (which is a zeroconf implementation) enables programs to discover hosts running on a local network.
This means you can plug the Pi into a Computer (with an Ethernet cable) or a local network router and connect without knowing the IP address.
You can easily connect from Linux and OS X with ssh [email protected] (Prior to 2020-04-04 version of Bullseye the default username was 'pi', hostname raspberrypi . This is now set on initial boot.) This should work with popular GUI ssh programs. This is sometimes problematic with some versions of Windows and networks which use .local in a non-standard way. (See https://en.wikipedia.org/wiki/.local )
NOTE .local resolution does not always work e.g. in rsync . The following should resolve IP (and can be included in bash scripts) RemotePi=$(getent hosts hostname.local | awk '{ print $1 }')
If your system does not have getent to query the hosts e.g. macOS you can use the following:- RemotePi=$(arp -n hostname.local | awk '{x = $2; gsub(/[()]/, "", x); print x }')
If you have multiple Pi you need to make sure each Pi has a unique hostname.
You can use a crossover cable, but you don't need one (most modern interfaces automatically detect).
One drawback of direct connection is that the Pi will have no Internet access and the date will not be set. You can copy the date from the host by running ssh [email protected] sudo date -s$(date -Ins) before connection.
This tutorial is about setting up a normal Raspbian/Raspberry Pi OS installation to access the internet using the included software. It also covers connections to other computers on the same network.
It is primarily aimed at helping new users struggling to get their Pi (especially WiFi) working .
It does NOT cover:- Other Network Managers. Running advanced networking on the Pi (e.g. DHCP servers, Tunnelling, VPN, Access Point). Use of ipv6 (although if you have an ipv6 network this should work). Alternate networking setups. (There are many different ways of setting up networking.)
- 2 I got confused by the "this is NOT something you would type into the file". If I'm not mistaken, what Milliways means here is that you wouldn't replace the entire file with this bit of text. However, it's perfectly fine to add this bit at the end (modifying the parameters to your liking, of course). Also, the routers and domain_name_servers lines are optional if you don't want to set up routing through that interface. – Mark Commented Dec 4, 2015 at 18:34
- 4 So, now, to configure your ip address, you need to have the DHCP client installed and use its configuration to set a static ip?! It doesn't work if I want a DHCP server on my Raspbian! The DHCP client is run after the DHCP server launch, so the ip is not yet set, making the DHCP server (isc-dhcpd) complain. – Luc Stepniewski Commented Dec 23, 2015 at 10:31
- 24 Where is this officially documented? – Alastair McCormack Commented Jan 16, 2016 at 14:13
- 7 Where IS this documented? I mean, WTF. I have followed these directions as well as many others and cannot get connected. I can happily see and scan networks, but it will never connect or associate. I'm so cranky about this. – AaronJAnderson Commented Feb 4, 2016 at 1:09
- 4 @MikeD. See raspberrypi.org/blog/… – Milliways Commented Aug 6, 2016 at 6:34
How to setup Raspbian Networking - Preliminaries
The Pi3B+ and Pi4 have Gigabit Ethernet interfaces and will only work on a Gigabit Ethernet (1000BASE-T) router if a 8 wire CAT 5E cable is used. Earlier Pi models which only supported 100BASE-T work over 6 wire cable.
If you use the latest Raspberry Pi Imager there are advanced options, invoked by the magic key sequence: Ctrl-Shift-X . These enable you to set many initial options; hostname, password, ssh, WiFi Country Code etc during imaging.
Questions about setting Static IP Address are among the most common on this site. There are very many tutorials (many wrong, obsolete or incomplete).
If the reason you are contemplating a Static IP Address is you want your Pi to be assigned a predictable IP Address you can request the DHCP server to assign one. E.g. Adding the following to /etc/dhcpcd.conf will request an address on wlan0 and on eth0 .
Disclaimer Before proceeding I feel obliged to state that setting up a static address is NOT recommended. Telecommunications Engineers do not do this. Static IP Addresses can be the bane of a Network Administrator's life. There are situations where Static IP Addresses are necessary e.g. if you are running a DHCP server, or running on an isolated network with no DHCP server. If you want to have a known IP Address it is preferable to reserve one on your DHCP server - preferably outside the range served by DHCP (I do this for my network printers). This avoids the complication of determining gateways etc.
If you are determined to proceed anyway you should make sure you get it right.
Find the Settings of your local Network
This is most easily done with the Pi itself, using DHCP, but can be done on any computer on your network, although the commands may differ on other systems.
The above assumes IPV4 addressing - if your ISP uses IPV6 omit the "-4" parameter.
which should give an output like:
The first address is the IP address of your Pi on the network, and the part after the slash is the network size. It is highly likely that yours will be a /24.
The second address is the brd (broadcast) address of the network.
Find the address of your router (or gateway)
Finally note down the address of your DNS server, which is often the same as your gateway.
Then follow ONE of the following methods. (There are other methods not documented here. These are the most common on Raspbian.) ( In either method substitute the appropriate network interface name for eth0 , wlan0 or predictable network interface names . )
If you want to find the interface names, even if not connected, run the following command ls /sys/class/net/
In either method you should choose IP addresses which are not in use; ideally outside the range used by your DHCP server, within the same sub-network.
dhcpcd method
Leave /etc/network/interfaces at its default (as above).
Edit /etc/dhcpcd.conf as follows:-
ip_address is the address and size from the command above (or another unused address on the same network), routers is the address of your router (or gateway). domain_name_servers is the DNS address(es) from /etc/resolv.conf. (see man dhcpcd.conf )
There is a good article on dhcpcd at https://wiki.archlinux.org/index.php/dhcpcd The Fallback profile is an alternative to static IP
Network Interfaces method
NOTE This method is NOT recommended (and only works if you disable the DHCP client daemon), particularly if you plan to use both interfaces.
Configure a static network adddress on your Pi in /etc/network/interfaces
address is the address from the command above (or another unused address on the same network), netmask 255.255.255.0 corresponds to network size /24 . gateway is the address of your router (or gateway).
You can also specify dns-nameservers , but this is generally not necessary. The broadcast is automatically derived from address and netmask and need not be specified. For more detail see https://wiki.debian.org/NetworkConfiguration
You can set either or both eth0 , wlan0 or one of the predictable network interface names
Then disable the DHCP client daemon and switch to standard Debian networking :
Reboot for the changes to take effect:
- 3 What are the pros and cons of these two methods you mention? – Elliott B Commented Jun 24, 2018 at 23:51
- 2 I did read that, I'm just wondering about the two methods dhcpcd vs networking. I want to see if a static IP lets it boot faster, because I see a 15s delay for dhcpcd in systemd-analyze . – Elliott B Commented Jun 25, 2018 at 4:42
- 1 I don't use either - this is only there because so many people try (for whatever reason - which eludes me) BUT get it wrong, because they don't understand networking. There is no simple answer because it depends on what else you are doing. NOTE setting a static IP is unlikely to have ANY impact on boot time, unless you have a very slow DHCP server. If you have questions you should ask a Question - this is not a discussion forum. – Milliways Commented Jun 25, 2018 at 5:11
- 2 Performance is better disabling dhcpd I just tested the second non recommended approach, and it speeds up the boottime by 7 seconds on my RasPI Zero W. – Stefan Profanter Commented Oct 28, 2019 at 17:22
- 3 network administrators do not like this. That is not a reason to have dhcp addresses on rapsberry pi's and orange pi's and local printers. Almost everybody who reads this is is a home user, and is not served by smug comments about what "professionals" do. Albert – Albert van der Horst Commented Nov 13, 2019 at 21:29
For a static IP address on an Ethernet connection:
- sudo nano /etc/dhcpcd.conf
Type in the following lines on the top of the file:
sudo reboot
This needs to be done for the recent Jessie update. /etc/network/interfaces should be left alone . Open your browser and enter your router address (192.168.1.1 for most) and check your home network to make sure the Raspberry Pi shows up as 'Static'.
- 6 If you are going to copy parts of the answer at least you should get it right. – Milliways Commented Dec 15, 2015 at 23:37
- 2 It probably did work in your case, but not in general because dhcpcd inferred the netmask, which it cannot for other address ranges. Read the man pages. – Milliways Commented Dec 17, 2015 at 0:58
- 1 You assert that /etc/network/interfaces should be left alone, but you do not say why. In fact, quite the opposite is true. See my answer below. – JayEye Commented May 12, 2016 at 23:10
- 2 If you want to restart networking services without reboot, make sure you have auto eth0 above iface eth0 inet manual line in your /etc/network/interface file. Restart network via sudo service networking restart command – Barmaley Commented Nov 2, 2016 at 4:21
- 4 This can be a copied answer but has everything you need to setup a static ip on raspberry, the accepted answer is unnecessarily long. – Pedro Lobito Commented May 31, 2017 at 3:57
Short and foolproof method how to do this with:
Raspbian Jessie, Stretch, Buster
This will set a fixed IP and enable the ssh daemon:
- Stick the sd card in your pc and find that it has two partitions; mount the smallest partition as /boot/
- Open /boot/cmdline.txt and add ip=192.168.1.20 to the end of the line.
- Create an empty file /boot/ssh
- Unmount the sd card from the pc, insert in the Pi and boot your Raspberry Pi
- On Linux start ssh [email protected] the password is raspberry . Use Putty on Windows to connect via ssh.
- On the Pi, configure settings to enable SSH, e.g. with GUI or raspi-config, because /boot/ssh is automatically removed at first boot
I'm using to this to access my Raspbian Jessie and Stretch which boots without a attached monitor, with power and ethernet only. After accessing it with a ssh shell I can continue my setup.
After this treatment the Raspberry PI had two IPs: One from the fixed IP you specified and one from the dhcp-client running on the Raspberry Pi.
ifconfig will show you the fixed IP. Whereas the blue arrow-Icon on the top-right shows the dhcpd-IP.
- 2 Please do NOT suggest disabling IPv6. There are NO need for that. – Anders Commented Sep 7, 2017 at 21:25
- Why would I need 2 IPs? – user42000 Commented Oct 20, 2017 at 14:04
- @SiXandSeven8ths There is no need for 2 IPs. I have observed the behavior and am describing it here to minimize surprises. I would improve my answer, but hadn't time to do that. – MadMike Commented Oct 20, 2017 at 14:42
- 1 @SiXandSeven8ths I'm sorry to hear that. It worked fine for me. Also this was the only way to do without attaching any monitor and keyboard to the raspberry pi. so I figured it could be useful to someone else. – MadMike Commented Oct 20, 2017 at 15:08
- 1 I found out what I did wrong. I tried to configure static IP after booting, with attached monitor mouse and keyboard. I edited your answer. If the edit gets accepted, I will remove my comments. +1 – Roland Commented Apr 16, 2020 at 22:45
First thing you should do is make your Raspberry pi's IP static. So that whenever you power up your Raspberry pi it should connect to your access point(Hotspot).
Connect to your Access point. Type ifconfig in raspberry pi's terminal and enter that IP address below, in my case it was 192.168.43.233
Start by editing the dhcpcd.conf file
Scroll all the way to the bottom and add this lines at the end as per your connection (wired or wireless).
Press Ctrl+x to save and reboot. Now power up your raspberry pi and it will automatically connect to your access point.
- Readers should do their homework before adopting the static ip configuration advocated by this answer. For example, the author of dhcpcd discourages use of static ip !! In man dhcpcd.conf he states, For IPv4, you should use the inform ipaddress option instead of setting a static address. Ask yourself why you should follow the recommendation in this answer when the author of dhcpcd says otherwise? – Seamus Commented Apr 3, 2022 at 14:13
SystemdNetworkd
Raspbian / Raspberry Pi OS initially used Debian Networking which was replaced by dhcpcd in 2015. dhcpcd is the current default networking system.
Raspbian is now based on systemd which includes systemd-networkd , a system service that manages networks. It detects and configures network devices as they appear, as well as creating virtual network devices.
This tutorial describes how to setup basic networking using systemd-networkd . NOTE only basic networking using the in-built interfaces eth0 and wlan0 is described.
It is assumed you are familiar with networking and reasonably competent configuring Linux. It is NOT a method recommended for beginners; it is more complex to setup. Each interface needs to be explicitly configured. WARNING this will disable the Networking tool on the Desktop Panel.
Ethernet Networking
You need to define a network by creating a file in /etc/systemd/network . This can be given any name with the extension .network
The following example tells systemd-networkd to use eth0 (which is set up by udev ) and assign it an address using DHCP.
An alternative using static IP Addresses
Wireless Networking
In order to connect to a wireless network with systemd-networkd , a wireless adapter configured with another application such as WPA supplicant is required. To use wlan0 You should create a suitable /etc/wpa_supplicant/wpa_supplicant-wlan0.conf e.g.
(If you have existing WiFi setup you can copy the file /etc/wpa_supplicant/wpa_supplicant.conf .)
Create a .network file in /etc/systemd/network .
Having created the appropriate configuration files you NEED to disable existing networking and enable systemd-networkd services. NOTE there is NO NEED to purge existing network services. If disabled they will not interfere, and can be easily re-enabled if required.
You can check the status using the following:-
Simplified Systemd-Networkd setup
Configuring networking using systemd-networkd requires multiple steps, and it is easy to get things wrong. The following 3 scripts simplify the process and enable swapping between systemd-networkd and dhcpcd .
The setup below is more general than that described above and should work with multiple interfaces (although if you have reason to have multiples you will probably want to customise the setup).
This should offer similar functionality to the dhcpcd setup (except this will disable the Networking tool on the Desktop Panel).
Step1 installs necessary files, and only needs to be run once. The other scripts activate/deactivate systemd-networkd but do not delete anything merely changing which services are running - Reboot REQUIRED! All script MUST be run by root or with sudo .
SetupSystemdNetworkd.sh
Activatesystemdnetworkd.sh, deactivatesystemdnetworkd.sh.
- Debian Wiki
- The ArchLinux Wiki provides a comprehensive set of documentation.
NetworkManager
See How do I set up networking on Raspberry Pi OS - Bookworm for NetworkManager detail instructions.
The Sep 2022 Update to Raspberry Pi OS added the option to use NetworkManager in Raspberry Pi OS.
This has been standard in many other Linux distributions for several years, and while dhcpcd remains the default for Raspberry Pi OS in earlier Raspberry Pi OS in Bookworm NetworkManager has become the default.
NetworkManager offers similar basic WiFi & Ethernet capability to dhcpcd and it is now simple to switch between the two. (See the link above for discussion of extra features.)
Fresh installations of Bullseye include NetworkManager, but it can be added to existing installations without loss of customisation or installed packages.
To load the new taskbar plugins launch Appearance Settings from the Preferences section of the main menu. On the Defaults tab select the size you prefer then reboot.
If you prefer not to update Appearance Settings (this messes up all my carefully crafted customisation) it is possible to add the Controller for Network Manager to the Panel. This can be added next to Control for dhcpcd network interface .
To switch to NetworkManager run sudo raspi-config
- Option 6 Advanced Options
- Option AA Network Config
- Choose option 2 NetworkManager then reboot when prompted.
NetworkManager should now be running.
Open the networking menu on the taskbar. This should show any Ethernet connection and available WiFi networks (similar to dhcpcd ).
An additional sub-menu at the bottom, Advanced Options allows you
- to connect to a hidden network
- create a hotspot or
- set up VPN connections (you need to install the relevant VPN plugin)
You can use raspi-config to go back to dhcpcd – just enter the Network Config option as described above and choose Option 1 dhcpcd
You can use the nmcli command to manage NetworkManager from the command line e.g.
Each WiFi network has a separate config file in /etc/NetworkManager/system-connections/
- Just a comment - no need to reply - but IMHO, your answer omits the fact that (at least at the command-line interface), NetworkManager is incredibly more complex/arcane than dhcpcd5 . Again IMHO, that makes NetworkManager perhaps not the best choice for tiny systems such as Raspberry Pis. I know that you didn't have a say in choosing to replace dhcpcd with NetworkManager , but, by omission, your answer may suggest that they are comparable in complexity/ease-of-use. – Seamus Commented May 27 at 20:19
- @Seamus I tend to agree with you but the complexity comes with more features. I expect most users will use the GUI interface which is much simpler (at least for the most common use cases) although I know you don't use it. Incidentally when dhcpcd was introduced (with minimal documentation) I found myself answering similar questions dozens of times so decided to write a comprehensive answer. – Milliways Commented May 28 at 2:46
Not the answer you're looking for? Browse other questions tagged networking raspbian-buster raspberry-pi-os static-ip raspberry-pi-os-bullseye or ask your own question .
- The Overflow Blog
- Community Products Roadmap Update, July 2024
- Featured on Meta
- We spent a sprint addressing your requests — here’s how it went
- Upcoming initiatives on Stack Overflow and across the Stack Exchange network...
- Please do not put SOLVED in question titles
Hot Network Questions
- What is the answer to this problem? What should be applied here? PRA? RS? RV?
- How would we write code for a smile with a dot underneathe it?
- Can the U. S. Supreme Court decide on agencies, laws, etc., that are not in front of them for a decision?
- Were there any stone vessels made in Paleolithic?
- Avoid underset text overlaping
- Is intuitionistic mathematics situated in time?
- Why danach instead of darüber?
- Can the US president kill at will?
- Error handling for singly linked list in C
- Sort Number Array
- What is the purpose of the BJT in this circuit?
- Sitting on a desk or at a desk? What's the diffrence?
- Are US enlisted personnel (as opposed to officers) required, or allowed, to disobey unlawful orders?
- Why does independent research from people without formal academic qualifications generally turn out to be a complete waste of time?
- Beer clip packaging
- Do thermodynamic cycles occur only in human-made machines?
- Segments of a string, doubling in length
- Can someone please translate this commentary by Malbim on Psalm 86:12
- How much damage does my Hexblade Warlock deal with their Bonus Action attack?
- GDPR Data Processor
- Does antenna arraying for deep space communications affect the CMB contribution?
- Why does `p` not put all yanked lines when copying across files?
- Rear disc brakes work intermittently
- Concrete works by Alexandre Grothendieck, other than Dessin d'Enfants?
How to Extract Gold from Electronics Without Chemicals?
Raspberry pi serial (uart) tutorial, half-bridge vs. full-bridge: what is the difference, how to set a static ip address on raspberry pi.
From building smart home systems to crafting intricate web servers, the Raspberry Pi’s potential seems boundless. Yet, amidst this technological marvel, lies a fundamental consideration that often determines the efficiency and accessibility of these projects: the choice between a dynamic and a static IP address.
An IP address, akin to a digital passport, distinguishes each device within a network, facilitating data transmission and routing across the internet or a local connection [1] . While dynamic IP addresses are automatically assigned by routers through DHCP, a static IP address offers a consistent, predetermined identity for a Raspberry Pi, a feature indispensable for projects necessitating unwavering connectivity and accessibility. This guide illuminates the nuanced journey of configuring such a steadfast address, providing step-by-step instructions to navigate the process with confidence and ease.
As we embark on this exploration, we unveil the significance of a static IP address and empower Raspberry Pi enthusiasts to transcend the boundaries of dynamic networking, ensuring that their projects thrive with uninterrupted communication and steadfast connectivity.
What Is An IP Address?
It serves two primary purposes:
IP addresses come in two main versions: IPv4 (Internet Protocol version 4) and IPv6 (Internet Protocol version 6). IPv4 addresses are written in a format like “192.168.1.1”, consisting of four sets of numbers ranging from 0 to 255. Due to the rapid growth of devices connecting to the internet, IPv4 addresses are running out, which led to the development of IPv6. IPv6 addresses are much longer and follow a hexadecimal format like “2001:0db8:85a3:0000:0000:8a2e:0370:7334” [2] .
IP addresses are managed by regional internet registries (RIRs) that allocate blocks of addresses to internet service providers (ISPs), organizations, and other entities. ISPs then assign IP addresses to their customers, allowing them to connect to the internet.
IP addresses play a fundamental role in Internet communication, enabling devices to find and interact with each other across vast networks.
Private vs. Public IP
Private ip address.
10.0.0.0 to 10.255.255.255 172.16.0.0 to 172.31.255.255 192.168.0.0 to 192.168.255.255
Public IP Address:
When you access a website or send data to a server on the internet, your device uses its public IP address to establish the connection. The server’s response is then sent back to your public IP address, and your router forwards the response to the appropriate device within your local network.
Why Do You Need A Static IP Address For Your Raspberry Pi?
Dynamic vs. static ip addresses.
By default, most networks assign dynamic IP addresses to devices. A dynamic IP address is temporary and subject to change each time a device connects to the network. While this setup works well for general internet browsing and casual use, it may not be ideal for certain scenarios, particularly those involving devices that need consistent and predictable connectivity, like a Raspberry Pi [4] .
A static IP address, on the other hand, is one that remains constant and does not change each time the device connects to the network. It’s like having a dedicated parking spot for your device on the network. This static assignment can be especially advantageous for Raspberry Pi projects that require uninterrupted communication and accessibility.
Benefits of a Static IP Address for Your Raspberry Pi
Reliable access and connectivity, easy networked services setup.
Many Raspberry Pi projects involve setting up services that other devices interact with. These could be a file server, a media center, a home automation system, or even a web server. Having a static IP address simplifies the process of configuring these services, as you can reliably specify the Raspberry Pi’s address in your configurations. This makes it easier for other devices to locate and communicate with the Raspberry Pi.
Port Forwarding and External Access
Network monitoring and security.
For network monitoring and security purposes, having a consistent IP address can be invaluable. With a static IP, you can easily track Raspberry Pi’s activity, apply access control rules, and monitor traffic patterns. This is especially important if you’re using the Raspberry Pi for network analysis, intrusion detection, or other security-related tasks.
Integration with DNS and Domain Names
How to setup a raspberry pi static ip address:, 1. required equipment, 2. prerequisites: get the network configuration, 3. get the ip address of your router.
Log in to your router’s administration interface. This is usually done by entering the router’s IP address into a web browser. Once logged in, navigate to the network settings section, where you can find the router’s IP address. Note down this IP address; you will need it later.
4. Set a Static IP for the Raspberry Pi on the Router
5. get the dhcp range, 6. get a list of the currently used ip addresses.
To avoid assigning an IP address that is already in use, check the list of currently assigned IP addresses on your network. Most routers provide a list of connected devices along with their IP addresses. Make sure the IP address you choose for your Raspberry Pi is outside the DHCP range and is not already in use by another device.
7. Set a Static IP on Raspberry Pi OS Desktop
8. set a static ip in the command line.
Press Ctrl + O to save the file, then Ctrl + X to exit.
9. Setting Up the Terminal
If you prefer the terminal approach, follow these steps [6] :
10. Prioritizing Internet Interface
interface metric
Replace with the name of the interface (e.g., eth0 or wlan0) and with a lower value for the interface you want to prioritize.
11. Disabling Static IP Address
12. testing the static ip.
You should see your chosen static IP address listed alongside the network interface you configured.
How to Assign a Static IP to a Raspberry Pi:
Determine raspberry pi’s current ip v4 address.
hostname -I
Get Router’s IP Address If You Don’t Already Know It
Get the ip address of dns (domain name server), open /etc/dhcpcd.conf for editing in nano.
To begin the static IP assignment process, you’ll need to edit the dhcpcd.conf file. This file controls various network settings, including IP addresses, on your Raspberry Pi. Open the file using the Nano text editor:
sudo nano /etc/dhcpcd.conf
Add The Following Lines To The Bottom Of The File
Save the file by hitting ctrl + x and reboot.
To apply the new static IP configuration, you’ll need to reboot your Raspberry Pi:
sudo reboot
Testing the Static IP Address
To confirm that the static IP address has been successfully assigned to your Raspberry Pi, you can use the ifconfig command. Open a terminal window and type:
Look for the interface you configured (e.g., eth0 or wlan0) and verify that the assigned IP address matches the one you set as static.
Using the Raspberry Pi OS Guide to Set a Static IP
To begin the process of setting a static IP address on your Raspberry Pi, you’ll utilize the user-friendly interface of the Raspberry Pi OS. Follow these steps:
Select The Appropriate Interface
Enter the ip addresses into the relevant fields.
Setting a static IP address involves entering specific values into the relevant fields. These values include the desired IP address, subnet mask, gateway address, and DNS server addresses.
Follow these steps to input the necessary information:
Click Apply, Close The Window, And Reboot Your Pi
1. how to assign a static ip address to my raspberry pi.
Scroll to the bottom of the file and add the following lines (replace the values with your network configuration):
Restart the dhcpcd service:
2. How to configure static IP in Raspberry Pi 4?
3. does raspberry pi have a static ip address, 4. how can you set a static ip address free.
Setting a static IP address for your devices, including a Raspberry Pi, is typically a configuration option provided by your router’s settings. Most home routers allow you to assign static IP addresses to devices on your network through the router’s administration interface. This feature is usually available without any additional cost.
5. What is the IP address 127.0.0.1 Raspberry Pi?
6. what are static ip and dhcp in raspberry pi, 7. why does static ip keep changing raspberry pi, 8. what is the command for the raspberry pi ip address.
To view the IP address of your Raspberry Pi, open a terminal and use the command:
9. How to set a static IP address in the command prompt?
Then, follow the steps mentioned earlier for adding the static IP configuration.
10. How to set a static IP address in Arduino?
Arduino devices typically don’t have built-in network interfaces like Raspberry Pi. However, if you’re referring to connecting an Arduino to a network, the process depends on the specific hardware and networking shield you’re using with the Arduino. Consult the documentation for your Arduino hardware and networking shield to configure network settings.
11. Is static IP better for gaming?
12. does raspberry pi ip address change.
By default, the Raspberry Pi’s IP address can change if it is configured to obtain an IP address dynamically from a DHCP server. However, if you set up a static IP address, it will remain constant unless you manually change it.
13. Why doesn’t Raspberry Pi get an IP address?
14. how to enable ssh on raspberry pi, 15. what is the ssh password for raspberry pi.
The default SSH password for the Raspberry Pi user “pi” is “raspberry.” It’s recommended to change this password for security reasons after enabling SSH.
16. Does static IP cost more?
17. is static ip more secure than dhcp, useful video: how to assign static ip address to raspberry pi, what does the battery fuse do, how to protect outdoor extension cord from rain, what does a fiber optic cable look like, klipper raspberry pi alternatives, how to use a raspberry pi for time machine backups, how to use mpu6050 accelerometer on raspberry pi, how to port forward raspberry pi.
Sign up for our daily newsletter
- Privacy Policy
- Advertise with Us
How to Use a Static IP Address and Setup SSH on a Raspberry Pi

Like most Linux systems, the Raspberry Pi allows you to connect to it over SSH and although it is possible to make a SSH connection to a Pi with a dynamically allocated IP address, it is much easier to configure the device with a static IP address. By default, the Raspberry Pi is set up to get its IP address dynamically using DHCP. This is great for many situations, however where the Pi is acting as a server (which it does when you connect over SSH) then having a fixed IP address means you always know the address of your Pi without having to log in and run ipconfig to obtain the current address.
The IP address is configured in the file /etc/network/interfaces and we will need to edit this file to change the configuration from dynamic to static. But before we do that, we need to discover what address range is being used on your network. A typical home network uses one of the following ranges of IP address: 192.168.1.1 – 192.168.1.255 or 10.1.1.1 to 10.1.1.255. There are other variations as in fact all the addresses between 192.168.0.0 – 192.168.255.255 and 10.0.0.0 – 10.255.255.255 are designated for use on private networks.
To discover your current IP address use the following command:

In the eth0 section, the second line displays the Internet address, the Broadcast address and the Netmask. Note down the Internet address and the Netmask for later on.
Most networks have a default gateway (often the router or modem from your Internet Service Provider) where all traffic is routed if it can’t be resolved locally. This is normally configured via DHCP when the IP address is assigned, but for a static address it needs to be defined manually. To discover the current default gateway type:

The default gateway is listed on the line with the G flag, in my case 192.168.1.1 which is actually the router from my ISP. Note down the default gateway for later on.
Before editing the /etc/network/interfaces file, you need to decide what IP address you want to use as the permanent address for your Pi. On your network the .1 or .254 addresses are probably taken by your router, modem or wireless access point. There will also be a range of addresses assigned for DHCP, normally by your router or modem. If you don’t know what that range is and you don’t know how to use your router’s web interface to check, then the easiest thing to do is pick an address far away from the dynamic one your Pi currently has. For example, my Raspberry Pi has an IP address of 192.168.1.164. Since there are a few PCs and the odd tablet in my house I could take a guess that the DHCP address range defined by my router starts at 192.168.1.160, which it does. Therefore a good IP address for my Pi would be somewhere far from that range, say 192.168.1.20. By picking an address away from the DHCP range and away from .1 or .254 then I am limiting the chances of there being an address clash. Of course, the correct way to do this is discover how your router or modem is configured and then plan your network accordingly, don’t ever tell a real network engineer that you did it by guessing!
If you want a better picture of your network, try installing the nmap package and use nmap -sn 192.168.1.* to find which devices are on your network. Where 192.168.1.* is the first three parts of the network address you are using plus an asterisk.
Once you have picked an IP address edit the /etc/network/interfaces file:
Find the line which reads iface eth0 inet dhcp and replace it with:
But put the address, netmask and gateway that you noted down previously. Press “Ctrl + X” to leave the nano editor and type “Y” to confirm that the file should be saved. Press ENTER to keep the current filename (i.e. /etc/network/interfaces). Now reboot.
Now that your Pi has a static IP address you can configure the SSH server. This is done via raspi-config .

From within raspi-config , select option 8 ( Advanced Options ) and then option A4 ( SSH ). When asked “Would you like the SSH server enabled or disabled”, select “Enable” and finally select “OK”.
You can now connect to your Pi using SSH. If you have another Linux machine, simply use the ssh command. For Windows try the popular PuTTY program or alternatively use the SSH extension for Chrome.
Image credit: Regular Raspberry Pi
Our latest tutorials delivered straight to your inbox

Gary has been a technical writer, author and blogger since 2003. He is an expert in open source systems (including Linux), system administration, system security and networking protocols. He also knows several programming languages, as he was previously a software engineer for 10 years. He has a Bachelor of Science in business information systems from a UK University.

- Compute Module 4
- Kits & Bundles
- Flash Drives
- Card Readers
- Accessories
- Power Supplies
- Power over Ethernet (PoE)
- Breakout Garden
- GPS, GSM & LoRa
- Motor & Servo Control
- Port Expanders
- Power Management
- Prototyping
- Real Time Clock
- Serial & I2C
- Raspberry Pi 5
- Raspberry Pi 4
- Raspberry Pi 3
- Raspberry Pi 3A+
- Raspberry Pi Zero
- Case Accessories
- DIN & Rack
- Display/Screen
- Media Centre
- Retro Gaming
- Heatsinks & Fans
- Cooling Cases
- Camera Modules
- USB Cameras
- Mini Displays
- Medium Displays
- Large Displays
- Touchscreen Displays
- ePaper Displays
- GPIO Connection
- HDMI Connection
- Display Accessories
- Adapters & Accessories
- Game Controllers
- Keyboards & Mice
- Remote Controls
- WiFi & Ethernet
- Buttons & Joysticks
- HATs & Control Boards
- Merch & Accessories
- Wires & Connectors
- Merch & Clothing
- Notepads & Pens
- Peripherals
- Stickers & Badges
- Amplifiers & Modules
- Cables & Connectors
- Microphones
- Speakers & Headphones
- ADC & DAC
- Flat Cable (FFC/FPC)
- GPIO Expanders
- GPS & GSM
- Logic Level
- DIY Cables & Connectors
- Buttons & Switches
- Component Kits
- Integrated Circuits
- Oscillators
- Transistors
- Circuit Playground
- QT Py & XIAO
- Trinkey & Trinket
- Kits & Projects
- DotStar & APA102
- NeoPixels & WS2812
- Standard LEDs
- Strips & Sticks
- Battery Holders
- Boost Converters
- Power over Ethernet
- Regulators & Buck Converters
- Breadboards
- Crocodile Clips
- Jumper Wires
- PCBs & Perfboard
- SMT Breakouts
- Wire & Heat Shrink
- Motor Drivers
- Mounting Hubs
- Stepper Motors
- Wheels & Tracks
- Accelerometers
- Body & Muscle
- Environment & Air Quality
- Fingerprint
- Force & Weight
- Hall, Reed & Magnet
- IMU & Gyro
- Light & Colour
- Line Following
- Liquid & Moisture
- NFC & RFID
- Temperature
- Tilt & Vibration
- Voltage & Current
- PETG Filament
- PLA Filament
- The micro:bit
- Add-ons & Extensions
- Cables & Accessories
- Official Arduino Boards
- Compatible Boards
- GPS & GSM Shields
- Input & Button Shields
- LED Shields
- Prototyping Shields
- Relay Shields
- Robotics Shields
- Sensor Shields
- Serial Shields
- Other Shields
- Raspberry Pi Gifts
- Maker Gifts
- Micro:bit Gifts
- Arduino Gifts
- Gifts Under £10
- Gifts Under £20
- Gifts Under £50
Login / Signup
from just £2.99
150,000+ reviews
support portal
order by 2pm*
Your cart is empty

How to give your Raspberry Pi a Static IP Address - UPDATE
This tutorial will show you how to set a static IP address on your Raspberry Pi with the release of Raspbian Jessie. At the time of writing, the latest release date of Raspbian Jessie is 18-03-2016 with Kernal version 4.1 (but this should work on most versions).
We recommend doing this on a fresh install, however if you have attempted to set a static IP address already, you may have found yourself editing the interfaces file (/etc/network/interfaces). I hope you made a backup, because you’ll need to remove any edits you have made, and revert it back to its original state!
The following is done over SSH, but you could just as well plug your Pi into a monitor, hook up a keyboard and mouse, and use the Terminal instead.
Start by editing the dhcpcd.conf file
sudo nano /etc/dhcpcd.conf

Scroll all the way to the bottom of the file and add one, or both of the following snippets. Depending on whether you want to set a static IP address for a wired connection or a wireless connection eth0 = wired, wlan0 = wireless.
You’ll need to edit the numbers in the snippet so they match your network configuration.
interface = This defines which network interface you are setting the configuration for. static ip_address = This is the IP address that you want to set your device to. (Make sure you leave the /24 at the end) static routers = This is the IP address of your gateway (probably the IP address or your router) static domain_name_servers = This is the IP address of your DNS (probably the IP address of your router). You can add multiple IP addresses here separated with a single space.
To exit the editor, press ctrl+x To save your changes press the letter “Y” then hit enter
Now all you need to do is reboot, and everything should be set!
You can double check by typing
And checking the interfaces IP address

Featured Products

Ulrich Kneidl
in a special use case i need two different addresses over the ethernet/lan port. for example 192.168.100.23 and at the same time 10.168.100.23. is this easy to realize? somewhere i read about a command eth0 add, but i don’t know how to use it.
Leave a comment
All comments are moderated before being published.
This site is protected by reCAPTCHA and the Google Privacy Policy and Terms of Service apply.
Setting a static IP on the Raspberry Pi using Ethernet and Raspbian
Posted 12 August 2015 by Renier Delport | Updated 21 March 2019 Filed under Raspbian

A static IP address is often used for Raspberry Pis. Here we show how to set a static IP on the Raspberry Pi using Ethernet and Raspbian.
Table of contents
Introduction
A static (vs. dynamic) IP address is often required for stand-alone Raspberry Pis. Whereas a dynamic IP address (dhcp) on a network changes from time to time, a static IP address will not. Using a static IP address will simplify and standardise network connections to a Raspberry Pi.
After a fresh install, the Raspberry Pi will be configured to connect to a network using a dynamic IP address. To make it accessible on all distributions of Raspbian, the process will mainly focus on using terminal commands .
Initially, a keyboard and screen will be required, but after a dynamic IP address is obtained, the terminal commands can also be done by using PuTTY.
All the Raspberry Pi B models have an Ethernet port. Raspberry Pi Models 3B and upwards have built-in Wi-Fi too.
Using an Ethernet connection is somewhat different from setting a static IP using a Wi-Fi connection.
To see what release of Raspbian is installed, the following terminal command can be used:
To see the Raspberry Pi model used, the following terminal command can be used:
Accessing the terminal
Raspbian Wheezy , Raspbian Jessie Lite and Raspbian Stretch Lite will boot straight into the terminal immediately asking for a username and password. The default username:password for Raspbian is pi:raspberry.

Raspbian Jessie and Raspbian Stretch will boot into the GUI. To access the terminal from Raspbian Jessie and Raspbian Stretch , click on the terminal button.

Raspbain Jessie GUI interface. To access the terminal, use the terminal icon on the top of the screen.
Setting a static IP on the Raspberry Pi and Raspbian
The Raspberry Pi should be booted while connected to the network. In an open terminal, the current IP address of the Raspberry Pi can be obtained using:
It can also be obtained, together with other network information, by using ifconfig . If the network settings haven’t been changed, this will be a dynamic/random IP address assigned by the router. This IP address will likely change from time to time.
To be able to change a dynamic IP address to a static one, certain network information needs to be collected and entered into the network configuration file.
Step 1 Collect the information needed for a static IP
The following network information will be needed:
- Current IP address (dynamic/dhcp)
- Desired IP address
- Netmask address
- Broadcast address
- Network address
- Gateway address
The Desired IP addres s is the address to be used as a static IP . Any unused IP on the network can be used.
Go to the Netmask address (Mask) and the Broadcast address (Bcast), the ifconfig terminal command can be used:

For the Network address , replace the last number of the Current IP address with 0 – e.g. 192.168.1.81 ‘s Network address is 192.168.1.0 .
Lastly, use netstat -nr or ip route | grep default | awk '{print $3}' to get the Gateway address .

Getting a Raspberry Pi’s gateway address using the netstat -nr or ip route | grep default | awk ‘{print $3}’ command.
The following network information will be used during this post:
- Current IP address 192.168.1.81
- Desired IP address 192.168.1.16
- Netmask address 255.255.255.0
- Broadcast address 192.168.1.255
- Network address 192.168.1.0
- Gateway address 192.168.1.254
Step 2 Enter the information gathered
After obtaining the desired network information, it needs to be added to Raspbian’s network configuration file. The network configuration files and the way the information is added are different for Raspbain Wheezy (2a) and Raspbian Jessie/Stretch (2b).
STEP 2A EDIT THE INTERFACES FILE (RASPBIAN WHEEZY)
For Raspbian Wheezy , the interface file is used to store the network configuration. Start off by making a backup of the original interfaces file:
Open the interfaces file for editing:
The original interfaces file for Raspbian Wheezy will look something like this:
Replace everything with the following lines (copy/paste):
This allows to simply un-comment the appropriate section for the settings needed (i.e. removing the appropriate #’s). For Raspbian Wheezy , un-comment section 2b and supply the network information as per Step 1 . This will not change the original Wi-Fi (wlan) settings. Press Ctrl + X to exit and save the changes.
These changes are mainly aimed at setting up the eth0 to static (as suppose to dynamic ). As from 05 05 2015 Raspbian Wheezy will assign an extra dynamic IP when connected. This will set a static Ethernet connection and dynamic Wi-Fi connection.
To check if Raspbian accepted the new network settings after the file has been closed, use:
If there are no errors, release the potential lease and reboot:
STEP 2B EDIT THE DHCPCD.CONF FILE (RASPBIAN JESSIE/Stretch)
For Raspbian Jessie and Raspbian Stretch , the dhcpcd.conf file is used to store the network configuration. Start off by making a backup of the original dhcpcd.conf file:
Open the dhcpcd.conf file for editing:
The original dhcpcd.conf file for Raspbian Jessie/Stretch will look something like this:
Scroll all the way to the bottom of the file and add the following:
As previously, this allows the user to simply un-comment the appropriate section for the settings needed. For Raspbian Jessie or Raspbian Stretch, un-comment section 1 and supply the network information as per Step 1 (routers & domain_name_servers are both = Gateway address). Leave the /24 at the end of the static IP address. Press Ctrl + X to exit and save the changes.
Step 3 Check & test the new IP
After the Raspberry Pi has booted, get the newest IP address again by using:
There might be more than one IP shown, but the static IP just configured should also be on the list. The other IP addresses can be ignored for now (see the Optional Step below). While the other addresses might change, the static IP address will remain the same until the network configuration file has been changed again.
Optional step
After setting a static IP address, there might still be two or more IPs assigned to the Raspberry Pi. As of 05 05 2015, Raspbian started to force a 2nd, dynamically assigned IP address, even if a static IP has been assigned.
I found that if you deactivate this dynamic IP you are more likely to have internet connection problems, so I generally leave this as is and let it be generated.
The apparent reason for this is that some wireless routers may not accept clients with self-assigned static IPs. When a new client logs into a router, a dynamic IP is assigned, which is supposed to be requested via DHCP. If this doesn’t happen, i.e. if a ‘non-assigned random IP’ connects, the router will simply drop its packets.
This can be changed by telling your router that the assigned IP should be made static (linked to the MAC address). This is router dependent, but on my D-Link DSL-G225 router these settings are under DHCP RESERVATION LIST under the Local Network SETUP section.
Apart from the interfaces file, Raspbian also uses the dhcpcd.conf file in some way as well. To prevent the assigning of a second dynamic IP, the dhcpcd.conf file can be manually deactivated (not recommended):
By manually deactivating the dhcpcd.conf file, Raspbian will boot without using this file (stop the DHCP server from running) – meaning that you have manual power over DHCP.
To check if Raspbian accepted the new network settings after the file has been deactivated, use:
The process can be reversed using:
The most current dhcpcd.conf will be used again after reversing it.
The simplest way to test whether the internet connection is still active after the DHCP server has been disabled is by using the ping command:
A static IP address is often used for Raspberry Pis. This post showed how to set a static IP on the Raspberry Pi using Ethernet and Raspbian. The process of setting a static IP address on the Raspberry Pi depends on the distribution of Raspbian, but can always be done using terminal commands.
Leave a Reply
Your email address will not be published. Required fields are marked *
IMAGES
VIDEO
COMMENTS
How to Assign a Static IP to a Raspberry Pi. 1. Determine your Raspberry PI's current IP v4 address if you don't already know it. The easiest way to do this is by using the hostname -I command at ...
Choose "Edit connection". Pick the connection you want to set to static, and select "Edit…" on the right. Use the arrows on your keyboard to select the connection and the action button. Press Enter to confirm the selection. On the next window, scroll the cursor to the "IPv4 Configuration" line and select "Automatic".
Restart your Pi for the changes to take effect. You have successfully set up static IP on Raspberry Pi. Step 4 (GUI Method): Change network configuration to set static IP. The same can be achieved from the graphical interface of Raspberry Pi OS. First, click on the network icon and then go to the Advanced options and click Edit connections.
It is very simple to set up your static ethernet address. Simply right-click on the Wi-Fi icon in the menu bar (top-right on the left of the speaker icon) and select the Wireless & Wired Network Settings. Now click the empty dropdown menu and select the network interface you want to configure. Now for IPv4 Address enter your chosen ip address ...
Take note of the name server IP address and close the file with CTRL + X. 3 - Edit the dhcpcd file on the Raspberry Pi. The static IP is set by adding it to a file on the Raspberry Pi. In the terminal window, run the following command to edit the dhcpcd.conf file. sudo nano /etc/dhcpcd.conf. 4 - Set the static IP address
3. Reboot the Raspberry Pi With the dhcpcd.conf configuration file modified, restart your Raspberry Pi to effect the changes and set the static IP address for it: . sudo reboot. Rather than using an address assigned automatically by DHCP, the Raspberry Pi will now attempt to connect to the router using the new static IP address that you set in the dhcpcd.conf file.
To set a static IP address, you will want to navigate to <Automatic> next to IPv4 CONFIGURATION and change this to <Manual>. Now navigate across to <SHOW> and press enter. You should see a range of fields that you need to fill out. We will cover each of these fields in the next step.
You can also set the static private IP address for your system through the Raspberry Pi OS GUI. The steps below demonstrate the GUI procedure. 1. Right-click the network adapter icon on the right side of the top panel. 2. Select the Wireless & Wired Network Settings item to open Network Preferences. 3.
Step 5 - Assigning the IP Address to the Connected Interface. My network has a DHCP range of 192.168.100 to 192.168.200, from which addresses will be automatically assigned, so I will assign my Raspberry Pi the address: 192.168.1.201. This is to make sure that it doesn't conflict with an existing IP (or the router's IP address, which is ...
A static IP address however will not change, it assigns your Raspberry Pi a permanent address on your network - so you know exactly where it is at all times. Setting up a static IP address on your Raspberry Pi can seem like a daunting task, but fear not, we'll walk you through it one step at a time in this tutorial.For this guide,
By default the Pi is configured with a dynamic IP address. To assign it a static IP address, you need to add your static IP, default gateway IP, and domain name servers to the dhcpcd.conf file. At the command prompt, enter sudo nano /etc/dhcpcd.conf to edit the dhcpcd.conf file: Now, without changing anything else in the file, add this code at ...
4. Click on "Add" and enter the IP address of Raspberry Pi in the "Reserved IP Address" field. You can find the IP address of your RPi board by entering hostname -I in the Terminal. To find the MAC address of your RPi, scroll down and look for the client list mentioned on the same admin page.Next, give a name in the "Description" field and turn on the "Enable This Entry" checkbox.
This is the IP of your Raspberry PI. The 192.168.137.255 is the IP of the PC which acts as a router. WIFI manual DHCP. In the similar fashion static IP is assigned to the WIFI connection. # Custom static IP address for wlan0 interface wlan0 static ip_address=192.168.1.162/24 static routers=192.168.1.1 static domain_name_servers=192.168.1.1
You must make sure you either use the IP address already given to your Raspberry Pi or that you're using an address that is currently vacant. To begin, enter this command: sudo nano /etc/dhcpcd ...
However, this can change whenever you remove the Pi from the network e.g. turn it off. Having a static IP isn't essential, however it will make repeated access to the Raspberry Pi via SSH much simpler, as you'll always know that the Raspberry Pi has the same address. Imagine how much trouble your postman would have if your house constantly changed
Set Static IP Address via Desktop GUI. Get started by right clicking on the network interfaces icon in the task bar at the top of your screen (the default location for the bar in Raspberry Pi OS). Then, click on Wired and Wireless Network Settings. Right clicking on the Raspberry Pi task bar to access networking settings.
Next set the addressing from DHCP to static, nmcli con mod preconfigured ipv4.method manual. Restart the connection to pick up these changes, nmcli con up preconfigured. Check your new IP address with ip addr show wlan0 (or whatever device you are using). Lastly check your network connectivity by doing a quick ping using ping 8.8.8.8.
Setup a Static IP Address. Questions about setting Static IP Address are among the most common on this site. There are very many tutorials (many wrong, obsolete or incomplete). If the reason you are contemplating a Static IP Address is you want your Pi to be assigned a predictable IP Address you can request the DHCP server to assign one.
Set a Static IP on Raspberry Pi OS Desktop. If you're using the Raspberry Pi OS desktop version, follow these steps: Click on the network icon in the top-right corner of the desktop; Select "Wireless and Wired Network Settings"; In the "Connection" tab, click on the wired or wireless connection you're using;
SSH. Now that your Pi has a static IP address you can configure the SSH server. This is done via raspi-config. From within raspi-config, select option 8 ( Advanced Options) and then option A4 ( SSH ). When asked "Would you like the SSH server enabled or disabled", select "Enable" and finally select "OK". You can now connect to your ...
Start by editing the dhcpcd.conf file. sudo nano /etc/dhcpcd.conf. Scroll all the way to the bottom of the file and add one, or both of the following snippets. Depending on whether you want to set a static IP address for a wired connection or a wireless connection eth0 = wired, wlan0 = wireless. You'll need to edit the numbers in the snippet ...
Accessing the terminal. Setting a static IP on the Raspberry Pi and Raspbian. Step 1 Collect the information needed for a static IP. Step 2 Enter the information gathered. STEP 2A EDIT THE INTERFACES FILE (RASPBIAN WHEEZY) STEP 2B EDIT THE DHCPCD.CONF FILE (RASPBIAN JESSIE/Stretch) Step 3 Check & test the new IP.
I have changed the IP address from DHCP to Static IP address into "/etc/dhcpcd.conf" and then simply I did a Reboot to the system to let the changes take effect, and unfortunately, that does not work, always, until I restart the the dhcpcd service by writing the command "sudo systemctl restart dhcpcd".