How-To Geek
How to change a drive letter on windows 10 or windows 11.
You can change your drive letters in Windows 10 and 11 using the Disk Management utility.

Quick Links
What changing a drive letter does, how to change a drive letter, how to fix programs broken by changing a drive letter.
Changing the letter of a drive is easy on Windows 10 and Windows 11, but you should do it as soon as you add the drive to prevent future hassles. Find out how to change a drive letter here.
Windows assigns drive letters alphabetically --- starting with C --- when they're initialized. If you want to change a drive letter, you should do it before you install anything on the drive. Changing a drive letter after programs are installed could break them since there will be references to an installation location that is no longer there.
Windows has gotten pretty smart about updating shortcuts so that programs work after changing a drive letter. Most of your applications' shortcuts will probably be automatically corrected. Unfortunately, Windows isn't as good about updating file associations. You'll have to manually set the default apps associated with files to fix file associations if they were broken by changing the drive letter.
It is possible to change the boot drive letter to something else, but we don't recommend it. Changing C:\ to another letter is likely to result in severe issues, like a PC that cannot boot into Windows at all. Even if it were able to boot, there would be a huge number of programs that would not be able to run.
Technically speaking, while they are commonly called drive letters, each letter actually refers to a partition on a disk. If you have multiple partitions on a single disk, you will need to assign a letter to each partition to make them all accessible. If a disk has just a single partition, it will just have a single letter pointing to that partition. (However, you do not have to assign a letter to each partition. Partitions without drive letters will not appear in File Explorer and elsewhere.)
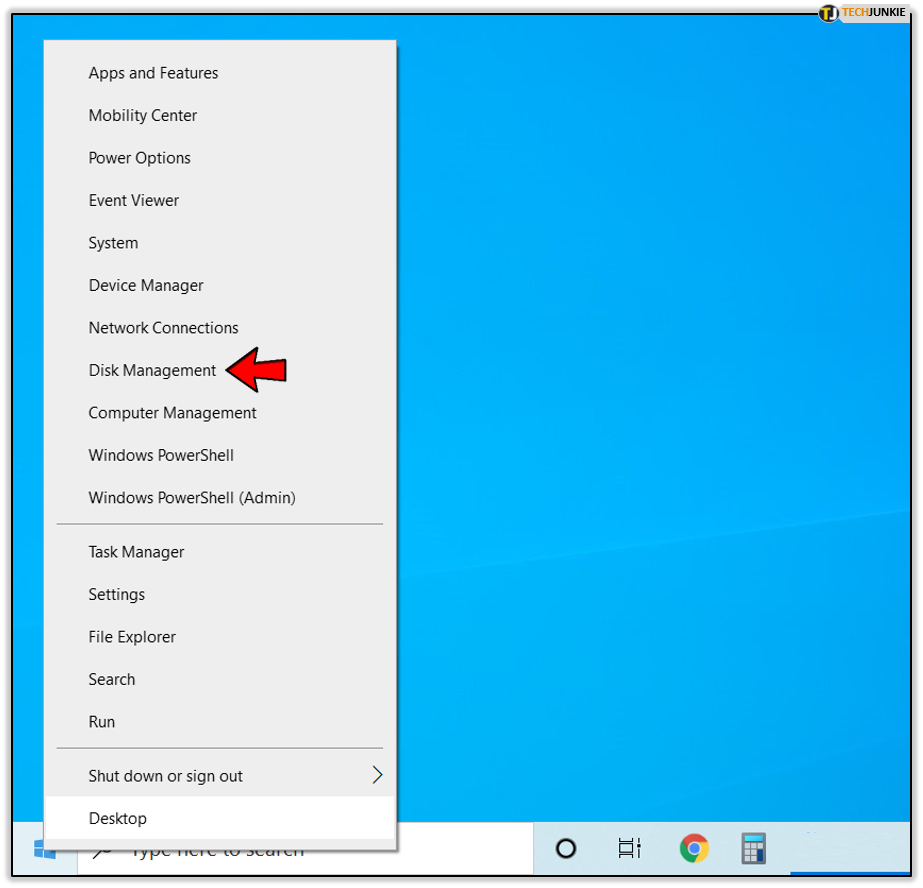
Changing a drive letter is pretty simple. Click the Start button, type "Disk Management" in the search bar, and then hit Enter.
The program name displayed in the search will not be Disk Management. It will be "Create and format hard disk partitions."
You could also hit Windows+X or right-click the Start button, and then click "Disk Management."
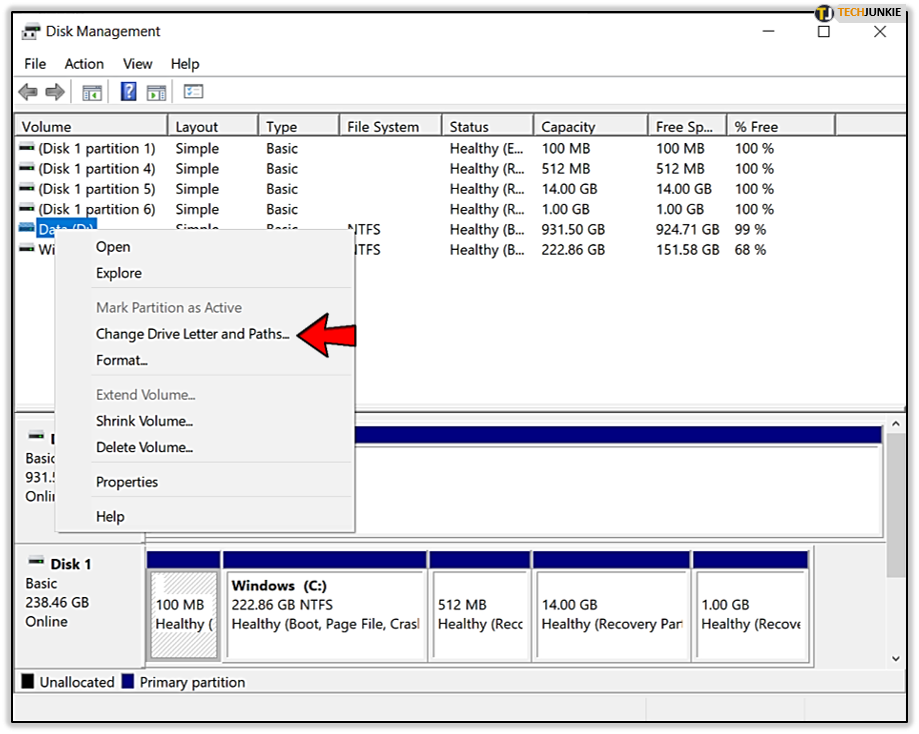
Identify the drive you'd like to change in the Disk Management Window. In this example, we'll change the letter of the D:\ drive to J:\. You can right-click the drive on the text list, or on the menu below. Either works.
Select "Change Drive Letter and Paths" in the right-click menu that appears.
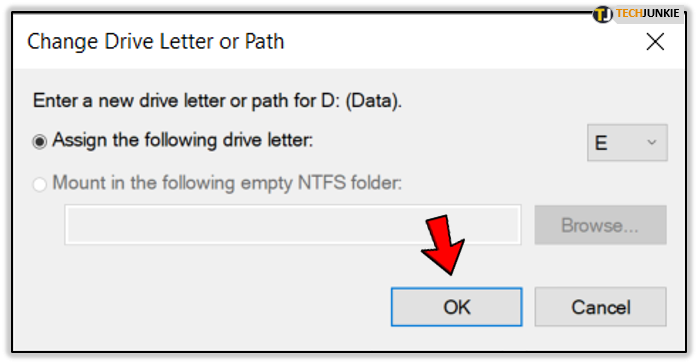
In the window that pops up, click "Change."
Select whatever letter you want from the drop-down menu. Then click "Ok."
Two popups will warn you about changing your drive letter. Click "Yes" on both of them, and then restart your computer.
Once Windows has restarted, the drive letter should be changed.
There are a few ways you can fix a program broken by changing the drive letter.
Fix The Shortcut
If you're lucky, the only thing that is broken is the shortcut. Fix a shortcut by right-clicking the shortcut on your desktop, and then click Properties.
You need to change the target of the shortcut to the new drive letter.
For example, if GIMP was previously installed at " D :\GIMP 2\bin\gimp-2.10.exe," and you changed the D drive to J, change the target of the shortcut to " J :\GIMP 2\bin\gimp-2.10.exe."
Finalize the change by clicking "Apply" and then "Ok."
Reinstall the Program
Reinstalling the program will generate new entries in the registry, so everything on the computer will know where to look for the program. Some installers won't like reinstalling directly over existing files, so you may need to rename or delete the old installation first.
Change the Drive Letter Back
If you changed the drive letter of a drive with a lot of programs installed, it might be easier to change the drive letter back. Changing the drive letter back should automatically fix any programs and file associations that were broken.
Edit the Registry
You can break programs, or even Windows itself, by editing the registry. Be careful, and learn about how to edit the registry before you try it. Make sure you backup the Windows registry first. You should not attempt this method unless you have no other options.
Windows, and a lot of programs, track where programs are installed via the Windows registry. It is possible to manually adjust the registry to fix broken programs. Keep in mind that there could be dozens of registry entries you need to edit. A program like GIMP can have registry entries for the context menu, for the "Open With" menu, for any file associations, and for the location of its executables. Other programs may only have a few entries related to where it is installed.
If you're not deterred, here's how you do it.
First, you need to know where the program was previously installed. In this case, the program was installed to the "D:\GIMP 2" folder, and the executables were found the "D:\GIMP 2\bin" sub-folder. It is now located at "J:\GIMP 2" instead.
We need to update the registry to reflect the change in location. Click the Start button, type "regedit" into the search bar, right-click Regedit, and click "Run as administrator."
In Regedit, hit Ctrl+F to bring up a search window. Type in the old location for the program you're trying to fix --- "D:\GIMP 2" for our example --- then click "Find Next."
Once Regedit has found something with "D:\GIMP 2" as part of a path, it'll show it to you. Here is an example from the GIMP search.
To actually change them, double click the name of the registry entry you want to modify. Then change the drive letter to J, or whatever you chose. If you didn't otherwise move the folder, leave the rest of the path alone. Then click "Ok."
You'll need to repeat this multiple times. To find the next result using your search term, you can hit the F3 key. There will be a popup once you've found all of the entries.
Changing drive letters can be a simple way to customize your PC. Do it before you install anything on the drive, however. You'll prevent any problems before they occur, and probably save yourself quite a bit of troubleshooting.
This browser is no longer supported.
Upgrade to Microsoft Edge to take advantage of the latest features, security updates, and technical support.
Change a drive letter
- 4 contributors
Applies To: Windows 11, Windows 10, Windows Server 2022, Windows Server 2019, and Windows Server 2016
If you want to change a drive letter assigned to a drive, or you have a drive that doesn't yet have a drive letter, use Disk Management to change it. You can also mount the drive in an empty folder so that it appears as a folder. For more information, see Mount a drive in a folder .
If you change the drive letter of a drive that already contains Windows or apps, apps might have trouble running or finding the drive. We suggest not changing the drive letter of a drive that already contains Windows or apps.
The following steps show how to change the drive letter.
Open Disk Management with administrator permissions.
In Disk Management, select and hold (or right-click) the volume on which you want to change or add a drive letter and select Change Drive Letter and Paths .

If you don't see the Change Drive Letter and Paths option or it's grayed out, the volume either isn't ready to receive a drive letter or it's unallocated and needs to be initialized . It might also be that the drive isn't accessible, which is the case with EFI system partitions and recovery partitions. If you've confirmed that your volume is formatted with a drive letter that you can access but you're still unable to change it, that's beyond the scope of this article. We suggest contacting Microsoft Support or the manufacturer of your PC for more help.
To change the drive letter, select Change . To add a drive letter if the drive doesn't already have one, select Add .

Select the new drive letter and choose OK . Then select Yes when prompted about how programs that rely on the drive letter might not run correctly.

Coming soon: Throughout 2024 we will be phasing out GitHub Issues as the feedback mechanism for content and replacing it with a new feedback system. For more information see: https://aka.ms/ContentUserFeedback .
Submit and view feedback for
Additional resources
Sign up for our daily newsletter
- Privacy Policy
- Advertise with Us
6 Ways to Change the Drive Letter in Windows

If your PC suddenly stops showing one of your internal drives in the file explorer or not list your external drive, it could be due to the OS getting confused with the drive letters. Simply changing your assigned drive letters can help you bypass this conflict. Here are six ways to change the drive letter.
1. Change the Drive Letter Using Settings
2. using command prompt, 3. disk management, 4. registry editor, 5. windows powershell, 6. drive letter changer software, frequently asked questions.
Also read: How to Clean Up and Make Space on Your Windows “C” Drive
Is It Safe to Change a Drive Letter in Windows?
Changing the drive letter is not entirely harmless and can cause significant problems based on the contents of your drive. If you have applications and software installed on your drive, those applications may cease to work.
For example, if you change the name of your D: drive to an F: drive, then the software installed in the D drive will still search for code in the D: file. While you can still access the data inside, there may be errors that will cause a nuisance in your day-to-day usage.
However, you may safely change the letter of some drives. If a partition simply includes data files that you rarely use, changing the drive letter may cause minor inconvenience, but nothing serious. The letters of external drives can almost always be changed without any problems.
- Press Win + I to open the Settings app, then select the “System” tab. Scroll down and click on “Storage.”

- Scroll down on the right side and click on “Advanced storage settings.”

- Under Advanced storage settings, click on “Disks & Volumes.”

- Select the drive whose letter you want to change, then click on the “Properties” button for that drive.

- In the Drive Properties, you will find the option to change the drive letter of the selected drive.

- Once you click on the option to change the drive letter, you will find a drop-down menu that will allow you to change the drive letter.

- Click on the letter you want to assign.

- Once you have selected your preferred letter, click on “OK” to confirm your choice.

Also read: How to Format a Drive in FAT32 in Windows
- Search for the command prompt on the start menu by typing cmd , right-click on it, and select “Run as administrator”.

- On the command prompt home screen, type:

- Press Enter , then type:

- Press Enter. You’ll see a list of your system’s drives. Make a note of the volume number of the drive. In the example pictured, it’s “Volume 3”.

- Type the following code:
- Type the following code to assign the new letter:
Instead of “new drive letter,” type the letter you want. For example: assign letter=S

The drive letter will be changed to your preferred letter.
Also read: 8 Ways to Customize Windows Terminal
- Right-click on the Windows button and open “Disk Management.”

- Under the “Volume” column, you will find the various partitions of your storage. You need to find the drive whose letter you’ll change and right-click on it.

- In the dialog box that appears, click on “Change.”

- Click the drop-down menu next to “Assign the following drive letter,” then select your letter and press “OK.”

- A warning message will pop up. Click “Yes” if you are sure about your decision to change the drive letter.

Also read: Which Allocation Unit Size Is Best for Your Drive?
- To change the drive letter through registry editor, first press Win + R to open the Run dialog and type regedit .

- Type in the following address at the top of the application:
and press Enter .

- Navigate to the list of binary keys. Select the key that corresponds to the drive letter that you want to change. For example, if we want to change the letter of the D: drive, we would look for “\DosDevices\D:”
- Right-click on the selected registry and rename the drive letter to what you want, just as you would rename any other file.You will have to restart your computer for the effects to take place.

Also read: 16 Useful Windows Registry Hacks to Optimize Your Experience
- Using the search button on the taskbar, search for “Powershell” and run it as administrator.

- Type the following command:

- A screen will show you your disk partitions. Make a note of what drive letter you want to change.

- To change the drive letter, type the following command:
Make sure to substitute “current drive letter’ and “new drive letter” with the actual drive letters, then press Enter .

Also read: How to Map a WebDAV Drive in Windows
If you are looking for a tool that can help you manage your partition and drives, these software will help you change your drive letter.
- MiniTool Partition Wizard
- AOMEI Partition Assistant
- EaseUS Partition Master
These tools are easy to use and have GUI interfaces that make them simple to use and also a one-stop destination for you to manage your storage devices. For the purposes of the demonstration, we are using MiniTool Partition Wizard to change the drive letter.
- Download MiniTool Partition Wizard. (It is a direct download link.)

- Run the installer and launch the app. You will get a listing of all your drive partitions mentioned below.

- Right-click on the target drive partition and select “Change Letter.”

- Open the drop-down list and select a new drive letter for your target drive.

- Click on “Apply” to save the changes.

- You will receive a warning pop-up asking you to close all background applications. Click “Yes.”

- You will now receive a confirmation message telling you that the new changes have been applied.Click “OK.”

Also read: How to Format Your USB Drives in Windows
1. How are drive letters assigned in Windows?
Drive letters are assigned to every new drive in alphabetical order. Traditionally, the A: and B: drives were used for floppy disks, and the system drive on which Windows is installed is named C: by default.
2. Can I change the drive letter for the System Drive?
No, changing the drive letter on the system drive is not possible, as Windows is installed on the system drive. If that was changed, the system drive would not be found and the computer would cease working.
3. Can I switch drive letters among two drives?
No, there is no functionality in Windows to switch drive letters directly between two drives. If you want to switch the drive letters between the D: drive and the E: drive, you will have first change the D: drive to another letter (so as to free up the D:), change the E: to D:, then change the first one to E:.
Image credit: Plastic magnetic letters by 123RF
Our latest tutorials delivered straight to your inbox

Ojash has been writing about tech back since Symbian-based Nokia was the closest thing to a smartphone. He spends most of his time writing, researching, or ranting about Bitcoin. Ojash also contributes to other popular sites like MakeUseOf, SlashGear, and MacBookJournal.

- Stream Your Favorite Sports
- Where to Watch WNBA Games
How to Change a Drive Letter
Don't like the letters assigned to your drives in Windows? Change them!
:max_bytes(150000):strip_icc():format(webp)/tim-fisher-5820c8345f9b581c0b5a63cf.jpg "change letter for drive")
- Emporia State University
:max_bytes(150000):strip_icc():format(webp)/image-5e6611aebe974bb7886a24b5070c834f.jpg "change letter for drive")
- The Ultimate Laptop Buying Guide
What to Know
- Open Disk Management. Locate the drive you want to change. Right-click and choose Change Drive Letter and Paths > Change .
- Select the drive letter you want to assign from Assign the following drive letter . Then select OK and choose Yes .
The letters assigned to your hard drives, optical drives, and USB drives in Windows are not fixed. Use the Disk Management tool in Windows to change drive letters. These steps apply to Windows XP and newer versions of Windows .
How to Change Drive Letters in Windows
Follow these steps to change the driver letters in any version of Windows.
You can't change the drive letter of the partition that Windows is installed onto. On most computers, this is usually the C drive.
Open Disk Management , the tool in Windows that lets you manage drive letters, among [many] other things.
In Windows 11/10/8, Disk Management is also available from the Power User Menu ( WIN + X keyboard shortcut) and is probably the quickest way to open it. You can also start Disk Management from the Command Prompt in any version of Windows, but starting it via Computer Management is probably best for most of you.
Locate from the list at the top, or from the map at the bottom, the drive you want to change the drive letter of.
If you're not sure that the drive you're looking at is really the one you want to change the drive letter for, you can right-click or tap-and-hold the drive and then choose Explore . If you need to, look through the folders to see if that's the right drive.
Right-click or tap-and-hold the drive and choose Change Drive Letter and Paths .
Select Change .
If you've selected the primary drive by accident, some versions of Windows will display a message that reads Windows cannot modify the drive letter of your system volume or boot volume.
Choose the drive letter you want Windows to assign to this storage device by selecting it from the Assign the following drive letter drop-down box.
You don't need to worry if the drive letter is already being used by another drive because Windows hides any letters you can't use.
Select OK .
Choose Yes to the Some programs that rely on drive letters might not run correctly. Do you want to continue? question.
If you have software installed to this drive, it might stop working properly after changing the drive letter. See details on this in the section below.
Once the drive letter change is complete, which usually only takes a second or two, you're welcome to close any open Disk Management or other windows.
The drive letter is different from the volume label. You can change the volume label using similar steps .
If You Have Programs Not on the Main Drive
Changing drive letter assignments for drives that have software installed to them may cause the software to stop working. This isn't quite as common with newer programs and apps but if you have an old program, especially if you're still using Windows XP or Windows Vista, this is likely to be a problem.
Fortunately, most of us don't have software installed to drives other than the primary drive (typically the C drive), but if you do, consider this your warning that you might need to reinstall the software after changing the drive letter.
No Changes for the Operating System Drive
You cannot change the drive letter of the drive that the Windows operating system is installed on. If you'd like Windows to exist on a drive other than C , or whatever it happens to be now, you can make that happen but you'll have to complete a clean install of Windows to do it. Unless you have a pressing need to have Windows exist on a different drive letter, we don't recommend going through all that trouble.
Change, Don't Switch
There's no built-in way to switch drive letters between two drives in Windows. Instead, use a drive letter that you don't plan on using as a temporary "holding" letter during the drive letter change process.
For example, let's say you'd like to swap Drive A for Drive B . Start by changing Drive A's letter to one that you don't plan on using (like X ), then Drive B's letter to Drive A's original one, and finally Drive A's letter to Drive B's original one.
Using the Command Prompt
You can also change the drive letter from Command Prompt . It's not as easy as using Disk Management and you can't see right away which letters are available to choose, but it is completely doable with the diskpart command.
Get the Latest Tech News Delivered Every Day
- The 34 Best Free Data Destruction Tools of 2024
- 10 Best Free Disk Partition Software Tools
- How to Open Disk Management
- How to Format a Hard Drive in Windows
- What Is a Volume Label of a Drive?
- How to Back Up Your iPhone to an External Hard Drive
- How to Partition a Hard Drive (Windows 11, 10, 8, 7, +)
- How to Burn an ISO File to a USB Drive
- How to Properly Reboot (Restart) a Windows Computer
- How to Use the Format Command to Write Zeros to a Hard Drive
- AOMEI Partition Assistant Standard Edition v10.4.0 Review
- What Is the NTFS File System?
- How to Open Disk Management From Command Prompt
- Disk Management
- What Is a Partition?
- How to Find a Drive's Volume Label or Serial Number
How to Change Drive Letter in Windows 10 & 11
Drive or partition letters are not fixed. You can change them. Here is how to change a drive letter in Windows 10 & 11 operating systems.
Windows automatically assigns a unique drive letter for all the drives, partitions, and plugged-in USB drives. Generally, the assigned letters are in incremental order starting with the letter C. For the most part, you don’t have to change the drive letter as it is pretty inconsequential in most cases. However, there might be times when you need to manually modify the drive letter of a drive, partition, or plugged-in USB drive to meet certain requirements.
For example, I want to use the drive letter X for one of my partitions because one of my older scripts requires it. The script won’t work as intended if it doesn’t have that specific drive letter. Since these are older files, and there are many of them, in typical Windows fashion, I tend to swap the drive letter rather than making the necessary changes to the script files.
Thankfully, Windows has several ways to change the drive letter . You can use the built-in partition manager or execute a few commands in the terminal. I will show both ways, follow the method you like.
Table of contents:
Change drive letter using partition manager
Commands to change drive letter.
Note: Close all active programs except your browser before proceeding with the below steps. It will reduce potential conflicts between programs and the drives.
Important: Do not change the drive letter of system volume or boot partition (C drive).
The steps below work the same in Windows 10 and 11.
Though most don’t know, Windows has a built-in partition manager called Disk Management. You can use it to quickly and easily change the drive letter. All you have to do is go to the drive options and choose the new drive letter.
Here is how to do it:
- Press “ Win + R ” to open Run .
- Type “ diskmgmt.msc ” and click “ Ok .”
- Find the drive you want to modify.
- Right-click on the drive.
- Choose the “ Change drive letter and paths ” option.
- Click the “ Change ” button.
- Select the “ Assign the following drive letter ” radio option.
- Choose a drive letter from the dropdown.
- Click “ Ok .”
- Click “ Yes ” in the warning window.
- Again, click “ Yes ” in the second warning window.
- Close the main disk management window.
- You have successfully changed the drive letter in Windows 10 and 11.
Steps with more details:
First, search and open “Create and format hard disk partitions” from the Start menu. You can also use the “diskmgmt.msc” Run (Win + R) command.
After opening the Disk Management tool, find the drive you want to change the drive letter, right-click on it, and choose the “Change drive letter and paths” option.

Now, click the “Change” button.

Select the “Assign the following drive letter” radio option, choose a drive letter from the dropdown menu, and press “Ok.”

You will see a couple of warning prompts. Press the “Yes” button in both prompts.

Finally, close the Disk Management tool, and you are done.
That is all. You’ve successfully changed the drive letter in Windows. To make the changes take full effect, reboot the system.

You can use the diskpart command to change the drive letter of any drive, partition, or USB drive in Windows. Here’s how to use the command to modify the drive letter.
Press the Windows Key to open the Start menu . Type “ Command Prompt ,” right-click on the result, and select the “ Run as administrator ” option. You can also right-click the Start menu, choose “Windows Terminal (Admin),” and open the Command Prompt tab in it.
After opening the cmd window, type “ diskpart ” and press Enter. This will launch the diskpart program in the cmd window.

Type “ list volume ” and press Enter.
The above command will list all partitions and their volume numbers. Take note of the volume number of the drive you want to modify.
Next, execute the “ select volume #number ” command. Don’t forget to replace the #number with the actual volume number.

After selecting the volume, execute the “ assign letter=NewDriveLetter ” command. Replace “ NewDriveLetter ” with the actual drive letter you want to assign.

Once assigned, close the cmd window.
That is all. Once the diskpart commands are executed successfully, the drive letter is changed instantly. To make the changes take full effect, reboot Windows.
I hope this simple and easy Windows how-to guide helped you.
If you are stuck or need some help, send an email, and I will try to help as much as possible.
Did you know you can change a drive icon to anything you want? Follow the linked article to understand how to do it.
About The Author

Leave a Comment Cancel Reply
Your email address will not be published. Required fields are marked *
Save my name, email, and website in this browser for the next time I comment.

How to Change a Drive Letter in Windows
Sometimes when you plug in a USB device, it doesn't show up
A task you will most likely have to perform a few times in Windows is changing the drive letter for an external hard drive, mapped network drive, or DVD drive. Sometimes when you plug in a USB flash drive, it doesn’t automatically get a drive letter assigned to it and it may not show up on your computer.
In those types of cases, you have to change the drive letter for the device and it will normally pop right up. In this article, I’ll show you how to change the drive letter for these devices using the GUI and also via the command prompt.
Change Drive Letter via Disk Management
You can open disk management on a Windows PC by either right-clicking on the Computer or This PC icon on the desktop and choosing Manage or by clicking on Start and typing in diskmgmt.msc .

You’ll see a list of volumes at the top and the disks and partitions at the bottom. Any partition that has a drive letter will be shown in the white area. If you connected a USB drive and you see it listed, but it doesn’t have a drive letter, you can now assign one.
To assign or change the drive letter for a disk or partition, simply right-click on it and choose Change Drive Letter and Paths .

A window will pop up with the current drive letter, if there is one, and a couple of options. Here you want to click on Change .

Next, you will choose the new drive letter from the dropdown list. You can pick from the letters A to Z.

That’s about it. Click OK to close out all the dialogs and the drive should now show up in Windows with the new drive letter. If you’re having issues using the GUI interface or you simply feel more comfortable using the command prompt, read the instructions below on how to use diskpart.
Use DiskPart to Assign Drive Letter
If you need to change or assign a drive letter via the command prompt, you have to use the diskpart command. I’ve written a bit on how to use diskpart , which is really useful for many disk management tasks.
To get started, open an administrator command prompt in Windows by clicking on Start, typing in CMD and then right-clicking and choosing Run as Administrator .

Now type in the following commands, each followed by the Enter key.
Above, you’ll replace x with the volume number in the list that corresponds to the drive you want to change and with the letter you want to assign to the drive. Here are the commands I ran for an external USB drive:

You’ll also notice that under the Type column, external drives will show up as Removable . That’s a good way to check before you select a volume. You can also figure out which drive is correct by looking at the size and also looking at the Info column. Volume 0 in my case is the system partition, so I wouldn’t want to mess with that by accident.
Overall, it’s a fairly simple process and hopefully you won’t run into any problems. There are times, however, when things don’t work properly. Below are some possible reasons.
Troubleshoot Can’t Change Drive Letter in Windows
One problem that I have seen is that the Change Drive Letter option is simply greyed out. This can occur for a few reasons. One of the main reasons is the volume is not formatted in FAT or NTFS format. For example, if you are attaching a disk from a Mac computer, you will not be able to change the drive letter unless you format the drive into a compatible format.
Another reason is if the drive is set to read-only. If so, you’ll have to Google the steps to change the drive to allow read/write access.

Also, if you don’t need any of the data on the volume in question, a simple solution is to delete the volume, which is normally never greyed out. Once you delete the volume, you can right-click again and create a new simple volume. Now you will be able to change the drive letter.

Founder of Help Desk Geek and managing editor. He began blogging in 2007 and quit his job in 2010 to blog full-time. He has over 15 years of industry experience in IT and holds several technical certifications. Read Aseem's Full Bio
Read More Posts:

Leave a Reply
Your email address will not be published. Required fields are marked *
How to assign permanent letters to drives on Windows 10
You can assign drive letters manually, and in this guide, we show you how on Windows 10.

On Windows 10, when connecting a removable storage device or an internal hard drive, the system detects and assigns a drive letter automatically to make it usable. However, when reconnecting an external drive (such as a USB flash drive or SD or microSD cards), the system can end up assigning a different letter, which can be annoying.
If you want to see the same drive letter on a particular device, you can manually assign a permanent letter to any drive connected to your computer, and on Windows 10 , you can do this in at least three different ways, using Disk Management, Command Prompt, or PowerShell.
Using this approach will prevent Windows 10 from assigning a new letter or trying to set a letter already in use, which can cause conflicts. Also, it helps to select a drive letter that makes more sense to you.
In this Windows 10 guide, we walk you through several methods to manually assign a permanent letter to a drive, as long as you're connecting the drive to the same device and the letter isn't already in use.
How to assign a drive letter using Disk Management
How to assign a drive letter using command prompt, how to assign a drive letter using powershell.
To manage drive letters with the Disk Management tool, use these steps:
- Open Start .
- Search for Create and format hard disk partitions and click the top result to open the Disk Management experience.
- Right-click the drive and select the Change Drive Letter and Paths option.

- Click the Change button.

- Select the Assign the following drive letter option.
- Use the drop-down menu to assign a new drive letter. Quick tip: To avoid the system trying to assign the same letter to another drive, it's a good idea to start adding letters in backward order. For instance, instead of using D, E or F, it better to start with Z, Y or X when assigning a new letter.

- Click the OK button.
- Click the OK button again.
Once you complete these steps, the drive will permanently retain the assigned letter, even after reconnecting it. However, if you connect the drive to another device, it may receive a different letter.
While the easiest way to assign a new drive letter is to use Disk Management, you can also use DiskPart in Command Prompt to perform the same task.
Get the Windows Central Newsletter
All the latest news, reviews, and guides for Windows and Xbox diehards.
To assign a drive letter using Command Prompt, use these steps:
- Search for Command Prompt , right-click the result, and then select the Run as administrator option.
- Type the following command to start DiskPart and press Enter : diskpart
- Type the following command to list all the available volumes and press Enter : list volume
- Type the following command to select the volume (drive) to assign a new letter and press Enter: select volume 3 In the command, make sure to change "3" to the number that represents the drive on your device.
- Type the following command to assign a new drive letter, and press Enter : assign letter=Z The command assigns the letter "Z" to the drive assuming it's available. However, you need to make sure to change the letter for the one that you want to use.

After completing these steps, similar to Disk Management, every time you reconnect the storage to the same device, Windows 10 should assign the same letter automatically.
Alternatively, you can also use PowerShell to change a drive letter on Windows 10 using these steps:
- Search for PowerShell , right-click the result, and then select the Run as administrator option.
- Type the following command to list the available drives and press Enter : Get-Disk
- Type the following command to assign a permanent letter to the drive and press Enter : Get-Partition -DiskNumber 1 | Set-Partition -NewDriveLetter Z In the command, make sure to change "1" to the number that represents the drive that you want to modify, and change "Z" for the new letter that you want to use.

Once you complete the steps, the drive will be accessible through File Explorer using the letter that you assigned, and Windows 10 won't try to change it.
Updated March 7, 2019: We revised this guide to make sure it's current with the latest version of Windows 10.
More Windows 10 resources
For more helpful articles, coverage, and answers to common questions about Windows 10, visit the following resources:
- Windows 10 on Windows Central – All you need to know
- Windows 10 help, tips, and tricks
- Windows 10 forums on Windows Central

Mauro Huculak is technical writer for WindowsCentral.com. His primary focus is to write comprehensive how-tos to help users get the most out of Windows 10 and its many related technologies. He has an IT background with professional certifications from Microsoft, Cisco, and CompTIA, and he's a recognized member of the Microsoft MVP community.
- 2 Is a Nintendo Switch with Windows 11 the ultimate portable console? No, but someone made one anyway.
- 3 Hellblade: Senua's Sacrifice story recap — Characters, plot, and more
- 4 Chants of Sennaar, Humanity, Senua's Saga: Hellblade 2, and more are coming to Xbox Game Pass
- 5 Baldur's Gate 3 player turns the Astral Prism into a fully functioning Xbox controller
5 Ways To Change Drive Letter In Windows 11, 10

Windows is programmed to assign drive letters automatically when a new partition is created. If you do not like the drive letter assigned to a partition, or for any other reason, you can change it.
Windows assigns drive letters in alphabetical order, starting with “C.” “A” and “B” are reserved for floppy disk drives. Since the first partition to be created is the system drive, it is usually labeled “C” by default.
For a partition to show up in Windows Explorer , it must have a drive letter assigned to it. Otherwise, you cannot access the partition. This is also true in case you attach a USB flash drive to your computer.
Table of Contents
On This Page
Is it possible to change system drive letter.
Before we discuss how to change a drive letter, we must inform you that you cannot change the drive letter of the system drive, after the operating system has been installed on it. This is because many dependent applications and programs are installed which require the complete path to files to function properly.
If the drive letter in the path to a file is changed, the associated app may no longer function. For example, if the initial path “C:\Windows\System32” was changed to “J:\Windows\System32,” certain components of the app may no longer find the file required.
Similarly, if an app or program is installed on another partition other than the system partition, and it does not automatically pick up the changed path (which most modern apps usually do), you may have to make manual changes to the Windows Registries to provide the new path.
Let us now show you 5 ways to change drive letters in Windows.
How to Change Drive Letters in Windows
Change drive letter using disk management console.
The Disk Management Console provides several options to manage your storage partitions and volumes, such as formatting or creating new partitions, shrinking or expanding them, or assigning/changing drive letters.
Follow the steps given below to change the partition’s assigned drive letter:
Open the Disk Management Console by typing in “ diskmgmt.msc ” in the Run Command box .

Right-click on the partition you want to change the letter for, and then click “ Change Drive Letter and Paths ” from the context menu.
Note: If you see that the option is not available or has been greyed out, then the partition’s drive letter cannot be changed.

From the pop-up wizard, click Change .

Select an available drive letter from the drop-down menu in front of “ Assign the following drive letter: ” and then click Ok .

Click Yes on the confirmation dialog box .

[Conditional] You may then see another warning message. If you do, click Yes again, and then restart your computer for the changes to fully take effect.

You will now see that the drive letter has been successfully changed.
Change Drive Letter using Command Prompt
If you are a command-line guy, you can also change the drive letter of a partition using the Command Prompt. Here is how:
Open Command Prompt with administrative privileges .
Enter the disk partition mode by typing in the following, and then hitting Enter :

Run the following to obtain a list of current partitions and their details.

Now select the volume for which you wish to change the drive letter by running the following cmdlet.
Replace [Number] in the command below with the volume number you see in the table obtained in Step 3 above.

Now use the following command to assign a new, vacant drive letter to this volume.
Replace [Alphabet]] with the new drive letter that you want to assign.

The new drive letter will now be assigned. You may now close the Command Prompt since the partition will now automatically open in Windows Explorer.
Change Drive Letter using PowerShell
Changing the drive letter using Windows PowerShell allows you to do so using the Command Line Interface (CLI) in a few easy cmdlets, as opposed to the lengthy process of using the Command Prompt. Here is how:
Launch Windows PowerShell with administrative rights .
Run the following cmdlet to get the current partitions and their associated details:

Now use this information to change a partition’s drive letter.
Replace [OldLetter] with the current drive letter for volume, and [NewLetter] with the new drive letter which you want to assign to the volume.

The drive letter will now change, and the partition will now automatically open in Windows Explorer.
Change Drive Letter from Windows Registry
You can also change the drive letter directly from the Windows Registry. Here is how:
Note: Misconfiguration of critical values in the system’s registry could be fatal for your operating system. Therefore, we insist that you create a system restore point or a complete system image backup before proceeding forward with the process.
You can also use our top selection of disk imaging and backup software so you never lose your data or operating system again.
Open the Registry Editor by typing in “ regedit ” in the Run Command box.

Now paste the following into the navigation bar at the top of the Editor for quick navigation:

In the right-hand pane, look for the values whose name starts with “ \DosDevices .” This will display the current drive letters for the partitions on your computer.
Right-click on the drive letter you want to change, and then click Rename from the context menu.
For example, to change “J”, right-click “ \DosDevices\J: ” and then click Rename .

Now rename the value and replace the old drive letter with the new one, as we did in the image below.

Now restart your computer for the changes to take effect.
When the computer reboots, you will see the drive letter has been changed.
Use Drive Letter Changer
Drive Letter Changer is a third-party freeware that can be used to perform a number of different tasks, including changing a partition’s drive letter. Moreover, it is portable software, which means it does not need to be installed on your PC.
Perform the following steps to download and use Drive Letter Changer to change drive letters:
Download the Drive Letter Changer here .
Extract the contents of the compressed folder.
Run the application labeled “ dChanger .”
The application will now automatically detect existing partitions and drive letters.
Right-click on the drive letter you want to change, expand “ Change drive letter ,” and then select a vacant drive letter that you wish to assign.

The drive letter will now change in an instant.
How to Swap Drive Letters Between Volumes
Unfortunately, there is no direct way of swapping drive letters between 2 partitions; you can only assign a vacant drive letter or remove it.
Therefore, if you wish to swap drive letters between two partitions, you must first change the drive letter of the primary partition to something else, so its initial drive letter becomes vacant. Then, change the drive letter of the secondary partition and assign the drive letter recently vacated from the primary partition. Now you can assign the vacated drive letter from the secondary partition to the primary partition.
This can be a bit confusing, so we have drafted down the process in the methods below.
Swap Drive Letter from Disk Management Console
Open the Disk Management Console by typing in “ diskmgmt.msc ” in the Run Command box.
Right-click on the primary partition and click “ Change Drive Letter and paths “ from the context menu.

From the popup wizard, click Remove .

If prompted for a confirmation, click Yes .

You may then see another warning message. If you do, click Yes again.
Now right-click on the secondary partition and click “ Change Drive Letter and paths ” from the context menu.

Now assign the drive letter from the primary partition and click Ok .

In the confirmation box, click Yes .
Now right-click on the primary partition again, and click “ Change Drive Letter and Paths ” from the context menu.

From the pop-up wizard, click Add .

Now assign the drive letter initially assigned to the secondary partition, and click Ok .

(Optional, but recommended) Now restart your computer so the changes can be finalized.
You can apply the same logic to switch drive letters between 3 or more partitions as well.
Swap Drive Letter using Command Prompt
You can also switch the drive letters between 2 partitions (or more) using the same logic. Here is how:
Enter the disk partition mode by typing in the following, and then hitting Enter .
Now paste the following to obtain a list of current partitions and their details:

Now select the primary volume using the cmdlet below.
Replace [Number] in the command with the volume number you see in the table obtained in Step 3 above.

Now remove the assigned drive letter using the following cmdlet.
Replace [Alphabet] with the drive letter currently assigned to this volume.

Now select the secondary volume using the cmdlet below.

Now assign the recently-vacated drive letter from the primary partition to this volume using the given cmdlet.
Replace [Alphabet] with the drive letter initially assigned to the primary volume.

Now select the primary partition again.

Now assign the drive letter from the secondary partition to this volume.

The drive letters have been swapped successfully. You can now close the Command Prompt.
You can apply similar logic to other methods to swap drive letters between 2 or more drives. This can be done using Windows PowerShell, Windows Registry, and the Drive Letter Changer software.
How to Fix Affected Programs After Changing Drive Letter
As we already mentioned, changing a drive letter where an app or program may be installed might break it. If the problem is not fixed automatically after a reboot, you may have to fix it manually. Here are a few solutions that might work.
Change Path for Shortcut
If you are trying to run an app or program using its shortcut, then just fixing the path of the shortcut might fix the problem.
Right-click on the shortcut and click Properties .

Switch to the Shortcut tab, change the drive letters in the “ Target ” and “ Start in ” fields with the new drive letters, and then continue to click Apply and Ok .

Now try re-running the program using the shortcut.
Revert Drive Letter
If the issue occurs after changing the drive letter, then you can try changing it back to the old one using the given methods above.
This is not an ideal case, but it will probably solve the problem.
If you do not wish to revert to the drive letter, you can skip this method and try out the ones discussed below.
Change Drive Letter in Windows Registry
From the Registry Editor, click Edit and then click Find .

Type in the old location for the app you are trying to troubleshoot, and then click “ Find Next .”

When the search wizard finds a match, double-click on the Value in the right pane, and then change the old drive letter with the new one in the text field under “ Value Data .”

Now repeat steps 2 through 5 until all paths have been updated with the new drive letter.
Once done, close the Registry Editor and restart the computer for the changes to take effect.
After the computer reboots, check to see if the issue has been resolved.
Reinstall Program
If none of these methods have worked for you, you can try reinstalling the program. Simply delete the app, download the new setup from the vendor’s website, and perform a new install.
Closing Words
People often mistake the drive letter for the name of the volume. However, these 2 are totally different. A drive letter is an alphabet defining a volume/partition on the disk, whereas a name could be anything you want it to be.
By default, Windows names a new volume as “New Volume.” You can change the name of the system volume, but cannot change its drive letter.
That said, we would like to know what prompted you to change the drive letter(s) on your system.
- How To Change Screen Brightness Using Command Line In Windows 11, 10
- 2 Ways to Change Power Modes in Windows 11
- 2 Ways To Change Touchpad Sensitivity On Windows 11

(Cancel Reply)
Notify me of follow-up comments by email.
Notify me of new posts by email.
Get Updates in Your Inbox
Sign up for the regular updates and be the first to know about the latest tech information
Email Address
- PC & Mobile
How to Change a Drive Letter in Windows 10
Lee Stanton Lee Stanton is a versatile writer with a concentration on the software landscape, covering both mobile and desktop applications as well as online technologies. Read more November 19, 2022
Changing drive letters in Windows certainly has its benefits. You can hide a specific drive from all apps on your computer, thus preventing these apps from writing on a specific partition or edit the drive letter after adding a new HDD or SSD.

If you’re looking to change drive letters in Windows 10, you’ve come to the right place. In this article, we’ll provide you with detailed steps on how to change or remove various drive letters.
There are a couple of different ways to change a drive letter in Windows 10. Below, we’ll show you how to do so with Disk Management. This is the most straightforward way to apply changes to your drive letters in Windows 10.

You have now successfully changed a drive letter in Windows 10.
How to Change Drive Letter in Windows 10 Using Command Prompt
Another way to change drive letters in Windows 10 is using Command Prompt. This process is relatively simple:
- Make sure you’re running your PC in Admin mode.

You have now changed your drive letter in Windows 10.
How to Remove a Drive Letter in Windows 10
If you want to remove a drive letter in Windows 10, you can do so from Desk Management. Just follow these simple steps:

- Click OK to confirm the operation.
You have now successfully removed a drive letter in Windows 10. After removing a drive letter, you won’t be able to see it in your File Explorer any longer. Also, to remove a letter, you must sign in as the administrator.
How to Change a Network Drive Letter in Windows 10
Changing a network drive letter in Windows is a pretty straightforward process. Just follow these steps, and you’ll be good to go:

Additional Steps if You Receive an Error Message:

You’ll now see your network share in the This PC screen.
How to Change a USB Drive Letter in Windows 10
You might want to change a USB drive letter in Windows 10 if Window Explorer doesn’t recognize the external hard drive. For this or any other reason, just follow the simple steps shown above for an HDD/SSD to change your USB drive letter.
How to Change DVD Drive Letter in Windows 10
Changing a DVD drive letter in Windows 10 can be done easily through Disk Management. Just follow the steps shown above to also change the DVD drive letter.
You have now successfully changed your DVD drive letter in Windows 10.
How to Change Recovery Drive Letter in Windows 10
Changing your recovery drive will only take a few seconds. Just as before, follow the directions shown previously to quickly change your recovery drive letter.
How to Change Boot Drive Letter in Windows 10
Unfortunately, changing your boot drive letter in Windows is not possible through Desk Management.
We only recommend changing your boot drive in case of an emergency. Otherwise, you shouldn’t make any changes to your boot drive. If you make a wrong step, you might not be able to run your system properly. For that reason, please follow the steps we’ve provided carefully. You should also make a system backup before proceeding any further.
Below, we’ll explain how to swap drive C and D letters. To assign your C drive with another letter, you should rename the \DosDevice\letter: value to another letter that’s not already in use.
Also, before you mess with the Register, it’s a good idea to create a copy of the Register before it’s been edited.

- Close the Registry Editor, wait a few seconds, and then open it back up.

- Click Rename .
- Rename the file to a new drive letter \DosDevices\Z:. This will empty your C partition.
- Locate the drive you wish to change the letter of. Find \DosDevice\D:. Right-click on it and click Rename .
- Change the name to the new drive letter \DosDevice\C:.
- Choose the appropriate value for \DosDevices\Z: and click Rename .
- Change the name to \DosDevices\D:.
- Close Regedit and open it back up.
- Change the Admin permission settings to Read Only .
- Restart your PC.
You have now successfully changed your boot drive letter in Windows 10.
Additional FAQs
Is it safe to change drive letters.
Changing drive letters is not a problem in itself. But if your computer needs to run a file that’s written in that very drive, you might have an issue. It’s not just for any reason that Windows warns you before changing a drive letter.
Generally, it’s not recommended to change drive letters unless that would help solve a specific issue. For example, if your Windows Explorer doesn’t recognize an external device under a certain driver, it’s okay to change its name.
There are some drives you can change the letters of without consequences. For example, to a partition that has files you rarely use. Also, you can change an external drive’s letter without problems.
Changing Drive Letters in Windows 10
In this article, we’ve provided you with some useful tips on how to change drive letters in Windows 10. Remember, only do this if strictly necessary, as it might cause some apps on your computer to not run properly.
Have you ever had to change your drive letters for a specific reason? Did you run into any problems? Share your experiences in the comments section below.
Related Posts

Disclaimer: Some pages on this site may include an affiliate link. This does not effect our editorial in any way.

Lee Stanton March 14, 2024

Digvijay Kumar March 8, 2024

Aman Kumar March 7, 2024
Send To Someone
Missing device.
Please enable JavaScript to submit this form.
TechRepublic
Account information.

Share with Your Friends
How to assign a drive letter in Windows 10
Your email has been sent

When you connect a new drive to your PC, Windows automatically assigns the next available letter after C, which is normally used for your system drive. So an external hard drive or USB thumb drive could end up as D, E, F, or whatever, depending on how many drive letters are already being used.
This is all well and good, but what if you want to assign the drive a letter? Maybe you want to use M for your music files or X for your top-secret X-Files. Here’s how in Windows 10.
- Ensure that the drive you’re relettering isn’t in use and that no files from that drive are open.
- Right-click on the Start button.
- Click Disk Management to open the Disk Management console.
- Right-click the volume that has the drive letter you want to change.
- Click Change Drive Letter And Paths.
- Click the Change button.
- Choose from a list of available drive letters. (Don’t use A or B, which have historically been reserved for floppy drives and can sometime confuse older software.)
- Click Yes if a popup windows appears asking if you really want to do this.
- Close the Disk Management console.
You may need to restart your machine for the change to take effect, but once you do the drive will use the new letter.
More Windows tips…
- How to turn on or off hibernate in Windows 10
- Regain hard disk space by using Windows Update Cleanup in Windows 7 and 8.x
- Restore a Windows XP backup in Windows 8
- How to replace SkyDrive with Libraries in Windows 8.1
- Pro tip: Use an optical Recovery Drive in Windows 8.1
Subscribe to the Developer Insider Newsletter
From the hottest programming languages to commentary on the Linux OS, get the developer and open source news and tips you need to know. Delivered Tuesdays and Thursdays
Create a TechRepublic Account
Get the web's best business technology news, tutorials, reviews, trends, and analysis—in your inbox. Let's start with the basics.
* - indicates required fields
Sign in to TechRepublic
Lost your password? Request a new password
Reset Password
Please enter your email adress. You will receive an email message with instructions on how to reset your password.
Check your email for a password reset link. If you didn't receive an email don't forgot to check your spam folder, otherwise contact support .
Welcome. Tell us a little bit about you.
This will help us provide you with customized content.
Want to receive more TechRepublic news?
You're all set.
Thanks for signing up! Keep an eye out for a confirmation email from our team. To ensure any newsletters you subscribed to hit your inbox, make sure to add [email protected] to your contacts list.
- All about AI
- Google Gemini AI
- Inflection AI Pi Chatbot
- Anthropic Claude
- Multimodal AI
- Generative AI
- AI Image Generation
- AI VIdeo Generation
- AI Coding Assistants
- AI Regulation
- AI Research
- Large Language Models (LLM)
- Surface Pro
- Surface Laptop
- Surface Book
- Surface Duo
- Surface Neo
- Surface Studio
- Surface Hub
- Surface Pen
- Surface Headphones
- Surface Earbuds
- About WinBuzzer
- Follow Us: PUSH, Feeds, Social
- Write for Us
- Cookie Policy and Privacy Policy
- Terms of Service
How to Assign / Change Drive Letter in Windows 10
We show you how to change the drive letter in CMD, DIsk Management, PowerShell, and Registry editor in Windows 10.

Table of Contents:
Windows 10 helpfully assigns drive letters to disks as they're added, but they aren't always the most logical choices. While we all know that C: is the system drive, it doesn't make quite as much sense to have D: as your games drive or E: as your media drive. Luckily it's quite easy to change a drive letter in Windows 10, and we're going to walk you through the process today.
How does Windows 10 drive letter assignment work?
For the most part, Windows 10 automatically assigns letters to drives as they're connected, in alphabetical order. However, there are a few exceptions to this rule that may leave some users confused.
As mentioned earlier, C: is always reserved for the system drive, but A: and B: are reserved too, for rarely used floppy drives. Because of Windows automatic assignment, you may have also noticed that Windows changes the drive letter of your USB stick if you've connected another before it.
If you want letters that are easier to identify in bios or don't want your USB letters jumping around, it's quite easy to permanently change a drive letter in Windows 10 to something of your choosing. We're going to cover a few different ways today, including how to change the drive letter in CMD.
How to Change Drive Letter in Windows 10 via Disk Management
The most user-friendly way to assign drive letters in Windows is through the Disk Management interface, which is relatively easy to use.

How to Change Drive Letter in CMD using a DISKPART Disk Management Command
Though it's not quite as user-friendly, it can be much faster to change a drive letter with Command Prompt.

How to Change Drive Letter in Windows 10 with a PowerShell Disk Management Command
Those more familiar with PowerShell can use this method instead to achieve the same result.

How to Change / Assign a Drive Letter via the Registry Editor
Alternatively, if none of the above methods worked or you're just feeling brave, you can modify the drive letter via the registry. Just be sure to read our safe registry editing guide first.

If you enjoyed this guide, you may want to consider enabling or disabling disk caching or turning on BitLocker for your newly customized drives.
- Assign drive letter
- assign drive letter windows 10
- Change boot drive letter Windows 10
- Change drive letter windows 10
- change usb drive letter Windows 10
- DIsc Management
- Disk management command
- how to change drive letter Windows 10
- powershell change drive letter
- win 10 change drive letter
Recent News

Google Issues Emergency Chrome Update to Patch 6th Zero-Day of 2024

Anthropic Expands Claude AI Chatbot to European Market
Subscribe to WinBuzzer on Google News

How to change drive letter on Windows 11
Here are four ways to assign a different letter to a drive on Windows 11.

On Windows 11 , a “drive letter” is automatically assigned to each internal storage, USB drive, DVD drive, and map network drive to identify the volume and make it available on File Explorer or other applications. However, you can change the drive letter to anything you want without deleting the data on the storage. For instance, if you want a drive to use a specific letter related to the content, or the system tries to assign a letter already in use, preventing the storage from appearing on File Explorer and apps.
Whatever the reason, on Windows 11, you can assign a different drive letter in at least four ways using the Settings app, Disk Management, Command Prompt, and PowerShell.
A drive letter (or device letter) can be any character from the English alphabet. However, you cannot use the “C:” because it’s reserved for the main storage that contains the installation. Also, “A:” and “B:” are reserved letters that used to be assigned automatically to floppy drives.
This guide will teach you how to assign a new drive letter on Windows 11.
Change drive letter on Windows 11
- Change drive letter from Disk Management on Windows 11
Change drive letter from Command Prompt on Windows 11
Change drive letter from powershell on windows 11.
To change the drive letter on Windows 11, use these steps:
Open Settings on Windows 11.
Click on System .
Click the Storage tab.
Under the “Storage management” section, click the “Advanced storage settings” option.
Click on Disks & volumes .

Select the drive with the volume with the letter to change.
Select the volume and click the Properties button.

Click the “Change drive letter” button.

Select the new drive letter for the device connected to Windows 11.

Click the OK button.
Once you complete the steps, the system will change the drive’s letter on Windows 11.
Change drive letter from Disk Management
To change the drive letter with Disk Management, use these steps:
Open Start .
Search for Create and format disk partitions and click the top result to open the Disk Management tool.
Right-click the volume and select the “Change Drive Letter and Paths” option.

Click the Change button.

Select the “Assign the following drive letter” option.
Choose a different letter for the drive.

Click the OK button again.
After completing the steps, the drive will appear in File Explorer with the new letter.
To add a new drive letter with Command Prompt, use these steps:
Search for Command Prompt , right-click the result, and select the Run as administrator option.
Type the following command to launch diskpart and press Enter :
Type the following command to list the volumes and press Enter :
Type the following command to select the volume (drive) to change the letter and press Enter :
In the command, change “2” for the number corresponding to the storage you want to change the letter.
Type the following command to change the drive letter on Windows 11 and press Enter :
In the command, change “H” for the letter you want to use with the drive.

Once you complete the steps, the diskpart tool will assign the new letter to the storage.
To change a Windows 11 drive letter with PowerShell, use these steps:
Search for PowerShell , right-click the result, and select the Run as administrator option.
Type the following command to identify the hard drive to change the letter and press Enter :
Type the following command to assign or change the drive letter to internal or external and press Enter :
In the above command, change “0” with the disk number of the drive you want to format and “F:” with the letter you wish to assign to the storage.

After completing the steps, the drive will have a new letter assignment. If the drive was previously missing, it will appear in File Explorer.

Mauro Huculak is a Windows How-To Expert who started Pureinfotech in 2010 as an independent online publication. He has also been a Windows Central contributor for nearly a decade. Mauro has over 14 years of experience writing comprehensive guides and creating professional videos about Windows and software, including Android and Linux. Before becoming a technology writer, he was an IT administrator for seven years. In total, Mauro has over 20 years of combined experience in technology. Throughout his career, he achieved different professional certifications from Microsoft (MSCA), Cisco (CCNP), VMware (VCP), and CompTIA (A+ and Network+), and he has been recognized as a Microsoft MVP for many years. You can follow him on X (Twitter) , YouTube , LinkedIn and About.me . Email him at [email protected] .
- How to upgrade Windows 7 to Windows 10 using clean install process
- How to reset Settings app on Windows 10
We hate spam as much as you! Unsubscribe any time Powered by follow.it ( Privacy ), our Privacy .
Home » Tech Tips » Windows » How to Assign or Change Drive Letter in Windows 11?
How to Assign or Change Drive Letter in Windows 11?
Windows by default uses C drive (C:) for hosting system and application files. You can choose different drives like D: instead of C: while installing Windows on your computer. Similarly, it is also possible to manually change the installed app’s location , though generally users install apps on C: drive. Did you anytime think of changing the existing drive letters in your system? Here is how you can do that in Windows 11 PC.
Default Drive Name Assignments in Windows 11
Let us say, you have two partitions C: and D: volumes on your hard disk. Here is how the default drive letter assignment in Windows work:
- A: – floppy disk drive for IBM computers (obsolete)
- B: – floppy drive for MS-DOS and Windows computers (obsolete)
- C: – Windows and app installation files
- D: – storage space partition
- E: – the letter after your storage partition for CD drive (if CD/DVD drive is available)
- F: onwards – removable storage disks like USB and external hard disks
When you have more partitions on the hard drive, system will use the next drive letters like E: or F: when you insert an external drive. For example, when you have C: and D: drives on your hard disk and insert an USB drive , it will take the letter E: or later.
Changing Drive Letters in Windows 11
It is not necessary to live with the assigned drive letters forever on your system. You can either reduce / increase the drive’s space and assign new letters or simply change an existing drive’s letter. For example, you have 400GB D: drive which you can simply change to F: drive. Alternatively, you can divide it into 200GB + 200GB drives and name them as G: and H: drives.
Windows 11 makes it easy to change the drive letters from the Settings app without using registry or changing system files. However, you can also do the same from Computer Management as with the case in Windows 10 .
1. Change Drive Letter from Windows 11 Settings
If you want to change the assigned drive letters for any partition on your hard disk except C drive then this is the option you should proceed with.
- Press “Win + I” keys or use Windows Search to find Windows Settings app.
- Once you are in the Settings app, go to “System” tab and then click on “Storage” option.

- Go down to the bottom of the “Storage” settings section and click on “Advanced storage settings” available under “Storage management” section.

- This will expand the section and click on “Disks & volumes” option.

- The “Disks and volumes” section will show all your existing drives and click on the one you want to change the letter name. it will show two buttons – “Explore” and “Properties” and click on the “Properties” button.

- On the next screen, you can see the buttons for “Change label” and “Change drive letter”.

- Click “Change drive letter” button and select your favorite letter from the dropdown to assign.

The dropdown will show all letters except C: and the current volume. In the above example, we want to change the D: drive and the system shows A to Z letters except C and D. Since D is the current volume, it is not shown in the list. But C is not shown because it is a system volume partition and you cannot change the drive letter for C. You will not see “Change drive letter” button when selecting properties of C drive. However, you can assign A and B for drive letters which were once reserved only for floppy disks. Since floppy disk is obsolete Windows allows you to assign those reserved drive letters A and B also.
2. Change Drive Letter from Disk Management in Windows 11
Though changing drive letter is easy with Windows Settings, it does not allow changing C drive letter. You can use Disk Management app for changing any drive letter with additional features.
- Press “Win + R” keys to Run prompt .
- Type compmgmt.msc and press “OK” button.

- This will open Computer Management app and select “Disk Management” from the sidebar available under “Storage” section.
- You will see all the drives available on your computer and select C or D or any drive that you want to assign a new letter.
- Go to “Action > All Tasks > Change Drive Letter and Paths…” menu.

- On the pop-up that appears, click on “Change…” button.

- Click on the dropdown against “Assign the following drive letter:” option.
- Select your favorite letter and click “OK” button.

Here you will see all the drive letters except D which is already assigned to another partition volume on the hard disk. Though it is possible to change drive letter for C, we do not recommend as it can affect the installed programs on your computer. Most programs by default install under “Program Files” section in C drive. Changing the drive letter may affect the installed programs and they may stop working. In such a case, you need to uninstall and reinstall the program on the new drive again. This will be a big task if multiple programs stopped working. Therefore, choose the system drive when you clean install Windows first time and stick with that. If you are using preinstalled Windows on C drive, then continue to use that without changing. You can change all other drives using Disk Management or Windows Settings app.
If you want to create parition, select the volume and right click on it. From the menu, select “Shrink Volume” option and select the reduced size for your volume. The remaining size will become unallocated for which you can assign a new label and letter as explained above. Learn more about how to create disk paritions in Windows computer .
Assigning Drive Letter to Removable Disks
As mentioned, Windows will assign the available drive letter for removable disks after the current partition volumes. The problem is when you have multiple removable disks, the assigned letters will change every time which may confuse you. The good part is that you can assign a drive letter as explained above for your removable USB or external hard disk. Windows will remember the assigned letter and use the same whenever you insert the external drive. However, make sure to use the letters clearly away from the current and CD/DVD drives. For example, you can use X or Y or even A or B which are generally not assigned.
About Editorial Staff
Editorial Staff at WebNots are team of experts who love to build websites, find tech hacks and share the learning with community.
You also might be interested in

How to Install Free Windows 8.1 Enterprise Evaluation Version?
Microsoft offers free 90 days evaluation version of the latest[...]

How to Fix Hard Disk Errors in PC?
Hard disk errors have been bothering many people out there.[...]

How to Sync Documents on Mac Using iCloud?
Apple’s great success is not only due to the strength[...]
DOWNLOAD EBOOKS
- SEO Guide for Beginners
- WordPress SEO PDF Guide
- Weebly SEO PDF Guide
- Alt Code Emoji Shortcuts PDF
- Free ALT Code Shortcuts PDF
- View All eBooks
TRENDING TECH ARTICLES
- 600+ Windows Alt Codes for Symbols
- Fix Chrome Resolving Host Problem
- Fix Slow Page Loading Issue in Google Chrome
- View Webpage Source CSS and HTML in Google Chrome
- Fix Safari Slow Loading Pages in macOS
- Fix Windows WiFi Connection Issue
- ROYGBIV or VIBGYOR Rainbow Color Codes
- Fix I’m Not A Robot reCAPTCHA Issue in Google Search
- Structure of HTTP Request and Response
POPULAR WEB TUTORIALS
- Move WordPress Localhost Site to Live Server
- Move Live WordPress Site to Localhost
- Move WordPress Media Folder to Subdomain
- Fix WooCommerce Ajax Loading Issue
- Create a Free Weebly Blog
- Edit Weebly Source Code HTML and CSS
- Add Scroll To Top Button in Weebly
- Add Table in Weebly Site
- How to Add Advanced Data Table Widget in Weebly?
- Up to $500 Free Google Ads Coupon Codes
FREE SEO TOOLS
- Webpage Source Code Viewer
- HTTP Header Checker
- What is My IP Address?
- Google Cache Checker
- Domain Age Checker Tool
- View All Free Web and SEO Tools
© 2024 · WebNots · All Rights Reserved.
Type and press Enter to search
- Best Video Converters
- The Best Video Downloaders for Windows

“Downloading Do Not Turn OFF The Target!” Error In Samsung
- The Best Network Monitoring Tools
- The Best TVs for Xbox Series X

‘IP address conflict’ – How To Manage & Fix
- Best Laptops Under $300
- Best Laptops Under $500

10 Alternatives to Trapcall
- Social Media
- Cut the Cord
TechJunkie is a BOX20 Media Company
Home PC Windows Windows 10 How To Change the Drive Letter in Windows 10
How To Change the Drive Letter in Windows 10

“I would love to keep my drives organized. Perhaps labeling my new drive as ‘M’ for music and the other ‘V’ for videos. So How do I go about doing it?”
Changing the drive letter in Windows 10 works the same as it does for Windows versions 8, 7, Vista, and XP. No drive letter (save for C:) is set in stone. Even C is technically changeable but definitely not recommended. You’d have to repartition your PC in order to do so and that’s a whole new can of worms better left unopened.
The Disk Management Tool found in Windows makes altering drive letters a breeze, even for individuals who are not familiar with drive editing. You can have everything completed in just a few minutes. Follow the guide below for instruction on how to change your drive letters.
Changing The Drive Letters in Windows 10
When first connecting a new drive to your PC, be it optical, hard drive, or USB, Windows will automatically assign it the next available drive letter following C. Which letter is assigned is determined by how many other drives you already have connected.
In order to change the letter to something you believe to be more suitable to your taste or needs, you’ll have to open up Disk Management .
- First, ensure that the letter you want to assign to the drive is not currently in use.
- You can look through the available folders to see if the correct drive has been chosen.
- You should avoid A and B as these particular letters have been historically reserved for floppy drives and could confuse older software by being altered.
- Any software that is currently installed to this drive may stop working properly once the letter has been changed. If this is the case, you’ll need to reinstall the software onto the new drive. This issue is more common in older programs and apps, especially if using Windows XP or Vista.
- To change your system drive from C: (or whatever you currently have it set as) to another letter will require a clean install of the Windows OS. As stated earlier, this is not something that I can recommend.
- Swapping drive letters can get a bit tricky. There isn’t any built-in way to do so in Windows. You would need to create a temporary drive letter for the drive letter you don’t intend on using. An example would be changing the D drive to the E drive. Begin by changing the D drive to something you don’t plan on using like ‘X’. Now you have an X drive and E drive. Next, change the E drive to ‘D’ and then finish up by changing X into ‘E’.
- It’s possible that you may need to restart your machine for the change to take effect. Once rebooted, the drive will display the newly assigned letter.
How To Turn Windows 10 into a Hotspot
One thought on “How To Change the Drive Letter in Windows 10”
Leave a Reply Cancel reply
Your email address will not be published. Required fields are marked *

Jun 13, 2021
76 Articles Published
You May Like

How to Use 2 Computers Within One Monitor

Ronil Thakkar
Aug 26, 2023

How to Enable Your Keyboard Backlight in Windows 10
Jun 16, 2023

The Best Twitter Desktop Clients for Mac and Windows [October 2022]

Oct 6, 2022
The Best 2-in-1 Laptops

William Sattelberg
Jul 10, 2022

The Five Best Budget Laptops

Jessie Richardson
Jun 28, 2022

Instagram Stuck on “Sending Message” Notification After Sending Media

Ashish Mohta
May 14, 2024

How to Take Screenshots of Microsoft Edge Copilot Chat on Android and iOS
May 9, 2024

How to Search on Google in WhatsApp
May 7, 2024

How to Change Your Name in Zoom

May 31, 2021

How To Filter By Color in Google Sheets

Robert Hayes
Jan 15, 2020
Copyright @2024 TechJunkie

Contribute to the Windows forum! Click here to learn more 💡
May 10, 2024
Contribute to the Windows forum!
Click here to learn more 💡
Windows 7 Top Forum Contributors: Bill Smithers - LemP ✅
Windows 7 Top Forum Contributors:
Bill Smithers - LemP ✅
Windows 7 Forum Top Contributors: Learn More
Windows 7 Forum Top Contributors:
- Search the community and support articles
- Search Community member
Ask a new question
changing drive letter of a mapped network drive
Can you change the drive letter of a mapped network drive without disconnecting and re-mapping it with desired drive letter?
Report abuse
Reported content has been submitted
705 people found this reply helpful
Was this reply helpful? Yes No
Sorry this didn't help.
Great! Thanks for your feedback.
How satisfied are you with this reply?
Thanks for your feedback, it helps us improve the site.
Thanks for your feedback.
hriket wrote:
Hello, Can you change the drive letter of a mapped network drive ....
By disconnecting from it and remapping to the desired drive letter. > .....without disconnecting and re-mapping it with desired drive letter?
Bruce Chambers
Help us help you:
http://support.microsoft.com/kb/555375 http://www.officeforlawyers.com/howask.htm http://www.catb.org/~esr/faqs/smart-questions.html
They that can give up essential liberty to obtain a little temporary safety deserve neither liberty nor safety. ~Benjamin Franklin
Many people would rather die than think; in fact, most do. ~Bertrand Russell
9 people found this reply helpful
Replies (21)
Question info.
- Network & internet
- Norsk Bokmål
- Ελληνικά
- Русский
- עברית
- العربية
- ไทย
- 한국어
- 中文(简体)
- 中文(繁體)
- 日本語
Letters to the editor
Share this:.
- Click to share on Facebook (Opens in new window)
- Click to share on Twitter (Opens in new window)
- Click to share on Reddit (Opens in new window)
- Click to print (Opens in new window)
- Entertainment
- Multimedia/Video
Breaking News
Bruins, jeremy swayman extend series with thrilling 2-1 win in game 5, opinion letters to the editor.

Opinion Columnists | Howie Carr: ‘Bleep you! Bleep America!’ Bleep Norfolk

Maguire: BPS needs MET-like Gala to raise $$ for schools

Editorial: Let BPD keep ShotSpotter tech – it saves lives

Gaskin: Healey must take lead on campus protests
Ad-free. Influence-free. Powered by consumers.
The payment for your account couldn't be processed or you've canceled your account with us.
We don’t recognize that sign in. Your username maybe be your email address. Passwords are 6-20 characters with at least one number and letter.
We still don’t recognize that sign in. Retrieve your username. Reset your password.
Forgot your username or password ?
Don’t have an account?
- Account Settings
- My Benefits
- My Products
- Donate Donate
Save products you love, products you own and much more!
Other Membership Benefits:
Suggested Searches
- Become a Member
Car Ratings & Reviews
2024 Top Picks
Car Buying & Pricing
Which Car Brands Make the Best Vehicles?
Tires, Maintenance & Repair
Car Reliability Guide
Key Topics & News
Listen to the Talking Cars Podcast
Home & Garden
Bed & Bath
Top Picks From CR
Best Mattresses
Lawn & Garden
TOP PICKS FROM CR
Best Lawn Mowers and Tractors
Home Improvement
Home Improvement Essential
Best Wood Stains
Home Safety & Security
HOME SAFETY
Best DIY Home Security Systems
REPAIR OR REPLACE?
What to Do With a Broken Appliance
Small Appliances
Best Small Kitchen Appliances
Laundry & Cleaning
Best Washing Machines
Heating, Cooling & Air
Most Reliable Central Air-Conditioning Systems
Electronics
Home Entertainment
FIND YOUR NEW TV
Home Office
Cheapest Printers for Ink Costs
Smartphones & Wearables
BEST SMARTPHONES
Find the Right Phone for You
Digital Security & Privacy
MEMBER BENEFIT
CR Security Planner
Take Action
Consumer Reports Named in Fast Company’s 2024 World Changing Ideas Awards
The award recognizes cr’s drive to improve auto technology and safety.

YONKERS, NY – Consumer Reports, the research, testing and advocacy organization , has been named in Fast Company ’s 2024 World Changing Ideas Awards for its state-of-the-art auto testing and unique approach to ensure innovation and safety go hand in hand.
CR was named an honorable mention in the Transportation category after ushering in a new era of evaluating auto technology. The organization boasts a 1.5-mile multi-lane auto test loop, launched in May 2023, to assess Advanced Driver Assistance Systems (ADAS), technologies that can automate certain driving functions.
“Most new cars sold today have automated features that can make driving safer and more convenient,” said Jake Fisher, Senior Director of CR’s Auto Test Center . “We’re honored that Fast Company has recognized CR’s long-term investment on ensuring auto innovation does not come at the expense of people’s safety and well-being,”
The $1 million loop , a new addition to CR’s 327-acre auto testing facility in Connecticut, helps CR build on its history of progressing auto safety – from making seat belts standard to ensuring all new vehicles today come equipped with rear-view backup cameras.
“I was struck this year by the global sweep of the honorees,” said Fast Company editor-in-chief Brendan Vaughan. “It’s endlessly inspiring to see how the world is coming together to devise inventive solutions to our most challenging problems. We need ideas from everywhere, and this year’s World Changing Ideas Awards are an extraordinary encapsulation of the innovation and creativity that is so abundant around the globe.”
This year’s World Changing Ideas Awards showcase 50 winners, 127 finalists, and 172 honorable mentions. A panel of Fast Company editors and reporters selected winners from a pool of more than 1,300 entries across a variety of categories. The 2024 awards feature entries from across the globe, including the Republic of Korea, Brazil, and Madagascar.
About the World Changing Ideas Awards: World Changing Ideas is one of Fast Company ’s major annual awards programs and is focused on social good, seeking to elevate finished products and bold concepts that make the world better. Judges choose winners, finalists, and honorable mentions based on feasibility and the potential for impact. With the goals of awarding ingenuity and fostering innovation, Fast Company draws attention to ideas with great potential and helps them expand their reach to inspire more people to work on solving the problems that affect us all.
About Fast Company Fast Company is the only media brand fully dedicated to the vital intersection of business, innovation, and design, engaging the most influential leaders, companies, and thinkers on the future of business. Headquartered in New York City, Fast Company is published by Mansueto Ventures LLC, along with its sister publication, Inc. , and can be found online at fastcompany.com.
Media Contacts
Barrie Rosen
+1 (914) 378-2090
Latest News Releases
Eken Fixes Security Issues in Video Doorbell Cameras after Consumer Reports Investigation
Consumer Reports: As Earth Day Arrives, The Lifetime Cost of Climate Change for a Baby Born in the U.S. in 2024 Could Be Nearly $500,000
Khalid El Khatib Joins Consumer Reports as Chief Marketing Officer
Consumer Reports Named 2024 Most Innovative Company by Fast Company
Consumer Reports Investigation Finds Video Doorbells Sold on Amazon, Walmart, Temu, and Other Digital Marketplaces Have Serious Security Flaws
About Consumer Reports
Founded in 1936, CR has a mission to create a fair and just marketplace for all. Widely known for our rigorous research and testing of products and services, we also survey millions of consumers each year, report extensively on marketplace issues, and advocate for consumer rights and protections around safety as well as digital rights, financial fairness, and sustainability. CR is independent and nonprofit.
© 2024 Consumer Reports. The material above is intended for legitimate news entities only; it may not be used for advertising or promotional purposes. Consumer Reports® is an expert, independent, nonprofit organization whose mission is to work side by side with consumers to create a fairer, safer, and healthier world. We accept no advertising and pay for all the products we test. We are not beholden to any commercial interest. Our income is derived from the sale of Consumer Reports® magazine, ConsumerReports.org® and our other publications and information products, services, fees, and noncommercial contributions and grants. Our Ratings and reports are intended solely for the use of our readers. Neither the Ratings nor the reports may be used in advertising or for any other commercial purpose without our prior written permission. Consumer Reports will take all steps open to it to prevent unauthorized commercial use of its content and trademarks.
Christianity is changing in SA as Pentecostal and indigenous churches grow — what’s behind the trend
One simply needs to drive through any city or town in south africa to see the diversity of 'christianities' on display.
Studies show that South Africa is one of only three countries in the world where religious participation has increased in recent years. The other two are Italy and the US.
The 2022 Census data show that South Africa’s Christian adherence has once again increased. However, the kinds of Christianity that are growing, and those that are declining, tell us some interesting things about the religious, cultural, social and political sentiments of South Africans.
Only 2.9% of the population claimed to have no religious views at all — this means that 96.1% of South Africans profess or practise some form of faith. Even though Covid-19 restrictions meant a 31% undercount in the 2022 census, the trends are clear.
Christianity is the most popular religious affiliation, with 85.3% of South Africans identifying as Christian of some kind or another. One simply needs to drive through any city or town in South Africa to see the diversity of “Christianities” on display. They range from cathedrals to storefront “miracle centres” to African indigenous communities worshipping in nature.
While there are some similarities in their general beliefs, one would hardly be able to say what a West African styled neo-Pentecostal community has in common with, for example, a Dutch Reformed Church group. Or the beliefs of members of the Zion Christian Church (ZCC). They may all be labelled Christian, but their beliefs and practices seem worlds apart.
Spiritual body loses bid to evict and expel monk for ‘sins’
Advertising regulator finds islamic billboard is not offensive to christians.
Understanding a nation’s religious beliefs helps explain the fabric of its society and also maps how that society changes.
In South Africa there has been a steady decline in membership of the so-called “mainline” Christian churches, such as the Methodists, Anglicans, Catholics or Dutch Reformed. At the same time, the country has seen the membership of African indigenous Christian groupings (such as the ZCC and the Johane Masowe and Johane Marange churches), and postcolonial Christian groupings (like prosperity and neo-Pentecostal groups) increasing significantly.
My research as a public theologian has focused on the religious, social and political changes in southern African Christianity for almost 30 years. Understanding a nation’s religious beliefs helps explain the fabric of its society and also maps how that society changes.
And churches exert political influence. This is particularly evident at election time when political leaders attend mega churches to campaign for votes and be endorsed by church leaders.
Church leaders also attempt to shape politics. Some of the fastest-growing Christian groupings in South Africa, for example, have pledged to “ shut down South Africa ” if corruption-tainted former president Jacob Zuma and his MK party don’t win the 2024 national elections.
It’s crucial to make sense of the world views of South Africa’s diverse Christian churches, and understand the potential impact of their moral and theological beliefs on the country’s collective future.
Like many things in South Africa, religious traditions have important links to a painful and racist colonial and apartheid history. My own religious tradition, Methodism, was among the earliest colonial Christianities to arrive on the southern tip of Africa.
Early forms of British, Dutch and French Christianities that arrived in South Africa were as committed to their cultural and political identities as they were to their religious beliefs. As historians have shown, missionaries often mixed their religions beliefs with the political and economic interests of their countries.
This had devastating effects on the cultures, identities and religious beliefs of the indigenous African populations. African religion was vilified as evil and even labelled as witchcraft. Local ethical systems were replaced by foreign Western ideals. Languages, art and customs were eroded and replaced with foreign symbols and practices that alienated people from their histories.
EDITORIAL | Politicians and church leaders should meet beyond elections
Politicians visit mass easter church service as build-up to 'unique' national election intensifies.
So it’s not surprising to see that these colonial Christian churches are being rejected in favour of postcolonial and African indigenous beliefs.
My research shows three broad reasons for the growth of “new” churches over the past decades.
First, there are cultural reasons. There’s growing interest among both “ordinary” believers and scholars in the decolonisation of religious beliefs and practices.
The largest proportion of South Africa’s Christians (40.82%) are expressing a longing to bring together African identity and African philosophical systems with their religious beliefs. They’re opting to join church communities that preach, sing and pray in African indigenous languages and that wear culturally appropriate clothing.
A notable debate is even taking place in South Africa’s largest “mainline” Christian denomination. There’s an appeal that Methodist ministers who are also traditional healers (ukuthwasa) be allowed to practise as both at the same time.
Second, there are socioeconomic reasons. As South Africa’s predominantly young population struggles with poverty, unemployment and inadequate social provisions, there’s a turn to churches that promise supernatural pathways to wealth and social prominence.
REV SC MATHEBULA | Open letter to SA: who are these Christians and where are they hiding?
Editorial | ongoing criminal attacks on churches need renewed action.
These churches, which often have links to either West African or US prosperity gospels, have long abandoned the central elements of colonial Christianities — like religious vestments or liturgies that still pray for the King of England. They’re devoting themselves to new forms of imperialism — like capitalism, individual liberty and identity politics.
Third, there are political reasons for the growth of these churches. Many South Africans have found the historical ties between “mainline” Christianity and political parties to be a disappointment. In the last parliamentary census, 63% of parliamentarians indicated they were members of the Methodist Church. The church recently posted on social media that politicians should not be “given the mic” in church services.
As South Africans lose faith in the promises of politicians, they’re also losing faith in the religious communities that seem to uncritically support them.
Why this matters
A history of Christianity offers insights into the hopes, dreams, frustrations and sorrows of South Africans. This can be seen in how religion has shifted along social, political and economic lines.
South Africans remain religious, and are growing in religiosity. Some of the forms of Christianity to which they are turning are politically dangerous and economically harmful, while others offer the promise of a more authentically African way of believing and living. What people believe matters, and what they no longer believe matters too.
— Dion Forster is Professor of Public Theology in the Department of Beliefs and Practices, Faculty of Theology, at the Vrije Universiteit Amsterdam (Free University of Amsterdam), Vrije Universiteit Amsterdam
This article was first published in The Conversation
- Christianity is changing in SA as Pentecostal and indigenous churches grow — ... Opinion & Analysis
- Q&A with deputy DG for National Health Insurance Nicholas Crisp Opinion & Analysis
- EDITORIAL | NHI has very good intentions, but is the legislation feasible? Opinion & Analysis
- TOM EATON | Fasten your seat belts — for some May 30 may be a rough landing Opinion & Analysis
- JUSTICE MALALA | The cold-blooded murder of five-year-old Ditebogo is the final ... Opinion & Analysis
Latest Videos
IMAGES
VIDEO
COMMENTS
Changing a drive letter is pretty simple. Click the Start button, type "Disk Management" in the search bar, and then hit Enter. The program name displayed in the search will not be Disk Management. It will be "Create and format hard disk partitions." You could also hit Windows+X or right-click the Start button, and then click "Disk Management."
The following steps show how to change the drive letter. Open Disk Management with administrator permissions. In Disk Management, select and hold (or right-click) the volume on which you want to change or add a drive letter and select Change Drive Letter and Paths. Tip. If you don't see the Change Drive Letter and Paths option or it's grayed ...
1 Open an elevated PowerShell. 2 Type Get-Partition into the elevated PowerShell, and press Enter. (see screenshot below) 3 Make note of the drive letter (ex: "G") of the drive you want to change. 4 Type the command below into the elevated PowerShell, and press Enter.
Press Win + I to open the Settings app, then select the "System" tab. Scroll down and click on "Storage.". Scroll down on the right side and click on "Advanced storage settings.". Under Advanced storage settings, click on "Disks & Volumes.". Select the drive whose letter you want to change, then click on the "Properties ...
Right-click and choose Change Drive Letter and Paths > Change. Select the drive letter you want to assign from Assign the following drive letter. Then select OK and choose Yes. The letters assigned to your hard drives, optical drives, and USB drives in Windows are not fixed. Use the Disk Management tool in Windows to change drive letters.
All you have to do is go to the drive options and choose the new drive letter. Here is how to do it: Press " Win + R " to open Run. Type " diskmgmt.msc " and click " Ok .". Find the drive you want to modify. Right-click on the drive. Choose the " Change drive letter and paths " option. Click the " Change " button.
To assign or change the drive letter for a disk or partition, simply right-click on it and choose Change Drive Letter and Paths. A window will pop up with the current drive letter, if there is one, and a couple of options. Here you want to click on Change. Next, you will choose the new drive letter from the dropdown list.
To set a new drive letter for it, click or tap the Change drive letter in the Volume data section. Windows 11 will then ask you to "Choose which drive letter to use for this volume.". Click or tap on the currently displayed letter. Select the new drive letter you want to use. The new drive letter is now selected.
Search for Create and format hard disk partitions and click the top result to open the Disk Management experience. Right-click the drive and select the Change Drive Letter and Paths option. Click ...
In the Disks & volumes section, scroll down and click the drive you want to change. Next, click the Properties button. Under the Volume Data section, click the Change drive letter button. When the ...
Open Settings on Windows 10. Click on System. Click on Storage. Under the "More storage settings" section, click the Manage Disks and Volumes option. Manage Disks and Volumes. Select the drive with the partition you want to change the letter. Quick note: You may need to click the arrow button in the top right corner of the drive to see all ...
Change the drive letter or path from the Disk Management Console. From the pop-up wizard, click Change. Change the drive letter. Select an available drive letter from the drop-down menu in front of " Assign the following drive letter: " and then click Ok. Assign a new drive letter from Disk Management Console.
This is the most straightforward way to apply changes to your drive letters in Windows 10. Right-click on the Windows Start button and choose the Disk Management option from the menu. Right-click ...
Right-click on the Start button. Click Disk Management to open the Disk Management console. Right-click the volume that has the drive letter you want to change. Click Change Drive Letter And Paths ...
Press "Ctrl+ X", and click "Disk Management". Open the Windows 10 Change Drive Letter interface. Right-click the drive that you want to change or free the letter from and click "Change ...
Once you complete the steps, the system will change the drive's letter on Windows 11. Change drive letter from Disk Management. To change the drive letter with Disk Management, use these steps: Open Start. Search for Create and format disk partitions and click the top result to open the Disk Management tool. Right-click the volume and select ...
With that said, the settings method is extremely simple. Here are the necessary steps: Press Win + I and select System > Storage > Advanced storage settings > Disks & volumes. Select the drive whose letter you'd like to change and click on Properties. Click on Change drive letter, select an available drive letter, and press OK.
Go to "Action > All Tasks > Change Drive Letter and Paths…" menu. Change Drive Letter in Disk Management. On the pop-up that appears, click on "Change…" button. Select Change Button. Click on the dropdown against "Assign the following drive letter:" option. Select your favorite letter and click "OK" button.
Type in diskmgmt.msc and hit Enter to pull up Disk Management. From the Disk Management console window, right-click on the volume that has the drive letter you want to change. To ensure it is the correct drive, tap and hold down the left-click button over the drive and then choose Explore. You can also right-click the drive and choose Explore ...
Press the Windows key + X and select "Disk Management" from the menu. Find the hard drive you want to change the letter designation for. It will be listed in the bottom half of the Disk Management window. Right-click on the partition of the hard drive you want to change the letter for, and select "Change Drive Letter and Paths".
Assign a Specific Drive Letter in Windows. 1. To set this up, plug in the drive that you want to assign a permanent letter. Then open the Run dialog ( Windows Key+R) and type: compmgmt.msc and hit ...
1.) Changing the drive letter of the DVD drive on Windows 10/11! You can quite easily change the path or the drive letter of the DVD / CD drive via the Disk Management. ( ... see Image-1 Arrow 1 to 6) this is the Solution via diskmgmt.msc command. (Image-1) change the drive letter in Windows 10!
Navigate to HKEY_CURRENT_USER\Network\. There you should see whatever network drives you have mapped, as a list of letters. Right-click the one you want to change, and select "Rename". Type your desired new drive letter. Close Regedit. Reboot. Your network drive is now associated with the new drive letter. Your network drive letter has been ...
Two: the truck driver's license to drive in Massachusetts suspended for a year. And finally: the bill for the repairs sent to the company employing the driver.
Passwords are 6-20 characters with at least one number and letter. We still don't recognize that sign in. ... Company's 2024 World Changing Ideas Awards The award recognizes CR's drive to ...
You'll be prompted to fill out information about your identity, your current address and your new address. You'll also fill in the date you want to receive mail at your new address. You'll ...
The 2022 Census data show that South Africa's Christian adherence has once again increased. However, the kinds of Christianity that are growing, and those that are declining, tell us some ...