Office 365 Automatically Assign License to Group
I like to automate as much as possible, and one of those repeating tasks is license assignment in Microsoft 365. You can automate the creation of users. It’s even possible to assign an Office 365 license with PowerShell. But most of the time it’s still a manual process, one that is prone to mistakes.
The problem, especially with medium or larger organizations, is that you create the users in the on-premise Active Directory. New users need to be synced to Azure AD (which we can force), after which we can assign a license.
But what if you are out of licenses? You will first need to increase the number of licenses or even order extra through your MSP or finance department. That takes time.
And when the news licenses are added, you will need to log back into the Admin Center to assign the license (which happens to be the part that I forget sometimes..)
The solution? Assign licenses to a group in Office 365.

Getting started
To get started with Office 365 group-based licensing, we first need to create groups to which we can assign the license too. You can create the (security) group in your local AD or in Azure Active Directory. It’s also possible to use existing groups, like department groups that you maybe already have.
For Azure AD you will need to login into Azure AD Admin Center .
- Select Azure Active Directory on the left side
- Choose Groups
- Click New group
- Set the Group type to Security
- Give the Group a name , for example, O365_E3
- Click on Create

Adding users to the Group
I already had Office 365 E3 licenses directly assigned to the users. So what I have done is used a small PowerShell script to get all the users with an E3 license and added them to the new security group.
You will need to have the Microsoft Online Service module installed for PowerShell. We are first going to get the AccountSkuId for the license that we want to assign.

The AccountSkuId is buildup with your tenant name and an ID of the product. For Office 365 it’s ENTERPRISEPACK and for E5 ENTERPRISEPREMIUM
The next step is to get all users with the E3 license and add them to our new group. When you are using an on-premise Active Directory, then use the script below:
If you are using only Azure Active Directory then you can use the following script:
Office 365 Group-Based Licensing
With the new group created and the users copied (or manually added) to the new group, we can now start with assigning the Office 365 license to the Group.
http://portal.azure.com

Find the new group that we have created and select licenses on the left side

Inherited vs Direct licenses
Users can have directly assigned licenses and inherited licenses. Directly assigned are the licenses that you have manually assigned to the users. The inherited are the licenses that the users gets based on the group membership.
If you already had manually assigned licenses to the users, then you will need to remove the directly assigned license. Not because they now have two licenses, but if you remove them from the group later, they will still have the directly assigned license.
- Open the Azure Active Directory in Azure AD Admin Center.
- Select Licenses
- All Products
- Open the license that you just have assigned to the group.

You will now see a list of all licensed users. In the column Assignment Paths, you will see how the user has gotten the license, Direct, or Inherited. Behind inherited you will also see from which group the user has inherited the license.

Select the users with the direct and inherited licenses and click Remove License to remove the direct license.
The users won’t notice anything from the removal as long as you keep the license and services the same. Otherwise, test it first with a small group of users.
Wrapping Up
You can assign users to multiple groups, so you could create a base group with Office 365 E3 for example and a separate group with PowerBI Pro. Using multiple groups, and each group for one license, gives you more flexibility when it comes to assigning licenses to the user in Microsoft 365.
Using Office 365 Group Based Licensing is easy to set up and takes way another manual step in creating and managing your users.
If you have any questions, just drop a comment below.
You may also like the following articles

How to use Passkeys in Microsoft Authenticator for Microsoft Entra ID

New Outlook Feature – Follow a Meeting

How to create Dynamic Membership Rules in Microsoft Entra
35 thoughts on “office 365 automatically assign license to group”.
Good afternoon, everyone:
There is another point to bear in mind as of January 2024.
From what I’m reading in Microsoft’s documentation ( https://learn.microsoft.com/es-es/entra/fundamentals/concept-group-based-licensing ) and I understand, you need to have Azure Entra ID P1 or P2 if your 365 licenses are not Premium or E3.
A shame and a lot of cash
What about UsageLocation which can’t be specified with the group? How would we assign this? Some Licenses depend on this, and all licenses is not availble in certain countries.. 🙁
You will need to set the location of the user in Azure AD:
– Sign in to the Azure portal in the User Administrator role. – Go to Azure AD > Users and select a user. – Select Edit properties. – Select the Settings tab and enter a location for the user.
Hi Rudy, I figured out you can automate this in AzureADConnect to automatically full this in based on the attribute ”c”, since it’s a common thing for Servicedesk/HR to fill out 🙂
Hi! Did all the steps. It all worked out. Great article!
But I don’t understand how to make when adding user to local group(AD on-prem) “License O365 E3” user will be added also to cloud group(Azure AD) and get license.
That is, tech support engineers don’t have access to Azure, but have access to local AD. I want them to be able to assign licenses from local AD.
If you have created the groups in Local AD, then they should be available in Azure AD for the assignment. You should then be able to follow the steps under “Office 365 Group-Based Licensing”
-Created a group in AD. -Synchronized it, it appeared in Azure -Added a user (AD) to the group -Synchronize it with Azure
The user did not show up in that group in Azure.
What am I missing?
That is odd, sounds like an issue with Azure AD Connect. Might be worth to double check the settings and check for errors.
You wrote: “But what if you are out of licenses? You will first need to increase the number of licenses or even order extra through your MSP or finance department. That takes time.”
This step is not omitted? If too few licenses are available, they are not automatically purchased. Even with a group assignment, enough licenses must be purchased. This cannot be automated …?
No, not that I am aware of. As far as I know, Microsoft requires human interaction to purchase licenses. Otherwise, your script could accidentally buy 1000 licenses for example.
Hi, I am using Power Automate to create a user and assign to group so that it will add the license automatically. However, it won’t generate any error if the license is not assigned because of license shortage. How can we set Azure to increase the number of license automatically? Or, at lease generate an error so that Power Automate can pick it up. Thank you.
I think your best option here is to first check how many licenses you have available and if that is 0 then send an email to purchase additional licenses. As far as I know you can’t purchase licenses through PowerShell.
Hello, Can we use PowerShell to configure Office 365 Group Based Licensing. I cannot find any option to assign a licenses to a dynamic group i created.
New-AzureADMSGroup -DisplayName “Dynamic Group 01” -Description “Dynamic group created from PS” -MailEnabled $False -MailNickName “group” -SecurityEnabled $True -GroupTypes “DynamicMembership” -MembershipRule “(user.department -contains “”Marketing””)” -MembershipRuleProcessingState “On”
Please is it possible to assign one license to two or more Azure AD Group? Thanks
Yes, you can repeat step 5 of “office 365 Group Based Licensing”
Hi Rudy Mens, after running the script for on-premise Active Directory, all Users get the Migrate state “False”. Do you have any advice?
Did you check the Get-MsolAccountSku result that it matches the AccountSkuId on line 2 of the script?
Great article! Will this work with nested groups (AD groups synced from AD to Azure)?
Yes, that’s exactly how I am using it as well. Users are members of a group in the local AD.
Sorry, I wasn’t clear – I meant nested local AD groups synced to Azure. Let’s say User1 is a member of Group3, Group3 is a member of Group2, Group2 is a member of Group1. Licenses allocated to Group1. Will User1 get license allocated? Looks like it didn’t work for me and licenses allocated only to direct members of the group.
Ah yes, that is indeed a good question. I have no idea if that will work, will have to test it out as well.
OK, nested groups won’t work 🙁
“Group-based licensing currently does not support groups that contain other groups (nested groups).”
https://docs.microsoft.com/en-us/azure/active-directory/enterprise-users/licensing-group-advanced
Bummer, thanks for sharing!
in the azure script is a little error. The line: try { # Try to add the user to the new group Add-MsolGroupMember -GroupObjectId $groupId -GroupMemberType User -GroupMemberObjectId $user.ObjectId -ErrorAction stop
Should be: try { # Try to add the user to the new group Add-MsolGroupMember -GroupObjectId $groupId.ObjectId -GroupMemberType User -GroupMemberObjectId $user.ObjectId -ErrorAction stop
Thx for the post!
Hi, This works well but how can we prevent users do become member of two groups. For example Microsoft Business Premium and Office E1?
You can first get all the existing users with one of the licenses and check if the user isn’t present in one of the two lists.
With the code below you can get all users with a specific license # Get all users with the Office 365 E3 license $msolUsers = Get-MsolUser -EnabledFilter EnabledOnly | Where-Object {($_.licenses).AccountSkuId -eq 'lazydev:enterprisepack'} | Select DisplayName,UserPrincipalName,ObjectId
Wondering if you have tried using powershell to assign a license to a group or is it only done through the GUI
I haven’t done that. You can assign a license to a user w ith PowerShell though
We have Office 365 E3 licenses. Do you happen to know if this will work for them? The documentation says “Office 365 Enterprise E3” which I think it technically different.
This will work with every Office 365 license
Group based, when you have 9 on-prem forests syncing to one tenant,each with different particularities
You can create different license groups in Azure. To assign the users to their groups you will need to use filters to select the correct users from the Active Directory.
How would you do this when merging 10 entities, 9 on-prem and one cloud to a single tenant?
Do you mean how to assign the licenses to the users?
Leave a Comment Cancel reply
Notify me of followup comments via e-mail. You can also subscribe without commenting.

So, about that AdBlocker... Will you consider disabling it?
Yes, ads can be annoying. But they allow me to keep writing content like this. You can also support me by Buying Me a Coffee ☕ or visit the shop to get some Tech-Inspired merchandise | Read more about disabling AdBlockers
- Manage your subscription
- Manage payment method
- Renew your subscription
- Turn recurring billing on or off
- When subscription expires
- Cancel Microsoft 365
- Microsoft 365 subscription refunds
- Share Microsoft 365 Family
- Stop sharing Microsoft 365 Family
- You received an invitation to share
- Switch between Microsoft 365 subscriptions
- Switch to a business subscription
- Transfer to a different Microsoft account
- About accounts
- Sign in to Microsoft 365
- Why you need to sign in
- Forgot account or password
- Get started at Microsoft 365.com
- Meet the Microsoft 365 app launcher
- Check version
- Microsoft 365 for home or business
- What business product do I have?
- Difference between Microsoft 365 and Office 2021
- Difference between home and business plans
- Difference between Microsoft 365 and free web apps
- Can't install or manage Office or Microsoft 365
- Parental permission when signing in to Office or Microsoft 365

What Microsoft 365 business product or license do I have?
There are several Microsoft 365 for business plans that you or your organization can choose from when you sign up for one of Microsoft's cloud services. After your organization signs up for Microsoft 365, the admin can assign different Microsoft 365 licenses to each user account. The different licenses include different services, such as SharePoint in Microsoft 365 and Skype for Business Online. See the different Office 365 for business plans .
Note: This topic is for Microsoft 365 for business. If you have an Office for home product and you're looking for where to install Microsoft 365, see Install or reinstall Office on a PC or Mac . To see what Office for home products you have a license for, sign in with your Microsoft account to Services and subscriptions .
If you experience a problem in Microsoft 365 – for example, you can’t use or install Microsoft 365 on a device – it could be that you don’t have the necessary license that enables that service or you don't have a subscription that includes the desktop applications which require installation. To fix this, you can contact your admin or IT staff for help, or if you're the admin, you can add the license yourself.

What Office 365 business product or license do I have?
If you work in an organization that uses Office 365 for business, use the steps below to find out what Microsoft 365 for business product or license you have. If you're an admin and you want to know what Microsoft 365 subscriptions have been purchased for your organization, follow the steps in What Office 365 for business subscription do I have? instead.
Select your Office 365 plan immediately below, then follow the steps:
- Select your Offic 365 plan
- Office 365 operated by 21 Vianet (China)
- Office 365 Germany
Sign in with your work or school account at www.office.com/signin .
Click Settings , and then under My app settings , choose Office 365 .

On the My account page, choose Subscriptions .

You’ll see the services that you're licensed to use, such as the latest desktop version of Microsoft 365, SharePoint in Microsoft 365 or OneDrive for work or school, and Exchange Online.
You’ll also see the version of the service you're using, such as Plan 1 or Plan 2 .
Tip: The latest desktop version of Office means you get an Microsoft 365 subscription with Word, Excel, PowerPoint, and others. SharePoint Online means you get OneDrive for work or school and team sites. And Exchange Online means you get email.
Sign in with your work or school account at login.partner.microsoftonline.cn .
Sign in with your work or school account at portal.office.de .
What happens if I don’t have an Office 365 business product or license?
A lot of things can happen if you don’t have the necessary Microsoft 365 for business product or license. Here are some examples:
You try to install Microsoft 365 on your PC from Microsoft 365 but discover that there is no installation button.
You try to use Word for the web, Excel for the web, or other Microsoft 365 for the web products and end up on the Microsoft 365 Settings page showing that you don’t have the needed license.
You try to sign in to OneDrive for work or school but can't access the site or get an error message.
You try to install Office for iPad from the Apple App store and get an error that your subscription is not entitled to use the app.
You try to use Office for iPad and find that Microsoft 365 apps like Word, Excel, and PowerPoint are in read-only or view mode.
Tip: For more about issues relating to installing Microsoft 365, see Troubleshoot installing Office .
What can I do if I don’t have the needed product or license?
If you don’t have the product or license you need, contact your Microsoft 365 admin or IT staff for help in getting that license or finding an alternative.
Or, if you are the admin, you can add the license yourself. See Buy licenses for your Office 365 for business subscription and Assign licenses to users in Office 365 for business .
In some cases, an admin may need to add an Microsoft 365 plan or switch you to an Microsoft 365 plan that includes the services you need. See Switch to a different Office 365 for business plan .
Learn more about the different Office 365 for business plans available to your organization.

Need more help?
Want more options.
Explore subscription benefits, browse training courses, learn how to secure your device, and more.

Microsoft 365 subscription benefits

Microsoft 365 training

Microsoft security

Accessibility center
Communities help you ask and answer questions, give feedback, and hear from experts with rich knowledge.

Ask the Microsoft Community

Microsoft Tech Community

Windows Insiders
Microsoft 365 Insiders
Find solutions to common problems or get help from a support agent.

Online support
Was this information helpful?
Thank you for your feedback.
How to Assign Microsoft 365 licenses with PowerShell
- Updated on February 19, 2024
- Microsoft 365 , Microsoft Entra
You can manually assign licenses to single or multiple users in the Microsoft 365 admin center or Microsoft Entra admin center. If you want to assign licenses to bulk users, it’s faster to create a CSV file and use a PowerShell script. In this article, you will learn how to assign user licenses in Microsoft Entra ID and Microsoft Graph PowerShell.
Table of contents
Microsoft 365 user licenses, assign microsoft 365 licenses to single user in microsoft entra id, assign microsoft 365 licenses to multiple users in microsoft entra id, connect to microsoft graph powershell, get sku id licenses, get unlicensed users, assign microsoft 365 licenses to a single user with microsoft graph powershell, assign microsoft 365 licenses to multiple users with microsoft graph powershell, assign microsoft 365 licenses to bulk users from csv file in powershell.
Each organization owns different Microsoft 365 products where a product may contain licenses from multiple subscriptions. To assign licenses to your users, you need to choose a Microsoft 365 product (e.g., Microsoft 365 E5 Developer) .
You can assign Microsoft licenses to users in different ways:
- Microsoft 365 admin center
- Microsoft Entra admin center
- Microsoft Graph PowerShell
We will only show you how to assign licenses to users in the Microsoft Entra admin center and PowerShell. This is because the Microsoft 365 admin center has limitations where you can assign a maximum of 20 users at a time.
How to assign Microsoft 365 licenses in Microsoft Entra ID
To assign Microsoft 365 licenses in Microsoft Entra ID to a single user or multiple users in Microsoft Entra ID, follow the steps below.
Assign Microsoft 365 licenses to a user in Microsoft Entra ID, following these steps:
- Sign in to Microsoft Entra admin center
- Expand Identity > Users > All users
- Select the user
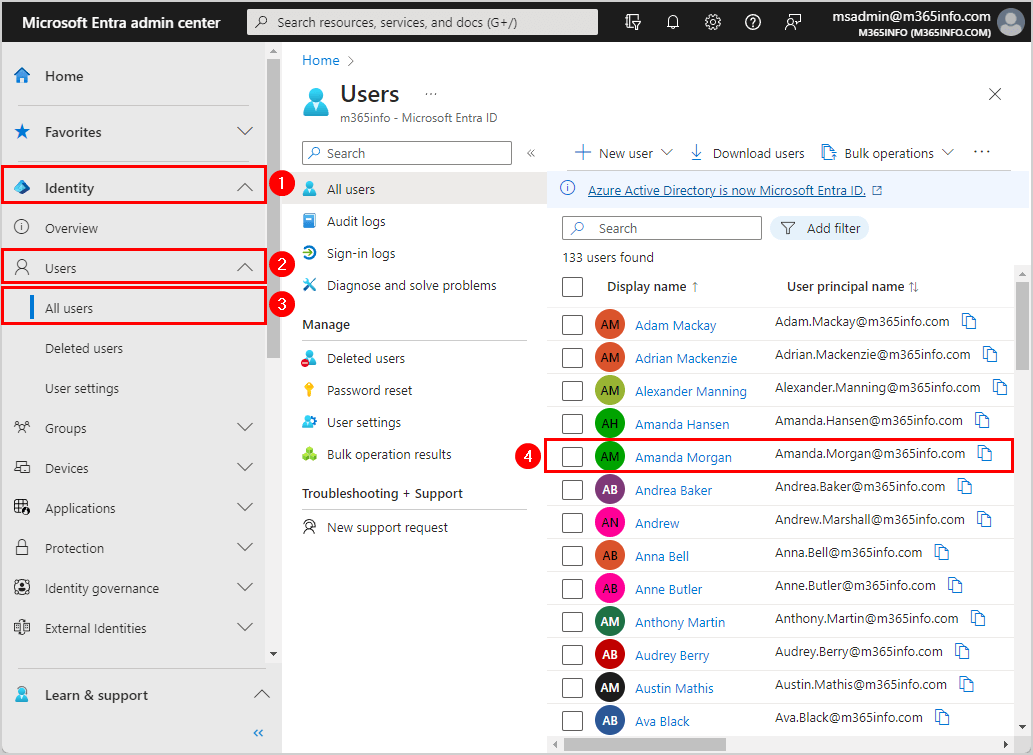
- Click Licenses on the left pane or at the bottom
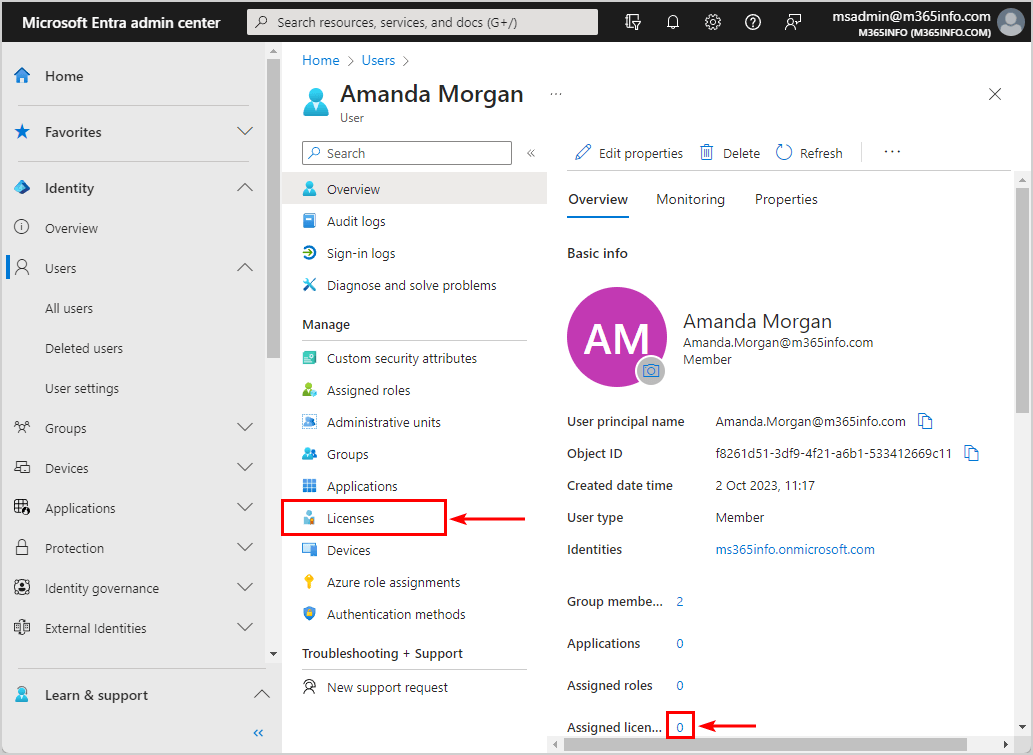
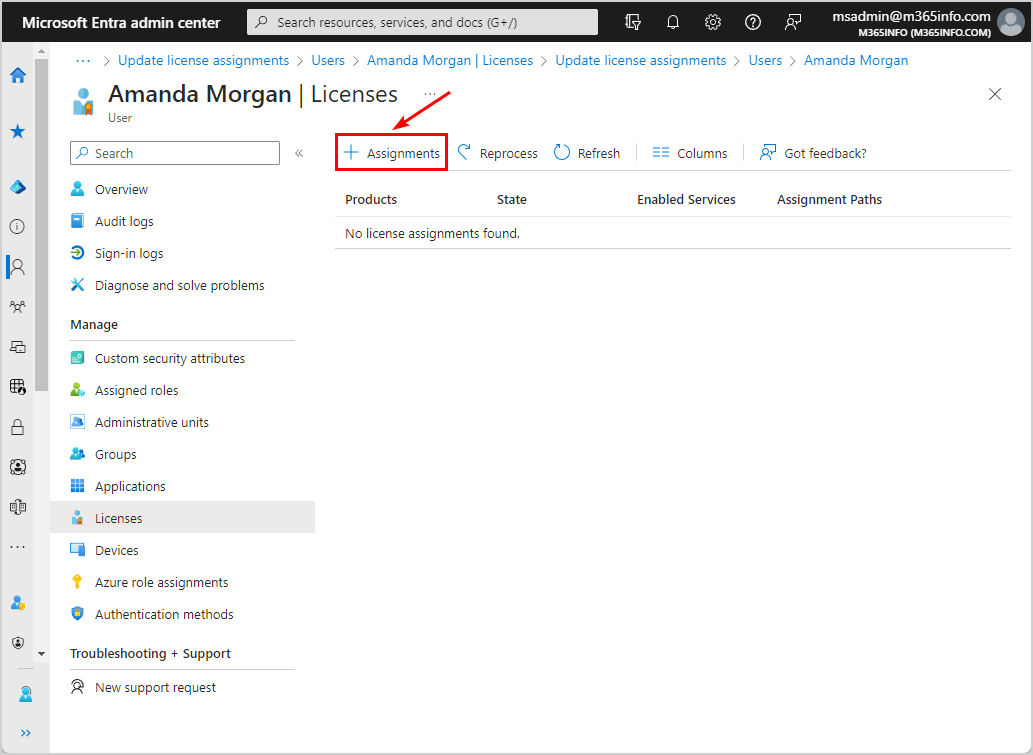
- Click Assignments
- Select licenses
- Select license options
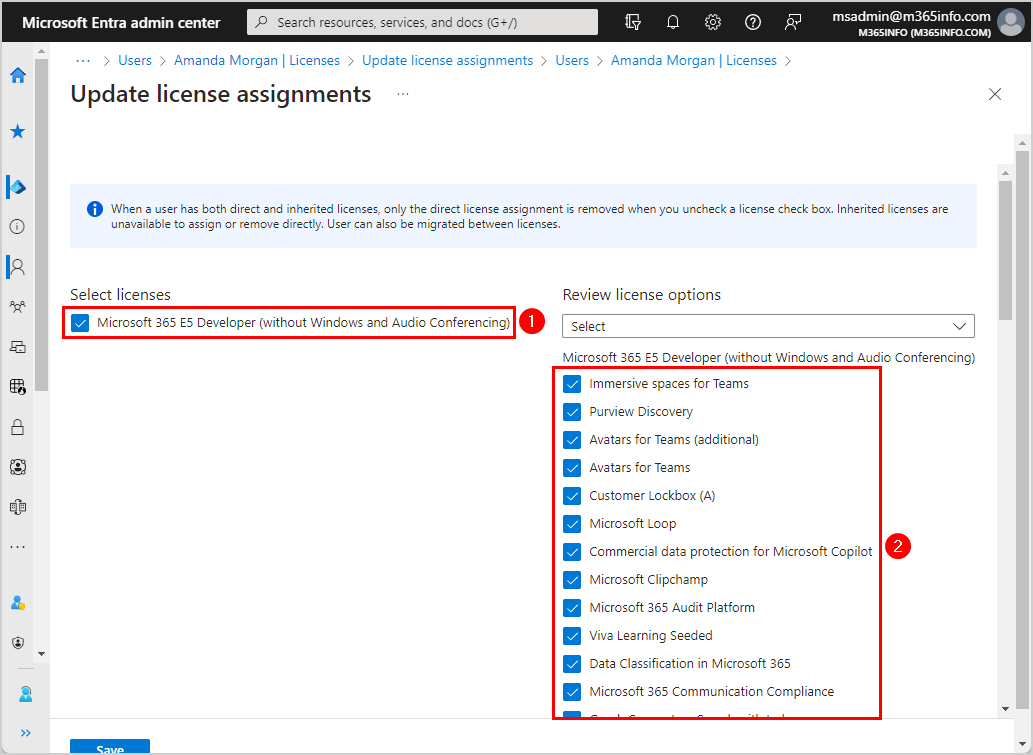
Note: Before a license can be assigned to a user, you must specify the Usage location . Otherwise, the license assignment fails for the user.
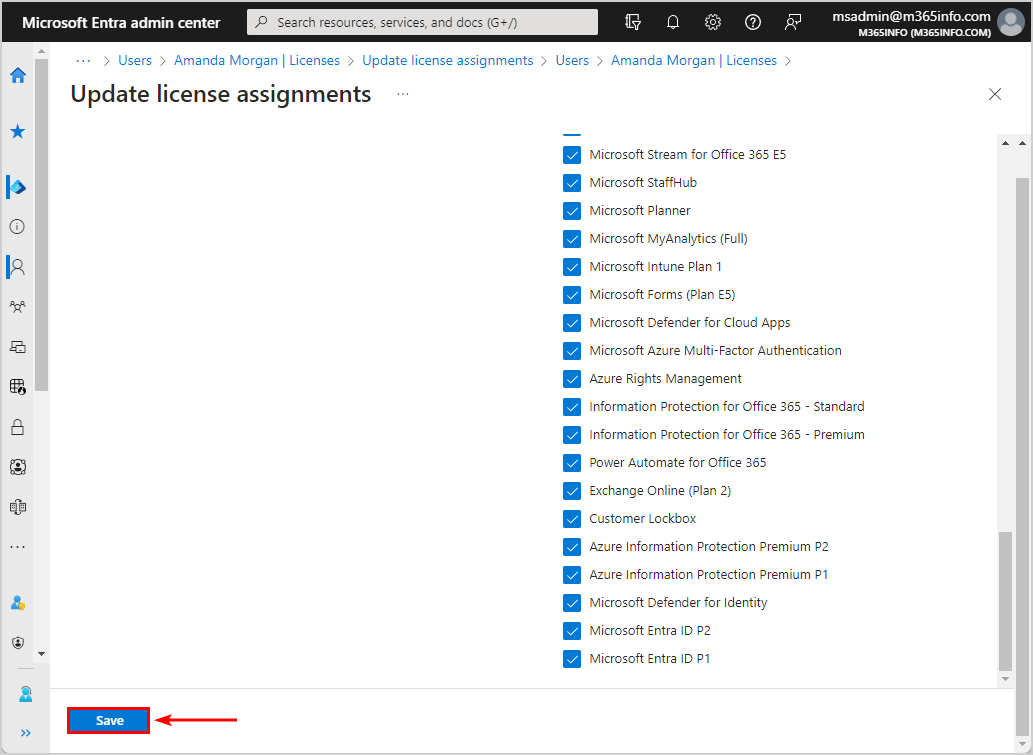
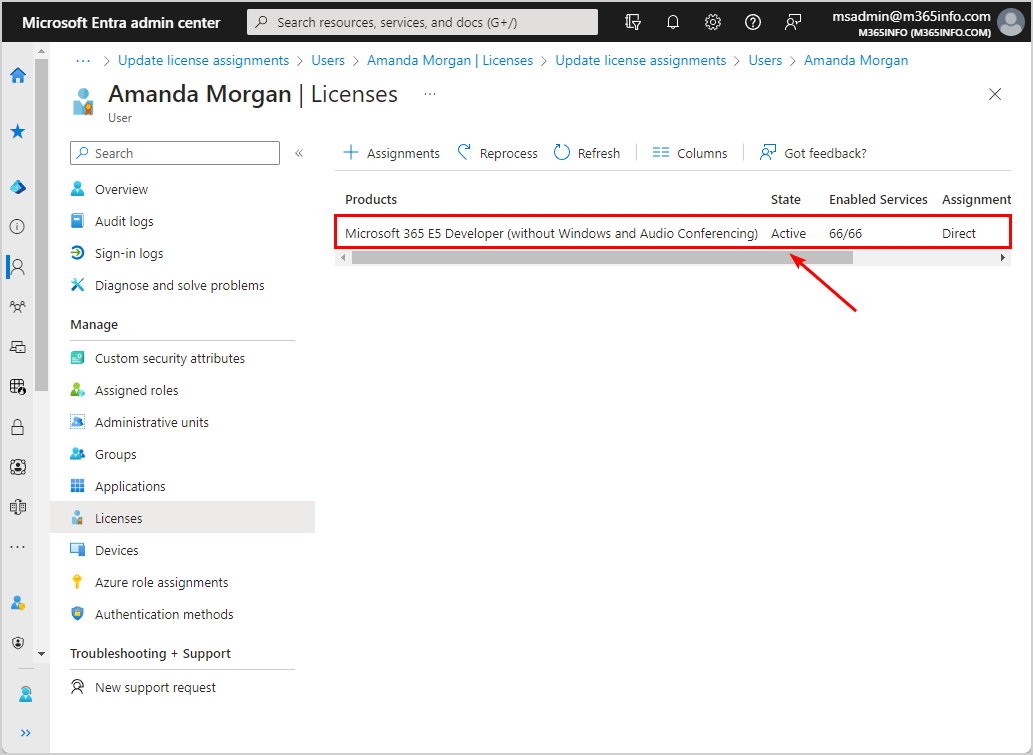
- License assignments to the member (Amanda Morgan) succeeded, and the State is Active
To assign Microsoft 365 licenses to bulk users, follow the below steps:
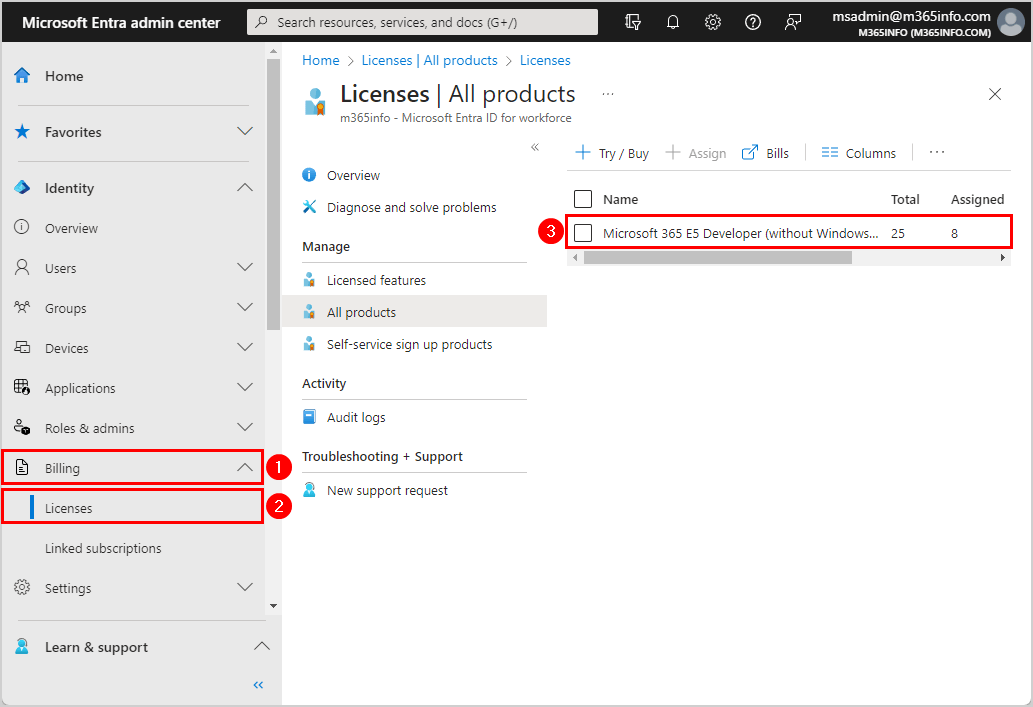
- Expand Identity > Show more
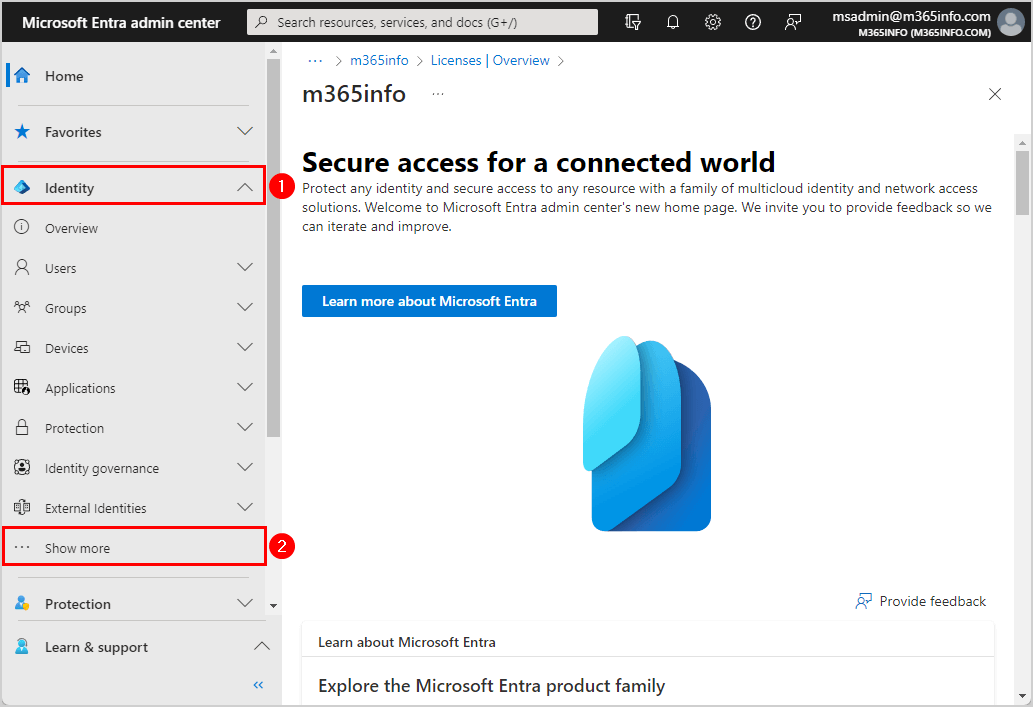
- Expand Billing > Licenses
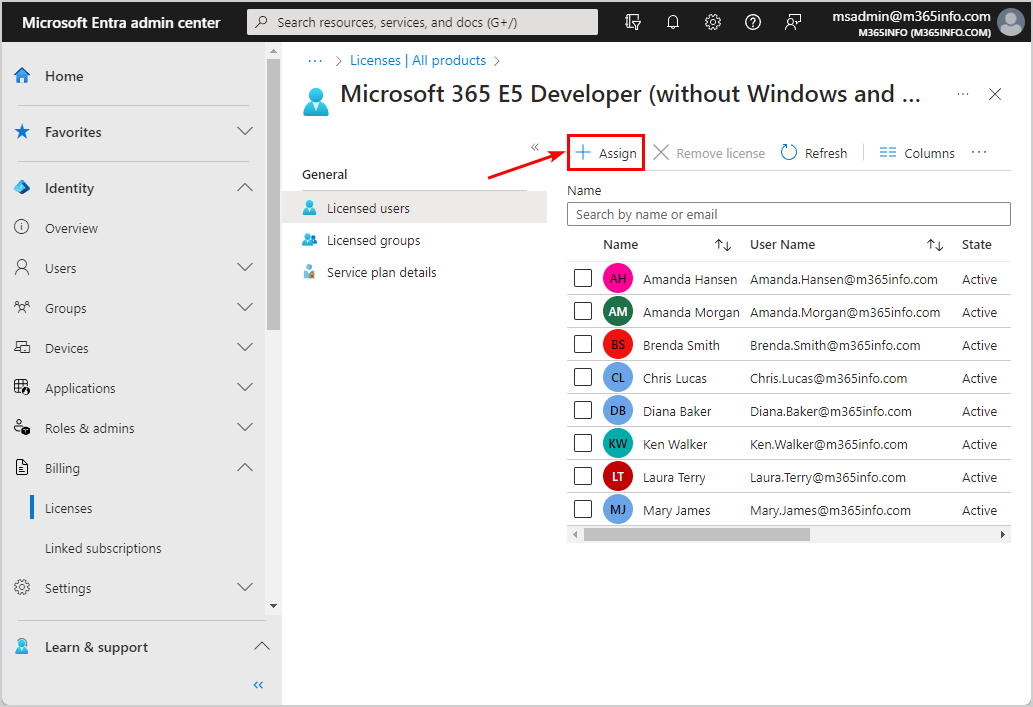
- Click All products
- Select the license plan
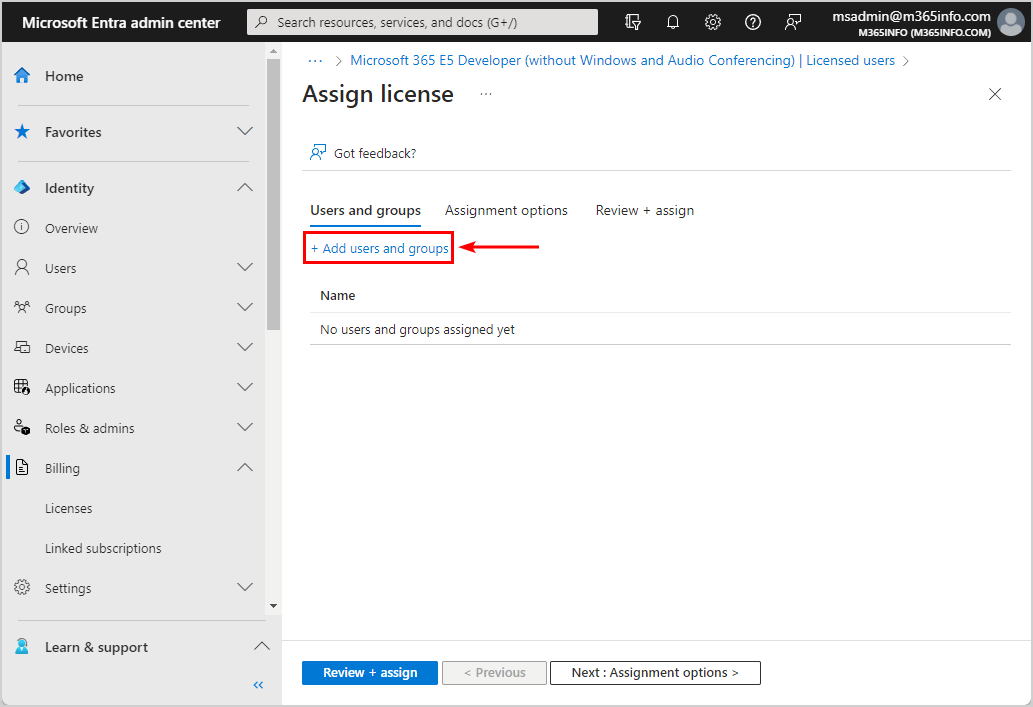
- Click Assign
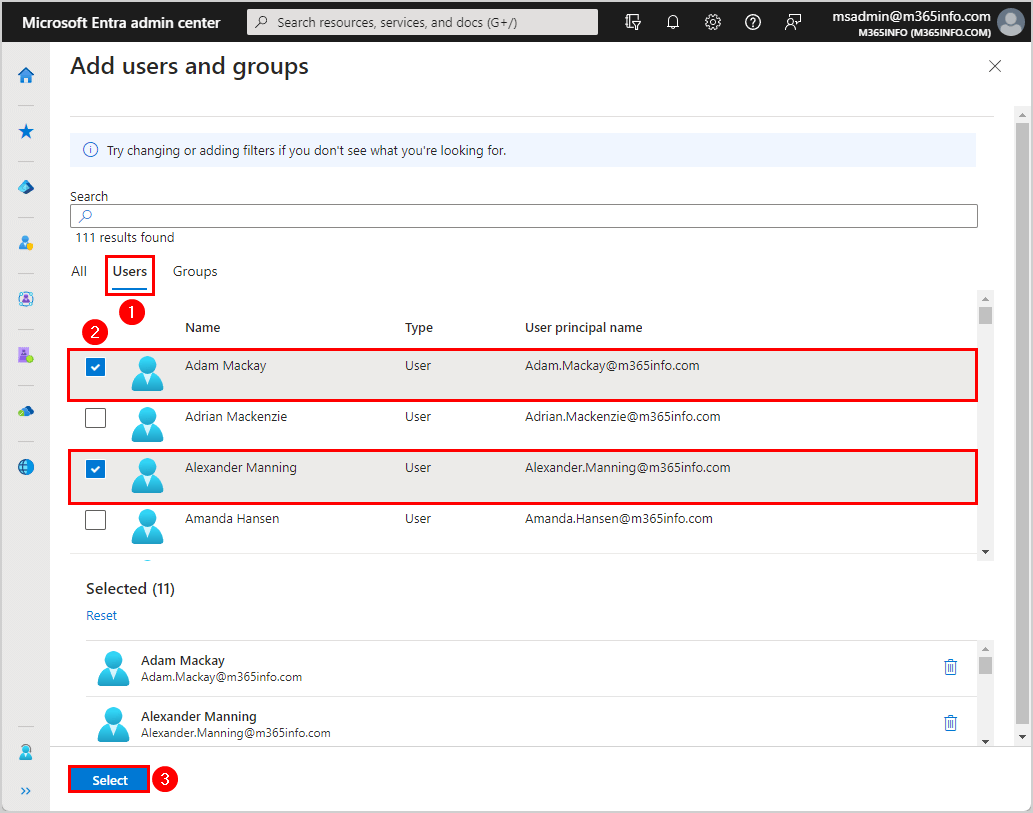
- Click Add users and groups
- Click Users
- Select the users
- Click Select
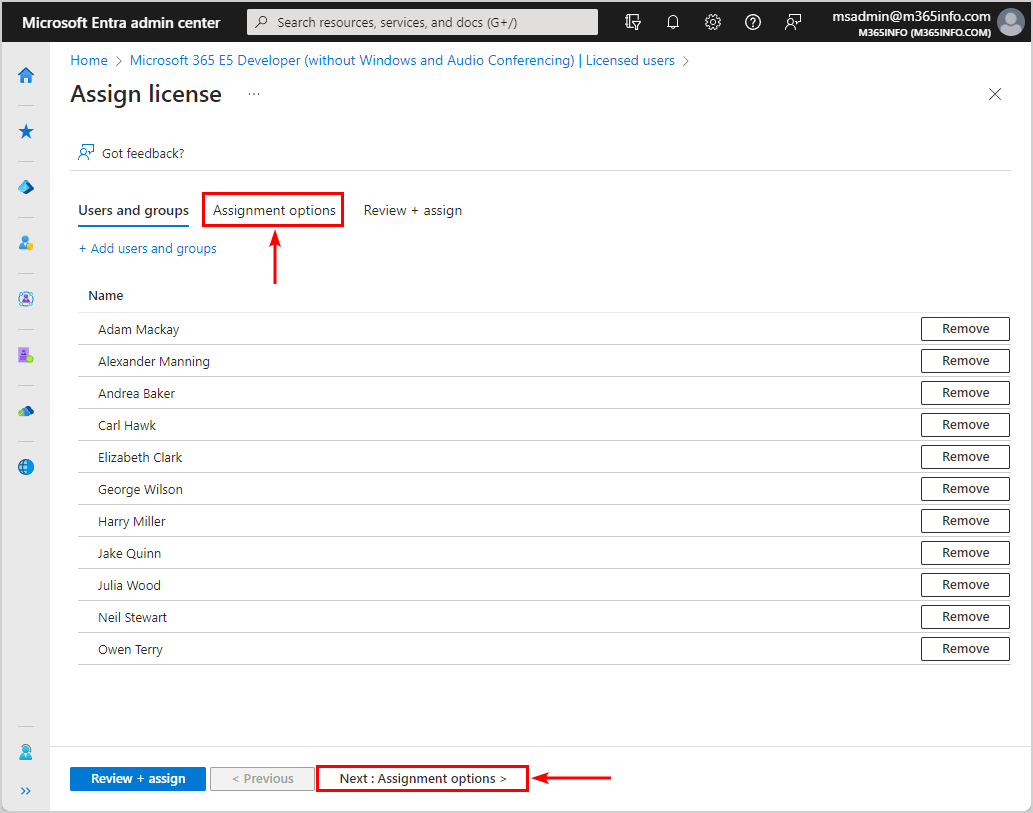
- Check the users in the list
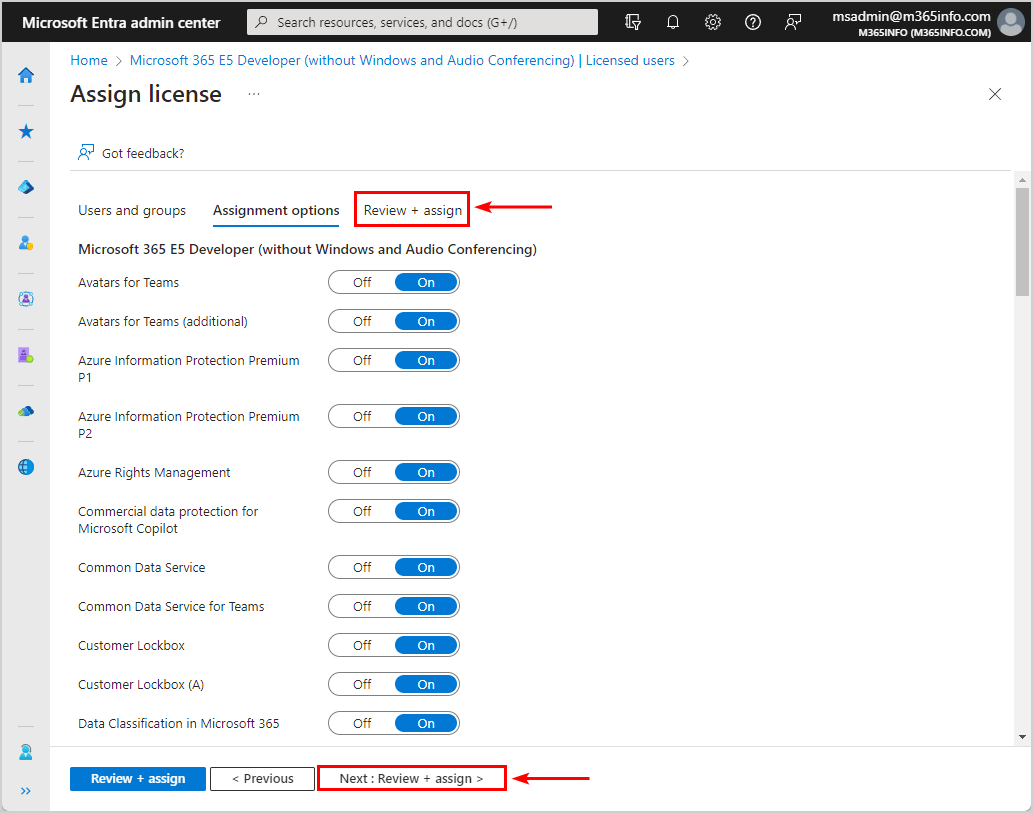
- Click Assignment options at the top or bottom
- Check if you want to enable all the options
- Click Review + assign at the top or bottom
- Check everything
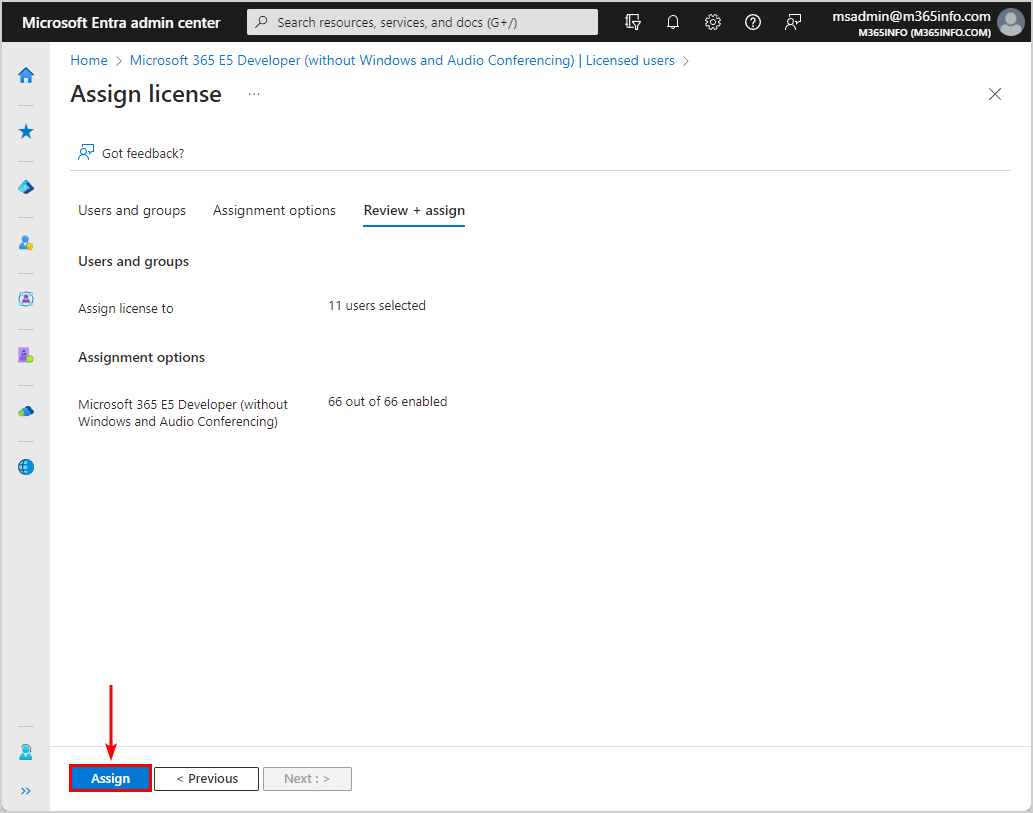
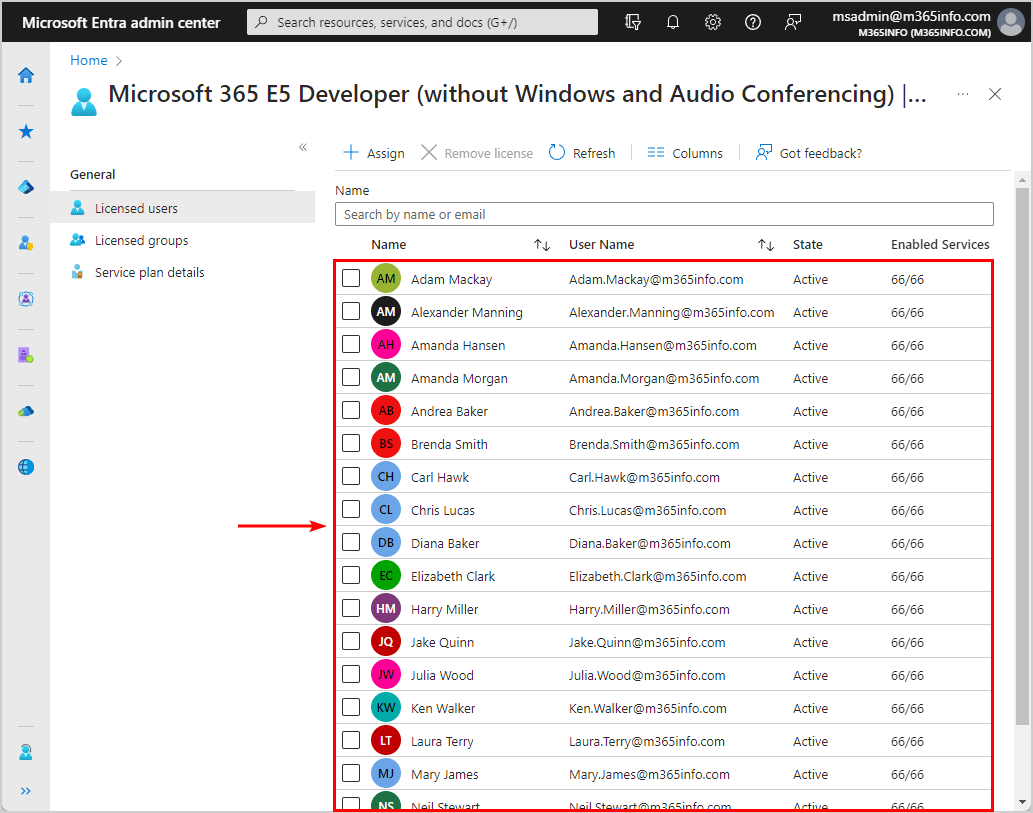
- The license assignments were successfully assigned to multiple users
If you want to assign Microsoft 365 licenses to bulk users, it’s best to create groups. Learn how to Assign Microsoft 365 licenses with group-based licensing .
How to assign Microsoft 365 licenses with PowerShell
To assign Microsoft 365 licenses to a single user or multiple users with Microsoft Graph PowerShell, follow the below steps.
Before you start, you must Install the Microsoft Graph PowerShell module . Start Windows PowerShell as administrator and run the below command.
Important: Always install the latest Microsoft Graph PowerShell module version before you run a cmdlet or script to prevent errors and incorrect results.
Run the Connect-MgGraph cmdlet with the below scopes to authenticate with Microsoft Graph.
Now that you are all set, you can use the commands with MS Graph PowerShell.
To assign licenses to multiple users with Microsoft Graph PowerShell, you need to know the SKU ID of the license. We will use the Get-MgSubscribedSku PowerShell cmdlet to get the SkuPartNumber that shows the available licensing plans for your organization. For example, ENTERPRISEPACK is the license plan name for Office 365 Enterprise E3 .
Run the below PowerShell command to get the SKU ID of all the licenses in your organization.
The PowerShell output results show a list of the SKU ID licenses.
To find all the unlicensed user accounts in your organization, you need to use the Get-MgUser cmdlet.
Run the below PowerShell command to get all unlicensed users, excluding guests.
It will show a list of all the unlicensed user accounts.
To assign licenses to a specific user, you will use the Set-MgUserLicense PowerShell cmdlet. In our example, we want to assign the user Amanda Morgan the DEVELOPERPACK_E5 license.
Note: You must add the -RemoveLicenses parameter with an empty array @() even if you don’t want to remove any licenses.
- Specify the license SKU ID in line 1
- Specify the UserPrincipalName in line 2
- Run the below PowerShell script
The PowerShell output shows that is assigned the licenses to this user.
To assign Microsoft 365 licenses to multiple users, use the below PowerShell script:
- Specify the UserPrincipalName of the users in line 2
- Specify the license SKU ID in line 5
The PowerShell output shows when:
- The license is already assigned to a user
- Assign a license to the user
The PowerShell script will stop when:
- The user has no Usage Location value
- There are no more available licenses (the maximum limit is reached)
- The user does not exist or is misspelled
It shows the below PowerShell result example.
You can also specify a group of users with the Get-MgUser cmdlet, as seen in the example below.
- Specify the users in line 1
- Specify the license SKU ID in line 2
It shows the below PowerShell example.
You can also create a CSV file with the unlicensed users in one column and use the PowerShell script to assign Microsoft 365 licenses.
To bulk assign Microsoft 365 licenses to users, follow the below steps:
- Open Microsoft Excel
- Type ID as the header of the first column
- Specify the UserPrincipalName

- Create the folder temp if you don’t have it already in the (C:) drive
- Name the file Users.csv
- Save as type CSV (Comma delimited (*.csv)

- Type the CSV file path in line 1
That’s it!
Read more: Change Microsoft 365 primary SMTP address »
You learned how to assign Microsoft 365 licenses in Microsoft Graph PowerShell and Microsoft Entra ID. With both methods, it’s possible to assign licenses to single and multiple users. There are multiple variations that you can work with in PowerShell to assign Microsoft 365 licenses to bulk users.
Did you enjoy this article? You may also like Bulk import contacts to Microsoft 365 using PowerShell . Don’t forget to follow us and share this article.
o365info Team
This article was written by our team of experienced IT architects, consultants, and engineers.
What Others Are Reading
You can create different Microsoft 365 group types in the Microsoft 365 portals. In the…
Each mailbox or recipient can have multiple email addresses. You can search and get all…
Microsoft recommends to set up an MFA with a Conditional Access policy when you have…
This Post Has 0 Comments
Leave a reply cancel reply.
Your email address will not be published. Required fields are marked *
- previous post: Fix error: Couldn’t remove OwaMailboxPolicy
- next post: Export Microsoft 365 users last sign-in date and time
Assign a License to an Office 365 User with PowerShell
There are several scenarios where you might need to assign an Office 365 license to a user. The specific scenario in this blog article is that you're migrating an Exchange Server 2010 on-premises environment to Office 365. The Exchange Server is already in hybrid mode. Users have been automatically created in Office 365 by synchronizing them from your on-premises Active Directory environment using Azure AD Connect. Users who haven't already had their mailbox moved to Office 365 will first need an Office 365 license assigned to them, and before a license can be assigned to them, a usage location must be set on their individual account.
This blog article is written using Windows 10 Enterprise Edition version 1803 and Windows PowerShell version 5.1. The examples shown in this blog article will not work with PowerShell Core. Your mileage may vary with other operating systems and other versions of PowerShell.
First, you'll need the cmdlets to perform these actions. Find the MSOnline module in the PowerShell Gallery .
Install the MSOnline module from the PowerShell Gallery:
Store your Office 365 credentials with sufficient access to perform these tasks in a variable.
Connect to your Office 365 account. This is the part that will generate an error if you're using PowerShell Core.
Check to see if you have more than one Office 365 subscription.
Store the specific account SKU with the licenses for the Office 365 subscription to assign to users in a variable.
Find the users to assign licenses to and store them in a variable. I found it useful to narrow these results down by filtering left with the UserPrincipalName and/or Department parameters of Get-MsolUser .
As you can see in the previous image, John Doe does not currently have a license assigned.
Assign a usage location.
Assign an Office 365 license.
A license has now been assigned to John Doe.
Although a single user was assigned a license, with the exception of the previous command, the code as it is written in this blog article can be used to assigned licenses to multiple users.
Contribute to the Microsoft 365 and Office forum! Click here to learn more 💡
April 9, 2024
Contribute to the Microsoft 365 and Office forum!
Click here to learn more 💡
Subscription, account, billing Forum Top Contributors: VincentChoy - NoOneCan - Stefan Blom ✅
May 10, 2024
Subscription, account, billing Forum Top Contributors:
VincentChoy - NoOneCan - Stefan Blom ✅
- Search the community and support articles
- Microsoft 365 and Office
- Subscription, account, billing
- Search Community member
Ask a new question
Microsoft Non-Profit Set Up and License Assignment Questions
Our nonprofit organization just got approval for Microsoft Nonprofit, and there some questions.
Once logged on, we were was able to add some users and assign licenses. (it said we already had licenses available - the "Nonprofit Portal (Nonprofit Staff Pricing) Trial" 25 licenses.
2. Does the "Nonprofit Portal (Nonprofit Staff Pricing) Trial" work on Mac computers? We have staff who use Macs, while our office computer is a Windows one. Or do will we need "Office 365 E3 (Nonprofit Staff Pricing)" or another package?
I see references to "1 TB personal file storage."
3. Does Microsoft Nonprofit have shared storage, where the nonprofit organization can put files that are common to all users? And if so, is there a guide on how to set up shared storage for our organization (I assume using OneDrive) ?
4. And since nonprofits have volunteers, many who have their own versions of Office, can volunteers get access to content in the Microsoft Nonprofit shared storage? And I assume if so, the access can be restricted to just certain folders. So if volunteers can get access, are there instructions on how to do this?
5. When one sets up the account, it asks for the Organization name in a field, which then coverts to " @___[org name].onmicrosoft.com". D o we have the ability to change the " @___[org name].onmicrosoft.com" - either the org name or the .onmicrosoft.com, and if so how?
Report abuse
Reported content has been submitted
Hi Betty -
I discovered when I hovered over the Active Users at the Microsoft 365 Admin Center, I see a key symbol that says "Reset a password." When I clicked and opened this and went through all the steps to reset a password, it actually lets me see the user's password, and it also let me enter my email address or anyone else's and have the user's name, password, and a link to log on to Office 365 sent to that address, with a very nice email that explains everything. So this is the answer to my question #1 - it is kind of cryptic that one has to hit "Reset a password" to open up all the other information that can be sent to to get the new nonprofit licenses.
And I also found out that the "Nonprofit Portal (Nonprofit Staff Pricing) Trial" 25 licenses weren't what we needed, but I was able to buy Microsoft 365 Business Premium licenses that seem to have the Office software that will work on the Mac computers.
Finally, when I bought the Microsoft 365 Business Premium licenses, I see Microsoft sent me an email that included all the instructions. This wasn't obvious that this would happen, and I read emails from newest to oldest, so the emails I saw first were the ones from following what I did above.
Thank you for assisting!
Was this reply helpful? Yes No
Sorry this didn't help.
Great! Thanks for your feedback.
How satisfied are you with this reply?
Thanks for your feedback, it helps us improve the site.
Thanks for your feedback.
- Microsoft Agent |
After you assigned the licenses to the users, they could login to Office portal and install Office products with their accounts, you could tell them the account's user name and password through call or other methods, and it is no need for them to install licenses. If I misunderstood your concern, please feel free to correct me.
In addition, the free trial subscription could work in Mac, but this subscription only contains Online Office services, which means you could only access Office services through browser. About shared OneDrive space, it is not possible, OneDrive space is only for personal use, if you would like to share files with many users, you could try Microsoft 365 group and Teams as I mentioned before, it is also convenient, after you assigned the licenses to the users and granted related permission, you could share files there. Your understanding is appreciated.
Kind Regards,
2 people found this reply helpful
Replies (5)
Question info.
- Norsk Bokmål
- Ελληνικά
- Русский
- עברית
- العربية
- ไทย
- 한국어
- 中文(简体)
- 中文(繁體)
- 日本語
Documentation
Welcome to the Okta Community!
The Okta Community is not part of the Okta Service (as defined in your organization’s agreement with Okta). By continuing and accessing or using any part of the Okta Community, you agree to the terms and conditions , privacy policy , and community guidelines
Assign Microsoft Office 365 Licenses in Okta
Nov 20, 2023 • knowledge article, information.
- Okta Integration Network (OIN)
- Office 365 Licenses
- Individual Assignment
- Group Assignment
Check out the video on how to assign Office licenses in Okta.
Individual assignment:
If users are assigned as an individual to the Office integration, the licenses will be managed for each user individually by opening the application user profile from the Assignments tab and changing the licenses.
Group Assignment:
If the Office integration is assigned to an Okta group, all users that are part of that Okta group will use the licenses that the Okta administrator has chosen for that specific group. This flow allows an administrator to easily set a specific license or set of licenses to many users instead of doing this one by one.
If licenses are assigned through groups, some users might be part of multiple groups that are assigning different Office licenses. In order to avoid any possible license conflicts, there are two different options for doing this:
Group prioritization use case
- Office 365 integration combines license assignment values from multiple groups
Recommendation:
- Although it is possible, do not assign the Office integration to application groups. It is best to create an Okta group for this purpose and use a group rule to populate it with the users from the app group.
Related References
- Group rules best practices
- Create group rules
- About group rules

Try Process AI free
How to assign visio license in office 365.
Are you struggling to properly assign Visio licenses in Office 365? Look no further! This article will guide you through the steps to ensure you are efficiently assigning licenses and getting the most out of your Office 365 subscription. Say goodbye to licensing confusion and hello to productivity.
What is Visio?
Visio is a powerful diagramming tool that allows users to easily create flowcharts, organizational charts, and other visual representations of data. It is a component of the Microsoft Office suite and can be accessed as a standalone application or as part of an Office 365 subscription.
With Visio, users can simplify complex information by creating simple and easy-to-understand diagrams, making it an invaluable tool for businesses, engineers, and project managers.
What is Office 365?
Office 365 is a cloud-based subscription service offered by Microsoft, providing access to various apps and services such as Word, Excel, PowerPoint, and Outlook . With the web-based and mobile versions of the Office apps, users can work and collaborate from anywhere. It also includes OneDrive for cloud storage and Microsoft Teams for communication and collaboration.
How to Assign Visio License in Office 365?
In today’s digital age, many organizations rely on Office 365 for their productivity needs. One useful tool in this suite is Visio, which allows for the creation of diagrams and flowcharts. However, not all users may have access to this tool by default. In this section, we will discuss the various methods for assigning Visio licenses in Office 365. Whether it’s for individual users, a group of users, or multiple users at once, we’ll cover all the steps needed to successfully grant access to this valuable tool.
1. Assigning Visio License to Individual Users
When assigning Visio licenses to individual users in Office 365, follow these steps:
- Log in to the Office 365 admin center.
- Go to Users > Active users.
- Choose the user to whom you want to assign the license.
- Under Product licenses, click Edit.
- Toggle the switch for Visio to On.
- Click Save changes.
For a seamless experience, make sure users have clear instructions for accessing and utilizing Visio once the license is assigned.
2. Assigning Visio License to a Group of Users
- Sign in to the Microsoft 365 admin center.
- Choose ‘Users’ and then ‘Active users’.
- Click ‘More’ > ‘Multiselect’ and select the group of users you wish to assign Visio licenses to.
- Choose ‘Edit product licenses’ and then select the ‘Visio’ license for the group.
- Finally, click ‘Save changes’.
Fact: Assigning Visio licenses to a group of users optimizes collaboration and simplifies diagram creation for the entire organization.
3. Assigning Visio License to Multiple Users Using PowerShell
- Open PowerShell with administrative privileges.
- Run the command ‘Connect-MSOLService’ and enter your Office 365 admin credentials.
- Next, execute ‘Get-MsolAccountSku’ to retrieve your account’s SKU ID.
- Create a CSV file with the users’ email addresses and SKU ID.
- Run ‘Import-Csv’ and ‘Set-MsolUserLicense’ commands together to assign Visio licenses to multiple users.
When working with PowerShell, it is important to ensure the accuracy of user information to avoid any licensing errors.
What are the Different Types of Visio Licenses in Office 365?
Office 365 offers several options for obtaining a Visio license, each with its own set of features and capabilities. In this section, we will discuss the different types of Visio licenses available in Office 365 and what sets them apart. From the basic Visio Online Plan 1 to the more comprehensive Visio Pro for Office 365, we will provide an overview of each license and help you determine which one best suits your needs. So, let’s dive in and explore the various options for obtaining a Visio license in Office 365.
1. Visio Online Plan 1
- Visio Online Plan 1 provides users with web-based diagramming tools.
- Users can access templates and collaborate on diagrams in real-time.
- The program also integrates with other Office 365 apps for seamless productivity.
2. Visio Online Plan 2
When exploring Visio Online Plan 2 , follow these steps:
- Access the Office 365 Admin Center.
- Choose ‘Billing’ and then ‘Purchase Services’.
- Select ‘Visio’ and ‘Buy Now’ for the Visio Online Plan 2 option.
- Once purchased, assign licenses to users through ‘Users’ and ‘Active Users’.
For seamless integration, consider exploring Visio’s collaboration features and templates.
3. Visio Pro for Office 365
- Log in to the Microsoft 365 admin center.
- Choose ‘Billing’ > ‘Purchase Services.’
- Click ‘Visio Pro for Office 365’ > ‘Buy Now.’
- Assign the Visio Pro for Office 365 license to users in the ‘Active users’ section.
Once, a colleague was struggling to assign the Visio Pro for Office 365 license. After following the above steps, they were able to easily allocate licenses to the entire team, streamlining their workflow.
How to Check if a User has a Visio License in Office 365?
- Sign in to the Office 365 admin center.
- Navigate to the ‘Users’ section and choose the desired user to check.
- Scroll down to the ‘Product licenses’ section to see if Visio is listed.
Pro-tip: To streamline this process, consider utilizing PowerShell scripts to efficiently check and manage licenses.
How to Remove Visio License from a User in Office 365?
To remove the Visio license from a user in Office 365, follow these steps:
- Go to the Users section, and then select the active user from whom you want to remove the license.
- Click on ‘Edit’ next to Product licenses.
- Locate Visio in the list of licenses and uncheck the box next to it.
- Click on ‘Save changes’ to remove the Visio license from the selected user.
What to Do if You Cannot Assign a Visio License in Office 365?
If you are unable to assign a Visio license in Office 365, make sure that the user has an available license in the admin center. If the issue persists, check if the user account has the necessary permissions to manage licenses. Furthermore, confirm if the user has been assigned a Visio license directly or through a group.
If the problem persists, please reach out to Microsoft support for further assistance.

No credit card required
Your projects are processes, Take control of them today.
This browser is no longer supported.
Upgrade to Microsoft Edge to take advantage of the latest features, security updates, and technical support.
Manage self-service purchases and trials (for users)
- 8 contributors
As a user, you can buy subscriptions to certain products and assign licenses for those subscriptions to people in your team. You're responsible for paying for any self-service purchases you make. You can manage your subscriptions in the Microsoft 365 admin center .
If you're using Microsoft 365 operated by 21Vianet in China, use the following link to access the admin center: https://portal.partner.microsoftonline.cn/
Your admin has a read-only view into any subscriptions that you buy. They can see the product, purchaser name, subscriptions purchased, expiry date, purchase price, and assigned users for each subscription that you buy.
View your subscriptions
You can view a list of all self-service purchased subscriptions that you bought.
- Go to the Microsoft 365 admin center , then go to the Billing > Your products page.
- On the Products tab, select the filter icon, then select Self-service .
Buy more or reduce licenses
- In the admin center , go to the Billing > Your products page.
- Select the subscription for which you want to buy more license or reduce the number of licenses.
- Select Buy licenses or Remove licenses .
- In the details pane, in the Total licenses box, enter the total number of licenses that you want for this subscription, then select Save . For example, if you have 100 licenses and you want to add 5 more, enter 105.
Assign or unassign licenses
To assign licenses.
- In the admin center , go to the Billing > Licenses page.
- Select the product for which you want to assign licenses.
- On the product details page, select Assign licenses .
You can only assign licenses to people in your organization.
- Select Assign , then select close the details pane.
To unassign licenses
- Select the product for which you want to unassign licenses.
- Select the users from whom you want to unassign licenses.
- Select Unassign licenses .
- In the Unassign licenses box, select Unassign .
Cancel a subscription
- On the Products tab, find the subscription that you want to cancel. Select the three dots (more actions), then select Cancel subscription .
- In the Cancel subscription pane, select a reason why you're canceling. Optionally, provide any feedback you have.
- Select Save .
Manage your payment details
- In the admin center , go to the Billing > Billing accounts page.
- On the Overview tab, select a billing account.
- On the billing account details page, select the Billing profile tab. The tab lists all billing profiles associated with the selected billing account.
- Select a billing profile name to view the details page.
- If you want to update an existing payment method, select Edit .
- If you want to add a new payment method, select Replace .
- In the details pane, enter the card details, then select Save or Replace .
Update an existing payment method
- In the admin center, go to the Billing > Bills & payments page.
- On the Payment methods tab, select an existing payment method from the list.
- In the details pane, select Edit . You can change the security code, expiration date, name on the card, and address.
- Make any needed changes, then select Save .
Add a new payment method
- On the Payment methods page, select Add a payment method , then select Add a payment method from the drop-down list.
- In the Add a payment method pane, enter the information for the new payment method, then select * Save .
View your invoices
- In the admin center, go to Billing > Bills & payments page.
- On the Invoices tab, select the invoice that you want to view. If no invoices are visible, change Past 3 months to either Past 6 months or Specify a date range .
Need help? Contact us
For common questions about self-service purchases, see Self-service purchases FAQ .
If you have questions or need help with self-service purchases, contact support .
Was this page helpful?
Coming soon: Throughout 2024 we will be phasing out GitHub Issues as the feedback mechanism for content and replacing it with a new feedback system. For more information see: https://aka.ms/ContentUserFeedback .
Submit and view feedback for
Additional resources
IMAGES
VIDEO
COMMENTS
Assign licenses by using the Licenses page. In the admin center, go to the Billing > Licenses page. Select a product. On the product details page, select Assign licenses. In the Assign licenses to users pane, begin typing a name, and then choose it from the results to add it to the list. You can add up to 20 users at a time.
Select Add user.You can select either the Add user button at the top of the page or in the Users tab under Your organization.; In the Set up the basics pane, fill in the basic user information, and then select Next.. Name Fill in the first and last name, display name, and username.; Domain Choose the domain for the user's account. For example, if the user's username is Jakob, and the domain is ...
You must configure each user account with a user location prior to or along with assigning a license. In either case, you must assign a license to user accounts so your users can access Microsoft 365 services, such as email and Microsoft Teams. You can assign licenses to user accounts either individually or automatically through group ...
For Microsoft 365 Family or Personal subscriptions: Select Install premium Microsoft 365 apps and follow the prompts to install or reinstall the desktop apps. On the Microsoft 365 subscription tab, select Manage. From here you can: Renew your subscription with a prepaid code or card. Cancel a subscription.
On the Users tab, select Add user. Fill in the user information for the person you want to add. Add up to 5 email addresses to send the new sign-in information to. Select Buy license and add user. After you add a user, you will receive an email with the person's user ID and password, so they can sign in to Microsoft 365.
Open your new Group and select Licenses. Find the new group that we have created and select licenses on the left side. Select Assignments to assign a new license. Select the license you want to assign to the Group. You can change the license services if you want.
After your organization signs up for Microsoft 365, the admin can assign different Microsoft 365 licenses to each user account. The different licenses include different services, such as SharePoint in Microsoft 365 and Skype for Business Online. See the different Office 365 for business plans. Note: This topic is for Microsoft 365 for business ...
This video provides a quick how-to on assigning licenses to Microsoft 365 users inside the Microsoft 365 Admin Center.
Assign Microsoft 365 licenses to single user in Microsoft Entra ID. Assign Microsoft 365 licenses to a user in Microsoft Entra ID, following these steps: Sign in to Microsoft Entra admin center. Expand Identity > Users > All users. Select the user. Click Licenses on the left pane or at the bottom. Click Assignments.
Professor Robert McMillen shows you how to create a new user and assign a license.
First, connect to your Microsoft 365 tenant. Assigning and removing licenses for a user requires the User.ReadWrite.All permission scope or one of the other permissions listed in the 'Assign license' Microsoft Graph API reference page.. The Organization.Read.All permission scope is required to read the licenses available in the tenant.
Users who haven't already had their mailbox moved to Office 365 will first need an Office 365 license assigned to them, and before a license can be assigned to them, a usage location must be set on their individual account. This blog article is written using Windows 10 Enterprise Edition version 1803 and Windows PowerShell version 5.1.
Get-Command -Noun *MSOL*. Listing Office 365 cmdlets. This command returns all MSOnline module cmdlets. You can also list the number of cmdlets in the module with this command: (Get-Command -Noun *MSOL*).count. Total count of Office 365 cmdlets. Now we are ready to manage Office 365 licenses with PowerShell.
From here, click on the admin panel settings icon (available in the left navigation menu) 3. Once you are on the admin dashboard, locate the ' Add User' button on the screen and click on it. 4. This will open add user section. Mention all the details of the user you want to assign the license as shown in the picture. 5. Once done, click on ...
Microsoft Non-Profit Set Up and License Assignment Questions. Our nonprofit organization just got approval for Microsoft Nonprofit, and there some questions. Once logged on, we were was able to add some users and assign licenses. (it said we already had licenses available - the "Nonprofit Portal (Nonprofit Staff Pricing) Trial" 25 licenses. 1.
Group Assignment: If the Office integration is assigned to an Okta group, all users that are part of that Okta group will use the licenses that the Okta administrator has chosen for that specific group. This flow allows an administrator to easily set a specific license or set of licenses to many users instead of doing this one by one.
You can assign one or more product licenses to a group, and Microsoft Entra ID ensures that the licenses are assigned to all members of the group. Any new members who join the group are assigned the appropriate licenses. When they leave the group, those licenses are removed. For more information, see Group-based licensing in Microsoft Entra ID.
You can see what comes with each product on the Microsoft 365 for small and medium-sized businesses page. When you buy a subscription, you specify the number of licenses that you need, based on how many people you have in your organization. After you buy a subscription, you create accounts for people in your organization, and then assign a ...
Assigning Visio License to a Group of Users. Sign in to the Microsoft 365 admin center. Choose 'Users' and then 'Active users'. Click 'More' > 'Multiselect' and select the group of users you wish to assign Visio licenses to. Choose 'Edit product licenses' and then select the 'Visio' license for the group. Finally, click ...
In the admin center, go to the Billing > Licenses page. Select the product for which you want to assign licenses. On the product details page, select Assign licenses. In the Assign licenses to users pane, begin typing a name, and then select it from the results to add it to the list. You can add up to 20 users at a time.