Networks Training

Basic Cisco Router Configuration Step-By-Step Commands
This post is by no means an exhaustive tutorial about Cisco Routers and how to configure their numerous features. It is a step-by-step guide for the most basic configuration commands needed to make the router operational.

When you first power up a new Cisco Router, you have the option of using the “setup” utility which allows you to create a basic initial configuration.
However, in this post I will show you how to do this basic setup with the Command Line Interface ( CLI ).
Mastering the Cisco Router CLI is essential for more complex configuration tasks and it is the most important knowledge you should acquire if you want to become a Cisco network administrator.
Table of Contents
CLI Configuration Modes
The basic CLI modes that we will be referring below are as following:
Router> <– User EXEC Mode Router# <– Privileged EXEC mode Router(config)# <– Global Configuration Mode Router(config-if)# <– Interface Configuration Mode Router(config-line)# <– Line Configuration Mode
I assume that you already have some basic knowledge of CLI and how to navigate between different configuration modes (user mode, privileged exec mode etc), so let’s get started:
Step-by-Step Configuration of Cisco Routers
Step1 : configure access passwords.
The first step is to secure your access to the router by configuring a global secret password and also passwords for Telnet or Console as needed.
Enter into Global Configuration mode from the Privileged EXEC mode:
Router# configure terminal <– Privileged EXEC mode Router(config)# <– Global Configuration Mode
In Global Configuration Mode you configure parameters that affect the whole router device. Here we will configure the Enable Secret password that you will be using from now own to enter into Privileged EXEC Mode from User EXEC Mode.
Router(config)# enable secret “somestrongpassword”
From now on, when you log in from user EXEC mode you will be asked for a password.
It is suggested also to configure a password for the Telnet Lines (VTY lines) which will secure your access when connecting via Telnet over the network.
Router(config)# line vty 0 4 Router(config-line)# password “strongTelnetPass” Router(config-line)# login
Some people prefer to create also local user accounts (usernames and passwords) on the router itself in order to authenticate to the device. Here I’m explaining how to configure this specific setup.
Step2 : Configure a Router Hostname
To differentiate your Router from other devices in the network, you should configure a Hostname for your device.
Router(config)# hostname My-Router My-Router(config)#
Notice that your Router prompt changes to the new hostname that you have just set.
Step3 : Configure IP addresses for Router Interfaces
This is an essential step in order for your router to be able to forward packets in the network. The most basic parameter for a Router Interface is the IP address. From Global Configuration Mode you need to enter into Interface Configuration Mode:
My-Router(config)# interface GigabitEthernet 0/0 My-Router(config-if)# ip address 100.100.100.1 255.255.255.252 My-Router(config-if)# no shutdown My-Router(config-if)# exit
My-Router(config)# interface GigabitEthernet 0/1 My-Router(config-if)# ip address 192.168.10.1 255.255.255.0 My-Router(config-if)# no shutdown My-Router(config-if)# exit
Step4 : Configure Routing (Static or Dynamic)
The Router’s main purpose is to find the best route path towards a destination network and forward packets according to the best path.
There are two main ways a router knows where to send packets. The administrator can assign static routes , or the router can learn routes by using a dynamic routing protocol .
For simple network topologies, static routing is preferred over dynamic routing. Let’s see how to configure static routes from Global Configuration Mode.
My-Router(config)# ip route [destination network] [subnet mask] [gateway]
My-Router(config)# ip route 200.200.200.0 255.255.255.0 100.100.100.2
The command above tells the router that network 200.200.200.0/24 is reachable via gateway address 100.100.100.2.
Another popular static route that we usually configure on Internet Border routers is the default static route:
My-Router(config)# ip route 0.0.0.0 0.0.0.0 100.100.100.2
The default static route above instructs the router to send ALL packets that the router does not have a more specific route entry to gateway address 100.100.100.2 (which might be the ISP gateway address).
Step5 : Save your configuration
Save your current running configuration into NVRAM. This will overwrite the startup configuration.
My-Router(config)# exit My-Router# copy running-config startup-config
You can display your current configuration to verify your settings as following:
My-Router# show running-config
Step 6 (optional) : Configure NAT
This step is optional and is required only if your router acts as Internet border gateway to provide access to the internal private LAN towards the Internet.
Assume that interface GigabitEthernet 0/0 is the WAN interface (connected to ISP for Internet access) and interface GigabitEthernet 0/1 is the LAN interface connected to the internal network.
My-Router# conf term My-Router(config)# interface GigabitEthernet 0/0 My-Router(config-if)# ip nat outside My-Router(config-if)# exit
My-Router(config)# interface GigabitEthernet 0/1 My-Router(config-if)# ip nat inside My-Router(config-if)# exit
The commands above tell the router that traffic entering GigEth 0/1 will be NAT translated. Also, traffic exiting GigEth 0/0 will also be NAT translated.
Now we need to create an Access List which will identify which specific traffic will be translated using NAT. Assuming that the internal LAN network is 192.168.10.0/24 :
My-Router(config)# access-list 1 permit 192.168.10.0 0.0.0.255 My-Router(config)# ip nat inside source list 1 interface GigabitEthernet 0/0 overload
The commands above will create a NAT overload (PAT) rule which tells the router to translate any address identified in Access List 1 to the address assigned to GigabitEthernet0/0. The overload keyword allows one public address to be shared among several private internal addresses.
Step 7 (optional) : Configure DHCP
A Cisco router can be configured as a DHCP server to assign IP addresses dynamically to internal hosts. First we need to create a pool of IP addresses that will be used to assign to clients:
! Configure the DHCP pool to assign addresses to internal hosts ip dhcp pool lan-pool network 192.168.10.0 255.255.255.0 default-router 192.168.10.1 dns-server 8.8.8.8
Then, exclude which IP addresses you don’t want to be assigned by the router:
! Do not assign addresses 1 to 50 ip dhcp excluded-address 192.168.10.1 192.168.10.50
How to connect to a Router in order to Configure it:
You can connect to a Cisco IOS Router either directly or remotely. For the first time when the device is not configured yet, you usually connect directly with a console cable via the CON port.
The console cable connection is also called “out of band” connection method. After you configure the router and assign IP addresses to its interfaces, you can connect to the router from the network with an “in-band” connection method using Telnet or SSH . Note however that Telnet uses clear-text communication whereas SSH uses encrypted traffic, therefore SSH is preferred .
Router Configuration Modes
After connecting to a Cisco Router (let’s say using a console), you are presented with the Command Line Interface in which you type and enter configuration commands.
After typing a command, you press enter and the command is automatically active on the device. For example using the “shutdown” command on an interface, automatically disables the interface. Now, there are two Router Configuration Modes (or access modes):
- User EXEC Mode : Allows the administrator to access only limited monitoring commands. You can not actually make any configurations from this mode. The command prompt on this mode is “router>”
- Privileged EXEC Mode : Allows the administrator to access all device commands, such as those used for configuration and management, and can be password protected to allow only authorized users to access the device at this “full-access” level. This mode is also called enable mode because you get to it with the enable command. The command prompt on this mode is “router#” . From the privileged EXEC mode you can start configuring the device by typing “ configure terminal “
Router Memory Types
A Cisco router has four memory types:
- ROM : This is where the POST script of the router is located. The POST software (Power On Self Test) is used during startup to perform the initial hardware checking of the device. The ROM also holds a mini-IOS used for password recovery.
- RAM : This is where the running configuration is located. After the device boots up, the IOS software is loaded into RAM. Also, RAM holds routing tables, network parameters during operation etc. When configuring the router, we actually change the running-configuration which as we said is stored into RAM
- NVRAM : When we save the running-configuration (using the command “ write “) it is stored into the NVRAM and becomes the startup-configuration. After rebooting the router, the startup-configuration is loaded from the NVRAM.
- Flash : This is like the hard-disk of a PC. It holds the IOS software image file and any backup configurations that you might save from time to time.
When you issue the “ show running-configuration ” command on the router you instruct the device to display the current running configuration in RAM. When you issue the “ show startup-configuration ” command you instruct the router to display the stored configuration in the NVRAM.
Related Posts
- EIGRP Variance and Unequal Cost Load Balancing in Networking
- Comparison of Reported Distance vs Feasible Distance in EIGRP
- Explanation and Comparison of OSPF E1 vs E2 Routes
- Discussion and Explanation of OSPF Graceful Restart and Shutdown
- Explanation and Configuration of OSPF MD5 Authentication on Cisco Networks

About Harris Andrea
Harris Andrea is an Engineer with more than two decades of professional experience in the fields of TCP/IP Networks, Information Security and I.T. Over the years he has acquired several professional certifications such as CCNA, CCNP, CEH, ECSA etc.
He is a self-published author of two books ("Cisco ASA Firewall Fundamentals" and "Cisco VPN Configuration Guide") which are available at Amazon and on this website as well.
July 1, 2010 at 8:40 am
i’m glad 2 get all these commands.i’m v much new to this subject.i’ll try all thses to learn working on a router.
July 23, 2010 at 9:30 am
u have done a decent job..thx :)
May 13, 2011 at 2:29 pm
thank you very much for the useful info,keep it up!
June 15, 2011 at 9:49 am
thankx for the info… It would be better if you can add snapshots for each configuration..
May 22, 2012 at 4:46 am
I follwed it up to here and then get an error? What am I doing wrong?
test(config)#interface serial 1/1 ^ % Invalid input detected at ‘^’ marker.
test(config)# interface fastethernet 0/1 ^ % Invalid input detected at ‘^’ marker.
test(config)# ip address 100.100.100.1 255.255.255.252 ^ % Invalid input detected at ‘^’ marker.
May 22, 2012 at 12:21 pm
The configuration shown above is just an example. It was taken from a router which had serial interface etc. Your own configuration depends on the type of router you have, what interfaces are installed on the specific device etc. Do a “show run” to see the interface types you have on your own device.
August 28, 2012 at 9:12 am
My router is Cisco ASA 5505 ROUTER. I am having problem with it when i plugged multiple devices (e.g PCs)to the inside interface ethernet ports. One device will connect and reach the internet but others will connect and not browse. All the inside interface ports works fine when i plugged when pc to it at a time
May 7, 2019 at 4:58 am
thank you very much for the useful info,i a prishet that
May 7, 2019 at 8:29 am
You are very welcome.
February 17, 2021 at 1:39 pm
thanks for this information. is the configuration steps also applicable to client side? thanks
February 17, 2021 at 1:48 pm
Rachy, what do you mean by client-side? The configuration is applicable for any site.
February 18, 2021 at 10:33 am
thank so very much, if the public ip from ISP is on vlan, must i configure the same vlan ID on the client side.
February 18, 2021 at 2:58 pm
Not necessary. Vlans have local significance.
You can ofcourse use the same vlan ID if you want on the client side just for consistency reasons.
February 24, 2021 at 10:04 am
great!! all above examples of config’s is suitable and opened. Add more and more tutarialx.
February 24, 2021 at 10:09 am
Fabian thanks for your feedback.
Have a nice day
June 10, 2021 at 8:36 am
How to get ccna certificate ?
June 10, 2021 at 10:35 am
You need to prepare for CCNA and then take the official exam. Right now, there is only a single CCNA exam with code 200-301
July 8, 2021 at 3:25 pm
I have a question regrading Cisco Routers and Switches.
What some of most important security-related configuration items of CISCO routers and Switches.
Also I’m having trouble understanding what TSNA is and what is does. If any could provide me with some explanation that would be great.
July 8, 2021 at 5:12 pm
About your first question about important security configuration, here is an article I wrote about the topic:
https://www.networkstraining.com/cisco-router-switch-security-configuration-guide/
December 9, 2021 at 9:05 pm
January 6, 2022 at 1:49 pm
I loved reading your blog post about configuring a Cisco Router. I think it was a great way to show how configuring a router is actually easy and a lot more in-depth than I thought. I also liked that you mentioned that you could also do this with the setup utility as well.
Please check out my LAB Configurations and guide me if I’m doing wrong?
Here is the link: https://eiheducation.in/ccna-practical/
February 1, 2022 at 7:45 am
it is very interesting configuration. I am try to configure my router but the internet is not working. What should I do boss?
February 1, 2022 at 4:52 pm
There can be a million reasons. Have you configured correct IP address, NAT, etc?
August 3, 2022 at 9:09 am
good day sir,plis can your firm send resources material on basic ip configuration,switch configuration and other network resouces to my to my mail? i need al this materail.. thanks
August 26, 2022 at 9:47 am
my-router(config)#interface GigabitEthernet 0/0 %Invalid interface type and number
August 26, 2022 at 1:23 pm
yeah it means you don’t have gigabethernet on your router. Run a “show run” first to see how your router’s interfaces are named.
October 24, 2022 at 1:42 am
Thank you for well explained configuration. Kindly help with commànd to block some websites.
October 24, 2022 at 2:07 am
Blocking some websites for certain time e.g from 8:00am to 4:00pm daily
October 24, 2022 at 5:33 am
Victor, for blocking websites in general, you need a web filtering solution. A router is not ideal for blocking websites. The only exception is when the website you want to block has a fixed public IP (which is not usually the case as most serious websites are behind a CDN). If the website has fixed public IP, then you can block it with an Access List.
April 12, 2023 at 1:16 pm
I like the way you’ve analyzed it it has really helped me realized the most important steps to take.
i need more of this
Leave a Reply
Your email address will not be published. Required fields are marked *
This site uses Akismet to reduce spam. Learn how your comment data is processed .
About Networks Training
Amazon disclosure.
Cisco IOS Router Basic Configuration
Lesson Contents
In this lesson, you will learn how to create a basic configuration for a Cisco IOS router. If you are completely new to the Cisco CLI, you might want to look at our Introduction to Cisco IOS CLI lesson first.
Integrated Services Routers
Most networking vendors, including Cisco, have different router models. Cisco offers routers for small branch offices with only a few users, up to very large routers that are used in data centers.
If you are new to networking, you will probably start with some of the smaller routers. Cisco has integrated services routers which are routers, but these devices also offer some other services like wireless or Voice over IP.
Here’s a picture of the 1800, 2800, and 3800 series Cisco routers:

These routers are not the newest models but are still very popular and often used in home labs. Here’s a closer look at one of the 2800 series routers:

Above, you can see:
- 1x USB port.
- 2x FastEthernet interfaces.
- 1x console port.
- 1x AUX port.
- 1x Flash memory slot.
- 4x WIC slots.
These WIC slots can be used to add certain cards. For example, DSL modems, serial interfaces, wireless access points and so on. Here’s an example of a WIC module for a serial interface:
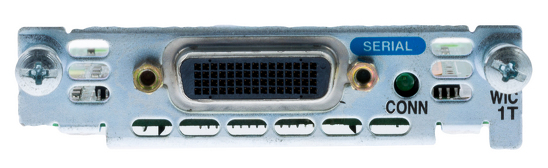
We will be using this serial interface in our example.
Configuration
Let’s see if we can configure a 2800 router. First, we will connect our blue Cisco console cable to our router and start Putty so that we can connect to the router:

Select “Serial line” and set the speed at 9600. The COM port might be different for you, especially if you are using a USB to Serial adapter. Make sure to check this number in the Windows device manager.
Once you are connected to the console port and switch on the power, you will see something like this:
When the router starts, it first initializes ROMMON. This is a bit similar to the BIOS of a computer. It allows the router to perform some basic functions like loading the IOS operating system, which occurs next:
Once the operating system is decompressed, you will be greeted with Cisco’s copyright information:
And you will see some basic information about the router:
Above we can see that this is a Cisco 2811 router which has 2 FastEthernet interfaces and 2 Serial interfaces. It also tells us how much RAM this router has and how big the compact flash memory is.
Finally, the router asks us if we want to start the initial configuration dialog:
Let’s enter no and continue. We will configure everything ourselves.
The final message is:
At the bottom of the console, you will see this line:
This means we are in user mode.
Erase Startup Configuration
The first thing we’ll do, just to be sure, is remove the startup configuration so that we can start with a clean slate.
Let’s enter enable mode:
Let’s erase the startup configuration:
And reload the router so that we start with a blank configuration:
It might take a few minutes for the router to reload. Once it’s ready, head back to privileged mode by typing enable and we will continue.
Routers have an IP address on each interface that they have. Let’s say that we want to configure for the following scenario:

Above you can see that R1 is connected to H1 on its FastEthernet 0/0 interface, it should use IP address 192.168.1.254 and the subnet mask is 255.255.255.0 (/24). It’s also connected to a leased line using its Serial 0/0/0 interface.
Here’s how you can see all interfaces on our router:
Above, you can see the four interfaces that this router has. It also tells us:
- IP-Address : if the interface has an IP address or not.
- OK : whether the interface is performing correctly or not.
- Method : how the IP address is configured. For example, we can configure an IP address manually or through DHCP.
- Status : this tells us if the interface is active or not.
- Protocol : this tells us if the protocol that the interface is using is working or not.
We can also take a closer look at any of these interfaces like this:
Above we can see that the FastEthernet 0/0 interface is currently not in use. Let’s see if we can configure this interface.
First, open the configuration mode:
Now go to the interface, add an IP address, and enable it:
This interface is now active.
We also have a serial interface. As explained in the introduction to WANs lesson , a serial interface might require a clock rate. If you connect two routers back-to-back with serial links, then the DCE side requires a clock rate. Let’s see if this is the case:
Above you can see that this router is the DCE so we will have to set a clock rate.
We can use the same command to verify that the clock rate has been configured:
Now we can continue by setting an IP address and enabling the interface:
Our router should now have two active interfaces. Let’s verify that:
An alternative command that gives you a similar result is the show protocols command:
This router now has two active interfaces with IP addresses. In other lessons, we’ll look at how it can route packets from one interface to another.
You have now learned what the boot process of a Cisco IOS router looks like and how to erase the startup configuration so that you can start with a blank configuration. We have also seen how to check what interfaces this router has, and how to configure IP addresses on each interface. You have also seen how you can check if your serial interface is on the DCE or DTE side and how to set a clock rate.
Tags: Router
Forum Replies
It’s a great article for the beginners. Do you have similar topics for the Cisco Switch
The basic configuration of a Cisco catalyst switch is similar to this example. The only difference is that a switch has “switchports” and a router has “routed ports”. The difference is that on the router we configure IP addresses on the interfaces, on the switch you’ll need to use a VLAN interface.
Hi Rene I have a question ? When I try to change login local password from plain text password to encrypt password this message appears to me : ERROR: Can not have both a user password and a user secret. Please choose one or the other. so how to solve this ?
and I have another question? why RSA key need ip domain-name to generate I need to know the relation between them and what does ip domain-name exactly means?
thanks Rene
If I use CLI to remote access to another router how I can use ssh ?
30 more replies! Ask a question or join the discussion by visiting our Community Forum
How to Configure IP Addresses on a Cisco Router

Network administrators routinely configure routers. Enterprise-grade routers are very different from consumer-grade routers, though. Consumer-grade routers are mostly configured out of the box. Likewise, consumer-grade ISP services typically configure home ‘routers’ with a dynamic IP address.
In contrast, business-grade ISP services assign static IP addresses. Before an enterprise-grade router can be installed in a network, it must have an IP address assigned to it first.
Configuring a Cisco router with an IP address is a simple process. There are typically four steps involved:
Verify the current interface configuration of the router
Choose the interface you want to assign an IP address to
Assign the IP address
Enable the interface on the Cisco router
We'll walk through each of those steps, explain how to complete them, and explore why they are essential.
An Overview of How to Configure IP Addresses on Cisco Devices [VIDEO]
In this video, Jeremy Cioara covers assigning IP addresses and enabling interfaces on Cisco routers. Unlike switches, which are essentially plug-and-play, routers require a bit of configuration before they can do what they were designed to.
Watch the below video for a straightforward, four-step process for enabling interfaces:
How to Display Interfaces on a Cisco Device
Before you assign an IP address to a Cisco router, you need to know its current configuration. Typically, Cisco routers have all their interfaces shut down out of the box. Therefore, we need to verify the state of those interfaces before proceeding, especially if this router is being re-used.
The rest of the instructions in this article will assume you are connected to the Cisco router.
To show the interfaces in a Cisco router, use the ‘show IP interface brief’ command in the console window.
For example, this command will output the following information:
Each interface and interface name
The IP address for that interface
Whether each interface is up or down on the Layer 1 level (status column)
Whether each interface is up or down on the Layer 2 level (protocol column)
The Status and Protocol columns will have one of three messages:
Administratively Down
Each message has a clear indication of the status of its associated interface. The ‘Up’ message is self-explanatory. That means that the associated interface is working correctly. The ‘Administratively Down’ message indicates that the interface is disabled by configuration.
Otherwise, the network admin purposefully disabled that interface for some reason. Finally, the ‘Down’ message means the associated interface isn’t working for other reasons (like unplugging the network cable from the network port ).
Cisco routers have the ‘Administratively Down’ configuration for each interface out of the box. This differs from Cisco Switches, Which come pre-configured out of the box. They can be safely implemented into an existing network almost right away. On the other hand, an unconfigured router can make a network inoperable.
That’s because an improperly configured router can send data from the network into a black hole. Routers are the pieces of equipment that push data to and from networks or network segments. If a router isn’t correctly configured, it won’t know where to send that information. Hence, that data is sent to purgatory. It is simply dropped from the network.
So, you need to verify the status of the interfaces on a Cisco router before you configure an IP address for it. This is an excellent first step since we need to configure as much of the router as possible before connecting it to a network.
What is the Difference Between Status and Protocol on a Cisco Router?
When you use the ‘show IP interface brief’ command in the console when connected to a Cisco router, the router will dump information about each interface on the router to the console display. That information will include the link-state labeled as ‘Status’ and ‘Protocol.’
Many new network admins may need help understanding the difference between both states. After all, aren’t they both the same?
The ‘Status’ and ‘Protocol’ states represent different layers of the OSI networking model , though. The ‘Status’ column represents layer 1, or the physical connection layer. The ‘Protocol’ column represents layer 2 of the OSI model.
The physical layer explains whether a cable is physically connected or if the physical hardware for that interface is working correctly. The protocol layer explains whether that interface is receiving signals it can understand and recognize.
Understanding the difference between layer 1 and layer 2 and their operational status is essential for configuring Cisco routers and diagnosing issues with them later.
How to Choose an Interface to Assign an IP Address on a Cisco Device
When we configure an IP address for a new Cisco router, we need to verify the current state of the interfaces of that router. After we confirm the state of those interfaces, we need to select an interface in the console before configuring an IP address. This process is easy.
Running the ‘show IP interface brief’ command in the console of a Cisco router will list each interface and its designation. Pay attention to those interfaces. Also, make sure to match the console interface with the Cisco router's physical interface. That way, you don’t plug the ethernet cable into the wrong port.
To select an interface in the console, first enter the global configuration mode in the router. Then, use the ‘configure terminal’ command in the console to enter configuration mode.
After switching to the router's configuration mode, use the ‘interface’ command followed by the interface name to select it. For additional help, you can also add a question mark after the ‘interface’ command instead of the interface designation.
In the example above, we used interface g0/0. That means we selected the first interface, which is a gigabit ethernet port on our router. The interfaces in your Cisco router may be labeled differently depending on the device you are configuring.
How to Assign an IP Address to a Cisco Router
Before assigning an IP address to a Cisco router, we must complete a couple of steps. First, we need to run the ‘show IP interface brief’ command. This will list each interface in the router as well as their status. Then, we need to enter global configuration mode with the ‘configure terminal’ command and select an interface using the ‘interface’ command in the console of that router. The interface designation must follow the ‘interface’ command. Once we have selected our interface, we can assign it an IP address.
Assigning an IP address to an interface in a Cisco router is as simple as using the ‘IP address’ command. That command must be followed by the IP address for that interface port as well as its subnet.
Entering that command will only produce confirmation messages if there is an error. In this case, no news is good news.
After assigning the IP address to an interface in a Cisco router, run the ‘show IP interface brief’ command again. When that command displays information about each interface in the router, you should see the IP address assigned to your chosen interface under the IP address column. If you do not, try repeating the process.
That’s it! It’s that simple to assign an IP address to a Cisco router.
How to Find the IP Address to Assign to a Cisco Router
Many new network admins may not understand where to find the IP address to assign to a new Cisco router. Those admins may have received that information from a senior network administrator or through documentation, but if those resources aren’t available, where would you find the IP address to assign to a Cisco router?
Often, that information comes from the ISP (Internet Service Provider). Businesses will typically choose to have a static IP address assigned to them from their ISP.
This is done for stability reasons. In a dynamic environment, the ISP can change a network's external IP address. If your business hosts a VPN , though, that could be an issue. Static IP addresses keep network configurations static for VPNs or DNS entries.
This is in stark contrast to the typical consumer-grade ISP connection. In these cases, the ISP will always use DHCP to assign a network address to consumer customers. But, of course, a business can use DHCP addresses, too. This is more common with small and medium-sized companies that may not need to host services that depend on a static IP address.
Cisco routers can also be configured to use DHCP instead of being assigned a static IP address. To do that, add ‘DHCP’ instead of the IP address and subnet mask to the ‘IP address’ command in the console in Cisco routes, like this:
How to Enable an Interface on a Cisco Router
After configuring an IP address for a Cisco router, you will most likely need to enable the interface to be active. Cisco routers come with all the interfaces shut down out of the box, which is important for network safety reasons. So, the interface you just configured needs to be enabled.
First, we can verify a Cisco router’s status and configuration using the ‘show run’ command from the configuration console for a Cisco device. That command will display all the current information for that device and its interfaces. More than likely, the information displayed from that command will be too much to fit on your screen. Use the space button to jump through the configuration information.
Look for the configuration information for the interface you need to enable. This should show that the interface is currently administratively down.
Once the status of that interface has been verified, we need to enable it. First, we need to select that interface. Use the ‘interface’ command in the console, followed by the interface name. For example:
In our example, the interface we are working with is GigabitEthernet0/0. Of course, the name of the interface you are working with may be different.
Now that the interface is selected use the ‘no shutdown’ command to enable that interface. If all goes well, you should see three messages. The first message shows that the interface is down. The next two messages should state that the ‘Status’ and ‘Protocol’ are now up. You should also see lights blinking next to the physical interface port that you just configured on the router.
Remember that the status and protocol states in a Cisco router represent different layers of the OSI network model. The status state represents layer 1, while the protocol state represents layer 2. This is why the console shows two different status prompts after running the ‘no shutdown’ command.
Wrapping Up
Assigning an IP address to a function you will perform frequently as a network admin. So, let’s go over how to assign an IP address to a Cisco router with a short and sweet instruction set.
Verify the interface status with the ‘show IP interface brief’ command.
After verifying all interfaces are down, enter global configuration mode with the ‘configure terminal’ command.’
Select the interface you want to configure with the ‘interface’ command followed by the interface name.
Assign an IP address to that interface with the ‘ip address’ command followed by the IP address and the subnet mask for that interface.
Run the ‘show IP interface brief’ command again to verify the IP address has been assigned to the network interface.
Run the ‘no shutdown’ command to enable that interface.
Keep these instructions handy until they become second nature.
We covered a lot of information in this article! Consider this guide a rough tutorial on assigning an IP address to a Cisco router.
To learn more, like what a subnet is or how to secure a router, consider our CCNA training .
By submitting this form you agree to receive marketing emails from CBT Nuggets and that you have read, understood and are able to consent to our privacy policy .
Recommended Articles
I have read and understood the privacy policy and am able to consent to it.
- Product Product
- Browse training
- All courses
- Certification training
- New training
- Solutions Solutions
- Active Military
- All Solutions
- Resources Resources
- Learner stories
- Why e-learning?
- Customer reviews
- Study Plans
- Ultimate Cert Guides
- Company Company
- Become a Trainer
- Transparency in Coverage
- Support Support
- Help Center
Let's chat!
- CCNA online course
- Linux online course
- VMware ESXi online course
- Nmap online course
- MySQL online course
- Raspberry Pi online course
- Apache HTTP Server course
- VMware Player online course
- Splunk online course
- SQL online course
- Oracle VirtualBox online course
- Python online course
- Asterisk course
- VMware Workstation Player course
- Process Explorer course
- Pillow online course
- Create a web crawler in Python
- A short introduction to…
- Configure an IP address for an interface
Cisco routers are almost useless without an IP address configured on one or more of their interfaces. To configure an IP address for an interface, you can use the ip address ADDRESS SUBNET MASK interface mode command:
In the picture above you can see that we have configured the Fa0/0 interface with the IP address of 192.168.5.44 . We also had to specify the subnet mask: 255.255.255.0 . If you run the show ip interface brief privileged mode command, you should see the IP address you’ve just configured:

To remove an IP address from an interface, just use the keyword no in front of the ip address command:

- Pipe function in IOS
CCNA course
- Introduction
- Computer network explained
- OSI reference model
- TCP/IP reference model
- Data encapsulation
- Data encapsulation in the OSI model
- Local Area Network (LAN)
- What is Ethernet?
- Ethernet frame
- MAC address
- Unicast, multicast, broadcast addresses
- Half and full duplex
- Basic networking
- What is a network hub?
- What is a network bridge?
- What is a network switch?
- Differences between a switch and a bridge
- What is a router?
- Collision domain explained
- Broadcast domain explained
- CSMA/CD explained
- IEEE Ethernet standards
- Cisco three-layered hierarchical model
- TCP/IP suite of protocols
- What is an IP address?
- Private IP addresses
- IP address classes
- IP address types
- Transmission Control Protocol (TCP) explained
- User Datagram Protocol (UDP) explained
- TCP and UDP ports
- Network protocols
- Telnet protocol
- Secure Shell (SSH) protocol
- File Transfer Protocol (FTP)
- Trivial File Transfer Protocol (TFTP)
- Simple Network Management Protocol (SNMP)
- Hypertext Transfer Protocol (HTTP)
- Hypertext Transfer Protocol Secure (HTTPS)
- Network Time Protocol (NTP)
- Domain Name Service (DNS)
- Dynamic Host Configuration Protocol (DHCP)
- Automatic Private IP Addressing (APIPA)
- Internet Control Message Protocol (ICMP)
- Address Resolution Protocol (ARP)
- IPv4 header
- What is subnetting?
- Subnet mask explained
- How to create subnets
- Cisco Internetwork Operating System (IOS)
- Power on IOS device
- Command modes in IOS
- Get help in IOS
- Display IOS command history
- IOS commands
- Configure the hostname in IOS
- Configure banners in IOS
- Configure passwords in IOS
- service password-encryption command
- Configure descriptions in IOS
- Run privileged commands in global config mode
- Interfaces on an IOS device
- Memory on a Cisco device
- Configuration files on an IOS device
- IOS show command
- Boot sequence of a Cisco device
- Back up IOS configuration
- Configure DHCP server on a Cisco router
- Configure NTP on a Cisco device
- Use Cisco Discovery Protocol (CDP)
- Mapping hostnames to IP addresses
- Configure DNS on a Cisco device
- Use extended ping
- traceroute command in IOS
- debug command in IOS
- Show running processes
- IP routing explained
- Routing table explained
- Directly connected routes
- Static routes
- Dynamic routes
- Types of routing protocols
- Administrative distance (AD) explained
- Routing metric explained
- RIP (Routing Information Protocol) overview
- RIP configuration
- Split horizon explained
- Route poisoning explained
- Holddown timer explained
- EIGRP overview
- EIGRP neighbors
- EIGRP tables
- Reported and feasible distance explained
- Successor and feasible successor explained
- EIGRP configuration
- Wildcard mask explained
- EIGRP and wildcard masks
- Reliable Transport Protocol (RTP)
- Diffusing Update Algorithm (DUAL)
- EIGRP auto-summary
- EIGRP manual summarization
- OSPF overview
- OSPF neighbor discovery
- OSPF neighbor states
- OSPF areas explained
- Link-state advertisement (LSA)
- Types of LSAs (Link-state advertisements)
- Configure OSPF
- Configure multiarea OSPF
- Designated router and backup designated router
- OSPF clear text authentication
- OSPF MD5 authentication
- OSPF route summarization
- Layer 2 switching
- How switches learn MAC addresses
- How switches forward frames
- Port security feature
- Assign the switch IP address
- Assign static MAC address
- VLANs explained
- Access and trunk ports explained
- Frame tagging explained
- Inter-Switch Link (ISL) overview
- 802.1q overview
- Configure VLANs
- Configure trunk ports
- Configure allowed VLANs on trunk
- Routing between VLANs
- Configure router on a stick
- VLAN Trunking Protocol (VTP)
- VLAN Trunking Protocol (VTP) overview
- VTP modes explained
- Configure VTP
- Access Control Lists (ACLs)
- What is ACL (Access Control List)?
- Standard ACLs
- Extended ACLs
- Network Address Translation (NAT)
- NAT definition
- Static NAT configuration
- Dynamic NAT
- PAT configuration
- IPv6 overview
- IPv6 address format
- IPv6 address types
- IPv6 global unicast address
- IPv6 unique local address
- IPv6 link-local addresses
- IPv6 EUI-64 calculation
- Configure IPv6 on a Cisco router
How to Configure a Cisco Router for Internet Access (step by step)
Alirio Zavarce
March 6, 2022
Are you looking to configure a Cisco router for Internet access for the first time? Yes? Great! This post is for you then.
I am going to show you step-by-step a quick and easy way to configure a Cisco IOS router to provide Internet connectivity securely. After putting together a network design diagram , we’re going to execute the following tasks:
Table of Contents
- Configure router interfaces
- Configure the built-in DHCP Server
- Configure Network Address Translation (NAT)
Configure Zone-Based Firewall
At the end of this post, your router should be ready to allow your users to access the Internet.
Are you ready? Let’s go.
Advertisement
Network Design Diagram
The first thing you need to do is to create a basic diagram to lay out all the IP addresses (private and public), physical interfaces (internal and external), and features you want to be turned on. Having a visual of your final network will make it easier for you to carry out the staging, testing, and implementation of your Internet router.

So we have the following information:
- ISP-facing interface: GigabitEthernet 0/0 (or Gi0/0)
- External/Public IP subnet: 165.13.70.64 255.255.255.252
- IP address assigned to the Internet Service Provider (ISP) end: 165.13.70.65
- IP address assigned to you (the customer): 165.13.70.66
- User-facing interface: GigabitEthernet 0/1 (or Gi0/1)
- Internal/Private IP subnet: 172.16.10.0 /24
- IP address assigned to the router: 172.16.10.1
Let’s now configure these IP addresses on the router’s interfaces.
Configure Router Interfaces
Your ISP should provide you with an Ethernet connection to their router. This line, however, could provide IP addresses dynamically via DHCP or statically (manually configured on the router).

In case the ISP’s line provides IP addresses dynamically, I’m going to give you the commands to allow your router to request and receive its public IP address from the ISP. Remember, the provider’s end has to be configured to provide an IP address with the DHCP protocol, which is the protocol used to assign IP addresses.
In our case, the ISP gave you the IP address you need to assign to your router’s ISP-facing interface. I like to use Gi0/0 to connect the ISP’s Ethernet line. Here are the commands to configure an IP address on your Cisco router.
Now you need to tell your router that any IP packet it doesn’t have a route for, it needs to send it to the ISP. You need to configure a default route.
Make sure that your Interface is up.
You can test connectivity to your ISP by pinging the ISP’s end of Internet line connected to Gi0/0.
You can test Internet connectivity by pinging a public IP device on the Internet. For instance, you can ping one of Google’s DNS servers 8.8.8.8.
Let’s configure now your internal IP address on interface Gi0/1.
Now that your router itself has Internet connectivity, let’s configure your router to provide IP addresses to your internal devices.
Configure DHCP Server
A Dynamic Host Configuration Protocol (DHCP) server is a service built into your router that allows your router to distribute IP addresses of a previously configured pool of addresses.
In our example, the network’s internal subnet is 172.16.10.0 /24 and the router has been assigned the 172.16.10.1 IP address to its Gi0/1 interface. You can tell the router to start assigning IP addresses starting from 172.16.10.11 through 172.16.10.254.

A /24 equals to 255.255.255.0. Decimal 255 is 11111111 (eight 1s) in binary. So, 255.255.255.0 equals to 11111111.11111111.11111111.0. And that is 24 bits. That’s why 255.255.255.0 is the same as a /24.
To check your DHCP Pool settings, use the show ip dhcp pool command:
When a computer on the inside of the network comes up, that computer will request an IP address via a DHCP Request. When the router sees that request on its Gi0/1 interface, it’ll respond with an IP address from the pool of IPs you just configured. Since you excluded IPs from 172.16.10.1 through 172.16.10.10, the first available IP would be 172.16.10.11.

In addition to the IP address for the PC itself, the DHCP Reply message also contains the IP addresses of the DNS servers (8.8.8.8 and 4.2.2.2) and the default gateway (172.16.10.1) configured.
Notice that we’re using public DNS servers. Remember Internet communications happen in terms of IP addresses. When you type www.cisco.com on your browser, your computer sends a request to its DNS server assigned by DHCP, in our case is 8.8.8.8, and this server with an IP address related to www.cisco.com. Your browser then sends an HTTP request to that IP address to load the home page of www.cisco.com.
If 8.8.8.8 doesn’t respond, a request is sent to 4.2.2.2 as configured above.
A default gateway is used when your PC wants to talk to an IP address that belongs to anything outside its IP address group. For instance, your PC was assigned an IP address from a pool of IPs that starts with 172.16.10.1 through 172.16.10.254.
Your DHCP server, however, was also configured to exclude IPs from 172.16.10.1 through 172.16.10.10 for dynamic assigned. Nevertheless, all IPs from 172.16.10.1 through 172.16.10.254 belong to your group and therefore you can communicate with them directly. Anything outside of that group needs to be sent to the default gateway.
For that reason, when your computer needs to send a DNS request to 8.8.8.8, that request is sent to its default gateway, 172.16.10.1.
Use the show ip dhcp binding command to see what IP addresses have been assigned off the pool configured.
Notice that the first IP address assigned is the first IP available on the pool.
Configure NAT
The Internet doesn’t know how to talk to any of your PCs with an IP that starts with 172.16.10. That IP subnet is considered private, not routable on the Internet. The only public IP you have on your router is the IP address assigned to your Gi0/0 interface and that is 165.13.70.66.
Network Address Translation (NAT) is another service that can be activated on your router that allows your router to hide your private IP addresses behind your public IP. In other words, your router will convert any private IP range into a public IP or public range.
Simply put, anyone on the Internet won’t know that IP communications, such as browsing a web server, are coming from PCs with IPs within the 172.16.10.0 /24 private range. What the Internet will see is IP communications coming from 165.13.70.66 IP address. And this is thanks to NAT.

When you click on a link on a webpage, that click is a request to display the contents of the webpage the link is pointing to. That request leaves your PC as an IP packet sourced from the IP address of your PC and destined to the IP address of the web server that hosts that new webpage. Remember that the link is based on a name that is then resolved into an IP address by your DNS server.
To configure NAT on your router, enter the following commands:
To look at the configuration, use the show ip nat statistics command:
What we’re saying here is that all traffic sourced from any of the IP addresses that belong to the 172.16.10.0 /24 subnet that comes in Gi0/1, goes out Gi0/0, and is directed to ANY IP, replace that source IP of 172.16.10.X with the IP address configured on Gi0/0 interface.
So, for the Internet, traffic is coming from 165.13.70.66 and not from 172.16.10.X. In other words, 172.16.10.X is being replaced/impersonated by 165.13.70.66.
The Inside Local IP is the original IP. The Inside Global is the NAT IP that’s impersonating the original IP. The Outside Local and Global are the destination IPs on the Internet. In this case, a ping was executed from 172.16.10.11 to 8.8.8.8. Notice that the protocol is ICMP.
Here’s the output of web access on TCP port 80 from 172.16.10.11 to 8.8.8.8.
You should know that there are other processes, such as Port Address Translation (PAT), working at the same time to keep track of all the sources and destinations IPs and their TCP ports.
To increase security and reject unauthorized traffic coming from the Internet, you can make use of the Cisco IOS Firewall. Let’s take a look.
The IOS firewall, or Zone-Based Firewall, requires the Security License on your router, so make sure you have it.

When configuring this firewall, you’re going to create two zones: the Protected Zone (internal network) and the Untrusted Zone (Internet).
This firewall will keep track of all TCP, UDP, and ICMP conversations initiated from the inside of your network that pass through the router and to the Internet. Notice that I mentioned, “initiated from the inside.”
Return traffic will then be expected by the router and allowed through towards the internal PCs that requested the traffic initially.
Any traffic initiated from the Internet will be denied!
Here’s the list of configuration commands you need to configure the Zone-Based Firewall:
So, here are the steps:
- You create the security zones.
- You create class-maps to define what traffic you want the IOS firewall to look at – in our case TCP, UDP, and ICMP.
- You create a policy-map that will “inspect” the traffic defined by the class-map – in other words, inspect TCP, UDP, and ICMP conversations.
- To this zone-pair, you attach the policy-map created to activate traffic inspection.
- You define what interfaces belong to the source and destination zones.
Remember that inspection enables the router to keep track of all the conversation details such as source and destination TCP and UDP ports as well as ICMP traffic.
Here’s a list of show commands for verifications:
At this point, all your users should be able to browse the Internet. All traffic initiated from the Internet will be denied by the firewall. All traffic that comes back from the Internet as a result of requests coming from internal users will be allowed through the firewall.
Getting CCNA or CCNP Certified?

Self-paced Books . On-demand Courses . Practice Tests .
Sign up for a 10-day free trial with unlimited access !
In this post, we covered the step-by-step design and configuration of a Cisco IOS router to allow Internet access. So, at this point, your router should allow your users Internet access with the protection of Cisco’s Zone-Based Firewall.
I hope this post was informative for you.

ABOUT THE AUTHOR
Alirio Zavarce, CCIE #28672, is a seasoned enterprise route-switch consultant with 30 years of experience with data networks. Alirio started this networking blog to help his peers become better network engineers and share all his everyday experiences and troubleshooting tips. More about me...
If Alirio had to prepare to take it again, here's what he would do to pass the CCIE lab .
Please Share
6 thoughts on “How to Configure a Cisco Router for Internet Access (step by step)”
I’ve tried to test your solution on PT 8.2. The part that i have a problem is the ISP configuration. Which PT device is used for this object ? How can i assigne my ISP address in this device ? Can you give more explaination of this point.
Many thanks
Hi Philippe. I’m not sure I understand your question. Could you please elaborate a little bit more?
Very interesting and complete explanation how to configure cisco router as a firewall. All works fine! Thanks a lot!
I’m glad it helped. Thanks for your feedback.
great thanks for you Mr
You’re very welcome!
Leave a Comment Cancel reply
Save my name, email, and website in this browser for the next time I comment.
- Trending Now
- Foundational Courses
- Data Science
- Practice Problem
- Machine Learning
- System Design
- DevOps Tutorial
- CCNA Tutorial for Beginners
Basics of Computer Networking
- Network and Communication
- LAN Full Form
- What is OSI Model? - Layers of OSI Model
- TCP/IP Model
- How Data Encapsulation and De-encapsulation Works?
Components of Computer Networking
- NIC Full Form
- What is a network switch, and how does it work?
- What is Network Hub and How it Works?
- Introduction of a Router
- Types of Ethernet Cable
Transport Layer
- Transport Layer responsibilities
- Introduction of Ports in Computers
- What is Transmission Control Protocol (TCP)?
- TCP 3-Way Handshake Process
- User Datagram Protocol (UDP)
Network Layer
- Introduction and IPv4 Datagram Header
- Difference between Unicast, Broadcast and Multicast in Computer Network
- Structure and Types of IP Address
IPv4 Addressing
- What is IPv4?
- Role of Subnet Mask
- Introduction of Classful IP Addressing
- Introduction To Subnetting
- Classless Inter Domain Routing (CIDR)
- Introduction of Variable Length Subnet Mask (VLSM)
- Private IP Addresses in Networking
Data Link Layer
- What is Ethernet?
- What is MAC Address?
- What is an IP Address?
Physical Layer
- Ethernet Frame Format
- What is Power Over Ethernet (POE)?
Cisco Networking Devices
- Network Devices (Hub, Repeater, Bridge, Switch, Router, Gateways and Brouter)
- Collision Detection in CSMA/CD
- Collision Domain and Broadcast Domain in Computer Network
- Difference between layer-2 and layer-3 switches
Life of a Packet
- Working of Domain Name System (DNS) Server
- Configuring DHCP and Web Server in Cisco Packet Tracer
- How Address Resolution Protocol (ARP) works?
Router and Switch Basic Configuration
- Cisco Router basic commands
Configure IP Address for Interface in Cisco Switches
- Transmission Modes in Computer Networks (Simplex, Half-Duplex and Full-Duplex)
- Link Layer Discovery Protocol (LLDP)
- What is Cisco Discovery Protocol (CDP)?
Cisco Device Management
- What are the different memories used in a CISCO router?
- Router Boot Sequence
- Recovering password in Cisco Routers
- Catalyst Switch Password Reset in Cisco
- Process of Backing Up and Restoring the Cisco IOS
- File Transfer Protocol (FTP)
- Difference between FTP and TFTP
- Backing up Cisco IOS Router image
- Steps Involves in Cisco Router Configuration Backups
Basic Network Trouble shooting
- Troubleshooting Questions on OS and Networking asked in Cloud based Interview
- Internet Control Message Protocol (ICMP)
- What is Ping?
- traceroute Command in Linux with Examples
IPv4 Routing
- What is IP Routing?
- Routing Tables in Computer Network
- Difference between Static and Dynamic Routing
- What is Floating Static Route ?
- How to Add a Static Route to Windows Routing Table?
Dynamic Routing Protocols
- Routing Protocol Code
- Difference between IGRP and BGP
- Administrative Distance (AD) and Autonomous System (AS)
- Configuring a Loopback Interface in Cisco
- What is a Loopback Address?
- What is Passive-Interface Command Behavior in RIP, EIGRP & OSPF?
Interior Gateway Protocols
- Routing Information Protocol (RIP)
- Configuring RIP Default Information Originate in Cisco
- Configuring RIP Versions 1 and 2 in Cisco
- EIGRP fundamentals
- Features of Enhanced Interior Gateway Routing Protocol (EIGRP)
- Types of EIGRP Packet in Computer Network
- How to Configure EIGRP Summarization in Cisco?
Open Shortest Path First(OSPF)
- Open shortest path first (OSPF) router roles and configuration
- Difference between EIGRP and OSPF
- Bandwidth Allocation Control Protocol (BACP)
- Open shortest path first (OSPF) - Set 2
- OSPF Implementation
- Explain OSPF DR/BDR Election?
- Configuring OSPF Passive Interface in Cisco
- Configuring OSPF Default Route Propagation
- Configuring OSPF Maximum Paths
- Configuring OSPF Route Summarization in Cisco
- Configuring OSPF Network Types in Cisco
Virtual Local Area Network(VLAN)
- Three-Layer Hierarchical Model in Cisco
- 2 - Tier And 3 - Tier Architecture in Networking
- Spine-Leaf Architecture
- Virtual LAN (VLAN)
- Configuring and Verifying VLANs in Cisco
- Access and Trunk Ports
- What is ISL(Inter-Switch Link)?
- Inter-Switch Link (ISL) and IEEE 802.1Q
- Access Ports (Data and Voice) in CCNA
- Dynamic Trunking Protocol (DTP)
- VLAN Trunking Protocol (VTP)
- What are the VTP Modes?
Inter-V LAN Routing
- Inter VLAN Routing by Layer 3 Switch
- Configuration of Router on a stick
Dynamic Host Control Protocol(DHCP)
- Difference between DNS and DHCP
- How to Configure DHCP Server on a Cisco Router?
- DHCP Relay Agent in Computer Network
- What is APIPA (Automatic Private IP Addressing)?
Hot Standby Routing Protocol(HSRP)
- Redundant Link problems in Computer Network
- Firsthop Redundancy Protocol
- Hot Standby Router Protocol (HSRP)
Spanning Tree Protocol(STP)
- Introduction of Spanning Tree Protocol (STP)
- What is Bridge in Computer Network - Types, Uses, Functions & Differences
- Working of Spanning Tree Protocol (STP)
- Root Bridge Election in Spanning Tree Protocol
- How Spanning Tree Protocol (STP) Select Designated Port?
- Types of Spanning Tree Protocol (STP)
- Rapid Spanning Tree Protocol
- Configuring Spanning Tree Protocol Portfast
Ethernet Channel
- EtherChannel in Computer Network
- Configure, Verify and Troubleshoot (Layer 2/Layer 3) EtherChannel
- Link Aggregation Control Protocol
Switch Security
- DHCP Snooping
- Wireless Security | Set 1
- Port Security in Computer Network
- Configuring Port Security on Cisco IOS Switch
Access Control List(ACL)
- Standard Access-List
- Static NAT Configuration in Cisco
- Dynamic NAT Configuration in Cisco
- Extended Access-List
- Reflexive Access-List
IPv6 Addressing and Routing
- What is IPv6?
- Internet Protocol version 6 (IPv6)
- IPv6 EUI-64 (Extended Unique Identifier)
- Differences between IPv4 and IPv6
- Global Unicast Address in CCNA
- Link Local Address
- What is IPv6 Address Planning?
- How to Configure IPv6 on CISCO Router?
- What is IPv6 Stateless Address Autoconfiguration ?
- RPL (IPv6 Routing protocol)
Wide Area Network
- WAN Full Form
- What is VPN and How It Works?
- Overview of Wireless Wide Area Network (WWAN)
- Multi Protocol Label Switching (MPLS)
- Point-to-Point Protocol (PPP) Suite
Security Concepts
- Types of Cyber Attacks
- Types of Network Firewall
- Introduction of Firewall in Computer Network
- Intrusion Detection System (IDS)
- Intrusion Prevention System (IPS)
- Difference Between Symmetric and Asymmetric Key Encryption
- HTTP Full Form
- Explain the Working of HTTPS
- What is Attack Mitigation?
Network Device Security
- TELNET and SSH in Cisco devices
- How to configure SSH Client in Linux ?
- AAA (Authentication, Authorization and Accounting) configuration (locally)
- RADIUS Protocol
- TACACS+ Protocol
- Network Time Protocol (NTP)
- Configure and Verify NTP Operating in Client and Server Mode
Network Device Management
- What is Syslog server and its working ?
- Command-Line Tools and Utilities For Network Management in Linux
- Simple Network Management Protocol (SNMP)
- Overview of SNMPv3
Wireless Networking
- Wired and Wireless Networking
- What is a Wireless Access Point?
- Cisco Wireless Architecture and AP Modes
- Physical Infrastructure Connections of WLAN Components
- WiFi and its Amendments
- Types of Wireless Security Encryption
To configure an IP Address on a switch interface, first, we must change the interface from a layer 2 interface to a layer 3 interface. A point to note is that to provide an IP Address to a switch interface, the switch first must be a Multilayer Switch and all ports of an MLS is layer 2 by default. There are two ways to configure an IP address to a switch interface that is given below:
Static Configuration:
Consider a Multilayer Switch:

First, we need to check whether an interface is a layer 2 port or a layer 3 port.

Switch port: Enabled means that the port is currently a layer 2 port. To change the interface from a layer 2 switch to a layer 3 switch:
Providing IP address to an interface:

Checking if an IP address has been provided to the interface

Dynamic Configuration:
Consider this topology:

First, we again make the fa0/1 port of Switch0 a layer 3 port.
Then we provide interface Fa0/0 and configure a DHCP pool for the network 192.168.1.0/24 on router0.
Checking DHCP pool status:

After that, we go to Switch’s interface fa0/1 and execute the command:

Simulation of the DORA Process:
Please login to comment..., similar reads.
- CCNA IP Addressing
Improve your Coding Skills with Practice
What kind of Experience do you want to share?
How To Log In To A Cisco Router: Accessing Interface & Default Credentials
May 13, 2024
Discover the steps to log in to your Cisco router, including accessing the interface, default credentials, and troubleshooting login issues .
Accessing Cisco Router Interface
Using web browser.
When it comes to accessing your Cisco router using a web browser, the process is quite straightforward. First, make sure your computer is connected to the same network as the router. Then, open your preferred web browser and enter the default IP address of the router in the address bar. Typically, the default IP address for a Cisco router is 192.168.1.1 or 192.168.0.1. Press enter, and you should be prompted to enter a username and password.
- Ensure your computer is on the same network as the router.
- Open a web browser and enter the default IP address of the router.
- Enter the username and password when prompted.
Using Command Line Interface
For more advanced users or those who prefer a command-line interface, accessing the Cisco router interface can also be done through the Command Line Interface (CLI). To do this, you will need to open a terminal window on your computer and establish a Telnet or SSH connection to the router’s IP address. Once connected, you will be prompted to enter your username and password to access the router settings.
- Open a terminal window on your computer.
- Establish a Telnet or SSH connection to the router’s IP address.
- Enter your username and password when prompted.
By following these steps, you can easily access your Cisco router interface either through a web browser or command line interface. Whether you prefer a user-friendly graphical interface or a more technical approach, the choice is yours. Accessing the router interface is the first step towards configuring your network settings and ensuring optimal performance.
When it comes to accessing your Cisco router interface, the default login credentials play a crucial role in getting you started. Let’s delve into the specifics of these default settings:
The default username for most Cisco routers is typically set to “admin.” This username grants you access to the router settings and configuration options. It serves as your gateway to making any necessary changes or adjustments to your network setup.
In conjunction with the default username, the password is equally important for logging into your Cisco router. The default password is often set to either “admin” or left blank. It is essential to ensure that you have the correct password to avoid any login issues and maintain the security of your network.
Related: Understanding MBR Vs GPT: How To Initialize Disk
In summary, the default Cisco router login credentials consist of the username “admin” and a corresponding password, either “admin” or left blank. These credentials are the key to unlocking the potential of your router and managing your network effectively. Remember to keep these details secure and confidential to prevent unauthorized access.
- Ensure that you have the correct login credentials before attempting to access your Cisco router interface.
- Regularly update your password to enhance the security of your network.
- Contact your network administrator if you encounter any issues with logging in or managing your router settings.
Troubleshooting Login Issues
When it comes to troubleshooting login issues on your Cisco router, there are a few common problems that users may encounter. By understanding these issues and how to resolve them, you can ensure seamless access to your router settings.
Incorrect Credentials
One of the most common login issues users face is entering incorrect credentials. Whether it’s mistyping your username or password or forgetting them altogether, this can be a frustrating roadblock. If you find yourself in this situation, there are a few steps you can take to the problem:
- Check for typos : Double-check the username and password you entered to make sure there are no mistakes. Sometimes, a simple typo can be the culprit behind login issues.
- Reset your password : If you can’t remember your password, you can usually reset it by accessing the router settings. Follow the instructions in the “Changing Cisco Router Login Password” section to set a new password.
- Contact your network administrator : If you still can’t log in after trying the above steps, reach out to your network administrator for assistance. They may be able to reset your credentials or provide further guidance.
Network Connectivity Issues
Another common login issue is network connectivity problems. If you’re unable to access your Cisco router interface due to network issues, here are some troubleshooting steps you can take:
- Check your network connection : Ensure that your device is connected to the same network as your router. If you’re using a wired connection, make sure the Ethernet cable is securely plugged in. If you’re on a wireless connection, verify that you have a stable Wi-Fi connection.
- Restart your router : Sometimes, a simple restart of your router can resolve network connectivity issues. Unplug your router, wait a few seconds, and then plug it back in to see if this resolves the problem.
- Update your network drivers : If you’re still experiencing network connectivity issues, it may be due to outdated or faulty network drivers on your device. Check for updates and install any necessary driver updates to ensure smooth connectivity.
By following these troubleshooting steps for incorrect credentials and network connectivity issues, you can effectively address login problems on your Cisco router and regain access to your router settings. Remember, patience and persistence are key when troubleshooting technical issues, so don’t hesitate to seek help if needed.
Changing Cisco Router Login Password
Changing your Cisco router login password is an essential step in ensuring the security of your network. By regularly updating your password, you can prevent unauthorized access and protect your sensitive information. In this section, we will guide you through the process of accessing your router settings and setting a new password.
Accessing Router Settings
To change your Cisco router login password, the first step is to access your router settings. This can be done by following these simple steps:
Related: How To Reset A Power On Password On HP Devices
- Connect your computer to the router using an Ethernet cable or by connecting to the router’s Wi-Fi network.
- Open a web browser and enter the router’s IP address in the address bar. The default IP address for most Cisco routers is 192.168.1.1, but you can check the router’s manual or the manufacturer’s website for the specific IP address.
- You will be prompted to enter the router’s username and password. By default, the username is usually “admin” and the password is either blank or “admin”. If you have changed these credentials in the past and cannot remember them, you may need to perform a factory reset on the router.
Once you have successfully logged into the router settings, you can proceed to change the login password.
Setting a New Password
Setting a new password for your Cisco router login is a straightforward process, but it is crucial to choose a strong and secure password to protect your network. Follow these steps to set a new password:
- Navigate to the “Administration” or “Security” section of the router settings menu.
- Look for the option to change the login password and click on it.
- Enter your current password (if prompted) and then enter your desired new password. Make sure to choose a password that is at least 8 characters long and includes a mix of letters, numbers, and special characters for added security.
- Confirm the new password and save your changes.
Congratulations! You have successfully changed your Cisco router login password. Remember to keep your password secure and avoid sharing it with anyone to maintain the security of your network.
In conclusion, changing your router login password is a simple yet crucial step in protecting your network from unauthorized access. By following the steps outlined in this guide, you can ensure that your network remains secure and your sensitive information is protected. Stay vigilant and regularly update your password to stay one step ahead of potential security threats.
You may also like
- Understanding The Significance Of A MIB Report
- Resolving Chown Operation Not Permitted: Tips And Tricks
- Understanding Write Through Vs Write Back Caching Methods
- Troubleshooting “sudo Port Command Not Found” Error On Mac
- How To Resolve Size Of A Request Header Field Exceeds Server Limit Issue
- Understanding MBR Vs GPT: How To Initialize Disk
- Troubleshooting Exec Format Error In Linux: Causes And Solutions
- Configuring SQL Server For Remote Connections: Best Practices & Security Tips
- Troubleshooting Xhost Unable To Open Display Issues
- NAT Gateway Vs Internet Gateway: A Comprehensive Comparison

Thomas Bustamante is a passionate programmer and technology enthusiast. With seven years of experience in the field, Thomas has dedicated their career to exploring the ever-evolving world of coding and sharing valuable insights with fellow developers and coding enthusiasts.
Leave a Comment Cancel reply
Save my name, email, and website in this browser for the next time I comment.
3418 Emily Drive Charlotte, SC 28217
+1 803-820-9654 About Us Contact Us Privacy Policy
Join our email list to receive the latest updates.
How to access router settings
Discover the power of network customization

Tools and requirements
- Step-by-step guide
How to find your IP address
Final thoughts, you might also like....
Do you want to take control of your home or office network? Accessing your router settings opens up a world of possibilities, allowing you to customize and manage various aspects of your network experience.
By navigating through your router's configurations, you can fine-tune wireless settings, strengthen security, troubleshoot issues, and create a network tailored to your needs. In this guide, we'll walk you through the steps to access your router settings, including how to find your IP address. Are you ready to optimize your network for peak performance? Let's dive in!
- A router
- A device connected to the router via Ethernet or Wi-Fi
- Your IP address
You can find your IP address by looking at the router itself or checking your computer or mobile phone. We'll cover seven of the most common options: Router, Windows, Linux, Chromebook, Mac, Android, and iPhone.
Step-by-step guide for how to access router settings
1. find password.

Next, you'll need your username and password. If you haven't changed these, the default credentials are usually found in the router's manual or on a sticker on the router itself.
Some routers also use a WPS (Wi-Fi Protected Setup) PIN as a security feature to facilitate connecting devices to a Wi-Fi network. If your router has this, make a note of this as well.
If you can't find your username, password, or PIN, there are a few other options you can try.
You can visit the official website of the router manufacturer. Many manufacturers provide default login information for their routers on their websites. If you can't find the information online, contact the manufacturer's customer support, who may be able to provide you with the default login credentials.
If all else fails, you can perform a factory reset on your router. Keep in mind that this will erase all custom configurations, and you'll need to set up your router again. To reset the router, locate the reset button on your router. It is usually a small button that may require a paperclip or a similar tool to press. Press and hold the reset button for about 10-15 seconds until the router lights flash. Release the reset button, and the router will reboot to its factory settings.
3. Open your router settings page

Open a web browser like Chrome, Firefox, or Safari, and type the router's IP address into the address bar of your web browser.
You should now see the login page for your router. The example in the screenshot shows the Virgin Media Super Hub. You will see the router access page for your provider.
Enter your password and username or PIN.
4. Access router settings and make changes

Once logged in, you will have access to the router's settings. The layout and options may vary, but common settings include wireless settings, security options, and network configurations.
You can configure various settings, such as Wi-Fi passwords, security protocols, port forwarding, and more. Be cautious while making changes, as incorrect settings can affect your network's functionality.
After making any changes, remember to log out of the router's interface for security reasons.

Check on your router itself to see if it displays the router IP address we need to access the settings page. You should also make a note of the password and PIN, as we're going to need that later on.

You can find your router IP address on a Windows device in the command prompt window.
To open the Windows Command Prompt, click the Start button (Windows icon) in the bottom-left corner of your screen. Type Command Prompt or cmd into the search bar. Select Command Prompt from the search results.
Type ipconfig /all and press enter. Under the heading Wireless LAN or similar, you'll see an IP address next to Default Gateway. This is your router IP address.

To find out your Router IP address, you'll need to open the terminal.
Methods for opening the terminal vary slightly depending on which Linux distro you're using, but you should be able to access it from your applications or by entering Ctrl + Alt + T.
Once inside the terminal, type ip r and hit return. The first IP address returned will be your Router IP address.
4. Chromebook

To get your router's IP address on a ChromeOS device, click the clock at the bottom right of your screen and select the gear icon. Click Network, then Wi-Fi. Select your Wi-Fi router. You'll find the router's IP address next to Gateway.

If you're using a MacOS device, go to System Settings and Network: Wi-Fi. Click Details on your connection, and you'll find the address next to Router.

Open the Settings app on your Android device and select the Wi-Fi or Network and Internet option. Find the connected Wi-Fi network and tap on it, then look for an option like Network details. The exact wording may vary depending on your device. Your router IP address will be displayed here. It may be called the Gateway or Router IP.

Open the Settings app on your iPhone and navigate to Wi-Fi Settings. Find the connected Wi-Fi network and tap the (i) icon next to its name. This icon is typically located on the right side of the network name. In the network details, look for the Router or Gateway field. This field contains the IP address of your router.
Now that you've successfully accessed your router settings, you can take a closer look at your network settings and modify them to suit your preferences and requirements.
You can strengthen your network's security by updating Wi-Fi passwords, changing security protocols, and enabling features like MAC address filtering. You can also keep an eye on the list of connected devices to your network. This enables you to detect unauthorized devices and troubleshoot any connectivity issues.
You can also set up port forwarding, check firmware, and prioritize network traffic using Quality of Service (QoS) settings.
However, you should remember that making changes to your router settings should be approached with caution. Incorrect configurations can impact your network's functionality. Always refer to your router's documentation for guidance, and if in doubt, consult your router manufacturer's support. After making adjustments, ensure you log out of the router's interface to uphold security measures.
Get daily insight, inspiration and deals in your inbox
Get the hottest deals available in your inbox plus news, reviews, opinion, analysis and more from the TechRadar team.
- What is an IP address?
- The best Wi-Fi routers
- How to build a VPN router

Emma Street is a freelance content writer who contributes technology and finance articles to a range of websites, including TechRadar, Tom's Guide, Top10.com, and BestMoney. Before becoming a freelance writer, she worked in the fintech industry for more than 15 years in a variety of roles, including software developer and technical writer. Emma got her first computer in 1984 and started coding games in BASIC at age 10. (Her long, rambling, [and probably unfinishable] Land of Zooz series still exists on a 5-inch floppy disk up in her parents' loft somewhere.) She then got distracted from coding for a few decades before returning to university in her thirties, getting a Computing Science degree, and realizing her ambition of becoming a fully-fledged geek. When not writing about tech and finance, Emma can be found writing about films, relationships, and tea. She runs a tea blog called TeaFancier.com and holds some very strong opinions about tea. She has also written a bunch of romance novels and is aided at work by a tech-savvy elderly cat who ensures Emma fully understands all the functions of the F keys so she can quickly undo whatever the cat has just activated while walking over the keyboard.
Apple's next accessibility features let you control your iPhone and iPad with just your eyes
LG's new super-bright OLED panel could give the next Meta Quest an edge over the Apple Vision Pro
iOS 17.5 is reportedly resurfacing once deleted photos for some users
Most Popular
- 2 Microsoft launches generative AI model designed exclusively for US intelligence services — air-gapped system for spies aims to avoid potential security leaks
- 3 Google Maps is getting two helpful new features in its latest update
- 4 Memorial Day preview: save up to $1,000 on stunning OLED TVs at Best Buy
- 5 Forget projectors – TCL’s 115-inch mini-LED TV has 6.2.2-channel Dolby Atmos speakers and 5,000 nits brightness
- 2 Forget projectors – TCL’s 115-inch mini-LED TV has 6.2.2-channel Dolby Atmos speakers and 5,000 nits brightness
- 3 Capture amazing images every single day
- 4 Sennheiser has slashed prices on some of its best headphones for Click Frenzy
- 5 You can now play PS1 games in iOS on your iPhone – here’s how
- Skip to content
- Skip to search
- Skip to footer
Configure Hairpin with Firepower Management Center
Available Languages
Download options.
- PDF (212.2 KB) View with Adobe Reader on a variety of devices
- ePub (278.0 KB) View in various apps on iPhone, iPad, Android, Sony Reader, or Windows Phone
- Mobi (Kindle) (273.8 KB) View on Kindle device or Kindle app on multiple devices
Bias-Free Language
The documentation set for this product strives to use bias-free language. For the purposes of this documentation set, bias-free is defined as language that does not imply discrimination based on age, disability, gender, racial identity, ethnic identity, sexual orientation, socioeconomic status, and intersectionality. Exceptions may be present in the documentation due to language that is hardcoded in the user interfaces of the product software, language used based on RFP documentation, or language that is used by a referenced third-party product. Learn more about how Cisco is using Inclusive Language.
Introduction
This document describes the necessary steps to successfully configure Hairpin on a Firepower Threat Defense (FTD) with Firepower Management Center (FMC).
Prerequisites
Requirements.
Cisco recommends that you have knowledge of these topics:
- Firepower Management Center (FMC)
- Firepówer Threat Defense (FTD)
Components Used
The information in this document is based on these software and hardware versions:
- Firepower Management Center Virtual 7.2.4.
- Firepower Threat Defense Virtual 7.2.4.
The information in this document was created from the devices in a specific lab environment. All of the devices used in this document started with a cleared (default) configuration. If your network is live, ensure that you understand the potential impact of any command.
The term hairpin is used because the traffic from the client makes it to the router (or firewall implementing NAT) and is then turned back like a hairpin to the internal network after translation to access the private IP address of the server.
This function is useful for network services like web hosting within a local network, where the users on the local network need to access the internal server using the same URL or IP address that external users would use. It ensures uniform access to resources regardless of whether the request originates from inside or outside the local network.
In this example, an FMC must be accessed through the IP of the external interface of the FTD

Step 1. Configure Outside-Inside Nat
As the first step, a static NAT must be configured; in this example, the destination IP and destination port are translated using the IP of the Outside interface and the port destination is 44553.
From the FMC navigate to Device > NAT to create or edit the existing policy, then click the Add Rule box.
- NAT Rule: Manual Nat Rule
- Original Source: Any
- Original Destination: Source Interface IP
- Original Destination Port: 44553
- Translated Destination : 192.168.14.25
- Translated Destination Port: 443

Configure the policy. Navigate to Policies > Access Control to create or edit the existing policy, then click the Add Rule box.
Source Zone: Outside
Destination Zone: Inside
Source Network: Any
Destination Network: 10.88.243.79

Step 2. Configure Inside-Inside Nat (Hairpin)
As the second step, a static NAT must be configured from Inside to Inside; in this example, the destination IP and destination port are translated using an object with the IP of the outside interface and the destination port is 44553.
From the FMC navigate to Device > NAT to edit the existing policy, then click the Add Rule box.
- Original Source: 192.168.14.0/24
- Original Destination: Address 10.88.243.79
- Translated Source: Destination Interface IP

Configure the policy. Navigate to Policies > Access Control to edit the existing policy, then click the Add Rule box.
Source Zone: Any
Destination Zone: Any
Source Network: 192.168.14.0/24

From the local client, do a telnet with destination IP and destination port:
If this error message "telnet unable to connect to remote host: Connection timed out" prompt, something went wrong at some point during the configuration.

But if it says Connected, the configuration was successful.

Troubleshoot
If you are experiencing issues with Network Address Translation (NAT), use this step-by-step guide to troubleshoot and resolve common issues.
Step 1: NAT Rules Configuration Check
- Review NAT Rules: Ensure all NAT rules are correctly configured in FMC. Check that the source and destination IP addresses, as well as ports, are accurate.
- Interface Assignment: Confirm that both the source and destination interfaces are correctly assigned in the NAT rule. Incorrect mapping can cause traffic not to be translated or routed properly.
- NAT Rule Priority: Verify that the NAT rule is placed at the top of any other rule that can match the same traffic. Rules in FMC are processed in sequential order, so a rule placed higher up has precedence.
Step 2: Access Control Rules (ACL) Verification
- Review ACLs: Check the Access Control Lists to make sure they are appropriate for permitting NAT traffic. ACLs must be configured to recognize the translated IP addresses.
- Rules Order: Make sure the access control list is in the correct order. Like NAT rules, ACLs are processed from top to bottom, and the first rule that matches the traffic is the one that is applied.
- Traffic Permissions: Verify that an appropriate access control list exists to allow traffic from the internal network to the translated destination. If a rule is missing or incorrectly configured, the desired traffic could be blocked.
Step 3: Additional Diagnostics
- Use Diagnostic Tools: Utilize the diagnostic tools available in FMC to monitor and debug the traffic passing through the device. This includes viewing real-time logs and connection events.
- Restart Connections: In some cases, existing connections cannot recognize changes made to NAT rules or ACLs until they are restarted. Consider clearing existing connections to force new rules to be applied.
- Verify Translation: Use commands like show xlate and show nat on the command line if you are working with FTD devices to verify that NAT translations are being performed as expected.
Revision History
Contributed by Cisco Engineers
- Yahir Alejandro Martinez Technical Consulting Engineer
Was this Document Helpful?

Contact Cisco
- (Requires a Cisco Service Contract )
This Document Applies to These Products
- Secure Firewall Management Center
IMAGES
VIDEO
COMMENTS
This configuration example shows the loopback interface configured on the gigabit ethernet interface with an IP address of 200.200.100.1/24, which acts as a static IP address. The loopback interface points back to virtual-template1, which has a negotiated IP address. ! interface loopback 0 ip address 200.200.100.1 255.255.255. ip nat outside ...
Both of them are discussed as follows: Through command line mode: Firstly, enter the command line by clicking on any router and then selecting the CLI tab. Enter config mode by typing the following commands in the command line: en. config t. Now we can assign IP addresses to their respective interfaces.
Configuring IP Address. IP addresses are the building block to IP communications. In a router, any active IP interface will require an IP address. Setting the IP address includes setting of the address itself plus the mask. The mask tells the router how to read the IP address and understand in terms of networks and hosts.
Assigning an IP address to an interface is the foundational requirement for all Cisco devices as Cisco devices are networking devices. ... - Activate the FastEthernet0/0 Interface. By default, all interfaces on a Cisco router are placed in "Administratively Down". To bring an interface up, issue the no shutdown command.
In the most general sense the term network address means "the IP address that routers use to route traffic to a specific network segment so that the intended destination IP host on that segment can receive it". ... Establishing IP Connectivity to a Network by Assigning an IP Address to an Interface. Perform this task to configure an IP ...
Step3: Configure IP addresses for Router Interfaces. This is an essential step in order for your router to be able to forward packets in the network. The most basic parameter for a Router Interface is the IP address. ... Step 7 (optional): Configure DHCP. A Cisco router can be configured as a DHCP server to assign IP addresses dynamically to ...
Configuring an IP Address on an Interface. To configure IP addresses on an interface, use the ip address command from interface configuration mode: Router#. Router#conf t. Enter configuration commands, one per line. End with CNTL/Z. Router(config)#int fa 0/0. Router(config-if)#ip addr 192.168.10.1 255.255.255..
To configure the router, perform one or more of these tasks: ... This configuration example shows the loopback interface configured on the Fast Ethernet interface with an IP address of 10.10.10.100/24, which acts as a static IP address. ... The Cisco routers can use IP routing protocols, such as Routing Information Protocol (RIP) or Enhanced ...
Above, you can see the four interfaces that this router has. It also tells us: IP-Address: if the interface has an IP address or not. OK: whether the interface is performing correctly or not. Method: how the IP address is configured. For example, we can configure an IP address manually or through DHCP.
Configuring a Cisco router with an IP address is a simple process. There are typically four steps involved: Verify the current interface configuration of the router. Choose the interface you want to assign an IP address to. Assign the IP address. Enable the interface on the Cisco router.
Follow the steps below to configure a static IP address on the switch: Step 1. Connect your computer directly to the switch using a serial cable. If you would prefer to SSH into your switch, click here to view an article on gaining CLI access to a switch. Step 2. Log in to the switch console.
Cisco routers are almost useless without an IP address configured on one or more of their interfaces. To configure an IP address for an interface, you can use the ip address ADDRESS SUBNET MASK interface mode command:. In the picture above you can see that we have configured the Fa0/0 interface with the IP address of 192.168.5.44.We also had to specify the subnet mask: 255.255.255..
I like to use Gi0/0 to connect the ISP's Ethernet line. Here are the commands to configure an IP address on your Cisco router. Router(config)# interface gigabitEthernet 0/0. Router(config-if)# description INTERNET LINE. Router(config-if)# ip address 165.13.70.66 255.255.255.252. Router(config-if)# no ip proxy-arp.
The supervisor engine sends IP packets that are destined for other IP subnets to the default gateway (typically, a router interface in the same network or subnet as the switch IP address). The switch does not use the IP routing table to forward traffic from connected devices; the switch forwards only IP traffic that is generated by the switch ...
Switch port: Enabled means that the port is currently a layer 2 port. To change the interface from a layer 2 switch to a layer 3 switch: int f0/1. no switchport exit. Providing IP address to an interface: int f0/1. ip add 192.168.1.1 255.255.255.1. Checking if an IP address has been provided to the interface.
Typically, the default IP address for a Cisco router is 192.168.1.1 or 192.168..1. Press enter, and you should be prompted to enter a username and password. Ensure your computer is on the same network as the router. Open a web browser and enter the default IP address of the router. Enter the username and password when prompted.
Open the Settings app on your iPhone and navigate to Wi-Fi Settings. Find the connected Wi-Fi network and tap the (i) icon next to its name. This icon is typically located on the right side of the ...
In this example, an FMC must be accessed through the IP of the external interface of the FTD. Diagram. Step 1. Configure Outside-Inside Nat. As the first step, a static NAT must be configured; in this example, the destination IP and destination port are translated using the IP of the Outside interface and the port destination is 44553.