How-To Geek
How to assign a static ip address in windows 10 or windows 11.
When organizing your home network it's easier to assign each computer it's own IP address than using DHCP. Here we will take a look at doing it in XP,

Quick Links
What is a static ip address, assign static ip addresses via your router, how to set a static ip address in windows 11, how to set a static ip address in windows 10, how to set a static ip address in windows 7 or 8 using "network connections", set a static ip address in windows vista, set a static ip address in windows xp, key takeaways.
- To set a static IP address in Windows 10 or 11, open Settings -> Network & Internet and click Properties for your active network.
- Choose the "Edit" button next to IP assignment and change the type to Manual.
- Flip the IPv4 switch to "On", fill out your static IP details, and click Save.
Sometimes, it's better to assign a PC its own IP address rather than letting your router assign one automatically. Join us as we take a look at assigning a static IP address in Windows.
A static IP address is manually set to a permanent, fixed address rather than being assigned automatically by your router using a procotol known as Dynamic Host Configuration Protocol (DHCP). DHCP is a handy way for devices to connect to your network more easily, because you don't have to configure IP addressing for each new device yourself. The downside to automatic addressing is that it's possible for a device's IP address to change from time to time, which is why people choose static IPs for certain types of devices. For example:
- You have a device like a home media server that you want to be able to find using the same IP address or host name each time.
- You have certain apps that can only connect to network devices using their IP address. In particular, many older networking apps suffer this limitation.
- You forward ports through your router to devices on your network. Some routers play nice with port forwarding and dynamic IP addresses; others do not.
Whatever your reason, assigning static IP addresses to devices is not difficult, but you do have a choice to make---whether to do it from the router or on the device itself.
Related: How to Set a Static IP Address in Ubuntu
While this article covers assigning static IP addresses to PCs within Windows itself, there is another way to go about it. Many routers allow you to assign a pool of IP addresses that are handed out to specific devices (based on the device's physical, or MAC address). This method offers a couple of significant advantages:
- IP addresses are still managed by the router, meaning that you won't have to make (and keep up with) changes on each individual device.
- It's easier to assign addresses within the same IP address pool your router uses.
This article is about assigning static IP addresses directly to PCs running Windows. We've already got a great guide on How to Set Static IP Addresses On Your Router , so if that's the way you want to go, be sure to give it a read.
With all that in mind, though, let's take a look at how to assign static IP addresses within any version of Windows.
Related: How to Find Your Router's IP Address on Any Computer, Smartphone, or Tablet
To set a static IP address in Windows 11, you'll want to open Settings, go to Network & Internet, and then find the Properties for your network. Inside there you'll be able to click the Edit button for IP Assignment and then fill out the manual network details.
First, open up the Settings app and then find Network & Internet on the left-hand side. You'll be presented with a panel that shows your current network connection. You can click where it says "Properties" right underneath the network, or if you have multiple network connections you can drill down into the specific network to see the IP address details for each one . In this case it's called "Ethernet", but you will most likely see "Wi-Fi" as the option to choose.
Once you've drilled down into the network connection that you want to set a manual IP for, scroll down until you see "IP Assignment" and then click the Edit button to the right.
Once there, you'll flip the drop-down to "Manual" and switch the IPv4 switch to "On". At this point you can fill out your network details and click Save to finish.
You can also use the old-school Network Connections panel in Windows 11, so if you prefer to use that method, keep reading.
If you're interested in more advanced networking, you might need to set up a static TCP/IP route , reset the entire TCP/IP stack on Windows , check open TCP/IP ports , find your MAC address on Windows , or find your IP address from the Command Prompt . We've got you covered there too.
To set a static IP address in Windows 10, you'll need to open the Settings app and drill down to Network & Internet. From there you'll select Properties for your network, and then the Edit button next to IP Assignment where you can input a manual IP address.
First, open the Settings app and locate the Network & Internet button.
On the next screen you'll see your network status, which should show you your active network. Here you'll want to click the Properties button. If you have multiple different networks, you could select them from the left-hand menu---in our case you'll notice we have both Wi-Fi and Ethernet networks, so you'll want to pick the one that you are trying to set a manual IP address for. You'll notice this is the same method we use when we're trying to find an IP address on Windows 10 .
On the network properties screen, scroll down until you see "IP settings" and click the Edit button under "IP assignment".
In the resulting popup window, change the Edit IP settings dropdown to Manual and then flip the IPv4 switch to "On". Fill out the details, click Save, and you should be good to go.
You might need to reboot to get all of your applications to work properly, just because it's Windows.
It's worth noting that you can use the old Network Connections method to set an IP address in any version of Windows, so if you prefer that method, keep reading.
To change the computer's IP address in Windows 7, you'll need to open the "Network Connections" window. Hit Windows+R, type "ncpa.cpl" into the Run box, and then hit Enter.
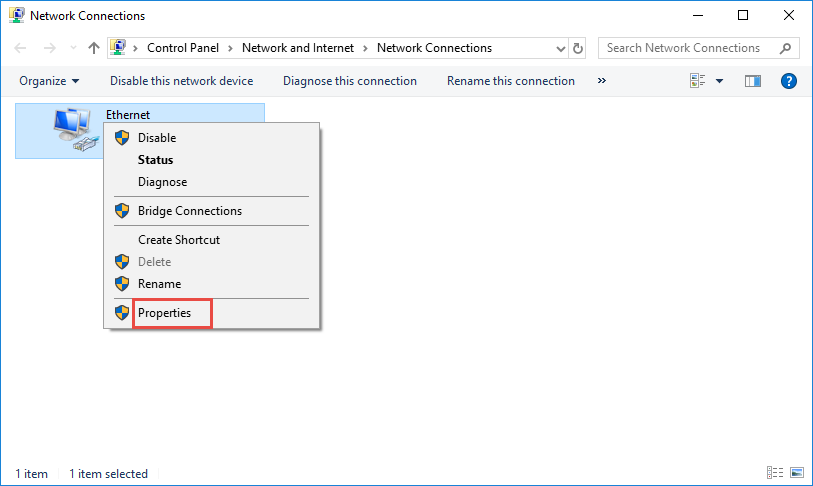
In the "Network Connections" window, right-click the adapter for which you want to set a static IP address, and then select the "Properties" command.
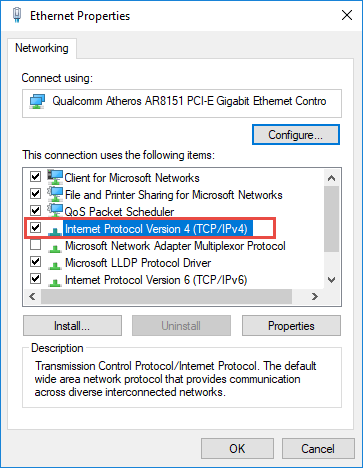
In the properties window for the adapter, select "Internet Protocol Version 4 (TCP/IPv4)" and then click the "Properties" button.
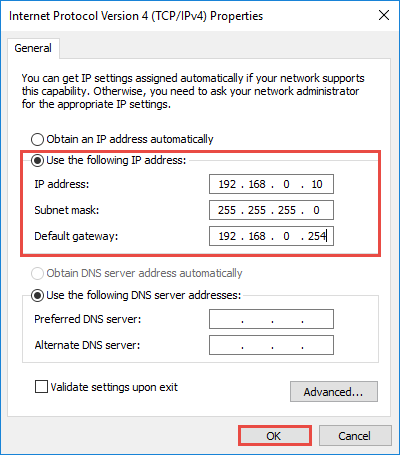
Select the "Use the following IP address" option, and then type in the IP address, subnet mask, and default gateway that corresponds with your network setup. Next, type in your preferred and alternate DNS server addresses. Finally, select the "Validate settings upon exit" option so that Windows immediately checks your new IP address and corresponding information to ensure that it works. When you're ready, click the "OK" button.
And then close out of the network adapter's properties window.
Windows automatically runs network diagnostics to verify that the connection is good. If there are problems, Windows will give you the option of running the Network troubleshooting wizard. However, if you do run into trouble, the wizard likely won't do you too much good. It's better to check that your settings are valid and try again.
Changing your IP from DHCP to a Static address in Vista is similar to other versions of Windows, but getting to the correct location is a bit different. Open the Start Menu, right-click on Network, and select Properties.
The Network and Sharing Center opens...click on Manage network connections.
Right-click on the network adapter you want to assign an IP address and click Properties.
Highlight Internet Protocol Version 4 (TCP/IPv4) then click the Properties button.
Now change the IP, Subnet mask, Default Gateway, and DNS Server Addresses. When you're finished click OK.
You'll need to close out of Local Area Connection Properties for the settings to go into effect.
Open the Command Prompt and use the
command to verify that the changes were successful.
To set a Static IP in Windows XP, right-click the "My Network Places" icon, and then select "Properties."
Right-click the adapter for which you want to set the IP, and then select "Properties" from the context menu.
Select the "Internet Protocol (TCP/IP)" entry, and then click the "Properties" button.
Select the "Use the following IP address" option. Type in the IP address, subnet mask, default gateway, and DNS server addresses you want to use. When you're finished, click the "OK" button.
You will need to close out of the adapter's properties window before the changes go into effect.
And you can verify your new settings by using the
command at the command prompt.
By and large, it's better to let most of your devices have their IP addresses assigned automatically by your router. Occasionally, though, you might want to set a static IP address for a particular device. While you can set static IP addresses directly on your devices (and this article has shown you how to do just that on Windows PCs), we still recommending setting up static IP addressing on your router if possible. It will just make life easier.
Related: How to Find Any Device's IP Address, MAC Address, and Other Network Connection Details
How To Change Your IP Address On Windows 10 (& Why You’d Want To)
We'll help you properly configure your network
When you connect to a local network, the device you’re using is given an IP address, allowing other devices to find and communicate with it, as well as signifying that the device itself has correctly authenticated. The larger the network, the more IP addresses that will be in use, which can cause some allocation issues.
In most cases, IP address allocation is determined by your local router, so to change your IP address on a Windows 10 PC, you’ll need to configure your network as a whole. Alternatively, you may want to set a static IP address , or change your public IP address for all your devices. To change your IP, here’s what you’ll need to do.

Why Change Your IP Address On Windows?
There are a couple of reasons why you might want to change your IP address.
Typically, a local network router will allocate a temporary IP address to your device when you connect using DHCP (the protocol used to assign IP addresses), giving it a temporary lease to that address. When the lease runs out, it will need to be renewed, otherwise you could be allocated a new address.

While this usually happens automatically, problems can sometimes occur. A poorly configured or busy local network, along with misconfigured devices, might result in the same IP address being allocated twice, causing conflicts.
If this happens, you may wish to set a static IP address, giving your device a permanent address. You’ll want to do this for devices that are regularly accessed by other devices, such as home servers or network attached storage devices .
These all apply for local networks, but you may want to change the IP address given to you by your internet service provider. This can be trickier to do, but there are a few ways to change this address if your ISP allows it.
Configuring Your Network Router DHCP Settings
One of the easiest ways to change your IP address is to configure your network router to assign a new IP address. To do this, you should configure the DHCP settings on your router to assign IP addresses differently.
You could, for instance, set a static allocation for your Windows PC. When your device connects, your router will always assign the same IP address to it by using your device’s MAC address to identify it.

If you don’t want to do this, you could also change the IP range used by your local router. This means that your local IP address may still change from time to time, but the range of addresses will be different. Your IP address may change from 192.168.0.10 to 192.168.10.10 , for instance.

To do this, you’ll need to access your router’s administration page. This will vary by device, but typically, many local routers can be accessed by typing http://192.168.0.1 or http://192.168.1.1 from your web browser. Consult your user manual for the correct username and password to use here.
The steps to change your DHCP settings will also vary, but you’ll typically find DHCP settings listed under its own section (eg. DHCP ), while fixed IP allocations can be found under address allocation or similar.

Releasing DHCP Lease and Resetting Your Dynamic IP
Any changes you make to your router’s DHCP settings may require you to release or renew your Windows IP address using the Windows PowerShell.
- To do this from the Windows PowerShell, right-click the Start menu and click the Windows PowerShell (Admin) option.

- In the PowerShell terminal window, type ipconfig /release to release your DHCP lease and disconnect. With your new settings in place, type ipconfig /renew to reconnect.

If your router settings have been correctly changed, releasing your DHCP lease and resetting your IP will result in a new IP address being allocated to your device.
Setting a Static IP Address On Windows 10
A static IP address can be achieved through a fixed DHCP allocation, but you can also set this manually in your Windows 10 settings. You may want to do this if you’re making a direct connection to another device.
This may also work with your local router, but as your device is already being assigned an IP using DHCP, an IP conflict may occur. In this case, it’s better to use a fixed IP allocation to do this instead.
- To set a static IP address, open your network settings by right-clicking the Start menu and clicking the Network Connections option.

- In the Network Connections settings menu, press the Change connection properties option.

- Under the IP Settings category, press the Edit option.

- Change the IP allocation type to Manual . Enable either IPv4 or IPv6 , then type the static IP settings you wish to apply. An example configuration for an static IPv4 IP address would include 192.168.0.10 for IP address, 24 for subnet prefix length, and 192.168.0.1 for gateway (referring to your local router) and preferred DNS server. Click Save once you’re done.

Once saved, your IP address settings will be applied automatically. You may need to release your existing IP using the steps above or restart your PC for the changes to take effect fully.
Change Your Public IP Address On Windows 10
Your public IP address is the address assigned by your internet service provider, giving you access to the internet. This is assigned to your modem (which is usually combined with your network router, but not always), allowing all other connected network devices to the internet, too.
Changing this address can sometimes be difficult. You’ll need to check if you’re assigned a dynamic (temporary) or static IP address by your ISP first. If you’re assigned a static public IP, your ISP will need to change this for you.

For dynamic IP addresses, you can usually reset this by switching your network modem off for a period of time. By doing this, you’re disconnecting your device from your ISP.
As with your local network, your public IP lease will eventually run out, meaning you may be allocated a new IP address at this point. However, this isn’t guaranteed to work, and you may need to try another method.
If your public IP address won’t change, there are other methods you could try. Using a virtual private network , will hide your public IP as you browse online, for instance.
Configuring Your Network On Windows 10
Whether you’re configuring a server for your network (or for wider internet users), or you just want to free up allocations for other devices, it’s an easy process to change your IP address on Windows 10, although much of the work relies on being able to access your router to properly configure your network.
If your network configuration is causing problems, you may wish to reset your network router to wipe the slate clean and start again. IP allocation issues might be why you’re struggling with network connection issues, but thankfully, there are several ways to fix unidentified network problems on Windows 10.

Ben Stockton is a freelance technology writer based in the United Kingdom. In a past life, Ben was a college lecturer in the UK, training teens and adults. Since leaving the classroom, Ben has taken his teaching experience and applied it to writing tech how-to guides and tutorials, specialising in Linux, Windows, and Android. He has a degree in History and a postgraduate qualification in Computing. Read Ben's Full Bio
Read More Posts:

You are using an outdated browser. Please upgrade your browser to improve your experience.
Your browser does not support JavaScript. Please turn it on for the best experience.
- All Support
- Download Center
- Support Videos
TP-Link Community
- Contact Technical Support
- Online Stores
- Distribution Partners
- Reseller Partners
- Solution Partners
How to find and manually assign an IP address on Windows 10
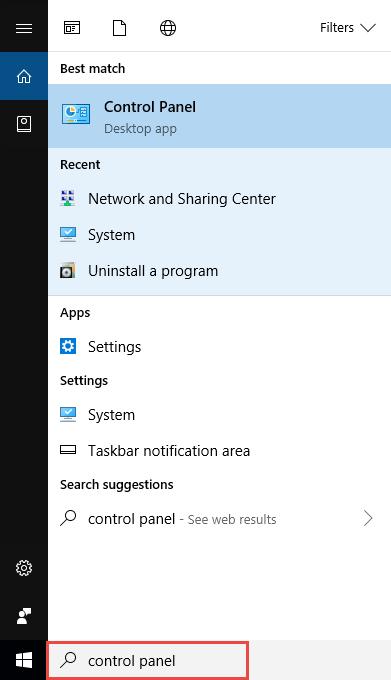
Step 1: Open the Control Panel

You can also type control panel in the search bar at the lower left of the screen and press Enter to open the control panel.
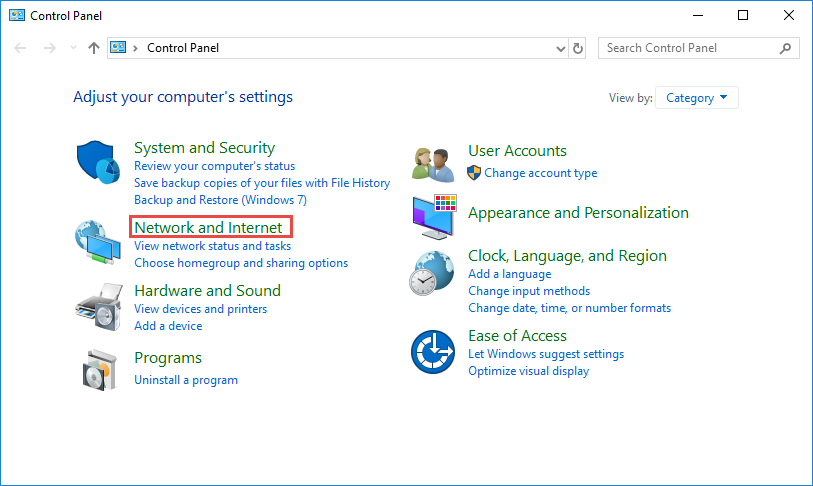
Step 2: Go to Network Connections
Go to Network and Internet > Network and Sharing Center .
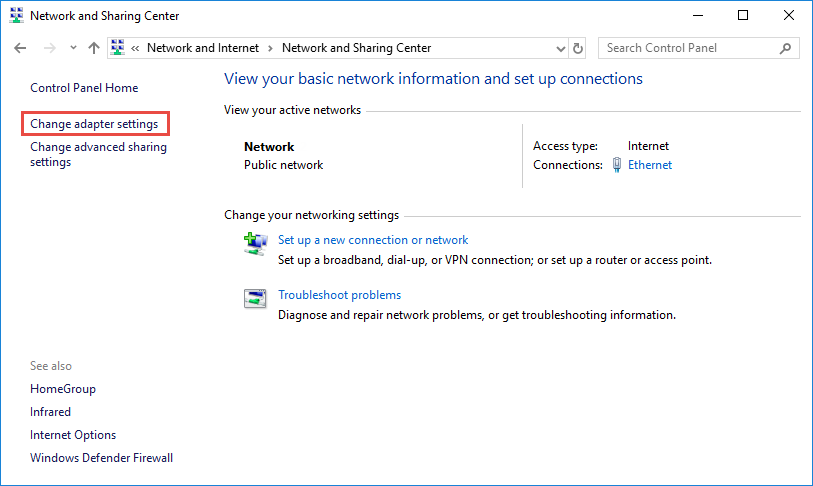
Select Change adapter settings on the left.
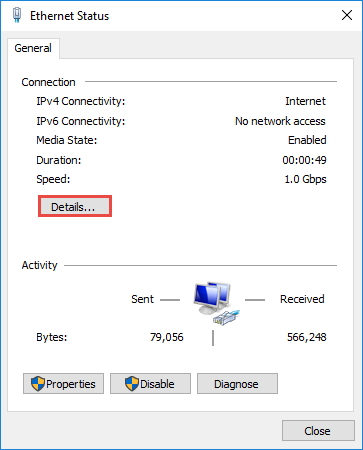
Step 3: Find the IP address
Right click the Ethernet icon and select Status from the context menu.

Then click Details... to view all detailed information of network connection.
Step 4: Set the IP address
Right Click Local Area Connection and select Properties .
Then double click Internet Protocol Version 4 (TCP/IPv4) .
Select Use the Following IP address: and type in the IP address , Subnet mask and Default gateway . Click OK to apply the settings.
Note : If you need to set a static DNS server, select Use the following DNS server address : and input the address of DNS server. By default, the computer obtains the address automatically.
Is this faq useful?
Your feedback helps improve this site.
What’s your concern with this article?
- Dissatisfied with product
- Too Complicated
- Confusing Title
- Does not apply to me
We'd love to get your feedback, please let us know how we can improve this content.
We appreciate your feedback. Click here to contact TP-Link technical support.
Still need help? Search for answers, ask questions, and get help from TP-Link experts and other users around the world.
Visit the Community >
We have updated our Policies. Read Privacy Policy and Terms of Use here. This website uses cookies to improve website navigation, analyze online activities and have the best possible user experience on our website. You can object to the use of cookies at any time. You can find more information in our privacy policy .
Basic Cookies
These cookies are necessary for the website to function and cannot be deactivated in your systems.
accepted_local_switcher, tp_privacy_base, tp_privacy_marketing, tp_smb-select-product_scence, tp_smb-select-product_scenceSimple, tp_smb-select-product_userChoice, tp_smb-select-product_userChoiceSimple, tp_smb-select-product_userInfo, tp_smb-select-product_userInfoSimple, tp_top-banner, tp_popup-bottom, tp_popup-center, tp_popup-right-middle, tp_popup-right-bottom, tp_productCategoryType
__livechat, __lc2_cid, __lc2_cst, __lc_cid, __lc_cst, CASID
id, VISITOR_INFO1_LIVE, LOGIN_INFO, SIDCC, SAPISID, APISID, SSID, SID, YSC, __Secure-1PSID, __Secure-1PAPISID, __Secure-1PSIDCC, __Secure-3PSID, __Secure-3PAPISID, __Secure-3PSIDCC, 1P_JAR, AEC, NID, OTZ
Analysis and Marketing Cookies
Analysis cookies enable us to analyze your activities on our website in order to improve and adapt the functionality of our website.
The marketing cookies can be set through our website by our advertising partners in order to create a profile of your interests and to show you relevant advertisements on other websites.
Google Analytics & Google Tag Manager
_gid, _ga_<container-id>, _ga, _gat_gtag_<container-id>
Google Ads & DoubleClick
test_cookie, _gcl_au
cebsp_, _ce.s, _ce.clock_data, _ce.clock_event, cebs
OptanonConsent, _sctr, _cs_s, _hjFirstSeen, _hjAbsoluteSessionInProgress, _hjSessionUser_14, _fbp, ajs_anonymous_id, _hjSessionUser_<hotjar-id>, _uetsid, _schn, _uetvid, NEXT_LOCALE, _hjSession_14, _hjid, _cs_c, _scid, _hjAbsoluteSessionInProgress, _cs_id, _gcl_au, _ga, _gid, _hjIncludedInPageviewSample, _hjSession_<hotjar-id>, _hjIncludedInSessionSample_<hotjar-id>
lidc, AnalyticsSyncHistory, UserMatchHistory, bcookie, li_sugr, ln_or
- Disk & Data Manager
- Partition Wizard
- Power Data Recovery
- ShadowMaker
- Media Toolkit
- uTube Downloader
- Video Converter
- Download Partition Wizard Free Edition: Download Pro Edition: Try Demo Server Edition: Try Demo
- Partition Magic
How to Change IP Address on Windows 10 [Step-by-Step Guide]
Sometimes, we have to change IP address out of many reasons. How to change IP address on Windows 10? If you are also searching for the answer, you can follow this Windows 10 guide provided by MiniTool to change IP address.
Before You Do
How to change your IP address? In order to change IP address Windows 10 smoothly, it’s required to log in to Windows 10 using an administrator account. Besides, you need to find the IP address of your router and computer. To do so, follow the steps below.
Step 1. Press the Win + I keys to open the Settings app and go to the Network & Internet section.
Step 2. In the Status tab, scroll down the right sidebar and click on the View your network properties option.
Step 3. Now, scroll down the new screen to find the Default gateway and IPv4 address sections. The router’s IP address is next to the Default gateway and the IPv4 address identifies your computer. Remember the IP addresses you have found.

Now, let’s see how to change IP address Windows 10 in the following part.

Minecraft port forwarding is a heated topic among a great number of Minecraft fans. How to port forward Minecraft? Let’s this post tell you the answer.
How to Change My IP Address in Windows 10
Here we will walk you through 2 methods. Each method will be discussed in detail. Now, let’s start learning how to change IP address Windows 10.
Method 1. Change IP Address Windows 10 Using the Settings App
The first and simplest way to change IP address is to use the Settings app. Here’s a full guide for you:
Step 1. Open the Settings app by pressing Win + I keys and then click on Network & Internet .
Step 2. In the pop-up window, select the network type based on your situation. If your device connects to the Internet through a wireless card, select the Wi-Fi section. If your device is using a wired connection, select the Ethernet section.

Step 3. Scroll down the right sidebar to locate the IP settings section and click on the Edit button.
Step 4. In the pop-up dialog box, select Manual from the drop-down menu and enable the IPv4 switch.
Step 5. Enter all the required details below including IP address , Subnet prefix length , Gateway , etc.
IP address : It refers to the static IP address that you want to use.
Subnet prefix length : It refers to the prefix length that determines the size of the subnet.
Gateway : It refers to the IP address of your router.
The Preferred DNS and Alternate DNS settings are not mandatory to enter. The setting will be automatically assigned by your router if they are blank.
Step 6. After the details are entered, click on the Save button to change IP address.

Method 2. Change IP Address Windows 10 in Control Panel
In addition to the above method, you can change IP address Windows 10 through the Control Panel. Here’s how to do that:
Step 1. Type control in the search window and select the Control Panel app from the best match.
Step 2. Change the View by to Category , and then click on View network status and tasks under the Network and Internet section.

Step 3. Navigate to the View your active networks tab and click on your Internet connection next to it.

Step 4. In the pop-up window, click on Properties and then select the Internet Protocol Version 4 or IPv6 , which depends on the IP address that you’re ready to change.
Step 5. Click on the Properties button.

Step 6. In the Properties window, select the Use the following IP address option if you want to set a static IP address.
Step 7. Then you need to enter all the required details manually including IP address, subnet mask , and Default gateway . After that, click on OK to save the changes and exit the window.

How to change your IP address in Windows 10? I believe that already have known detailed steps. Now, it’s your turn to have a try.
About The Author

Position: Columnist
User Comments :
- PRO Courses Guides New Tech Help Pro Expert Videos About wikiHow Pro Upgrade Sign In
- EDIT Edit this Article
- EXPLORE Tech Help Pro About Us Random Article Quizzes Request a New Article Community Dashboard This Or That Game Popular Categories Arts and Entertainment Artwork Books Movies Computers and Electronics Computers Phone Skills Technology Hacks Health Men's Health Mental Health Women's Health Relationships Dating Love Relationship Issues Hobbies and Crafts Crafts Drawing Games Education & Communication Communication Skills Personal Development Studying Personal Care and Style Fashion Hair Care Personal Hygiene Youth Personal Care School Stuff Dating All Categories Arts and Entertainment Finance and Business Home and Garden Relationship Quizzes Cars & Other Vehicles Food and Entertaining Personal Care and Style Sports and Fitness Computers and Electronics Health Pets and Animals Travel Education & Communication Hobbies and Crafts Philosophy and Religion Work World Family Life Holidays and Traditions Relationships Youth
- Browse Articles
- Learn Something New
- Quizzes Hot
- This Or That Game
- Train Your Brain
- Explore More
- Support wikiHow
- About wikiHow
- Log in / Sign up
- Computers and Electronics
- Operating Systems
How to Change Your IP Address (Windows)
Last Updated: March 13, 2020 Tested
This article was written by Stan Kats and by wikiHow staff writer, Jack Lloyd . Stan Kats is the COO and Chief Technologist for The STG IT Consulting Group in West Hollywood, California. Stan provides comprehensive technology & cybersecurity solutions to businesses through managed IT services, and for individuals through his consumer service business, Stan's Tech Garage. Stan has over 7 years of cybersecurity experience, holding senior positions in information security at General Motors, AIG, and Aramark over his career. Stan received a BA in International Relations from The University of Southern California. The wikiHow Tech Team also followed the article's instructions and verified that they work. This article has been viewed 2,546,719 times.
This wikiHow teaches you how to change both your public IP address and your private IP address on a Windows computer. Your public IP address is the address that your computer broadcasts to other networks, while your private IP address is your computer's specific address within your own wireless network. Changing either of these may fix connection issues.

- You may want to check your current IP address before doing this.
- Simply unplugging the router and modem from the wall will work.

- Click Wi-Fi in the pop-up window.

- You may want to check your IP address again to make sure it has changed.

Renewing the Address

- If you aren't an administrator on your current computer, you won't have this option and thus won't be able to renew your computer's IP address.

Changing the Address

- IP address - Usually, your device's IP address will be "192.168.1.X" (or a similar set of numbers), wherein "X" is specific to your device. Change the "X" value to a number between 1 and 100. Make sure you don't use the same IP address as another device on your network (e.g., your phone).
- Subnet prefix length - This depends on your IP address, but will usually be "255.255.255.X".
- Gateway - This is your router's IP address.
- Preferred DNS - Your preferred DNS address (for example: "208.67.222.222" for the OpenDNS server, or "8.8.8.8" for Google's server).
- Alternate DNS - A secondary DNS address (for example: "208.67.220.220" for the OpenDNS server, or "8.8.4.4" for Google's server).

Expert Q&A

- You'd change your public IP address in the event that you were kicked out of a gaming service (e.g., Steam), while you'd change your private IP address to fix website loading errors. Thanks Helpful 1 Not Helpful 0
- Using a proxy server will not change your IP address in the traditional sense, but it will alter the IP address that others can see. Thanks Helpful 0 Not Helpful 0
- You can also use a browser like Tor to hide your IP address, though such browsers can be dangerous and are often slower than average. Thanks Helpful 0 Not Helpful 0

- If you choose an in-use IP address for your computer when changing its private IP address, the device that is currently using that address will get kicked off of the network. Thanks Helpful 0 Not Helpful 0
You Might Also Like

- ↑ http://www.whatismyip.com/ip-faq/how-to-change-your-ip-address/
About This Article

1. Unplug your router and modem. 2. Disable your Wi-Fi. 3. Wait 5 minutes. 4. Plug the router and modem back in. 5. Re-enable Wi-Fi. Did this summary help you? Yes No
- Send fan mail to authors
Is this article up to date?

Featured Articles

Trending Articles

Watch Articles

- Terms of Use
- Privacy Policy
- Do Not Sell or Share My Info
- Not Selling Info
Keep up with tech in just 5 minutes a week!
How to Set up Static IP Address on Windows 10
You can set up a static IP address for your Windows 10 computer from the network adapter settings. Follow these steps to setup static IP address.
When you connect to a network, more often than not, you will automatically get an IP address from the router or your ISP (Internet Service Provider). This is called a dynamic IP address. In case you don’t know, a dynamic IP address means that the IP address can change every time you reconnect to that same network. For most people, this is not a big deal, and never have to worry. However, if you want to reliably connect to a local network or if your ISP requires you to configure a specific IP address, set up a static IP address on Windows 10 .
For example, my ISP uses an additional layer of authentication besides the MAC address . In order to connect to my ISP’s network, I have to configure the static IP address given to me by them. Otherwise, I cannot connect to the ISP network to access the internet.
The good thing is, Windows 10 makes it very easy to change IP address to set a static IP address. All you have to do is open the adapter settings and setup the static IP address.
In this quick and short Windows guide, let me show you the steps to set the static IP address on Windows 10.
Note: Before making changes, make sure you are connected to the network.
Set static IP address on Windows 10
To set a static IP address on Windows 10, follow the steps given below.
- Open the Settings app.
- Click on “Network & Internet.”
- Select the “Status” tab on the sidebar.
- Click on the “Properties” button in the right panel.
- Scroll down and click “Edit” the “IP Settings” section.
- Turn on the “IPv4” option.
- Type the IP address, Subnet, Gateway, and Preferred DNS addresses.
- Click on the “Save” button.
In Windows 10, you can set the static IP address from the Settings app. First, open the Settings app with “Win + I” keyboard shortcut. Go to the “Network & Internet -> Status” page. On the right panel, click on the “Properties” button under the active connection.

In this page, scroll down and click on the “Edit” button under the “IP Settings” section.

Turn on the “IPv4” option. Next, type all the details like the actual Static IP address, Subnet, Gateway, and Preferred DNS. Finally, click on the “Save” button. You can get all these details from the ISP or your network administrator. In case you are configuring a local network, you can get them from your router config page.

From now on, Windows should connect to the network with the static IP address. If Windows is still using a dynamic IP address, restart the system. Doing so should apply the changes you just made.
That is all. It is that simple to set up a static IP address in Windows 10. If you are stuck or need some help, comment below and I will try to help as much as possible.
About The Author

Leave a Comment Cancel Reply
Your email address will not be published. Required fields are marked *
Save my name, email, and website in this browser for the next time I comment.

How to access router settings
Discover the power of network customization

Tools and requirements
- Step-by-step guide
How to find your IP address
Final thoughts, you might also like....
Do you want to take control of your home or office network? Accessing your router settings opens up a world of possibilities, allowing you to customize and manage various aspects of your network experience.
By navigating through your router's configurations, you can fine-tune wireless settings, strengthen security, troubleshoot issues, and create a network tailored to your needs. In this guide, we'll walk you through the steps to access your router settings, including how to find your IP address. Are you ready to optimize your network for peak performance? Let's dive in!
- A router
- A device connected to the router via Ethernet or Wi-Fi
- Your IP address
You can find your IP address by looking at the router itself or checking your computer or mobile phone. We'll cover seven of the most common options: Router, Windows, Linux, Chromebook, Mac, Android, and iPhone.
Step-by-step guide for how to access router settings
1. find password.

Next, you'll need your username and password. If you haven't changed these, the default credentials are usually found in the router's manual or on a sticker on the router itself.
Some routers also use a WPS (Wi-Fi Protected Setup) PIN as a security feature to facilitate connecting devices to a Wi-Fi network. If your router has this, make a note of this as well.
If you can't find your username, password, or PIN, there are a few other options you can try.
You can visit the official website of the router manufacturer. Many manufacturers provide default login information for their routers on their websites. If you can't find the information online, contact the manufacturer's customer support, who may be able to provide you with the default login credentials.
If all else fails, you can perform a factory reset on your router. Keep in mind that this will erase all custom configurations, and you'll need to set up your router again. To reset the router, locate the reset button on your router. It is usually a small button that may require a paperclip or a similar tool to press. Press and hold the reset button for about 10-15 seconds until the router lights flash. Release the reset button, and the router will reboot to its factory settings.
3. Open your router settings page

Open a web browser like Chrome, Firefox, or Safari, and type the router's IP address into the address bar of your web browser.
You should now see the login page for your router. The example in the screenshot shows the Virgin Media Super Hub. You will see the router access page for your provider.
Enter your password and username or PIN.
4. Access router settings and make changes

Once logged in, you will have access to the router's settings. The layout and options may vary, but common settings include wireless settings, security options, and network configurations.
You can configure various settings, such as Wi-Fi passwords, security protocols, port forwarding, and more. Be cautious while making changes, as incorrect settings can affect your network's functionality.
After making any changes, remember to log out of the router's interface for security reasons.

Check on your router itself to see if it displays the router IP address we need to access the settings page. You should also make a note of the password and PIN, as we're going to need that later on.

You can find your router IP address on a Windows device in the command prompt window.
To open the Windows Command Prompt, click the Start button (Windows icon) in the bottom-left corner of your screen. Type Command Prompt or cmd into the search bar. Select Command Prompt from the search results.
Type ipconfig /all and press enter. Under the heading Wireless LAN or similar, you'll see an IP address next to Default Gateway. This is your router IP address.

To find out your Router IP address, you'll need to open the terminal.
Methods for opening the terminal vary slightly depending on which Linux distro you're using, but you should be able to access it from your applications or by entering Ctrl + Alt + T.
Once inside the terminal, type ip r and hit return. The first IP address returned will be your Router IP address.
4. Chromebook

To get your router's IP address on a ChromeOS device, click the clock at the bottom right of your screen and select the gear icon. Click Network, then Wi-Fi. Select your Wi-Fi router. You'll find the router's IP address next to Gateway.

If you're using a MacOS device, go to System Settings and Network: Wi-Fi. Click Details on your connection, and you'll find the address next to Router.

Open the Settings app on your Android device and select the Wi-Fi or Network and Internet option. Find the connected Wi-Fi network and tap on it, then look for an option like Network details. The exact wording may vary depending on your device. Your router IP address will be displayed here. It may be called the Gateway or Router IP.

Open the Settings app on your iPhone and navigate to Wi-Fi Settings. Find the connected Wi-Fi network and tap the (i) icon next to its name. This icon is typically located on the right side of the network name. In the network details, look for the Router or Gateway field. This field contains the IP address of your router.
Now that you've successfully accessed your router settings, you can take a closer look at your network settings and modify them to suit your preferences and requirements.
You can strengthen your network's security by updating Wi-Fi passwords, changing security protocols, and enabling features like MAC address filtering. You can also keep an eye on the list of connected devices to your network. This enables you to detect unauthorized devices and troubleshoot any connectivity issues.
You can also set up port forwarding, check firmware, and prioritize network traffic using Quality of Service (QoS) settings.
However, you should remember that making changes to your router settings should be approached with caution. Incorrect configurations can impact your network's functionality. Always refer to your router's documentation for guidance, and if in doubt, consult your router manufacturer's support. After making adjustments, ensure you log out of the router's interface to uphold security measures.
Get daily insight, inspiration and deals in your inbox
Get the hottest deals available in your inbox plus news, reviews, opinion, analysis and more from the TechRadar team.
- What is an IP address?
- The best Wi-Fi routers
- How to build a VPN router

Emma Street is a freelance content writer who contributes technology and finance articles to a range of websites, including TechRadar, Tom's Guide, Top10.com, and BestMoney. Before becoming a freelance writer, she worked in the fintech industry for more than 15 years in a variety of roles, including software developer and technical writer. Emma got her first computer in 1984 and started coding games in BASIC at age 10. (Her long, rambling, [and probably unfinishable] Land of Zooz series still exists on a 5-inch floppy disk up in her parents' loft somewhere.) She then got distracted from coding for a few decades before returning to university in her thirties, getting a Computing Science degree, and realizing her ambition of becoming a fully-fledged geek. When not writing about tech and finance, Emma can be found writing about films, relationships, and tea. She runs a tea blog called TeaFancier.com and holds some very strong opinions about tea. She has also written a bunch of romance novels and is aided at work by a tech-savvy elderly cat who ensures Emma fully understands all the functions of the F keys so she can quickly undo whatever the cat has just activated while walking over the keyboard.
Apple's next accessibility features let you control your iPhone and iPad with just your eyes
LG's new super-bright OLED panel could give the next Meta Quest an edge over the Apple Vision Pro
iOS 17.5 is reportedly resurfacing once deleted photos for some users
Most Popular
- 2 Microsoft launches generative AI model designed exclusively for US intelligence services — air-gapped system for spies aims to avoid potential security leaks
- 3 Google Maps is getting two helpful new features in its latest update
- 4 Memorial Day preview: save up to $1,000 on stunning OLED TVs at Best Buy
- 5 Forget projectors – TCL’s 115-inch mini-LED TV has 6.2.2-channel Dolby Atmos speakers and 5,000 nits brightness
- 2 Forget projectors – TCL’s 115-inch mini-LED TV has 6.2.2-channel Dolby Atmos speakers and 5,000 nits brightness
- 3 Capture amazing images every single day
- 4 Sennheiser has slashed prices on some of its best headphones for Click Frenzy
- 5 You can now play PS1 games in iOS on your iPhone – here’s how
IMAGES
VIDEO
COMMENTS
To set a static IP address in Windows 10 or 11, open Settings -> Network & Internet and click Properties for your active network. Choose the "Edit" button next to IP assignment and change the type to Manual. Flip the IPv4 switch to "On", fill out your static IP details, and click Save. Sometimes, it's better to assign a PC its own IP address ...
In both Windows 11 and Windows 10, you can also change your IP address from the Control Panel. Open the Control Panel and click or tap on "View network status and tasks" under "Network and Internet.". In the Network and Sharing Center, click or tap on your internet connection from the "View your active networks" area.
Set static IP address on Windows 10 from Settings. To assign a static IP address on Windows 10, use these steps: Open Settings on Windows 10. Click on Network & Internet. Click on "Wi-Fi" or "Ethernet.". Click on the current network connection. Under the "IP settings" section, click the Edit button. Using the drop-down menu, select ...
Press the Start button, then click the settings cog, above the power button. Alternatively, press Windows + I. Click "Network & Internet". Click "Wi-Fi" in the sidebar and select your Wi ...
To set a static IP address, open your network settings by right-clicking the Start menu and clicking the Network Connections option. In the Network Connections settings menu, press the Change connection properties option. Under the IP Settings category, press the Edit option. Change the IP allocation type to Manual.
Select Use the Following IP address: and type in the IP address, Subnet mask and Default gateway. Click OK to apply the settings. Note: If you need to set a static DNS server, select Use the following DNS server address: and input the address of DNS server. By default, the computer obtains the address automatically.
To enable DHCP or change other TCP/IP settings. Select Start, then type settings. Select Settings > Network & internet. Do one of the following: For a Wi-Fi network, select Wi-Fi > Manage known networks. Choose the network for which you want to change the settings. For an Ethernet network, select Ethernet, then select the Ethernet network you ...
To set a static TCP/IP configuration on Windows 11, use these steps: Open Start. Search for Command Prompt, right-click the top result, and select the Run as administrator option. Type the ...
Method 1. Change IP Address Windows 10 Using the Settings App. The first and simplest way to change IP address is to use the Settings app. Here's a full guide for you: Step 1. Open the Settings app by pressing Win + I keys and then click on Network & Internet. Step 2.
Fill in the text boxes. Here's what they mean: IP address - Usually, your device's IP address will be "192.168.1.X" (or a similar set of numbers), wherein "X" is specific to your device. Change the "X" value to a number between 1 and 100. Make sure you don't use the same IP address as another device on your network (e.g., your phone).
This article covers the steps to configure IP to connect to the Internet. Steps to follow : 1. Go to the search bar and search for control panel. Once it appears then double click on it. A dialogue box will appear. 2. In the dialogue box, find "Networks and Internet" option and click on it. 3.
To set up a static IP address configuration for an Ethernet (wire) adapter using the Settings app, use these steps: Open Settings. Click on Network & Internet. Click on Ethernet. Select the connection that you want to configure. Ethernet connections on Windows 10. Under the "IP settings" section, click the Edit button.
Here's how to set a static IP address on your Windows 10 PC. Click the magnifying glass icon in the bottom-left corner of your screen. Then type IP Address into the search bar and click Open. You can also hit Enter on your keyboard if you see Ethernet settings. Then click Change adapter options.
To set a static IP address on Windows 10, follow the steps given below. Click on "Network & Internet.". Select the "Status" tab on the sidebar. Click on the "Properties" button in the right panel. Scroll down and click "Edit" the "IP Settings" section. Turn on the "IPv4" option.
Here's how you can set a static IP Address using the Windows settings: Head to the Start menu search bar, type in 'settings,' and select the best match. Alternatively, press the Windows Key + I to launch the Settings menu. Then head to Network & internet settings . Look for the Properties button.
Using CMD may seem difficult for some users, yet it is one of the fastest ways to assign a static IP address in Windows 10. Step 1: There are two ways to open the command line. Click on the Start menu, type CMD in the search box, then right-click on it and select Run as administrator.
How To Change IP Address In Windows 11/10 [Tutorial]There are many reasons why a person would want to change his or her IP address. This tutorial will show y...
Method 3: Set Up a Static IP Address using Command Prompt. If you like commands, then here are the instructions to change your Dynamic IP address to Static, via command line. 1. Open Windows Search, type command prompt, and select Run as administrator. Then, click Yes on the UAC prompt to proceed. 2.
Click on Change adapter options under the Change your network settings area. Right-click on your network connection and select Properties. Go to Internet Protocol Version 4 (TCP/IPv4) and click on it. Select Properties below the list. Click on the Use the following IP address option. Fill in your static IP address.
1] Setting a static IP address via Control Panel. Right-click the network (or Wi-Fi) icon visible on Windows 10 Taskbar. From the list of 2 options displayed, select the latter one - Open ...
Open Settings on Windows 10. Click on Network & Internet. Click on Ethernet or Wi-Fi. Click the network connection. Under the "IP settings" section, click the Edit button. Use the Edit IP settings drop-down menu and select the Automatic (DHCP) option. Click the Save button. Once you complete the steps, the networking stack configuration ...
For Wi-Fi connection. Select Start > Settings > Network & internet > Wi-Fi and then select the Wi-Fi network you're connected to. Under Properties, look for your IP address listed next to IPv4 address. Open Wi-Fi setting.
How to Set Up a Static IP Address on Windows 10. Open the settings panel on your computer. Go to Network & Internet. Select your current network connection (Ethernet or Wi-Fi). Go to IP settings and click the edit button. Select Manual from the dropdown list. Toggle on the IPv4 switch.
Open the Settings app on your iPhone and navigate to Wi-Fi Settings. Find the connected Wi-Fi network and tap the (i) icon next to its name. This icon is typically located on the right side of the ...
Open Anchorpoint, create a new tab and click on "New Project". Pick "Git Repository", then add the path to your project files. In the Remote Settings, pick "Connect existing Repository via Http" and paste the URL from our Git server. Wait until you see the "Login to Git" button. Click it.