

Add resources to your project
Resources are typically people included in your project plan, whether or not they are assigned to tasks. However, a resource could also include anything that is used to complete a project, including equipment and other materials (such as cement or web servers).
You can add several types of resources to your project.
Enterprise resources An enterprise resource is a part of the list of resources for the whole organization; therefore, each of these resources can be shared across multiple projects. Typically, the list of enterprise resources is managed by an administrator, and each project manager adds these resources to their projects as needed.
Non-enterprise resources A non-enterprise resource, or local resource , is not a part of the list of resources for the whole organization. No other project manager can use your non-enterprise resources in their projects.
Generic resources Generic resources are used to specify the staffing requirements for a project, such as carpenters and developers, or a team of resources.
What do you want to do?
Add enterprise resources to your project (project professional only), add generic enterprise resources to your project (project professional only), add non-enterprise generic resources to your project (project professional only).
On the View tab, in the Resource Views group, choose Resource Sheet .
In the Resource Name field, type a job title, material, or generic resource name.
If you want to designate resource groups, then in the Group field for the resource name, type the name of the group.
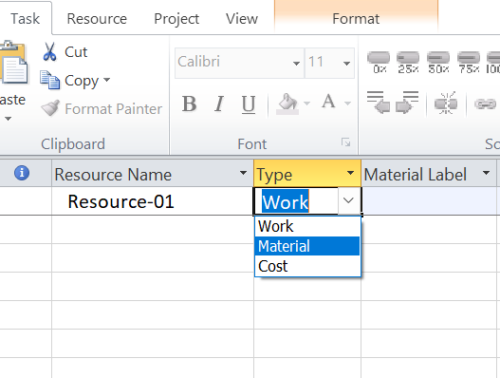
Specify the resource type.
To specify that this resource is a work resource, in the Type field, select Work .
To specify that this resource is a material resource, in the Type field, select Material . In the Material Label field, type the label (for example, yards , tons , or boxes ) for the resource.
To specify that this resource is a cost resource, in the Type field, select Cost .
In the Max. Units field for the resource, type the number of total units that this resource is available for this project. The maximum units value specifies how much of this resource is available for this project — for example, part-time or multiples.
For example, if you have a resource who is available for your project two days a week, you can enter a maximum units value of 40% . You can use maximum units to specify multiple availability of a resource designation. For example, suppose you have a resource named Engineers , a single resource that represents three individual engineers on your team. You can enter the maximum units for Engineers as 300%. You can schedule all three engineers for full-time work at one time without the Engineers resource being overallocated.
You can enter maximum units as a percentage ( 50% , 100% , 300% ), or as a decimal ( 0.5 , 1 , 3 ).
To create a budget resource, select the resource, right-click the resource name, and then choose Information . Select the Budget check box.
You can add a work resource and associated information by using your MAPI email address book, from the Active Directory, or from Microsoft Project Server. On the Resource tab, in the Insert group, choose Add Resources , and then choose Build Team from Enterprise (Project Professional only), Active Directory , or Address Book .
Top of Page
On the Resource tab, in the Insert group, choose Add Resources > Build Team from Enterprise .
In the Build Team from Enterprise dialog box, in the Existing filters box, select the filter that you want to apply. The filtered list of enterprise resources is displayed in the Enterprise Resource column. Any resources already assigned to your project team are listed in the Project Resource column.
To search for resources who are available to work a specific number of hours during a particular time range, select the Available to work check box. Enter the amount of time a resource needs to be available to work, and then select the date range by using the From and To boxes.
In the Enterprise Resource column, select the enterprise resource that you want to add to your project, and then choose Add . To select multiple resources, hold down CTRL while you select each resource.
To find enterprise resources that match the skills and other attributes of one of your team's existing resources, select the resource that you want to match under Project Resource , and then choose Match .
To replace an existing resource with an enterprise resource, in the Project Resource column, select the resource or generic resource that you want to replace. Under Enterprise Resource , select the new enterprise resource, and then choose Replace .
When you replace a resource, the replaced resource is not removed if they have completed any actual work. The replacement resource is assigned the remaining work.
To add a proposed resource to the project team, in the Book column, choose Proposed .
To view a graph of a selected resource's availability, choose Graphs .
Choose OK .
Adding an enterprise resource to your project allows you only to assign the resource to a task on your project. You cannot make changes to the attributes of enterprise resources, such as pay rates or availability.
If you want to add resources to the list of available enterprise resources, you must import the resources.
On the Resources tab, in the Insert group, choose Add Resources > Build Team from Enterprise .
If there are more than 1,000 enterprise resources, you can filter the list of resources by using enterprise outline codes. Outline codes are defined based upon the requirements of your organization.
Under Customize filters , select Generic in the Field Name column, select Equals in the Test column, and then type Yes in the Values column.
Choose Apply filter to apply the filter settings to the list of enterprise resources.
In the Enterprise Resource column, select the generic resource that you want to add to your project, and then choose Add . To select multiple resources, hold down CTRL while you select each resource.
In the Resource Name column, type a name for the generic resource, such as "carpenter."
Right-click the resource name, and choose Information . In the Resource Information dialog box, select the General tab, and then select the Generic check box
On the Custom Fields tab, under Custom Fields , enter values for any fields that are required for this generic resource.
Because these custom fields are unique to each organization, see your administrator for answers to any questions about their use.
Note: You can add any generic resource to the list of enterprise resources. You might have to specify other attributes for the resource, such as calendars and skill sets, depending upon the requirements of your organization.
There are two ways to add resources to your projects:
Build Team Using the Build Team feature, you can search for enterprise resources that have the required skills to complete the tasks in your project.
Resource plan During project initiation, before a detailed project plan with tasks and assignments has been prepared, you can use a resource plan to represent the resource requirements for the project at a high level. This is helpful when you need to advise the resource managers and department managers of upcoming work, but you do not know the specific tasks or resources that will make up the project plan.
Note: You can create and view resource plans only by using Project Web Access. The resource plans are not visible in Project Professional, and the plans do not limit the resource availability within Project.
Add resources to a project by using Build Team
Create a resource plan for a project proposal.
On the Quick Launch, choose Projects .
Select the row for the project that you want to build a team for, and then choose Build Team .
On the Build Team page, a list of resources on the left shows all the resources that you have permission to see within the resource breakdown structure code for your organization. The list on the right shows the resources that are already assigned in your project.
Select the resources on the left that you want to assign to the project, and then choose Add . Select the resource by selecting the check box next to the resource.
To create a list on the left that contains only those resources that have skills that match a resource on the right, select the resource on the right, and then choose Match .
Finding resources in this way is particularly helpful when you have generic resources in your project and you want to find real resources (people) with the same skills to replace the generic resources.
If you want to replace the resource on the right with the resource on the left, select both the resource on the left and the resource on the right, and then choose Replace . If the resource has actual work values recorded for tasks, that resource cannot be used in the project.
Under Booking Type , select Committed if you want to commit the resource to the project, or select Proposed if you do not yet have authorization to commit the resource to the project.
Tip: To see a graph showing the availability of the selected resources before you add them to your schedule, select the resources on the left, and then choose Graph .
Choose Save Changes to add the new resources to your project.
You can also create a filter to see only a subset of resources on the Build Team page:
In the Filter list, select the filter that you want to apply.
Select a field in the Field Name list and a test in the Test list. In the Value list, select a value to test for, or set a range of values by typing two values separated by a comma (,).
If the filter contains more than one criterion row, select an operator in the And/Or column to start a new row.
To test whether the filter will return valid results before you apply it to your resources, choose Validate Filters .
Choose OK to apply the filter to the list of resources.
Note: Project managers may not be able to view and assign all resources in their organization. See your server administrator if you need permission to build a team.
On the Quick Launch, under Projects , choose Proposals and Activities .
Select the project for which you want to create a resource plan, and then choose Resource Plan .
In the Date range and Units boxes, type a date range and the time units to display in the timephased part of the resource plan table.
In the Display Units box, indicate whether you want the values in the resource table to show hours, days, or FTEs (full-time equivalents).
To determine how the summary resource assignments are presented in the reports that you can generate from Project Web Access, in the Calculate resource utilization from section, select one of the following:
Project plan If you want to calculate resource availability from all assignments within the project, but not from the project's resource plan, select this option.
Resource plan If you want to calculate resource availability by using resource information in the resource plan, select this option.
Project Plan until If you want to calculate resource availability from all assignments within the project until a specific date, select this option. The resource utilization from the resource plan will be used to determine the resource availability after the specified date.
Select the Show total work check box to show the total hours in the resource plan table instead of timephased values.
In the Items per page box, type the maximum number of lines to display in the resource plan table.
Choose Apply to apply the setting to the resource grid without saving.
Choose Publish to publish the plan so that it appears as a project proposal within the Project Center.
If you want to save the proposal without publishing it, choose Save . Other team members will not be able to see the proposal in the Project Center.
Why can't I perform some actions in Project Web Access?
Depending on the permissions settings you used to log on to Project Web Access, you may not be able to see or use certain features. Also, what you see on some pages may differ from what is documented if your server administrator customized Project Web Access and did not customize the Help to match.

Need more help?
Want more options.
Explore subscription benefits, browse training courses, learn how to secure your device, and more.

Microsoft 365 subscription benefits

Microsoft 365 training

Microsoft security

Accessibility center
Communities help you ask and answer questions, give feedback, and hear from experts with rich knowledge.

Ask the Microsoft Community

Microsoft Tech Community

Windows Insiders
Microsoft 365 Insiders
Was this information helpful?
Thank you for your feedback.
Project-O-Metric
We are on the Project side

How to Add Resources in MS Project?
Microsoft Project is a scheduling tool that is extremely useful for Planning Engineers and Project Managers. Through MS Project, you can create a schedule of the tasks in a project, small or big. Also, you can prepare exhaustive planning by adding resources to your schedule. Hence, adding resources to your schedule is an extremely useful way to efficiently plan your project.
Table of Content
- Why add resources to your MS Project schedule?
What are the various types of resources in MS Project?
Which type of resource is to use when, how to assign resources in ms project, how to assign multiple resources to a task in ms project, how to add cost to a cost type of resource, how to assign a fixed cost to a task, how to derive project cost after adding resources to an ms project schedule, why add resources to your ms project schedule.
You need resources to complete the tasks of a project. A resource can be a material, a particular category of workmen, equipment, or even some overhead.
There are multiple benefits of adding resources to your MS Project schedule. Below are some of the major advantages of adding resources to your schedule:
- You can get the month-wise or week-wise or day-to-day requirements of all the resources. Accordingly you may initiate action to procure them at the right time.
- You can add the cost per unit of the resources, and derive the planned cost for your project.
- You can track the schedule along with the cost of the project.
There are three types of resources in MS Project that you can assign to the tasks in your schedule. These are:
Now that we know what are the various types of resources available in Microsoft Project, let us see which one when should we use while preparing a project schedule.
1. Material type of resources
Planners use these types of resources most generally for planning a construction project. As an example, all the construction materials required in a project like cement, steel, blocks, tiles, etc. fall in the category of Material resources. Same for the labour resources if you pay the wage per unit. For example, if you pay the workmen or the contractor for ‘Fabrication of steel per Ton’ instead of paying them on headcount, it will come under the resource category of Material. This type of resource is assigned by quantity and not by time. For example, the same number of bricks will be required to build 1 cubic meter of brick wall, irrespective of the time you take to build it.
To go easy with the conception, simply think about whether the cost of the resource will vary with time. If it’s fixed over time, it’s a material type of resource.
Read More: Estimating Task Duration in Project Management
2. Work type of resources
Work types of resources are those which are associated with time. For example, the equipment and machinery required in a project fall in the category of work resources. Also, the Project Manager and other human resources are work resources . This type of resource is tracked by time, not by quantity. For example, if you want to build a brick wall it can take any amount of time depending on the skill of the workmen, even if all the materials are available. Hence, the workmen required to build a wall is an example of a work type of resource.
3. Cost type of resources
You can use t he Cost type of resource when the cost per use of the resource is fixed for executing a task.
For example, say, you need the transportation of materials for reinforcement fixing, and the number of trips will be different as per the quantum of the work involved. But, it does not directly vary with the quantities of materials. If the capacity is 20 Ton for the truck carrying steel, and the quantity of steel is 35 Ton, you have to move the truck twice although the second time it will have a partial load. Hence, here you are not paying the truck rental per unit of reinforcement steel and paying ‘per use’ of the truck.
Let’s take another example. Say, you need to hire a consultant for examining a particular work that is related to task 1. And, you need the same consultant for examining task 2 also. But, the consultant’s charge is different for the tasks. Say, for task-1 they will charge you $1000 and for task-2 they will charge you $1500. This consultant resource is an example of a cost type of resource.
Now that we know the basics of the types of resources, let us see how to assign the resources to a task in your schedule. As the first step, you would need to add the resources to your schedule, and the next step would be to assign them to a particular task/multiple tasks. Keep your list of resources and their quantities & rates handy so that you can complete the resource assignment process seamlessly.
When you create a schedule, it is basically consisting of some tasks. A sample is given below:
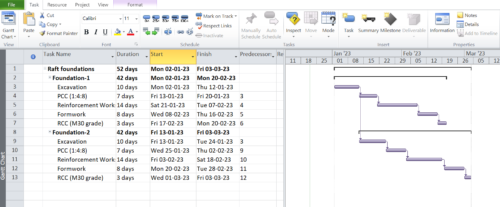
A simple schedule of raft foundation is here. The tasks are linked to each other, and the Gantt chart is created based on the relationships between the tasks. Now, we would create resources and also assign them to various tasks.
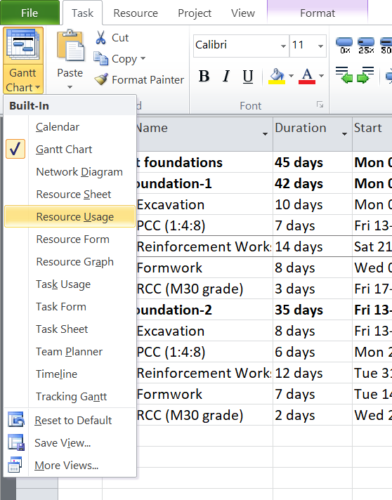
As the first step , click on the left-top corner of the window where it is showing ‘Gantt Chart’.

The following window is open now:

Adding a Work type of resource
Let’s see an example of assigning equipment to a particular task. We will assign an Excavator to the related tasks – Excavation of raft-1 and Excavation of raft-2.
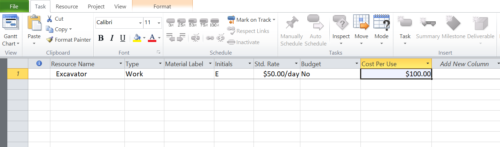
- Type the Resource name you want to give, ‘Excavator’ in this case.
- The type will appear automatically as ‘Work’.
- You can not enter the material type as it is not a material type of resource.
- Std. rate: Enter the rate of the resource. In this case, if the per day rental of the Excavator is $50, enter 50 in the field.
- If the Std. rate unit is showing ‘per hour’ instead of ‘per day’, you can change the unit. Click File->Options->Advanced->General options for this project .
- For now, we will select ‘No’ from the dropdown ‘Budget’.
- If there is a fixed cost per use for the resource, put it in the ‘Cost per use’ field. For example, if the work completion bonus of your Excavator per structure is $100, you can put it here.
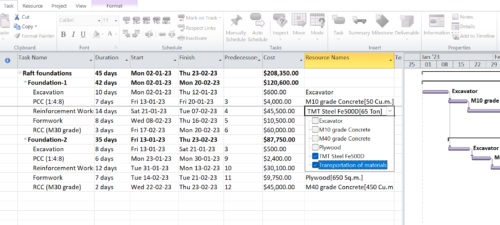
Now go back to the Gantt Chart view. Right-click on the columns to add two new columns: Resource Names and Cost .

The new look will be like this.

Now, against the Excavation tasks (Task ID-3 and 9) click on the dropdown. Then select Excavator to assign it to these tasks.

Now you have added the Excavator resource to two tasks in the project. The cost of the project is appearing in the named column.

For the Excavation of Foundation-1, cost = Excavator hire of 10 days @ $50 / day + Cost per Use $100 = $500 + $ 100 = $600.
For the Excavation of Foundation-2, cost = Excavator hire of 8 days @ $50 / day + Cost per Use $100 = $400 + $ 100 = $500.
Adding a Material type of resource
Now, let us add other resources as required for completing the tasks in the schedule. The process is the same as the Work type of resources, but here you select the Material option from the dropdown and put the unit of the material in the Material Label column. Enter the rate per unit in the Std. Rate column and you observe that the per day/per hour label is not there anymore once you select the Material type from the dropdown.

Now, go back to the Gantt Chart view and assign the appropriate resources to the tasks.

You will see that, on selection, the material type resources have taken 1 unit as the default quantity. You can directly change it from there, or double-click on the resource name to open the Task information pop-up. Then go to the Resources tab, and change the Units number to the required quantity.

Now, after adding the quantities of resources to all the tasks, the project cost will be like the below:

Adding a Cost type of resource
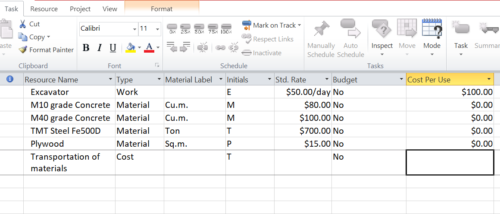
We have entered a resource ‘ Transportation of materials’ and selected the Cost option from the dropdown, and what you observe is, you cannot enter any figure in the Std. Rate or Cost Per Use columns. We will shortly elaborate on this, in this tutorial itself. For now, let us assign this resource to the appropriate tasks.
To assign multiple resources to a task, you can check them all while selecting the resources from the dropdown. As an example, we will add the Transportation of Materials resource to two tasks, going back to the Gantt Chart view.
Also, you can just edit the resource names column field for the task if you want to add multiple resources. Then just type and continue to add along wtih a comma (,) between two resources, and it will yield the same result.
As you have seen, you cannot add the cost to a Cost type of resource directly from the resource sheet unlike the other two types of resources (Material and Work type). The reason is, the cost of a Cost type of resource may be different for various tasks. As an example, a Consultant may charge differently for the same test for different tasks if the magnitude of the work is different. Or the transportation cost involved for two tasks may be different.
If in our example, the cost of transportation is $400 for the reinforcement work of Foundation-1 and $500 for the reinforcement work of Foundation-2, then we will assign it like below:
Step-1: Select the Resource Usage sheet from the top left corner as shown below:
Step-2: Select the View tab from the Ribbon, click on Tables , then select Cost .
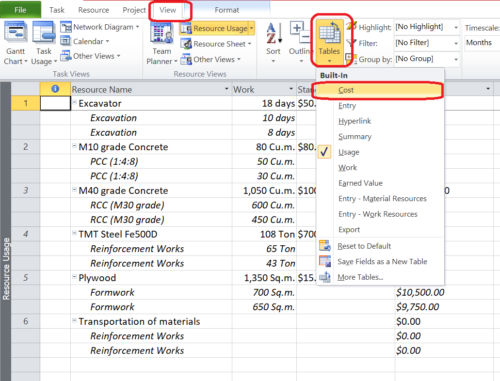
Here you will see that the tasks to which the Transportation of materials named resource was assigned are visible with cost as zero. You can now enter the cost of the same resource which may be different for different tasks to which you have assigned it. Note the Green highlighted are below.

Now go back to the Gantt Chart view -> select View -> Click on Tables -> select Cost , and see the changes in the Total Cost column for the tasks Reinforcement in foundation-1 and in foundation-2. The cost of the Transportation of materials are now accounted for.

If even after adding all the resources, you feel that there is some cost that has not been covered through the resources, you can enter the cost directly into the task. For example, if you want to add the concrete pump hire charge for RCC tasks of Foundation-1 and Foundation-2, go to the Gantt Chart view -> select View -> Click on Tables -> select Cost . Now add the fixed cost in the appropriate place against the task.

If the Fixed Cost column is not available, you can add it by right-clicking on any of the columns and selecting Fixed Cost from the dropdown. From the Fixed Cost Accrual column, you can select when this fixed cost is to accrue to the task, at the start of the task, at the end, or pro-rata basis. It is like the below table.

Once you’ve added all the resources to the project schedule and entered the cost to all, now it’s time to get the project cost and its distribution. Click on Project from the Ribbon -> Click on Reports -> Click on Costs from the pop-up -> and then select the Cash flow option, and click on Select.

You will get a cash flow over the period you select like below, along with the total cost for the project.

If you have any query that remains unanswered in the above tutorial, you may ask it in the comment.
3 thoughts on “ How to Add Resources in MS Project? ”
- Pingback: How to Handle Resource Rate Variation in MS Project? -
Artificial Intelligence Developments
Artificial Intelligence: Its Past and Future
Leave a Reply Cancel reply
Your email address will not be published. Required fields are marked *
Save my name, email, and website in this browser for the next time I comment.
Simon Sez IT
Online software training and video tutorials for Microsoft, Adobe & more
- Get Started
- Access 2021 Beginners
- Access 2021 Advanced
- Access 2019
- Access 2019 Advanced
- Access 2016
- Microsoft Excel 365 Intermediate
- Excel 365 for Beginners
- The Accountants Excel Toolkit
- Data Analytics in Excel
- Excel 2021 Advanced
- Microsoft 365
- PowerPoint 365 for Beginners
- Microsoft Word 365
- OneNote Desktop and Windows 10
- OneNote 2016
- Outlook 2021
- Outlook 2019
- Outlook 2016
- Outlook 2013
- Outlook 2010
- Introduction to Power Automate
- Power BI Essentials
- Power BI Training
- Power BI Intermediate
- PowerPoint 2021
- PowerPoint 2019
- PowerPoint 2016
- PowerPoint 2013
- Project 2021 Advanced
- Project 2021 Beginners
- Project for the Web
- Project 2019
- Project 2019 Advanced
- Microsoft Publisher 365
- Publisher 2013
- SharePoint Online: The Essential Guide (2023)
- SharePoint Online (2021)
- SharePoint Foundation 2013
- SharePoint Server 2013
- SharePoint Foundation 2010
- Microsoft Teams (2023 Update)
- Macros and VBA for Beginners
- VBA for Excel
- VBA Intermediate Training
- Microsoft Visio 2019
- Microsoft Visio 2010
- Windows 11 Advanced
- Windows 11 (2023 Update)
- Windows 10 (2020 Update)
- Word 2019 Advanced
- Dreamweaver CC
- Dreamweaver CS6
- Dreamweaver CS5
- Dreamweaver CS4
- Adobe Illustrator CC for Beginners
- Adobe InDesign CC for Beginners
- InDesign CS6
- InDesign CS5
- Adobe Photoshop CC Advanced
- Adobe Photoshop CC Intermediate
- Adobe Photoshop CC for Beginners
- Photoshop CS6
- Photoshop CS5
- Photoshop Elements 2022
- Photoshop Elements 2019
- Photoshop Elements 2018
- Photoshop Elements 15
- Photoshop Elements 14
- QuickBooks Desktop 2023
- QuickBooks Desktop Pro 2022
- QuickBooks Pro 2021
- QuickBooks Online Advanced
- QuickBooks Online
- AngularJS Crash Course
- Bootstrap Framework
- HTML/CSS Crash Course
- HTML5 Essentials
- Java for Beginners
- JavaScript for Beginners
- jQuery Crash Course
- MySQL for Beginners
- PHP for Beginners
- Advanced PHP Programming
- Matplotlib, Seaborn, and Plotly Python Libraries for Beginners
- Python Object-Oriented Programming
- Pandas for Beginners
- Introduction to Python
- SQL for Beginners
- SQL Server Integration Services for Beginners
- XML Crash Course
- Alteryx Advanced
- Introduction to Alteryx
- Introduction to Data Visualization and Business Intelligence Principles
- Analytical Methods for Effective Data Analysis
- Introduction to Analytics and Artificial Intelligence
- Financial Risk Management
- Financial Forecasting and Modeling
- Qlik Sense Advanced
- R Programming
- Tableau Desktop Advanced
- Tableau Desktop
- Advanced Agile Scrum
- Agile Scrum Training
- Generative AI and Cybersecurity
- Introduction to ChatGPT
- Artificial Intelligence Intermediate
- Asana for Employees and Managers
- Introduction to Asana
- Effective Communication Tactics for the Modern Workplace
- Introduction to Confluence
- HubSpot CRM for Beginners
- Introduction to Google Drive
- Gmail for Beginners and Pros
- Google Sheets for Beginners
- Getting Started in Jira
- Getting Started in Monday.com
- Cybersecurity Essentials: Stay Safe and Secure Online
- Cybersecurity Awareness Essentials
- Excel Efficiency and Data Management
- Excel Advanced Features and Customization
- Mastering PivotTables
- Microsoft Suite Productivity

How to Assign Resources in Microsoft Project 2016
During this Microsoft Project 2016 training tutorial video, we will show you some basic ways of assigning resources to specific tasks. We will also discuss other functions such as increasing the amount of work while keeping the same duration.
Like what you see? Get our complete Microsoft Project 2016 video training course. Click here to learn more. >>
Video Transcript
Hello again and welcome back to our course on Project 2016.
In this section we’re going to look at the basics of assigning resources to tasks.
In the previous section we set up a few resources for the wedding project. Clearly there are going to be many more. But let’s switch back to Gantt Chart View using the button towards the right hand end of the Status Bar. And I’m going to choose one of the tasks and assign resources to it.
Select Agree budget and approach, right click, and click Assign Resources. Now that brings up the Assign Resources dialogue. And in the dialogue you can see a list of the available resources. Later on in the course we’ll look at the fact that as the number of resources available in a project grows you may need to filter this list in order to find a particular resource or resources that you need. But at the moment we’ve got such a short list of resources that it’s easy to find the one that we want to assign.
I’m going to assign the bride and groom to this task. I’m going to work on the principle that the bride and groom are arranging this wedding themselves. I appreciate that in many situations it will perhaps be family members or other relations or friends that will be doing some or all of the organizing. But I’m trying to make this not too complicated.
To assign a resource all I need to do is to select that resource, in this case the bride is already selected and then click on Assign. Now when I assign a resource to a task like that it doesn’t automatically close the Assign Resources dialogue. You note there a separate Close button. But what you can see if first of all the number of units. Well 100% represents one bride.
So there’s one bride attached to that task which is just as well really because we only have one bride available. And the cost of the bride working on that task is zero. Don’t forget that the rate for the bride chargeable to this project is $0 per hour. So if she’s working on that task for ten days then she’s still not going to charge us any money for doing it.
Now one very important point I’d like you to bear in mind here and this is going to become increasingly important later in the course. Is that the 100% means that the bride is working on this task fulltime. Now in reality it may well be that she is not working fulltime and that she’s actually doing her day job most of the time and she’s just spending a certain amount of time working on, in this case, the budget and approach to her wedding.
But for the purposes of this particular project and this will not be the case for the bathroom refit, but for the purposes of this project all I’m going to do is treat that 100% as being all of the time that she has available. That doesn’t mean to say it’s a 40 hour week or an eight hour day or anything else.
It just means that all of the time she’s got available she is going to spend on that task while that task is in progress. Now fortunately while that task is in progress she doesn’t actually have any other tasks on the wedding so she can spend all of her time on it.
If I want to assign a second resource and the most obvious second resource to assign is the groom. I’m going to select the groom and do the same thing. Click on Close and the bride and groom are now assigned to that task.
One of the consequences of assigning the bride and groom to that task is to do with the amount of work involved in that task.
I pointed out to you much earlier on in the course that when you look at work, particularly for a new project and particularly when this project was new, in the work column there was zero hours of work because we had no resources assigned to that task. As far as Project 2016 is concerned we have now taken a ten day task and it defaults to an eight hour working day. So ten days for eight hours a day is 80 hours. And when I assigned two people to it full time that is 160 hours of work. So as far as Project 2016 is concerned these two resources are going to do 160 hours of work on this task.
Now when you do this and the reasons for this will become apparent in the next section, when you do this and you effectively increase the amount of work from zero hours to 160 hours Project 2016 offers you alternative ways of dealing with the change that you’ve made. And that little exclamation mark on the left there with the dropdown next to it offers you alternative ways of dealing with a situation where you’ve increased the amount of work in a task.
As far as the wedding project is concerned this is of little interest really because we’re not really going to charge for the brides and grooms time.
So the costings and in fact the scheduling of this is not going to be changed by the fact that we’ve assigned two resources to that task. We’re not going to say that because the bride and groom are working on it it’s only going to take half the time. We decided it was a ten day task and that was it. We don’t make it a five day task because two people are working on it.
That set of arguments about work and duration and the amount of work in a task and so on is what we’re going to look at in the next section. And I hope that that section will explain to you why we get these options here and in fact which of these options is the right one to choose. But on this occasion we’re going to go for the default option which is Increase the amount of work but keep the same duration.
When we do that Project 2016 is quite happy. The warnings gone away. We’ve got our 160 hours of work. We’ve still got a ten day task and the bride and groom are assigned to that task.
My main concern over the next few sections is going to be the scheduling of this wedding and the scheduling of projects in general. And in fact it’s the assignment of work resources that will be the key factor. For the balance of this section I’m just going to quickly show you a couple of other ways of assigning resources and we’re going to assign those other two resources that we set up, one cost resource and one material resource just to go through the basics of dealing with those. We’ll be coming back to cost and material resources later though as I really do want to concentrate on work resources and scheduling now.
Let’s go down to the photography section and let’s suppose that I want to assign the photographer to the Select and book photographer task. So I’m going to assign the cost of the photographer to this task.
On the Resource Tab one of the buttons is Assign Resources. And that brings up the Assign Resources dialogue and from here I can assign the photographer. Now don’t forget that when I assign the photographer we don’t have a cost assigned because it’s a cost resource and we haven’t specified what that cost is until we actually assign it to the task. Now we’re going to allow for the fact that the photographer/videographer we’re going to use is going to charge right about $1,500. So enter $1,500, click somewhere else and we have a cost of $1,500.
Having done that click on Close and that resource is assigned to the task. Note how the cost appears in brackets after Photographer.
I should point out to you by the way that what you see on the Gantt Chart on the right, the words to the right of the blocks in this case, this is all customizable and we will be looking at customizing the Gantt Chart later on in the course.
The last assignment that I would like to make here is the assignment of the rings. So I’m going to go to Select and buy rings and right click. I’m going to use this approach to getting the Assign Resources dialogue. And on this occasion I’m going to choose Ring. And I’m going to actually assign the number of rings because we’re actually going to buy two rings. Note how as I use that roller there the units I’ve specified for rings which is the text that I put in the material column on the Resource Sheet is shown. You can just about see it there.
It’s saying two rings. You can just about make it out. You’ll see it better in just a moment. Click on Assign and as you can see two rings and it knows that each ring we’ve allowed $500 for. So that’s $1,000 for two wedding rings.
The other important thing to bear in mind here is that I could at the same time assign the bride and groom to this task as well. So if I select Bride, hold the Control key down, select Groom, click on Assign and now click on Close. I’ve got three resources assigned to that task. I’ve got the bride and groom work resources and material resource, two wedding rings and note the units there, two ring.
That’s the basics of assignments. In the next section we’re going to turn our attention back to work and we’re going to look at work with particular reference to different types of task. That’s it for this section. I’ll see you then.
Simon Calder

Chris “Simon” Calder was working as a Project Manager in IT for one of Los Angeles’ most prestigious cultural institutions, LACMA.He taught himself to use Microsoft Project from a giant textbook and hated every moment of it. Online learning was in its infancy then, but he spotted an opportunity and made an online MS Project course - the rest, as they say, is history!
START LEARNING How to Assign Resources in Microsoft Project 2016 ON SIMONSEZIT.COM
Similar posts.
Shape Alignment and Spacing in Visio 2010 – Part 2
Things You Can Do with Pictures in PowerPoint 2016
Ten Ways to Clean Data in Excel
How to Create Task Dependencies in Microsoft Project 2016
Create and Update an Index in Word
How to Recover a Word Document ? 4 Proven Ways
- Privacy Policy

ADVANCE YOUR CAREER
Gain instant access to 200+ courses. Earn a CERTIFICATE each time you complete a course.
- PRO Courses Guides New Tech Help Pro Expert Videos About wikiHow Pro Upgrade Sign In
- EDIT Edit this Article
- EXPLORE Tech Help Pro About Us Random Article Quizzes Request a New Article Community Dashboard This Or That Game Popular Categories Arts and Entertainment Artwork Books Movies Computers and Electronics Computers Phone Skills Technology Hacks Health Men's Health Mental Health Women's Health Relationships Dating Love Relationship Issues Hobbies and Crafts Crafts Drawing Games Education & Communication Communication Skills Personal Development Studying Personal Care and Style Fashion Hair Care Personal Hygiene Youth Personal Care School Stuff Dating All Categories Arts and Entertainment Finance and Business Home and Garden Relationship Quizzes Cars & Other Vehicles Food and Entertaining Personal Care and Style Sports and Fitness Computers and Electronics Health Pets and Animals Travel Education & Communication Hobbies and Crafts Philosophy and Religion Work World Family Life Holidays and Traditions Relationships Youth
- Browse Articles
- Learn Something New
- Quizzes Hot
- This Or That Game New
- Train Your Brain
- Explore More
- Support wikiHow
- About wikiHow
- Log in / Sign up
- Computers and Electronics
How to Allocate Resources in Microsoft Project
Last Updated: November 18, 2023
wikiHow is a “wiki,” similar to Wikipedia, which means that many of our articles are co-written by multiple authors. To create this article, volunteer authors worked to edit and improve it over time. This article has been viewed 200,665 times. Learn more...
Microsoft Project is a project management software application branded under the Microsoft Office suite. The application allows users to control all aspects of managing a project, including budgeting, scheduling, and resource management. For this reason, the software is used heavily in the construction and engineering industries. One of the most important but often overlooked parts of the project management process is allocating resources properly. Once a project schedule is created, it will usually have to be altered to avoid over-allocating a particular resource (for instance, a subcontractor), which will cause the schedule to be held up. Knowing how to allocate resources in Microsoft Project will help keep you in control of your project from start to finish.

- Begin your task duration estimates by estimating the total number of man-hours needs to complete the task. By focusing on man-hours rather than total workdays, you take into account how many resources will be needed.

- �Work" resources are the most useful, and should be used to categorize people who will spend time working on tasks. On a small project, this type of resource could refer to each team member by name. On a larger project, this resource could specify different subcontractors.
- �Material" resources should refer to materials that get used up during work, such as lumber, nails, and gasoline.
- �Cost" resources should be used to track resources that have a clear cost rate attached to them. The daily rate for renting a crane or a field trailer could be tracked as a cost resource.

- Any point at which a resource exceeds 100 percent usage represents an over-allocation (meaning the resource can't possibly perform all the tasks assigned to it in the given time). Over-allocation is represented in red. To remedy this, increase the task durations, assign more resources to the tasks, or shift concurrent tasks to create less overlap.
- Any point at which the resource is being used very little may point to inefficient under-allocation. Consider decreasing the task durations or using fewer total resources.
Community Q&A
- Always involve the people who will be performing the work in the duration estimation process. This generally increases accuracy and improves morale. Thanks Helpful 5 Not Helpful 0

Things You'll Need
- Microsoft Project
You Might Also Like

About This Article
- Send fan mail to authors
Is this article up to date?

Featured Articles

Trending Articles

Watch Articles

- Terms of Use
- Privacy Policy
- Do Not Sell or Share My Info
- Not Selling Info
wikiHow Tech Help Pro:
Level up your tech skills and stay ahead of the curve
Use Hidden Functions in Project’s Assign Resources Window

Assigning Resources to Multiple Tasks
Assume there’s a schedule in which four new resources need to be added to multiple existing tasks. These additions can complete one task at a time, which is tedious. But the quick way is to add all four resources to the existing tasks at the same time using the Assign Resources window.
To accomplish this, open a task view such as the Task Usage view used in these examples. In the Resource ribbon, click the Assign Resources icon. After the Assign Resources window opens, select multiple tasks in the view. In the figure below, tasks 1, 3 and 5 have been selected.

Then, in the Assign Resources window, select all the resources to be assigned to the selected tasks. This is done by Ctrl-clicking the resource names in the resources list. Finally, click the Assign button. All selected resources are now assigned to each of the selected tasks with one click!
In the next figure, Bob, Evan, Jack and Janice must to be added to Tasks 1, 3 and 5. After selecting the tasks and resources, the Assign button is clicked. In one operation, the selected resources are now assigned to the selected tasks at their default (Max Units) value.

But what if the resource assignments need an Assignment Units value different from the Max Units?
The Assign Resources window can still be used. But instead of selecting resources and clicking the Assign button, enter the Units value for each resource. When a value is entered, the resource is assigned to all selected tasks the same as if the Assign button was clicked. For example, to assign Bob at 50 percent, simply enter 50% into Bob’s Units field. Entering a value of 35% into Evan’s Units field assigns Evan at 35 percent. And so on.
Comparing Task Assignments
Assume a schedule contains multiple operational type tasks and these tasks need to have the same 20, 50 or more resources assigned to them. Over time, due to on-going maintenance, it’s not uncommon for the resource assignments on these tasks to get out of sync. Is Bob on all tasks? From which task is Judy missing? Is Jack allocated with the same Units value on each task? Unfortunately, manually comparing all the task and assigned resources can be time consuming and laborious.
This is where the Assign Resources window can help by automatically identifying assignment discrepancies across selected tasks.
Let’s start with something simple. In the figure below, only Task 1 has been selected. Note the “Task: Task 1” indicator at the top of the Assign Resources window. The Assign Resources window contains a resource list that’s now divided into two parts. Assigned (checked) resources appear in alphabetical order at the top of the resource list. For these resources the Units (Assignment Units) and Cost values appear. Unassigned (unchecked) resources appear after the assigned resources.

When multiple tasks are selected, the Assign Resources window will show inconsistencies among the selected tasks. In the figure below, Tasks 1 and 3 have been selected. This is indicated in the Assign Resources window by the “Multiple tasks selected (1,3)”.
As expected, the assigned resources appear at the top of the resource list. But some interesting inconsistency indicators now appear. Looking at Bob, a black check appears next to his name, meaning Bob is assigned to both tasks. However his Units value is not the same on both tasks so that value displays as “- -“. Janet and Judy now appeared within the top of the Resource list. But their checks are gray, meaning they are assigned to at least one of the selected tasks but not all of them. And because they’re not on all selected tasks, their R/D, Units, and Cost values also display as “- -“. In short, gray checks and “- -” indicators indicate inconsistencies. Now that the problems are known, let’s see how to fix them.

Aligning Resource Assignments
Continuing the example, the Assign Resources window can be used to correct or align resource assignments. This is illustrated in the figure below. By selecting Janet and Judy in the Assign Resources window and clicking the Assign button, Project will add the selected resources to only the tasks on which they are not currently assigned. In this case, Janet and Judy are already assigned to Task 3, so Project adds them to Task 1. After the assignment, the Assign Resources window now shows Janet and Judy with black checks and their Units and Cost fields now display a value. This indicates that Janet and Judy are now assigned to all selected tasks with the same Units and Cost value.
Note, even if all checked resources were selected and the Assign button clicked, the result would be the same. Only Janet and Judy would have been added to Task 1 because all of the other selected resources are already assigned to the selected tasks.

Looking at the Assign Resource window in the figure above, it is now apparent that Bob is the only remaining resource not assigned consistently across the selected tasks because his Units field is showing a “- -” value. This can be verified by looking at Bob’s Assignment Units for Task 1 (100%) and Task 3 (85%).
As the final step in re-aligning tasks, the Assign Resources window can be used to correct Bob’s inconsistent Assignment Units. In the Assign Resources window, simply enter the desired value in the Units field. In the figure below, a value of 65% was entered in Bob’s Units field. Both Task 1 and Task 3 changed accordingly.

After this final adjustment, it’s apparent that all resources on all selected tasks are aligned because the Assign Resources window displays black checks for all assigned resources and all assigned resources display a value in the Units and Cost column. Now that was simple!
One final word, before you get too excited about these new found capabilities. These functions only work when comparing tasks and resource assignments within the same schedule.
Have your own Assign Resources tricks? Share them in the comments below.
Image Source

Tim Shaw 06/01/2016, 12:24 am
Daryl, thank you for these insights into identifying and resolving inconsistencies and errors of resource assignments across project tasks. Had I known this last week, I estimate I could have saved a good two – four hours in reviewing task assignments on release planning across several sprints. Now I know!
Leave a Reply Cancel Reply
You must be logged in to post a comment.
Remember Me
Lost Password
Please enter your username or email address. You will receive a link to create a new password via email.
LEOPARD PROJECT CONTROLS
How to assign resources in ms project.
Resources are required to carry out the tasks in the project. We need to assign resources to the tasks in the project schedule to track the task progress, resources, and cost.
To Update/Add Resources:
The first step is to add/update the required resources in the resource pool for the project. To do that we will click the “View” tab and click “Resource Sheet” in the Resource Views group.

When we click the “Resource Sheet,” the resource sheet will appear below with resources already available in the resource pool.

Updating Resource:
The “Resource Name,” and “Calendar” shall be updated in the respective columns of the “Resource Sheet” if required.
Then to view the resource information we will double click the “Resource Name.” In the resource information window, we can update “Booking type,” “Initials,” “Group,” “Code,” “Type,” “Resource Availability,” “Notes,” and “Custom Fields.”
For instance, we select the resource named “Project manager” and double-click to view the resource information. The Booking type is “Committed” which is the default. The “Initial” is PM, the “Group” is Management, and the “Code” is PM01. There are three types of resources in MS Project such as “Work,” “Material,” and “Cost.” The “Type” for “Project Manager” is “Work” since all the manpower allocated to the tasks is to be considered as “Work.”
In resource availability, we will keep the default value “NA,” in the “Available From” field and “Available To” fields. This means the resource’s starting availability is the same as the project start date and the resource’s ending availability is the same as the project finish date. If the resource is available only for a specific period, we need to enter the dates in the “Available From” and “Available To” fields. We will enter” Units” as 100% which indicates the full-time availability of the project manager to the Project.
To update the Cost, we will click “Cost” in the “Resource Information” and enter the values as $100 for “Standard Rate” and $150 for “Overtime Rate.”

Adding Resource:
To add a resource, we will click the “View” tab and “Resource Sheet.” For instance, in the “Resource Sheet,” we will add a resource Scrum Master in the “Resource Name” column.

We will double-click the resource name and navigate to a new window, “Resource Information.” In the resource information window , we will enter SM as “initial,” Management in “Group,” select “type” as Work, and enter 100% in “unit. We will keep the default option NA for “Resource Availability” which is the default.

Assigning Resource:
To assign a resource to a task we will open Gantt Chart, by clicking the “Gantt Chart” pull-down menu and selecting “Gantt Chart”. Then we need to click the “Resource” tab, and “Assign Resources.” For instance, we will select the task “Setup software components” and click the “Resource” tab and “Assign Resources.” Then in the “Assign Resources” window we will select the “Scrum Master” in the “Resource Name” column and enter 40% in the “Units” column. Note that we have entered 40% in the “Units” column since the scrum master works part-time for the project, which is 2 working days/ week.

Assigning resources to tasks helps to effectively distribute the workload and manage the resource allocation of the project.
Share This Blog, Choose Your Platform!
Our services.
- BASELINE P6 SCHEDULE
- PROGRESS UPDATE & REPORTING
- CONSTRUCTION DELAY ANALYSIS
- 4D SCHEDULING
- FREE BID SCHEDULE DEVELOPMENT
CONTACT INFO
Florida office.
- 2820 US Highway 1 S, Suite H, Saint Augustine, Florida 32086
New York Office
- (In LOVE Building) 1350 Ave of the Americas, Fl 2 -1063 New York NY 10019
Virginia Office
- 1550 Wilson Blvd, Suite 700, Arlington, VA 22209
- [email protected]
- (833) 777-6276
- (833) 77-P6CPM
- consultleopard.com

SEYAR AZADANI, PMP
President & ceo.
Seyar Azadani has over 20 years of CPM scheduling and construction management experience working with general contractors and project owners, including the USACE, DOT, VA, Meta, QTS, Turner, Donohoe Construction, and Whiting-Turner company. As a Construction CPM Scheduling Consultant, Seyar has provided Primavera P6 CPM Scheduling services for government agencies and the private sector, representing owners, general contractors, construction managers, and architects.
Seyar has proven knowledge, expertise, and experience in utilizing Oracle Primavera P6, Primavera P6 Team Member, Primavera Unifier, Bluebeam, MS Project, Procore, eBuilder, Tableau, Navisworks, and Autodesk Revit. As a project controls specialist, Seyar has assisted Meta and QTS with Data Center projects, including new build projects, retrofit projects, and leased spaces.
Seyar has provided project controls services to projects ranging from civil to industrial to high-rise construction, including hospitals and healthcare facilities, roads and highways, high-rise apartment buildings, and commercial projects, utilizing Primavera and MS Project CPM scheduling tools to create and maintain the CPM schedules for his clients. With the US Army Corps of Engineers projects, as a contractor and construction manager, Seyar has built military facilities, including completing the construction of a USACE training facility, a $200+ million project in the capacity of project construction director.
Seyar has a Master of Science degree in Construction Management from New York University (NYU) in Jan of 2012 and a Bachelor of Science degree in Civil Engineering in 2004.
Seyar Azadani

GREAT SERVICES
We are fully committed to delivering outstanding project controls solutions to our clients.

TRUSTED CONSULTANTS
We are trusted by some of the best-known AEC firms in North America.
FAST TURNAROUND AND COST-EFFECTIVE PROJECT CONTROLS SERVICES
At Leopard, our certified and experienced project controls specialists are committed to delivering excellent project controls services to our clients in a timely and cost-effective manner.
- Certified Small & Micro Business in the SWaM Program of Virginia’s DSBSD
Florida DOT Certified DBE Business, and Florida Certified Minority-owned Business Enterprise
- Certified SWaM Business with The U.S. SBA
A certified DBE and Minority-owned (MBE) Business Enterprise, Leopard Project Controls provides CPM Scheduling Services, Owner’s Rep Services, and Construction Management Support Services.
Licensed and Insured Florida Certified General Contractor License Number: CGC1534435
OUR OFFICES
- 1350 Ave of the Americas, Fl 2 -1063 New York NY 10019

- CPM Scheduling
- 4D Scheduling
- Owner's Representative
- Baseline P6 Schedule
- Project Schedule Review Support
- Progress Update & Reporting
- Construction Delay Analysis
- Free Bid Schedule Development
Copyright 2023, Leopard Project Controls, LLC. All Rights Reserved. Oracle® and P6® are registered trademarks and brands of Oracle Corporation and/or its affiliates. All other marks are the property of their respective owners.
- Privacy Policy |
- Terms of Use |
- Refund Policy |
- Contact Us |
- P6 Training |
IMAGES
VIDEO
COMMENTS
Add resources to your project. On the View tab, in the Resource Views group, choose Resource Sheet. In the Resource Name field, type a job title, material, or generic resource name. If you want to designate resource groups, then in the Group field for the resource name, type the name of the group. Specify the resource type.
The Microsoft Project Assign Resources window will appear, showing the same multiple resource assignments that we established earlier: Resources with a green checkbox next to them have already been assigned. To assign a new resource, left-click on that resource and click the Assign button.
In this Microsoft Project 2021 training course for beginners, learn how to assign resources to a task that are available to you in MS Project.🌍 Get unlimite...
In this video, i will show you how to assign resources in 3 different ways. You will learn efficient ways to assign resources, ways that allow you to get gr...
Get my free 3 hour course for Project 2016 course ️ https://simonsezit.leadpages.co/free-project-2016-course/ Get 20 training videos to help you learn M...
Right-click on the columns to add two new columns: Resource Names and Cost. The new look will be like this. Now, against the Excavation tasks (Task ID-3 and 9) click on the dropdown. Then select Excavator to assign it to these tasks. Now you have added the Excavator resource to two tasks in the project.
To create a resource using the Resource Information dialog box, follow these steps: Click the bottom of the Gantt Chart button on the Task tab in the View group of the Ribbon, and click Resource Sheet. At that point the view changes to Resource Sheet View. Double-click a blank cell in the Resource Name column.
Within Microsoft Project there are various ways to assign resources to tasks within a project schedule. In my opinion there is no right way to assign resources. However, using the right method will allow you to assign resources and plan the assignment correctly and efficiently. I am going to discuss three methods of assigning resources Read more about Assigning Resources in Microsoft Project[…]
And I'm going to choose one of the tasks and assign resources to it. Free Microsoft Project 2016 Training. Master Your Projects On Time & Budget. Click Here to Get Started. Select Agree budget and approach, right click, and click Assign Resources. Now that brings up the Assign Resources dialogue.
You can assign work hours, materials used, fees, licenses, and other costs in MS Project using the Resource Sheet and Assign Resources options in MS Project.
Previously absent in Microsoft Project, the ribbon was added later, providing users with easier navigation and improved functionality. Within the resource tab, the resource assignment dialog box is a powerful tool for managing and assigning resources. By selecting one or more tasks, users can quickly assign resources or replace them.
2. Create and organize all your resources. The best way to keep your resources organized is through the resource sheet. To access this sheet, click on the "View" menu and select "Resource Sheet." Make sure all of your resources have clear names, and make sure you at least specify the resource type.
In the Resource ribbon, click the Assign Resources icon. After the Assign Resources window opens, select multiple tasks in the view. In the figure below, tasks 1, 3 and 5 have been selected. Then, in the Assign Resources window, select all the resources to be assigned to the selected tasks. This is done by Ctrl-clicking the resource names in ...
MS Project 2019 tutorial on how to add resources to tasks in a project, detect overallocation, and resolve using the automated resource leveling tool in the ...
To assign a resource to a task we will open Gantt Chart, by clicking the "Gantt Chart" pull-down menu and selecting "Gantt Chart". Then we need to click the "Resource" tab, and "Assign Resources.". For instance, we will select the task "Setup software components" and click the "Resource" tab and "Assign Resources.".