
Cloud Build
Microsoft azure, 365 and all things tech.
difference between eligible and active azure PIM
How to configure azure ad roles in privileged identity management (pim).
Privileged Identity Management (PIM) is a service in Azure Active Directory (Azure AD) that enables you to manage, control, and monitor access to important resources in your organisation.
Privileged Identity Management provides time based and approval based role activation to mitigate the risks of excessive, unnecessary, or misused access permissions on resources that you care about. Here are some of the key features of Privileged Identity Management:
- Provide just-in-time privileged access to Azure AD and Azure resources
- Assign time-bound access to resources using start and end dates
- Require approval to activate privileged roles
- Enforce multi-factor authentication to activate any role
- Use justification to understand why users activate
- Get notifications when privileged roles are activated
- Conduct access reviews to ensure users still need roles
- Download audit history for internal or external audit
Privileged Identity Management licence requirements
- Azure AD Premium P2 or Enterprise Mobility + Security (EMS) E5
Ensure that your directory has at least as many Azure AD Premium P2 licenses as you have employees that will be performing the following tasks:
- Users assigned as eligible to Azure AD or Azure roles managed using PIM
- Users who are assigned as eligible members or owners of privileged access groups
- Users able to approve or reject activation requests in PIM
- Users assigned to an access review
- Users who perform access reviews
Azure AD Premium P2 licenses are not required for the following tasks:
- No licenses are required for users who set up PIM, configure policies, receive alerts, and set up access reviews.
It can become confusing when working out the number of Azure AD P2 licences required so Microsoft have provided examples at the following link: Azure PIM Example Licence Scenari os In this blog post I will go through the process of configuring Azure AD Roles in Privileged Identity Management (PIM). I will grant a user named Joe Bloggs eligible assignment for one of my Azure admin roles.
As mentioned above, to use PIM you must have an Azure AD P2 or Enterprise Mobility + Security (EMS) E5 licence. I currently have access to an E3 license which grants me access to an Azure AD P1 licence which is obviously not sufficient.
If you already have access to Azure AD P2, skip to the next section by scrolling down to section Configuring Azure Privileged Identity Management (PIM)
- Firstly, I will sign up to a free 90 day Enterprise Mobility + Security (EMS) E5 trial account. As you can see from the screenshot below my licence assignment is currently Azure AD Premium P1.

and if I attempt to access PIM, I receive the message below

Microsoft offer trials for a number of their products including Azure AD P2 which will allow you to test Azure PIM. I’ll start with activating a free trial which can be ready within minutes as you’ll find out shortly.
2. Access Azure AD, click Licenses , click All products and click the + Try / Buy button as highlighted below

3. Enterprise Mobility + Security E5 includes Azure AD P2 and Microsoft offer a 90 day trial so I selected this option. I’ll be going through further demo’s at a later date which require Enterprise Mobility + Security E5 so this licence will be useful.

4. Click Free Trial under the licence you wish to activate. In my case I clicked Free trial under Enterprise Mobility + Security E5

5. Click Activate

6. Wait for the product to activate which should take seconds

7. After activation my licence status still shows as Azure AD P1

8. Log out of the portal and back in and the correct version is now displayed

That’s the free trial sorted
Configuring Azure AD Roles – Azure Privileged Identity Management (PIM)
- Log into the Azure Portal (portal.azure.com)
- Search PIM and select Azure AD Privileged Identity Management

3. Click Azure AD roles

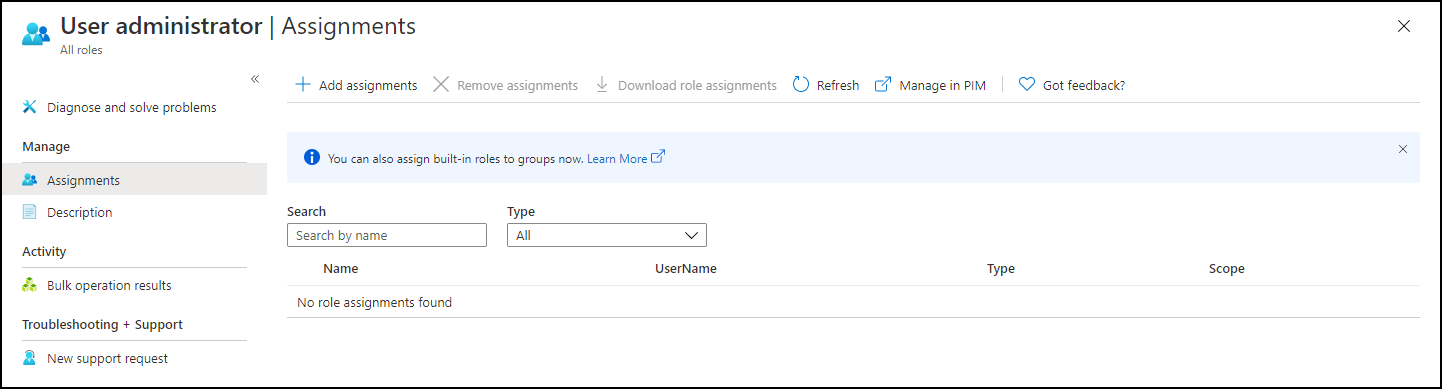
4. Click Assignments

5. I don’t have any assignments at the moment, click +Add Assignments

6. Select a role and member

For the purpose of this demo, I have selected the role Global Administrator and selected an existing user named Joe Bloggs from my directory. Click Next

7. For the purpose of this demo, I will select Eligible and leave the default at permanently eligible. Eligible A role assignment that requires a user to perform one or more actions to use the role. If a user has been made eligible for a role, that means they can activate the role when they need to perform privileged tasks. There’s no difference in the access given to someone with a permanent versus an eligible role assignment. An eligible administrator can activate the role when they need it, and then their permissions expire at a set time, until the next time the role is activated. The only difference is that some people don’t need that access all the time. So in my case, Joe Bloggs will be eligible which means he will request access each time he requires access to the Global Administrator role (Default limit for 8 hours and his permissions will be removed until he activates again). Permanently eligible which means he will be allowed to continue to activate the role when he needs to perform privileged tasks. A permanently eligible end date can be configured, for example, users can activate access for 8 hours at a time for up to 1 year instead of being able to activate the role continuously without an end date. I’ll cover more on this as we move on.
Active: This is a role assignment that doesn’t require a user to perform any action to use the role. Users assigned as active have the privileges assigned to the role at all times but can be setup so access is removed at a certain date.

Continuing with Active Assignment, this options provides a user with permanent access or up to a date set by the administrator. See screenshot below. In this case, the user will have access to the role assigned permanently or by a set expiry date. A further text box appears as shown below requesting a justification on why the admin is granting the user with an active assignment.

8. For the purpose of this demo, I have selected eligible. Click Assign when ready

9. Now that Joe Bloggs has been granted an eligible assignment, I will log in as Joe Bloggs and demonstrate what Joe Bloggs will see.
10. When logging in as Joe Bloggs, I am prompted to enable MFA.

11. MFA configured, I can now move on to logging in as Joe Bloggs. Now that I am logged in, Joe Bloggs is still a basic user without global admin permissions, which is normal. He can’t create accounts within Azure AD or perform any other administrative tasks which require elevated permissions. Access is disabled.

12. Joe Bloggs will need to activate his eligible assignment within PIM. Whilst still logged in as Joe Bloggs, I search for PIM and click Azure AD Privileged Identity Management

13. Click My roles

14. The eligible assignment is displayed with an Activate link as shown below. Click Activate

If the user skipped MFA at the initial logon stage, as shown in the screenshot below, the user will be prompted to authorise via MFA which is enforced by a default enabled setting within PIM. I’ll explain where this option is found shortly. If you wish to disable the below 14 day reminder, you can have a read of the following link later – Disable Skip MFA prompt

15. After clicking activate, Joe Bloggs receives the below prompt

Duration: maximum of 8 hours access. After the 8 hours, Joe Bloggs access will be revoked and he will have to activate his assignment again. Joe Bloggs was allowed permanent eligibility which allows him to activate his eligible assignment when required.
Custom activation: If Joe Bloggs requires admin access in the future, he could select the option Custom activation start time and select a date and time he would like his 8 hours access to begin. In the example below, I have configured the time for a time in the past.

16. When ready, click activate
17. Activation has been scheduled

If I check access from my account, i’ll find that Joes Bloggs has been granted access without any further action required from me Location: Access PIM > Click Azure AD Roles > Pending Access
From here you could also cancel Joe Bloggs access by clicking the Cancel link

That’s the default settings but what if you wish to increase the default 8 hour access limit? Or you would like for the request to go to a team of approvers for review before Joe Bloggs is granted access? or you require 8 hours access for the Global Administrator role but 10 hours access for the Exchange Administrator role. Let’s move onto where these settings are configured.
Configuring Azure AD Privileged Identity Management Azure AD role settings
- Click Azure AD Privileged Identity Management

2. Click Azure AD roles

3. Click Settings

4. Here you can apply different configuration settings based on roles. For the purpose of this demo, I will be configuring the Global Administrator role.

5. After clicking the Global Administrator Role, you’ll find the below settings. Review and click Edit

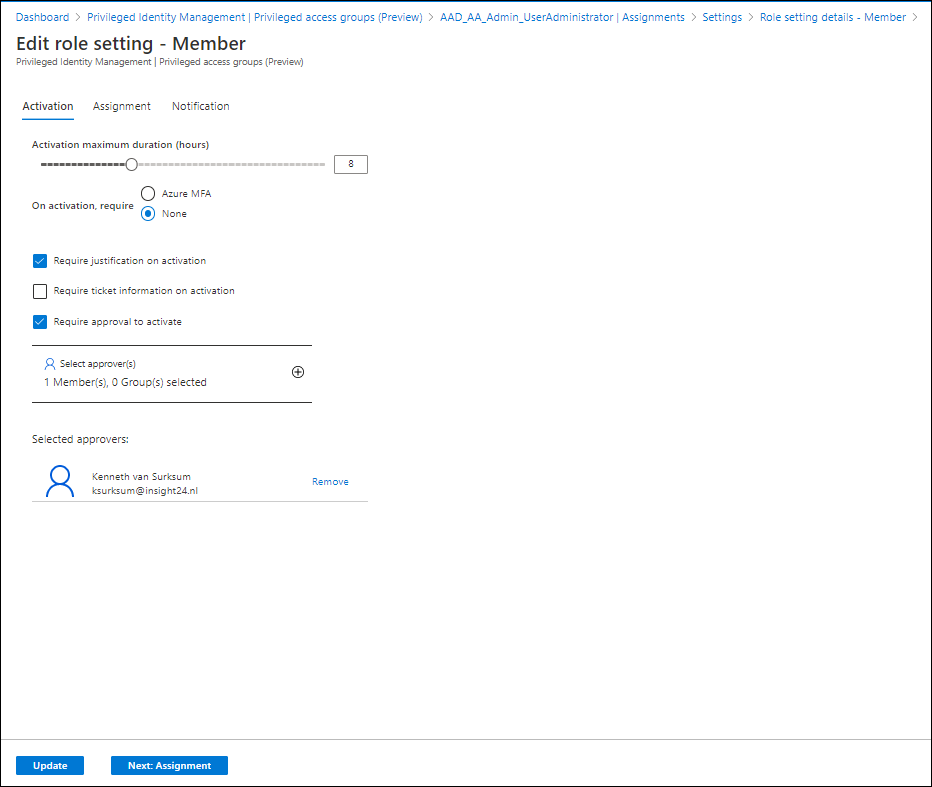
6. The first windows displays a number of settings including the default 8 hour access. You can extend this to 24 hours if required
Azure MFA is enabled by default, which enforces MFA while activating the assignment.
Require justification: requests a reason why the user requires access
Require ticket information: you may have a process where the user requiring access needs to input a ticket or change number
Require approval to activate: this feature is an important one. Setting approvers adds an additional check before a users assignment is activated. The request goes into a pending approval list after the user activates the assignment which allows a approver to review access and deny or approve access accordingly. Note: each approver will need to be assigned an Azure AD P2 licence

To allow me to demo the approval process, I have enabled require approval to activate and added a single user as an approver.

Before I move on and demo the approval process, clicking the assignments button moves us onto the next screen below. You may wish to leave the defaults or set an expiry. For example, you could configure the below policy so that users will be eligible to elevate their account into the role assigned for one year instead of being eligible forever. The same applies for the active role.

Finally, the next screen is where you can configure email notifications
7. When ready, click the update button. Note the below fields which can be useful.

We can now move on and test the approval process.
Azure AD PIM Approval demo
- I granted Joe Bloggs an eligible assignment earlier. The new settings I configured above will apply to Joe on his next eligible assignment activation.
- I log in as Joe Bloggs
- Click Azure PIM
- Click My Roles
- Click Activate

6. Type in justification details and click activate

7. After clicking activate, Joe Bloggs is not granted access immediately. His request is pending approval as shown below

8. The admin allocated as a approver earlier must review the request and decide whether to approve or deny access. Back over to my account where I will review Joe Bloggs access. I will also receive an email to notify me that there is a request pending.
Access PIM > Azure AD Roles > Approve requests
9. Here is the pending request where I can review each case.

Note: Clicking approve or deny opens the window below allowing you review the details fully without having to expand the tabs above. A justification needs to be provided.

10. And Joes Bloggs access is approved. He will be granted access for 8 hours and does not need to take any further action to activate the role.

A complete audit of all actions carried out in PIM Azure AD Roles can also be located at: PIM > Azure AD Roles > Audit

Using Azure Active Directory (Azure AD) Privileged Identity Management (PIM), you can also improve the protection of your Azure resources and as you can see below Privileged access groups which was in preview at the time of writing this post.

Azure PIM also offers Access Reviews. Access to privileged Azure resource roles for employees changes over time. To reduce the risk associated with stale role assignments, you should regularly review access. You can use Azure Active Directory (Azure AD) Privileged Identity Management (PIM) to create access reviews for privileged Azure resource roles. You can also configure recurring access reviews that occur automatically. I will cover these topics in a further post. Note: Azure AD P2 licences are required within your directory for users assigned to an access review and users who perform access reviews.
Feedback welcome, please comment below. It would also be great to hear about your experience using Azure PIM.

Subscribe to new tech posts. We will never send you spam email or forward your details to third parties.
This will close in 0 seconds
Privacy Overview
Abou Conde's Blog
Cloud and infra security, assigning azure resource roles in privileged identity management (pim).
- by Abou Conde
- Posted on July 12, 2019 July 11, 2019
Azure Active Directory (Azure AD) Privileged Identity Management (PIM) can manage the built-in Azure resource roles, as well as custom roles, including (but not limited to):
- User Access Administrator
- Contributor
- Security Admin
- Security Manager, and more
Assign a role
Sign in to Azure portal with a user that is a member of the Privileged Role Administrator role.

Open Azure AD Privileged Identity Management .
If you haven’t started PIM in the Azure portal yet, go to Enabling Azure AD Privileged Identity Management (PIM) .
Click Azure resources .
Use the Resource filter to filter the list of managed resources.

Click the resource you want to manage, such as a subscription or management group.
Under Manage, click Roles to see the list of roles for Azure resources.
Click Add member to open the New assignment pane .

Click Select a role to open the Select a role pane, Click a role you want to assign and then click Select .

The Select a member or group pane opens.
Click a member or group you want to assign to the role and then click Select .

The Membership settings pane opens.
In the Assignment type list, select Active and click ok
PIM for Azure resources provides two distinct assignment types:
- Active assignments don’t require the member to perform any action to use the role. Members assigned as active have the privileges assigned to the role at all times.
- Eligible assignments require the member of the role to perform an action to use the role. Actions might include performing a multi-factor authentication (MFA) check, providing a business justification, or requesting approval from designated approvers.

Verify that the User is listed as the member of the Active roles.

Share this:
One thought on “ assigning azure resource roles in privileged identity management (pim) ”.
Hi, I was trying to do something where I needed a subscription ID but I don’t have/see one. Would that mean I don’t have the role associated with that subscription? Is that how it works? Thank you for your time.
Leave a comment Cancel reply

- Already have a WordPress.com account? Log in now.
- Subscribe Subscribed
- Copy shortlink
- Report this content
- View post in Reader
- Manage subscriptions
- Collapse this bar
Assigning groups to Azure AD roles and Privileged access groups, a first look!
On August 13th 2020, Alex Simons (Microsoft Identity PM) announced that assigning groups to Azure AD roles in now in public preview . This feature is one of the most requested features to be found in the Azure AD feedback forum .
I have been following this feature request for a while now, and up until recently Microsoft stated that implementing Azure AD role assignment for Azure AD groups wasn’t the issue, the issue was more related to who is able to manage those groups. For example, if enabled how can we circumvent that someone with the “User Administrator” role (capable of adding users to groups) is capable of adding someone to the group used to assign Global Administrator rights. When implemented incorrectly, this new “feature” could then introduce a new security risk in your environment.
Assigning groups to Azure AD roles requires an Azure AD Premium P1 license at minimum, for the Privileged Identity Functionality an Azure AD Premium P2 license is needed.
Disclaimer: This post reflects the status of assigning groups to Azure AD roles as of August 20, 2020. Functionality may change, even right after this post has been published.
So, let’s walk through on what was announced and see..
So, up until now when you wanted to assign a user an Azure AD role, you had to include the user account directly in the role. Verifying which account has what privileges is therefore hard, especially if you don’t have Azure AD Privileged Identity Management (PIM) licensed.
For a more in depth overview of what Azure AD Privileged Identity Management (PIM) is, please see another blogpost I wrote on this subject here: Lessons learned while implementing Azure AD Privileged Identity Management (PIM)
Changed behaviour while adding members to Azure AD Roles
On the topic of PIM, I also noticed some changed functionality when adding users when you have PIM enabled in your environment. If you don’t have PIM enabled you can assign a user to a role, but if you have PIM enabled there is another experience where when you want to assign an Azure AD role you are actually redirected to the Privileged Identity Management blade, where you can directly create an Eligible (must be activated) or Active (always active) assignment.
Adding users to Azure AD roles via Group membership
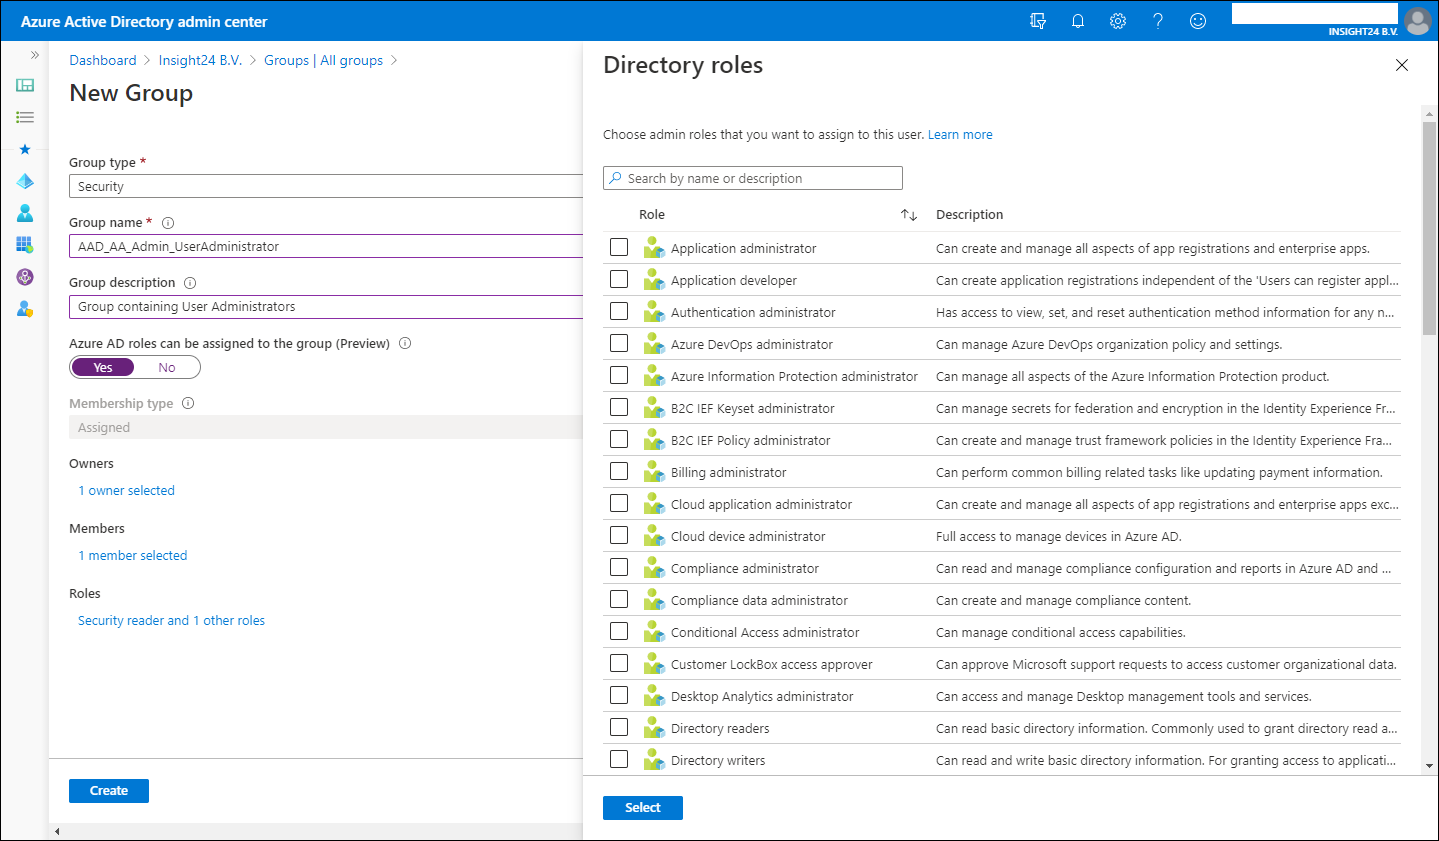
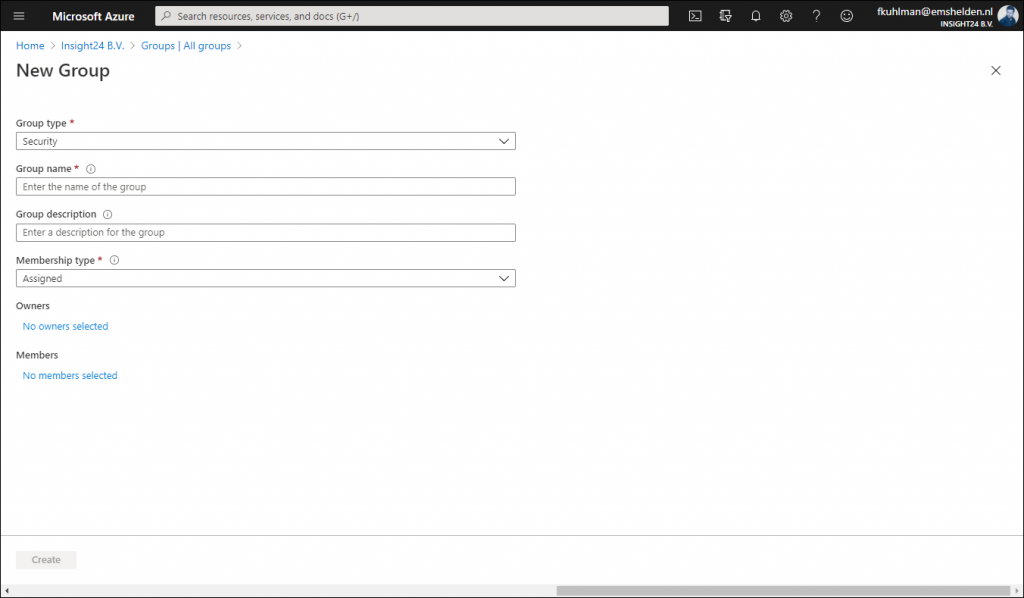
In order to add users to Azure AD roles via Group membership you first have to create a new group, so it’s not possible to repurpose an existing group for this.
New groups have the option to set the “Azure AD roles can be assigned to the group (Preview)” option which can be set to either “No” or “Yes”. When you switch this setting to ‘Yes’ the group’s eligibility for role assignment is permanent. Besides that you can only have a membership type of Assigned, so using Dynamic Groups is not supported, and within the wizard you can only add users as member and not groups (group nesting). Interestingly, you can assign multiple Azure AD roles to the group.

If you want to create the Group with the “Azure AD roles can be assigned to the group (Preview)” option enabled you will get an extra confirmation screen:

The option “Azure AD roles can be assigned to the group (Preview)” is only visible if you are member of either the Global Administrator or Privileged Role Administrator role.
Privileged access groups
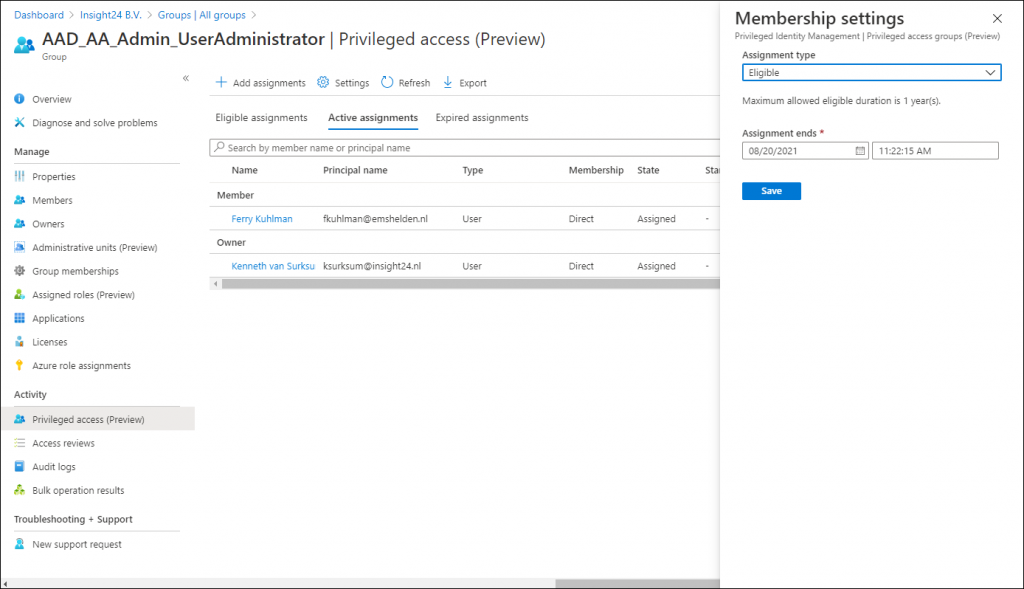
Once a group with the option to enable Azure AD role assignments is created and you have PIM enabled, a new option becomes available called “Privileged access (Preview)”.
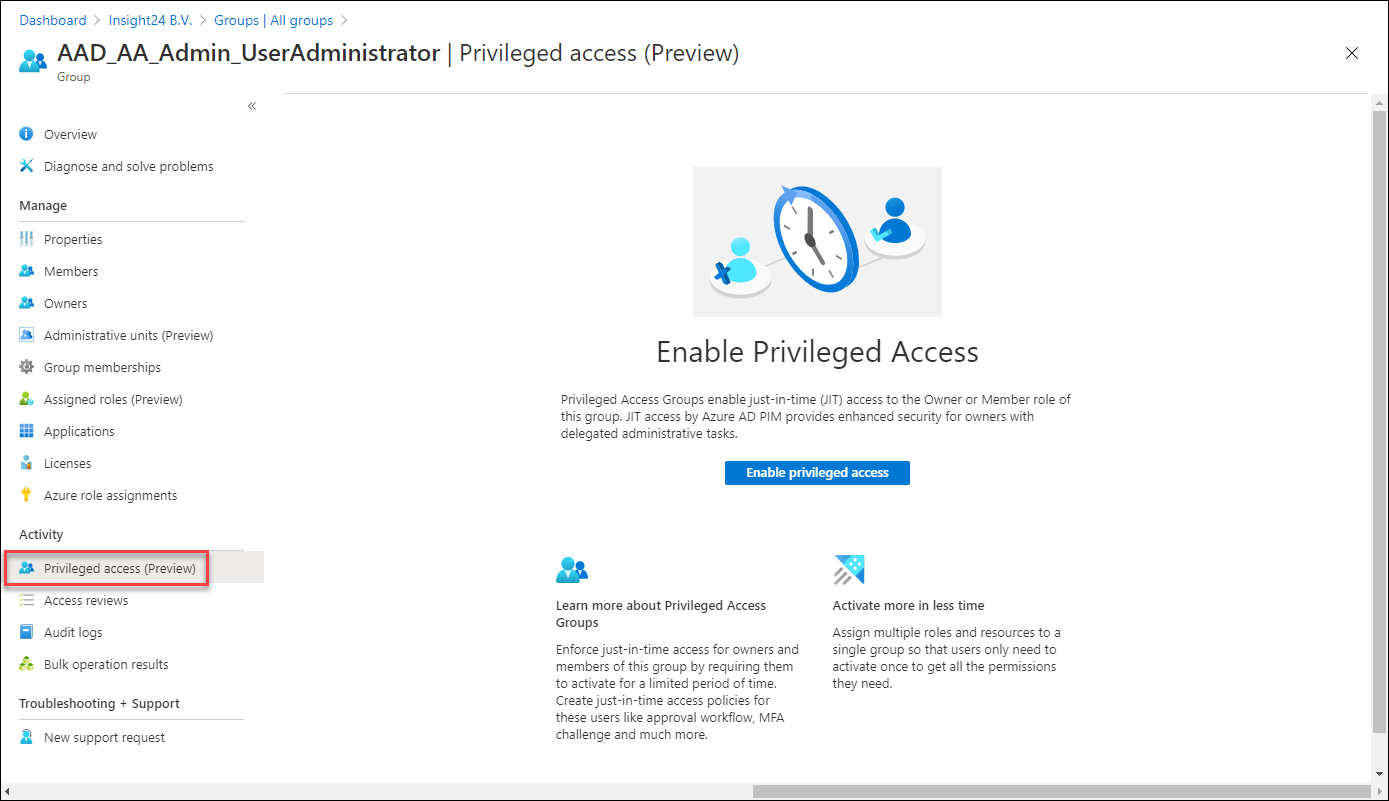
Enabling this option gives us the following options:
Define Eligible or Active assignments to the group
On the group you can assign members or owners using the capabilities provided by PIM. So for example, while adding our user as a member of the group permanently earlier in this article, I now have the option to make the membership Eligible. Also notice that this assignment type is time bound, with a maximum of 1 year.
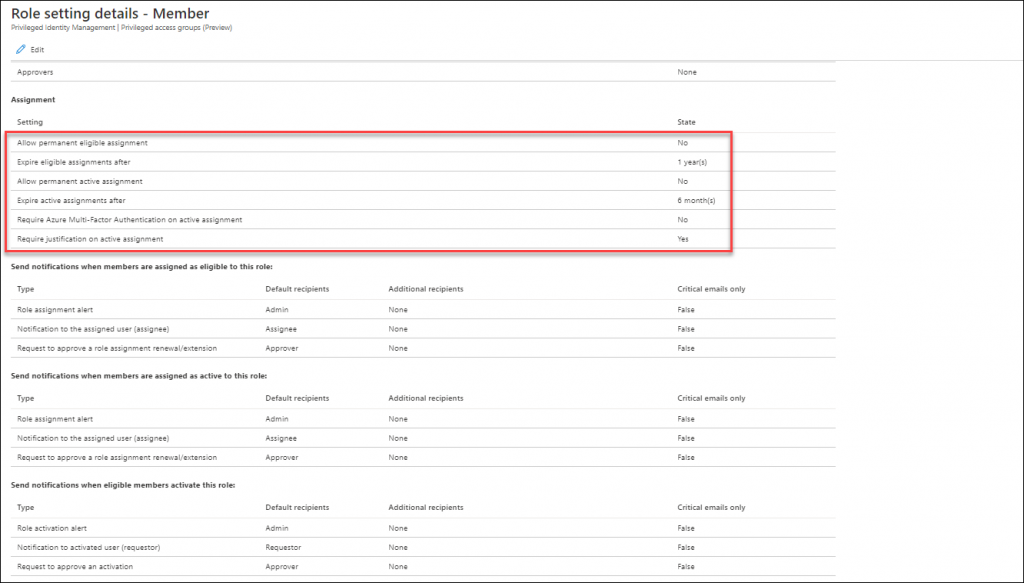
It’s also interesting to notice that if you want to update an Active Assignment you will not be allowed to Permanently assign an Active role by default. And that assigning an Active role has a maximum allowed assignment duration of 6 months. Once the group is enabled for Privileged Access and you want to add a member, then you don’t have the option “Permanently assigned” available. Also notice that providing a justification is mandatory.
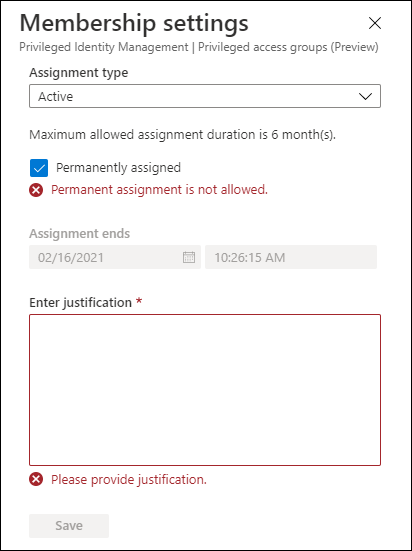
The default options described above are configurable though, trough the settings, so you are able to configure these depending on your requirements.
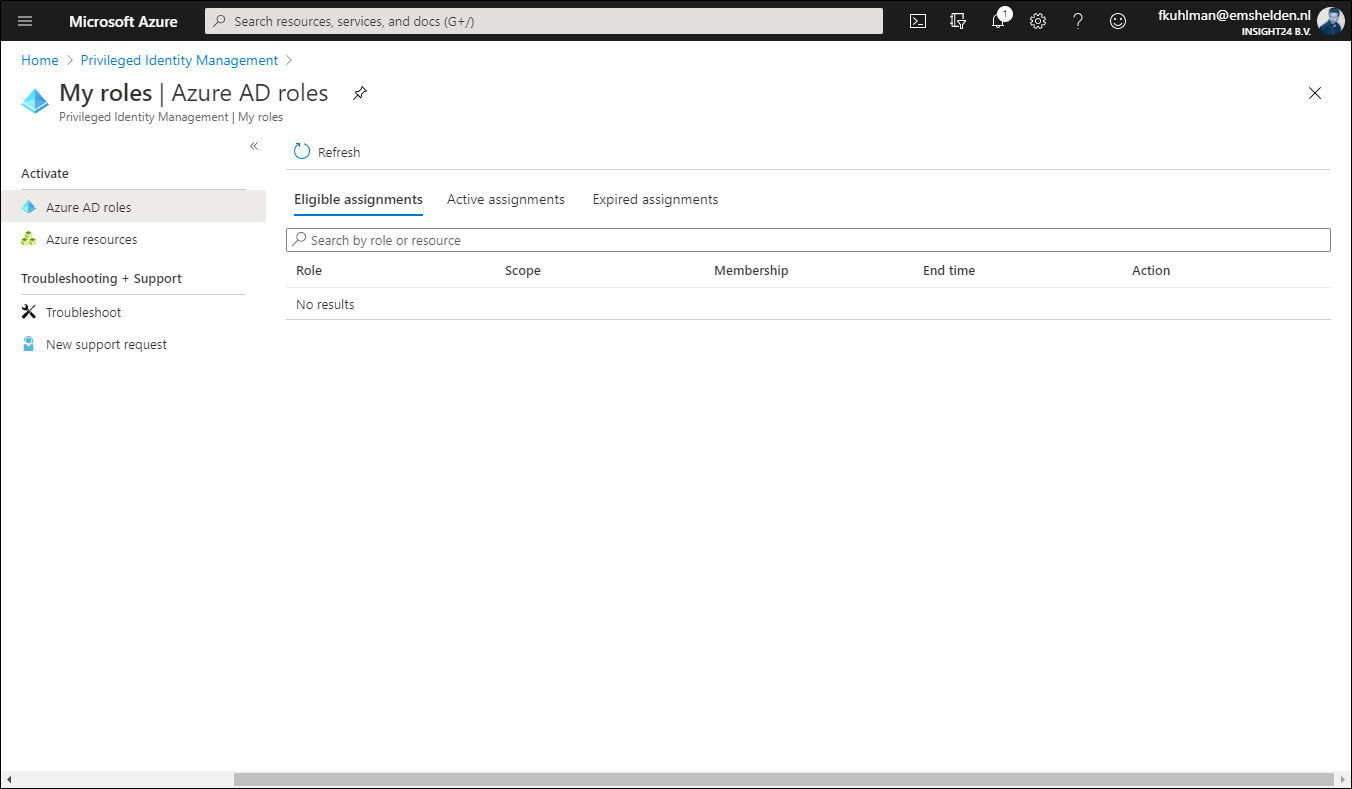
Activating your Azure AD role while using Privileged access groups
It’s interesting to see that once a user is set to Eligible for the privileged access group, that the Azure AD role doesn’t show up under Eligible Assignments when the user browses to My Roles in PIM. In order to active the Azure AD role in this scenario, the user must go to Privileged access groups (Preview) and active the role from there.
Once the role is activated via the group, it will show up under Active assignments, and what’s interesting to see is that at this time it’s still displayed as being permanent. But I expect that to be fixed while the functionality is still in preview.
Within the PIM settings of the group you can also specify that any Activation request for the group must be approved. This works similar to approval in PIM as we already know it. You define that approval is mandatory and specify who can approve. This can either be a user or a group.
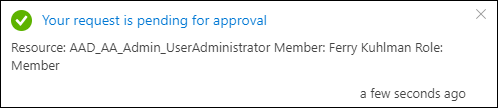
If the user now requests to activate the privileged access group, he will receive the message that the request is pending for approval
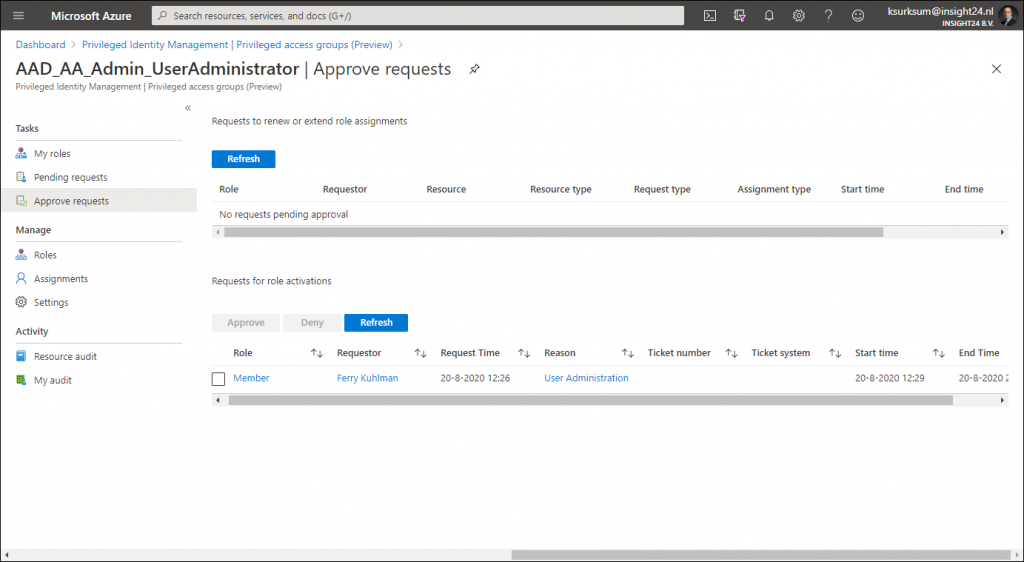
The approver doesn’t see the request under Privileged Identity Management | Approve requests but has to go to Privileged Identity Management | Privileged access groups (Preview) and select the group, from there the Approve Requests functionality is providing the ability to approve the request.
I hope this walkthrough gave you an idea on the new possibilities as announced in the public preview. And there is much more to cover actually when it comes to PIM, like more in depth information about auditing and access reviews.
Microsoft has addressed its own concerns by only allowing Global Administrators and Privileged Role Administrators to create the groups enabled for Azure AD role assignment. And having this functionality combined with Privileged Identity Management (PIM) makes the solution even better. Another reason to buy an Azure AD Premium P2 license for your administrative accounts at least.
A winning feature is that by using Privileged access with Azure AD Groups is that you can enable multiple Azure AD roles at once, this could save you creation of a custom role in some cases when using PIM.
While there are still some little fixes which must be applied, for now this looks like a welcome addition for any Azure AD tenant using Premium functionality.
Assigning groups to Azure AD roles is now in public preview!
Use cloud groups to manage role assignments in Azure Active Directory (preview)
Management capabilities for privileged access Azure AD groups (preview)
2 thoughts on “ Assigning groups to Azure AD roles and Privileged access groups, a first look! ”
- Pingback: Active Directory Identity Governance – Privileged Identity Management - JanBakker.tech
make the Security Admin Role a member Privilege Role Admin in Privilege Identity Management in Azure AD is this possible??
Leave a Reply Cancel reply
Your email address will not be published. Required fields are marked *
This site uses Akismet to reduce spam. Learn how your comment data is processed .
Privacy Overview
Step-by-Step Guide : Azure AD PIM for Groups
Azure AD Privileged Identity Management (PIM) offers organizations a comprehensive solution for managing, monitoring, and auditing access to their Azure resources. Among its key functionalities, Azure AD PIM allows the implementation of just-in-time (JIT) access to both Azure AD and Azure resources. Sometime ago Microsoft released preview feature that enable the usage of Azure AD PIM for Azure AD role-assignable groups.
Since then, this feature has been fully released (General Availability) with some noteworthy enhancements. Previously, utilizing Azure AD PIM with groups required them to be Azure AD role-assignable groups. However, the functionality has now been extended to encompass any Azure AD security group and any Microsoft 365 group, irrespective of whether they are role-assignable groups or not. In this blog post, I will be providing a demonstration of how to enable Azure AD PIM for an Azure AD security group.
Let's discuss the key points about Azure AD Privileged Identity Management (PIM) for groups:
- Azure AD PIM for groups has certain limitations: It does not support dynamic groups or groups synchronized from on-premises directories.
- Azure AD role-assignable groups have a maximum limit of 500 groups. This constraint is imposed by Azure AD itself and not by Azure AD PIM. However, for security groups, this 500 group limit does not apply.
- Azure AD PIM for groups fully supports nested groups. If a group is eligible for membership in another group, the members of the nested group can activate their membership in the parent group through Azure AD PIM.
Let's go ahead and see how this actually works.
In my demo environment, I already have an Azure AD security group called “ RebelTest Group A ” and it doesn't have any members assigned.

Let's explore how to enable Azure AD Privileged Identity Management (PIM) for a specific group and understand its functionalities through a step-by-step process:
Enabling Azure AD PIM for a Group
- Start by logging in to the Azure portal at https://portal.azure.com/ using Global Administrator or Privileged Role Administrator credentials.

- Confirm the onboarding of the selected group(s) to Azure AD PIM by selecting OK when prompted.

- In the role settings page, select Require approval to activate and specify the user as the approver. Then select Update to finalize the configuration.

This complete the Azure AD PIM for group configuration. Let's see how its really works for the group members and approvers.
- To test Azure AD PIM as an eligible member, log in to the Azure portal using Isaiah Langer's credentials ( [email protected] ).
- Navigate to Azure AD Privileged Identity Management and select Groups .

- In the new page, provide justification and select Confirm .

By following these steps, you should now have a better understanding of how Azure AD PIM for groups operates.
This article was originally published by Microsoft's Entra (Azure AD) Blog . You can find the original article here .
Related Posts
- Using Microsoft 365 Defender to protect against Solorigate
- Using Debugging Tools to Find Token and Session Leaks
- The Case of Azure AD Quota Exhaustion
- Support for Azure AD user creation on behalf of Azure AD Applications for Azure SQL
- Storage Spaces Direct Step by Step: Part 1 Core Cluster
Assignment Types
At a time when security breaches seem to be an everyday occurrence, it’s become more and more important to protect resources with more than just a username and password. It’s even more important to protect resources from INTERNAL threats. By implementing Azure AD Privileged Identity Management, organizations can protect their resources with improved security features, and even keep an eye on what legitimate administrators are doing.
In this lesson, you’ll learn how to implement Azure AD Privileged Identity Management. We’ll start the lesson by touching on an overview of what Azure AD Privileged Identity Management is and what it offers. We will then work through the deployment of PIM and how it works with multi-factor authentication. As we work through some demos, you will learn how to enable PIM and how to navigate tasks in PIM.
We’ll then cover the activation of roles and the assignment of those roles, including permanent roles and just-in-time roles. We’ll also cover the concepts of updating and removing role assignments, reinforcing these concepts through demonstrations.
We’ll round out the lesson with supported management scenarios, configuring PIM management access, and how to process requests.
Learning Objectives
- Activate a PIM role
- Configure just-in-time resource access
- Configure permanent access to resources
- Configure PIM management access
- Configure time-bound resource access
- Create a Delegated Approver account
- Process pending approval requests
Intended Audience
- People who want to become Azure cloud architects
- People who are preparing to take Microsoft’s AZ-101 exam
Prerequisites
- Moderate knowledge of Azure Active Directory
To see the full range of Microsoft Azure Content, visit the Azure Training Library .
Tom is a 25+ year veteran of the IT industry, having worked in environments as large as 40k seats and as small as 50 seats. Throughout the course of a long an interesting career, he has built an in-depth skillset that spans numerous IT disciplines. Tom has designed and architected small, large, and global IT solutions. In addition to the Cloud Platform and Infrastructure MCSE certification, Tom also carries several other Microsoft certifications. His ability to see things from a strategic perspective allows Tom to architect solutions that closely align with business needs. In his spare time, Tom enjoys camping, fishing, and playing poker.
This browser is no longer supported.
Upgrade to Microsoft Edge to take advantage of the latest features, security updates, and technical support.
Assign user roles with Microsoft Entra ID
- 4 contributors
The ability to manage resources is granted by assigning roles that provide the required permissions. Roles can be assigned to individual users or groups. To align with the Zero Trust guiding principles , use Just-In-Time and Just-Enough-Access policies when assigning roles.
Prerequisites
Before assigning roles to users, review the following Microsoft Learn articles:
- Learn about Microsoft Entra roles
- Learn about role based access control
- Explore the Azure built-in roles
Assign roles
There are two main steps to the role assignment process. First you'll select the role to assign. Then you'll adjust the role settings and duration.
Select the role to assign
Steps in this article might vary slightly based on the portal you start from.
Sign in to the Microsoft Entra admin center as a Privileged Role Administrator .
Browse to Identity > Users > All users .

Search for and select the user getting the role assignment.

Select Assigned roles from the side menu, then select Add assignments .

Select a role to assign from the dropdown list and select the Next button.
Adjust the role settings
You can assign roles as either eligible or active . Eligible roles are assigned to a user but must be elevated Just-In-Time by the user through Privileged Identity Management (PIM). For more information about how to use PIM, see Privileged Identity Management .

From the Setting section of the Add assignments page, select an Assignment type option.
Leave the Permanently eligible option selected if the role should always be available to elevate for the user.
If you uncheck this option, you can specify a date range for the role eligibility.
Select the Assign button.
Assigned roles appear in the associated section for the user, so eligible and active roles are listed separately.

Update roles
You can change the settings of a role assignment, for example to change an active role to eligible.
Search for and select the user getting their role updated.
Go to the Assigned roles page and select the Update link for the role that needs to be changed.
Change the settings as needed and select the Save button.

Remove roles
You can remove role assignments from the Administrative roles page for a selected user.
Search for and select the user getting the role assignment removed.
Go to the Assigned roles page and select the Remove link for the role that needs to be removed. Confirm the change in the pop-up message.
Related content
- Add or delete users
- Add or change profile information
- Add guest users from another directory
Coming soon: Throughout 2024 we will be phasing out GitHub Issues as the feedback mechanism for content and replacing it with a new feedback system. For more information see: https://aka.ms/ContentUserFeedback .
Submit and view feedback for
Additional resources
IMAGES
VIDEO
COMMENTS
In the Assignment type list, select Eligible or Active. Privileged Identity Management provides two distinct assignment types: Eligible assignment requires member or owner to perform an activation to use the role. Activations may also require providing a multi-factor authentication (MFA), providing a business justification, or requesting ...
Assignment duration. When you configure settings for a role, you can choose from two assignment duration options for each assignment type: eligible and active. These options become the default maximum duration when a user is assigned to the role in Privileged Identity Management. You can choose one of these eligible assignment duration options.
On the settings page, keep the assignment type as Eligible and set the allowed eligible duration (e.g., 1 year). Once the settings are confirmed, Select Assign to complete the user assignment process. Next, configure the approval process for the role by selecting Settings in the assignment page.
In the Assignment type list on the Membership settings pane, select Eligible or Active. \n \n \n. Eligible assignments require the member of the role to perform an action to use the role. Actions might include performing a multi-factor authentication (MFA) check, providing a business justification, or requesting approval from designated approvers.
In the Assignment type list on the Membership settings pane, select Eligible or Active.. Eligible assignments require the member of the role to perform an action to use the role.Actions might include performing a multi-factor authentication (MFA) check, providing a business justification, or requesting approval from designated approvers.
The eligible assignment is displayed with an Activate link as shown below. Click Activate. ... Type in justification details and click activate. 7. After clicking activate, Joe Bloggs is not granted access immediately. His request is pending approval as shown below. 8. The admin allocated as a approver earlier must review the request and decide ...
In the Assignment type list, select Active and click ok. PIM for Azure resources provides two distinct assignment types: ... Eligible assignments require the member of the role to perform an action to use the role. Actions might include performing a multi-factor authentication (MFA) check, providing a business justification, or requesting ...
In Your Scenario, Create Two separate groups for Internal and External users. For External Members: Go to Privileged Identity Management, Select Specific role . Add External_Member_Group . Select "Eligible" as assignment type from drop-down. Save. Go to Role settings . "Add MFA" and "Require approval to activate" based on your requirement.
Also notice that this assignment type is time bound, with a maximum of 1 year. Update assignment options. ... that the Azure AD role doesn't show up under Eligible Assignments when the user browses to My Roles in PIM. In order to active the Azure AD role in this scenario, the user must go to Privileged access groups (Preview) and active the ...
On the Settings tab, in the Assignment type list, select Eligible or Active. \n \n. Azure AD PIM for Azure resources provides two distinct assignment types: \n \n \n. Eligible assignments require the member to activate the role before using it. Administrator may require role member to perform certain actions before role activation which might ...
On the settings page, keep the assignment type as Eligible and set the allowed eligible duration (e.g., 1 year). Once the settings are confirmed, Select Assign to complete the user assignment process. Next, configure the approval process for the role by selecting Settings in the assignment page.
In the Assignment type list, select Eligible or Active. Privileged Identity Management provides two distinct assignment types: \n \n; Eligible assignment requires member or owner to perform an activation to use the role. Activations may also require providing a multi-factor authentication (MFA), providing a business justification, or requesting ...
Eligible - This is the type of role assignment where a user needs to perform one or more actions to activate and use the role. Once those actions are completed, the role type changes from eligible to active. When a user has been made eligible for any role, it simply means that they can activate the role that they were made eligible for when ...
We'll also cover the concepts of updating and removing role assignments, reinforcing these concepts through demonstrations. We'll round out the lesson with supported management scenarios, configuring PIM management access, and how to process requests. Learning Objectives.
The type of the assignment Eligible assignments require the member of the role to perform an action to use the role. Actions might include activation, or requesting approval from designated approvers. Active assignments don't require the member to perform any action to use the role. Members assigned as active have the privileges assigned to the ...
When you configure settings for a role, you can choose from two assignment duration options for each assignment type: eligible and active. These options become the default maximum duration when a user is assigned to the role in Privileged Identity Management. You can choose one of these eligible assignment duration options.
Medicare.gov Care Compare is a new tool that helps you find and compare the quality of Medicare-approved providers near you. You can search for nursing homes, doctors, hospitals, hospice centers, and more. Learn how to use Care Compare and make informed decisions about your health care. Official Medicare site.
From the Setting section of the Add assignments page, select an Assignment type option.. Leave the Permanently eligible option selected if the role should always be available to elevate for the user.. If you uncheck this option, you can specify a date range for the role eligibility. Select the Assign button.. Assigned roles appear in the associated section for the user, so eligible and active ...
Closed 9 months ago. Via PowerShell or API, is there a way to recursively or non-recursively list role assignments for azure resources at (a) given scope (s) and show whether the role assignment is Eligible or Active? The results need to be exportable to a csv file. azure. azure-rbac.