- All about AI
- Google Gemini AI
- Inflection AI Pi Chatbot
- Anthropic Claude
- Multimodal AI
- Generative AI
- AI Image Generation
- AI VIdeo Generation
- AI Coding Assistants
- AI Regulation
- AI Research
- Large Language Models (LLM)
- Surface Pro
- Surface Laptop
- Surface Book
- Surface Duo
- Surface Neo
- Surface Studio
- Surface Hub
- Surface Pen
- Surface Headphones
- Surface Earbuds
- About WinBuzzer
- Follow Us: PUSH, Feeds, Social
- Join our Team
- Cookie Policy and Privacy Policy
- Terms of Service

How to Change Your IP Address on Windows 10 (3 Methods)
We show you how to change your IP address in Windows 10 using the Settings app, Control Panel, and Command Prompt.

Table of Contents:
IP addresses are one of the primary ways services identify a user. Though your IP address may change automatically from time to time, if you've been assigned the wrong IP by your router or want something more static, you need to know how to change your IP address on Windows 10 manually.
What is an IP address?
An IP address is a series of numbers that identifies your device and therefore allows information to be sent between devices. Without IP addresses, computers on the internet and your local network would not be able to differentiate between different devices, routers, websites, etc.
However, IP addresses also come with some downsides. For starters, somebody may be able to use your IP address to get a general idea of your location. Services may also utilize your IP address to track you across the web.
Unfortunately, changing your IP address will with the methods outlined below will not disguise your location. As the IP address will still be connected to your ISP, it can still be traced to their nearest networking hub. It will also not help if you have been banned by a service – you're only changing the IP address on your local network, not the one the internet sees. For that kind of protection, you should consider using Tor or a VPN.
That said, if you do want to change IP address on Windows 10, you'll need to have access to your administrator account. If you do have access, you can learn how to change IP by following the steps below:
How to Change IP Address in Windows 10 via Settings
Unsurprisingly, the simplest way to change your IP address in Windows 10 is via the in-built settings app, but there are a few things you need to look out for when it comes to choosing your new IP:
Press the Start button, then click the settings cog, above the power button. Alternatively, press Windows + I .

If your IP address is currently set manually and you're running into issues, you can change the dropdown in “Edit network IP settings” to “Automatic (DHCP)” and press “Save” .

When you change your IP address, it's important to make sure the information you enter is correct. Before you start, it's useful to gather:
– Your current IP address – Your subnet mask – Your gateway (router IP)
If you don't know these details, you can run the ipconfig command in Command Prompt to obtain them.
Ideally, your new IP address should be of the same format as your old one. For example, if your current IP address is 10.0.0.1, you'll probably want to keep the 10.0.0.x format. Make sure you don't set your IP to the same as your gateway or other devices on your network.
Once you're done, press “Save” .

How to Change your Windows 10 IP Address in Control Panel
If you prefer the old-school way of doing things, the Control Panel may be better suited to you. In some ways, its interface is easier to navigate when it comes to IP editing. Here's how you can use it for that purpose:
Press Start and then type “Control Panel” . Click the top result.

At this point, you'll likely have to authenticate yourself as an administrator.

If your IP address is currently manually assigned and you're running into issues, you can tick “Obtain an IP address automatically” here instead and click “Save” .

Once you're done, press “OK” . You can leave the DNS fields blank, though it's worth noting that there are advantages to changing them.

How to Change IP in CMD (Command Prompt)
The command-line is often the fastest way to get things done, and this is no exception. You can change your IP in Command Prompt in under a minute if you need to. Here's how:
Press Start and type “Command Prompt” , then click “Run as administrator” on the right-hand side.

Before you change your IP, you need to know the name of your interface. This will likely be “Wi-Fi” if you're on a Wi-Fi network or “Ethernet” if you're on Ethernet.
You can check yours with netsh interface IP show config . While you're there, note down its default gateway and subnet mask.

If you set your manual IP previously, you can revert it to automatic assignment via DHCP with the following command:
Remember to replace “Wi-Fi” with whatever your interface is called.

If you'd rather set your IP address manually, you can instead use the following command:

Now that you know how to change your IP address on Windows 10, you may be interested in learning more about your network. Here's how you can change your network name or disable a Wi-Fi or Ethernet adapter .
Last Updated on February 14, 2022 7:43 pm CET
- Change IP address
- how to change ip address on pc
- how to change ip address on windows 10
- how to find ip address windows 10
- windows 10 change ip address
Recent News
Google DeepMind Introduces AI Safety Evaluation Framework
OpenAI Reaffirms AI Safety Commitment Amid Resignations
Subscribe to WinBuzzer on Google News

How To Change Your IP Address On Windows 10 (& Why You’d Want To)
We'll help you properly configure your network
When you connect to a local network, the device you’re using is given an IP address, allowing other devices to find and communicate with it, as well as signifying that the device itself has correctly authenticated. The larger the network, the more IP addresses that will be in use, which can cause some allocation issues.
In most cases, IP address allocation is determined by your local router, so to change your IP address on a Windows 10 PC, you’ll need to configure your network as a whole. Alternatively, you may want to set a static IP address , or change your public IP address for all your devices. To change your IP, here’s what you’ll need to do.

Why Change Your IP Address On Windows?
There are a couple of reasons why you might want to change your IP address.
Typically, a local network router will allocate a temporary IP address to your device when you connect using DHCP (the protocol used to assign IP addresses), giving it a temporary lease to that address. When the lease runs out, it will need to be renewed, otherwise you could be allocated a new address.

While this usually happens automatically, problems can sometimes occur. A poorly configured or busy local network, along with misconfigured devices, might result in the same IP address being allocated twice, causing conflicts.
If this happens, you may wish to set a static IP address, giving your device a permanent address. You’ll want to do this for devices that are regularly accessed by other devices, such as home servers or network attached storage devices .
These all apply for local networks, but you may want to change the IP address given to you by your internet service provider. This can be trickier to do, but there are a few ways to change this address if your ISP allows it.
Configuring Your Network Router DHCP Settings
One of the easiest ways to change your IP address is to configure your network router to assign a new IP address. To do this, you should configure the DHCP settings on your router to assign IP addresses differently.
You could, for instance, set a static allocation for your Windows PC. When your device connects, your router will always assign the same IP address to it by using your device’s MAC address to identify it.

If you don’t want to do this, you could also change the IP range used by your local router. This means that your local IP address may still change from time to time, but the range of addresses will be different. Your IP address may change from 192.168.0.10 to 192.168.10.10 , for instance.

To do this, you’ll need to access your router’s administration page. This will vary by device, but typically, many local routers can be accessed by typing http://192.168.0.1 or http://192.168.1.1 from your web browser. Consult your user manual for the correct username and password to use here.
The steps to change your DHCP settings will also vary, but you’ll typically find DHCP settings listed under its own section (eg. DHCP ), while fixed IP allocations can be found under address allocation or similar.

Releasing DHCP Lease and Resetting Your Dynamic IP
Any changes you make to your router’s DHCP settings may require you to release or renew your Windows IP address using the Windows PowerShell.
- To do this from the Windows PowerShell, right-click the Start menu and click the Windows PowerShell (Admin) option.

- In the PowerShell terminal window, type ipconfig /release to release your DHCP lease and disconnect. With your new settings in place, type ipconfig /renew to reconnect.

If your router settings have been correctly changed, releasing your DHCP lease and resetting your IP will result in a new IP address being allocated to your device.
Setting a Static IP Address On Windows 10
A static IP address can be achieved through a fixed DHCP allocation, but you can also set this manually in your Windows 10 settings. You may want to do this if you’re making a direct connection to another device.
This may also work with your local router, but as your device is already being assigned an IP using DHCP, an IP conflict may occur. In this case, it’s better to use a fixed IP allocation to do this instead.
- To set a static IP address, open your network settings by right-clicking the Start menu and clicking the Network Connections option.

- In the Network Connections settings menu, press the Change connection properties option.

- Under the IP Settings category, press the Edit option.

- Change the IP allocation type to Manual . Enable either IPv4 or IPv6 , then type the static IP settings you wish to apply. An example configuration for an static IPv4 IP address would include 192.168.0.10 for IP address, 24 for subnet prefix length, and 192.168.0.1 for gateway (referring to your local router) and preferred DNS server. Click Save once you’re done.

Once saved, your IP address settings will be applied automatically. You may need to release your existing IP using the steps above or restart your PC for the changes to take effect fully.
Change Your Public IP Address On Windows 10
Your public IP address is the address assigned by your internet service provider, giving you access to the internet. This is assigned to your modem (which is usually combined with your network router, but not always), allowing all other connected network devices to the internet, too.
Changing this address can sometimes be difficult. You’ll need to check if you’re assigned a dynamic (temporary) or static IP address by your ISP first. If you’re assigned a static public IP, your ISP will need to change this for you.

For dynamic IP addresses, you can usually reset this by switching your network modem off for a period of time. By doing this, you’re disconnecting your device from your ISP.
As with your local network, your public IP lease will eventually run out, meaning you may be allocated a new IP address at this point. However, this isn’t guaranteed to work, and you may need to try another method.
If your public IP address won’t change, there are other methods you could try. Using a virtual private network , will hide your public IP as you browse online, for instance.
Configuring Your Network On Windows 10
Whether you’re configuring a server for your network (or for wider internet users), or you just want to free up allocations for other devices, it’s an easy process to change your IP address on Windows 10, although much of the work relies on being able to access your router to properly configure your network.
If your network configuration is causing problems, you may wish to reset your network router to wipe the slate clean and start again. IP allocation issues might be why you’re struggling with network connection issues, but thankfully, there are several ways to fix unidentified network problems on Windows 10.

Ben Stockton is a freelance technology writer based in the United Kingdom. In a past life, Ben was a college lecturer in the UK, training teens and adults. Since leaving the classroom, Ben has taken his teaching experience and applied it to writing tech how-to guides and tutorials, specialising in Linux, Windows, and Android. He has a degree in History and a postgraduate qualification in Computing. Read Ben's Full Bio
Read More Posts:

- Disk & Data Manager
- Partition Wizard
- Power Data Recovery
- ShadowMaker
- Media Toolkit
- uTube Downloader
- Video Converter
- Download Partition Wizard Free Edition: Download Pro Edition: Try Demo Server Edition: Try Demo
- Partition Magic
How to Change IP Address on Windows 10 [Step-by-Step Guide]
Sometimes, we have to change IP address out of many reasons. How to change IP address on Windows 10? If you are also searching for the answer, you can follow this Windows 10 guide provided by MiniTool to change IP address.
Before You Do
How to change your IP address? In order to change IP address Windows 10 smoothly, it’s required to log in to Windows 10 using an administrator account. Besides, you need to find the IP address of your router and computer. To do so, follow the steps below.
Step 1. Press the Win + I keys to open the Settings app and go to the Network & Internet section.
Step 2. In the Status tab, scroll down the right sidebar and click on the View your network properties option.
Step 3. Now, scroll down the new screen to find the Default gateway and IPv4 address sections. The router’s IP address is next to the Default gateway and the IPv4 address identifies your computer. Remember the IP addresses you have found.

Now, let’s see how to change IP address Windows 10 in the following part.

Minecraft port forwarding is a heated topic among a great number of Minecraft fans. How to port forward Minecraft? Let’s this post tell you the answer.
How to Change My IP Address in Windows 10
Here we will walk you through 2 methods. Each method will be discussed in detail. Now, let’s start learning how to change IP address Windows 10.
Method 1. Change IP Address Windows 10 Using the Settings App
The first and simplest way to change IP address is to use the Settings app. Here’s a full guide for you:
Step 1. Open the Settings app by pressing Win + I keys and then click on Network & Internet .
Step 2. In the pop-up window, select the network type based on your situation. If your device connects to the Internet through a wireless card, select the Wi-Fi section. If your device is using a wired connection, select the Ethernet section.

Step 3. Scroll down the right sidebar to locate the IP settings section and click on the Edit button.
Step 4. In the pop-up dialog box, select Manual from the drop-down menu and enable the IPv4 switch.
Step 5. Enter all the required details below including IP address , Subnet prefix length , Gateway , etc.
IP address : It refers to the static IP address that you want to use.
Subnet prefix length : It refers to the prefix length that determines the size of the subnet.
Gateway : It refers to the IP address of your router.
The Preferred DNS and Alternate DNS settings are not mandatory to enter. The setting will be automatically assigned by your router if they are blank.
Step 6. After the details are entered, click on the Save button to change IP address.

Method 2. Change IP Address Windows 10 in Control Panel
In addition to the above method, you can change IP address Windows 10 through the Control Panel. Here’s how to do that:
Step 1. Type control in the search window and select the Control Panel app from the best match.
Step 2. Change the View by to Category , and then click on View network status and tasks under the Network and Internet section.

Step 3. Navigate to the View your active networks tab and click on your Internet connection next to it.

Step 4. In the pop-up window, click on Properties and then select the Internet Protocol Version 4 or IPv6 , which depends on the IP address that you’re ready to change.
Step 5. Click on the Properties button.

Step 6. In the Properties window, select the Use the following IP address option if you want to set a static IP address.
Step 7. Then you need to enter all the required details manually including IP address, subnet mask , and Default gateway . After that, click on OK to save the changes and exit the window.

How to change your IP address in Windows 10? I believe that already have known detailed steps. Now, it’s your turn to have a try.
About The Author

Position: Columnist
User Comments :
- PRO Courses Guides New Tech Help Pro Expert Videos About wikiHow Pro Upgrade Sign In
- EDIT Edit this Article
- EXPLORE Tech Help Pro About Us Random Article Quizzes Request a New Article Community Dashboard This Or That Game Popular Categories Arts and Entertainment Artwork Books Movies Computers and Electronics Computers Phone Skills Technology Hacks Health Men's Health Mental Health Women's Health Relationships Dating Love Relationship Issues Hobbies and Crafts Crafts Drawing Games Education & Communication Communication Skills Personal Development Studying Personal Care and Style Fashion Hair Care Personal Hygiene Youth Personal Care School Stuff Dating All Categories Arts and Entertainment Finance and Business Home and Garden Relationship Quizzes Cars & Other Vehicles Food and Entertaining Personal Care and Style Sports and Fitness Computers and Electronics Health Pets and Animals Travel Education & Communication Hobbies and Crafts Philosophy and Religion Work World Family Life Holidays and Traditions Relationships Youth
- Browse Articles
- Learn Something New
- Quizzes Hot
- This Or That Game
- Train Your Brain
- Explore More
- Support wikiHow
- About wikiHow
- Log in / Sign up
- Computers and Electronics
- Operating Systems
How to Change Your IP Address (Windows)
Last Updated: March 13, 2020 Tested
This article was written by Stan Kats and by wikiHow staff writer, Jack Lloyd . Stan Kats is the COO and Chief Technologist for The STG IT Consulting Group in West Hollywood, California. Stan provides comprehensive technology & cybersecurity solutions to businesses through managed IT services, and for individuals through his consumer service business, Stan's Tech Garage. Stan has over 7 years of cybersecurity experience, holding senior positions in information security at General Motors, AIG, and Aramark over his career. Stan received a BA in International Relations from The University of Southern California. The wikiHow Tech Team also followed the article's instructions and verified that they work. This article has been viewed 2,547,828 times.
This wikiHow teaches you how to change both your public IP address and your private IP address on a Windows computer. Your public IP address is the address that your computer broadcasts to other networks, while your private IP address is your computer's specific address within your own wireless network. Changing either of these may fix connection issues.

- You may want to check your current IP address before doing this.
- Simply unplugging the router and modem from the wall will work.

- Click Wi-Fi in the pop-up window.

- You may want to check your IP address again to make sure it has changed.

Renewing the Address

- If you aren't an administrator on your current computer, you won't have this option and thus won't be able to renew your computer's IP address.

Changing the Address

- IP address - Usually, your device's IP address will be "192.168.1.X" (or a similar set of numbers), wherein "X" is specific to your device. Change the "X" value to a number between 1 and 100. Make sure you don't use the same IP address as another device on your network (e.g., your phone).
- Subnet prefix length - This depends on your IP address, but will usually be "255.255.255.X".
- Gateway - This is your router's IP address.
- Preferred DNS - Your preferred DNS address (for example: "208.67.222.222" for the OpenDNS server, or "8.8.8.8" for Google's server).
- Alternate DNS - A secondary DNS address (for example: "208.67.220.220" for the OpenDNS server, or "8.8.4.4" for Google's server).

Expert Q&A

- You'd change your public IP address in the event that you were kicked out of a gaming service (e.g., Steam), while you'd change your private IP address to fix website loading errors. Thanks Helpful 1 Not Helpful 0
- Using a proxy server will not change your IP address in the traditional sense, but it will alter the IP address that others can see. Thanks Helpful 1 Not Helpful 0
- You can also use a browser like Tor to hide your IP address, though such browsers can be dangerous and are often slower than average. Thanks Helpful 0 Not Helpful 0

- If you choose an in-use IP address for your computer when changing its private IP address, the device that is currently using that address will get kicked off of the network. Thanks Helpful 0 Not Helpful 0
You Might Also Like

- ↑ http://www.whatismyip.com/ip-faq/how-to-change-your-ip-address/
About This Article

1. Unplug your router and modem. 2. Disable your Wi-Fi. 3. Wait 5 minutes. 4. Plug the router and modem back in. 5. Re-enable Wi-Fi. Did this summary help you? Yes No
- Send fan mail to authors
Is this article up to date?

Featured Articles

Trending Articles

Watch Articles

- Terms of Use
- Privacy Policy
- Do Not Sell or Share My Info
- Not Selling Info
wikiHow Tech Help Pro:
Level up your tech skills and stay ahead of the curve
How to Change IP Address on Windows 10
By Victor Ashiedu
Published March 20, 2020
On this page...
This Itechguide teaches you how to change your IP address on Windows 10. The guide covers steps for 3 methods to change IP address in Windows 10.
Option 1: Change IP Address from Adapter Settings
- Right-click the Windows 10 Start menu and click Settings .

- On the Windows Settings screen, click Network & Internet .

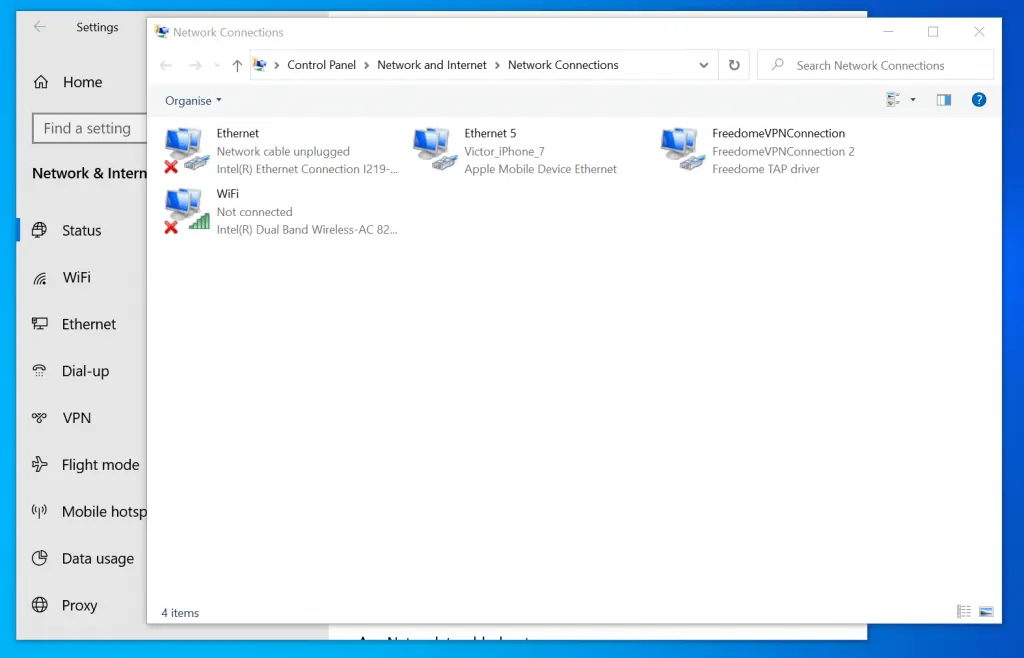
- When Network status setting opens, scroll down to Change your network settings and click Change adapter options . Network connections will open and display all network connections on your computer.

- On Network connections , double-click the adapter you want to change the DNS. The Properties of the adapter will open.
- On the properties of the adapter, click Internet Protocol Version 4 (TCP/IPv4) to highlight it. Then, click Properties .
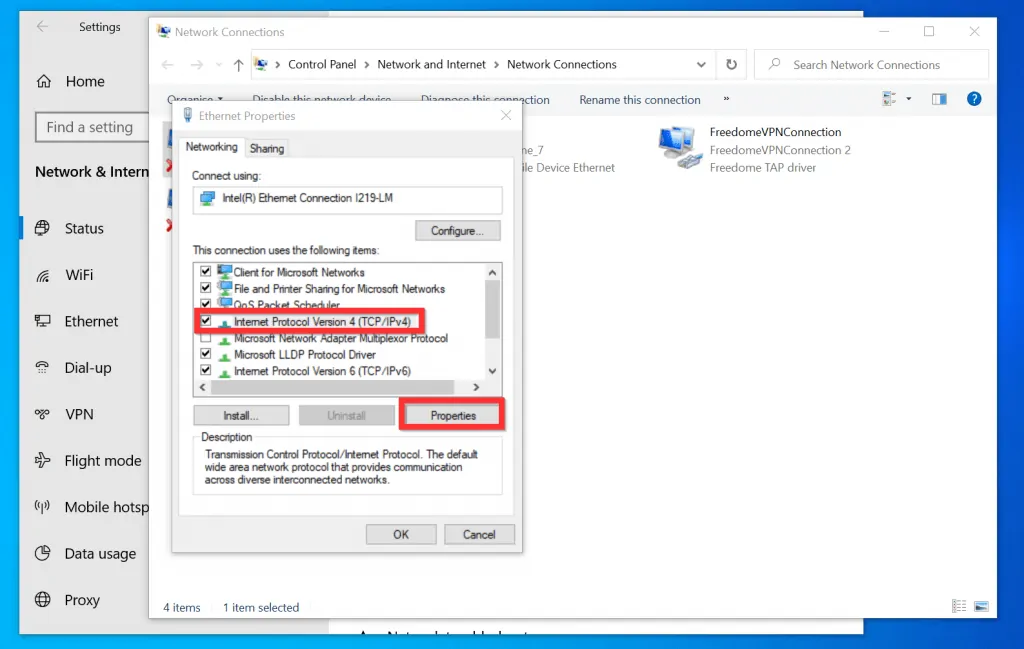
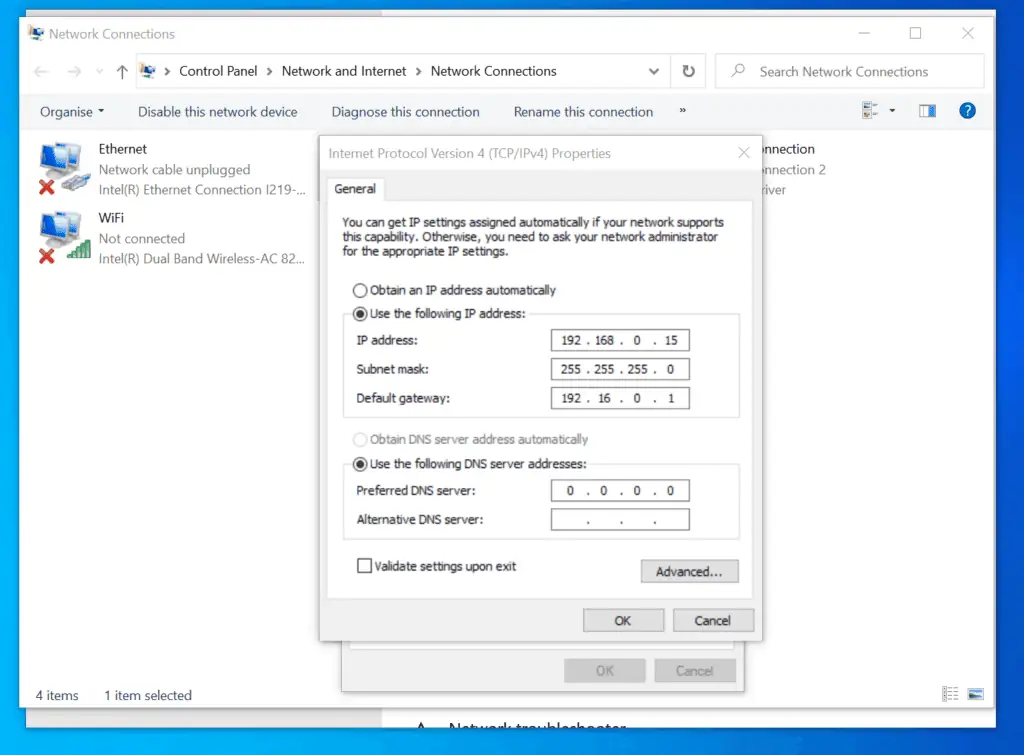
- Finally, on the Internet Protocol Version 4 (TCP/IPv4) Properties , select Use the following IP address .

- Then, enter the IP address , Subnet mask , and Default gateway and click OK.
Option 2: Change IP Address with Command Prompt
- Type command prompt in the search box. Then, from the search result, right-click Command Prompt and select Run as administrator .

- If you receive a User Account Control confirmation, click Yes .
- On Command Prompt, type the command below and click enter.
- Then, on the netsh prompt, type the command below and press enter.

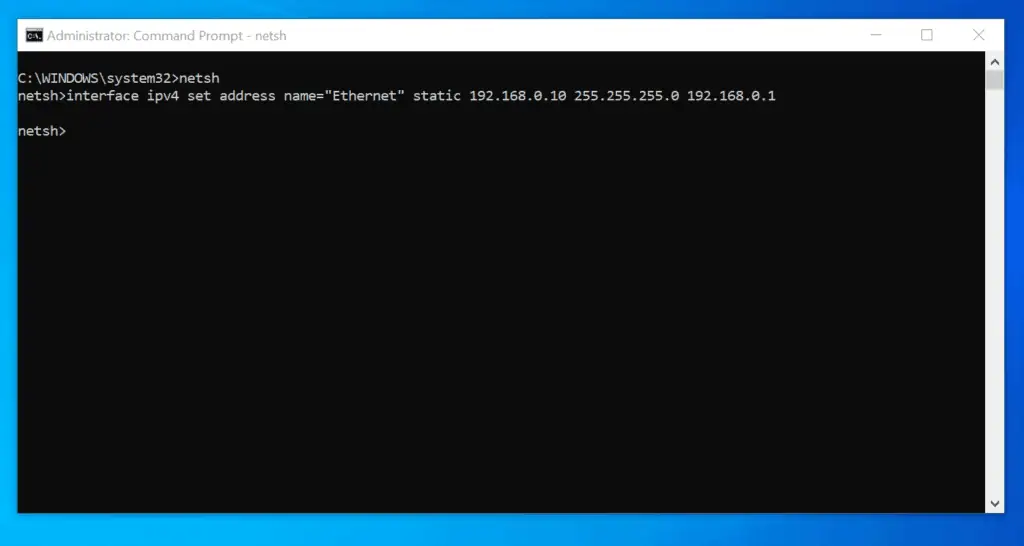
- Finally, to change IP address on Windows 10 with command prompt, type the netsh command in the format shown below and press enter.
Change: “interface name for your network adapter” to the name of the network adapter you want to set an IP address for. IP_address to the IP address you want to set. SUBNET_MASK to the Subnet mask you want to set. DEFAULT_GATEWAY to your default gateway.
- Here is an actual command…
Option 3: Change IP Address with PowerShell
- Type powershell in the Windows 10 search box. Then, beneath Windows PowerShell , click Run as Administrator .

- If you receive a User Account Control confirmation prompt, click Yes .
- On the PowerShell prompt, type the command below and press enter.
- The command lists the basic information for all the network adapters on your PC.
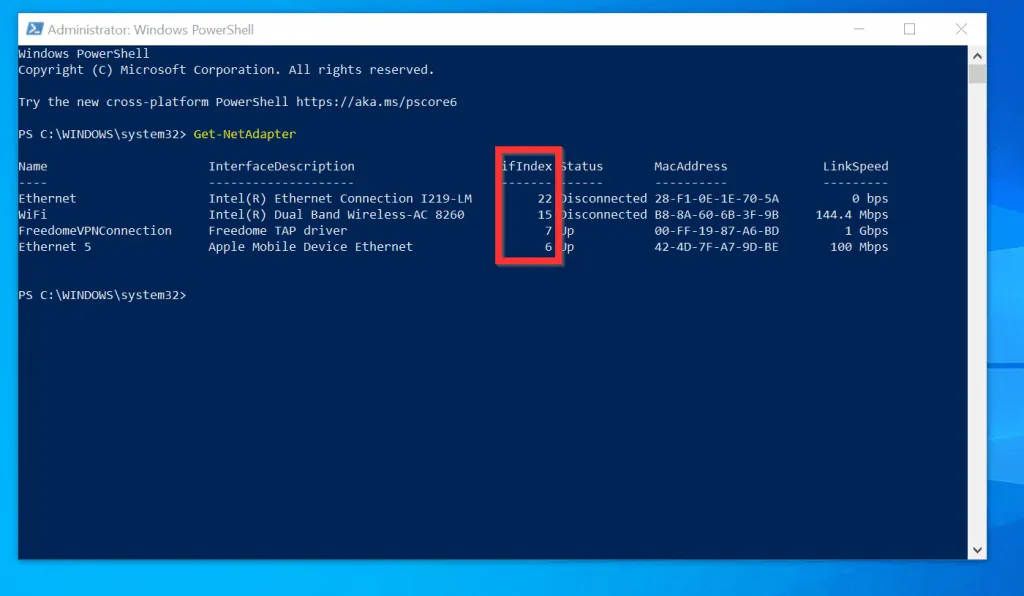
- Finally, to change IP address on Windows 10 with PowerShell, type the New-NetIPAddress Cmdlet in the format shown below and press enter.
- Here is an actual command to change the IP address for the adapter with the Interface Index of 22.
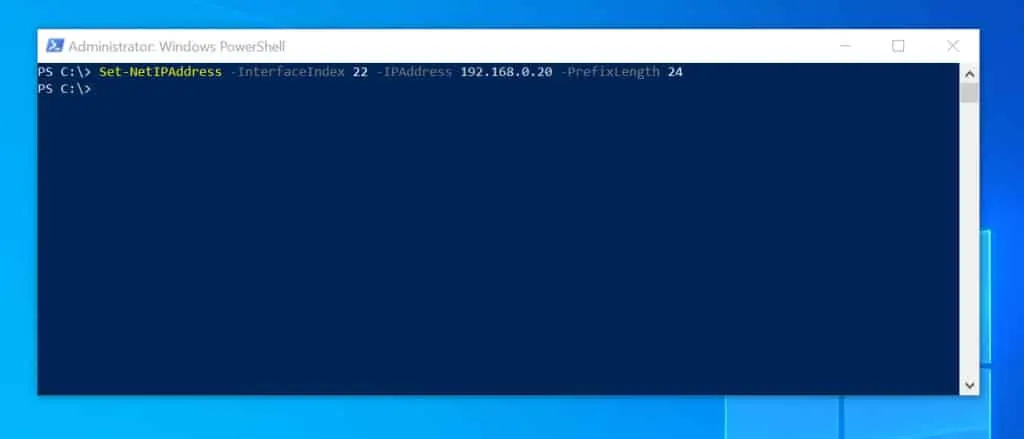
- When you ran the last command, if you receive an error message, use the Set-NetIPAddress Cmdlet to modify the configuration of an IP existing address. Here is the general format:
- Here is an actual command to change the IP address for a card with an Interface Index of 22 to 192.168.0.20.
It is very easy to change IP address on Windows 10! I hope you found this Itechguide helpful.
If you were able to change IP address on your Windows 10 PC, click on “Yes” beside the “Was this page helpful” question below. You may also express your thoughts and opinions by using the “Leave a Comment” form at the bottom of this page.
Finally, for more Windows 10 Itechguides, visit our Windows 10 How-To page.
- Was this page helpful?
- Yes (0) No (0)
About the Author

Victor Ashiedu
Related Articles

How to Create, Rename, Delete Files or Folders in Windows

How to Set Paging File Size in Windows 11 or Windows 10

How to Download and Install Windows 10 22H2 Update Manually
Get in Touch
We're committed to writing accurate content that informs and educates. To learn more, read our Content Writing Policy , Content Review Policy , Anti-plagiarism Policy , and About Us .
However, if this content does not meet your expectations, kindly reach out to us through one of the following means:
- Respond to "Was this page helpful?" above
- Leave a comment with the "Leave a Comment" form below
- Email us at [email protected] or via the Contact Us page.
Leave a comment Cancel reply
Save my name, email, and website in this browser for the next time I comment.
![How To Run Sysprep (Generalize) In Windows 10 [2 Methods]](https://www.itechguides.com/wp-content/uploads/2022/05/8-2.webp "how to change computer ip address in windows 10")
How to Run Sysprep (Generalize) in Windows 10 [2 Methods]
How To Change IP Address in Windows 10: A Visual Guide

W hen working in a larger environment, we are often asked to change our IP address. To change IP address in Windows 10, we have come up with a visual guide with really simple and easy steps. Follow this Windows 10 guide and change IP address in Windows 10. Let’s tell you about it in detail.
The need for changing IP address, sometimes, it is needed that we change IP address in Windows 10. This mostly happens when we are a part of a large organization like a college or a company and any change in IP policy might want us to change our machine’s IP address.
So, here are the steps on how to change IP address in Windows 10:
How to change IP address in Windows 10
On the taskbar of your computer, right click on the internet icon and click on “ Open Network and Sharing Center”

In the Network and Sharing center, click on the connections

A new Wireless Network Connection Status window will open up. Click on the properties .

A network connection status pop-up window will open up. Click on Internet Protocol Version 4 (TCP/ IP v4 ) if you want to change the IPv4 address of your computer.

Now fill in the required IP address and press OK.

And this is how you change the IP address in Windows 10. Sometimes, along with the IP address, you are also given Subnet mask, Default gateway and DNS Server address by your network administrator. You can use those addresses to fill in the required details.
Also read: How To Set Up A VPN In Windows 10: The Ultimate Guide

A passionate adventure traveller over Trekkerpedia.com and Author of the book 'The Girl from the Woods'.
Similar Posts

Here’s How To Watch Instagram Stories Anonymously In 2022
They’re gonna know! How would they know?

How To Copy-Paste From Chrome Desktop To Android?
One of the reasons why Google remains behind Apple in cross-device continuity is the lack of…

Windows 10 Fall Creators Update Features: What’s New In The Big Release
he Fall Creators Update is being pushed out as a part of Microsoft’s bi-annual update routine…

How To Connect Apps To Google Drive? How To Manage Google Drive Apps?
Short Bytes: Among the crowd of various cloud-based storage solutions, Google Drive is a favored name….
How To Turn Off, Restart & Lockdown A Google Pixel Phone
Make the most out of Android’s power menu!

How To Fix The “PS5 Cannot Connect To The Wi-Fi Network” Error?
A few fixes to help you resolve any internet connection issues with your PS5.
- Skip to primary navigation
- Skip to main content
- Skip to primary sidebar
Technology Simplified.
How to Change IP Address in Windows 10
By: Waseem Patwegar | Filed Under: Windows
Sometimes, you may find the need to modify or change the IP Address of your computer. You will find below the steps to Change IP Address in Windows 10.

Change IP Address in Windows 10
In a typical Networking setup, the IP Address of Modem/Router is assigned by the ISP (Internet Service Provider), which in-turn assigns a unique Private IP Address to your computer.
While most users never find the need to change or even check the IP Address of their computers, those working on a large network may sometimes find the need to change IP Address of their computer.
Hence, we are providing below an easy way to Change IP Address in Windows 10.
Step#1. Find Router IP Address
The first step is to note down the IP Address of Router (DHCP Server Entry) and also the Subnet Mask Address . These will be required, when you change your computers IP Address in the next step.
1. Type Command Prompt in Windows search bar > right-click on Command Prompt and select Run as Admin .

2. In Command Prompt window, type ipconfig/all and press the Enter key.

3. Once the command is executed, scroll down the list of entries and note down Subnet Mask Address and the DHCP Server Address (Router IP Address)

4. Close the Command Prompt window.
Step#2. Change IP Address Using Settings
After noting down Subnet Mask and DHCP Server Address, follow the steps below to change the IP Address of your computer.
1. Go to Settings > click on Network & Internet .
2. On the next screen, select your Network type ( WiFi or Ethernet) in the left-pane. In the right-pane, scroll down and click on Change adapter options link under “Related Settings”.

3. On the next screen, right-click on your active Network (WiFi or Ethernet) and click on Properties .

4. On the properties screen, select Internet Protocol Version 4 (TCP/IPv4) and click on Properties .

5. On IPv4 properties screen, select Use the following IP Address option > Enter Default Gateway (DHCP Server Address), Subnet Mask Address , New IP Address and click on OK .

As you can see in above image, the first 3 number sets (192.175.0) in IP Address Field need to be the same as the Router IP Address (DHCP Server entry) and you can only change the last number set with any number from 1 to 255.
- How to Find Your Public and Private IP Address
- How to Change Router IP Address
- The Lowdown on Meta AI
- What's the Difference? PS5 Slim vs. PS5
How to Change Your IP Address
If you need to spoof your IP address, there are a few ways to do it
- Massachusetts Institute of Technology
- University of Illinois
:max_bytes(150000):strip_icc():format(webp)/headshot-00415ba557444a8a9b6bb139498b97c5.jpg "how to change computer ip address in windows 10")
- The Wireless Connection
- Routers & Firewalls
- Network Hubs
- Installing & Upgrading
- Wi-Fi & Wireless
What to Know
- Windows: Control Panel > Network and Sharing Center > Change adapter settings and follow the instructions below.
- Mac: System Preferences > Network . Select a network > Advanced . Go to the TCP/IP tab and select Manually . Enter info.
- iOS: Open Settings > Wi-Fi , tap the circled i next to the network, select Configure IP > Manual . Set up the new IP.
This article explains how to change your IP address manually by switching from the router's assigned DHCP address to a static one on Windows, Mac, iOS, and Android. It also covers how to change your router's public IP address, which appears as the public IP address of every device on the network unless you use a VPN.
You can also get a new IP by releasing and renewing your IP .
Change a Windows Computer's IP Address
If your Windows computer has the IP address set up as a static one, change the IP address as follows:
Open Control Panel and select Network and Sharing Center . If you don't see it, first select Network and Internet .
Choose Change adapter settings .
Double-click the connection that you want to change the IP address on. For example, to change the wireless adapter's IP address, double-click the one that mentions Wi-Fi.
Select Properties .
Select Internet Protocol Version 4 (TCP/IPv4) .
Either alter the IP address or select Obtain an IP address automatically to have the router control the IP address.
If you leave the setting to obtain an IP address automatically, the router automatically assigns an IP address to the computer. However, when you enter the IP address information, the computer's IP address stays static.
Leave Obtain DNS server address automatically selected. Otherwise, your DNS server settings remain empty, which may cause other connection issues.
Change a Mac Computer's IP Address
Here's how to change the IP address on a Mac.
Open the System Preferences app on the Mac and select Network .
Select your Wi-Fi network in the left panel and click Advanced .
Select the TCP/IP tab.
Select Manually in the drop-down menu next to Configure IPv6 (or iPv4) and enter the information for the new IP.
Change a Phone's IP Address on iPhone
You can also change the IP address on a mobile device such as the Apple iPhone as follows:
Open the Settings app and select Wi-Fi .
Tap the small ( i ) next to the network and select Configure IP .
Choose Manual . Enter the network details manually, such as your IP address and DNS information.
The choice of a specific local IP address does not affect the network performance in any meaningful way.
Change a Phone's IP Address on Android
It's also possible to change an Android device's IP to a static IP on your network.
Android phones can vary depending on the manufacturer of the device. Some manufacturers alter the Android OS to meet their specifications, which means the steps you need to follow may differ slightly from those listed here. These steps should apply to most Android devices.
Go to Settings > Network & internet > Wi-Fi .
Tap the network that you want to change the IP address for.
Select Forget .
Tap the network from the list of available Wi-Fi networks.
Select Advanced options .
Choose Static .
Scroll down and fill out the IP address fields.
Enter the Wi-Fi password at the top of the screen.
Select Connect .
Change a Router's IP Address
To change the router's IP address, log in to the router as an administrator. From the control panel, change the IP address to whatever you like. However, this IP address is usually changed when there's a problem with it. The default IP address should suffice for most situations.
How to Change Your Public IP Address
An external public IP address is the address used to communicate with networks outside of your own, such as those on the internet. Use a VPN to mask or hide your real IP address. You can also use a web proxy to mask your public IP.
Why Change Your IP Address?
Some ISPs assign static IP addresses to their subscribers. Home users are commonly configured with a dynamic IP address . Either way, you may be able to contact your ISP to request a new static IP or a dynamic IP change. You can't change your external internet IP address on your own.
Some people change their public external IP address to avoid online bans or bypass country location restrictions that some sites impose on video content.
Changing the IP address of a client computer, phone, or router is useful when:
- An invalid address is accidentally configured, such as a static IP address in the wrong numeric range.
- A malfunctioning router provides bad addresses, such as an address used by another computer on the network.
- Installing a new router and reconfiguring a home network to use its default IP address range.
No. There are many reasons someone may want to change their IP address. However, if you're on a work setup or have a home network running, messing with IP addresses can sometimes cause headaches, so make sure you know what you're doing.
It's possible but not probable. If you're power-cycling your router , the address likely won't change. Still, if you reset your router to factory defaults, it's more likely the device will assign new addresses.
Yes, you can. However, you need third-party software. A VPN , or virtual private network, gives you unique IP addresses in places anywhere on earth.
Get the Latest Tech News Delivered Every Day
- How to Find Your IP Address on Windows 10
- What Is a Private IP Address?
- How to Connect to Your Home Router as an Administrator
- How to Find Your Default Gateway IP Address
- How to Fix It When There's No Internet Connection
- How to Change the IP Address on a Mac
- What Is a Public IP Address? (and How to Find Yours)
- How to Find the IP Address on a Mac
- NETGEAR Default Password List (May 2024)
- 3 Ways to Find Your Roku IP Address (With or Without the Remote)
- How to Find Your IP Address in Windows
- What Is an IP Address?
- What Is a Static IP Address?
- How to Find Your IP Address
- How to Find a Modem's IP Address
- How to Change the IP Address on Your Android
How to configure a static IP on Windows 10 or 11
Do you need to switch from a dynamic to a static IP address configuration on Windows 11 or 10? Here's how.

- Windows 11 static IP
- Windows 10 static IP
On Windows, the router's Dynamic Host Configuration Protocol (DHCP) server is (usually) responsible for assigning a dynamic Transmission Control Protocol/Internet Protocol (TCP/IP) configuration to every device in the network, including to your computer running Windows 11 or Windows 10.
Although a dynamic IP address is the recommended configuration for most situations, you may need to change to a static IP address if you're thinking about setting up a printer or file sharing, or you have to configure port forwarding on the router to your computer.
The reason is that a dynamic network configuration can change at any time after the lease from the DHCP expires and if the address changes, network resources you may have configured will stop working. Setting a static IP address will always stay the same on the computer, allowing a more reliable experience sharing resources in the network or forwarding ports.
Whatever the reason, on Windows 10 and 11, you have many ways to configure a static TCP/IP address, including using the Settings app and Command Prompt.
This guide will walk you through the different ways to configure a static network configuration on Windows 11 and 10.
How to set a static TCP/IP network configuration on Windows 11
On Windows 11, you can change your computer's dynamic IP configuration to static in at least two ways through the Settings app or commands.
Configure IP from Settings app
Get the Windows Central Newsletter
All the latest news, reviews, and guides for Windows and Xbox diehards.
To assign a permanent TCP/IP configuration on Windows 11, use these steps:
- Open Settings .
- Click on Network & internet .
- (Optional) Click on Advanced network settings .
- Under the "More settings" section, click on Hardware and connection properties.
- Note the current IPv4 , Subnet mask , Default Gateway , and DNS server addresses to determine the new configuration, as it has to be in the same network scope.
- Click the Ethernet or Wi-Fi page on the right side from the "Network & internet." page.

- Quick note: If you select the Wi-Fi page, you need to click on the connection properties to access the network settings.
- Click on the Edit button for the "IP assignment" setting.

- Select the Manual option from the drop-down menu.
- Turn on the IPv4 toggle switch.
- Confirm the IP address for the computer – for example, 10.1.4.90.
- Confirm the subnet mask for the configuration – for example, 255.255.255.0.
- Confirm the default gateway address (usually your router's IP) – for example, 10.1.4.1.
- Confirm the preferred DNS address – for example, 10.1.4.1.

- Quick note: In a home network, you may also be able to use the router's IP address for the DNS configuration. You can also use third-party DNS services like Google Public DNS, Cloudflare, Cisco's OpenDNS, and others.
- (Optional) Select the "On (automatic template)" option for the "DNS over HTTPS" setting and leave the "Fallback to plaintext" option disabled unless you want to encrypted as well as unencrypted traffic or you're troubleshooting connectivity.
- Quick note: DNS over HTTPS (DoH) is a feature that encrypts the DNS queries over the HTTPS protocol to improve security and privacy on the internet. You only want to enable this feature if the DNS server supports this feature.
- Confirm the alternate DNS address (if applicable).
- (Optional) Select the "On (automatic template)" option for the "DNS over HTTPS" setting and leave the "Fallback to plaintext" option disabled.
- Click the Save button.
Once you complete the steps, the computer will start using the static network configuration. If everything has been configured correctly, you should be able to open the web browser to access the internet.
If you entered an address (such as the DNS address) and then changed it, you probably won't be able to save the settings. If this is the case, cancel the configuration, start over, enter the correct configuration, and then try to save the settings.
Configure IP from Command Prompt
To set a static TCP/IP configuration on Windows 11, use these steps:
- Open Start .
- Search for Command Prompt , right-click the top result, and select the Run as administrator option.
- Type the following command to see your current networking configuration and press Enter : ipconfig /all
- Confirm the name of the adapter and the networking configuration, including the IPv4 , Subnet mask , Default Gateway , and DNS Servers .

- Type the following command to configure a static TCP/IP address and press Enter : netsh interface ip set address name= "ADAPTER-NAME" static IP-ADDRESS SUBNET-ADDRESS DEFAULT-GATEWAY-ADDRESS
In the above command, replace ADAPTER-NAME with the name of your network adapter. Change IP-ADDRESS SUBNET-ADDRESS DEFAULT-GATEWAY-ADDRESS with the device IP address, subnet mask, and default gateway addresses you want. For example, this command sets the 10.1.4.90, 255.255.255.0, 10.1.4.1 configuration: netsh interface ip set address name="Ethernet 10Gb" static 10.1.4.90 255.255.255.0 10.1.4.1

- Type the following command to set a DNS server address and press Enter : netsh interface ip set dns name="ADAPTER-NAME" static DNS-ADDRESS
In the command, change ADAPTER-NAME with your adapter's name and DNS-ADDRESS with the DNS server address of the network. For example, this command sets the local router as the DNS server: netsh interface ip set dns name="Ethernet 10Gb" static 10.1.4.1
- Type the following command to set an alternate DNS server address and press Enter : netsh interface ip add dns name="ADAPTER-NAME" DNS-ADDRESS index=2
In the command, change ADAPTER-NAME with the adapter's name and DNS-ADDRESS with an alternate DNS server address. For example, netsh interface ip add dns name="Ethernet 10Gb" 1.1.1.1 index=2
After you complete the steps, the commands will set a static network configuration on Windows 11.
How to set a static TCP/IP network configuration on Windows 10
On Windows 10, you can also use the Settings app and Command Prompt to set up a static IP network configuration.
To assign a permanent TCP/IP configuration on Windows 10, use these steps:
- Click on Ethernet or Wi-Fi .
- Click on the active connection on the right side.

- Click the Edit button for the "IP assignment" setting.

- Select the Manual option.
- Confirm the subnet prefix length (subnet mask) for the configuration – for example, 24 to specify the 255.255.255.0 subnet mask.

- Quick tip: It's important to use the number that represents the network instead of the subnet mask. Otherwise, the configuration won't save. If you don't know the subnet prefix length for your subnet mask, you can use any online subnet calculator to find out.
Once you complete the steps, Windows 10 will start using the static IP configuration. If you lose network connectivity, restart the computer to regain access to the local network and internet.
To change from dynamic to static IP address with commands on Windows 10, use these steps:
In the command, change ADAPTER-NAME with your adapter's name and DNS-ADDRESS with the DNS server address of the network. For example, this command sets the local router as the DNS server: netsh interface ip set dns name=" Ethernet 10Gb" static 10.1.4.1
In the command, change ADAPTER-NAME with the adapter's name and DNS-ADDRESS with an alternate DNS server address. For example, netsh interface ip add dns name="Ethernet0" 1.1.1.1 index=2
After you complete the steps, the network configuration will switch from dynamic to static on Windows 10.
Mauro Huculak is technical writer for WindowsCentral.com. His primary focus is to write comprehensive how-tos to help users get the most out of Windows 10 and its many related technologies. He has an IT background with professional certifications from Microsoft, Cisco, and CompTIA, and he's a recognized member of the Microsoft MVP community.
- 2 Xbox is already reminding us that Call of Duty: Black Ops 6 is coming to Game Pass on day one
- 3 Ubisoft adds an egregious subscription to one of its most popular games and the players are not happy
- 4 Sony and Bose are battling it out to give you the best deal on active noise canceling headphones this Memorial Day
- 5 This Dell XPS still has a physical function row, sports an RTX 4080 GPU, and is over $1,000 off right now
How-To Geek
How to change your ip address from the command prompt in windows.
It's easy enough to change an IP address on your PC using Control Panel, but did you know you can also do it from the Command Prompt?
Quick Links
Launch command prompt as admin to use netsh, view your network information with command prompt, change your ip address, subnet mask, and default gateway, change your dns settings in command prompt, key takeaways.
- You must launch Command Prompt, PowerShell, or Terminal as admin to use netsh.
- Use the "netsh interface ipv4 show config" command to find the full name of the network interface you want to change.
- Modify your IP address, subnet mask, and default gateway using the command "netsh interface ipv4 set address". You can also change DNS settings using "netsh interface ipv4 set dns".
Changing your IP address with the Control Panel interface isn't difficult, but it does require clicking through a number of different windows and dialog boxes. If you're a fan of the Command Prompt, though, you can get it done more quickly using the netsh command, which is just one of the great network utilities built into Windows .
We're going to use the netsh command, but it requires that Command Prompt be launched as administrator to work. The netsh command allows you to configure just about any aspect of your network connections in Windows.
To launch Command Prompt (or PowerShell) as Admin, open up the Start Menu, search "cmd," hover over the result, then click "Run as Administrator."
In Windows 10 or Windows 11, you can also right-click the Start menu (or press Windows+X on your keyboard) to open the Power User Menu and choose "PowerShell (Admin)."
You can (and should ) use PowerShell for this instead.
Before you change your IP address and related information, you'll need to find the full name of the network for the interface you want to change. To do this, type the following command:
netsh interface ipv4 show config
Scroll down until you see the interface you're looking for. In our example, we're going to modify the Wi-Fi interface, which on our machine is just named "Wi-Fi." You'll also see other default names that Windows assigns to interfaces, such as "Local Area Connection," "Local Area Connection* 2," and "Ethernet." Just find the one you're looking for and make note of the exact name. You can also copy and paste the name to Notepad and then back into Command Prompt later to make things easier.
With the interface name in hand, you're ready to change the IP Address, subnet mask, and gateway. To do this, you'll issue a command using the following syntax:
netsh interface ipv4 set address name="YOUR INTERFACE NAME" static IP_ADDRESS SUBNET_MASK GATEWAY
So, for example, your command might look something like the following:
netsh interface ipv4 set address name="Wi-Fi" static 192.168.3.8 255.255.255.0 192.168.3.1
Where the info is replaced by whatever you want to use. In our example, the command does the following:
- Uses the interface name "Wi-Fi"
- Sets the IP address to 192.168.3.1
- Sets the subnet mask to 255.255.255.0
- Sets the default gateway to 192.168.3.1
And if you're using a static IP address but want to switch to using an IP address assigned automatically by a DHCP server — such as your router — you can use the following command instead:
netsh interface ipv4 set address name="YOUR INTERFACE NAME" source=dhcp
You can also use the netsh command to change the DNS servers used by a network interface. Third-party DNS servers — like Google Public DNS and OpenDNS —can be faster and more reliable than the DNS servers provided by your ISP. Whatever your reason for changing your DNS server , you can do it either at the router so it affects all the devices that get their information from the router or at the individual device. If you want to change the DNS servers for just one PC, it's easy to do with the netsh command.
You'll need to use the command twice: once to set your primary DNS server and once to set your secondary, or backup, DNS server. To set your primary DNS server, use the following syntax:
netsh interface ipv4 set dns name="YOUR INTERFACE NAME" static DNS_SERVER
So, for example, your command might look something like the following (in which we set it to Google's primary public DNS server, 8.8.8.8):
netsh interface ipv4 set dns name="Wi-Fi" static 8.8.8.8
To set your secondary DNS server, you'll use a very similar command:
netsh interface ipv4 set dns name="YOUR INTERFACE NAME" static DNS_SERVER index=2
So, continuing our example, you might set your secondary DNS as the Google Public DNS secondary server, which is 8.8.4.4:
netsh interface ipv4 set dns name="Wi-Fi" static 8.8.4.4 index=2
And just like with the IP address, you can also change it so that the network interface grabs its DNS settings automatically from a DHCP server instead. Just use the following command:
netsh interface ipv4 set dnsservers name"YOUR INTERFACE NAME" source=dhcp
And there you have it. Whether you like typing at the command prompt better or just want to impress your coworkers, now you know all the command line magic you need for changing your IP address settings.

Change TCP/IP settings
TCP/IP defines how your PC communicates with other PCs.
To make it easier to manage TCP/IP settings, we recommend using automated Dynamic Host Configuration Protocol (DHCP). DHCP automatically assigns Internet Protocol (IP) addresses to the computers on your network if your network supports it. If you use DHCP, then you don't have to change your TCP/IP settings if you move your PC to another location, and DHCP doesn't require you to manually configure TCP/IP settings, such as Domain Name System (DNS) and Windows Internet Name Service (WINS).
To enable DHCP or change other TCP/IP settings
Select Start , then type settings . Select Settings > Network & internet .
Do one of the following:
For a Wi-Fi network, select Wi-Fi > Manage known networks . Choose the network for which you want to change the settings.
For an Ethernet network, select Ethernet , then select the Ethernet network you’re connected to.
Next to IP assignment , select Edit .
Under Edit network IP settings or Edit IP settings , select Automatic (DHCP) or Manual .
To specify IPv4 settings manually
Under Edit network IP settings or Edit IP settings , choose Manual , then turn on IPv4 .
To specify an IP address, in the IP address, Subnet mask , and Gateway boxes, type the IP address settings.
To specify a DNS server address, in the Preferred DNS and Alternate DNS boxes, type the addresses of the primary and secondary DNS servers.
To specify if you want to use an encrypted (DNS over HTTPS) or unencrypted connection to the DNS server or servers you specify, for DNS over HTTPS , choose the setting you want:
Off : All DNS queries will be sent to the DNS server unencrypted in plaintext over HTTP.
On (automatic template) : DNS queries will be encrypted and sent to the DNS server over HTTPS. DNS queries will use the default settings for the automatic template or try to discover them automatically.
On (manual template) : DNS queries will be encrypted and sent to the DNS server over HTTPS. They’ll use the settings you enter in the DNS over HTTPS template box.
If you use DNS over HTTPS (automatic or manual template), turn Fallback to plaintext on or off:
When it’s turned on, a DNS query will be sent unencrypted if it can’t be sent over HTTPS.
When it’s turned off, a DNS query won’t be sent if it can’t be sent over HTTPS.
To specify IPv6 settings manually
Under Edit network IP settings or Edit IP settings , choose Manual , then turn on IPv6 .
To specify an IP address, in the IP address , Subnet prefix length , and Gateway boxes, type the IP address settings.
When you select Automatic (DHCP) , the IP address settings and DNS server address setting are set automatically by your router or other access point (recommended).
When you select Manual , you can manually set your IP address settings and DNS server address.
When you’re done, select Save .
Note: To install IPv4, run Command Prompt as an administrator, type netsh interface ipv4 install , and then press Enter .
Select Start , then select Settings > Network & Internet .
For a Wi-Fi network, select Wi-Fi > Manage known networks . Choose the network you want to change the settings for, then select Properties.
For an Ethernet network, select Ethernet , then select the Ethernet network you’re connected to.
Under IP assignment , select Edit .
Under Edit IP settings , select Automatic (DHCP) or Manual .
Under Edit IP settings , choose Manual , then turn on IPv4 .
To specify an IP address, in the IP address, Subnet prefix length , and Gateway boxes, type the IP address settings.
To specify a DNS server address, in the Preferred DNS and Alternate DNS boxes, type the addresses of the primary and secondary DNS servers.
Under Edit IP settings , choose Manual , then turn on IPv6 .
When you select Automatic (DHCP) , the IP address settings and DNS server address setting are set automatically by your router or other access point (recommended).
When you select Manual , you can manually set your IP address settings and DNS server address.
When you’re done, select Save .
In Windows 8.1, select the Start button, start typing View network connections , and then select View network connections in the list.
In Windows 7, open Network Connections by selecting the Start button, and then selecting Control Panel . In the search box, type adapter , and then, under Network and Sharing Center , select View network connections .
Right-click the connection that you want to change, and then select Properties . If you're prompted for an administrator password or confirmation, type the password or provide confirmation.
Select the Networking tab. Under This connection uses the following items , select either Internet Protocol Version 4 (TCP/IPv4) or Internet Protocol Version 6 (TCP/IPv6) , and then select Properties .
To specify IPv4 IP address settings, do one of the following:
To get IP settings automatically using DHCP, select Obtain an IP address automatically , and then select OK .
To specify an IP address, select Use the following IP address , and then, in the IP address, Subnet mask , and Default gateway boxes, type the IP address settings.
To specify IPv6 IP address settings, do one of the following:
To get IP settings automatically using DHCP, select Obtain an IPv6 address automatically , and then select OK .
To specify an IP address, select Use the following IPv6 address , and then, in the IPv6 address, Subnet prefix length , and Default gateway boxes, type the IP address settings.
To specify DNS server address settings, do one of the following:
To get a DNS server address automatically using DHCP, select Obtain DNS server address automatically , and then select OK .
To specify a DNS server address, select Use the following DNS server addresses , and then, in the Preferred DNS server and Alternate DNS server boxes, type the addresses of the primary and secondary DNS servers.
To change advanced DNS, WINS, and IP settings, select Advanced .

Need more help?
Want more options.
Explore subscription benefits, browse training courses, learn how to secure your device, and more.

Microsoft 365 subscription benefits

Microsoft 365 training

Microsoft security

Accessibility center
Communities help you ask and answer questions, give feedback, and hear from experts with rich knowledge.

Ask the Microsoft Community

Microsoft Tech Community

Windows Insiders
Microsoft 365 Insiders
Find solutions to common problems or get help from a support agent.

Online support
Was this information helpful?
Thank you for your feedback.
How to change from static to dynamic IP address on Windows 10
Are you using a static IP address? Here are four ways to switch to a dynamic configuration on Windows 10.

On Windows 10, you can configure a network adapter to use a static IP address manually, or you can use an automatically assigned configuration using the local Dynamic Host Configuration Protocol (DHCP) server.
Although using a static IP address is recommended for devices that provide services to network users, as its configuration never changes, it may come a time when you may no longer need this configuration, and a dynamically assigned network configuration will be more suited.
If you use a static IP address and need to switch to a dynamic configuration, it’s possible to perform this task in several ways, including using the Settings app, Control Panel, Command Prompt, and even PowerShell.
In this guide , you’ll learn the steps to remove a static IP address configuration to obtain a dynamic configuration from the DHCP server on Windows 10 .
Change to dynamic IP address (DHCP) from Settings
Change to dynamic ip address (dhcp) from command prompt, change to dynamic ip address (dhcp) from powershell, change to dynamic ip address (dhcp) from control panel.
To enable DHCP to obtain a TCP/IP configuration automatically on Windows 10, use these steps:
Open Settings on Windows 10.
Click on Network & Internet .
Click on Ethernet or Wi-Fi .
Click the network connection.
Under the “IP settings” section, click the Edit button.

Use the Edit IP settings drop-down menu and select the Automatic (DHCP) option.

Click the Save button.
Once you complete the steps, the networking stack configuration will reset, and your device will request an IP address from the DHCP server (usually your router).
To switch from a static TCP/IP configuration to a dynamically assigned configuration using DHCP with Command Prompt, use these steps:
Open Start .
Search for Command Prompt , right-click the top result, and select the Run as administrator option.
Type the following command to note the name of the network adapter and press Enter

Type the following command to configure the network adapter to obtain its TCP/IP configuration using DHCP and press Enter :
In the command, make sure to change “Ethernet1” for the adapter’s name that you want to configure.

After completing the steps, the network adapter will stop using a static IP address, and it’ll obtain a configuration automatically from the DHCP server.
To remove a static IP and DNS addresses to use a dynamic configuration using PowerShell, use these steps:
Search for PowerShell , right-click the top result, and select the Run as administrator option.
Type the following command to note the “InterfaceIndex” number for the network adapter and press Enter :

Type the following command to enable the network adapter to obtain its TCP/IP configuration using DHCP and press Enter :
In the command, make sure to change “Ethernet0” for the adapter’s name that you want to configure.
Type the following command to enable the network adapter to obtain its DNS configuration using DHCP and press Enter :
In the command, change “3” for the InterfaceIndex for the adapter to configure.

Once you complete the steps, the IP and DNS addresses will be reset from the adapter, and your computer will receive a new dynamic configuration from DHCP.
To configure a network adapter to use a dynamic IP address using Control Panel, use these steps:
Open Control Panel .
Click on Network and Internet .
Click on Network and Sharing Center .
On the left pane, click the “Change adapter settings” option.

Right-click the network adapter and select the Properties option.
Select the “Internet Protocol Version 4 (TCP/IPv4)” option.
Click the Properties button.

Select the “Obtain an IP address automatically” option.
Select the “Obtain the following DNS server address automatically” option.

Click the OK button.
After completing the steps, the statically assigned TCP/IP configuration will no longer be available, and the computer will automatically request a dynamic network configuration from the network.

Mauro Huculak is a Windows How-To Expert who started Pureinfotech in 2010 as an independent online publication. He has also been a Windows Central contributor for nearly a decade. Mauro has over 14 years of experience writing comprehensive guides and creating professional videos about Windows and software, including Android and Linux. Before becoming a technology writer, he was an IT administrator for seven years. In total, Mauro has over 20 years of combined experience in technology. Throughout his career, he achieved different professional certifications from Microsoft (MSCA), Cisco (CCNP), VMware (VCP), and CompTIA (A+ and Network+), and he has been recognized as a Microsoft MVP for many years. You can follow him on X (Twitter) , YouTube , LinkedIn and About.me . Email him at [email protected] .
- Windows Subsystem for Android gets January 2023 update
- How to access Advanced startup (WinRE) on Windows 10
We hate spam as much as you! Unsubscribe any time Powered by follow.it ( Privacy ), our Privacy .
IMAGES
VIDEO
COMMENTS
In both Windows 11 and Windows 10, you can also change your IP address from the Control Panel. Open the Control Panel and click or tap on "View network status and tasks" under "Network and Internet.". In the Network and Sharing Center, click or tap on your internet connection from the "View your active networks" area.
Press the Start button, then click the settings cog, above the power button. Alternatively, press Windows + I. Click "Network & Internet". Click "Wi-Fi" in the sidebar and select your Wi ...
To set a static IP address, open your network settings by right-clicking the Start menu and clicking the Network Connections option. In the Network Connections settings menu, press the Change connection properties option. Under the IP Settings category, press the Edit option. Change the IP allocation type to Manual.
Besides, you need to find the IP address of your router and computer. To do so, follow the steps below. Step 1. Press the Win + I keys to open the Settings app and go to the Network & Internet section. Step 2. In the Status tab, scroll down the right sidebar and click on the View your network properties option. Step 3.
in the bottom-right corner of the screen. Click Wi-Fi in the pop-up window. 3. Wait for five minutes. Some ISPs will assign a new IP address in as little as five minutes; if doing this doesn't work, however, you may need to leave your router unplugged overnight (or for around eight hours). 4.
If you want to set a static IP, you can change your IP address. To do so, open the Network and Sharing Center in the Control Panel, and click on the Connections link. A new window will open up ...
This video guides about how to change your ip address on windows 10.Changing your IP address on Windows 10 can enhance online privacy and security, help trou...
In this tutorial video I'll show you how to change your IP address on Windows 10 and Windows 11.If you're wondering how to change your ip address on a window...
To assign a static IP address on Windows 10, use these steps: Open Settings on Windows 10. Click on Network & Internet. Click on "Wi-Fi" or "Ethernet.". Click on the current network connection. Under the "IP settings" section, click the Edit button. Using the drop-down menu, select the Manual option. Turn on the "IPv4" toggle ...
Option 3: Change IP Address with PowerShell. Type powershell in the Windows 10 search box. Then, beneath Windows PowerShell, click Run as Administrator. If you receive a User Account Control confirmation prompt, click Yes. On the PowerShell prompt, type the command below and press enter. Get-NetAdapter.
Key Takeaways. The simplest way to change your IP address is to power off your router, wait at least 10 seconds, then power it back on. If that doesn't fix your problem, you may want to set a static IP address instead. Changing your IP address is a simple fix for a number of networking issues. However, there's more than one way to cook that ...
Click on the properties. A network connection status pop-up window will open up. Click on Internet Protocol Version 4 (TCP/ IP v4) if you want to change the IPv4 address of your computer. Now fill ...
Updated version of this video based on comments:https://youtu.be/bXVh8estOpgAuthor, teacher, and talk show host Robert McMillen shows you how to change your ...
Here's how to set a static IP address on your Windows 10 PC. Click the magnifying glass icon in the bottom-left corner of your screen. Then type IP Address into the search bar and click Open. You can also hit Enter on your keyboard if you see Ethernet settings. Then click Change adapter options.
After noting down Subnet Mask and DHCP Server Address, follow the steps below to change the IP Address of your computer. 1. Go to Settings > click on Network & Internet. 2. On the next screen, select your Network type ( WiFi or Ethernet) in the left-pane. In the right-pane, scroll down and click on Change adapter options link under "Related ...
Mac: System Preferences > Network. Select a network > Advanced. Go to the TCP/IP tab and select Manually. Enter info. iOS: Open Settings > Wi-Fi, tap the circled i next to the network, select Configure IP > Manual. Set up the new IP.
To set a static IP address in Windows 10 or 11, open Settings -> Network & Internet and click Properties for your active network. Choose the "Edit" button next to IP assignment and change the type to Manual. Flip the IPv4 switch to "On", fill out your static IP details, and click Save. Sometimes, it's better to assign a PC its own IP address ...
To change from dynamic to static IP address with commands on Windows 10, use these steps: Open Start. Search for Command Prompt, right-click the top result, and select the Run as administrator ...
For Wi-Fi connection. Select Start > Settings > Network & internet > Wi-Fi and then select the Wi-Fi network you're connected to. Under Properties, look for your IP address listed next to IPv4 address. Open Wi-Fi setting.
View Your Network Information with Command Prompt. Before you change your IP address and related information, you'll need to find the full name of the network for the interface you want to change. To do this, type the following command: netsh interface ipv4 show config. Scroll down until you see the interface you're looking for.
If you would like to change IP address in Windows 10 or 11 PC and configure static IP address, then this video will help you to manually set IP address on Wi...
To enable DHCP or change other TCP/IP settings. Select Start, then type settings. Select Settings > Network & internet. Do one of the following: For a Wi-Fi network, select Wi-Fi > Manage known networks. Choose the network for which you want to change the settings. For an Ethernet network, select Ethernet, then select the Ethernet network you ...
Open Settings on Windows 10. Click on Network & Internet. Click on Ethernet or Wi-Fi. Click the network connection. Under the "IP settings" section, click the Edit button. Use the Edit IP settings drop-down menu and select the Automatic (DHCP) option. Click the Save button. Once you complete the steps, the networking stack configuration ...
How To Change IP Address on Windows 11→Subscribe for more helpful tutorials and How-To Guides.If you found this video helpful, please leave a like and a comm...