Filter by Keywords

Project Management
How to create a project plan in 5 steps (with examples & templates.
Erica Golightly
Senior Writer
March 21, 2024
Project management documentation are non-negotiable resources that directly influence a project’s final outcome. To achieve a high success rate, the project plan serves as a dependable and effective roadmap that teams rely on throughout the entire project lifecycle, from initiation to completion. 📍
This guide is packed with the resources you need to send a project on the right path. We’ll break down the steps to build effective project plans, optimize resources, and coordinate communication efforts.
We know you’re a busy bee, so here’s a resource to jumpstart your project planning process right now: The ClickUp Example Project Plan Template . The List and Board views are already set up with key requirement fields, so all you have to do is add your project tasks!

Check out more project roadmap templates !
Before we dive in, let’s explain what a project plan is. Because it gets chaotic with a revolving door of project documentation…
Ok if we’re honest, we like a little chaos. But only if Organized comes before Chaos. 😊
What is a Project Plan?
Benefits of writing a project plan, step 1: specify the expected deliverables and end results of the project, step 2: identify the key stakeholders and estimate budget expenses, step 3: create a work breakdown structure (wbs), step 4: add key milestones into a detailed project schedule, step 5: set expectations for communication , project plan examples, manage your team with project plans.
The project plan is a living document to provide a clear understanding of the project’s objectives, so stakeholders can align their efforts towards a collective goal. It defines the project’s scope , specifying what is included and what is not, to prevent scope creep and meet target deadlines.
At its best, it equips team members with the context to spend their time on the right things, including:
- Risk assessment and mitigation strategies
- Individual and team responsibilities
- Resource management strategies
- Task dependencies
- Key milestones

A well-prepared project plan not only serves as a roadmap for project execution but also brings about various advantages that contribute to a project’s all-around success.
Better Risk Management : A carefully written project plan provides room for risk identification and mitigation strategies right from the inception. By visualizing risks earlier, you can frame proactive measures to tackle them effectively and minimize their impact on the project’s outcome.
Increased Team Efficiency: A project plan outlines the roles and responsibilities of each team member, fostering clarity on what exactly is expected of them. This not only boosts individual productivity but also makes the team more cohesive and efficient.
Effective Resource Allocation and Cost Control: With a concrete project plan at hand, project managers can optimize resource allocation , minimizing wastages and ensuring that costs stay within the budget limit. It serves as a reference point for financial management, allowing managers to track and control expenses effectively.
High Client Satisfaction: A project plan structures the path to desired results, thereby enhancing the quality of the final deliverables. When clients receive value-driven results within the established time frame, they are more likely to be satisfied, leading
How to Create a Project Plan in 5 Steps
From establishing clear project objectives to building the project timeline, we’ll get into practical insights and best practices to guide you in drafting project plans.
Basically, here’s the over-caffeinated version of how to create a fail-proof project plan in 2023. 🏆
Not all requests in the queue should be full-scale projects. By prioritizing the right projects, teams can maximize their chances of success and optimize resource utilization for the best possible outcomes.
Do the deliverables and outcomes align with your organization’s growth goals? When stakeholders see the relevance and alignment of a project with the organization’s KPIs, they are more inclined to actively participate, provide necessary resources, and advocate for project success. (More about project stakeholders in the next step!)
Who will be the primary users or recipients of the deliverables? Customers or end users may have distinct preferences, expectations, or levels of expertise, and understanding their characteristics allows the project team to create deliverables that effectively meet their unique needs.
Are there any specific requirements, templates, or guidelines for the deliverables? This question upfront saves everyone time by providing a structured framework or starting point, so the project team can focus on the content and value-added aspects of the deliverables rather than spending unnecessary effort on formatting or presentation.

Now that you’re prepped with the project deliverables and goals, it’s time to begin drafting the project plan. 📃
Depending on your preferred project management methodology , the project plan’s format varies. Documents, tables, and Gantt charts are a few popular options. As long as it gives a clear description of each element in a project plan, you’re on the right track!
Here’s what you should have so far:
- Project Title : Clearly state the name or title to capture the project’s essence. If you’re using an acronym, provide the full term
- Project Description : Write a concise description of the project’s purpose, objectives, and scope
- Project Manager and Team : Identify the project manager responsible for overseeing the project and list the key members of the project team (e.g. the marketing team )
- Project Start, End, and Delivery Dates : Distinguish between the completion of internal project activities and the delivery of the final results to the stakeholders
- Project Objectives : State the specific goals and outcomes of the project. Give context to its impact on the organization’s KPIs and OKRs
Discover project planning tools to support any type of workflow!

Project stakeholders typically include individuals or groups directly impacted by or having a vested interest in the project’s outcomes. Part of your project plan in this section should include approaches for stakeholder communication, involvement, and participation. 🧑💻
These may include project sponsors, end-users, clients, key project members, and the accounting partner.
Yes, accounting partners are stakeholders. Here’s why:
A small design project for an agency might cost a few thousand dollars, whereas a large infrastructure project for a multinational corporation could involve millions of dollars.
In recent times of changing market conditions, it’s more important than ever to give stakeholders an idea of expenses related to resources, equipment, materials, and any other relevant costs. The plan also includes processes for tracking and managing costs throughout the project lifecycle.

This brings us to the next productivity resource to have on your radar. There’s a faster way to get out of building a budget report spreadsheet line by line every Friday afternoon:
Give transparency into project budget utilization where the work is happening.
Use free tools like Custom Fields in ClickUp to categorize project task resources, like contractors, project management software, and one-off purchases. (For example, purchasing a license for a song in a brand video.)
And this doesn’t take extra effort and, more importantly, email chains on your part. With ClickUp, all your project’s tasks and resources are recorded in one place. @Mention a stakeholder for purchase approval, upload a receipt image, and update the Custom Field to reflect how much funding is left. 💰
When Custom Fields are updated, task watchers (including accounting partners) are notified of the changes. They have the convenience of referring to the digital trail whenever they need to!

Now that we have project stakeholders and the budget added to the project plan let’s move to the next step!
A work breakdown structure (WBS) represents the project’s scope by breaking it down into team and individual tasks or activities.
Starting with the most important project deliverable, the WBS progressively breaks it down into smaller work packages and subtasks. Each work package represents a distinct task or activity to be assigned, scheduled, and tracked. The hierarchical rundown continues until the work packages are at a level where they can be easily understood and executed. 🤩
The WBS is a collaborative process. Connect with your key project team members to fill in what’s missing for the project’s requirements and deliverables. As a project manager, your focus is on the project as a whole, including strategic planning , project scheduling , budgeting, and stakeholder communication.
Here is a general outline of the WBS format if you want to build a simple project plan template:
The project team is the subject matter experts in their fields. Their perspectives on how long a task would take and what they would need from other team members to complete their work are invaluable for a successful project.
Virtual whiteboards are a great option for a remote or in-person brainstorming session. With real-time editing, it’s a non-intimidating way to encourage participation from everyone. Add to your next project planning session the ClickUp Work Breakdown Structure Template . A beginner-friendly tool with rich text editing, embedding features, and actionable tasks! 🎯

When you’re at a good place with the WBS, it’s ready to be added to a project timeline.
Bonus: Work Breakdown Structure Software !
The schedule will get updated weekly or monthly as the project progresses. To keep up with the changes, and, most importantly, communicate the changes, using intuitive tools like Gantt charts, Kanban boards, and timelines will make managing ongoing changes less tedious.
Gantt charts
Offer a visual representation of the project schedule, allowing project managers to easily track task dependencies, durations, and milestones. When updates are required, they can quickly modify the chart, rearranging tasks or adjusting timelines with a simple drag-and-drop action.
Kanban boards
Provide a streamlined workflow view, allowing project managers to visualize tasks in various stages of completion. As changes occur, they can easily move tasks across different columns, reflecting the updated progress and priorities.
Timelines
Show a clear chronological view of project events, deadlines, and milestones. This enables stakeholders to stay informed about important dates and ensures that everyone is on the same page regarding project progress.
Check out our guide to creating a project timeline ! It’s packed with more templates and examples to help you build a powerful project visual. 🎨
Bonus: Construction scheduling software !
We’ve arrived at the final step of the project planning process!
Following up on task statuses and answering one-off status emails take up so much time and energy from a project manager’s work week.
Chances are, everyone is working on multiple projects simultaneously. So replying to DMs is sometimes held off until the very end of the day. Or lost somewhere in the void for days.
Status reports are essential for decision-making. They provide a digital record of the project’s activities, decisions made, and outcomes, which can be useful for future reference, audits, or lessons learned.
PRO TIP Use ClickUp AI to summarize comment threads and quickly see the main points of a long thread or comment! After the content is generated, you have the option to try for a slightly different AI response, copy the text, close the Summarize thread modal, or tell AI what to do next.
Replace long email chains with ClickUp tasks for your status reports. With a single ClickUp task, all the weekly updates are stored in one place. This simple shift to task-based communication eliminates the need to search across multiple apps. 🔍
However, if your team relies on messaging platforms like Slack for urgent updates and real-time problem-solving, use the Slack integration with ClickUp . Turn messages into tasks and comments from the Slack app and notifications about tasks to Slack channels of your choice!
Take project communication one step further by providing a project status report template to follow so all updates are organized and uniform for stakeholders:
- Team Accomplishments : List key milestones or tasks completed during the week
- Current Status : Provide an overview of the project’s progress and any challenges or bottlenecks faced
- Upcoming Tasks and Deadlines : Note any important deadlines approaching in the following week
- Tasks at Risk : Highlight any issues or risks identified and their potential impact
- Resource Updates : Mention any changes or updates related to resource allocation
- Next Steps : Summarize the immediate next steps and priorities
- Assistance Needed : Specify any support or assistance required from team members or stakeholders
Bonus: Create a “Coordination” ClickUp task, which serves as the main channel where teams can expect the latest updates from you!

Different departments may have unique workflows and requirements, hence different types of project plans are needed. Here are some project plan examples to get you started:
1. Marketing Team Project Plan Example
Goal: Increase website traffic by 30% in the first quarter.
Roles & Responsibilities: SEO manager leads keyword research and content optimization; Social media executive handles promotion; Email marketing manager sets up email drip campaigns; The marketing analyst tracks and reports progress.
Budget: $10,000 for software, content creation, promotion, and analysis.
Deliverables: SEO-optimized blog posts, social media campaigns, email newsletters, and a detailed analytics report.
Schedule: 3 months, with weekly check-ins.
Communication Plan: Weekly meetings for updates and month-end reports; Ad-hoc meetings as necessary; all communication documented in ClickUp.
2. Product Team Project Plan Example
Goal: Develop a new feature for the app within six months.
Roles & Responsibilities: Product manager defines feature requirements; Designer drafts interface; Developer builds feature; QA tester checks for defects; Feedback tracked by product analysts.
Budget: $50,000 for research, design, development, testing, and launch.
Deliverables: A new, tested, and fully-functional app feature.
Schedule: 6 months, with bi-weekly sprint reviews.
Communication Plan: Daily stand-ups for updates; Bi-weekly sprint review meetings; Ad-hoc meetings as necessary ; All communication documented in ClickUp.
3. Design Team Project Plan Example
Goal: Redesign the company’s website for better user experience and increased conversions in four months.
Roles & Responsibilities: UX researcher conducts user research; UI designer creates mockups; Front-end developer codes the design; Quality analyst performs UX tests; Project manager oversees all operations.
Budget: $20,000 for research, design, development, testing, and implementation.
Deliverables: A fully-responsive, tested, and live website offering a superior user experience.
Schedule: 4 months, with monthly iterations.
Communication Plan: Weekly catch-up meetings for updates; Monthly review meetings; Ad-hoc meetings as necessary; All communication documented in ClickUp.
Remember, these are just examples and your actual project plan might vary based on many factors like scope of the project, team size and other specific needs.
Leverage ClickUp to take the administration tasks off your workload so you can do what you do best. You are capable of handling every single request or question that comes your way, but you shouldn’t have to. Your team needs you in your most present self, driving the project toward success.
Create a free ClickUp Workspace and invite team members to experience better project planning. If you need any support with building project workflows, we’re only a message away. Happy planning! ✍️
Questions? Comments? Visit our Help Center for support.
Receive the latest WriteClick Newsletter updates.
Thanks for subscribing to our blog!
Please enter a valid email
- Free training & 24-hour support
- Serious about security & privacy
- 99.99% uptime the last 12 months
How to Create a Realistic Project Plan with Templates & Examples
As a project manager, a huge part of your role is to write project plans that help you keep projects on track. But that’s not all a project plan should do.
A project plan is arguably the most important document you’ll create for a project. At its core, a plan should communicate your project approach and the process your team will use to manage the project according to scope.
Let’s take a closer look at how you can develop a rock-solid planning process that guides your team and projects to success.
What is a project plan?
Project plan example: what to include, why you should always write a project plan, 5 steps to an effective project planning process, how to create a project plan in teamgantt, free project plan templates.
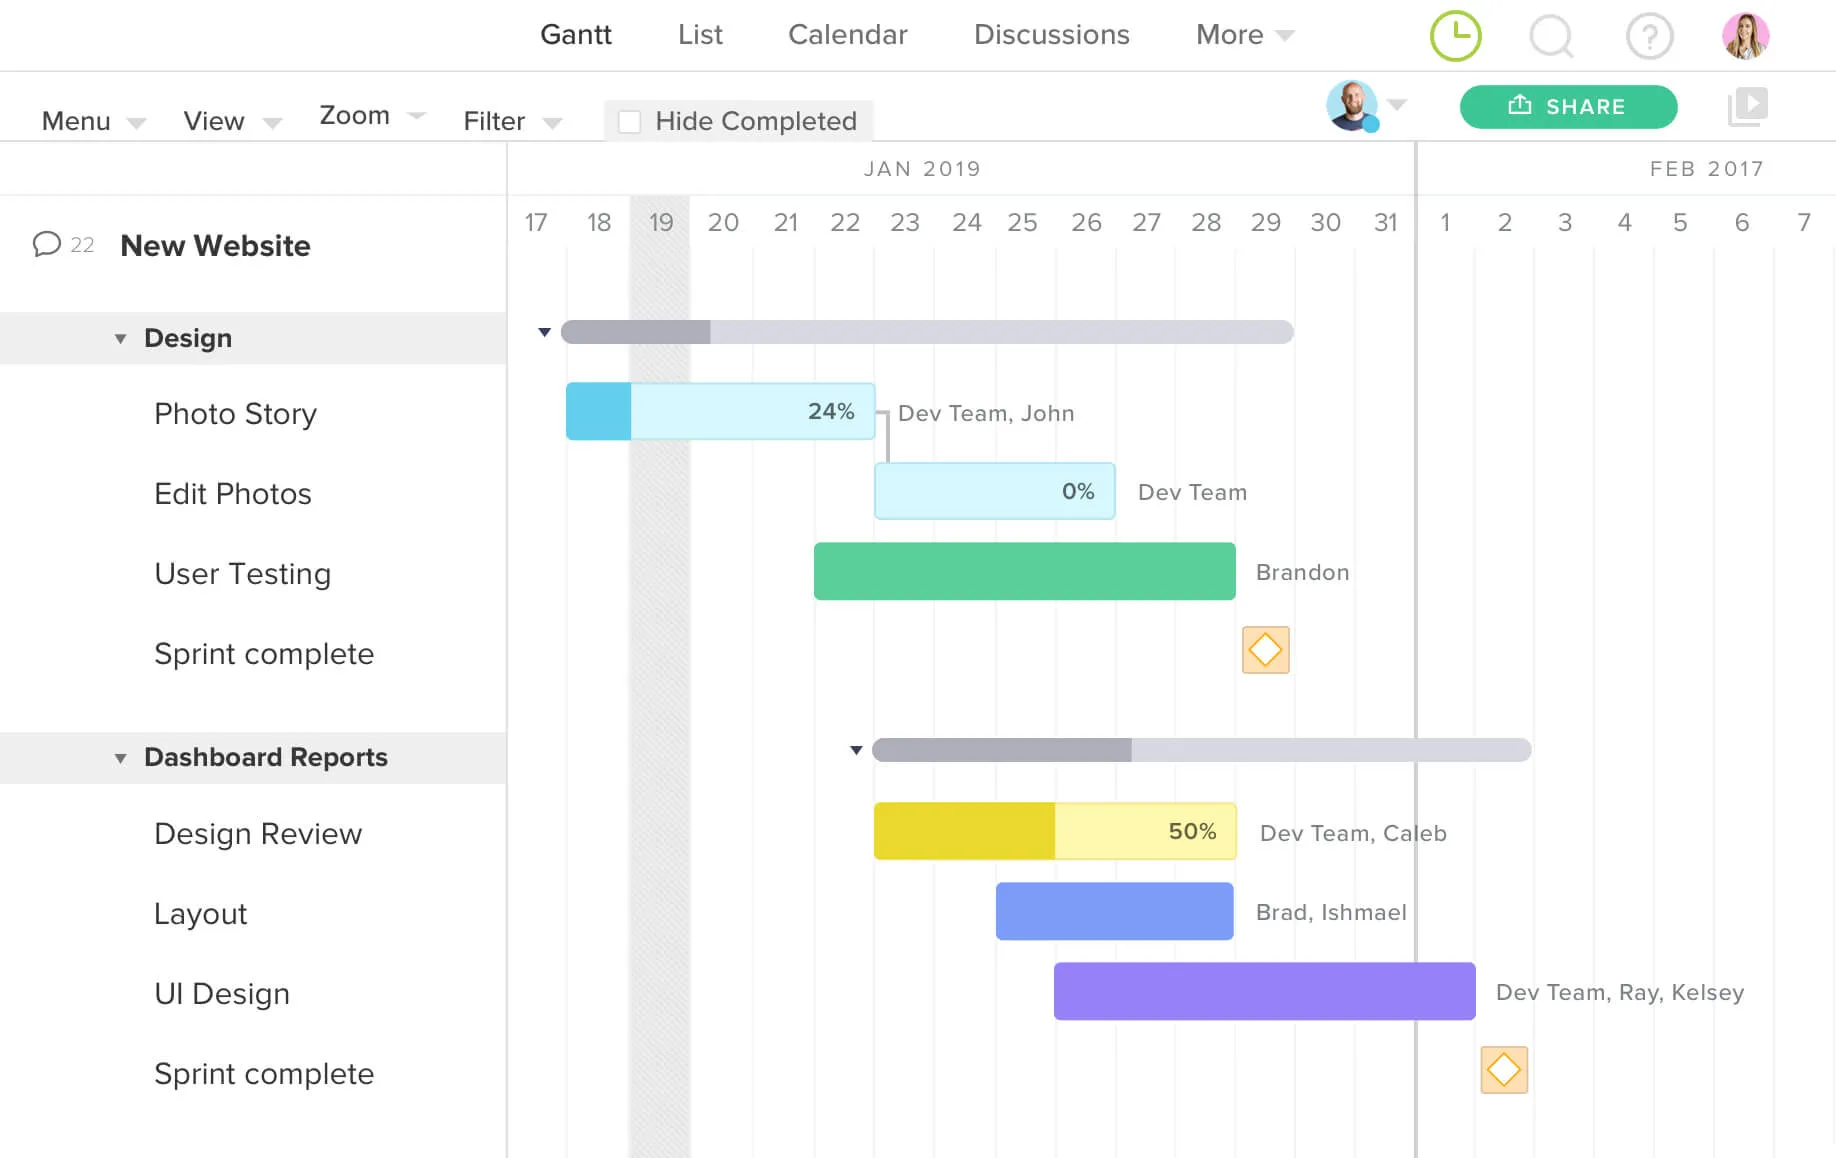
A project plan is a document that maps out the tasks, effort, timing, and resources needed to meet project goals within a predefined scope. It’s often presented in the form of a gantt chart because it’s easy to visualize the project timeline and ensure work stays on track.
Any solid project management plan should answer the following questions:
- What are the major deliverables?
- How will we get to those deliverables and the deadline?
- Who’s on the project team, and what role will they play in those deliverables?
- Which stakeholders need to provide feedback on deliverables, and when?
- When will the team meet milestones?
A project plan communicates this information in a simple, straightforward way so everyone clearly understands the objectives and how they contribute to project success. It may also be accompanied by other planning documents, such as a project charter , risk assessment , or communication plan .
While no two project plans are alike, they all share the same common building blocks. Be sure to include the following components in any project plan you create:
- Project tasks : A detailed list of work to be done organized by project phase, process step, or work group
- Project schedule : A visual timeline of task start dates, durations, and deadlines, with clear progress indicators
- Key milestones : Major events, dates, decisions, and deliverables used for tracking forward progress
- Dependencies : A line connecting tasks that need to happen in a certain order
- Resources : Assignments that indicate the person or team responsible for completing a task
Here’s a simple example of what a project plan looks like with these basic elements highlighted:

Some people don’t understand the power of a good project plan. If you feel pressured to skip the plan and jump right into the work, remind your team and stakeholders that having a plan benefits everyone by making it easier to:
- Build consensus before work begins : A detailed project plan ensures everyone has a clear understanding of—and agrees on—the overall process, scope, staffing, and even communications from the outset. That goes a long way in keeping project confusion and pop-up requests from gumming up the works.
- Avoid scheduling conflicts : Project plans enable you to organize tasks so it’s clear who's responsible for what and when. If your team is juggling multiple projects, you can cross-reference other plans to see who’s available to take on new work before committing to a timeline.
- Monitor project goals and scope : When new tasks creep in, it’s easy to lose sight of the original objectives. Spelling out the work you need to complete in a time-based plan keeps project goals front and center so you can ensure project scope stays intact.
- Hold your team and stakeholders accountable : A good project plan sets expectations around the process and pacing you'll follow each step of the way. When plans are shared with teams and stakeholders, it keeps folks honest about what is—or isn’t—happening and forces you to resolve issues in a timely way.
Easy drag and drop features with templates for faster scheduling. Plan a project in minutes, collaborate easily as a team, and switch to calendar and list views in a single click.
Poor planning can lead to some pretty ugly consequences—from missed deadlines and budget overages to team burnout and client frustration. That’s why it’s important to establish a solid process you can use to plan any project.
Planning a project doesn’t have to be difficult. These basic project planning steps can help you write a plan that’s both realistic and on target.

- Start with project discovery & definition
- Draft a rough outline of your plan
- Formalize your project management plan
- Present & confirm your plan
- Execute your plan & adjust as needed
Step 1: Start with project discovery and definition
A project plan is more than a dry document with dates. It’s the story of your project, and you don’t want it to be a tall tale! So make sure you know all the facts before you start creating a project plan.
Understand the project scope and value
Understanding the ins and outs of the project will help you determine the best process and identify any snags that might get in the way of success. Conduct your own research to dig deeper on:
- Project goals and outcomes
- Partnerships and outlying dependencies
- Potential issues and risks
Review the scope of work , and dive into any documents or communications relevant to the project (maybe an RFP or notes from sales calls or client meetings). Be thorough in your research to uncover critical project details, and ask thoughtful questions before you commit to anything.
Interview key stakeholders
If you want to dazzle stakeholders with a stellar project delivery, you’ve got to know how they work and what they expect. Schedule time with your main project contact, and ask them some tough questions about process, organizational politics, and general risks before creating a project plan.
This will give project stakeholders confidence that your team has the experience to handle any difficult personality or situation. It also shows you care about the success of the project from the start.
Be sure to discuss these things with your stakeholders:
- Product ownership and the decision-making process
- Stakeholder interest/involvement levels
- Key outages, meetings, deadlines, and driving factors
- Related or similar projects, goals, and outcomes
- The best way to communicate with partners and stakeholders
See a list of sample interview questions to ask stakeholders so you can develop better project plans.
Get to know your team
The last step in the research phase is to take time to learn more about the people who’ll be responsible for the work. Sit down with your team and get to know their:
- Collaboration and communication styles
- Availability and workload
Understanding these basics about your team will help you craft a thoughtful plan that takes their work styles and bandwidth into consideration. After all, a happy team delivers better projects.
Step 2: Draft a rough outline of your plan
Now that you’ve gathered the basic project details, the next step is to knock out a rough draft of your plan. Take some time to think about the discussions you had in the pre-planning phase and the approach your team might take to meet the project goals.
Sketch out the main components of your project plan
Sit down with a pen and paper (or a whiteboard), and outline how the project should work at a high level. Be sure you have a calendar close by to check dates.
If you’re at a loss for where to begin, start with the who, what, when, and how of the project. A first outline can be very rough and might look something like a work breakdown structure . Make sure your project outline includes the following components:
- Deliverables and the tasks required to create them
- Your client’s approval process
- Timeframes associated with tasks/deliverables
- Ideas on resources needed for tasks/deliverables
- A list of the assumptions you’re making in the plan
- A list of absolutes as they relate to the project budget and/or deadlines
Considering these elements will help you avoid surprises—or at least minimize them. And remember, you’re doing this as a draft so you can use it as a conversation-starter for your team. It’s not final yet!
Get input from your team on process, effort, and timing
You don’t want to put yourself or your team in an awkward position by not coming to a consensus on the approach before presenting it to your client. That's why a project manager can’t be the only one writing a project plan.
Once you’ve created a basic project outline, take those rough ideas and considerations to your team. This enables you to invite discussion about what might work rather than simply dictating a process. After all, every project must begin with clear communication of the project goals and the effort required to meet them.
Be sure to get input from your team on how they can complete the tasks at hand without killing the budget and the team’s morale. As a project manager, you can decide on Agile vs. Waterfall approaches , but when it comes down to it, you need to know that the team can realistically execute the plan.
You can also use this review time to question your own thinking and push the team to take a new approach to the work. For example, if you’re working on a digital product, could designers start creating visual concepts while the wireframes are being developed? Or can you have two resources working on the same task at once?
Running ideas by the team and having an open dialogue about the approach not only helps you build a more accurate project plan. It gets everyone thinking about the project in the same terms. This type of buy-in and communication builds trust and gets people excited about working together to solve a goal. It can work wonders for the greater good of your team and project.
Step 3: Formalize your project management plan
You should feel comfortable enough at this point to put together a rock-solid project schedule using whatever tool works for you.
Build out a detailed project schedule that’s easy to read
Any good online project planning tool will help you formalize your thoughts and lay them out in a consistent, visual format that’s easy to follow and track. (Ahem, TeamGantt works nicely for a lot of happy customers. )
Make sure tasks have clear start and end dates so there’s no question when work needs to happen to hit project deadlines. Organize work into phases, and use labels and/or color-coding to improve scannability. The easier your project plan is to understand at a glance, the better!
See how to create a project plan in TeamGantt
Consider how your team likes to work
Be as flexible as possible when it comes to how your project plan is presented. There's no absolute when it comes to how to format your plan as long as you and your team understand what goes into one.
Remember, people absorb information differently. While you might be partial to a gantt chart, others might prefer to view tasks in a list, calendar, or even a kanban board. You can make all of those variations work if you’ve taken the steps to create a solid plan.
For example, here’s an Agile project plan we built that lists each sprint as its own task group with milestones for sprint planning and deployment.

And here’s what that same project plan looks like if you turn it into a kanban board in TeamGantt. Simply click the Board tab and set up your columns so your team can manage their daily workflows more easily.

If your team currently prefers spreadsheets and isn’t quite ready to use TeamGantt yet, try our free Excel gantt chart template .
Step 4: Present and confirm your plan
You’re almost finished! Now it’s time to do your due diligence. It’s easy to throw stuff in a plan, but you have to make sure you get it right.
Run your final plan by your internal team
Your team needs to know the reality of your plan as it stands after you’ve built it out in TeamGantt. And you want to be sure they’re comfortable committing to the details. If they don’t, things will quickly fall apart!
Always review your final plan with your team before delivering it to stakeholders. Why? Because things like dates and tasks—and even assignments—will shift as you formalize the rough sketch of your plan.
Here are a few things you’ll want to discuss with your team as you review the final plan together:
- Review times
- Team work times
- Dependencies
- Time off, meetings, and milestones
- The final deadline
- Any assumptions you’ve made
- Major changes since your last talk
There’s nothing more embarrassing than delivering a plan with an error or a promise you can’t keep. Taking a few minutes to get buy-in from your team will give everyone peace of mind about your plan.
Review your project plan with stakeholders
Once you’ve confirmed the plan with your team and have their full sign-off, you’re ready to share your project plan with stakeholders .
When delivering your project plan, make sure you provide an executive summary. This might come in the form of a project brief . A short recap of the overall methodology, resources, assumptions, deadlines, and related review times will help you convey what the plan means to the project and everyone involved.
Project plans can be daunting, so schedule time to present your project plan to stakeholders at a high level. Here are some things you’ll want to point out about your plan during this review:
- Overall process and pacing
- Major deliverables and timing
- The time they’ll have to review deliverables
- Overall timing for task groups or phases
- How far off you are from the deadline
- Wiggle room on the final deadline
If a stakeholder is interested in the day-to-day details, feel free to walk them through the plan line by line. Otherwise, start by explaining overall sections or phases, and be sure to come back to your plan at intervals throughout the project to remind them of tasks, next steps, and overall progress.
Step 5: Execute your plan and adjust as needed
Some projects are smooth and easy to manage, and others are a complete nightmare that wake you up at 3 a.m. every other night. Thankfully, having a solid project plan is your best defense against project chaos once work gets underway.
Keep in mind that project plans are living documents. Projects change constantly, and someone has to stay on top of—and document—that change. Remember to:
- Update your plan regularly as work progresses and things change
- Communicate changes to your team, partners, and stakeholders
- Monitor and communicate risks as your project evolves
Ready to plan your project in TeamGantt? Follow these easy steps to build a plan that’s structured well and includes the elements you need for project success.
1. Enter your basic project details.
To create a new project plan in TeamGantt, click the New Project button in the upper right corner of the My Projects screen. Then enter your project name and start date, and select the days of the week you want to include in your plan. Click Create New Project to move on to the next step.

2. List out your project tasks and milestones.
Now the real planning fun begins! Enter all the different tasks it will take to get the job done. If there are any key meetings, deliverable deadlines, or approvals, add those as milestones in your project plan.

3. Organize tasks into subgroups.
Scrolling through one long list of tasks can be mind-numbing, even to the best of us. Break tasks down into phases or sections to ensure your project plan is easy to read and understand.
4. Add task durations and milestone dates to the project timeline.
A visual project plan makes it easy to see exactly what needs to get done by when. Make sure every task has a start and end date so nothing falls through the cracks. TeamGantt’s drag and drop feature makes this planning step quick and easy.

5. Connect related tasks with dependencies.
Adding dependencies between tasks ensures work gets done in the right order and also helps you plan for delay risks. If your plan shifts and you need to move tasks around, dependencies speed up the process.

6. Assign responsible team members to tasks.
That way there’s no confusion about who’s doing what, and your team can update and manage their daily tasks . Don’t forget to check team availability along the way to avoid overloading anyone with too much work.

7. Use the RACI chart to define task roles more clearly.
This feature takes accountability one step further by letting you assign more specific roles to each task: Responsible , Accountable , Consulted , and Informed . Learn how RACI charts work and what each role means.

8. Add hourly estimates and/or points to each task.
This makes it easy to see the lift each task involves at a glance. Including hourly estimates in your project plan also enables you to manage workloads and track overages more accurately.

9. Color-code tasks for better scannability.
You can use colors to categorize tasks by project phase, priority, department, or team member—whatever makes visual sense to you and your team.

10. Add notes to clarify tasks or spell out important details.
There’s no such thing as too much information if it means your team has what they need to deliver quality work on time. Use the Notes section of your Discussion tab to enter any pertinent details your team will find helpful.

11. Upload important documents to the project.
This ensures project files are accessible to everyone in a centralized hub. For example, you might attach your creative brief to the project so your content and design teams have clear direction for completing their deliverables.
If you’re planning a project for the first time or taking on a totally new type of project, you might be struggling to get your plan off the ground. We created a simple project management plan template to help you get started.
TeamGantt gives you the ability to quickly and easily build and adjust your plan using drag and drop scheduling. Plus, it comes with customizable views to fit every team member’s work style.
Try our basic project plan template for free!

Looking for more specific project plan examples to jumpstart your process? Use these project planning templates to generate ideas and save time building out your plan:
- Construction project plan template
- Event planning template
- Strategic marketing plan template
- Tactical marketing plan template
- Software development plan template
- Video production schedule template
- Website project plan template
Plan your next project in minutes
Discover just how easy project planning can be with TeamGantt. Create your first gantt chart for free!

We use essential cookies to make Venngage work. By clicking “Accept All Cookies”, you agree to the storing of cookies on your device to enhance site navigation, analyze site usage, and assist in our marketing efforts.
Manage Cookies
Cookies and similar technologies collect certain information about how you’re using our website. Some of them are essential, and without them you wouldn’t be able to use Venngage. But others are optional, and you get to choose whether we use them or not.
Strictly Necessary Cookies
These cookies are always on, as they’re essential for making Venngage work, and making it safe. Without these cookies, services you’ve asked for can’t be provided.
Show cookie providers
- Google Login
Functionality Cookies
These cookies help us provide enhanced functionality and personalisation, and remember your settings. They may be set by us or by third party providers.
Performance Cookies
These cookies help us analyze how many people are using Venngage, where they come from and how they're using it. If you opt out of these cookies, we can’t get feedback to make Venngage better for you and all our users.
- Google Analytics
Targeting Cookies
These cookies are set by our advertising partners to track your activity and show you relevant Venngage ads on other sites as you browse the internet.
- Google Tag Manager
- Infographics
- Daily Infographics
- Popular Templates
- Accessibility
- Graphic Design
- Graphs and Charts
- Data Visualization
- Human Resources
- Beginner Guides
Blog Business How to Create a Project Plan: Strategy, Examples and Templates
How to Create a Project Plan: Strategy, Examples and Templates
Written by: Aditya Rana Apr 02, 2024

If you’re a project manager, juggling tasks and people is your bread and butter.
It may seem tough but someone’s got to have a plan of action with clear goals and methods to track progress. Do we really want more conflict and tension between managers, employees, and clients?
But there’s a lot more to project plans than goal setting.
Project plans must also include an action plan that assigns responsibility, set clear timelines, and define the line of communication plan (and more) to ensure everything goes smoothly from start to finish.
In this blog, I’ll show you how to develop robust project plans (using a Gantt Chart Maker or project plan templates ) that drive success.
Click to jump ahead:
- What is a project plan
- Why project plans are important
- Key components of a project plan
- How to create a project plan
- Phases of a project life cycle
Example project plan
Project plan templates, what is a project plan.
A project plan is a document that outlines the goals, objectives and task of a project. It also includes additional details such as project schedule, scope, due date, and deliverables.
The main use cases of a project plan include:
- Define what needs to be done and by when
- Define roles and responsibilities
- Facilitate communication
Here’s an example project plan:

Why are project plans important?
Project plans are important because they tell teams who is responsible for what and when to execute, from day one until project completion.
Let’s explore the importance of project plans in detail.
Provide a common vision to all parties
Project plans let you describe a vision which helps prevent confusion and team members working at odds.
Essentially, they keep everyone “on the same page” and help teams work together to achieve a common goal.
This project plan template is a great example of how you can define your project and set clear goals and objectives from the start.

Allow you to minimize risks (risk management)
Risk management is a critical component of project management as it allows you to identify potential threats and take preventive action to keep projects on track.
Project plans should include periodic project status reports like in this example below to monitor progress and identify emerging risks.

Make sure resources are allocated appropriately
Resource allocation is the strategic process of assigning the right people, tools, and budget to tasks throughout the project life cycle.
With project plans, you’ll be better able to allocate resources to areas where they are needed most.
This project project plan breaks the project into distinct stages so that you can map out resource requirements ahead of time.

Let you define a clear project scope
The project scope defines the boundaries of a project and informs you on what tasks and activities to expect.
This information is critical when it comes to complete projects on time, not go over the set budget, and deliver acceptable quality.

Improve both internal and external communication
Good communication is central to success no matter the type or size of your project.
Project managers must lay out how communication occurs whether the project includes two employees or hundreds spanning multiple teams and time zones.
Will communication be through email, virtual meetings, shared documents, or live chat through tools like Slack? Or a combination of all? Project plans should answer this question.
Here’s a great example of a project communication plan which clearly informs team members on what communication method to use in different situations.

Allow you to set clear milestones
Setting milestones for each phase of a project project helps you evaluate overall progress and identify and address potential roadblocks ahead of time.
A great way to set clear milestone is to visualize them for easy tracking using a Gantt chart.

Allow you to be flexible and make changes quickly
Change is an unavoidable aspect or projects. Once your team starts working, it’d be a miracle if you’re able to avoid snags that affects scope, timeline, and overall success.
That’s why project plans not only make you to set goals but also mandate frequent status reports sections so that you can detect issues and adapt before something becomes a big problem.

Give you the ability to create high-level project schedules
Project plans have a wide use case, including being a tool to inform people outside your organization (investors for example).
In these cases, project schedules can provide a high-level and more accessible overview of what the project hopes to accomplish and by when.

What does a project plan typically include?
A project plan has many moving parts but generally they include information about the project scope, schedule, deliverables, and due dates for each phase of a project.
Information on project phases
Project plans usually break projects into smaller manageable stages, with each phase having specific goals and deliverables (I’ll go through this later down in the blog…so keep reading!)

Detailed description of activities, tasks, and deliverables
Project plans include detailed information on what needs to be done at the granular level as well as at the high-level. Generally, we can classify this information as follows:
- Activities are the broad categories of work that needs to be done (think of them as the chapters of your project story).
- Tasks are the specific actionable steps that make up each activity (aka the sentences within each chapter).
- Deliverables are the outputs produced at the end of each phase.

Task start and end dates
Project plans would be pretty useless if they didn’t tell you when certain tasks or activities should be completed.
Although project plans with set start and end dates are most effective, you don’t always need to be that specific (often a range of a few days or a week is equally effective).

Task dependencies
Task dependencies refers to figuring out relationships between tasks as this can influence the project timeline.
For example, for a website launch to happen, developers can’t start coding (dependent on) until designers provide the final website layout.
This is where Gantt charts really shine since you can use them to visualize concurrent timelines on one chart which makes it easy to spot task dependencies.

There are several types of task dependencies to keep in mind:
- Finish-to-start (one task must finish before another can begin)
- Start-to-start (both tasks can begin at the same time)
Clear milestones and baselines
Milestones and a baseline give project managers a way to measure actual project performance against expectations.
- Baseline : Refers to an approved project plan at a specific time point, and includes information on schedule budget, schedule, and resource allocation.
- Milestones : Represents completion of major project stages or deliverables.
Both elements allow project managers to course-correct if needed to keep the project on track for success.

An informative project scope statement
The project scope statement defines the boundaries of your project.
It’s usually a single statement that encapsulates everything you need to know about a project, from specific goals, tasks, deliverables, costs, and timelines to be followed.
Here’s an example:
“To renovate the community park spending no more than $500,000 and to provide modern recreational facilities, enhanced green spaces, and improved accessibility while ensuring environmental sustainability by year-end”
List of requirements
Project plans should include a list of all requirements that must be met before any work begins.
Depending on the type of project, you might include technical requirements, functional requirements, non-functional requirements, or other kinds of requirements.
Methods to assess risk
All good project plans include an analysis of factors that can negatively impact the goal, timeline, or results of a project.
The logic is that ideally you should be able to nip problems in the bud before they derail a project entirely.

How to create a project plan in 10 simple steps
Creating project plans can seem daunting at first since there’s so many things to cover. The best advice I can give you though is to break the project planning process down into distinct steps.
Some important things to consider when creating a project plan include:
- Set clear goals
- Create a list of tasks
- Set a timeline
- Sett a budget
- Have a communication plan
Let’s look at how you can create a project plan in 10 simple steps.
1. Define the project scope
Your project scope is the foundation of your project plan and defines the what, who, and why of a project as well as when it’ll be completed.
Without setting a clear project scope, scope creep can set in (when a project grows beyond its original purpose).
2. Define your goals
Set project goals before you begin work so that everyone involved is on the same page from the start.
What are the characteristics of effective goals? They’re clear, realistic, and measurable.

3. Have a timeline
A visual timeline helps everyone involved in the project of what needs to be done.
One of the best ways to create these timelines is to use project management tool like Gantt charts.

4. Create a communication plan
Since most projects involve multiple teams and departments with various communication styles, you’ll need to define your communication strategy from the get go.
This way, there’s no confusion on how people should communicate on project progress and subsequent steps.
Including a org chart in your project plan is a great way to present information about everyone involved and their contact information in a format that’s always accessible.

5. Define the deliverables
Deliverables help you complete tasks on time by breaking down milestones or big goals into smaller, achievable tasks.
These tasks can be defined in terms of day-to-day goals or weekly goals.

6. Create a work breakdown structure
This step is all about dividing the project into smaller, more manageable parts.
To make this easy, work backwards. Start with the final deliverable and break it down into main phases, and then further into individual tasks and subtasks.
Continue this process until the project is distilled into small bits that can be easily scheduled, assigned, and tracked.
7. Identify the stakeholders
Stakeholders are people interested in or involved in the project’s outcome and can include anyone from investors, employees, and even customers.
Make sure you know before who and how someone will be involved so that you can clarify responsibilities and plug gaps early (if any exist).
When identifying stakeholders, you can create lists based on responsibility or level of involvement like in the example below.
- Decision makers (people who will provide input at each step of the project)
- Managers (people who will be overseeing employees within their department)
- Employees (People actually doing project tasks).

8. Identify issues and assess risks
This step is crucial for developing strategies to mitigate against issues that can impact a project’s timeline, budget, or quality.
Start by listing possible issues based on your understanding of the project. For any gaps in information, use assumptions as a temporary placeholder, but make sure these assumptions can be as more information becomes available.
This proactive approach to project planning allows for the creation of contingency plans to address risks before they become problematic.
9. Create a project schedule
In this second to last step, you’ll create a schedule that maps out each task and activity against a timeline.
This includes assigning start and end dates to each task, considering dependencies between tasks, and identifying critical milestones.
You’ll also need to allocate resources and estimate durations for each task.
This schedule will serve as a baseline to monitor and control the project’s progress, ensuring that the project stays on track.
10. Present your project plan to stakeholders
As a project manager, you’re not only expected to create project plans but also present it at a moment’s notice.
In most scenarios, you’ll probably want to create a slide deck and present have your project plan ready to go in PowerPoint or Google Slides.

What are the 5 phases of a project life cycle
Though each project is unique, generally you can classify the process from initiation to completion into five phases.
The initiation phase is where you make your case and explain the purpose and potential risks/benefits of a project.
Key activities in this stage include defining the project at a high level, establishing objectives, scope, and identifying stakeholders and/or a project manager.
The planning stage is the most critical phase of a project life cycle where you list out the steps needed to meet objectives set in the initial phase.
Common tasks in this phase include creating an action plan, schedule, timelines, and budget needed.
If you don’t take this step seriously, you’ll pay the price during the execution and control phases.

The execution phase is where plans are finally put into action.
This phase requires you to have a clear understanding of the deliverables so that you can execute tasks outlined in the planning phase.

Monitoring and controlling
Monitoring generally happens alongside execution and is the tracking phase where you keep check on project progress and performance.
This phase requires you to be adaptable as changes to project scope, schedule, and costs are the norm rather than the exception.
The closure phase marks the end or completion of a project. In this phase, project managers review deliverables with the stakeholders and confirms that all project work has been completed.
Some common steps in this phase include success evaluation and formal project closure reports.
Also, a project closure meeting or party never hurt anyone either.
This multi-page project plan houses all relevant project information in one easily accessible document.
There’s a cover page with title and a black and red color scheme. The subsequent pages contain various sections, including a project summary, objectives, scope, deliverables, and a project timeline, with icons and infographics added for visual emphasis.
This project plan has a clean, business-like appearance with a color scheme that’s easy on the eyes.
It includes sections for a general project overview, which summarizes the status of schedule, scope, and budget. There’s also a section summarizing key accomplishments and milestones are also clearly listed with their status, dates, and comments.

This project communication plan has a neutral color scheme and the company logo is included, giving it a formal appearance suitable for professional use.
It organizes project communications by listing the team members, their specific deliverables, schedules for these deliverables, the client’s name, priority level of the tasks, means of communication, and additional notes.

This project plan is color-coded to distinguish between different phases and includes a header with the agency’s logo, document title, and last update date. It’s structured in phases with each phase listing specific milestones, the team member assigned, priority level, target month for completion, and current status.

Conclusion: Use Venngage to create and share your project vision and drive successful outcomes
Projects have many moving parts that can become difficult to manage if you don’t have a plan of action.
And most project managers are well…dare I say, not good at design? So, if you’re looking to create a project plan for your team or company, edit one of our project plan templates instead to save time, money, and headaches!
Discover popular designs

Infographic maker

Brochure maker

White paper online

Newsletter creator

Flyer maker

Timeline maker

Letterhead maker

Mind map maker

Ebook maker
.css-s5s6ko{margin-right:42px;color:#F5F4F3;}@media (max-width: 1120px){.css-s5s6ko{margin-right:12px;}} AI that works. Coming June 5, Asana redefines work management—again. .css-1ixh9fn{display:inline-block;}@media (max-width: 480px){.css-1ixh9fn{display:block;margin-top:12px;}} .css-1uaoevr-heading-6{font-size:14px;line-height:24px;font-weight:500;-webkit-text-decoration:underline;text-decoration:underline;color:#F5F4F3;}.css-1uaoevr-heading-6:hover{color:#F5F4F3;} .css-ora5nu-heading-6{display:-webkit-box;display:-webkit-flex;display:-ms-flexbox;display:flex;-webkit-align-items:center;-webkit-box-align:center;-ms-flex-align:center;align-items:center;-webkit-box-pack:start;-ms-flex-pack:start;-webkit-justify-content:flex-start;justify-content:flex-start;color:#0D0E10;-webkit-transition:all 0.3s;transition:all 0.3s;position:relative;font-size:16px;line-height:28px;padding:0;font-size:14px;line-height:24px;font-weight:500;-webkit-text-decoration:underline;text-decoration:underline;color:#F5F4F3;}.css-ora5nu-heading-6:hover{border-bottom:0;color:#CD4848;}.css-ora5nu-heading-6:hover path{fill:#CD4848;}.css-ora5nu-heading-6:hover div{border-color:#CD4848;}.css-ora5nu-heading-6:hover div:before{border-left-color:#CD4848;}.css-ora5nu-heading-6:active{border-bottom:0;background-color:#EBE8E8;color:#0D0E10;}.css-ora5nu-heading-6:active path{fill:#0D0E10;}.css-ora5nu-heading-6:active div{border-color:#0D0E10;}.css-ora5nu-heading-6:active div:before{border-left-color:#0D0E10;}.css-ora5nu-heading-6:hover{color:#F5F4F3;} Get early access .css-1k6cidy{width:11px;height:11px;margin-left:8px;}.css-1k6cidy path{fill:currentColor;}
- Product overview
- All features
- App integrations
CAPABILITIES
- project icon Project management
- Project views
- Custom fields
- Status updates
- goal icon Goals and reporting
- Reporting dashboards
- workflow icon Workflows and automation
- portfolio icon Resource management
- Time tracking
- my-task icon Admin and security
- Admin console
- asana-intelligence icon Asana Intelligence
- list icon Personal
- premium icon Starter
- briefcase icon Advanced
- Goal management
- Organizational planning
- Campaign management
- Creative production
- Marketing strategic planning
- Request tracking
- Resource planning
- Project intake
- View all uses arrow-right icon
- Project plans
- Team goals & objectives
- Team continuity
- Meeting agenda
- View all templates arrow-right icon
- Work management resources Discover best practices, watch webinars, get insights
- What's new Learn about the latest and greatest from Asana
- Customer stories See how the world's best organizations drive work innovation with Asana
- Help Center Get lots of tips, tricks, and advice to get the most from Asana
- Asana Academy Sign up for interactive courses and webinars to learn Asana
- Developers Learn more about building apps on the Asana platform
- Community programs Connect with and learn from Asana customers around the world
- Events Find out about upcoming events near you
- Partners Learn more about our partner programs
- Support Need help? Contact the Asana support team
- Asana for nonprofits Get more information on our nonprofit discount program, and apply.
Featured Reads

- Project planning |
- What is project planning? (Plus, 7 ste ...
What is project planning? (Plus, 7 steps to write a successful project plan)

Organize your projects with project plans to keep things on track—before you even start. A project plan houses all the necessary details of your project, such as goals, tasks, scope, deadlines, and deliverables. This shows stakeholders a clear roadmap of your project, ensures you have the resources for it, and holds everyone accountable from the start. In this article, we teach you the seven steps to create your own project plan.
Project plans are essential to keeping your project organized and on track. A great project plan will help you kick off your work with all the necessary pieces—from goals and budgets to milestones and communication plans—in one place. Save yourself time (and a few headaches) by creating a work plan that will make your project a success.
What is a project planning?
Project planning is the second stage in the project management process, following project initiation and preceding project execution. During the project planning stage, the project manager creates a project plan, which maps out project requirements. The project planning phase typically includes setting project goals, designating project resources, and mapping out the project schedule.
What is a project plan?
Get started with a free template in asana.
Kick off work the right way, every time. Use templates to standardize and scale business processes across your organization.
If you're still unsure about what a project plan is, here's how it differs from other project elements:
Project plan vs. work plan: A project plan and a work plan are the same thing. Different teams or departments might prefer one term or another—but they both ultimately describe the same thing: a list of big-picture action steps you need to take to hit your project objectives .
Project plan vs. project charter: A project charter is an outline of your project. Mostly, you use project charters to get signoff from key stakeholders before you start. Which means your project charter comes before your project plan. A project charter is an outline of a simple project plan—it should only include your project objectives, scope, and responsibilities. Then, once your charter has been approved, you can create a project plan to provide a more in-depth blueprint of the key elements of your project.
Project plan vs. project scope: Your project scope defines the size and boundaries of your project. As part of your project plan, you should outline and share the scope of your project with all project stakeholders. If you’re ever worried about scope creep , you can refer back to your pre-defined scope within your project plan to get back on track.
Project plan vs. agile project: Agile project management is a framework to help teams break work into iterative, collaborative components . Agile frameworks are often run in conjunction with scrum and sprint methodologies. Like any project, an Agile project team can benefit from having a project plan in place before getting started with their work.
Project plan vs. work breakdown structure: Similar to a project plan, your work breakdown structure (WBS) helps you with project execution. While the project plan focuses on every aspect of your project, the WBS is focused on deliverables—breaking them down into sub-deliverables and project tasks. This helps you visualize the whole project in simple steps. Because it’s a visual format, your WBS is best viewed as a Gantt chart (or timeline), Kanban board , or calendar—especially if you’re using project management software .
Why are project plans important?
Project plans set the stage for the entire project. Without one, you’re missing a critical step in the overall project management process . When you launch into a project without defined goals or objectives, it can lead to disorganized work, frustration, and even scope creep. A clear, written project management plan provides a baseline direction to all stakeholders, while also keeping everyone accountable. It confirms that you have the resources you need for the project before it actually begins.
A project plan also allows you, as the person in charge of leading execution, to forecast any potential challenges you could run into while the project is still in the planning stages. That way, you can ensure the project will be achievable—or course-correct if necessary. According to a study conducted by the Project Management Institute , there is a strong correlation between project planning and project success—the better your plan, the better your outcome. So, conquering the planning phase also makes for better project efficiency and results.
![[Product UI] Brand campaign project plan in Asana, spreadsheet-style list (Lists)](https://assets.asana.biz/transform/f8cc1f69-97b6-4806-9471-b27453e459a9/inline-generic-list-2x?io=transform:fill,width:2560&format=webp "how to make a project do")
7 steps to write a project plan to keep you on track
To create a clear project management plan, you need a way to track all of your moving parts . No matter what type of project you’re planning, every work plan should have:
Goals and project objectives
Success metrics
Stakeholders and roles
Scope and budget
Milestones , deliverables , and project dependencies
Timeline and schedule
Communication plan.
Not sure what each of these mean or should look like? Let’s dive into the details:
Step 1: Define your goals and objectives
You’re working on this project plan for a reason—likely to get you, your team, or your company to an end goal. But how will you know if you’ve reached that goal if you have no way of measuring success?
Every successful project plan should have a clear, desired outcome. Identifying your goals provides a rationale for your project plan. It also keeps everyone on the same page and focused on the results they want to achieve. Moreover, research shows that employees who know how their work is contributing to company objectives are 2X as motivated . Yet only 26% of employees have that clarity. That’s because most goal-setting happens separate from the actual work. By defining your goals within your work plan, you can connect the work your team is doing directly to the project objectives in real-time.
What's the difference between project goals and project objectives?
In general, your project goals should be higher-level than your project objectives. Your project goals should be SMART goals that help you measure project success and show how your project aligns with business objectives . The purpose of drafting project objectives, on the other hand, is to focus on the actual, specific deliverables you're going to achieve at the end of your project. Your project plan provides the direction your team needs to hit your goals, so you can create a workflow that hits project objectives.
Your project plan provides the direction your team needs to hit your goals, by way of your project objectives. By incorporating your goals directly into your planning documentation, you can keep your project’s North Star on hand. When you’re defining your project scope, or outlining your project schedule, check back on your goals to make sure that work is in favor of your main objectives.
Step 2: Set success metrics
Once you’ve defined your goals, make sure they’re measurable by setting key success metrics. While your goal serves as the intended result, you need success metrics to let you know whether or not you’re performing on track to achieve that result. The best way to do that is to set SMART goals . With SMART goals, you can make sure your success metrics are clear and measurable, so you can look back at the end of your project and easily tell if you hit them or not.
For example, a goal for an event might be to host an annual 3-day conference for SEO professionals on June 22nd. A success metric for that goal might be having at least 1,000 people attend your conference. It’s both clear and measurable.
Step 3: Clarify stakeholders and roles
Running a project usually means getting collaborators involved in the execution of it. In your project management plan, outline which team members will be a part of the project and what each person’s role will be. This will help you decide who is responsible for each task (something we’ll get to shortly) and let stakeholders know how you expect them to be involved.
During this process, make sure to define the various roles and responsibilities your stakeholders might have. For example, who is directly responsible for the project’s success? How is your project team structured (i.e. do you have a project manager, a project sponsor , etc.)? Are there any approvers that should be involved before anything is finalized? What cross-functional stakeholders should be included in the project plan? Are there any risk management factors you need to include?
Consider using a system, such as a RACI chart , to help determine who is driving the project forward, who will approve decisions, who will contribute to the project, and who needs to remain informed as the project progresses.
Then, once you’ve outlined all of your roles and stakeholders, make sure to include that documentation in your project plan. Once you finalize your plan, your work plan will become your cross-functional source of truth.
Step 4: Set your budget
Running a project usually costs money. Whether it’s hiring freelancers for content writing or a catering company for an event, you’ll probably be spending some cash.
Since you’ve already defined your goals and stakeholders as part of your project plan, use that information to establish your budget. For example, if this is a cross-functional project involving multiple departments, will the departments be splitting the project cost? If you have a specific goal metric like event attendees or new users, does your proposed budget support that endeavor?
By establishing your project budget during the project planning phase (and before the spending begins), you can get approval, more easily track progress, and make smart, economical decisions during the implementation phase of your project. Knowing your budget beforehand helps you with resource management , ensuring that you stay within the initial financial scope of the project. Planning helps you determine what parts of your project will cost what—leaving no room for surprises later on.
Step 5: Align on milestones, deliverables, and project dependencies
An important part of planning your project is setting milestones, or specific objectives that represent an achievement. Milestones don’t require a start and end date, but hitting one marks a significant accomplishment during your project. They are used to measure progress. For example, let’s say you’re working to develop a new product for your company . Setting a milestone on your project timeline for when the prototype is finalized will help you measure the progress you’ve made so far.
A project deliverable , on the other hand, is what is actually produced once you meet a milestone. In our product development example, we hit a milestone when we produced the deliverable, which was the prototype. You can also use project dependencies —tasks that you can’t start until others are finished. Dependencies ensure that work only starts once it’s ready. Continuing the example, you can create a project dependency to require approval from the project lead before prototype testing begins.
If you’re using our free project plan template , you can easily organize your project around deliverables, dependencies, and milestones. That way, everyone on the team has clear visibility into the work within your project scope, and the milestones your team will be working towards.
Step 6: Outline your timeline and schedule
In order to achieve your project goals, you and your stakeholders need clarity on your overall project timeline and schedule. Aligning on the time frame you have can help you better prioritize during strategic planning sessions.
Not all projects will have clear-cut timelines. If you're working on a large project with a few unknown dates, consider creating a project roadmap instead of a full-blown project timeline. That way, you can clarify the order of operations of various tasks without necessarily establishing exact dates.
Once you’ve covered the high-level responsibilities, it’s time to focus some energy on the details. In your work plan template , start by breaking your project into tasks, ensuring no part of the process is skipped. Bigger tasks can even be broken down into smaller subtasks, making them more manageable.
Then, take each task and subtask, and assign it a start date and end date. You’ll begin to visually see everything come together in a cohesive project timeline . Be sure to add stakeholders, mapping out who is doing what by when.
![[Product UI] Brand campaign project in Asana, Gantt chart-style view (Timeline)](https://assets.asana.biz/transform/10e77bb8-a116-4169-83d5-d4d644824c54/inline-gantt-chart-basics-1-2x?io=transform:fill,width:2560&format=webp "how to make a project do")
Step 7: Share your communication plan
We’ve established that most projects include multiple stakeholders. That means communication styles will vary among them. You have an opportunity to set your expectations up front for this particular project in your project plan. Having a communication plan is essential for making sure everyone understands what’s happening, how the project is progressing, and what’s going on next. And in case a roadblock comes up, you’ll already have a clear communication system in place.
As you’re developing your communication plan, consider the following questions:
How many project-related meetings do you need to have? What are their goals?
How will you manage project status updates ? Where will you share them?
What tool will you use to manage the project and communicate progress and updates?
![[inline illustration] Communication plan for brand campaign in Asana (example)](https://assets.asana.biz/transform/3cf9f2d5-69b4-454e-b7e6-9452122a07d7/inline-project-planning-communication-plan-1-2x?io=transform:fill,width:2560&format=webp "how to make a project do")
Like the other elements of your project plan, make sure your communication plan is easily accessible within your project plan. Stakeholders and cross-functional collaborators should be able to easily find these guidelines during the planning and execution phases of your project. Using project planning tools or task management software that integrates with apps like Slack and Gmail can ensure all your communication happens in one easily accessible place.
Example project plan
Next, to help you understand what your project management plan should look like, here are two example plans for marketing and design projects that will guide you during your own project planning.
Project plan example: annual content calendar
Let’s say you’re the Content Lead for your company, and it’s your responsibility to create and deliver on a content marketing calendar for all the content that will be published next year. You know your first step is to build your work plan. Here’s what it might look like:
Goals and success metrics
You establish that your goal for creating and executing against your content calendar is to increase engagement by 10%. Your success metrics are the open rate and click through rate on emails, your company’s social media followers, and how your pieces of content rank on search engines.
Stakeholders and each person’s role
There will be five people involved in this project.
You, Content Lead: Develop and maintain the calendar
Brandon and Jamie, Writers: Provide outlines and copy for each piece of content
Nate, Editor: Edit and give feedback on content
Paula, Producer: Publish the content once it’s written and edited
Your budget for the project plan and a year’s worth of content is $50,000.
Milestones and deliverables
Your first milestone is to finish the content calendar, which shows all topics for the year. The deliverable is a sharable version of the calendar. Both the milestone and the deliverables should be clearly marked on your project schedule.
You’ve determined that your schedule for your content calendar project plan will go as follows:
October 15 - November 1: The research phase to find ideas for topics for content
November 2 - November 30: Establish the topics you’ll write about
December 1 - January 1: Build the calendar
January 1 - December 31: Content will be written by Brandon and Jamie, and edited by Nate, throughout the year
January 16 - December 31: Paula will begin publishing and continue to do so on a rolling basis throughout the year.
You’ll have a kick-off meeting and then monthly update meetings as part of your communication plan. Weekly status updates will be sent on Friday afternoons. All project-related communication will occur within a project management tool .
How ClassPass manages project plans from start to finish
Kerry Hoffman, Senior Project Manager of Marketing Operations at ClassPass , oversees all marketing projects undertaken by the creative, growth, and content teams. Here are her top three strategies for managing project plans:
Identify stakeholders up front: No matter the size of the project, it’s critical to know who the stakeholders are and their role in the project so you ensure you involve the right people at each stage. This will also make the review and approval process clear before the team gets to work.
Agree on how you want to communicate about your project: Establish where and when communication should take place for your project to ensure that key information is captured in the right place so everyone stays aligned.
Be adaptable and learn other people’s working styles: Projects don’t always go according to plan, but by implementing proper integration management you can keep projects running smoothly. Also, find out how project members like to work so you take that into account as you create your plan. It will help things run smoother once you begin executing.
Write your next project plan like a pro
Congratulations—you’re officially a work planning pro. With a few steps, a little bit of time, and a whole lot of organization, you’ve successfully written a project plan.
Keep yourself and your team on track, and address challenges early by using project planning software like Asana . Work through each of the steps of your project plan with confidence, and streamline your communications with the team.
Related resources

How to track utilization rate and drive team profitability

How to accomplish big things with long-term goals

Smooth product launches are simpler than you think

What is stakeholder analysis and why is it important?
- Contact sales
- Start free trial
Project Planning: How to Make a Project Plan
This guide is brought to you by projectmanager, the project planning software trusted by 35,000+ users worldwide. make a project plan in minutes.

What Is a Project Plan?
How to create a project plan, project planning phase, what is project planning software, benefits of online project planning software, must-have project planning software features, project planning terms, project planning steps, how to create a project plan with projectmanager, what is the purpose of a project management plan, the elements of a project plan, how long does the project planning phase take, techniques for the project planning process, how to manage your project plan.
A project plan is a series of formal documents that define the execution and control stages of a project. The plan includes considerations for risk management, resource management and communications, while also addressing scope, cost and schedule baselines. Project planning software is used by project managers to ensure that their plans are thorough and robust.
ProjectManager allows you to make detailed project plans with online Gantt charts that have task dependencies, resource hours, labor costs, milestones, the critical path and more. Plus, your team can execute the plan in any of our five project views, while you track progress along the way with dashboards. Start today for free.

The project plan, also called project management plan, answers the who, what, where, why, how and when of the project—it’s more than a Gantt chart with tasks and due dates. The purpose of a project plan is to guide the execution and control project phases.
As mentioned above, a project plan consists of the following documents:
- Project Charter : Provides a general overview of the project. It describes the project’s reasons, goals, objectives, constraints, stakeholders, among other aspects.
- Statement of Work : A statement of work (SOW) defines the project’s scope, schedule, deliverables, milestones, and tasks.
- Work Breakdown Structure : Breaks down the project scope into the project phases, subprojects, deliverables, and work packages that lead to your final deliverable.
- Project Plan : The project plan document is divided in sections to cover the following: scope management, quality management, risk assessment, resource management, stakeholder management, schedule management and the change management plan.
This guide aims to give you all the information and resources you need to create a project plan and get it approved by your customers and stakeholders. Let’s start with the basics of writing a project plan.
Get your free
Project Plan Template
Use this free Project Plan Template for Word to manage your projects better.
Your project plan is essential to the success of any project. Without one, your project may be susceptible to common project management issues such as missed deadlines, scope creep and cost overrun. While writing a project plan is somewhat labor intensive up front, the effort will pay dividends throughout the project life cycle.
The basic outline of any project plan can be summarized in these five steps:
- Define your project’s stakeholders, scope, quality baseline, deliverables, milestones, success criteria and requirements. Create a project charter, work breakdown structure (WBS) and a statement of work (SOW) .
- Identify risks and assign deliverables to your team members, who will perform the tasks required and monitor the risks associated with them.
- Organize your project team (customers, stakeholders, teams, ad hoc members, and so on), and define their roles and responsibilities.
- List the necessary project resources , such as personnel, equipment, salaries, and materials, then estimate their cost.
- Develop change management procedures and forms.
- Create a communication plan , schedule, budget and other guiding documents for the project.
Each of the steps to write a project plan explained above correspond to the 5 project phases, which we will outline in the next section.
What Are the 5 Phases of the Project Life Cycle?
Any project , whether big or small, has the potential to be very complex. It’s much easier to break down all the necessary inclusions for a project plan by viewing your project in terms of phases. The Project Management Institute , within the Project Management Book of Knowledge (PMBOK), have identified the following 5 phases of a project:
- Initiation: The start of a project, in which goals and objectives are defined through a business case and the practicality of the project is determined by a feasibility study.
- Planning: During the project planning phase, the scope of the project is defined by a work breakdown structure (WBS) and the project methodology to manage the project is decided on. Costs, quality and resources are estimated, and a project schedule with milestones and task dependencies is identified. The main deliverable of this phase is your project plan.
- Execution: The project deliverables are completed during this phase. Usually, this phase begins with a kick-off meeting and is followed by regular team meetings and status reports while the project is being worked on.
- Monitoring & Controlling: This phase is performed in tandem with the project execution phase. Progress and performance metrics are measured to keep progress on the project aligned with the project plan.
- Closure: The project is completed when the stakeholder receives the final deliverable. Resources are released, contracts are signed off on and, ideally, there will be an evaluation of the successes and failures.
Free Project Plan Template
Address all aspects of your project plan with this free project plan template for Word . This in-depth template will guide you through every phase of the project, as well as all the elements you need to outline for a proper document. Download your template today.

We’ve created also created other project planning templates to help you create all the different documents that make up a project plan, like the project schedule, project budget or resource plan.
Now that we’ve learned how to make a project plan, and identified the stages of the project management life cycle, we need to emphasize on the importance of the project planning phase.
The project planning process is critical for any kind of project because this is where you create all the documents that will guide how you’ll execute your project plan and how you’ll control risks and any issues that might occur. These documents, which are part of the project management plan, cover all the details of your project without exception.
There are project plan templates out there that can help you organize your tasks and begin the project planning process—but we here at ProjectManager recommend the use of project planning software. The feature set is far more robust and integrated with every project phase compared to an Excel project plan template, and is a great way to ensure your actual progress stays aligned with your planned progress.
Once you write a project plan, it’s time for implementation . Watch the video below to see how project planning software helps organize a project’s tasks, resources and costs.

Project planning tools has become an invaluable tool for project managers in recent years, as it provides them the ability to maintain and automate the components we outlined above. Project planning software is a great tool to facilitate project management processes such as schedule development, team management, cost estimation, resource allocation and risk monitoring.
Beyond that, planning software also allows managers to monitor and track their plan as it moves through the execution phase of the project. These features include dashboards, for a high-level view of the project’s progress and performance, and in-depth reports that can be used to communicate with stakeholders.
Project planning software comes in all different sizes and shapes. There are some that focus on a single aspect, and others that offer a suite of planning features that can be used in each one of the project planning steps. What’s right for your project depends on your specific needs, but in general terms, project planning software is a much more powerful tool than project planning templates .
Related: 20 Must-Have Project Management Excel Templates
Online project planning software is highly flexible and adaptable to your team’s style of work. It has features that are designed to assist you throughout your project planning process.
Before the rise of planning software, project managers would typically have to keep up with a disjointed collection of documents, excel spreadsheets and so on. Savvy managers, however, make use of the project management tools available to them to automate what they can, and streamline what they can’t.
Some of the time-saving benefits of project planning software include the following.
- Organize, prioritize and assign tasks
- Plan and schedule milestones and task dependencies
- Monitor progress, costs and resources
- Collaborate with team
- Share project plans with team and stakeholders
- Generate reports on plans
Gantt Charts for Superior Planning
A Gantt chart is the most essential tool for the project planning process. Organize tasks, add their duration and they automatically populate a project timeline . Set milestones to break the larger project into manageable phases, and link task dependencies to avoid bottlenecks later in the project.

Get More Than a To-Do List
When planning a project, you need more than a to-do list. Seek out a planning software with a task list feature that lets you set priority levels, filters and collaborate. It’s a big plus if you can also make personal task lists that are private to manage your own work.

Use Kanban for Workflows
Workflows ensure proper execution of your plan, and no feature does this better than kanban boards. Customize boards to match your workflow and drag and drop cards as teams get their work done. See what work needs to be done and keep the focus on productivity with this feature.

Be Able to Track Progress
A dashboard can keep your project plan on track. Try and find a dashboard that’s synced with your planning tools, so everything updates automatically. It will make reporting easier too.

Get Transparency Into Teams
For a plan to go smoothly, you have to know what your team is working on. Find a way to balance your team’s availability with the project schedule. Workload features that map out resource allocation and holidays can be a big help here.

Be Able to Manage Multiple Projects
Rarely do you need to only focus on one project at a time. Give yourself the flexibility to manage multiple projects at once in the same tool. A roadmap feature that maps all of your projects on one timeline can be a lifesaver.

Before we dive into how to create a project plan, it helps to be familiar with some of the terms that you’ll run across. Here is a list of general terms you’ll encounter in this guide.
- Deliverable: The results of a project, such as a product, service, report, etc.
- Stakeholder: Anyone with a vested interest in the project—project manager, project sponsor, team members, customers, etc.
- Tasks: Small jobs that lead to the final deliverable.
- Milestone: The end of one project phase, and the beginning of the next.
- Resources: Anything you need to complete the project, such as personnel, supplies, materials, tools, people and more.
- Budget: Estimate of total cost related to completing a project.
- Tracking & Monitoring: Collecting project data, and making sure it reflects the results you planned for.
The project planning process is critical for the success of your project, and as a project manager, you have to think about all the elements that make up your project management plan such as work, time, resources and risks.
Now, we’re going to take you through the main project planning steps :
- Outline the business case
- Meet with key stakeholders
- Define project scope
- Assemble a project team
- Determine a project budget
- Set project goals & objectives
- Outline project deliverables
- Create a project schedule
- Assign tasks to your team members
- Do a risk analysis
- Create your project plan
- Report your progress
By following these project planning steps, you’ll clarify what you need to achieve, work out the processes you need to get there and develop an action plan for how you are going to take this project plan outline forward.
1. Outline the Business Case
If you have a project, there’s a reason for it—that’s your business case . The business case outlines reasons why the project is being initiated, its benefits and the return on investment. If there’s a problem that is being solved, then that problem is outlined here. The business case will be presented to those who make decisions at your organization, explaining what has to be done, and how, along with a feasibility study to assess the practicality of the project. If approved, you have a project.
2. Meet with Key Stakeholders
Every project has stakeholders , those who have a vested interest in the project. From the ones who profit from it, to the project team members who are responsible for its success. Therefore, any project manager must identify who these key stakeholders are during the project planning process, from customers to regulators. Meeting with them is crucial to get a better picture of what the project management plan should include and what is expected from the final deliverable.
3. Define Project Scope
It refers to the work required to accomplish the project objectives and generate the required deliverables. The project scope should be defined and organized by a work breakdown structure (WBS). Therefore, the project scope includes what you must do in the project (deliverables, sub deliverables, work packages, action items ), but also what is nonessential. The latter is important for the project plan, because knowing what isn’t high priority helps to avoid scope creep ; that is, using valuable resources for something that isn’t key to your project’s success.
4. Assemble a Project Team
You’ll need a capable project team to help you create your project plan and execute it successfully. It’s advisable to gather a diverse group of experienced professionals to build a multi-disciplinary team that sees your project management plan from different perspectives.
5. Determine a Project Budget
Once you define your project scope, you’ll have a task list that must be completed to deliver your project successfully. To do so, you’ll need resources such as equipment, materials, human capital, and of course, money. Your project budget will pay for all this. The first step to create a project budget is to estimate the costs associated with each task. Once you have those estimated costs, you can establish a cost baseline , which is the base for your project budget.
6. Set Project Goals & Objectives
Goals and objectives are different things when it comes to planning a project. Goals are the results you want to achieve, and are usually broad. Objectives , on the other hand, are more specific; measurable actions that must be taken to reach your goal. When creating a project plan, the goals and objectives naturally spring from the business case, but in this stage, you go into further detail. In a sense, you’re fine-tuning the goals set forth in the business case and creating tasks that are clearly defined. These goals and objectives are collected in a project charter , which you’ll use throughout the project life cycle.
7. Outline Project Deliverables
A project can have numerous deliverables. A deliverable can be a good, service or result that is needed to complete a task, process, phase, subproject or project. For example, the final deliverable is the reason for the project, and once this deliverable is produced, the project is completed. As defined in the project scope, a project consists of subprojects, phases, work packages, activities and tasks, and each of these components can have a deliverable. The first thing to do is determine what the final deliverable is, and how you will know that the quality meets your stakeholder’s expectations. As for the other deliverables in the project, they must also be identified and someone on the team must be accountable for their successful completion.
8. Create a Project Schedule
The project schedule is what everything hangs on. From your tasks to your budget , it’s all defined by time. Schedules are made up by collecting all the tasks needed to reach your final deliverable, and setting them on a project timeline that ends at your deadline. This can make for an unruly job ahead, which is why schedules are broken into phases, indicated by milestones , which mark the end of one project phase and the beginning of the next.
9. Assign Tasks to Your Team Members
The plan is set, but it still exists in the abstract until you take the tasks on your schedule and begin assigning them out to your team members. Their roles and responsibilities must be clearly defined, so they know what to do. Then, when you assign them tasks from your plan, they should be clear, with directions and any related documentation they will need to execute the tasks.
10. Do a Risk Analysis
Every project has some level of risk . There are several types of risk such as scope risk, technical risks and schedule risk, among others. Even if your project plan is thorough, internal and external factors can impact your project’s time, cost and scope (triple constraint). Therefore, you need to regard your planning as flexible. There are many ways to prepare for risk, such as developing a change management plan, but for now, the most important thing to do is to track your progress throughout the execution phase by using project status reports and/or project planning software to monitor risk.
11. Create your Project Plan
As discussed above, a project management plan is a document that’s made of several elements. Before we get into a detailed explanation of each of them, it’s important to understand that you should include them all to have a solid project plan. The components that you’ll need might vary depending on your project, but in general terms, you’ll need these main documents to create your project management plan:
- Project charter
- Project schedule
- Project budget
- Project scope statement
- Risk management plan
- Change management plan
- Cost management plan
- Resource management plan
- Stakeholder management plan
12. Report Your Progress
Your ultimate goal is to ensure a successful project for your stakeholders. They’re invested, and will not be satisfied twiddling their thumbs without looking at project status reports to track progress. By constructing a work breakdown structure (WBS) during the project planning phase you can break down the project for them so that they understand how your project plan will be executed. Keeping stakeholders informed is important to manage their expectations and ensure that they’re satisfied. Having regular planning meetings where you present progress reports are a great way to show them that everything is moving forward as planned and to field any questions or concerns they might have. Your stakeholder management plan will specify how you’ll engage stakeholders in the project.
Project planning software is a tool that helps to plan, organize and manage the schedule and resources needed to complete a project. ProjectManager is an award-winning project management software that organizes projects from planning to completion. Sign up for a free 30-day trial and follow along to build a thorough project plan that covers every detail.
1. List Your Tasks for the Plan
Tasks are the building blocks of any project and the start of any plan is identifying all the tasks that lead to your final deliverable.
Open the tool to add your tasks on the Gantt chart or one of the other multiple project views. You can import a task list from any spreadsheet or use one of our templates to get started.

2. Add Duration and Costs to Tasks
Every task has an estimated duration, which is the time it will take to complete it. They will also require a certain amount of funding, which needs to be collected to formulate your plan.
Add the start and end dates for each task in the Gantt and they populate a project timeline, so you can see the whole project laid out in one place. There’s also a column for task costs.

3. Link Dependent Tasks
Tasks are not always separate from one another. Often one cannot start or stop until another has started or stopped. That’s called a task dependency and needs to be noted in your plan.
Link dependent tasks by dragging one to the other. A dotted line indicates that they’re linked, so you stay aware of the fact and can avoid bottlenecks later in the project.
4. Set Milestones & Baseline
A milestone indicates the end of one phase and the beginning of another, which helps with tracking and morale. The baseline sets your plan so you can compare it to actual progress.
There is a filter on the Gantt that automatically sets the baseline, so you can use it to track your actual progress against the plan. The baseline can also be locked with a click.
5. Onboard Team & Assign
Getting the team and the tool together is how a project plan becomes actualized. The easier and seamless this transition, the faster you’ll get to work on the project.
Invite your team from the software and it generates an email with a link. Once they follow that link, they’re in and have access to the tools they need to manage their tasks.

6. Monitor Progress & Report to Stakeholders
Keeping track of your progress and then updating stakeholders is both how you stay on track and manage your stakeholders’ expectations.
See progress as it happens on our real-time dashboard, which calculates data and displays it over six project metrics. Reports can be filtered and shared for a deep dive into those numbers.
7. Adjust Plan As Needed
No plan remains the same throughout a project. Things happen and changes are demanded. Therefore, being able to edit your plan easily is key to the project planning process.
Edit your plan on the Gantt by a simple drag and drop. Move the old date to the new date and not only is that task fixed, but any impacted tasks are also updated automatically.
ProjectManager is an award-winning software that helps managers plan and helps teams get organized. Gantt charts control all aspects of your project plan from scheduling to assigning tasks and even monitoring progress. Multiple project views provide transparency into workflow and give everyone the tools they need to be at their best.
Ready to make your plan? Try ProjectManager today with this free 30-day trial.
The project manager is responsible for producing the project plan, and while you can’t make up all the content yourself, you’ll be the one banging the keys to type it all out. Use templates where you can to save time. Download our free project plan template and write your plan in double-quick time!
The purpose of a project management plan is to serve as a guide for the execution and control phases. The project plan provides all the information necessary for the execution phase such as the project’s goals, objectives, scope of work, milestones, risks and resources. Then, this information helps project managers monitor and control the progress of the project.
We plan at the beginning to save time later. A good project plan means that you don’t have to worry about whether the project participants are going to be available on the right dates—because you’ve planned for them to be. You don’t have to worry about how to pay those invoices—you’ve planned your financial process. You don’t have to worry about whether everyone agrees on what a quality outcome looks like—you’ve already planned what quality measures you are going to use.
A good project plan sets out the processes that everyone is expected to follow, so it avoids a lot of headaches later. For example, if you specify that estimates are going to be worked out by subject matter experts based on their judgement, and that’s approved, later no one can complain that they wanted you to use a different estimating technique. They’ve known the deal since the start.
Project plans are also really helpful for monitoring progress. You can go back to them and check what you said you were going to do and how, comparing it to what you are actually doing. This gives you a good reality check and enables you to change course if you need to, bringing the project back on track.
Tools like dashboards can help you make sure that your project is proceeding according to plan. ProjectManager has a real-time dashboard that updates automatically whenever tasks are updated.
The project planning process already discussed only scratches the surface of what is a deep well of practices created to control your project. They start with dialogue — speaking to stakeholders, teams, et al.
The deliverable for your planning phase is a document called the project plan. A Guide to the Project Management Body of Knowledge (PMBOK Guide) – Fifth Edition says that the project plan is made up of lots of subsidiary plans. These include:
- A project scope statement to define all the tasks and deliverables that are needed to complete the project
- A risk management plan for dealing with project risk including the processes for logging and tracking risks
- A change management plan to manage any changes that will be made to the project plan
- A cost management plan for managing costs and the budgeting elements of the project including any procurements or supplier engagements you might have
- A resource management plan for managing the material resources such as equipment and the human resources on the team both in terms of availability and skills
- A stakeholder management plan setting out who is going to receive messages about the project, when and in what format
- A quality plan that specifies the quality targets for the project
That’s a lot of documentation.
In reality, it’s rare that you’ll produce these as individual documents. What you need is a project plan that talks about the important elements of each of these. There’s no point creating a big document that sets out exactly how your business works anyway. If you already have a structured risk management process , then don’t waste time writing it all down again in your project plan.
Your project management plan needs to include enough information to make sure that you know exactly what processes and procedures need to be followed and who needs to be involved. Get your project plan approved by your stakeholders, your project sponsor and your team so there are no surprises later. As explained above, project planning charts and techniques such as Gantt charts, CPM, WBS or PERT can help you create your project plan.
This is hard to answer. It’s going to take longer to plan the moon landing than a new dating app.
The best way to estimate how long your project planning phase will take is to look at similar projects that have happened before, and see how long it took them to plan. Talk to the project manager as well, if you can, because they’ll have a view on whether that length of time was enough or not!
It’s easy to see how long other projects took if you have a project management tool that archives your old project schedules and makes the data available to everyone who needs it. You can then search for similar projects and study their schedules in detail.
A project plan is all about working out what to do and how to do it, so you need to get a lot of people involved. There are several good tools and project planning techniques for getting information from other people including:
- One-to-one meetings or interviews
- Surveys or customer focus groups to gather and validate requirements.
You should also arm yourself with a task management tool , like a list or a kanban board. They are incredibly useful for noting down important things that should be in your project plan. Kanban board software can help structure your plan by writing down the key headings and then moving them around as required until you have a flow that looks right.
Finally, you’ll need an online project management system to store your project management plan in. Make sure that everyone in the team can access the latest version of the project plan.
Your project plan is not a document written in stone. You should be referring back to it and making changes to it as often as you need to. Parts of it, like your project schedule, will change almost daily. Other parts, like your procurement plans and cost management processes, won’t change at all during the life of your project.
The important thing to remember is that if your project management plan isn’t working for you, think about what you can do to change it. It’s there to guide your project management, not restrict you from doing the right thing. If you need to review how you manage work and project resources, then go back and review it. Make the changes you need, get the plan approved again and share it with the team.
How To Make a Project Plan When You Don’t Have All the Answers
Yes, this happens–most of the time! It’s rare to have all the information at the beginning of a project. Most managers want you to dive in and get started, but you might not have the luxury of knowing all the details.
That’s OK; we have techniques to help deal with uncertainty.
First is the project assumption. You use these to put caveats on your plan and to document the things that you assume to be true at this point in time. For example:
- We assume that the resources will be available.
- We assume that the required funding is available.
- We assume that the colors requested will be in line with the company brand and that Marketing sign off is not required.
You get the picture. Then, if the design team comes back and says that they want the product to be a totally new palette of colors and that Marketing has to approve that, you are justified in saying that you’ll have to change the timescales on the schedule to make that possible.
You planned based on an assumption (that everyone agreed to, because you got the document approved) and that assumption turned out not to be true.
Next Steps for Project Planning
The most important thing to remember is that you shouldn’t rush the project planning process. Done properly, project planning takes time. And it’s worth doing it properly because if you don’t, we guarantee that you will hit problems later on as people won’t understand what they are supposed to do and why.
Great planning sets you up for success. It gives you the confidence of knowing that you’ve got all your processes, tools and systems in place to deliver the perfect result.
Now that you’ve learned all about project planning, it’s time to take action. Sign up for a free 30-day trial of ProjectManager and start planning your project today!
Start My Free Trial
Project Planning Resources
- Best Project Planner Tools: Apps, Software & Templates
- Best Project Planning Software of 2024 (Free & Paid)
- 25 of the Best Planning Quotes
- 3 Best Planner Apps for Mac in 2024
- 3 Best Project Management Charts for Project Planning
- Project Management Trends
- How to Create a Project Roadmap (Example Included)
- What Is Aggregate Planning? Strategies & Tips
- What Is Rolling Wave Planning?
- How to Create a Project Execution Plan (PEP) – Free Template Included
- Sample Project Plan For Your Next Project
- Operational Planning: How to Make an Operations Plan
- Project Planning Software
- Gantt Chart Software
- Project Scheduling Software
- Work Breakdown Structure Software
- Project Timeline Software
- Resource Planning Software
- Free Project Planning Templates
- Free Project Management Templates
- Project Proposal Template
- Project Charter Template
- Project Timeline Template
- Implementation Plan Template
- Work Plan Template
- Action Plan Template
Start your free 30-day trial
Deliver faster, collaborate better, innovate more effectively — without the high prices and months-long implementation and extensive training required by other products.
How to Create a Winning Project Plan
By Kate Eby | May 25, 2022
- Share on Facebook
- Share on LinkedIn
Link copied
Creating a project plan can be overwhelming, but that doesn’t always have to be the case. We provide the basics steps for how to write a project plan.
In this article, you’ll learn how to write a project plan . You’ll find helpful tips and a downloadable template starter kit so that you don’t have to worry about formatting and can hit the ground running.
What Is a Project Plan?
A project plan is a document that outlines what’s needed to complete a project. This can cover a project scope overview, a budget breakdown, a detailed schedule of deliverables, and a rundown of potential risks and stakeholders.
A project plan contains much of the same information as a project charter , but includes finalized details and a more specific schedule and budget. Think of a project charter as the blueprint for your project plan; the charter lays out your intent before the project begins. A project plan maps out the processes necessary to complete it. Your project plan should always be up to date and serve as a source of truth for a project’s status.
How to Write a Project Plan
Writing a project plan starts with finalizing your project information. Create an overview and a scope statement, determine a deliverables schedule, and define a budget. Include a risk management strategy, a communication plan, and any other documents your project needs.
Project planning is fundamentally about balancing the goals, schedule, and costs in a way that demonstrates that you can control the project’s scope. You may consider adopting the use of project planning templates to maintain consistency between projects and build on them over time.
A project plan also includes all the supporting documents that walk your stakeholders, clients, and team through the project.
1. Write a Project Overview
The overview is a short introduction to the project, not exceeding a page or so in length. Summarize the high-level details, covering project goals, deliverables, success measurements, and dependencies. Include the project’s sponsors and their titles, and name the project.
Add links to project portals or dashboards to give stakeholders a place to conveniently check on status and to access more detailed documents in the project plan.

Download Project Overview Statement Template Microsoft Word | Adobe PDF
Use this template to provide a high-level summary of a project’s goals, scope, risks, schedule, budget, and success metrics. Add links to your company’s risk management plan , a detailed budget, and your project schedule. This template is fully customizable, so you can add or remove text to include only the information you need.
2. Define the Project’s Scope
Outlining your project’s scope is important for controlling scope creep . Define the project’s deliverables and goals. It is just as crucial to highlight what is within a project’s scope as what is outside of it.
A project’s scope may shift, but consider the changes against the project as a whole and update them in the project plan when approved.
3. Create a Project Schedule
The project schedule should be visual and easy to read, showing how each task contributes to the project’s main goal. Note the people and resources needed for each task and subtask, how long each will take, and the dependencies between them.
Depending on your project management strategy, you might consider using Gantt charts , Kanban boards , or shared calendars to create the schedule. Whatever you choose, ensure that your project status is updated on the schedule and that tasks are marked when started, completed, or falling behind.
Leave room in your schedule for roadblocks, emergencies, and tasks that may take more time. Consult with your team about how long each task has required in the past and use their feedback to inform the schedule. Create the schedule based on how long the work takes, not how long you wish it would take.

Download Project Schedule Template Microsoft Excel | Google Sheets | Smartsheet
Use this customizable project schedule template to create a visual map of your project’s tasks and phases. The template will use any dates you add to the matrix to create a Gantt chart. You also have space for project notes.
4. Finalize the Project Budget
Your project plan should have the approved spending plan or time-phased budget that lists all costs by time period. Make sure to itemize the budget and keep it as close to reality as possible. Include room in the budget for unforeseen and emergency expenditures, and account for any additional resources you may need. Plan to update it immediately when emergencies arise or when tasks cost more. It is important to know ahead of time what kind of costs need executive approval and to make a plan to get that approval ahead of time.

Download Project Budget Template Microsoft Excel | Google Sheets
Use this customizable project budget template to create a detailed, line-item budget for the project. Add labor and materials rates or the fixed cost for each task in your project. The template will automatically calculate the costs and compare your actual budget to your estimates, so it’s easy to tell if you’re going over.
5. Identify a Risk Management Strategy
Make a list of the specific risks your project faces, and outline a strategy to manage them . If your company already has a general risk management plan in place, it may not be necessary to reproduce it in your project plan as long as you highlight the individual risks that apply to your project. Talk to other project managers and your team about the obstacles they faced, and ask for tips for addressing similar challenges.
6. Write a Communication Plan
Create a communication plan to establish how and when you’ll share updates with stakeholders. The plan will list your project’s key stakeholders and team members, as well as their contact information and when they should receive project updates. You can use this document to outline the kinds of updates each stakeholder wishes to receive, and map out a schedule for planned meetings and reports.

Download Project Communication Plan Template Microsoft Word | Adobe PDF | Google Docs
Download this project communication plan template to document your key stakeholders’ contact details and their preferred contact style and frequency. Input your communication goals and customize the plan to include scheduled meetings, progress reports, and status reports.
7. Finalize All Documents and Get Sponsor Approval
The final project plan should include all of the information above and any additional documents that might be relevant to your particular project.
Additional elements you might include in a project plan include the following:
- A link to your project charter
- A quality assurance plan
- Your work breakdown structure
- Your project management methodology or framework
- Links and access to necessary permits and certifications
Present the final plan to your sponsor and get their approval. If they request any changes, take this opportunity to make them.
8. Save and Share Your Plan
Once you’ve approved your project plan, save it in a centralized, easily accessible location, and share it with project stakeholders and your team. Ensure that all schedule and budget documents are updated regularly so that the project plan always accurately reflects your project’s status. Any critical changes to the plan itself should only be adjusted through the approved change control and management process.
Tips for Writing a Good Project Plan
Writing a good project plan begins with good organization. Use templates and software to keep your plan up to date and accessible.
Follow these tips for writing a good project plan:
- Write Clearly: Don’t complicate the plan with details that your audience already knows, such as your organization’s existing risk management or change control policies . Provide the information that your readers need to know about the specific project, not the entire company.
- Use Formatting and Be Specific: Some people will skim the plan, while others will pore over every detail. To make it consumable for all, use visual charts for schedules and budgets, bullet points for lists, and bold fonts to highlight important details. The skimmers will get the high-level information they need, and the detail-oriented will be able to drill down into the information they want.
- Keep It Updated: Even though the project plan contains a series of documents, don’t let it become something that stakeholders ignore or forget because it no longer has relevant information. Use an updated project plan to maintain support and enthusiasm for the work ahead.
- Use Your Project Charter: The project charter is the basis for your project plan. A detailed project charter includes similar information. Build off of the speculative schedules and budgets you already created.
- Use Templates and Software: Using project plan templates for your project plan documents is a great way to ensure consistency between teams and projects. Many project management software solutions also provide methods for creating, organizing, and sharing project plan information as well.
- Involve Your Team: Make sure to talk with your team before the project starts. They are the people who ensure the project succeeds, so get their input and buy-in during the planning process. They will likely have insight that you do not, and they will ask questions that will surface important details. Involving your team in the planning process also builds trust, as they feel closer to the project and more invested in its success.
Project Plan Starter Kit

Download Project Plan Starter Kit
We’ve collected the templates above to create a project plan starter kit that makes it easy to write your own project plan. In this kit, you’ll find customizable templates to create a project overview, a project budget, a detailed schedule, and a communication plan. Together, these documents form the foundation of a solid project plan and will help get your project off the ground.
Use Smartsheet Project Management Tools to Create and Implement Your Project Plan
Empower your people to go above and beyond with a flexible platform designed to match the needs of your team — and adapt as those needs change.
The Smartsheet platform makes it easy to plan, capture, manage, and report on work from anywhere, helping your team be more effective and get more done. Report on key metrics and get real-time visibility into work as it happens with roll-up reports, dashboards, and automated workflows built to keep your team connected and informed.
When teams have clarity into the work getting done, there’s no telling how much more they can accomplish in the same amount of time. Try Smartsheet for free, today.
Discover why over 90% of Fortune 100 companies trust Smartsheet to get work done.
Project Management For Beginners: How To Manage A Project From Start To Finish
You don’t have to be a project manager to be “doing” project management. Whether you’re a freelancer, an in-house manager, or someone who’s just stepped into a manager’s role, learning about the basics of project management will help you manage your work better.
In this article, you’ll learn how to plan and manage a project from start to finish. Specifically, you’ll learn:
- What is project management?
- Importance of project management
- Roles & Responsibilities within the project teams
- Phases of a project’s life cycle
- Project management methodologies
- Steps involved in the project management process
- And, project management tools
Project Management Basics
Before we look at the steps involved, let’s first understand the basics of project management.
What Is Project Management?
Project management is the process by which a project is planned, tracked, controlled, and reported. Each project has a specific start date and end date. In addition, a project produces a specific deliverable.
Proven project management processes help move a project towards completion. These include:
- Planning & scheduling
- Resource management
- Risk management
- Task management & monitoring
Project managers are responsible for planning and executing a project along with the project team to produce the desired deliverable and meet stakeholder expectations.
You might also like » 10 Proven Project Management Tips For Small-Team Project Managers
Why Project Management Is Important?
According to PMI, organizations that do not value project management report 67 percent more projects as failed . Also, the same report finds that poor project management results in an 11 percent wasted investment.
With so much at stake, following proven project management practices should be a no-brainer. Here are the reasons why project management is important:
- Ensures an alignment between the team and the delivered value.
- Provides leadership and direction to projects.
- Ensures smooth communication between the project team and clients.
- Creates a roadmap for executing projects and meet business goals.
- Improves planning by providing realistic work estimates.
- Ensures that a project stays on schedule.
- Extracts learning from past projects.
- Reduces risks in delivering the project.
Project Management Roles And Responsibilities
A project does not happen in isolation. You need people to execute a project. And, these people need to play a well-defined role.
Let’s look at the common roles and responsibilities in project management.
- Team members: Team members are skilled persons who are responsible for executing the project and producing the deliverable.
- Suppliers: Suppliers are often external teams who sub-contract part of a project where internal resources or skilled team members are not available.
- Project manager: Project managers are responsible for planning, tracking, and controlling the project. In addition, they also lead the team members, manage suppliers, and guide the project towards completion.
- Program manager: Program managers are responsible for a set of related projects. One or more project managers report to a program manager.
- Project sponsor: Project sponsors (or account managers) are senior managers accountable for the project deliverables. They’re answerable to a client and also the single point of contact between the team and the clients.
- Project portfolio manager: Portfolio managers manage projects of one or more clients across the organization.
- Stakeholders : Stakeholders are the people that are directly or indirectly affected by the project. Their inputs and feedback are sought to define the project’s deliverables.
- Clients: A project is finally delivered to clients, who, pay for it.
What Are The Four Phases Of Project Management?
Next, we need to understand the four phases that define a project’s life cycle . From start to finish, every project goes through these four phases:
- Initiation phase: This starting phase is all about understanding the goals, scope, risks, and priorities of a project.
- Planning phase: In this phase, project activities and required resources are identified. Also, managers create an estimated timeline required to complete the project.
- Execution phase: Skilled team members come together to turn the project plan into deliverables. Managers track project progress.
- Closure phase: Teams hand over deliverables, analyze project performance and are finally dissolved.
Project Management Methodologies
How you execute these four project phases is up to you and your team. However, over years, project management professionals have come up with tried and tested methodologies that can make life simpler.
Three project management methodologies are popular among teams:
- Waterfall: The Waterfall methodology follows a linear approach to project management — gather detailed requirements, put a plan together, build a solution, test, and deliver it. This method works great when the requirements are clear.
- Agile: The Agile project management methodology follows an iterative approach. Each phase of the project is time-boxed and the complete project features are delivered iteratively. This method works for projects where you want to see quick wins and can be built over iterations.
- Lean: Lean project management is an iterative approach that focuses on reducing waste. The lean methodology tries to reduce three types of wastes: useless activities, overburdened team members, and unevenly distributed workloads.
How To Manage A Project From Start To Finish?
The project life cycle gives you a high-level overview of the phases a project goes through. In practice, there’s a lot more in each of these phases.
Initiation Phase
As discussed above, the initiation phase is all about understanding the project. This involves meetings, discussions, and documentation. However, there’s very little planning that goes into this phase.
High-level role players including clients, client-side stakeholders, project sponsors, and project managers are involved in this phase.
Key steps involved in this phase include:
Step# 1: Identify project goals and deliverables.
A project kickoff meeting starts the project management process. All the high-level role players in the project attend this meeting.
The objective is to identify the project’s goals and deliverables from the clients’ perspective.
At the end of this step, key goals and deliverables are documented.
Step #2. Uncover project risks, constraints, and priorities.
Once the high-level goals are documented, it’s time to identify all the internal and external variables that can impact the project’s progress adversely. These include:
- Risks: Factors that negatively impact the project’s goals, schedule, or budget.
- Constraints: Factors that limit the project’s execution, such as, budget, schedule, or resources.
- Priorities: Factors that impact the order of the project including dependencies between project activities.
Identifying these threats early can help you manage risks and plan your project better.
Step #3. Establish Project Scope
Now that you know all the factors that can affect your project, you can start breaking down the goals and deliverables into activities. Based on the identified constraints in step #2, scope boundaries are set.
Project scope defines what’s included and what’s not included in the project.
It’s critical to document the agreed-upon scope and freeze it mutually with the client before proceeding further.
Failure to do so results in scope creep. Further, scope creep results in over-delivery, poor management, and ultimately project failure.
While you can manage scope creep , it’s best not to let your project’s scope increase during the execution phase.
Step #4. Submit the project proposal
All the information collected in the initiation phase is documented and presented to clients as a project proposal. In addition, the project proposal also includes a high-level budget and timeline, based on the project scope.
Unlike a project plan, which includes a detailed schedule, the proposal includes a high-level schedule.
At the end of the initiation phase, the project sponsor and manager present this proposal to clients. Here’s an example proposal template .
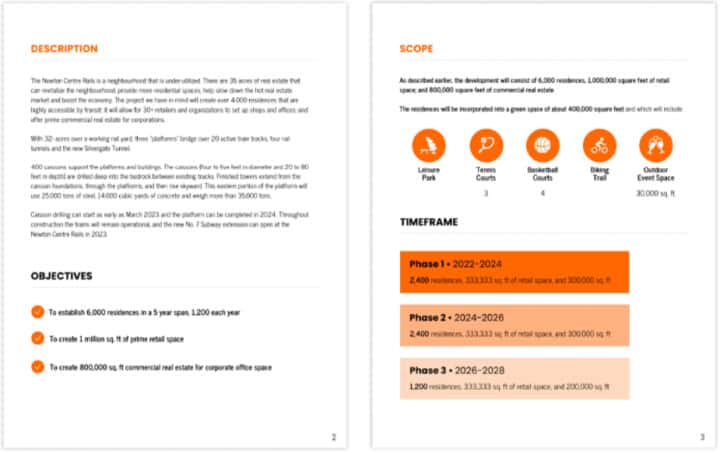
Planning Phase
Once the client approves the project proposal, the project moves on to the planning phase.
It’s important to note that project planning is not a one-time activity in the project’s life cycle. A lot of things can change as the project moves forward. Client goals may change, resources may become unavailable, or estimates may go wrong.
That’s why planning is an ongoing activity that happens throughout the life cycle of a project. As things change, you may need to revisit and adjust your plans accordingly.
A project manager is the main role player for this phase. The steps involved in this phase are:
Step #5. Create a project roadmap
To create a project roadmap , the high-level project activities identified in the project proposal are mapped on the timeline. The project roadmap is presented using Gantt charts .
When creating the project timeline , a project manager needs to consider the risks, constraints, and priorities documented in the proposal. In addition, project managers also need to consider resource allocation .
For larger projects, the timeline is divided into phases. At the end of each phase, the project team delivers some deliverables to the client. The end of a phase marks a milestone . Milestones are checkpoints to evaluate a project’s progress.
A project manager creates a project roadmap and presents it to the client for approval.
Step #6. Create a detailed project plan

Once the client approves the project roadmap, a project manager creates a task-level project plan by breaking down roadmap activities.
Tasks are low-level project activities. Team members take up tasks and are responsible for completing them. That’s why a task must include all the information necessary for a team member to complete the task.
Execution Phase
Once the initial project and resource plan is in place, the project moves on to the execution phase.
This is where the actual work happens. Skilled team members work on the planned tasks and move them from to-do to done.
However, task management is not all that happens in this phase. A project manager also needs to:
- Revaluate and adjust the project plan based on changes
- Communicate the project’s progress
Step #7. Manage tasks and track project progress
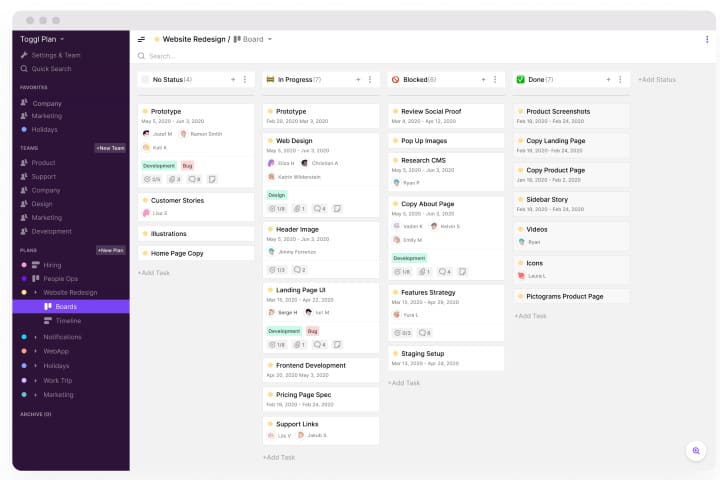
Task management involves managing the task workflow and monitoring task progress.
A task workflow is a sequence of steps where a task moves from planning to completion. Workflows can be simple as To do → Doing → Done. Or, they can involve complex steps as in the case of software projects. As a project manager, you’re responsible to ensure that the team has everything they need to move the task along this workflow.
The second activity a project manager needs to look at is tracking task progress. Delayed tasks can sometimes derail the entire project.
Step #8. Review and adjust the project plan
The project moves towards closure as tasks get done, milestones are achieved, and deliverables are delivered to clients. However, often things don’t go as planned. Estimates go wrong, suppliers miss a deadline, or client priorities change.
That’s why, at least after every milestone, a project manager needs to review the project’s progress. Review resource availability and priorities. And then, adjust the project plan and schedule accordingly.
Step #9. Communicate project progress
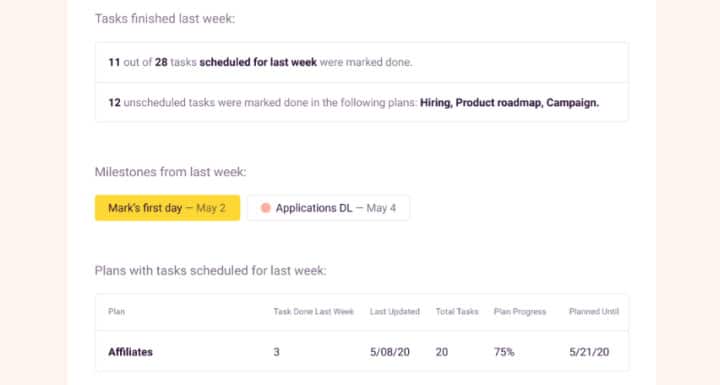
Project managers spend most of their time on task management and reviewing plans. However, they also need to communicate the project’s progress with all stakeholders from time to time.
Typically, the project sponsor does this at the end of a phase or on reaching a milestone.
Keeping clients up to date with project progress helps in the following ways:
- Demonstrates progress to clients and prevents any last stage surprises
- Provides an opportunity for the client to review the deliverables and adjust priorities accordingly
- Acts as an opportunity for the project team to get project feedback from stakeholders and correct the course if necessary
A project manager creates status reports to communicate the project’s progress. This can be a simple email or an elaborate document.
Closure Phase
Finally, after clients are satisfied with the results and sign-off on the deliverables, it is time to close the project.
Step #10. Handoff deliverables, analyze performance and release resources
Activities involved at this stage include:
- Handover of deliverables: The project team hands over the deliverables to clients including documents and manuals.
- Analyze performance: A retrospective analysis of the project’s performance helps the team extract learnings from the project.
- Release resources: The project manager releases team members and other allocated resources back into the resource pool.
The most important responsibility of the project manager here is to analyze the project team’s performance. This is for both — to celebrate the successful completion of the project, as well as, to extract learnings from it.
Finally, team members document the extracted learnings. This helps avoid or manage challenges in other projects.
Project Management Tools & Templates
According to PWC , 77 percent high performing projects use project management software.
Project management software not only helps in managing projects but also handles communication between the team and clients. Capterra found that two out of three project teams use project management software to communicate with clients.
What is the best project management tool?
Choosing a project management tool depends on your budget and your team’s needs.
However, reliability, ease of use, and ease of integration are the top criteria that project leaders use to choose a project management tool.
We’ve compiled a list of top project management software tools spanning budgets and features. Shortlist a few that you like and try them out to find a tool that suits your needs.
Toggl Plan: A Simple Project Management Tool
Toggl Plan is an online project management tool. Unlike other tools, Toggl Plan makes it easy to manage projects across remote teams by encouraging transparency and accountability.
It comes with:
- Gantt chart timelines for creating project roadmaps and plans.
- Team timelines for managing your team’s workloads.
- Kanban-style boards to manage tasks with customizable task workflows.
- Read-only views for clients and stakeholders.
- Notification emails to keep everyone in the loop.
Pricing-wise, Toggl Plan comes with a free plan for solo users that has all the above features. You can use the free plan for unlimited projects and up to five team members. Team plans start at $9 per user, per month.

Jitesh is an SEO and content specialist. He manages content projects at Toggl and loves sharing actionable tips to deliver projects profitably.
Join 30,000+ subscribers getting the best tips on productivity, work management, hiring and more!
We promise we won't spam you and you can unsubscribe anytime.
You might also like...
Related to Project Management
![15 Top Smartsheet Alternatives for 2024 [Full Comparison]](https://toggl.com/blog/wp-content/uploads/2024/02/smartsheet-alternatives-746x394.jpg "how to make a project do")
15 Top Smartsheet Alternatives for 2024 [Full Comparison]
What Is A Project Communication Plan And How To Create One?
6 Key Project Estimation Techniques to Know [2023]
Take a peek at our most popular categories:
- Professional Services
- Creative & Design
- See all teams
- Project Management
- Workflow Management
- Task Management
- Resource Management
- See all use cases
Apps & Integrations
- Microsoft Teams
- See all integrations
Explore Wrike
- Book a Demo
- Take a Product Tour
- Start With Templates
- Customer Stories
- ROI Calculator
- Find a Reseller
- Mobile & Desktop Apps
- Cross-Tagging
- Kanban Boards
- Project Resource Planning
- Gantt Charts
- Custom Item Types
- Dynamic Request Forms
- Integrations
- See all features
Learn and connect
- Resource Hub
- Educational Guides
Become Wrike Pro
- Submit A Ticket
- Help Center
- Premium Support
- Community Topics
- Training Courses
- Facilitated Services
How to write a project plan in 8 easy steps
April 25, 2022 - 10 min read
A project plan is a comprehensive document that outlines the goals, objectives, timelines, and resources needed to complete a project successfully. It’s an essential tool for project managers and team members to monitor the project’s progress and ensure that it stays on track.
In this article, we’ll walk you through the essential steps to write a project plan that meets your team’s needs. We’ll cover how to define the project’s scope , set realistic goals and timelines, identify potential risks and issues, create a project schedule, and monitor and adjust the plan as needed. As a bonus, we’ll share with you the project scheduling template that will help you to start your planning effortlessly.

Step 1: Explain the project to key stakeholders, define goals, and get initial buy-in
The first step in any project is to define the “what” and “why.” Key stakeholders have the influence and authority to determine whether a project is successful, and their objectives must be satisfied. Even if the project comes from the CEO himself, you still need their buy-in.
Use this initial conversation to get aligned, define goals, and determine the value of the project. In this part of the project planning process, discuss needs and expectations and establish a scope baseline, budget, and timeline. This creates a solid base for your project work plan. Consider utilizing a project plan template to get started.
Here are some questions you should consider reviewing with stakeholders:
- How do we write a project plan that aligns with company goals?
- What do stakeholders expect? What will be expected from them?
- How will you measure success?
- What are your resources?
- What assets or deliverables are expected out of this project?

Step 2: List out goals, align OKRs, and outline the project
According to executive leaders, a lack of clear goals accounts for 37% of project failure . Without clear goals, you’ll find that the requirements, tasks, and deadlines you set for your project work plan have nothing anchoring them. Now that you have a list of key stakeholder needs and their buy-in, begin to assign them to goals and OKRs. OKRs are a planning and goal-setting technique made famous by Intel and Google. Your project should align with your team and company’s OKRs.
Try writing down the project goals on a project plan board and connect them to the stakeholder requirements they address. From there, build out the structure, milestones, and tasks it takes to reach those goals. For example, the project or product launch itself can be a big milestone, so it's important to know how you will go about it — perhaps you'll use a product launch plan template to make the process easier. Milestones can define check-in points throughout the project so that everyone is clear about what progress looks like, what the expectations are, and when they’ll be measured.
Step 3: Create a project scope document
Now that you have the project outlined, your tasks aligned with goals, and buy-in from the team, it’s time to create a project scope document detailing the project elements you’ve listed in step two.
Look at each deliverable and define the series of tasks that must be completed to accomplish each one. For each task, determine the amount of time it’ll take, the resources necessary, and who will be responsible for execution. Finalize and record the project details so that everyone has a single source of truth. Make the document easily shareable, like in your project management tool , to reduce the chance of costly miscommunication.
While preparing project scope documentation and calculating earned value should be standard practice, one in four project managers surveyed in Wellingstone's State of Project Management Survey said they “never” or “sometimes” prepare standard scoping documents. Creating one ensures you stand out from the crowd and helps everyone stay on the same page.
Step 4: Craft a detailed project schedule
With your goals, tasks, and milestones already outlined for you, it’s time to start plugging your project into a schedule. A Gantt chart is a handy tool that helps you visualize your project timeline easily. It’s an interactive timeline that gives you a complete view of the project’s progress, work scope, and dependencies.

Dependencies are tasks that need to be completed before other tasks can begin. As you plot out tasks, use subtasks to help you break up larger ones into smaller ones. This can make reporting (you can check out our guide on how to write a project management report !) and resource management easier. Let’s define each:
- Tasks: The individual tasks that people need to carry out to achieve your goals
- Subtasks: No longer than a few days each, these help you break a larger task into the smaller steps
- Milestones: Major phases or events in your project that help break up the project and act as check-ins throughout the project life cycle
Pro tip: Want in on a little secret? As you set them up, add cushions to key tasks so that you have wiggle room for fire drills or unexpected bottlenecks — for example, if a client needs extra time to review or a team member calls in sick. In a perfect world, some tasks might take a day. So maybe you make it two in your plan. There's no need to give every task a cushion, though — weigh the risks and add them where it makes the most sense. Future you will thank you.
Step 5: Define the roles, responsibilities, and resources
Resources are the people, equipment, or money needed to complete a project. Once you’ve selected your tools and gotten a budget, don’t forget about your people. Even folks who already know how to write a project work plan and have done so a hundred times can underestimate their labor needs.
A RACI chart helps you determine who will do what for your project. It's a matrix of all a project’s tasks, paired with who's responsible (assigned to complete the work), accountable (has yes/no/veto power), consulted (needs to approve or contribute), and informed (needs to know about the action or decision).

As you begin to assign tasks, make sure you take bandwidth into consideration. Clarify the responsibilities and expectations of each person. Keep in mind that 95% of workers report working on more than one team or project concurrently, and if projects aren’t aligned, workloads become too stressful for teams. Stress causes about 50% of workers to start looking for another job and 25% to quit their current jobs altogether, according to our report on The Stress Epidemic .
As you plan your project, consider how you’ll filter incoming requests that impact the project’s timeline or budget . Knowing how to calculate earned value to monitor the level of work completed on a project against the plan is imperative. For project managers, tools like Wrike's resource management can help you visualize the tasks for your project from a team workflow perspective, giving you the visibility and flexibility to balance workloads.
Step 6: Define the communication and check-in process
According to McKinsey , employees spend nearly 20% of the workweek searching for and gathering information. Inefficient communication and collaboration are two of the top causes of stress in the workplace . When stakeholders have to dig through pages of emails or constantly ask for updates, they get frustrated, and their motivation dips.
Mitigate frustration by housing all project pieces — like assets, conversations, tasks, due dates, updates, and reporting — in a single location, like a collaboration tool . This makes it easy to manage clients, track progress, share updates, and make edits. Define how everyone should communicate throughout the project and keep it in one tool so everyone can access information.

Step 7: Plan for it not going as planned
Even if you’re an expert and already know how to write a project plan , the truth is that all projects have twists and turns — that’s what makes them fun. You’ve given yourself some breathing room during the scheduling process, ensured everyone knows their role, and set up communication.
Before you launch, sit down and identify potential issues like upcoming vacations for team members, holidays, or external teams that might be involved. Set up a clear chain of command and list key contacts within the project. Communicate upfront about risks so the whole team can be prepared to tackle them together.
Step 8: Throw a launch party!
Every successful project needs a kickoff. Set a quick meeting with key stakeholders and have a clear agenda. Your goal should be to get everyone on the same page with goals, roles, processes, and timelines. Your agenda should include everything you’ve focused on in the steps above:
- Define the project goals and the value they bring
- List the assets the project is expected to deliver
- Draw the connection between stakeholder requirements and the project tasks
- Show the timeline of the project so everyone can see dependencies and know the expected dates
- Describe the roles and responsibilities of each stakeholder
- Review how and where everyone will communicate throughout the project, where they can go for information, and who to call for questions
- Discuss risks and ensure the team is prepared
- Get that final commitment!
Bonus tip: You don’t have to start from scratch every time! Now that you know how to write a project plan that jives with your team, you can copy your project plan into a template to use again and again. As you grow, you can create multiple templates for specific types of project work plans. Let’s get you started right away with these free sample project plan templates .
Getting to “The End”
Looks like your weekend is saved! You’re welcome. You’re now empowered with the project planning process, and after this, you’ll have a simple project plan template to help you lead your next project to success — and the next one after that. In fact, all these complex projects will become so easy that you may start to feel like you’re on vacation. Right?
How to use Wrike for project planning
Wrike offers a range of powerful features and templates to help you plan and execute your projects more efficiently. With Wrike, you can create a project plan that covers all the essential aspects of your project.
Wrike’s pre-built project scheduling template provides a customizable framework for creating a project schedule. This template helps you set realistic timelines, identify potential risks, and assign tasks to team members, so you can create a clear, actionable project plan that helps your team stay on track and ensure on-schedule delivery.

Laura Quiambao
Laura is a former Senior Content Marketing Manager of Wrike. She has a passion for using stories to share helpful tips, best practices, and insights. When she’s not writing, she enjoys rock climbing, disc golfing, traveling, and cooking with her husband.
Related articles

Scrum vs. Kanban Board: Which One Is Better for Building a Project Plan?
There's a lot of confusing project management jargon thrown around these days. We compare Scrum with Kanban Boards to determine the best methodology to plan your project.

5 Reasons Why Project Work Plans Fail and How to Avoid Them
Leading projects at work can be daunting, set your next one up for success by learning the 5 reasons why project work plans fail & how to avoid them.

7 Mission Critical Things to Consider When Building Your Project Plan
You’ve just been put in charge of a big project. Before it starts to spiral into chaos, you need to introduce some structure and order — fast. What you need is a project plan.

Get weekly updates in your inbox!
You are now subscribed to wrike news and updates.
Let us know what marketing emails you are interested in by updating your email preferences here .
Sorry, this content is unavailable due to your privacy settings. To view this content, click the “Cookie Preferences” button and accept Advertising Cookies there.
Project Management
12 minute read
How to Create a Project Management Plan (Step by Step)

Devan Ciccarelli
Facebook Twitter LinkedIn WhatsApp Email
Here’s how to create a project management plan, even if you have zero experience doing so.
Whether you’re a newly hired project manager or one who’s been slaying the game for years, having the right plan in place is essential to the success of your project. After all, when you have everything outlined and neatly organized, you’ll score a much better chance of managing a project that runs smoothly from start to finish.
Bad news: It’s this step, actually creating the plan, that trips many managers up. Fortunately, with the help of today’s article, you won’t fall into that trap. I’ll show you everything you need to know about how to create a project management plan so you have a roadmap to run with.
We’ll cover how to:
Step 1: Identify the goal of the project
Step 2: map out the scope, step 3: develop an outline or plan, step 4: share this initial idea with your team, step 5: finalize your plan.
- Step 6: Use a Gantt chart to keep things organized
Step 7: Distribute your project management plan
Step 8: hold a project post mortem.
So let’s jump right in.
Want to learn more?
Take your project management skills to the next level with our comprehensive (and free) ebook!
How to create a project management plan
Follow these eight steps to build a solid project management plan from the ground up:
To build anything of substance, the first step you’ll want to tackle is creating the right foundation.
Ask yourself these questions to lay the groundwork:
- Why are you creating this project?
- What’s the goal of it?
- How will this affect your stakeholders?
- What about your team?
And to help you answer those, make sure you do the following:
Research and homework
- You may already have a good idea of why you’re creating this project, but it’s essential to back this up with research.
- How is your company doing things right now? What’s working? What doesn’t work?
- Are there enough resources available? What else is needed?
- Figure out the real the problem at hand and gain a deep understanding of the current mechanics before you try to improve them.
Meet with your team for feedback
- Meet with anyone who could be involved in this project during this stage. Before narrowing things down, be sure to speak with any employees who will be involved in this project.
- You need to see things from their perspective so you have all your ducks in a row when it comes time to introduce the plan to your stakeholders.
- Once that’s taken care of, you can then meet your stakeholders with confidence.
Figure out who is a stakeholder
- Sure, you may have a Board of Directors or some other stakeholders involved, but don’t forget, those aren’t the only people to consider.
- Your customers and employees may also be stakeholders in this project.
- In short, anyone who could be affected by these changes is a stakeholder and must be considered as such.
- After you nail down your “why” and meet with both your team and all prominent stakeholders, you’re ready to set your priorities and goals.
Identify priorities
- Before you dive into your goals, consider your priorities first. What is more important here? What can take a backseat?
- Identify your priorities before moving on to finalizing your goals.
Set clear goals
- Once you’ve tackled all of that, you’re ready to set specific, measurable goals.
- These goals serve as the foundation of your project management plan so it’s crucial that you spend enough time figuring them out before moving on to the rest of our steps.
You’ll need to answer:
- What are you hoping to achieve here?
- How will you measure that?
- What’s considered a success?
With that important information nailed down, you can then map out your project’s scope.

If you were to compare your project management plan to building a house, your first step is the concrete foundation.
This next step is the blueprint for how things will get done and what your project will look like once it’s in motion.
So answer these next questions before proceeding:
What is your budget?
- Before you create an elaborate project scope that’s out of reach, you need to consider your budget first. And I’m not only referring to your financial investment here.
- You must also take into account your other valuable resources, such as time and manpower. How much of these can you afford to use?
- Outline your budget in terms of financial investment, time, and resources needed. Only then will you be able to create a realistic project scope, which is also your next step.
What is your project scope?
- As with setting goals, it’s important to stretch your project to the right limits. You don’t want to go so far that your team can’t reach its targets, yet you also don’t want to create a project that doesn’t accomplish much.
- To help strike the right balance, create a project scope that is crystal clear and outlines all of the details — both big and small.
- Your project scope should also include your deliverables and the deliverable schedule .
- For more on keeping your project's scope within bounds, check out our definitive guide to scope creep .
What are your deliverables?
- Everyone on your team should know what needs to be delivered and when. By spelling this out in your project scope, you’ll do just that.
- Not only does this deliverables list create a workflow everyone can follow, it also helps keep everyone on track.
- You’ll also show stakeholders or clients what they can expect, which naturally builds accountability into your project management plan.
- So when you account for all the deliverables you’re responsible for, your next task is to plot out your deliverable schedule.
What is your deliverable schedule?
- It’s crucial that you don’t over promise during this step. Do that and your team will be left scrambling throughout the project and your deliverables will suffer in quality.
- A better approach is to use the research you conducted in step 1 to hone in on a realistic delivery schedule.
- If your research uncovered that the task takes 2 weeks to complete, it’s not a good idea to only give your team a few days and hope everything somehow falls into place within a shorter time frame.
- It’s also smart to add a buffer to any areas you’re not sure of, just to be safe. This gives your project and your team the breathing room needed to get the job done correctly.
- If you’re worried that your stakeholders will be concerned about the amount of time needed, reassure them that to do the job right the first time, it needs to take that much time. Otherwise you’ll be stuck re-working things for months to come.
- Now that you have all of this sketched out, you’re ready to create the first draft of your project plan.
Your next step is to create an outline and plan of action based on everything you’ve learned so far.
While this is only a first draft at this point, it pays to finalize as much as you can (as if it were the real thing) so you can avoid multiple rounds of revisions.
In this outline, include the project’s:
- “Why”
- Stakeholders
- Deliverables
- Deliverable schedule
You should also include a page about your research to highlight your biggest key findings and discuss how they inspired your project management plan.
Polish up your document, add some branding elements, and you’ll be ready to share it with your team.
Before you get too excited and send your document to every one of your stakeholders, you need to finalize it with your team beforehand.
This step is one that many project managers overlook for time’s sake — and it’s a crucial and costly mistake.
When there’s a disconnect between the initial plan and how the work is implemented, you’re going to face several snags along the way.
You’re better off finalizing this draft plan with your team before it gets to the approval stage.
This ensures that your project will run as smoothly as your dreams.
So in this stage, hold a kickoff meeting to:
- Explain the ins and outs of the project
- Let your team know what’s expected of them and when
- Work out any kinks that may come up
It’s especially important to pay attention to that last point.
No matter how hard you try to cover all of your bases, hiccups will inevitably surface in any project.
But with proper planning, you’ll minimize problems as much as humanly possible. I’ll touch more on this next.
Using the feedback from your team, you’re ready to finalize your plan.
This official plan will be the one you’ll send to stakeholders so it’s important to take your time here.
You should also add a section about any issues that may come up, including how you plan to handle them.
While it may seem counterintuitive to highlight possible hiccups to your stakeholders, you’ll be showing them that you’re taking a proactive, instead of reactive, approach. This foresight is always appreciated.
It’s also ideal to assign roles during this phase of the project plan so stakeholders know how to get in touch with your points of contact during each step.
The best way to display this type of information, both internally and externally for stakeholders, is through a Gantt chart.
Step 6: Use a Gantt chart to keep things organized
If you have Excel, you can use this free Gantt Chart template to create a timeline of deliverables.

This helpful tracker ensures that both your team and stakeholders know what to expect and when.
As the project unfolds, keep this updated throughout the day so anyone can see where your project presently stands.
Once you’ve finished creating your project management plan and created a timeline using a Gantt chart, you can finally share your plan with everyone.
When your plan is ready to send out to stakeholders and everyone else on your team, you’ll be able to answer questions and start putting your plan into motion.
To stay on track, plot out the big milestones first and then how you plan to achieve each one using smaller targets, such as daily, weekly, or monthly goals.
After that, you’re simply managing deliverables and your team. Easy peasy.
Now, before you use this template again on your next project, conduct a project post mortem as I’ll show you next.
This is similar to a kickoff meeting except that it happens after a project has finished.
I spoke in depth about the topic in this guide so I’ll keep things brief here. If you need more help, check out that guide when you’re done reading this one.
With a project post mortem, your goal is to find out how your project went from start to finish, including any bumps in the road you experienced.
- Did you run on schedule?
- If there were any milestones missed, what caused the delay? Can that be prevented for the next one?
- Are there any other issues you ran into?
You should also compare how your results fared with your initial plan.
By taking this time to reflect, you’ll all but guarantee that your next project doesn’t fall victim to the same mistakes.
You also want to highlight what went well and give your team the kudos they deserve for a job well done.
This will help keep the positive momentum moving right into your next project.
Jot down everything you discover here so you can use this intel to improve your next project management plan.
Create your project management plan now
Don’t let the thought of creating a project management plan from scratch stress you out.
Follow these 8 steps and you’ll have everything you need to make your project a success starting today!
Want to brush up on your project management skills? Check out the Project Management Basics and Project Management for Team Members courses to get a solid foundation in how to better manage your projects.
Prepare to get certified in project management
Start learning today with GoSkills courses
Loved this? Subscribe, and join 451,608 others.
Get our latest content before everyone else. Unsubscribe whenever.

Crafting fluff-free content is Devan’s jam. When she’s not writing for GoSkills, you’ll find her outside reading, soaking up the sun, or hiking her next adventure.

Recommended
How Can AI Enhance Project Management?
These 7 applications of artificial intelligence can lead to greater productivity and project outcomes.

10 Strategies for Managing Multiple Projects (+Practical Solutions)
Get practical suggestions from the experts on how to make managing multiple projects a breeze.

Project Management for Travel Agencies: The Ultimate Guide
Project management is crucial for travel agency success. It is vital for travel agents at all levels to master project-based work.
© 2024 GoSkills Ltd. Skills for career advancement
- EXPLORE Random Article
How to Make a Project Plan
Last Updated: October 4, 2023 References
This article was co-authored by Ksenia Derouin . Ksenia Derouin is a Business Strategy Specialist, OBM, and Artist based in Grand Rapids, Michigan. With over ten years of professional experience, Ksenia works with wellness and social impact sector solopreneurs and organizations to support their business strategy, operations, marketing, and program development. Her mission is to support business owners in building thriving businesses and creating impact so that they can achieve a sense of purpose, career fulfillment, and financial independence. This article has been viewed 19,731 times.
A good project plan allows you to present a complete picture of your plan to stakeholders, including the timeline, workflow, and cost estimate. Keep reading to learn more about the in-depth information you should include in your plan!
Organizing the Project Workflow

- The project sponsor is the person or business that provides the funds for the project. They usually own the end result. Usually the sponsor has to sign off on all big decisions.
- The management team are the ones who oversee the project. Usually each member of the management team heads a division that carries out specific tasks to complete the project.
- End users are people who will use the project when it's finished. Visitors to a building, for example, are end users. You usually don’t meet with end users, but you should take their potential concerns into account while planning the project.

- Speak with the project sponsor to understand their expectations and work out the project goals. Begin by consulting with them.
- Meet with the management team before drawing up concrete plans to understand the budget, timeline, necessary resources, and risks of the project. If the managers bring up any concerns about the project, take them seriously. They are the ones who have to carry the project out and can identify potential problems.

- For instance, a project scope could be building a new luxury apartment building. All the subsequent planning will build towards this end result.
- Make sure the project scope is feasible. For example, if a sponsor wants to travel to Mars next year, this is probably not a manageable scope. Talk with the sponsor and inform them of what is currently possible, and then work out a scope you can meet.
- If the sponsor is not entirely sure what the intended scope for the project is, help them work it out. Speak with them and the project managers to come to a conclusion on what the end result should produce.

- If the goal is building an apartment building, important milestones would include purchasing the land, getting the building permits, laying the building foundation, constructing the frame, and so on until the building is completed. Identify all necessary milestones like these.
- List the milestones in the order they have to be done. For example, you can’t lay the foundation until you have construction permits. Keep your project flow organized like this.

- Part of this workflow is making sure people aren’t bothered with problems that aren’t in their department. For example, the person responsible for landscaping around the building doesn’t need to know if there was an issue with the phone lines in the building, so they shouldn’t be contacted if such a problem occurs.
- Plan on writing this communications workflow in your project plans so all participants know who to contact if they need information.
Researching the Budget and Schedule

- If one milestone is “Lay the building foundation,” there are many substeps involved there. You have to contact potential contractors, get price quotes from them, choose a company, excavate the land, pour the concrete, and so on. Account for each of these substeps when making your estimate.

- If you're calculating the cost for the "Lay the foundation" milestone of an apartment building, the costs to account for include the price of concrete and other materials, the permits for pouring concrete, and the labor cost for the work. Research the average cost of each step to develop a cost estimate. Use the most up-to-date information you can find so your figures are accurate.
- If your company has analysts who have worked on these projects before, consult with them on these costs. It’s their job to account for project costs.
- Break your cost estimate into several different forms. Draw up a total project cost, cost per milestone, and cost per month or quarter. Project sponsors need this information to adjust their expectations and financing.

- For example, a new building requires construction permits. This means that no work can start until you get these permits, and all other steps are dependent on this step.
- Once construction starts on an apartment, you can’t start wiring the building until the foundation is constructed. However, you can start doing the landscaping outside while you wire the building, so these two tasks aren’t dependent on each other.

- Take the planning stage into account as well. For instance, building permits in your city may take 6 months to process. That means no construction can start for at least 6 months.
- While you're waiting for the permits, however, you can start negotiating with construction companies. Then when the permits come through, all the agreements are in place for work to start. Identify steps like these than can happen simultaneously to speed the process.
- When estimating project timelines, it’s often best to overestimate a bit. This way you have breathing room if there are any unexpected problems.

- For example, if you’re planning a building project, one potential risk is the price of raw materials going up and impacting the project budget. You might propose that working fast is the best option for avoiding this risk. Alternatively, you could propose buying certain materials ahead of time and storing them so the project doesn’t encounter unexpected price increases.
Presenting Your Project Plan

- Use clear, simple language when explaining your plan. Avoid jargon as much as you can so there are no miscommunications and everyone is on the same page.
- Clear statements like, "I will show you the three ways that this plan accomplishes our project goals," convey your message best.
- There are many options that can help you formulate your project plan and present it in a visually attractive way, helping with comprehension. For instance, you could present it like a Gantt chart to help stakeholders have a complete vision of the project.

- You don’t have to go through every calculation you made. Start by presenting the estimate for each milestone, and give a summary of how you reached that conclusion. If anyone wants more information, be prepared to go into more detail.
- Be concise and direct when explaining the budget. For example, state, "I've calculated a total budget of $15 million for this project. This includes $7 million for material costs, $1 million for permits, $5 million in labor costs, and $2 million in land purchases. I developed these estimates by researching the normal expenses for construction in this area last year. I'm happy to explain these calculations further if anyone wants more detail."

- If your team has a shared cloud folder or uses a communication software, upload the plan here. Also print off some paper copies to bring to the meeting.
- Your stakeholders may want a summary of the information without the entire report. Provide a handout that hits all the major points in your plan.

- Stating, "I'm confident that I've been comprehensive with this project plan, but I welcome any feedback or suggestions," shows that you're happy with the plan you produced but are flexible enough to work with a team as well.
- Take concerns from project managers seriously. They are the ones who have to carry the project out, and if they think one of your estimates is unrealistic you should consider revising it.
How Can You Become a Project Manager?
Community Q&A
You Might Also Like

Expert Interview

Thanks for reading our article! If you’d like to learn more about making a project plan, check out our in-depth interview with Ksenia Derouin .
- ↑ https://www.projecttimes.com/articles/10-steps-to-creating-a-project-plan.html
- ↑ https://www.pmi.org/learning/library/milestone-different-planning-approach-7635
- ↑ https://www.projecttimes.com/articles/the-project-plan-how-much-detail-is-enough.html
- ↑ https://pm4id.org/chapter/11-1-defining-risk/
- ↑ https://www.usability.gov/how-to-and-tools/methods/kick-off-meeting.html
About this article

Did this article help you?

- About wikiHow
- Terms of Use
- Privacy Policy
- Do Not Sell or Share My Info
- Not Selling Info
- Get started
- Project management
- CRM and Sales
- Work management
- Product development life cycle
- Comparisons
- Construction management
- monday.com updates
What is a project plan and how to write a project plan in 6 steps
A project plan is an essential document for keeping your project on track. It states the purpose of your project and identifies the scope, structure, resources, goals, deliverables, and timelines.
Without a solid plan, projects typically get delayed and run over budget.
In this high-level guide, we’ll show you how to write a project plan in six steps and share five monday.com templates to get you up and running quickly. But first, let’s define a project plan and its various components.
What is a project plan?

A project plan is a formal document that outlines an entire project’s goals and objectives, specific tasks, and what success looks like.
In addition to setting the purpose of your project, it should include other materials and deliverables relevant to the project, such as:
- Timelines and Gantt charts for key milestones — like start and end dates, getting your 200th customer, or launching an event or app.
- Communication plans — to keep everyone informed of progress, achievements, and potential roadblocks.
- Work breakdown structure — especially if you have multiple team members working on different or simultaneous tasks, in which case, you may also need a Project Planner .
- Resources needed to complete the project — like project management tools , cash, freelancers, and more.
In short, your project plan serves as a central hub to define, organize, prioritize, and assign activities and resources throughout your project’s life cycle.
What is project planning?
Project planning is the second phase in the project management lifecycle :
- PHASE 1: Project Initiation — where you identify a business need or problem and a potential solution.
- PHASE 2: Project Planning — where you define specific tasks, assign responsibilities, and create the project schedule.
- PHASE 3: Project Execution — where you touch base with resources, monitor the timeline and budget, and report back to stakeholders.
- PHASE 4: Project Close-out — where you review the success of the project.
During the project planning phase, you extend the project charter document from the initiation phase to create your detailed project plan. Typical tasks within the project planning phase include:
- Setting a budget.
- Defining a project schedule or timeline.
- Creating work breakdown structures.
- Identifying resources and ensuring availability.
- Assessing any potential roadblocks and planning for those scenarios .
- Defining project objectives , roles, deadlines, responsibilities, and project milestones .
Project plan elements
Here’s how a project plan differs from other project planning elements.
Project plan vs. work plan
Although similar, work plans are not as comprehensive as project plans. A work plan focuses on helping project teams achieve smaller objectives, whereas a project plan provides a high-level overview of an entire project’s goals and objectives.
Project plan vs. project charter
A project charter provides an overview of a project. It’s a formal short document that states a project’s existence and authorizes project managers to commence work. The charter describes a project’s goals, objectives, and resource requirements. You create it in the project initiation phase before your project plan and present it to key stakeholders to get the project signed off.
Project plan vs. project scope
Part of your project plan includes the project scope , which clearly defines the size and boundaries of your project. You document the project scope in three places: a scope statement, work breakdown structure (WBS), and WBS dictionary. It serves as a reference point to monitor project progress, compare actual versus planned results, and avoid scope creep.
Project plan vs. work breakdown structure
A work breakdown structure (WBS) is a hierarchical outline of the tasks required to complete your project. It breaks down large or complicated goals into more manageable tasks so you can execute the project plan. The WBS breaks down the project scope into phases, subprojects, deliverables, and work packages that lead to your final deliverable.
Project plan vs. agile project
An agile project is the opposite of a traditional project plan. Agile projects use an incremental, iterative approach to deliver a project, whereas traditional projects — also known as a waterfall approach — use a cascading, step-by-step planning process. Agile projects are synonymous with software development teams, but you can use them in any field.
Why are project plans important?
Over a third of all projects experience something called scope creep . This is where the team ends up doing more work than originally planned. Much of this can be avoided by accounting for unexpected hold-ups or changes in circumstances within your project plan. A project plan also makes it easy to pinpoint when problems arose, so you can be better prepared for future projects.
If you look at the numbers related to project management, it’s easy to understand where a project management plan could have a positive impact— 45% of projects aren’t completed on time, and 38% of projects are over budget.

A project plan can help to curtail wily overspending and late turnaround by identifying these issues early. This leaves no room for confusion and delays in the workflow and progress of your projects.
How to create a project plan in 6 steps
There are no hard-and-fast rules for a project plan. However, we recommend you use the following six steps as a springboard for creating one.
1. Start with an executive summary
The executive summary goes at the beginning of your project plan and should summarize the key points of the project plan . It should restate the purpose of the project plan, highlight the major points of the plan, and describe any results, conclusions, or recommendations from the project.
Even though it is at the beginning of your project plan , it’s something you will write last , as you’ll be pulling out the main points from the rest of your plan.
It should be no longer than a page, offering a brief overview of:
- The project objectives and goals
- Your chosen project methodology/framework
- The final deliverables and acceptance criteria
- Key scope risks and countermeasures
- Summary of milestones
- An overview of the project timeline and schedule-based risks
- Resource and spending estimates
This snapshot of your project makes it easy for key stakeholders who aren’t actively involved in the mechanics of the project to understand it. For project managers, the executive summary serves as a quick reminder of the key project goal, scope, expectations, and limitations. Since almost a third of projects don’t meet their original goals, it’s important that project managers review the project plan regularly to stay on track.
2. Define the project scope
There are few things worse than starting on a project only for it to balloon. By defining a project’s scope , you set the boundaries for a project’s start and end dates as well as expectations about deliverables and who approves requests—and what merits approval— throughout a project.
It also involves outlining the potential risks associated with meeting these expectations and providing countermeasures to mitigate these risks. Identifying exactly who’s accountable for tracking these risks is essential.
This step will help you prevent scope creep, or how a project’s requirements tend to increase over a project lifecycle. Organizations complain that 34% of all their projects experience scope creep, yet only 52% of organizations go to the effort of mostly or always creating a scoping document every time.
3. Structure your project
There are several frameworks you could use to guide your project and this will affect your workflow’s organizations and how deliverables are produced and assigned.
For example, if you’re using the waterfall framework , you’ll be planning everything in advance, working through each stage of development sequentially, and specialized task owners executing their work at a defined time.
Remember that creating too many dependencies within your project structure can negatively impact success, so try to work out ways that teams can work autonomously to achieve deliverables in a timely manner. It’s also good to consider how many approvers are needed to maintain order but also to prevent bottlenecks.
Above all else, it’s important to incorporate set times for team knowledge-sharing, so your projects can be more successful. Make a note of the communication structures you’ll use to encourage collaboration .
4. Check what project resources you have available
Define the resources you have available for this project:
- Physical resources
You need to be precise when you’re assessing what you’ll need, otherwise you’re baking a cake with all the wrong ingredients. A resource manager or project manager can lead this.
As an example, when teams have the right highly skilled people, projects are 30% more likely to succeed. Yet, a third of people don’t believe their teams have all the right skills for the project—a recipe for failure.
The quantity of team members is also important—if the ratio of work to available people is off, efficiency and quality will suffer. If you want to effectively allocate your resources to meet expectations, you’ll need to be realistic about resource limitations.
This may, for example, mean adjusting timescales if you’re short on staff or increasing your budget if you need more specialist equipment.
5. Map out your project timeline
Organizations that implement time frames into project plans are more likely to succeed. Despite this, 52% of projects don’t always set baseline schedules. That’s probably why 45% of organizations say they rarely or never complete successful projects on time.
In this sense, it’s wise to add a project schedule section to your project plan. This part of your plan should set expectations on when you’ll deliver and how you’ll stick to your project timeline.

Your project schedule will look a little different depending on which framework you choose.
The tasks that you have a ‘Work in Progress’ (WIP) will depend on your team’s capacity. In this section, you should set your maximum number of WIPs you can have in each column at each time.
6. Manage your project changes
Organizations put change control in their top three project challenges. If you don’t solidify a change management plan , your team will be clueless about what to do when unplanned change hits. A dynamic change management plan will outline the steps to follow and the person to turn to when unforeseen changes occur.
A key part of this is having a change management tool in place. And monday work management is flexible enough to help you manage all parts of the project life cycle — from planning and monitoring to reporting and resource management. Let’s take a look at a few of our templates that can help you get started.
5 project planning templates to help you write a good project plan
monday.com templates can be lifesavers when it comes to visualizing each section of your project plan, and they make it easy to get started. Try these 5 project plan templates to kickstart your project planning process.
1. Project Plan Template
Looking for a general project plan template? Try one of our project plan templates .

Using this highly visual template by monday.com, you can structure your subprojects by set time periods and allocate accountable personnel to each phase.
Prioritize each project and add a timeline to show when deliverables are expected.
2. Resource Utilization Template
Resource management allows teams to focus on executing tasks, projects, and processes efficiently and achieve shared goals at scale.

You can allocate resources to individuals and tack on timescales so your staff knows what resources they’re responsible for in which phase. Adding a location makes it easy for teams to know where to hand over resources as they transition from one phase to the next—and they can check this on our mobile app.
Use the Workload view to manage your team’s time proactively and get an overview of the workload and capacity of each person on the team.

3. Project Cost Management Template
It’s far easier to plan a budget when you can see all your costs in one place.
That’s why this Project Cost Management Template from monday.com is so incredibly handy.

Add each subproject and plan out projected costs, allocating totals to each department. You can use the document to estimate the budget you’ll need and to record your approved project budget. You can then use our dashboards or reports to see the information in a different, more colorful way.
4. Project Timeline Template
Plan out your schedules with this Project Timeline Template .

While this dashboard isn’t really suitable if you’re working with the Kanban framework, it’s ideal for those operating under Waterfall or Scrum frameworks.
For Waterfall projects, add in your milestones, attach a timeline, and allocate a set number of workdays to complete the tasks for each milestone.
Tag the team leader for each phase so project managers know which milestones they’re responsible for.
During project execution, teams can use the status bar to track progress. They can also add updates to each milestone by clicking on each item, which encourages inter-team collaboration.
For Scrum projects, you can organize the dashboard by Sprints, adding in the specific tasks as they’re decided.
5. Program Risk Register Template
Visualize all your project scope and schedule risks in this Program Risk Register Template .

Use color-coded status bars to illustrate risk status, risk probability, and risk impact for your project scope and schedule.
You can even categorize risks, add a risk owner, and suggest mitigation strategies. That way other project team members know what to do if these risks start to blossom into real glitches.
Optimize your project management plan with the right tool
Project plans are an essential part of your team’s success.
While they are detail-oriented and complex, creating one and managing it shouldn’t be a struggle. Use monday.com’s pre-built planning templates to help you break down each section of the plan as you go and monitor everything in real-time.
Try monday work management, and see for yourself how much smoother your next project will run when you can consolidate all your project planning materials in one place.

- PRO Courses Guides New Tech Help Pro Expert Videos About wikiHow Pro Upgrade Sign In
- EDIT Edit this Article
- EXPLORE Tech Help Pro About Us Random Article Quizzes Request a New Article Community Dashboard This Or That Game Popular Categories Arts and Entertainment Artwork Books Movies Computers and Electronics Computers Phone Skills Technology Hacks Health Men's Health Mental Health Women's Health Relationships Dating Love Relationship Issues Hobbies and Crafts Crafts Drawing Games Education & Communication Communication Skills Personal Development Studying Personal Care and Style Fashion Hair Care Personal Hygiene Youth Personal Care School Stuff Dating All Categories Arts and Entertainment Finance and Business Home and Garden Relationship Quizzes Cars & Other Vehicles Food and Entertaining Personal Care and Style Sports and Fitness Computers and Electronics Health Pets and Animals Travel Education & Communication Hobbies and Crafts Philosophy and Religion Work World Family Life Holidays and Traditions Relationships Youth
- Browse Articles
- Learn Something New
- Quizzes Hot
- This Or That Game
- Train Your Brain
- Explore More
- Support wikiHow
- About wikiHow
- Log in / Sign up
- Education and Communications
How to Create a Successful Project (for School)
Last Updated: November 28, 2023 Fact Checked
This article was co-authored by Kim Gillingham, MA . Kim Gillingham is a retired library and information specialist with over 30 years of experience. She has a Master's in Library Science from Kutztown University in Pennsylvania, and she managed the audiovisual department of the district library center in Montgomery County, Pennsylvania, for 12 years. She continues to do volunteer work for various libraries and lending library projects in her local community. There are 8 references cited in this article, which can be found at the bottom of the page. This article has been fact-checked, ensuring the accuracy of any cited facts and confirming the authority of its sources. This article has been viewed 553,804 times.
School projects can come in a variety of forms, and the exact process you'll need to create a successful one will vary from project to project, subject to subject, and class to class. However, some general steps and best practices can help you tackle any project on your plate more successfully. You'll need to pick a topic and plan out your project. Next, you'll need to do some research. Finally, you'll need to put everything together in your final project.
Deciding on a Project

- For instance, maybe your assignment is "Create a visual representation of the US Civil War. You can pick one battle, one idea, one speech, a defining moment, or focus on the war as a whole. Make sure to include relevant dates and people in your representation."
- You can break this down into parts: 1) Make something visual about the Civil War. 2) Choose a focus. 3) Include relevant dates. 4) Include relevant people.

- Try freewriting. Take out a sheet of paper. On the top, write down something such as "US Civil War Project." Start writing about the project. Don't stop yourself or censor ideas. Just let them come as they will. For instance, maybe you could start out by writing "For me, one of the defining points of the Civil War was the Gettysburg Address. It really made clear that the fight was about human equality. But now I must make that visual. Four-score and seven years ago... I could take individual lines, maybe? Connect ideas to defining parts of the war..." [3] X Trustworthy Source University of North Carolina Writing Center UNC's on-campus and online instructional service that provides assistance to students, faculty, and others during the writing process Go to source
- Try a map. Start with a circle in the middle of the paper with "US Civil War Project" written in the middle of it. Draw a line from the center circle to another circle, and add a fact or idea. Just keep associating ideas together, not really thinking too deeply about it. As you go, group like ideas near each other. When you're done, look at where the largest groupings are, and let that guide your focus. [4] X Trustworthy Source University of North Carolina Writing Center UNC's on-campus and online instructional service that provides assistance to students, faculty, and others during the writing process Go to source

- The best way to pick a topic is to choose what you focused on in your brainstorming. For instance, maybe you think the Gettysburg Address is a good focal point.
- However, if your topic is still too broad, such as "battles in the Civil War," try picking one aspect within that topic. You could choose one battle you think is defining, or a particular aspect of the battles, such as battle fatigue in soldiers.
- Most public and university libraries have databases providing access to scholarly articles. You can always ask the librarian to help you find what you're looking for

- You can even think about doing something 3-dimensional instead of 2-dimensional. Maybe you could make a 3-D map of the battles, depicting the movement of troops.
- Alternatively, you could try sculpting out of papier-mâché. Maybe you could sculpt Abraham Lincoln and use scripts coming off his body to tell your story.
Planning Out Your Project

- To make an outline, start with the main topic you are covering. Maybe you're doing the Gettysburg Address. Write that at the top.
- Next, break down your project into sub-headings. Maybe your subheadings could be "Speech Background," "Location of Speech," and "Impact of Speech."
- Under your subheadings, jot down the basic ideas of what you'll need. For instance, under "Speech Background," you might need the date, what battle preceded the speech, and the reason Lincoln gave the speech.

- Assign time for each chunk, including deadlines. Work from the final deadline backward. For instance, if you have 4 weeks to complete your project, say you'll spend the last week painting and putting the project together. The week before that, write out the text for your project. The week before that, research your project. In the first week, make your plan, and get your materials together.
- If needed, divide your project further. For instance, "researching the speech" may need to be divided into several days' worth of work.

Researching Your Projects

- When using an article database, narrow the search engine to only relevant databases. For instance, platforms such as EBSCOhost carry a wide range of smaller databases, and you can narrow your search down to one relevant to your topic, such as a database focused on history.
- You can also research the archives of particular newspapers. While some newspapers offer free access to their archives, others might require you to pay.

- You'll need the author's full name, the title of the book, the publisher, the edition, the date it was published, the city it was published in, the title and author of individual articles in the book if it has them, and the page number where you found the information.
- For articles, you'll need the author's full name, the title of the article and the journal, the volume and issue (if it has them), the page numbers of the article, the page number you found it, and the digital online identifier number (doi), which is usually on the description page in the catalog. [10] X Trustworthy Source Purdue Online Writing Lab Trusted resource for writing and citation guidelines Go to source
Creating Your Project

- Your teacher should tell you how should cite your sources or what guidelines you should be using.
- If you don't know how to write according to those guidelines, try an online resource such as Purdue's Online Writing Lab. It covers the basics of the major citation styles. [12] X Research source

- Before you turn it in, make sure you covered everything your teacher asked you to.
- If you skipped something, see if you can add it in, even if it's last minute.
Community Q&A
- Ensure you build in extra time for each step. You may run into problems or parts may take longer than you think. Thanks Helpful 0 Not Helpful 0
Tips from our Readers
- Write down a lot of ideas for your project, that way if someone else has an idea similar to yours you can still do something else.
- Plan in advance and be enthusiastic about it! Your enthusiasm will rub off onto your work and make it that much better.
- Ask your teacher if you can look at projects from previous years to get an idea of what they're looking for.

You Might Also Like

- ↑ https://www.ed.ac.uk/education/professional-learning/resources/educational-resources
- ↑ http://writingcenter.unc.edu/handouts/brainstorming/
- ↑ https://libguides.umflint.edu/science/topics
- ↑ https://theartofeducation.edu/2016/06/21/12-key-steps-leading-amazing-mural-projects/
- ↑ https://owl.purdue.edu/owl/research_and_citation/resources.html
- ↑ https://www.library.cornell.edu/research/introduction
- ↑ https://owl.purdue.edu/owl/research_and_citation/apa_style/apa_formatting_and_style_guide/reference_list_electronic_sources.html
- ↑ https://owl.english.purdue.edu/owl/
About This Article

To create a successful project for school, start by reading the assignment to make sure you understand the requirements. Then, break up the assignment into manageable chunks, like research, writing, and proofreading, so you can schedule yourself enough time to get everything done. Choose a good topic by brainstorming a lot of broad ideas, like gender or fashion, and then narrow it down to something more specific, like women's fashion during the Victorian period, so you can start your research and design your project. To learn how to research your project, keep reading! Did this summary help you? Yes No
- Send fan mail to authors
Reader Success Stories
Dec 6, 2023
Did this article help you?

Prashant Aggarwal
Jun 10, 2022
Anusha Bhattacharya
Nov 25, 2019
Jan 30, 2021
Emily Lousia
May 23, 2017

Featured Articles

Trending Articles

Watch Articles

- Terms of Use
- Privacy Policy
- Do Not Sell or Share My Info
- Not Selling Info
Don’t miss out! Sign up for
wikiHow’s newsletter

Create a new project
You can always create a new project from a template or another project . But if you need to start fresh, you can create a blank project file:
Click File > New > Blank Project .

That gives you a blank canvas to work on. If you’re not sure what to do next, read on.
Note: For a quick introduction to more basic tasks in Project, see Project Quick Start .
What to do with your new project
Set the project start or finish date, set the name or title and other file properties, show the project summary task, where to go from here.
Click Project > Project Information .

Go to the Schedule from box, and pick Project Start Date or Project Finish Date .
Add the date to the Start date or Finish date box.
Project management tip Schedule from the finish date to figure out how late you can start a project and still meet your deadline. Change the setting above to schedule from the start date once work begins, so you can see when changes put the deadline in danger.
Once you get the big picture in place, Project can help you sort out the details of the schedule:
Use a calendar to change the working days and hours.
Add holidays or any nonworking time to the schedule.
Set vacation days for people working on the project.
Set up a different calendar for a specific task .
Top of Page
Save your project to give it a name or title. You can change the name and other file properties at any time.
Click File > Info .
On the right, click Project Information and then click Advanced Properties .
On the Summary tab, type the name in the Title box.
Add any other info you want to be part of the project file.

Most projects start their lives as a list of tasks in Excel, Word, or even on a piece of paper. Before you can schedule and manage those tasks, you need to get them into your project file.
Add tasks manually That is, type them into Project .
Cut and paste Project remembers the outline structure you created for your tasks in Word, Outlook, or PowerPoint, and it makes them summary tasks and subtasks when you paste them into Project .
Import data from Excel If your Excel task list had durations, cost estimates, deadlines, or other data about the project, you can bring that over , too.
Sync with SharePoint You can work with Project in SharePoint . After you schedule these tasks, your team members can see the schedule and update their work in SharePoint, and you’ll see the changes in Project. And vice-versa.
Once you add them, you can start to work with your tasks:
Set their end dates and start dates .
Link them together to create dependencies between them.
Add milestones to mark important events in the schedule.
Make an outline of your project with summary tasks and subtasks.
The project summary task contains all other tasks, and it appears at the top of your task list. Project hides the project summary task by default. To turn it on, go to the Gantt Chart, click Format , and then check Project Summary Task .

Add people (resources) to the project .
Assign them to tasks .
Save your project .
Publish it to Project Web App .
When you create a new project in Project Web App, you have the following options:
Enterprise Project. This option creates the project so that it is editable in Project Web App.
SharePoint Tasks List. This option creates the project as a project site. Use the task list on the project site to list out the tasks for your project. As you build your task list on this project site, those tasks will be viewable from the Project Center within Project Web App.
Your organization may have several different templates for creating new projects, so you should choose the template that makes the most sense for the project that you are creating.
Create a new enterprise project
To create a new enterprise project:
On the Quick Launch, click Projects .
On the Projects tab, click New , and then choose Enterprise Project , or choose an enterprise project template that is specific for your organization.
On the page that appears, type the appropriate information in the Name , Description , and Start Date boxes, and then choose Finish .
Complete as much information as you can on the pages that are created for your project. After entering information, on the Task tab or the Project tab, in the Project group, click Save . Each page for the project is listed on the Quick Launch, under the project name, while you have the project open. You can navigate between pages by clicking the Quick Launch links, or by clicking Previous and Next on the Project tab, in the Page group.
If the project or proposal is associated with a workflow with multiple stages, you can click Submit to kick off the workflow once you've added as much information as you can on the project detail pages.
When you first create a project or proposal, it is only visible to the project owner. To make it visible to the team members assigned to tasks in the project, you need to publish the project. For more information on publishing a project, see Publish a project .
Create a new SharePoint Tasks List project
To create a new SharePoint Tasks List project:
On the Projects tab, click New , and then choose SharePoint Tasks List , or choose a SharePoint Tasks List project template that is specific for your organization.
On the Create a new project page, type a name for the new project, and then click Finish .
Once the project site is created, click edit in the gray box on the left side of the Project Summary Web Part.
Use the Tasks page to add your project’s tasks, including Due Date and Assigned To information.
Tip: For more information on creating tasks on a project site, see Add tasks to your project .
Once you have created this task list, if you return to Project Web App you see it listed as a project in the Project Center. Updates made to the task list on the project site are reflected in the Project Center in Project Web App.

Need more help?
Want more options.
Explore subscription benefits, browse training courses, learn how to secure your device, and more.

Microsoft 365 subscription benefits

Microsoft 365 training

Microsoft security

Accessibility center
Communities help you ask and answer questions, give feedback, and hear from experts with rich knowledge.

Ask the Microsoft Community

Microsoft Tech Community

Windows Insiders
Microsoft 365 Insiders
Was this information helpful?
Thank you for your feedback.
How to Build a Programming Project Step by Step

This tweet about building projects really resonated with me:

It says a lot about how programmers build the projects we all admire. It pin-points the less glamorous parts of our activities which beginners don't always pay attention to, probably because of their lack of experience.
And that reminds me of my recent experience building a VSCode extension. The extension is meant to make me look like a genius in video tutorials and reduce my recording challenges. (But hey – I am really not a genius 😜).
The extension displays the content of a file per character whenever any key is pressed. It simulates a real-coding experience while I only pay attention to the voice recording. Wow! How did I build that? Well, let's see how it went.
It might go without saying, but you don't know how to build a new project until you've actually built it. Before I started, I didn't feel like I knew what to do and what to bring together. But I was sure of one thing – I knew how to find what I needed. Boom! The research began.
So let me tell you how I did it, so you can get better at building your own projects, too.
Break the Project Down into Smaller Units

I knew it would be hard to find a complete tutorial about what I wanted to build. But it was relatively easy to find tutorial related to each unit of the project. So, I broke the project down into these parts:
- Installing the VSCode extension.
- Getting the content of an active file.
- Breaking down the content of the file into characters. (Word => w, o, r, d).
- Listening to key-presses.
- Displaying the character one by one whenever any key was pressed.
Those are the basic things I expected the extension to be able to handle.
But wait! What if I am building a whole website? Don't worry – it's still the same process. This is what I would have done if I wanted to build a website, too.
Step 1: Break everything up into sections
For a website, your manageable sections might look like this:
Step 2: Break the sections down into components
To do this, I would ask myself what I wanted in each section. And then I would list those elements out one by one.
✅ Header: I want a logo, search-box, signup/login button (or other navigation buttons) and settings in the header.
✅ Main: How many column(s) do I need? Does it have to include a left or right sidebar or a list?
✅ Footer: Do I want copyright information and navigation in the footer? Anything else?
Then I'd ask myself what other things I wanted and note them down as I thought of them.
In short, you have to list out everything you want in each section and component. But don't waste too much time on planning, because execution is key. Do it as quickly as possible because once you have a job, you'll probably hardly have any spare time to plan out your projects.
But you might be thinking, Oh, no! I am confused. How do I know all the sections and components I need as a beginner?
That is a good observation because I am not a beginner and I have had experience with of all of these components. That is why I can list them easily.
But it's ok. You will learn all these things along the line. You just need to pay attention to my VSCode extension story. :)
Write Your First Line of Code and Get Stuck

After having a clear picture of what to build, I believe the most important thing to kick-start a project is to write you first line of code and get stuck. It is pessimistic, but it helps you to become solution driven.
Instead of being worried unnecessarily because you're not sure of how to start, open you code editor of choice and write your first line of code – even if you get stuck right after that.
You first line of code will probably get deleted or improved upon several times, and that is fine. It is meant to help you overcome procrastination.
In reality, you will always be confused about how to start and what to do. Don't procrastinate because of such feelings, especially after you understand how the project should work in your head or on paper.
Don't try to understand everything before writing your first line of code. You will never understand everything. At least, no one has ever understood everything yet.
No Project is Perfect – Including Google

It is easy to want your project to be the best ever built, especially when you are a beginner. I have been there, so I know how it feels.
I was just an art student trying to solve a problem by using web technology. After I failed to hire a web developer to build the project for me because I couldn't afford the price they quoted, I decided to learn how to build it by myself.
Silly me tried to build almost every feature on the internet to make sure my project had all the features others didn't have. Anyway, I killed the project eventually.
The point I am making is don't try to build a project that can't be criticized – there is nothing like that. You need to focus on core features, not extra features that might make the project unusable.
Don't try to make a perfect project or feature – make usable and lovable projects and features instead.
Every Project is Built on Other Projects

After I had a clear picture of what I needed to build the VSCode extension, I had to look into related projects. I opened the source code of vscode-hacker-typer to study how the project handles some of the things I wanted to implement. By doing that, I learnt a bit about VSCode extension APIs.
As I was totally inexperienced in making VSCode extensions, looking into vscode-hacker-typer helped me move from being totally clueless to knowing what to research.
Knowing the name of what you want to deal with is the greatest first step to solving any problem in programming.
For instance, say that there is a feature you like on a related website but you don't know what it is called. How will you research the feature? Well, it is not rocket science.
You can take a picture of the feature and ask for its name in programming groups or ask someone. Or you can discover it name or API by diving into a related project's source code like I did. So check out projects that are similar to your project, learn from them, and copy their features.
Don't Be Afraid to Google

Before I dove into creating the VSCode extension, I didn't even know where to start – but I was sure I would be able to research my way to something reasonable. I started googling different questions:
✅ How to get the content of a VSCode active editor?
✅ How to use VSCode activeTextEditor?
✅ How to use VSCode onDidTextDocumentChange?
Understanding what you want to build is the first step to having relevant search results especially when building a project you have never built. You need to conceptualize the idea or features you want to implement so that you can find solutions you need.
Basic googling tips that can help you get better results
Know the keywords you care about..
For example, if I want to built a landing page with HTML and CSS only, I won't search for something like "How to build a landing page". That will be bring a lot of things I don't want. It has to include the keywords I care about.
Below are examples to study:
- How to build a landing page with HTML and CSS?
- How to make a VSCode extension with Typescript (If I want Typescript)?
- How to make a VSCode extension with JavaScript?
Make sure your expected keywords are included – be specific.
Googling (How to build a landing page with HTML and CSS?) may yield a generic result. That is an issue. But it can be fixed with exact matches.
Use quotes to get exact matches in Google
For example, "How to build a landing page with HTML and CSS" will give you an outcome with the exact words in that search.
If you want to explore general ideas about building a landing page, remove the quotes.
Exclude a search term with (-)
Sometimes, you only want a result with HTML and CSS, but you're getting those with HTML, CSS and JavaScript.
You can use "- JavaScript" to exclude JavaScript. For instance, you can search "How to build a landing page with HTML and CSS - JavaScript.
This is useful when you want to exclude certain keywords.
Switch out your terms
When you want to move from one language, library, or framework to another, you need to use all you know from the first language or framework.
For instance, you want to move from JavaScript to Python and you know how JavaScript works. All your previous search terms or approaches for JavaScript will still be very useful while using Python.
You only need to switch out your specific terms – replace JavaScript with Python in all your searches. Then, you can google "Array in Python" instead of "Array in JavaScript".
You'll Always Get Stuck – and That's OK

The problem with "How to" tutorials is that they don't always inform you that getting stuck is a part of the process. The VSCode extension I have been working on is still not working because I am stuck. After thinking through every part, I was stuck while implementing the features.
The VSCode extension API I was using can't be iterated, so I have to find a way to do that. Also, vscode-hacker-typer doesn't use the approach I am using. It records keystrokes and replays them. I want to avoid recording keystrokes. I only want to display the content of an activeTextEditor character by character whenever any key is pressed.
You will always be stuck, and that is why you have to learn How to improve your debugging skills . Getting stuck is a significant part of the process. Your ability to overcome the challenges of getting stuck will determine how far you go in making projects.
It can be tempting to want to quit because you feel you are not as good as everyone else. The reality is that we all struggle behind the scenes. We've all solved a lot of problems through trial and error. We all feel dumb and fake because we are always building on the projects of others.
But don't forget that every amazing project has a less glamorous story you know nothing about behind it. What matters, above all, is making sure you build the project in the end.
Don't forget:
"The genius thing that we did was, we didn't give up" - Jay Z.
Ayobami loves writing history with software development and is currently helping those who are struggling to understand and build projects with HTML, CSS and JavaScript here .
Ayobami loves writing history with JavaScript(React) and PHP(Laravel). He has been making programming fun to learn for learners. Check him out on YouTube: https://bit.ly/3usOu3s
If you read this far, thank the author to show them you care. Say Thanks
Learn to code for free. freeCodeCamp's open source curriculum has helped more than 40,000 people get jobs as developers. Get started
- (855) 776-7763
Training Maker
Survey Maker
WebinarNinja
ProProfs.com
All Products
- Get Started Free
Do you want a free Knowledge Base?
We have the #1 Online Knowledge Base Software for instant self-help
How to Create Project Documentation in 5 Steps [Templates & Examples]

Customer Support Expert
Review Board Member
Dan Miller is a seasoned customer support expert with over 11 years of hands-on experience in the dynamic field of customer service. His wide-ranging expertise covers help center management, internal ... Read more
Dan Miller is a seasoned customer support expert with over 11 years of hands-on experience in the dynamic field of customer service. His wide-ranging expertise covers help center management, internal knowledge base development, and customer-facing knowledge base implementation, among other areas. Always in tune with the latest trends in knowledge management, Dan adapts swiftly to the evolving customer support landscape. His unwavering commitment to excellence and a genuine passion for optimizing customer interactions have established him as a reliable authority in the industry. Read less

Knowledge Management Specialist
Brayn is a knowledge management specialist with over 10 years of industry experience. A thought leader in the field, Brayn writes about the utility of knowledge base software for business growth, customer support, user management, and more.

Project management is an indispensable part of all business functions.
Sure, assembling a capable team is crucial, but there’s another secret ingredient that ensures your projects stay on the right path: dedicated project documentation.
Now, I know what you’re thinking: “More paperwork? Isn’t that just adding to the workload when we already have a stellar team?”
Well, hold onto your seat because you’re about to discover the incredible benefits that come with this seemingly mundane task.
Imagine a world where paperwork is reduced, your teams are effortlessly aligned, project gaps are identified and resolved, and progress is meticulously tracked. Sounds pretty amazing, right? That’s exactly what project documentation can do for you.
Dive into this blog to learn how to write project documentation, explore its impressive benefits, get access to templates, and much more.
Stay tuned!
What is Project Documentation?

Project documentation is an online document comprising information related to project details, milestones met, targets achieved, changes accommodated, and much more. This document acts as a centralized reference point where teams can quickly find the information they need to complete certain tasks, track progress, or check recent updates.
From project reports and business cases to project plans, proposals, budgets, and risks, this documentation contains all the necessary information required to manage projects with ease.
By consolidating all project information in one place, this documentation brings clarity to the project management process and helps teams stay on the same page. While this keeps the confusion at bay, team alignment and productivity also witness a substantial improvement.
Why Is Project Documentation a Must for Your Business?
Do you know why projects fail?
Well, there are multiple reasons for that. From inaccurate requirements gathering to changes in project objectives, there are various reasons that cause project delays and failures.

With well-written and meticulously structured project documentation, you can avoid most of these problems.
As a centralized space where all project details are clearly mentioned, project documentation ensures that everyone in the team is aware of the project goals, developments, vision, and scope.
Your project teams will always have the most updated information at their disposal, which helps them perform tasks effectively. They can also document their learnings and analysis in this documentation for future reference.
There are many other benefits of creating project documentation, which we will explore in the next section.
Types of Project Documentation
Project documentation comes in various forms, each serving a specific purpose in managing and communicating project information. Here are some key types of project documentation you should be familiar with:
Project Charter
The project charter outlines the project’s purpose, objectives, scope, stakeholders, and high-level deliverables. It establishes the project’s foundation, providing clarity and alignment to all team members and stakeholders from the start.
Project Plan
The project plan details the approach, tasks, timelines, resources, and dependencies required to complete the project. It serves as a roadmap that guides your team throughout the project’s lifecycle, facilitating effective coordination and execution.
Requirements Documentation
Requirements documentation captures the functional and non-functional requirements of the project. It specifies the features, capabilities, and constraints that the end product or service must meet. With clear and well-documented requirements, you can ensure that the project meets stakeholder expectations and runs smoothly as intended.
Change Control Documentation
Change control documentation outlines the procedures for requesting, reviewing, approving, and implementing changes to the project scope, schedule, or budget. It ensures that changes are carefully assessed and controlled to maintain project alignment with stakeholder requirements.
Status Reports
Status reports provide a snapshot of the project’s progress, including accomplishments, milestones reached, issues, risks, and upcoming activities. These reports help stakeholders monitor project performance and make informed decisions based on the project’s current status.
Read More: Best Software Documentation Tools for 2023
Astounding Benefits of Project Documentation
Poor alignment, miscommunication and lack of clarity are some of the key reasons that deviate projects from the right path.
Something as simple as building project documentation can streamline the entire process while maximizing the efficiency with which team members work.
Let’s look at some of the remarkable project documentation benefits in detail:
Eliminates Confusion & Drives Success
Often, project members lack clarity on project goals, client requirements, stakeholder expectations and milestones to be achieved. Project documentation has all essential project information explained in a detailed manner. This leaves little to no room for confusion and teams can carry out their project duties without any hassles.
Brings Transparency to the Process
It’s natural for project members to go off-track while working on projects. There can be inconsistencies in the pace and quality of task delivery.
With project documentation at their disposal, teams have a clear picture of what is done and what is pending. This transparency helps them ramp up their efforts, ensuring that projects are delivered on time always.
Increases Accountability
Assumptions, misinterpretations, and blame games in project management impact the overall team productivity and performance. With project documentation, team members have complete clarity of their roles and responsibilities, project scope, goals, and plans.
This means if something goes wrong, they can take accountability for their actions instead of blaming others.
Makes Project Tracing Easier
It’s natural for project managers to lose track of how the project is progressing while carrying out the day-to-day activities. Project documentation comprises thorough information on project progress, deadlines, and team workload. This makes it easy for managers to evaluate what worked well and what didn’t, as the project ends.
Identify Risks & Manage Them
Risks are a part of the project management process and your team should be well-prepared to handle them. A detailed project document outlines not just the project scope, plan, and goals, but also the potential risks and their solutions. With this document, you will have a clear idea of what kind of risks to expect and how to mitigate them.
How to Write Project Documentation in 5 Easy Steps
Now that you’re well-acquainted with the incredible benefits of project documentation, it’s time to equip yourself with the essential know-how to create it effectively.
It’s finally time to dive into the step-by-step process for crafting exceptional project documentation that sets you on the right path from the very beginning.
Step 1: Bring all Scattered Documents in One Place
You might have project information scattered across Word docs, interactive PDF files , Excel sheets, and Powerpoint presentations.
The first step to creating project documentation is to bring all this valuable information together in a centralized space.
Modern project documentation tools offer features that help you directly import such files to the document. This makes content transfer pretty simple and fast.
As for the missing information, you will have to write it from scratch. For example, if you do not have pre-built documents for project plans and scope, create articles on these topics after discussing them with your team.
This will put in place a single source of truth that your project team can instantly refer to every time they are stuck on a task or need assistance with something.
Step 2: Take it Stage by Stage
While writing project documentation, it is important to take the process step by step – one stage at a time.
For example, the initiation stage is about setting up the team and outlining the basic requirements. For this stage, the documentation should cover the project proposal, scope, and team structure.
After initiation comes the planning stage . For this stage, your project documentation should have thorough articles on the project plan, roadmap, communication strategy, and even the budget details.
For the execution phase , it is important to add project status reports and potential risks expected in the course of the project. This information is essential to keep team members aligned throughout the project lifecycle.
Changes are a vital part of any project. That makes change management an important stage in the process. Any changes requested by the client should be recorded in the change management section of the project documentation.
Teams can quickly go through this section to keep track of the changing client requests and alter their strategies accordingly.
Last comes the evaluation stage, when the project is delivered, and it’s time to assess what went right and what didn’t.
Project closure details and progress reports should be a part of your documentation for this stage. This will help you track the overall project and team performance and identify bottlenecks that posed hurdles in the project. They can then implement the learnings in future projects and achieve better outcomes
Step 3: Pave Way for Collaborative Authoring
From the previous step, it looks like project documentation is a comprehensive resource that is not possible for a single person to manage.
You need a strong team who have the dedication and passion to consistently record all that goes on in the project – every milestone achieved, deadline met, or change requests accepted!
By deploying a tool like ProProfs Knowledge Base, you can add users and assign relevant roles and permissions to each one of them. For instance, some users can work as contributors – the ones who will do all the writing work, and some can take charge of editing all that’s written to ensure quality is not compromised.
You can also assign the role of administrator to users who have proved themselves as capable managers. They are the ones who will take up the responsibility of overseeing every activity happening in the documentation, identifying gaps, and taking timely steps to ensure smooth operations.
For more details on how collaborative authoring really works, watch this quick video.
Step 4: Structure the Document & Make it Easy to Search
Project documentation loaded with useful information but lacking a logical structure is counterproductive. An unstructured document is likely to make your team members confused and indecisive.
Once you have all the information in place, try giving it a proper structure.
For example, you can create broad topics and their sub-categories to fit in all project details. You can also create a table of contents enlisting all sections and subsections of the document.
Follow a stage-by-stage approach while structuring the document. Start by adding topics related to the initiation stage and then drill down into more complex topics on project execution, closure, and progress reports, change management, etc.
For best results, you can make use of internal article linking to make information search even faster. This will save your team from mindless browsing and help them get what they need in just a few clicks.
Here’s an example of what the ideal documentation structure looks like:
Step 5: Let Your Team Review the Document Before Sharing
Project documentation is supposed to be highly reliable and comprehensive. That’s precisely why all team members should collaboratively work on the document right from the start to ensure a high level of quality and accuracy.
Creating articles is a heavy task and can take up a lot of your team’s time. In such situations, it’s natural for your team to sideline the review process and pass the content for publishing without taking a second look at it.
Inaccurate information can wreak havoc on your projects. It can spread wrong facts in the team and completely change the track of the project. Therefore, careful review and analysis of every articles is important before taking them live.
As and when articles are created, they should be thoroughly reviewed by editors and subject matter experts before publishing.
The best project documentation tools out there come with a dedicated workflow review and approval system that allows you to track the status of each article right from the time it is written to when it finally gets published. This reduces the chances of any article skipping the review process.
In the end, you can rest assured that everything that goes into your project documentation is free of errors and inaccuracies.
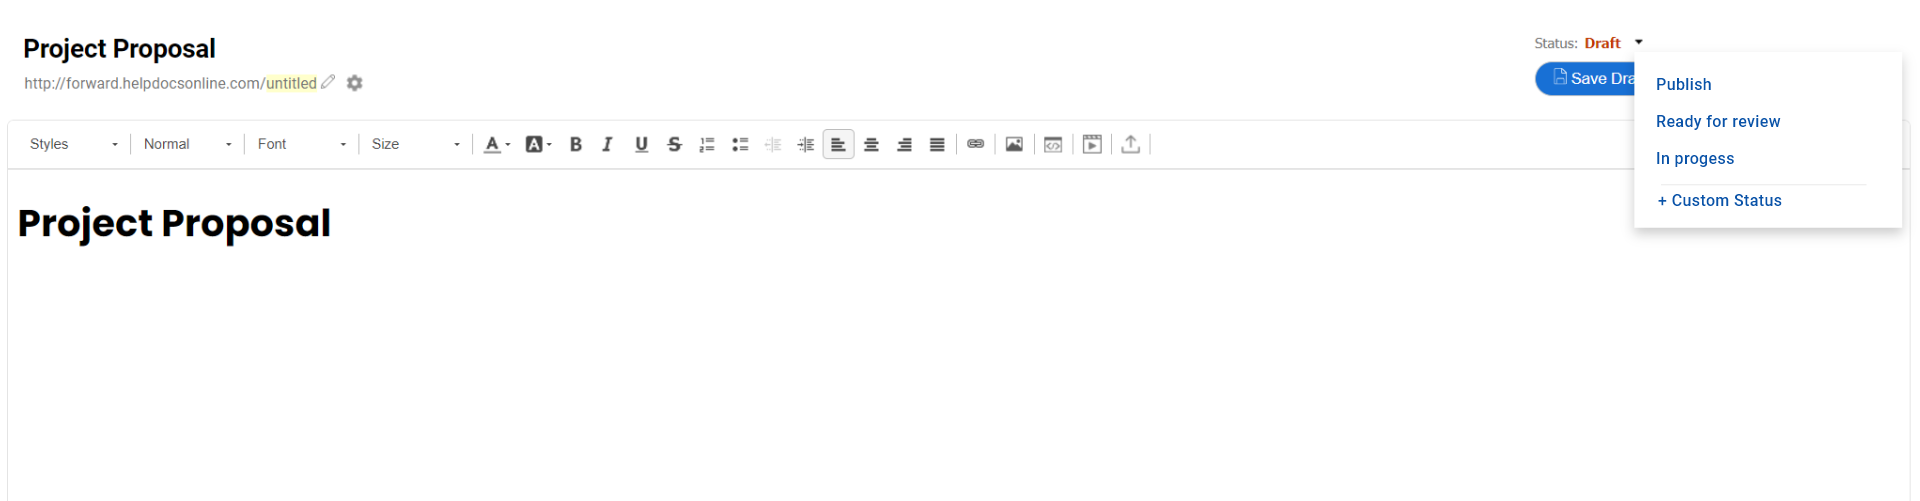
Read More: 10 Best Technical Documentation Software
Step 6: Keep Updating the Documentation
The project management process is not static, so how can your document remain unchanged?
As your project progresses, there will be multiple changes in its plan, scope, client requirements, etc. Regularly maintaining project documentation ensures that teams always have the most updated information at their fingertips.
As a project documentation best practice, your team must keep checking the document for any inaccuracies and continue updating it with relevant information.
Manually tracking and making all the changes can consume more time than required.
Instead, you can use reports to track document performance and identify knowledge gaps.
For example, if you want to identify poorly rated articles or articles that are the most helpful for your teams, you can track metrics such as article upvotes and downvotes, total views, and reads. Once you know which articles are not received well by project members, consider improving them.
Additionally, you can also go through the comments left by team members to identify their pain points and take timely steps for performance improvement.
Read More: Best Technical Writing Tools and Software For 2024
Best Practices for Writing an Impressive Project Document
Creating project documentation is the key to ensuring clarity, alignment, and success in your projects. It serves as a roadmap for your team, keeping everyone on track and focused on the project’s goals.
To help you create a stellar project document, here are seven best practices to follow:
Harness the Power of Visuals
To enhance user engagement and understanding, incorporate interactive elements into your project document. You can utilize clickable links, interactive charts, or multimedia content to provide a dynamic and immersive experience to all project stakeholders.
Interactive features and visual elements help present information in an impactful way, making it easier for stakeholders to grasp complex concepts faster.
Provide On-the-Go Mobile Access
Project documentation is only helpful if teams can access it on their mobile devices right when they need it.
You can optimize the document’s layout and design to ensure easy access and viewing on smartphones and tablets. By creating a mobile-friendly document, you enable stakeholders to access the information conveniently, even while they are away from their desks. This flexibility promotes better collaboration, decision-making, and responsiveness among the project team.
Make it Searchable & Easy to Navigate
Searchability and navigation are two crucial elements that should not be ignored.
You can implement a logical structure within your project document, using headings, subheadings, and a table of contents to facilitate easy navigation. Additionally, you can incorporate a search function that enables stakeholders to quickly locate specific information within the document.
A well-organized and searchable document saves time, enhances user experience, and ensures your teams get everything they need in seconds.
Define Clear Objectives
Kickstart your project document by articulating clear and concise objectives. These objectives serve as the guiding light, providing your teams with a clear idea of what the project aims to achieve.
As you start creating project documentation, clearly state the project’s purpose, desired outcomes, and measurable goals. Avoid ambiguity and ensure that stakeholders have a crystal-clear vision of the project’s direction.
With objectives clearly defined, you will be able to build a solid foundation for the project, align the team’s efforts, and drive action towards a common goal.
Deploy the Right Project Documentation Tool
Deploying the right project documentation tool can give your efforts the much-needed boost. It will equip you with all the bells and whistles you need to get started in the right direction and achieve an impressive document.
When investing in document collaboration tools , look for one that aligns with your team’s needs and offers collaborative features, version control capabilities, and customization options. With the right tool in place, it will be easier for your team to make content curation a collaborative process and simplify document management.
Best Project Documentation Templates
Writing project documentation can mean spending days or weeks doing the initial groundwork.
What if we told you there is a shortcut to the process?
Project documentation templates offer a ready-made framework, so you don’t have to do the heavy lifting. The templates take a lot of pressure off your shoulders by giving you a pre-defined table of contents, topic-relevant sections, a dedicated space for branding, and much more.
With these beautiful templates, your work is reduced to half, as you don’t have to work on a blank canvas.
As your project progresses, you may want to expand the template by adding more categories and information.
Examples of Project Documentation
While for large projects, the documentation is quite comprehensive, involving multiple change requests, documentation for small projects is mostly limited to the basics.
However, there are some sections that are standard for all project documentation, regardless of their size and scale.
Project Proposal
Project proposal is all about ideating and communicating a project’s goals to clients and internal stakeholders. It gives a clear overview of project objectives, requirements, and value proposition. As part of the project proposal, you can highlight the number of resources that will work on the project, the budget allocation, timelines, and the key deliverables.
This document encapsulates everything that goes into the project planning stage. From outlining key milestones and their deadlines to setting the team, the project plan document covers it all. It acts as a roadmap for teams, guiding them in the right direction throughout the project lifecycle.
Project Charter
While the project plan covers the “What” part of project management, the project charter covers the “how”.
This document shows the process of achieving the goals established in the planning stage and also highlights the roles and responsibilities of all team members. The project charter provides a solid foundation for all activities that take place during the project.
Project Progress Report
Whether it is a large project or a small one, it’s crucial to keep everyone updated about how a project is progressing. This report highlights the project’s progress since the start, along with the bottlenecks that occurred during the process. It also shows the next steps you need to take to keep the progress on the right track.
Project Evaluation
Project evaluation is a vital part of project documentation. It brings into the spotlight both the best and the worst parts of the project. It shows how the project performed – what went well and what didn’t meet your expectations. Your team can use this as a reference and implement the lessons learned in the next project.
How to Choose the Right Project Documentation Software
To write impactful project documentation, you need a knowledgeable team. But to bring the documentation to life and share it with key stakeholders, you need the support of a solid tool.
Depending on your project’s size, scope, and requirements, you may need a simple tool with basic features or an advanced tool with unique functionality. There are different kinds of online documentation software available today, but how do you know which one is worth the investment?
Keep an eye for these top features when looking for project documentation software:
- Easy to use with little to no coding required
- Simple to set up without any specialized skills or training
- Ready-to-use documentation templates that help you get started quickly
- A smart search system that displays context-relevant results
- User management and access control to help teams work in collaboration
- Internal comments for team discussions on articles
- A workflow review and approval system to ensure content accuracy
- Robust integrations with tools like Slack and JIRA for smooth communication
These are the standard features that any tool you pick must have. Rest, depending on your requirements, you can also opt for tools with advanced features like reports and version control.
Set Your Projects for Success With Project Documentation
As a project manager, you may have to handle different types of projects simultaneously.
In such a high-pressure environment, it’s natural for you to lose sight of important project details. With up-to-date project documentation, you can rest assured that nothing important will slip through the cracks. You can easily track progress, identify bottlenecks, and fix them right in time.
To curate an impactful project document, bring all information to a central space, add relevant articles for different stages of project management , and give them a proper structure.
All these steps can be easily executed with the support of a powerful project documentation tool like ProProfs Knowledge Base. It has all the necessary features and functionality you need to kick off the process and take your projects on the road to success.

About the author
Brayn wills.
Bryan Wills is a seasoned expert in knowledge management with over a decade of experience in the field. His expertise extends across various domains, including Security & Compliance, User Management, Knowledge Management, Software Documentation, and Customer Support. His writings not only reflect his deep understanding of these subjects but also offer practical solutions and strategies to help organizations enhance their knowledge management processes. Bryan’s work has been published in GetFeedback , CustomerThink , and Apruve .
Popular Posts in This Category

How to Create an Operations Manual & What Are Its Benefits

Effective Tips to Promote Your Self-Service Platform Among Customers

25 Reasons That Will Convince You to Create an Enterprise Wiki

How to Create a Knowledge Base in 8 Easy Steps

How to Improve Customer Experience (CX) Amidst COVID-19 Pandemic

Why a Searchable Knowledge Base Is the Best Thing for Your Business?
- Agile tutorials
- How to do scrum with Jira
Learn scrum with Jira
Step-by-step instructions on how to drive a scrum project

Browse topics
Scrum tutorial.
In this tutorial, we'll give you step-by-step instructions on how to drive a scrum project , prioritize and organize your backlog into sprints, run scrum ceremonies and more, all within Jira.
10 minute read. Complete over 2 weeks
You are new to scrum, agile software development, or Jira
Prerequisite:
You have created a Jira account
Get it free
Scrum is one of the most popular frameworks for implementing agile. With scrum, the product is built in a series of fixed-length iterations called sprints that give teams a framework for shipping on a regular cadence.
Step 1: Create a scrum project
Once you create and log in to an account in Jira, you can select a template from the library. Select Scrum (you can preview the free scrum template here, or you can learn how to create a Kanban project here ).
Next, you’ll be prompted to choose a project type. If your team works independently and wants to control your own working processes and practices in a self-contained space, consider giving our team-managed Scrum template a try. See Getting started with team-managed projects at the Atlassian Community to learn more.
Once you've created your project, you will land on the empty backlog . The backlog is also known as the product backlog and contains an ongoing list of your team's potential work items for the project.
Step 2: Create user stories or tasks in the backlog
In Jira, we call work items like user stories, tasks, and bugs " issues ". Create a few user stories with the quick create option on the backlog. If you don't have user stories in mind, just create sample stories to get started and see how the process works.

User stories are used to describe work items in a non-technical language and from a user's perspective. . As a {type of user}, I want {goal} so that I {receive benefit}.
Let's use a website as a simple example to create a user story.
As a customer, I want to be able to create an account so that I can see my previous purchases.
User stories are usually sketched out and prioritized by the product owner, and then the development team determines detailed tasks necessary to complete the story in an upcoming sprint. The development team is also responsible for estimating the relative effort required to complete the work of the story.
Once you've created a few user stories, you can start prioritizing them in the backlog. In Jira, you rank or prioritize your stories by dragging and dropping them in the order that they should be worked on.
These are just the starting stories for your project. You will continue to create stories for the project's lifetime. This is because agility involves continuously learning and adapting.
Step 3: Create a sprint
Create your first sprint in the backlog so you can start planning the sprint.
In Scrum, teams forecast to complete a set of user stories or other work items during a fixed time duration, known as a sprint. Generally speaking, sprints are one, two, or four weeks long. It's up to the team to determine the length of a sprint — we recommend starting with two weeks. That's long enough to get something accomplished, but not so long that the team isn't getting regular feedback. Once a sprint cadence is determined, the team perpetually operates on that cadence. Fixed length sprints reinforce estimation skills and predict the future velocity for the team as they work through the backlog.

Step 4: Hold the sprint planning meeting
At the beginning of a sprint, you should hold the sprint planning meeting with the rest of your team. The sprint planning meeting is a ceremony that sets up the entire team for success throughout the sprint. In this meeting, the entire team discusses the sprint goal and the stories in the prioritized product backlog. The development team creates detailed tasks and estimates for the high-priority stories. The development team then commits to completing a certain number of stories in the sprint. These stories and the plan for completing them become what is known as the sprint backlog.
Add story point estimates to your stories by adding a number in the Story point estimate field. You can also add more details to the stories or click the create subtask icon to further break down the work of the story.

When you're ready, drag the stories agreed to in the sprint planning meeting into the sprint that you just created. This is your sprint backlog.
Attendees: Required: development team, scrum master , product owner
When: At the beginning of a sprint.
Duration: Usually two hours per week of iteration – e.g. a two-week sprint kicks off with a four-hour planning meeting. The meeting ends when its purpose has been achieved.
Purpose: Plan the work of the sprint. The team agrees to the sprint goal and the sprint backlog.
When creating a sprint, the product owner usually identifies a sprint goal. This provides a theme for the work to be completed in the sprint. A sprint goal also provides some flexibility in the number of stories that are completed in a sprint. A sprint is considered a success if the sprint goal is achieved.
Traditional software teams give estimates in a time format: days, weeks, months. Many agile teams, however, have transitioned to story points. Story points rate the relative effort of work, often in a Fibonacci-like format: 0, 0.5, 1, 2, 3, 5, 8, 13, 20, 40, 100.
Estimates help you gauge how much work you should add to the next sprint based on the number of team members you have. After a few sprints, your team will get better at figuring out how much work they can do each sprint, which will help avoid over-committing.
Step 5: Start the sprint in Jira
Name the sprint. Some teams name the sprint based on their sprint goal. If there is a commonality between the issues in the sprint, name the sprint around that theme. Otherwise, you can name the sprint whatever you like.
Add a duration of the sprint and start and end dates. The start and end dates should align to your team's schedule. For example, some teams start sprints on a Monday and then end on a Friday morning in the next week. Other teams decide to start and end their sprints mid-week. It's up to you! If you're unsure how long your sprints should be, we recommend trying two weeks.
Add the sprint goal as agreed to in the sprint planning meeting.
Once you start your sprint, you will be taken to the Active sprints tab in the project.

This is where your team will work to pick up items from the to-do column and move them into in-progress and eventually, done!
If you’re using the team-managed scrum template, this will be called a Board .
Step 6: Hold the daily standup meetings
After your sprint has started, have your team meet daily, typically in the morning, to review what everyone is working on. The purpose of this is to see if anyone on your team is experiencing any roadblocks towards the completion of sprint tasks.
Attendees (Primarily): development team
When: Once per day, typically in the morning
Duration: No more than 15 minutes. Don't book a conference room and conduct the standup sitting down. Standing up helps keep the meeting short!
Purpose: The daily standup is designed to inform everyone quickly of what's going on across the team and to plan the work of the day. It's not a full status meeting. The tone should be light and fun, but informative. Have each team member answer the following questions:
- What did I complete yesterday?
- What will I work on today?
- Am I blocked by anything?
There's an implicit accountability in reporting what work you completed yesterday in front of your peers. No one wants to be the team member who is constantly doing the same thing and not making progress.
ProTip: Some teams use timers to keep everyone on track. Others toss a ball across the team to make sure everyone's paying attention. Many distributed teams use video-conferencing or group chat to close the distance gap. Your team is unique — your standup should be, too!
You can use the active sprints of your scrum board during the daily standup, so that each member can view the tasks they're working on.
Step 7: View the Burndown Chart
It's a good idea to check the Burndown Chart during a sprint. In Jira, the Burndown Chart shows the actual and estimated amount of work to be done in a sprint. The Burndown Chart is automatically updated by Jira as you complete work items. To view this chart, click Reports from the sidebar, and then select the Burndown Chart from the reports dropdown.
A Burndown Chart shows the actual and estimated amount of work to be done in a sprint. The horizontal x-axis in a Burndown Chart indicates time, while the vertical y-axis typically indicates story points.
Use the Burndown Chart to track the total work remaining for a sprint, and to project the likelihood of achieving the sprint goal. By tracking the remaining work throughout the iteration, a team can manage its progress and respond accordingly.

- The team finishes early sprint after sprint because they aren't committing to enough work.
- The team misses their forecast sprint after sprint because they're committing to too much work.
- The burndown line makes steep drops rather than a more gradual burndown because the work hasn't been broken down into granular pieces.
- The product owner adds or changes the scope mid-sprint.
Step 8: View the sprint report
At any point during or after the sprint, you can view the Sprint Report to monitor the sprint.
The Sprint Report includes the Burndown Chart, and lists the work completed, work not completed, and any work added after the sprint started.
Step 9: Hold the sprint review meeting
The sprint review, or sprint demo, is a sharing meeting where the team shows what they've shipped in that sprint. Each sprint usually produces a working part of the product called an increment.
This is a meeting with a lot of feedback on the project and includes a brainstorming session to help decide what to do next.
Attendees (Primarily): development team, scrum master, product owner. Optional: stakeholders
When: Typically on the last day of the sprint
Duration: Typically two hours for a two-week sprint
Purpose: Inspect the increment and collaboratively update the product backlog.
Questions to ask:
- Did the team meet the sprint forecast?
- Was there work added or removed during the middle of the sprint?
- Did any work not get completed within the sprint?
- If so, why?
Step 10: Hold the sprint retrospective meeting
After you complete the sprint, have your team do a retrospective. Document your retrospective somewhere. May we suggest Confluence ?
Attendees: development team, scrum master, product owner.
When: At the end of an iteration.
Duration: Typically 90 minutes for a two-week sprint.
Purpose: The team inspects itself, including its processes, tools and team interaction. Improvement issues are often added to the next sprint's backlog.
Retrospectives aren't just a time for complaints without action. Use retrospectives to find out what's working so the team can continue to focus on those areas. Also, find out what's not working and use the time to find creative solutions and develop an action plan. Continuous improvement is what sustains and drives development within an agile team, and retrospectives are a key part of that.
- What did we do well during the sprint?
- What could we have done better?
- What are we going to do better for next time?
ProTip: Even if things are going well across the team, don't stop doing retrospectives. Retrospectives provide ongoing guidance for the team to keep things going well.
Step 11: Complete the sprint in Jira
At the end of the sprint, you must complete it.

If the sprint has incomplete issues, you can:
- Move the issue(s) to the backlog.
- Move the issue(s) to a future sprint.
- Move the issue(s) to a new sprint, which Jira will create for you.
Step 12: Repeat from step 2
At this point, you've got the basics on building your backlog with user stories, organizing your user stories into sprints, starting your sprint, and holding Scrum ceremonies. You can decide if this is working for your team, or if you'd like to move forward into some more advanced topics.
After you and your team have completed the steps above, move on to the advanced article: How to do advanced scrum practices with Jira.
Claire is an Atlassian marketing veteran who’s worked across growth, performance, and product marketing throughout her tenure. Currently she drives brand, content, and go-to-marketing strategy for Confluence Cloud. Outside work, you can find Claire surfing, running, or trying out new restaurants in San Francisco or new cities across the globe.
Learn advanced scrum with Jira
An advanced guide on more advanced scrum practices such as using epics, customizing your workflow and using reports in Jira.
Scrum - A brief introduction to scrum methodology
Scrum is a structured framework for product development that is frequently used by agile software development teams. Read this beginner's guide to scrum.

- SUGGESTED TOPICS
- The Magazine
- Newsletters
- Managing Yourself
- Managing Teams
- Work-life Balance
- The Big Idea
- Data & Visuals
- Reading Lists
- Case Selections
- HBR Learning
- Topic Feeds
- Account Settings
- Email Preferences
How to Manage a Cross-Functional Team
- David Burkus

Start by getting clear on how you’ll communicate.
Cross-functional teams — those with people from different departments who have varied expertise — are becoming more common, as is the rise of project-based work arrangements. Early in your career, you may even find that your first “real” leadership role is managing a newly formed, cross-functional team for a specific and short-term project. There are a few key actions new leaders can take to get their team off to a great start.
- Establish goals and roles. Each member has different knowledge, skills, abilities, and past experiences. As the team leader, it’s important to establish the scope of the project quickly, deliberate on the tasks required, and facilitate a discussion around who on the team would be best suited for different tasks. Resist the urge to assign tasks to whomever volunteers first, instead think who fits the task best.
- Set communication norms. Just as your team members will bring different knowledge, skills, and abilities, they’ll also bring their own unique work and communication preferences. Take some time during the initial project kickoff to discuss those work and communication preferences. Failure to establish collaboration norms tells teammates they can work and communicate however they want, making it more likely for messages to get missed.
- Build safety and candor. To generate ideas and solve problems, we need to lower inhibitions and create a culture where each member can be more honest and less guarded. To encourage this openness, new leaders often call for candor in meetings, but doing so before building psychological safety is a mistake. As a leader, it’s your responsibility to establish that level of safety. You can do this by signaling your own openness to feedback or expressing doubt in your own ideas.
- Celebrate milestones and small wins. Milestones don’t just track progress; they serve as an early warning signal that a pivot might need to be made. These milestones will also give the team early wins to celebrate and help them feel a sense of accomplishment. Celebrating small wins can boost morale and foster a sense of collective appreciation
A couple years into your career, you’ll find a few different opportunities to step up and practice your leadership skills. Sometimes it will be preparing and running a team meeting. Other times it may be volunteering for a new task the team requires.
- David Burkus is an organizational psychologist and best-selling author of five books, including Best Team Ever . For more information, visit his website .
Partner Center
'It's one-of-a-kind experience': 'Heeramandi' creator Sanjay Bhansali on why series is a must-watch
"it's one-of-a-kind experience, and everyone in the world should experience it," says creator sanjay leela bhansali..

Sanjay Leela Bhansali has always done things larger than life. One look at his films or even a trailer and you would know that the filmmaker likes to go all out with his projects.
But Heeramandi remains his grandest project to date. It took him 18 years from the moment Moin Beig handed him the script to when it finally made its way to Netflix. Bhansali would not have done in any other way.
"When I read Moin Beig's 25 Pages called 'Heeramandi', I was fascinated by the world," Bhansali tells USA TODAY over Zoom from Los Angeles, where Netflix has arranged a special screening of the series. "We've not seen this world. This world does not exist anymore."
The filmmaker said that each character from the series captivated him, and he found each one of them to be "beautiful, charming women."
Courtesans and tawaifs are a recurring theme in Bhansali's projects from Chandramukhi (played by Madhuri Dixit) in "Devdas" to Gangubai (played by Alia Bhatt) in "Gangubai Kathiawadi". So, what made him want to make an eight-episode series on a subject that he has previously worked on?
Need a break? Play the USA TODAY Daily Crossword Puzzle.
"I was fascinated by these characters," said Bhansali. "And I found them to be such beautiful, charming women. They were so educated. They knew the art of conversations. They were artists."
The filmmaker said that he was intrigued by their way of living - the way they interacted with one another, the power play between them, the way they controlled the nawabs (royal men) and how they survived.
"These courtesans needed to be celebrated," Bhansali said. "A lot of my films talk about these women. These women who have been deprived of their dignity, their rights. Sometimes they're only looked at as beautiful objects, but not wanting to know that how wonderful their minds were or how intelligent they were. How stylish they were. How important they were."
However, none of the characters have been inspired by real-life people, said Bhansali, adding that Beig did borrow inspiration from people he met in Heeramandi on his travels to Lahore, often meshing different people into one character.
'Epic saga of love, power, betrayal': Release date, cast, where to watch 'Heeramandi: The Diamond Bazaar'
An homage to Heeramandi
Located in the historical city of Lahore, in present-day Pakistan, Heeramandi was once a hub for performing arts, culture, music, poetry, dances, etiquette and poise, so much so that royal families would send their children to learn art and etiquette from the courtesans there. Much like the Geishas in Japan, courtesans from Heeramandi were revered and were viewed as a status symbol, gracing elite parties with their presence. After the British colonized India, Heeramandi gradually transformed into a red-light district with prostitution replacing cultural activities. It was eventually closed down by the Government of Pakistan in the 2010s.
Bhansali feels that the current generations are unaware of what a "special place" Heeramandi was and wanted to pay a homage to the place and people who lived there, especially in light of how the area is now associated with vulgarity and sex only.
"Heeramandi was a very special place," Bhansali said. "It was a place of arts, culture. It was a place of etiquettes. It was a place of artists."
The filmmaker felt that it was important to tell this story and educate the current generation on this culture that existed in undivided India back then and he wanted to do it tastefully in a dignified manner.
While the filmmaker's project is set in Lahore, he himself has never visited the city.
"I wanted to, but I couldn't do it," Bhansali said. "It's a fascinating city and I'd love to go there because people over there really love my work and they give me a lot of love, but I have not been able to visit unfortunately."
As a result, the series' visuals and sets are more of an amalgamation of references and research that Bhansali and his production team found from the internet and Beig's notes than actual reality.
"I took a lot of Lahore from his [Beig] point of view, from his mind and the rest was to my imagination," Bhansali said. "I imagined and created a world that would somehow feel like the real Lahore. I keep saying, I'm a whole soul. I may have traveled those places at some point in my previous birth. I don't know, I somehow know these places deep down."
He added: "So, I resorted to using my own imagination, more than actually visiting Lahore and seeing it."
Finalizing the cast took 6-8 months
Once the project was locked, the next step was finalizing the cast. For a project that has gone on for as long as this, it is natural that the many names would have been considered for the project. Some even made it to the news and headlines.
"Normally all the films that I make, are with me for 8 years, 10 years as an idea," Bhansali said. "I live with the idea, and I develop it more. I live with the characters. I talk to them, create a lot of conversation of myself with the characters."
In this case, it was 18 years and over that time the cast changed, said Bhansali, adding that the project was first started as a film.
Many actors such as Rekha, Madhuri Dixit, Kareena Kapoor Khan, Fawad Khan, Mahira Khan and Imran Abbas were on Bhansali's wish list, but when it finally came down to naming the cast, Bhansali picked Manisha Koraila, with whom he had worked on his first film "Khamoshi."
"She is a little less seen, she's a little less exposed today," Bhansali said. "She had never played a courtesan first and she's an extremely beautiful, intelligent woman to be able to. Then I said Mallikajan would be fantastic with her."
As for Mallikajan's archnemeses Fareedan, Bhansali chose Sonakshi Sinha.
"Sonakshi is someone I've have been wanting to work (with) for a long time because she has such an aura. She is so beautiful and extremely talented. Those eyes speak volumes and she's really the star that I would say has the aura of a big star."
It took Bhansali about 6 to 8 months to finalize the cast and the meticulous filmmaker is satisfied with the results.
"I just got the perfect casting in terms of not being overexposed and willing to work for so many days. We shot for 350 days, and they had to come every day [and] get ready, dressed for almost 2-3 hours," Bhansali said. "So, it was a lot of hard work and a lot of commitment. I'm grateful to these actors that they've done it."
An extravagant affair
The Vice President of Netflix India Monika Shergill, in a statement said that the series is Netflix's "grandest endeavor yet."
Bhansali said that no expense was spared when it came to the series' production. The sets were built on a grand scale, spanning an area of 3-acres at a studio in Mumbai, with chandeliers, fountains and hand-embroidered panels. Furniture was sourced from antique shops across India. The costumes, designed by Rimple and Harpreet , were hand-crafted and elaborately done. In fact, Bhansali confessed that he had the designers make the same costumers multiple times because of various issues.
Ensuring that everything was as perfect as it could be also caused production delays and Bhansali is grateful to his team and actors for their patience.
"You see I wanted to give everything to this show," Bhansali said. "It had to be perfect. I would never make a show like this at this scale ever again in my life. We owe that to the people, to the audience to give them the best."
In many of the scenes, the actors even wore original jewelry and for that the security was heightened with guards standing outside the sets and wardrobe department to ensure their safety, shared Bhansali.
Bhansali said that if he could, he would have probably liked to take the whole set home with him.
The filmmaker shared that he spent two days before the set was taken down wandering around it and soaking it all in and reminiscing all the time he spent there making the show - all the songs, the dances, the lighting, the chaos - "and the joy and exuberance of the set."
And when the set finally came down, he felt like Heeramandi was actually closing down.
'It needed that scale'
"Heeramandi" is Bhansali's first foray in the world of streaming the OTT platforms. Given the grandiosity of this project, one would assume that it would release as a film on the big screen. And Bhansali tried.
"I feel that was too vast a subject," Bhansali said. "When I tried to make it as a few years ago, I realized I would not be able to continue it into a two-hour film or three. I would not be able to justice to the canvas, to all these characters and the wonderful lives that they lived."
"So, it was important that it'd be done episode wise, so that you get the time to nicely develop the characters, to take their trajectory, to culminate the right point of the right way. You needed the time. It needed that scale."
Bhansali joked that audiences nowadays watch his big-screen projects such as "Devdas" and "Padmaavat" on their mobile devices, so the lines between the different mediums have gotten a little blurred.
However, he is confident that audiences will be able to gauge the scale and grandeur of production even on their mobile devices.
Another advantage of releasing the series on Netflix is the reach. Had the film released in cinemas, it might not have been able to tap into multiple audiences and travel to so many different countries across the world, said Bhansali.
How to watch 'Heeramandi'
'Heeramandi: The Diamond Market' is now streaming on Netflix. It is also available in English with subtitles.
Saman Shafiq is a trending news reporter for USA TODAY. Reach her at [email protected] and follow her on X @saman_shafiq7.
- Español – América Latina
- Português – Brasil
- Tiếng Việt
Build Your First Android App in Java
1. welcome.

In this codelab, you'll learn how to build and run your first Android app in the Java programming language. (If you're looking for the Kotlin version of this codelab , you can go here .)
What you must know already
This codelab is written for programmers and assumes that you know either the Java or Kotlin programming language. If you are an experienced programmer and adept at reading code, you will likely be able to follow this codelab, even if you don't have much experience with Java.
What you'll learn
- How to use Android Studio to build your app.
- How to run your app on a device or in the emulator.
- How to add interactive buttons.
- How to display a second screen when a button is pressed.
Use Android Studio and Java to write Android apps
You write Android apps in the Java programming language using an IDE called Android Studio. Based on JetBrains' IntelliJ IDEA software, Android Studio is an IDE designed specifically for Android development.
To work through this codelab, you will need a computer that can run Android Studio 3.6 or higher (or already has Android Studio 3.6 or higher installed).
2. Install Android Studio
You can download Android Studio 3.6 from the Android Studio page.
Android Studio provides a complete IDE, including an advanced code editor and app templates. It also contains tools for development, debugging, testing, and performance that make it faster and easier to develop apps. You can use Android Studio to test your apps with a large range of preconfigured emulators, or on your own mobile device. You can also build production apps and publish apps on the Google Play store.
Android Studio is available for computers running Windows or Linux, and for Macs running macOS. The OpenJDK (Java Development Kit) is bundled with Android Studio.
The installation is similar for all platforms. Any differences are noted below.
- Navigate to the Android Studio download page and follow the instructions to download and install Android Studio .
- Accept the default configurations for all steps, and ensure that all components are selected for installation.
- After the install is complete, the setup wizard downloads and installs additional components, including the Android SDK. Be patient, because this process might take some time, depending on your internet speed.
- When the installation completes, Android Studio starts, and you are ready to create your first project.
3. Task: Create your first project
In this step, you will create a new Android project for your first app. This simple app displays the string "Hello World" on the screen of an Android virtual or physical device.
Here's what the finished app will look like:

- How to create a project in Android Studio.
- How to create an emulated Android device.
- How to run your app on the emulator.
- How to run your app on your own physical device, if you have one.
Step 1: Create a new project
- Open Android Studio.

- Give your application a name such as My First App .

- Leave the defaults for the other fields.
- Click Finish .
After these steps, Android Studio:
- Creates a folder for your Android Studio project called MyFirstApp . This is usually in a folder called AndroidStudioProjects below your home directory.
- Builds your project (this may take a few moments). Android Studio uses Gradle as its build system. You can follow the build progress at the bottom of the Android Studio window.
- Opens the code editor showing your project.
Step 2: Get your screen set up
When your project first opens in Android Studio, there may be a lot of windows and panes open. To make it easier to get to know Android Studio, here are some suggestions on how to customize the layout.

- Depending on the size of your screen, consider resizing the pane on the left showing the project folders to take up less space.
At this point, your screen should look a bit less cluttered, similar to the screenshot shown below.

Step 3: Explore the project structure and layout

Based on you selecting the Basic Activity template for your project, Android Studio has set up a number of files for you. You can look at the hierarchy of the files for your app in multiple ways, one is in Project view. Project view shows your files and folders structured in a way that is convenient for working with an Android project. (This does not always match the file hierarchy! To see the file hierarchy, choose the Project files view by clicking (3) .)
- Double-click the app (1) folder to expand the hierarchy of app files. (See ( 1) in the screenshot.)
- If you click Project (2) , you can hide or show the Project view. You might need to select View > Tool Windows to see this option.
- The current Project view selection (3) is Project > Android .
In the Project > Android view you see three or four top-level folders below your app folder: manifests , java , java (generated) and res . You may not see java (generated) right away.
- Expand the manifests folder.
This folder contains AndroidManifest.xml . This file describes all the components of your Android app and is read by the Android runtime system when your app is executed. 2. Expand the java folder. All your Java language files are organized here. The java folder contains three subfolders:
com.example.myfirstapp: This folder contains the Java source code files for your app.
com.example.myfirstapp (androidTest): This folder is where you would put your instrumented tests, which are tests that run on an Android device. It starts out with a skeleton test file.
com.example.myfirstapp (test): This folder is where you would put your unit tests. Unit tests don't need an Android device to run. It starts out with a skeleton unit test file. 3. Expand the res folder. This folder contains all the resources for your app, including images, layout files, strings, icons, and styling. It includes these subfolders:
drawable : All your app's images will be stored in this folder.
layout : This folder contains the UI layout files for your activities. Currently, your app has one activity that has a layout file called activity_main.xml . It also contains content_main.xml , fragment_first.xml , and fragment_second.xml .
menu: This folder contains XML files describing any menus in your app.
mipmap : This folder contains the launcher icons for your app.
navigation: This folder contains the navigation graph, which tells Android Studio how to navigate between different parts of your application.
values : This folder contains resources, such as strings and colors, used in your app.
Step 4: Create a virtual device (emulator)
In this task, you will use the Android Virtual Device (AVD) manager to create a virtual device (or emulator) that simulates the configuration for a particular type of Android device.
The first step is to create a configuration that describes the virtual device.

- Click +Create Virtual Device . (If you have created a virtual device before, the window shows all of your existing devices and the +Create Virtual Device button is at the bottom.) The Select Hardware window shows a list of pre-configured hardware device definitions.
- Choose a device definition, such as Pixel 2 , and click Next . (For this codelab, it really doesn't matter which device definition you pick).
- In the System Image dialog, from the Recommended tab, choose the latest release. (This does matter.)
- If a Download link is visible next to a latest release, it is not installed yet, and you need to download it first. If necessary, click the link to start the download, and click Next when it's done. This may take a while depending on your connection speed.
- In the next dialog box, accept the defaults, and click Finish .
The AVD Manager now shows the virtual device you added.
- If the Your Virtual Devices AVD Manager window is still open, go ahead and close it.
Step 5: Run your app on your new emulator

- In Run > Select Device , under Available devices , select the virtual device that you just configured. This menu also appears in the toolbar.

The emulator starts and boots just like a physical device. Depending on the speed of your computer, this may take a while. You can look in the small horizontal status bar at the very bottom of Android Studio for messages to see the progress.
Once your app builds and the emulator is ready, Android Studio uploads the app to the emulator and runs it. You should see your app as shown in the following screenshot.

Step 6: Run your app on a device (if you have one)
What you need:
- An Android device such as a phone or tablet.
- A data cable to connect your Android device to your computer via the USB port.
- If you are using a Linux or Windows OS, you may need to perform additional steps to run your app on a hardware device. Check the Run Apps on a Hardware Device documentation. On Windows, you may need to install the appropriate USB driver for your device. See OEM USB Drivers .
Run your app on a device
To let Android Studio communicate with your device, you must turn on USB Debugging on your Android device.
On Android 4.2 and higher, the Developer options screen is hidden by default. To show Developer options and enable USB Debugging:
- On your device, open Settings > About phone and tap Build number seven times.
- Return to the previous screen ( Settings ). Developer options appears at the bottom of the list. Tap Developer options .
- Enable USB Debugging .
Now you can connect your device and run the app from Android Studio.
- Connect your device to your development machine with a USB cable. On the device, you might need to agree to allow USB debugging from your development device.
- Select your device, and click OK . Android Studio installs the app on your device and runs it.
Troubleshooting
If you're stuck, quit Android Studio and restart it.
If Android Studio does not recognize your device, try the following:
- Disconnect your device from your development machine and reconnect it.
- Restart Android Studio.
If your computer still does not find the device or declares it "unauthorized":
- Disconnect the device.
- On the device, open Settings->Developer Options .
- Tap Revoke USB Debugging authorizations .
- Reconnect the device to your computer.
- When prompted, grant authorizations.
If you are still having trouble, check that you installed the appropriate USB driver for your device. See the Using Hardware Devices documentation .
Check the troubleshooting section in the Android Studio documentation .
Step 7: Explore the app template
When you created the project and selected Basic Activity , Android Studio set up a number of files, folders, and also user interface elements for you, so you can start out with a working app and major components in place. This makes it easier to build your application.

Later in this codelab, you'll look at the Next button and modify the way it looks and what it does.
4. Task: Explore the layout editor
Generally, each screen in your Android app is associated with one or more fragments . The single screen displaying "Hello first fragment" is created by one fragment, called FirstFragment . This was generated for you when you created your new project. Each visible fragment in an Android app has a layout that defines the user interface for the fragment. Android Studio has a layout editor where you can create and define layouts.
Layouts are defined in XML . The layout editor lets you define and modify your layout either by coding XML or by using the interactive visual editor.
Every element in a layout is a view. In this task, you will explore some of the panels in the layout editor, and you will learn how to change property of views.
- How to use the layout editor.
- How to set property values.
- How to add string resources.
- How to add color resources.
Step 1: Open the layout editor

- Double-click fragment_first.xml .

On the left is a Palette (1) of views you can add to your app.
Below that is a Component Tree (2) showing the views currently in this file, and how they are arranged in relation to each other.
In the center is the Design editor (3) , which shows a visual representation of what the contents of the file will look like when compiled into an Android app. You can view the visual representation, the XML code, or both.

- Try selecting the different modes. Depending on your screen size and work style, you may prefer switching between Code and Design , or staying in Split view. If your Component Tree disappears, hide and show the Palette .

- At the lower right of the Design editor you see + and - buttons for zooming in and out. Use these buttons to adjust the size of what you see, or click the zoom-to-fit button so that both panels fit on your screen.

The Design layout on the left shows how your app appears on the device. The Blueprint layout , shown on the right, is a schematic view of the layout.

Depending on the size of your screen and your preference, you may wish to only show the Design view or the Blueprint view, instead of both.

- Use the device menu to view the layout on different devices. (This is extremely useful for testing!)

On the right is the Attributes panel. You'll learn about that later.
Step 2: Explore and resize the Component Tree
- In fragment_first.xml , look at the Component Tree . If it's not showing, switch the mode to Design instead of Split or Code .

The Component Tree closes. 4. Bring back the Component Tree by clicking the vertical label Component Tree on the left.

Step 3: Explore view hierarchies
- In the Component Tree , notice that the root of the view hierarchy is a ConstraintLayout view.
Every layout must have a root view that contains all the other views. The root view is always a view group , which is a view that contains other views. A ConstraintLayout is one example of a view group. 2. Notice that the ConstraintLayout contains a TextView , called textview_first and a Button , called button_first .

- If the code isn't showing, switch to Code or Split view using the icons in the upper right corner.
- In the XML code, notice that the root element is <androidx.constraintlayout.widget.ConstraintLayout> . The root element contains a <TextView> element and a <Button> element.
Step 4: Change property values
- In the code editor, examine the properties in the TextView element.
- Click on the string in the text property, and you'll notice it refers to a string resource, hello_first_fragment .
- Right-click on the property and click Go To > Declaration or Usages
values/strings.xml opens with the string highlighted.
- Change the value of the string property to Hello World! .
- Switch back to fragment_first.xml .

- Run the app to see the change you made in strings.xml . Your app now shows "Hello World!".

Step 5: Change text display properties
- With textview_first still selected in the Component Tree , in the layout editor, in the list of attributes, under Common Attributes , expand the textAppearance field. (You may need to scroll down to find it.)

- Change some of the text appearance properties. For example, change the font family, increase the text size, and select bold style. (You might need to scroll the panel to see all the fields.)
- Change the text color. Click in the textColor field, and enter g .
A menu pops up with possible completion values containing the letter g. This list includes predefined colors.

- Select @android:color/darker_gray and press Enter .
Below is an example of the textAppearance attributes after making some changes.

- Look at the XML for the TextView . You see that the new properties have been added.
- Run your app again and see the changes applied to your Hello World! string

Step 6: Display all attributes
- In the Attributes panel, scroll down until you find All Attributes .

- Scroll through the list to get an idea of the attributes you could set for a TextView .
5. Task: Add color resources
So far you have learned how to change property values. Next, you will learn how to create more resources like the string resources you worked with earlier. Using resources enables you to use the same values in multiple places, or to define values and have the UI update automatically whenever the value is changed.
- How resources are defined.
- Adding and using color resources.
- The results of changing layout height and width.
Step 1: Add color resources
First, you'll learn how to add new color resources.
- In the Project panel on the left, double-click on res > values > colors.xml to open the color resource file.

The colors.xml file opens in the editor. So far, three colors have been defined. These are the colors you can see in your app layout, for example, purple for the app bar.
- Go back to fragment_first.xml so you can see the XML code for the layout.
- Add a new property to the TextView called android:background , and start typing to set its value to @color . You can add this property anywhere inside the TextView code.
A menu pops up offering the predefined color resources:

- Choose @color/colorPrimaryDark.
- Change the property android:textColor and give it a value of @android:color/white .
The Android framework defines a range of colors, including white, so you don't have to define white yourself. 6. In the layout editor, you can see that the TextView now has a dark blue background, and the text is displayed in white.

Step 2: Add a new color to use as the screen background color
- Back in colors.xml , create a new color resource called screenBackground :
A Color can be defined as 3 hexadecimal numbers (#00-#FF, or 0-255) representing the red, blue, and green (RGB) components. The color you just added is yellow. Notice that the colors corresponding to the code are displayed in the left margin of the editor.

Note that a color can also be defined including an alpha value (#00-#FF) which represents the transparency (#00 = 0% = fully transparent, #FF = 100% = fully opaque). When included, the alpha value is the first of 4 hexadecimal numbers (ARGB).
The alpha value is a measure of transparency. For example, #88FFEE58 makes the color semi-transparent, and if you use #00FFEE58, it's fully transparent and disappears from the left-hand bar.
- Go back to fragment_first.xml .

- In the Attributes panel, select the background property and press Enter . Type "c" in the field that appears.
- In the menu of colors that appears, select @color/screenBackground . Press Enter to complete the selection.

- Click on the yellow patch to the left of the color value in the background field.

- Feel free to change the value of the screenBackground color, but make sure that the final color is noticeably different from the colorPrimary and colorPrimaryDark colors.
Step 3: Explore width and height properties
Now that you have a new screen background color, you will use it to explore the effects of changing the width and height properties of views.
- In fragment_first.xml , in the Component Tree , select the ConstraintLayout .

The layout_width and layout_height properties are both set to match_parent . The ConstraintLayout is the root view of this Fragment , so the "parent" layout size is effectively the size of your screen.
- Notice that the entire background of the screen uses the screenBackground color.

- Select textview_first . Currently the layout width and height are wrap_content , which tells the view to be just big enough to enclose its content (plus padding)
- Change both the layout width and layout height to match_constraint , which tells the view to be as big as whatever it's constrained to.
The width and height show 0dp , and the text moves to the upper left, while the TextView expands to match the ConstraintLayout except for the button. The button and the text view are at the same level in the view hierarchy inside the constraint layout, so they share space.

- Explore what happens if the width is match_constraint and the height is wrap_content and vice versa. You can also change the width and height of the button_first.
- Set both the width and height of the TextView and the Button back to wrap_content .
6. Task: Add views and constraints
In this task, you will add two more buttons to your user interface, and update the existing button, as shown below.

- How to add new views to your layout.
- How to constrain the position of a view to another view.
Step 1: View constraint properties
- In fragment_first.xml , look at the constraint properties for the TextView .
These properties define the position of the TextView . Read them carefully.
You can constrain the top, bottom, left, and right of a view to the top, bottom, left, and right of other views.
- Select textview_first in the Component Tree and look at the Constraint Widget in the Attributes panel.

Step 2: Add buttons and constrain their positions
To learn how to use constraints to connect the positions of views to each other, you will add buttons to the layout. Your first goal is to add a button and some constraints, and change the constraints on the Next button.
- Notice the Palette at the top left of the layout editor. Move the sides if you need to, so that you can see many of the items in the palette.

- Click on some of the categories, and scroll the listed items if needed to get an idea of what's available.
- Select Button , which is near the top, and drag and drop it onto the design view, placing it underneath the TextView near the other button.

Notice that a Button has been added to the Component Tree under ConstraintLayout .
Step 3: Add a constraint to the new button
You will now constrain the top of the button to the bottom of the TextView .
- Move the cursor over the circle at the top of the Button .

- Click and drag the circle at the top of the Button onto the circle at the bottom of the TextView .

The Button moves up to sit just below the TextView because the top of the button is now constrained to the bottom of the TextView .

- Take a look at the Constraint Widget in the Layout pane of the Attributes panel. It shows some constraints for the Button , including Top -> BottomOf textView .
- Take a look at the XML code for the button. It now includes the attribute that constrains the top of the button to the bottom of the TextView .
- You may see a warning, " Not Horizontally Constrained ". To fix this, add a constraint from the left side of the button to the left side of the screen.
- Also add a constraint to constrain the bottom of the button to the bottom of the screen.
Before adding another button, relabel this button so things are a little clearer about which button is which.
- Click on the button you just added in the design layout.
- Look at the Attributes panel on the right, and notice the id field.
- Change the id from button to toast_button .
Step 4: Adjust the Next button
You will adjust the button labeled Next , which Android Studio created for you when you created the project. The constraint between it and the TextView looks a little different, a wavy line instead of a jagged one, with no arrow. This indicates a chain , where the constraints link two or more objects to each other, instead of just one to another. For now, you'll delete the chained constraints and replace them with regular constraints.
To delete a constraint:

- Or click on one of the constrained views, then right-click on the constraint and select Delete from the menu.
- Or in the Attributes panel, move the cursor over the circle for the constraint until it shows an x, then click it.

If you delete a constraint and want it back, either undo the action, or create a new constraint.
Step 5: Delete the chain constraints
- Click on the Next button, and then delete the constraint from the top of the button to the TextView .
- Click on the TextView , and then delete the constraint from the bottom of the text to the Next button.
Step 6: Add new constraints
- Constrain the right side of the Next button to the right of the screen if it isn't already.
- Delete the constraint on the left side of the Next button.
- Now constrain the top and bottom of the Next button so that the top of the button is constrained to the bottom of the TextView and the bottom is constrained to the bottom of the screen. The right side of the button is constrained to the right side of the screen.
- Also constrain the TextView to the bottom of the screen.
It may seem like the views are jumping around a lot, but that's normal as you add and remove constraints.
Your layout should now look something like this.

Step 7: Extract string resources
- In the fragment_first.xml layout file, find the text property for the toast_button button.
- Notice that the text "Button" is directly in the layout field, instead of referencing a string resource as the TextView does. This will make it harder to translate your app to other languages.
- To fix this, click the highlighted code. A light bulb appears on the left.

- In the dialog box that appears, change the resource name to toast_button_text and the resource value to Toast and click OK .

- Notice that the value of the android:text property has changed to @string/toast_button_text .
- Go to the res > values > strings.xml file. Notice that a new string resource has been added, named toast_button_text .
- Run the app to make sure it displays as you expect it to.

You now know how to create new string resources by extracting them from existing field values. (You can also add new resources to the strings.xml file manually.) And you know how to change the id of a view.
Step 8: Update the Next button
The Next button already has its text in a string resource, but you'll make some changes to the button to match its new role, which will be to generate and display a random number.
- As you did for the Toast button, change the id of the Next button from button_first to random_button in the Attributes panel.

- In strings.xml , right-click on the next string resource.
- Select Refactor > Rename... and change the name to random_button_text .
- Click Refactor to rename your string and close the dialog.
- Change the value of the string from Next to Random .
- If you want, move random_button_text to below toast_button_text .
Step 9: Add a third button
Your final layout will have three buttons, vertically constrained the same, and evenly spaced from each other.

- In fragment_first.xml , add another button to the layout, and drop it somewhere between the Toast button and the Random button, below the TextView .
- Add vertical constraints the same as the other two buttons. Constrain the top of the third button to the bottom of TextView ; constrain the bottom of the third button to the bottom of the screen.
- Add horizontal constraints from the third button to the other buttons. Constrain the left side of the third button to the right side of the Toast button; constrain the right side of the third button to the left side of the Random button.
Your layout should look something like this:

- Examine the XML code for fragment_first.xml . Do any of the buttons have the attribute app:layout_constraintVertical_bias ? It's OK if you do not see that constraint.
The "bias" constraints allows you to tweak the position of a view to be more on one side than the other when both sides are constrained in opposite directions . For example, if both the top and bottom sides of a view are constrained to the top and bottom of the screen, you can use a vertical bias to place the view more towards the top than the bottom.
Here is the XML code for the finished layout. Your layout might have different margins and perhaps some different vertical or horizontal bias constraints.The exact values of the attributes for the appearance of the TextView might be different for your app.
Step 10: Get your UI ready for the next task
The next task is to make the buttons do something when they are pressed. First, you need to get the UI ready.
- Change the text of the TextView to show 0 (the number zero).
- Change the id of the last button you added, button2 , to count_button in the Attributes panel in the design editor.
- In the XML, extract the string resource to count_button_text and set the value to Count.

The buttons should now have the following text and ids:
- Run the app.
Step 11: Fix errors if necessary

The errors occur because the buttons have changed their id and now these constraints are referencing non-existent views.
If you have these errors, fix them by updating the id of the buttons in the constraints that are underlined in red.
7. Task: Update the appearance of the buttons and the TextView
Your app's layout is now basically complete, but its appearance can be improved with a few small changes.
Step 1: Add new color resources
- In colors.xml , change the value of screenBackground to #2196F3 , which is a blue shade in the Material Design palette .
- Add a new color named buttonBackground . Use the value #BBDEFB , which is a lighter shade in the blue palette.
Step 2: Add a background color for the buttons
- In the layout, add a background color to each of the buttons. (You can either edit the XML in fragment_first.xml or use the Attributes panel, whichever you prefer.)
Step 3: Change the margins of the left and right buttons
- Give the Toast button a left (start) margin of 24dp and give the Random button a right (end) margin of 24dp. (Using start and end instead of left and right makes these margins work for all language directions.)

Step 4: Update the appearance of the TextView
- Remove the background color of the TextView , either by clearing the value in the Attributes panel or by removing the android:background attribute from the XML code.
When you remove the background, the view background becomes transparent. 2. Increase the text size of the TextView to 72sp.
- Change the font-family of the TextView to sans-serif (if it's not already).
- Add an app:layout_constraintVertical_bias property to the TextView , to bias the position of the view upwards a little so that it is more evenly spaced vertically in the screen. Feel free to adjust the value of this constraint as you like. (Check in the design view to see how the layout looks.)

- Make sure the layout_width is wrap_content , and the horizontal bias is 50 ( app:layout_constraintHorizontal_bias="0.5" in XML).
Step 5: Run your app
If you implemented all the updates, your app will look like the following figure. If you used different colors and fonts, then your app will look a bit different.

8. Task: Make your app interactive
You have added buttons to your app's main screen, but currently the buttons do nothing. In this task, you will make your buttons respond when the user presses them.
First you will make the Toast button show a pop-up message called a toast . Next you will make the Count button update the number that is displayed in the TextView .
- How to find a view by its ID.
- How to add click listeners for a view.
- How to set and get property values of a view from your code.
Step 1: Enable auto imports
To make your life easier, you can enable auto-imports so that Android Studio automatically imports any classes that are needed by the Java code.
- In Android Studio, open the settings editor by going to File > Other Settings > Preferences for New Projects .
- Select Auto Imports . In the Java section, make sure Add Unambiguous Imports on the fly is checked.

Step 2: Show a toast
In this step, you will attach a Java method to the Toast button to show a toast when the user presses the button. A toast is a short message that appears briefly at the bottom of the screen.

- Open FirstFragment.java ( app > java > com.example.android.myfirstapp > FirstFragment ).
This class has only two methods, onCreateView() and onViewCreated() . These methods execute when the fragment starts.
As mentioned earlier, the id for a view helps you identify that view distinctly from other views. Using the findViewByID() method, your code can find the random_button using its id, R.id.random_button . 2. Take a look at onViewCreated() . It sets up a click listener for the random_button , which was originally created as the Next button.
Here is what this code does:
- Use the findViewById() method with the id of the desired view as an argument, then set a click listener on that view.
- In the body of the click listener, use an action, which in this case is for navigating to another fragment, and navigate there. (You will learn about that later.)
- Just below that click listener, add code to set up a click listener for the toast_button , which creates and displays a toast. Here is the code:
- If you want, extract the message string into a resource as you did for the button labels.
You have learned that to make a view interactive you need to set up a click listener for the view which says what to do when the view (button) is clicked on. The click listener can either:
- Implement a small amount of code directly.
- Call a method that defines the desired click behavior in the activity.
Step 3: Make the Count button update the number on the screen
The method that shows the toast is very simple; it does not interact with any other views in the layout. In the next step, you add behavior to your layout to find and update other views.
Update the Count button so that when it is pressed, the number on the screen increases by 1.
- In the fragment_first.xml layout file, notice the id for the TextView :
- In FirstFragment.java , add a click listener for the count_button below the other click listeners in onViewCreated() . Because it has a little more work to do, have it call a new method, countMe() .
- In the FirstFragment class, add the method countMe() that takes a single View argument. This method will be invoked when the Count button is clicked and the click listener called.
- Get the value of the showCountTextView . You will define that in the next step.
- Convert the value to a number, and increment it.
- Display the new value in the TextView by programmatically setting the text property of the TextView .
Here is the whole method:
Step 4: Cache the TextView for repeated use
You could call findViewById() in countMe() to find showCountTextView . However, countMe() is called every time the button is clicked, and findViewById() is a relatively time consuming method to call. So it is better to find the view once and cache it.
- In the FirstFragment class before any methods, add a member variable for showCountTextView of type TextView .
- In onCreateView() , you will call findViewById() to get the TextView that shows the count. The findViewById() method must be called on a View where the search for the requested ID should start, so assign the layout view that is currently returned to a new variable, fragmentFirstLayout , instead.
- Call findViewById() on fragmentFirstLayout , and specify the id of the view to find, textview_first . Cache that value in showCountTextView .
- Return fragmentFirstLayout from onCreateView() .
Here is the whole method and the declaration of showCountTextView :
- Run your app. Press the Count button and watch the count update.
9. Task: Implement the second fragment
So far, you've focused on the first screen of your app. Next, you will update the Random button to display a random number between 0 and the current count on a second screen.

- How to pass information to a second fragment.
Update the layout for the second fragment

Step 1: Add a TextView for the random number
- Open fragment_second.xml ( app > res > layout > fragment_second.xml ) and switch to Design View if needed. Notice that it has a ConstraintLayout that contains a TextView and a Button .

- Add another TextView from the palette and drop it near the middle of the screen. This TextView will be used to display a random number between 0 and the current count from the first Fragment .
- Set the id to @+id/textview_random ( textview_random in the Attributes panel.)
- Constrain the top edge of the new TextView to the bottom of the first TextView , the left edge to the left of the screen, and the right edge to the right of the screen, and the bottom to the top of the Previous button.
- Set both width and height to wrap_content .
- Set the textColor to @android:color/white , set the textSize to 72sp , and the textStyle to bold .

- Set the text to " R ". This text is just a placeholder until the random number is generated.
- Set the layout_constraintVertical_bias to 0.45 .
This TextView is constrained on all edges, so it's better to use a vertical bias than margins to adjust the vertical position, to help the layout look good on different screen sizes and orientations. 10. If you get a warning "Not Horizontally Constrained," add a constraint from the start of the button to the left side of the screen and the end of the button to the right side of the screen.
Here is the XML code for the TextView that displays the random number:
Step 2: Update the TextView to display the header
- In fragment_second.xml , select textview_second , which currently has the text "Hello second fragment. Arg: %1$s" in the hello_second_fragment string resource.
- If android:text isn't set, set it to the hello_second_fragment string resource.
- Change the id to textview_header in the Attributes panel.
- Set the width to match_constraint , but set the height to wrap_content , so the height will change as needed to match the height of the content.
- Set top, left and right margins to 24dp . Left and right margins may also be referred to as "start" and "end" to support localization for right to left languages.
- Remove any bottom constraint.
- Set the text color to @color/colorPrimaryDark and the text size to 24sp .
- In strings.xml , change hello_second_fragment to " Here is a random number between 0 and %d. "
- Use Refactor > Rename... to change the name of hello_second_fragment to random_heading .
Here is the XML code for the TextView that displays the heading:

Step 3: Change the background color of the layout
Give your new activity a different background color than the first activity:
- In colors.xml , add a new color resource:
- In the layout for the second activity, fragment_second.xml , set the background of the ConstraintLayout to the new color.
In the Attributes panel:

Your app now has a completed layout for the second fragment. But if you run your app and press the Random button, it may crash. The click handler that Android Studio set up for that button needs some changes. In the next task, you will explore and fix this error.
Step 4: Examine the navigation graph
When you created your project, you chose Basic Activity as the template for the new project. When Android Studio uses the Basic Activity template for a new project, it sets up two fragments, and a navigation graph to connect the two. It also set up a button to send a string argument from the first fragment to the second. This is the button you changed into the Random button. And now you want to send a number instead of a string.
- Open nav_graph.xml ( app > res > navigation > nav_graph.xml ).
A screen similar to the Layout Editor in Design view appears. It shows the two fragments with some arrows between them. You can zoom with + and - buttons in the lower right, as you did with the Layout Editor .
- You can freely move the elements in the navigation editor. For example, if the fragments appear with SecondFragment to the left, drag FirstFragment to the left of SecondFragment so they appear in the order you work with them.

Step 5: Enable SafeArgs
This will enable SafeArgs in Android Studio.
- Open Gradle Scripts > build.gradle (Project: My First App)
- Find the dependencies section In the buildscript section, and add the following lines after the other classpath entries:
- Open Gradle Scripts > build.gradle (Module: app)
- Just below the other lines that begin with apply plugin add a line to enable SafeArgs:

- Choose Build > Make Project . This should rebuild everything so that Android Studio can find FirstFragmentDirections .
Step 6: Create the argument for the navigation action
- In the navigation graph, click on FirstFragment , and look at the Attributes panel to the right. (If the panel isn't showing, click on the vertical Attributes label to the right.)
- In the Actions section, it shows what action will happen for navigation, namely going to SecondFragment .
- Click on SecondFragment , and look at the Attributes panel.
The Arguments section shows Nothing to show .
- Click on the + in the Arguments section.

Step 7: Send the count to the second fragment
The Next / Random button was set up by Android Studio to go from the first fragment to the second, but it doesn't send any information. In this step you'll change it to send a number for the current count. You will get the current count from the text view that displays it, and pass that to the second fragment.
- Open FirstFragment.java ( app > java > com.example.myfirstapp > FirstFragment )
- Find the method onViewCreated() and notice the code that sets up the click listener to go from the first fragment to the second.
- Replace the code in that click listener with a line to find the count text view, textview_first .
- Create an action with currentCount as the argument to actionFirstFragmentToSecondFragment() .
- Add a line to find the nav controller and navigate with the action you created.
Here is the whole method, including the code you added earlier:
- Run your app. Click the Count button a few times. Now when you press the Random button, the second screen shows the correct string in the header, but still no count or random number, because you need to write some code to do that.
Step 8: Update SecondFragment to compute and display a random number
You have written the code to send the current count to the second fragment. The next step is to add code to SecondFragment.java to retrieve and use the current count.
- In SecondFragment.java , add an import for navArgs to the list of imported libraries.
- In the onViewCreated() method below the line that starts with super , add code to get the current count, get the string and format it with the count, and then set it for textview_header.
- Get a random number between 0 and the count.
- Add code to convert that number into a string and set it as the text for textview_random .
Congratulations, you have built your first Android app!
10. Learn more
The intention of this codelab was to get you started building Android apps. We hope you want to know a lot more though, like how do I save data? How do I run background tasks? How do I display a list of photos? How do I ...
We encourage you to keep learning. We have more Android courses built by Google to help you on your learning journey.
Written tutorials
- Android Developer Fundamentals teaches programmers to build Android apps. This course is also available in some schools.
- Kotlin Bootcamp codelabs course is an introduction to Kotlin for programmers. You need experience with an object oriented programming language (Java, C++, Python) to take this course..
- Find more at developer.android.com , the official Android developer documentation from Google.
These interactive, video-based courses were created by Google experts in collaboration with Udacity. Take these courses at your own pace in your own time.
- Developing Android Apps in Kotlin : If you know how to program, learn how to build Android apps. This course uses Kotlin .
- Kotlin Bootcamp for Programmers : This is an introduction to Kotlin for programmers. You need some experience with an object oriented programming language (Java, C++, Python) to take this course.
Except as otherwise noted, the content of this page is licensed under the Creative Commons Attribution 4.0 License , and code samples are licensed under the Apache 2.0 License . For details, see the Google Developers Site Policies . Java is a registered trademark of Oracle and/or its affiliates.
- Share full article

Can Forests Be More Profitable Than Beef?
Cattle ranches have ruled the Amazon for decades. Now, new companies are selling something else: the ability of trees to lock away planet-warming carbon.
Forest restoration workers planted native Amazonian seedlings on degraded pastureland in Mãe do Rio, Brazil. Credit...
Supported by
By Manuela Andreoni
Photographs by Victor Moriyama
Manuela Andreoni visited restoration projects and ranches in the northern Amazon to understand how local economies there are changing.
- May 2, 2024
The residents of Maracaçumé, an impoverished town on the edge of the Amazon rainforest, are mystified by the company that recently bought the biggest ranch in the region. How can it possibly make money by planting trees, which executives say they’ll never cut down, on pastureland where cattle have been grazing for decades?
“We are killing pasture that a lot of farmers need,” said Josias Araújo, a former cowboy who now works in reforestation, as he stood on a patch of soil he was helping to fertilize. “It’s all strange.”
The new company, which is also Mr. Araújo’s new employer, is a forest restoration business called Re.green. Its aim, along with a handful of other companies, is to create a whole new industry that can make standing trees, which store planet-warming carbon, more lucrative than the world’s biggest driver of deforestation: cattle ranching.
It’s the holy grail of the forest economy. And now, it might be within reach.
The stakes are high. About a fifth of the great rainforest is already gone. And scientist warn that rising global temperatures could push the entire ecosystem, a trove of biodiversity and a crucial regulator of the world’s climate, to collapse in the coming decades unless deforestation is halted and an area the size of Germany is restored .

Re.green plans to restore native trees in deforested areas and sell credits that correspond to the carbon they lock away. Those trees will be protected, not logged. Then, businesses will use those credits to offset their own greenhouse gases in emissions accounting.
The bet hinges on the success of a system that’s being built from scratch and comes with some big challenges. Measuring the carbon held in trees and soil is complex. And, many conservationists worry that carbon credits could easily be abused by companies that want to appear environmentally conscious while sticking with fossil fuels.
Still, reforestation projects have created a buzz in the northern Amazon, where companies are rushing to buy up big plots of land with restoration potential.
“You know that people who handle cattle don’t care much about this reforestation stuff,” said Anderson Pina Farias, a rancher whose farm is almost completely deforested. But, he added, “if selling carbon is better than ranching, we can change businesses.”
Challenging an Empire
A backlash from nature seems to be helping the restoration companies win hearts and minds in a region where ranching culture runs deep.
Jose Villeigagnon Rabelo, the mayor of Mãe do Rio, a city in the northeastern part of the Amazon, is worried. A brutal drought fueled by climate change and deforestation has recently dried out much of the grass that ranchers there use as feed. And, after decades of pounding by hooves, millions of acres across the region have become so degraded they can’t nourish much of anything.
“The cattle are starving,” Mr. Rabelo said sitting in his office, with wooden paneling and benches made of angelim-vermelho, a tree that’s become hard to find in the region. “We’ve never had a summer like this.”
The crisis has prompted ranchers to dedicate bigger and bigger parts of their farms to feed ever-shrinking numbers of cattle. Now, fewer than half of the ranches registered with the city have any cattle on them.
But around a year ago, a restoration company called Mombak started a 7,500-acre project on one of the region’s biggest ranches. Mr. Rabelo says he is hopeful the new industry will offer the community a lifeline.
The idea is simple: A credit for each ton of carbon that the trees pull out of the atmosphere can be sold to companies that want to compensate for their own pollution.
Environmental disruptions, combined with growing interest in carbon credits, have created an opening to challenge the beef empire’s hold on vast stretches of the rainforest, experts say. According to a 2023 report by BloombergNEF , carbon markets could be valued at $1 trillion by 2037, double what the global beef market is worth now.
Growing a large, biodiverse forest on degraded land can cost tens of millions of dollars. For years, forestry projects had to rely on multiple revenue streams, including sustainable timber harvesting, to restore soil and grow different types of natives trees.
But companies looking to burnish their climate credentials are increasingly willing to spend more to fund projects they deem to be high quality. It’s why companies like Mombak and Re.green are now developing a business model that relies almost solely on carbon credits, with little or no logging.
Microsoft has bought a major project from Mombak, and Re.green says it expects to announce buyers soon. The two companies have raised some $200 million from investors — including large pension funds, the Brazilian Development Bank and global asset managers — to reforest hundreds of thousands of acres by the end of the decade.
“Scaling all of the other carbon removal sectors, it’s just going to move too slow,” said Brian Marrs, Microsoft’s senior director of energy and carbon. “I don’t think there’s a solution to carbon removal without global forestry included.”
Part of the strategy of companies like Mombak and Re.green is to help farmers improve land and intensify cattle ranching in some degraded areas while restoring forests on others. On average, Amazon ranches support one animal on every two acres. That could rise to three animals with little investment, researchers say .
Most projects employ a few dozen local people to plant trees, fertilize the soil and stand lookout for fires. The companies are also funding and training local businesses to provide much-needed native seeds and seedlings.
In some projects, as the forests grow local communities can also make a living from collecting and processing Brazil nuts, andiroba oil and other forest products they can sell to food, beauty and pharmaceutical companies.
When a standing forest becomes an answer to people’s range of needs, that becomes a powerful reason for communities to protect it, said Luiza Maia de Castro, an economist who is managing community relations for Re.green. Right now, razing trees is a perfectly acceptable livelihood in most of the Amazon.
“To break that cycle,” she said, “you have to change how people make a living.”
‘Real Questions’ About a New Model
The efforts still face big challenges. The supply of seeds for native trees is a bottleneck, and finding farms to buy in regions where land tenure is chaotic can take months of research.
Perhaps more important, the trajectory of carbon credit prices depends on whether the world can agree on what a high-quality credit looks like. The carbon markets have been repeatedly rattled by academic and media investigations that revealed dozens of projects had overstated their emissions impact, for instance, by “protecting” forests that were never in danger of being cut down.
But reforestation projects store carbon by growing trees on degraded land, a more straightforward system.
Some experts caution that displaced cattle could simply continue to drive deforestation elsewhere and that wildfires could erase the benefits of trees that took decades to grow.
“It sounds like carbon finance can make a difference,” said Barbara Haya, the director of the Berkeley Carbon Trading Project, which has investigated a number of carbon forestry projects. But she said there were also real questions about accounting methods.
On top of that, she added, “it’s problematic to trade forest carbon for fossil fuel emissions.” That’s partly because buying carbon credits might prove less costly than transitioning a business away from dirty sources of energy, the thing that scientists say the world must ultimately do to avoid the worst effects of climate change.
The companies say they have addressed concerns by setting up firefighting teams, making sure their projects don’t affect cattle supply and adopting a methodology that allows for changing circumstances like new government land policies.
And, remaking a forest isn’t only about the carbon math. It takes a lot more than planting trees. To get it right, scientists working in restoration have to study how each plant fits into a complex ecosystem.
Walking in the forest that remains in Re.green’s farm in Maracaçumé, Ricardo Rodrigues, a professor at the University of São Paulo and a co-founder of Re.green, didn’t stop by the samaúma tree, an Amazonian giant that can live hundreds of years and grow over 200 feet tall, or by the peroba, which is prized in the timber industry.
Instead, he grabbed a vine called a monkey ladder, which was about 10 feet long and perhaps a foot in diameter, that was hanging from a branch.
“For it to grow to this size, it takes decades,” he said. But the forest needs it, he added, because it holds a lot of water, producing flowers and fruit during drier seasons. “It maintains pollinators when trees can’t.”
Creating the conditions for vines, bromeliads and orchids to grow is a part the challenge, too, Mr. Rodrigues said. It’s how you make sure the forest will remain a forest after humans stop helping it along.
Right now, the idea is to get both humans and nature to work together. Techniques vary, depending on how far each parcel of land is from the existing forests. The nearest new plots benefit from the forest’s regenerative powers.
In Mãe do Rio, reforestation workers have been planting 1,000 seedlings a day, working alongside tractors that make trenches on the soil. Drones are documenting their progress.
Six months after the first round of planting, the team was ready to measure the 44 trees in one sample plot. Luiz Carlos Batista Lobato, a botanist who specializes in tree censuses, walked across the plot to document three trees that had died, many that were taller than him and one that was more than two inches thick.
In a few years, Mr. Batista Lobato said, monkeys and armadillos would come to eat the fruits of different trees and birds would feast on the açaí berries, dispersing their seeds as they move around the forest.
“That’s the cycle,” he said.
Watching the trees start to grow helped to dispel some of the skepticism that farmers across the region still have. Back in Maracaçumé, Djalma Soares, a rancher who works on land next to the Re.green project, said that, though he still loves his cattle, he can’t deny that the idea of bringing the forest back to life is “beautiful.”
Mr. Soares said he never had the privilege of studying all the other things he could do with his farm beyond raising cattle. But, still, he feels the unrelenting heat. Seeing his neighbors work to address that, he said, is inspiring.
“We end up feeling like following the same path,” he added, as he watched the sun set on a vast pasture. “We see that it’s the future.”
Manuela Andreoni is a Times climate and environmental reporter and a writer for the Climate Forward newsletter. More about Manuela Andreoni
Learn More About Climate Change
Have questions about climate change? Our F.A.Q. will tackle your climate questions, big and small .
Giant batteries are transforming the way the United States uses electricity. Here’s how .
Are carbon offsets for air travel worth it? A lot of them don’t work and some might even be harmful, but there are alternatives .
Cattle ranches have ruled the Amazon for decades. Now, new companies are selling something else: the ability of trees to lock away planet-warming carbon .
“Buying Time,” a series from The New York Times, looks at the risky ways humans are starting to manipulate nature to fight climate change.
Did you know the ♻ symbol doesn’t mean something is actually recyclable ? Read on about how we got here, and what can be done.
Advertisement
IMAGES
VIDEO
COMMENTS
A simple project plan includes these elements: Project name, brief summary, and objective. Project players or team members who will drive the project, along with their roles and responsibilities. Key outcomes and due dates. Project elements, ideally divided into must-have, nice-to-have and not-in-scope categories.
Add visual aids like charts, pictures, and maps to enhance the project. Add a tactile part to your project, like a short video. 4. Review the project rubric to make sure you've hit your requirements. Double check the rubric provided to you by your teacher and do a self-assessment of your project.
Step 3: Create a Work Breakdown Structure (WBS) A work breakdown structure (WBS) represents the project's scope by breaking it down into team and individual tasks or activities. Starting with the most important project deliverable, the WBS progressively breaks it down into smaller work packages and subtasks.
When a project and its budget are approved, the next step is assembling a project team with the skills and experience to execute the project as planned. A project manager will lead this team and define their roles and responsibilities. 10. Have a Project Kickoff Meeting. A kickoff meeting is how a project is formally started.
To create a new project plan in TeamGantt, click the New Project button in the upper right corner of the My Projects screen. Then enter your project name and start date, and select the days of the week you want to include in your plan. Click Create New Project to move on to the next step. 2.
How to create a project plan in 10 simple steps. Creating project plans can seem daunting at first since there's so many things to cover. The best advice I can give you though is to break the project planning process down into distinct steps. Some important things to consider when creating a project plan include: Set clear goals; Create a ...
A project plan houses all the necessary details of your project, such as goals, tasks, scope, deadlines, and deliverables. This shows stakeholders a clear roadmap of your project, ensures you have the resources for it, and holds everyone accountable from the start. In this article, we teach you the seven steps to create your own project plan.
A project plan: Clarifies the process and activities that will lead to the project's outputs and deliverables. Gives you information that enables you to estimate properly and define a project's outputs and project scope. Enables you to visualize the entire project and see the interdependencies between tasks.
The project plan, also called project management plan, answers the who, what, where, why, how and when of the project—it's more than a Gantt chart with tasks and due dates. The purpose of a project plan is to guide the execution and control project phases. As mentioned above, a project plan consists of the following documents:
1. Determine a timeline. The cornerstone of the project plan is often the timeline or schedule. A timeline should include the date you'll begin and expect to end the project, how long it'll take to finish each task and milestone, and the dates you expect tasks and milestones to be completed. Project managers often begin creating schedules ...
How to Write a Project Plan. Writing a project plan starts with finalizing your project information. Create an overview and a scope statement, determine a deliverables schedule, and define a budget. Include a risk management strategy, a communication plan, and any other documents your project needs.
A project manager creates a project roadmap and presents it to the client for approval. Step #6. Create a detailed project plan. Once the client approves the project roadmap, a project manager creates a task-level project plan by breaking down roadmap activities. Tasks are low-level project activities.
Step 1: Explain the project to key stakeholders, define goals, and get initial buy-in. The first step in any project is to define the "what" and "why.". Key stakeholders have the influence and authority to determine whether a project is successful, and their objectives must be satisfied. Even if the project comes from the CEO himself ...
We'll cover how to: Step 1: Identify the goal of the project. Step 2: Map out the scope. Step 3: Develop an outline or plan. Step 4: Share this initial idea with your team. Step 5: Finalize your plan. Step 6: Use a Gantt chart to keep things organized. Step 7: Distribute your project management plan. Step 8: Hold a project post mortem.
3. Provide a complete copy of the project plan to all stakeholders. You won't be reading the entire project plan word for word in the meeting, and some stakeholders may want more information. Provide a full copy of your report to each stakeholder, either electronically or on paper.
Project planning is the second phase in the project management lifecycle: PHASE 1: Project Initiation — where you identify a business need or problem and a potential solution. PHASE 2: Project Planning — where you define specific tasks, assign responsibilities, and create the project schedule. PHASE 3: Project Execution — where you touch ...
Open Project. Or select File > New if you're already working in a project plan. Select a template or type in the Search for online templates box and then press Enter. Or, choose Blank Project to create a project from scratch. When you select a template, select the options you want, and select Create. Change the resources, tasks, and durations ...
Link tasks. You can link any two tasks in a project to show their relationship (also called a task dependency). Dependencies drive the project schedule — once you link the tasks, every change you make to one affects the other, which affects the next one, and so on. Select View > Gantt Chart. Hold down Ctrl and select the two tasks you want to ...
3. Allot your time. Make subgoals within your project. That is, divide your project into manageable chunks, such as "getting materials together," "researching the speech," "writing out the text for the project," "painting the parts," and "putting the project together." Assign time for each chunk, including deadlines.
Step 6: Launch! The final step in the initiation phase is to get the team together and hold a formal kickoff meeting! This is an exciting step in the project management life cycle and is a stake in the ground for you as a leader of the project and the team for what they are committing to.
You can always create a new project from a template or another project. But if you need to start fresh, you can create a blank project file: Click File > New > Blank Project. That gives you a blank canvas to work on. If you're not sure what to do next, read on. Note: For a quick introduction to more basic tasks in Project, see Project Quick ...
So, I broke the project down into these parts: Installing the VSCode extension. Getting the content of an active file. Breaking down the content of the file into characters. (Word => w, o, r, d). Listening to key-presses. Displaying the character one by one whenever any key was pressed.
Step 1: Bring all Scattered Documents in One Place. You might have project information scattered across Word docs, interactive PDF files, Excel sheets, and Powerpoint presentations. The first step to creating project documentation is to bring all this valuable information together in a centralized space.
Once you create and log in to an account in Jira, you can select a template from the library. Select Scrum (you can preview the free scrum template here, or you can learn how to create a Kanban project here).. Next, you'll be prompted to choose a project type. If your team works independently and wants to control your own working processes and practices in a self-contained space, consider ...
As the team leader, it's important to establish the scope of the project quickly, deliberate on the tasks required, and facilitate a discussion around who on the team would be best suited for ...
Sanjay Leela Bhansali has always done things larger than life. One look at his films or even a trailer and you would know that the filmmaker likes to go all out with his projects. But Heeramandi ...
If you click Project (2), you can hide or show the Project view. You might need to select View > Tool Windows to see this option. The current Project view selection (3) is Project > Android. In the Project > Android view you see three or four top-level folders below your app folder: manifests, java, java (generated) and res.
A fire crew from the Mombak project in Mãe do Rio helped to extinguish an outbreak on a neighboring farm. Image. A Mombak nursery in Mãe do Rio. Companies are funding and training local ...
After years of delays, Boeing's Starliner is finally ready to fly NASA astronauts on a landmark test mission. Here's what you should know about the historic launch.
A few months ago, a local shop tipped us off that this Camaro was in for a full interior refresh, so we decided to follow along. The owner of this lightly modified 1969 Chevrolet Camaro wanted to ...