
Contribute to the Windows forum! Click here to learn more 💡
May 10, 2024

Contribute to the Windows forum!
Click here to learn more 💡
Windows 7 Top Forum Contributors: Bill Smithers - LemP ✅
Windows 7 Top Forum Contributors:
Bill Smithers - LemP ✅
Windows 7 Forum Top Contributors: Learn More
Windows 7 Forum Top Contributors:
- Search the community and support articles
- Search Community member
Ask a new question
Changing the preferred IP address in windows 7
Report abuse.
Reported content has been submitted
Replies (10)
You may manually assign the default gateway and the IP address and check if it works fine. Before assigning the IP address and the Default gateway manually, make a note of the IP address on the computer. To do this open Command prompt and type ipconfig and press enter. This will display the IP address, make a note of it.
To assign the IP address and default gateway manually, follow the steps below:
a) In system tray, right click network icon. Choose Open Network and Sharing Center.
b) Right click on Local Area Connection and click on Properties.
c) Double click Internet Protocol Version 4 (TCP/IPv4) and assign the IP address manually.
Example: Old IP address is 192.168.0.1
d) Change the IP address to 192.168.0.50
e) Let the Subnet mask and default gateway be the same.
f) Subnet mask = 255.255.255.0
g) Default gateway, usually would be 192.168.0.1 or 192.168.1.1
h) Click on Apply and Ok, restart the computer, and verify if it helps to fix the issue.
2 people found this reply helpful
Was this reply helpful? Yes No
Sorry this didn't help.
Great! Thanks for your feedback.
How satisfied are you with this reply?
Thanks for your feedback, it helps us improve the site.
Thanks for your feedback.
1 person found this reply helpful
191 people found this reply helpful
Hi, If you are on a router you can reserve an IP in the DHCP settings or you can hardset the IP in Windows 7 to an address range within what the router uses.
7 people found this reply helpful
Are the computers connected to a Domain?
3 people found this reply helpful
The issue you have posted would be better suited in the TechNet Forums. I would recommend posting your query in the link below.
Windows 7 IT Pro Category
Hah, that was pretty good. :)
This site has some more info - someone says it's not possible to change it -
http://superuser.com/questions/470585/how-to-force-windows-7-to-ask-for-a-fresh-ip-address-from-dhcp-server
Just a quick note. I don't think it's really critical to the Q&A here, but the example given for the default gateway is potentially misleading in this answer.
So, while the router's interface acting as the default gateway could be any IP address in the subnet, it does HAVE TO BE in the same subnet. So since this example is a 255.255.255.0 mask, then the default gateway would have to be 192.168.0.XXX where XXX is any valid host IP address NOT currently being used. Note that the word "valid host" in this case implies that it is NOT 0 and NOT 255.
Specifically, given this mask and the example IPs, the default gateway cannot have a third octet value of 1.
Question Info
- Network & internet
- Norsk Bokmål
- Ελληνικά
- Русский
- עברית
- العربية
- ไทย
- 한국어
- 中文(简体)
- 中文(繁體)
- 日本語
Static IP Configuration - Windows 7
- To request a static IP address, please go to http://hippo.colorado.edu/ and select Static IP Address Application.
- Static IP addresses on the CU Boulder campus must be assigned by OIT or other designated network administrators. A static IP address must be manually entered into a device, along with router address, subnet mask, DNS server addresses and domain information.
Click the Start menu. Next, click on the Control Panel option.

Click on the Network and Sharing Center option.

Click on Change adapter settings from the left side menu.

Right-click on the Local Area Connection icon, then select Properties .

In the window that opens, click on the Internet Protocol Version 4 (TCP/IPv4) (you may need to scroll down to find it). Next, click on the Properties button.

In the window that opens, click the Use the following IP address: radio button. In the IP address: , Subnet mask: , and Default gateway: number fields, insert the numbers that were assigned to you by OIT.

Next, click the Use the following DNS server addresses: radio button. Next, in the Preferred DNS server: , and Alternate DNS server: number fields, input the numbers that were assigned by OIT. Then click the OK button.

Click OK in the other window. You can now start using your new internet connection. If for some reason the internet connection doesn't start working right away, restart the computer and try again.
- Voice Conferencing
- Getting Started
- AI Companion
- Additional Licenses
- App Marketplace
- Canvas Integration Guide
- Secure Meetings Guide
- No Fixed Time Meetings
- Known Issues
- Accessibility
- Academic Technology Training
- Group Training Request
- Cloud Computing in the Classroom
- Turnitin Review Project
- Campus Perceptions of Lecture Capture
- Online Proctoring Needs Assessment
- Meet Our Team
- Accessibility and Usability Lab
- Project Information FAQ
- Container Platform
- COVID-19 Site Access Guidelines
- Sustainability
- Remote Hands Service
- Rules and Guidelines
- Data Services
- 2022/2023 Service Changes
- Facilitating Remote Work & Support
- Moving to DDS
- Service Level Agreement
- Land Mobile Radios (LMR)
- Messaging & Collaboration Team
- Software Engineering
- Maintenance Schedules
- Support Definitions & Response Time
- Red Hat Enterprise Linux
- Requesting Escalated Access
- Virtual Infrastructure Policies
- Testimonials
- External Linux Support Changes
- User Experience Team
- Access Management
- Basic Access Management
- Retrieve a File
- Tips & Tricks
- How to Encrypt Files Before Sharing
- Physical Servers
- Virtual Servers
- Report an Incident
- Definition of Terms
- Remote Work Guidance
- Identify & Report Phishing Emails
- Password Managers
- Risk Acceptance and Temporary Security Exceptions
- Security Training for ITSP
- IdentiKey Manager
- Account Provisioning & Activation
- Enterprise Access Management
- Digital ID Attributes
- RFP Guidance
- Microsoft 365 Multi-Factor Authentication
- Auxiliary AV Service
- Find or Reserve a Lab
- Liaison List
- Software Additions & Modifications
- Labs Homepage
- OIT Cloud Applications
- Remote Access
- iClicker Classic
- Download Software
- Attendance-Only Feature
- Pedagogical Resources
- How to Onboard your Students
- Room Frequencies
- Student Resources
- Frequency & Wireless Ratings
- Wireless Considerations for CUClickers
- Distance Learning Studios Transition Resources
- How to Print with wepa
- Learning Spaces Technology Classroom Standards
- Training Videos
- Classroom Standards Equipment List
- Technology Equipped Classrooms List
- Hybrid-Capable Classrooms List
- Hybrid Work Recommendations - Your Meetings
- Zoom Web Conferencing
- Technology Copilots
- Use your Google Group as an email list
- Manage your Google Drive usage
- Review and save Google Drive files
- App Descriptions
- Enabling Apps for Campus
- Google Migration Dashboard
- Alumni Changes to Microsoft and Google
- Faculty, Staff, and Student Gmail Migration
- Google Drive Migrations
- Google Shared Drive File Migrations
- Outlook on the web - Email & Calendars
- Calendaring Best Practices
- Request Exception
- Retention Policy E-memo
- Resource Display Name Format
- FindTime Add-In
- Office 365 Desktop Apps
- Office 365 Online
- Prepare your data for OneDrive on macOS
- Departmental Intranet Site
- Microsoft Copilot for Bing Chat Enterprise
- Microsoft Loop
- Collaboration and File Storage
- Guest & External Users
- New Microsoft Teams Client
- Sharing channels with people outside of CU Boulder
- Viva Insights
- Resource Library
- Office Online
- Administrative E-memo
- Course Roster Email
- Exchange Distribution Lists
- Email & Calendaring Direction
- Email Attachments
- Email Forwarding
- Service Guidelines
- Interference Sources
- Tips and Tricks
- Network Registration
- Clear the Browser Cache
- Technical Details
- Foundational Services and Connectivity
- Always on VPN
- Advanced/Server Admins
- How It Works
- Usage Policy
- Security & Regulations
- IP Address & Hostname Management
- Dynamic DNS
- Research Computing
- Software Catalog
- Acquiring Software
- Appropriate Use and Compliance
- Software Asset Management Program
- Software Audit Information
- Recording a Lecture or Event
- Sound and Microphones
- Your Recordings
- Analytic Reports Overview
- Request a Course
- Accessible Content Structure
- Creating Accessible Quizzes
- Providing Extended Time Accommodations
- Rich Content Editor Accessibility Checklist
- New Analytics
- Course Access Report
- Interactions Report
- Feature Options
- Cidi Labs Design Tools (Pilot)
- Example Courses
- Latest Updates
- Enhancements
- Mobile Apps
- Grade Schemes
- Assignment Groups
- Designing for Student Comprehension
- Dropped Students FAQ
- Getting Started with Canvas
- Roles and Permissions
- Testing and Assessment Center Instructions
- Using Announcements and Inbox to Communicate
- Reviewing Migrated Content
- Student Support Videos
- Start of Term FAQ
- End of Semester Best Practices
- Automatic Course Creation
- Profile Pictures
- Canvas Scheduler vs. Microsoft Bookings
- Coursera Learning Programs
- Terms of Use
- Canvas Integration
- Kaltura Retirement Information
- Kaltura and Canvas Studio Comparison
- Open Researcher & Contributor ID (ORCID)
- Student FAQ
- Privacy Information
- SensusAccess
- Syllabus Archive
- Using Turnitin with Canvas
- Instructor Guide
- Student Guide
- Channel Lineup
- Scan for Channels
- Teams Calls Support Form
- Enghouse Touchpoint Contact Centers
- Long Distance
- Basic Functions
- Phone Interface
- Voice/Data Service Request
- Connect to the Server
- Password Protect Web Pages
- General Permissions Guide
- Online Manual
- Local Unix Conventions
- vi Commands
- Spot and Rintintin Personal Sites
- SSL Certificates
- Application Development Support
- Projects & Partners
- Staff Resources
- Our Practices
- Recommendations for Student Administrators
- Python - Install modules without root access
- Offline Surveys App
- Managers / Supervisors
- Student Success Staff
- Course Alerts
- GitHub Enterprise
- Jira Software
- Paperless Campus
- Acquire Software & Hardware
- Standard Computer Peripherals
- Standard Computers
- Department Labs
- Student Shopping List
- Linux Support
- Crowdstrike vs. Microsoft Defender Comparison
- Endpoint Guide Mac
- Endpoint Guide Windows
- Privacy & Software Transparency
- Nudge for macOS Updates
- iOS Patching
- Windows Patching Process
- Self Service Software
- Software Lifecycle
- Software News, Events, and Announcements
- Your Microsoft Products and Services
- Ordering Exception
- Ordering and Reimbursement
- Standard Models List
- Multi-Function Device Setup
- Faculty, Staff, and Retirees
- Microsoft Entra ID
- Secondary Accounts
- Sponsored Affiliates
- Purpose & Mission
- Buff Techs Desktop Support
- Getting Started with Campus Technology
- Fall 2020 Technology and Requests Survey Report
- Instruction Modes & Technology Mapping
- Tips for Recording Lectures from Home
- Remote Guidance for Students
- Your Computer
- Hybrid Meeting Technology Best Practices
- Your Productivity and Collaboration
- Your Network Access
- Retirees Access to Microsoft and Google Access
- LinkedIn Learning
- Initiative: Cloud Computing for Research and Teaching at CU Boulder
- OIT Group Profiles
- Survey Results
- Offenders/Alternatives
- Report Abuse or Harassment
- Cisco Transition to Teams Calls
- Google Storage Project
- Mail Security Upgrade
- Major Projects & Service Direction
- Microsoft Office Licensing Remediation Project
- Secure Computing Project
- YuJa Enterprise Video Platform Implementation Project
- Administrative
- OIT Campus Outreach
- Service Alerts
Sign up for our daily newsletter
- Privacy Policy
- Advertise with Us
How to Set a Static IP Address on Windows

A dynamic IP address is the recommended configuration for most Windows PC users. However, a static IP address is required when a computer provides a service for other PCs. This tutorial walks you through how to quickly set a static IP address on your computer.
Good to know : check out how to find the IP address of a network printer .
Why Do You Need a Static IP Address
1. set static ip address using settings, 2. using command prompt, 3. using powershell.
A static IP address could be useful in various cases, including:
- Hosting : if you’re hosting a website, having a dynamic IP address can be a hassle. It’s best to have a static IP address to avoid the need to manually change the router settings every time the computer gets a new IP address.
- File server : is your computer configured as an FTP or a web server? It is highly recommended to use a static IP address, as your device can be easily accessed by others to download files.
- Remote access : if you plan on accessing your Windows PC remotely, having a static IP address can provide faster and more reliable access. In contrast, dynamic IP addresses are constantly changing and can create difficulties connecting with remote devices.
You don’t need to be a pro user to set a static IP address, as you can do that easily with the Settings app on your Windows computer.
- Click the Start menu, and launch the Settings app.

- Click “Network & Internet” in the left pane. Click “Properties” next to your Wi-Fi network on the right.

- Scroll down and click the “Edit” button next to “IP assignment.”

- Click the drop-down box in the “Edit network IP settings” dialog, and select “Manual.”

- Select the IPv4 or IPv6 format to set the static IP address. In this example, we are selecting IPv4.

- Fill in all the required details, such as IP address, Subnet mask, and Gateway, and click “Save.”

- When entering the IP address, make sure it is a private IP address that can be used on home and other private networks. According to the Internet Assigned Numbers Authority (IANA) , the addresses reserved for private networks are as follows:
- Class A : 10.0.0.0 to 10.255.255.255
- Class B : 172.16.0.0 to 172.31.255.255
- Class C : 192.168.0.0 to 192.168.255.255
- For any private network that needs to use IP addresses internally, it is permissible to use any address within the specified ranges. These addresses are unique only within the given private network.
- Typically, networks with a significant number of total hosts utilize Class A addresses, while medium- to large-sized networks opt for Class B, and small local area networks use Class C.
- To fill the Subnet Mask and Gateway fields, make sure you are using the same values that are currently assigned to your router. To find those values, launch the Command Prompt, type the following command, and press Enter . Also, note the “DNS Servers” address, as you’ll need it later.

Tip : learn how to manage and control wireless networks via the Command Prompt .
You can also configure the static IP address from the Command Prompt if you prefer the command line.
- Right-click on the Start menu, and click “Run” from the list of options.

- Type cmd.exe in the box, then press Ctrl + Shift + Enter to launch the Command terminal in admin mode.

- To set a static IP address, use the following command and press Enter . Make sure you replace “X” with the name of your network adapter, as well as [IP address], [Subnet Mask], and [Default Gateway], each with your specific address. The values correspond to Subnet Mask and Default Gateway that you identified using ipconfig in the previous section.
Note : to find the name of the network adapter, navigate to “Control Panel -> Network and Internet -> Network and Sharing Center,” and jot down the name next to “Connections.”
- To set the DNS server address, use the following command and press Enter . Replace “X” with the name of your network adapter and [DNS server address] with the DNS server address of the network you found earlier using ipconfig .

- You will not see a success message but can run the ipconfig command again to check the new configuration.

Tip : need the IP address of your router ? Learn how to find it.
Alternatively, use the PowerShell tool to set a static IP address for your Windows PC.
- Press Win + X on your keyboard, and click Terminal (Admin) in the menu to launch PowerShell.

- To view the details of your current network configuration, type the following command and press Enter . From the results displayed, jot down the values for the following fields: InterfaceIndex, IPv4Address, IPv4DefaultGateway, and DNSServer.

- Type the following command to set a static IP address and press Enter . Before executing the command, don’t forget to add the values for InterfaceIndex, IPAddress, and DefaultGateway. As for the PrefixLength, in most cases, it should be set to “24.” The parameter defines the local subnet size or subnet mask. For example, for a subnet mask such as “255.255.255.0,” the prefix length is 24 bits, while a subnet mask of “255.255.0.0” has a prefix length of 16 bits.

- To set the DNS server address, use the following command and press Enter . Make sure to add the values for InterfaceIndex and ServerAddresses (DNSServer).

Tip : unable to launch PowerShell? Try these fixes.
Static IP Is Sometimes Handy
Businesses have more use for static addresses than home networks. It’s completely safe to use a static IP address, as errors like “ Your IP has been temporarily blocked ” happen mostly with dynamic IP addresses. Plus, it is not complicated to set a static IP address if you follow the instructions outlined in this tutorial. Check out our post to troubleshoot Wi-Fi-related issues if you experience any problems with your Internet connection.
Image credit: Unsplash . All screenshots by Meenatchi Nagasubramanian .
Our latest tutorials delivered straight to your inbox

Meenatchi is always passionate about learning new technological advancements and would love to try out new gadgets, software, and apps. After quitting her career as an Embedded Software Developer in 2009, she took up a career in content writing.

How-To Geek
How to change your ip address from the command prompt in windows.
It's easy enough to change an IP address on your PC using Control Panel, but did you know you can also do it from the Command Prompt?
Quick Links
Launch command prompt as admin to use netsh, view your network information with command prompt, change your ip address, subnet mask, and default gateway, change your dns settings in command prompt, key takeaways.
- You must launch Command Prompt, PowerShell, or Terminal as admin to use netsh.
- Use the "netsh interface ipv4 show config" command to find the full name of the network interface you want to change.
- Modify your IP address, subnet mask, and default gateway using the command "netsh interface ipv4 set address". You can also change DNS settings using "netsh interface ipv4 set dns".
Changing your IP address with the Control Panel interface isn't difficult, but it does require clicking through a number of different windows and dialog boxes. If you're a fan of the Command Prompt, though, you can get it done more quickly using the netsh command, which is just one of the great network utilities built into Windows .
We're going to use the netsh command, but it requires that Command Prompt be launched as administrator to work. The netsh command allows you to configure just about any aspect of your network connections in Windows.
To launch Command Prompt (or PowerShell) as Admin, open up the Start Menu, search "cmd," hover over the result, then click "Run as Administrator."
In Windows 10 or Windows 11, you can also right-click the Start menu (or press Windows+X on your keyboard) to open the Power User Menu and choose "PowerShell (Admin)."
You can (and should ) use PowerShell for this instead.
Before you change your IP address and related information, you'll need to find the full name of the network for the interface you want to change. To do this, type the following command:
netsh interface ipv4 show config
Scroll down until you see the interface you're looking for. In our example, we're going to modify the Wi-Fi interface, which on our machine is just named "Wi-Fi." You'll also see other default names that Windows assigns to interfaces, such as "Local Area Connection," "Local Area Connection* 2," and "Ethernet." Just find the one you're looking for and make note of the exact name. You can also copy and paste the name to Notepad and then back into Command Prompt later to make things easier.
With the interface name in hand, you're ready to change the IP Address, subnet mask, and gateway. To do this, you'll issue a command using the following syntax:
netsh interface ipv4 set address name="YOUR INTERFACE NAME" static IP_ADDRESS SUBNET_MASK GATEWAY
So, for example, your command might look something like the following:
netsh interface ipv4 set address name="Wi-Fi" static 192.168.3.8 255.255.255.0 192.168.3.1
Where the info is replaced by whatever you want to use. In our example, the command does the following:
- Uses the interface name "Wi-Fi"
- Sets the IP address to 192.168.3.1
- Sets the subnet mask to 255.255.255.0
- Sets the default gateway to 192.168.3.1
And if you're using a static IP address but want to switch to using an IP address assigned automatically by a DHCP server — such as your router — you can use the following command instead:
netsh interface ipv4 set address name="YOUR INTERFACE NAME" source=dhcp
You can also use the netsh command to change the DNS servers used by a network interface. Third-party DNS servers — like Google Public DNS and OpenDNS —can be faster and more reliable than the DNS servers provided by your ISP. Whatever your reason for changing your DNS server , you can do it either at the router so it affects all the devices that get their information from the router or at the individual device. If you want to change the DNS servers for just one PC, it's easy to do with the netsh command.
You'll need to use the command twice: once to set your primary DNS server and once to set your secondary, or backup, DNS server. To set your primary DNS server, use the following syntax:
netsh interface ipv4 set dns name="YOUR INTERFACE NAME" static DNS_SERVER
So, for example, your command might look something like the following (in which we set it to Google's primary public DNS server, 8.8.8.8):
netsh interface ipv4 set dns name="Wi-Fi" static 8.8.8.8
To set your secondary DNS server, you'll use a very similar command:
netsh interface ipv4 set dns name="YOUR INTERFACE NAME" static DNS_SERVER index=2
So, continuing our example, you might set your secondary DNS as the Google Public DNS secondary server, which is 8.8.4.4:
netsh interface ipv4 set dns name="Wi-Fi" static 8.8.4.4 index=2
And just like with the IP address, you can also change it so that the network interface grabs its DNS settings automatically from a DHCP server instead. Just use the following command:
netsh interface ipv4 set dnsservers name"YOUR INTERFACE NAME" source=dhcp
And there you have it. Whether you like typing at the command prompt better or just want to impress your coworkers, now you know all the command line magic you need for changing your IP address settings.
Thank you for taking the time to respond. The NETGEAR documentation team uses your feedback to improve our knowledge base content.
Rating Submitted
Do you have a suggestion for improving this article?
Characters Left : 500
MyNETGEAR® Account
Welcome back
Access your NETGEAR

NETGEAR Support
How do I set a static IP address in Windows?
Was this article helpful? Yes No | 6 people found this helpful in last 30 days
Most users do not need to set a static IP address. However, advanced users and businesses might benefit from a static IP address.
A static IP address is useful for hosting servers or websites and for sharing large files. For more information about static and dynamic IP addresses, see What is an IP address?
To set a static IP address in Windows 7, 8, and 10:
- Click Start Menu > Control Panel > Network and Sharing Center or Network and Internet > Network and Sharing Center.
- Click Change adapter settings .
- Right-click on Wi-Fi or Local Area Connection.
- Click Properties .
- Select Internet Protocol Version 4 (TCP/IPv4) .
- Click Properties .
- Select Use the following IP address .
- Enter the IP address , Subnet mask , Default gateway , and DNS server .
- Click OK . Your computer displays a static IP address.
To set a static IP address on a Macintosh OS X computer, see Configuring TCP/IP and Proxy Settings on Mac OSX .
Last Updated:04/25/2023 | Article ID: 27476
Was this article helpful?
This article applies to:.
- EX7000-1AZNAS
- R6300-2CHNAS
- XR1000-1RNNAS (ENTOUCH)
- XR1000-1RNNAS (GRANDE)
- XR1000-1RNNAS (RCN)
- XR1000-1RNNAS (WAVE)
- DGN1000SP-1RGUKS
- DGN1000SS-1VGUKS
- DGN2200-4DDAUS
- DGN2200M-2TKSAS
- DGN2200T-3BEGES
- DGND3300Bv2
- DGND3700Bv2
- DM111PSP-2GTLAS
- ProLine 6100
- Versalink 7500
- EVG1500-1EMRUS
- EVG1500-2EMRUS
- EVG2000-1STAUS
- DG834NU-2BEGES
- WN2000RPTv1
- WN2000RPTv2
- WN2000RPTv3
- CENTRIA (WNDR4700/4720)
- JWNR2000-4EMRUS
- JWNR2000Tv3
- WNDR3400-1CANAS
- WNR1000-2VCNAS
- WNR2000-3XFNAS
- WNR2000UPPE
- WNR3500CEIF
- WNR612-2EMRUS
- WGR614-7VCNAS
- WGR614-8CONAS
- WGR614-9UMGRS
Read this article in another language:
Looking for more about your product.
Get information, documentation, videos and more for your specific product.
Can’t find what you’re looking for?
Quick and easy solutions are available for you in the NETGEAR community.
Need to Contact NETGEAR Support?
With NETGEAR’s round-the-clock premium support, help is just a phone call away.
Complimentary Support
NETGEAR provides complimentary technical support for NETGEAR products for 90 days from the original date of purchase.
NETGEAR Premium Support
Gearhead support for home users.
GearHead Support is a technical support service for NETGEAR devices and all other connected devices in your home. Advanced remote support tools are used to fix issues on any of your devices. The service includes support for the following:
- Desktop and Notebook PCs, Wired and Wireless Routers, Modems, Printers, Scanners, Fax Machines, USB devices and Sound Cards
- Windows Operating Systems (2000, XP or Vista), MS Word, Excel, PowerPoint, Outlook and Adobe Acrobat
- Anti-virus and Anti-Spyware: McAfee, Norton, AVG, eTrust and BitDefender
ProSUPPORT Services for Business Users
NETGEAR ProSUPPORT services are available to supplement your technical support and warranty entitlements. NETGEAR offers a variety of ProSUPPORT services that allow you to access NETGEAR's expertise in a way that best meets your needs:
- Product Installation
- Professional Wireless Site Survey
- Defective Drive Retention (DDR) Service
Where to Find Your Model Number
To find the model/version number, check the bottom or back panel of your NETGEAR device.
Select a product or category below for specific instructions.

Nighthawk Routers

Powerline and Wall Plug Extenders

Cable and DSL Modem Routers

ReadyNAS Network Storage

Wireless Access Points

Other Business Products

Mobile Broadband
- Help Center

Setting a Static IP Address in Windows 7
It is very important to setup a static ip address, if you are going to use port forwarding. When you have port forwarding setup, your router forwards ports to an ip address that you specify. This will probably work when you initially set it up, but after restarting your computer it may get a different ip address. When this happens the ports will no longer be forwarded to your computer's ip address. So the port forwarding configuration will not work.
What is an ip address? IP addresses are four sets of numbers separated by periods that allow computers to identify each other. Every computer has at least one ip address, and two computers should never have the same ip address. If they do, neither of them will be able to connect to the internet. There is a lot of information at the following link. You don't need all of it. But if you want to know more about how networks work, you'll find it there. For more information on ip addresses, subnets, and gateways go here
Dynamic vs Static IPs Most routers assign dynamic IP addresses by default. They do this because dynamic ip address networks require no configuration. The end user can simply plug their computer in, and their network will work. When ip addresses are assigned dynamically, the router is the one that assigns them. Every time a computer reboots it asks the router for an ip address. The router then hands it an ip address that has not already been handed out to another computer. This is important to note. When you set your computer to a static ip address, the router does not know that a computer is using that ip address. So the very same ip address may be handed to another computer later, and that will prevent both computers from connecting to the internet. So when you asign a static IP addresses, it's important to assign an IP address that will not be handed out to other computers by the dynamic IP address server. The dynamic IP address server is generally refered to as the dhcp server.
Setting up a static ip for Windows 7.
If you have a printer, before you begin print out this page! Step 1: Open up the start menu, and look for the Search programs and files box. You should now see the following window.

Step 2: Type cmd in the Search programs and files box, and press Enter on your keyboard. The will bring up a black command prompt window.

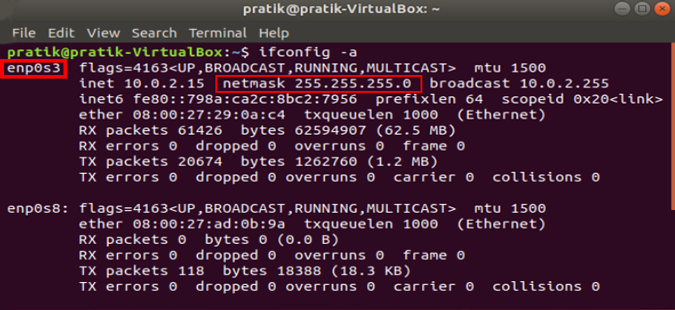
Step 3: The command prompt may look different on your screen, but it doesn't really matter. Type ipconfig /all in that window, and then press the enter key. This will display a lot of information. If it scrolls off the top you may need to enlarge the window.

Step 4: I want you to write down some of the information in this window. Take down the IP address, Subnet Mask, Default Gateway, and Name Servers. Make sure to note which is which. We are going to use this information a little bit later. We are only concerned with IPv4 entries, you can ignore the IPv6 stuff.
The name server entries are a bit complicated. Name Server is just another name for DNS(domain name server) server. Some router's act as a proxy between the actual name servers and your computer. You will know when this is the case, because the Default Gateway will list the same ip address as the Name Servers entry. We need to have the correct Name Server IP addresses. If we do not, you will not be able to browse the web. There are a couple ways to get these. The first way is to log into your router's web interface, and look at your router's status page. On that page you should see an entry for DNS Servers, or Name Servers. Write down the ip adresses of your Name Servers. Another way to get the correct Name Servers to use, is to give your ISP a call. They should know the ip addresses of your Name Servers right off. If they ask you why you need them, you can tell them you are trying to setup a static IP address on your computer. If they try to sell you a static external ip address, don't buy it. That's an entirely different thing that what you are trying to setup.
Type exit in this window, then press the enter key to close it.
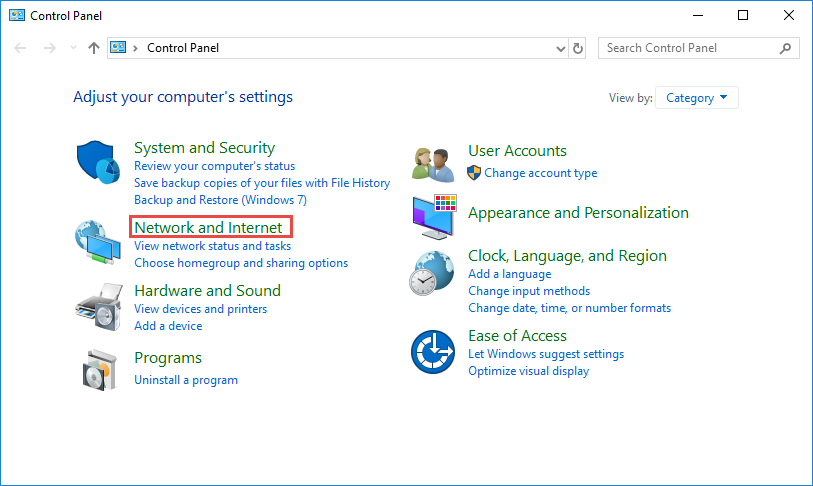
Step 5: Once again open the start menu. This time click Control Panel .

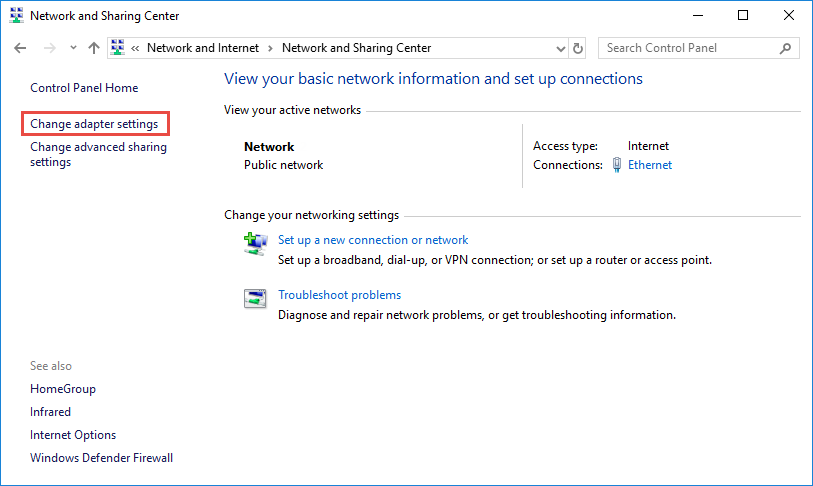
Step 6: Click on View Network Status and Tasks .

Step 7: Single click Change adapter settings on the left side of your screen.

Step 8: You might have more than one Internet connection listed here. You will need to determine which adapter is your connection to the Internet if this is the case. Right click on your network adapter and choose properties to open up the properties window of this internet connection.

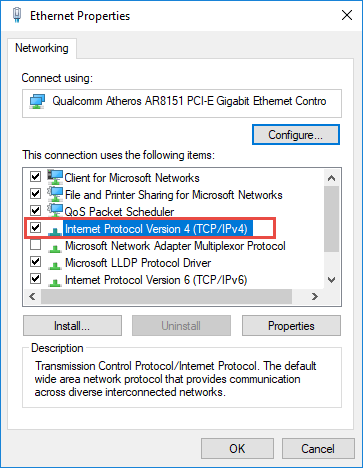
Step 9: Click Internet Protocol Version 4(TCP/IPv4) and then the Properties button.

You will see the following screen:

Step 10: Before you make any changes, write down the settings that you see on this page. If something goes wrong you can always change the settings back to what they were! You should see a dot in the Obtain an IP address automatically box. If you do not, your connection is already setup for a static ip. Just close all these windows and you are done.
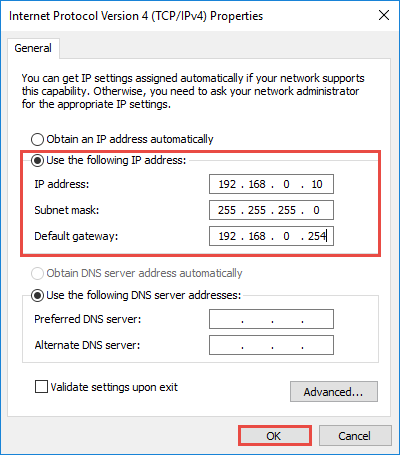
Pick an ip address and enter it into the IP Address box. The ip address you choose should be very similar to the router's ip addres. Only the last number of the ip address should be different. If the router's ip address is 192.168.1.1, I might choose 192.168.1.10. The ip address you choose should end with a number between 1 and 254, and should not be the same as the router's ip address. Every device that connects to your network needs to have it's own ip address.
Put the subnet mask we previously found in the subnet mask section. The default gateway should go into the Default gateway box. Enter the dns servers we prevoiusly found into the two DNS Server boxes. Click okay all the way out of this menu.
If you find that you can not pull up webpages, the problem is most likely the dns numbers you entered. Give your ISP a call, and they will be able to tell you which dns servers to use. This is a question they answer all of the time. They will be able to tell you what you should use right away.
That's it you should be done! If you can't connect to the internet go back and change your configuration back to what it originally was.
More From Portforward

Forward Ports on Your Router for The Anacrusis
Connect with others in The Anacrusis more easily and help improve your connections by forwarding some ports in your router.

Forwarding Ports in Your Router for Star Wars: Battlefront II (2017)
Forward some ports to help make it easier to connect with others and improve your connections in Star Wars: Battlefront II (2017).

How To Open Ports in Your Router for Forza Motorsport (2023)
Help improve your connections in the new Forza Motorsport and more easily connect with other racers by forwarding some ports.

How to Port Forward in Your Router for Marvel's Avengers
Forwarding some ports for Marvel's Avengers can enable a smoother and more reilable multiplayer expereince.

How To Open Ports in Your Router for Among Us
Poor connections can make you look sus. Forwarding some ports for Among Us in your router can help improve them.

How to Port Forward Dead Island 2
Connect with friends more easily and improve your online co-op experience in Dead Island 2 by forwarding some ports.

Forwarding Ports in Your Router for BattleBit Remastered
Forwarding some ports for BattleBit Remastered in your router can help improve your online multiplayer connections.

How to Forward Ports in Your Router for Farming Simulator 22
Forwarding some ports in your router for Farming Simulator 22 can help you connect with more farmers.
How to Assign Static IP Address to Your Devices
By default, your router assigns dynamic IP Address to every device that connects to it. This is called DHCP (short for Dynamic Host Control Protocol). But sometimes, we need our devices to have the same IP address (i.e. Static IP) every time it connects to the network. Reason being,
- Access your computer from the Internet.
- Share data between two devices on the same network.
- Quickly access your Network Printer or NAS.
- Use your computer as a media server.
- Or your work WiFi requires you to use Static IP address.

What IP address should you choose?
If two devices on the network have the same IP address, then there will be conflicts. The Internet won’t work on one of them or both, depending on your router. So, it’s important to assign a unique IP address to your computer. There are a couple of ways to pick an unused IP address.
For instance– first find your device’s IP address , say it’s 192.168.1.7 ; then keep the first three values (i.e. 192.168.1) as it’s and replace the last digit with some far number like 192.168.1.222 . Though make sure the last digit should be between a 0-255 range.
Assigning Static IP address to most devices is easy, just go to its network settings, look for DHCP option and turn it OFF. Once you do that, you’ll see a text area to enter Static IP address. Enter the new IP address there, save changes and that’s it.
So let’s see how to Assign Static IP address to various Operating Systems
1. Assign IP Address on Windows 10/8/7
You can do this quickly through the command line. You will need to first find your subnet mask, default gateway, and network adapter name. In my case, I’m on a Wi-Fi network, so the adapter name is Wi-Fi. To find yours just type the following command.
Once you get the output, find for the Network Adapter which has IP listed under it. The adapter name is a one-word name suffixed to the end of the Network Title. You will also need the Subnet mask and the Default Gateway Address.

Once you have the adapter name, Subnet Mask and Default Gateway, run the following command.
Wherein, Wi-Fi should be replaced by your adapter name and the IP, subnet mask and gateway address according to your configuration.

This will change your IP address from DHCP to manual with the static IP address you have specified.
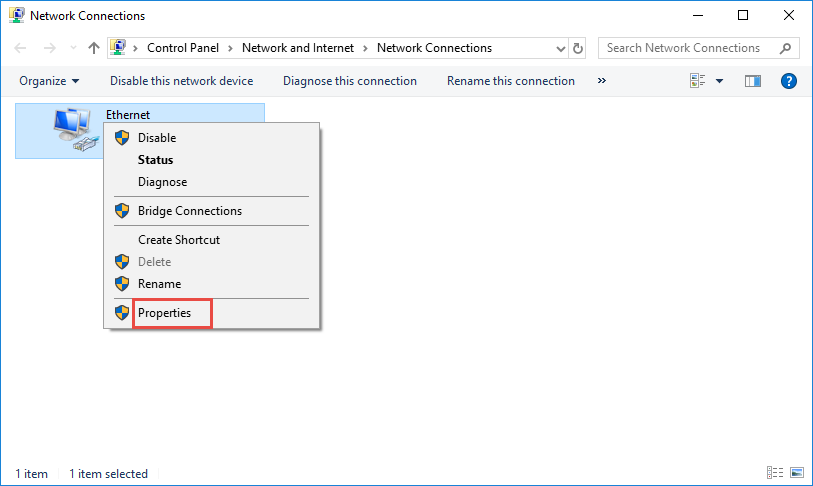
In case you find it too confusing, you are not alone. You can do the same via GUI which is much more intuitive. You’ll need the Subnet Mask and Default Gateway Address . You can refer to the above step on how to find these details. Once you have noted down the address, click on Start Menu and type in Network and Sharing Center. Click once you see the Network and Sharing Center Icon.

Alternatively, if you are in Windows 10 then you can right-click on the Start menu and click on “ Network Connections “.

A new window will open, click on Change Adapter Options.

Right Click on your Current Network Adapter ( like WiFi) and choose Properties.

When the new window pops up, select Internet Protocol Version 4(TCP/IPv4) and click on Properties.

Once you get the pop-up window, select “ Enter the IP address you want ” and fil the IP Address, For Subnet Mask , and Default Gateway Address enter the values that you have noted down previously. Next, click on OK to save changes.

To switch to dynamic IP, click on Obtain the IP address automatically. Once this is enabled, your system will start picking an IP address dynamically from the router.
2. How to setup static IP on Ubuntu
On Ubuntu, you can set a static IP Address via the terminal or GUI. Firstly, let’s start with the command line. Right-click anywhere on the desktop to open the terminal.

Once the terminal window opens, we need to run a command. We need the subnet mask and network adapter name in order to set a static IP and to get that, run the following command on the terminal.
Once you have the subnet mask noted down, in my case, it’s 255.255.255.0, we can proceed further.
It is pretty simple and straight forward. We need to open the Network Adapter settings. To do that, click on the Network Icon at the top right corner of the desktop.

Now, navigate on the active network and click on the expand button for more options. Click on Wired Settings to open the Network menu.

Once you get the Wired Settings dialogue, make sure you are on the Network page. Click on the Settings icon beside the active network to open the adapter properties.
When you get the pop-up, navigate to the IPv4 tab to change the IP settings.

On the IPv4 tab, select the radio button which says “ Manual “. Some text fields will appear, you need to enter the IP address, Netmask and Gateway accordingly. Once it is validated, you can click on the Apply button to register the changes.

Again you need to restart the network for the changes to take effect. You can do it manually via command line or just switch off and switch on the Network adapter. Once done, run ifconfig on the terminal to check the IP address. It should be the same IP address which you have specified earlier.

3. How to setup static IP on Mac
If you are on macOS, setting static IP is quite similar to that of Ubuntu. But, here you don’t need the subnet mask or Default Gateway Address. Right click on the apple icon at the top left corner of the desktop. Click on System Preferences from the dropdown list.

Once the System Preferences dialogue box displays, navigate to Network and click on it to open the Network Settings

Alternatively, you can also hit Cmd+Space to trigger the Spotlight search. Type “ Network ” in the search bar and click on the icon once it appears. This will directly navigate you to the Network Settings.

From the pop-up window, select an active network interface. For example, I am connected to a WiFi network so my active network is Wi-Fi. Make sure you are on the active network tab and then click on Advanced .

A new window will open the configuration settings for that adapter. Move over to the IP settings by clicking on the TCP/IP tab .

From the Configure IPv4 menu, choose Using DHCP with manual address. Enter a static IP address in the IPv4 Address and leave the Subnet Mask and Router field as default. Click Ok to save the changes.

Now when you do an ifconfig, the system should be using the static IP you have defined in the previous times. If the IP’s have not changed, try restarting the Wi-Fi and it should fix it.
To switch back to dynamic IP, move back to “ Using DHCP ” from the Configure IPv4 menu.
4. How to setup static IP on Android

The network which you are connected to should be on top of the list. Tap on the settings icon beside the Wi-Fi network name.

Once the pop-up opens, you will see IP settings at the bottom of the menu. The default option is “DHCP”. Tap on it to change the IP configuration.

Select “ Static ” from the presented drop-down menu. Enter the desired IP address and leave the other options as default. Make sure that other devices are not using the same IP. You can see the IP address of the other devices in your network by using a small utility called Fing . For a detailed process, check our article on how to find the IP Address of any Device on your network . Once you have entered the IP, click on Save to register the change. Now, your Android phone should start using the desired IP Address.

In almost all the Android version, you get the option to set static IP Address. For some rare older Android versions, you can use a third-party app like WiFi Static . It’s free and it doesn’t require ROOT.
To switch back to dynamic IP, repeat the same procedure and select “DHCP” from the IP settings instead.
5. How to setup static IP on iPhone and iPad
If you are using an iPhone or iPad, then you can set static IP Address natively. You would need the Subnet Mask of your network. This can be obtained from the Wi-Fi settings and we would see to it in the further steps. To get started, click on the Settings icon in the dock to get to the Settings menu.

Now on the Settings menu page, tap on Wi-Fi to get to the Wi-Fi settings.

On the Wi-Fi page, you should see your connected Wi-Fi network at the top. Click on the “i” button beside it. This will open the Wi-Fi configuration window.

Once the Wi-Fi settings page appears, you will see an option called “ Configure IP “. By Default, this would be set to automatic. Just below this option, you will see “ Subnet Mask “, note it down as we will need it in the further steps. In order to set static IP, we need to change Configure IP it to Manual. Tap on it and it will open the IPv4 settings page.

There should be 3 options available on the “Configure IPv4” page. Select “ Manual ” from it. As soon as Manual IP is enabled, you will get extra text fields at the bottom to enter the IP Address, Subnet Mask, Router. We need to fill in the IP Address of our choice and Subnet Mask which we noted down in the previous step. Now, after you fill both the fields, the save button at the top right corner will be enabled. Click on it to save the static IP configuration.

Now, when you return to the Wi-Fi settings page, you will see your device is using the Static IP address. This should be the same IP address we have set in the IP configuration menu.

This static IP address will be applicable only to that particular Wi-Fi network. In case, you connect to some other Wi-Fi network the IP will change accordingly.
6. How to setup static IP to any Device from Router
Other network devices like your Wireless Printer, PS4, NAS, IP Camera, Raspberry Pi , etc. do not have an Interface. Hence, in order to configure the network, either you have to connect remotely or use the router. If you have access to the router, setting Static IP for network devices is the easiest and convenient way. I would recommend this method over any other.
So, to assign a Static IP Address to any network device, you need to login to the web portal of the router. The web portal address, username, and password are mostly printed behind the router. In case you don’t have physical access to the router, the web portal URL is mostly the PC’s gateway address. To find that, open command prompt and type the following command.
Once you have the web portal loaded, log in with the credentials. Now every router has a different web UI, but the overall structure is the same. Basically, you will have to link the IP Address to the Mac Address and Hostname of the device. So, we need to find the MAC address & Hostname of the network device. To do that, look for DHCP client list which should look something like the following screenshot.

You can get your MAC Address & Hostname under DHCP Client list. Once, you have the MAC address & Hostname noted down, we can proceed further. On most of the routers, you will have the option to set a Static IP under the section IP Mac binding or DHCP Static IP option. In case you are on a custom ROM like dd-wrt, head over to Services tab and you will have DHCP Server . Under DHCP Server, add an entry for Static Leases by clicking on the Add button.

Clicking on the Add button will create a new row. You have to enter the MAC Address, Hostname, desired Static IP and Lease time . Lease time is a unit in minutes after which your IP will be renewed. Since we are adding only 1 entry for the particular host the IP will be the same even after the renewal. Once, done click on Save changes .

Once you have configured successfully on the router, just restart the Wi-Fi on the device. When it connects it should start using the static IP. In case of issues, make sure that you have the correct MAC Address and Hostname. To check, just run the command ipconfig or look back again in the router’s DHCP client list.

These changes are written to the ROM so restarting the router won’t make changes to the static IP configuration. In order to get back to Dynamic IP, just remove the entry from the IP leases.
What’s next
Once you have started configuring the IPs on Router and network devices, you are good to go configure telnet and SSH. Have a look at our brief article on How to Enable Telnet Server in Windows 10 , Best SSH clients for iOS To Manages Remote Servers and 6 Best FTP Clients For Android . A word of caution would be to note down the static IPs assigned to devices as assigning the same IP to two network devices would render them useless.
Also Read: How To Change DNS on Windows|Mac|Android|iOS

Mrinal Saha
Mrinal is a tech geek who spends half of his day reading and writing about tech. While the nights are spent on shooting or editing YouTube videos. Feel free to geek out with him on-
You may also like
7 fixes for microsoft teams audio is not..., accidentally closed an important chrome tab – here’s..., how to manage collaborative collections on instagram, 3 fixes for whatsapp status not showing, how to block adult websites on windows and..., 2 best discord bots (or apps) to delete..., how do i enlarge a photo without losing..., watch netflix together with your long distance partner..., how to stream netflix on discord for watch..., i tried meta ai on whatsapp: 5 things..., leave a comment cancel reply.
You must be logged in to post a comment.
How to Set a Static IP Address on a Windows PC
You can learn how to set up a static IP address on your computer. Here's how.
While most of the internet runs on dynamic addresses these days, static addresses are sometimes helpful to use as well. Whether you need to run a server of your own, set up external devices or services, or are just simply looking to explore, before you get your hands dirty, you need to know your way around and be super careful while setting up an IP address.
Moreover, there's more than one way to go about this. So, one by one, let's look at all the ways you can easily set up a static IP address on your Windows.
Static IP Addresses: The Whys and Hows
An IP address of a computer that stays the same over time is known as a Static IP address . This is in contrast to a dynamic IP Address, which is an address that can tweak over time.
Today, most devices use a dynamic IP address because of their ease of use and management. However, in rare cases, Static IP addresses can become handy. Some of those cases include:
- When you have external devices that you can only connect to your network through your IP address.
- When you connect to other networks through a VPN.
- Static IP addresses can make hosting a server somewhat easier.
Because of a slew of such benefits, using a Static IP address can make your life super easy in some situations. So, now let's look at the different methods you can use to set up a static IP address for yourself.
How to Set a Static IP Address on Windows 11
Like most things on Windows, you have multiple ways to do this. Let's look at the most straightforward method first, which is using Windows Settings.
Here's how you can set a static IP Address using the Windows settings:
- Head to the Start menu search bar, type in 'settings,' and select the best match. Alternatively, press the Windows Key + I to launch the Settings menu.
- Then head to Network & internet settings .
- Look for the Properties button. It's right next to your connection settings.
- Scroll down and look for the IP assignment section. Then click on Edit .
- In the new Edit IP settings dialog box, click on the scroll-down menu and select Manual .
- Toggle on the switch for the IPv4 button.
- Fill in all the network details here, including the IP address , Subnet mask , Gateway , and then click on Save .
Follow the above steps meticulously, and your Windows 11 will have a new static IP address from here on.
How to Set Up a Static IP Address on Windows 10
The basics of setting up an IP Address in Windows 10 are similar. Even though the implementation of steps might differ here and there, you have to follow a pattern that's pretty much the same. Here's how:
- Open the Windows 10 Settings.
- Click on Network & Internet .
- Depending on how you are connected to the Internet, select Wi-Fi or Ethernet .
- Select the current network connection.
- Toggle on the IPv4 switch.
- Set up the static IP address here and fill in other relevant information, such as the Preferred DNS , Default Gateway , etc.
- Click on Save .
After you are done, you will have a new static IP address on your PC from here on.
How to Set Up a Static IP With Command Prompt
The above method, using the Settings GUI, is only one of the ways to tweak your IP address settings. For those of you who tilt more towards a command line rather than a simple click-and-play GUI, luckily, alternatives exist. For instance, you can also use the Command prompt, and set up the address with just a few commands.
To change up your IP address through your Command Prompt, follow the below steps:
- Head to the Start menu search bar, type in 'cmd,' and launch the cmd as administrator.
- Type in the following command in the cmd and hit Enter : ipconfig /all
- Subnet mask
- Default Gateway
- DNS Servers
- Type in the following command to assign static IP address on your Windows and hit Enter : netsh interface ip set address name= "Ethernet1" static 10.1.4.220 255.255.255.0 10.1.4.1 In the above command, replace Ethernet1 with the name of your adapter, and change 10.1.4.220 255.255.255.0 10.1.4.1 with the device IP address, subnet mask, and default gateway address corresponding to your network configuration
- Now type the following command to set up a DNS server address and hit Enter : netsh interface ip set dns name= "Ethernet1" static 10.1.4.1
That's it. Your new static IP address will be set up from here.
How to Set Up a Static IP Address With PowerShell
PowerShell is another tool primarily handy for power users, designed to give them more control and management capabilities through task automation. If any of the above methods fail, you can also use PowerShell to set up the Static IP Address. Here’s how you can get started:
- Head to the Start menu search bar, type in ‘powershell,’ and run it as administrator.
- Type the following command to view your current network configuration and press Enter : Get-NetIPConfiguration
- InterfaceIndex
- IPv4Address
- IPv4DefaultGateway
- Type in the following command to set up a static IP address and hit Enter : New-NetIPAddress -InterfaceIndex 10 -IPAddress 10.1.4.119 -PrefixLength 24 -DefaultGateway 10.1.4.1
- Here, replace all values of information. Replace the InterfaceIndex number (10) with the number assigned to your adapter. Similarly, replace the above IPAddress with a static IP address that you want to set.
- Finally, type in the following command to assign the DNS server address and hit Enter : Set-DnsClientServerAddress -InterfaceIndex 10 -ServerAddresses 10.1.4.1
Again, replace the InterfaceIndex number (10) with your network’s corresponding number. Also, replace the ServerAddress with the DNS IP address.
You will have a new static IP address as soon as you finish all the above steps.
Setting up a Static IP Address on a Windows PC
Setting up your static IP address doesn't have to be complicated. If you follow the above methods we have laid out above, you should be done without any significant difficulties.
And while static IP address has their uses, dynamic addresses are undoubtedly necessary. So, before you make an important switch, ensure you understand their significant differences well.
- Knowledge Base
Related Articles
Set ip address on windows 7, windows 8.x or windows 10.
- Click Start menu
- Type Network and Sharing Center in search field
- Click Local Area Connection
- Click Properties on new window
- Click Internet Protocol Version 4 (TCP/IPv4) on new window
- Click Properties
- Click Use the following IP address radio button
- Enter IP address within same range as reader in IP address field (i.e., if the reader's IP address is 10.19.1.101, the computer IP should be in the 10.19.1.x range, where x is any number other than 101)
- Note : Example configuration
- Click Close
Was this article helpful? YES NO
We are glad this helped!

ACTIVE Network, LLC 717 North Harwood Street Suite 2500 Dallas, TX 75201

You are using an outdated browser. Please upgrade your browser to improve your experience.
Your browser does not support JavaScript. Please turn it on for the best experience.
- All Support
- Download Center
- Support Videos
TP-Link Community
- Contact Technical Support
- Online Stores
- Distribution Partners
- Reseller Partners
- Solution Partners
How to find and manually assign an IP address on Windows 10
Step 1: Open the Control Panel

You can also type control panel in the search bar at the lower left of the screen and press Enter to open the control panel.
Step 2: Go to Network Connections
Go to Network and Internet > Network and Sharing Center .
Select Change adapter settings on the left.
Step 3: Find the IP address
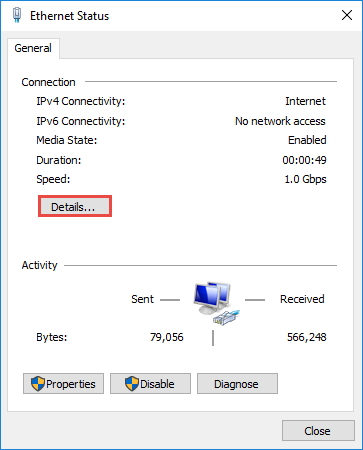
Right click the Ethernet icon and select Status from the context menu.

Then click Details... to view all detailed information of network connection.
Step 4: Set the IP address
Right Click Local Area Connection and select Properties .
Then double click Internet Protocol Version 4 (TCP/IPv4) .
Select Use the Following IP address: and type in the IP address , Subnet mask and Default gateway . Click OK to apply the settings.
Note : If you need to set a static DNS server, select Use the following DNS server address : and input the address of DNS server. By default, the computer obtains the address automatically.
Is this faq useful?
Your feedback helps improve this site.
What’s your concern with this article?
- Dissatisfied with product
- Too Complicated
- Confusing Title
- Does not apply to me
We'd love to get your feedback, please let us know how we can improve this content.
We appreciate your feedback. Click here to contact TP-Link technical support.
Still need help? Search for answers, ask questions, and get help from TP-Link experts and other users around the world.
Visit the Community >
We have updated our Policies. Read Privacy Policy and Terms of Use here. This website uses cookies to improve website navigation, analyze online activities and have the best possible user experience on our website. You can object to the use of cookies at any time. You can find more information in our privacy policy .
Basic Cookies
These cookies are necessary for the website to function and cannot be deactivated in your systems.
accepted_local_switcher, tp_privacy_base, tp_privacy_marketing, tp_smb-select-product_scence, tp_smb-select-product_scenceSimple, tp_smb-select-product_userChoice, tp_smb-select-product_userChoiceSimple, tp_smb-select-product_userInfo, tp_smb-select-product_userInfoSimple, tp_top-banner, tp_popup-bottom, tp_popup-center, tp_popup-right-middle, tp_popup-right-bottom, tp_productCategoryType
__livechat, __lc2_cid, __lc2_cst, __lc_cid, __lc_cst, CASID
id, VISITOR_INFO1_LIVE, LOGIN_INFO, SIDCC, SAPISID, APISID, SSID, SID, YSC, __Secure-1PSID, __Secure-1PAPISID, __Secure-1PSIDCC, __Secure-3PSID, __Secure-3PAPISID, __Secure-3PSIDCC, 1P_JAR, AEC, NID, OTZ
Analysis and Marketing Cookies
Analysis cookies enable us to analyze your activities on our website in order to improve and adapt the functionality of our website.
The marketing cookies can be set through our website by our advertising partners in order to create a profile of your interests and to show you relevant advertisements on other websites.
Google Analytics & Google Tag Manager
_gid, _ga_<container-id>, _ga, _gat_gtag_<container-id>
Google Ads & DoubleClick
test_cookie, _gcl_au
cebsp_, _ce.s, _ce.clock_data, _ce.clock_event, cebs
OptanonConsent, _sctr, _cs_s, _hjFirstSeen, _hjAbsoluteSessionInProgress, _hjSessionUser_14, _fbp, ajs_anonymous_id, _hjSessionUser_<hotjar-id>, _uetsid, _schn, _uetvid, NEXT_LOCALE, _hjSession_14, _hjid, _cs_c, _scid, _hjAbsoluteSessionInProgress, _cs_id, _gcl_au, _ga, _gid, _hjIncludedInPageviewSample, _hjSession_<hotjar-id>, _hjIncludedInSessionSample_<hotjar-id>
lidc, AnalyticsSyncHistory, UserMatchHistory, bcookie, li_sugr, ln_or
How to set static IP address on Windows 10
You can assign a static IP address manually on Windows 10 in many ways, and in this guide, you'll learn how.

- To set a static IP address on Windows 10, open Settings > Network & Internet > Wi-Fi , click the connection, click on “Edit,” select “Manual,” turn on “IPv4,” and set the static IP address.
- Alternatively, you can configure a static IP address from Command Prompt, PowerShell, and Control Panel.
UPDATED 12/20/2023: On Windows 10, setting a static IP address to a computer is a configuration you may need to set up in many scenarios. For instance, if you plan to share files , set up a printer on a local network , enable and use Remote Desktop , or configure port forwarding on the router.
If you don’t assign a static IP address, services or a port forwarding configuration may eventually stop working. The reason is that, by default, connected devices use dynamic IP addresses assigned by the Dynamic Host Configuration Protocol (DHCP) server (usually the router), which can change anytime, as soon as you restart the machine or after the dynamically assigned configuration lease expires. On the other hand, a static configuration is permanent, and it’ll remain assigned until you change it.
Regardless of the reason, Windows 10 offers multiple ways to configure a static network configuration through the Settings app, the legacy Control Panel, and the command line using Command Prompt and PowerShell.
In this guide , I will teach you the steps to set a static IP (version 4) address to a Windows 10 computer.
Set static IP address on Windows 10 from Settings
Set static ip address on windows 10 from control panel.
- Set static IP address on Windows 10 from Command Prompt
- Set static IP address on Windows 10 from PowerShell
To assign a static IP address on Windows 10, use these steps:
Open Settings on Windows 10.
Click on Network & Internet .
Click on “Wi-Fi” or “Ethernet.”
Click on the current network connection.

Under the “IP settings” section, click the Edit button.

Using the drop-down menu, select the Manual option.
Turn on the “IPv4” toggle switch.

Set a static IP address to use by the Windows 10 computer.
Specify a “Subnet prefix length” (subnet mask). If the subnet mask is 255.255.255.0 , the subnet prefix length in bits is 24 .
Specify a “Default Gateway” address.
Specify a “Preferred DNS” address.
Specify an “Alternate DNS address” (if applicable).
Click the Save button.

After you complete the steps, you can test your settings using your web browser to open a website.
To assign a static IP from the Control Panel on Windows 10, use these steps:
Open Control Panel .
Click on Network and Internet .
Click on Network and Sharing Center .
Click the Change adapter settings option on the left navigation pane.

Right-click the Wi-Fi or Ethernet adapter and select the Properties option.
Select the “Internet Protocol Version 4 (TCP/IPv4)” option.
Click the Properties button.

Select the “Use the following IP address” option.
Set the static IP address for the adapter – for example, 10.1.2.220 .
Specify a Subnet mask . (Typically, on a home network, the subnet mask is 255.255.255.0 .)
Specify a Default gateway . (Usually, your router’s IP address. For example, 10.1.2.1 .)
Under the “Use the following DNS server addresses set Preferred DNS server” section, set the Preferred DNS server address. (Usually, your router’s IP address or server IP address that provides the DNS resolution, such as 10.1.2.1 ).
(Optional) Specify an Alternative DNS server. (The computer will use this address if it cannot reach the preferred DNS server.)
Click the OK button.

Click the Close button again.
Once you complete the steps, you can open your web browser and load a website to see if the configuration works.
Set static IP address on Windows 10 from Command Prompt
To set a static IP address on Windows 10 from Command Prompt, use these steps:
Open Start .
Search for Command Prompt , right-click the top result, and select the Run as administrator option.
Type the following command to see your current networking configuration and press Enter :
Under the network adapter, note the name of the adapter as well as the following information in these fields:
- Subnet mask
- Default Gateway
- DNS Servers

Type the following command to assign a static IP address on Windows 10 and press Enter :
In the above command, replace “Ethernet0” with the name of your network adapter. Change “10.1.4.220 255.255.255.0 10.1.4.1” with the device IP address, subnet mask, and default gateway address corresponding to your network configuration.
Type the following command to set a DNS server address and press Enter :
In the command, make sure to change “Ethernet0” with your adapter’s name and “10.1.4.1” with the DNS server address of the network.
Type the following command to set an alternate DNS server address and press Enter :
In the command, replace “Ethernet0” with your adapter’s name and “8.8.8.8” with an alternate DNS server address.

After you complete the steps, you can test the new configuration using the ping command (for example ping google.com ) to see if the internet is working. Alternatively, you can open a website to see if the configuration works.
Set static IP address on Windows 10 from PowerShell
Windows 10 also includes the PowerShell command line platform that allows you to use the “NetTCPIP” module to manage networking settings, including the ability to change your computer’s IP address settings. Microsoft recommends using this command-line method instead of netsh .
To set a static IP address from PowerShell, use these steps:
Search for PowerShell , right-click the result, and select the Run as administrator option.
Type the following command to view your current network configuration and press Enter :
After running the command, note the following information:
- InterfaceIndex
- IPv4Address
- IPv4DefaultGateway

Type the following command to set a static IP address and press Enter :

In the command, replace the “InterfaceIndex” number (5) with the corresponding number of your adapter. Change “IPAddress” with the static IP address you want to assign to your device. Change PrefixLength (subnet mask) with the correct bit number if necessary. Typically, on a home network, the setting is “24.” Also, change the “DefaultGateway” option with the default gateway address of the network.
Type the following command to assign a DNS server address and press Enter :

If you need to set a secondary DNS server address, use a comma to use the same command with another address. For example:
In the command, replace the “InterfaceIndex” number (5) with your network adapter’s corresponding number. Also, change “ServerAddresses” with the DNS IP address.
After you complete the steps, you can test the new configuration by opening your web browser and navigating a website.
Whatever method you use, assigning an IP address within the network range and outside of the DHCP server scope is recommended to allow proper connectivity and avoid address conflicts. If multiple devices share the same address, this will cause a networking conflict, preventing connection to the internet.
Update December 20, 2023: This guide has been updated to ensure accuracy and reflect changes to the process.

Mauro Huculak is a Windows How-To Expert who started Pureinfotech in 2010 as an independent online publication. He has also been a Windows Central contributor for nearly a decade. Mauro has over 14 years of experience writing comprehensive guides and creating professional videos about Windows and software, including Android and Linux. Before becoming a technology writer, he was an IT administrator for seven years. In total, Mauro has over 20 years of combined experience in technology. Throughout his career, he achieved different professional certifications from Microsoft (MSCA), Cisco (CCNP), VMware (VCP), and CompTIA (A+ and Network+), and he has been recognized as a Microsoft MVP for many years. You can follow him on X (Twitter) , YouTube , LinkedIn and About.me . Email him at [email protected] .
- How to revert back to Windows 10 from Windows 11
- How to disable Fast Startup on Windows 11, 10
We hate spam as much as you! Unsubscribe any time Powered by follow.it ( Privacy ), our Privacy .
Stack Exchange Network
Stack Exchange network consists of 183 Q&A communities including Stack Overflow , the largest, most trusted online community for developers to learn, share their knowledge, and build their careers.
Q&A for work
Connect and share knowledge within a single location that is structured and easy to search.
How to use DHCP with manual address in Windows?
In OS X there's an option for use DHCP with manual address: is there any way to do that (or something similar, with any program) in Windows?

Here's my problem:
At my school there's a wifi with proxy, I can connect my iPhone, my Mac, phones running Android, but I can't connect computers using Windows to it, I thinks it's cause I couldn't find an option like that on Windows, does anybody knows of something else I could do?
If there's no way to do that on windows, any Linux solution?
EDIT: Turned out that after trying the answers below a lot of times, I accidentally put the wrong subnet mask (DHCP gives 10.244.49.220 and it was inserted as 10.255.49.220) and it connected. Black magic.
- 1 No the option does not exist – Ramhound Aug 21, 2013 at 1:53
- Just for clarification... DHCP gives you an ip, but you want or need (which is it?) to make it static is that right? what's the reason for needing a non-dynamic ip? – monsto Aug 21, 2013 at 4:17
- @monsto the Wifi at my school is protected under proxies and the IP are assigned for each student, but turned out only my Mac was connecting with that configuration, and the windows computers wouldn't connect even if they copy the DHCP subnet mask gateway etc. – GBF_Gabriel Aug 24, 2013 at 0:34
2 Answers 2
Question 1:
Windows does not natively have an option to take a DHCP lease and override the IP address
Question 2:
You can accept a DHCP lease then reconfigure your network based upon the information provided in the DHCP lease - more information after break
Question 3:
Leaving open to others to answer but linux is very open-ended it would be better to ask if there are any linux distros that support this functionality
Assumptions:
OP has basic understanding of CLI and windows command prompt
Tools needed
Windows command prompt
Okay we're going to start up Command prompt and start typing commands and noting down some basic information from the output
ipconfig /all
From the output you need to identify which adapter you want to be working with eg: Local Area Connection going forward I will refer to this selection as foo
Next commands:
netsh interface ip set address name="foo" dhcp ipconfig /release ipconfig /renew ipconfig /all
This will set your foo interface to release any current leases ten request and accept a DHCP then lastly display the config from that DHCP lease
From here you will need to make note of your foo interfaces DNS Servers, Default Gateway and Subnet Mask
Going forward I will refer to these as follows
- The static IP address you want = x
- Subnet Mask = y
- Default Gateway = z
- DNS Server 1 = a
- DNS Server 2 = b
From here we have all the information we need so we can finish this in 3 more commands
netsh interface ip set address name="foo" static x y z netsh interface ip set dns "foo" static a netsh interface ip add dns "foo" b INDEX=2
If you would like a better understanding of how these commands work you can read up on the technet KB items
- Big thanks for the answer, I'll try it out tomorrow. – GBF_Gabriel Aug 21, 2013 at 3:50
- It worked and I made a .bat for changing proxy between various wifi, thanks for the command lines. – GBF_Gabriel Aug 24, 2013 at 0:29
Short answer: If it's something you need to get things done, then talk to campus network support. If that's the case, they may already have a process for you to follow
If it's NOT for classwork then on windows 7 you can try the following. But read the whole thing first, and understand the caveats:
- click start > run
- type cmd , Enter
- type ipconfig , Enter
- you may have to read through the output, but you can find the adapter in use and an entry for "IPv4 Address". Yours will likely be 192.168.x.x (not a guarantee). mine says 192.168.1.120. so we'll use that for the example going forward. Leave this window open.
- go to Start > Control Panel > Network and Sharing Center
- in the "View your active networks" section, right side, it shows your connection. Click that.
- click Properties
- highlight (single click) "Internet Protocol Version 4 (TCP/IPv4)"
In this window, you can select "Use the following IP address:" and set the "IP address" field to match the IPv4 Address shown in the ipconfig output. You must also set the Subnet mask and Default gateway to match those entries from the ipconfig output.
You will likely not have any problems with this, but I wouldn't trust it. It doesn't affect your dynamic ip address leases. So, depending on the config of the network you're on, it may force release of your ip at anytime, take your ip lease from you and give it to someone else. In that case, it will most likely prefer the person with the full dynamic config (because their station accepted it outright) and leave you with no network connection... forcing you to call support and give them a chance to chastise you for TRYING TO HACK OUR SYSTEM!!1 or some nonsuch.
50-3 said basically the same thing, but using the command line while I directed you through the graphical user interface. The problem is much the same: your system is dependent upon how the network treats ip leases. A lot of networks don't bother them, but colleges can be pretty anal about people doing "illicit things" over their networks, and employ all kinds of non-standard practice to thwart them.
On a technical level, though, there's nothing in either of our posts that could floob your machine beyond use. The worst thing that could happen is that you randomly lose internet at the worst time and have to call someone.
- prefer the person with the full dynamic config (because their station accepted it outright) Actually it will cause a network conflict as two people on the network will have the same address. – 50-3 Aug 23, 2013 at 3:25
- Thank you for your answer, as this do the same thing as the other answer I choose the other one as best because the command line helped me. But both are correct. – GBF_Gabriel Aug 24, 2013 at 0:31
You must log in to answer this question.
Not the answer you're looking for browse other questions tagged networking dhcp ..
- The Overflow Blog
- Reshaping the future of API platforms
- Between hyper-focus and burnout: Developing with ADHD
- Featured on Meta
- Our Partnership with OpenAI
- Imgur image URL migration: Coming soon to a Stack Exchange site near you!
Hot Network Questions
- How does one convert LBA to CHS with regards to USBs whereupon the format is inapplicable?
- Why doesn't constant acceleration give me total displacement?
- Is there any explanation or discussion regarding the change in the Bard class from its AD&D1ed orignal implementation?
- Try Triling ("Triangular-Tiling")
- What's the story behind the "mysterious" 486DX3?
- How did the bugs get all over the place?
- Quickest return from stable Earth orbit to ground?
- I keep blowing up irrigation solenoids
- The Wu line drawing algorithm for anti-aliased lines optimization
- Story about robots and unemployment
- May the Fourth Be With You - a Star Wars Day Bounty Hunt
- printf - store formatted string output in a variable
- Is the meter relative to time?
- Using Mars inner moon Phobos as a brake
- What does "come the nut-cutting" mean?
- Scientist travels back in time to murder his wife’s secret lover
- What is "the sin that no Christian need pardon"?
- LED as a flyback for a 3V relay?
- How realistic is a communist hardboiled detective?
- A word for not just optional but usually not done
- If the Earth stopped spinning, what's the ideal point for it to stop to ensure the most people survive?
- How does Russia exactly define Russian territory in its state policy?
- Create an empty 8x8 One Up puzzle with a unique solution
- Is my DM taking too long to level us up?
How to configure a static IP on Windows 10 or 11
Do you need to switch from a dynamic to a static IP address configuration on Windows 11 or 10? Here's how.

- Windows 11 static IP
- Windows 10 static IP
On Windows, the router's Dynamic Host Configuration Protocol (DHCP) server is (usually) responsible for assigning a dynamic Transmission Control Protocol/Internet Protocol (TCP/IP) configuration to every device in the network, including to your computer running Windows 11 or Windows 10.
Although a dynamic IP address is the recommended configuration for most situations, you may need to change to a static IP address if you're thinking about setting up a printer or file sharing, or you have to configure port forwarding on the router to your computer.
The reason is that a dynamic network configuration can change at any time after the lease from the DHCP expires and if the address changes, network resources you may have configured will stop working. Setting a static IP address will always stay the same on the computer, allowing a more reliable experience sharing resources in the network or forwarding ports.
Whatever the reason, on Windows 10 and 11, you have many ways to configure a static TCP/IP address, including using the Settings app and Command Prompt.
This guide will walk you through the different ways to configure a static network configuration on Windows 11 and 10.
How to set a static TCP/IP network configuration on Windows 11
On Windows 11, you can change your computer's dynamic IP configuration to static in at least two ways through the Settings app or commands.
Configure IP from Settings app
Get the Windows Central Newsletter
All the latest news, reviews, and guides for Windows and Xbox diehards.
To assign a permanent TCP/IP configuration on Windows 11, use these steps:
- Open Settings .
- Click on Network & internet .
- (Optional) Click on Advanced network settings .
- Under the "More settings" section, click on Hardware and connection properties.
- Note the current IPv4 , Subnet mask , Default Gateway , and DNS server addresses to determine the new configuration, as it has to be in the same network scope.
- Click the Ethernet or Wi-Fi page on the right side from the "Network & internet." page.

- Quick note: If you select the Wi-Fi page, you need to click on the connection properties to access the network settings.
- Click on the Edit button for the "IP assignment" setting.

- Select the Manual option from the drop-down menu.
- Turn on the IPv4 toggle switch.
- Confirm the IP address for the computer – for example, 10.1.4.90.
- Confirm the subnet mask for the configuration – for example, 255.255.255.0.
- Confirm the default gateway address (usually your router's IP) – for example, 10.1.4.1.
- Confirm the preferred DNS address – for example, 10.1.4.1.

- Quick note: In a home network, you may also be able to use the router's IP address for the DNS configuration. You can also use third-party DNS services like Google Public DNS, Cloudflare, Cisco's OpenDNS, and others.
- (Optional) Select the "On (automatic template)" option for the "DNS over HTTPS" setting and leave the "Fallback to plaintext" option disabled unless you want to encrypted as well as unencrypted traffic or you're troubleshooting connectivity.
- Quick note: DNS over HTTPS (DoH) is a feature that encrypts the DNS queries over the HTTPS protocol to improve security and privacy on the internet. You only want to enable this feature if the DNS server supports this feature.
- Confirm the alternate DNS address (if applicable).
- (Optional) Select the "On (automatic template)" option for the "DNS over HTTPS" setting and leave the "Fallback to plaintext" option disabled.
- Click the Save button.
Once you complete the steps, the computer will start using the static network configuration. If everything has been configured correctly, you should be able to open the web browser to access the internet.
If you entered an address (such as the DNS address) and then changed it, you probably won't be able to save the settings. If this is the case, cancel the configuration, start over, enter the correct configuration, and then try to save the settings.
Configure IP from Command Prompt
To set a static TCP/IP configuration on Windows 11, use these steps:
- Open Start .
- Search for Command Prompt , right-click the top result, and select the Run as administrator option.
- Type the following command to see your current networking configuration and press Enter : ipconfig /all
- Confirm the name of the adapter and the networking configuration, including the IPv4 , Subnet mask , Default Gateway , and DNS Servers .

- Type the following command to configure a static TCP/IP address and press Enter : netsh interface ip set address name= "ADAPTER-NAME" static IP-ADDRESS SUBNET-ADDRESS DEFAULT-GATEWAY-ADDRESS
In the above command, replace ADAPTER-NAME with the name of your network adapter. Change IP-ADDRESS SUBNET-ADDRESS DEFAULT-GATEWAY-ADDRESS with the device IP address, subnet mask, and default gateway addresses you want. For example, this command sets the 10.1.4.90, 255.255.255.0, 10.1.4.1 configuration: netsh interface ip set address name="Ethernet 10Gb" static 10.1.4.90 255.255.255.0 10.1.4.1

- Type the following command to set a DNS server address and press Enter : netsh interface ip set dns name="ADAPTER-NAME" static DNS-ADDRESS
In the command, change ADAPTER-NAME with your adapter's name and DNS-ADDRESS with the DNS server address of the network. For example, this command sets the local router as the DNS server: netsh interface ip set dns name="Ethernet 10Gb" static 10.1.4.1
- Type the following command to set an alternate DNS server address and press Enter : netsh interface ip add dns name="ADAPTER-NAME" DNS-ADDRESS index=2
In the command, change ADAPTER-NAME with the adapter's name and DNS-ADDRESS with an alternate DNS server address. For example, netsh interface ip add dns name="Ethernet 10Gb" 1.1.1.1 index=2
After you complete the steps, the commands will set a static network configuration on Windows 11.
How to set a static TCP/IP network configuration on Windows 10
On Windows 10, you can also use the Settings app and Command Prompt to set up a static IP network configuration.
To assign a permanent TCP/IP configuration on Windows 10, use these steps:
- Click on Ethernet or Wi-Fi .
- Click on the active connection on the right side.

- Click the Edit button for the "IP assignment" setting.

- Select the Manual option.
- Confirm the subnet prefix length (subnet mask) for the configuration – for example, 24 to specify the 255.255.255.0 subnet mask.

- Quick tip: It's important to use the number that represents the network instead of the subnet mask. Otherwise, the configuration won't save. If you don't know the subnet prefix length for your subnet mask, you can use any online subnet calculator to find out.
Once you complete the steps, Windows 10 will start using the static IP configuration. If you lose network connectivity, restart the computer to regain access to the local network and internet.
To change from dynamic to static IP address with commands on Windows 10, use these steps:
In the command, change ADAPTER-NAME with your adapter's name and DNS-ADDRESS with the DNS server address of the network. For example, this command sets the local router as the DNS server: netsh interface ip set dns name=" Ethernet 10Gb" static 10.1.4.1
In the command, change ADAPTER-NAME with the adapter's name and DNS-ADDRESS with an alternate DNS server address. For example, netsh interface ip add dns name="Ethernet0" 1.1.1.1 index=2
After you complete the steps, the network configuration will switch from dynamic to static on Windows 10.

Mauro Huculak is technical writer for WindowsCentral.com. His primary focus is to write comprehensive how-tos to help users get the most out of Windows 10 and its many related technologies. He has an IT background with professional certifications from Microsoft, Cisco, and CompTIA, and he's a recognized member of the Microsoft MVP community.
- 2 DesktopGPT brings GPT-3.5 Turbo, GPT-4, and GPT-4 Turbo to Windows 11's backyard, potentially giving Microsoft's Copilot AI a run for its money as the best alternative
- 3 Clippy, the infamous paperclip, is here to debloat Windows 11 and save you from ads
- 4 Microsoft says most company execs won't hire anyone without an AI aptitude, prompting "a 142x increase in LinkedIn members adding AI skills like Copilot and ChatGPT to their profiles"
- 5 World of Warcraft Dragonflight's final major update, Patch 10.2.7 "Dark Heart", is now available
IMAGES
VIDEO
COMMENTS
To assign the IP address and default gateway manually, follow the steps below: a) In system tray, right click network icon. Choose Open Network and Sharing Center. b) Right click on Local Area Connection and click on Properties. c) Double click Internet Protocol Version 4 (TCP/IPv4) and assign the IP address manually.
To set a static IP address in Windows 10 or 11, open Settings -> Network & Internet and click Properties for your active network. Choose the "Edit" button next to IP assignment and change the type to Manual. Flip the IPv4 switch to "On", fill out your static IP details, and click Save. Sometimes, it's better to assign a PC its own IP address ...
Click (once) on the appropriate one. Then right-click on the same connection — this will bring up a context menu like the one shown in Figure 4. Then click Properties. This will bring up the ...
Show activity on this post. Run ipconfig /all in cmd and write down the MAC address of your ethernet card (one with address given by you). Log on to your router and goto DHCP -> Address Reservation. Click add and fill in your MAC address and IP that you set to your computer, set enabled and click Apply. That's it.
A static IP address must be manually entered into a device, along with router address, subnet mask, DNS server addresses and domain information. ... Static IP Configuration - Windows 7. ... Click on Change adapter settings from the left side menu. Step. Right-click on the Local Area Connection icon, ...
This tutorial shows how to set a manual IP address in Windows 7.
10 minutes. TOOLS. Windows 10 or 11. Step 1: Open the Command Prompt. Your first step should be to track down your computer's current IP address, subnet mask, and default gateway. Do this by ...
Click "Properties" next to your Wi-Fi network on the right. Scroll down and click the "Edit" button next to "IP assignment.". Click the drop-down box in the "Edit network IP settings" dialog, and select "Manual.". Select the IPv4 or IPv6 format to set the static IP address. In this example, we are selecting IPv4.
View Your Network Information with Command Prompt. Before you change your IP address and related information, you'll need to find the full name of the network for the interface you want to change. To do this, type the following command: netsh interface ipv4 show config. Scroll down until you see the interface you're looking for.
Click Change adapter settings. Right-click on Wi-Fi or Local Area Connection. Click Properties. Select Internet Protocol Version 4 (TCP/IPv4). Click Properties . Select Use the following IP address. Enter the IP address, Subnet mask, Default gateway, and DNS server. Click OK. Your computer displays a static IP address.
Setting up a static ip for Windows 7. If you have a printer, before you begin print out this page! Step 1: Open up the start menu, and look for the Search programs and files box. You should now see the following window. Step 2: Type cmd in the Search programs and files box, and press Enter on your keyboard.
From the Configure IPv4 menu, choose Using DHCP with manual address. Enter a static IP address in the IPv4 Address and leave the Subnet Mask and Router field as default. Click Ok to save the changes. Now when you do an ifconfig, the system should be using the static IP you have defined in the previous times.
If you wish, you would in Windows set a computer's static IPv6 inside Start > Network > Network and Sharing Center > Change Adapter Setting , right-click on the Ethernet connection IPv6 and choose Properties, right-click "Internet Protocol Version 6 (TCP/IPv6)" and click on Properties, the set "Use the following IPv6 address".
Here's how you can set a static IP Address using the Windows settings: Head to the Start menu search bar, type in 'settings,' and select the best match. Alternatively, press the Windows Key + I to launch the Settings menu. Then head to Network & internet settings . Look for the Properties button.
Go to Network connections and right-click the network device where you're sharing your internet. Go to Properties, and then click on the Sharing tab. uncheck the Allow other users to connect through this network, click ok, go to the tab again, and share Local Area Network* 13 again. Windows will have filled this information for you ...
Below are instructions to set the IP address on a computer running Windows 7, Windows 8.x or Windows 10. Setting the IP address is needed so that the computer and the reader can interact with one another. These instructions can be helpful if you borrowed or rented a reader from someone and need to update the IP address to use the reader.
Step 2: Go to Network Connections. Go to Network and Internet > Network and Sharing Center. Select Change adapter settings on the left. Step 3: Find the IP address. Right click the Ethernet icon and select Status from the context menu. Then click Details... to view all detailed information of network connection. Step 4: Set the IP address.
Set static IP address on Windows 10 from Settings. To assign a static IP address on Windows 10, use these steps: Open Settings on Windows 10. Click on Network & Internet. Click on "Wi-Fi" or "Ethernet.". Click on the current network connection. Under the "IP settings" section, click the Edit button. Using the drop-down menu, select ...
In both Windows 11 and Windows 10, you can also change your IP address from the Control Panel. Open the Control Panel and click or tap on "View network status and tasks" under "Network and Internet.". In the Network and Sharing Center, click or tap on your internet connection from the "View your active networks" area.
highlight (single click) "Internet Protocol Version 4 (TCP/IPv4)" click Properties. In this window, you can select "Use the following IP address:" and set the "IP address" field to match the IPv4 Address shown in the ipconfig output. You must also set the Subnet mask and Default gateway to match those entries from the ipconfig output.
To set a static TCP/IP configuration on Windows 11, use these steps: Open Start. Search for Command Prompt, right-click the top result, and select the Run as administrator option. Type the ...