
Floating Paper Clip on Water – Science Experiment
- March 10, 2021
- 10 Minute Science , 7-9 Year Olds , Physics
Today, I am going to share an awesome science concept ‘Surface Tension’ through a classic science experiment.
If you are in need of science project for your science fair day, then here is the best science activity you can pick to perform on the day.
How to Make Paper Clips Float on Water
Objective: To explore the strength of water molecules and investigate the science concept ‘Surface Tension’.
Materials Required:
All the materials you are going to collect on your experiment table in this activity are easily available. Here is the simple supplies list:
1) Paper Clips
2) A transparent glass Bowl
3) Clean Water
4) Tissue Paper
5) A New Pencil attached with Eraser or Craft Stick

Instructions to do Floating Paper Clip Science Experiment

Complete Step By Step Video
Take a clean and transparent glass bowl on your experiment table and fill it with fresh water.
Make sure to fill the glass bowl with water nearer to the top or brim of the bowl. Such that we are making things go easily during the activity.
Also, you need to wash your hands before the experiment but only using water.
Do not use soap when you decide to conduct this activity because soap may tamper the outcome results as it holds its own surface tension properties.

Just to show your children, perform a small step how a paper clip actually does when dropped in water.
So, take a paper clip and simply drop it in to the glass bowl filled with water. And now ask your child to check whether it is sinking or floating in the bowl of water.
Absolutely, the paper clip sinks to the bottom of the bowl because of density differences.

Remove the paper clip out of the bowl to perform the next step. Then, take a tissue paper and cut it in the shape of square. Make sure the size of the cut tissue paper is slightly larger than the paper clip.

Now, gently place the square cut tissue paper into the glass bowl with water. You will observe the tissue paper start floating and reaches to top of the water.

At this point of time, place our paper clip carefully on top of the tissue paper. This is a bit tricky step as there is no balance inside water to hold things in right place.

Hope this helps you to place the experiment clip in right place on tissue paper and does not touch the water surface.
It is time to poke tissue paper and this is the favourite step for children.
Hahaha! Take the pencil with eraser on the other side. Use the eraser side to poke the tissue paper.
But make sure you are not touching the paper clip on the tissue paper while poking it with pencil. You need to poke the tissue paper until it reaches to the bottom.

Here is another trick. Extend a paperclip to create a holder like this.

Now carefully place the paper clip on the holder and dip it slowly in the water. Viola.. your paper clip will float now.

I let my kids to float as many paper clips as possible on the surface of the water.

We even had fun blowing air through straw to make the paperclips move in circular motion while floating on the water.

What you observe here? You will observe the tissue paper sinks but not the paper clip. The paper clip remains on the surface of the water floating. It looks magical but it is not a magic, it is actually the science. Let us learn the science behind this super classic experiment.

Science involved in Floating Paper Clip Science Experiment
Why does paper clips sinks to bottom in water? Generally, paper clips are of metal material and normally sink to bottom when put in water.
Because the metal materials are usually heavy in weight and possess higher density when compared to water. That is the reason, paper clips usually sink to the bottom in water.
However, we can make the paper clips to float on the surface area of water using simple science trick.
The floating paper clip science experiment is all about ‘ Surface Tension ’. Surface tension is the cohesive nature of liquid surface film due to the attraction between the molecules which tends to the minimum surface area possible.
In this floating paper clip activity, water molecules hold tightly and stay together because of surface tension.
And we are creating “skin” on the water surface which holds water molecules tightly and suspending the paper clip to appear as floating.
Until the water molecules stay together and hold tightly, they can support paper clip to float on water surface.
So, we are creating ideal and right conditions to support the paper clip to float using tissue paper.
Using tissue paper, we are suspending the paper clip on the surface tension of the water and slowly removing the tissue under it.
Actually, the paper clip does not float but it holds up by the cohesive forces of surface tension and appear as floating.
The same science is being used by the tiny insects to walk across the water surface of the lakes.
Extension Experiment
Here is another awesome experiment that proves surface tension in an educational way. This is an extension activity to floating paper clip science experiment.
Set up the experiment table with a bowl of water. Repeat the same steps of the above activity and make a paper clip float.
Now, dip your finger in a little amount of dish soap and put it on the surface of the water. You will notice the floating paper clip drop to the bottom that means the paper clip sinks to the bottom of the bowl.
Because the soap liquid spreads or pushes away the surface or skin of the water surface to its sides as soon as the soap comes in contact with water.
The soap liquid has a thin layer of surface tension which is less dense than the water surface tension.
That is the reason the soap layer does not hold paper clip anymore and makes it sink.
If you even want to take the experiment further, you can try the same experiment using other steel objects instead of paper clips.
Also, you can replace water with different varieties of juices, milk, etc. and check whether the outcome results are same.
You can try these interesting and related science experiments with water and surface tension:
Learn to Make a Square Bubble
DIY Soap Powered Boats
Walking Water Experiment
Swirling Magic Milk Experiment
Floating Drawings on Water
Chemical Formula of Surface Tension and Water
Surface tension is the nature of liquid molecules to get attracted due to cohesive forces and remain tightly and tends to minimal surface area possible. The chemical formula of surface tension is:
r = 1/2 . F/L
r is surface tension
F represents Force
L represents Length
Water is the major constituent of Earth’s atmosphere with chemical formula, H2O. In chemical formula , H represents hydrogen atoms and 2 says hydrogen atoms in two numbers. Whereas O represents one oxygen atom. Hydrogen atoms are positively charged and oxygen atom is negatively charged. That means, water molecule is a constituent of two hydrogen atoms and one oxygen atom. Water is colorless, tasteless, odorless, and offers no calories.
Water molecule is stable when two positively charged hydrogen atoms bond to one negatively charged atom. There is a slight difference in charges while bonding which is known as dipole. The bond between two water molecules is referred as hydrogen bonding. The water molecules on the surface of water in the bowl attract each other due to cohesive forces and form surface tension on top of it. This surface tension is the reason to hold paper clip on top of water.
When you dip the soap liquid in the water, the surface tension breaks because the thin layer of soap liquid reduces the water surface tension because of existence of non-polar and dipole free bodies. Hence, it is difficult for paper clips to float and sinks to bottom.
Questions to discuss during the Experiment
Asking questions during the experiment helps children to improve their critical thinking skills and encourages them to do wonders in science. Here are a few questions to discuss about the experiment:
1) Why does paper clip floats on water but not on other liquids?
2) Are there any other liquids that hold paper clip to float?
3) What do you think the shape of the paper clip impacts the floating ability?
4) How many paper clips can the water surface tension holds?
5) Is it possible to increase the surface tension of the water naturally?
6) What are the other liquids that show stronger surface tension and good at floating things?
Yes, absolutely you can float a paper clip on water. Paper clips are of steel material which defy the floating physical laws. But surprisingly we can float steel paper clips on the water using surface tension created on top surface area of water. The higher surface tension of water molecules holds the paper clips float on water.
Naturally, paper clips are of heavy weight and sinks in the water container as it shows greater density than water. But when you suspend the paper clip carefully on top of the water surface, it floats amazingly. This is because of surface tension formed due to the cohesive forces between the water molecules. You can find many tricks to make the paper clip float on top of the water surface in a container.
When you drop a paper clip into the water, it sinks to the bottom of the container. But when you drop the paper clip trickily, on top of the water surface, it floats. Because the water molecules stay tightly together by attracting other water molecules and form a strong surface tension due to cohesive forces. This surface tension keeps the paper clip floating on the water surface.
Alcohol is a non-polar liquid body that holds very less surface tension when compared to water. As alcohol is non-polar, it does not form hydrogen bonds. Without hydrogen bonds there is no cohesive forces and no surface tension making the paper clips sink in the water! Hence, it is highly impossible for a paper clip to float on alcohol.
When you add some detergent to the water on which a paper clip is floating, the surface tension of water gets disturbed. Due to the thin layer of soapy liquid of detergent, the surface tension of water breaks. When the surface tension gets disturbed the water molecules loose enough strength to hold the water molecules together. And the water surface area loses its surface tension due to lack of attraction between the water molecules. Finally causes the floating paper clip to sink to the bottom of the bowl containing full of water.
Tooth picks float on water surface because they naturally come with flat surface and made of wood. Flat surfaces do not sink into the water instead float on top of the water surface naturally. Because of their light weight and surface tension of water, the tooth picks float amazingly on top of the water.
Paper clips float on the surface area of the water because of surface tension. Surface tension is the tendency of liquid molecules to attract each other due to cohesive forces. In floating paper clip science experiment, the water molecules on the surface area attract each other and stay tight due to cohesive force. Thus forms the strong surface tension on the top layer of water in the bowl. When you push the paper clip, due to strong force the surface tension breaks and sinks the paper clip float.
Naturally, paper clip is a metal material i.e. steel and stays separated from other paper clips when placed together in a container. However, they become magnetised when we use strong magnets to make the paper clips float. This is because steel easily gets attracted to magnets and becomes slightly magnetic but loses its magnetism soon after you remove the magnet away.
Yes, absolutely we can increase the surface tension of water using salt. Salt is the magical kitchen hold ingredient that surprisingly increases the water surface tension. All you need to do is just add a little amount of salt to the fresh water taken in a container. That’s it! The surface tension of water increases amazingly. You can observe this by doing some surface tension experiments like floating paper clip, magnet paper clip, etc.
Water is an odourless, tasteless, and calorie less inorganic compound that has strong surface tension i.e. 72.8millinewtons (mN) per meter at 20 °C. There are other liquids that show strongest surface tension such as mercury. Whereas alcohol and benzene shows less surface tension compared to water and mercury.
It all depends on the surface tension. You can keep on adding paper clips to the water surface carefully until the surface tension of the water in the container holds. Make sure you are dropping paper clip one after the other carefully on the surface tension of the water. When you drop paper clips one by one, they start sticking to each other because of the forces acting inside the liquid surface area.
Because of higher surface tension on the water, the paper clip is able to float when placed on quizlet. The water molecules stay tightly together and remain closely forming skin of the water surface due to the cohesive forces inside it. This skin of the water surface is nothing but the surface tension which makes paper clips float on the water surface area.
Floating paper clips with magnets is an interesting and exciting science activity using everyday supplies in the home. Here are the instructions to do: 1) Take 5-6 inch long thread and tie it to one end of the paper clip 2) Now glue the other free end of the thread to the immobile object in the home like tables, desks, etc. Whatever you use, you need to perform the experiment near that object only. 3) Place a magnet just above the paper clip and make sure the magnet is not touching the paper clip. Just bring it near to the paper clip. 4) As the paper clip is metal, it gets attracted to the magnet and starts moving towards magnet which seem like the paper clip is floating.
As human body is much stronger and has great gravitational force, it is impossible for them to walk on water surface. Because of these two reasons, the humans overcome the surface tension of water. Whereas the small tiny insects walk across the surface layer of lake water because of string surface tension of water molecules on the lake. As insects are small in size and light in weight cannot overcome the strong surface tension of water. Thus, it is easy for tiny insects to walk across the water.
The densest liquid on Earth’s atmosphere is Mercury or Quick Silver. Mercury is the best known liquid since 3500 years and stays stable at STP i.e. standard conditions of pressure and temperature. In addition, mercury proves to have higher surface tension than water and known as second highest surface tension liquid after water.
Time requires: It just requires 3-5 minutes of your free time. As it is a simple and quick activity, you can even perform it on your busy day during play time as well.
Age Group: Kids of all age group are perfect to investigate this simple science activity. Especially the older kids learn the science concepts in an easy and educational way while having a lot of fun. Kindergarten, elementary, and pre-school children can also perform this activity during their free time and learn about water molecules.
Safety measures: This activity is completely safe as we are not using any single toxic material or substances. The only thing we need consider is paper clips. As paper clips are tiny, there are chances by younger children to keep it inside the mouth. So, adult supervision is mandatory when you perform this activity with toddlers, and kindergarten. It is always suggestible to wear safety goggles and gloves while performing the activity.

Leave a Reply Cancel Reply
Your email address will not be published. Required fields are marked *
Name *
Email *
Add Comment *
Save my name, email, and website in this browser for the next time I comment.
Post Comment
Skip to Main Content
Build a Simple Motor + Video
<< Back to Popular Projects
See for yourself how the forces of electricity and magnetism can work together by building a simple DC electric motor using simple materials you can find in any hardware store!
Electricity and magnetism are both forces caused by the movement of tiny charged particles that make up atoms, the building blocks of all matter. When a wire is hooked up to a battery, current flows through the wire because negatively charged electrons flow from the negative terminal of the battery toward the positive terminal of the battery because opposite charges attract each other, while similar charges repel each other. This flow of electrons through the wire is an electric current, and it produces a magnetic field.
In a magnet, atoms are lined up so that the negatively charged electrons are all spinning in the same direction. Like an electric current, the movement of the electrons creates a magnetic force. The area around the magnet where the force is active is called a magnetic field. Metal objects and other magnets that enter this field will be pulled toward the magnet.
The way the atoms are lined up creates two different poles in the magnet, a north pole and a south pole. As with electrical charges, opposite poles attract each other, while like poles repel each other.
Learn about electromagnetism and its many uses here .
Now let's watch it work as we build a motor. (Note: This science project requires adult supervision.)
What You Need to Make a DIY Motor with Magnets
- Insulated copper wire or magnet wire
- Black permanent marker (such as a Sharpie)
- Small neodymium disc magnets
- D-cell battery
- Battery holder (sticky tack or modeling clay can be used instead)
- Large rubber band (not needed if using a battery holder)
- 2 large paperclips
- Pen or pencil
How to Build a Simple Electric Motor
- To make a bundle, wrap the ends of the wire several times around the loops to hold them in place. Position the ends so they are directly across from each other and extending out in a straight line on either side of the bundle, to form an axle. What you just made is called the armature .
- Hold the wire bundle you have made so that it would be flat against a wall, rather than a table, and color the top side of each wire end using the marker. Leave the bottom side of each wire bare.
- Carefully bend each paperclip, forming a small loop by wrapping one end around a small object such as a pencil or pen. Thick wire and pliers may be used instead of a paper clip if you want. Be sure to use caution when using the pliers.
- If you are using a battery holder, attach a paper clip to either side and insert the battery. If you don’t have a battery holder, wrap the rubber band tightly around the length of the battery. Insert the paper clips so each one is touching one of the terminals, and they are securely held by the rubber band. Attach the curved side of the battery firmly to a table or other flat surface using clay or sticky tack.
- Set one neodymium magnet on top of the battery, in the center. Position the armature in the paper clip loops, with the shiny, uncolored side touching the paper clips. Make sure it doesn’t touch the magnet.
- If your motor doesn’t start immediately, try giving it a start by spinning the wire bundle. Since the motor will only spin in one direction, try spinning it both ways.
- If your motor still is not working, make sure that the paper clips are securely attached to the battery terminals. You may also need to adjust the insulated wire so both ends are straight, and the bundle you have made is neat, with the wire ends directly opposite of each other.
- With the motor spinning, hold up the other magnet, above the armature. As you move it closer, what happens? Turn the magnet over and try again to see what happens.
What Happened:
The armature is a temporary magnet, getting its force from the electrical current in the battery. The neodymium magnet is permanent, meaning that it will always have two poles, and cannot lose its force.
These two forces – electricity and magnetism – work together to spin the motor. The poles of the permanent magnet repel the poles of the temporary magnet, causing the armature to rotate one-half turn. After a half-turn, the insulated side of the wire (the part you colored with a permanent marker) contacts the paper clips, stopping the electric current. The force of gravity finishes the turn of the armature until the bare side is touching again and the process starts over.
The motor you created uses direct current, or DC, to rotate the armature. The magnetic force is only able to flow in one direction, so the motor spins in only one direction. AC, or alternating current, uses the same principle of electron flow, but the pole is rotating rather than in one place. AC motors are often more complex than DC motors, like the simple one you were able to make. Unlike a fixed DC motor, AC motors can switch the direction of rotation.
(The DC motor you made is only able to spin in one direction because its direction is determined by the poles of the permanent magnet. If you turn the magnet over, so the other pole is facing up, it will change the direction the motor spins.)
When you held the second magnet over the top of the armature, it either stopped or made the motor rotate more rapidly. If it stopped, it’s because the pole was in the opposite direction of the first magnet, in a sense canceling out the rotation of the armature. If it moves faster, the same poles of the first and second magnets, which repel each other, work to spin the armature more quickly than with only one magnet.
Building Bigger, Faster Motors
Experiment with batteries of higher voltage, as well as more powerful magnets. You can also try using ceramic magnets. One design we found worked well was to set the armature over 4 ceramic ring magnets and connect the supporting paperclips to a 6V battery.
You can also try increasing the size of the armature, and how many coils there are, to make a stronger electromagnet. When using batteries of higher voltage, and bare wires, be very careful. The circuit can emit enough heat to cause a burn if the wire is held too long.
More Electricity Science Projects:
These experiments are perfect for science fair projects or to continue learning about electricity and magnetism at home.
- Electromagnetism Experiments
- Electricity Experiments (including making a homemade battery!)
- Make a Light Bulb
Motors, Motors, Everywhere!
Without motors, your house would be without electricity! AC motors are essential for power plant generators that supply us with electricity.
Many small motors can be found in cars for power windows, heating, cooling fans, and windshield wipers. Motors can also be found all around the house, especially for slow-moving, high-torque functions .
Kitchen appliances like blenders and mixers turn electricity into mechanical energy by using electric motors. Most washer and dryer machines use an AC motor to be able to spin in either direction. Small DC motors can be found in DVD or CD players, and the disk drive of a computer. The vibrator in your cell phone also works because of a tiny DC motor.
We get it. Science can be messy. But Home Science Tools' products and service can handle it.
Our products are durable, reliable, and affordable to take you from the field to the lab to the kitchen. They won't let you down, no matter what they're up against. Whether it's (over)eager young scientists year after year, or rigorous requirements that come once-in-a lifetime.
And if your science inquiry doesn't go as expected, you can expect our customer service team to help. Count on friendly voices at the other end of the phone and expert advice in your inbox. They're not happy until you are.
Bottom line? We guarantee our products and service won't mess up your science study—no matter how messy it gets.
Questions? Get in touch with our Customer Service team.
3 Magnet Science Projects: Studying the Power of Magnets
- Keren Perles
- Categories : Great ideas for science fair projects
- Tags : Homework help & study guides
Block the Magnet
For this magnet science project, you’ll need a strong magnet. Put the magnet on a table, and lay a ruler next to it so that the magnet lines up with the beginning edge of the ruler. Then put a paper clip at the 6 inch mark of the ruler. Does the magnet attract the paper clip? If not, move the paper clip half an inch closer and try again. Keep on moving the paper clip until the magnet attracts it, and record the measurement that the paper clip was at before it was attracted to the magnet. Then repeat the experience, putting a piece of tin foil in front of the magnet. Does the paper clip have to be closer in order for the magnet to attract it? Repeat the experience with various materials, such as glass, cardboard, or plastic. Which one blocks the magnet’s power the most?
Are Two Heads Better Than One?
Do you think that two magnets will have more power than one magnet? How much more? Twice the power? Test your hypothesis with this magnet science project. Put two paper plates next to each other, and cover one of the plates with paper clips. Then take a magnet and hold it directly over the paper clips. Transfer the paper clips attached to the magnet to the other plate. Count the number of paper clips and record it on a table. Repeat this part of the experiment ten times. Then put two magnets together and see how many paper clips you can transfer. (Note: Make sure to hold the magnets in the same location over the first plate.)
Plant Growth and Magnets
Magnets produce a magnetic field. But does a magnetic field affect living things, like plants? Find out by using this magnet science project. Wet a paper towel and fold it so that it fits the inside of a foam cup. Then slip a bean between the paper towel and the side of the cup. Repeat this process until you have twenty cups. Place the cups indoors in a sunny area. Place a magnet into alternate cups, and mark them “Magnet Beans.” Measure your bean plants daily to see whether the Magnet Beans are growing more quickly or slowly than the other beans. (Take a look at this article for more bean plant experiments .)
This post is part of the series: Fun and Simple Science Projects
The simple science projects in this series are easy to do - and they’re fun too! They include chewing gum science projects, soda pop science projects, magnet science projects, and making a DNA model for part of a science project.
- 3 Middle School Science Projects: Soda Pop Science
- Middle School Science Projects: Magnet Science
- Middle School Science Projects: Chewing Gum Science
- Easy Science Fair Projects: How to Make a DNA Model at Home
- The 3 Fastest and Easiest Science Fair Projects Around
Science Bob
- Experiments
- Science Fair Ideas
- Science Q&A
- Research Help
- Experiment Blog
more in Experiments
Make a paperclip float.
You will need
clean dry paper clips tissue paper a bowl of water pencil with eraser
Fill the bowl with water Try to make the paper clip float…not much luck, huh? Tear a piece of tissue paper about half the size of a dollar bill GENTLY drop the tissue flat onto the surface of the water GENTLY place a dry paper clip flat onto the tissue (try not to touch the water or the tissue) Use the eraser end of the pencil to carefully poke the tissue (not the paper clip) until the tissue sinks. With some luck, the tissue will sink and leave the paper clip floating!
How does it work?
How is this possible? With a little thing we scientists call SURFACE TENSION. Basically it means that there is a sort of skin on the surface of water where the water molecules hold on tight together. If the conditions are right, they can hold tight enough to support your paper clip. The paperclip is not truly floating, it is being held up by the surface tension. Many insects, such as water striders, use this “skin” to walk across the surface of a stream.
MAKE IT AN EXPERIMENT
The project above is a DEMONSTRATION. To make it a true experiment, you can try to answer these questions:
1. How many paperclips can the surface tension hold?
2. Does the shape of the paperclip affect its floating ability?
3. What liquids have the strongest surface tension?
4. Can the surface tension of water be made stronger? (try sprinkling baby powder on the surface)
More Images & Video

More from my site

ADS (these ads support our free website)
Share this page.
Cool Science Experiments Headquarters
Making Science Fun, Easy to Teach and Exciting to Learn!
Science Experiments
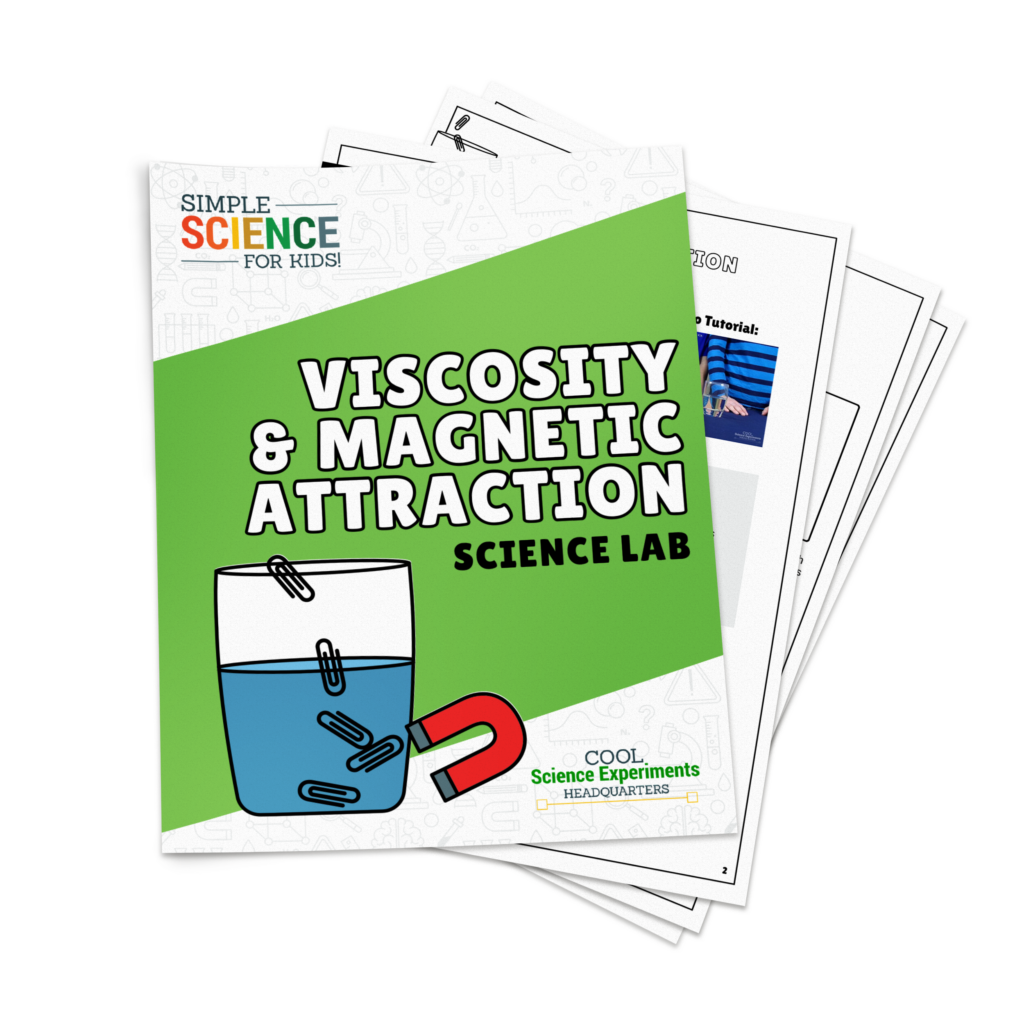
How Liquid Viscosity Impacts Magnetic Attraction Science Experiment
What do you think, will the type of liquid in a glass impact a magnet’s attraction? We use three different liquids to test our theory.
Using simple supplies found at home, kids can learn about viscosity and resistance through this simple hands-on experiment. Preview our demonstration video using water, vegetable oil and corn syrup, but our printable instructions and simple scientific explanation include alternate liquids you can use to test the concept.

JUMP TO SECTION: Instructions | Video Tutorial | How it Works
Supplies Needed
- 12 Paper Clips
- 1/2 Cup Water
- 1/2 Cup Vegetable Oil
- 1/2 Cup Light Corn Syrup
Viscosity & Magnetic Attraction Lab Kit – Only $5
Use our easy Viscosity & Magnetic Attraction Science Lab Kit to grab your students’ attention without the stress of planning!
It’s everything you need to make science easy for teachers and fun for students — using inexpensive materials you probably already have in your storage closet!
Experiment Instructions
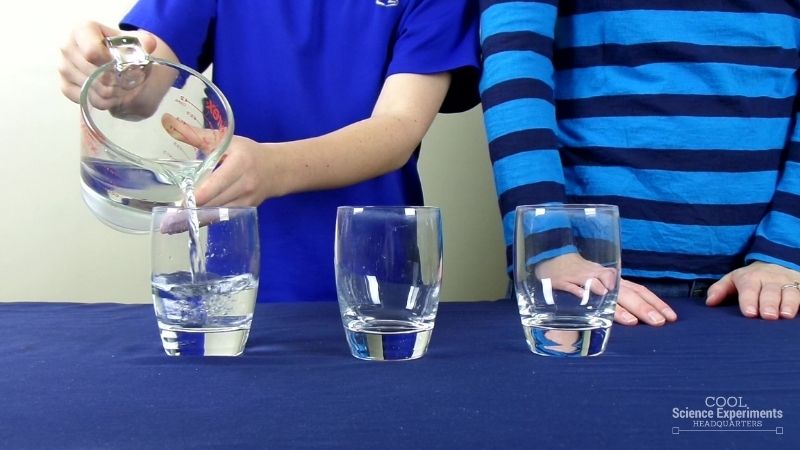
Step 1 – Place three cups in a row. Fill the first glass with the water.
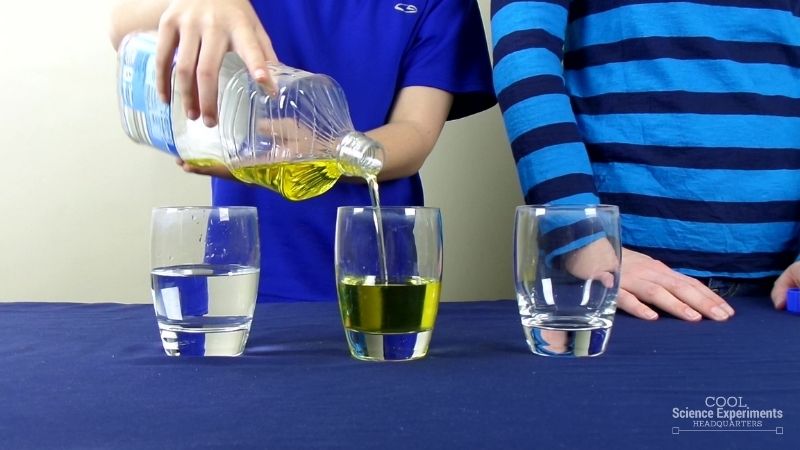
Step 2 – Fill the middle glass with the vegetable oil.
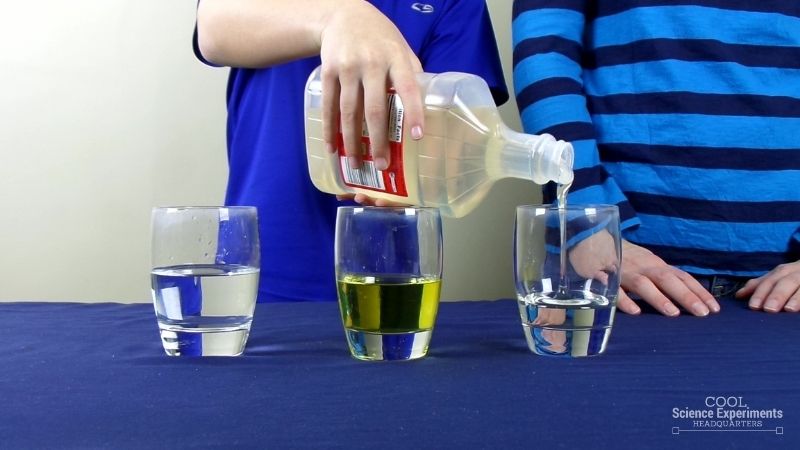
Step 3 – Fill the third glass with the corn syrup.
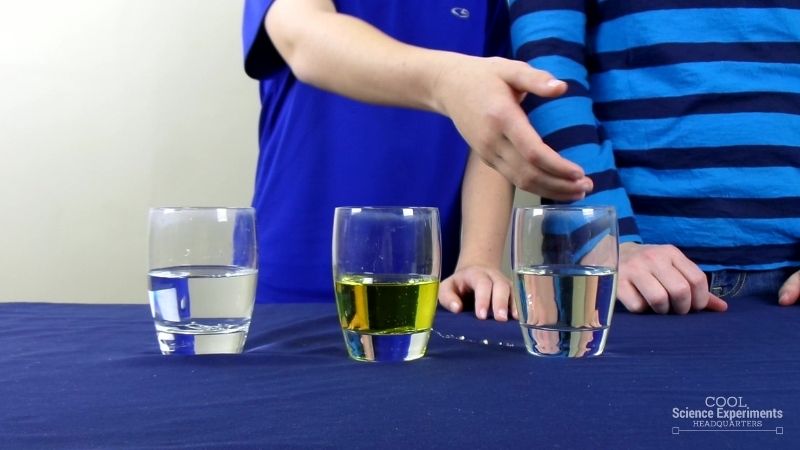
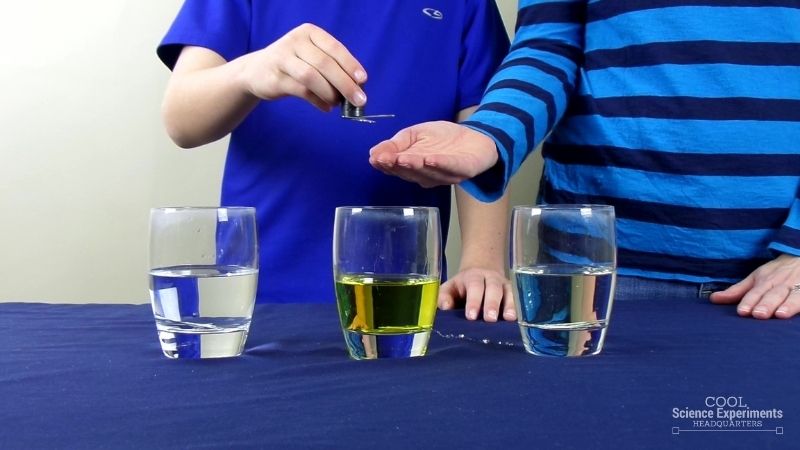
Step 4 – Next, place 4 paper clips in each glass.
Step 5 – You may need to gently push the paper clips to the bottom of the glass with the corn syrup.
Step 6 – Test your magnet by showing how paper clips outside of the liquid are attracted to it.
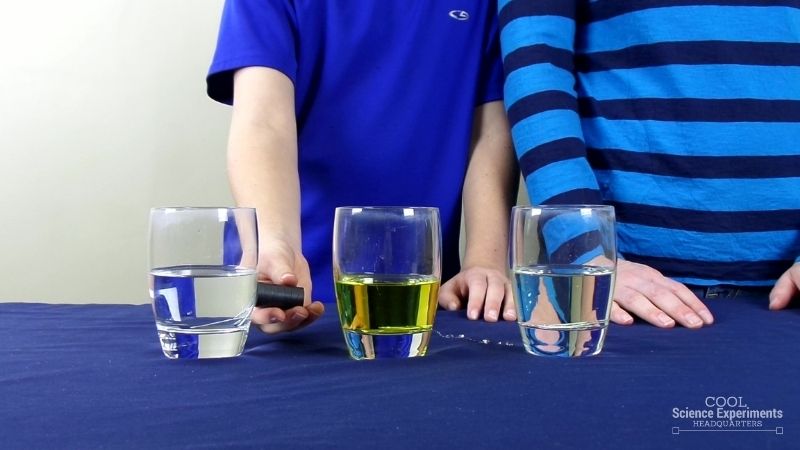
Step 7 – Next, take your magnet and place it next to each glass. Notice that all the paper clips are attracted to the magnet, but that the liquid in the glass causes the paper clips to move differently. Do you know why? Find out the answer in the how does this experiment work section below.
Video Tutorial
How Does the Science Experiment Work
The question answered in this experiment is how does the consistency of a liquid impact magnetic attraction.
A unique property of liquids is something called viscosity. Viscosity is a liquid’s resistance to flowing. Viscosity depends on the size and shape of the particles that make the liquid, as well as the attraction between the particles. Liquids that have a LOW viscosity flow quickly (ie. water, rubbing alcohol, and vegetable oil). Liquids that have a HIGH viscosity flow slowly (ie. honey, corn syrup, and molasses).
When using water and vegetable oil, the paper clips moved through the liquid to the magnet very quickly. This is because water and vegetable oil have a low viscosity and provide very little resistance to the paperclips moving through them. When using corn syrup, the paper clips moved very slowly toward the magnet. This is because the corn syrup has a high viscosity and provides a lot of resistance to the paper clips moving through it.
The magnet still attracts the paperclips in each of the scenarios, but the experiment shows how the viscosity of a liquid impacts how fast (or slow) the paperclips move toward the magnet.
I hope you enjoyed the experiment. Here are some printable instructions;

Instructions
- Place three cups in a row
- Fill the first glass with the water
- Fill the middle glass with the vegetable oil
- Fill the third glass with the corn syrup
- Next, place 4 paper clips in each glass
- You may need to gently push the paper clips to the bottom of the glass with the corn syrup
- Test your magnet by showing how paper clips outside of the liquid are attracted to it.
- Next, take your magnet and place it next to each glass. Notice that all the paper clips are attracted to the magnet, but that the liquid in the glass causes the paper clips to move differently

Reader Interactions

March 30, 2016 at 9:12 am
Will this work if plastic cups are used?

April 5, 2016 at 1:09 pm
I believe it will, but I’ve never tried it. If you do, leave a comment and let us know if it works.

April 30, 2017 at 12:54 pm
I don’t think they will work

January 8, 2018 at 7:58 am
It will definitely work! Most cups will work because the walls of the cups are thin. Additionally, metal cups and water bottles will probably not work because the molecule are packed more tightly. These materials can also contain iron particles which will make them magnetic and therefore will interfere with your experiment.

February 20, 2018 at 6:42 pm
It works, we used a plastic water bottle and it was a success!

November 8, 2016 at 6:47 pm
this is my science fair project i’m going to do

December 8, 2016 at 12:05 pm
Is this good for a science project for eighth graders or is it to easy?

December 9, 2016 at 2:37 pm
Hi, just a small comment. Is not the magnetic force that is affected is that in the case of syrup the friction force is bigger so the total force acting on the paper clip is smaller, then the acceleration will be smaller. F=m.a

January 1, 2017 at 4:21 pm
Nice experiment to show relationship between Center of Gravity and Balance Points. At the start point the Center of gravity is only a little higher than the point it’s touching the board. If it moves to the wider(higher) end, the Center of gravity lowers because the boards get wider and the contact point on the funnels gets further out, so the Center of gravity is actually getting lower as the funnel appears to be going UP HILL. It is in fact going down toward the direction of gravity.

January 25, 2017 at 11:27 am
I ENJOYED THIS EXPERIMENT AND PERFOMED THE SAME IN MY SEMINAR.I AND MY FRIENDS WAS HAVING A GOOD INTERACTIONS.SO GOOD.

April 2, 2017 at 6:47 pm

April 27, 2017 at 12:35 pm
HI thanks for the video it was cool to know how liquid impacts a magnet.

September 4, 2017 at 1:58 pm

September 8, 2017 at 12:05 am
This fits perfectly in our magnet lessons for homeschool tomorrow. Thank you! The kids are going to love it. I’m thinking we may even expand on it a bit — they love to experiment.

January 2, 2018 at 12:29 pm
How strong are your magnets?

March 14, 2018 at 4:04 am
that’s a pretty cool experiment, especially for kids! Thanks for the great idea, i will test it soon with my kids.
Regards Christine

September 3, 2018 at 9:59 pm
Thank you for sharing! Can’t wait to try it with my class this week.

October 16, 2021 at 11:47 pm
Hi Can I use honey instead of corn syrup ?

March 17, 2022 at 12:31 pm
OMG im doing this experiment for my science fair on school

December 7, 2023 at 7:36 pm
Leave a Reply Cancel reply
Your email address will not be published. Required fields are marked *
Save my name, email, and website in this browser for the next time I comment.

- Privacy Policy
- Disclosure Policy
Copyright © 2024 · Cool Science Experiments HQ
WE OFFER INCREDIBLE OPPORTUNITIES TO ELECTRICIANS / BROWSE JOB OPPORTUNITIES

Build an Electrical Circuit for the Science Fair!

October 4, 2013 | In Residential
It’s back to school season and your children are suddenly busy with new classes, books, bus routes, and hopefully no teachers’ “dirty looks.”
While the Science Fair may not come until Spring, preparing a topic now will help your middle school child wrap his or her head around new concepts and brainstorm creative ways to present the information.
The following science fair project will engage and excite your young learner. Parenting bonus: work on the project together so you both learn something!
Build an Electrical Circuit
In this experiment, your little Einstein will discover how electricity works by building an actual circuit through which electricity can flow. Using a power source, such as a battery, the energy will then flow through a wire to a light bulb or other object and back to the power source once again. Gather the following household items to help your child create energy:
Small light bulb or flashlight bulb
One D battery for a regular light bulb or one AAA battery for your small flashlight bulb.
2 alligator clip wires or aluminum foil
Paper clips
Electrical or Scotch tape
Bulb holder (optional)
Battery holders (optional)
If using foil instead of wires, cut two strips at 6” long and 3” wide. Fold each tightly along the long edge to create a thin, wire-like strip.
If using paper clips in place of battery holders, tape one end of the paper clip to each end of the battery using thin pieces of tape and connect your wires to the paper clips.
Creating a circuit
1. Connect one end of each wire to the screws at the base of the light bulb holder. Be sure to help your young one release each screw enough to fit a foil strip underneath if using foil instead of wire.
2. Connect the free end of one of your wires to the negative (-) end of the battery. Observe and note if anything happens.
3. Attach the free end of the other wire to the positive (+) end of the battery and note any bulb activity.
Adding Power
1. Disconnect your battery from the circuit. Stand one battery so that the positive end is pointing up and set the other battery beside it so that the negative end is pointing up. Tape the batteries around their middle to hold them together.
2. Place a paperclip across the batteries to connect the positive end of one to the negative end of the other. Tape the paper clip in place. Avoid taping the metal battery ends.
3. Turn the batteries over and tape one end of the paper clip into each battery. Connect one wire to each paper clip, and make sure that the bottom of the battery pack has only one paper clip, and no wire connected to it.
4. Connect the free ends of these wires to your light bulb.
What do you see?
In the first section, you built a simple circuit and used a battery to light up the bulb. However, when you connected the light bulb to one end of the battery using the wire, it did not light up because battery energy only works when flowing out from the negative end and back to the positive. What you created was an open circuit, while a closed circuit is required to keep energy flowing.
Closed circuits
When a circuit is complete, or closed, electrons (tiny particles with negative charges that create electricity) can flow from one end of the battery to the other, carrying energy through wires. On this path, the circuit carries electricity to electrical objects connected to it, such as the light bulb.
Conductors vs. Insulators
Any material that electricity can flow through is called a conductor. Materials that stop the flow of electricity are known as insulators. Using the circuit above, you and your child can have a “blast” testing objects around the house to see which ones are conductors and which are insulators. Simply create an open circuit and use the ends of the free wires to connect to objects and see if they light up the bulb. In general, plastic, rubber, and cloth items will be insulators and metal will conduct electricity. However, allow your child to test items for herself and come to her own conclusions.
Be sure to display images of the project steps on your tri-fold board, whether using photographs or drawings. A visit to a crafts shop for additional supplies, such as markers and science-themed paper applique images can help showcase your child’s efforts on what could be an A+ team effort!
Start the school year with a “high voltage” science fair project that’s sure to excite and inspire. By setting aside time to help your young learner test a hypothesis, you show your support and have a little hands-on fun of your own.
Have electrical questions of any kind? Call Prairie Today!

FEATUR ED PR OJECTS

Hospitality facility
Woodlark Hotel

Educational Facility
Ridgefield Middle School
Browse projects
- Earth Science
- Physics & Engineering
- Science Kits
- Microscopes
- Science Curriculum and Kits
- About Home Science Tools
Science Projects > Physics & Engineering Projects > All About Magnets Science
All About Magnets Science
Magnet science in action.
Magnets are solid objects of stone, metal, or other material, which have the property of attracting iron-containing materials. This attracting property is either natural, as in the case of lodestone, or induced (formed by unnatural means). You can demonstrate the science of magnets at home, by producing and testing the strength of a magnetic field.
Magnet Science Projects
Project 1: what’s the attraction.
All magnets have the ability to attract other magnets or magnetic objects (such as iron and some other metal objects). But a magnet doesn’t necessarily have to touch a magnetic object for the object to be attracted to it. Try this experiment to learn why.
What You Need:
- Plastic or wooden ruler
- Two or more different magnets
What You Do:

1. Line the paperclip up along the end of the ruler so that one side of the paperclip is at the ruler’s zero mark.
2. Place one magnet at the other end of the ruler. Now, hold the ruler in place with one hand and slowly slide the magnet toward the paperclip with your other hand. When the paperclip attaches to the magnet, stop moving the magnet.
3. Look at where the magnet was at along the ruler to see how far apart the magnet and paperclip were when they came together. (You might need to try it a few times before you are sure!) Write down the distance in your notebook. Draw a picture of the magnet that you used so you will remember which one it was.
4. Do steps 1-4 again with each of the magnets that you have.
What Happened:
All magnets have a magnetic field – an area around a magnet where its magnetism affects other objects. By measuring how far the magnet was from the paperclip when they become attached, you were finding the length of the magnetic field. Stronger magnets can generally attract magnetic materials from a farther distance than weaker magnets can. Based on that fact and the results you wrote in your notebook, which of your magnets was the strongest? Which one was weakest?
Project 2: Which Magnet Is the Strongest?
A good way to test how strong different magnets are is to see how many magnetic objects it can attract. Try this experiment with your magnets!
- Several magnets
- Box of paperclips
- Someone to help you

1. Have your helper hold on to one end of one of the magnets. Stick one paperclip to the other end of the magnet. One end of the paperclip should dangle off the magnet. (Your magnet may be really strong, so you may need your helper to hold the paperclip so just an end is touching the magnet rather than the side of the paperclip, like in the picture.)
2. Now touch another paperclip to the end of the first paperclip to start a paperclip chain. Keep adding paperclips until no more stick to the chain. In your notebook, write down how many paperclips the magnet was able to hold together in a chain before paperclips started to fall off.
3. Do steps 1 & 2 with the other magnets, recording in your notebook how many paperclips would stick in a chain to each magnet.
When a magnet touches another magnetic object (such as a paperclip), the object becomes a temporary magnet for as long as it is touching the real magnet! It can now be used to pick up more paperclips.
Each additional paperclip also becomes a temporary magnet with a weaker magnetic force than the one before it. Some magnets may be able to hold a chain of five paperclips while another magnet may only be able to hold one or two paperclips.
How many paperclips a magnet can hold is a good indication of its strength. If you have a strong enough magnet and lift up the paperclips long enough, you may find that some of the paperclips will keep the ability to act like magnets for a little while even when they are not touching the magnet.
If this happens, you have just made a very strong temporary magnet.
Science Words
These words about magnets are used in the science projects. If you are not sure what they mean, just read the definitions below!
Magnetic object – any object that can be attracted to a magnet. Paperclips, iron filings, keys, and bobby pins are all examples of magnetic objects.
Magnetic field – an invisible area around a magnet where its magnetic force affects other objects. The magnetic field is what actually pulls other magnetic objects towards a magnet.
Temporary magnet – a magnetic object that can become a magnet when it is touching a permanent magnet but loses its magnetic properties when it is no longer touching the permanent magnet.
Magnet Science Lesson
Magnets in household items.
A magnet is a solid object, usually a rock or piece of metal, that has the ability to attract certain materials.
To help discover what is and what is not attracted to magnets, go on a magnet hunt.
Look around the room and help your child make a list of objects he or she thinks will be attracted to the magnet as well as a list of objects that will not be attracted. After making your lists, test each of the objects.
(Don’t use magnets on computers, cassette tapes, discs, and other electronic devices – it could damage the magnets inside of them!)
Compare your results with what you predicted would be attracted. Were you correct on all your predictions? Were you wrong on any?
Discuss why items did or did not stick when you originally thought the opposite would be true.
For instance, the object is made out of plastic but coated with shiny paint to make it look metallic; not all metals are attracted to magnets; or maybe just parts of an object were attracted to the magnet. What does this tell us about magnetic attraction?
(That an object must be made out of metal to be attracted, but not all metals are attracted.)
Metals such as iron, nickel, and cobalt are attracted to magnets. Steel has iron in it, so it is also attracted to magnets.
Alternatively, you can use this coloring page as part of a magnet hunt. Go around the house and find things that are magnetic. Circle the items on the coloring sheet that are attracted to the magnet and draw in any other items you found that are also magnetic.
As mentioned before, many common household items have magnets in them and are part of what makes these items work. Electronic devices such as refrigerators, washing machines, lamps, telephones, TVs, and stereos all have magnets in them.
Attraction and Repulsion
All magnets have two ends where the pull is strongest – a north pole and a south pole. The poles are named this way because if a magnet is floating in water or is suspended by a string tied around its middle, it will align itself in a north-south direction, consistent with the magnetic field of the Earth.
To best show how the poles of magnets react with each other, get two bar magnets with the north poles and south poles labeled. Holding firmly onto the magnets, have your child try to push their hands and the ends of the magnets together so that the north poles of both magnets meet. What happens? Now flip one of the magnets around and try pushing the ends together so that a north pole of one magnet meets with the south pole of the other magnet. What happened this time? Finally, flip the other magnet so that the south poles are facing each other and try to push them together. What happened?
Children should find that when a north pole was facing a south pole, they felt a force pulling the magnets together. But when the north poles were facing each other or the south poles were facing each other, they should have felt a force pushing them apart. Help children understand that opposite poles attract (pull together) while similar poles repel (push apart).
Magnetic Field

The invisible area around a magnet which attracts another object is called a magnetic field.
Magnetic objects (such as paperclips) will get pulled towards the magnet if they are placed in this field. You can see the magnetic field of a magnet using iron metal filings in a Ziploc bag or iron filings in a sealed case .
(We highly recommend putting loose filings in a sealed bag to avoid a mess.)
Lay a bar magnet on a table. Gently shake the bag or case to evenly distribute the iron filings and lay it on top of the magnet.
(You may also want to try placing the magnet on top of the Ziploc bag.)
Observe the pattern of the iron filings. The magnetic field is strongest at the poles. You can see this because the iron filings cluster at these points.
Now place two bar magnets on the table with similar poles facing each other.
Place them as close together as possible without them moving away from each other.
Place the iron filings on top of the magnets. Observe the pattern of the iron filings.
Now flip one magnet around so that opposite poles are facing each other and get them as close as possible without them moving together.
Place the iron filings on top and again observe the pattern made.
In each of these experiments, the iron filings allow us to visibly see how the magnetic field is shaped and how multiple magnetic fields can interact with each other.
Extend this by trying different magnet shapes ( ring magnet , horseshoe magnet , etc.) to see what their magnetic fields look like. Also try it with multiple magnets close together to see how their magnetic fields interact with each other.
Adult supervision should always be provided when children are playing with magnets.
More Physics & Engineering:
- How Do Gears Work?
- Centripetal Force
- Compass Science Project
- Rocketry Science Project
Physics & Engineering
Welcome! Read other Physics & Engineering related articles or explore our Resource Center, which consists of hundreds of free science articles!
Shop for Physics Supplies!
Home Science Tools offers a wide variety of Physics products and kits. Find physics & engineering tools, equipment, STEM kits & more for kids and adults.
Related Articles

Homopolar Motor – Make a Spinning Wire Sculpture
In this experiment, we will make a homopolar motor! To make a simple motor (homopolar motor) that doubles as a work of art you will need three things – a battery, magnet, and wire. Use one of our neodymium magnets to power the spinning wire motor. What You Will Need:...

Solar Energy Matching Game
Print out this page on a sheet of heavy paper or cardstock. Kids can color the pictures and cut out the squares to make a matching game. Half of the squares show a way to use solar energy as an alternative to the picture shown on the other squares. Place all the...

Simple Spring Break Science Projects
Spring break is here! What will you do with your time off? Perhaps you're looking forward to a family vacation, or a few days of down time at home. Either way, find a quick and easy project that's sure to put a sparkle in the eye of any science lover, or win over a...

Sink or Float Worksheet
Use the Sink or Float Worksheet with the "Sink or Float?" science project to encourage kids to make predictions, perform tests, and record their results. This project is perfect for indoor discovery - especially in colder months! Put a towel under a large container of...

Physics Science Fair Projects
Find physics science fair project ideas about magnetism, electricity, energy and solar power, and more.
JOIN OUR COMMUNITY
Get project ideas and special offers delivered to your inbox.
Help | Advanced Search
Computer Science > Computer Vision and Pattern Recognition
Title: rethinking prior information generation with clip for few-shot segmentation.
Abstract: Few-shot segmentation remains challenging due to the limitations of its labeling information for unseen classes. Most previous approaches rely on extracting high-level feature maps from the frozen visual encoder to compute the pixel-wise similarity as a key prior guidance for the decoder. However, such a prior representation suffers from coarse granularity and poor generalization to new classes since these high-level feature maps have obvious category bias. In this work, we propose to replace the visual prior representation with the visual-text alignment capacity to capture more reliable guidance and enhance the model generalization. Specifically, we design two kinds of training-free prior information generation strategy that attempts to utilize the semantic alignment capability of the Contrastive Language-Image Pre-training model (CLIP) to locate the target class. Besides, to acquire more accurate prior guidance, we build a high-order relationship of attention maps and utilize it to refine the initial prior information. Experiments on both the PASCAL-5{i} and COCO-20{i} datasets show that our method obtains a clearly substantial improvement and reaches the new state-of-the-art performance.
Submission history
Access paper:.
- HTML (experimental)
- Other Formats
References & Citations
- Google Scholar
- Semantic Scholar
BibTeX formatted citation
Bibliographic and Citation Tools
Code, data and media associated with this article, recommenders and search tools.
- Institution
arXivLabs: experimental projects with community collaborators
arXivLabs is a framework that allows collaborators to develop and share new arXiv features directly on our website.
Both individuals and organizations that work with arXivLabs have embraced and accepted our values of openness, community, excellence, and user data privacy. arXiv is committed to these values and only works with partners that adhere to them.
Have an idea for a project that will add value for arXiv's community? Learn more about arXivLabs .
IMAGES
VIDEO
COMMENTS
You can create an electromagnet with a simple coil of wire and a battery. In this project, you will explore whether the strength of an electromagnet changes with the number of turns in the magnet's coil. You will measure the magnet's strength by counting the number of paper clips your electromagnet can lift.
Then, take a tissue paper and cut it in the shape of square. Make sure the size of the cut tissue paper is slightly larger than the paper clip. Step-4: Now, gently place the square cut tissue paper into the glass bowl with water. You will observe the tissue paper start floating and reaches to top of the water.
Position the armature in the paper clip loops, with the shiny, uncolored side touching the paper clips. Make sure it doesn't touch the magnet. If your motor doesn't start immediately, try giving it a start by spinning the wire bundle. Since the motor will only spin in one direction, try spinning it both ways.
Mix some soap with water in a container. Add a couple drops of soapy water to the surface of the water using a dropper. Do this where the paperclip is floating. But be careful to add it to the water away from the paperclip. The soapy water should break the surface tension of the water, causing the paperclip to fall to the bottom of the container.
Twist the wire at least 50 times around the nail to create a solenoid. Once the wire has covered the nail, tape the wire to the negative terminal of the 12V battery. Cut a short piece of wire to connect the positive terminal of the battery to the negative terminal of the toggle switch. Turn on the switch. Bring paper clips close to the nail.
Set out two plastic food trays, about an inch apart from each other. Place one empty tin can on the center of each of the trays. Cut a piece of thread so that its length is twice the distance between the edges of the two cans. Tie one end of the thread to a paper clip. Tie the other end of the thread to the center of a plastic ruler.
Test your hypothesis with this magnet science project. Put two paper plates next to each other, and cover one of the plates with paper clips. Then take a magnet and hold it directly over the paper clips. Transfer the paper clips attached to the magnet to the other plate. Count the number of paper clips and record it on a table.
Fill the bowl with water. Try to make the paper clip float…not much luck, huh? Tear a piece of tissue paper about half the size of a dollar bill. GENTLY drop the tissue flat onto the surface of the water. GENTLY place a dry paper clip flat onto the tissue (try not to touch the water or the tissue) Use the eraser end of the pencil to carefully ...
Step 2 - Next, take a magnet and place one paperclip on it. Helpful Tip: The stronger the magnet, the more paperclips you will be able to stick together. We used Ceramic Round Disc Magnets and put 5 together to form our magnet. Another option is to use a Ceramic Bar Magnet. Step 3 - Next, slowly add a second paperclip to the bottom of the ...
Tape your magnet to the end of the ruler. Tie one end of the string to the paperclip. Move the paperclip closer and closer to the magnet until it starts to be attracted. Tape the other end of the string to the table when the paperclip is close enough to the magnet so that it will stay suspended in the air. Try pulling the string to the side.
Step 1 - Place three cups in a row. Fill the first glass with the water. Step 2 - Fill the middle glass with the vegetable oil. Step 3 - Fill the third glass with the corn syrup. Step 4 - Next, place 4 paper clips in each glass. Step 5 - You may need to gently push the paper clips to the bottom of the glass with the corn syrup. Step 6 ...
The paper clip across the bottom of the battery pack allowed electricity to flow between the batteries, making the flow of electrons stronger. ... Science Fair Projects for 7th Graders Science fair projects for 7th graders are a step up in complexity. Because 7th graders have a better grasp of science concepts, they're expected to practice ...
The following science fair project will engage and excite your young learner. Parenting bonus: work on the project together so you both learn something! Build an Electrical Circuit. ... If using paper clips in place of battery holders, tape one end of the paper clip to each end of the battery using thin pieces of tape and connect your wires to ...
1. Line the paperclip up along the end of the ruler so that one side of the paperclip is at the ruler's zero mark. 2. Place one magnet at the other end of the ruler. Now, hold the ruler in place with one hand and slowly slide the magnet toward the paperclip with your other hand. When the paperclip attaches to the magnet, stop moving the magnet.
6. Students find the mass of one of each of their objects (small paper clip, large paper clip, and washer). III. Experiment Evaluation: After completing the experiment, have students again take turns writing up the final sections for the science fair board. E. Data-- Gather the results and compare the data in a data table and a bar graph.
Tape the magnet to the inside of the jar lid. Place the lid on the jar and turn it upside down so that the paper clip with ghost hangs from the string (the ghost should be hanging up-side-down). Carefully turn the jar right side up. The paper clip will be pulled by the magnet and the ghost will remain upright. It will appear that the paper clip ...
Few-shot segmentation remains challenging due to the limitations of its labeling information for unseen classes. Most previous approaches rely on extracting high-level feature maps from the frozen visual encoder to compute the pixel-wise similarity as a key prior guidance for the decoder. However, such a prior representation suffers from coarse granularity and poor generalization to new ...
Procedure. Ask your grown-up to use the wire strippers to first strip about 2 1/2 inches of plastic insulation off the copper wire. Then, request that the grown-up clip that piece of stripped wire off of the main roll. Carefully straighten the steel paper clip. Use the wire clippers to cut it to the same length as your copper wire.
Science Fair Project Idea. You can make a very simple hovercraft with a stiff, disposable plate-a pie plate should work well-and a balloon. Glue a square of cardboard in the center of the bottom of the plate. Make a small hole through the center of both of these layers. Enlarge the hole slightly with a pencil.