Drawing in a sketchbook changed my life.
Let me show you how it can change yours..
I was 38 and hadn’t drawn since I was a kid. A tragic family accident sent me looking for the meaning of my life.
I found it through a simple drawing habit.
Now I help others discover the same power and magic.
I’ve written a dozen books, spoken around the world, and I founded Sketchbook Skool to bring artists together to learn from each other.
You can join me by taking one of our courses.
I am so glad we are on this adventure together.


Ready to start your art adventure?
Pick your path…
Start your art adventure
© Copyright 2013-2023 Sketchbook Skool, LLC. | All Rights Reserved. | Terms | [email protected]
Privacy Overview
- Join for Free
Sketchbook Exercises for Artistic Growth
A course by sarah van dongen , illustrator.

Discover tools and techniques for developing your creative skills, overcoming creative blocks, and unlocking your imagination in the pages of your sketchbook
- Best seller
- 97% positive reviews ( 338 )
- 19149 students
- English , Spanish , Portuguese , German , French , Italian , Polish , Dutch
- Information

A sketchbook is an essential tool for any artist. It's a safe space where you can enhance your skills, develop your style, try new materials, and explore different techniques. Illustrator Sarah Van Dongen uses hers to make characterful artwork inspired by the world around her. She has collaborated with clients like Flow Magazine and Adobe, and created her own picture book.
In this online course, Sarah teaches you different exercises for developing the most important artistic skills, overcoming creative blocks, and unlocking your imagination. Learn how to fill a sketchbook with experimental drawings using different materials and reference images, designed to help you improve as a creative. Learn, play, and explore through sketchbooking.
Want to take your sketchbook practice further? Check out Sarah’s other illustration courses .
What will you learn in this online course?
16 lessons & 17 downloads

- 16 lessons (3h 1m)
- 17 additional resources (5 files)
- Online and at your own pace
- Available on the app
- Audio: English, English
- Level: Beginner
- Unlimited access forever
What is this course's project?
Fill a sketchbook with vibrant illustrations using a variety of materials and techniques.

Projects by course students

By lulucestbon
By egrikurova
By a.eveleens
Who is this online course for?
This course is for anyone who wants to use sketchbooking as a tool to improve their artistic abilities.
Requirements and materials
No previous experience is required.
In terms of materials, you will need gouache, graphite pencils, oil pastels, acrylic markers, and other materials specified by the teacher in the course.

really nice tasks! love it !
Es muy bueno, pero el material de recursos no está en español y no o deja traducir.
View translation
Hide translation
this course was disappointing to me. I expected something more expanded I think.
El curso es muy creativo y aporta muchas herramientas para crecer como dibujante
sabrinagarcia64
Curso super guay. Muy interesante para hacer crecer la practica artistica! Muchas gracias Sarah!
- More reviews

Sarah van Dongen A course by Sarah van Dongen
Sarah van Dongen is a Dutch illustrator based in Amsterdam who is passionate about telling stories. She began her studies in comparative literature but enrolled in the MA in Children’s Books Illustration in Cambridge, UK after realizing she wanted to pursue a more creative career.
Sarah’s illustration work can be found in children’s books, stationery, newspapers, and magazines across the globe. Her clients include Flow Magazine, Adobe, Tiny Owl Publishing, and Ragged Bears Publishing, among others. Sarah enjoys exploring themes like gardens, food, social interactions, mental health, and her childhood. She doesn’t shy away from subjects like insecurity, loneliness, and loss, she expresses them in her sketches to help make these feelings more comprehensible.
Introduction
The sketchbook, materials, and style.
- The Sketchbook
- Art Materials
- Introduction to Illustration and Artistic Skills
Let's Fill That Sketchbook
- Drawing and Observation 1
- Drawing and Observation 2
- Drawing and Observation 3
- Inspiration, Research, and Copying 1
- Inspiration, Research, and Copying 2
- Experimentation and Playing 1
- Experimentation and Playing 2
- Association and Imagination 1
- Association and Imagination 2
Continuing Drawing
- Making a Final Piece
- Keep Using Your Sketchbooks
Final project
What to expect from a domestika course, learn at your own pace.
Enjoy learning from home without a set schedule and with an easy-to-follow method. You set your own pace.
Learn from the best professionals
Learn valuable methods and techniques explained by top experts in the creative sector.
Meet expert teachers
Each expert teaches what they do best, with clear guidelines, true passion, and professional insight in every lesson.
Certificates Plus
If you're a Plus member, get a custom certificate signed by your teacher for every course. Share it on your portfolio, social media, or wherever you like.
Get front-row seats
Videos of the highest quality, so you don't miss a single detail. With unlimited access, you can watch them as many times as you need to perfect your technique.
Share knowledge and ideas
Ask questions, request feedback, or offer solutions. Share your learning experience with other students in the community who are as passionate about creativity as you are.
Connect with a global creative community
The community is home to millions of people from around the world who are curious and passionate about exploring and expressing their creativity.
Watch professionally produced courses
Domestika curates its teacher roster and produces every course in-house to ensure a high-quality online learning experience.
Domestika's courses are online classes that provide you with the tools and skills you need to complete a specific project. Every step of the project combines video lessons with complementary instructional material, so you can learn by doing. Domestika's courses also allow you to share your own projects with the teacher and with other students, creating a dynamic course community.
All courses are 100% online, so once they're published, courses start and finish whenever you want. You set the pace of the class. You can go back to review what interests you most and skip what you already know, ask questions, answer questions, share your projects, and more.
The courses are divided into different units. Each one includes lessons, informational text, tasks, and practice exercises to help you carry out your project step by step, with additional complementary resources and downloads. You'll also have access to an exclusive forum where you can interact with the teacher and with other students, as well as share your work and your course project, creating a community around the course.
You can redeem the course you received by accessing the redeeming page and entering your gift code.
- Illustration
- Traditional illustration

Courses you might be interested in

Sketchbook Basics

Introduction
What is a sketchbook and why is it necessary for an artist to have one?
A sketchbook is simply put, a book with empty drawing pages in it.
This book is however your personal growth factory because you are going to sketch, draw, write, paint, experiment, mess and make mistakes in it.
Generally you never even show anybody your sketchbook. It is your private art journal in which you, and you alone, can document and watch how you progress.
As only you will see the inside of your journal, there is no pressure on your part to perform or get anything perfect. Nobody will see your mistakes so you can lose your abandon and play to your hearts content.
In the process you will improve your art beyond anything you ever imagined.
Then in a few years time you will be able to page back through your sketchbooks and relive your artistic journey and see how far you have come.
In my opinion every artist should first be given a sketchbook and a pencil (no eraser) and be sent out to sketch at least 10 pages full before they ever follow a single tutorial or buy any more art supplies. That way they will always have some before sketches to look back on - something very few artists have.

Sketches from my Sketchbook
Sketching Equipment
Let's start off by looking at the equipment you will need to start your sketchbook.
1) Sketchbooks
They are available in a variety of sizes, paper types and makes. I will mention a few, but in the end, you will have to make your own choice depending on what is available in your area and to suit your own pocket. I always recommend that you try to buy the best you can afford.
Things to look out for when purchasing a sketchbook are:
a) Sturdy : You will be taking your sketchbook with you everywhere you go. In the car, on holiday, hiking, you name it so ensure the cover is sturdy enough to handle the rough and tumble it is going to endure.
b) Paper Thickness : You don't want the pages to be too thin for two reasons. The first is that you don't want any of your harder pen / pencil strokes to score the sheet of paper below it. The second is the problem of bleeding. If you are using inks or paints and the paper is too thin it can bleed through the sheet onto the one below. I recommend ensuring the paper is at least 160gsm thick.
c) Size : The size sketchbook you buy will depend on where you are going to use it. If you going to only use it in the studio then one with larger pages will allow you the freedom to either make multiple sketches / studies of the same subject on the same page or one larger study per page.
Smaller sketchbooks (A4 / 9" x 12" or smaller) are better for working outdoors as you generally need to hold the sketchbook in your hand as you work so anything larger tends to be unstable in your hand.
d) Paper Colour : Most sketchbooks come with white paper inside, but you can also get ones where the paper is off white, as well as coloured. (Strathmore have a good variety of paper colours from tan to grey to cream)
If you are wondering why you would want to use off white or coloured paper then here is your answer : To save you adding a heap of colour / tone to the paper you choose a paper that is already the base colour you need. You then only need to add the shadow and highlight colours to complete the sketch.
Standard Sketchbooks

Click to buy on Amazon
(This tutorial contains affiliate links to products we recommend you use when sketchbooking. If you purchase through our affiliate link we will get a small percentage of the purchase price for the referral. This helps us to create more tutorials. It will however not affect the price you pay. All products are the ones we personally use. To purchase the product you can click the photo of the product.)
Standard sketchbooks normally come in three different styles.
- Hardbound Similar to a hard cover book these sketchpads are very sturdy. You will however find that they often want to close on themselves while sketching because of the stiff cover. Open it in the store at a variety of places (front, centre, back) to make sure the cover will remain open while drawing.
- Paperbound This type does not have a hard cover. Generally the cover is little more than a thin cardboard which does not give much protection to the papers inside the book. Only use these sketchbooks in light duty situations, like in studio.
The advantage of wirebound sketchbooks is that you can flip the whole book open and back on itself. This takes up less space and is easier to hold than a glue bound book.
Using these are also recommended if you want to remove the pages for framing, etc. later as individual pages can be removed without affecting the integrity of the rest of the book.
I like the mixed media sketchbook shown above because you can use it to add watercolour, acrylic, gouache and a variety of other media over your sketches to give them colour and make them look interesting. The pages will however not bleed through like many of the other sketchbooks do.
Moleskine Sketchbooks

These sketchbooks are normally made from quality heavy paper that is perfect for outdoor handling.
The paper is suitable for pencil, pen and ink washes and gouache. Many are reasonably priced and have special hard covers for durability. They are available from large to convenient pocket size.
Moleskine sketchbooks are very popular with Urban Sketchers who like to use pen and ink for the sketch and then add colour over it using watercolor washes.

When sketching we don't need a lot of pencils. You basically need only 3 pencils - one hard, one medium and one soft. I recommend a 2H, B and 6B.
If you are working outdoors and have more space in your bag, then by all means take more with but I seldom use more than these three, In fact I will often use only one pencil.
The pencils I recommend and use are the Tombow pencils shown above. I have also successfully used and can recommend the Faber-Castell, Staedtler and Derwent brands. I just find the Tombow pencils have smoother lead so they glide better over the paper.
The set shown above also comes with a Mono eraser which I constantly use for erasing fine detail into a sketch.
2) Sharpener

You will also need something to sharpen your pencils with. For this a simple little sharpener will do.
If however you want different shaped tips to your pencils, then a carpet knife works well to trim them.
There are many other bits of equipment you can use, but they are not required in order to start sketching so let's move on to learning how to sketch. We will then revisit the equipment later to see how we can expand our options beyond the basics.
The Rules of Sketching
Rule #1 - only you see your sketchbook.
As you are allowing yourself to make mistakes and experiment inside your sketchbook, your sketchbook is a place for your eyes only.
There must never be a penalty for what is inside your sketchbook. You don't want people to see your sketchbook and you feel bad or them judging you for some horrible artworks inside.
Your sketchbook is a place where you are allowed to create horrible artworks, and believe me in the beginning there will be many of those. These horrible artworks will allow you to later create the amazing artworks that will stun the world.
Rule #2 - There are no art rules in your sketchbook
Your sketchbook is your play area where you mess around with ideas, practice and learn without abandon or restriction.
If you want to doodle, then doodle.
If you want to do a super accurate drawing of a local landmark, then do it.
If you want to test out a new paint colour by making a few swatches, then do it.
If you want to practice freehand sketching, then go ahead.
Heck, if you want to see what happens when you mix acrylic and oil paint together, test it in your sketchbook.
In your sketchbook you follow the rules when you want, break them when you don't and sometimes even make your own rules.
Rule #3 - No Fear
Take all the preconceptions, misconceptions, misguided road blocks that people have drilled into your head about how you are supposed to do art and throw them out the window.
Free your mind and allow yourself the space to make mistakes, flops and outright disasters inside your sketchbook.
Out of these flops and disasters you will learn something every single time. Each flop and disaster is a stepping stone along the way to becoming the artist you envisioned when you first started.
Rule #4 - Sketch Often
Drawing and experimenting inside your sketchbook is going to allow you to grow incredibly fast as an artist, but only if you are consistent.
Let's look at an analogy – driving a motor vehicle.
For the beginner there are many things to remember, do and to look out for when learning to drive.
The big L plate displayed on the vehicle warns other drivers to be cautious as anything can unexpectedly happen. It is so easy to become mixed up trying to do many things at the same time, such as engaging the proper gear, pulling off correctly, watching the traffic in the front, sides and rear, traffic lights, pedestrians, etc.
Fortunately, the time arrives when all these actions become so natural that you do them automatically without even thinking about them.
What has happened? Without you realizing it, the subconscious mind has conveniently stored all the relevant information in order to do the thinking for you.
How has this happened? By repeating the actions over and over again. Repetition is the key to success. I cannot stress his enough.
The more you practice the easier drawing becomes. Repetition is a large factor, so sketch regularly.
The Basics of Sketching

In the beginning start off by drawing simple things. Whatever is around you.
Draw your watch for example. Don't even bother with shadings, just draw the outline and add the numbers and the hands.
As an example let's draw the watch above:
Use your B pencil only. Gently sketch a circle. Correct the circle as you go along until you are happy with the shape. Don't bother erasing the wrong bits, just leave them there.
Now indicate the 12, 3, 6 and 9 marks on the watch face.
This makes it easy to judge the marks indicating rest of the hours so add them in.
Next draw the watch straps. Roughly indicate the stitching.
Finish off by adding the numbers and arms.
Well done, you have just completed your first sketch.
You will probably end up with something like this:

Does it look like the photo?
Probably not because your judgement is well off, but it doesn't matter. You have started to train your eye and hand co-ordination.
Do the same for many more seemingly simple items around you.
Concentrate on getting the shapes and proportions correct.
Don't be shy to use whatever means you need to help you - like using your pencil to estimate lengths or using a proportional divider or redrawing using common shapes. There are many methods like this to help you.
I recommend you follow the How to Draw Quick Sketches Class to learn all the methods.
When you are starting to feel confident that you are estimating the shape and basic features correctly start to add some cross hatching or scumbling to the sketch in order to show some shading and depth.
Hatching is when you use a series of parallel lines to indicate shading. The closer the lines are to each other, the darker the area appears. The further apart the lines the lighter the area appears.
Cross hatching is when you add multiple series' of parallel lines in different directions. You can see examples of hatching and cross hatching below:

Scumbling is when you use random scribbles to create a shading like in the example below.
To the left you can see a single scumble. Your scumble technique will differ, but it gives you a good idea of how I do it.

Continue practicing this for a few weeks.
After a few weeks come back here and redraw the watch above.
It will now probably look something like this then because your eye hand co-ordination will have improved dramatically:

As you gain more confidence start to draw more complex subjects, like your portrait in the mirror or venture outside to sketch objects in the garden.
What to Sketch?
Anything. Anything you see, or imagine, can be sketched.
There is no need to stare at a blank piece of paper. There is more than enough inspiration around you to last for years of sketching. Even the most mundane of objects make for excellent sketching practice.
Just look around you. What do you see? Kitchen utensils, flowers, ornaments, trees, animals, birds, hills, mountains, furniture, clothing, clouds, buildings, rocks, workshop tools, and thousands of others. Even a simple feather has much to teach you about drawing.
Try different angles of the same object, from the side, from slightly above and so on. You will be amazed how drawing the same object from different angles can pose completely different challenges.

Monotone sketch of an ostrich
The Secret to Good Sketching
What is the biggest key in drawing?
Observation.
Most see an object, but they don't look at it. What do I mean by that?
You see a mug on a table. So what! But have you really studied it? Have you observed it properly?
What type of lettering is printed on it? How large are the letters? What other features are there? What type of flowers are printed on it. How about their colours?
What shape is the mug and is the ear large or small? What are the different textures on it and how will I represent it on the paper?
So often we just glance over an object. Oh! It is only a mug. As an artist you need to look and observe all the details that make up the object more carefully than the average person would.
Train your mind to look at the object, and not just see. Get this right and you will be well on your way to excellent sketching.
Make Sketching a Habit

Some sketches I did in 1952
We have already discussed why you need to sketch often, now let's take a look at ways that you can turn sketching into a habit.
The most important thing is to :
Make time for sketching.
No matter how busy your lifestyle, if you look at your schedule you will find intervals where you can slot in a quick sketch or two. For example on your lunch break, while waiting for the bus, while on the bus, while watching TV and so on.
Once you have found the time in your schedule, stick to. Set an alarm on your phone to remind you so that you don't get carried away with other things. This is your sketch time. Your time to relax.
In an ideal world you would give yourself at least half an hour to sketch in the beginning as you are not as proficient at judging accurately yet, but if you only have shorter spells available, don't let that stop you.
Choose a subject to concentrate on.
I find that if you concentrate on one subject at a time you learn quicker than when you jump around.
You could for example start by drawing small common items and only worry about sketching the proportions correctly. Once you feel you are happy with your proportions, you may decide to concentrate on your shading work and do a series of shading exercises.
After that you may decide to do a series of hand studies, then figures and so on.
You will find that as you start to gain confidence in a subject you not only work quicker and more accurately, you start to enjoy it more so look forward to your next sketch session, which is a great motivator to keep it a habit.
Carry a sketchbook with you.
No matter where you go make sure you have some form of a sketchbook with you or within easy reach.
It could even be something a small as a notebook and pen carried in your shirt pocket or handbag which you can whip out when the opportunity presents itself and do a quick sketch or doodle.
You could keep a small bag with some sketching equipment permanently in your car so that you have them available wherever you are.
Challenge yourself.
Keep challenging yourself when you start to become too comfortable with a subject. You don't want sketching to become boring or you will lose the habit.
There are endless ways in which you can keep things interesting. Start by changing the subject you are concentrating on. You could add a new medium to the mix like sketching with a pen instead of a pencil. You could start to add colour to your sketches. You may decide to set yourself a time limit on the sketch and so on...
Take Your Sketches to the Next Level

Line and Wash Sketch
That brings us nicely to taking your sketches to the next level and the optional equipment I mentioned earlier.
Starting off with simple little pencil sketches opens up the door to an incredible array of new opportunities for you to grow as an artist.
You will find that you will be able to transition to more intricate forms of drawing like photorealistic or pen and ink drawing.
You can start to add colour to your sketches by adding watercolour washes, gouache or acrylic paints.
Your sketches can become the study used to design a more complex painting or drawing done in the studio.
It can open up the door to en plein air (outdoor) drawing and painting.
The easiest and most common add on to sketching is usually pen and ink with watercolour washes, also called line and wash, so let's have a quick chat about that.
Line and Wash
With line and wash you will initially sketch your drawing outlines lightly using pencils. Once you are happy with your sketch, you will go over the lines using ink pens to establish the drawing. You can also add shading and detail using the pen.
With the drawing finalised you then whip out your watercolour paints and a basic brush and add lose layers of colour over the drawing to suggest the colours.
This style is fabulous as it lends itself perfectly to indoor as well as outdoor work on any scale.
You can take a look at our Pen and Ink Lessons for more info about this fabulous method.
To get started with line and wash all you need to add to your equipment are a few different size Felt Tipped Pens and a portable watercolour set like the one shown below.

Click to purchase this set
I hope this tutorial has given you a good feel for what is involved in sketching and wet your appetite to give it a go.
You will not regret making sketching a habit. Good luck.

About Dennis Clark
Read more about Dennis Clark
Follow Us on :
Copyright © · Paint Basket TV · All Rights Reserved
As an Amazon Associate, I earn from qualifying purchases.
Pin It on Pinterest
Best Drawing Books for Artists: 20 Books to Learn How to Draw
Find the best drawing books to inspire your practice and help you to develop your skills, to get your art journey off to the right start.
Learning to draw can be one of the most fulfilling, rewarding and life enhancing things you can do! Nothing compares to the feeling of creativity flowing whilst drawing, and the accomplishment you feel when you execute a drawing in the way you envisioned it to look.
To be able to draw well, all you need is the desire to create, some time to put aside, the right pencils , a sketchbook and an open mind. But the right drawing books can set you on a course to improve your drawing skills , give you some fresh ideas and a new approach.
Disclaimer: Fine Art Tutorials is a reader supported site. When you make purchases through links on this site, we may earn a small commission at no extra cost to you.
Best drawing books for beginners
You will be able to draw by the end of this book.
Buy it here
Have you bought a sketchbook but have no idea what to draw first? This book could be an answer! It’s a sketchbook that teaches you how to draw. With thick, quality pages, the book opens out flat. This makes for a comfortable sketching experience.
Learn about line, mass, volume, contours, the relationship between edges and values. Plus, learn all the different techniques that allow you to render value. Plus, put these newly learnt techniques to practice on the pages of the book.
Beginning Drawing Atelier: An Instructional Sketchbook
This wonderful, practical workbook was put together with the notion that artists learn by creating, not by reciting art theory in a classroom.
This book is perfect for those who want to get stuck in, learn the drawing process and start putting pencil to paper straight away. The author, Juliette Aristides breaks the learning process into lessons of shape, form and proportion, referencing famous drawings by old masters, which will leave you feeling inspired.
Draw straight on the pages of the book to log your progress and improve as you go along.
Drawing on the Right Side of the Brain
In this classic, popular book, originally published in 1979, Betty Edwards guides the reader through perceiving the relationship between subjects and objects in your reference and how to translate this to drawing.
The great thing about this book is that it will teach you problem solving techniques, so you can overcome challenges when you start to practise drawing more regularly.
Drawing books for intermediate to professional artists
For those who want to fine tune their skills, or revisit the basics—these books are the perfect picks to take your drawings to new heights.
If you’re a self taught artist, there will be aspects of fundamental skills that you pick up at different points of your art journey, that may differ from an artist that has been formally trained. Reading about how to approach certain concepts like perspective drawing when structured in a linear fashion with exercises can help cement these skills and get you drawing more quickly, consistently and with more confidence.
Figure Drawing Atelier: Lessons in the Classical Tradition
This book teaches a classical approach to figure drawing to create lively forms that have a sense of movement. Juliette Aristides shows the reader how to draw gestures to capture the action of the figure and the essence of the pose, before rendering the details.
This ‘instructional sketchbook’ is a wonderful practical guide. With a large space to create your own drawings for each exercise. The paper of the book is of excellent quality for sketching.
What I particularly like about this book is the focus on values, light and shadows and creating volume in a portrait drawing. It will take you through start to finish how to draw every pose imaginable so you feel equipped to draw from life yourself.
If you’re stuck trying to draw hands and feet realistically—these are usually the part of the body people find most difficult—Aristides has a section dedicated to just that. This book really helps people steer away from just drawing outlines and filling them in, but rather capturing poses and focussing on highlights and shadows to convey realism.
Composition in Drawing: The Design and Composition of Drawings
You may have already learned the fundamentals of drawing, but what is it about a drawing that captures the viewer’s attention and wows them?
A big part of this effect can be credited to the composition. The composition of a drawing can have a psychological influence on the viewer’s interpretation and whether they regard it as aesthetically pleasing or not.
In this drawing book, learn how to organise elements in a drawing and use contrast to portray your intended message and effect—whether that’s a sense of drama or calm.
Sketching from the Imagination: Dark Arts
Arguably, sketching from the imagination is more challenging than sketching from a reference. Copying a photo or even drawing from life, means that you have your subject right in front of you. You don’t need to remember scale, proportions or even create your own composition.
This book brings together 50 digital and traditional artists to shed some light on the art of drawing from imagination to create magical illustrations. This book is especially suited to those who are interested in comic art, concept design and animation. This particular title focuses on ‘Dark Arts’—with macabre and gothic inspiration. But there are other titles in the Sketching from Imagination series, including a book on fantasy art and one on characters.
Complete Guide to Life Drawing
Drawing from life, where there are time constraints, where the subject is in a pose you’re not used to drawing is a challenge. But it’s a way to further your perception and understanding of your reference.
Getting stuck in and going to life drawing classes is a way to improve your skills rapidly, as it will reveal your weaknesses to yourself. Whether it’s that you want to speed up at sketching, or become more confident and drawing a greater range of poses and angles. To achieve this, you will need a better understanding of human anatomy. This is the ultimate drawing book that you can use as a reference and a guide to perfect your drawing skills in different applications and environments, like life drawing classes. The book has detailed sections on human anatomy, so you can have confidence in drawing every limb, hand and face.
Using a photo as a reference usually doesn’t compare to drawing from life, there will be differences in the depth, contrast and quality of light. These features will seem amplified when you have a subject sitting in front of you. Of course, all of this input from your reference translates, so you can create some total novel drawings.
Portrait sketching books
Drawing the human body is a challenge—one that can be approached with a variety of methods and techniques. You need to learn to translate structure, gesture, light, shade and edges. Remember, the illusion of detail can be created without too much focus on detail.
Anatomy for the Artist
Reading this book is like compacting hours of life drawing lessons in one book, with valuable and practical tuition on how to draw a variety of poses. By learning human anatomy and the construction of the body with its muscle groups and bone structure, it will help you to render the appearance and details in the human figure better. Sarah Simblet also gives masterclasses on famous artists’ works, including a Michalangelo study.
This book also teaches beginners how to draw distance and perspective, an essential skills for realism drawing. From this book you will acquire an incredible range of skills and techniques, to prepare you to start pencilling in a blank sketchbook of your own.
If you’re especially interested in learning more about anatomy, to improve your figure drawing skills, check out our review of the best anatomy books for artists.
Figure Drawing for Artists: Making Every Mark Count
This book will teach you, from start to finish, how to draw the human form. From the first pencil line to the last shaded marks.
The author, Steve Huston, outlines the two step method taught to artists at Warner Brothers, Disney Animation and Dreamworks to create drawings that exude a sense of liveliness and movement. Houston breaks down the laws of light, which you can use to create luminosity in your drawings.
Lessons in Masterful Portrait Drawing: A Classical Approach to Drawing the Head
Take a classic approach to figure drawing by learning the ways of the old masters. Mau-Kun Yim teaches artists how to create volume and form in drawings by rendering a traditional bust. Then learn how to study your reference and improve your sketching skills by focussing on value and anatomy.
Drawing books for pen, ink & coloured pencil artists
There’s a whole world of materials beyond the classic graphite pencil. Discover the mediums of pen, ink, coloured pencil, charcoal and more in this assortment of art books .
Pen & Ink Drawing: A Simple Guide
This drawing book shows artists different line drawing and shading techniques to render shadow, light, volume and form. Create texture with a pen, to bring vibrancy to your drawings.
The book has a brilliant section on ‘sketchbooking’. A particularly good tip Alphonso Dunn shares, is how by making thumbnail sketches in your sketchbook, it can help artists to consider composition before starting their final piece. Learn how to create portraits, abstract art, gesture drawings , animal drawings and much more.
Encyclopedia of Colored Pencil Techniques
Coloured pencils make for an excellent drawing medium. Layer wax or oil pencil to create smooth blends and highly detailed, realistic drawings that can emulate paintings.
In this encyclopedia, learn all the essential techniques like stippling, blending, impressing, sgraffito and more! The book gives a multitude of examples of other artists’ works to give you an idea of what to draw for yourself.
Drawing techniques books
These books focus on specific techniques. They could introduce you to some new techniques you didn’t even know were missing from your art practice. Or help you to hone specific techniques that you are struggling with.
Artists’ Drawing Techniques
This book is the perfect beginner’s hand guide, with a comprehensive look at every aspect of drawing. It covers 80 different techniques such as stippling and blending.
While predominantly focussing on how to draw with pencil. It has in depth workshops on pastel, coloured pencil and ink. If you feel like you want to try other mediums, this book is a great starting point. The book features demonstrations of all manner of subjects—portraits, landscapes, water, still lifes and more.
It’s formatted a little bit like an instructional text book. It would suit you if you like learning by reading. You could also grab a piece of paper and try to follow along with the techniques for yourself.
Perspective Made Easy
Many artists can draw perspective realistically, but very few artists fully understand the rules that make it what it is. When perspective is conveyed properly in a drawing, it can bring life to the artwork, making landscapes and cityscapes appear more realistic.
Ernst Norling describes the how and why behind the laws of perspective. Illustrated with 250 simple line drawings so you can see it work in practice. Learn about vanishing points, the horizon and eye level. Then find out how to place objects in relation to the distance from the onlooker and how to depict shadows. Norling encourages simplicity in drawing. You can practice what you learn with the drawing exercises he provides.
Other drawing books you’ll love!
Essential techniques of landscape drawing: master the concepts and methods for observing and rendering nature.
Natural landscapes are most commonly rendered in oil, watercolour or other painting media. So it’s not often you come across a landscape drawing! Susan Brooker segments this book into various aspects of nature, such as land, sea, foliage, trees. She applies drawing fundamentals to help artists render each subject.
It’s a beautifully presented book and an essential for those who gravitate towards the subject of landscapes.
The Art of Urban Sketching: Drawing On Location Around The World
Delve into the experience of urban sketching on location. Flick through 700 beautiful sketches and illustrations travelling through 50 cities in 30 different countries. The book is a compilation of different stories, styles, tools, tutorials and techniques. All from different artists who participate in sketching the urban landscape.
5-Minute Sketching — Architecture: Super-Quick Techniques for Amazing Drawings
A collection of tips and inspiration to help artists render complex architecture. From mastering perspective drawing to detailing decorative elements in buildings. ‘5 Minute Sketching’ shows artists that you don’t need to commit a huge amount of time to enjoy a regular drawing practice.
Drawing Lessons from the Great Masters
If you’re interested in art history, this is the book for you! Robert Beverly Hale analyses 100 drawings from the old masters, including Rembrandt and da Vinci. Take some inspiration from their creative process and individual set of techniques.
Best drawing books: Pin it!
If you’ve found anything on this site especially useful, you can make a donation to me through PayPal. I take a lot of time to research and write each topic, making sure each tutorial is as detailed as possible and I make all my content freely available. Any small donation (even the price of a cup of coffee!) can help me to cover the running costs of the site. Any help from my readers is much appreciated :).
Follow the link in the button below to support this site.
Leave a Reply Cancel reply
Your email address will not be published. Required fields are marked *
Save my name, email, and website in this browser for the next time I comment.

Top 10 Best Drawing Books For Absolute Beginners
When you’re just getting started drawing it can be incredibly frustrating to draw poorly every day. It’s crucial to get as much practice as you can early on. But the wrong kind of practice is both annoying and a hinderance to your progress.
So if you’re a complete novice how do you get started drawing properly?
I always recommend the Proko figure series but not everyone wants to follow video courses. Instead I’d recommend starting with books that cover the raw fundamentals of drawing and measuring to draw accurately from life.
All of the books in this post will radically improve your knowledge and technical skillset to help you become a better draftsman and artist.
Keys to Drawing

This is one of the most recommended books for beginners and I’m happily apart of that bandwagon. Keys to Drawing teaches you how to draw what you see using measurements and proper marksmanship.
I cannot think of too many other books that guide you along in the same way as this book. The author Bert Dodson first published Keys to Drawing well over two decades ago but it’s still relevant to this day.
You’ll learn about controlling your elbow and shoulder motion to make the most accurate lines on the paper. This goes hand-in-hand with measuring and seeing things accurately to draw them from life.
If you want to become a professional artist then you need to draw from life.
The difficult part is understanding what “drawing from life” means and how to get started. Keys to Drawing will make this topic much less difficult and a bit smoother for anyone with little-to-no experience.
Drawing for the Absolute Beginner

Here’s another title that helps the reader learn to draw starting from step one. You’ll learn which materials to start with, how to hold your pencil, and how to accurately make marks on your paper.
As you learn to see and measure you’ll grow more comfortable with your marksmanship. Drawing for the Absolute Beginner helps you build this confidence and pushes you to study the fundamentals like form, lighting, perspective, and other related properties.
In total the book covers 128 pages which seems very short. But inside you get 24 unique demos which cover a broad range of sketching, measuring, constructing and rendering objects.
You’ll start with basic objects like chairs and cups but quickly move onto more detailed items like trees and vehicles.
This is the perfect book for anyone with no prior experience who genuinely wants to be good at drawing. But remember this book can only take you so far. It’s up to you to actually practice and follow the lessons to see improvements.
Drawing on the Right Side of the Brain

Many people recommend Betty Edwards’ Drawing on the Right Side of the Brain as the perfect beginner’s book. It has a lot of practical exercises that build on previous ideas in the book until you learn to see perspective, negative space, and values.
I personally did not get much from this book. I think the text is great and the lessons do mean well. But I just could not understand exactly what Betty was trying to teach or how it was supposed to improve my performance.
Once I moved over to a couple other books things started to click, and that’s when Betty’s book made a lot more sense to me.
But many novice artists swear by this title and would highly recommend it to complete beginners.
I think this book will be great for self-motivated artists who know why they want to draw and what they’re trying to do. If you’re completely new to art and seriously have no idea how to even comprehend drawing them I’d recommend a softer intro like Keys to Drawing .
However both are incredible books so you really can’t go wrong either way.
Drawing for the Absolute and Utter Beginner

Still life drawings are perfect for beginners because objects don’t move like the human figure. This is the purpose of Drawing for the Absolute and Utter Beginner . It aims to help anyone learn to draw from life with accuracy.
You’ll start with constructing the outside contours of objects and quickly move to constructing shapes and volumes. This is a crucial part of learning to draw and the exercises in this book teach you how to execute properly.
Plus before each exercise you’ll get a brief description of what you’re trying to learn and why it’s important. This is very helpful to new artists who simply don’t know why they’re doing these exercises.
You will probably need to re-read these passages a few times for them to really sink in but the lessons are invaluable to new artists.
The author Claire Watson Garcia is a teacher and many of these lessons are applied to her real life courses. Her teaching style is very approachable for children and adults so this book is a great start to real still life drawing.
Perspective Made Easy

One of the main fundamental art skills you have to learn is perspective. This creates the illusion of depth in a 2D drawing in the same way you’d find this in a photograph.
There are dozens of perspective books and the reason I like Perspective Made Easy is, well, the title says it all.
This book makes the concept of perspective super easy to understand. You’ll learn about horizon lines, vanishing points, and nitpicky tricks to help you construct buildings and objects in perspective based on any scene.
The author Ernest Norling repeats important points using different exercises to drive these concepts into your brain.
By the end you should have a powerful understanding of perspective and how it’s applied to every piece of art you create.
This book alone will not make you a master at perspective. But it’ll give you a big push into the deep end of the pool with some floaties to keep you above water as you get deeper into this subject.
Light for Visual Artists

Another fundamental skill of drawing is rendering light and shadow. This can be grouped together and labeled as value but learning to render value inherently means understanding how light works.
The book Light for Visual Artists is perhaps the best intro guide to understanding the physics and the artistic techniques for light and shadow. The author covers different materials and how they reflect light, plus the concepts of multiple light sources and how these affect objects in a scene.
If you’re starting with drawing first you’ll have an easier time with the basics of lighting & shadows. When you get to painting you’ll deal with colors that make the topic a whole lot more complicated.
Thankfully this book also talks about color selection so it really can be your ultimate reference guide for lighting. I’d highly recommend this to anyone serious about art because it should answer most(if not all) of your questions about values.
Vilppu Drawing Manual

Not many people talk about the Vilppu Drawing Manual because it’s published privately by Glenn Vilppu and his estate. But this is one of the most helpful guides I’ve ever bought on the subject of life drawing and figure drawing.
Vilppu has been teaching art for decades and he has a very unique style of teaching. This spiral-bound guide covers a lot of topics from basic forms to measuring and constructing objects accurately from life.
I covered this in a previous post explaining the difference between realist and constructionist drawing. Vilppu works closely with animators and concept artists so he understands the need to learn both techniques.
Gesture drawing and form construction are the two primary concepts you’ll study in this book. Some people prefer Loomis for these topics, but with Loomis you’ll end up grabbing 2-3 different books just to cover the material in this one spiral-bound guide to life drawing.
I do not think every artist will need a copy of this book. However it’s definitely great for complete beginners or even semi-experienced beginners who want to study a different approach to life drawing.
The Natural Way to Draw: A Working Plan for Art Study

This book is like a full art course crammed into print form. The author expects a lot from the reader and if you grab this book you should plan to draw for at least 4 hours a day every day.
The Natural Way to Draw: A Working Plan for Art Study teaches you how to draw figures and objects from life with a quick sketch/animator’s attitude. The author forces you to see beyond the 2D paper to draw the forms as if they’re right in front of you. But it also forces you to make marks quickly with less concern on line quality.
If you’re a complete beginner this book will be hard. If you’re looking to render realistically I would absolutely avoid this book. It’s also not great for someone who already has figure drawing experience.
But if you’re an aspiring animator this book will teach you how to capture figure poses quickly with weight and style. It will not help you draw accurately from life. But it will help you see what you’re drawing beyond simple contours.
Figure Drawing for All It’s Worth

We finally get to the one and only Loomis book that I’ll drop in this post. Yes there are many incredible books from Andrew Loomis, and yes I would personally recommend most of them.
But Figure Drawing for All It’s Worth is the one book that can make the biggest impact on a beginner’s mindset. Learning to draw the figure is arduous and honestly annoying at first. It can be stressful to understand what you’re even trying to do, let alone how to do it.
Loomis breaks down the process in this book teaching you how to see the figure, how to construct it, and finally how you should apply these techniques in the figure room.
You can find so much more info about this title online because this is one of the most highly recommended books for learning figure drawing.
It’s a great choice for new artists but only if you’re getting serious about figure drawing. If you’re only drawing chairs or park benches then I’d recommend a simpler “learning to see” art book such as Keys to Drawing or Drawing on the Right Side of the Brain .
How to Draw What You See

Lastly we get to an older book that was first published in the early 1970s. It has since been reprinted and amended with more info and more up-to-date writing.
How to Draw What You See is one of the top books to help you see objects properly and capture them accurately. It spans just over 170 pages and the writing is exceptionally detailed. You’ll learn about forms, shading, and perspective through a series of realistic drawing exercises.
I’d define this book to be helpful but incredibly simple. It’s really made for novice artists who have never drawn from life and have no idea where to start. The reason it’s so low on my list is that it doesn’t just cover drawing, but also gets into charcoal and watercolor too. This isn’t necessarily bad but it’s not great for beginners.
If you just want to master drawing then you will not want any other mixed media. This book covers drawing for the first 18-20 chapters then quickly switches mediums.
If you want a singular book on drawing then I’d instead recommend the first 2-3 books at the top of this list.
However I wouldn’t say this book is bad or incorrect in how it teaches drawing. Just that it goes far beyond mere drawing, and this can be off-putting to some artists who just want to master a pencil.
Everyone dives into drawing from different stages and it’s tough to recommend one single book for every person. But the titles in this list are all fantastic, some covering more specific topics while others are more broad and generic.
But either way I guarantee there’s something in this list to help you improve.
Whether you’re looking to become an animator, concept artist, illustrator, comic artist, or even a fine artist, these books will get you started and teach you the right way to see and draw accurately.
Related Posts:
")
Recent Posts

Interview With Animation Story Artist David Trumble

Artist Michael Salsbury Talks On His New Webcomic Boundless!

What are 3D & Game Shaders?

What is High & Low Poly in 3D Modeling?

What is LOD (Level of Detail) in 3D Modeling?
Cae newsletter.
Get monthly updates on new posts & cool art links sent right to your inbox.
How to Make a Simple Sketchbook
To find instructions on how to make a simple sketchbook from scratch click here for the Sketchbook Instructions
If you want to learn more about how to use sketchbooks in your classroom, check out this post .
If you would like to learn about how to create suminagashi for a sketchbook cover, click here .
If you would like to learn about paper marbling for a sketchbook cover, click here .
Leave a comment
Please sign in or register to comment on this lesson .
You May Also Like

Recent Additions
5 Solar Eclipse Artworks to Look and Talk About With Your Students
Ways To Spotlight Art Students
Chalk Pastel Portraits
Greek Sculpture Paintings
Split Self Portrait
Topics of Interest
Subscribe to our newsletter for weekly ideas and inspiration direct to your inbox.
My Art Lesson uses cookies to enhance your experience, deliver personalized ads and content, and analyze our traffic. By clicking "Accept Essential" or "Accept All ", you consent to our use of cookies. Cookie Policy
- Education Resources
- Art + Merch
Art Class Projects: Bookbinding & Sketchbooks
Do you need engaging art class projects? Teach your students about book binding and save money by having them make their own sketchbooks! Sketchbooks are a great way for art teachers to save money from their budget while having students gain valuable art practice. Keep reading this blog post to find out more about these fun art projects and the best way to implement them with any grade level!

SKETCHBOOK OVERVIEW
In twelve years teaching I have had every single class make their own sketchbook. This not only teaches them about bookbinding, but it also saves money from your budget. Sketchbooks are an incredibly valuable part of an art class from kindergarten through college. Their sketchbooks are a place to practice techniques and plan their projects to give them to confidence to start an assignment.
Each semester and year, our very first project is to make a sketchbook. The process of decorating and tailoring a sketchbook to their aesthetic gives students buy in when they start working on their sketches. The best part is, it also gives me insight into their artistic ability and skill level. I allow them full access to supplies and art materials in my art room when they decorate their cover. They get to pick the subject, materials, and overall look. Right off the bat, I have a great idea of what materials they are comfortable with, what their artistic style is, and where potential weakness may lie.
To avoid monotany, I teach a different bookbinding technique in every class. As they move through the art courses, the binding techniques become more complex. Check out the range of styles I have taught below, as well as some tips on implementing a sketchbook in class at the end of the post.

FOLDER TO SKETCHBOOK
The quickest, cheapest, most basic sketchbook style I teach is the folder to sketchbook . I use this in my introduction to art class because the focus is less on tedious bookbinding techniques and more on decorating. This is an easy art project to do with young kids as well.
For this assignment, each student gets a manila folder, they have access to a range of art supplies and materials from paint to tissue paper to Sharpies to magazine collage material. Students have to completely cover the Manila folder, inside and out, and pick a quote, song lyric, or similar to write on the first page.
Once their folder is decorated, a stack of white paper is added and stapled inside the folder.
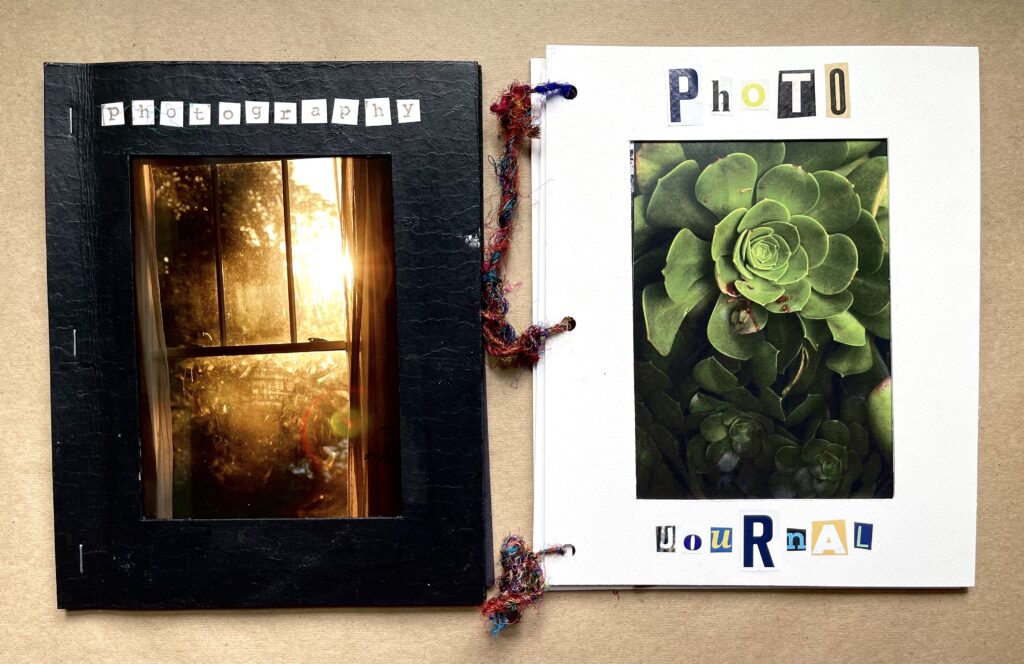
PHOTO WINDOW SKETCHBOOK
A very simple sketchbook I recommend for photography classes is a stapled or hole punched booklet with a window cut out out to add a photograph.
For this sketchbook style I recommend using matboard for the front and back. Cut mat board down to 8”x10” pieces. Using an Xacto knife or box cutter, cut a 4”x6” or 5”x7” window from the front cover. Cut down white piece of paper to fit between the pieces of mat board. Either staple the matboard and paper together using a heavy duty stapler or hole punch the stack and tie the booklet together.
For this style sketchbook I recommend keeping the design simple, especially for a photography class. Keep the mat board white or paint it black. Tape a photograph to the inside of the front cover to display through the window of the sketchbook. This sketchbook is a great opportunity for students to add favorite pictures from the course, take notes on lighting, timing, and camera settings.
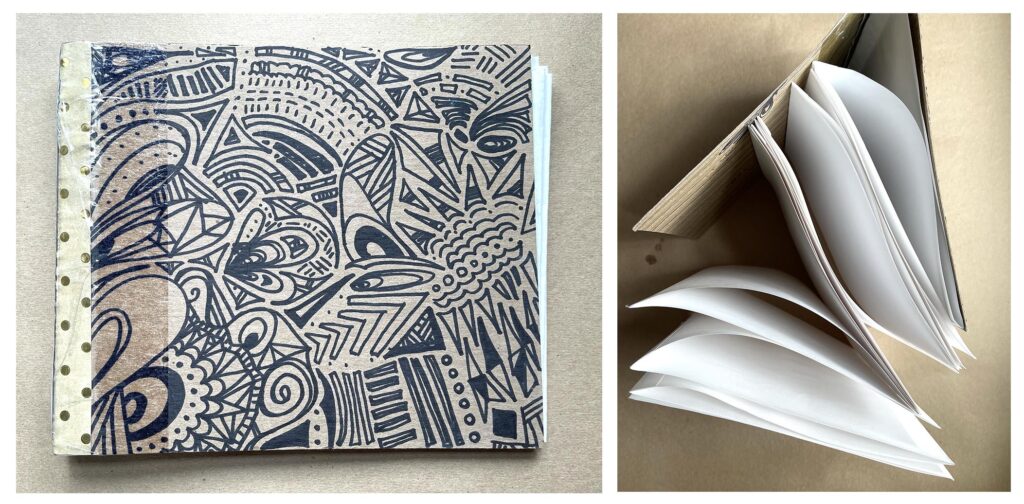
ACCORDION SKETCHBOOK
In my ceramic and sculpture classes I like to teach them the accordion sketchbook technique. Because the paper pulls out of the sketchbook like an accordion or fan, it has a more sculptural feel.
For this book, they decorate sheets of cardboard. The decide if they want their sketchbook horizontal or vertical, then fold a flap on each cover to create a spine. Once they are finished decorating the front and back cover, they overlap the flaps and glue them together using hot glue. To add paper, they fold a flap at the edge of each sheet of paper to glue it to the next sheet of paper. After they have a long line of glued paper, they fold it back and forth like an accordion. The final flap is glued into the spine. The paper sits in a stack between the front and back covers.
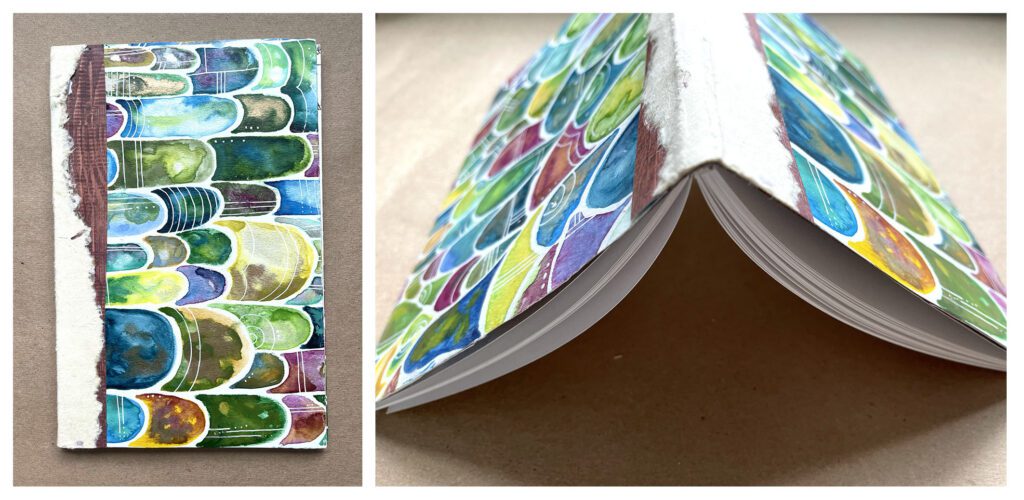
PERFECT BOUND SKETCHBOOK
One of my favorite styles of sketchbook is the perfect bound sketchbook . It looks like a book you can buy at a store and younger and older students are always impressed with the professional looking end product with these art class projects. Plus, it is so much fun to create!
To create this sketchbook students are given two sheets of cut down poster board. The students decide if their sketchbook will be vertical or horizontal. Next, they fold a flap on one side of the poster board to overlap to create the spine. They then decorate the poster board inside and out.
Once their sketchbook cover is ready, they overlap the folded flaps and glue them together. Next, they line up a stack of paper, select the side that will be glued into the spine, and coat the edge with glue. Repeat this step 2-3 more times, allowing the layers of glue to dry in between. Once there is a solid layer of glue holding the paper together, a final layer of glue is added. The paper stack is placed inside the cover, with the paper pushed up to the spine. TIP: weigh down the sketchbook to ensure everything stays in place.

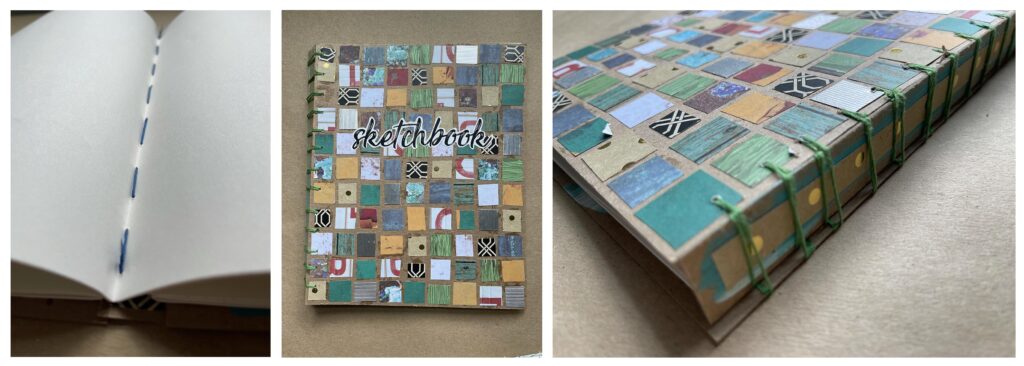
COPTIC SKETCHBOOK BOOKBINDING
I love teaching Coptic style sketchbook because it gives students a good understanding of bookbinding. In addition, the sketchbook lays flat when open and overall it is a sturdy book.
I typically plan for sketchbook making to take the first week of class. However, the Coptic style takes two, possibly three weeks to complete. It’s a more complicated process that involves decorating the front and back cover, folding paper together, hammering holes through each paper stack, and stitching the cover and paper sections together.
Despite the complex process, it’s worth the final result. The stitching makes a beautiful pattern and shows through the center of each paper section. I show demonstration videos, work with students one and one, and pass out how to sheets for them to reference as they work through the steps. You can check out my lesson pack for these art class projects with all the resources here .
SECRET BELGIAN BOOKBINDING
The secret Belgian bookbinding technique is similar to the Coptic bookbinding technique. Students decorate the front and back cover, stack and fold sections of paper, hammer holes through each paper stack, and stitch the paper and the cover together.
What I like about this technique is the addition of a decorated spine. This bookbinding technique is also a simple way to build off of the Coptic bookbinding techniques because students now have to stitch through the paper and wrap the string around the spine to hold it in place.
Like the Coptic sketchbook, the Belgian technique requires much more hands on assistance with students. I have an amazing art lesson pack that includes a demo video, how to handouts, and step by step instructions for students to follow as they create their sketchbook. Check it out here .

SKETCHBOOK BOOK JACKET
In my AP levels classes I like to give them a nice, hardback sketchbook. They have reached the highest level of the art program and they deserve a heavy duty sketchbook.
Since they aren’t making their own sketchbook, they instead decorate the sketchbook I give them. They have the option of decorating directly onto the hardback book or creating a book jacket . To make the book jacket, they take a large sheet of drawing paper and fold it around the book. Flaps are folded inside the cover to keep the cover on the sketchbook. Using scissors, students cut it to fit the sketchbook, leaving the flaps uncut.
Students can use any supply to decorate the cover or book jacket. The only requirement is they have to decorate the front, back, spine, and flap of the book jacket. If they opt for a book jacket design, I take their cover to laminate it to make it more durable.

USING SKETCHBOOKS
After teaching students bookbinding techniques it’s time to actually use their sketchbook. Although I primarily use them as a brainstorm space for projects, I also incorporate other activities, especially in beginner level courses for young artists.
For typical art class projects and art activities, students are researching famous artists, finding inspiration images, and creating thumbnail sketches. In my intro to art or drawing/painting courses in addition to project prep, they are also learning and practicing techniques in their sketchbooks. From color wheels, to color mixing , to shading techniques, the beginner level art students will walk away at the end of the year with a jam packed sketchbook.
Sketchbooks are also an amazing emergency sub plan option. I have a sketchbook prompt pack that includes a variety of prompts to get students inspired to work in their books. If you are in a pinch, have students randomly select a topic from a jar or a list and have them get to work.
Thanks for taking the time to check out my blog about art class projects! I hope you found inspiration for your art classroom or for your own sketchbook. Looking for a different way to engage students in your class? Check out information on visual journals here . Check out more items and art lesson plans in my shop here.
2 responses to “Art Class Projects: Bookbinding & Sketchbooks”
Curious, do you allow students to use their sketchbooks, across courses in the same year or even over multiple years if they have space?
Because I like to start every class with a new book binding technique they always start the course with a new sketchbook. However, they always have tons of space in their sketchbook so you could absolutely use them in multiple classes or over multiple years. I liked to give my advanced art students hardback sketchbooks and if they continued to AP Art they kept working in that same sketchbook.
Leave a Reply Cancel reply
Your email address will not be published. Required fields are marked *
Save my name, email, and website in this browser for the next time I comment.
Related Posts

Recent Posts

Another awesome resource from one of my favorite creators! I used this with both in person and virtual students. All were engaged and enjoyed learning." -Buyer, Photoshop Basics Packet
Give us a Follow
Get a free set of 8 elements of art posters when you subscribe!
- Economical Plan
- Premium Plan
- Standard Plan

Platinum Plan – Basic to Advance – Lifetime Access – With Mentorship

Learn Drawing in Just 30 Days – 30 Lessons

YouTube Hobby Basic to Advance Portrait Course – Lifetime Access

YouTube Hobby Drawing Course – 200 Videos, Lifetime Access(Without Mentorship)

Watercolor: Learn Basic Techniques (Without Mentorship)

How to DRAW Basics for KIDS & BEGINNERS

Learn Realistic Portrait Techniques

Hyper Realistic Portrait Drawing

YouTube Hobby Drawing Course – 55 Videos, Lifetime Access(Without Mentorship)

YouTube Hobby Drawing Course – 120 Videos, Lifetime Access(Without Mentorship)
Watch CBS News
Maurice Ashley, first Black chess grandmaster, uses game to teach life lessons: "Learning never ends"
By Kelsie Hoffman
Updated on: April 2, 2024 / 11:58 AM EDT / CBS News
Maurice Ashley, who became the first Black chess grandmaster in 1999, is using the game of chess to teach life lessons.
Ashley fell in love with chess as a 14-year-old high school student after immigrating to the U.S. from Jamaica.
To achieve his goal of having the highest title in chess, Ashley said he had to learn an important lesson, which he explained as the concept of ""To become, be."
"To become you first have to be, and that means if you are always chasing a goal, you're thinking 'I have to this, this, this, so I can get there,' but you first have to be that person that can be successful. Whatever it is that you want to be in life."
His advice is to not worry about the results, but the process.
"So you have to get in the mindset of the champion, the training that you need, the focus that you need, the kind of commitment that you need," he said. "When you get in that place where you're practicing as hard as you can and doing all those things necessary to master your craft, then when the time comes for you to take that test or to win that game, it will just happen. Don't worry about the results. Worry about the process."

Ashley's new book, "Move by Move: Life Lessons on and off the Chessboard," offers life advice drawn from the wisdom of chess.
For him, the most important thing is to have a beginner's mindset.
"That's the beauty of the approach when you look at it from the viewpoint of a child, of a beginner, that there is so much to learn. Even those who master any sport, or any activity in business. You could be the biggest millionaire. You could be a Super Bowl winner. There's always stuff that you keep on learning."
Although he is a grandmaster, which is the highest title you can have in chess, Ashley considers himself an advanced beginner chess player.
"Because there is so much greatness and wonder in the game that the learning never ends," he said.
Ashley also has a children's book, "The Life-Changing Magic of Chess," which he said teaches patience.
"If you go too fast you're not going to win the games, because you're going to make a mistake and lose pieces very easily. So we teach kids to slow down, to be patient, to make sure they're focused."
Kelsie Hoffman is a push and platform editor on CBS News' Growth and Engagement team. She previously worked on Hearst Television's National Desk and as a local TV reporter in Pennsylvania and Virginia.
More from CBS News

Student, 12, shoots 3 other 12-year-olds at Finnish school, kills 1, police say

Biden speaks with China's Xi in first call since November meeting

She bought a $100 tail and used it for a "magical" mermaid career

3 ways to have your credit card debt forgiven
When you’re lost, remember your red helicopter — what you once knew as a child
In an excerpt adapted from his forthcoming book, james rhee argues the lessons of childhood will always endure..

We all have a special story from childhood — one that can serve as both a beacon during times of darkness and a reminder of hardship and suffering during times of joy. My little childhood story helped change the course of my life. All it took was kindness, a little math, the unexpected friendship of a group of women who gave me permission to rediscover myself, and the courage to sing our collective song aloud.
My story happened when I was 5 years old and in kindergarten. One morning, the father of one of my good friends showed up in our classroom unannounced. He handed me a small white bag containing a wrapped present. Inside was a toy red helicopter. I didn’t understand why he was giving it to me, but I could sense he was both happy and sad.
Advertisement
At home, my parents seemed worried I had done something wrong. Maybe I had taken it from my classroom without asking. Or maybe they thought they had done something wrong.
As first-generation Korean immigrants, they didn’t always have a handle on local customs. Maybe every 5-year-old had received a red helicopter that day?
My parents soon got to the root of the red helicopter mystery. They called me into our tiny family room. “Why did you share your lunch with your friend?” Dad asked. Worried I was in trouble for somehow creating financial pressure on my family or displaying ingratitude toward my mom, who always woke up early to prepare lunch, I explained myself.
Why wouldn’t I share? I had enough, and he didn’t. It wasn’t a big deal.
I wasn’t in trouble — just the opposite. My parents told me my friend had lost his mom before the start of the school year. My friend must’ve told his family that I sometimes shared lunch with him on days he came to school without one. Wanting to thank me, his dad had invested the time to buy a toy red helicopter and to give it to me in person.
I felt confused and sad for my friend. I also felt good about what I’d done. It appeared as a warm, good ache spreading deeply inside my chest. You know the feeling I’m talking about, right?
I was surprised at Dad’s emotional reaction. I’ll always remember the look of pride in his eyes in our family room that day. Dad was a pediatrician and Mom was a nurse. Good grades and test results mattered, but not as much as how we behaved. Kindness, caring about others, and doing what was right were expected.
But so were achievement and success, as the world conventionally defines them — money, titles, credentials, status. It was an apparent contradiction I would spend 40 years struggling to reconcile.
My red helicopter met the fate of most childhood toys — lost, given away, thrown out. When high school ended, I went off to Harvard College and Harvard Law School. Suffocating under a mountain of student debt, I made an improbable pivot into investment banking and private equity.
During those years, I forgot all about the red helicopter. Or maybe more accurately, I buried that part of me. The red helicopter, and everything it symbolized about my immigrant parents, my upbringing, and their value system, felt like a burden, even an embarrassment.
Then, at a crucial time in my early 40s, the red helicopter reappeared.
I had resisted it on many occasions — too childish — but at the right moment, as Dad was taking his last breaths, it served as a signal fire for me after I had walked away from my identity as a “private equity guy” to help a broken clothing company for plus-size, moderate-income Black women living in urban neighborhoods across the United States. The red helicopter, and what it truly stood for, revealed itself gradually at first, and finally, triumphantly. It was at the heart of an unprecedented transformation that on the surface couldn’t have been an unlikelier fit for me. Ultimately, my story landed me on a TED conference stage .

Though many years have passed since I left the company, the ripple effects of the positive impact we created together are still expanding. The real impact wasn’t the what — the result, or the outcome; it was the how — the process itself. The how changed people’s minds and made a frenzied world pause, pay close attention, think, and feel.
I’m guessing you have your own red helicopter story. About how the pure, commonsense things we intuitively knew to be true as children are central to understanding who we are and how we should treat one another as human beings. Maybe you’re at the same point in your life as I was when I made a major change: fighting off a low-level malaise, a disquiet that doesn’t have a name; sensing that the rules don’t seem right, and wondering, Who made them anyway?
We just need a process, a framework, and a bit of knowledge to have the courage to rediscover the knowing we felt as children. We just need to find and trust our red helicopter story, and then lift off with the help of a few friends, the old but especially the new.
James Rhee is based in Newton and teaches at Howard University, MIT Sloan School of Management, and Duke Law School. This excerpt was adapted from Red Helicopter - A Parable for our Times by James Rhee and reprinted with permission from HarperOne, an imprint of HarperCollins Publishers. On sale April 9. Copyright 2024. Send comments to [email protected] .
EVENTS: James Rhee in conversation with Cliff Hakim at Belmont Books (with GBH Forum Network), April 9, 7 p.m. Book signing at Wellesley Books on April 23, 7 p.m.; tickets $5; RSVP required. See wellesleybooks.com/event .
Korean rolled omelet offers a lesson in cooking intuition

From an early age, Monica Lee writes in her new cookbook, it was clear she possessed “sohn-mat,” the Korean term for a natural instinct for cooking that translates to “flavor in the fingertips.”
It’s such an important part of her story — she never saw (never mind used) a measuring cup or spoon even as she ran a Koreatown restaurant in Los Angeles for decades — that it became the title of the book. “Sohn-mat” is the story of Lee’s groundbreaking restaurant, Beverly Soon Tofu , which closed during the pandemic, and a guide to her intuitive style of Korean cooking (with measurements added).
The restaurant was pioneering in that it specialized in soon tofu chigae, a bubbling hot bowl of soft tofu stew, which Lee made to order. And over its decades of operation, Beverly Soon Tofu (named, like Monica herself, after an iconic L.A. place) introduced legions of diners to the dish and made them fans in the process . “If I close my eyes,” chef Roy Choi writes, “I can taste the thick spicy stew and see Monica cooking 12 of them at the same time over viciously bursting open flames with only a pair of pliers in her hand to grab the pot.”
Get the recipe: Rolled Omelet
The book includes more than 40 pages of recipes and tips for soon tofu chigae in almost a dozen varieties. But it also goes deep into other staples of the Korean table, such as kimchi and banchan, the latter the spread of small dishes that accompanies Korean meals. As much as I loved the soon tofu chigae that I tasted at her restaurant before the pandemic, it was one of the banchan recipes I couldn’t wait to try.
Weeknight Vegetarian with Joe Yonan
- How to cook a simple, flavorful pot of beans and use it throughout the week
- A former omnivore comes out as vegetarian
I’ve long wanted to learn the right way to make a rolled omelet, called gyeran mari in Korean and tamagoyaki in Japanese. A popular side dish in both cuisines, it’s often added to bento boxes, served on bowls of ramen or just presented among all the other delectable little plates alongside the main course or courses. In a Zoom call from California, Lee and her daughters, CJ and JJ, talked about how Lee would pack gyeran mari for the girls’ lunches along with multiple other banchan, something they loved but didn’t fully appreciate until they were older and, in JJ’s case, had a child of their own.
“We didn’t know at the time how much effort and attention my mom put into our lunches,” CJ said. “And this was on top of her running the restaurant! So when we were asked what recipes we wanted to put in the book, this one was a must.”
Lee said she learned the technique from one of her aunts, a much better cook than her mother. “I was always interested in whatever she made,” she said. “I pay attention, I remember, and then I try. So every time if I didn’t like what I make, I make it one more time, one more time, until I’m satisfied, you know? I see something, I have to practice.”
With its confetti of vegetables and distinctive sushi-like shape, it’s one of the most captivating ways to eat eggs I’ve seen, but I was daunted by the prospect of rolling the thin egg layer from one side of a pan to the other, pouring in another layer, and repeating, back and forth until the roll took shape. Would it hold together?
Turns out, I got the hang of it pretty quickly. After jumping at the chance to order a special rectangular tamagoyaki pan (yes, I love my job), I followed the book’s expert guidance — finessed by co-author Tien Nguyen. It soon became clear that the most important instructions were to adjust the heat so that the egg mixture would be barely set on the bottom while still runny on top when I rolled each layer; that’s what creates one homogenous piece (or close to it, anyway). I tried to channel Lee’s philosophy, with which I absolutely agree, that being happy when you cook results in better food. My first attempt resulted in something not very pretty — but still delicious. My second came awfully close to hitting the mark, and by the third time I had nailed it.
When I reported my experience to Lee and her daughters, the matriarch was charmingly generous with her smile and her praise: “You must have sohn-mat!”
Maybe. Just maybe I do.

IMAGES
VIDEO
COMMENTS
SketchBook Pro 7 Coloring. Wacom's YouTube channel actually has a few guided tutorials and lessons on popular painting software. This one covers tips & tricks for artists just starting to learn the SketchBook Pro 7 software.. It's a quick video only 11 minutes long but it's a great resource once you know the basics.
[ 6K LIKES! ] Learn how to use SketchBook with this SketchBook app tutorial, a great solution for artists and beginners in just 11 mins! Getting started, bas...
In this tutorial, I will introduce you to the basics of the program in its desktop version. 1. The Basic Interface of Sketchbook Pro. Once you open Sketchbook Pro, you are welcomed by an interface with the basic panels already present. You can move and resize them as you see fit.
Pick your path…. Browse our courses. Learn about membership. Sketchbook Skool is the place for artists of all levels. Whether you want to take a course or build a life-changing art habit, we have the resources and guidance you need to awaken your creativity.
Draw Every Day, Draw Every Way (Guided Sketchbook): Sketch, Paint, and Doodle Through One Creative Year. Paperback - September 13, 2016. Conceived by Instagram's daily sketch sensation @augustwren, this guided journal encourages carving out a moment of self-expression every day. To conquer the intimidating prospect of filling 365 blank ...
She has collaborated with clients like Flow Magazine and Adobe, and created her own picture book. In this online course, Sarah teaches you different exercises for developing the most important artistic skills, overcoming creative blocks, and unlocking your imagination. Learn how to fill a sketchbook with experimental drawings using different ...
Please be brave and upload your work, it's going to really help you to grow and give you a little bit more importance to sketchbook practice. 3. My Sketchbook Tour: [MUSIC] Here's my special red notebook and when I was just starting out, I did feel a little bit shaky about where I was going with this. Wasn't really sure how to use sketch book.
Rule #4 - Sketch Often. Drawing and experimenting inside your sketchbook is going to allow you to grow incredibly fast as an artist, but only if you are consistent. Let's look at an analogy - driving a motor vehicle. For the beginner there are many things to remember, do and to look out for when learning to drive.
Discover the power of creativity with Autodesk Sketchbook Pro. In this comprehensive course, "Learn Autodesk Sketchbook Pro from Basics to Sketch Drawings," you will learn how to unleash your imagination and create stunning digital drawings. Our course is designed for artists of all levels, from beginners just starting their digital art journey ...
Sketchbook® is a professional-grade sketching & painting app that is easy for everyone to use - From quick sketches to fully finished artwork, Sketchbook goe...
3 Portrait sketching books. 3.1 Anatomy for the Artist. 3.2 Figure Drawing for Artists: Making Every Mark Count. 3.3 Lessons in Masterful Portrait Drawing: A Classical Approach to Drawing the Head. 4 Drawing books for pen, ink & coloured pencil artists. 4.1 Pen & Ink Drawing: A Simple Guide.
So I got an idea of the darker elements in the foreground, lighter elements in the background, and it's starting to shape up. So in the next video will continue this this process and refining her sketch 4. Sketching - 2: Welcome back, guys. We continue to add bass tones to her painting, refining our sketch. Just one tip here.
Moleskine 11-3/4" x 8-1/4" Hardcover Sketchbook. Moleskin | $30.49. Moleskine is known for high-quality sketchbooks that artists love to use. This book features premium off-white paper that's 111 lbs and suitable for all types of media. Additionally, Moleskine is great for traveling.
Final spine = 0.75 in. Book trims with rounded corners. ISBN-13: ISBN-10: 978--321-94050-6 -321-94050-4. 9 780321 940506 52499 US $24.99 CAN $25.99. www.peachpit.com LEVEL: Beginning / Intermediate CATEGORY: Design / Drawing COVERS: Drawing Fundamentals COVER DESIGN: Denise Anderson and Laura Menza COVER ILLUSTRATION: Mitzie Testani and Robin ...
This book is like a full art course crammed into print form. The author expects a lot from the reader and if you grab this book you should plan to draw for at least 4 hours a day every day. The Natural Way to Draw: A Working Plan for Art Study teaches you how to draw figures and objects from life with a quick sketch/animator's attitude. The ...
5.0 out of 5 stars car sketch book. Reviewed in the United States on February 11, 2020. Verified Purchase. great for adults who are car enthusiasts and budding artists. Read more. One person found this helpful. Helpful. Report. insogna8. 3.0 out of 5 stars small. Reviewed in the United States on August 21, 2020.
Sketchbook Lessons. Anne Hevener. Four sketching enthusiasts—Stephanie Bower, Uma Kelkar, James Richards and Brenda Swenson—share a few of their proven approaches and techniques for advancing and enhancing a sketching practice. This post is only available to members.
9 x 12 inches Sketch Book, Top Spiral Bound Sketch Pad, 1 Pack 100-Sheets (68lb/100gsm), Acid Free Art Sketchbook Artistic Drawing Painting Writing Paper for Kids Adults Beginners Artists $9.98 $ 9 . 98
Sketchbook has all the features you expect from a professional-grade app. A wide variety of highly customizable brushes supported by guides, rulers and stroke tools give you both stylistic freedom and precision when you need it. Layers with a full complement of blend modes deliver the flexibility to build up and explore drawings and color ...
For our Class Project, we will create a digital sketchbook that will also be our Lesson Book for the class - which we can keep for reference right on our iPad. This Learning Book can also be saved as a PDF file for any device, or printed as a hard copy. Supplies you will need: An iPad and Apple Pencil or other stylus.
My Art Lesson Originals. To find instructions on how to make a simple sketchbook from scratch click here for the Sketchbook Instructions. If you want to learn more about how to use sketchbooks in your classroom, check out this post. If you would like to learn about how to create suminagashi for a sketchbook cover, click here.
I love teaching Coptic style sketchbook because it gives students a good understanding of bookbinding. In addition, the sketchbook lays flat when open and overall it is a sturdy book. I typically plan for sketchbook making to take the first week of class. However, the Coptic style takes two, possibly three weeks to complete.
YouTube Hobby Drawing Course - 55 Videos, Lifetime Access (Without Mentorship) 383. SB. By Sketch Book by Abhishek In Economical Plan. ₹ 2,999.00 ₹ 299.00. Add to cart. 4.94. (17)
Maurice Ashley, who became the first Black chess grandmaster in 1999, is using the game of chess to teach life lessons. Ashley fell in love with chess as a 14-year-old high school student after ...
In an excerpt adapted from his forthcoming book, James Rhee argues the lessons of childhood will always endure. By James Rhee Updated April 2, 2024, 2 hours ago Email to a Friend
Korean rolled omelet offers a lesson in cooking intuition. By Joe Yonan. March 31, 2024 at 10:00 a.m. EDT ... The book includes more than 40 pages of recipes and tips for soon tofu chigae in ...