- Python Basics
- Interview Questions
- Python Quiz
- Popular Packages
- Python Projects
- Practice Python
- AI With Python
- Learn Python3
- Python Automation
- Python Web Dev
- DSA with Python
- Python OOPs
- Dictionaries

Reading and Writing XML Files in Python
- Reading and Writing CSV Files in Python
- Reading and Writing to text files in Python
- Reading and Writing JSON to a File in Python
- Reading and Writing lists to a file in Python
- Read File As String in Python
- Read and Write TOML Files Using Python
- Reading .Dat File in Python
- Reading CSV files in Python
- Writing to file in Python
- How To Read .Data Files In Python?
- Read JSON file using Python
- Automate Renaming and Organizing Files with Python
- Modify XML files with Python
- How to read from a file in Python
- Saving Text, JSON, and CSV to a File in Python
- Creating and Viewing HTML files with Python
- Reading an excel file using Python openpyxl module
- Working with XML Files in R Programming
- Reading Rows from a CSV File in Python
Extensible Markup Language , commonly known as XML is a language designed specifically to be easy to interpret by both humans and computers altogether. The language defines a set of rules used to encode a document in a specific format. In this article, methods have been described to read and write XML files in python.
Note: In general, the process of reading the data from an XML file and analyzing its logical components is known as Parsing . Therefore, when we refer to reading a xml file we are referring to parsing the XML document .
In this article, we would take a look at two libraries that could be used for the purpose of xml parsing. They are:
- BeautifulSoup used alongside the lxml parser
- Elementtree library.
Using BeautifulSoup alongside with lxml parser
For the purpose of reading and writing the xml file we would be using a Python library named BeautifulSoup. In order to install the library, type the following command into the terminal.
Beautiful Soup supports the HTML parser included in Python’s standard library, but it also supports a number of third-party Python parsers. One is the lxml parser (used for parsing XML/HTML documents). lxml could be installed by running the following command in the command processor of your Operating system:
Firstly we will learn how to read from an XML file. We would also parse data stored in it. Later we would learn how to create an XML file and write data to it.
Reading Data From an XML File
There are two steps required to parse a xml file:-
- Finding Tags
- Extracting from tags
XML File used:

Writing an XML File
Writing a xml file is a primitive process, reason for that being the fact that xml files aren’t encoded in a special way. Modifying sections of a xml document requires one to parse through it at first. In the below code we would modify some sections of the aforementioned xml document.
Example:

Using Elementtree
Elementtree module provides us with a plethora of tools for manipulating XML files. The best part about it being its inclusion in the standard Python’s built-in library. Therefore, one does not have to install any external modules for the purpose. Due to the xmlformat being an inherently hierarchical data format, it is a lot easier to represent it by a tree. The module provides ElementTree provides methods to represent whole XML document as a single tree.
In the later examples, we would take a look at discrete methods to read and write data to and from XML files.
Reading XML Files
To read an XML file using ElementTree, firstly, we import the ElementTree class found inside xml library, under the name ET (common convension). Then passed the filename of the xml file to the ElementTree.parse() method, to enable parsing of our xml file. Then got the root (parent tag) of our xml file using getroot(). Then displayed (printed) the root tag of our xml file (non-explicit way). Then displayed the attributes of the sub-tag of our parent tag using root[0].attrib. root[0] for the first tag of parent root and attrib for getting it’s attributes. Then we displayed the text enclosed within the 1st sub-tag of the 5th sub-tag of the tag root.
Example:

Writing XML Files
Now, we would take a look at some methods which could be used to write data on an xml document. In this example we would create a xml file from scratch.
To do the same, firstly, we create a root (parent) tag under the name of chess using the command ET.Element(‘chess’). All the tags would fall underneath this tag, i.e. once a root tag has been defined, other sub-elements could be created underneath it. Then we created a subtag/subelement named Opening inside the chess tag using the command ET.SubElement(). Then we created two more subtags which are underneath the tag Opening named E4 and D4 . Then we added attributes to the E4 and D4 tags using set() which is a method found inside SubElement(), which is used to define attributes to a tag. Then we added text between the E4 and D4 tags using the attribute text found inside the SubElement function. In the end we converted the datatype of the contents we were creating from ‘xml.etree.ElementTree.Element’ to bytes object, using the command ET.tostring() (even though the function name is tostring() in certain implementations it converts the datatype to `bytes` rather than `str`). Finally, we flushed the data to a file named gameofsquares.xml which is a opened in `wb` mode to allow writing binary data to it. In the end, we saved the data to our file.

Please Login to comment...
Similar reads.
- python-utility
Improve your Coding Skills with Practice
What kind of Experience do you want to share?
- Skip to primary navigation
- Skip to main content
- Skip to primary sidebar
PythonForBeginners.com
Learn By Example
Working With an XML File in Python
Author: Aditya Raj Last Updated: February 27, 2023
XML files are used to store data as well as to transmit data in software systems. This article discusses how to read, write, update, and delete data from an XML file in Python. For this task, we will use the xmltodict module in python.
What is an XML File?
Create an xml file in python, read an xml file in python, add a new section to an xml file in python, update value in an xml file using python, delete data from xml file in python.
XML (eXtensible Markup Language) is a markup language that is used to store and transmit data. It is similar to HTML in structure. But, unlike HTML, XML is designed to store and manipulate data, not to display data. XML uses a set of markup symbols to describe the structure and meaning of the data it contains, and it can be used to store any type of data, including text, numbers, dates, and other information.
An XML file is a plain text file that contains XML code, which can be read by a wide range of software applications, including web browsers, text editors, and specialized XML tools. The structure of an XML file consists of elements, which are defined by tags, and the data within those elements is stored as text or other data types.

The syntax for declaring data in an XML file is as follows.
To understand this, consider the following example.
The above XML string is a simple XML document that describes the details of an employee.
- The first line of the document, <?xml version="1.0"?> , is the XML declaration and it specifies the version of XML that is being used in the document.
- The root element of the document is <employee> , which contains several other elements:
- The <name> element stores the name of the employee, which is “John Doe”.
- The <age> element stores the age of the employee, which is “35”.
- The <job> element contains information about the employee’s job, including the <title> (Software Engineer), the <department> (IT), and the <years_of_experience> (10) elements.
- The <address> element contains information about the employee’s address, including the <street> (123 Main St.), <city> (San Francisco), <state> (CA), and <zip> (94102) elements.
Each of these elements is nested within the parent <employee> element, creating a hierarchical structure. This structure allows for the data to be organized in a clear and concise manner, making it easy to understand and process.
XML is widely used for data exchange and storage because it is platform-independent, meaning that XML data can be transported and read on any platform or operating system, without the need for proprietary software. It is also human-readable, which makes it easier to debug and maintain, and it is extensible, which means that new elements can be added as needed, without breaking existing applications that use the XML data.
XML files are saved using the .xml extension. Now, we will discuss approaches to read and manipulate XML files using the xmltodict module. You can install this module using pip by executing the following command in your command prompt.
To create an XML file in python, we can use a python dictionary and the unparse() method defined in the xmltodict module. For this, we will use the following steps.
- First, we will create a dictionary containing the data that needs to be put into the XML file.
- Next, we will use the unparse() method to convert the dictionary to an XML string . The unparse() method takes the python dictionary as its input argument and returns the XML representation of the string.
- Now, we will open an XML file in write mode using the open() function. The open() function takes the file name as its first input argument and the literal “w” as its second input argument. After execution, it returns a file pointer.
- Next, we will write the XML string into the file using the write() method. The write() method, when invoked on the file pointer, takes the XML string as its input argument and writes it to the file.
- Finally, we will close the file using the close() method.
After execution of the above steps, the XML file will be saved in the file system. You can observe this in the following example.
Instead of using the write() method, we can directly write the XML data into the file using the unparse() method. For this, we will pass the python dictionary as the first input argument and the file pointer as the second input argument to the unparse() method. After execution of the unparse() method, the data will be saved to the file.
You can observe this in the following example.
The output file looks as follows.

To read an XML file in python, we will use the following steps.
- First, we will open the file in read mode using the open() function. The open( ) function takes the file name as its first input argument and the python literal “r” as its second input argument. After execution, it returns a file pointer.
- Once we get the file pointer, we will read the file using the read() method. The read() method, when invoked on the file pointer, returns the file contents as a python string.
- Now, we have read the XML file into a string. Next, we will parse it using the parse() method defined in the xmltodict module. The parse() method takes the XML string as its input and returns the contents of the XML string as a python dictionary.
- After parsing the contents of the XML file, we will close the file using the close() method.
After executing the above steps, we can read the XML file into a python dictionary. You can observe this in the following example.
To add a new section to an existing XML file, we will use the following steps.
- We will open the XML file in “r+” mode using the open() function. This will allow us to modify the file. Then, we will read it into a python dictionary using the read() method and the parse() method.
- Next, we will add the desired data to the python dictionary using key-value pairs.
- After adding the data to the dictionary, we will erase the existing data from the file. For this, we will first go to the start of the file using the seek() method. Then, we will erase the file contents using the truncate() method.
- Next, we will write the updated dictionary as XML to the file using the unparse() method.
After executing the above steps, new data will be added to the XML file. You can observe this in the following example.

In this example, you can observe that we have added a single element as well as a nested element to the XML file.
To add a single element to the XML file, we just need to add a single key-value pair to the dictionary. To add an entire section, we need to add a nested dictionary.
To update a value in the XML file, we will first read it into a python dictionary. Then, we will update the values in the dictionary. Finally, we will write the dictionary back into the XML file as shown below.

To delete data from the XML file, we will first read it into a python dictionary. Then, we will delete the key-value pairs from the dictionary. Next, we will dump the dictionary back into the XML file using the unparse() method. Finally, we will close the file using the close() method as shown below.

In this example, you can observe that we have deleted a single element as well as a nested element from the XML file.
In this article, we have discussed how to perform create, read, update, and delete operations on an XML file in python using the xmltodict module. To learn more about XML files, you can read this article on how to convert XML to YAML in Python . You might also like this article on how to convert JSON to XML in python .
I hope you enjoyed reading this article. Stay tuned for more informative articles.
Happy Learning!
Recommended Python Training
Course: Python 3 For Beginners
Over 15 hours of video content with guided instruction for beginners. Learn how to create real world applications and master the basics.
More Python Topics
Read and Write XML Files with Python
Insights stats, toc table of contents, example xml file, use xml dom model, read xml document, write xml document, use xml.etree.elementtree , read xml file using elementtree, write xml file using elementtree.
XML is a commonly used data exchange format in many applications and systems though JSON became more popular nowadays. Compared with JSON, XML supports schema (XSD) validation and can be easily transformed other formats using XSLT. XHTML is also a strict version of HTML that is XML based and used in many websites.
This article provides some examples of using Python to read and write XML files.
Create a sample XML file named test.xml with the following content:
As many other programming languages, XML DOM is commonly used to parse and to manipulate XML files.
More than decades ago when I started coding with C#, XmlDocument was a commonly used class to manipulate XML data. In Python, there are also DOM model implementations like package minidom even though it is a minimal implementation of the Document Object Model interface.
The following code snippet reads the attributes from the document. It first creates a DOM object and then finds all the record elements from document root element. For each element, is parsed as a dictionary record. When parsing record element, several objects are used: Attr, Text and Element. All these elements are inherited from Node class.
We can also use DOM object to write XML data in memory to files.
The following code snippet adds a new attribute for each record element in the previous example and then save the new XML document to a new file.
As you can see, attribute node testAttr is added for each element.
Another approach is to use xml.etree.ElementTree to read and write XML files.
The above scripts first create ElementTree object and then find all 'record' elements through the root element. For each 'record' element, it parses the attributes and child elements. The APIs are very similar to the minidom one but is easier to use.
The output looks like the following:
To write XML file we can just call the write function.
Example code:
Again, the API is simpler compared with minidom. The content of the newly generated file text_new_2.xml is like the following:
For ElementTree.write function, you can specify many optional arguments, for example, encoding, XML declaration, etc.
There are many other libraries available in Python to allow you to parse and write XML files. For many of these packages, they are not as fluent or complete as Java or .NET equivalent libraries. ElementTree is the closest one I found so far.
- xml.dom - The Document Object Model API
- xml.etree.ElementTree — The ElementTree XML
Read XML Files as Pandas DataFrame
Please log in or register to comment.
Log in with external accounts
Please log in or register first.
- Python Programming
- Subscribe RSS
- Help centre
- Contributors
XML Files Handling
Table of contents, open xml file and read data with python, how to write xml, how to convert xml to json, how to convert xml to csv.

XML files in Python allow for the manipulation and parsing of XML data. XML ( Extensible Markup Language ) is a widely used data interchange format.
To read data from an XML file with Python, you can use in-built XML parser module. In this part we will learn how to parse XML data in Python by exploring popular Python libraries.
The most commonly used libraries for parsing XML files are lxml and ElementTree .
Using lxml library
The lxml library is a popular XML files reader, it is quite efficient for parsing XML data. You can install the lxml library by using the pip command.
Using ElementTree
ElementTree is an in-built library that allows to parse XML files. With ElementTree, come built-in modules that allow parsing and creating of elements. To use the ElementTree library, you need to import it.
Here's an example of how you can parse an XML file using ElementTree :
By using either of these methods, you can read XML files efficiently.
To write XML in Python, you can use the ElementTree XML API library. Here are two code examples to demonstrate how to create and write XML:
Example 1: Creating and Writing XML in Python
Example 2: creating and writing xml with attributes.
In both examples, the ElementTree() class is used to create an XML element tree . The write() method is then used to write the element tree to an XML file. By specifying encoding and xml_declaration in the second example, a custom-formatted XML file is created with an XML declaration at the top.
Converting XML to JSON is a common task that can be achieved easily.
The xmltodict module allows us to convert an XML document into a dictionary, which can then be easily converted into JSON using the built-in json module. Below is an example code snippet that demonstrates how to use this approach:
The xml.etree.ElementTree module allows us to parse the XML document and create an Element object, which can be traversed to get the required data. Once we have the data as a dictionary, we can use the json module to convert it to JSON. Here is an example code snippet that demonstrates how to use this approach:
To convert XML to CSV, you can use the xml.etree.ElementTree module and the csv module. Here are two code examples to help you get started:
Example 1: Using ElementTree and CSV modules
Example 2: using pandas.
In both of these examples, the xml.etree.ElementTree module is used to parse the XML file and extract the data. The csv module (in Example 1) or the pandas library (in Example 2) is used to write the data to a CSV file.
Contribute with us!
Do not hesitate to contribute to Python tutorials on GitHub: create a fork, update content and issue a pull request.

Reading and Writing XML Files in Python with Pandas
- Introduction
XML (Extensible Markup Language) is a markup language used to store structured data. The Pandas data analysis library provides functions to read/write data for most of the file types.
For example, it includes read_csv() and to_csv() for interacting with CSV files. However, Pandas does not include any methods to read and write XML files.
In this article, we will take a look at how we can use other modules to read data from an XML file, and load it into a Pandas DataFrame. We'll also take data from a Pandas DataFrame and write it to an XML file.
- Reading XML with Pandas
Let's have a look at a few ways to read XML data and put it in a Pandas DataFrame.
For this section, we'll use one set of input data for every script. Save the following XML in a file called properties.xml :
- Reading with xml.etree.ElementTree
The xml.etree.ElementTree module comes built-in with Python. It provides functionality for parsing and creating XML documents. ElementTree represents the XML document as a tree. We can move across the document using nodes which are elements and sub-elements of the XML file.
In this approach, we read the file content in a variable and use ET.XML() to parse the XML document from the string constant. We will loop across each child and sub child maintaining a list of data they contain. Meanwhile, writing child tags for the DataFrame column. Then we write this data into a DataFrame.
Note: When reading data from XML, we have to transpose the DataFrame, as the data list's sub-elements are written in columns.
Let's look at the code to demonstrate use of xml.etree.ElementTree :
The above code will produce this output (varies on the input file used):
- Reading with lxml
The lxml library is a Python binding for the C libraries libxml2 and libxslt . It also extends the native ElementTree module. As this is a third-party module, you'll need to install it with pip like this:
Unlike ElementTree , we don't read the file data and parse it. We can directly use objectify.parse() and give it the path to the XML file. To get the root element, we will use getroot() on the parsed XML data.
Now we can loop through the children elements of the root node and write them into a Python list. Like before, we'll create a DataFrame using the data list, and transpose the DataFrame.
Let's look at the code to create a Pandas DataFrame using lxml :
If we run this on Python interpreter, we see the following output:
- Reading with xmltodict
The xmltodict module converts the XML data into a Python dictionary as the name suggests. Like lxml , this is a third-party module we need to install with pip :
Like we've done before, we read the XML contents into a variable. We give this data in the parse() method which returns a dictionary of the XML data. It will be a nested dictionary that has elements and sub-elements of the XML file. We can loop through the elements and write them into a data list that we use to create a DataFrame.
Let's have a look at the code to parse XML data to create a DataFrame using xmltodict :
If we run the above code, we can see the output as:
Check out our hands-on, practical guide to learning Git, with best-practices, industry-accepted standards, and included cheat sheet. Stop Googling Git commands and actually learn it!
Note : The xmltodict library is not recommended for huge XML files as many developers have observed performance drops. The lxml library is considered to be the fastest at working with XML, even faster than the included xml.etree.ElementTree .
Use what's best for your project, and if performance is critical you should run tests with each library.
- Writing XML with Pandas
Let's look at various ways to write Pandas DataFrame in an XML file. Every script we use below will create a new file called coordinates.xml with the following contents:
- Writing with Built-in write() Function
We can use the included write() function for files to write a DataFrame as an XML file. To accomplish this, we'll keep a list of the XML data, such that each item represents a line in XML. We will then iterate over the DataFrame and write the data with appropriate opening and closing tags of XML in the data list.
Once that's complete, we iterate over the list once more to write the data into the XML file. Here's the code that shows the use of write() :
Running this code will produce a file named coordinates.xml in the current directory.
- Writing XML Files with xml.etree.ElementTree
The default xml.etree.ElementTree module can be used to store data as XML and convert it to a string so it can be written to a file.
Our first step is to create the root element. We then iterate over the columns and rows of the DataFrame, adding them as elements and sub-elements in the ElementTree. Then we convert the ElementTree object's data into a binary string using the tostring() method.
As the XML data is a binary string, we decode it into UTF-8 before writing it into the file.
The following code uses xml.etree.ElementTree to write a DataFrame as an XML file:
Like before, running this script will create a coordinates.xml file with the expected output.
- Writing XML Files with lxml
Using lxml is similar to how we used xml.etree.ElementTree . We begin by creating an etree object with the root element of the file we're creating. We then iterate over the DataFrame, adding columns and rows as elements and sub-elements of the tree. Lastly, we use the tostring() method to get the etree as a binary string. We write the file after decoding the binary string into UTF-8.
Here is the code to write DataFrame as XML using lxml :
Upon successful completion, you will see the coordinates.xml with the XML coordinates.
This tutorial shows various ways we can read and write XML data with Pandas DataFrames. You can read data with the built-in xml.etree.ElementTree module, as well as two third-party modules: lxml and xmltodict .
For writing a Pandas DataFrame to an XML file, we have used conventional file write() with lists, the xml.etree.ElementTree module, and lxml . Given that manipulating XML strings directly to write a file is more prone to human error, xml.etree.ElementTree and lxml are the preferable solutions for exporting a DataFrame to XML.
You might also like...
- Dimensionality Reduction in Python with Scikit-Learn
- How to Get the Max Element of a Pandas DataFrame - Rows, Columns, Entire DataFrame
Improve your dev skills!
Get tutorials, guides, and dev jobs in your inbox.
No spam ever. Unsubscribe at any time. Read our Privacy Policy.
Freelance Python Developer
In this article

Building Your First Convolutional Neural Network With Keras
Most resources start with pristine datasets, start at importing and finish at validation. There's much more to know. Why was a class predicted? Where was...

Data Visualization in Python with Matplotlib and Pandas
Data Visualization in Python with Matplotlib and Pandas is a course designed to take absolute beginners to Pandas and Matplotlib, with basic Python knowledge, and...
© 2013- 2024 Stack Abuse. All rights reserved.
fullstackdn
Fullstack Developer Network
- XML File Manipulation in Python: A Comprehensive Guide
Introduction:
XML (Extensible Markup Language) is a widely used data format for representing structured data. Python offers built-in libraries that make working with XML files straightforward. In this guide, we will cover the essential techniques and functions for XML file manipulation with practical examples.
Reading XML Files
To read data from an XML file, Python provides the xml.etree.ElementTree module. You can use the xml.etree.ElementTree.parse() function to read the contents of an XML file and convert it into an ElementTree object, which represents the XML structure.
Example: Reading an XML file using xml.etree.ElementTree
Suppose we have an XML file named data.xml with the following content:
Writing to XML Files
To write data to an XML file, you can use the xml.etree.ElementTree module to create XML elements and structure, and then use the xml.etree.ElementTree.ElementTree() function to write it to the file.
Example: Writing to an XML file using xml.etree.ElementTree
Modifying XML Files
Modifying XML files typically involves reading the data, making changes to the ElementTree object, and then writing the updated ElementTree back to the XML file.
Example: Modifying an XML file
Suppose we want to add a new person to the existing XML file data.xml :
Handling XML File Exceptions
When working with XML files, it’s essential to handle potential exceptions, such as file not found or permission errors. You can use try and except blocks to catch and handle these exceptions.
Example: Handling XML file exceptions
XML file manipulation is a common task in working with structured data in Python. In this guide, we covered how to read, write, append, and modify XML files using the xml.etree.ElementTree module. Additionally, we discussed handling XML file exceptions to ensure smooth execution of your Python scripts. Armed with this knowledge, you can confidently work with XML data and files and perform data processing tasks using Python.
Share this:
FullstackDN
Leave a Reply Cancel reply
As a passionate and dedicated full-stack developer, I thrive on crafting innovative and user-friendly solutions that seamlessly integrate the front-end and back-end aspects of web development. With expertise in a wide range of programming languages, frameworks, and databases, I take pride in turning ideas into functional and visually appealing applications. Whether it’s designing intuitive user interfaces or building robust server-side logic, I am constantly seeking opportunities to embrace new technologies and best practices. My goal is to contribute my skills to meaningful projects, collaborating with diverse teams to deliver cutting-edge software that positively impacts users worldwide.
Recent Posts
- Context Managers in Python: A Comprehensive Guide
- PDF File Manipulation in Python: A Comprehensive Guide
- JSON File Manipulation in Python: A Comprehensive Guide
- Excel File Manipulation in Python: A Comprehensive Guide using Pandas
Type your email…
Discover more from fullstackdn
Subscribe now to keep reading and get access to the full archive.
Continue reading
Python XML File – How to Read, Write & Parse
What is XML?
XML stands for eXtensible Markup Language. It was designed to store and transport small to medium amounts of data and is widely used for sharing structured information.
Python enables you to parse and modify XML documents. In order to parse XML document, you need to have the entire XML document in memory. In this tutorial, we will see how we can use XML minidom class in Python to load and parse XML files.
How to Parse XML using minidom
We have created a sample XML file that we are going to parse.
Step 1) Create Sample XML file
Inside the file, we can see the first name, last name, home, and the area of expertise (SQL, Python, Testing and Business)

Step 2) Use the parse function to load and parse the XML file
Once we have parsed the document, we will print out the “node name” of the root of the document and the “ firstchild tagname” . Tagname and nodename are the standard properties of the XML file.

- Import the xml.dom.minidom module and declare file that has to be parsed (myxml.xml)
- This file carries some basic information about an employee like first name, last name, home, expertise, etc.
- We use the parse function on the XML minidom to load and parse the XML file
- We have variable doc and doc gets the result of the parse function
- We want to print the nodename and child tagname from the file, so we declare it in print function
- Run the code- It prints out the nodename (#document) from the XML file and the first child tagname (employee) from the XML file
Nodename and child tagname are the standard names or properties of an XML dom.
Step 3) Call the list of XML tags from the XML document and printed out
Next, We can also call the list of XML tags from the XML document and printed out. Here we printed out the set of skills like SQL, Python, Testing and Business.

- Declare the variable expertise, from which we going to extract all the expertise name employee is having
- Use the dom standard function called “getElementsByTagName”
- This will get all the elements named skill
- Declare loop over each one of the skill tags
- Run the code- It will give list of four skills
How to Write XML Node
We can create a new attribute by using the “createElement” function and then append this new attribute or tag to the existing XML tags. We added a new tag “BigData” in our XML file.
- You have to code to add the new attribute (BigData) to the existing XML tag
- Then, you have to print out the XML tag with new attributes appended with the existing XML tag

- To add a new XML and add it to the document, we use code “doc.create elements”
- This code will create a new skill tag for our new attribute “Big-data”
- Add this skill tag into the document first child (employee)
- Run the code- the new tag “big data” will appear with the other list of expertise
XML Parser Example
Python 2 Example
Python 3 Example
How to Parse XML using ElementTree
ElementTree is an API for manipulating XML. ElementTree is the easy way to process XML files.
We are using the following XML document as the sample data:
Reading XML using ElementTree:
we must first import the xml.etree.ElementTree module.
Now let’s fetch the root element:
Following is the complete code for reading above xml data
Python enables you to parse the entire XML document at one go and not just one line at a time. In order to parse XML document you need to have the entire document in memory.
- To parse XML document
- Import xml.dom.minidom
- Use the function “parse” to parse the document ( doc=xml.dom.minidom.parse (file name);
- Call the list of XML tags from the XML document using code (=doc.getElementsByTagName( “name of xml tags”)
- To create and add new attribute in XML document
- Use function “createElement”
- Online Python Compiler (Editor / Interpreter / IDE) to Run Code
- PyUnit Tutorial: Python Unit Testing Framework (with Example)
- How to Install Python on Windows [Pycharm IDE]
- Hello World: Create your First Python Program
- Python Variables: How to Define/Declare String Variable Types
- Python Strings: Replace, Join, Split, Reverse, Uppercase & Lowercase
- Python TUPLE – Pack, Unpack, Compare, Slicing, Delete, Key
- Dictionary in Python with Syntax & Example
We Love Servers.
- WHY IOFLOOD?
- BARE METAL CLOUD
- DEDICATED SERVERS
Python XML Handling | Guide (With Examples)
Are you finding it challenging to navigate the labyrinth of XML data in Python? You’re not alone. Many developers find themselves in a maze when it comes to handling XML files in Python, but we’re here to help.
Think of Python’s XML handling as a skilled librarian – it can help you navigate through a maze of XML data, providing a versatile and handy tool for various tasks.
In this guide, we’ll walk you through the process of parsing and generating XML files using Python , from their creation, manipulation, and usage. We’ll cover everything from the basics of XML parsing to more advanced techniques, as well as alternative approaches.
Let’s get started!
TL;DR: How Do I Work with XML Files in Python?
Python provides several libraries for parsing and generating XML files, including the built-in xml.etree.ElementTree module. Here’s a simple example of parsing an XML file:
In this example, we import the xml.etree.ElementTree module as ET . We then parse the ‘example.xml’ file and get the root of the XML tree. Finally, we print the tag of the root element, which in this case is ‘root_element’.
This is a basic way to parse XML files in Python, but there’s much more to learn about XML parsing and generation. Continue reading for more detailed explanations and advanced usage examples.
Table of Contents
Parsing XML Files in Python: A Beginner’s Guide
Advanced xml parsing techniques with python, exploring alternative libraries for xml in python, troubleshooting xml handling in python, understanding xml and its comparison to other data formats, exploring dom and sax parsing models, integrating xml parsing into larger python projects, wrapping up: mastering xml parsing and generation in python.
Python offers a variety of libraries for parsing XML files, but one of the most straightforward and beginner-friendly is the built-in xml.etree.ElementTree module. This module treats an XML document as a tree of elements, making it intuitive to navigate and manipulate the data.
Here’s a simple step-by-step guide on how to parse an XML file using xml.etree.ElementTree :
In this example, we first import the xml.etree.ElementTree module as ET . We then parse the ‘example.xml’ file and get the root of the XML tree. Finally, we print the tag of the root element, which in this case is ‘root_element’.
Pros and Cons of Using xml.etree.ElementTree
Like all tools, xml.etree.ElementTree has its strengths and weaknesses. On the plus side, it’s built into Python, so you don’t need to install any additional packages. It also treats the XML document as a tree, which can be more intuitive than other models of XML parsing.
On the downside, xml.etree.ElementTree isn’t as powerful or flexible as some other XML parsing libraries. For example, it doesn’t support XPath expressions, which can be a more efficient way to navigate an XML document. We’ll explore some of these more advanced techniques in the next section.
As you become more comfortable with XML parsing in Python, you might find yourself needing more powerful tools. One such tool is XPath, a language for navigating XML documents.
XPath expressions can be used with the xml.etree.ElementTree module to find specific elements or attributes. Here’s an example:
In this example, the XPath expression ‘.//child’ finds all ‘child’ elements in the XML document. We then print the tag and text of each ‘child’ element.
Generating XML Files with Python
Python’s xml.etree.ElementTree module can also be used to generate XML files. Here’s a simple example:
In this example, we first create the root element and a child element. We then set the text of the child element, create an ElementTree object, and write the XML document to a file.
Pros and Cons of Advanced XML Parsing Techniques
Advanced XML parsing techniques like XPath can provide more efficient and flexible ways to navigate XML documents. However, they also have a steeper learning curve and can be overkill for simple tasks. Similarly, generating XML files with Python can be a powerful tool, but it requires a good understanding of both the XML format and Python’s XML libraries.
While xml.etree.ElementTree is a powerful tool for XML parsing and generation, Python offers other libraries that provide additional features and flexibility. Two such libraries are lxml and xml.dom.minidom .
The Power of lxml
lxml is a library for processing XML and HTML in Python. It’s compatible with xml.etree.ElementTree , but adds some powerful features like XPath 1.0 support, XSLT 1.0 support, and more.
Here’s an example of parsing an XML file with lxml :
In this example, we use the lxml.etree module to parse an XML file and find all ‘child’ elements with an XPath expression.
Navigating XML with xml.dom.minidom
xml.dom.minidom is another Python library for parsing XML documents. It implements the Document Object Model (DOM), a standard for navigating XML and HTML documents.
Here’s an example of parsing an XML file with xml.dom.minidom :
In this example, we use the xml.dom.minidom.parse function to parse an XML file. We then use the getElementsByTagName method to get all ‘child’ elements and print their tags and text.
Choosing the Right Library
Choosing the right library for XML parsing in Python depends on your needs. If you want a simple, intuitive interface, xml.etree.ElementTree might be the right choice. If you need more powerful features like XPath and XSLT support, lxml could be a better fit. If you prefer the DOM model for navigating XML documents, xml.dom.minidom might be the best choice. Ultimately, the best tool is the one that fits your needs and workflow.
XML parsing and generation in Python is generally straightforward, but you may encounter some common issues. Two of the most common are handling namespaces and dealing with malformed XML files.
Handling Namespaces
Namespaces in XML are a way of avoiding element name conflicts. They can be tricky to handle, but Python’s XML libraries provide ways to manage them. Here’s an example using xml.etree.ElementTree :
In this example, we first parse an XML string with a namespace. We then define the namespace and use an XPath expression with the namespace to find the ‘child’ element.
Dealing with Malformed XML Files
Malformed XML files can cause errors when parsing. Python’s XML libraries raise specific exceptions for these cases, which can be caught and handled. Here’s an example:
In this example, we try to parse a malformed XML file. When the ET.parse function raises a ParseError , we catch it and print an error message.
XML, or Extensible Markup Language, is a widely used data format. It’s similar to HTML in its use of tags, but unlike HTML, XML allows you to define your own tags. This makes it a flexible and powerful tool for storing and exchanging data.
In comparison to other data formats like JSON or CSV, XML offers a few distinct advantages. It’s human-readable and machine-readable, supports complex nested data structures, and allows for the use of namespaces to avoid element name conflicts.
However, XML is also more verbose than JSON or CSV, which can lead to larger file sizes. It also requires a parser to read and write data, whereas JSON and CSV can be read and written with standard text editors.
When it comes to parsing XML files in Python, you’ll typically use one of two models: DOM (Document Object Model) or SAX (Simple API for XML).
Understanding the DOM Model
The DOM model treats an XML document as a tree of nodes or elements. This makes it easy to navigate and manipulate the document, but it also means that the entire document needs to be loaded into memory, which can be a problem for large files.
Here’s a simple example of parsing an XML file with the DOM model using the xml.dom.minidom module:
Understanding the SAX Model
The SAX model, on the other hand, treats an XML document as a stream of elements. This makes it more memory-efficient than the DOM model, but it also makes the document harder to navigate and manipulate.
Here’s a simple example of parsing an XML file with the SAX model using the xml.sax module:
In this example, we define a handler class with methods for handling the start and end of elements. We then create a parser, set the handler, and parse the XML file.
The skills of parsing and generating XML files in Python can be applied to a wide range of larger projects. Two common applications are web scraping and data analysis.
XML Parsing in Web Scraping
Web scraping is the process of extracting data from websites. Many websites use XML (or HTML, which is a type of XML) to structure their data, so knowing how to parse XML can be a crucial skill for web scraping.
For example, you could write a Python script that uses the requests library to download an XML sitemap from a website, then uses xml.etree.ElementTree to parse the sitemap and extract the URLs of all the pages on the site.
XML Parsing in Data Analysis
XML is also a common format for data files, especially in fields like bioinformatics. If you’re analyzing data in Python, you might need to parse XML files to extract the data you need.
For example, you could write a Python script that uses xml.etree.ElementTree to parse an XML file of gene expression data, then uses a library like pandas or numpy to analyze the data.
Exploring Related Topics
Once you’re comfortable with XML parsing and generation in Python, there are many related topics you could explore. Two suggestions are JSON parsing and web scraping with BeautifulSoup.
JSON (JavaScript Object Notation) is a lightweight data-interchange format that’s easy to read and write. It’s similar to XML, but less verbose and easier to work with in many cases. Python’s json module provides tools for parsing and generating JSON data.
BeautifulSoup is a Python library for parsing HTML and XML documents. It’s often used for web scraping, and provides a more flexible and powerful interface than xml.etree.ElementTree .
Further Resources for Mastering XML in Python
If you’re interested in learning more about XML parsing and generation in Python, here are some resources you might find helpful:
- Python JSON Mastery: Step-by-Step – Learn about JSON data validation and data structure integrity.
Excel Data Handling with Python’s openpyxl – Dive into the details of reading, writing, and modifying Excel spreadsheets.
Python YAML Processing: Techniques and Examples – Dive into the world of YAML parsing and data manipulation in Python.
Official Documentation for Python’s ‘xml.etree.ElementTree’ module for XML processing.
Official Documentation for ‘lxml’ Library – Consult ‘lxml’ library’s official documentation to learn about its features and applications in Python.
Also consider BeautifulSoup Library’s Official Documentation for comprehensive understanding of HTML and XML parsing in Python.
In this comprehensive guide, we’ve explored the ins and outs of working with XML files in Python, from parsing to generation, and everything in between.
We started with the basics, learning how to parse XML files using Python’s built-in xml.etree.ElementTree module. We then dove deeper, exploring advanced techniques like XPath expressions and XML generation. We also ventured into alternative approaches, examining libraries like lxml and xml.dom.minidom and their unique strengths.
Along the way, we tackled common challenges you might encounter when working with XML in Python, such as handling namespaces and dealing with malformed XML files, providing you with practical solutions and examples for each issue.
We also delved into the fundamentals of XML, comparing it to other data formats and discussing the DOM and SAX parsing models. And we looked at how XML parsing and generation fit into larger Python projects, such as web scraping and data analysis.
Here’s a quick comparison of the methods and libraries we’ve discussed:
Whether you’re just starting out with XML in Python or you’re looking to level up your skills, we hope this guide has given you a deeper understanding of XML parsing and generation in Python.
With its balance of simplicity and power, Python is a fantastic tool for working with XML. Now, you’re well equipped to handle any XML tasks that come your way. Happy coding!
About Author

Gabriel Ramuglia
Gabriel is the owner and founder of IOFLOOD.com , an unmanaged dedicated server hosting company operating since 2010.Gabriel loves all things servers, bandwidth, and computer programming and enjoys sharing his experience on these topics with readers of the IOFLOOD blog.
Related Posts

- Data Automation
- ETL Solution
- Data Extraction
- EDI Software
- Integrations
- Data Ingestion
- Data Integration
- Data Transformation
- Database Replication
- Data Enrichment
- Get Started →
- Request a demo
Our AI experts will help find the right solution for you
- parsing & processing

Learn how Nanonets can help automate your business
- PARTNERSHIPS
- Get Started For Free
- Request a Demo
XML Parsing with Python: Mastering Mini DOM, ElementTree, SAX, and More
From ordering groceries through Instamart and wardrobe shopping in Myntra to booking vacations on MakemyTrip, websites have become indispensable in this decade! Ever wondered how these websites display information to customers in an easily-interpretable way and also process and interact with the data in the backend?
There are certain file formats that bridge this gap, being interpretable to both machine language and humans. One such widely used format is XML, which stands short for Extensible Markup Language.
What are XML files, and how do we use them?
XML files are used to store and transport data between clients and servers. It allows us to define the data in a structured format through tags, attributes, and values. One of the main advantages of XML is its flexibility. It can be used to represent data in many formats and easily adapted to new uses. This makes it a popular choice for applications such as web services, data exchange, and configuration files.In this article, I’ll take you through the different methods in python to parse an XML file with a practical example.
Are you looking for automate XML Parsing? Try Nanonets automated workflows. Start your free trial now.
While parsing XML files can be a meticulous task, especially when dealing with high volumes, Nanonets offers a streamlined solution where manual parsing becomes a thing of the past. With Nanonets, you can effortlessly integrate your parsing tasks into automated workflows, connecting to your apps and data for a seamless experience. This not only reduces errors but also frees up valuable time. Ready to revolutionize your XML parsing process? Head over to our Workflow Automation platform and discover the power of automation integrated with AI. Learn more at Nanonets' Workflow Automation .
Understanding the structure of XML files
Before we dive into the details of how to parse XML files, let’s first understand the different parts of an XML document. In XML, an element is a fundamental building block of a document that represents a structured piece of information. The element’s content has to be enclosed between an opening tag and a closing tag always as shown below.
<title>Harry Potter and the Sorcerer's Stone</title>
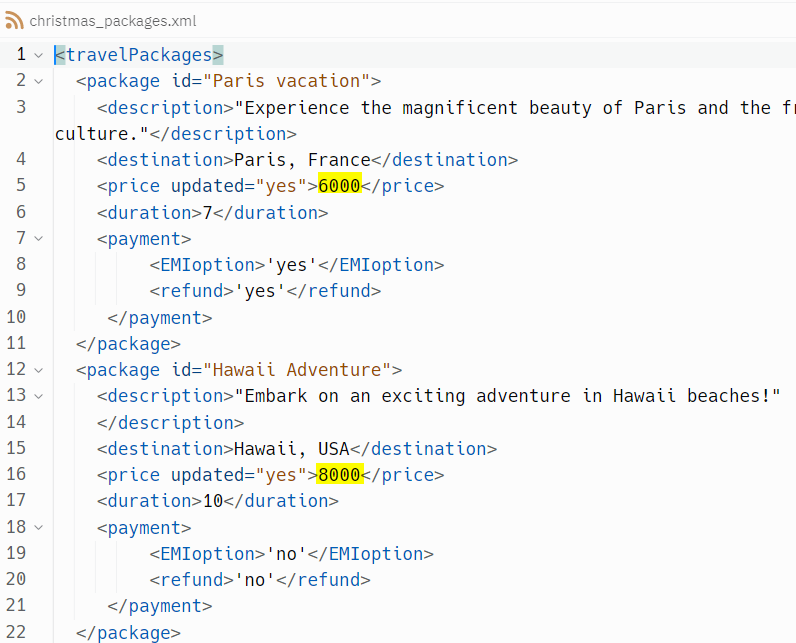
I’ll be using an example file, “travel_pckgs.xml,” which contains details of the different tour packages offered by a company. I’ll continue to use the same file throughout the blog for clarity.
The file has data of 4 tour packages, with details of destination, description, price and payment options provided by an agency. Let’s look at the breakdown of the different parts of the above XML:
- Root Element: The topmost level element is referred as the root, which is <travelPackages> in our file. It contains all the other elements( various tours offered)
- Attribute: ‘id’ is the attribute of each <package> element in our file. Note that the attribute has to have unique values (‘Paris vacation’, ‘Hawaii Adventure’, etc) for each element. The attribute and its value is usually mentioned inside the start tag as you can see.
- Child Elements : The elements wrapped inside the root are the child elements. In our case, all the <package> tags are child elements, each storing details about a tour package.
- Sub-Elements: A child element can have more sub-elements inside its structure. The <package> child element has sub-elements <description>, <destination>, <price>, <duration> and <payment> . The advantage of XML is that it allows you to store hierarchical information through multiple nested elements. The <payment> sub-element further has sub-elements <EMIoption> and <refund> , which denote whether a particular package has ‘pay through EMI’ and refund options or not.
Tip: You can create a Tree view of the XML file to gain a clear understanding using this tool . Check out the hierarchical tree view of our XML file!

Great! We want to read the data stored in these fields, search for, update, and make changes as needed for the website, right? This is called parsing, where the XML data is split into pieces and different parts are identified.
There are multiple ways to parse an XML file in python with different libraries. Let’s dive into the first method!
Try Nanonets to parse XML files. Start your free trial without any credit card details.
Using Mini DOM to parse XML files
I’m sure you would have encountered DOM (Document Object Model), a standard API for representing XML files. Mini DOM is an inbuilt python module that minimally implements DOM.
How does mini DOM work?
It loads the input XML file into memory, creating a tree-like structure “DOM Tree” to store elements, attributes, and text content. As XML files also inherently have a hierarchical-tree structure, this method is convenient to navigate and retrieve information.
Let’s see how to import the package with the below code. You can parse the XML file using xml.dom.minidom.parse() function and also get the root element.
The output I got for the above code is:
Let’s say I want to print each package's place, duration, and price.
The getAttribute() function can be used to retrieve the value of an attribute of an element.
If you want to access all the elements under a particular tag, use the getElementsByTagName() method and provide the tag as input. The best part is that getElementsByTagName() can be used recursively, to extract nested elements.
The output of the above code is shown here, with the ID, description text, and price values of each package extracted and printed.
Minidom parser also allows us to traverse the DOM tree from one element to its parent element, its first child element, last child, and so on. You can access the first child of the <package> element using the firstChild attribute. The extracted child element’s node name and value can also be printed through nodeName and nodeValue attributes as shown below.
You can verify that ‘description’ is the first child element of <package>. There’s also an attribute called childNodes that will return all the child elements present inside the current node. Check the below example and its output.
Similar to this, minidom provides more ways to traverse like parentNode, lastChild nextSibling, etc. You can check all the available functions of the library here .
Automate XML parsing Nanonets. Start your free trial today . No credit card is required.
Using ElementTree Library to parse XML files
ElementTree is a widely used built-in python parser that provides many functions to read, manipulate and modify XML files. This parser creates a tree-like structure to store the data in a hierarchical format.
Let’s start by importing the library and calling our XML file's parse() function. You can also provide the input file in a string format and use the fromstring() function. After we initialize a parsed tree, we can use get root () function to retrieve the root tag as shown below.
The root tag ‘travelPackages’ is extracted!
Let’s say now we want to access all the first child tags of the root. We can use a simple for loop and iterate over it, printing the child tags like destination, price, etc...Note that if we had specified an attribute value inside the opening tag of the description, the parentheses wouldn't be empty. Check out the below snippet!
Alternatively, the iter() function can help you find any element of interest in the entire tree. Let’s use this to extract the descriptions of each tour package in our file. Remember to use the ‘text’ attribute to extract the text of an element.
While using ElementTree, the basic for loop is pretty powerful to access the child elements. Let’s see how.
Parsing XML files with a for loop
You can simply iterate through the child elements with a for loop, extracting the attributes as shown below.
To handle complex querying and filtering, ElementTee has the findall() method. This method lets you access all the child elements of the tag passed as parameters. Let’s say you want to know the tour packages that are under $4000, and also have EMIoption as ‘yes’. Check the snippet.
We basically iterate over packages through root.findall('package') and then extracts the price and refund with find() method. After this, we check the constraints and filter out the qualified packages that are printed below.
Paris vacation
Andaman Island Retreat
Using ElementTree, you can easily modify and update the elements and values of the XML file, unlike miniDOM and SAX. Let’s check how in the next section.
How to modify XML files with ElementTree?
Let’s say it is time for the Christmas holidays and the agency wants to double the package costs. ElementTree provides a set() function, which we can use to update the values of elements. In the below code, I have accessed the price of each package through iter() function and manipulated the prices. You can use the write() function to write a new XML file with updated elements.
You should be able to find an output file like the one in the below image. If you recall, the prices for Paris Vacation and Hawaii Adventure are $3000 and $4000 in the original file.
But, what if we want to add a new tag <stay> to the Andaman package to denote that the stay offered is ‘Premium private villa’. The SubElement() function of ElementTree lets us add new subtags as per need, as demonstrated in the below snippet. You should pass the element you want to modify and the new tag as parameters to the function.
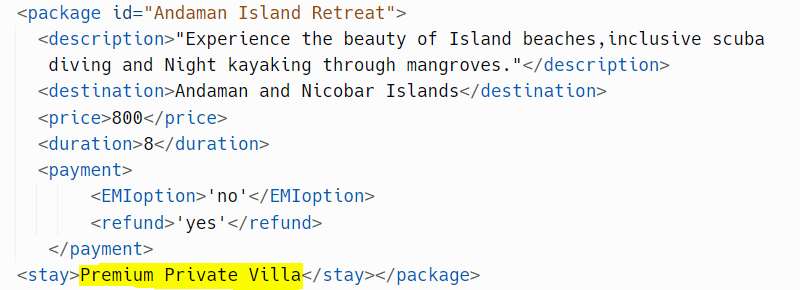
Hope you got the results too! The package also provides pop() function, through which you can delete attributes and subelements if they are unnecessary.
Simple API for XML (SAX)
SAX is another python parser, which overcomes the shortcoming of miniDOM by reading the document sequentially. It does not load the entire tree into its memory, and also allows you to discard items, reducing memory usage.
First, let us create a SAX parser object and register callback functions for the different events that you want to handle in the XML document. To do this, I define a custom TravelPackageHandler class as shown below by sub-classing SAX’s ContentHandler.
In the above snippet, the startElement(), characters(), and endElement() methods are used to extract the data from the XML elements and attributes. As the SAX parser reads through the document, it triggers the registered callback functions for each event that it encounters. For example, if it encounters the start of a new element, it calls the startElement() function. Now, let’s use our custom handler to get the various package IDs parsing our example XML file.
Output >>
Package: Paris vacation
Package: Hawaii Adventure
Package: Italian Getaway
Package: Andaman Island Retreat
SAX can be used for large files and streaming due to its efficiency. But, it is inconvenient while working with deeply nested elements. What if you want to access any random tree node? As it doesn’t support random access, the parser will have to read through the entire document sequentially to access a specific element.
Sync all your double entries with Nanonets. Keep all your accounts balanced, 24x7. Set up your accounting processes in <15 minutes. See how .
Streaming Pull Parser for XML
This is the pulldom Python library that provides a streaming pull parser API with a DOM-like interface.
How does it work?
It processes the XML data in a "pull" manner. That is, you explicitly request the parser to provide the next event (e.g., start element, end element, text, etc.) in the XML data.
The syntax is familiar to what we have seen in the previous libraries. In the below code, I demonstrate how to import the library and use it to print the tours which have a duration of 4 days or more, and also provide a refund on cancellation.
You should get output like:
Duration: 7
Refund: yes
Duration: 8
Check the results! The pull parser combines a few features from miniDOM and SAX, making it relatively efficient.
I’m sure you have a good grasp of the various parsers available in python by now. Knowing when to choose which parser to save time and resources is equally important. Among all the parsers we saw, ElementTree provides maximum compatibility with XPath expressions that help perform complex queries. Minidom has an easy-to-use interface and can be chosen for dealing with small files, but is too slow in case of large files. At the same time, SAX is used in situations where the XML file is constantly updated, as in the case of real-time Machine learning.
One alternative to parse your files is using automate parsing tools like Nanonets. Nanonets can help you extract data from any kind of document in seconds without writing a single line of code.
O ptimize your business performance, save costs and boost growth. Find out how Nanonets' use cases can apply to your product.
Related content

- Residential Dashboard
- Data Center & ISP Dashboard
Residential Proxies
Ethical residential proxies for all of your data needs.
Data Center IPs
Unlimited bandwidth and unlimited connections.
Mobile Proxies
Get the best rotating mobile proxies for web scraping!
ISP Proxies
The authority of residential meets the speed of data center.
Scraping Robot
Scrape websites into JSON with ease!
Rotating ISP Proxies
Learn more about our newest beta product.
All Products
Click here to compare our products on price, speed, and authority for all use cases.
Residential Pricing
Isp proxies pricing, data center pricing, mobile pricing.
Get the best rotating mobile proxies for web scraping.
Get A Custom Package
Connect with our sales team to find a price that works for you!
See All Pricing
Use our pricing calculator to identify the right mix of products for your use case.
How we build proxies fit for the Fortune 500.

Why we've rebranded from Blazing SEO to Rayobyte.
A leading source of proxy and scraping information.
Learn how to get started with proxies for any use case.
Knowledge Base
Learn the ins and outs of Rayobyte proxies.
Make money at home through the Rayobyte affiliate program.
API Documentation
Our easy-to-use world-class API puts the power in developers' hands.
Why we do what we do.
Law Enforcement Inquiries
Are you a member of Law Enforcement seeking records for investigations related to a Rayobyte user?

Support Ukraine
Ukraine Support Campaign 2024
Working With XML in Python: A Guide to Python XML Parsers
Table of contents.
As a Python developer, you’ll likely need to find a way to parse an Extensible Markup Language (XML) document. They’ve been a cornerstone of exchanging data between systems for years. Python’s rich ecosystem of tools and libraries offers a lot of support for XML manipulation.
This guide explores XML and the different options for creating XML with Python and navigating the document. Ultimately, you’ll better understand how to work with different XML parsers from the Python Standard Library and where you can tap into third-party libraries.

What Is XML?

An XML is a structured data format containing tags defining elements and how they relate to one another within the document. Elements typically have attributes along with additional text and other details. One of the benefits of using XML is they’re readable to both machines and humans. It’s why they’ve become a popular way to set up structured information for different contexts like:
- Web Services
- Configuration files
- Data interchange
XML is best suited for storing and transporting small to medium data stores. One of the great things about Python, and programming in general, is that there’s always more than one way to accomplish a task. All the options explored in this road map let you create an XML with Python and store it in memory for parsing.
Parsing an XML Document

Below is a simple example of an XML document. It represents an online record store with two albums. Each album entry contains the following elements:
- <title>
- <artist>
- <price>
XML example
<recordstore>
<record>
<title>Spring is Here</title>
<artist>John Doe</author>
<price>15.99</price>
</record>
<title>Fun Times in San Diego</title>
<author>Jane Smith</author>
<price>19.99</price>
</recordstore>
The hierarchal nature of the XML data format allows you to represent it as a tree, as in the example below.

This understanding is essential to using different functions available to create XML with Python.
Document Object Model
Below is an overview of how the DOM works.
- Load XML document: After you find a way to create an XML with Python, load the document into memory using a DOM parser.
- Navigate the XML document: Once you’ve loaded the XML, start navigating through the structure using the nodes. Common methods used include “getElementsByTagName” and “childNodes.”
- Access elements and attributes: You can access the content of elements and attributes using different DOM methods and properties.
- Manipulate the XML document: Add, remove, or modify elements and attributes within the DOM.
The DOM should be familiar to anyone who’s worked with web pages. Web browsers expose the DOM, which allows developers to manipulate HTML markup using languages like JavaScript. HTML and XML are both markup languages, which makes it possible to parse the DOM.
The structure of the DOM makes it the most straightforward and versatile way to work with markup code after creating an XML with Python. Standard operations allow you to move from one element to the next and change various objects. Keep in mind that the DOM gets parsed as a whole. Therefore, you must consider its size and ability to fit into available memory. That makes the DOM best suited for relatively large configuration files versus huge gigabyte XML databases.
DOM parsers are best for situations where memory and processing time are less important than convenience. For example, you may need to set up and parse a small XML file. In that case, creating an XML with Python and using a module from the language’s XML parser library is more effortless.
If time is a factor, there are more efficient options available. After creating an XML with Python, you can try more efficient methods of parsing XML documents.
Simple API for XML (SAX)

Simple API for XML, or SAX, is an event-driven approach to parsing XML. Java developers created the library as an alternative to the DOM. Instead of loading the entire document into memory after creating an XML with Python, SAX provides a more scalable way to work with and manipulate large documents.
It reads documents sequentially and generates events after encountering elements, text, or attributes. You can handle these events through a user-defined callback function, which makes SAX more customizable than working with the DOM.
How SAX works
Below is an overview of how SAX handles XML files:
- Initialization: After creating an XML with Python, you must set up and configure the SAX parser. Developers have control over defining callback functions for specific events like finding the start of an element or locating text content.
- Parsing: The SAX parser reads the entire XML document and generates events for occurrences of every element, attribute, and event.
- Event handling: When SAX encounters certain events, it invokes the specified user callback functions that access and process data.
- Completion: After completing the XML parsing , SAX is closed or disposed of while the application continues with data processing.
SAX processes elements in the XML document from top to bottom. The push parsing approach by SAX generates callbacks to handle specific XML nodes. You can also dispose of unnecessary elements, allowing SAX to leave a smaller memory footprint vs. DOM. Another benefit to using SAX is its ability to handle large files, which is helpful when performing functions like indexing or converting an XML to other formats.
Benefits of SAX
Here’s what you gain as a developer with SAX after you create an XML with Python.
- Memory efficient: There’s no need to load the entire XML into memory.
- Event-driven: SAX lets you work with specific parts of XML when they are encountered.
- Customizable: You can customize the parsing process by handling events through user-defined callback functions and logic.
- Streamable: As a streaming parser, SAX lets you process XML documents of any size without worrying about memory constraints.
- Speedier: Because there’s no need for an in-memory representation of an AXM document, SAX runs faster than DOM-based parsers.
One drawback to using SAX is the need to perform multiple passes on a file after creating an XML using Python. Every node gets tracked, making the process more cumbersome. It’s also harder for SAX to manage deeply nested elements. You can only perform read-only parsing with SAX.
While SAX is a great space and time saver, it has a steeper learning curve than DOM. However, it’s an excellent tool for creating an XML with Python and working with it in real time.
Using SAX with Python
Python provides developers with a SAX parser within its standard library within the “xml.sax” module. Below is an example of using SAX with Python after creating an XML document.
1. Define handler
import xml. sax
class DocHandler(xml.sax.ContentHandler):
def firstElement(self, name, attribs):
# Handles the start of an element
def lastElement(self, name):
# Handles the end of an element
def textContent(self, content):
# Handle text content
2. Create SAX parser
After creating an XML with Python, build an XML parser using the “xml.sax.make.parser()” function. Set your custom handler for the parser.
saxParser = xml.sax.make_parser()
# Set the custom handler
saxHandler = NewHandler()
parser.setXMLContentHandler(saxHandler)
3. Parse XML document
Use the SAX parser to parse your XML document. Set the source as the place you saved your file after creating an XML with Python. In addition to a file, you can point to a string or network stream.
with open(“sample.xml”, “r”) as new_xml_file:
parser.parse(new_xml_file)
3. Handle events
As the parser moves through the XML document, it handles events by calling methods from your custom handler class.
if name == “elementName”:
# Access and process element attributes (attribs)
# Handle the end of the specified element
def characters(self, content):
Streaming API for XML

While not as popular as SAX, StAX is another option for working with a document after creating an XML with Python. It was built as an alternative to the heaviness of the DOM. StAX also addresses SAX’s lack of ability to navigate backward through a document. Like SAX, StAX started as a Java-based API. Its success led to the creation of similar modules in other languages, including Python.
StAX allows you to read and write XML via streaming. That lets programmers efficiently process documents after creating an XML using Python and avoids the need to hold the contents in memory. StAX also allows for more convenient state management, which refers to holding onto information about an application’s stored inputs like variables or constants. Stream events are consumed when enabled, allowing for lazy evaluation, meaning StAX only calls a value when needed.
How StAX works
Streaming is key to how StAX functions. It doesn’t generate events like SAX. Instead, StAX processes documents in increments. After creating an XML with Python, you can read and write XML data as it’s encountered. It fits various needs, including parsing documents and creating an XML document in Python of any size.
Below is an overview of how StAX handles XML files:
- Initialization: After creating the StAX parser or writer, you configure the code to fit your requirements.
- Iterative processing: After creating an XML with Python, you can navigate the document sequentially without holding onto the file contents in memory.
- Event-driven handling: StAX comes with an event-driven model that allows developers to handle elements, attributes, and content as they come up.
- Forward and backward navigation: StAX parsers typically use methods allowing you to move back and forth within an XML document, making it versatile enough to cover various use cases.
Parsing an XML file with Python xml.etree.ElementTree to emulate StAX
You can leverage StAX capabilities using the “xml.etree.ElementTree” module from the Python Standard Library. Keep in mind that it’s not a true StAX representation. However, you can use streaming to parse and create XML with Python.
1. Import xml.etree.ElementTree
Add the import statement to bring in the module.
import xml.etree.ElementTree as ET
2. Create the parser
Below is an example of code designed to set up an element tree for parsing an XML file.
# Create an ElementTree object from parsing an XML file
XTree = ET.parse(“example.xml”)
# Find the root element of the XML document
root = xTree.getroot()
3. Iterate through each element
Write code allowing you to move through each XML element and access the information they hold.
for xElement in root:
print(f”Element Name: xElement.tag}”)
print(f”Element Text: {xElement.text}”)
4. Access relevant attributes
Set up a code block for moving through the attributes of each XML file element.
attribute_value = xElement.get(“attribute_name”)
print(f”Attribute Value: {attribute_value}”)
Creating an XML with Python
You can also create an XML with Python using the StAX capabilities in xml.etree.ElementTree. Use the following code example as a guide.
# Create a new ElementTree with a root element
root = ElTree.Element(“root_element”)
# Add any needed child elements
childElem1 = ElTree.SubElement(root, “child_element_1”)
childElem2 = ElTree.SubElement(root, “child_element_2”)
# Set the text content and related attributes
childElem1.text = “Text content for child element 1”
childElem2.set(“attribute_name”, “Attribute value for child element 2”)
# Create an ElementTree from the root element
xTree = ElTree.ElementTree(root)
# Save the XML to a file
xTree.write(“new_xml_file.xml”)
Exploring XML Parsers in the Python Standard Library

Python provides built-in XML parsers in almost every Python distribution. Let’s look at some available parsers from the Python standard library that you can use after creating an XML with Python.
xml.dom.minidom
The xml.dom.minidom represents a subset of standard DOM functionality, which allows you to use it for most XML-related tasks. It takes the DOM approach to parsing, meaning it holds XML contents in a treelike memory structure, letting you manipulate contents within the document.
Below is an overview of working with xml.dom.minidom after creating an XML file.
1. Import the module
Start by importing the xml.com.minidom module.
import xml.dom.minidom
2. Load and parse the XML file
Use the parseString method to parse XML from a string. The parse method is available for working directly with an XML file. You can find an example below using the Record Store XML file created earlier.
# Add a definition of the XML string
xml_string = “””
# Parse the XML string
dom = xml.dom.minidom.parseString(xml_string)
3. Work with XML elements and attributes
After parsing the XML file, you can work with any content. You can traverse the DOM tree and locate specific elements and related attributes.
# Locate and access the root element
root = dom.documentElement
print(“Root Element:”, root.tagName)
# Access specific elements and their content
records = root.getElementsByTagName(“record”)
for record in records:
title = record.getElementsByTagName(“title”)[0].firstChild.nodeValue
artist = record.getElementsByTagName(“record”)[0].firstChild.nodeValue
price = record.getElementsByTagName(“price”)[0].firstChild.nodeValue
print(f”Title: {title}, Author: {artist}, Price: {price}”)
The above example accesses the XML document’s root element with “dom.documentElement.” Next, “getElementByTagName” looks for specific elements and navigates the DOM to find the text content they contain.
4. Modify the XML document
You can also change and manipulate the XML document, similar to how you do when creating an XML with Python. Here’s an example of adding a new record to the XML file.
# Create a new record element
new_record = dom.createElement(“record”)
# Create child elements for the new record
new_title = dom.createElement(“title”)
new_title.appendChild(dom.createTextNode(“Music for Programmers”))
new_artist = dom.createElement(“artist”)
new_artist.appendChild(dom.createTextNode(“Giles Freeman”))
new_price = dom.createElement(“price”)
new_price.appendChild(dom.createTextNode(“18.99”))
# Append the child elements to the new book element
new_record.appendChild(new_title)
new_record.appendChild(new_artist)
new_record.appendChild(new_price)
# Append the new record element to the root element
root.appendChild(new_record)
5. Serilialize the XML
Once you finish working with the XML document, you can serialize it back to a string by calling the “toxm # Serialize the modified document to a string
modified_xml_string = dom.toxml()
print(modified_xml_string) l()” function.

You can work with SAX and Python using the parse() and parseString functions by importing the “xml.sax” package. One difference between “xml.sax” and “dom.documentElement” is that you must provide at least one argument representing a content handler instance. This is similar to Java in that you subclass a specific base class.
1. Import xml.sax
Start by importing the xml.sax package.
import xml.sax
2. Set up a custom SAX handler
You’ll need to create a custom SAX handler to process XML data. You do that by subclassing the “xml.sax.ContentHandler” class. It then overrides any methods corresponding to the events you wish to handle.
class MySaxHandler(xml.sax.ContentHandler):
def startSaxElement(self, name, attrib):
# Handle the start of an element
def endSaxElement(self, name):
# Handle the end of an element
3. Create the XML parser
Use the “xml.sax.make_parser()” function to create a SAX parser. From there, set your custom handler as the parser’s content handler.
# Create a SAX parser
parser = xml.sax.make_parser()
handler = MySaxHandler()
parser.setSaxContentHandler(handler)
4. Parse the XML document
Use the parser to work with the file after creating an XML with Python.
# Parse the XML file
- Handle the Events
You can call methods from your custom handler class to handle events while parsing the XML document.
if name == “element_name”:
xml.etree.ElementTree
This Python module allows you to parse and manage XML documents. It’s also handy when you need to create an XML with Python. It implements an XML API that uses the ElementTree API. You work with XML with a tree structure, similar to a DOM.
One of the benefits of using “xml.etree.ElementTree” is that it’s simple to use and doesn’t require extensive knowledge about parsing XML. Below is an overview of how to use the module to work with XML files.
1. Add the module
Import the “xml.etree.ElementTree” module.
2. Build an ElementTree
Use the ElementTree class to create an “ElementTree” object.
# Parse an XML file
elemTree = ET.ElementTree(file=sample.xml’)
# Get the root element of the XML document
root = elemTree.getroot()
3. Access elements and attributes
After parsing the XML document, you access the elements, attributes, and contents. The “xml.etree.ElementTree” module represents elements as objects. You can use methods to access the data, as shown in the example below.
# Access the root element
print(“Root Element:”, root.tag)
for record in root.findall(record):
title = record.find(‘title’).text
artist = record.find(artist).text
price = record.find(‘price’).text
In the above example, the find method lets you locate specific elements within the XML tree and access the content.
4. Modify and manipulate the XML file
Below is an example of using “xml.etree.ElementTree” to add a new record element to the XML.
# Create a new book element
new_book = ET.Element(“book”)
# Create child elements for the new book
new_title = ET.SubElement(new_record, “title”)
new_title.text = “Music for Programmers”
new_artist = ET.SubElement(new_record, “artist”)
new_artist.text = “Giles Freeman”
new_price = ET.SubElement(new_book, “price”)
new_price.text = “19.99”
root.append(new_record)
5. Serialize the XML document
Once you’re done modifying the XML, you can serialize it back to a string or write the file changes using the “ElementTree” class.
# Serialize the modified document to a string
modified_xml_string = ET.tostring(root)
# Save the modified document to a file
with open(‘modified.xml’, ‘wb’) as xml_file:
tree.write(xml_file)
Third-Party XML Parser Libraries
While Python has some robust parsers for creating an XML with Python and manipulating the data, you might want a parser with different capabilities. For example, you may need to validate the XML against a specific schema or work with more complicated XPath expressions. External libraries on PyPI allow you to do all that and more. Below are some you can explore.
- untangle : Provides a way to use one line of code to turn an XML document into a Python object.
- xmltodict : Lets you parse an XML and represent it as a Python library.
- lxml : This Python binding library is compatible with the Element Tree API. You can work with those capabilities and reuse your existing code by replacing the import statement.
Learn To Work With XML Files for Effective Web Scraping

Understanding how to work with XML on websites and other resources is essential for successful data collection. Creating XML with Python becomes much easier once you’re familiar with the ins and outs of XML. If you’re using Python to scrape websites, you also need to know how to use parsers capable of parsing XML. The right parser can make web scraping much easier and more convenient.
If you want to learn how to improve your web collection results, contact Rayobyte for a demonstration of our web scraping and proxy solutions.
The information contained within this article, including information posted by official staff, guest-submitted material, message board postings, or other third-party material is presented solely for the purposes of education and furtherance of the knowledge of the reader. All trademarks used in this publication are hereby acknowledged as the property of their respective owners.
Sign Up for our Mailing List
To get exclusive deals and more information about proxies.
Start a risk-free, money-back guarantee trial today and see the Rayobyte difference for yourself!
Related Posts
Residential proxies quick start guide, isp proxies quick start guide, a quick start guide for dedicated data center proxies, semi-dedicated data center proxies quick start guide.
XML parsing 

untangle is a simple library which takes an XML document and returns a Python object which mirrors the nodes and attributes in its structure.
For example, an XML file like this:
can be loaded like this:
and then you can get the child element’s name attribute like this:
untangle also supports loading XML from a string or a URL.
xmltodict 
xmltodict is another simple library that aims at making XML feel like working with JSON.
An XML file like this:
can be loaded into a Python dict like this:
and then you can access elements, attributes, and values like this:
xmltodict also lets you roundtrip back to XML with the unparse function, has a streaming mode suitable for handling files that don’t fit in memory, and supports XML namespaces.
xmlschema 
xmlschema provides support for using XSD-Schemas in Python. Unlike other XML libraries, automatic type parsing is available, so f.e. if the schema defines an element to be of type int , the parsed dict will contain also an int value for that element. Moreover the library supports automatic and explicit validation of XML documents against a schema.
This opinionated guide exists to provide both novice and expert Python developers a best practice handbook to the installation, configuration, and usage of Python on a daily basis.
O'Reilly Book
This guide is now available in tangible book form!

All proceeds are being directly donated to the DjangoGirls organization.
Translations
- Brazilian Portuguese
Table Of Contents
Related topics.
- Previous: Data Serialization
Quick search
©2011-2023 Kenneth Reitz & Real Python . CC BY-NC-SA 3.0
Parsing XML Files in Python – 4 Simple Ways
Problem formulation and solution overview.
This article will show you various ways to work with an XML file.
ℹ️ XML is an acronym for E x tensible M arkup L anguage. This file type is similar to HTML. However, XML does not have pre-defined tags like HTML. Instead, a coder can define their own tags to meet specific requirements. XML is a great way to transmit and share data, either locally or via the internet. This file can be parsed based on standardized XML if structured correctly.
To make it more interesting, we have the following running scenario:
Jan, a Bookstore Owner, wants to know the top three (3) selling Books in her store. This data is currently saved in an XML format.
💬 Question : How would we write code to read in and extract data from an XML file into a Python script ?
We can accomplish this by performing the following steps:
- Method 1 : Use xmltodict()
- Method 2 : Use minidom.parse()
- Method 3 : Use etree
Method 4: Use untangle.parse()
Method 1: use xmltodict().
This method uses the xmltodict() function to read an XML file, convert it to a Dictionary and extract the data.
In the current working directory, create an XML file called books.xml . Copy and paste the code snippet below into this file and save it.
In the current working directory, create a Python file called books.py . Copy and paste the code snippet below into this file and save it. This code reads in and parses the above XML file. If necessary, install the xmltodict library.
The first line in the above code snippet imports the xmltodict library. This library is needed to access and parse the XML file.
The following highlighted section opens books.xml in read mode ( r ) and saves it as a File Object, fp. If fp was output to the terminal, an object similar to the one below would display.
Next, the xmltodict.parse() function is called and passed one (1) argument, fp.read() , which reads in and parses the contents of the XML file. The results save to books_dict as a Dictionary , and the file is closed. The contents of books_dict are shown below.
The final highlighted section loops through the above Dictionary and extracts each book’s Title and Sales .
💡 Note : The \t character represents the <Tab> key on the keyboard.

Method 2: Use minidom.parse()
This method uses the minidom.parse() function to read and parse an XML file. This example extracts the ID, Title and Sales for each book.
This example differs from Method 1 as this XML file contains an additional line at the top ( <?xml version="1.0"?> ) of the file and each <book> tag now has an id (attribute) assigned to it.
In the current working directory, create an XML file called books2.xml . Copy and paste the code snippet below into this file and save it.
In the current working directory, create a Python file called books2.py . Copy and paste the code snippet below into this file and save it.
The first line in the above code snippet imports the minidom library. This allows access to various functions to parse the XML file and retrieve tags and attributes.
The first section of highlighted lines performs the following:
- Reads and parse the books2.xml file and saves the results to doc . This action creates the Object shown as (1) below.
- Retrieves the <storename> tag and saves the results to name . This action creates an Object shown as (2) below.
- Retrieves the <book> tag for each book and saves the results to books . This action creates a List of three (3) Objects: one for each book shown as (3) below.
The last section of highlighted lines loop through the books Object and outputs the results to the terminal.

Method 3: Use etree
This method uses etree to read in and parses an XML file. This example extracts the Title and Sales data for each book.
ℹ️ The etree considers the XML file as a tree structure. Each element represents a node of said tree. Accessing elements is done on an element level.
This example reads in and parses the books2.xml file created earlier.
The first line in the above code snippet imports the etree library. This allows access to all nodes of the XML <tag> structure.
The following line reads in and parses books2.xml . The results save as an XML Object to xml_data . If output to the terminal, an Object similar to the one below displays.
The following highlighted section uses a for loop to iterate through each <book> tag, extracting the <title> , <author> and <sales> tags for each book and outputting them to the terminal.
To retrieve the attribute of the <book> tag, run the following code.
This code extracts the id attribute from each <book> tag and outputs it to the terminal.
To extract the values, run the following code.
This method uses untangle.parse() to parse an XML string.
This example reads in and parses the books3.xml file shown below. If necessary, install the untangle library.
ℹ️ The untangle library converts an XML file to a Python object. This is a good option when you have a group of items, such as book names.
In the current working directory, create an XML file called books3.xml . Copy and paste the code snippet below into this file and save it. If necessary, install the untangle library.
In the current working directory, create a Python file called books3.py . Copy and paste the code snippet below into this file and save it.
The first line in the above code snippet imports the untangle library allowing access to the XML file structure.
The following line reads in and parses the books3.xml file. The results save to book_obj .
The next line calls the join() function and passes it one (1) argument: List Comprehension . This code iterates through and retrieves the name of each book and saves the results to books . If output to the terminal, the following displays:
The next line instantiates a for loop, iterates through each book name, and sends it to the terminal.

This article has shown four (4) ways to work with XML files to select the best fit for your coding requirements.
Good Luck & Happy Coding!
Programmer Humor – Blockchain
At university, I found my love of writing and coding. Both of which I was able to use in my career.
During the past 15 years, I have held a number of positions such as:
In-house Corporate Technical Writer for various software programs such as Navision and Microsoft CRM Corporate Trainer (staff of 30+) Programming Instructor Implementation Specialist for Navision and Microsoft CRM Senior PHP Coder
Designing an output capturer
Dear Python Experts.
There is a library that I run from my python script. This library dumps to the terminal text that I need to parse but the library does not offer a way to pick up the text, so I have to copy paste it myself in a text file.
I would like to build a mechanism that stores the text in some file that I can later parse, while also dumping it to the screen as it normally does. Chat GPT suggests something like:
so for every line that goes to the terminal I am moving back and forth between my OutputCapturer and the system stdout. Finally, I have to tell the system to restore the capture to the right capturer. This seems a little cumbersome. Is this the cleanest way to do what I need?
How exactly do you do this? The approach will be completely different for code that is import ed and used, versus code run in a subprocess, for example.
Did you try to check the documentation for any alternative approaches to get the output?
Normally, something that works by “dumping text to the terminal” is not considered a “library”. The point of a “library” is to provide functionality that can return the information back to your code.
This code makes very little sense, and you should not ask ChatGPT to try to write code for you. I mean really you should not use any AI to try to write code for you (only perhaps to offer suggestions in an IDE), but ChatGPT is not even designed for the task while certain other AIs are.
Thank you for your answer
The code is imported
Yes, there does not seem to be any. The particular output does not get stored anywhere. We are trying to move away from that library, However we are under time constraints and within our time frame we have to work with what we have.
HAHAHAHAHA yes, I do not trust it, I always try to understand it first. I am testing it and the thing I pasted above seems to work, but I think there must be a better way of doing this.
It would help to know which library this is?
Off the top of my head, it’s easy to capture output from subprocesses, either combining or separating stdout and stderr, using subprocess.run .
Otherwise, to do it all in the same Python process I’d have a play with contextlib.redirect_stdout :
Even if it works, the code you showed is extremely poor code. The weird dance inside the write() method is bizarre and pointless, and liable to cause problems. ChatGPT is a terrible source of program code; you will do far better to write the code yourself than to try to massage its nonsense into something useful.
Thanks for your answer. The library is ROOT, it is a C++ library but also has python bindings. We are trying to get the importance table from training a machine learning algorithm with:
https://root.cern/doc/master/classTMVA_1_1Factory.html
the documentation is also not very good.
What’s the return value from the call to TMVA::Factory::GetImportance ? The C++ code is indeed printing some information to stdout. But from a first glance very similar information to this (and more) is returned. Maybe it’s lost via the Python binding. But any method named GetSomething , ought to return something.
https://root.cern/doc/master/tmva_2tmva_2src_2Factory_8cxx_source.html#l02591
Hello James,
The return value is a pointer to a TH1 instance. These are instances of histograms, structures containing the value of something (bin content), for a specific value of something else (location of the bin). In this case, the function is taking the names of the features and the importances:
i.e. I need to have them already. The strange thing is that, this function seems to be reading the values from the C++ vectors, however they are not passed as const references (i.e. references that cannot be changed but only read) but instead the object itself is passed, making an unnecessary copy. Which does not tell me anything good about this code HAHAHAHAHA.
Related Topics
- Python »
- 3.14.0a0 Documentation »
- The Python Standard Library »
- File Formats »
- csv — CSV File Reading and Writing
- Theme Auto Light Dark |
csv — CSV File Reading and Writing 
Source code: Lib/csv.py
The so-called CSV (Comma Separated Values) format is the most common import and export format for spreadsheets and databases. CSV format was used for many years prior to attempts to describe the format in a standardized way in RFC 4180 . The lack of a well-defined standard means that subtle differences often exist in the data produced and consumed by different applications. These differences can make it annoying to process CSV files from multiple sources. Still, while the delimiters and quoting characters vary, the overall format is similar enough that it is possible to write a single module which can efficiently manipulate such data, hiding the details of reading and writing the data from the programmer.
The csv module implements classes to read and write tabular data in CSV format. It allows programmers to say, “write this data in the format preferred by Excel,” or “read data from this file which was generated by Excel,” without knowing the precise details of the CSV format used by Excel. Programmers can also describe the CSV formats understood by other applications or define their own special-purpose CSV formats.
The csv module’s reader and writer objects read and write sequences. Programmers can also read and write data in dictionary form using the DictReader and DictWriter classes.
The Python Enhancement Proposal which proposed this addition to Python.
Module Contents 
The csv module defines the following functions:
Return a reader object that will process lines from the given csvfile . A csvfile must be an iterable of strings, each in the reader’s defined csv format. A csvfile is most commonly a file-like object or list. If csvfile is a file object, it should be opened with newline='' . [ 1 ] An optional dialect parameter can be given which is used to define a set of parameters specific to a particular CSV dialect. It may be an instance of a subclass of the Dialect class or one of the strings returned by the list_dialects() function. The other optional fmtparams keyword arguments can be given to override individual formatting parameters in the current dialect. For full details about the dialect and formatting parameters, see section Dialects and Formatting Parameters .
Each row read from the csv file is returned as a list of strings. No automatic data type conversion is performed unless the QUOTE_NONNUMERIC format option is specified (in which case unquoted fields are transformed into floats).
A short usage example:
Return a writer object responsible for converting the user’s data into delimited strings on the given file-like object. csvfile can be any object with a write() method. If csvfile is a file object, it should be opened with newline='' [ 1 ] . An optional dialect parameter can be given which is used to define a set of parameters specific to a particular CSV dialect. It may be an instance of a subclass of the Dialect class or one of the strings returned by the list_dialects() function. The other optional fmtparams keyword arguments can be given to override individual formatting parameters in the current dialect. For full details about dialects and formatting parameters, see the Dialects and Formatting Parameters section. To make it as easy as possible to interface with modules which implement the DB API, the value None is written as the empty string. While this isn’t a reversible transformation, it makes it easier to dump SQL NULL data values to CSV files without preprocessing the data returned from a cursor.fetch* call. All other non-string data are stringified with str() before being written.
Associate dialect with name . name must be a string. The dialect can be specified either by passing a sub-class of Dialect , or by fmtparams keyword arguments, or both, with keyword arguments overriding parameters of the dialect. For full details about dialects and formatting parameters, see section Dialects and Formatting Parameters .
Delete the dialect associated with name from the dialect registry. An Error is raised if name is not a registered dialect name.
Return the dialect associated with name . An Error is raised if name is not a registered dialect name. This function returns an immutable Dialect .
Return the names of all registered dialects.
Returns the current maximum field size allowed by the parser. If new_limit is given, this becomes the new limit.
The csv module defines the following classes:
Create an object that operates like a regular reader but maps the information in each row to a dict whose keys are given by the optional fieldnames parameter.
The fieldnames parameter is a sequence . If fieldnames is omitted, the values in the first row of file f will be used as the fieldnames and will be omitted from the results. If fieldnames is provided, they will be used and the first row will be included in the results. Regardless of how the fieldnames are determined, the dictionary preserves their original ordering.
If a row has more fields than fieldnames, the remaining data is put in a list and stored with the fieldname specified by restkey (which defaults to None ). If a non-blank row has fewer fields than fieldnames, the missing values are filled-in with the value of restval (which defaults to None ).
All other optional or keyword arguments are passed to the underlying reader instance.
If the argument passed to fieldnames is an iterator, it will be coerced to a list .
Changed in version 3.6: Returned rows are now of type OrderedDict .
Changed in version 3.8: Returned rows are now of type dict .
Create an object which operates like a regular writer but maps dictionaries onto output rows. The fieldnames parameter is a sequence of keys that identify the order in which values in the dictionary passed to the writerow() method are written to file f . The optional restval parameter specifies the value to be written if the dictionary is missing a key in fieldnames . If the dictionary passed to the writerow() method contains a key not found in fieldnames , the optional extrasaction parameter indicates what action to take. If it is set to 'raise' , the default value, a ValueError is raised. If it is set to 'ignore' , extra values in the dictionary are ignored. Any other optional or keyword arguments are passed to the underlying writer instance.
Note that unlike the DictReader class, the fieldnames parameter of the DictWriter class is not optional.
The Dialect class is a container class whose attributes contain information for how to handle doublequotes, whitespace, delimiters, etc. Due to the lack of a strict CSV specification, different applications produce subtly different CSV data. Dialect instances define how reader and writer instances behave.
All available Dialect names are returned by list_dialects() , and they can be registered with specific reader and writer classes through their initializer ( __init__ ) functions like this:
The excel class defines the usual properties of an Excel-generated CSV file. It is registered with the dialect name 'excel' .
The excel_tab class defines the usual properties of an Excel-generated TAB-delimited file. It is registered with the dialect name 'excel-tab' .
The unix_dialect class defines the usual properties of a CSV file generated on UNIX systems, i.e. using '\n' as line terminator and quoting all fields. It is registered with the dialect name 'unix' .
Added in version 3.2.
The Sniffer class is used to deduce the format of a CSV file.
The Sniffer class provides two methods:
Analyze the given sample and return a Dialect subclass reflecting the parameters found. If the optional delimiters parameter is given, it is interpreted as a string containing possible valid delimiter characters.
Analyze the sample text (presumed to be in CSV format) and return True if the first row appears to be a series of column headers. Inspecting each column, one of two key criteria will be considered to estimate if the sample contains a header:
the second through n-th rows contain numeric values
the second through n-th rows contain strings where at least one value’s length differs from that of the putative header of that column.
Twenty rows after the first row are sampled; if more than half of columns + rows meet the criteria, True is returned.
This method is a rough heuristic and may produce both false positives and negatives.
An example for Sniffer use:
The csv module defines the following constants:
Instructs writer objects to quote all fields.
Instructs writer objects to only quote those fields which contain special characters such as delimiter , quotechar or any of the characters in lineterminator .
Instructs writer objects to quote all non-numeric fields.
Instructs reader objects to convert all non-quoted fields to type float .
Instructs writer objects to never quote fields. When the current delimiter occurs in output data it is preceded by the current escapechar character. If escapechar is not set, the writer will raise Error if any characters that require escaping are encountered.
Instructs reader objects to perform no special processing of quote characters.
Instructs writer objects to quote all fields which are not None . This is similar to QUOTE_ALL , except that if a field value is None an empty (unquoted) string is written.
Instructs reader objects to interpret an empty (unquoted) field as None and to otherwise behave as QUOTE_ALL .
Added in version 3.12.
Instructs writer objects to always place quotes around fields which are strings. This is similar to QUOTE_NONNUMERIC , except that if a field value is None an empty (unquoted) string is written.
Instructs reader objects to interpret an empty (unquoted) string as None and to otherwise behave as QUOTE_NONNUMERIC .
The csv module defines the following exception:
Raised by any of the functions when an error is detected.
Dialects and Formatting Parameters 
To make it easier to specify the format of input and output records, specific formatting parameters are grouped together into dialects. A dialect is a subclass of the Dialect class containing various attributes describing the format of the CSV file. When creating reader or writer objects, the programmer can specify a string or a subclass of the Dialect class as the dialect parameter. In addition to, or instead of, the dialect parameter, the programmer can also specify individual formatting parameters, which have the same names as the attributes defined below for the Dialect class.
Dialects support the following attributes:
A one-character string used to separate fields. It defaults to ',' .
Controls how instances of quotechar appearing inside a field should themselves be quoted. When True , the character is doubled. When False , the escapechar is used as a prefix to the quotechar . It defaults to True .
On output, if doublequote is False and no escapechar is set, Error is raised if a quotechar is found in a field.
A one-character string used by the writer to escape the delimiter if quoting is set to QUOTE_NONE and the quotechar if doublequote is False . On reading, the escapechar removes any special meaning from the following character. It defaults to None , which disables escaping.
Changed in version 3.11: An empty escapechar is not allowed.
The string used to terminate lines produced by the writer . It defaults to '\r\n' .
The reader is hard-coded to recognise either '\r' or '\n' as end-of-line, and ignores lineterminator . This behavior may change in the future.
A one-character string used to quote fields containing special characters, such as the delimiter or quotechar , or which contain new-line characters. It defaults to '"' .
Changed in version 3.11: An empty quotechar is not allowed.
Controls when quotes should be generated by the writer and recognised by the reader. It can take on any of the QUOTE_* constants and defaults to QUOTE_MINIMAL .
When True , spaces immediately following the delimiter are ignored. The default is False .
When True , raise exception Error on bad CSV input. The default is False .
Reader Objects 
Reader objects ( DictReader instances and objects returned by the reader() function) have the following public methods:
Return the next row of the reader’s iterable object as a list (if the object was returned from reader() ) or a dict (if it is a DictReader instance), parsed according to the current Dialect . Usually you should call this as next(reader) .
Reader objects have the following public attributes:
A read-only description of the dialect in use by the parser.
The number of lines read from the source iterator. This is not the same as the number of records returned, as records can span multiple lines.
DictReader objects have the following public attribute:
If not passed as a parameter when creating the object, this attribute is initialized upon first access or when the first record is read from the file.
Writer Objects 
writer objects ( DictWriter instances and objects returned by the writer() function) have the following public methods. A row must be an iterable of strings or numbers for writer objects and a dictionary mapping fieldnames to strings or numbers (by passing them through str() first) for DictWriter objects. Note that complex numbers are written out surrounded by parens. This may cause some problems for other programs which read CSV files (assuming they support complex numbers at all).
Write the row parameter to the writer’s file object, formatted according to the current Dialect . Return the return value of the call to the write method of the underlying file object.
Changed in version 3.5: Added support of arbitrary iterables.
Write all elements in rows (an iterable of row objects as described above) to the writer’s file object, formatted according to the current dialect.
Writer objects have the following public attribute:
A read-only description of the dialect in use by the writer.
DictWriter objects have the following public method:
Write a row with the field names (as specified in the constructor) to the writer’s file object, formatted according to the current dialect. Return the return value of the csvwriter.writerow() call used internally.
Changed in version 3.8: writeheader() now also returns the value returned by the csvwriter.writerow() method it uses internally.
The simplest example of reading a CSV file:
Reading a file with an alternate format:
The corresponding simplest possible writing example is:
Since open() is used to open a CSV file for reading, the file will by default be decoded into unicode using the system default encoding (see locale.getencoding() ). To decode a file using a different encoding, use the encoding argument of open:
The same applies to writing in something other than the system default encoding: specify the encoding argument when opening the output file.
Registering a new dialect:
A slightly more advanced use of the reader — catching and reporting errors:
And while the module doesn’t directly support parsing strings, it can easily be done:
Table of Contents
- Module Contents
- Dialects and Formatting Parameters
- Reader Objects
- Writer Objects
Previous topic
File Formats
configparser — Configuration file parser
- Report a Bug
- Show Source
IMAGES
VIDEO
COMMENTS
For the purpose of reading and writing the xml file we would be using a Python library named BeautifulSoup. In order to install the library, type the following command into the terminal. pip install beautifulsoup4. Beautiful Soup supports the HTML parser included in Python's standard library, but it also supports a number of third-party ...
LXML (Based on libxml2. Offers a rich superset of the ElementTree API as well XPath, CSS Selectors, and more) Here's an example of how to generate your example document using the in-stdlib cElementTree: import xml.etree.cElementTree as ET. root = ET.Element("root") doc = ET.SubElement(root, "doc")
To add a new section to an existing XML file, we will use the following steps. We will open the XML file in "r+" mode using the open () function. This will allow us to modify the file. Then, we will read it into a python dictionary using the read () method and the parse () method. Next, we will add the desired data to the python dictionary ...
XML is a widely used format for data exchange and storage. In this article, you will learn how to read and write XML files in Python using the ElementTree module. You will also see some examples of XML manipulation and parsing in Python. If you want to learn more about Python and XML, this is the article for you.
This function takes an XML data string (xml_data) or a file path or file-like object (from_file) as input, converts it to the canonical form, and writes it out using the out file(-like) object, if provided, or returns it as a text string if not. The output file receives text, not bytes. It should therefore be opened in text mode with utf-8 ...
XML is a widely used data format for many applications and systems. Learn how to read and write XML files with Python in this tutorial. You will also find code snippets and tips for working with JSON, CSV, Parquet, and MongoDB in related articles on Kontext.
XML files in Python allow for the manipulation and parsing of XML data. XML (Extensible Markup Language) is a widely used data interchange format. Open XML File and Read Data with Python. ... How to Write XML. To write XML in Python, you can use the ElementTree XML API library. Here are two code examples to demonstrate how to create and write XML:
Meanwhile, Python 2.5 brought a fresh perspective on parsing and writing XML documents—the ElementTree API. It's a lightweight, efficient, elegant, and feature-rich interface that even some third-party libraries build on. ... There are two appropriately named functions in the module that allow for parsing a file or a Python string with XML ...
For writing a Pandas DataFrame to an XML file, we have used conventional file write() with lists, the xml.etree.ElementTree module, and lxml. Given that manipulating XML strings directly to write a file is more prone to human error, xml.etree.ElementTree and lxml are the preferable solutions for exporting a DataFrame to XML.
XML file manipulation is a common task in working with structured data in Python. In this guide, we covered how to read, write, append, and modify XML files using the xml.etree.ElementTree module. Additionally, we discussed handling XML file exceptions to ensure smooth execution of your Python scripts. Armed with this knowledge, you can ...
How to Parse XML using minidom. We have created a sample XML file that we are going to parse. Step 1) Create Sample XML file. Inside the file, we can see the first name, last name, home, and the area of expertise (SQL, Python, Testing and Business) Step 2) Use the parse function to load and parse the XML file.
Parsing XML Files in Python: A Beginner's Guide. Python offers a variety of libraries for parsing XML files, but one of the most straightforward and beginner-friendly is the built-in xml.etree.ElementTree module. This module treats an XML document as a tree of elements, making it intuitive to navigate and manipulate the data.
Entity declarations can contain more than just text for replacement. They can also point to external resources or local files. The XML parser accesses the resource and embeds the content into the XML document. DTD retrieval. Some XML libraries like Python's xml.dom.pulldom retrieve document type definitions from remote or local locations. The ...
First you need to read in the file with ElementTree. tree = ET.parse('movies.xml') root = tree.getroot() Now that you have initialized the tree, you should look at the XML and print out values in order to understand how the tree is structured. Every part of a tree (root included) has a tag that describes the element.
The basics of reading and writing files in Python; Some basic scenarios of reading and writing files; ... xml.etree.ElementTree: create or read XML based files; msilib: read and write Microsoft Installer files; plistlib: generate and parse Mac OS X .plist files; There are plenty more out there. Additionally there are even more third party tools ...
XML is a widely used format for storing and exchanging data, but parsing XML files in Python can be challenging. In this comprehensive guide, you will learn how to use different methods and libraries to read and write XML files in Python, such as Mini DOM, ElementTree, SAX, and Streaming Pull Parser. You will also discover the advantages and disadvantages of each method, and how to choose the ...
4. Parse the XML document. Use the parser to work with the file after creating an XML with Python. # Parse the XML file. with open ("sample.xml", "r") as new_xml_file: parser.parse (new_xml_file) Handle the Events. You can call methods from your custom handler class to handle events while parsing the XML document.
note: output written to file_new.xml for you to experiment, writing back to file.xml will replace the old content. IMPORTANT: the ElementTree library stores attributes in a dict, as such, the order in which these attributes are listed in the xml text will NOT be preserved. Instead, they will be output in alphabetical order. (also, comments are ...
xmlschema¶. xmlschema provides support for using XSD-Schemas in Python. Unlike other XML libraries, automatic type parsing is available, so f.e. if the schema defines an element to be of type int, the parsed dict will contain also an int value for that element. Moreover the library supports automatic and explicit validation of XML documents against a schema.
Method 1: Use xmltodict () This method uses the xmltodict() function to read an XML file, convert it to a Dictionary and extract the data. In the current working directory, create an XML file called books.xml. Copy and paste the code snippet below into this file and save it. <bookstore>. <book>.
Parsing XML files in Python is a common task, especially for automating manual processes like processing data retrieved from web APIs or web scraping. In this article, you'll learn about some of the libraries that you can use to parse XML in Python, including the ElementTree module, lxml library, minidom, Simple API for XML (SAX), and untangle.
This module defines a class HTMLParser which serves as the basis for parsing text files formatted in HTML (HyperText Mark-up Language) and XHTML.. class html.parser. HTMLParser (*, convert_charrefs = True) ¶. Create a parser instance able to parse invalid markup. If convert_charrefs is True (the default), all character references (except the ones in script / style elements) are automatically ...
Ask questions, find answers and collaborate at work with Stack Overflow for Teams. Explore Teams Create a free Team
The below code does accept the user input and generates a correctly formatted CSV file except that an unwanted blank row is inserted between each valid row… Any suggestions for eliminating the generation of the blank ro…
1. Whetting Your Appetite¶. If you do much work on computers, eventually you find that there's some task you'd like to automate. For example, you may wish to perform a search-and-replace over a large number of text files, or rename and rearrange a bunch of photo files in a complicated way.
Dear Python Experts. There is a library that I run from my python script. This library dumps to the terminal text that I need to parse but the library does not offer a way to pick up the text, so I have to copy paste it myself in a text file. I would like to build a mechanism that stores the text in some file that I can later parse, while also dumping it to the screen as it normally does. Chat ...
Ask questions, find answers and collaborate at work with Stack Overflow for Teams. Explore Teams Create a free Team
csv. writer (csvfile, dialect = 'excel', ** fmtparams) ¶ Return a writer object responsible for converting the user's data into delimited strings on the given file-like object. csvfile can be any object with a write() method. If csvfile is a file object, it should be opened with newline='' [1].An optional dialect parameter can be given which is used to define a set of parameters specific to ...