
- How to Assign records to Queue using Salesforce Flow?
If you’re a Salesforce user, you’re probably familiar with queues – a way to organize records and assign them to specific groups or teams. However, manually assigning records to a queue can be time-consuming and inefficient. That’s where Salesforce Flow comes in – a powerful tool that can help automate the process of assigning records to queues. In this blog post, we’ll show you how to assign records to queues using Salesforce Flow, step-by-step. If you have not followed our previous post related to flow, please check it out.
Table of Contents

What is Queue in Salesforce?
In Salesforce, a queue is a virtual storage area that enables users to manage and work on records as a team. Queues can be used to manage leads, cases, opportunities, and other types of records in Salesforce. By assigning records to a queue, users can easily share workloads and collaborate with each other to complete tasks efficiently.
Problem Statement
Whenever ever lead record is created with Lead Source as “Phone Inquiry” then assign the owner to the Phone Inquiry Leads queue.
Step 1: Create a Flow.
The first step is to create a new flow. To do this, go to Setup > Flows > New Flow. Select “Record-Triggered Flow” as the type of flow.
Step 2: Choose the Object and Trigger.
Next, choose the object you want to assign to a queue, such as Leads or Cases. Here we are choosing Lead. As we know the criteria to trigger the flow, hence
- configured the trigger when ” A record is created”.
- Add the entry conditions as leadSource Equals Phone Inquiry.
- And choose to Optimize the flow for “Fast Field Updates”.

Step 3: Add the Get Record Element.
Add the Get record to the canvas and choose the Get Records of This Object as “Group” and then add the below filter record criteria i.e.,
- Add the label and API Name of the Get record element.
- Choose the field as Type Equals as Queue
- Choose DeveloperName Equals as the API name of Queue. In my case, i have a new Queue created as “Phone_Inquiry_Leads”.
- Choose How many records to store as “Only the first record”.
- Choose How to store record data as ” Choose fields and let Salesforce do the rest”.
- Then Click Done.

Step 4: Add an Assignment Element.
Once you’ve retrieved the record i.e. step 3, the next step is to assign it to a queue. To do this, add an assignment element to the flow canvas. In the “Set variable” section,
- select the field that represents the queue, such as “Owner ID.” of record equals the value as get the record. As per the below image.
- Then click done.

- Read the best salesforce Books: Click Here .
Step 4: Save the Flow

In this blog post, we showed you how to assign records to queues using Salesforce Flow. By following these simple steps, you can easily automate this process and ensure that your records are assigned to the appropriate queue. Remember to test your flow thoroughly before activating it to ensure that it works correctly. Also please follow our other flows blog posts.
- HTTP Callout in Salesforce Flow Without Code [GET & POST]
- How to Invoke a Flow from a Lightning Web Component
- How to update child records using salesforce flow
- How to create a Data Table in Salesforce Flow : Complete Guide.
- How to retrieve record Type Id in flow
- How to navigate record detail page in flow
- How to send email using flow in salesforce
- How to Display Icon In Lightning Datatable
- How to Create Record in lightning Component
- How to Delete Multiple Records Using Checkbox In Lightning Component.
4 thoughts on “How to Assign records to Queue using Salesforce Flow?”
- Pingback: How to call flow from Quick Action in Salesforce
- Pingback: How to Invoke a Flow from a Lightning Web Component
- Pingback: How to retrieve record Type Id in flow
- Pingback: How to Delete Multiple Records Using Checkbox In Lightning Component
Leave a Comment Cancel reply
Save my name, email, and website in this browser for the next time I comment.
Salesforce Geek
Let's Learn Apply and Share

How to Assign a Queue as Record Owner in Salesforce Flow
In this blog, we’ll explore the functionality of Salesforce Flows and how they empower users to assign a queue as a record owner, providing a comprehensive solution for efficient workflow management.
What are Triggered flows?
A triggered flow consists of a trigger, at least one criterion and an action.
- A trigger indicates by what the flow is launched. We can launch a flow on a pre-defined schedule or a record change that occurs.
- The criteria define the specifics of the trigger. The trigger for modifying a record is based on alterations made to field values within the designated object.
- The action decides the outcome of the flow.
What is Record-Triggered flow?
The record-triggered flow creates, updates, or deletes a record and updates a record or sends notifications based on requirements.
Refer to Record-Triggered flow for more examples.
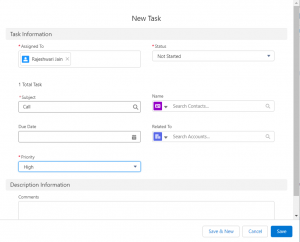
Business Scenario: When task priority for a record is ‘ High ‘, assign that record to a Queue using Salesforce flows.
Pre-requisite:
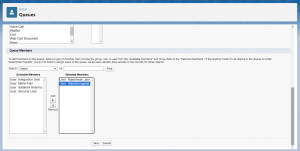
Create a Queue: Go to setup and search ‘Queue’ in the quick find box. Select ‘New’ and enter the ‘High Priority Team’ label.
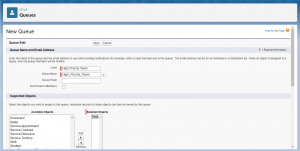
Select the ‘Task’ object and choose the necessary Queue members to whom the system will assign the record in Supported Objects. Save the Queue.
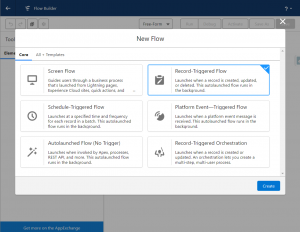
Configure Start: From Setup, enter ‘Flows’ in the Quick Find box then click ‘New flow’. Select ‘Record Triggered Flow’ and click on Create. Hence, the configure Start window opens.
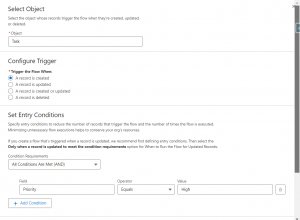
Define Record-Triggered Flow: For the object, select ‘Task’. This flow is triggered when the record is created and for condition requirements, select All Conditions Are Met. Define condition as Priority is equal to High.
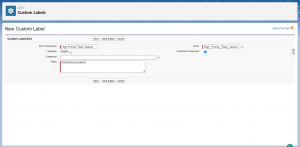
Create Custom Label: First, Using Salesforce Inspector search for the Queue ID using the ‘ SELECT Id FROM Group WHERE DeveloperName =’High_Priority_Team ‘ query’. Copy the Queue Id ‘ 00G2t000000eCb9EAE ‘.
Then in the Setup Quick Find search for Custom Label and click on New Custom Label. In the value use the Queue ID which we got from the developer name of the Queue.
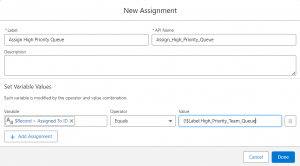
Add Assignment Element: An assignment element is added to assign the high-priority record to the Queue we created.
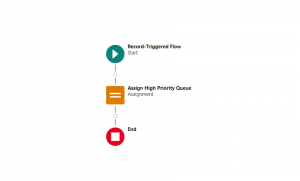
Save the ‘High Priority Task to Queue’ flow and activate the flow.
To check how our flow works create a Task with high priority. We can see in the task details that our task is assigned to a High-priority Team.
What is the difference between Record-Triggered flow and Screen flow?
In Screen Flows, users interact with screens to guide them through processes. In contrast, Record-Triggered Flows are triggered by changes to records and are used to automate record data-related processes.
What is the key difference between a Record-Triggered Flow and a Workflow Rule in Salesforce?
A Record-Triggered Flow enables the implementation of intricate business logic and decision-making processes triggered by changes in records.
In contrast, a Workflow Rule has limitations in dealing with complex scenarios, highlighting a significant distinction between Workflow Rules and Record-Triggered Flows.
Should Record-triggered flow be before or after save?
We can optimize the flow for fast field update vs actions and related records depending on the automation needed based on the requirement.
When we need a Fast field update, the record-triggered flow is before save whereas if the flow involves other records or intricate actions then it’s after flow.
When to use an Asynchronous path in Record-Triggered flow?
If your flows are taking a long time to run, you can improve their performance by executing some actions asynchronously.
This means that some parts of your flows can run in parallel, reducing the overall transaction duration. Consider using an asynchronous path within your flows to speed things up.
Record Triggered flow vs Scheduled Triggered flow?
Depending on the needs of your organization, there may be functions you need to run against a record that can wait until after hours and are not necessary right away.
At times, record-triggered flows may offer the most effective approach, while schedule-triggered flows prove more effective when handling multiple actions simultaneously, typically outside of business hours.
For more details, Check out the video below!!
Get a complete Roadmap To Learn Salesforce Admin And Development

Rajeshwari Jain
Related posts.

How to create a task using flow in Salesforce

Salesforce Flow Analyzer
Leave a reply cancel reply.
Your email address will not be published. Required fields are marked *
Save my name, email, and website in this browser for the next time I comment.
- App Building
- Be Release Ready – Spring ’24
- Integration
- Salesforce Well-Architected ↗
- See all products ↗
- Career Resources
- Essential Habits
- Salesforce Admin Skills Kit
- Salesforce Admin Enablement Kit
Home » Article » How I Solved This: Managing Queue Membership with a Custom Object

- How I Solved This: Managing Queue Membership with a Custom Object
Key business problem:
In Service Cloud, Omni-Channel, and list views, ownership of Cases, Leads, and other objects can be difficult in call centers or sales teams with high turnover. We don’t want to manually manage lots of queues and be a bottleneck for our business needs.
Background:
Working in a high-velocity business before High Velocity Sales was available, I was tasked with creating a way to assign declined orders to sales reps. We refined the requirements to evaluate failed payments based on their payment value. Putting this into high value and low-value ranges, we were able to have newer sales team members work on lower value customer issues and more skilled agents take higher value issues. As teams skilled up to take the more complex orders, or as we lost team members and had to replace them, I frequently had to update the queues a person was assigned to.
Now, we could have implemented skills-based routing to solve this challenge, but that would have forced us to use a different routing feature than we had already implemented — and it wasn’t really about skills for our use case.
Since that project, I’ve been asked to do something similar — use queues for management of different case types for customer issues and chat topics.
How I solved it:
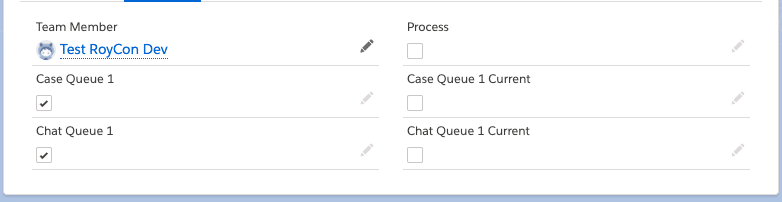
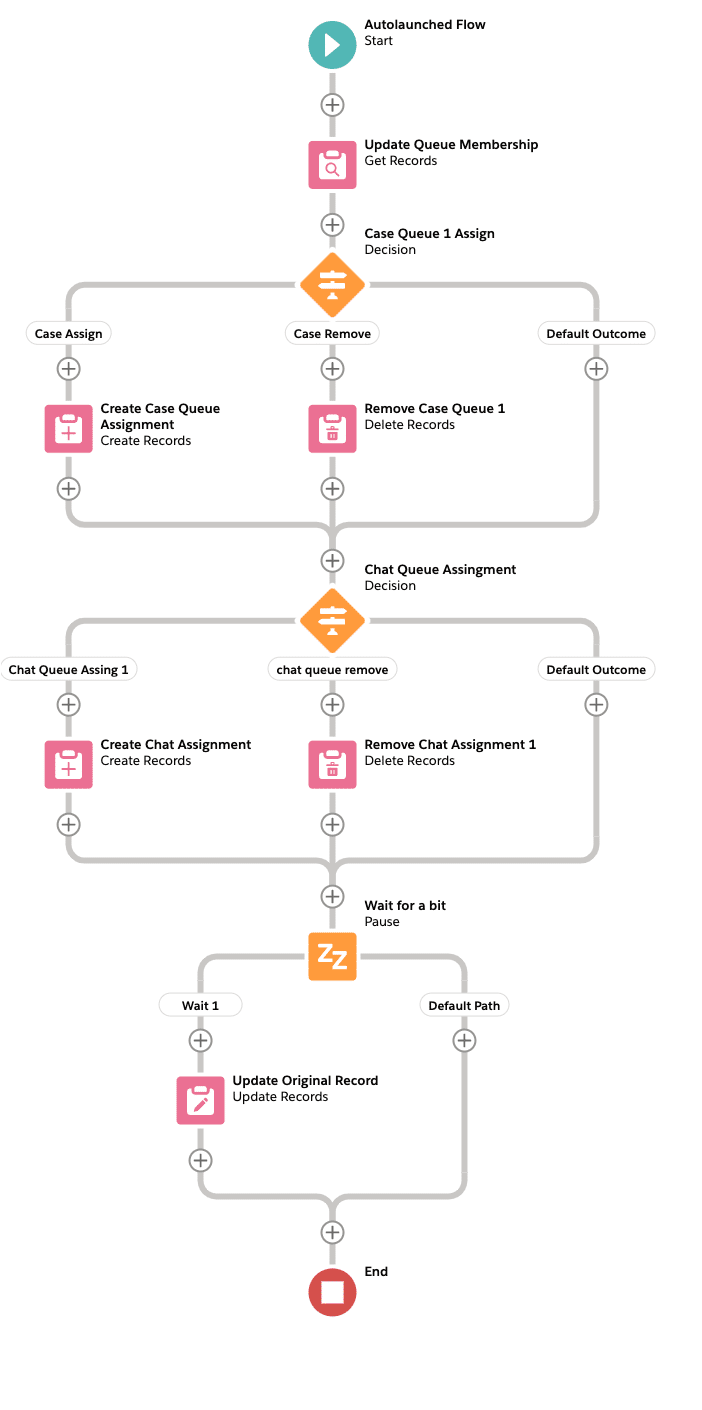
1) Create a Team Management custom object
I created a new Team Management object to store the items that I was assigning users to: list of queues, permission sets, and so on. There are two fields for every queue. A hidden field will store the current value of queue membership in setup; this saves query time if you have a lot of queues to work through. I also used a custom Process field on the object. This field allows you to know that someone is editing a queue rather than a different field on the object. It becomes difficult if you have 10+ fields to use Process Builder logic to determine if there was a change. I added this field to the users to identify that they made a change to the queue assignments.
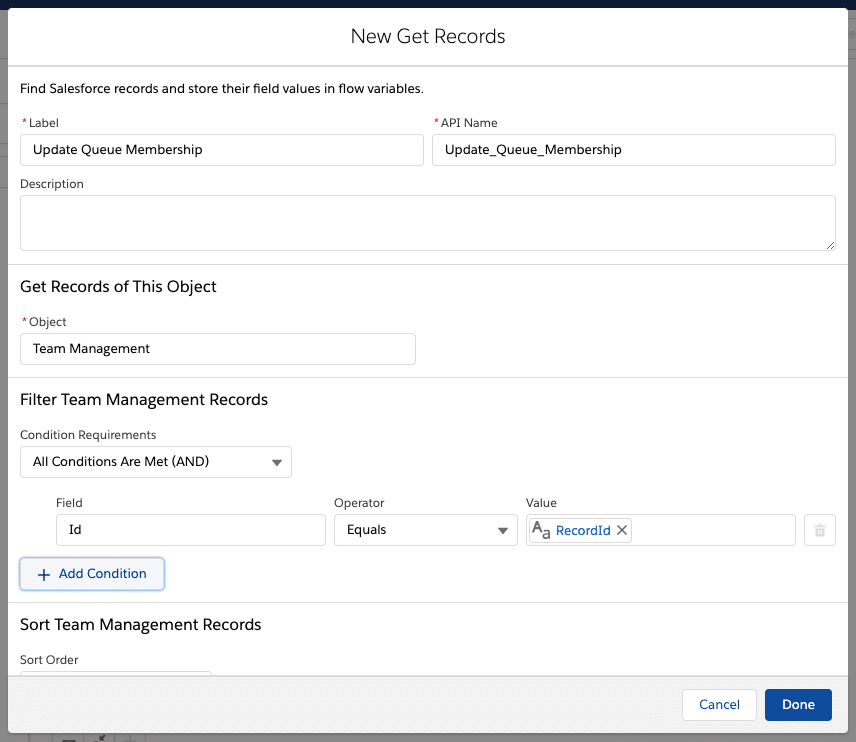
2) Create a flow to assign the queue membership using your custom object
Create a new flow and get the record values for the Team Members record that was just updated. In the new flow, add an element for Get Records. In the filter conditions, you’ll need to make a new variable.
Pro Tip: Get in the habit of naming the first variable in the Get Records element as “RecordId.” When making an Input variable, you do not need to make a Record variable — just make a Text variable that allows input. “RecordId” is the standard name for passing variables from quick actions or buttons.
We only store the first record because we are specifically looking up only one record in the Filter Conditions. Additionally, Storing All Data on the record will save you time if you add more fields to the object for new queues in the future. This saves you from having to do a ton of extra work — let Salesforce do the work for you.
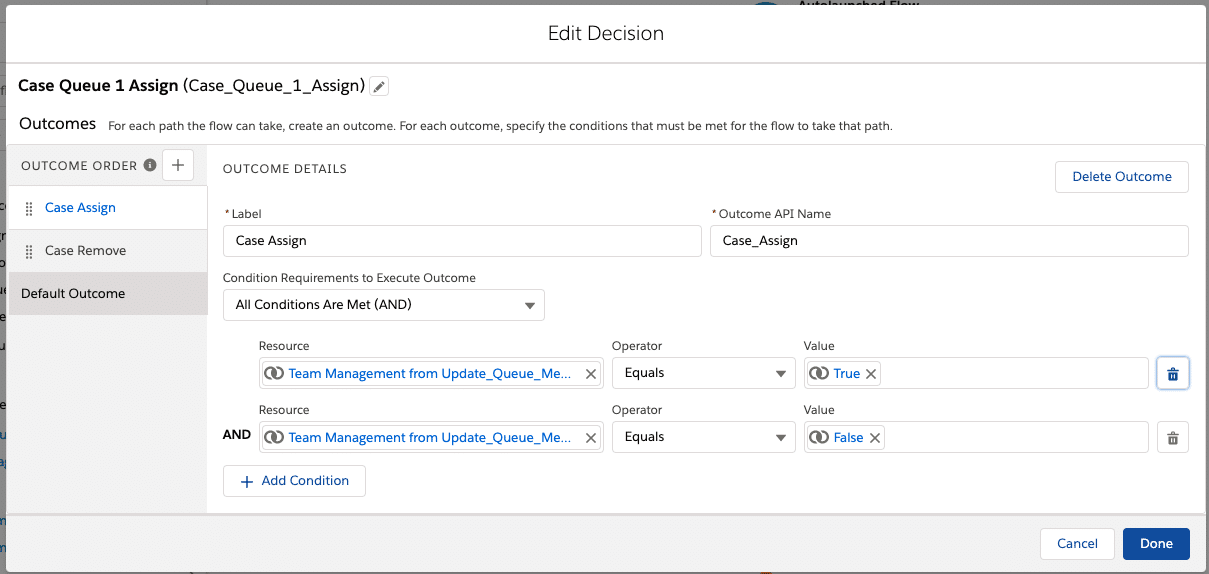
Now that we have the record in the flow, we have to make some decisions. The Decision flow element will have two points. You’ll make a Decision for adding a user to the queue and removing the user from the queue. You cannot use a Default Outcome, because if this queue membership wasn’t updated, you’ll skip this section and move to the next queue to add or remove.
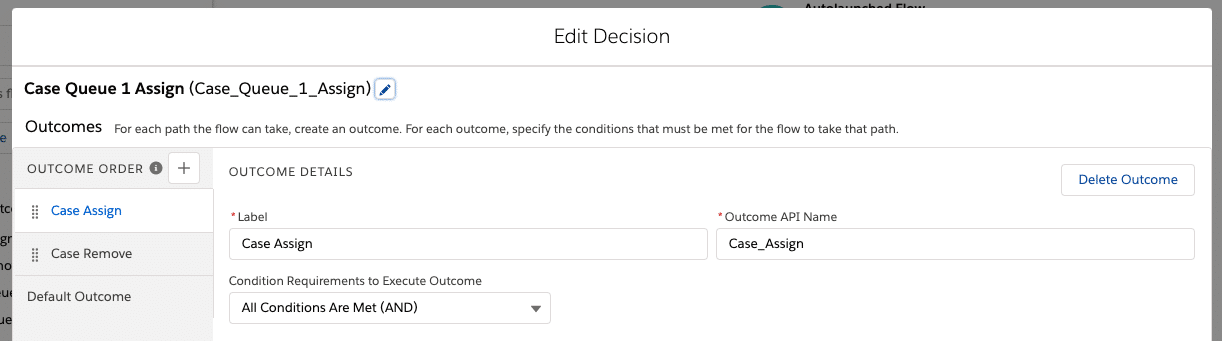
In the Resource fields, you’ll find the “Record (Single) Variable” created in your Get Records element. Then, select the user visible fields — Case Queue 1 from the Resource dropdown, set the Operator to “Equals,” and set the Value to “{!GlobalConstant.True}.”
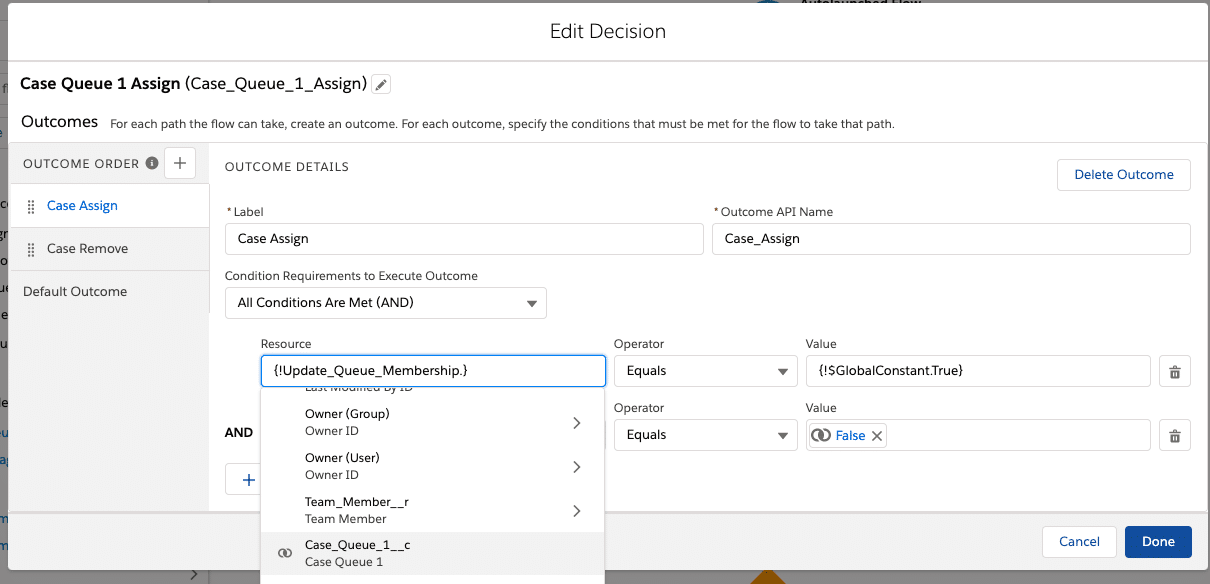
The Flow logic here is that a user wants to put them in the queue, but they are not yet in the queue, so we have to add them in the next step.
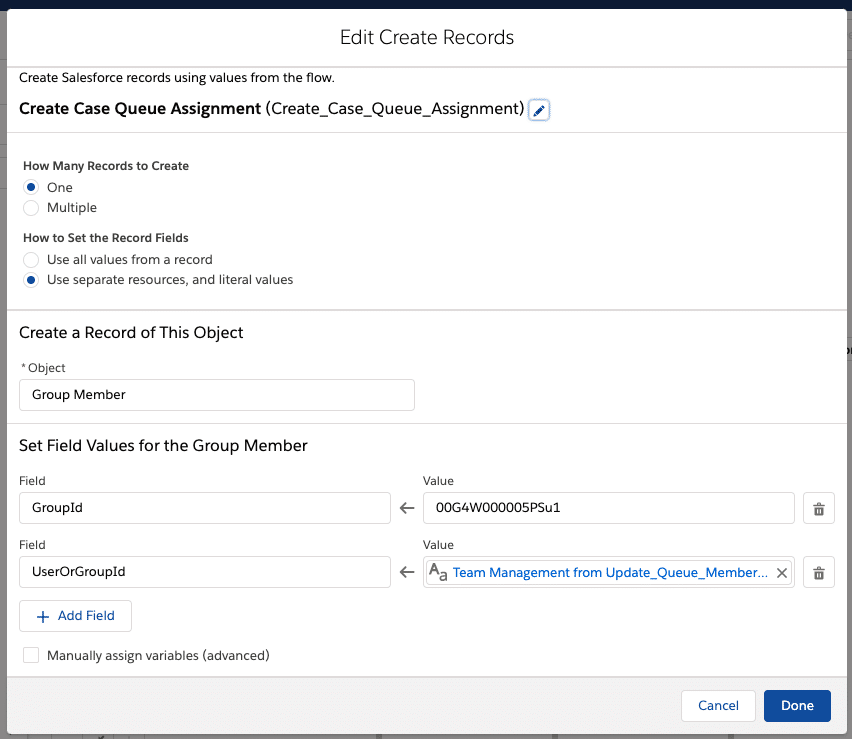
Note: I typically get errors when I grab the ID from the URL in Lightning, so either switch to classic to grab it from the URL or export a list of queue IDs from the account.
Pro Tip: If you do not like the idea of storing an ID in your flow because you may have different IDs by environment (sandbox/production), then create a Custom Setting and use a formula to reference the IDs from the Custom Settings. This saves you from having to make versions just to pass a flow from one environment to the next.
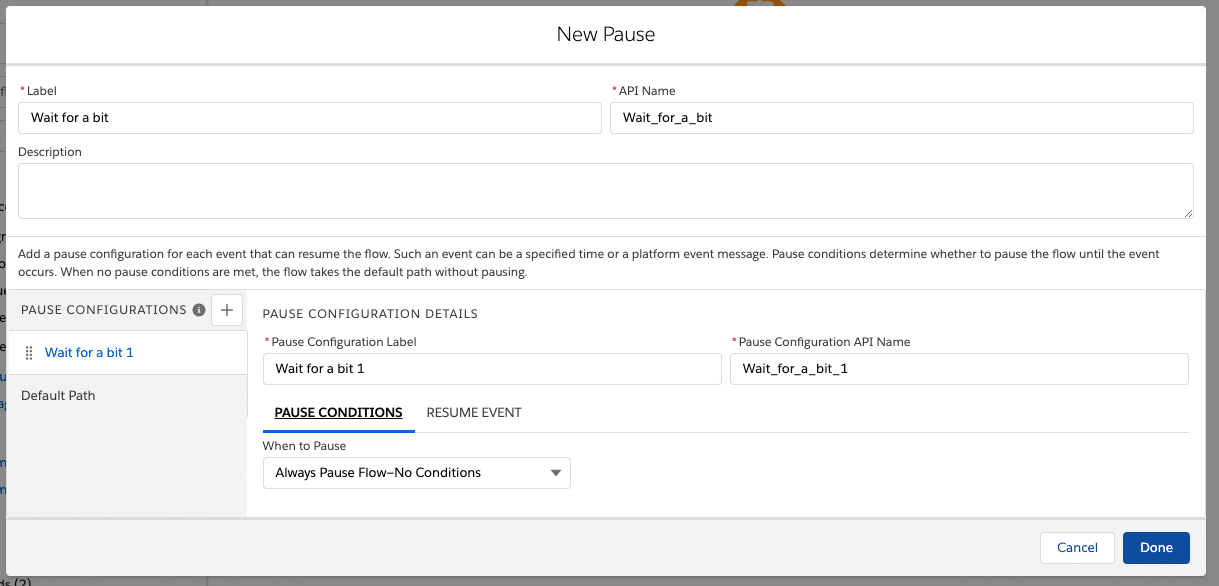
By this point, I hope you’re thinking, “What happens to that checkbox that started the process? When do we uncheck it?” After we’ve added all the add and remove steps for each queue, you’ll need to add a Wait element.
Salesforce has some rules about editing a Non-Setup object after a Setup object in the same automation or vice versa. By adding a Wait element, you can remove the Data Manipulation Language (DML) exception issues. Flow Wait elements are pretty basic in our use case. Ensure that Pause Conditions is set to “Always Pause Flow—No Conditions.” Then, click the Resume Event tab and set the Time Source to “Specific time,” then set the Base Time to “{!$Flow.CurrentDateTime}.” The Offset Number can be 0 Hours because you don’t need to wait long; you just need a pause to prevent DML exceptions.
Add an Update Records element and use the Filter Conditions to look for the original record you started with. Then, add the fields for Case Queue 1 Current, Chat Queue 1 Current, and Process. Map the fields as such: Case Queue 1 Current → Team Management Case Queue 1 Chat Queue 1 Current → Team Management Chat Queue 1 Process → GlobalConstant.False
Save and activate this flow! Your finished flow should look like this:
Now that you have an active flow, we should create the Process Builder that will start the flow.
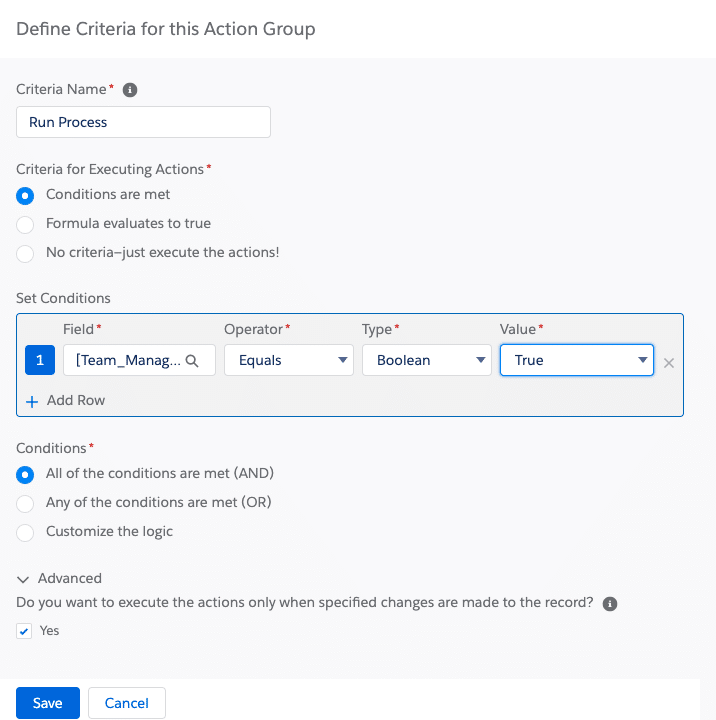
Create a Process Builder on the Team Management object every time a record is changed.
The only logic is when Process is set to “True.” But note an item mentioned earlier: Because you cannot edit a Setup object from a Non-Setup object, you need to have a delay. One of the few ways to get a Scheduled Action applied to Process Builder is to click Advanced and check the Yes box for only running when specific changes are made.
Some considerations: We can’t leave fields we do not want users to know about or interact with on the page, and we should make sure we test. Note that because we added so many waits to this process, it will take 5-10 minutes to actually get the person added or removed from all the queues. This can be annoying to a call center manager because they may have made a mistake and may go in and try to correct the error quickly. So, we are going to make it error-proof to ensure a good end user experience.
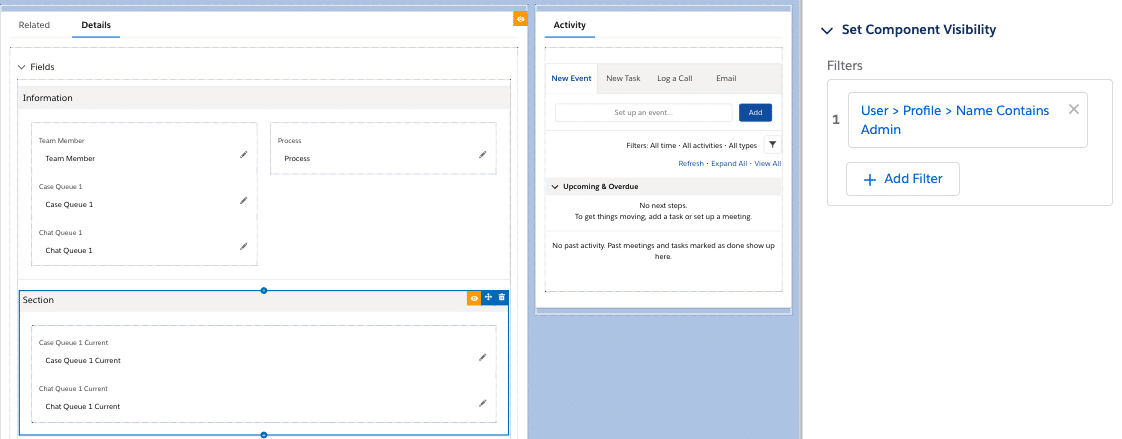
Let’s go back to the Team Management record. We’re going to update this page to remove the hidden fields. In classic Salesforce, you can take them off the page layout or you can make an Admin Layout. Both of those options forget the power of Lightning. From the Team Management record, go to setup and click Edit Page in the upper right corner.
First, click into the Details section of the page layout; let’s convert this to a Dynamic Form. This will allow us to take the hidden fields that contain “Current” in the name and put them in their own Field section. In that Field section, you can set the visibility to only be visible to people on the System Admin profile.
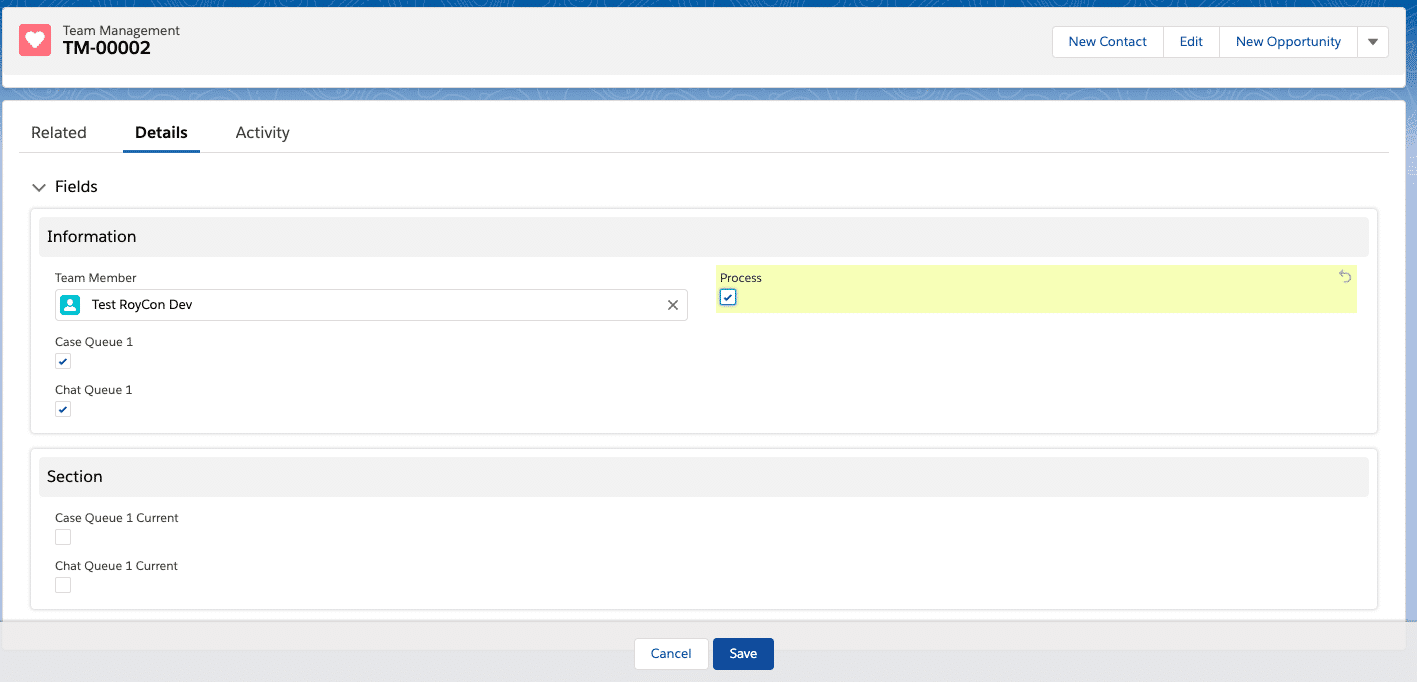
If you go back to the record page, you can update the Team Member record and check the Process checkbox.
Business results:
I have built this process, or something similar, at a few companies. As admins, our primary goal should be to democratize the system but keep the security and access to setup limited. We were able to dramatically reduce requests to the admins of the system and improve the end-user experience. Once agents were in training, their managers were able to add them to queues to start taking cases, chat, decline orders, and more. This brought value to those teams by not having capable agents waiting on an admin to update their access to the system.
We are now able to manage queue membership declaratively — and we don’t need an admin to do it!
Do try this at home
This example was real and it’s very simple. But the principle behind it could be applied in all sorts of ways. Let your imagination run wild! Here are a couple of examples to get your creative juices flowing:
- Give people access to new permission sets that you allow your end-users to assign (not all that exist in Salesforce)
- Add to a public group that affects sharing, list views, etc.
- Update a user’s role and profile if you have people moving between different departments often
Let us know what you think about this solution and tell us how you want to use it with #AwesomeAdmin & #HowISolvedThis on Twitter .
Jen Lee’s Blog Automation Champion Blog
Scott Luikart
Scott is the Lead Technical Architect at Roycon helping to scale and build customer environments. Salesforce MVP and Golden Hoodie recipient with a passion for helping the Salesforce community grow and learn.
Related Posts

How I Solved It: Manage Data with MuleSoft
By Jennifer Cole | April 13, 2023
In this episode of “How I Solved It” on Salesforce+, #AwesomeAdmin Jen Cole solves an inefficient fulfillment and sales process using MuleSoft Composer. Learn how she approached building her solution and her tips for developing admin skills. The problem Once upon a time, not so long ago, I was asked to fix an inefficient sales […]

How I Solved It: Design User-Friendly Apps
By Paolo Sambrano | April 6, 2023
In this episode of “How I Solved It” on Salesforce+, #AwesomeAdmin Paolo Sambrano solves an inefficient service desk experience using App Builder and Flow. Learn how he approached building his solution and his tips for developing admin skills. The problem A long, long time ago, someone (ahem, maybe a less-experienced me) built a service desk […]

How I Solved It: Sewing (& Flow-ing!) for Good at the Start of a Pandemic
By Rachel Park Brayboy | April 4, 2023
Welcome to another “How I Solved It.” In this series, we do a deep dive into a specific business problem and share how one #AwesomeAdmin chose to solve it. Once you learn how they solved their specific problem, you’ll be inspired to try their solution yourself! Watch how Rachel Park Brayboy used her sewing (and […]
About 15 mins
Create Case Queues
Create a case assignment rule, test the case assignment rule.
- Challenge +100 points
Create Case Queues and Assignment Rules
Now that you have your basic support processes and layouts configured for cases, create case queues and assignment rules to route your cases to the correct support teams at Ursa Major Solar.
Create Product Support Tier 1 and Product Support Tier 2 queues so product support cases can be routed to one of these queues based on case criteria and how long the case has been open.

- From Service Setup, enter Queues in the Quick Find box and select Queues .
- Click New and complete the queue details.
- Label: Product Support Tier 1
- Queue email: [email protected]
- Supported Objects: select Case and click Add .
- Queue Members: Click User: (Your Name) in the Available Members list, and click Add to add yourself to the Selected Members list.
- Click Save .
- From the Queue page, click New and complete the queue details.
- Label: Product Support Tier 2
- Queue email: [email protected]

Now, create the Inquiry queue for inquiry cases.
- From the Queues page, click New .
- Enter the queue details.
- Label: Inquiry
- Queue Email: [email protected]
- Queue Members: Click User: Ada Balewa in the Available Members list, and click Add to add her to the Selected Members list.
So, now you have case queues set up and ready to handle different types of cases as they’re created. Next, create and activate a standard case assignment rule to assign cases to the correct team members. This is how cases get sent to specific case queues, like the ones you just created.
- From Service Setup, enter Case Assignment Rules in the Quick Find box and select Case Assignment Rules .
- Click New and enter the rule details.
- Rule Name: Standard Case Assignment
- Select the Active checkbox to make this the active case assignment rule.
Add a rule entry that assigns Product Support cases to the Product Support Tier 1 queue.
- Click the Standard Case Assignment link.
- Under the Rule Entries, click New and enter the details.

- Click Save & New .
Next, add a rule entry that assigns inquiry cases to the Inquiry queue.
- Enter the details.
Now rename the Automated Case User to System. Every time there’s an automated case change from an assignment rule, for example, the automated case user name will show up in the case history. It will now show an automated “system” change, rather than showing your name as the admin, whenever an automated case change occurs.
- Enter Support Settings in the Quick Find box and select Support Settings .
- Click Edit .

You want to make sure the assignment rules work for Ursa Major Solar by creating a case.

- Click the Contacts tab.
- Select Recently Viewed from the dropdown, and click the Pat Stumuller link.
- In the Cases related list, click New .
- Select a record type: Product Support .
- Click Next and enter the case information.
- Click the Case Number for the case you just created. Ensure that the Case Owner is Product Support Tier 1.
By setting up case queues and assignment rules, cases are now automatically routed to the correct teams. Next, escalate higher priority cases to the Product Support Tier 2 team by creating an Escalation Rule.
- Salesforce Help: Rules
- Salesforce Help: Create Queues
- Salesforce Help: Set Up Assignment Rules
- Get personalized recommendations for your career goals
- Practice your skills with hands-on challenges and quizzes
- Track and share your progress with employers
- Connect to mentorship and career opportunities
Product Area
Feature impact.

- Set Up Salesforce Scheduler and Book Appointments
- Capabilities of Salesforce Scheduler
- Cost-Effective Alternative for Creating Service Resources
- Supported Licenses for Authenticated External Users
- View Maximum Schedulable Assets in Salesforce Scheduler
- What’s Included in Salesforce Scheduler
- Key Terms in Salesforce Scheduler
- Key Roles in Salesforce Scheduler
- Data Model Overview
- Salesforce Scheduler Resources
- Implementation Guidelines
- Considerations for When Salesforce Scheduler and Field Service Are...
- Considerations for Performance Improvement in Salesforce Scheduler
- Salesforce Scheduler Implementation Guide
- Salesforce Scheduler Developer Resources
- Launch the Salesforce Scheduler Setup App
- Explore the Salesforce Scheduler Setup Assistant (Optional)
- Configure Related Lists for Salesforce Scheduler Object Page Layouts
- Enable Maps and Location Services in Salesforce Scheduler
- Configure State and Country Picklists
- Extend Location Search
- Create Service Territories in Salesforce Scheduler
- Considerations for Virtual Territories
- Data Integration Rules for Salesforce Scheduler
- Assign Service Resources to Service Territories in Salesforce...
- Assign Service Territories to Work Types in Salesforce Scheduler
- Guidelines for Managing Service Territories in Salesforce Scheduler
- Create Skills
- Configure Who Can Be a Service Resource
- Enable the Main Service Resource Setting
- Provide User Profile Access to the Asset Field
- Update the Service Resource Page Layout for Asset Scheduling
- Update the Default Asset Sharing Setting (Optional)
- Create Assets in Salesforce Scheduler
- Make Assets Available for Scheduling
- Create Service Resources in Salesforce Scheduler
- Assign Skills to Service Resources
- Assign Skills with Start and End Dates
- Assign Service Territories
- Considerations for Sharing Appointments with Service Resources
- Enable Resource Appointment Sharing
- Appointment Sharing
- Guidelines for Managing Service Resources in Salesforce Scheduler
- Create Work Type Groups in Salesforce Scheduler
- Customize Appointment Subtopics in Salesforce Scheduler
- Create Work Types in Salesforce Scheduler
- Add Skill Requirements for Work Types in Salesforce Scheduler
- Assign Work Types to Service Territories in Salesforce Scheduler
- Assign Work Types to Work Type Groups in Salesforce Scheduler
- Assign Work Type Groups to Work Types in Salesforce Scheduler
- How Work Types, Work Type Groups, and Service Territories Work...
- Customize Default Appointment Types in Salesforce Scheduler
- Change Labels in Flow Screens
- Considerations for Data Translation of Objects
- Enable Data Translation
- Enable Translation Workbench
- Add Translation Languages and Translators
- Enable Translation of Custom Field Data
- Add the Translations Tab to an Object
- Add Translations to Standard and Custom Fields
- Import and Export Translations
- Example of How to Isolate Data Between Partners
- Add the Operating Hours Component to Record Pages
- Update the Default Operating Hours Sharing Setting
- Create Operating Hours
- Assign Operating Hours
- Considerations for Shifts
- Manage Your Shifts in Schedule View
- Create Shifts in Salesforce Scheduler
- Create Shifts in Bulk by Using a CSV File
- Considerations for Using Engagement Channel Types
- Update Engagement Channel Type Page Layout for Salesforce Scheduler
- Create Engagement Channel Types
- Enable the Schedule Appointments Using Engagement Channels Setting
- Add Engagement Channel Types to a Shift
- Prerequisites to Enable Multiple Topics for Shifts Setting
- Enable the Multiple Topics for Shifts Setting
- Add Multiple Topics to a Shift
- Appointment Time Slot Calculation for Concurrent Shifts
- Create Roles and Hierarchies
- Create Public Groups
- Configure Shift Sharing Rule
- Assign Record Types to Profiles
- Define Shift Rules in Scheduling Policy
Create a Queue
- Create Email Templates
- Add Email Alerts to the Approval Process
- Add an Approval Step to the Approval Process
- Add Field Update to the Approval Process
- Activate the Shift Approval Process
- Restrict Service Resources from Modifying Shifts for Two Weeks with...
- Restrict Working Hours Selectively
- Appointment Distribution Implementation Considerations
- Enable Appointment Distribution Settings
- Define an Appointment Assignment Policy
- Link Your Appointment Assignment Policy to a Scheduling Policy
- How Appointment Distribution Works
- Considerations for Concurrent Scheduling
- Update Field-Level Security for the Time Slot Object
- Enable Concurrent Scheduling
- Define Time Slots for Concurrent Scheduling
- Considerations for Multi-Resource Scheduling
- Enable Multi-Resource Scheduling
- Update Field-Level Security for Multi-Resource Scheduling
- Service Resource Absences in Salesforce Scheduler
- Considerations for Holidays
- Create Holidays in Salesforce Scheduler
- Link Holidays to a Service Territory
- Check Salesforce Calendar to Determine Resource Availability
- Check External Calendars to Determine Resource Availability
- Apex Interface Implementation Limitations and Error Codes
- Prerequisites for Setting Operating Hours for Resources Working on...
- Enable Operating Hours for Service Territory Members for Work Type...
- Determine Service Resource Availability by Work Type Groups: Example
- Scheduling Policy Rules in Salesforce Scheduler
- Select Scheduling Policy Rules to Enforce
- Create and Use Custom Scheduling Policies in Salesforce Scheduler
- Add Service Resource Preferences to Accounts for Salesforce Scheduler
- Example: How Salesforce Scheduler Determines Available Time Slots
- Salesforce Scheduler Standard Flow Templates
- Customize Standard Flow Templates
- Customize the Select Service Resources Screen
- Customize the Select Work Type Group Screen
- Customize the Select Appointment Type Screen and the Select...
- Customize the Select Service Resource Screen
- Customize the Service Resource Availability Screen
- Customize the Select Service Territory Screen
- Customize the Select Service Appointment Time Screen
- Customize the Select Service Resource and Service Appointment Time...
- Customize the Review Inbound or Outbound Service Appointment Screen
- Customize the Review Service Appointment Screen
- Customize the Select Appointment Invitee Screen
- Customize the Appointment Booking Invitation Details Screen
- Customize the Review URL for Appointment Booking Screen
- Customize the Collect Waitlist Details Screen
- Customize the Select Work Types for Waitlist or Select Service...
- Customize the Review Waitlist Screen
- Flow Screen Component: Select Service Resources
- Flow Screen Component: Select Work Type Groups
- Flow Screen Component: Select Appointment Type
- Flow Screen Component: Select Service Resource
- Flow Screen Component: Service Resource Availability
- Flow Screen Component: Select Service Territory
- Flow Screen Component: Select Service Appointment Time
- Flow Screen Component: Select Service Resource and Service...
- Flow Screen Component: Review Inbound or Outbound Service Appointment
- Flow Screen Component: Review Service Appointment
- Flow Screen Component: Service Appointment Confirmation
- Flow Action: Save Appointment
- Flow Action: Cancel Appointment
- Flow Screen Component: Select Appointment Invitee
- Flow Screen Component: Appointment Booking Invitation Details
- Flow Screen Component: Review URL for Appointment Booking
- Flow Action: Save Appointment Invitation Details
- Flow Screen Component: Multi-Select Waitlist
- Flow Action: Create Waitlist
- Flow Screen Component: Select Actionable List Member Status
- Flow Screen Component: Send Appointment Invitation URL Email
- Flow Screen Component: Filter Service Appointment Reassignments
- Flow Screen Component: Reassign Service Appointments
- Grant Users Edit Access to the Anonymous Booking Field
- Enable Automatic Service Resource Assignment
- Enable Anonymous Resource Scheduling
- Salesforce Scheduler Flows
- Add Components to Salesforce Scheduler Flow Screens
- Change the Fields That Appear on Service Resource Cards
- Show Images on Service Resource Cards
- Autofill Fields in the Appointment Review Screen
- Preselect an Option on the Select Service Resources Page
- Filter Work Type Groups
- Enable Service Resource Filtering
- Skip the Service Territory Selection Screen
- Preset a Time Zone for Appointment Time Slot Pages
- Set a Time Zone for the Review Appointment Page
- Enable Multiple Time Zone Selection
- Use Service Territory Time Zone on Flow Screens
- Add Validation Rules to Service Appointment Fields
- Update Flows to Refresh Inputs
- Modify the Review Service Appointment Screen
- Considerations for Creating a Custom Review Service Appointment Screen
- Create a Record-Triggered Flow to Send Appointment Notifications
- Retrieve List of Assigned Service Resources
- Add Assigned Service Resources to the Appointment Notification Email...
- Add Service Appointment’s Parent Record to the Appointment...
- Identify the Service Appointment Record for Email Notifications
- Create an Action to Send Service Appointment Notifications
- Manage Access to Salesforce Scheduler Flows
- Create an Appointment Status
- Considerations for Video Appointments with Amazon Chime
- Assign Video Call User Permission to Service Resources
- Enable Video Calls
- Amazon Account Requirements
- Connect Amazon to Salesforce
- Configure External Video Service
- Create a Named Credential for Virtual Calls
- Create Pages for Virtual Calls on Your Experience Site
- Configure Video Calls
- Add the Video Call Utility Item to the Utility Bar
- Appointment Details Shown in the My Appointments Micro Calendar...
- Create a Record-Triggered Flow
- Get Recipient’s Email Address
- Get Service Resource ID
- Get Service Resource Name
- Update Service Appointment Record
- Create an Apex Class for the Apex Action
- Create an Apex Action to Send Email Notifications
- Set Up the Outbound New Appointment Flow
- Set Up the Outbound Modify Appointment Flow
- Set Up a Custom Outbound Flow (Optional)
- Embed Outbound Flows Into Record Pages (Optional)
- Assign Permissions to Schedule Appointments
- Schedule an Outbound Appointment
- Reschedule an Outbound Appointment in Salesforce Scheduler
- Reassign an Outbound Appointment in Salesforce Scheduler
- Reassign Multiple Service Appointments
- Cancel an Outbound Appointment in Salesforce Scheduler
- Grant Authenticated Users Required User and Object Permissions
- Update Sharing Settings for Authenticated External Users Who...
- Additional Configuration for Inbound Modify Appointment Flow
- Add Inbound Flows to an Experience Cloud Site
- Make the Inbound Flow Available as an Outbound Flow
- Grant Guest Users Required User and Object Permissions
- Create Sharing Rules for Guest Users Who Schedule Appointments
- Add the Inbound New Guest Appointment Flow to an Experience Cloud Site
- Add Inbound New Guest Appointment Flow to Websites Using Lightning Out
- Add the Inbound New Guest Appointment Flow to Websites Using Redirect
- Schedule an Inbound Appointment
- Reschedule an Inbound Appointment in Salesforce Scheduler
- Reassign an Inbound Appointment in Salesforce Scheduler
- Cancel an Inbound Appointment in Salesforce Scheduler
- Create an Invitation URL Prefix for Community Sites
- Create a Quick Action to Launch the Flow
- Add Flow Quick Action to Service Resource Record Pages
- Generate an Appointment Invitation URL
- Generate an Appointment Invitation URL for a Customer Website
- Book a Service Appointment by Using an Appointment Invitation URL
- Enable the Resource Availability Sharing Using Actionable List Setting
- Set Email Field-Level Security to Share Availability Using an...
- Share Service Resource Availability with Actionable List Members
- Change an Actionable List Member Status and View Appointment Details
- Customize the Lobby Management Page
- Manage Scheduled Appointments Using Lobby Management
- Prerequisites for Using Drop In Appointments
- Update Sharing Settings for Drop In Appointments
- Enable Drop In Appointments
- Create Waitlists for a Service Territory
- Manage Waitlists and Drop In Appointments in the Lobby Management Tab
- Check In Drop-In Customers
- Considerations for Attending Drop In Appointments
- How Salesforce Scheduler Tracks Appointments
- Embed Salesforce Scheduler Flows into Other Flows
- Considerations to Write Appointments to Salesforce Calendar
- Show Appointments with Before and After Buffer Time on Salesforce...
- Considerations for Multiple Attendee Events
- Prerequisites to Enable Multiple Attendee Event Setting
- Enable Multiple Attendee Event Setting
- Write Salesforce Scheduler Appointments to External Calendars
- Connect Your Salesforce Calendar with External Calendars
- Identify Missing Permissions
- Retrieve the getAppointmentSlots API Payload for Troubleshooting
- Reasons for Missing Time Slots
- Record Validations
- Debug a Salesforce Scheduler Flow as Another User
- Troubleshoot Work Type Groups
- Troubleshoot Service Territories
- Troubleshoot Service Resources
- Troubleshoot Time Slots
- Field-Level Security (FLS) Permissions Checklist
- Extend Salesforce Scheduler Functionality with Salesforce Products...
A queue defines the roles that receive email notifications. Create a queue to send email notifications to territory managers or services resources when the status of a shift is updated.
Required Editions and User Permissions
- From Setup, in the Quick Find box, enter Queues , and then click Queues .
- Click New .
- Enter a label for the queue.
- Add an email for the queue if necessary.
- Select Send Emails to Members .
- Under Supported Objects, from the Available Objects list, select Shift .
- To move the shift object to the Selected Objects list, click Add .
- Under Queue Members, from the Available Members list, select the user roles to whom you want to assign the queue
- To move the selected members to the Selected Members list, click Add . For example, select User: Territory Manager to notify territory managers of the rejected or approved shifts.
- Save your changes.
Cookie Consent Manager
General information, required cookies, functional cookies, advertising cookies.
We use three kinds of cookies on our websites: required, functional, and advertising. You can choose whether functional and advertising cookies apply. Click on the different cookie categories to find out more about each category and to change the default settings. Privacy Statement
Required cookies are necessary for basic website functionality. Some examples include: session cookies needed to transmit the website, authentication cookies, and security cookies.
Functional cookies enhance functions, performance, and services on the website. Some examples include: cookies used to analyze site traffic, cookies used for market research, and cookies used to display advertising that is not directed to a particular individual.
Advertising cookies track activity across websites in order to understand a viewer’s interests, and direct them specific marketing. Some examples include: cookies used for remarketing, or interest-based advertising.
Cookie List
IMAGES
VIDEO
COMMENTS
In this video, I'm explaining How to assign records to the queue using Salesforce Flow, I'm using a record-triggered flow to automate the business use case w...
In this Salesforce Flow Tutorial we'll cover how to assign a queue as a record owner in Salesforce Flow10 Ways to Boost Your Salesforce Career Guide (Free):h...
Step 4: Add an Assignment Element. Once you've retrieved the record i.e. step 3, the next step is to assign it to a queue. To do this, add an assignment element to the flow canvas. In the "Set variable" section, select the field that represents the queue, such as "Owner ID." of record equals the value as get the record. As per the ...
Learn how to assign records to a queue in Salesforce.Free Consultation: https://bit.ly/40rs0PGUpgrades: https://bit.ly/3z14UnpLinkedin: https://bit.ly/3z2OQl...
2. Create a Record-Triggered Flow whenever a case owner changes from Queue to a User then copy the original Case Owner ID (US Support Queue) to the above created (Step 1) field. b. Click on New Flow button, select Record-Triggered Flow and press Create button. d. Select Fast Field Updates and click on Done.
I am using flow builder to create cases and assign them to specific queues based on criteria within the flow. In the Assignment element, I can set OwnerId to a hard coded id string or a resource. I would like to use a resource to keep it dynamic, but am not seeing an obvious way to get the queue id by name.
Create a Queue: Go to setup and search 'Queue' in the quick find box. Select 'New' and enter the 'High Priority Team' label. Select the 'Task' object and choose the necessary Queue members to whom the system will assign the record in Supported Objects. Save the Queue. Configure Start: From Setup, enter 'Flows' in the Quick ...
2) Create a flow to assign the queue membership using your custom object. Create a new flow and get the record values for the Team Members record that was just updated. In the new flow, add an element for Get Records. In the filter conditions, you'll need to make a new variable. Pro Tip: Get in the habit of naming the first variable in the ...
Jun 17, 2022. In this Salesforce Flow Tutorial we'll cover how to assign a queue as a record owner in Salesforce Flow. Check out the video below: How to Assign a Queue as Record Owner in Salesforce Flow. Watch on.
Test the Lead Assignment Rule of Queue: Go to the Lead tab. Click New. Add Name, Company, and other details. Choose " Finance " from the Industry dropdown menu. Choose "Open - Not Contacted" from the Lead Status dropdown menu. Check the " Assign using active assignment rule " checkbox. Click Save.
When an Opportunity Stage is changed to "Approved" , create multiple Tasks and assign to different Queues - Create Task for 'Customer Management Queue' Create Task for one or both of the following queues based on value in Main_Company__c field. IF Opportunity. Main_Company__c = "KML" create Task and assign to 'KML Queue' IF Opportunity.
From Service Setup, enter Queues in the Quick Find box and select Queues . Click New and complete the queue details. Supported Objects: select Case and click Add . Queue Members: Click User: (Your Name) in the Available Members list, and click Add to add yourself to the Selected Members list. Click Save .
In this video, I'm creating a Record Triggered Flow to show you How to Assign a Queue as a Record Owner in Salesforce Flow.🧵Salesforce Flow Course Learn fro...
3. This can be done in two ways: 1) Using workflows: Make the workflow fire on only when the record is created. set the ownerid of case in the field update. 2) in the flow itself you can set the ownerid based on your criteria. Share.
Salesforce Queues prioritize, distribute, and assign records used by teams that share workloads. Use Queues in Salesforce for managing cases, leads, tasks, contact requests, orders, service contracts, knowledge articles, and custom objects.. This guide will cover how Salesforce queues work, and provide step-by-step guidance for setting up your first queue.
Resolution. You cannot specify a Lead owner while creating it, however, once the lead record is created, you can change its owner and assign it to the queue. Follow below steps to do so: 1. Open the newly created lead. 2. Go to Details tab. 3. Click on the 'Change Owner' icon on the Lead Owner field.
Here are some search tips. Search all of Salesforce Help. Prioritize and assign records to teams that share workloads. There's no limit to the number of queues you can create, and you can choose when queue member...
Assign the Interactive Steps in the Flows for Onboarding to a Queue. Work with the Sample App for Onboarding Applicants. Troubleshoot. Set Up and Manage Wealth Management. Set Up and Manage Common Capabilities. Set Up and Manage Add-Ons. Create a queue and specify the set of objects that are supported by the queue, and the set of users that are ...
Lightning Flows in Salesforce: How to Assign records to Queue using FlowsIn this video, we discuss how we can assign a record to Queue using Salesforce Light...
To set it, navigate to Setup | Users | Queues. Then, you can click the New button and create a new queue and set Task as the supported object. However, note that you are only able to assign Task to Queues when you are at the Task tab in Lightning Experience. If you are creating a Task under the Activity Timeline using the New Task action from a ...
2. When you assign record to QUEUE any Queue member can take ownership of the record. It will allocate to only one user in the queue. All users have options to take the ownership but only one user can take ownership at a time. So in case if any user is on leave then other user can handle that case. You also have option to send notification ...
Account plan template creators then assign tasks to the queue. When a new action plan is generated, a newly created task is added to the queue, ready for pick-up by a queue member. From Setup, enter Queues in the Quick Find box, then select Queues. Click New and enter a label and queue name. The label is the name of the list view that users ...
From Setup, in the Quick Find box, enter Queues, and then click Queues. Click New. Enter a label for the queue. Add an email for the queue if necessary. Select Send Emails to Members. Under Supported Objects, from the Available Objects list, select Shift. To move the shift object to the Selected Objects list, click Add. Under Queue Members ...