Things you buy through our links may earn Vox Media a commission

How to Make a Realistic Duplicate of Your Head and Face (for Zoom)

Wouldn’t you love a guilt-free break from Zooming? Try to imagine it. The ability to have a single night’s relief from screaming into a computer during an ultimately dispiriting facsimile of a “hang-out” with your friends or loved ones, without the stigma that accompanies turning down the invitation. The ability to act as a sounding board for your in-laws’ thoughts about lifting isolation restrictions, without having to be a sounding board for your in-laws’ thoughts about lifting isolation restrictions. The ability to present an attentive audience for your boss during a “meeting,” while you just close your eyes or lie on the ground or do literally anything else, for the love of God.
Believe me when I tell you: I can bring you this relief.
“Papier-mâché,” which is French for “chewed paper,” has been used in various forms since 200 B.C . The method of using pulpy scraps of paper, combined with paste or flour, was particularly big with British people during the Georgian and Victorian periods , when it was mostly used to create decorative objects. Now, in 2020 A.D, an American has used the method to cover a balloon in order to create a realistic head and face stand-in for video conferences. (Me.)
To make my head , I turned to the WikiHow page for “How to Make Mannequin Heads.” My method varied somewhat, so I’d like to walk you through it. Here are the materials you’ll need to create your own head, which we will discuss in greater detail as we come to them.
•Balloon •Empty soda can •Coins or sand •Newspaper •Flour •Water •Paintbrushes •Paint •Bravery
Step 1: Prepare Your Base and Balloon

For the base, or “neck,” I cut the top off of a seltzer can. Your base needs to be weighty to support the eventual papier-mâché, so WikiHow suggests you fill it with sand. I don’t keep sand in my apartment, so I used coins that I’d previously kept in a bag. Now the coins are in my head, which is functioning as sort of a piggy bank.
I happened to have a bag of party balloons in my apartment already. If you aren’t quite as prepared, you can check your local convenience store. If you find they don’t carry balloons and roll the options around in your head and realize the next-best thing to balloons is condoms, well, I won’t judge you. And don’t be embarrassed. “I’m not using them for anything weird,” you can tell the person behind the counter. “They’re just for a mannequin.”
Cover the jagged edges of your can with tape, and put your balloon in there, on top of the coins. Then tape it to the can sturdily, using my handsome photo (above) for guidance.
Step 2: Coat the Balloon With Flour Mixture and Paper
The recipe for the flour mixture is two parts water to one part flour. Now, I know flour is hard to come by . If you’d like to make a head but you’d rather not waste the flour, there are some alternative options to be found through searching online . They’re mostly glue-related. Maybe you have glue?
Cut your newspaper (“skin”) into strips, and dip the strips into your mixture. I’ll warn you not to make too big of a batch of the flour mixture at any one point, because you have to wait between newspaper coats, and each coat can take several hours to dry, during which time the mixture becomes gross.
Dip your newspaper, take off the excess paste, and place it on your balloon; continue on like this until the balloon is covered. When she’s all dry, you can do another full coat. Attach four coats of newspaper in total. This took me two days, but maybe the air in your home is drier. Consider placing your head in the window so she might have a view while she becomes herself.

Step 3: Make Your Nose
You can add other facial features, too, but I found the nose was the only one that seemed particularly necessary in telegraphing a head. Attempting to duplicate my nose as exactly as possible, I folded up some newspaper into a nose shape, and taped it (using painter’s tape) to the skull. Then I covered it with some of the newspaper and paste mixture. The head was finally beginning to become very similar-looking to my own.

Step 4: Paint Your Face and Outfit

When your features are dry, it’s finally time to paint. First, paint on your flesh. Then, it’s time to choose a permanent outfit to paint onto the neck. I recommend not going with anything particularly flashy — you don’t want people noticing that you’re wearing the same blouse with a decorative keyhole neckline in every Zoom, for example. For my outfit I chose a simple black turtleneck, which my colleague Emilia Petrarca once called “the official getup of those with something to hide.” What am I hiding? Of course, the fact that I’m not really there at all…
Then all you have to do is look into a mirror and paint on your exact face. Take your time with it. Really look at the shape of your eyes, the length of your eyebrows, the placement of your lips. It doesn’t need to be photorealistic, exactly, as the Zoom feed tends to be a little blurry anyway, but it should be as close to your real face as possible.

Step 5: Figure Out Your Hair
Do you have yarn? If you knit, you can use the yarn from your knitting. I don’t have yarn, and didn’t realize that I didn’t have anything that could realistically act as hair until it came time to put the hair on, so I (smartly) used more newspaper strips and painted them the color of my hair, which is brown.

My hair is curly, so I also curled the “hair” by scrunching it with my hands. I also dabbed on some “blush” (pink paint mimicking Glossier’s “Cloud Paint” in “Puff”) to my face, to look Zoom-ready . The effect, you’ll agree, is quite stunning. (I promise you what you see below is not a picture of a human head. It is, in fact, papier-mâché.)

Step 6: Get Zooming
Ah, and now to experience the fruit of our labor! Set up your second head and get “Zooming”!
You can Zoom with your c-oworkers.

You can join a “happy hour” Zoom with your family.

You can take part in a “celebration” Zoom (the party hat) with your boyfriend.

And you can “hear” all about your dog’s day.

Some Questions and Answers
Now, I know you might have some logistical questions about using your second head. I’ve done my best to anticipate them and have answered them here.
Will people in the Zoom notice I’m not talking? Yes, but this can be solved several ways. The easiest is to place yourself on mute, assuming other people will think you’ve done it by accident. If you’re called upon to speak and the result is silence (even though you’re clearly in the call, everyone can see you) someone in the group will eventually notice you’re on mute. “Hey, you’re on mute!” they’ll tell you. “You’re on mute!!!” Eventually they’ll get tired of trying to make you understand that you’re on mute and they’ll move on to someone else.
If you must speak — maybe it’s a work call where you have to, at some point, present an idea — make sure to stay within earshot of the computer. When it’s your turn to talk, crawl beneath your screen and slowly rise up, replacing your second head with your first (real) head as you go. After you’ve finished speaking, do the same move in reverse. To the other Zoomers no change will have taken place, and you can get back to what you were doing.
Will people in the Zoom notice I’m not moving? No, I don’t think so. I suspect most people in Zooms either look at themselves or at the person talking. Since you won’t be talking, I don’t imagine many people will look at you. If you run into an issue (maybe you hear some murmuring about how you’ve become oddly still) text someone in the Zoom, “Ugh, do you guys see me waving? I think my Zoom might be frozen.” Ask several times (“Can you see me waving now?”; “I see you guys moving but I don’t know if you can see me”; “Does anyone know how to get it to unfreeze?”) until they stop bringing it up.
Should I feel guilty about using my second head when people usually just want to Zoom with me because they love me and miss my company? If you’re the type to create an ultra-realistic version of your head to use in a Zoom call just so you don’t have to decline the invitation, I have to assume you’re going to experience some guilt here, yes. I suggest burying it. What your loved ones don’t know (that you’re not really there and that they are, in fact, talking to a papier-mâché head) won’t hurt them.
What do I do with my head when I’m not using it for Zoom? I’d suggest keeping her by an open window where she can feel the breeze and see the sights. Alternatively, you can sit her next to you while you watch TV. She isn’t just a Zoom head, you know. She’s a friend.
- excellent ideas
The Cut Shop
Most viewed stories.
- Madame Clairevoyant: Horoscopes for the Week of April 7–13
- Get Ready for the Solar Eclipse in Aries to Change You
- Behold, the Ballet Sneaker
- Cracks Are Back
- The Case for Marrying an Older Man
- What We Know About the Mommy Vlogger Accused of Child Abuse
- The Moms Who Smoke in Secret
Editor’s Picks

Most Popular
What is your email.
This email will be used to sign into all New York sites. By submitting your email, you agree to our Terms and Privacy Policy and to receive email correspondence from us.
Sign In To Continue Reading
Create your free account.
Password must be at least 8 characters and contain:
- Lower case letters (a-z)
- Upper case letters (A-Z)
- Numbers (0-9)
- Special Characters (!@#$%^&*)
As part of your account, you’ll receive occasional updates and offers from New York , which you can opt out of anytime.
- PRO Courses Guides New Tech Help Pro Expert Videos About wikiHow Pro Upgrade Sign In
- EDIT Edit this Article
- EXPLORE Tech Help Pro About Us Random Article Quizzes Request a New Article Community Dashboard This Or That Game Popular Categories Arts and Entertainment Artwork Books Movies Computers and Electronics Computers Phone Skills Technology Hacks Health Men's Health Mental Health Women's Health Relationships Dating Love Relationship Issues Hobbies and Crafts Crafts Drawing Games Education & Communication Communication Skills Personal Development Studying Personal Care and Style Fashion Hair Care Personal Hygiene Youth Personal Care School Stuff Dating All Categories Arts and Entertainment Finance and Business Home and Garden Relationship Quizzes Cars & Other Vehicles Food and Entertaining Personal Care and Style Sports and Fitness Computers and Electronics Health Pets and Animals Travel Education & Communication Hobbies and Crafts Philosophy and Religion Work World Family Life Holidays and Traditions Relationships Youth
- Browse Articles
- Learn Something New
- Quizzes Hot
- This Or That Game New
- Train Your Brain
- Explore More
- Support wikiHow
- About wikiHow
- Log in / Sign up
- Arts and Entertainment
How to Make Mannequin Heads
Last Updated: March 29, 2019
wikiHow is a “wiki,” similar to Wikipedia, which means that many of our articles are co-written by multiple authors. To create this article, 12 people, some anonymous, worked to edit and improve it over time. This article has been viewed 270,892 times. Learn more...
Mannequins are used to display fashions and dressing a mannequin properly often distinguishes a product, increasing sales. Small shops, accessory stores, and decorators may not want to buy a whole mannequin when they have to only display hats or accessories. In these cases, all that is needed is a mannequin head and these can be created using paper mache and decoupage.
Papier Mâché Mannequin Head

- Fill a tin can 1/3 full of sand. Use masking tape to affix your balloon inside the can on all sides. Smooth down the masking tape wherever there are bumps. The can will serve as a neck to your paper mache head.

- Most paper mache recipes suggest 2 parts water to 1 part flour. You want your recipe to be a little bit thicker for your paper mache head, but feel free to dilute it with more water to make it easier to work with.

- Take a plain or patterned nylon sock or tights. Stretch it over the head of the mannequin head and the can. Knot it at the back of the can. This is the fastest way to cover your mannequin with a layer of fabric, as it does not require any drying time.

Styrofoam Mannequin Head

Community Q&A
- This is a very messy project. Work in clothes that can get dirty. Thanks Helpful 52 Not Helpful 12
Things You'll Need
- Masking tape
- Paints or spray paint (optional)
- Drop cloth (optional)
- Fabric (optional)
- Nylon sock (optional)
- Styrofoam mannequin head
- Decoupage glue
- Pieces of colored or designed paper
- Foam paint brush
- Plate or wooden base
- Hot glue gun
You Might Also Like

- http://www.papiermache.co.uk/forum/viewtopic.php?id=2335
- http://en.wikipedia.org/wiki/Decoupage
About This Article
To make a mannequin head with paper mâché, start by blowing up a balloon to the size you want your head to be. Then, tear newspaper into several 2-inch by 6-inch strips, and dip them in a paste made of 2 parts water to 1 part flour. Smooth the strips over the balloon one at a time until it’s completely covered, and create details like a nose and mouth by wadding up newspaper, taping it to the head, and covering with more wet strips. Once it’s dried, smooth out edges with a light coat of spray adhesive. For more ways to make mannequin heads, like how to use decoupage to create a stylish wig holder, read on! Did this summary help you? Yes No
- Send fan mail to authors
Did this article help you?

Featured Articles

Trending Articles

Watch Articles

- Terms of Use
- Privacy Policy
- Do Not Sell or Share My Info
- Not Selling Info
Get all the best how-tos!
Sign up for wikiHow's weekly email newsletter
- Video Library
- Monthly Collection
- Craft Academy
- Paper Flowers
- Felt & Fiber
- Kid's Crafts
Paper Mache Animal Heads

- Copy Link
Join our email list to learn about new projects, discounts, and membership perks!
Goodies You Can't Google
You've found a member-exclusive project. But for less than the price of a fancy coffee... You'll get instant access to this and over 2,000 other premium projects inside the Lia Griffith membership!

Taxidermy at its Most Adorable
Our guest designer Jessica from Bramble Workshop is at it again with another gorgeous paper mache project that you can incorporate into your home decor (be sure to check out these paper mache cacti if you missed them!). Today’s project is a set of paper mache animal heads with a woodland theme. We’re calling these adorable animal heads our cruelty-free taxidermy. And we promise they are much more fun to make than real taxidermy too! These cute characters are a great way to add a bit of whimsy to a room, and because you are making them yourself you can easily do some customizing with designs or color palettes. Follow our tutorial below, or let this technique inspire you to make your own creations! You can find the tutorial for the crepe paper wildflower wreath here!
Tools
- Low Temperature Hot Glue Gun
- Bowl for Paper Mache
- Paintbrushes
- Wire cutters
- Wheat Paste
- Masking Tape
- Floral Wire
- Acrylic Paint
- Gather tools and materials listed above.
- Print the PDF template below. Cut foam core circles and bend floral wire according to the template.
- Crumple small balls of newspaper and begin taping to foam core circle. The circle is the base of the head and will hang flush with the wall.
- Push the wire ear forms into the head, securing with hot glue. Refer to the photo tutorial for a visual guide!
- Cover the entire head and ears with masking tape.
- Rip newspaper into strips. Dip each strip of newspaper in wheat paste, removing excess by sliding two fingers from the top to the bottom. Apply overlapping strips around the animal head until it is covered.
- Let the paper mache dry overnight, then paint the head with white paint. After the paint dries, draw the animals features (eyes, nose, etc.) with pencil.
- Using the pencil drawings as your guide, paint the head in your base color.
- Paint detailing on animal head, mixing colors.
- After drying, screw eye hook into the back center of the head and add some hot glue to secure. This is what you will use to hang the head on the wall.
- Adorn with a Crepe Paper Wildflower Wreath !
The steps in our tutorial are specifically written for the rabbit, but you should use the same general technique for the other two animals as well. While you are bringing your characters to life, think about the 3-D shape of the animal’s head. We recommend referring to photos of the animal from different angles to help you. As you can see in our photos, we dressed up our characters a bit with some crepe paper wildflowers and wreaths. Stay tuned for the tutorial for these pretty blooms in an upcoming post! Once you are finished with your paper mache animal heads, we love the idea of using them as nursery decor or accents for a kid’s bedroom. We are hanging them up in the studio to give us crafty paper inspiration for future projects, so get creative with how you want to display these!
Explore With Us!
Do you love paper mache projects? Let us know in the comments! We always love getting you in on the creative process, so add your feedback or suggestions for projects you want to see next on the site. Follow us on Instagram , Facebook and Twitter for daily inspiration, or head over to our membership page to start downloading. Share your project photos with us using #DIYDreamingWithLia and subscribe to our newsletter if you want projects delivered straight to your inbox. See you soon! ~ Lia & Team
All the Goodies You Can't Google 🎁
Tired of scrolling endlessly for the perfect project? Save time, money, and Google-induced headaches with us! Our membership makes it easy to create beautifully finished crafts without needing to look all over the internet for ideas and materials or spend lots of money on individual videos and templates.
Already a member? Click here to log in.
Ask Lia or the community!
Leave a comment cancel reply.
Your email address will not be published. Required fields are marked *
Save my name and email in this browser for the next time I comment.
18 Comments

Why do you cover it with masking tape?

Hi Jenny! Masking tape will hold the shape of the animal head.

Do you have a template for the other 2 designs as I can only find the bunny? Thanks

The template for the fox and bunny ears and foam core backer for all three animals is available for download at the bottom of this post.

do you have a video of this???
Sorry we don’t have a video! You can reach out to Jessica from Bramble Workshop who designed them if you have specific questions about how they’re made!

Where is the tutorial for the flowers? I would love to add some to my rabbit I just made!
Here! https://liagriffith.com/crepe-paper-wildflower-wreath/

I used the fox, but i love wolves so i made it a wolf, awesome tutorial
That’s great!!

W o n d e r f u l ! Thank you so much for sharing these adorable sculptures! I look forward to more of your paper projects!
Thank you Helen!

Hi. I would love to make these!! Where can I find foam core? It is not mentioned in your materials. Thank you, Carli
You’ll find it where poster board is sold at craft stores, or sometimes it’s available at the grocery store!

amazing! i cannot wait to make these! Thanks for the great ideas!
You’re so welcome, have fun!

Squeal! So Cute 🙂
Aren’t they amazing!?
Member Login
Email Address
Remember Me
Let your creativity bloom!

Join our email list to get a free flower crafting project bundle . Create four pretty peonies with the materials you already have on hand - in 60 minutes or less.
Your fresh picked peony projects are on the way to your inbox!
Continue Download?
This will use up one of your extra projects for the month.
Save posts to your craft room with the Lia Griffith membership.
Enjoy your freebie.
Join our email list to instantly download this freebie and get more DIY inspiration delivered to your inbox.
- Email Address *
- Hidden download_url
Already a member? Log in to get this freebie.
How to Make Paper Mache Heads
Things you'll need.
Flour or glue
Craft or newsprint paper
Acrylic paint and brushes
Salt (optional)
Hand blender (optional)

Paper mache heads decorate special occasions such as the "Day of the Dead" in Mexico, Halloween, parties and parades. The heads may be skeleton designs, cartoon-like characters or detailed copies of life-like animal or human forms. Paper mache is a medium that is pliable with a slow-drying process which enables the artist to take the time needed to create a sculpted form.
Advertisement
Select a round balloon that is large enough for the size of the head. Fill the balloon with air and tie it securely to keep its shape.
Video of the Day
Tear paper into strips. Mix equal parts water and either flour or white craft glue in a large bowl. Alternately, you can mix three parts boiling water, one part flour and 1/4 cup salt which is slowly mixed with hand blender for a smooth paste. It is best to mix such heated paste in small batches.
Place several paper strips into the bowl of paste. When the paper is saturated lift one piece at a time from the mixture. Strip away excess paste with your fingers and smooth the paper strip over the surface of the balloon. Completely cover the balloon with a layer of the paste and paper. When using heated paper mache, work with the paste only until the mixture cools down. Once your first layer is complete, add one or two more layers to the balloon and set it aside to dry thoroughly.
Cut pieces of cardboard to make a foundation for the ears and nose of the paper mache head.
Mix a new batch of paper mache paste. Place four-to-five-inch strips of paper into the paste. Place a piece of cardboard against the center of the front of the balloon to create the bridge of a nose. Paste it in place using the short pieces of saturated paper. Continue adding strips and form the full shape of the nose. Build the brow line of the face and concave area for the eyes with pieces of pasted paper. Keep adding paper to form the half-round shape of the upper and lower eyelids.
Set a cardboard ear against one side of the head. Paste it in place with small strips of paper. Position the ear in line with the eyebrow and the bottom of the nose. Continue adding pasted paper until an ear shape is formed and the cardboard is completely covered. Make a second ear on the opposite side of the head in the same fashion. Set the head on a large empty bowl and allow it to dry completely.
Paint the paper mache head with acrylic paint and brushes. Set aside to dry.
Pop the balloon by poking a pin through the layers of the dried papier mache if you require the head to be wholly enclosed.
The paper mache head may collapse if you try to paint it before the pasted material has dried to a hard shell.
- Mexonline: Day of The Dead
- The Papier Mache Resource: Giant Head
- First Palette: Paper Mache (Balloon)
Report an Issue
Screenshot loading...
Paper Mache Animal Heads (A Tutorial)
April 14, 2012 by Ashley Hackshaw

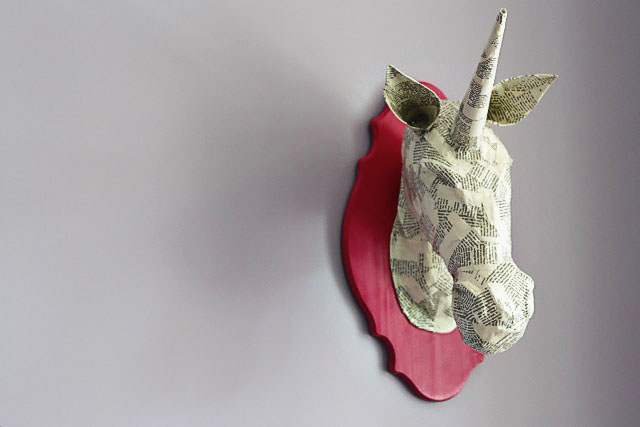
Another addition to Boo’s playroom….a paper mache unicorn head! It took about 4 hours total to make….over 3 days. I love that it’s whimsical 3-dimensional artwork appropriate for a child’s room.

I crumpled up newspaper and kept wrapping it into a ball until it was the size needed and secured it with masking tape:

I made three different sized newspaper balls to make up the entire head…..

….and secured them together with tape.

I wrapped the pieces in newspaper to help secure them and used tape to contour different sections:

I formed a neck out of newspaper and attached it:

I cut a heavy piece of cardboard to be the backing for the neck (the flat piece that will lie against the wall when mounted):

The cardboard was secured with masking tape:

I use a boiled paste for my paper mache mixture. 1 part flour to 4 parts water works for best for me but you can experiment with your own mixture to see what you prefer to work with. I bring it to a boil stirring constantly until it’s a soupy mixture.

Pouring the soupy paper mache into a bowl I let it cool for about a minute and then start tearing paper towels into small pieces. I use paper towels because they are easier to sculpt.

I dipped pieces of paper towel into the mixture…..

I press and sculpt the head as I go to give it the shape I want:

Once the head has been coated completely I let it completely dry overnight:

The next day, I cut out some ears…..

…..and made a horn by wrapping a sturdy piece of paper into a cone. I used masking tape to secure them into place.

I made another mixture of paper mache and used paper towel pieces to secure the horn and ears securely to the head:

Paper towels are great for sculpting….so I used pieces to create nostrils and more bone structure. It doesn’t matter what it looks like except for the basic structure because I’m adding another layer of nicer paper on top for the finish coat.

I built up layers and layers until the head looked like I wanted it to.

Then I let it dry overnight again!

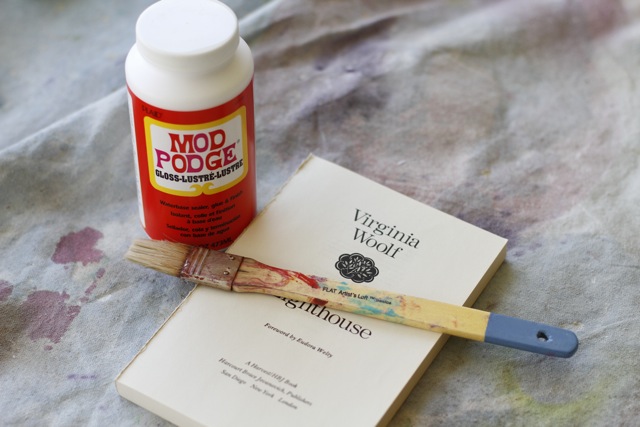
After the paper mache form had ample time to dry….I took an old book and some Mod Podge and used it to cover the entire form.
I cut up the pages into small piece and just started layering them over…….

….and over…..until the form was covered entirely.

I bought a pre-cut wood plaque from Michael’s for $5.00 using my 50% off coupon and spray painted it hot pink.

The final step was to attach the unicorn head to the plaque! I used industrial glue and a staple gun to secure it. The staples are easily covered with some more paper and Mod Podge.
I can’t decide what animal to make next!

Check out the entire Project Playroom series by clicking the image below!
About Ashley Hackshaw
Living a simple, creative life in #smalltownusa Bryson City, NC. Renovating a 1960s ranch house and an old train depot. Thank you for reading! Read more in my about section.
April 14, 2012 at 4:17 pm
I freakin’ LOVE this, Ashley!!! I can hardly wait to get started on one for the boys’ room and maybe even our room. Thanks for your amazing talent, friend!
April 14, 2012 at 5:07 pm
U could mass market these! I love the idea of putting it in a really serious, traditional room as a surprise element! Great job (as always!)
April 14, 2012 at 4:14 pm
Thank you soooo much Ashley. You are brilliant.
April 14, 2012 at 4:25 pm
Amazing! How fun for your daughter.
April 14, 2012 at 4:27 pm
Yay!!! I’m much too excited about this I’m sure but really really glad you did a tutorial. I’ve wanted a moose head with sparkly antlers for my wall since seeing on on pinterest but those things (even not sparkly) are pricey! Maybe sparkly moose will have a sparkly unicorn friend.
April 14, 2012 at 4:30 pm
Genius! I’m gonna do it. I glittered some antlers that we found and was gonna just mount those on a board but I like this idea now. Thanks for sharing all the steps.
April 14, 2012 at 4:32 pm
You are seriously amazing! I LOVE this !! xx
April 14, 2012 at 4:35 pm
This is so cute, very talented my dear. My granddaughter would love this, so may just try to make one. How you feeling keeping you in my prayers 🙂 as always.
April 14, 2012 at 4:36 pm
This is incredible! Love it!!!!!!!!!!!
April 14, 2012 at 4:38 pm
This is awesome!!! I love paper mâché but don’t do it nearly enough. Love this!
April 14, 2012 at 5:01 pm
This is brilliant! my daughter so wants one of these for her wall. off to raid my recycling bin for newspapers 😉 Thankyou for sharing this, hope your feeling well x
April 14, 2012 at 5:09 pm
Ashley, is there any type of craft or project that you don’t “EXCEL” at???? You come up with the most adorable projects, and the range is endless. From sewing, to leather, to paper mache, etc. etc………………………… Your imagination is so incredible, but the thing about it is that you do such an incredible job and anything you do! Your latest creation of the unicorn is unbeliveable. I love subscribing to your blog, I find it so inspiring. You are an wonderful craftsperson, wife and mother. Thank you for sharing all your “goodness” with your fans in blogland. Bless you Ashley and your beautiful family. Have a great week.
I fell in love with paper mache back in the 60’s when I was in college taking an art class, this makes me want to do it again. Beautiful job. I really like the book pages as the final layer. Take care.
April 14, 2012 at 5:47 pm
Ashley – – this is simply amazing. I love it! I haven’t done paper mache since probably grade school sometime, so I’m not sure how awesome my sculpting abilities would be at making a unicorn head . . . but your tute sure makes me want to try! You’re the best. 🙂
April 14, 2012 at 5:59 pm
I feel like you READ MY MIND! I’ve spent the past few weeks googling “paper mache unicorn” because I want to make EXACTLY THIS THING for my daughter’s room. And here you’ve got it all neatly packaged in a tidy tutorial just for me.
I love you.
April 14, 2012 at 6:20 pm
You seriously amaze me. You are an artist all the way to your soul. I’m glad “met” you here in cyber-space. I love that you captured the exact moment your creation went from odd pieces of paper mache to the obvious beginning of a lovely unicorn. It was like watching the beginning of life!
April 14, 2012 at 6:36 pm
I am so trying this ! Your blog is the best and I wish you health and happiness . You are so talented and such a strong person . Such an inspiration !
April 14, 2012 at 6:42 pm
That’s incredible! I’m pretty sure mine would not turn out looking that fab! Very, very cool.
April 14, 2012 at 6:43 pm
Great job on this head! Really nice work! Thank you for sharing!
April 14, 2012 at 7:09 pm
How cow girl! This is fantastic! Next I want to see an Elk ha! I wish I had seen this before I bought a cardboard one 😉 Though you are much more artistic then I and mine would probably end up a blob with my kids asking what in the world it is 🙂
April 14, 2012 at 7:11 pm
I LOVE this. However, it would just love very, very sad if I attempted it.
You are truly talented!
April 14, 2012 at 7:18 pm
Make a giraffe!!
April 14, 2012 at 7:40 pm
What?! Only you would go and create a unicorn head. LOVE IT!
April 14, 2012 at 8:38 pm
That is freakin’ amazing! You rock! ~Beth
April 14, 2012 at 8:41 pm
That is great! I’ll have to pass on this one. Paper Mache brings back 8th grade memories of my art teacher giving me a pity “B”; 1986 version of a participation award I think … It was so God awful.
I just don’t think she had the heart to crush our dreams. Out of 130 8th graders, there were like 6 really gifted kids.
If only she could see my Draw Something “talent” – she might feel a little better about her gimme grades
April 14, 2012 at 8:57 pm
Eventhough your talents never cease to amaze me, I’m afraid that this is one tutorial that I am going to have to pass on. Hope you had a great day! Love ya, Beth
April 15, 2012 at 12:20 am
So awesome – and the possibilities are truly endless! Thanks for the great how-to – I would never have guessed that you started with bulky balls of newspaper!!
April 14, 2012 at 9:26 pm
I love it! Such a wonderfully creative idea. Beautifully done!
April 14, 2012 at 10:06 pm
Impressive! I tried a paper mache dressform a few months ago and my results were pretty pitiful, so I am quite impressed with your talent. Also, love the pink background.
April 14, 2012 at 10:07 pm
You are so talented!! The unicorn looks great. Love the idea of paper towels. We’ve made pinatas but never a sculpture, so this will be a fun project! Thank you for sharing! 🙂
April 15, 2012 at 1:09 am
You have an amazing talent for creating things! You are truly a blessing.
April 15, 2012 at 1:51 am
Genious!!! I love it!!!!
April 15, 2012 at 3:23 am
Thank you for sharing that! I´ve got to try sometime!
April 15, 2012 at 3:47 am
Wow! It looks A-MA-ZING!!! But can I just say ….. I have made stuff out of paper mache for kids school projects, and they have Never come out half as nice as your Unicorn head, lol!!! You def have a talent at all things creative!!! xxxx
April 15, 2012 at 7:37 am
Is there anything that you aren’t great at? Wonderful tutorial.
Blessings, Shelley
April 15, 2012 at 8:50 am
Que cosa mas bella!!!!
En el post anterior vi el unicornio, y me parecio que era una taxidermis de caballo, y que le habias agregado un cuerno.
ES PRECIOSO!
April 15, 2012 at 11:16 am
i’m not sure mine would ever look that great. that unicorn is perfect and oh so adorable!
April 15, 2012 at 12:31 pm
This is really cute! I could use some fun decorations like this for my classroom!
April 15, 2012 at 12:55 pm
What an awesome project! Very creative!
April 15, 2012 at 5:08 pm
Okay, too complicated for my blood, but I LOVE IT! So great. I hope you are feeling well… seems like you have some of your energy back.
April 15, 2012 at 5:46 pm
This is truly inspired!! Thank you so much!
April 15, 2012 at 6:12 pm
You are so talented!! This is super cute!!
April 16, 2012 at 8:14 am
i love this! and a unicorn would totally be my first choice! i saw a tutorial very similar to this on vintagerevivals.blogspot.com last year sometime. anthropology sells them for about a gagillion dollars! she made a rhino head!
April 16, 2012 at 9:12 am
Woman, you are so insanely talented!! I know God blesses each of us with our own special skill sets, but your cup overfloweth! Great work, Boo is a lucky duck to have you for a mama 🙂
April 16, 2012 at 9:51 am
This is phenomenal! Absolutely incredible! I really have to do this! Catherine
April 16, 2012 at 5:39 pm
YOU ARE SO TALENTED! I WANT TO COME LIVE AT YOUR HOUSE 😉
April 17, 2012 at 8:53 pm
You are one talented lady.
April 18, 2012 at 6:37 pm
Oh lovely idea!!! I really love your tutorial!
April 18, 2012 at 9:32 pm
You’re a really great sculpture. My unicorn head would have turned out to be a really large clothes hook.
April 20, 2012 at 11:50 am
WOW! What an amazing DIY project!
April 20, 2012 at 7:20 pm
Seriously and totally cool! What a fantastic project. I know what I’m doing next week thanks to you! Thanks for the inspiration and how-to.
April 21, 2012 at 3:49 am
This is so cool! It looks great. And the fact it’s a unicorn makes it even better!
April 21, 2012 at 11:38 pm
I am now convinced that you can make absolutely anything! Love it!!!!!!
April 24, 2012 at 10:29 pm
Thanks so much for this tutorial! I made one for my best friend as a graduation gift. She’s getting an MFA in Creative Writing, and this was so whimsical and appropriate–she loved it!
April 25, 2012 at 5:56 am
Wow!!! ♥LOVE♥
April 26, 2012 at 8:11 pm
I will try this with my students! Will try other animals head! Thanks
May 3, 2012 at 4:48 pm
I am doing this right now! I’m making a chihuahua and a giraffe. So excited!
May 16, 2012 at 7:47 am
This is amazing and you have so much patience!!! Seriously.
May 16, 2012 at 11:32 pm
I love this, but I can’t find a similar mounting plaque. In what section of Michael’s did you find yours?
May 17, 2012 at 8:57 am
You should be able to find them in the section with all of the wood material. Take a photo to Michael’s and they should be able to help you find one 🙂
May 17, 2012 at 1:24 pm
Thanks for the tutorial! I never thought to use paper towel as a paper mache medium, and it works much better than newspaper. I made myself a moose bust, which I featured on my blog and tracked you back as a reference.
Love your website!
May 20, 2012 at 11:46 pm
This is AMAZING! I was desperate for a faux deer head like some I have seen on etsy. I bought a fake furry deer head but it’s just creeping me out. Now I can make my own instead! Either a deer or a rhino.
Thanks for a great tutorial and I lurve the colour and text combo – well done!
May 23, 2012 at 6:25 pm
I am curious about where you found the plaque. Can you get them at Michaels or Joanns?? This is gorgeous!!
May 23, 2012 at 6:29 pm
Hi Liz, I got this plaque at Michael’s in the woodworking section.
May 23, 2012 at 6:42 pm
Thank you so much! I was going to make that myself. That would have been a waste of time!!
May 29, 2012 at 11:31 pm
I can’t believe you came up with this idea! It’s so unique. 🙂
June 26, 2012 at 6:17 pm
I fell in love with these at Anthropologie but didn’t want to pay the $70 they were asking… this is my weekend project. Can’t wait!
July 9, 2012 at 6:06 pm
July 30, 2012 at 6:36 am
Love, love, love your unicorn! What a great tutorial too, thanks! I have this linked to my animal art post as well today, for inspiration!
August 19, 2012 at 3:19 pm
you should totally make a peacock
August 28, 2012 at 3:49 am
Thank you so much for this post. It is absaloute genius.
I am about to have my first baby and desperatley want animal heads in their room. I have been searching around the internet and the prices of these heads shocked me. So, your blog post has been my life saver.
Would you mind if I pop a link up to this post on my blog please?
August 28, 2012 at 9:40 am
of course! thank you so much!
September 10, 2012 at 8:31 am
I was inspired by your project to make different animals with my students. Check it out! thanks for all your creativity, it keeps me going! Saludos, Cristina
November 20, 2012 at 5:27 am
Hi! I just wanted to let you know I mentioned this post on my blog. I made the picture link back to your site but if there is another way you would like me to link back please let me know! Thanks, Jillian
December 18, 2012 at 6:06 pm
Very very cool. I have adapted your paper mache’ method to make Christmas angel bodies.
I made the angels wing shape base of heavy paper and then (many!) feathers were cut out from regular weight paper and glued on. A little gold spray paint and WOW!
Thanks and may the spirit of creativity and joy surround you always. Happy Holidays!
February 22, 2013 at 12:05 pm
I’ve been wanting to make something like this for a while, thank you for the details tutorial!
The paper towels are a great idea. I’m sort of fascinated that you used a classic book for the top layer. To The Lighthouse is one of my favorites, I don’t know if I could ever cut into a copy…. but it is pretty cool to find snippets of recognizable text on a piece of art.
April 4, 2013 at 9:35 am
Um i have done everything up to the first day. So i let it dry and its still really wet. How do you make the paper mache mixture exactly?
April 5, 2013 at 5:14 pm
Do you live in a very humid area? I just mixed flour and water on the stove top to make soupy mixture. You could try using a hairdryer or put it out in the sun to speed it along.
April 8, 2013 at 5:49 pm
This is amazing! I love it!!
http://www.mariacroqueta.blogspot.com.ar
April 9, 2013 at 5:45 am
I love this. I need a unicorn head in my life!
April 10, 2013 at 10:18 am
Amazing! You are talented and very nice to share. I can see many reasons I MUST try this! LOL Thanks
May 8, 2013 at 4:16 pm
you should have pinted it
July 31, 2013 at 10:49 pm
You could definitely see your enthusiasm within the article you write. The sector hopes for even more passionate writers like you who aren’t afraid to mention how they believe. At all times follow your heart.
August 15, 2013 at 2:08 pm
if only all tutorials on the internet were as thorough and simple! This is soo cool. I will try this and let you know how beautiful and easy it was as a direct result of your phenomenal tutorial : )
October 19, 2013 at 2:39 pm
paper towels, your idea? GENIUS!!!!! AB-SO-LUTELY!!!! I have been making variations of these and this is a bit delicate but much better for weight, quickness, and nicely realistic….LU-UU-UU-UU-UVVV! thx so much for sharing…definitely trying!! ~smiles~
October 19, 2013 at 2:41 pm
btw….pinned many times…wink & smiles….
October 31, 2013 at 9:31 am
So cool! Using this to inspire a middle school art lesson!!
December 18, 2013 at 1:10 pm
Yay! Thanks for this tutorial! I was having flashbacks to my high school art classes while I made it. See mine here: http://thingsthatfloatmyboat.blogspot.com/2013/12/faux-and-mini.html
December 24, 2013 at 3:06 pm
Thank you for your excellent tutorial. I used it to make a raindeer head which I set into a Christmas wreath on the wall. I used two branches for the antlers. It looks very funky with a touch of Christmas
January 2, 2014 at 9:32 am
Could you please to a tutorial on a moose head? This is for a high school art project and is very important.
January 12, 2014 at 3:23 pm
llooooooooove it tried it myself
January 21, 2014 at 7:20 pm
This was the BEST tutorial ever. I’m in love with my new unicorn! I blogged about my attempt with pictures on my site if you want to check it out! Thank you for posting this!
Ricky Patassini was commissioned to make a giant sized head of David Oppenheimer and this is how he did it.
You will need
- Packaging foam - Glue gun and glue sticks - Cords of varying diameters for wrinkles (twine and shoelaces are good) - Styrofoam balls from hobby shop for eyes - Packing straw or shredded wood for beard - Used black shag sweater from the thrift store - Kraft or other paper
Introduction
This mask was commissiond by the Oppenheimer group to commemorate David Oppenheimer day in the city of Vancouver.
Gather enough foam. I suggest LDPE packaging foam . This foam is non toxic and odourless, unlike most other foams. It's the type one gets typically in computer boxes. I found that computer stores etc. were more than happy to sell a huge plastic recycling bag for $10 Canadian. The larger the head, the more you need; I found that you will lose a 5th to 1/4 in construction. Another source of foam is drought sealer expanding foam; however, it tends to get a little pricey for large pieces.
Step by step
Create the head template; this will be the rough 3d guide. Normally the cross bar would be eyebrow level, but for my mask I gave him a higher forehead to project leadership qualities.
Create two boxes.
Note: LDPE foam is temperature sensitive and easy to melt, so spread the glue on a stick first, waiting a moment before smearing on the foam.
Be sure to glue with the foam grain facing outwards (embedded strips). This makes carving later much easier.
Glue corner gussets that are the same thickness as the sides. Create panels first then assemble larger sections, making sure to glue the seams on inside, otherwise they can be difficult to cut later.
Here I trimmed the top (this helps to give perspective as to the basic shape), remembering to cut length ways along seams.
Useful areas
Artist login, frequently asked questions, glossary of terms, papier mache art & design.
Now also in print!
Papier Mache Art & Design E-book
Available now
THE SWEETEST DIGS
Creating a stylish, simple & handmade home.
The Easiest DIY (Faux!) Paper Mache Animal Heads
Do you have some kind of faux taxidermy up in your pad? Have you jumped on board the trend? I happily admit, I love a good white deer head like the rest of them.
If you have wanted to get something like that for a kids nursery or bedroom, then this DIY tutorial is for you. Forget the sloppy paper and mis-shapen busts of going the usual paper mache route. This version of faux (!!) mini paper mache animal heads is going to take you no time and look SO cute.
So many colours and animal choices – you’ll be able to make a bunch!
Here’s What You’ll Need:
[Please note that some affiliate links have been used.]
- Plastic toy animals . You can choose whatever mixed bag of animals has the types of animals you want – dinosaurs, farm animals, jungle, sea life, etc.
- A saw, sharp utility knife, or heat knife. You’re going to need something to cut your animals in half (the horror!)
- Sandpaper. Just some medium grit sandpaper to sand your plaques and animals lightly before painting.
- Wood plaques . You can get a variety of shapes, so just pick the one(s) that you like best. My faves ended up being these circles and square ones .
- Paint. Standard craft acrylic paint is all you need. I’m a big fan of the colours in this set (Martha Stewart, of course!).
- Foam brushes .
- Hot glue sticks.
- Velcro strips for mounting .
DIY Animal Heads Tutorial:
Step 1: chop off animal heads.
Yep, you gotta de-capitate those little guys. Because they are hard plastic, it can be a bit of a pain to actually chop these bad boys in half. Use a hand-held saw, a sharp utility knife, or a heat knife if you have one. Then just hack away at your animals, trying to cut as straight as you can.
Depending on the animal you choose, you may have to chop off part of the middle of the body too. This is only if you want to do the animal head plus butt — if there is too much midsection, the butt will stick out too far.
See the cow in the pic below? Most of its mid-section was cut out, leaving the head and bum with the same general depth. Make sense?
My girlfriend Caroline and I run a DIY workshop business here in Ottawa ( check it out here if you’re local! ). We actually did this DIY for one of our events, hence the huge number of decapitated animals in these pics. Ha!
Step 2: Sand & Paint
Once your toy animal pieces are ready, then it’s time to choose the plaque you want to use for it. Make sure you figure out placement before painting – the circle plaques tend to only fit one animal piece, whereas the square or rectangle plaques leave room for head and bum.
Give both the animal pieces and the wood plaques a quick sand. Nothing too extreme, but just to rough up the animals and smooth out the plaques.
Then paint all pieces with whatever colour of paint you choose. Regular craft acrylic paint is all that’s needed. Know that the animal pieces take a lot of paint for good coverage, so you’ll need to do probably 4 coats. We found that foam brushes were the easiest thing for applying the paint.
Step 3: Hot Glue
Once all of your pieces have dried (let that happen overnight), it’s time to glue them together.
Just put hot glue along the back rim of the animal piece and press down onto your plaque. Hold it in place for about 20 seconds before letting go. Don’t stress about there being a bit of glue being visible. Once it has all cooled, simply do a last coat of paint on top and it’ll all blend in.
So cute, right?!
In terms of affixing them to the walls, we found that the easiest way was to use some wall mounting velcro strips .
Stick some on the back of the plaque, then a piece on your wall, and press together. It means that the plaque is flush with the wall, and little hands won’t be able to pull them down!
We did a whole bunch of these at our workshop. You can see below all the fun colour and animal combinations. One of our participants did two different colours for the animal and the plaque, which turned out really nicely too (not shown – I forgot to snap a pic!).
I love them so much! I’m re-doing a section of Maya’s room soon and she chose a pink pig so I’ll be incorporating it into her new gallery wall.
Don’t forget to pin it!
If you like that project, you might also be interested in checking these out:
My daughter’s nursery – a pink and mint dream!
How to create a scandi style accent wall , like we did in my son’s nursery.
The DIY mountain mural – a super easy (and budget friendly!) wall art project.
And lots more ideas over in the DIY Project Gallery .
This Ole Mom
July 31, 2019 · 2 Comments
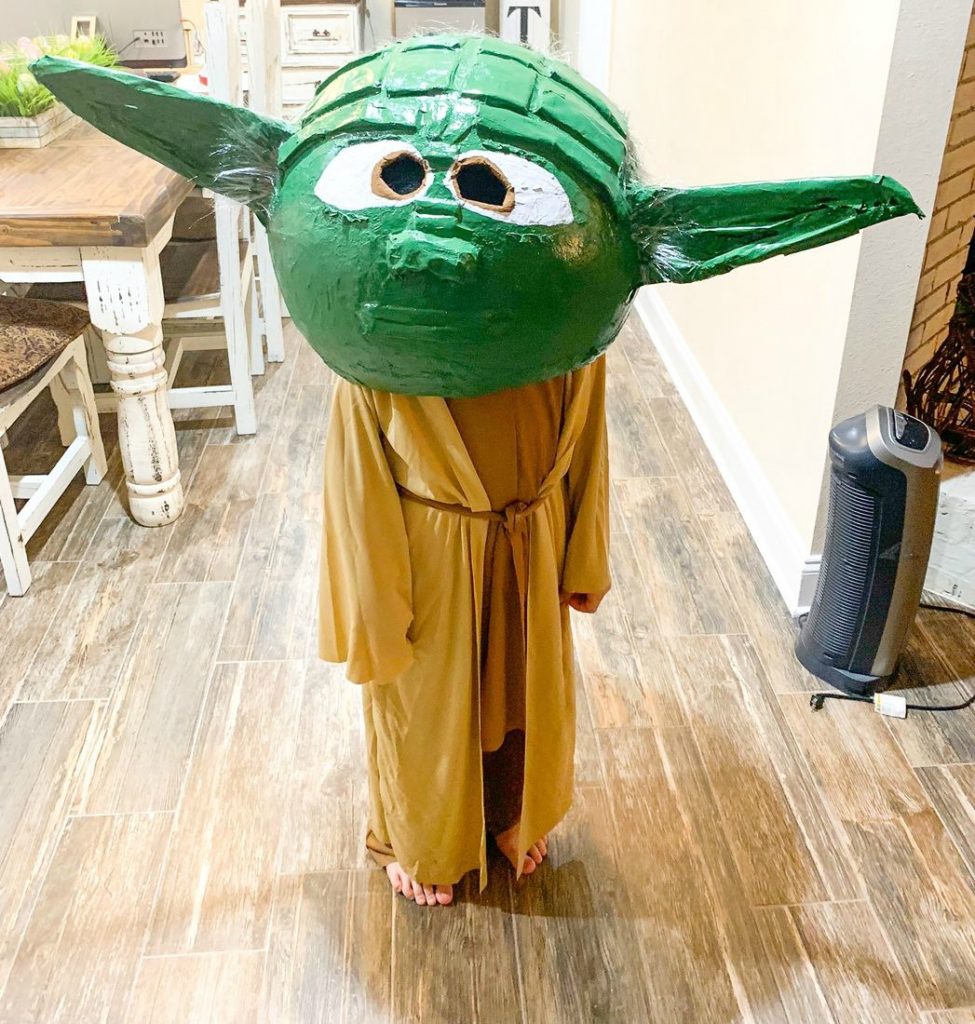
Yoda Paper Mache Head
Crafts · DIY · Halloween · Star Wars
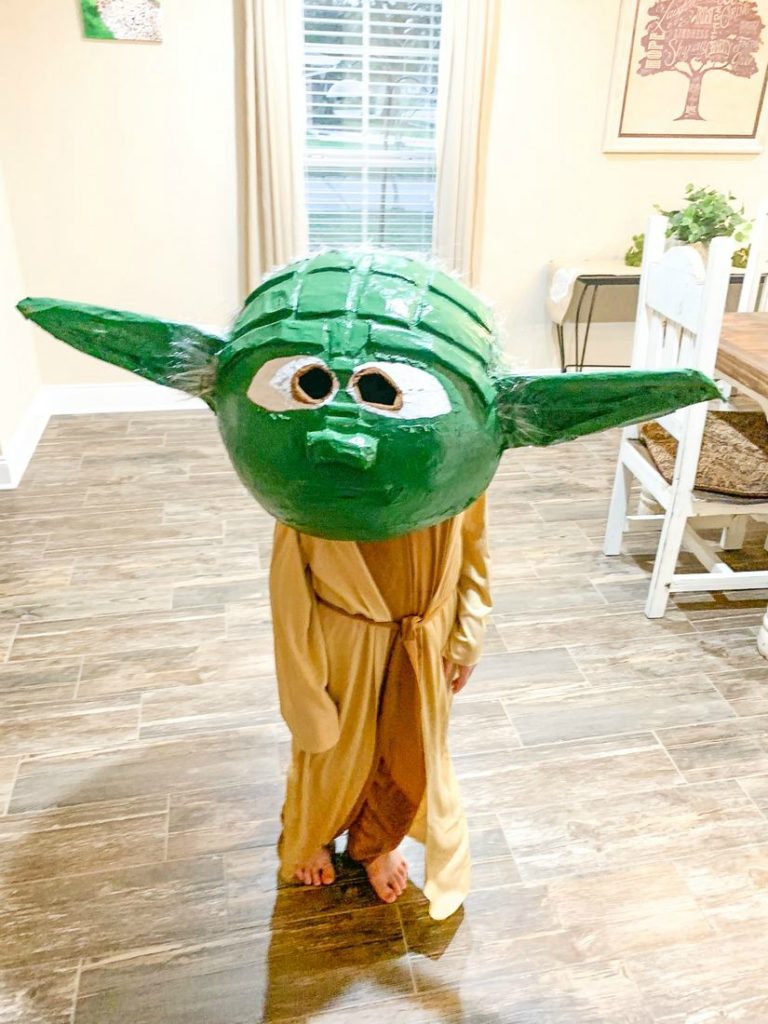
Learn how to make a Yoda Paper Mache Head using newspaper, flour, and water. The step by step tutorial will have you wearing the DIY Yoda Head in no time!

Star Wars fans will enjoy making this large Yoda Head of their favorite Jedi Master.
It’s the perfect mask for kids or adults to wear for Halloween and to show off at Comic-Con or Fan Expo.
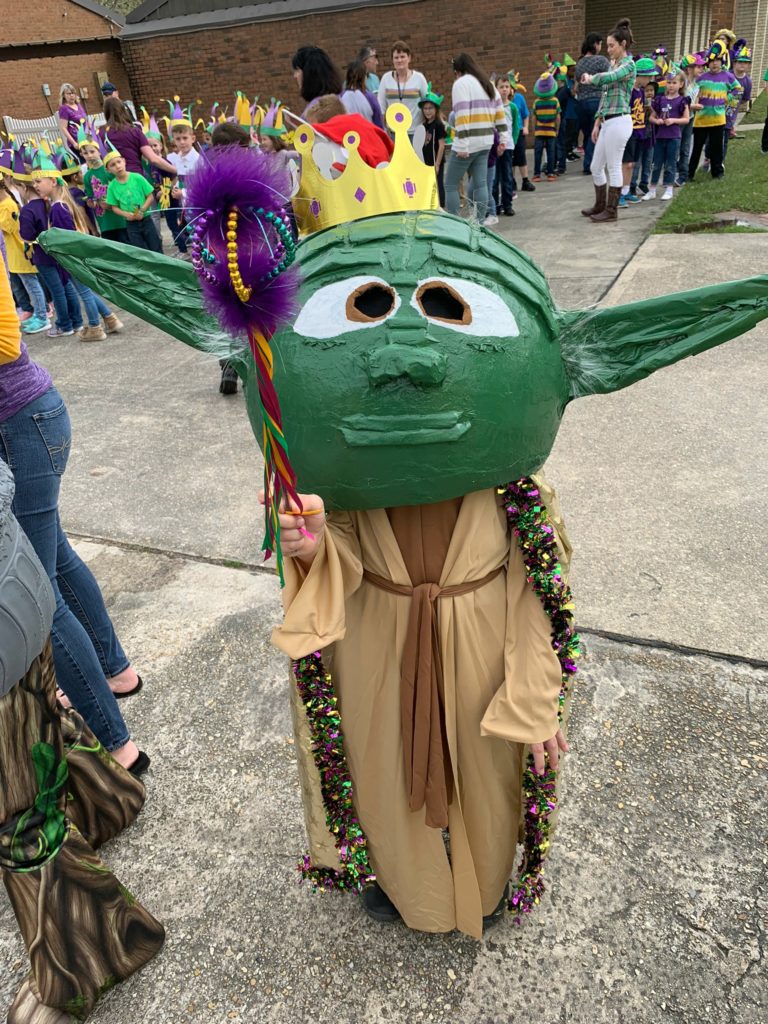
Additionally, the paper mache mask is also excellent to wear for Mardi Gras.
My son and I made this giant Yoda head for him to wear during his school’s head parade.

Every year before Mardi Gras break the third graders at my son’s school parade around the school parking lot.
They wear giant paper mache heads made with help from their parents.

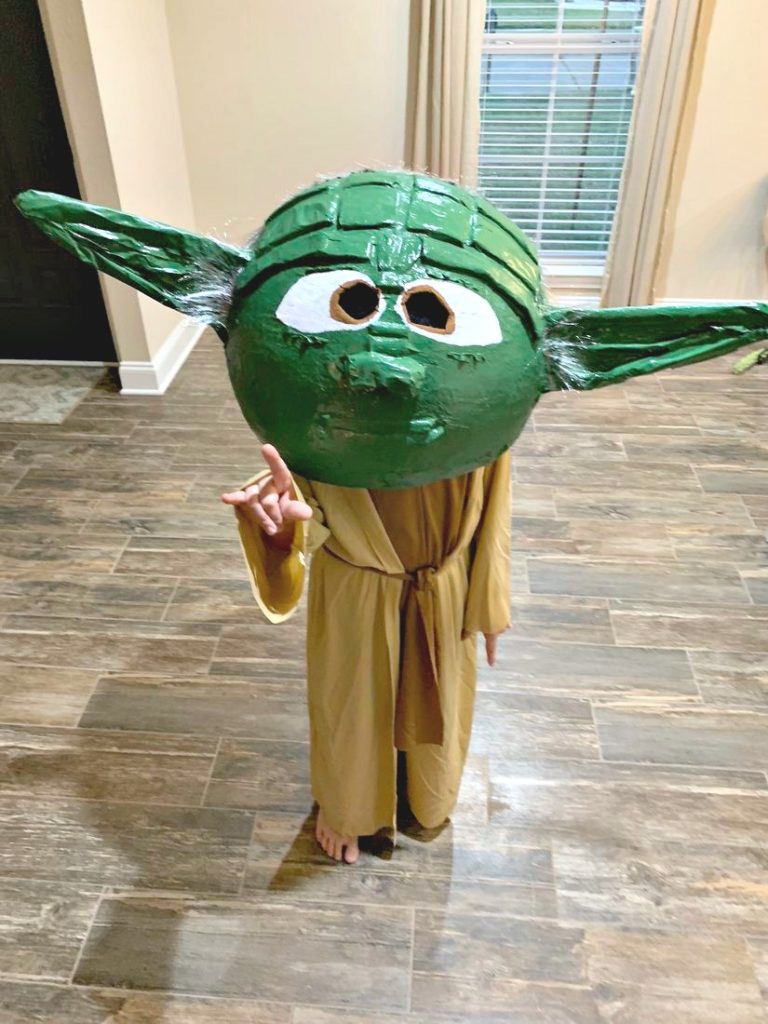
When my son decided to make Yoda for the parade, he knew he wanted to save the giant head to wear for Halloween.
Of course Yoda will have a Lightsaber for Halloween.

If you know how to make a pinata, then this paper mache Yoda mask will be a cinch for you to make.
Even if you’re not an expert at paper mache or pintas, this tutorial will help you feel confident enough to make this Star Wars Jedi Master paper mache mask.
What you need for the Yoda Mask:
- extra large play ball or beach ball
- newspaper torn in long strips
- extra newspaper
- white copy paper torn in long strips
- paper mache glue with flour and water (see instructions below)
- masking tape
- hot glue gun
- Hot glue gun finger silicone caps
- cardboard (empty cereal boxes)
- gray wig for kids (Yoda’s hair)
- E6000 Industrial Strength adhesive
- paper bowls
- 2 cans green spray paint
- white acrylic paint
- brown acrylic paint
- paint brush
- black tulle
- plaster wrap
- plastic tablecloth (Dollar Tree) or old shower curtain
- Optional: Yoda Star Wars Costume
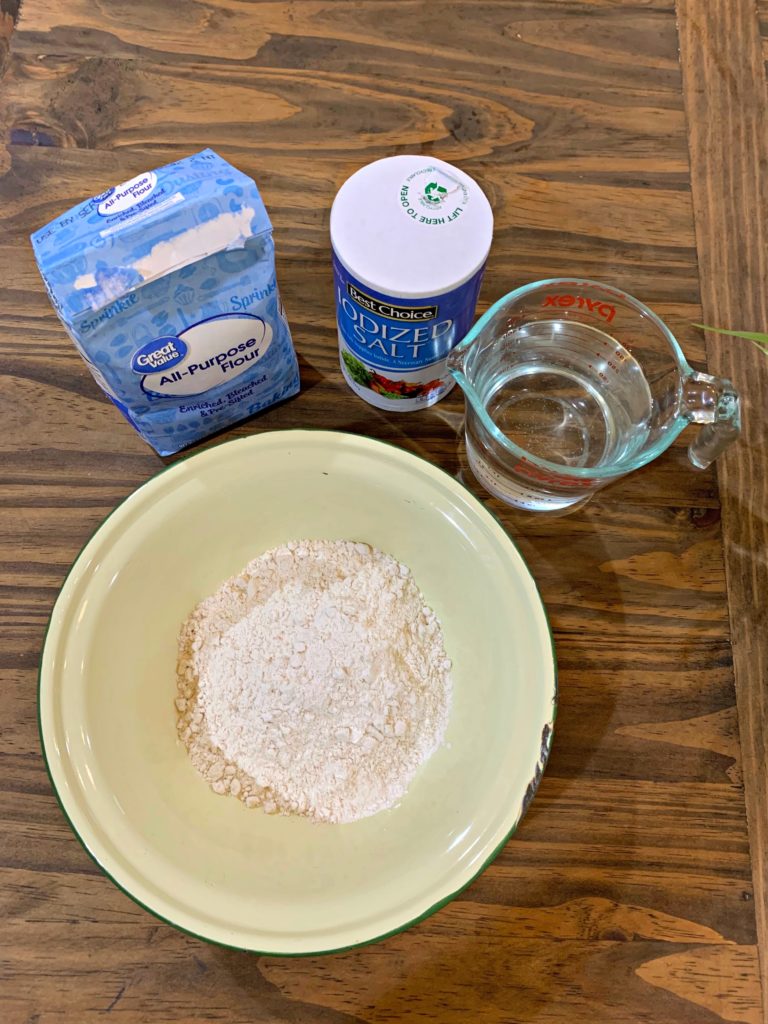
How to Make Paper Mache Glue
Making the paper mache glue is simple with ingredients you probably already have in your kitchen pantry.
We used only water and flour to make the non-cook paper mache glue, which is very inexpensive and a little messy.

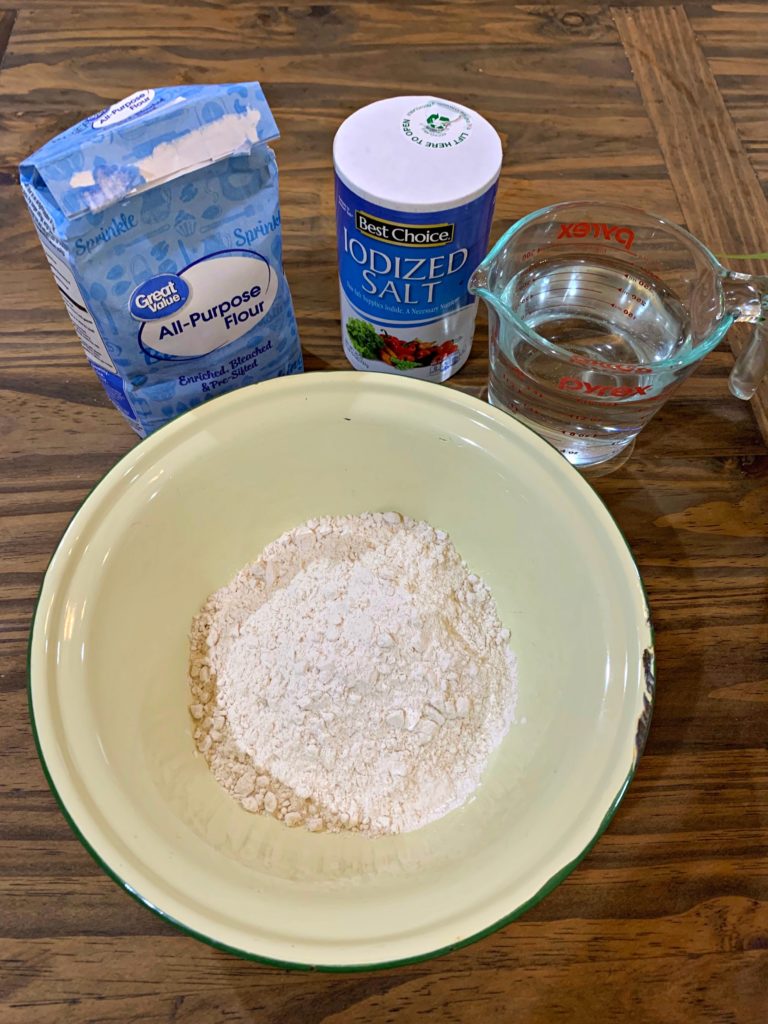
- You will need 1 cup flour and 2 cups water.
- Salt (1/2 tbsp) to keep the mask from mildewing.
- Large mixing bowl.
- Spoon or whisk for mixing the ingredients together.
- Mix the flour, water, and salt together until most of the lumps are gone.
We started off using 2 cups of flour, 4 cups of water, and salt. Then we made more paper Mache glue as needed.
Add more flour or water as needed. The paper mache glue should be the consistency of pancake mixture or thinner.
How to Make a Yoda Paper Mache Head
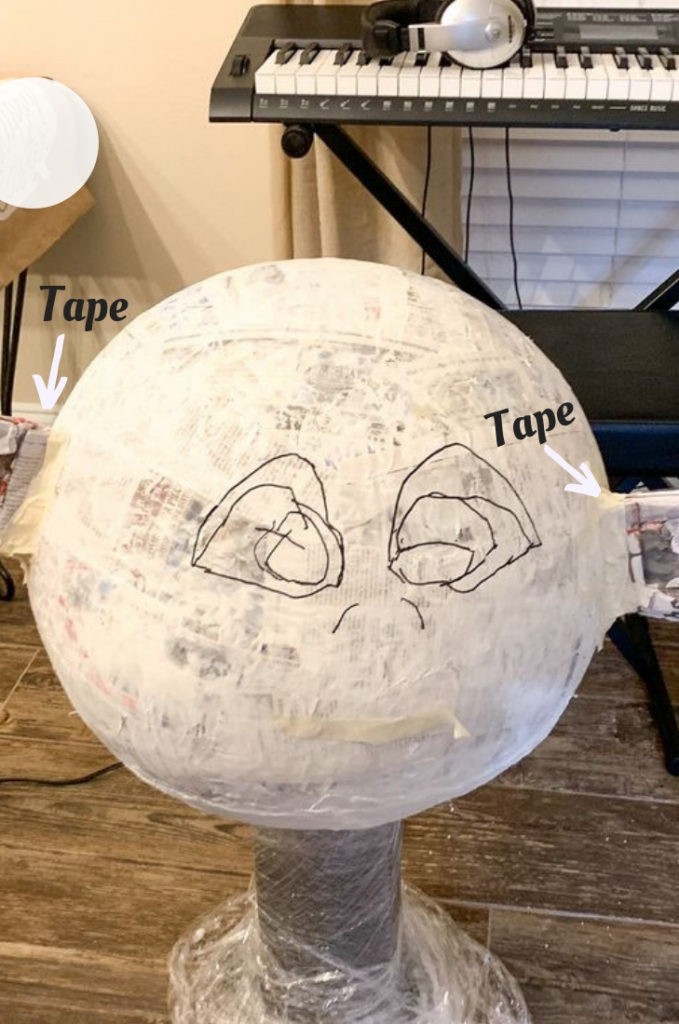
First you will need an extra large playball. The one we used was 54 inches around. We found the ball at Walmart. You could also use a beach ball.

The next step is to prepare the ball. This step is crucial do not SKIP this step.
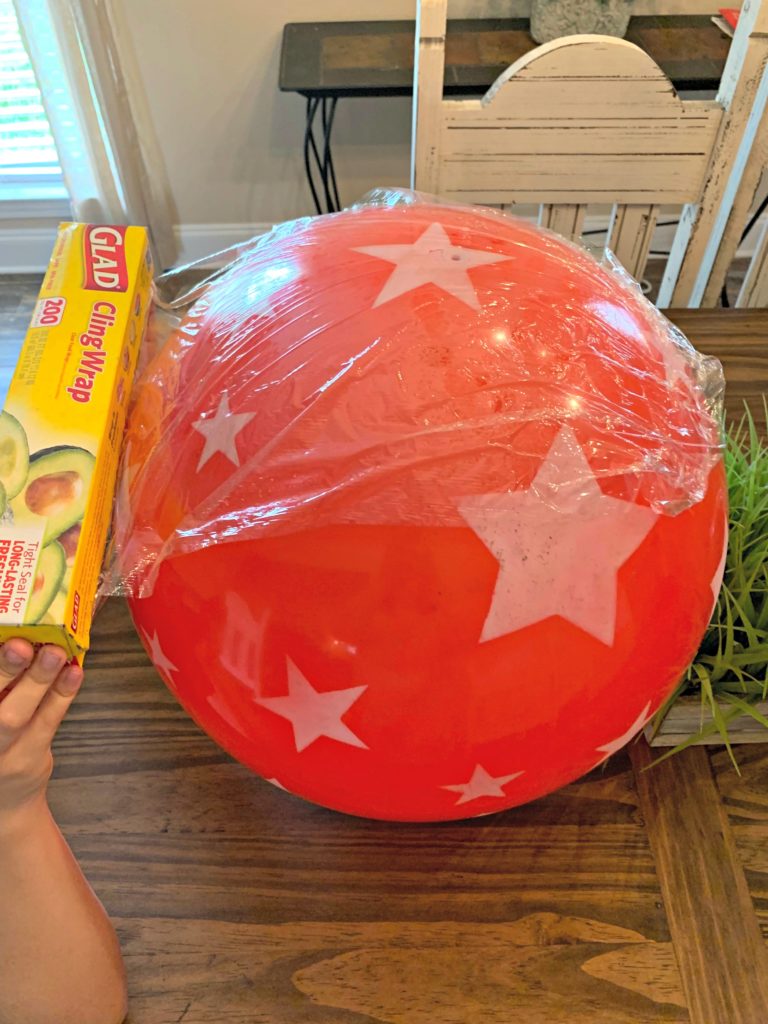
Using cling wrap, cover the entire ball with 3-4 layers. You can use your hand to smooth out the saran wrap as you go.
Saran wrap will prevent the paper mache from sticking to the ball. This step is VERY important.

Next, find the air hole on the ball, draw a circle around it. The air hole will be the top.
This spot will be where you will deflate the ball later after you finish the Yoda mask.
The second step for making the Yoda Head is making paper mache glue. Use the directions from above for the Paper Mache glue.
Third, cover your work surface. Next, if you have a lazy susan turntable cover it with foil.
Then place your ball on a paper bowl on top of the turntable or on your work surface.
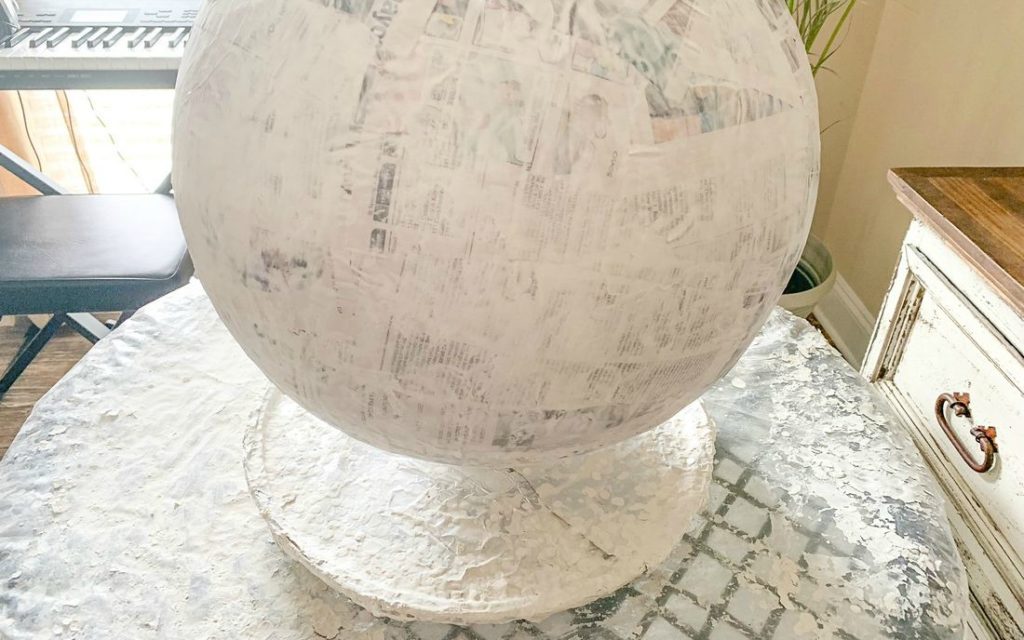
Fourth, dip a strip of newspaper in the paper mache glue. Place strips of dipped newspaper on the ball.
Make sure not to cover the circle with the air hole. Continue placing strips of paper on the ball until it’s completely covered.
Fifth, use your hands to smooth the paper as you place the strips on the ball. Be careful not to move the paper.
Let each layer completely dry before you start another layer. You need at least 6 layers. I used several layers of newspaper and layers of copy paper.
How to Dry the Paper Mache Head
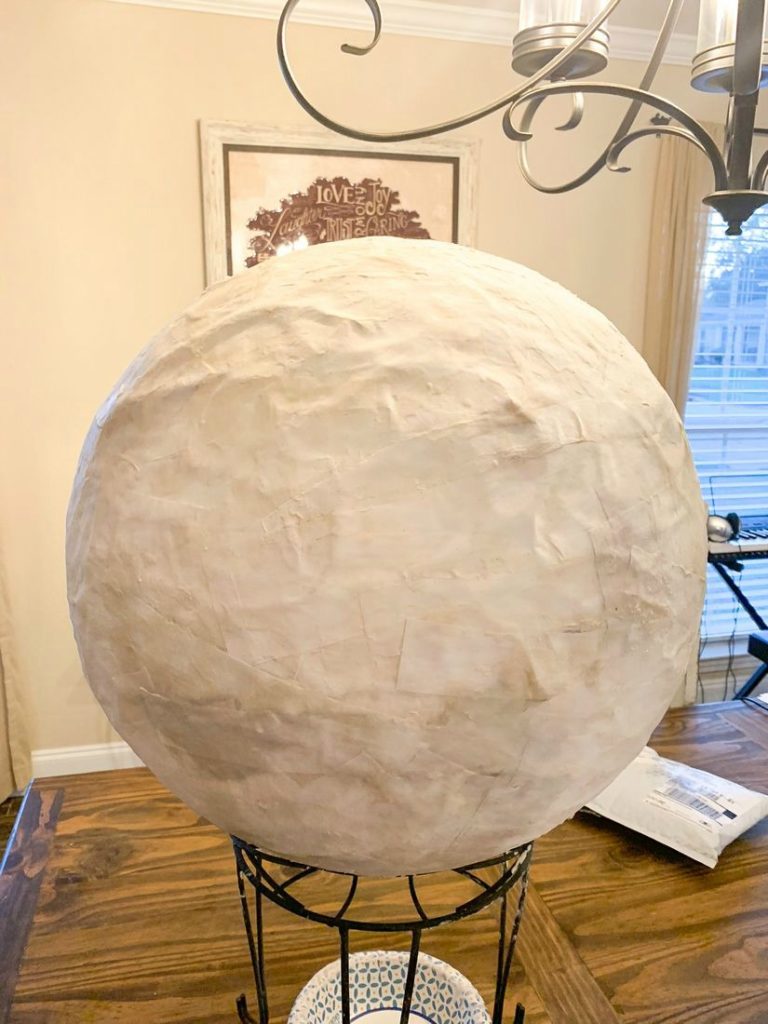
The best place to let your paper mache ball dry is outside in the sun or overnight indoors. I used a wire flower pot stand to hold my paper mache ball while it was drying.
Additionally, you can also use a heater indoors to dry the paper mache head. Never leave the heater unattended. And, turn the paper mache head several times.
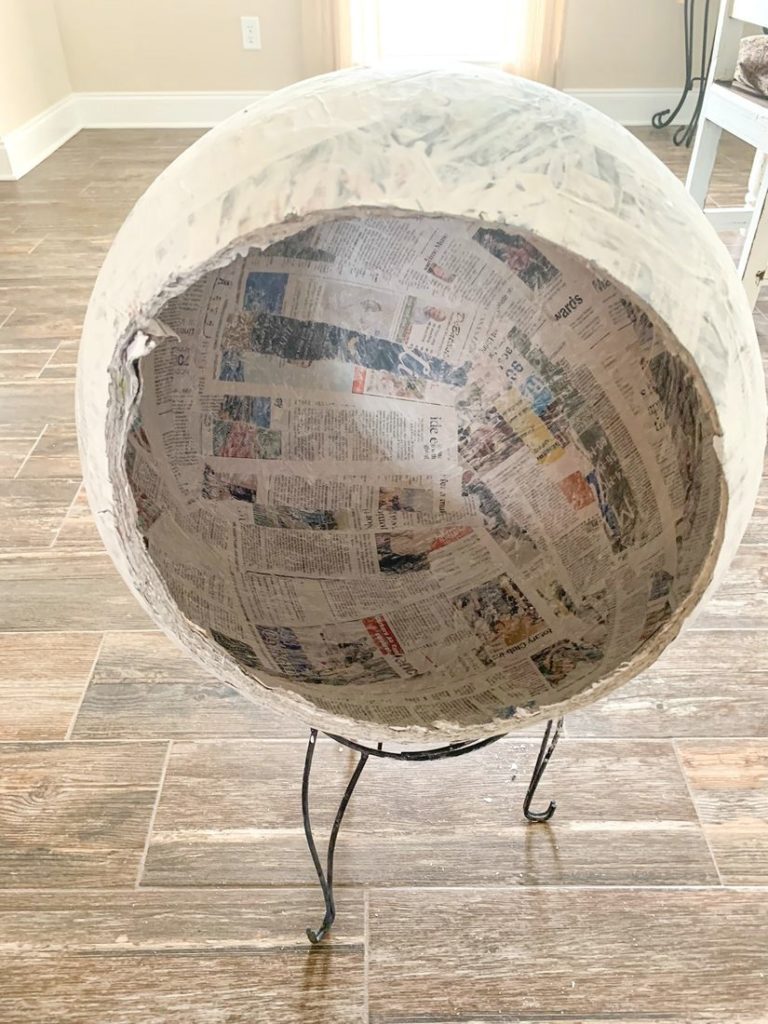
Sixth, once the layers are completed and dry, deflate the ball. Cut the hole size you want so the paper mache head fits over the head of the person who will be wearing it.
We cut our paper mache head so it could rest on my son’s shoulders.
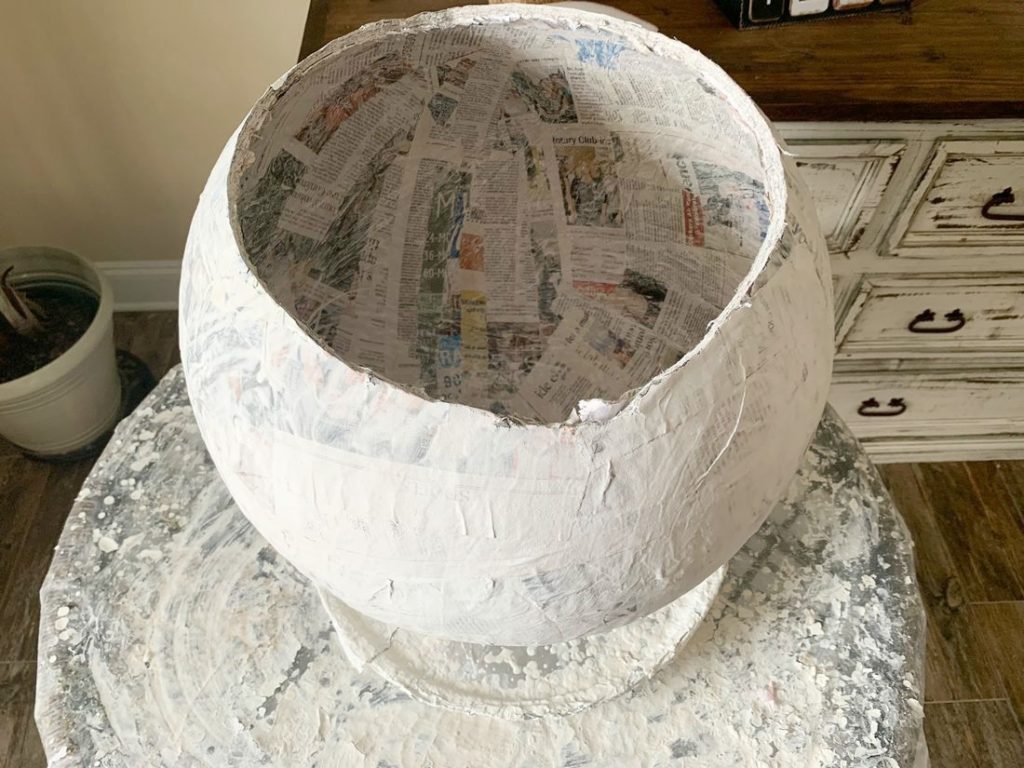
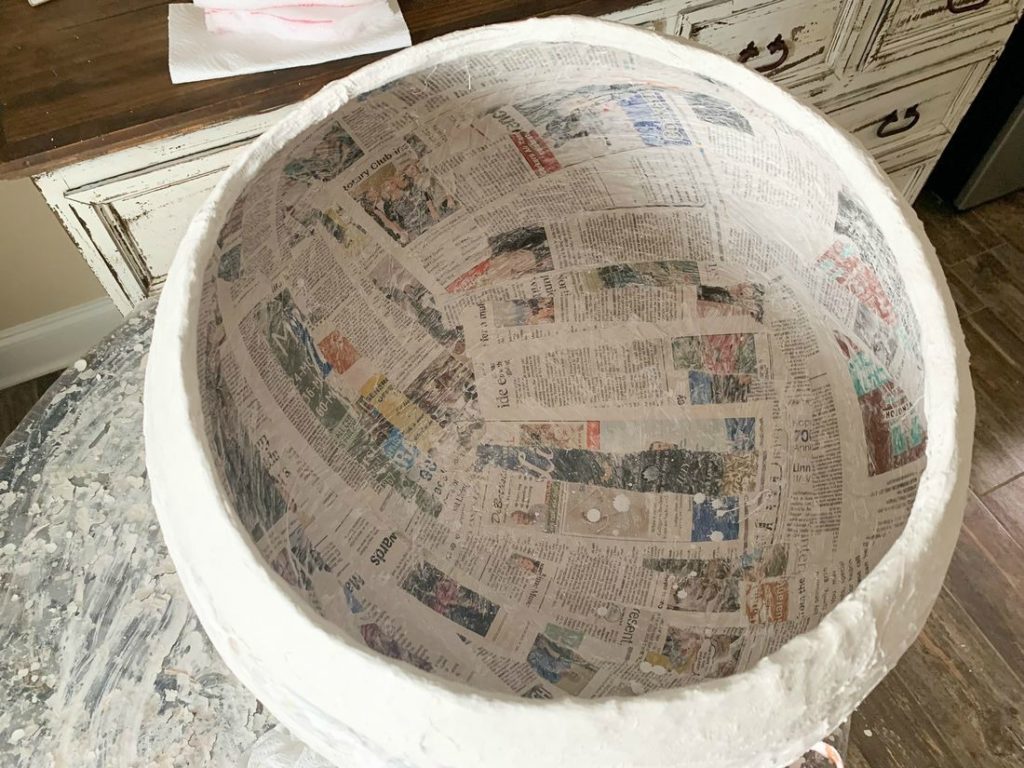
Pull the cling wrap and deflated ball from the inside of the paper mache head. Then let the inside of the head dry completely.
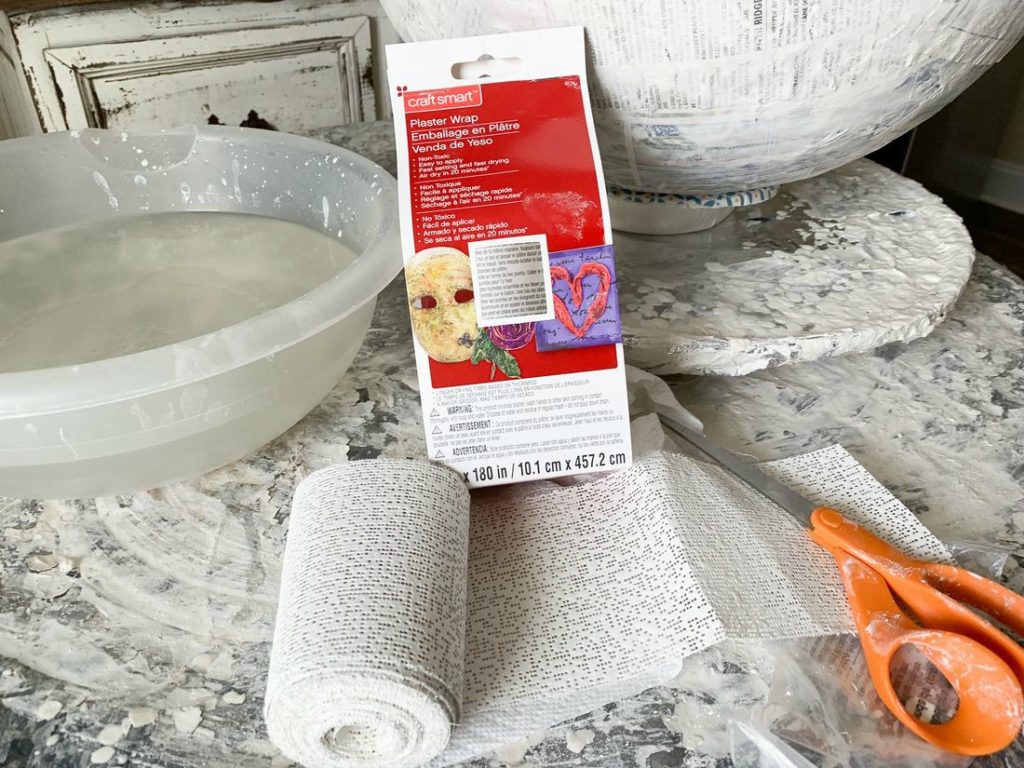
For the seventh step, use several layers of plaster wrap around the inside and outside edge of the paper mache head.
Follow the directions on how to use the plaster wrap on the the packaging.
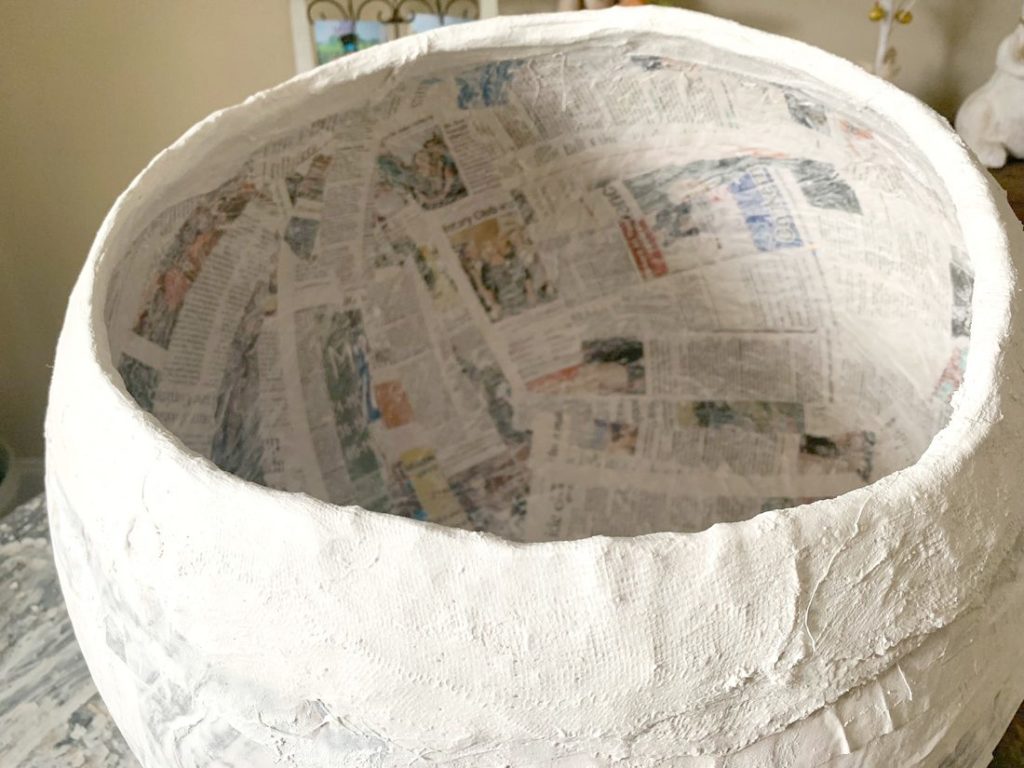
Use your fingers to smooth the plaster wrap over the top of the paper mache head.
The plaster wrap will prevent the paper edges from shredding and make the paper mache head more durable.
Do not start the next step until the plaster wrap dries completely.

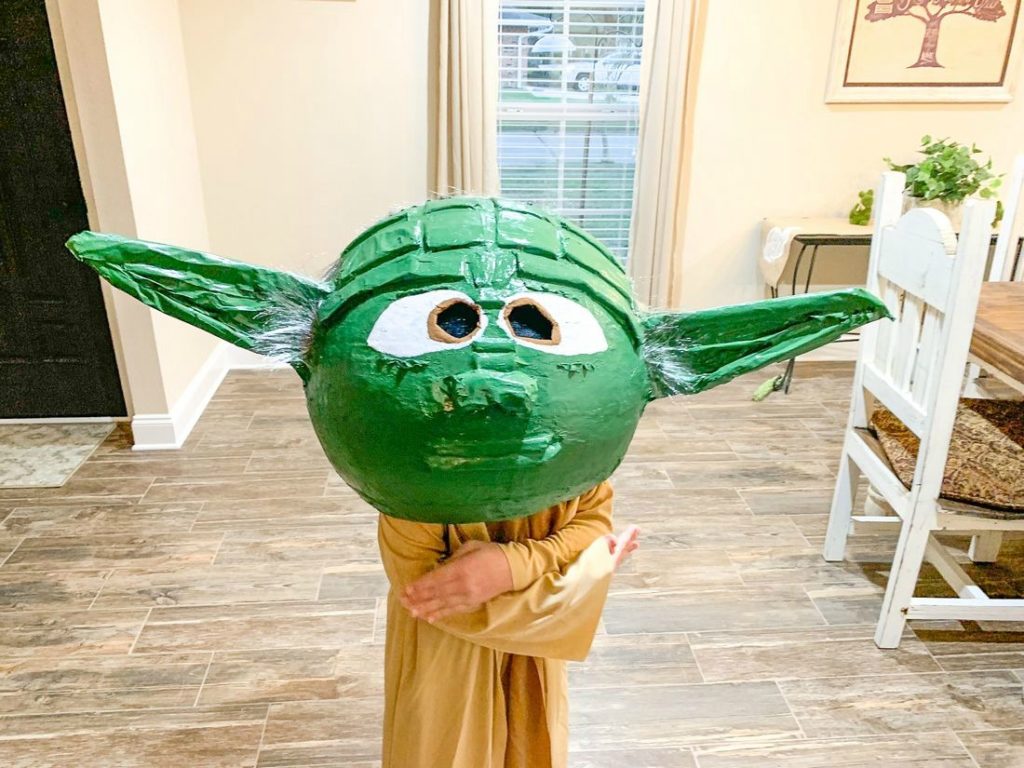
Drawing Yoda’s Face and Ears
Once the plaster wrap dries flip the head over. For the eighth step, we used a stand-up fan wrapped in cling wrap as a base for our paper mache head.
Have the person who will be wearing the mask put it on. Use markers and tape to mark where you want the eyes, nose, and mouth.
Draw Yoda’s ears on a piece of cardboard. See photo above. Also, I used this picture as a reference while I was making Yoda.
Draw and cut out the ears. Roll newspaper and glue it around the edges of the cutout ears. Crumbled up a piece of paper for each ear and glue the paper inside the ears.
Glue Yoda’s ears on the head using a glue gun. Make sure to wear glue gun finger caps . Use masking tape on the front and back of the ears as needed.
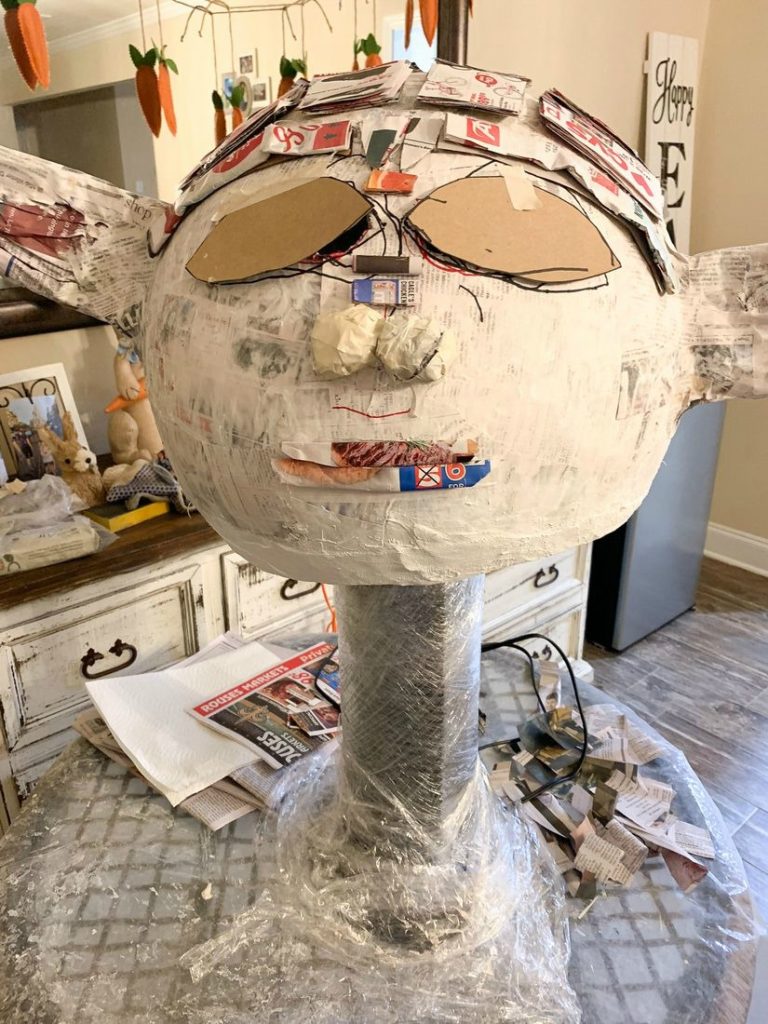
How to Make Yoda’s Facial Features
When you’re ready to do the ninth step, make sure to refer to the photo above.
Cut out cardboard lips, and glue newspaper to the lips. Attach the lips where you want them using a hot glue gun.
Next, ball up paper. Use masking tape to form two balls to make the nose. Tape the nose above the lips. Refer to photo above.
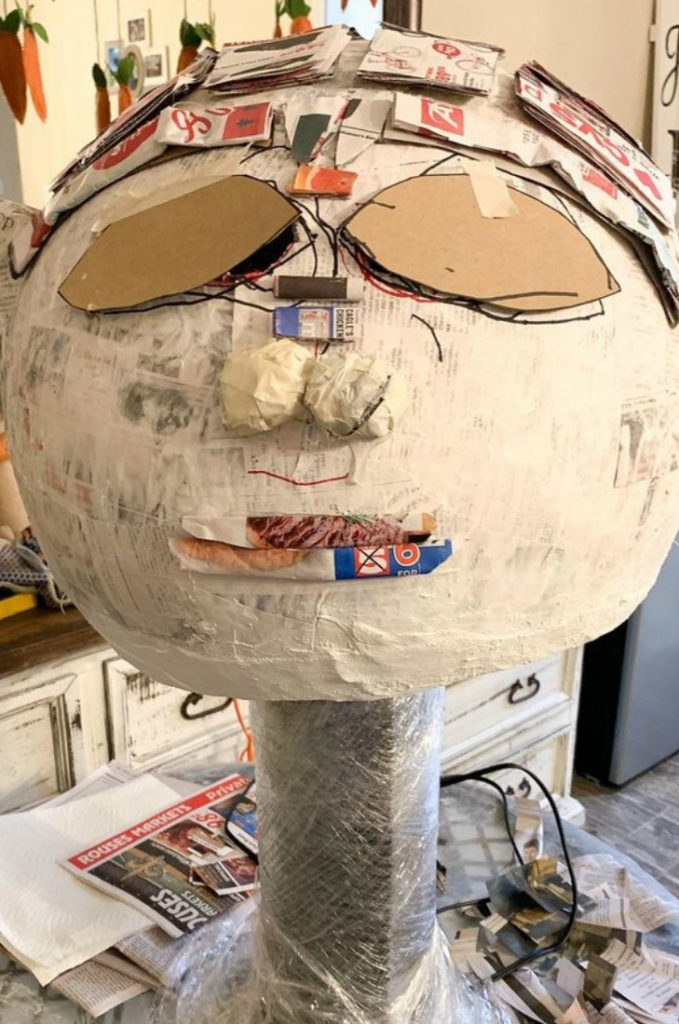
Don’t forget to cut out eye holes. Make larger eyes with cardboard. Cut large cardboard eyes out and tape them over the small eye holes.
Trace the large cardboard eyes onto the face, then discard the cardboard.
Make two small rectangles with the newspaper glue above the nose. See photo above.
Furthermore, make wrinkles by gluing small crumpled paper below each eye. Then glue a piece of small rectangle paper in the center of the eyes.
Finally, glue a long strip of folded newspaper on each side of the face.
Next, glue two pieces of triangle shaped paper in the middle of the long strips of paper.
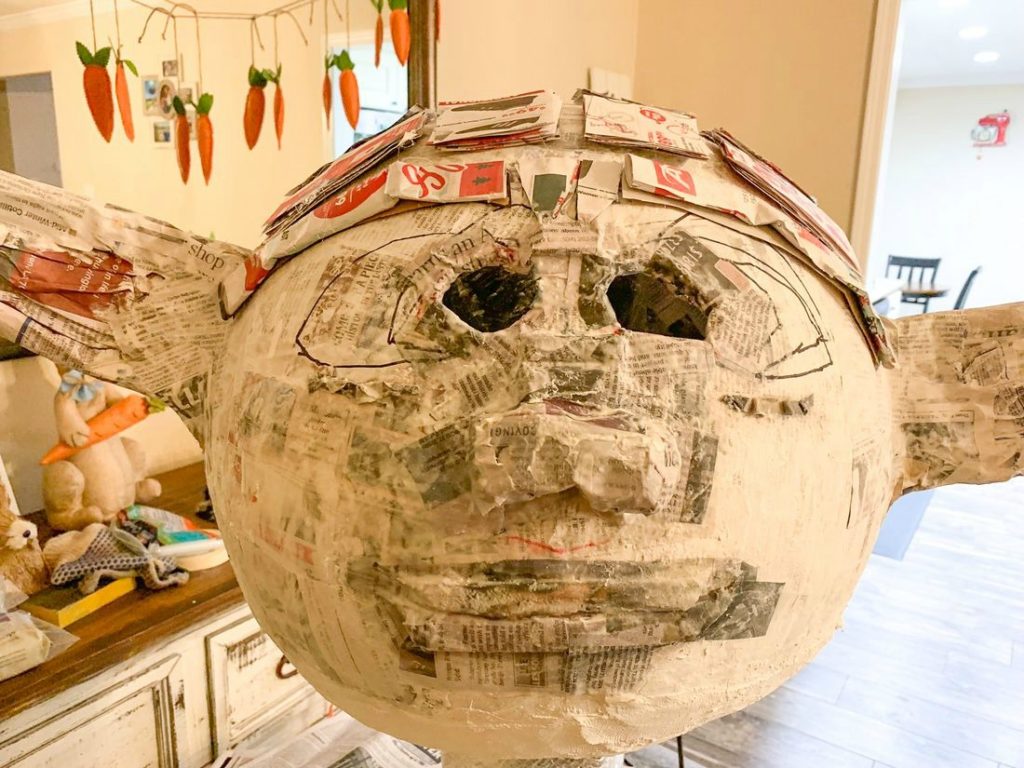
On the top of the head, you will make two rows of four squares by gluing several pieces of paper together to form thick squares.
After the squares are completed glue them to the paper mache head with the hot glue gun.
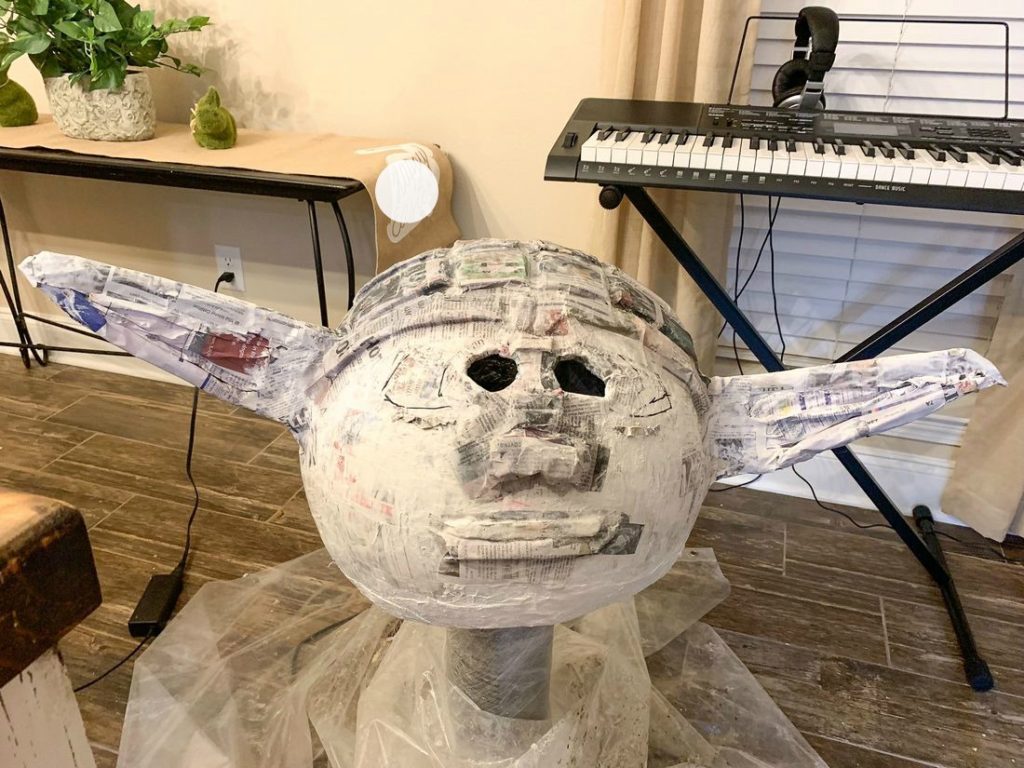
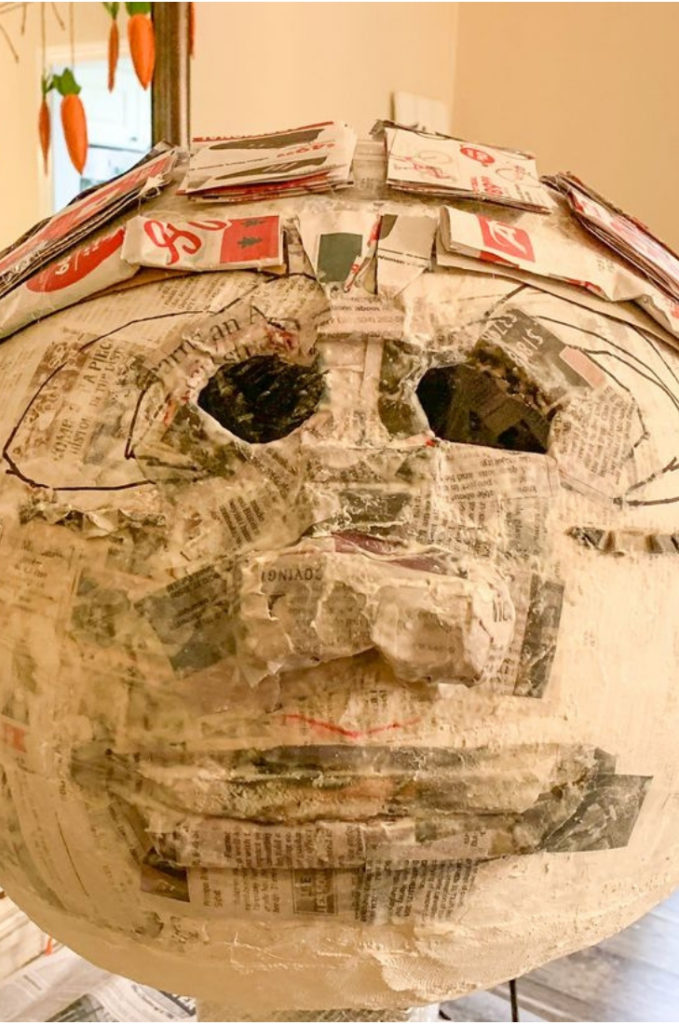
So for the tenth step, make some paper mache glue. Use small strips of newspaper dipped in the paste.
Next, cover all the facial features, around the eye holes, edges of the ears, back of the ears, and the pieces on the head. See photo above.
Make sure to use your fingers to mold the paper on the face, ears, and top of the head.

Now there’s just a few steps left before the paper mache craft is finished.
Once the Yoda Head is completely dry, take it outside and spray it with the primer.
After the primer is dry, paint the paper mache head several times with the green-colored spray paint. Make sure to do at least 2-3 coats of paint. Next, let the paint dry.
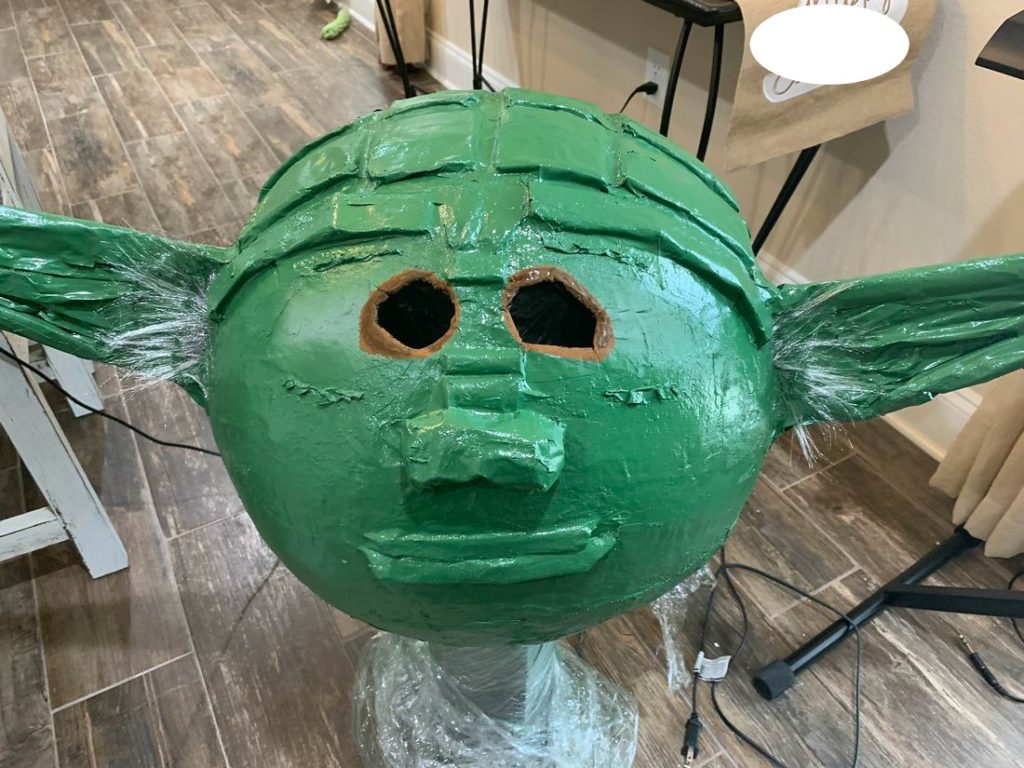
Finally, paint around the eye holes with the brown paint. Next, glue the black tulle inside of the head by the eye holes.
Now you can start gluing on the hair. Cut pieces of the gray wig and glue it around the front and back of the ears. Use the E6000 adhesive and q tips.
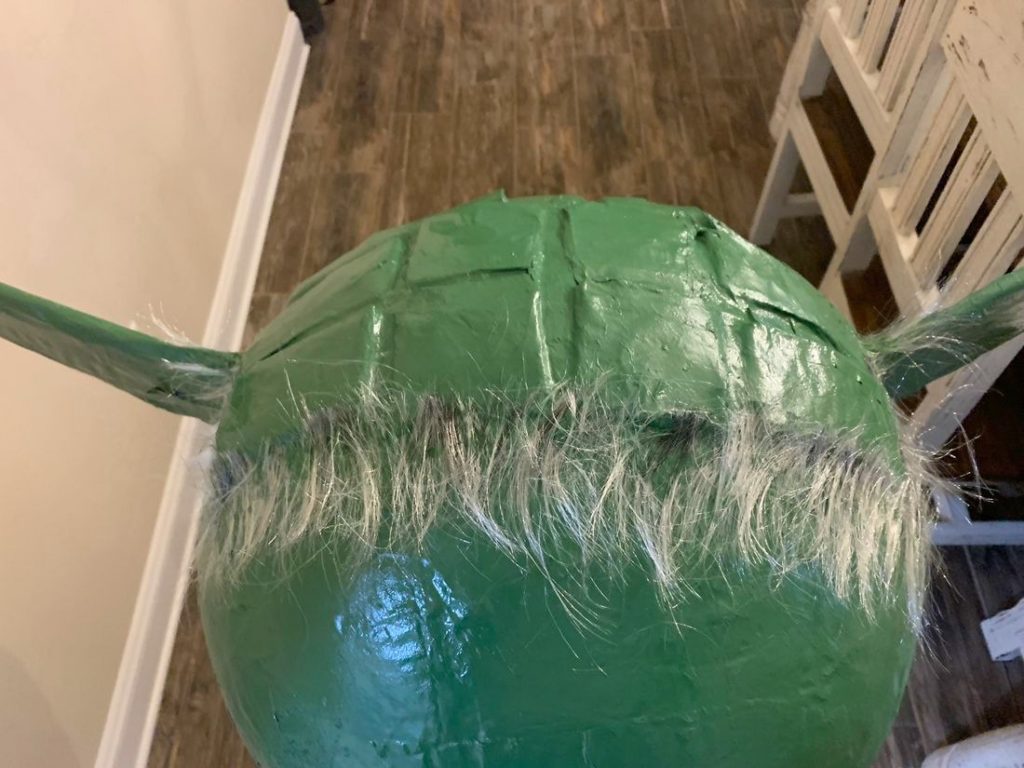
Make sure to glue hair to the back of the Jedi Master’s head. Gluing the hair to the paper mache head takes lots of q tips. See photos above for reference.
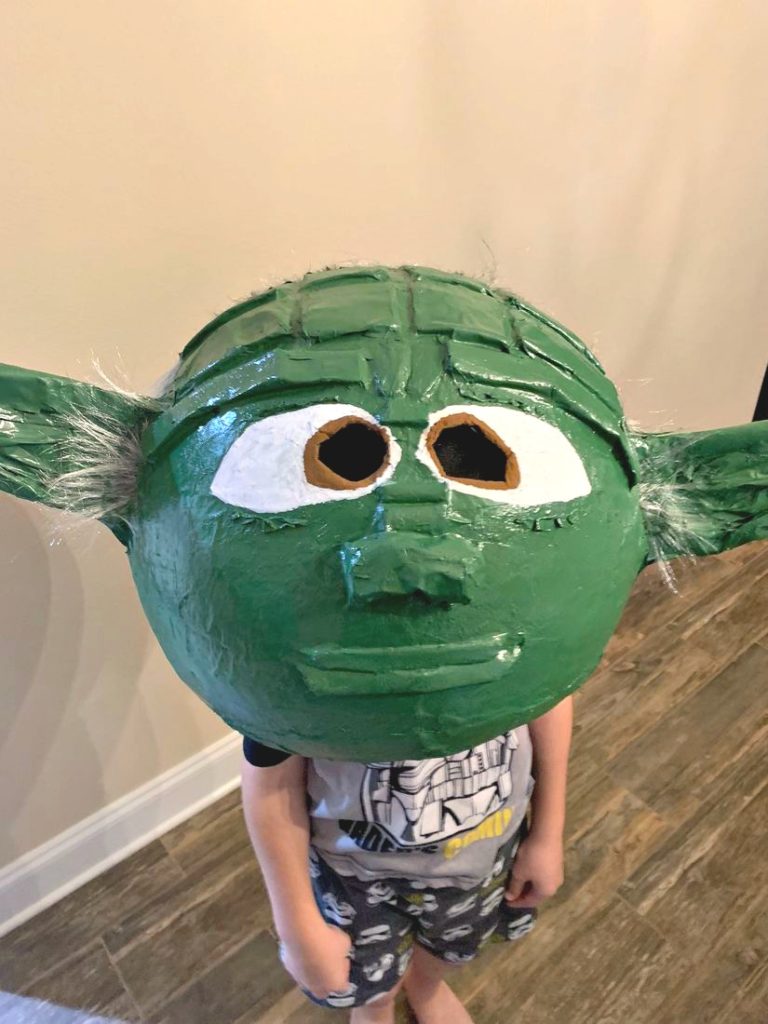
Final step! Don’t forget to paint the eyes white. We did 2-3 coats of the white paint.
What do you think about our Star Wars Yoda Paper Mache Mask?
The paper mache mask took approximately three weeks to make from start to finish.
Disney Star Wars fans will love wearing this fun DIY Yoda Head for Halloween.
Pair it with a Yoda costume and lightsaber, and you’re ready to help fight the darkside.

Reader Interactions
August 1, 2019 at 8:43 pm
Wow that’s a lot of hard work you put into this project for your son . I hope you got lots of extra hugs and kisses from him for this.Looks very cute. B.
Kim Seghers says
August 2, 2019 at 4:51 pm
Thank you so much! Yes my son loved the Yoda Paper Mache head. And, he did give me extra hugs and kisses…LOL! Thank you for leaving a comment. Have a great weekend, Kim
Leave a Reply Cancel reply
Your email address will not be published. Required fields are marked *
This site uses Akismet to reduce spam. Learn how your comment data is processed .
Privacy Overview
Be sure to check our other articles and patterns.
How To Make A Paper Mache Marionette Head

This is how you make a paper mache Marionette head.
The first thing you do is make a clay Marionette head. I have attached a dowel stick to a 9″x9″ wooden base to make a support for the clay head. Then I mold my head on the dowel.

Take your clay Marionette head and cover it with petroleum jelly. Get a thin layer all over. This will do is it will keep the paper mache from sticking to the clay. Be sure to try to get in all the little crevices everywhere.
I like to paper mache with wood glue and water and regular computer paper or newspaper.
Get some water and add some little torn-up pieces of paper. Rip the paper into little pieces of about half-inch square.
Add wood glue. And I don’t use a specific ratio. I just mix wood glue in until it gets kind of a milky appearance. And as you go along, you can add more.
Then when some pieces have some soaked glue water on them, start laying tiny pieces onto your head, and you want to do a single layer first and the tinier the pieces you use the smoother it will be.

After you have done about six layers of paper mache on your clay head, it’s time to remove it from the clay interior.
Cut a line behind the ears all the way around. Score around the head with a razor knife. Then take a blade, and start cutting through the layers.
If you can’t get it off, you can pop it in the microwave. And that will heat up the clay.
We now have our two halves. You can add extra layers of paper mache on the inside, but six layers is strong enough.
Now to start covering up the seam. Add some wood glue all the way around, one-half of the head. Then put your two halves together. Add some more paper mache with water, and wood glue.
Start paper mache strips over the gap. Let that dry.
Next is to add a neck to your marionette head.
After you have finished the paper mache Marionette head, you’ve cut it and covered the seams with paper mache and let it dry, you’re going to use a piece of dowel that fits into the neck hole.
- Figure out how much dowel it will take to fill up the neck. Stick it in And mark it.
- Then cut this off with a band saw or Dremel tool. You now have a neckpiece of dowel that will fit inside.
- You will need to drill two holes for a wire to be strung through the neck and dowel. Now, the wire I suggest you use is a regular clothes hanger wire. Be sure that your drill bit is bigger than your wire.
- Measure out a long piece of wire that can go through, make a loop and come out the top and then twist.
- The neck should be about an inch and a half. Cut about five inches of wire. Take your wire and fold it in half.
- And then you’re going to thread it through the holes in the neck dowel.
- Make a loop of wire at the bottom, big enough for to get nylon string through and at the top twist these two together. Rememberto twist at the top.
- Then the neck piece has to go into the torso with the same direction as the support bar in the middle of the torso. So that way, when we put our nylon cord, it will be going perpendicular in a loop, kind of like a chain, which means that our loop in the wire needs to also go flat across the front of the face.
- So use wood loop, give some glue on the top And also give some glue to the inside of your neck hole And slide your dowel into your neck hole, the wire facing flat, perpendicular to the face And put as much glue as you can get. And then go ahead and let that dry.
Painting Your Marionette Head

Before you attach your head to the body, you will want to paint it.
Acrylic paints are excellent for painting paper mache. They dry quickly and colors can be blended together to get a beautifully detailed finish.
Make sure your paper mache is completely dry before painting. Start with a primer or base coat. I use a solid white. When this has dried, add your skin color. Then add the details.
For a longer-lasting paint job, seal the finished head with varnish or acrylic sealing spray.

Attaching Your Marionette Head To The Body
Once all the glue has dried, take your marionette torso, which should have a wire inside, a thick wire for the head to hold onto. Using a dacron or nylon cord, thread a double layer of cording through the wire loop.
Loop around the inside of the torso. Be sure that the head is straightforward with the swoop of the neck facing forward as well, and drop your cording in.
Tie a knot around the bottom of the wire from the inside, estimating how to make it about the right distance of a neck coming out of a torso.
Then take a dab of glue and put it on the knot. You are finished .
Share this:
Unveiling the Whimsical World of Puppet Maker Noreen Young: A Journey of Creativity and Influence
Noreen Young is an incredibly influential puppeteer, puppet builder, and producer who has made significant contributions to the world of puppetry. Her career in puppetry began after graduating from...
Barbara Dewey: A Pioneer in Puppet Making and Education
Barbara Dewey: A Pioneer in Puppet Making and Education Barbara Dewey is a distinguished puppet maker and educator who has made a significant impact in the world of puppetry. With a career...


15% OFF PATTERN ORDERS OF $30 OR MORE – USE CODE: 15%OffOver30

Share on Pinterest Share on Facebook Share on Pocket Share on Email

Moose Head Wall Sculpture Pattern

This wall sculpture of a moose is easy to make with the pattern, cardboard, paper mache and paint.
And you can easily customize the size and shape of the antlers and dewlap to create a unique sculpture, and finish it to compliment your own decor.
How to Make Your Moose Head Wall Sculpture:

The first few pieces you’ll tape together are a little tricky, so be sure to watch the video below. After that, the pieces are quite large and go together quickly. Also, be sure to watch the video with ideas for customizing the shape and sizes of the antlers before you cut them out and attach them to your moose’s head.
This is not a fast project, but it isn’t difficult to do. Just follow the video instructions or read the full written instructions and many photos that come with your pattern.
The moose has a few more pieces than some of my other patterns, because their faces have so many strange bumps and ridges. Just be patient as you tape the pieces together, and take your time. I’m sure you’ll be very happy with the result.
Finished size: About 18 inches (45.72 cm) high, 22 inches (55.88 cm) wide and 14.5 inches (36.83 cm) deep.
My downloadable PDF Patterns come with full instructions .
There’s no waiting for your pattern to arrive, and no shipping costs, so you can start on your project right away.
Click here if you’d like to know more about how the patterns are delivered. (If you’ll be saving your pattern to and iPhone or iPad, they do tend to hide your files. You can scroll down this page to see how to find them.)
And remember – if you have any problems downloading your files or putting your pattern together, just let me know . I’m always happy to help. 😀

How to Put Your Moose Pattern Together:
How to customize the look of your moose sculpture:, how to add the antlers, ears and dewlap to your moose’s head:, how to add paper mache to your moose sculpture:, painting the moose sculpture.
I painted my moose using latex paints. It was an experiment, but I love the way it turned out. Acrylic paints work too, of course. And, because every real moose is different, you should look at moose images online and use your favorite moose as your model.
To Make Your Moose With this Pattern You Will Need:
- Copy paper or full-sheet labels
- Glue stick if using copy paper for pattern instead of the labels (the labels are easier and stick better, but the glue stick will work, too)
- Cardboard from 4 standard-sized cereal boxes
- Corrugated cardboard from 2 shipping containers. You need one box that’s at least 12”(30.48 cm) tall or wide and another box with sides that are at least 12″ x 16″ (30.48 cm x 40.64 cm). If you want to make bigger antlers you’ll need a bigger box.
- Sharp scissors for cutting light cardboard
- Box cutter for corrugated cardboard
- Tape, both clear plastic tape and masking tape
- Two 1.5” (3.81 cm) Styrofoam balls
- Aluminum foil
- Glue gun (if you don’t have one you can use masking tape instead but the glue gun is easier)
- Paper strips and paste or paper mache clay. See link for recipes below.
- Acrylic gesso or latex primer
- Acrylic paint and acrylic varnish
** You can find the recipes for paper mache paste and for Paper Mache Clay here.
Do you have a question or need help with your pattern?
If you have a question about putting your pattern together or painting it, leave a comment below or on the Daily Sculptors page . I read all comments and answer them as soon as I can, usually within a few hours. Some of my readers might ideas for you, too — we have a very supportive community on this site.

When your moose is finished , please come back to the Daily Sculptors page on this site, and show it off. We’d love to see how it comes out! 🙂
Some of the sculptures that have been made with this moose pattern:

Maine Moose
Made by Julie Urban

My completed moose with all the bling
Made by Penny Hope

Weathered Moose
Made by Jeff Pasek

Wall Sculptures with Origami Paper, Feathers and More…
Made by Ada Tereshinski

9 thoughts on “Make a Paper Mache Moose”
I would like to make a much bigger version. Could I double or triple the pattern if I took care in supporting the antlers with wire?
A lot of people have printed my patterns larger, and all the pieces will still fit. I don’t think anyone has tried it with a moose, yet, but if you use strong wire you should have no problem with it. The easy way to get a larger pattern is to have it printed at a print shop, where their machines can use larger paper. But you can print it at home using the ‘poster’ setting on your printer. Have fun! 🙂
Hey, could somebody tell me the dimensions of only the main part? By that I mean just the head part- no extra stuff like ears, antlers, dewlap, and neck. Height, length, and width. Don’t want to buy it and print it out only to find out a while into assembly that it’s not the size I want. Would rather know so I can resize it before printing and not have to worry about wasting time and paper.
The moose head is about 6″ wide, without the antlers or ears. If you leave off the neck, it’s about 11″ from jaw to the tip of his nose.
That is some VERY impressive pattern work! It’s a master class in giving directions. I can’t even imagine writing them out–in addition to multiple videos. How satisfying to immerse yourself in a project like this– both for you and those who make this moose. Thank you!
oh my word I knew it would be Great but Wow how Beautiful is that, Nice work Jonni I will be purchasing the pattern lol 🙂
Thanks, Marisa! You’re our moose expert, so I’m glad you like him. 🙂
This guy is just amazing!!! He sure does have lumps n bumps. YOU are amazing in what you create and share with us. Huge thank you.
You’re welcome. This was a challenging pattern to design, because I wasn’t willing to give up any of the bumps. But now I think I’m in love with him. I’m glad you like him. 🙂
Leave a Comment Cancel reply
Save my name, email, and website in this browser for the next time I comment.
Don't subscribe All new comments Replies to my comments Notify me of followup comments via e-mail. You can also subscribe without commenting. Manage your subscriptions
Affiliate Disclosure – Privacy Policy – Cookie Policy – Shipping and Terms of Service

FREE PRINTABLE DOWNLOAD:
"5 best recipes for paper mache".
Includes Jonni’s famous Paper Mache Clay recipe, and tips on choosing the right recipe for your next project.

DIY PAPER MACHE DEER HEAD
Sharing is caring!
Learn how to make this DIY paper mache deer head for free using items around the house! Perfect for a woodland nursery or kids room!

This post contains affiliate links used to help support The Bluebonnet Farmhouse. For more information, please see my disclosures here .
While out shopping for our son’s nursery, I came across this $15 paper mache deer head at Hobby Lobby. I could have just bought the deer head, I could have used a coupon, but me being my stubborn self said, “I can make that.”
Let me preface this with the fact that I have probably only done paper mache once back in grade school…
After completing our ultrasound picture frame and wood letters , I wanted some way to add dimension to the collage wall we were doing in the nursery. This DIY deer head was a wonderful addition with its neutral tones and antique flair of the newspaper and twine!

Zero planning went into the making of this project, and my process may seem like a mess. Nonetheless, it worked and I didn’t even spend a penny to complete this project! All of the supplies was either free – newspaper and packing paper – or items we already had – twine and Mod Podge .
My logic was this:
I will make it and love it. – OR – I will hate it and it only cost me the time to make it.
Thankfully, the former was what happened!
Zero planning. Zero dollars spent. One happy mama. One good looking deer!

VARIATIONS OF THIS PROJECT:
- Add floral to the crown of the deer’s head for a girl’s room or nursery.
- Use this pre-made paper mache deer head and simply decorate!
- Cover only in brown paper for a more neutral look.
- Remove the antlers for a doe or try a different animal.
- Use as an art project and have your kids help make it!
- Heavy Paper (I used leftover packing paper from our previous move.)
- Brown Paper Lunch Bags
- Mod Podge – Matte
- Hot Glue Gun + Glue Sticks
- Command Strip + Hook
If you do not want to make the form from scratch, you can purchase a ready made paper mache deer head and skip to Step 3 for how to decorate!
STEP 1 – PAPER STRIPS + MOD PODGE
We had mounds of packing paper leftover from our previous move with the Navy, so I decided to put at least a tiny portion of it to good use!
I used scissors to cut my paper into strips. I later found out the the pieces of paper will lay smoother if torn rather than cut. Either way works!

I cut both 1-2″ strips for my paper mache and 4-6″ strips for creating the overall base form.
To thin the adhesive, I placed some Mod Podge in a bowl and added some water to get the thinner consistency to dip the paper strips in.
STEP 2 – FORM THE BASE
Y’all are going to laugh so hard when you see my process for how this paper mache deer head took shape! I am not exaggerating when I say that I was completely winging it on this project and seeing where it took me.
HEAD + NECK
To begin, I grabbed two brown paper lunch bags and stuffed them with packing paper. I roughly shaped them into a head and neck, and tied them off. You can use whatever you have to tie them off – rubber band, tape, glue, staples, string, etc.

Next, I formed the base of the antlers by twisting a 4-6″ wide strip of packing packing into a curve and wrapping it in smaller paper mache strips.
I did the same with smaller portions to form the points of the antler and attached them to the base of the antler by wrapping with smaller 1-2″ wide paper mache strips.

The ears were simply flat pieces of packing paper that I rolled up the sides of to form the rims of the ear. I used the hot glue gun to glue the rolled up sides to prevent them from unrolling before applying the paper mache.

FORM THE BASE
After I had all of my pieces, I then attached them all to form the base. Starting with the base pieces, I glued the head to the neck portion. I twisted some more 4-6″ wide strips of packing paper and wrapped them along the top and base of the neck to form a natural tapering shape.

Next, I created and attached the detail pieces. I glued the ears onto the head and crumbled up some small bits of paper to form mounds for the eyes and nose.
I know, it looks pretty bad right now. Keep going, it will get better!

Dipping the strips of 1-2″ wide packing paper into the glue, I began laying the strips onto the base. I used the strips to taper and smooth the details of the face until the base was covered and I was happy with how everything looked.

The antlers were the last pieces to be glued onto the head because of their weight. Once I glued the antlers on, I had to prop them up while they dried.
Notice my glue bottles playing the role of structural supports!
STEP 3 – PAPER MACHE THE NEWSPAPER
Now that the foundation was made, it’s time to move onto the decorating portion! Considering our son was a Navy baby, I found it fitting to use Navy newspaper articles to decorate the deer head for his nursery!
I cut the newspaper into 1-2″ wide strips for my paper mache and thinned out some more Mod Podge .
Dipping the strips of newspaper into the glue, I began laying the strips onto the base. Continue until the base is covered in paper mache newspaper.
When working with newspaper, be careful not to overwork the paper. The ink can smear if brushing the surface with a sponge brush, rubbing the surface, etc.
Make sure to paper mache the base of the neck (the part that will be against the wall) with packing paper strips to strengthen it for hanging.

STEP 4 – APPLY THE TWINE
Once all of the paper mache was complete and dry, I then used a hot glue gun to attach the twine to the antlers.
I started from the base of the antlers and worked my way up, venturing off the base of the antler onto each point.
At the top of each point, I wrapped the twine until it filled in the space, glued it down at the center of the point, and trimmed off any excess.
Then, I went back to where I left off on the base of the antler and continued up the antler with a new strand of twine.
I repeated this process until the whole antler was covered in twine.
At this point you could choose to add floral! If we have a little girl at some point, I plan to add floral to the crown of the deer’s head and possibly intertwine some into the antlers.
STEP 5 – HANG ON THE WALL
My original plan for hanging the deer head onto the wall was to attach it to a wood plaque like a taxidermy deer head.
But, I was in a pinch to get this on the wall in time for some baby photos that were being taken in our son’s nursery.
What I ended up doing was simply poking a hole into the back of the deer’s neck and hung it on the wall through the use of a small command hook . It got the job done and I was happy with it!

I gotta admit, I was very happy with how this turned out especially when I didn’t have a clue what I was doing in the process! And I especially love how this project didn’t cost me anything! You can find more of our nursery projects below!
MORE NURSERY PROJECTS :
- Woodland Nursery Curtains
- Woodland Nursery Signs
- Floating Corner Shelves
- Industrial Pipe Shelf
- Ultrasound Picture Frame
- Painted Wood Letters
- More coming over the next few weeks! Sign up for our email list or follow us on social media to be notified of new posts! Our social media accounts are listed below.
Happy Crafting!
How did you decorate your DIY paper mache deer head? Comment below or tag us on social media to share with us!
- FACEBOOK: @TheBluebonnetFarmhouse
- INSTAGRAM: @the_bluebonnet_farmhouse (<< Don’t forget the underscores!)
- TWITTER: @TheBBFarmhouse
- PINTEREST: @thebluebonnetfarmhouse
Similar Posts

EASY DIY CUBE STORAGE TO ORGANIZE KIDS CLOSETS
It all started after we moved into our new home and toys were everywhere! I had this beautiful picture in my mind of our toddler’s closet being perfectly organized, where every toy had a place and that place was not the floor. …

How to Make Indoor Wall Planters with Sconces
There I was, innocently standing in the store pickup line at Kirkland’s when I fell for their trap – a strategically placed clearance corner right next to the store pickup line. Seriously, what is a woman to do while she waits?! …

DIY Privacy Trellis with Jasmine
Shortly after moving into our first home, we wanted to come up with a solution for how to add both privacy and a beautiful view outside of our dining room windows. …

DIY Wool Felt Ball Trivets
Winter is that time of year of long, cold days built for getting cozy in our homes and making something with our hands whether it’s sourdough bread or indoor crafting. …

HOW TO MAKE A HOT WATER BOTTLE COVER
During the winter months, my grandma loves to keep warm under the covers by placing her hot water bottle near her feet. She decided it would be nice to have a cover for her hot water bottle and asked if I could make one for her birthday. …

DIY FLOATING CORNER SHELVES
If you saw our post about the DIY pipe shelf we made, then you already know the so-called dresser we were using in our son’s nursery was rather small. With extremely limited counter space, we were wanting to add more storage and decorating space through shelving. …
Leave a Reply Cancel reply
Your email address will not be published. Required fields are marked *
Save my name, email, and website in this browser for the next time I comment.
This site is protected by reCAPTCHA and the Google Privacy Policy and Terms of Service apply.

Fun Paper Mache Ideas for Kids to Create
H ere are some creative paper mache ideas that kids can make at home. From animals to food, these projects are perfect for developing their artistic skills.
When you think about paper mache (aka papier-mâché or papier mache), the first thing that probably comes to mind is MESSY — and you would be right. Paper mache involves dipping newspaper strips into a liquidy mixture that will help the paper stick to a surface. It can drip everywhere and create a mess, but it is also super exciting for kids to use to create!
The most popular crafts you may think of when talking about paper mache are pinatas, masks and those erupting volcanos you made in school. However, there are so many other things you can make using this technique. I’ve collected a bunch of fun ideas and listed them for you below.
It is time to get a little messy and a lot of creative with some paper mache ideas! From cute animal piggy banks to giant papier-mâché hot air balloons (okay, maybe not that giant), I’ve gathered a few fun ideas that will keep your kids entertained for hours. So grab your glue, some newspaper, and let’s get messy…
Paper Mache Ideas
Help kids develop their artistic skills with these creative paper mache projects for kids.
Kids can make their own fun hats for playtime using papier mache! A few different options are shown, but I think this sheriff's hat is my favorite. It reminds me of the one Rick Grimes wears in The Walking Dead .
Learn how to make paper mache pumpkins using balloons, twine, and Mod Podge! This is a fun craft for fall decorating and great for families.
This paper mache moon project is perfect for a school project or as a fun kid's room decoration!
Food On A Stick
Create these fun food on a stick toys to use when your kids are pretending like they are at the state fair! I love that baked potato.
Kids can make one-of-a-kind vehicles! Instructions are given for cars/trucks, a rocket, and a UFO.
Learn how to make paper mache teacups using a soda bottle and then decorate them by decoupaging napkins to them!
Learn how to make Mod Podge paper mache bowls the easy way! If you have craft paint, kids can make these bowls any color they like. So simple!
Dinosaur Mask
Why buy a costume for Halloween when you can have fun making one? Find out how to make a head for a T-Rex. Use similar steps to make pretty much any animal you like!
Mini Turkey Roast Pinatas
Pinatas aren't usually associated with Thanksgiving, but now they definitely will. Make a mini pinata filled with goodies for the kid's table! Each could get their own or just make a large one for the table.
Create the whole solar system using paper mache! This would be a fun project for kids to work on as a group.
Patchwork Turtle
This little turtle is delightful! I really like that Sherri used little fabric pentagons to decorate the shell.
Air Plant Pod
Air plants just scream for cute little ways to display them! This paper mache pod is definitely one of them. You could make a few since your kids will probably want to paint some in fun colors.
Bead Bracelets
Learn how to create beautiful beads and make a bracelet or necklace. You are only limited by your imagination!
Hot Air Balloons
This is one of my favorite simple kids crafts ! Use a paper mache with Mod Podge technique to make these fun hot air balloon decorations.
Birds on Branches
Inspired by a chunky little bird on their birdfeeder, @slugs_snails_puppydogtails and her sons made these super cute birds on branches!
Burger & Fries
Here is another paper mache food tutorial. I really like these for kitchen playtime. This looks so real!
Lucy made this creepy octopus as a Halloween decoration for her house. I love it! I may want to make a smaller (less creepy) one to keep out year-round.
What kid wouldn't want to save money when they get to put it in a cute little piggy? They can learn about saving and have fun making the bank!
String of Pearls Plant
What could be better than a plant that doesn't die? One that your kids can help you make! Find out how here.
Star Wars Death Star Pinata
Love, love, this pinata! Looking for a perfect pinata for a Star Wars party ? Look no further! I don't know if I would want to break this open...
Here are instructions for the classic papier-mâché volcano school project. This post also has some good tips on drying paper mache projects.
How sweet is this boat? It would make a cute kid's room or beach house decoration . I love the patches on the sail!
Colorful Ring Dish
Create a paper mache ring dish and then decorate it to look like a mosaic ! Such a fun piece.
Rainbow Pinata
Another classic paper mache project is the pinata. Follow these instructions to make one that looks like a rainbow .
Standing Bird
Create a pretty bird or two to using cardboard and papier mache. I love the adorable paper clip legs!
Animal Head
Devany's daughter made this cow head to match a stuffed animal she loves. I think she did a pretty good job, don't you?
I can't believe these were made from cardboard and some kitchen ingredients! Kids can help you make these cake stands and paint them for some very unique party or home decorating.
Find out how to DIY your own witch mask using the gauze technique. This is a fun Halloween craft for older kids; they will really enjoy making and decorating their own mask.
Wobbling Bunny
This is a fun Easter activity for kids ! Use a balloon to create an egg shape and make a cute little bunny.
Dollhouse Sofa
Paper mache is a great idea for making dollhouse furniture! This way you can get the exact size, shape and color you are looking for.
Kids can make and gift a cute paper mache platter! Maybe one to match the bowls from earlier?
I applaud the intent for this project — Kelly decided to make a paper mache version of herself to do Zoom meetings and video calls she didn't want to do during the pandemic shut down. This post is quite a funny read!
If you enjoyed this list of paper mache ideas for kids, you will love these other popular crafts for kids :
- Easy Slime Recipe with Mod Podge (no Borax!)
- Easy Kids Craft: Faux Stained Glass House
- Toothpick Craft: Make a Cool Cactus for Kids
- DIY Play Dough That Glows In The Dark (3 Ingredients!)
- How to Make a Custom Photo Puzzle
The post Fun Paper Mache Ideas for Kids to Create appeared first on Mod Podge Rocks .

Human Bodies, Elongated Heads: Alien Fever Grips Southern Peru
The plateau is famous for the nazca lines, incisions on the desert floor forming birds and other animals visible from the air..

Nazca is also known for salt flats that dehydrate and preserve human and animal remains
Leandro Rivera says he chanced upon the cave in Peru's remote Nazca region that contained hundreds of pre-Hispanic artifacts - including human bodies with elongated heads and what appeared to be only three fingers on each hand.
The plateau is famous for the Nazca lines, incisions on the desert floor forming birds and other animals visible from the air. The ancient geoglyphs have long intrigued anthropologists and exert a powerful fascination over some believers in extraterrestrials.
Nazca is also known for salt flats that dehydrate and preserve human and animal remains, making it the site of important archeological finds that have deepened modern understanding of ancient cultures - and attracted grave robbers.
Rivera was convicted in 2022 of assault on public monuments for unearthing the artifacts. He received a four-year suspended sentence and was fined about 20,000 Peruvian soles ($5,190), short of the maximum penalty of an eight-year prison term.
His haul was thrust into the spotlight last year when two of the mummies ended up in Mexico as the centerpiece of congressional hearings on UFOs and extraterrestrial life. Mexican journalist Jaime Maussan presented the bodies as a sign of life beyond Earth - a claim dismissed by scientists.
In an interview with Reuters, Rivera said he removed as many as 200 sets of remains from the cave, and some bodies had been smuggled out of Peru to France, Spain and Russia.
The presentation of bodies in Mexico - as well as Rivera's claims to have dozens more - have prompted some experts to ask whether Peru is losing the battle to stop the plunder of its archaeological sites to feed a lucrative black market for mummies and other pre-Hispanic artifacts.
"Peru has done a lot of work to try and control this trade," said Christopher Heaney, a Latin American history professor at Penn State University and author of a book on Peruvian mummies. "But this implies that these claims for government success need to be re-examined a bit if objects like (the bodies in Mexico) can leave the country."
Peru's Culture Ministry did not respond to questions about the effectiveness of its efforts to control trafficking.
Reuters was granted rare access to the ministry's anti-smuggling unit at Lima's international airport and spoke to four government officials who said stricter penalties, more resources and better coordination were needed to fight the looting.
The news agency was unable to verify independently key details of Rivera's account. The public prosecutor's office of the culture ministry said in a statement to Reuters that its investigation into Rivera yielded just two altered bodies and two partial sets of bones.
Evelyn Centurion, head of cultural heritage recovery for the ministry, said the government is working on a task force with police, the attorney general, the foreign ministry and other departments to toughen penalties for looting cultural artifacts.
"The looting has not stopped," Centurion said in an interview. "We need greater collaboration from local governments and local authorities to prevent these illicit acts."
TOMB RAIDERS TRADE TIPS ONLINE
Archaeological materials including human remains command high prices on a black market controlled by well-organized criminal groups, experts said.
Since the COVID-19 pandemic, trafficking in cultural goods has exploded around the world, according to UNESCO and the World Customs Organization(WCO).
Antiquities stores that had previously relied on in-person shopping turned to online sales to survive.
Black-market sellers took advantage of the greater privacy online or resorted to encrypted channels.
The shift to an online black market also allowed buyers to actively seek out illegal goods, rather than wait for invitations to elite in-person events, as the trade was typically run pre-pandemic, a WCO official told Reuters.
And tomb raiders went online to share information about how to locate and raid vulnerable sites.
"Social networks have become spaces for the sale of works of art and antiques of illegal origin, and unfortunately this traffic has increased during the COVID-19 pandemic," said Enrique Lopez-Hurtado, who was until recently the coordinator of the culture sector of UNESCO Peru.
The sheer volume of online sales - and the demands of pandemic safety protocols - presented challenges for customs officials inspecting shipments and trying to intercept illegal goods, the WCO official said.
Reduced staffing put cultural sites in isolated areas, especially those previously guarded by local communities, at greater risk of looting.
Guido Lombardi, a medical doctor and anthropologist at the Peruvian University of Cayetano Heredia who specializes in mummy studies said he has received anonymous texts on WhatsApp offering looted objects for sale including terracotta figurines that are hundreds of years old.
Flavio Estrada, an archaeologist at the Institute of Legal Medicine and Forensic Sciences in Lima who assisted in the 2017 investigation of Rivera, said smuggling networks also market fakes, constructed out of animal bones and paper mache.
In some cases, alien enthusiasts exploit a lack of understanding of cranial remodeling, a documented social practice in Pre-Colombian times that involved binding a child's head to manipulate the shape, Lombardi said.
"There were no people who were born like this, as some of the theorists of 'ancestral aliens' also try to make us believe," he said. "There's a whole contemporary mythology around this topic, and that generates a market."
While cranial modification was a practice in some of Peru's ancient cultures, Estrada said it is likely that grave robbers altered the Nazca remains to make it look like they had only three fingers on their hands in a bid to appeal to those who subscribe to the notion of extraterrestrials.
Near the ancient carved lines in Nazca there is little evidence of protection beyond a few government signs indicating cultural territory.
But on the road between Nazca and Lima, plenty of billboards feature flying saucers and a friendly cartoon alien pops up along the highway advertising "Helados Ovni," or UFO ice cream.
CHANGING ATTITUDES
In recent years, there has been a global change in attitudes towards displaying the remains of indigenous people. Reputable museums have begun to repatriate bodies to their countries of origin.
But there is still demand for remains and other artifacts from private collectors in the United States and Europe looking for status symbols and alien enthusiasts, ten experts interviewed by Reuters said.
The WCO official also cited a social media market for buying skeletons and scalps, which has been growing in popularity over the last ten years.
Stopping looted items from leaving Peru is challenging. Peru shares borders with five countries and has 27 border crossings.
At Lima's international airport, experts from Peru's culture ministry monitor security checkpoints for suspected cultural material picked up by x-ray scanners.
Officials seize between four and 10 items a year, compared to 200 a month in 2008, said Rolando Mallaupoma an archeology analyst in the recovery unit of the culture ministry.
Mallaupoma attributes the decline to the ministry's work educating vendors in tourist areas on how to identify authentic culture goods.
The vast majority of incidents at the airport involve tourists, he said.
"In most cases what they are going to say is that they didn't know, and there will not be any criminal action," Mallaupoma said. The item will be confiscated and turned over to the ministry.
Ignacio Higueras, deputy minister of foreign affairs, told Reuters it is difficult to account for stolen cultural materials once they leave Peru.
Repatriating smuggled remains requires extensive diplomacy as well as documentation to prove their origin and cultural significance, Centurion from Peru's culture ministry said.
In February 2022, DHL workers intercepted a U.S-bound shipment of a human skull camouflaged using resin and eyeglasses at Lima's international airport, and police intercepted a mummy on its way to Bolivia in the backpack of a motorcycle carrier in February 2023.
Peruvian culture ministry officials are also looking into how the bodies displayed by Maussan wound up in Mexico and what role Rivera played in getting them there.
Another four sets of remains Rivera claims to have recovered ended up at the San Luis Gonzaga National University of Ica, about two hours from the Nazca Lines, according to university professors and Centurion.
A group of researchers at the university has been in a four-year standoff with the culture ministry over access to the bodies.
Anthropologist Roger Zuniga said the researchers have refused to hand over the bodies because they are trying to determine their origin.
Promoted Listen to the latest songs, only on JioSaavn.com
If the Peruvian culture ministry is serious about stopping the trafficking of cultural artifacts, he said, they could "at least do a surprise raid" in areas known for tomb robbing.
(Except for the headline, this story has not been edited by NDTV staff and is published from a syndicated feed.)
Track Budget 2023 and get Latest News Live on NDTV.com.
Track Latest News Live on NDTV.com and get news updates from India and around the world .
Track Latest News and Election Results Coverage Live on NDTV.com and get news updates from India and around the world.
Watch Live News:
IMAGES
VIDEO
COMMENTS
Step 2: Coat the Balloon With Flour Mixture and Paper. The recipe for the flour mixture is two parts water to one part flour. Now, I know flour is hard to come by. If you'd like to make a head but you'd rather not waste the flour, there are some alternative options to be found through searching online. They're mostly glue-related.
Find out how you can make a mannequin head with paper mache. You need: a plastic bottle and cup (this is the inner support). Mask tape, old newspapers, wood ...
Make an easy mannequin head from simple paper mache (no clay or pulp) with this quick tutorial. You only need a plastic bottle and cup (for support), old new...
Working with 1 strip at a time, cover the entire head and can. 7. Allow the can and balloon to dry completely. 8. Cover with a second layer of newspaper strips dipped in the flour and water mixture. 9. Allow to dry and repeat 2 more times. You should have done 4 paper mache coats on your mannequin head.
Want to be with Frank? Here's all you need to create your own papier mâché head. You will need:An inflatable gym ballCling filmFor the papier mache: glue, wa...
DIY Form for Sculpting Faces and Heads. This is a reader-supported site. When you buy through links on this site, I may earn an affiliate commission. Thanks for your support! 🙂. African Animals Pattern Set. Save $10 when you buy this three-pattern set. Use the patterns to create memorable gifts, or to bring a little bit of Africa to your own ...
Cover the entire head and ears with masking tape. Rip newspaper into strips. Dip each strip of newspaper in wheat paste, removing excess by sliding two fingers from the top to the bottom. Apply overlapping strips around the animal head until it is covered. Let the paper mache dry overnight, then paint the head with white paint.
Step 1: Build the Shape. To build the head you will need: a styrofoam ball or egg, modeling clay, lots of newspaper, some liquid starch or "Papier Mache Art Paste" (follow package directions if you use this), white paper towels, foil, masking tape, and an empty papertowel or toilet paper roll. To begin you will use your styrofoam ball as your base.
Set a cardboard ear against one side of the head. Paste it in place with small strips of paper. Position the ear in line with the eyebrow and the bottom of the nose. Continue adding pasted paper until an ear shape is formed and the cardboard is completely covered. Make a second ear on the opposite side of the head in the same fashion.
For the last layer I used the thinner masking paper to cover all of the skull head. I wanted a smoother last layer and it covered all of the brown paper bag paper along with the eyes, nose and jaw. I also paper mache-ed under the skull about 2 inches in. I wanted some extra strength when I removed the foam.
The cardboard was secured with masking tape: I use a boiled paste for my paper mache mixture. 1 part flour to 4 parts water works for best for me but you can experiment with your own mixture to see what you prefer to work with. I bring it to a boil stirring constantly until it's a soupy mixture. Pouring the soupy paper mache into a bowl I let ...
Step by step. Create the head template; this will be the rough 3d guide. Normally the cross bar would be eyebrow level, but for my mask I gave him a higher forehead to project leadership qualities. Create two boxes. Note: LDPE foam is temperature sensitive and easy to melt, so spread the glue on a stick first, waiting a moment before smearing ...
Step 1: Chop off Animal Heads. Yep, you gotta de-capitate those little guys. Because they are hard plastic, it can be a bit of a pain to actually chop these bad boys in half. Use a hand-held saw, a sharp utility knife, or a heat knife if you have one. Then just hack away at your animals, trying to cut as straight as you can.
Giraffe Neck, Step 1. Giraffe Neck, Step 2. Giraffe Neck, Step 3. Giraffe Neck, Step 4. Before adding the head or any paper mache, I needed to weight the neck. Otherwise, the head would cause the sculpture to fall over. To do this I cut a circle of cardboard and cut notches into it, then folded it up to make a bottom for the tube.
http://ultimatepapermache.com/paper-mache-head-maybe How to Make Masks: http://goo.gl/McFp8LMake Animal Sculptures with Paper Mache Clay: http://amzn.to/1nMU...
Once the Yoda Head is completely dry, take it outside and spray it with the primer. After the primer is dry, paint the paper mache head several times with the green-colored spray paint. Make sure to do at least 2-3 coats of paint. Next, let the paint dry. Finally, paint around the eye holes with the brown paint.
Paper Mache Puppet Head and neck. Smear the whole neck with glue first and then glue strips of newspaper to the neck. Use long thin strips and wrap them around and around and around tying the whole thing onto the head. Wrap it around, sticking it to the head around the neck several times and back onto the head.
You can add extra layers of paper mache on the inside, but six layers is strong enough. Now to start covering up the seam. Add some wood glue all the way around, one-half of the head. Then put your two halves together. Add some more paper mache with water, and wood glue. Start paper mache strips over the gap.
Step 2: Layer on Paper Mâché. Once the frame had fully dried, I started adding paper mâché. Each layer consisted of two strips of 2-3" paper that was torn with the grain of the paper - you can tell if you're tearing with the grain of the paper if it's easier to make strips.
How to Make Your Moose Head Wall Sculpture: Print the pattern, glue it to cardboard and cut it out. Tape the pattern pieces together, and add small details with foil and hot glue. Cover your moose with paper mache or paper mache clay. Paint or decorate your moose to fit your own decor (painted moose photo coming soon.)
STEP 4 - APPLY THE TWINE. Once all of the paper mache was complete and dry, I then used a hot glue gun to attach the twine to the antlers. I started from the base of the antlers and worked my way up, venturing off the base of the antler onto each point.
Some people had trouble finding a paper mache deer head in stores, so I thought I'd put together a tutorial on how you can make your own from scratch! I used...
Here are some creative paper mache ideas that kids can make at home. From animals to food, these projects are perfect for developing their artistic skills. When you think about paper mache (aka ...
A Step by Step DIY Tutorial of how to make a marionette string puppet head out of paper mache and how to attach the neck to the torso. Send me a tip, I appre...
Rivera was convicted in 2022 of assault on public monuments for unearthing the artifacts. He received a four-year suspended sentence and was fined about 20,000 Peruvian soles ($5,190), short of ...