How-To Geek
How to assign a static ip address in windows 10 or windows 11.
When organizing your home network it's easier to assign each computer it's own IP address than using DHCP. Here we will take a look at doing it in XP,

Quick Links
What is a static ip address, assign static ip addresses via your router, how to set a static ip address in windows 11, how to set a static ip address in windows 10, how to set a static ip address in windows 7 or 8 using "network connections", set a static ip address in windows vista, set a static ip address in windows xp, key takeaways.
- To set a static IP address in Windows 10 or 11, open Settings -> Network & Internet and click Properties for your active network.
- Choose the "Edit" button next to IP assignment and change the type to Manual.
- Flip the IPv4 switch to "On", fill out your static IP details, and click Save.
Sometimes, it's better to assign a PC its own IP address rather than letting your router assign one automatically. Join us as we take a look at assigning a static IP address in Windows.
A static IP address is manually set to a permanent, fixed address rather than being assigned automatically by your router using a procotol known as Dynamic Host Configuration Protocol (DHCP). DHCP is a handy way for devices to connect to your network more easily, because you don't have to configure IP addressing for each new device yourself. The downside to automatic addressing is that it's possible for a device's IP address to change from time to time, which is why people choose static IPs for certain types of devices. For example:
- You have a device like a home media server that you want to be able to find using the same IP address or host name each time.
- You have certain apps that can only connect to network devices using their IP address. In particular, many older networking apps suffer this limitation.
- You forward ports through your router to devices on your network. Some routers play nice with port forwarding and dynamic IP addresses; others do not.
Whatever your reason, assigning static IP addresses to devices is not difficult, but you do have a choice to make---whether to do it from the router or on the device itself.
Related: How to Set a Static IP Address in Ubuntu
While this article covers assigning static IP addresses to PCs within Windows itself, there is another way to go about it. Many routers allow you to assign a pool of IP addresses that are handed out to specific devices (based on the device's physical, or MAC address). This method offers a couple of significant advantages:
- IP addresses are still managed by the router, meaning that you won't have to make (and keep up with) changes on each individual device.
- It's easier to assign addresses within the same IP address pool your router uses.
This article is about assigning static IP addresses directly to PCs running Windows. We've already got a great guide on How to Set Static IP Addresses On Your Router , so if that's the way you want to go, be sure to give it a read.
With all that in mind, though, let's take a look at how to assign static IP addresses within any version of Windows.
Related: How to Find Your Router's IP Address on Any Computer, Smartphone, or Tablet
To set a static IP address in Windows 11, you'll want to open Settings, go to Network & Internet, and then find the Properties for your network. Inside there you'll be able to click the Edit button for IP Assignment and then fill out the manual network details.
First, open up the Settings app and then find Network & Internet on the left-hand side. You'll be presented with a panel that shows your current network connection. You can click where it says "Properties" right underneath the network, or if you have multiple network connections you can drill down into the specific network to see the IP address details for each one . In this case it's called "Ethernet", but you will most likely see "Wi-Fi" as the option to choose.
Once you've drilled down into the network connection that you want to set a manual IP for, scroll down until you see "IP Assignment" and then click the Edit button to the right.
Once there, you'll flip the drop-down to "Manual" and switch the IPv4 switch to "On". At this point you can fill out your network details and click Save to finish.
You can also use the old-school Network Connections panel in Windows 11, so if you prefer to use that method, keep reading.
If you're interested in more advanced networking, you might need to set up a static TCP/IP route , reset the entire TCP/IP stack on Windows , check open TCP/IP ports , find your MAC address on Windows , or find your IP address from the Command Prompt . We've got you covered there too.
To set a static IP address in Windows 10, you'll need to open the Settings app and drill down to Network & Internet. From there you'll select Properties for your network, and then the Edit button next to IP Assignment where you can input a manual IP address.
First, open the Settings app and locate the Network & Internet button.
On the next screen you'll see your network status, which should show you your active network. Here you'll want to click the Properties button. If you have multiple different networks, you could select them from the left-hand menu---in our case you'll notice we have both Wi-Fi and Ethernet networks, so you'll want to pick the one that you are trying to set a manual IP address for. You'll notice this is the same method we use when we're trying to find an IP address on Windows 10 .
On the network properties screen, scroll down until you see "IP settings" and click the Edit button under "IP assignment".
In the resulting popup window, change the Edit IP settings dropdown to Manual and then flip the IPv4 switch to "On". Fill out the details, click Save, and you should be good to go.
You might need to reboot to get all of your applications to work properly, just because it's Windows.
It's worth noting that you can use the old Network Connections method to set an IP address in any version of Windows, so if you prefer that method, keep reading.
To change the computer's IP address in Windows 7, you'll need to open the "Network Connections" window. Hit Windows+R, type "ncpa.cpl" into the Run box, and then hit Enter.
In the "Network Connections" window, right-click the adapter for which you want to set a static IP address, and then select the "Properties" command.
In the properties window for the adapter, select "Internet Protocol Version 4 (TCP/IPv4)" and then click the "Properties" button.
Select the "Use the following IP address" option, and then type in the IP address, subnet mask, and default gateway that corresponds with your network setup. Next, type in your preferred and alternate DNS server addresses. Finally, select the "Validate settings upon exit" option so that Windows immediately checks your new IP address and corresponding information to ensure that it works. When you're ready, click the "OK" button.
And then close out of the network adapter's properties window.
Windows automatically runs network diagnostics to verify that the connection is good. If there are problems, Windows will give you the option of running the Network troubleshooting wizard. However, if you do run into trouble, the wizard likely won't do you too much good. It's better to check that your settings are valid and try again.
Changing your IP from DHCP to a Static address in Vista is similar to other versions of Windows, but getting to the correct location is a bit different. Open the Start Menu, right-click on Network, and select Properties.
The Network and Sharing Center opens...click on Manage network connections.
Right-click on the network adapter you want to assign an IP address and click Properties.
Highlight Internet Protocol Version 4 (TCP/IPv4) then click the Properties button.
Now change the IP, Subnet mask, Default Gateway, and DNS Server Addresses. When you're finished click OK.
You'll need to close out of Local Area Connection Properties for the settings to go into effect.
Open the Command Prompt and use the
command to verify that the changes were successful.
To set a Static IP in Windows XP, right-click the "My Network Places" icon, and then select "Properties."
Right-click the adapter for which you want to set the IP, and then select "Properties" from the context menu.
Select the "Internet Protocol (TCP/IP)" entry, and then click the "Properties" button.
Select the "Use the following IP address" option. Type in the IP address, subnet mask, default gateway, and DNS server addresses you want to use. When you're finished, click the "OK" button.
You will need to close out of the adapter's properties window before the changes go into effect.
And you can verify your new settings by using the
command at the command prompt.
By and large, it's better to let most of your devices have their IP addresses assigned automatically by your router. Occasionally, though, you might want to set a static IP address for a particular device. While you can set static IP addresses directly on your devices (and this article has shown you how to do just that on Windows PCs), we still recommending setting up static IP addressing on your router if possible. It will just make life easier.
Related: How to Find Any Device's IP Address, MAC Address, and Other Network Connection Details
How to Assign Static IP Address to Your Devices
By default, your router assigns dynamic IP Address to every device that connects to it. This is called DHCP (short for Dynamic Host Control Protocol). But sometimes, we need our devices to have the same IP address (i.e. Static IP) every time it connects to the network. Reason being,
- Access your computer from the Internet.
- Share data between two devices on the same network.
- Quickly access your Network Printer or NAS.
- Use your computer as a media server.
- Or your work WiFi requires you to use Static IP address.

What IP address should you choose?
If two devices on the network have the same IP address, then there will be conflicts. The Internet won’t work on one of them or both, depending on your router. So, it’s important to assign a unique IP address to your computer. There are a couple of ways to pick an unused IP address.
For instance– first find your device’s IP address , say it’s 192.168.1.7 ; then keep the first three values (i.e. 192.168.1) as it’s and replace the last digit with some far number like 192.168.1.222 . Though make sure the last digit should be between a 0-255 range.
Assigning Static IP address to most devices is easy, just go to its network settings, look for DHCP option and turn it OFF. Once you do that, you’ll see a text area to enter Static IP address. Enter the new IP address there, save changes and that’s it.
So let’s see how to Assign Static IP address to various Operating Systems
1. Assign IP Address on Windows 10/8/7
You can do this quickly through the command line. You will need to first find your subnet mask, default gateway, and network adapter name. In my case, I’m on a Wi-Fi network, so the adapter name is Wi-Fi. To find yours just type the following command.
Once you get the output, find for the Network Adapter which has IP listed under it. The adapter name is a one-word name suffixed to the end of the Network Title. You will also need the Subnet mask and the Default Gateway Address.

Once you have the adapter name, Subnet Mask and Default Gateway, run the following command.
Wherein, Wi-Fi should be replaced by your adapter name and the IP, subnet mask and gateway address according to your configuration.

This will change your IP address from DHCP to manual with the static IP address you have specified.
In case you find it too confusing, you are not alone. You can do the same via GUI which is much more intuitive. You’ll need the Subnet Mask and Default Gateway Address . You can refer to the above step on how to find these details. Once you have noted down the address, click on Start Menu and type in Network and Sharing Center. Click once you see the Network and Sharing Center Icon.

Alternatively, if you are in Windows 10 then you can right-click on the Start menu and click on “ Network Connections “.

A new window will open, click on Change Adapter Options.

Right Click on your Current Network Adapter ( like WiFi) and choose Properties.

When the new window pops up, select Internet Protocol Version 4(TCP/IPv4) and click on Properties.

Once you get the pop-up window, select “ Enter the IP address you want ” and fil the IP Address, For Subnet Mask , and Default Gateway Address enter the values that you have noted down previously. Next, click on OK to save changes.

To switch to dynamic IP, click on Obtain the IP address automatically. Once this is enabled, your system will start picking an IP address dynamically from the router.
2. How to setup static IP on Ubuntu
On Ubuntu, you can set a static IP Address via the terminal or GUI. Firstly, let’s start with the command line. Right-click anywhere on the desktop to open the terminal.

Once the terminal window opens, we need to run a command. We need the subnet mask and network adapter name in order to set a static IP and to get that, run the following command on the terminal.
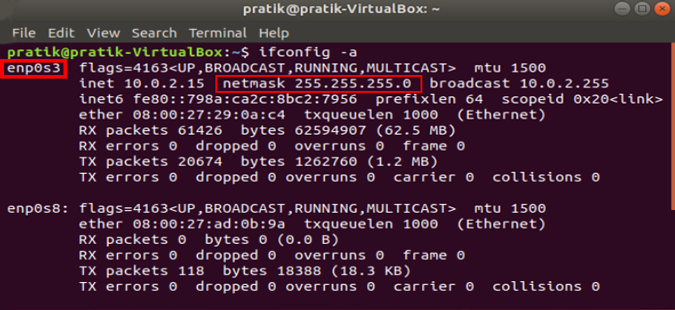
Once you have the subnet mask noted down, in my case, it’s 255.255.255.0, we can proceed further.
It is pretty simple and straight forward. We need to open the Network Adapter settings. To do that, click on the Network Icon at the top right corner of the desktop.

Now, navigate on the active network and click on the expand button for more options. Click on Wired Settings to open the Network menu.

Once you get the Wired Settings dialogue, make sure you are on the Network page. Click on the Settings icon beside the active network to open the adapter properties.
When you get the pop-up, navigate to the IPv4 tab to change the IP settings.

On the IPv4 tab, select the radio button which says “ Manual “. Some text fields will appear, you need to enter the IP address, Netmask and Gateway accordingly. Once it is validated, you can click on the Apply button to register the changes.

Again you need to restart the network for the changes to take effect. You can do it manually via command line or just switch off and switch on the Network adapter. Once done, run ifconfig on the terminal to check the IP address. It should be the same IP address which you have specified earlier.

3. How to setup static IP on Mac
If you are on macOS, setting static IP is quite similar to that of Ubuntu. But, here you don’t need the subnet mask or Default Gateway Address. Right click on the apple icon at the top left corner of the desktop. Click on System Preferences from the dropdown list.

Once the System Preferences dialogue box displays, navigate to Network and click on it to open the Network Settings

Alternatively, you can also hit Cmd+Space to trigger the Spotlight search. Type “ Network ” in the search bar and click on the icon once it appears. This will directly navigate you to the Network Settings.

From the pop-up window, select an active network interface. For example, I am connected to a WiFi network so my active network is Wi-Fi. Make sure you are on the active network tab and then click on Advanced .

A new window will open the configuration settings for that adapter. Move over to the IP settings by clicking on the TCP/IP tab .

From the Configure IPv4 menu, choose Using DHCP with manual address. Enter a static IP address in the IPv4 Address and leave the Subnet Mask and Router field as default. Click Ok to save the changes.

Now when you do an ifconfig, the system should be using the static IP you have defined in the previous times. If the IP’s have not changed, try restarting the Wi-Fi and it should fix it.
To switch back to dynamic IP, move back to “ Using DHCP ” from the Configure IPv4 menu.
4. How to setup static IP on Android

The network which you are connected to should be on top of the list. Tap on the settings icon beside the Wi-Fi network name.

Once the pop-up opens, you will see IP settings at the bottom of the menu. The default option is “DHCP”. Tap on it to change the IP configuration.

Select “ Static ” from the presented drop-down menu. Enter the desired IP address and leave the other options as default. Make sure that other devices are not using the same IP. You can see the IP address of the other devices in your network by using a small utility called Fing . For a detailed process, check our article on how to find the IP Address of any Device on your network . Once you have entered the IP, click on Save to register the change. Now, your Android phone should start using the desired IP Address.

In almost all the Android version, you get the option to set static IP Address. For some rare older Android versions, you can use a third-party app like WiFi Static . It’s free and it doesn’t require ROOT.
To switch back to dynamic IP, repeat the same procedure and select “DHCP” from the IP settings instead.
5. How to setup static IP on iPhone and iPad
If you are using an iPhone or iPad, then you can set static IP Address natively. You would need the Subnet Mask of your network. This can be obtained from the Wi-Fi settings and we would see to it in the further steps. To get started, click on the Settings icon in the dock to get to the Settings menu.

Now on the Settings menu page, tap on Wi-Fi to get to the Wi-Fi settings.

On the Wi-Fi page, you should see your connected Wi-Fi network at the top. Click on the “i” button beside it. This will open the Wi-Fi configuration window.

Once the Wi-Fi settings page appears, you will see an option called “ Configure IP “. By Default, this would be set to automatic. Just below this option, you will see “ Subnet Mask “, note it down as we will need it in the further steps. In order to set static IP, we need to change Configure IP it to Manual. Tap on it and it will open the IPv4 settings page.

There should be 3 options available on the “Configure IPv4” page. Select “ Manual ” from it. As soon as Manual IP is enabled, you will get extra text fields at the bottom to enter the IP Address, Subnet Mask, Router. We need to fill in the IP Address of our choice and Subnet Mask which we noted down in the previous step. Now, after you fill both the fields, the save button at the top right corner will be enabled. Click on it to save the static IP configuration.

Now, when you return to the Wi-Fi settings page, you will see your device is using the Static IP address. This should be the same IP address we have set in the IP configuration menu.

This static IP address will be applicable only to that particular Wi-Fi network. In case, you connect to some other Wi-Fi network the IP will change accordingly.
6. How to setup static IP to any Device from Router
Other network devices like your Wireless Printer, PS4, NAS, IP Camera, Raspberry Pi , etc. do not have an Interface. Hence, in order to configure the network, either you have to connect remotely or use the router. If you have access to the router, setting Static IP for network devices is the easiest and convenient way. I would recommend this method over any other.
So, to assign a Static IP Address to any network device, you need to login to the web portal of the router. The web portal address, username, and password are mostly printed behind the router. In case you don’t have physical access to the router, the web portal URL is mostly the PC’s gateway address. To find that, open command prompt and type the following command.
Once you have the web portal loaded, log in with the credentials. Now every router has a different web UI, but the overall structure is the same. Basically, you will have to link the IP Address to the Mac Address and Hostname of the device. So, we need to find the MAC address & Hostname of the network device. To do that, look for DHCP client list which should look something like the following screenshot.

You can get your MAC Address & Hostname under DHCP Client list. Once, you have the MAC address & Hostname noted down, we can proceed further. On most of the routers, you will have the option to set a Static IP under the section IP Mac binding or DHCP Static IP option. In case you are on a custom ROM like dd-wrt, head over to Services tab and you will have DHCP Server . Under DHCP Server, add an entry for Static Leases by clicking on the Add button.

Clicking on the Add button will create a new row. You have to enter the MAC Address, Hostname, desired Static IP and Lease time . Lease time is a unit in minutes after which your IP will be renewed. Since we are adding only 1 entry for the particular host the IP will be the same even after the renewal. Once, done click on Save changes .

Once you have configured successfully on the router, just restart the Wi-Fi on the device. When it connects it should start using the static IP. In case of issues, make sure that you have the correct MAC Address and Hostname. To check, just run the command ipconfig or look back again in the router’s DHCP client list.

These changes are written to the ROM so restarting the router won’t make changes to the static IP configuration. In order to get back to Dynamic IP, just remove the entry from the IP leases.
What’s next
Once you have started configuring the IPs on Router and network devices, you are good to go configure telnet and SSH. Have a look at our brief article on How to Enable Telnet Server in Windows 10 , Best SSH clients for iOS To Manages Remote Servers and 6 Best FTP Clients For Android . A word of caution would be to note down the static IPs assigned to devices as assigning the same IP to two network devices would render them useless.
Also Read: How To Change DNS on Windows|Mac|Android|iOS

Mrinal Saha
Mrinal is a tech geek who spends half of his day reading and writing about tech. While the nights are spent on shooting or editing YouTube videos. Feel free to geek out with him on-
You may also like
7 fixes for microsoft teams audio is not..., accidentally closed an important chrome tab – here’s..., how to manage collaborative collections on instagram, 3 fixes for whatsapp status not showing, how to block adult websites on windows and..., 2 best discord bots (or apps) to delete..., how do i enlarge a photo without losing..., watch netflix together with your long distance partner..., how to stream netflix on discord for watch..., i tried meta ai on whatsapp: 5 things..., leave a comment cancel reply.
You must be logged in to post a comment.
How to configure a static IP on Windows 10 or 11
Do you need to switch from a dynamic to a static IP address configuration on Windows 11 or 10? Here's how.

- Windows 11 static IP
- Windows 10 static IP
On Windows, the router's Dynamic Host Configuration Protocol (DHCP) server is (usually) responsible for assigning a dynamic Transmission Control Protocol/Internet Protocol (TCP/IP) configuration to every device in the network, including to your computer running Windows 11 or Windows 10.
Although a dynamic IP address is the recommended configuration for most situations, you may need to change to a static IP address if you're thinking about setting up a printer or file sharing, or you have to configure port forwarding on the router to your computer.
The reason is that a dynamic network configuration can change at any time after the lease from the DHCP expires and if the address changes, network resources you may have configured will stop working. Setting a static IP address will always stay the same on the computer, allowing a more reliable experience sharing resources in the network or forwarding ports.
Whatever the reason, on Windows 10 and 11, you have many ways to configure a static TCP/IP address, including using the Settings app and Command Prompt.
This guide will walk you through the different ways to configure a static network configuration on Windows 11 and 10.
How to set a static TCP/IP network configuration on Windows 11
On Windows 11, you can change your computer's dynamic IP configuration to static in at least two ways through the Settings app or commands.
Configure IP from Settings app
Get the Windows Central Newsletter
All the latest news, reviews, and guides for Windows and Xbox diehards.
To assign a permanent TCP/IP configuration on Windows 11, use these steps:
- Open Settings .
- Click on Network & internet .
- (Optional) Click on Advanced network settings .
- Under the "More settings" section, click on Hardware and connection properties.
- Note the current IPv4 , Subnet mask , Default Gateway , and DNS server addresses to determine the new configuration, as it has to be in the same network scope.
- Click the Ethernet or Wi-Fi page on the right side from the "Network & internet." page.

- Quick note: If you select the Wi-Fi page, you need to click on the connection properties to access the network settings.
- Click on the Edit button for the "IP assignment" setting.

- Select the Manual option from the drop-down menu.
- Turn on the IPv4 toggle switch.
- Confirm the IP address for the computer – for example, 10.1.4.90.
- Confirm the subnet mask for the configuration – for example, 255.255.255.0.
- Confirm the default gateway address (usually your router's IP) – for example, 10.1.4.1.
- Confirm the preferred DNS address – for example, 10.1.4.1.

- Quick note: In a home network, you may also be able to use the router's IP address for the DNS configuration. You can also use third-party DNS services like Google Public DNS, Cloudflare, Cisco's OpenDNS, and others.
- (Optional) Select the "On (automatic template)" option for the "DNS over HTTPS" setting and leave the "Fallback to plaintext" option disabled unless you want to encrypted as well as unencrypted traffic or you're troubleshooting connectivity.
- Quick note: DNS over HTTPS (DoH) is a feature that encrypts the DNS queries over the HTTPS protocol to improve security and privacy on the internet. You only want to enable this feature if the DNS server supports this feature.
- Confirm the alternate DNS address (if applicable).
- (Optional) Select the "On (automatic template)" option for the "DNS over HTTPS" setting and leave the "Fallback to plaintext" option disabled.
- Click the Save button.
Once you complete the steps, the computer will start using the static network configuration. If everything has been configured correctly, you should be able to open the web browser to access the internet.
If you entered an address (such as the DNS address) and then changed it, you probably won't be able to save the settings. If this is the case, cancel the configuration, start over, enter the correct configuration, and then try to save the settings.
Configure IP from Command Prompt
To set a static TCP/IP configuration on Windows 11, use these steps:
- Open Start .
- Search for Command Prompt , right-click the top result, and select the Run as administrator option.
- Type the following command to see your current networking configuration and press Enter : ipconfig /all
- Confirm the name of the adapter and the networking configuration, including the IPv4 , Subnet mask , Default Gateway , and DNS Servers .

- Type the following command to configure a static TCP/IP address and press Enter : netsh interface ip set address name= "ADAPTER-NAME" static IP-ADDRESS SUBNET-ADDRESS DEFAULT-GATEWAY-ADDRESS
In the above command, replace ADAPTER-NAME with the name of your network adapter. Change IP-ADDRESS SUBNET-ADDRESS DEFAULT-GATEWAY-ADDRESS with the device IP address, subnet mask, and default gateway addresses you want. For example, this command sets the 10.1.4.90, 255.255.255.0, 10.1.4.1 configuration: netsh interface ip set address name="Ethernet 10Gb" static 10.1.4.90 255.255.255.0 10.1.4.1

- Type the following command to set a DNS server address and press Enter : netsh interface ip set dns name="ADAPTER-NAME" static DNS-ADDRESS
In the command, change ADAPTER-NAME with your adapter's name and DNS-ADDRESS with the DNS server address of the network. For example, this command sets the local router as the DNS server: netsh interface ip set dns name="Ethernet 10Gb" static 10.1.4.1
- Type the following command to set an alternate DNS server address and press Enter : netsh interface ip add dns name="ADAPTER-NAME" DNS-ADDRESS index=2
In the command, change ADAPTER-NAME with the adapter's name and DNS-ADDRESS with an alternate DNS server address. For example, netsh interface ip add dns name="Ethernet 10Gb" 1.1.1.1 index=2
After you complete the steps, the commands will set a static network configuration on Windows 11.
How to set a static TCP/IP network configuration on Windows 10
On Windows 10, you can also use the Settings app and Command Prompt to set up a static IP network configuration.
To assign a permanent TCP/IP configuration on Windows 10, use these steps:
- Click on Ethernet or Wi-Fi .
- Click on the active connection on the right side.

- Click the Edit button for the "IP assignment" setting.

- Select the Manual option.
- Confirm the subnet prefix length (subnet mask) for the configuration – for example, 24 to specify the 255.255.255.0 subnet mask.

- Quick tip: It's important to use the number that represents the network instead of the subnet mask. Otherwise, the configuration won't save. If you don't know the subnet prefix length for your subnet mask, you can use any online subnet calculator to find out.
Once you complete the steps, Windows 10 will start using the static IP configuration. If you lose network connectivity, restart the computer to regain access to the local network and internet.
To change from dynamic to static IP address with commands on Windows 10, use these steps:
In the command, change ADAPTER-NAME with your adapter's name and DNS-ADDRESS with the DNS server address of the network. For example, this command sets the local router as the DNS server: netsh interface ip set dns name=" Ethernet 10Gb" static 10.1.4.1
In the command, change ADAPTER-NAME with the adapter's name and DNS-ADDRESS with an alternate DNS server address. For example, netsh interface ip add dns name="Ethernet0" 1.1.1.1 index=2
After you complete the steps, the network configuration will switch from dynamic to static on Windows 10.

Mauro Huculak is technical writer for WindowsCentral.com. His primary focus is to write comprehensive how-tos to help users get the most out of Windows 10 and its many related technologies. He has an IT background with professional certifications from Microsoft, Cisco, and CompTIA, and he's a recognized member of the Microsoft MVP community.
- 2 DesktopGPT brings GPT-3.5 Turbo, GPT-4, and GPT-4 Turbo to Windows 11's backyard, potentially giving Microsoft's Copilot AI a run for its money as the best alternative
- 3 Clippy, the infamous paperclip, is here to debloat Windows 11 and save you from ads
- 4 Microsoft says most company execs won't hire anyone without an AI aptitude, prompting "a 142x increase in LinkedIn members adding AI skills like Copilot and ChatGPT to their profiles"
- 5 World of Warcraft Dragonflight's final major update, Patch 10.2.7 "Dark Heart", is now available
How To Configure Ip Address For Ethernet

- How-To Guides
- Tech Setup & Troubleshooting

Introduction
Configuring the IP address for Ethernet is an essential step in setting up a network connection. Whether you are using Windows, Mac, or Linux, correctly configuring the IP address ensures that your device can communicate with other devices on the network.
In this article, we will explore the process of configuring the IP address for Ethernet on various operating systems. We will discuss the importance of this configuration, delve into the fundamentals of IP addresses, provide step-by-step instructions for configuration on different platforms, and even troubleshoot common issues that may arise during the process.
Understanding how to configure the IP address for Ethernet is particularly useful for network administrators, IT professionals, and individuals looking to set up their home network. By following the guidelines provided in this article, you will be able to ensure a stable and efficient network connection for your devices.
So, whether you are a seasoned tech enthusiast or a beginner delving into the world of networking, let’s get started and learn how to configure the IP address for Ethernet on Windows, Mac, and Linux systems.
Importance of Configuring IP Address
Configuring the IP address for Ethernet is crucial for the proper functioning of a network. An IP address acts as a unique identifier for each device connected to the network, allowing data packets to be transmitted and received accurately.
One of the primary reasons to configure the IP address is to establish seamless communication between devices. By correctly assigning an IP address to each device on the network, you enable them to send and receive data packets without any conflicts or confusion. This is especially important in environments where multiple devices need to interact, such as office networks or home networks with various connected devices.
Additionally, configuring the IP address allows for efficient routing of network traffic. When a device on the network wants to communicate with another device, it needs to know the destination IP address. By having a properly configured IP address, the device can identify the specific destination and send the data packets on the most optimal path, reducing network congestion and improving overall performance.
Another significant benefit of configuring the IP address is enhanced security. By assigning unique IP addresses to each device, administrators can implement access restrictions and firewall rules based on IP addresses. This enables finer control over network access, protecting sensitive data and preventing unauthorized access to the network resources.
Furthermore, configuring the IP address facilitates network troubleshooting. Having a specific IP address assigned to each device makes it easier to identify and isolate any connectivity or performance issues. Network administrators can use IP addresses to pinpoint the problematic device and address the issue promptly, minimizing network downtime and optimizing network performance.
In summary, configuring the IP address for Ethernet is essential for seamless network communication, efficient routing of data packets, enhanced security, and effective network troubleshooting. By understanding the importance of properly configuring IP addresses, you can ensure a robust and reliable network environment for your devices.
Understanding IP Address
An IP address (Internet Protocol address) is a unique numerical identifier assigned to each device connected to a network. It serves as a means for devices to identify and communicate with each other over an IP-based network, such as the internet or a local network.
IP addresses consist of a series of numbers, separated by periods (IPv4) or colons (IPv6). In the case of IPv4 addresses, they are composed of four sets of numbers ranging from 0 to 255. For example, 192.168.0.1 is a commonly used IPv4 address format. On the other hand, IPv6 addresses use a longer and more complex format, consisting of eight sets of hexadecimal values.
There are two main types of IP addresses: public and private. Public IP addresses are assigned by internet service providers (ISPs) and are unique across the internet. They allow devices to communicate with other devices on the internet. Private IP addresses, on the other hand, are used within local networks and are not exposed to the internet. They enable devices to communicate with each other within the same network.
Another important aspect of IP addresses is the concept of subnetting. Subnetting allows network administrators to divide a large network into smaller subnetworks, known as subnets. Each subnet has its own range of IP addresses, allowing for better organization and management of network resources.
It’s worth noting that IP addresses can be assigned statically or dynamically. Static IP addresses are manually assigned to devices and remain constant over time. Dynamic IP addresses, on the other hand, are automatically assigned by a Dynamic Host Configuration Protocol (DHCP) server. Dynamic IP addresses are more commonly used, as they allow for efficient allocation of IP addresses within a network, especially in scenarios where devices frequently connect and disconnect from the network.
Understanding IP addresses is crucial for configuring and managing network connections effectively. Whether you are setting up a small home network or managing a large corporate network, having a solid grasp of IP address concepts is essential for ensuring smooth network communication and efficient resource allocation.
Configuring IP Address for Ethernet on Windows
Configuring the IP address for Ethernet on Windows is a straightforward process that can be done through the network adapter settings. Here’s a step-by-step guide on how to do it:
- Open the Control Panel by searching for it in the Start menu or right-clicking the Start button and selecting it from the menu.
- In the Control Panel, navigate to the “Network and Internet” section and click on “Network and Sharing Center.”
- In the Network and Sharing Center, click on “Change adapter settings” on the left-hand side.
- Right-click on the Ethernet adapter for which you want to configure the IP address and select “Properties.”
- In the Properties window, scroll down and select “Internet Protocol Version 4 (TCP/IPv4).” Click on the “Properties” button.
- In the TCP/IPv4 Properties window, select the option “Use the following IP address.”
- Type in the desired IP address in the “IP address” field, along with the subnet mask provided by your network administrator.
- Optionally, you can also enter the default gateway and preferred/alternate DNS server addresses if required by your network.
- Click “OK” to save the changes, and then close the remaining windows.
Once the IP address is configured, Windows will use the specified settings for the Ethernet adapter, allowing it to communicate with other devices on the network. It is important to note that if you are configuring the IP address in a business or enterprise environment, it is advisable to consult with your network administrator before making any changes.
Configuring IP Address for Ethernet on Mac
Configuring the IP address for Ethernet on a Mac is a simple process that can be done through the Network preferences. Follow these steps to configure the IP address on your Mac:
- Click on the Apple menu in the top left corner of your screen and select “System Preferences.”
- In the System Preferences window, click on the “Network” icon.
- In the Network preferences, select the Ethernet adapter from the list on the left-hand side.
- Click on the “Advanced” button at the bottom right corner of the window.
- In the Advanced settings, navigate to the “ TCP/IP ” tab.
- In the TCP/IP tab, select the “Using DHCP with manual address” option from the “Configure IPv4” dropdown menu.
- Click on the “Renew DHCP Lease” button to obtain a new IP address automatically.
- If you want to set a static IP address , select the “Manually” option from the “Configure IPv4” dropdown menu.
- Click on the “+” button to add a new IP address, and enter the desired IP address and subnet mask.
- Optionally, you can also enter the router address and DNS server addresses if required by your network.
- Click on the “OK” button to save the changes, and then close the Network preferences window.
Once the IP address is configured on your Mac, the Ethernet adapter will use the specified settings for communication with other devices on the network. Keep in mind that it is recommended to consult with your network administrator before configuring the IP address, especially in enterprise environments where specific network configurations may be required.
Configuring IP Address for Ethernet on Linux
Configuring the IP address for Ethernet on Linux can be done using various methods, depending on the distribution and network manager being used. Here, we’ll cover two commonly used methods: using the command line and using the Network Manager applet.
- Using the Command Line:
- Open a terminal window.
- Type the command sudo nano /etc/network/interfaces to open the network interfaces configuration file for editing.
- Locate the Ethernet interface configuration section, usually named eth0 .
- address [IP Address] : Replace [IP Address] with the desired IP address.
- netmask [Subnet Mask] : Replace [Subnet Mask] with the appropriate subnet mask.
- gateway [Gateway] : Replace [Gateway] with the IP address of the default gateway, if necessary.
- Save the changes and exit the editor.
- Restart the networking service using the command sudo service networking restart or sudo systemctl restart networking .
- Using the Network Manager Applet:
- Click on the network icon in the system tray to open the network manager applet.
- Select “Edit Connections” or a similar option to open the connection settings.
- Find your Ethernet connection from the list and click on the “Edit” button.
- In the IPv4 tab, select the “Manual” method.
- Click on the “Add” button to add a new IP address.
- Enter the desired IP address, subnet mask, and gateway (if needed).
- Click “Save” and close the settings window.
Once the IP address is configured on your Linux system, the Ethernet adapter will use the specified settings for communication with other devices on the network. Remember to consult relevant documentation or community resources specific to your Linux distribution or network manager for more detailed instructions.
Troubleshooting IP Address Configuration Issues
While configuring the IP address for Ethernet, it is possible to encounter some common issues. Fortunately, most of these issues can be resolved with a few troubleshooting steps. Here are some troubleshooting tips to help you address IP address configuration issues:
- Check the IP address settings: Ensure that the IP address, subnet mask, and gateway (if applicable) are correctly entered. Double-check for any typos or mistakes in the configuration.
- Restart the device: Sometimes, a simple restart can fix connectivity issues. Try restarting the device and check if the IP address is being assigned correctly.
- Check for IP address conflicts: It is essential to ensure that the IP address you are trying to configure is not already in use by another device on the network. This can cause conflicts and lead to connectivity problems. Use an IP address that is unique within the network.
- Reset network settings: If the issue persists, attempt to reset the network settings on the device. This will clear any misconfigurations or conflicts that may be causing the problem.
- Troubleshoot DHCP: If you are using DHCP to assign IP addresses automatically, verify that the DHCP server is functioning correctly. Check the DHCP settings and ensure that there are available IP addresses in the DHCP pool.
- Disable firewall or security software: Sometimes, firewalls or security software can interfere with network connections. Temporarily disable any firewall or security software on the device and check if the IP address configuration succeeds.
- Update network drivers: Outdated or incompatible network drivers can cause IP address configuration issues. Ensure that you have the latest drivers for your network adapter installed. Check the manufacturer’s website for driver updates.
- Consult network administrator: If you are configuring the IP address in a business or enterprise environment, it is advisable to consult with your network administrator. They can provide guidance and assistance in troubleshooting and resolving IP address configuration issues.
By following these troubleshooting tips, you can overcome common IP address configuration issues and maintain a stable and reliable network connection. If the issue persists, it may be necessary to seek further technical support or consult relevant documentation specific to your operating system or network setup.
Configuring the IP address for Ethernet is a crucial step in establishing network connectivity. Whether you are using Windows, Mac, or Linux, understanding how to configure the IP address allows your devices to communicate efficiently and seamlessly with other devices on the network.
In this article, we discussed the importance of configuring the IP address and how it enables devices to establish reliable connections, efficient data routing, enhanced security, and effective troubleshooting. We explored the fundamentals of IP addresses, including the difference between public and private addresses, as well as the concept of subnetting.
We provided step-by-step instructions on how to configure the IP address for Ethernet on Windows, Mac, and Linux systems. By following these guidelines, you can ensure that your devices have the necessary settings to connect and communicate within your network environment.
In addition, we discussed common troubleshooting tips to address IP address configuration issues. By employing these troubleshooting steps, you can resolve connectivity problems and ensure the smooth operation of your network.
Remember that the process of configuring the IP address may vary slightly depending on the operating system or network manager you are using. It is always recommended to consult relevant documentation or seek assistance from network administrators if you are in an enterprise setting.
Mastering the art of configuring IP addresses is a valuable skill that will empower you to set up and manage efficient network connections. With a solid understanding of IP address configuration, you can create secure and reliable networks that enable seamless communication between devices and optimize overall network performance.
Leave a Reply Cancel reply
Your email address will not be published. Required fields are marked *
Save my name, email, and website in this browser for the next time I comment.
- Crowdfunding
- Cryptocurrency
- Digital Banking
- Digital Payments
- Investments
- Console Gaming
- Mobile Gaming
- VR/AR Gaming
- Gadget Usage
- Gaming Tips
- Online Safety
- Software Tutorials
- Tech Setup & Troubleshooting
- Buyer’s Guides
- Comparative Analysis
- Gadget Reviews
- Service Reviews
- Software Reviews
- Mobile Devices
- PCs & Laptops
- Smart Home Gadgets
- Content Creation Tools
- Digital Photography
- Video & Music Streaming
- Online Security
- Online Services
- Web Hosting
- WiFi & Ethernet
- Browsers & Extensions
- Communication Platforms
- Operating Systems
- Productivity Tools
- AI & Machine Learning
- Cybersecurity
- Emerging Tech
- IoT & Smart Devices
- Virtual & Augmented Reality
- Latest News
- AI Developments
- Fintech Updates
- Gaming News
- New Product Launches
How to Use Email Blasts Marketing To Take Control of Your Market
Learn to convert scanned documents into editable text with ocr, related post, how to make stairs planet coaster, how to rotate camera in planet coaster, how to make a good roller coaster in planet coaster, where is the minecraft folder, how to update minecraft windows, how to update minecraft education edition, related posts.

How To Connect To Allen Bradley Plc Via Ethernet

What Is An Ethernet IP Protocol

How To Fix Ethernet Doesnt Have A Valid Ip Configuration

How To Share Internet Through Ethernet

How To Port Forward Ethernet

What Address Is Used For Ethernet Broadcasts?

Why Ethernet Not Working

How To Find Ethernet Ip Address
Recent stories.

Top Mini Split Air Conditioner For Summer

Comfortable and Luxurious Family Life | Zero Gravity Massage Chair

Fintechs and Traditional Banks: Navigating the Future of Financial Services

AI Writing: How It’s Changing the Way We Create Content

How to Find the Best Midjourney Alternative in 2024: A Guide to AI Anime Generators

How to Know When it’s the Right Time to Buy Bitcoin
- Privacy Overview
- Strictly Necessary Cookies
This website uses cookies so that we can provide you with the best user experience possible. Cookie information is stored in your browser and performs functions such as recognising you when you return to our website and helping our team to understand which sections of the website you find most interesting and useful.
Strictly Necessary Cookie should be enabled at all times so that we can save your preferences for cookie settings.
If you disable this cookie, we will not be able to save your preferences. This means that every time you visit this website you will need to enable or disable cookies again.
How to set a static IP address on Windows 11
Here are the steps to set a static IP address on Windows 11 with Command Prompt, PowerShell, Control Panel, and Settings.

UPDATED 7/21/2023: On Windows 11, a static IP address is a network configuration that never changes, making it the preferred option to share files , a printer on a local network , or configure port forwarding.
Usually, when a computer connects to the network, it receives a dynamic IP address assigned by the local Dynamic Host Configuration Protocol (DHCP) server. The only problem is that this configuration can change at any time, as soon as you restart the computer or after the settings expire, and this can cause services like port forwarding and remote desktop to stop working. A static network configuration always maintains the same settings, making it ideal for hosting services that other users can access through the network.
This guide will teach you how to set a static IP (version 4) address on Windows 11 . (See also this video tutorial with the steps to complete this task.)
Assign static IP address on Windows 11 from Command Prompt
Assign static ip address on windows 11 from powershell, assign static ip address on windows 11 from settings, assign static ip address on windows 11 from control panel.
To set a static IP address on Windows 11 with Command Prompt, use these steps:
Open Start on Windows 11.
Search for Command Prompt , right-click the top result, and select the Run as administrator option.
Type the following command to see your current networking configuration and press Enter :
Under the network adapter, note the name of the adapter as well as the following information in these fields:
- Subnet mask
- Default Gateway
- DNS Servers

Type the following command to assign a static IP address on Windows 11 and press Enter :
In the above command, replace “Ethernet0” with the name of your network adapter. Change “10.1.4.119 255.255.255.0 10.1.4.1” with the device IP address, subnet mask, and default gateway address corresponding to the local area network.
Type the following command to set a DNS server address and press Enter :
In the command, make sure to change “Ethernet0” with your adapter’s name and “10.1.4.1” with the DNS server address of the network.
Type the following command to set an alternate DNS server address and press Enter :
In the command, change “Ethernet0” with the adapter’s name and “8.8.8.8” with an alternate DNS server address.

After completing the steps, you can use the ping command (for example ping google.com ) to see if the configuration works correctly.
You can use PowerShell with the “NetTCPIP” module to manage networking settings, including changing the IP address settings to a static configuration.
To set a static IP address with PowerShell, use these steps:
Open Start .
Search for PowerShell , right-click the result, and select the Run as administrator option.
Type the following command to view your current network configuration and press Enter :

Confirm the following network information:
- InterfaceIndex
- IPv4Address
- IPv4DefaultGateway
Type the following command to set a static IP address and press Enter :

In the command, replace the “InterfaceIndex” number (10) with the corresponding number of your adapter. Change “IPAddress” with the static IP address you want to assign to your device. Change “PrefixLength” (subnet mask) with the correct bit number if necessary. Typically, on a home network, the setting is “24.” Also, change the “DefaultGateway” option with the default gateway address of the network.
Type the following command to assign a DNS server address and press Enter :

If you need to set a secondary DNS server address, use a comma to use the same command with another address. For example:
In the command, replace the “InterfaceIndex” number (10) with your network adapter’s corresponding number. Also, change “ServerAddresses” with the DNS IP address.
Once you complete the steps, the new network configuration will apply to the computer.
Regardless of your chosen method, always assign a TCP/IP address in the network range and outside of the DHCP server scope to allow proper connectivity and avoid configuration conflicts. The reason is that multiple computers sharing the same address will cause problems, preventing them from connecting to the internet.
On Windows 11, you can set a static IP address configuration from the Settings app for wireless and wired adapters.
Set static IP address on Wi-Fi adapter
To assign a static IP address configuration to a Wi-Fi adapter, use these steps:
Open Settings on Windows 11.
Click on Network & Internet .
Click the Wi-Fi tab.

Select the current network connection.

Under the “IP settings” section, click the Edit button.

Select the Manual option.

Turn on the IPv4 toggle switch.
Set a static IP address for Windows 11 – for example, 10.1.4.119 .

Specify a Subnet mask – for example, 255.255.255.0 .
Specify a Default Gateway address.
Specify a Preferred DNS address (required).
(Optional) Specify an “Alternate DNS” address.
Use the “DNS over HTTPS” drop-down menu and select the Off option for the preferred and alternate addresses, but you can enable DoH with these options:
- Off: Transmits all DNS traffic without encryption.
- On (automatic template): Sends all DNS traffic with encryption.
- On (manual template): Allows you to specify a specific template. It is only required if the DNS service doesn’t work automatically or has a template that works as expected.
Turn off the “Fallback to plaintext” toggle switch (if you enable DoH).
Click the Save button.
Once you complete the steps, the static network configuration will apply to the computer. You can test the new settings by opening the web browser and loading a website.
Set static IP address on Ethernet adapter
To assign a static IP address to an Ethernet (wired) adapter on Windows 11, use these steps:
Open Settings .
Click the Ethernet tab.

After you complete the steps, you can test your settings using your web browser to open a website.
On Windows 11, you can still use Control Panel to change the IP settings for Ethernet or Wi-Fi adapters.
To assign a static IP configuration through the Control Panel, use these steps:
Open Control Panel .
Click on Network and Internet .
Click on Network and Sharing Center .
Click the Change adapter settings option on the left navigation pane.

Right-click the network adapter and select the Properties option.
Select the “Internet Protocol Version 4 (TCP/IPv4)” option.
Click the Properties button.

Select the “Use the following IP address” option.
Assign the static IP address – for example, 10.1.4.119 .

Specify a Subnet mask . Typically, on a home network, the subnet mask is 255.255.255.0 .
Specify a Default gateway address – for example, 10.1.4.1 (Usually, your router’s address).
Under the “Use the following DNS server addresses set Preferred DNS server” section, set the “Preferred DNS server address,” which is usually your router’s IP address or server IP address providing DNS resolutions (for example, 10.1.4.1 ).
(Optional) Specify an “Alternative DNS server,” which the computer will use if it cannot reach the preferred DNS server.
Click the OK button.
Click the Close button again.
Once you complete the steps, you can open the web browser and load a website to see if the configuration works.
If you want to revert the changes, you can use these instructions to remove the static settings to configure a dynamic IP address on Windows 11.

Mauro Huculak is a Windows How-To Expert who started Pureinfotech in 2010 as an independent online publication. He has also been a Windows Central contributor for nearly a decade. Mauro has over 14 years of experience writing comprehensive guides and creating professional videos about Windows and software, including Android and Linux. Before becoming a technology writer, he was an IT administrator for seven years. In total, Mauro has over 20 years of combined experience in technology. Throughout his career, he achieved different professional certifications from Microsoft (MSCA), Cisco (CCNP), VMware (VCP), and CompTIA (A+ and Network+), and he has been recognized as a Microsoft MVP for many years. You can follow him on X (Twitter) , YouTube , LinkedIn and About.me . Email him at [email protected] .
- How to delete network folder with thumbs.db file on Windows 10
- How to enable new energy and battery usage settings on Windows 11
We hate spam as much as you! Unsubscribe any time Powered by follow.it ( Privacy ), our Privacy .
- Standards & Protocols
- Data Center
- Unified Communications
Enterprise Networking Planet content and product recommendations are editorially independent. We may make money when you click on links to our partners. Learn More .
Setting up a local area network (LAN) might seem like a daunting task reserved for IT professionals. However, with the right guidance and a systematic approach, anyone can configure a secure and efficient LAN.
To effectively set up a LAN, you should be aware of your devices, networking hardware, and network connectivity options. You should also plan your approach beforehand and make sure that your network is healthy and secure — before and after it’s set up.
Whether an IT manager, network administrator, or tech decision-maker in a large or small organization, this guide will guide you to a successful LAN setup.
Table of Contents
Requirements for setting up a LAN
Before initiating the configuration steps, it’s important to know exactly what you’re configuring. A LAN is a network of interconnected digital devices in a limited geographical area such as an office building or campus for communication and exchange of resources like files and applications.
Understanding the basic requirements for setting up a local area network ensures that your LAN is not only functional but also secure and efficient. The must-haves are networking devices, nodes, cables, and connectivity:
- Devices: These could be desktops, laptops, or other computing devices that will be part of the network.
- Networking hardware: A router and a switch are fundamental. The router connects your LAN to the internet, while the switch connects various devices within the LAN.
- Cables: Ethernet cables are needed for wired connections. Make sure to have enough for each device you plan to connect.
- External storage and printers: These are optional, if your enterprise requires shared resources.
- Wired LAN: Ethernet cables connect devices to the switch and router. This option is generally more secure.
- Wireless LAN: Wi-Fi can be used for a more flexible setup but may require additional security measures.
8 steps to LAN setup and configuration
Here’s a quick walkthrough of how to set up and configure your LAN in eight simple steps.
1. Identify network services and resources
Start by listing all the services and resources that will be shared across the network. This could include file servers, printers, and internet access.
Knowing what needs to be shared helps in selecting the right hardware and software, ensuring that all networking needs are met. You can use a spreadsheet to organize these resources, noting their locations and access requirements.
2. Select and prepare networking devices
Choosing the right switch and router is crucial. Make sure these devices have enough ports for all your workstations and other hardware. Update the firmware to the latest versions to ensure you’re getting the best performance and security features.
3. Plan your network architecture
Before you start connecting cables, you can either use network design software such as Cisco Packet Tracer ( Figure A ) or pen and paper to sketch out a network diagram. This will serve as your blueprint for device placement, cable lengths, and types. A well-planned architecture minimizes potential issues and simplifies troubleshooting down the line.

4. Configure IP addressing
IP addressing is a critical aspect of network setup. Decide whether to use static or dynamic IP addresses. Static IPs are often used for servers and network devices, while dynamic IPs can be assigned to workstations through DHCP.
For static IPs, you’ll need to manually enter IP addresses for each device. This is often done through each device’s settings menu. It’s also possible to enable DHCP for dynamic IPs on your router via its admin panel to automatically assign IPs to connected devices.
5. Cable and connect devices
Based on your network diagram, start connecting devices using the appropriate cables. Remember to keep the process neat. Make sure to use quality cables and connectors to minimize signal loss and potential issues. Test each connection as you go along to ensure it’s secure and functional.
6. Initial testing
Once all devices are connected, perform an initial round of tests. Check if all devices can communicate with each other, access the internet, and use shared resources. Resolve any issues before moving to the next step.
7. Monitor and manage
While you could stop after Step 6, it will serve you better in the long run to ensure that your LAN is not just up and running, but that it stays that way. This is done by keeping an eye on your network’s performance after confirming that it’s functional.
Use network monitoring and management tools like Wireshark and SolarWinds Network Performance Monitor to monitor traffic, bandwidth usage, and any unauthorized access attempts.
8. Document your network
Documentation is often overlooked, but is crucial for effective network management. Keep a record of all configurations, IP addresses, and device placements. This documentation will be invaluable for troubleshooting and future network expansions.
This recording can be done by creating a digital network documentation file. Use a secure, accessible location to store this file. Include all device configurations, IP addresses, and a digital copy of your network diagram. And make it a practice to update this file whenever there are changes to the network configuration.
7 LAN configuration best practices
After setting up your enterprise LAN, your work has just begun: you still need to maintain a secure, efficient, and reliable network. For this to happen, there are a number of best practices to consider:
1. Regularly update firmware and software
Manufacturers regularly release updates that patch security vulnerabilities and improve performance. Schedule regular checks for firmware updates for your router, switch, and other network devices. Use the admin panel to apply these updates, often found under a “system” or “maintenance” label, or invest in a patch management software solution to help you automate the process.
2. Segment your network
For improved security, consider using Virtual LANs (VLANs) to segment your network based on department or function. This helps you isolate sensitive data while enhancing performance. You can configure VLAN settings through your switch’s management interface.
3. Use strong authentication methods
Implement authentication methods like WPA3 for Wi-Fi and 802.1X for wired connections. These methods require a combination of usernames, passwords, and sometimes even hardware tokens for network access, which will frustrate unauthorized users when they try to gain entry.
4. Backup network configurations
Regularly back up the configurations of all your network devices. This will be invaluable for quick recovery in case of device failure or other issues.
5. Mind the cable length
In the case of Ethernet cables, ensure that you use just the right length. Your cable should in no way exceed 100 meters as Ethernet cables experience signal degradation at the 100-meter mark, which may result in greater latency, packet loss, and lower throughput.
6. Practice cable management
The physical routing of cables is an often overlooked aspect of network setup, but it’s crucial for both safety and performance. For instance, unless your cables are fire-rated, you shouldn’t lay them in air ducts as they could become a fire hazard. Instead, use cable organizers, raceways, and conduits to maintain neat and protected cables.
You can also label cables to make them easier to identify, especially as cables build up in your environment, using simple tags. Finally, consider that at some point you may need to replace or upgrade cables, so you should set them up in a way that allows you to make changes painlessly.
7. Conduct regular security audits
Schedule regular network security audits to identify vulnerabilities through auditing tools like Nessus or OpenVAS for automated scanning. Use the reports to take corrective actions for any identified vulnerabilities.
Regularly and consistently maintaining these best practices will go a long way in helping your LAN to remain secure, efficient, and optimized.
Bottom line: Setting up your local area network
Setting up local area networks goes beyond ensuring there’s connectivity across your devices. It’s also about planning to get the most out of your networks and hardware.
A reliable and secure LAN needs careful planning prior to setup and deliberate maintenance after it’s already up and running. With these steps and best practices, you have the groundwork you need to set up your LAN and keep it operational for the long haul.
Investing in one of the best network management tools and network monitoring tools will help you keep an eye on your LAN’s performance, health, and security — and get ahead of any problems quickly.

Related Articles
Top 9 enterprise wi-fi solutions for businesses in 2024, 9 best network switches for 2024: speed and features compared, 9 network patch management best practices and tips, get the free newsletter.
Subscribe to Daily Tech Insider for top news, trends, and analysis.
Latest Articles
8 best firewalls for small & medium business (smb) networks, top 10 mobile security threats for devices, networks, and apps — and how to prevent them, what is a router in networking core function explained, follow us on social media, explore more.
- Click the Advanced button and then click Add in the IP Addresses section;
- Specify an additional IP address, subnet mask, and click Add ;

To check the availability of the second IP address over the network from other computers, use the ping command.
If you assign an additional IP from the Control Panel GUI, this IP address will be used for outgoing connections. There is no such thing as a primary IP address in Windows. To prevent Windows from using a specific IP address for outbound connections, you need to enable the SkipAsSource option for it.
Use PowerShell to list the IPv4 addresses assigned to network adapters on Windows:
Get-NetIPAddress | where AddressFamily -eq IPv4| Select-Object IPAddress, InterfaceAlias, SkipAsSource

Get-NetIPAddress 192.168.1.90 | Set-NetIPAddress -SkipAsSource $True

Now the specified IP will not be used by Windows as a source for outgoing connections, except the cases where it is explicitly used by a specific app. Also, if the SkipAsSource flag is enabled, the second IP address will not be registered in DNS (if dynamic registration is enabled).
You can enable the SkipAsSource flag when adding an additional IP address from the prompt. For example, using netsh :
Netsh int ipv4 add address name="Local Area Connection" 192.168.1.92 255.255.255.0 SkipAsSource=True
List all assigned IP addresses and their SkipAsSource values:

Also, you can also use PowerShell to configure a second IP for an Ethernet0 network adapter:
New-NetIPAddress –IPAddress 192.168.1.92 –PrefixLength 24 –InterfaceAlias Ethernet0 –SkipAsSource $True

Get-NetIPAddress 192.168.1.92 | Set-NetIPAddress -SkipAsSource $False

Get-NetIPAddress 192.168.1.92| Remove-NetIPAddress
FTP Server Quick Setup on Windows 10/11 and Windows Server
Restricting group policy with wmi filtering, related reading, create a multi-os bootable usb flash drive with..., read, modify, and parse json file (object) with..., configure dns scavenging to clean up stale dns..., how to read outlook emails with powershell, hide library and special folders from file explorer....

Hey, It’s really good contents. I have a question about this. Do the multiple IPs in single NIC have a priority? If the server want to connect to another server using the NIC, which IP would be used? I manage some server like this condition, they operate differently, so I confused. Do you know anything about this?

You can set the SkipAsSource=False flag for all non-primary IP addresses.

what should we give in DNS server ip & alternate DNS ip?
You will always use the DNS address of the primary IP address when resolving.

Interesting stuff. I’d like to utilise it for the following scenario: NEW AD-DC, new name okay but: masses of devices w/hard code DNS IP. Use the 2nd IP for the DNS service.

Were you able to set it in a DC? Did you have replication issues? I need to do the same as I have network devices pointing to an IP as DNS

Hello — I hope you are still active here and can assist me.,
I wish to use a dedicated Server 2019 to only host (10 to 15) websites. I have changed the registrar to point the domain to my custom DNS assignment. We have a single static IP. Goal = set up one server to host multiple web sites over using one IP address. Only have one NIC card installed. Traffic for all websites will be small (< 10,000 per month). Using a SonicWall TZ500 firewall.
Do we need to create additional private IPs — one for each web site? Running ipconfig shows only one private IP — 192.168.1.145. Could we create additional IPs … 146, 147, 148, etc?? What is limit on the # of IPs that can be created?
Any suggestions you can offer will be appreciated.
Leave a Comment Cancel Reply
Notify me of followup comments via e-mail. You can also subscribe without commenting.
Current ye@r *
Leave this field empty
- PRO Courses Guides New Tech Help Pro Expert Videos About wikiHow Pro Upgrade Sign In
- EDIT Edit this Article
- EXPLORE Tech Help Pro About Us Random Article Quizzes Request a New Article Community Dashboard This Or That Game Popular Categories Arts and Entertainment Artwork Books Movies Computers and Electronics Computers Phone Skills Technology Hacks Health Men's Health Mental Health Women's Health Relationships Dating Love Relationship Issues Hobbies and Crafts Crafts Drawing Games Education & Communication Communication Skills Personal Development Studying Personal Care and Style Fashion Hair Care Personal Hygiene Youth Personal Care School Stuff Dating All Categories Arts and Entertainment Finance and Business Home and Garden Relationship Quizzes Cars & Other Vehicles Food and Entertaining Personal Care and Style Sports and Fitness Computers and Electronics Health Pets and Animals Travel Education & Communication Hobbies and Crafts Philosophy and Religion Work World Family Life Holidays and Traditions Relationships Youth
- Browse Articles
- Learn Something New
- Quizzes Hot
- This Or That Game
- Train Your Brain
- Explore More
- Support wikiHow
- About wikiHow
- Log in / Sign up
- Computers and Electronics
- Computer Networking
- Wireless Networking
How to Configure Your PC to a Local Area Network
Last Updated: April 24, 2024 Approved
Setting Up the LAN
Connecting your pc, assigning ip addresses (no router), expert q&a.
This article was co-authored by Mitch Harris . Mitch Harris is a Consumer Technology Expert based in the San Francisco Bay Area. Mitch runs his own IT Consulting company called Mitch the Geek, helping individuals and businesses with home office technology, data security, remote support, and cybersecurity compliance. Mitch earned a BS in Psychology, English, and Physics and graduated Cum Laude from Northern Arizona University. wikiHow marks an article as reader-approved once it receives enough positive feedback. In this case, several readers have written to tell us that this article was helpful to them, earning it our reader-approved status. This article has been viewed 1,201,247 times.
A local area network (LAN) is a network of devices that are all connected to each other in a single physical location, like a home or office building. This wikiHow will teach you how to set up a LAN to connect multiple Windows PCs.

- If you are connecting four or less computers, you'll just need a single router, or one switch if you don't need internet.
- If you're connecting more than four computers, you'll want a router and a switch, or just a switch if you don't need internet.

- You'll need one Ethernet cable for each computer you want to connect to the LAN, as well as an Ethernet cable to connect the router to the switch (if applicable).

- Switches are similar to routers but do not automatically assign IP addresses. Switches typically have many more Ethernet ports than a router has.

- You can skip this if you're setting up a LAN without internet access.
- You don't need a router at all to create a LAN, but it makes things easier. If you just use a network switch, you'll need to manually assign IP addresses to each computer after connecting them.

- Slim laptops may not have an Ethernet port, in which case you'll need to either use a USB Ethernet adapter or connect wirelessly if your router allows it.

- If you're using a switch and no router, you'll still need to assign IP addresses to each computer.

- Think of an IP address as a mailing address. Each computer on the network needs a unique IP address so that information sent across the network reaches the correct destination.

You Might Also Like

- ↑ Mitch Harris. Consumer Technology Expert. Expert Interview. 16 July 2021.
About This Article

1. Plug an Ethernet cable into your PC. 2. Connect the other end of the cable to the LAN port. 3. Open your network settings. 4. Enable file and printer sharing. 5. Assign an IP address if you're not using a router. Did this summary help you? Yes No
- Send fan mail to authors
Reader Success Stories
Jul 1, 2017
Is this article up to date?

Jan 3, 2017
Salia Salifu
Jan 12, 2017
Aug 4, 2017
Israil Mansuri
Aug 23, 2016

Featured Articles

Trending Articles

Watch Articles

- Terms of Use
- Privacy Policy
- Do Not Sell or Share My Info
- Not Selling Info
wikiHow Tech Help Pro:
Level up your tech skills and stay ahead of the curve
Assign a Static IP Address to a Printer or Any Network Device
A little work to set up but will make life easier
It’s handy and straightforward to let the router use DHCP to decide what IP addresses devices get. We don’t have to pick them, assign them, and better yet, try to remember them.
Devices like printers often have web-based management, which can be configured and maintained from anywhere. That makes printers a top candidate for static IPs .

Why Assign a Static IP Address to a Device?
It seems like more work, yet it does make life simpler and easier. If the device needs to be accessible from other devices, a static IP address is the way to go. Imagine having a web server where the IP address changes daily. It’s like changing your phone number every day.
When thinking of other devices that need to be accessible from anywhere, smart TVs , security systems , home automation , and camera systems come to mind.
Another reason, to a lesser extent, is security. A router can issue hundreds, if not thousands of IP addresses. It doesn’t care whose device it is. By using static IPs and limiting the number of IP addresses available, rogue devices have a harder time getting on the network. It can also help resolve an IP address conflict .
What IP Addresses Can I Use?
The Internet Assigned Numbers Authority (IANA) has set aside the following blocks of IPs for private use. Private use means you can only use the IP addresses in a private network. They aren’t for the outside world. IANA defines the following ranges for private IPs:
- 10.0.0.0 to 10.255.255.255 – equals 16,777,214 IP addresses
- 172.16.0.0 to 172.31.255.255 – equals 1,048,574 IP addresses
- 192.168.0.0 to 192.168.255.255 – equals 65534 IP addresses
If the router is being used already, it has a range. It’s easiest to stick with that range. Some routers pre-define the range.
Make a Static IP Plan
If the network has ten or fewer devices connected, a plan isn’t necessary. Just put them all in a single range, like 192.168.2.10 to 192.168.2.19. Skip the rest of this section.
If the network has more than ten devices, it’s wise to make a plan. This is just one way to make a plan. If it doesn’t work for you, change it.

- Count all the devices that will connect to the network.
- Group the devices by type. For example, there may be 3 phones, 2 smart TVs, 4 cameras and a DVR, 2 IoT devices like smart fridges, and a printer.
- Phones and tablets: 192.168.2.20 to 192.168.2.29
- TVs: 192.168.2.30 to 192.168.2.39
- Cameras and DVR: 192.168.2.40 to 192.168.2.49
- IoT devices: 192.168.2.50 to 192.168.2.59
- Printers: 192.168.2.60 to 192.168.2.69
Some best practices for using ranges:
- Begin a device type IP range with a number ending in zero and end the range with a number ending in 9
- Increment ranges in tens. Any less can become confusing, and you can easily outgrow them. Plus, it allows for additional devices of the same type in that range. If the number of devices is already close to 10, make the range cover 20 IP addresses, like 192.168.2.40 to 192.168.2.59.
- Whatever the router’s IP address is, leave its entire block open for the addition of networking equipment, like other routers, switches, firewalls, etc. For example, if the router uses 192.168.2.1, then reserve 192.168.2.2 to 192.168.2.9 for networking equipment.
- In a spreadsheet, assign the devices their IP addresses. This becomes an inventory of devices and makes it easier to identify the devices on the network. It’s a good idea to assign the first IP in a range to controller devices. For example, the DVR is the controller of the cameras, so it will have an IP of 192.168.2.50.
If you plan it on a spreadsheet, it may look like this:

How to Assign Static IPs to Devices in the Router
- Consult our article on how to find the IP address of the router if you’re using a Mac or not comfortable using the Command Prompt. Select the Start menu and search for CMD . Command Prompt will be the top result, so select it.

- When the Command Prompt window opens, enter the command <pre>ipconfig</pre> and press Enter .

The value for Default Gateway is the IP address of the router. Write this down somewhere.

- Open a web browser and enter the IP address of the router in the location bar , then press Enter . This will open the router’s web-based management page.

Assign Static IPs – Asus Router
- Login to the Asus router, find the LAN button, and select it.

- Select the DHCP Server tab. This router allows for staying in DHCP mode while assigning static IPs to selected devices. If desired, it can be configured to use only static IPs.

- Scroll to the Manual Assignment section. Where it reads Enable Manual Assignment , select Yes .

- Select the drop-down box under Client Name (MAC Address) and choose a device in the Manually Assigned IP around the DHCP list. All devices currently connected to the router are listed. To see devices that you previously connected, select Show Offline Client List .

It will show the device’s current IP address in the IP Address field. This can be left as is, or it can be changed at this point. Add the IP address of a DNS server in the DNS Server (Optional) field, if needed. Select the plus sign button to add the device to the list of manually assigned IP devices. Repeat this for all the desired devices.

Once all the desired devices have been assigned static IPs, select the Apply button to set the changes.

Assign Static IPs – TrendNet Router
- Log in to the TrendNet router and select the Advanced tab.

- In the left-side menu, select Setup , then select LAN Settings .

- Scroll down to the Add DHCP Reservations section. Check the Enable box, then enter the details of the device to receive a static IP address. Ensure the details are correct and then select Add .

- The device just added will show in the DHCP Reservations Ready Group . If everything is correct, select Apply and the device will have a static IP.

Assign Static IPs – Belkin Router
- Log in to the Belkin router and select the Configuration tab. Then under Connectivity select Local Network. Now select the DHCP Reservation button.

- In the DHCP Client Table window, any devices that are currently connected are shown. If it’s the device that requires a static IP address, check the Select box, then select Add Clients .

- In the same window, you can manually add clients as well. First, enter the device details, then select the Add button. Once all the devices requiring static IP addresses are defined, select Save to commit the changes.

What About Assigning Static IPs on Other Routers?
There are at least a dozen router makers out there, and each has several models of routers. It’s just far too many to cover all of them. Reading through the instructions above, though, you’ll see that there’s a pattern; find out where to work with the LAN, look for something named like DHCP Reservation, then follow through to assign IP addresses. If you’re running into issues, please let us know. One of our writers or knowledgeable readers will likely have the answer.
Related Posts
- How to Splice an Ethernet Cable
- Cellular Data or Wi-Fi: Which Should You Use on Your Smartphone?
- How to Setup a Second Router on Your Home Network
- A Quick Guide to How Your Home Network Works
- What Is Fiber Internet and Should You Switch From Cable?

Guy has been published online and in print newspapers, nominated for writing awards, and cited in scholarly papers due to his ability to speak tech to anyone, but still prefers analog watches. Read Guy's Full Bio
Leave a Reply
Your email address will not be published. Required fields are marked *
- Engineering Mathematics
- Discrete Mathematics
- Operating System
- Computer Networks
- Digital Logic and Design
- C Programming
- Data Structures
- Theory of Computation
- Compiler Design
- Computer Org and Architecture
Configure IP in Windows 10
- Setting Static IP Address in Windows
- How to Configure Firewalls in Windows?
- How to Create and Configure Wi-Fi Hotspot in Windows 10?
- How to Configure DNS in Linux?
- How To Set Up VPN on Windows 10?
- DHCP Server Configuration in Cisco
- How to Manage User Accounts in Windows 10?
- How to Get Volume Mixer in Windows 10 ?
- How to Create a New User in Windows 10?
- How to Open Control Panel on Windows 11?
- Enable In-Built Dark Mode on Windows 10
- How to Open Camera in Windows?
- Configuring IP Networking with nmtui in linux
- How to Set Up a VPN in Windows 11?
- How to Forget a Network in Windows 11?
- Steps to Configure a New WLAN Network
- How to Set Internet Priority on Windows 11?
- How to Change Administrator Account in Windows 11?
- Windows Defender Firewall Settings
Prerequisite : IP address , Subnet mask , DNS server .
Introduction : An IP address is basically an identifier for a device on a network, it helps in sending information to and from a specific device on the network. An IP address is a string of numbers separated by periods. IP addresses are expressed as a set of four numbers ex- 192.168.0.10. Each number in the set can range from 0 to 255. So, the full IP addressing range goes from 0.0.0.0 to 255.255.255.255.
The internet needs a way to differentiate between different computers, routers, and websites. IP addresses provide a way of doing so and form an essential part of how the internet works.
Let us see how IP works behind the scene –
- Your device indirectly connects to the internet by connecting at first to a network connected to the internet, which then grants your device access to the internet.
- When you are at home, that network will probably be your Internet Service Provider (ISP). At work, it will be your company network.
- Your IP address is assigned to your device by your ISP.
- Your internet activity goes through the ISP, and they route it back to you, using your IP address. Since they are giving you access to the internet, it is their role to assign an IP address to your device.
- However, your IP address can change. For example, turning your modem or router on or off can change it. Or you can contact your ISP, and they can change it for you.
- When you are out and about – for example, traveling – and you take your device with you, your home IP address does not come with you. This is because you will be using another network (Wi-Fi at a hotel, airport, or coffee shop, etc.) to access the internet and will be using a different (and temporary) IP address, assigned to you by the ISP of the hotel, airport or coffee shop.
This article covers the steps to configure IP to connect to the Internet.
Steps to follow : 1. Go to the search bar and search for control panel. Once it appears then double click on it. A dialogue box will appear.

2. In the dialogue box, find “Networks and Internet” option and click on it.

3. A new menu will appear, find “Network and Sharing Center”, present in the left hand side. Click on it.

4. Click on “Change adapter settings” at the left hand side of the menu.

5. Right click on the desired network to which you want your computer to be connected. If you are unable to find the desired network then do the following –
- Check whether the router is switched on or not.
- Check if the ethernet wire has been properly plugged or not.
- If you are using hotspot, then check whether the device is visible to other devices or not. You can check it by going to the tethering hotspot settings of your phone.

6. Click on the “Properties”.

7. Select IPv4. The IPv4 address is a 32-bit number that uniquely identifies a network interface on a machine. It is widely used even when its successor protocol, i.e. IPv6 is more efficient.

8. Go to “Properties” and Click on the “Use the following IP address” radio button for manually adding the IP address.

9. Enter the details provided by your ISP. These includes –
- IP address – An IP address is a unique address that identifies a device on the internet or a local network. IP stands for “Internet Protocol,” which is the set of rules governing the format of data sent via the internet or local network.
- Subnet mask – A subnet mask is used to divide an IP address into two parts. One part identifies the host (computer), the other part identifies the network to which it belongs.
- DNS server – It is basically a phonebook of internet that maps IP addresses to its domain name.

Please Login to comment...
Similar reads, improve your coding skills with practice.
What kind of Experience do you want to share?
You are using an outdated browser. Please upgrade your browser to improve your experience.
Your browser does not support JavaScript. Please turn it on for the best experience.
- All Support
- Download Center
- Support Videos
TP-Link Community
- Contact Technical Support
- Online Stores
- Distribution Partners
- Reseller Partners
- Solution Partners
How to find and manually assign an IP address on Windows 10
Step 1: Open the Control Panel

You can also type control panel in the search bar at the lower left of the screen and press Enter to open the control panel.
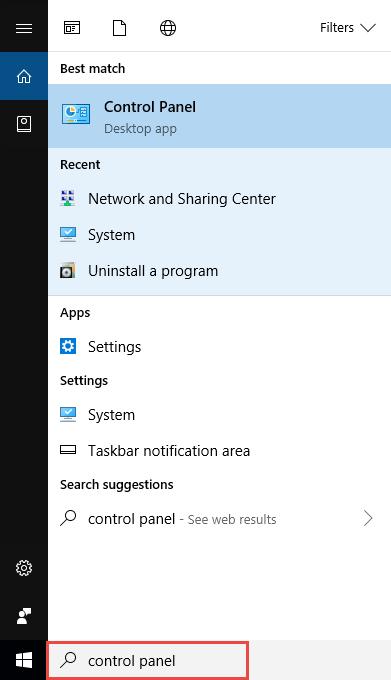
Step 2: Go to Network Connections
Go to Network and Internet > Network and Sharing Center .
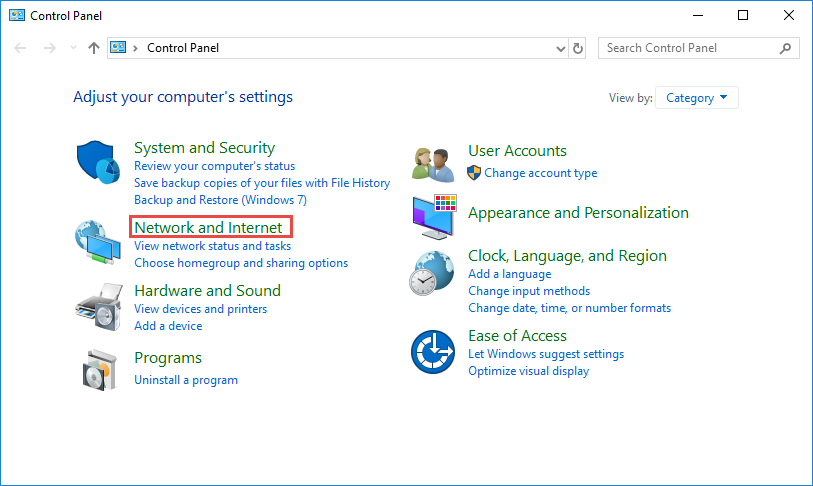
Select Change adapter settings on the left.
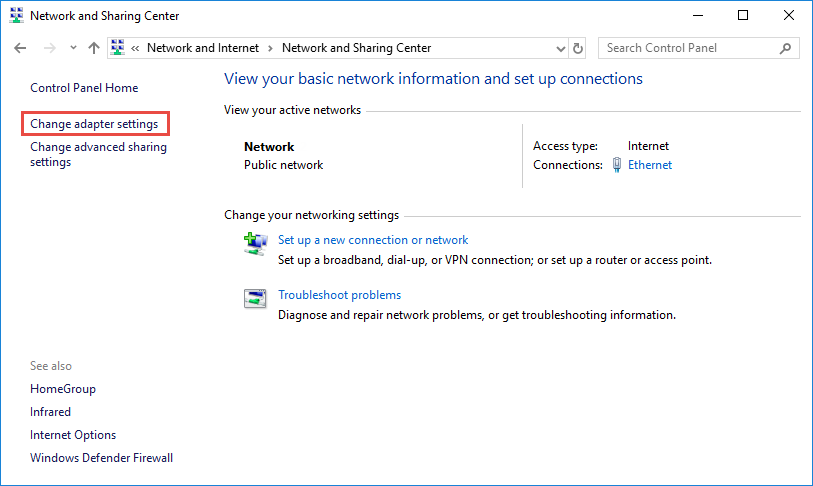
Step 3: Find the IP address
Right click the Ethernet icon and select Status from the context menu.

Then click Details... to view all detailed information of network connection.
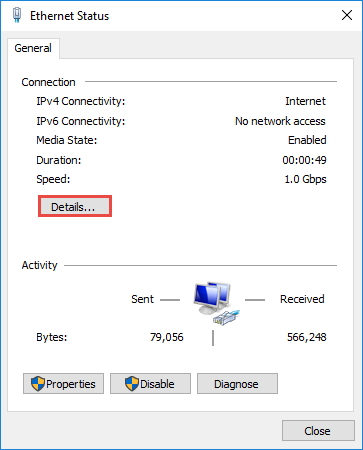
Step 4: Set the IP address
Right Click Local Area Connection and select Properties .
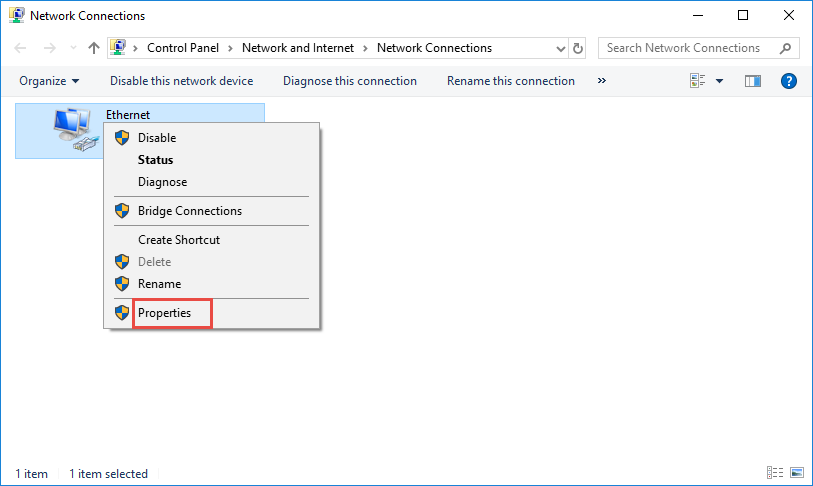
Then double click Internet Protocol Version 4 (TCP/IPv4) .
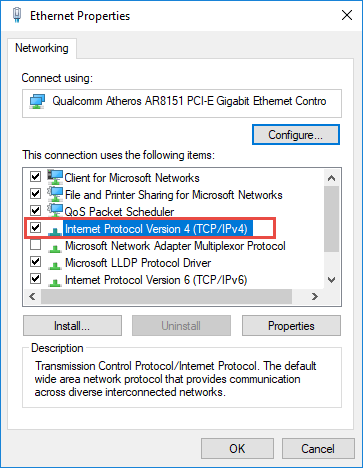
Select Use the Following IP address: and type in the IP address , Subnet mask and Default gateway . Click OK to apply the settings.
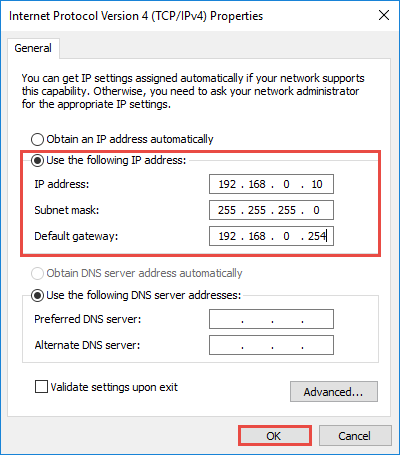
Note : If you need to set a static DNS server, select Use the following DNS server address : and input the address of DNS server. By default, the computer obtains the address automatically.
Is this faq useful?
Your feedback helps improve this site.
What’s your concern with this article?
- Dissatisfied with product
- Too Complicated
- Confusing Title
- Does not apply to me
We'd love to get your feedback, please let us know how we can improve this content.
We appreciate your feedback. Click here to contact TP-Link technical support.
Still need help? Search for answers, ask questions, and get help from TP-Link experts and other users around the world.
Visit the Community >
We have updated our Policies. Read Privacy Policy and Terms of Use here. This website uses cookies to improve website navigation, analyze online activities and have the best possible user experience on our website. You can object to the use of cookies at any time. You can find more information in our privacy policy .
Basic Cookies
These cookies are necessary for the website to function and cannot be deactivated in your systems.
accepted_local_switcher, tp_privacy_base, tp_privacy_marketing, tp_smb-select-product_scence, tp_smb-select-product_scenceSimple, tp_smb-select-product_userChoice, tp_smb-select-product_userChoiceSimple, tp_smb-select-product_userInfo, tp_smb-select-product_userInfoSimple, tp_top-banner, tp_popup-bottom, tp_popup-center, tp_popup-right-middle, tp_popup-right-bottom, tp_productCategoryType
__livechat, __lc2_cid, __lc2_cst, __lc_cid, __lc_cst, CASID
id, VISITOR_INFO1_LIVE, LOGIN_INFO, SIDCC, SAPISID, APISID, SSID, SID, YSC, __Secure-1PSID, __Secure-1PAPISID, __Secure-1PSIDCC, __Secure-3PSID, __Secure-3PAPISID, __Secure-3PSIDCC, 1P_JAR, AEC, NID, OTZ
Analysis and Marketing Cookies
Analysis cookies enable us to analyze your activities on our website in order to improve and adapt the functionality of our website.
The marketing cookies can be set through our website by our advertising partners in order to create a profile of your interests and to show you relevant advertisements on other websites.
Google Analytics & Google Tag Manager
_gid, _ga_<container-id>, _ga, _gat_gtag_<container-id>
Google Ads & DoubleClick
test_cookie, _gcl_au
cebsp_, _ce.s, _ce.clock_data, _ce.clock_event, cebs
OptanonConsent, _sctr, _cs_s, _hjFirstSeen, _hjAbsoluteSessionInProgress, _hjSessionUser_14, _fbp, ajs_anonymous_id, _hjSessionUser_<hotjar-id>, _uetsid, _schn, _uetvid, NEXT_LOCALE, _hjSession_14, _hjid, _cs_c, _scid, _hjAbsoluteSessionInProgress, _cs_id, _gcl_au, _ga, _gid, _hjIncludedInPageviewSample, _hjSession_<hotjar-id>, _hjIncludedInSessionSample_<hotjar-id>
lidc, AnalyticsSyncHistory, UserMatchHistory, bcookie, li_sugr, ln_or
Blog Post View
How are ip addresses assigned.

When you're connected to a network, your computer or smart device will obtain an IP address either from your ISP or your router. There are 2 ways how you can assign an IP address to your device: (1) dynamically via DHCP or (2) statically by manually assigning an IP address yourself. In either case, you must use the IP address that is provided to you by your ISP, or the IP range you allocated yourself within your private space (i.e. private IP address).
How are IP addresses allocated?
Before we can discuss IP assignment, we need to understand how IP addresses are allocated. There are two versions of IP addresses: IPv4 (version 4) and IPv6 (version 6). There are numerical differences , but they essentially serves the same purpose by uniquely identifying a device on the Internet. There are a few organizations that allocate and manage IP addresses globally, and they are:
- ICAAN (The Internet Corporation for Names & Numbers): ICANN manages supply of all IPv4 and IPv6 addresses as well as domain name system ( DNS ) and Root Servers.
- IANA (Internet Assigned Numbers Authority): IANA is a part of ICANN that maintains technical aspect of the DNS. DNS is the system that translates human-readable domain names to machine friendly IP addresses.
- ARIN (American Registry for Internet Numbers): ARIN is a region specific organization that manages IP addresses for the USA, Canada, Caribbean and North Atlantic islands.
- ISP (Internet Service Providers): ISPs reach out to ARIN and register blocks of IP addresses (i.e. class A, B and C). In addition to ISPs, large corporations may reach out to ARIN to register blocks of IP address for their corporate use.
- RIR (Regional Internet Registry): Much like the ARIN for managing IP address for North American region, RIR manages IP addresses for rest of the world.
As ARIN and RIR manages IP addresses for the region, they allocate and deallocate IP addresses for countries, ISPs and corporations. A larger blocks of IP addresses are assigned to countries, the accuracy of IP location for country level is approximately 95% - 98% depending on the provider.
Once one or more blocks of IP addresses are assigned to an ISP or Corporation, the organization assigns the IP address to its customers. When you purchase the Internet Service from an ISP, you have an option to obtain static (non-changing) or dynamic (changing) IP Address(es). Most home users obtain a dynamic IP address, and small businesses may obtain static IP addresses. The IP addresses obtained from an ISP are "public" IP addresses which are a globally unique number within the Internet.
Once the IP address is obtained by your router from your ISP, you have an option to create a private network by assigning private IP addresses to your devices that are not globally unique, but unique within your private network.
IP addresses are governed by ICANN, and ARIN and RIR are responsible for allocating IP addresses to ISPs and Corporations within its regions. IANA manages DNS for translating domain names to IP addresses. The IP addresses are then assigned to individuals or small businesses either statically or dynamically via DHCP, and every computing devices on the Internet must have an IP address to communicate with each other.
Share this post
Comments (0), leave a comment.
All comments are moderated. Spammy and bot submitted comments are deleted. Please submit the comments that are helpful to others, and we'll approve your comments. A comment that includes outbound link will only be approved if the content is relevant to the topic, and has some value to our readers.
Reply Comment
Do not sell or share my personal information..
At IPLocation.net, we prioritize the privacy and security of our visitors. We want you to feel confident and comfortable when browsing our website. That's why we want to assure you that we do not sell or share any personal information collected from our website. Your trust is important to us. Whether you're browsing our site for information, or engaging with our content, rest assured that any data you provide remains strictly confidential. We adhere to stringent privacy policies and comply with all relevant regulations to safeguard your information. Your privacy matters, and we are committed to maintaining the highest standards of data protection. If you have any questions or concerns regarding our privacy practices, please don't hesitate to reach out to us.
© 2006 - 2024, Brand Media, Inc. All rights reserved.
Stack Exchange Network
Stack Exchange network consists of 183 Q&A communities including Stack Overflow , the largest, most trusted online community for developers to learn, share their knowledge, and build their careers.
Q&A for work
Connect and share knowledge within a single location that is structured and easy to search.
Assign Public IP on Private LAN
I have 5 reserved (unused) public addresses that I purchased (/29) from my ISP, and I'd like to assign one of those addresses to a Windows server/client machine that exists in my private LAN.
The purpose is from anywhere I want to access the server/client machine without port forwarding in my MikroTik Router .
Is it possible to do this? If the answer is yes, then how?
- You cannot assign an outside public address inside your LAN to access the LAN remotely. Install a VPN router and access it via VPN. This works great - I have done it. – John Oct 27, 2023 at 11:55
- You may be able to assign the public IP address to your internal server by using Proxy Arp on your router. I haven't implemented a solution using this in over 15 years so I cannot remember the specifics but I have seen it, had it working – Chris Davies Oct 27, 2023 at 12:39
- Yeah, probably the solution would be Proxy ARP, 1-to-1 NAT, or by some means move the LAN host to the WAN (by adjusting the VLAN configurations or so), if your router has such flexibility / capability. – Tom Yan Oct 27, 2023 at 12:42
- 2 It depends! Does your ISP offer documentation on how this subnet is supposed to be used? What’s your access technology? DSL, Cable, Fiber, …? – Daniel B Oct 29, 2023 at 9:01
- @DanielB Usually, the ISP routes static IPs you purchased to your connection / edge router, is there anything else that determines how you use them? Why is the access technology relevant for IP routing? – Albin Oct 29, 2023 at 23:00
2 Answers 2
Yes you can, there are loads of examples on the internet, text-based as well as videos for MikroTik routers.
Please note that assigning public IP addresses (and routing them) to a machine in your private network makes this machine (which is inside your private network) a "public machine". There are potential security issues here if you don't address the risks involved with this configuration.
Here's an example ( source ):
Step 1 : Assign IP Addresses to Mikrotik Interface to which your device will be connected.
Step 2 : Create Firewall Rule to Allow Connections from Subnet
Step 3 : Assign IP Address to Device
Step 4 : Create Firewall Rule to Allow Connections to Subnet
I don't have a MikroTik Router so unfortunately I can not test this.
- The poster asked for a solution that doesn't involve port-forwarding or other parameters of the MikroTik router, while your answer does just that. – harrymc Oct 28, 2023 at 7:48
- I might be blind, but where do you see a port forward? – Albin Oct 28, 2023 at 18:25
- I said "port-forwarding or other parameters ". – harrymc Oct 28, 2023 at 18:29
- 1 I can see the addition about "port-forwarding" in the question, but nothing about "other parameters". What specific "other parameter" in my answer do you see as problematic and why? Outlining the relevant and irrelevant parts of your comment would help to avoid those misunderstandings in the future. – Albin Oct 29, 2023 at 8:19
- Look, you're suggesting to modify inside the router, which the poster asked to avoid. I think we discussed the subject enough. – harrymc Oct 29, 2023 at 9:23
Technically you won't be able to pass IP address from your WAN side to your LAN side. The only way to achieve this will be the following options:
Option 1:This is the best option and no other configuraiton is required you create 2 bridges:
1- Bridge-WAN: Any interface which is the member of this bridge will route the IP address. The issue with this option is you need to connect your server or customer's router directly to the port which is member of bridge-WAN and not through your switch trunk port.
2- Bridde-LAN: Any port or VLAN assigned to this bridge will be you LAN side and will be pass through your switch trunk port.
Option 2: for this option you need 2 subnets which will be provided by the ISP let's say you get /30 for your router and /29 or in my case I have /27 for internal usage. When the ISP provide these 2 subnets the second one which they call it your LAN can be route to either Bridge-LAN or Bridge-WAN just like any of your internal IP address. The only difference here is that ISP route the whole 2nd subnet over the first subnet therefor it doesn't matter weather they come from WAN port or from LAN port, both are routable.
I hope this help
You must log in to answer this question.
Not the answer you're looking for browse other questions tagged networking router ..
- The Overflow Blog
- Reshaping the future of API platforms
- Between hyper-focus and burnout: Developing with ADHD
- Featured on Meta
- Our Partnership with OpenAI
- Imgur image URL migration: Coming soon to a Stack Exchange site near you!
Hot Network Questions
- Scientist travels back in time to murder his wife’s secret lover
- Can someone who isn't flying meet me at my gate for a layover at Istanbul airport?
- What is Rishi Sunak's reasoning/incentive to talk of a hung parliament, rather than a Labour majority, right now?
- Has there ever been a transfer of occupants from one aircraft to another while airborne?
- Would you correct grading mistakes downwards if there is a mistake in grading?
- Try Triling ("Triangular-Tiling")
- Is it a bad idea to design a purposefully inconsistent magic system?
- Did the widow of Zarephath know who Elijah was to just believe him?
- Advice on designing an inconsistent magic system
- Using Mars inner moon Phobos as a brake
- Calculating engine air intake per minute
- How to find what is wearing out my SSDs
- Who was Nicolò Paganini that discovered the amicable pair 1184, 1210?
- Can an employee be made to pay back training costs when resigning from the company?
- How can I work with a senior researcher who is less knowledgeable than myself?
- A short fiction about an American poetess who supposedly foiled, thanks to posthumous poems, the Martian invasion described by H. G. Wells
- When in Rome... – a deconstruction sudoku
- Looked at a different rolling (3d6, 3d6, average) for D&D characters in AnyDice and the result didn't come out as expected. What am I missing?
- Create an empty 8x8 One Up puzzle with a unique solution
- In OOP, what count as a "getter"
- Morphisms in the category of elements
- What's the story behind the "mysterious" 486DX3?
- A lightning-datatable with the rows and columns transposed?
- Why doesn't `FindInstance` work in finding Heronian triangle?
- Mobile WiFi
- WiFi Routers
- WiFi Extenders
- Home Network
What is an IP address? Finding a Router IP address
NETGEAR Team
This guide will help you learn more about IP address and how to find your router's IP address. Locating your router's Internet Protocol (IP) address will help you more quickly access your router and other devices on your home network.
IN THIS ARTICLE
Why is My IP Address Important?
Public vs private ip addresses, what is my netgear router ip address, how to find a netgear public ip address of your router, what is the difference between ipv4 vs ipv6, additional resources for ip addresses:.
IP addresses are the identifier that allows information to be sent via a WiFi router or Ethernet cables to devices on a network: they contain location information and allow your router, modem, and connected devices to function as normal. IP addresses can differentiate between different computers, laptops, routers and websites in your wired and wireless networks. On a standard regular network each device has at least one IP address. Some of the most important IP addresses to ascertain are:
- Your Routers Private IP address – For accessing it’s login and connecting devices.
- Your Routers Public IP address – For connecting your router to the modem and the Internet.
- An individual device’s Private IP address – For connecting to the Router.
- An individual device’s Public IP address (usually a PC or Laptop) – Useful for gaming or hosting a server.

NETGEAR Orbi and NETGEAR Nighthawk Routers are assigned two IP addresses: one IP address for private networks and one IP address for public networks such as the wider internet. Public IP addresses are typically assigned by your Internet Service Provider (ISP) from your modem. Private IP address allocation is managed by the network administrator (Usually just automatically by your router). If you have never changed your router’s private IP address, it is possibly using the default IP address found on the router’s documentation. Refer to your Orbi app or Nighthawk app for setup of your WiFi router or WiFi mesh system.
By default, your NETGEAR router’s IP address is either 192.168.1.1 or 192.168.0.1 . Internal IP addresses usually start with 192.168.x.x. The computer or mobile device you are using retrieves the IP address from your WiFi network router using your router’s web interface. Or – if your device is using a static IP address, you need to configure it to retrieve the IP address. To access the admin NETGEAR router settings, you will need to know the router’s default IP address. Alternatively you can also access your router with the Nighthawk App or Orbi App. Learn more about the Router login system .
If you want to find the ‘public IP address’ of your NETGEAR router there are two methods depending on how you are accessing your Router.
Public IP address Nighthawk App Method:
Open the Nighthawk app, login and then open your router’s control panel and click on the advanced tab to check your Public IP address.
Find your Router Public IP address Web login RouterLogin.com Method:
- Login to the web interface of your router.
- The basic home page displays.
- Select ‘ADVANCED’. Your router’s IP address displays under Router Information.
Find the Internal IP address of devices connected to Your Router:
- Go to ‘NETGEAR Router Login’.
- In the router dashboard, go to the ‘BASIC’ section.
- Navigate to the ‘Attached Devices’ section.
- Every Device will be listed with their respective name and IP address.
A majority of devices currently use an address format known as IPv4, or “Internet Protocol v4,” which consists of four numbers between 0 and 255 separated by periods (e.g., 192.168.1.0). There are approximately 4 billion possible combinations of IPv4 addresses. To combat the risk of running out of addresses, IPv6 was developed, which increases the number of possible addresses to a vastly larger scale. IPv6 addresses are formatted as eight groups of four hexadecimal numbers separated by colons (e.g., 2001:0db8:85a3:0000:0000:8a2e:0370:7334). This expansion not only accommodates more devices but also enhances security, as IPv6 addresses are significantly more difficult to guess, reducing network vulnerabilities.
We hope this guide helped you log in to your NETGEAR router seamlessly and gain a better understanding of IP addresses. If you have any questions or feedback, please feel free to contact us at this page . Thank you for choosing NETGEAR!
How do I locate my router’s IP address? How do I find the IP address of my NETGEAR wireless access point? How do I find the IP address of a device connected to my router? More IP address articles
Related Stories

How to Reset Your NETGEAR Router Password
Router Login Page – How to Access Your NETGEAR Router
What is a WiFi Router?
The Auvik Guide to Basic Switch Configuration
Though I’m a big believer in the importance of network configuration management , even I’ll admit that network switch configuration from a command-line interface (CLI) is still one of the most fundamental network engineering skills you can have.
It’s also one of the harder things to pick up if you’re new to the field. And it’s not just knowing what commands to enter. It isn’t always obvious what should be part of a basic configuration.
So to help all the aspiring network engineers, or seasoned pros looking for a refresher, we’ve put together this basic guide on how to set up a switch.
There are a lot of devices that fall into the “network switch” category. Since we’re talking about configuration, we’ll be referring specifically to managed switches in this article. It’s worth noting how you configure a Layer 2 vs Layer 3 switch will be different, as will small office/home office (SOHO) vs. enterprise switches. And don’t forget there’s always going to be small differences between vendors and software versions.
Because Cisco is so common, and its IOS-style CLI is used on more than just Cisco switches, we’ll focus on command-line configuration of Cisco switches running 15.x IOS as our prime example. But you’ll be able to use what we cover here in lots of different environments. In fact, because many of the commands and concepts apply to routing devices too, this can also be a good reference for basic router and switch configuration.
From a network perspective, we’ll focus on features related to Layer 2 .
What basic switch configuration includes
Basic switch configuration can be thought of as the minimum network, port, and security provisioning required for the production deployment of a switch. In practice, your exact needs will vary from environment to environment. And overall, effective switch management is a detailed topic in its own right.
Our goal here is to cover some switch configuration basics that are applicable to most production use cases. These include configuring switch management settings, hardening the switch, and VLAN configuration.
Getting started: things to know before setting up a network switch
There are a lot of nuances related to the configuration of a switch that aren’t obvious to beginners. Here are some basic tips to be aware of before you start.
Command line completion, the tab key, and up/down arrows are time savers
Typos are a pain, and typing out long commands is tedious. Fortunately, Cisco’s IOS has features that can help you avoid typos and work faster:
1. Command Line completion. Once you type enough of a command that it is unique, you can just hit enter. For example, instead of typing “configure terminal”, you can use the command “config t” like this:
2. Tab completion. Hitting the tab key once you have enough unique text on the screen will auto-complete a command. For example, hitting tab after “conf” auto-completes to “configure”:
3. Command scrolling with up/down keys. Need to rerun a command? You can scroll through your command history with the up/down arrows on your keyboard.
4. Bonus! Use “?” for added help. Hitting “?” at the beginning of a command prompt will show you all the commands that are available in the current context. Hitting “?” after a command will show you all the parameters that are available in that context.
Access levels and modes
There are several Cisco access levels and modes that allow you to run different commands. You can learn more about each mode in the Cisco IOS command hierarchy , but the table below is a reference for our examples.
Console ports and cables
When you’re connecting to a switch for the first time, you’re often doing it through the console port. Usually, this is done by connecting a serial cable to the switch. You can also use a USB to serial adapter to make the connection.
Once the physical connections are made, how can you actually access the CLI? By using a terminal emulator. For Windows, there are several popular emulator options, like Putty, RealTerm, and TerraTerm. MacOS can make use of the same emulators as Linux, including screen, minicom, and tmux.
If you’re looking for out-of-band (remote) access to the console ports on switches, routers, and firewalls, consider using a console server.
Startup config vs. running config
Your switch actually has two “config” types and locations. A switch’s running config is stored in RAM. Its startup config is stored in nonvolatile memory.
Why is this important? Take it from someone who has made the mistake too many times: if your configuration changes aren’t saved to the startup config, you’ll lose them when the switch reboots. As you make changes to the running config, you’ll see them take effect in real time. However, you need to explicitly save those changes to the running config for them to persist. Save yourself some pain and double-check before moving on.
How to configure a network switch
Now that you know the basics, we can move onto the commands. Here, we’ll walk through 10 of the most important basic network switch configuration steps.
While any particular production deployment will likely require specific additional steps (e.g. for additional hardening and user management), these commands will help you hit the ground running.
Note: Our example commands and output were generated using Cisco Packet Tracer’s default 2960 switch running SW version 15.0(2)SE4.
Step 1: Connect to the console
If you’re labbing with a simulator/emulator or accessing the CLI via SSH, you can skip this step.
You need to start with a connection to the console port. That means configuring your terminal emulator software and connecting your rollover cable between your switch’s console port and your PC.
Many Cisco switches use these serial settings:
- Baud rate: 9600
- Data bits: 8
- Stop bits: 1
- Parity: None
Assuming your PC’s serial port is COM1, if you use Putty and Windows, you can set the session up like this (under the “Serial” options in the menu): Once your cable is connected and the session is set up, click open. Then press enter to get a response at the terminal window.
Step 2: Set a management IP and default gateway
The management IP address is where you can log in to the switch for future administrative tasks. Once your management IP is set up, you can use it to SSH into the switch and configure it over the network.
First, we access Privileged EXEC mode with the “enable” switch configuration command:
From there, we enter Global Configuration mode with “config t” (or “configure terminal”):
Next, we access the VLAN interface:
Now, we can assign the management IP and subnet. In this example, I’ll assign 10.10.11.11 with a 255.255.255.0 subnet. Be sure to replace that with the correct values for your switch!
We can exit interface configuration mode and assign a default gateway for the switch from global configuration mode.
Step 3: Set hostname and domain name
In addition to setting the IP address of the switch, you should give it a logical hostname. To do that, we enter global configuration mode and use the hostname command:
Similarly, we can also add a domain name with the domain command:
Step 4: Set logins on VTY lines and console port
Strong passwords are an important part of hardening a managed switch, so next we’ll add a password to all virtual terminal (VTY) lines. Our switch has 16 VTY lines which are used for remote access, so we’ll configure the entire range from 0-15:
Next, we’ll exit the VTY configuration, access console line 0, and assign it a separate password:
Step 5: Set Privileged EXEC password
In addition to password protecting the VTY and console lines, we can and should protect Privileged EXEC mode with a password.
We can do that from global configuration mode:
Note: Because switch security is a complex topic, and we’re focused on the basics, we won’t go into user management here. However, be sure to properly configure users or remote authentication servers before a production deployment.
Step 6: Enable SSH
At some point, you’ll find yourself in need of access to your network devices, and you’re not physically in the same room as them. To access a switch’s CLI over the network, you’ll need to use Telnet or SSH. From a security perspective, Telnet is usually a non-starter because data is transmitted in plaintext. That leaves us with SSH.
The first step to enabling SSH is generating the RSA keys:
Next, we’ll set the SSH version to 2:
Now, we can set SSH up on specific VTY lines. I’ll use the first 6 lines here:
Finally, we’ll tell the switch to check the local users’ database to authenticate users:
Step 7: Create VLANs
One of the most obvious reasons to use a managed switch is the ability to create VLANs to separate network segments. We can do that by using the vlan command, and then assigning our VLAN a name. For example, to create VLAN 2 and name it “cafe”:
You can now exit, and repeat these steps for as many VLANs as you need.
Step 8: Add access ports to a VLAN
After we create our VLANs, we can add ports to them. For example, to add ports 5, 6, and 7 as access ports in VLAN 2, we can use these switch configuration commands:
Step 9: Configure trunk ports
If you need one port to transmit traffic from multiple VLANs, you’ll need to designate it a “trunk port”. To make a port a trunk port, we simply access its configuration and set the mode to trunk. For example, to make port 2 on our switch a trunk port:
Step 10: Save configuration
When our configuration is complete, we can save our changes to the startup configuration. Don’t forget this step, or all your work will be gone come the next switch reboot!
What does an effective switch look like?
After you complete a network switch configuration, how do you know if it will be effective? Frankly, there is no one-size-fits-all answer. Generally, an effective switch is one that is both secure and well performing given the requirements of its specific environment. Understanding if your switch configuration is effective begins with establishing those baseline requirements and monitoring performance .
Auvik is a great resource when it comes to measuring your switches’ health and performance, making changes and automatically backing up your configurations, and proactively monitoring for any potential issues. Give Auvik a try, free for 14-days , to see the difference it can make.
If there’s something we missed, or you’d like us to cover in more detail, let me know in the comments! Once you’re comfortable with the basics, there’s plenty more to learn when it comes to effective switch management and network design best practices .
As you go through the process of making your network more managable, consider Auvik.
Your Guide to Selling Managed Network Services
Get templates for network assessment reports, presentations, pricing & more—designed just for MSPs.
What do you think?
Share your thoughts and read what others have to say
Leave a Reply Cancel reply
Your email address will not be published. Required fields are marked *
Share your thoughts here *
Enter your name *
Enter your email address *
Save my name, email, and website in this browser for the next time I comment.
How to Enable Hyper-V: An IT Pro’s Guide to Mastering Virtual Environments
The auvik network device buyer’s guide, the no sweat guide to effective switch management, what’s your shadow it risk factor.
- The impact shadow IT has on an organization
- How to evaluate tools
- Tips on security
- A quiz to help you determine the severity of shadow IT in your org
- Solutions to solve these problems
Change the hostname of your AL2 instance
When you launch an instance into a private VPC, Amazon EC2 assigns a guest OS hostname. The type of hostname that Amazon EC2 assigns depends on your subnet settings. For more information about EC2 hostnames, see Amazon EC2 instance hostname types in the Amazon EC2 User Guide for Linux Instances .
A typical Amazon EC2 private DNS name for an EC2 instance configured to use IP-based naming with an IPv4 address looks something like this: ip-12-34-56-78.us-west-2.compute.internal , where the name consists of the internal domain, the service (in this case, compute ), the region, and a form of the private IPv4 address. Part of this hostname is displayed at the shell prompt when you log into your instance (for example, ip-12-34-56-78 ). Each time you stop and restart your Amazon EC2 instance (unless you are using an Elastic IP address), the public IPv4 address changes, and so does your public DNS name, system hostname, and shell prompt.
This information applies to Amazon Linux. For information about other distributions, see their specific documentation.
Change the system hostname
If you have a public DNS name registered for the IP address of your instance (such as webserver.mydomain.com ), you can set the system hostname so your instance identifies itself as a part of that domain. This also changes the shell prompt so that it displays the first portion of this name instead of the hostname supplied by AWS (for example, ip-12-34-56-78 ). If you do not have a public DNS name registered, you can still change the hostname, but the process is a little different.
In order for your hostname update to persist, you must verify that the preserve_hostname cloud-init setting is set to true . You can run the following command to edit or add this setting:
If the preserve_hostname setting is not listed, add the following line of text to the end of the file:
To change the system hostname to a public DNS name
Follow this procedure if you already have a public DNS name registered.
For AL2: Use the hostnamectl command to set your hostname to reflect the fully qualified domain name (such as webserver.mydomain.com ).
For Amazon Linux AMI: On your instance, open the /etc/sysconfig/network configuration file in your favorite text editor and change the HOSTNAME entry to reflect the fully qualified domain name (such as webserver.mydomain.com ).
Reboot the instance to pick up the new hostname.
Alternatively, you can reboot using the Amazon EC2 console (on the Instances page, select the instance and choose Instance state , Reboot instance ).
Log into your instance and verify that the hostname has been updated. Your prompt should show the new hostname (up to the first ".") and the hostname command should show the fully-qualified domain name.
To change the system hostname without a public DNS name
For AL2: Use the hostnamectl command to set your hostname to reflect the desired system hostname (such as webserver ).
For Amazon Linux AMI: On your instance, open the /etc/sysconfig/network configuration file in your favorite text editor and change the HOSTNAME entry to reflect the desired system hostname (such as webserver ).
Open the /etc/hosts file in your favorite text editor and change the entry beginning with 127.0.0.1 to match the example below, substituting your own hostname.
You can also implement more programmatic solutions, such as specifying user data to configure your instance. If your instance is part of an Auto Scaling group, you can use lifecycle hooks to define user data. For more information, see Run commands on your Linux instance at launch and Lifecycle hook for instance launch in the AWS CloudFormation User Guide .
Change the shell prompt without affecting the hostname
If you do not want to modify the hostname for your instance, but you would like to have a more useful system name (such as webserver ) displayed than the private name supplied by AWS (for example, ip-12-34-56-78 ), you can edit the shell prompt configuration files to display your system nickname instead of the hostname.
To change the shell prompt to a host nickname
Create a file in /etc/profile.d that sets the environment variable called NICKNAME to the value you want in the shell prompt. For example, to set the system nickname to webserver , run the following command.
Open the /etc/bashrc (Red Hat) or /etc/bash.bashrc (Debian/Ubuntu) file in your favorite text editor (such as vim or nano ). You need to use sudo with the editor command because /etc/bashrc and /etc/bash.bashrc are owned by root .
Edit the file and change the shell prompt variable ( PS1 ) to display your nickname instead of the hostname. Find the following line that sets the shell prompt in /etc/bashrc or /etc/bash.bashrc (several surrounding lines are shown below for context; look for the line that starts with [ "$PS1" ):
Change the \h (the symbol for hostname ) in that line to the value of the NICKNAME variable.
(Optional) To set the title on shell windows to the new nickname, complete the following steps.
Create a file named /etc/sysconfig/bash-prompt-xterm .
Make the file executable using the following command.
Open the /etc/sysconfig/bash-prompt-xterm file in your favorite text editor (such as vim or nano ). You need to use sudo with the editor command because /etc/sysconfig/bash-prompt-xterm is owned by root .
Add the following line to the file.
Log out and then log back in to pick up the new nickname value.
Change the hostname on other Linux distributions
The procedures on this page are intended for use with Amazon Linux only. For more information about other Linux distributions, see their specific documentation and the following articles:
How do I assign a static hostname to a private Amazon EC2 instance running RHEL 7 or Centos 7?

To use the Amazon Web Services Documentation, Javascript must be enabled. Please refer to your browser's Help pages for instructions.
Thanks for letting us know we're doing a good job!
If you've got a moment, please tell us what we did right so we can do more of it.
Thanks for letting us know this page needs work. We're sorry we let you down.
If you've got a moment, please tell us how we can make the documentation better.
IMAGES
VIDEO
COMMENTS
Key Takeaways. To set a static IP address in Windows 10 or 11, open Settings -> Network & Internet and click Properties for your active network. Choose the "Edit" button next to IP assignment and change the type to Manual. Flip the IPv4 switch to "On", fill out your static IP details, and click Save. Sometimes, it's better to assign a PC its ...
10 minutes. TOOLS. Windows 10 or 11. Step 1: Open the Command Prompt. Your first step should be to track down your computer's current IP address, subnet mask, and default gateway. Do this by ...
From the Configure IPv4 menu, choose Using DHCP with manual address. Enter a static IP address in the IPv4 Address and leave the Subnet Mask and Router field as default. Click Ok to save the changes. Now when you do an ifconfig, the system should be using the static IP you have defined in the previous times.
To set a static TCP/IP configuration on Windows 11, use these steps: Open Start. Search for Command Prompt, right-click the top result, and select the Run as administrator option. Type the ...
Find your Ethernet connection from the list and click on the "Edit" button. In the IPv4 tab, select the "Manual" method. Click on the "Add" button to add a new IP address. Enter the desired IP address, subnet mask, and gateway (if needed). Click "Save" and close the settings window.
Set static IP address on Windows 10 from Settings. To assign a static IP address on Windows 10, use these steps: Open Settings on Windows 10. Click on Network & Internet. Click on "Wi-Fi" or "Ethernet.". Click on the current network connection. Under the "IP settings" section, click the Edit button. Using the drop-down menu, select ...
Right-click on the network adapter you want to assign an IP address and click Properties. Highlight Internet Protocol Version 4 (TCP/IPv4), then click the Properties button. Now change the IP, Subnet mask, Default Gateway, and DNS Server addresses. When you're finished, click OK.
Assign static IP address on Windows 11 from Settings. On Windows 11, you can set a static IP address configuration from the Settings app for wireless and wired adapters. Set static IP address on Wi-Fi adapter. To assign a static IP address configuration to a Wi-Fi adapter, use these steps: Open Settings on Windows 11. Click on Network & Internet.
In both Windows 11 and Windows 10, you can also change your IP address from the Control Panel. Open the Control Panel and click or tap on "View network status and tasks" under "Network and Internet.". In the Network and Sharing Center, click or tap on your internet connection from the "View your active networks" area.
Figure A: Design of a simple network in Cisco Packet Tracer. 4. Configure IP addressing. IP addressing is a critical aspect of network setup. Decide whether to use static or dynamic IP addresses. Static IPs are often used for servers and network devices, while dynamic IPs can be assigned to workstations through DHCP.
Click the Advanced button and then click Add in the IP Addresses section; Specify an additional IP address, subnet mask, and click Add; Save the changes. Multiple IP addresses can only be added for a network adapter whose first IP address is set manually (not assigned by a DHCP server). If DHCP is enabled on the interface, you won't be able ...
Slim laptops may not have an Ethernet port, in which case you'll need to either use a USB Ethernet adapter or connect wirelessly if your router allows it. 2. Plug one end of an Ethernet cable into your computer. Make sure you're using an Ethernet cable (RJ45), not a telephone cable (RJ11). 3.
Assign Static IPs - TrendNet Router. Log in to the TrendNet router and select the Advanced tab. In the left-side menu, select Setup, then select LAN Settings. Scroll down to the Add DHCP Reservations section. Check the Enable box, then enter the details of the device to receive a static IP address.
Prerequisite : IP address, Subnet mask , DNS server. Introduction : An IP address is basically an identifier for a device on a network, it helps in sending information to and from a specific device on the network. An IP address is a string of numbers separated by periods. IP addresses are expressed as a set of four numbers ex- 192.168..10.
Use Control Panel to set a static IP in Windows 11. Hit the Windows key, type Control Panel in the search bar and click Open. Navigate to Network & Internet. Select Network and Sharing Center. On the left pane, select Change adapter settings. Right-click your network connection and click the Properties option.
Step 2: Go to Network Connections. Go to Network and Internet > Network and Sharing Center. Select Change adapter settings on the left. Step 3: Find the IP address. Right click the Ethernet icon and select Status from the context menu. Then click Details... to view all detailed information of network connection. Step 4: Set the IP address.
Thanks, I do have some 120 IP reservations in my DHCP server. I only have guest devices getting dynamic IPs (end even then, return guest are often given reservations, since I use ping as a presence detection for home automation, e.g. if my moms phone is on the network, the house is in "Guest Mode" and won't power down when my girlfriend and I are both away from home).
There are several possibilities, depending on how the ISP has set up your connection. You assign the public address to the router, DNAT (port-forward) all relevant ports to the server's regular LAN address, and likewise SNAT all outgoing connections. (In pfSense, "1:1 NAT" covers both at once.) This works regardless of what the ISP expects, but ...
When you're connected to a network, your computer or smart device will obtain an IP address either from your ISP or your router. There are 2 ways how you can assign an IP address to your device: (1) dynamically via DHCP or (2) statically by manually assigning an IP address yourself. In either case, you must use the IP address that is provided to you by your ISP, or the IP range you allocated ...
Step 1: Assign IP Addresses to Mikrotik Interface to which your device will be connected. This could be Bridge, LAN or VLAN depending on your particular set up. In my case I required my VoIP phone to be on VLAN 100. You also need to decide what IP address is to be assigned to your interface and what addresses are to be used for your device(s).
Assigning IP addresses in a LAN. There are two ways to assign IP addresses in a LAN. You can manually assign a static IP address to each computer in the LAN, or you can use a special type of server that automatically assigns a dynamic IP address to each computer as it logs into the network.. Static IP addressing. Static IP addressing means manually assigning a unique IP address to each ...
So, for example, a device that has a 192.168.10.100 IP address is a private IP address in the Class C space. 2. Calculate the number of bits in the subnet mask. An IP subnet mask is a 32-bit address that designates which portion of an IP address is the network address and which is part of the pool of individual endpoint addresses.
Internal IP addresses usually start with 192.168.x.x. The computer or mobile device you are using retrieves the IP address from your WiFi network router using your router's web interface. Or - if your device is using a static IP address, you need to configure it to retrieve the IP address.
Now, we can assign the management IP and subnet. In this example, I'll assign 10.10.11.11 with a 255.255.255. subnet. Be sure to replace that with the correct values for your switch! Switch(config-if)#ip address 10.10.11.11 255.255.255. Switch(config-if)# We can exit interface configuration mode and assign a default gateway for the switch ...
Step 3: Assigning a Static IP Address (Recommended) While not strictly necessary, assigning a static IP address to the remote computer simplifies the connection process. This ensures the computer always has the same IP address on your network, making it easier to locate during remote access. Open the Command Prompt and run the command "ipconfig ...
On a Windows computer, go to Settings from the Start menu, open up the Network & internet page and click either wifi and then the network name, or Ethernet, depending on how you're connected.Your ...
Types of IP addresses IP address diagram Private IP address. A private IP is an identifier assigned to all the devices within a private network.Therefore, it's sort of like an ID number for that particular network.
Change the system hostname. If you have a public DNS name registered for the IP address of your instance (such as webserver.mydomain.com), you can set the system hostname so your instance identifies itself as a part of that domain.This also changes the shell prompt so that it displays the first portion of this name instead of the hostname supplied by AWS (for example, ip-12-34-56-78).