
- Design Studio Overview
- Key Concepts
- Installing the Software
- Managing Accounts
- Commissioning Workflow
- Creating an Installation
- Managing N4 Hubs
- Building Groups
- Adding Devices
- Dividing Linear Runs Into Groups
- Using the Color Picker
- Managing Lighting Power-Restore States
- Building Scenes
- Building Shows
- Programming Ketra Keypads
- Enabling Sensor Control
- Enabling Emergency Lighting
- Integrating Third-Party Lighting
- All Analog Integration Profiles
- DMX Integration
- Integrating with Lutron
- Publishing: Saving Configurations to Devices
- Collaborating with Other Users
- Accessing Remotely
- Updating Firmware
- Other Operations
- Two Ways to Save
- Troubleshooting an Installation
- Device Troubleshooting
- Appendix A: Integrating Ketra Products into HomeWorks QS Systems
- Appendix B: DMX Control Support with Ketra
- Design Studio 3.0 Manual
- Commissioning an Installation

Ketra with Homeworks QS (Residential)
For a document that specifically covers integration between Ketra products and the HomeWorks QS system, we recommend referring to Lutron’s app note #696, Integrating Ketra products into HomeWorks QS systems :
- Web link (Requires Internet access)
The Design Studio workflow for Ketra with Homeworks QS installations varies depending on whether you are programming on-site or off-site.
Note: We recommend saving progress regularly. If your computer has an Internet connection, the best way to save progress is to sync by closing out of the installation. If there is no Internet, the best way is to click Publish and Save in the top-right. For more information, see Saving Your Progress .
If programming entirely on-site:
1. Create an Installation
2. Enable API Authentication on N4 Hubs (only if commissioning without Internet access)
3. Build Groups
4. Add Devices
5. As needed:
- Divide Linear Runs into Groups
- Manage Power-On Lighting States
- B uild Scenes
- Build Shows
- Integrate Third-Party Lighting via DMX Output
6. Publish Configurations (see Publishing: Saving Configurations to Devices )
7. Return to Homeworks QS, import the Design Studio installation, and continue commissioning
If programming partially off-site:
Note: If creating an installation off-site, skip the N4 provisioning steps.
2. Build Groups
3. As needed:
- Build Scenes
4. Travel to site
5. Add N4 Hubs (see Adding Additional Hubs )
6. Enable API Authentication on N4 Hubs (only if commissioning without Internet access)
7. Add Devices
8. As needed:
- Integrate Third-Party Lighting via DMX Output (see DMX Output )
9. Publish Configurations (see Publishing: Saving Configurations to Devices )
10. Return to Homeworks QS, import the Design Studio installation, and continue commissioning
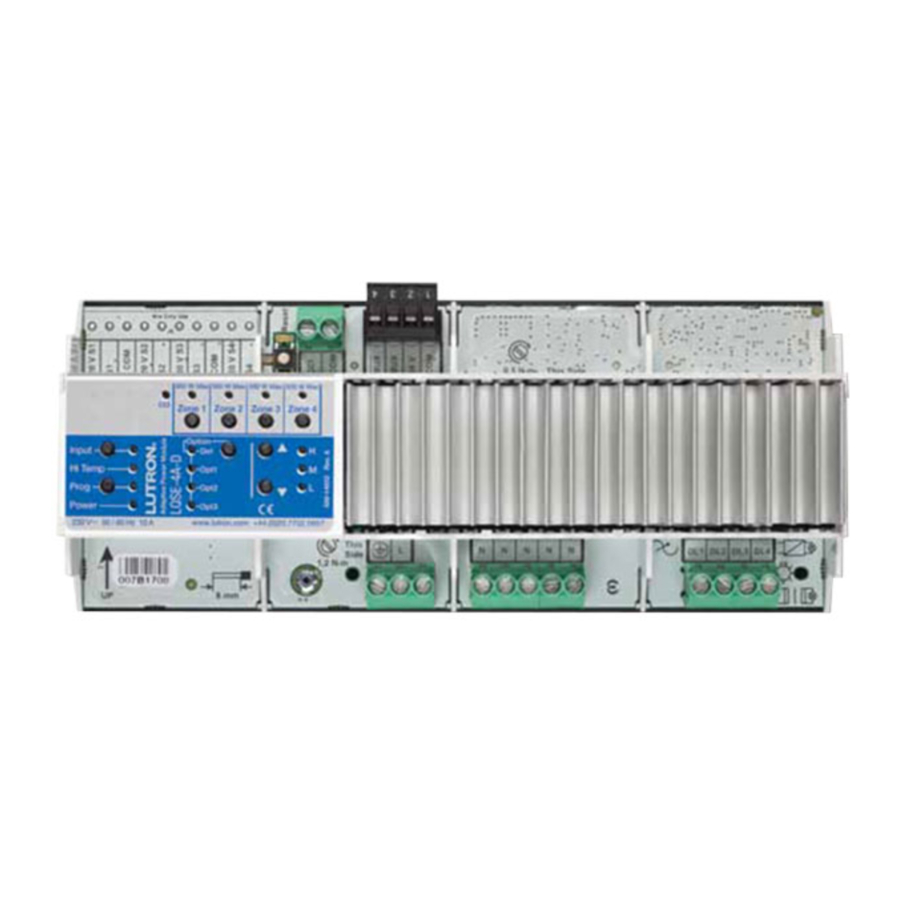
- Lutron Electronics Manuals
- Installation manual
Lutron QSNE-4A-D, LQSE-4A-D Install Guide
- Also fits for
Advertisement
Mains Wiring
Verify wiring, zone wiring, qs link (iec pelv), emergency contact closure input (iec pelv), multi-function inputs (iec pelv), led diagnostic indicators, programming, contact information.
- Download manual
- 3 Mains Wiring
- 4 Verify Wiring
- 5 Zone Wiring
- 6 QS Link (IEC PELV)
- 7 Emergency Contact Closure Input (IEC PELV)
- 8 Multi-Function Inputs (IEC PELV)
- 9 LED Diagnostic Indicators
- 10 Programming
- 12 Contact Information
- 13.1 QSNE-4A-D
- 13.2 LQSE-4A-D
- 14.1 References
- 14.2 Download manual

- QS Link (IEC PELV )
Buttons and LEDs in the unit are used for programming and troubleshooting. If wiring is exposed when accessing buttons and LEDs, the unit must be accessed by a certified electrician, following local codes.
Note: For additional information on unit operation and ratings, please refer to Lutron ® P/N 369583 (for LQSE-4A-D) or 369609 (for QSNE-4A-D) at www.lutron.com .
- Mount in IP20 (minimum) panel with integrated DIN rail.
- Internal relays make audible noise, mount where acceptable.
- Unit is 12 DIN modules (216 mm) wide.
- Mount to DIN rail using clips on bottom of unit. Clips can be pulled out using a screwdriver.
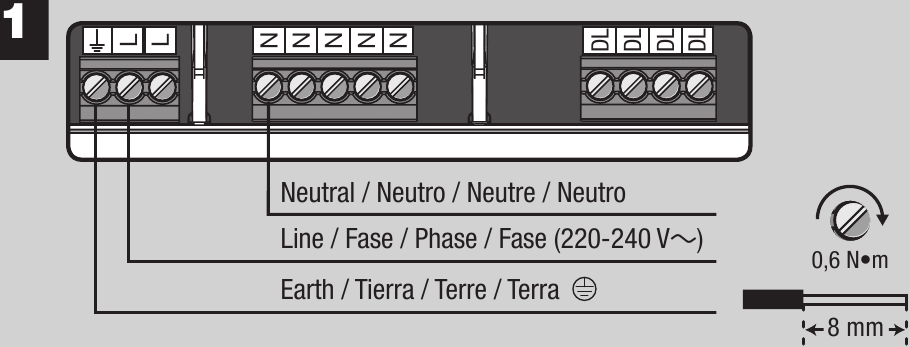
- Turn off power and wire mains to the unit as shown.
- Apply power, "Power" (Power) LED will light if unit is wired correctly.
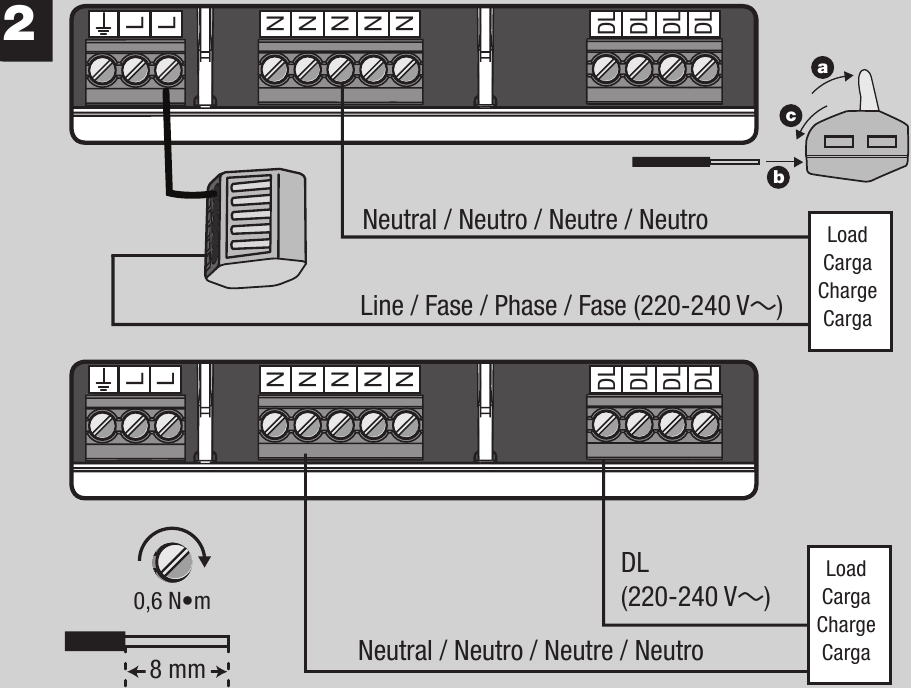
- Follow the steps below to verify there are no faults in the load or wiring.
- Turn off power.
- Wire loads to the provided connector which bypasses the unit and protects it from faults.
- Apply power and ensure that the desired loads power on without any faults.
- 100 W Derating is required on all zones for a single module in a single non-ventilated DIN enclosure if the room ambient temperature is between 30 ºC and 40 ºC.
- 200 W Derating is required on all zones for multiple row non-ventilated DIN enclosure if the room ambient temperature is between 30 ºC and 40 ºC.
- Wire loads as shown.

- Each zone is unassigned by default and will switch load on or off until it has been programmed.
- Note: If iron core transformers are used, they must be intended for use with an electronic switch or dimmer per Clause 8.3 of IEC/EN 60669-2-1.
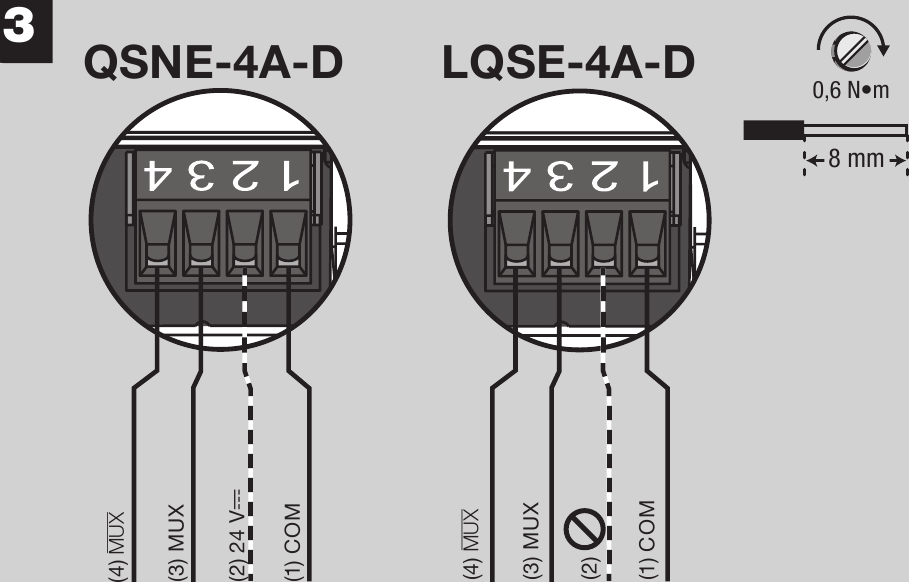
- Turn off power while servicing unit.
- Wire QS Link to the unit as shown, note terminals 3 and 4 are twisted, shielded pair.
- Link may be daisy chained or t-tapped, length not to exceed 609 m.
- For QSNE-4A-D , wire terminal 2 so that it supplies a maximum of 4 PDU's. Do not connect terminal 2 between devices that supply PDU's. For additional information, refer to P/N 369405 at www.lutron.com .
- On LQSE-4A-D , do not connect to terminal 2.

- If not needed, leave pre-installed jumper in CCI terminals.
- Turn off power while servicing unit and wire CCI as shown.
- Input is Normally Closed, if opened unit will go to Emergency light levels and not respond to inputs from other devices.
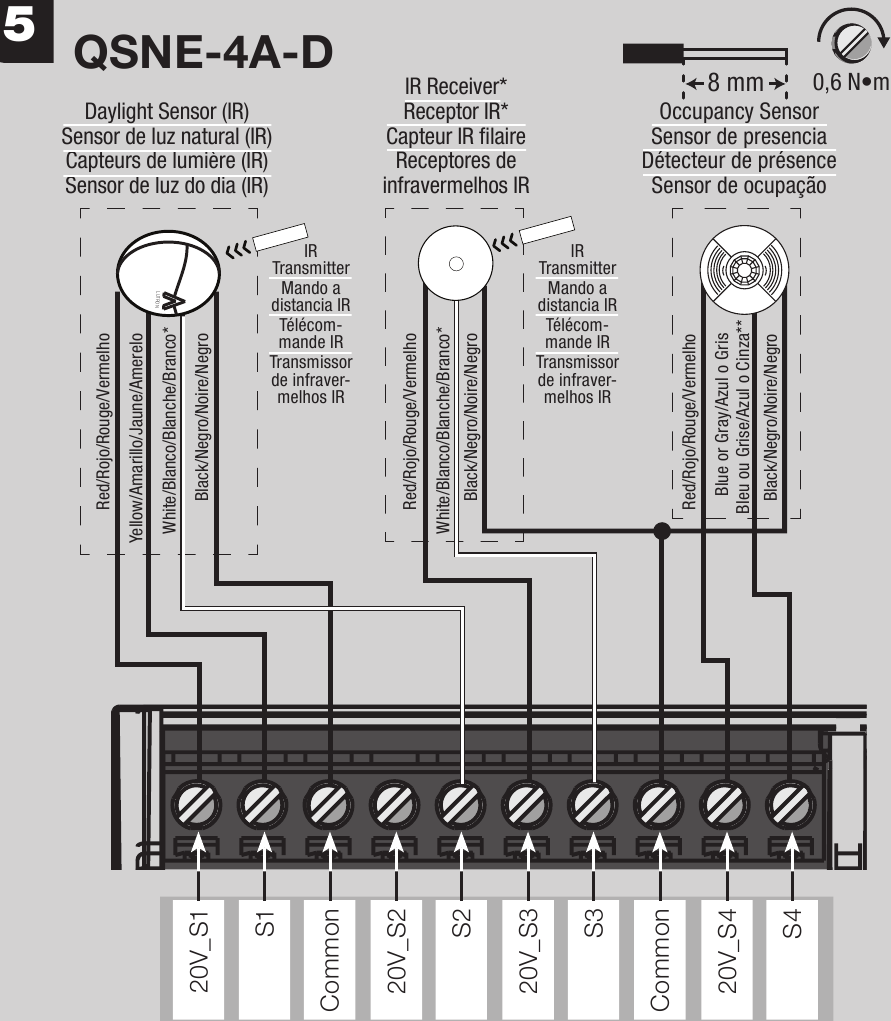
- Note: Multi-function inputs available on QSNE-4A-D only.
- Each input accepts one output from an occupancy or daylight sensor, an IR receiver or an IEC PELV dry contact switch (by others).
- Turn off power while servicing unit and wire as shown.
- Wire length to sensor/input device not to exceed 30 m.
* Note: Daylight sensor with IR requires two inputs. Only one IR device may be connected per input. If the IR signal from a daylight sensor is connected, another control may not be connected to the same input, and vice-versa.
** Note: Connect the gray wire on -R Occupancy Sensor models.
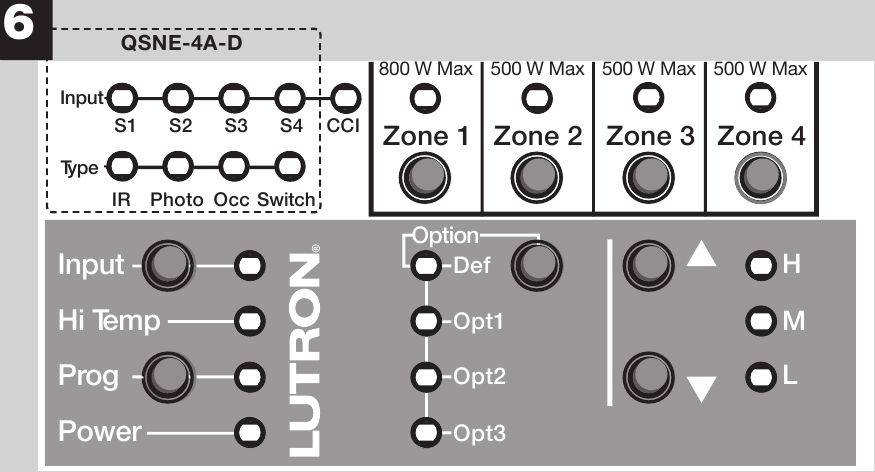
- For QSNE-4A-D programming: Standalone applications please refer to Lutron ® P/N 032416 (for button programming) or P/N 040384 (for iPod programming) at www.lutron.com ; For Quantum ® systems use the Quantum ® software suite.
- For LQSE-4A-D programming: use the HomeWorks® QS Designer software.
- Can I use non-dim loads with this product? No, only dimmable loads may be used.
- Can I use LED or CFL loads with this product? Yes, Refer to Lutron ® P/N 048478 on www.lutron.com for compatibility with dimmable CFL/LED light sources.
- Can I use multiple load types on one zone? No, only one load type may be used per zone.
- Can I control receptacles with this product? No, output must not be used to control receptacles.
- How many sensors can be used with this product? For QSNE-4A-D models only: This product will accept up to four wired sensor inputs and is compatible with Lutron ® Occupancy and Daylight sensors, as well as Lutron ® IR receivers and IEC PELV Dry Contact Switches (by others). Additional sensors can be used by using a QS Sensor Module (QSM).
- How do I know if the unit is dimming with leading-edge or trailing-edge dimming? In system applications, the dimming type will be automatically set depending upon the load types selected in the design software. For standalone applications, please consult the unit programming guide 032416 or iPod Energi Savr Node TM handheld programming guide 040384.
- How do I know if the QS link is working properly? Press the "Option" (Option) button. If the power LED flutters periodically, the QS link is operating normally. If the "Power" (Power) LED is flashing, there is a communication error or there are no other QS devices on the link. Verify link wiring.
- Can I install multiple devices in one panel? Yes, please refer to Lutron ® P/N 048466 at www.lutron.com .
www.lutron.com
World headquarters TEL +1.610.282.3800 Technical Support 1.800.523.9466 Toll-Free 1.888.LUTRON1
European headquarters TEL +44.(0)20.7702.0657 Technical support +44.(0)20.7680.4481 FREEPHONE 0800.282.107
Asian headquarters TEL +65.6220.4666
Technical hotlines France: 0800.90.12.18 Germany: 00800.5887.6635 Italy: 800.979.208 Spain: 900.948.944 Northern China: 10.800.712.1536 Southern China: 10.800.120.1536 Hong Kong: 800.901.849 Singapore: 800.120.4491 Taiwan: 00.801.137.737 Thailand: 001.800.120.665853 Other Areas in Asia: +65.6220.4666
Lutron Electronics Co., Inc. | 7200 Suter Road | Coopersburg, PA 18036-1299 | U.S.A.
Limited Warranty
This warranty shall run for a period of two years from the date of purchase and Lutron's obligations under this warranty are limited to remedying any defect, replacing any defective part or replacement (at Lutron EA's sole option) and shall be effective only if the defective unit is shipped to Lutron EA postage prepaid within 24 months after purchase of the unit. Repair or replacement of the unit does not affect the expiry date of the warranty.
http://www.lutron.com/TechnicalDocumentLibrary/HomeWorks_Intl_Warranty.pdf
Lutron and HomeWorks QS are registered trademarks and Energi Savr Node is a trademark of Lutron Electronics Co., Inc.
©2013 Lutron Electronics Inc. Co., Inc.

Documents / Resources
Download manual Here you can download full pdf version of manual, it may contain additional safety instructions, warranty information, FCC rules, etc. Download Lutron QSNE-4A-D, LQSE-4A-D Install Guide
Need assistance.
Do you have a question about the QSNE-4A-D that isn't answered in the manual? Leave your question here.
Thank you! Your question has been received!
Related Manuals for Lutron Electronics QSNE-4A-D

Table of Contents
Delete from my manuals.
Click the green button to print the entire article. To print the original version of the document - click the blue one.
Upload manual
Your resource for Lutron Articles and Documents


Caséta Wireless
Maestro Dimmer Switch
No Results Found! Please enter valid model number to search.
How do I find my Model Number?
Dimmers & switches, do you have the original packaging.
If your product came in plastic packaging (a clamshell), you’ll find the model number on the front of the insert card, on the lower left corner. If your product came in a box, you’ll find the model number on the top of the box.
Most model numbers are 12-16 characters and start with a couple letters followed by a dash.

No packaging? No problem!
The product number is on a label on the side of the dimmer or switch.*
If you’ve already installed the dimmer/switch, turn off the electricity and then remove the wallplate. Unscrew and remove the wallplate adapter, then unscrew the dimmer/switch and pull it out of the wall until you can see the label.
*Please note: The product number for Ariadni/Toggler dimmers is not on a label. It’s located directly on the front of the dimmer on the top left, or right below the on/off toggle.

Wiring Wizard

FAQs & Documents

Product Selection Assistance
Need help finding an led for your lutron dimmer.
Try our LED Compatibility Tool
Step-by-step instructions for installing a Lutron dimmer.
Request a Color Sample
Order Dimmer & Switch Color Samples

Dimming LEDs
Is your LED buzzing, flickering, or dropping out? Learn about these common problems and more, and how to work through them.

Can't find what you're looking for?
Lutron support community.
The Lutron Support Community provides a convenient and valuable area to ask questions and share ideas, best practices, and troubleshooting tips with fellow community members and Lutron moderators about Lutron products. Anyone may browse the forum, however to post questions and respond, you must register .
Fields in bold are required.
This field is required.
Please enter at least 10 characters.
Please enter a proper email address.
Please enter a proper name.
Technical Support 24/7
1.888.409.8483

IMAGES
VIDEO
COMMENTS
Technical Documentation & Support Overview. Here you can find an extensive library of technical resource materials. Search through performance specifications, installation instructions, wiring diagrams, videos, brochures, and much more. To find a specific technical document, use the drop-down menus below. Lutron offers an extensive library of ...
HomeWorks RF Tabletop Keypads and RF Lamp Dimmers offer great flexibility for the placement of controls. Locations such as bedside, countertops, and end tables are ideal for these controls. CAR VISOR CONTROL The HomeWorks Car Visor transmitter clips on to a car's sun visor providing complete control of the system from the convenience of the car.
In this Lutron Homeworks QS Tutorial I will share with you step by step how I do start a new Homeworks QS database as well as doing a quick overview of my wo...
Homeworks Qs Software Manual - Free download as PDF File (.pdf), Text File (.txt) or read online for free.
Page 8 Lutron Electronics Co., Inc. 7200 Suter Road Coopersburg, PA 18036-1299 World Headquarters 1.610.282.3800 24/7 Technical Support Center 1.800.523.9466 Customer Service 1.888.588.7661 ©10/2011 Lutron Electronics Co., Inc. P/N 368-2371 REV A... View and Download Lutron Electronics Homeworks qs quick reference manual online.
manual override capabilities, which can be activated from dedicated switches located anywhere in the home. POWER-FAILURE MEMORY All HomeWorks components are designed with 10-year power-failure memory. If power is interrupted temporarily and restored, lights will automatically return to the levels to which they were set prior to the power outage.
System Requirements Getting Started Lutron Homeworks QS Requirements Creating a Project Software: Homeworks QS 1. Name the project. 2. Click on the Activate tab. 3. Select "processors" in drop-down box. 4. Uncheck the "4HHuunntteerr" box. 5. Record the processor IP address. Page 4 Getting Started 6. In the Design tab, select Controls from the ...
This tool is ideal for Lutron commercial projects including Athena, Vive, QS Standalone, GRAFIK Eye QS, Energi Savr Node, Quantum, and myRoom systems. For information on additional software packages, please contact Customer Service online, or call us at 1.888.LUTRON1 (588-7661). Using Lutron light control programming software, you will be able ...
Page 2: Specifications. Low-Voltage Power 18 AWG (0.75 mm Wire Type Ethernet, RS485 (QS, RF, Power Panel) Communications Total link capacity between the HomeWorks QS Wired Device Link and the Link Capacities ® HomeWorks QS RF Link cannot exceed 50 devices / 50 zones. Page 3 369755a 01.24.13 HomeWorks QS MDU Processor ® Dimensions Dimensions ...
Main Repeater - This is the basic RadioRA 2 controller and will be the main RadioRA 2 component connected to any network. Each RadioRA 2 Main Repeater has one RJ45 female connector for the RadioRA 2 LAN/VLAN. HWQS - Abbreviation of HomeWorks QS. RA2 - Abbreviation of RadioRA 2. Processor - May refer to either/both the HomeWorks QS ...
The QSX processor for HomeWorks creates a link between your HomeWorks system and the cloud, enabling control, integration, and monitoring of a HomeWorks system from a smartphone or tablet using the Lutron app. This app allows you to control all your homes from one convenient location, whether they have HomeWorks or RA2 Select.
Lutron Homeworks QS Requirements Software: Homeworks QS. 4 Getting Started 6. In the Design tab, select Controls from the drop-down box. 7. Press "+" next to Exterior to add the location. Note: The location name should correspond to the Luxor location (e.g., front yard, backyard, etc.). 5
The Lutron App for HomeWorks with a QSX processor is an easily configurable app that allows for convenient and intuitive control of lights, shades, and scenes from a mobile device anywhere in the world. The Lutron App also allows for simple editing of keypad buttons. This guide demonstrates how to add the Lutron App to any HomeWorks system with ...
Ketra with Homeworks QS (Residential) For a document that specifically covers integration between Ketra products and the HomeWorks QS system, we recommend referring to Lutron's app note #696, Integrating Ketra products into HomeWorks QS systems: Web link (Requires Internet access) Appendix B. The Design Studio workflow for Ketra with ...
Programming. For QSNE-4A-D programming: Standalone applications please refer to Lutron ® P/N 032416 (for button programming) or P/N 040384 (for iPod programming) at www.lutron.com; For Quantum ® systems use the Quantum ® software suite.; For LQSE-4A-D programming: use the HomeWorks® QS Designer software.; FAQ. Can I use non-dim loads with this product? No, only dimmable loads may be used.
HomeWorks QS Processor SPEC (369376) The QS processor provides control and communication to HomeWorks system components. The Ethernet links allow communication to the HomeWorks QS software, integration with third party systems and communication between multiple processors. HomeWorks QS processors may be connected using either standard ...
Welcome to Lutron online Support Center. Your one stop guide for Selection Tools, Frequently Asked Questions, Documentation and easy Troubleshooting steps for your Lutron dimming product.
Design & Configuration Software; Product Selection Tools; User Guides & Videos; Technical FAQs; Brochures; Legacy Products; ... Manual Shades; Whole Home Systems; RadioRA 3 ... HomeWorks QS Power Supply: 100 - 277 V: Portuguese (pdf) QSPS-DH-1-75-H : HomeWorks QS Power Supply: 100 - 277 V:
The HomeWorks QSX processor is required when using the Clear Connect - Type X Gateway for control of residential Ketra light sources. See Lutron Spec Submittal 3691128 at www.lutron.com for the complete details on Clear Connect - Type X Gateway. The processor is powered from the QSPS-DH-1-75-H power supply.