

How to set up and test microphones in Windows
To install a new microphone, follow these steps:
Make sure your microphone is connected to your PC.
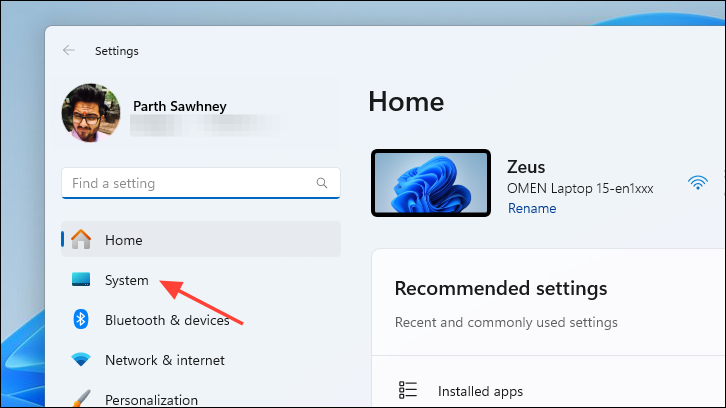
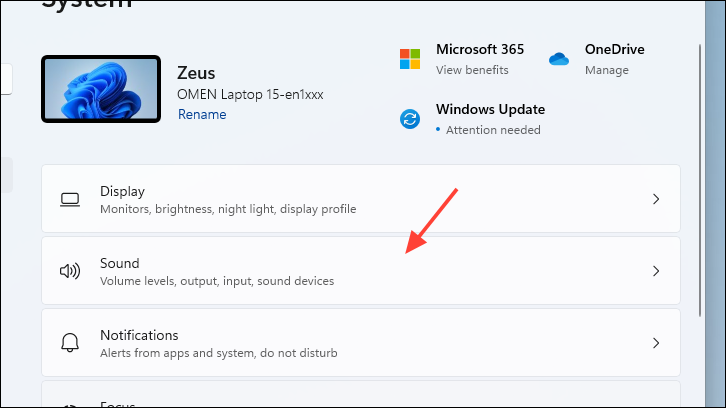
Select Start > Settings > System > Sound .
In Sound settings, go to Input to see your connected microphones. If it's a Bluetooth microphone, select Add device .
To test a microphone that's already installed:
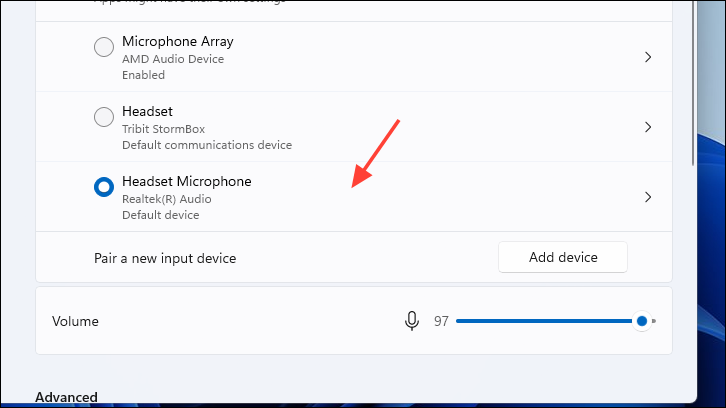
In Input , select the microphone that you want to test.
In Input settings , look at Input volume while speaking into the microphone. If the bar moves while you speak, your microphone is working properly.
If don't see the bar moving, go to Test your microphone and select Start test .
Open Settings
Select Start > Settings > System > Sound .
In Sound settings, go to Input and in the Choose your input device list, select the microphone or recording device you want to use.
To test a microphone that has already been installed:
In Sound settings, go to Input and under Test your microphone , look for the blue bar that rises and falls as you speak into your microphone. If the bar is moving, your microphone is working properly.
If you aren't seeing the bar move, select Troubleshoot to fix your microphone.

Need more help?
Want more options.
Explore subscription benefits, browse training courses, learn how to secure your device, and more.

Microsoft 365 subscription benefits

Microsoft 365 training

Microsoft security

Accessibility center
Communities help you ask and answer questions, give feedback, and hear from experts with rich knowledge.

Ask the Microsoft Community

Microsoft Tech Community

Windows Insiders
Microsoft 365 Insiders
Was this information helpful?
Thank you for your feedback.

Microphone Test
Use this online mic test to check if your microphone is properly set up., get easily started with your test.
- 1 Click the 'play' button.
- 2 Click 'allow' if you see a question in the browser.
- 3 Now the line should move when you talk into the mic!
If the line is responding to sounds, then that means the mic works!
If you're having problems, scroll down or click here.
The mic test:
Waiting for microphone...
Your Privacy Is Important To Us
All our tests run on the "client side" - which means that we do not and can not record your voice or any other information.
The Long Explanation
- If this is the first time you have visited here your browser will ask you if you allow this site access to your microphone. Select Allow. * On a PC this question should be near the address bar at the top of your screen. * On a mobile device scroll all the way up to see it appear.
- You should then see a line moving in the test area - beneath the words The mic test - whenever your mic "hears" a sound.
- If the line is moving when you talk into the mic , then the result of the test is that your microphone is working and properly configured!
Trouble-Shooting Guide
- If you don't see a line after allowing access to the mic, try these steps: Step 1. In some cases you will not see a line before making a relatively loud sound into the microphone. Try that and see if the line appears. Step 2. Reload the page and try again. In many cases that solves it. Step 3. If nothing helped please check if your microphone is connected.
- If you do see a line but the line isn't moving , then your mic is either broken or (much more likely) it's not properly setup. Try these steps to solve the problem: Step 1. Check that your microphone is connected to the correct (normally pink) socket in your computer. If it's a mic with a USB connector just make sure it is properly connected to the USB socket (you will not use the pink microphone in this case). Step 2. Check that your microphone is not muted - sometimes the mic has a mute button on it or on the wire that is connected to it. Step 3. Check that the volume on the microphone is not turned all the way down.
- How To Change Mic Settings In Windows 10
- How To Change Mic Settings In macOS
- How To Change Mic Settings In Windows 8.1
- How To Change Mic Settings In Windows 8
- How To Change Mic Settings In Windows 7
- How To Change Mic Settings In Windows Vista
- How To Change Mic Settings In Windows XP
- How To Change Mic Settings In Ubuntu (Linux)
- Discord Settings
Read This If You Want To Learn More:
What is the benefit of testing my microphone with this site.
Regardless of if you are having problems with Zoom or Skype, with recording something or with using Discord - the built-in microphone testing facilities provided by most of those services are far from perfect . Applications like Zoom and Skype are designed to communicate and they do their core jobs well, however, when they do not work troubleshooting them can be a nightmare .
At OnlineMicTest we provide you with the most simple and effective way to quickly test your mic so you can immediately rule out mic connection issues.
The problem with checking the mic with software
The problem with carrying out a mic test on a piece of software which does not seem to be responding to the mic is, as you are already having issues, you cant be sure if the issue is software or mic related .
The advantage of testing through the browser
By using the free service here your mic will attempt to simply communicate with your browser which is one of the most direct and straightforward ways of testing .
if you find that your mic is working fine, as many people do, then you can be sure that any issues you were having are related to the software which is not correctly detecting the incoming sound.
So what do I do if my mic still isn't working in some program?
If you found out on this website that your microphone is working but it's still causing problems in some 3rd party piece of software, we suggest you submit a support ticket or get some extra help from the support team for that program .
If you state on the ticket that your microphone is working on onlinemictest.com, they would be able to isolate the problem quicker.

How to Fix a Microphone Not Working on Windows 10 or 11
Get up and running again in minutes.
Several reasons can prevent your Windows 10 or 11 microphone from working. Troubleshooting steps include checking physical connections, Windows and app options, audio drivers, and permissions. Here’s how to get your microphone working again.

Before getting started, locate the original documentation for the microphone or at least find the microphone model and brand name so that you can research potential fixes if necessary. Hopefully, by the time you’ve finished our guide, your microphone will work. Also, be sure to read out article on how to enable a microphone in Windows .

Check Physical Connections
The first step is to check whether your microphone has a faulty hardware connection. This is quite simple to do. First, unplug your microphone and then plug it back in. You should notice a sound to signify that Windows has recognized new hardware.
Find Out If It’s Just an App Problem
Before you get too into troubleshooting your microphone, figure out whether it’s having problems in a particular app or a system-wide issue. The easiest way to do this is to open Sound settings. Press Windows + I, then go to System > Sound > Microphone . Select Start Test and start talking.
If Windows indicates that it hears the input, you probably have a problem with just the app you used. Sometimes, standalone apps have their own controls for choosing which audio devices are used as default.
Typically, you can find these options somewhere in the settings menu. The location will differ between each application, and some apps won’t have the setting at all.

If you cannot find any sound settings page, a quick Google search for “How to change microphone in x application” will bring back valuable results.
Once you’ve made the change, restart the application and test to see if your microphone works.
Make Sure Windows Recognizes Your Microphone
Don’t have any sound prompts? Click Start and search for Device Manager. Click on the first option that appears.

In Device Manager, expand the Audio inputs and outputs section. When your microphone is plugged in, it should appear here. If you don’t see your microphone here, unplug it and plug it back in again.

If the microphone still doesn’t appear on the list, try these steps:
- Connect it to a different USB port.
- Try a different cable if the one on your microphone is interchangeable.
- Connect it to another computer to ensure the microphone is functional.
If none of these steps work, chances are good that your microphone has a problem, and you’ll need to replace it.
If your microphone does appear in Device Manager, it’s time to check your audio drivers.
Install or Update Audio Drivers
Most microphones are now plug-and-play, and installing and updating drivers yourself is mostly a thing of the past. In rare cases with Windows 10, you might need to download an official driver.
If you see your microphone in Device Manager, right-click it and choose Properties . In the Properties window, switch to the Driver tab and select Update Driver . In the window that opens, select Search automatically for updated driver software.

If Windows doesn’t find a driver, search the web for your microphone brand and model number. Head to the manufacturer’s website to see whether any drivers are available.
After following these steps, revisit the application you were trying to use the microphone in and test to see if it works. Still no luck? Move on to the next step below.
Check Microphone Options
Windows has its own default audio devices that you might need to adjust before you can use your microphone. To adjust your sound preferences on Windows, open the Start menu, type Audio , and then select Manage audio devices .

In the Sound window, switch to the Recording tab. Right-click the microphone you want to use and select Enable if you see that option. If you see a Disable option instead, your microphone is already enabled.

If you don’t see your microphone here, try selecting Show Disabled Devices to make sure it hasn’t been hidden from sight. If it shows up on the list, right-click it and choose Enable .
You should also select the Set as default device option if you see it on the context menu. If it is already the default, you’ll see a green tick and the Default Device entry.
Note: If you use a Bluetooth headset with a built-in microphone but would like to use a standalone microphone instead, make sure hands-free mode is disabled. On the Playback and Recording tabs of the Sound window, right-click any hands-free Bluetooth devices and select the Disable option.

Test your microphone again. If it still doesn’t work, move on to the next section.
Check App Permissions
In Windows 10 and 11, you can deny or allow apps from having access to certain permissions, one of which is access to your microphone.
To access app permissions, follow the steps below:
- Open the Start Menu
- Type microphone privacy settings and select that result
- On the microphone privacy Settings page, make sure the Allow apps to access your microphone option is turned on. (It’s called Let apps access your microphone in Windows 11.)
- If the app you’re using is a Microsoft app (like Xbox or Skype), find it on the list and make sure it’s toggled to the On position to allow that app access.

If the app you’re using isn’t a Microsoft app, look for the Let desktop apps access your microphone option at the bottom of the list. You can’t enable desktop apps individually— it’s all or nothing.

Ollie stumbled upon writing online whilst participating in a mobile network forum back in 2011. Since then, he has developed an incredible passion for writing about all sorts of tech from smartphones, PC hardware, software, and everything in between. Read Ollie's Full Bio
Read More Posts:
Leave a Reply
Your email address will not be published. Required fields are marked *
We explain and teach technology, solve tech problems and help you make gadget buying decisions.
10 Ways to Make Your Mic Sound Better on Windows

A computer engineer by degree, Varun has 7+ years of experience in the field of technology. After his stints at Beebom and MrPhone, Varun has been covering different facets of technology at Guiding Tech. Here, he contributes to Team GT by helping its readers make better purchases while also understanding the meaning of each feature. In his free time, you can find him sharing his excellent photography skills along with his Aces in Valorant over Twitter.
A clear and high-quality microphone is essential for various activities on your Windows computer, such as voice chat, video conferencing, online gaming, podcasting, and recording audio. However, the microphone quality may fail to meet your expectations due to various factors. The good news is that you don’t have to settle for subpar microphone audio.

In this article, we will explore various steps and tips to enhance the microphone quality on your Windows computer. Whether you are a content creator, a business professional, or an avid gamer , these steps will help you achieve clearer, more professional-sounding audio. Let’s dive in and unlock the full potential with these microphone settings.
1. Place the Microphone Properly
One of the first things to ensure is that your microphone is placed properly. The position of your microphone can affect the sound quality of your recordings. The best position for your microphone is about 6 inches away from your mouth.

You should also ensure the microphone is not pointing directly at your mouth, as this can cause distortion. For a better placement, you can invest in a good boom arm if your microphone supports it. You can check out our list of the best boom arms for Shure MV7 and Hyperx QuadCast microphones.
2. Use Pop Filters
Another way to boost microphone quality is with the help of a pop filter. A pop filter is a mesh screen between the microphone and the user. As a result, plosive sounds are significantly reduced, resulting in a smoother and more natural audio output.

Additionally, pop filters also help minimize the impact of breath sounds and sibilance. This further enhances the overall clarity and intelligibility of the recorded voice or speech.
3. Adjust the Gain
Adjusting the gain of the microphone is a crucial step in improving audio quality on Windows. Gain refers to the microphone’s sensitivity, controlling how loud or soft the input sounds should be. Setting the gain too high can lead to distortion and clipping while setting it too low can result in weak and barely audible audio.

Most microphones have a dial or knob on them indicating the gain level. Adjust it and simultaneously test it using the Sound Recorder app on Windows 11 to find the sweet spot.
4. Increase the Mic Level in Windows
In case your microphone doesn’t have a knob for gain, you can use Windows to adjust it on a software level. While this wouldn’t be as effective as a change on the hardware level, the changes are definitely noticeable.
You can check our comprehensive guide on how to increase mic volume on Windows .
5. Adjust the Microphone Format
If you’re using a high-end microphone, it’s possible to record in a higher format for better quality as well. You can essentially increase the bitrate of your recording, thus, resulting in an improved audio result. Here’s how you can do that.
Step 1 : Right-click on the speaker icon in the system tray and click on Sound settings.

Step 2 : Under the Input section, click on the arrow next to your microphone.

Step 3 : Click on the drop-down menu for Format to select a different recording format.

Step 4 : Windows typically offers options like ’16-bit, 44100 Hz (CD Quality)’, or ’16-bit, 48000 Hz (DVD Quality)’. You may have other options depending on your audio hardware. Just select the highest format available.

Step 5 : After selecting the desired recording format, click Apply and then OK to save the changes.
6. Close Apps Using Your Microphone
It’s also likely that background applications are using your microphone. For instance, if you’re trying to record something, Discord could be trying to access the microphone in the background. As such, it’s advisable to close any background apps that could be accessing your microphone. Here’s how to do that.
Step 1 : Click the Start button and search for Run . Then, click on Open to launch it.

Step 2 : Inside the Run window, type taskmgr , and press Enter or click on OK.

Step 3: The Task Manager will now be launched. Check for any applications that might be accessing your microphone. Simply right-click on an unwanted application and click on End task.

7. Enable Exclusive Mode
Additionally, it’s important to enable exclusive mode for your microphone on Windows as well. Exclusive mode grants the microphone exclusive access to the audio device, preventing other applications from accessing it simultaneously.
This, in turn, reduces potential conflicts and resource sharing, resulting in a smoother and more stable audio experience. Here’s how to enable exclusive mode for microphones on Windows.
Step 2 : Scroll down to the bottom and click on ‘More sound settings’.

Step 3 : Switch to the Recording tab in the popup window.

Step 4 : Right-click on your microphone and select the Properties option.

Step 5 : Now, switch to the Advanced tab.

Step 6 : Check the box next to ‘Allow applications to take exclusive control of this device’. Also, check the box next to ‘Give exclusive mode applications priority’.

Step 7 : Once done, click on Apply and then OK.
8. Update Microphone Driver
It’s also possible that your microphone in itself is in perfect condition. However, a faulty driver is why you can’t use it to its best ability. Outdated or incorrect audio drivers can cause microphone issues. To update your audio drivers, follow these steps:
Step 1 : Right-click on the Start button and select Device Manager.

Step 2 : Click on ‘Sound, video and game controllers’ to expand it.

Step 3 : Right-click on your microphone device and select Update driver.

Step 4 : Choose ‘Search automatically for drivers’. Windows will now automatically search and update to the latest drivers.

Once the process is complete, reboot your PC and try and use your microphone post that.
9. Turn on Microphone Enhancements
Using Windows, you can further tweak the quality of your microphone using some enhancements. These enhancements can be used to suppress the noise in the background as well as subdue the echo.

Step 3 : Click on the drop-down menu for Audio Enhancements, and select the enhancement of your choice.

For most users, it will be Device Default Effects. However, if you’re using an expensive microphone, you’ll also get options for Noise suppression and Acoustic echo cancellation.
10. Use Third-Party Apps
If you don’t have any Microphone enhancements available, fret not. You can use third-party tools for the same. If you have an NVIDIA RTX GPU, download the NVIDIA Broadcast tool for Windows. It offers various features such as Noise removal as well as Room echo removal. It further allows you to fine-tune the strength of these effects to ensure the final output doesn’t sound too robotic.

Download NVIDIA Broadcast
Alternatively, you can also try using Krisp AI. It uses artificial intelligence to remove background noise from your microphone. It works similarly to NVIDIA Broadcast, except it works across all platforms. While it has a paid version, try out the free version for up to 60 minutes of sound recording daily.
Download Krisp.AI
FAQs on Improving Microphone Quality
There could be several reasons your microphone barely picks up your voice in Windows 11. It could be due to a faulty connection, improper placement, or a lot of noise in the background. There’s also the possibility that the gain of your microphone is too low or other background apps on your PC are accessing it simultaneously as you recording.
You can test your microphone by heading over to the Sound settings and opening the properties of your mic. Speak into the microphone, and observe the volume bar to check if it registers your voice properly. You can also click on Device properties > Additional device properties > Test Microphone to run a test and listen to the playback.
Yes, microphone privacy is essential. Always be cautious of granting microphone access to unauthorized applications, and regularly review privacy settings to ensure your microphone is not misused.
Sound Better With These Fixes
Following the steps outlined in this guide, you can achieve better microphone sound quality, whether for communication, recording, or other audio-related activities. Now that your microphone is optimized, here’re various ways to improve the audio quality of Windows 11 speakers .
Was this helpful?
Last updated on 02 August, 2023
The above article may contain affiliate links which help support Guiding Tech. However, it does not affect our editorial integrity. The content remains unbiased and authentic.
Leave a Reply Cancel reply
Your email address will not be published. Required fields are marked *

The article above may contain affiliate links which help support Guiding Tech. The content remains unbiased and authentic and will never affect our editorial integrity.
DID YOU KNOW

Varun Mirchandani
More in windows.

How to Customize Lid Close Action and Settings in Windows 10

How to Count Number of Files or Subfolders Inside a Folder
Join the newsletter.
Get Guiding Tech articles delivered to your inbox.
Microphone Test

Our Favorite Microphones

This is a simple online microphone test so you can check whether your microphone works correctly. It's great before you start a Zoom call or any other video or audio-only call that requires a working microphone to be connected to your desktop or laptop computer. To begin the mic test, simply click the 'Start Test' button above.
User Reviews
See what some of our users are saying:
Microphone Test Before Zoom Call
"I used this microphone test to quickly check if my webcam and mic are working before jumping on a Zoom call. Very simple and useful!" - ★★★★★ - James
Quick Mic Test
"This mic test was quick and painless. Ideal for a fast mic check before having a call." - ★★★★★ - May
Problem Solved
"This simple microphone tester detected that my mic wasn't enabled. Problem solved!" - ★★★★★ - Jo
"I checked my mic with this micrphone test tool. All is well!" - ★★★★★ - Mike
Simple Microphone Test
"Simple mic test that just works. 5 stars." - ★★★★★ - Michael
Fixed Microphone
"My microphone somehow wasn't working so I had it tested with this online mic test." - ★★★★★ - Gemma
Microphone Check
"Needed a few microphones checked and this site let me choose each one for testing. Great!" - ★★★★★ - Linda
"Useful little site. Works great!" - ★★★★★ - Liu
Fast & Easy Microphone Test
"The microphone test I did worked perfectly and it was fast and easy." - ★★★★★ - Maya
"Easy mic check and test. 5 stars." - ★★★★★ - Nina
5 Stars - Great!
"I wish other sites would be so straightforward and simple to use." - ★★★★★ - George
Tested Laptop Microphone
"Loved it, used to test microphones connected to my laptop." - ★★★★★ - Vicky
PC Computer Mic Test
"Microphone test on desktop computer done, it works!" - ★★★★★ - Sophie
You can read our latest blog posts here:
HyperX QuadCast USB Microphone Review (2023 Update)
HyperX QuadCast USB Microphone HyperX QuadCast – USB Condenser Gaming Microphone, for PC, PS4, PS5 and Mac, Anti-Vibration Shock Mount, Four Polar Patterns, Pop Filter, Gain Control, Podcasts, Twitch, YouTube, Discord, Red LED Product Overview The HyperX Quad Cast is the ideal all-inclusive standalone microphone for streamers, podcasters and gamers that are looking for a […]
MAONO USB Microphone Review (2023 Update)
MAONO USB Microphone MAONO Computer Microphone for PC, All in One USB Mic 192kHz/24bit with Metal Pop Filter, Tripod, Gain Knob & 0-Latency Monitoring for Zoom Meeting, Podcasting, Streaming, YouTube, Voice Over, Gaming Product Overview This podcast microphone is a classic microphone launched by MAONO. It is plug and play, easy to install and set […]
Razer Seiren Mini USB Microphone Review (2023 Update)
Razer Serien Mini USB Microphone Razer Seiren Mini USB Condenser Microphone: for Streaming and Gaming on PC – Professional Recording Quality – Precise Supercardioid Pickup Pattern – Tilting Stand – Shock Resistant – Classic Black, White or Pink Product Overview With the Razer Seiren Mini, big sounds can come in small packages. Introducing our ultra-compact […]
Webcam Test added
We are proud to announce that we have added a webcam test to our site. With this test you can prepare for video calls, e.g. Zoom calls, by testing both the video feed and quality, as well as your microphone.
Coming Soon: Webcam Test
We are working on a webcam test for our users, as we’ve seen quite a lot of demand for it in addition to our microphone test. So stay tuned, we will be releasing our webcam test very soon!
How this Microphone Test works
You may be wondering how our microphone test works. It’s quite simple. First, when you arrive to our site, you are requested to grant access to your microphone so that we can check it. Then our site checks whether a microphone is connected and can be detected, followed by a sound and volume check. If all is well, you will see that your microphone is working. If not, you will receive an error message telling you what happened.
Welcome to Test-Microphone.com
We built this simple yet powerful online microphone test tool so that anyone can quickly test their mic anytime and from anywhere without fuss. We are proud that our microphone test is quick, simple to use, and without unneccessary complications or complexities. It just works.
© 2022 test-microphone.com
- Latest News
- Headphones Reviews
- IEMs / Earbuds Reviews
- DAC / AMP Reviews
- Digital Audio Player (DAP) Reviews
- Headphone Fundamentals
- Learn: Headphones DIY / Modifications
- Audiophile Acronyms and Abbreviations That You Should Know
- [Glossary] Common Audio Technical Terms That You Should Know
- [Glossary] An Audiophile Guide to Describing Sound
- How to Measure Headphones and IEMs
- Best Headphones for Audiophile
- Best Headphones for Entertainment
- Best Headphones for Gaming
- Noise-cancellation Headphones Reviews
- Best Headphones for Productivity
- Best Headphones for Workout
- Headphones Power Calculator
How to Use Headphones With Built-in Mic on Your Windows 10 PC
We independently review all our recommendations. Purchases made via our links may earn us a commission. Learn more ❯
A comprehensive guide on how to set up your headphones with built-in mic on a Windows 10 PC. Plus, the common issues you may encounter and how to fix them.
Imagine this: you got a new pair of headphones with a built-in microphone. So, you excitedly plug them into your PC to start your day full of online classes, calls, or game chat. But no matter what you do, no one can hear you!
No one likes having their communications interrupted, especially when you really need to be heard. There’s no denying how frustrating it is when instructions aren’t getting through to the other side.
This is especially agonizing when the issue only happens when you use your headphones or earbuds with your PC.
Don’t worry! Even with the best headphones, you won’t get the best mic input experience till you’ve set it up properly. So, before you make any hasty decisions, here’s a guide for a few quick solutions you can do to use headphones with a built-in mic on your Windows 10 PC.

How to Use Headphones With Built-in Mic on Windows 10 PC
How to enable/disable your headset mic in windows 10, how to adjust the headset microphone volume on windows 10 pc, how to test your headset microphone on windows pc, troubleshooting headphones mic issues on windows pc.
With working-from-home becoming the default practice, headsets with built-in mics have become a necessity. But not all headsets are plug-and-play; sometimes, you may need to do some settings tweaks to make them work properly. This is especially so for Windows 10 PCs.

With Windows 10, you can configure multiple devices simultaneously and customize your sound settings for different events. However, this sometimes causes your PC to be confused with which device to use for certain settings: like the mic input.
That’s why, if your headphones’ microphone isn’t working , it’s most probably because your Windows PC doesn’t recognize it as the default input device.
Here’s how you can set your headset as the default device:
- Ensure your headsets (wired/wireless) and all their components are properly connected. If you need help on this, make sure to check out our guides on how to connect your wired or wireless headphones to a PC.

If your headphones are already set as your default input device but it still doesn’t work, it may be because it’s disabled in your sound settings.
You can do this in two ways:
- Using the Device properties – For enabling and disabling your headphone mic if it’s currently set as your default input device.
- Using the ‘Manage sound devices’ option – For when you want to enable/disable one or more mics.
Using the Device properties

Using the ‘Manage sound devices’ option
If you want to enable or disable one or more mics, you can use these steps:

- Repeat steps 3 and 4 to disable multiple microphones. Upon completing the above steps, Windows 10 and apps will not have access to the mics disabled.
Of course, the default mic settings on your Windows PC may not be enough to please everyone. That’s why Windows allows users to finetune the mic volume manually. This is great for when the headphones are working, but your teammates still can’t hear you properly.
If you wish to tweak the current microphone input volume, follow these steps:
- Go to “ System ” on your Settings tab.

Don’t be too quick to pass judgment on your headset just because the mic doesn’t seem to work properly on your Windows PC. There are other factors to consider (e.g., headphones compatibility, hardware issues, connectivity, etc.). You wouldn’t want to throw them away prematurely.
That’s where testing your headphones’ microphone plays a key role.
Testing eliminates these unknowns and identifies the key fault with your headphones’ microphone.
There are three main methods you use to test your headphone microphone on Windows 10 PC:
Windows mic test
Sound recording test, mic monitoring.
The Windows mic test is the most straightforward solution to testing your microphone issue.
This can help you check if the headphone mic set up is configured correctly. It’s exceptionally useful when multiple devices are connected to the Windows PC. You can isolate your input device and test them out.

Sound recordings are a good indicator for measuring the clarity and amplitude of the sound recorded from the microphone. Based on the quality of the recording, you can make the adjustments to your PC settings accordingly.

- If the recording isn’t clear, the issue likely lies with the app. However, if the recording cuts out or sounds choppy, the issue may lie with the hardware. Test your headphone mics on another computer to see if the same issue persists.
Mic Monitoring is one of the oldest features around for Windows that allows you to hear yourself accurately. Most gamers and gaming brands use this to develop their devices. However, most people are unaware of this feature.
With mic monitoring, you can monitor if your voice is loud enough or clearly communicated to others through your headphone mics.
Here’s how to enable Mic Monitoring on PC for headphones with in-built mics:

- To disable Mic Monitoring, uncheck the “Listen to this device” option.
Now, if you find that your headset mic is unsatisfactory after the mentioned tests, you can take more advanced routes to troubleshoot your headset mic on Windows 10.
Allow apps to access your microphone
Update sound driver.
- Use the Windows Troubleshooter
Try a different headset
Your default privacy settings can prevent your apps from automatically accessing the built-in mic. Hence, some settings modifications are required to grant microphone access to your system and apps:

Most drivers for Windows 10 are automatically downloaded and updated through the periodic Windows Updates. However, you can still manually update your sound driver to be sure:

Use the Windows troubleshooter
The Windows Troubleshooter is your trusted aide whenever you encounter issues with Windows 10 PCs – especially for sound/mic-related problems.

- Allow the troubleshooter to run and answer any questions that appear. If no changes or updates were necessary, you could try out the recovery options .
If you’ve exhausted all our abovementioned suggestions, it could be a hardware issue. However, before jumping to the conclusion that you have a faulty headset, make sure you test them first (to be safe).
To do this, you can connect other sets of headphones to your computer to confirm that it’s a headphone issue. Or, try the same pair of headphones on a different device.
Being able to use your headphones with built-in mic on your Windows 10 PC can have a great impact on the quality of your online meetings or even gaming.
With your headset mic properly working, you can now go through your daily online tasks with ease.
Which of these suggestions solved your headset mic issue? Are there any other solutions you can think of? Tell us more via the comments section below.
💬 Conversation: 1 comment
Thank you. Finally the listen feature allowed me to see that even if my microphone won’t test it is working. 🙂 I think, we will find out at 9am.
Leave a Reply
Related articles.
- The Best Tech Gifts Under $100
- Traveling? Get These Gadgets!
How to Fix It When a Windows 11 Microphone Is Not Working
Check that the mic isn’t muted or disconnected, then confirm mic permissions and see if it needs a driver update
:max_bytes(150000):strip_icc():format(webp)/matthew.s.smith.biopic-075658983c0849d5b7b0e849f94070cc.jpg "make my mic work")
- Beloit College
:max_bytes(150000):strip_icc():format(webp)/jonfishersquare-93eb80e77a004035887f56816d3623c5.jpg "make my mic work")
- Wichita Technical Institute
In This Article
Jump to a Section
- Fixes for a Headset Mic
- Realtek Mic Fixes
- Frequently Asked Questions
This article explains how to fix it when a Windows 11 microphone is not working.
Why Is My Windows 11 Microphone Not Working?
Your Windows 11 microphone may not work a variety of reasons. The most common include:
- Microphone is turned off.
- Microphone isn't connected or loosely connected.
- Audio input is muted on your Windows 11 PC.
- Audio input is muted on your headset or microphone.
- The incorrect microphone is selected in Windows.
- Missing device drivers.
- Faulty microphone hardware.
How to Fix a Microphone in Windows 11
Follow these steps to troubleshoot your microphone:
Check that your microphone or headset is not muted by a button or setting physically on the device.
Microphones will often have a mute button on the microphone itself (if it's an external microphone) or on your PC's keyboard (if it's an integrated microphone).
Headsets may have a button. Some may automatically mute when the built-in microphone is folded or retracted.
If your Bluetooth headset's mic and audio aren't working, reconnect the headphones to your computer . This is a common problem for some people on Windows 11 that usually occurs because the headset enters into sleep mode.
If you have a wired microphone, ensure that it's properly plugged in. If it is, remove it from its port and attach it again a few seconds later to "reboot" Windows' connection to it.
Make sure the app has permission to use your mic. There are two things to do here:
- Go to Settings > Privacy & security > Microphone . Ensure Microphone access is on and the toggle next to the app (if you see it) is turned on so it can access your mic.
- Open the app you want to use the mic with. Confirm that the correct mic is chosen.
Right-click the speaker icon on the Windows taskbar and then select Sound settings . You can also access this through the Windows 11 Settings app.
A window will open. Look for the Input section and examine the list of input microphones available. Check that the microphone you want to use is selected. If not, select it.
If the microphone still is not working, select it in the Sound settings menu opened in the prior step. This will open additional options.
Under General , check to see if the microphone is allowed. If it says Don't allow , then it's turned on.
Also, check that the Input volume is turned up.
If the problem persist, right-click the speaker icon on the taskbar. Follow the directions in the Get Help app that opens to run through some automated sound troubleshooters.
Install any pending Windows updates . This should fix known bugs that could be causing Windows 11 mic problems.
Open Device Manager and expand Audio inputs and outputs . The microphone input you intend to use should be listed. If it is, try these solutions. Check if the microphone is working after each one.
- Right-click the input device you want to use and select Update driver . Follow the on-screen instructions.
- Right-click the input device and select Disable device . Then right-click it once more and choose Enable device .
- Right-click the input device and select Uninstall device . Then tap Action in the Device Manager menu and select Scan for hardware changes . This will reinstall the device (reboot if it doesn't).
Connect and use a different microphone.
These troubleshooting steps should resolve the problem in most situations.
If it persists even after connecting a different microphone, however, the problem is most likely a fault deep in Windows or a fault with the audio hardware in your PC.
You can reset Windows in a final attempt to fix the problem, but, as always, you should back up Windows before you proceed.
Why Does My Headset Work But Not My Mic?
This is likely because the microphone isn't selected in Windows. The troubleshooting steps above will help you find and select the correct microphone.
If the mic doesn't appear as an option, it likely isn't connected to your Windows 11 PC, the connection is faulty, or the microphone is faulty.
How Do I Fix My Realtek Mic Not Working?
Realtek is a company that makes audio hardware found in many Windows PCs. A computer with a Realtek audio solution will have a Realtek audio input listed in Windows. This controls the PC's 3.5mm audio input.
If the Realtek audio input doesn't appear in Windows, or it doesn't work even with a microphone securely connected to the audio input port, you probably need to download Realtek's latest audio driver update .
If your mic isn't working in Windows 10, it could be due to faulty hardware, missing device drivers, audio input being muted, and more. Some fixes for when your microphone isn't working in Windows 10 include running the Windows 10 troubleshooter, checking your mic's mute button, checking Device Manager to make sure your PC can detect your mic, disabling other Bluetooth devices, and more.
If your mic isn't working on Discord, there can be issues with settings and connections. To troubleshoot the problem, try restarting your PC; when Discord starts back up, go to User Settings > Voice & Video and click Reset Voice Settings . If this doesn't solve the problem, go to Voice Settings and change the input device from Default to your specific microphone. Also, try switching your Discord voice settings Input Mode from Voice Activity to Push to Talk .
If your mic isn't working on Xbox, there could be a software glitch or physical damage to the microphone. To fix a mic that's not working on Xbox , try disconnecting and reconnecting the Xbox mic. Also, make sure the mic isn't muted or that team members haven't muted you. Try increasing the mic volume, testing the mic with other devices, and updating the Xbox One's controller firmware .
Get the Latest Tech News Delivered Every Day
- How to Fix the Microphone on an HP Laptop
- How to Set up and Test a Microphone in Windows 10 or Windows 11
- How to Fix It When a Lenovo's Mic Is Not Working
- How to Turn On the Microphone on an Android Phone
- How to Fix It When a Windows 10 Microphone is Not Working
- How to Fix It When a Lenovo Laptop Isn't Working
- No Sounds on Windows 11? Here's How to Fix It
- How to Fix It When Your Xbox Series X or S Mic Isn't Working
- How to Fix An Xbox One Mic That Isn't Working
- How to Fix It When a Laptop Microphone is Not Working
- How to Use the Meta (Oculus) Quest Microphone
- What to Do When Windows 11 Can't Connect to a Network
- How to Fix It When a Zoom Microphone Is Not Working
- How to Increase Mic Volume in Windows 10
- How to Fix a Computer That Turns On and Then Off
- How to Fix It When Your Surface Pro Camera Is Not Working
How to Use Headset Mic on a PC with One Jack in Windows 11
Learn how to seamlessly use your headset's microphone on a PC with a single audio jack in Windows 11. Our comprehensive guide covers both TRRS and TRS headsets, ensuring you can enjoy clear communication and immersive audio without hassle.

Have a headset with a mic that is still rocking separate connectors? Or do you have a headset with a mic with a single connector but still aren't able to capture your voice via it? Whatever issue you are facing, this guide will resolve all of them.
If you have a headset cable that has two connectors . You can get an audio splitter that has two female ports on one end that will accept both microphone and speaker connections from your headset, and a TRRS (audio jack) plug on the other end, which you can connect with the single jack on your PC.
You can still use your headphones with two connectors without the audio splitter. The only caveat is you will either be able to hear from the headset speaker or record your voice through the mic, depending on which connector you insert in the PC jack.
For instance, you can insert the mic connector in the PC and change the audio input device from the Settings app (if needed). You can now speak into the headset to let other people hear you, while you can hear them via computer speakers. It is definitely not pretty, but a workaround that can get you out of a tricky situation.
If you have a headset with a mic that has a single connector , but you are still not able to capture sound from it, use the below-mentioned method to change the input device on Windows.
Change the Audio Input Device in Sound Settings
Suppose the headset mic is not working even after connecting it properly to your PC. You might need to change the default input audio from the Settings app.
- Head to the 'Settings' app from the Start Menu.

- Ensure you have selected the 'System' option from the left sidebar.
- From the right section of the screen, select the 'Sound' option.
- Select 'Headphone Microphone' under the 'Input devices' section.
The Windows shall now capture all the sound from the headset mic.
You can also test the Mic
- Click on the selected input device tile on the 'Sound' settings screen.
- On the subsequent screen, click on 'Start Test'. Once the test has started, speak into your microphone to let Windows perform an assessment.
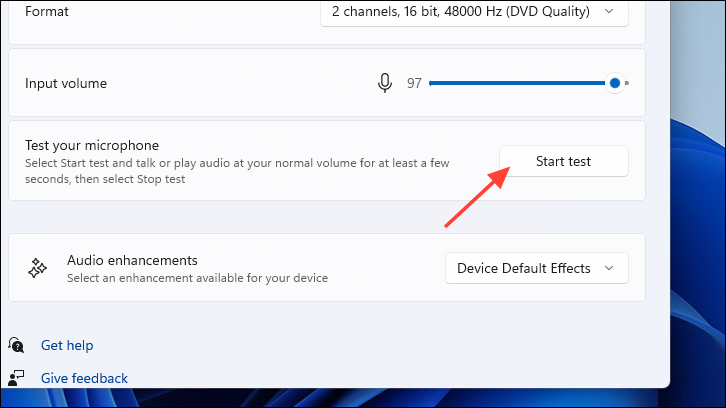
- Windows will automatically stop the test and display how efficiently the microphone is capturing the sound. The higher the percentage, the louder and clearer you will sound to the other person.
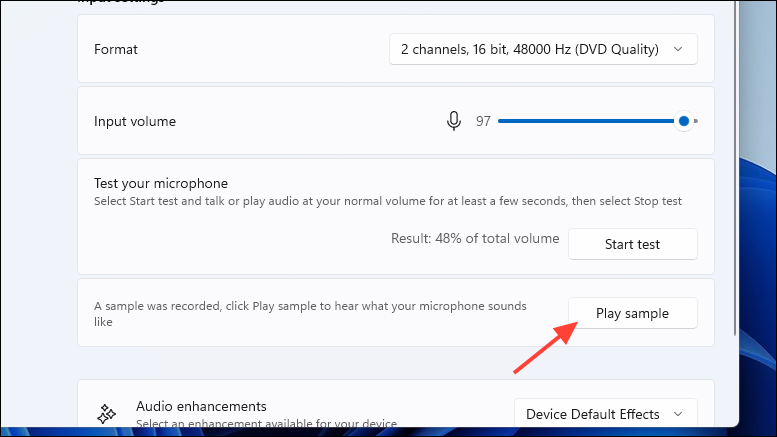
- If you wish to listen to the recorded audio of your microphone, click on 'Play Sample'.
If you have an older headset with a mic that has two connectors and you are not yet ready to part ways with it, your best option is to get an audio splitter. If you were not able to capture voice using the headset mic, hopefully, the methods mentioned above helped you resolve the problem.
How to Use Gemini Code Assist in VS Code

How to Code Using AI

Microsoft Copilot Pro Review: There is a lot of Unrealized Potential
Get all the latest posts delivered straight to your inbox., member discussion.

How to Disable Ads in Windows 11 Start Menu

Why You Should Consider Switching to Linux After Windows 10 Support Ends

What to Do After Microsoft Ends Support for Windows 10?

How to Quickly Install Your Apps on a New Windows PC

How to Transfer to a New PC Using Windows Backup
How to Fix Roblox Voice Chat Not Working on Windows
It's frustrating if you can't hear your friends (or your friends can't hear you) while playing with them on Roblox. Here's how you can fix the issue.
The voice chat feature has revolutionized how users interact with other Roblox players. There are times, however, when the feature becomes problematic and hamper communication within the game.
Several factors can cause voice chat to stop working in Roblox: disabling the feature by mistake, muting your microphone or friends accidentally, choosing the incorrect input and output audio devices, web browser conflicts, operating system restrictions, hardware issues with your audio devices, and more.
Whether you aren't hearing from your friends or they aren't hearing from you, here are fixes and checks that may help you out.
1. Basic Checks and Fixes
Start the troubleshooting process by performing the following basic checks and fixes:
- Restart Roblox and your computer to ensure a temporary glitch hasn't caused the problem.
- Unplug and reconnect your audio input and output devices.
- Close the other apps running in parallel with Roblox that might be using your microphone or speaker concurrently, especially if you're using one of the best voice chat apps for gaming .
- If you have more than one audio input and output device plugged into your device, consider unplugging all except the ones you plan to use for Roblox.
If none of the above checks resolve the problem, continue with the remaining steps.
2. Check for Device-Specific Issues
Check whether the issue persists only on Roblox or throughout your operating system. It will help determine if your operating system settings interfere with Roblox's voice chat feature.
First, ensure your audio input and output devices are correctly connected to your computer and detected by your operating system. To check that, go to Settings > System > Sound .
Here, select the correct audio output device (if you have more than one connected), click on the device to reveal its settings, and then click Test under Output settings .
Has your primary output device made a sound? If yes, it's connected!
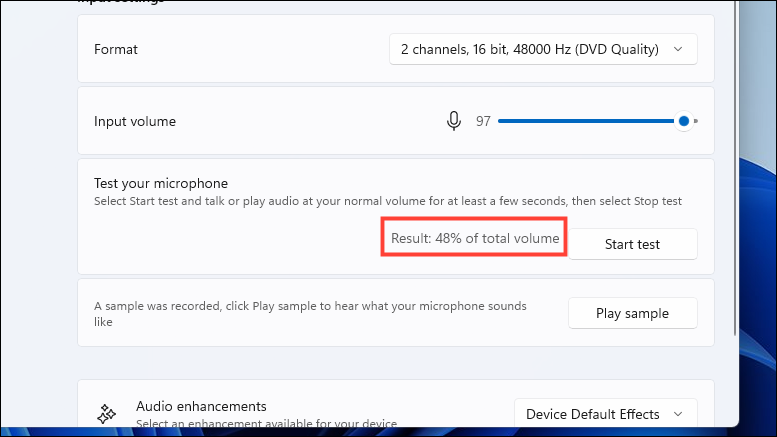
Afterward, go back to the Sound settings page, select the correct microphone, click on the primary microphone device to access its settings, and then click Start test under Input settings .
Click on the Stop test button after speaking for a few seconds. If you see any percentage of the recorded volume next to Result , your microphone is connected.
After confirming that both audio devices are connected, you should ensure both are set as default. To check that, click on More sound settings on the sound settings page.
Then, go to the Playback tab, right-click on your primary audio output device, and select Set as Default Device .
Then, go to the Recording tab, right-click on your primary audio input device, and select Set as Default Device .
If your audio input or output device isn't working with other apps, too, there could be a problem with your device. To diagnose and resolve the primary issue, see our guide on how to fix a microphone and troubleshoot other sound problems on Windows .
3. Ensure the Voice Chat Feature Is Enabled in Roblox
Voice chat isn't available for all Roblox accounts. Only users who are 13+ and have verified their age can access it. You won't see this feature in Roblox settings if you aren't old enough or haven't verified your age.
If you meet the age requirements but haven't verified your age yet, you can find instructions on verifying your age and setting up voice chat on the Roblox website . If you have already activated the feature by verifying your age, make sure the feature is enabled.
To check that, log in to your Roblox account, click on the gear icon in the top-right corner, and select Settings .
Then, navigate to the Privacy tab and check that the Enable voice chat toggle is on.
4. Ensure the Roblox Experience Supports Voice Chat
As of this writing, most Roblox experiences don't support voice chat, so you cannot use this feature when playing them. If the voice chat feature is already enabled in Roblox settings, find out whether the experience where voice chat isn't working supports it.
An easy way to confirm that is to simply ask other players if they use voice chat in that experience. If that is not possible, you can check the experience's listing on Roblox to confirm this.
If the experience does not support the feature, you can wait for the developer to add it in future updates. If the experience supports this feature but doesn't work on your end, then some other issue might be at play.
5. Check for Misconfigured Game Settings
To ensure incorrect game settings haven't caused the problem, follow these steps:
- Launch the experience where you are unable to use voice chat.
- Navigate to the Settings tab.
- Ensure the correct audio devices are selected next to the Input Device and Output Device fields.
- Lastly, return to your Roblox experience and look over your character's head. If you see a microphone with a slanted line over it , the microphone is muted. Simply click on it once to unmute it.
6. When Nothing Else Works…
If none of the above fixes resolves the issue, and you are still unable to make voice chat work, here are some other solutions you can attempt:
Switch the Roblox Client
You can play Roblox on Windows through the Microsoft Store app or the Roblox launcher. If you are experiencing this issue on one of these clients, try the other you haven't tried yet. If switching clients fix the problem, the issue is with the other client where the feature isn't working. If this occurs, you should uninstall the problematic client and reinstall it.
Report the Problem to Roblox Support
If switching the client doesn't work and the problem persists, contact Roblox support so they can investigate the issue. If you haven't contacted customer support before, refer to the Roblox website for instructions on contacting them.
Get Back to Voice Chatting With Your Friends on Roblox
Being unable to use voice in Roblox despite activating it after much effort can be frustrating. If you have correctly activated voice chat on your account, the feature is enabled in Roblox settings, and the experience you're running supports it, the above fixes will likely resolve the issue. If the problem persists, contact Roblox support as a last resort.
How-To Geek
How to configure your microphone and headset in discord.
Discord is great for voice chat while gaming, but bad voice quality can ruin the game. Configure your input device for crystal clear sound.
Quick Links
How do you adjust your microphone in discord, key takeaways.
To configure your microphone and headset in Discord, click the gear icon, and then select the "Voice & Video* tab. Change the settings under "Input Device" to configure your microphone, or change the settings under "Output Device" to configure your headset.
Discord is great for voice chatting, but you might have to change some settings to fix static, background noise, and poor audio quality. Here's how to choose your sound devices and make sure you're coming in crystal clear.
In Discord, open the Settings menu by clicking on the cog icon next to your name and avatar in the bottom left.
In the Settings menu, under "App Settings", select the "Voice & Video" on the left. This will bring up the menu where you can change the settings for your microphone or headset.
To choose which microphone or headset Discord should use, open the drop-down menu under "Input Device". Select the device you're trying to configure. If you choose the default setting, Discord will defer to whichever microphone is set as the default for your operating system .
If your microphone is coming through too loud, click and drag the slider under "Input Volume" to an appropriate level. You can test the volume and quality of your current microphone or headset by clicking the "Let's Check" button under Mic Test.
By default, Discord will activate your microphone when it detects noise. You can change this setting to push-to-talk, which will instead activate your microphone only when you decide to push the corresponding key. Change this setting by checking the box for either "Voice Activity" or "Push To Talk."
If you selected "Voice Activity", you can adjust the sensitivity of this setting. Discord automatically determines mic sensitivity by default, but you can turn this setting off by clicking the toggle. Then adjust the slider to be more or less sensitive.
If you selected "Push To Talk", select which key activates your mic by clicking "Record Keybind" under "Shortcut". Use the slider under "Push To Talk Release Delay" to increase or decrease the time delay between when you release the push-to-talk key and when your mic actually deactivates. Lastly, you can add additional push-to-talk shortcut keys by clicking "Keybind Settings".
Additional voice settings are available under the "Advanced" tab, which you can access by scrolling down this menu. Echo Cancellation, Noise Suppression, Automatic Gain Control, and Quality of Service are all enabled by default. We recommend leaving these settings enabled unless they are otherwise interfering with your existing setup. If Krisp is not enabled for some reason, you should enable it — it does a great job at filtering out background noise without distorting your voice.
Finally, use the "Attenuation" setting to make it easier to hear your friends or yourself when speaking. Raise the slider to increase how much Discord will lower the volume of your other applications. This will apply to you or others in the channel, depending on how you set the two toggles beneath.
Remember that your voice will only sound as clear as your microphone. Whether it's a headset, a desktop microphone, or built right into your device, these settings will help you attain better sound quality through Discord.
Delta - Game Emulator 4+
All-in-one gba4ios successor, testut tech, designed for iphone.
- #1 in Entertainment
- 4.9 • 12.1K Ratings
iPhone Screenshots
Description.
Delta is an all-in-one emulator for iOS. Delta builds upon the strengths of its predecessor, GBA4iOS, while expanding to include support for more game systems such as NES, SNES, N64, and DS. FEATURES Supported Game Systems • Nintendo Entertainment System • Super Nintendo Entertainment System • Nintendo 64 • Game Boy (Color) • Game Boy Advance • Nintendo DS • And plenty more to come! Controller Support • Nintendo Switch Pro controllers, Joy-Cons • Nintendo Switch Online controllers (NES, SNES, N64) • PS4, PS5 • Xbox One S, Xbox Series X • MFi game controllers • Bluetooth & wired keyboards Save States • Save and load save states for any game from the pause menu. • Lock save states to prevent them from being accidentally overwritten. • Automatically makes backup save states to ensure you never lose your progress. • Support for “Quick Saves,” save states that can be quickly saved/loaded with a single button press (requires external controller). Cheats • Supports various types of cheat codes for each supported system: • NES: Game Genie • SNES: Game Genie, Pro Action Replay • N64: GameShark • GBC: Game Genie, GameShark • GBA: Action Replay, Code Breaker, GameShark • DS: Action Replay Delta Sync • Sync your games, game saves, save states, cheats, controller skins, and controller mappings between devices. • View version histories of everything you sync and optionally restore them to earlier versions. • Supports both Google Drive and Dropbox. Custom Controller Skins • Beautiful built-in controller skins for all systems. • Import controller skins made by others, or even make your own to share with the world! Hold Button • Choose buttons for Delta to hold down on your behalf, freeing up your thumbs to press other buttons instead. • Perfect for games that typically require one button be held down constantly (e.g. run button in Mario games, or the A button in Mario Kart). Fast Forward • Speed through slower parts of games by running the game much faster than normal. • Easily enable or disable from the pause menu, or optionally with a mapped button on an external controller. 3D/Haptic Touch • Use 3D or Haptic Touch to “peek” at games, save states, and cheat codes. • App icon shortcuts allow quick access to your most recently played games, or optionally customize the shortcuts to always include certain games. Game Artwork • Automatically displays appropriate box art for imported games. • Change a game’s artwork to anything you want, or select from the built-in game artwork database. Misc. • Gyroscope support (WarioWare: Twisted! only) • Microphone support (DS only) • Support for delta:// URL scheme to jump directly into a specific game. **Delta is in no way affiliated with Nintendo. The name "Nintendo" and all associated game console names are registered trademarks of Nintendo Co., Ltd.**
Version 1.5.3s
• Pre-fills game name in Games Database search field • Fixed using touch screen when AirPlaying DS games • Hides "Genesis" controller mapping while Genesis support is in beta Thanks so much for using Delta! Glad to see everyone enjoying their favorite retro games :)
Ratings and Reviews
12.1K Ratings
Exceptional, best vintage emulator on the App Store!
It’s really cool to think how far we have came in terms of gaming in the last 20 years. 7 systems seamlessly on 1 device is just… amazing. This application brings so much joy to me, playing my childhood DS games. I ended up losing all of my childhood games on a flight when i was about 12 years old, and since then had been wanting to play the games again. I ended up loading all the games that I had lost into my library on the application 🥹 There are no bugs and the AirPlay integration is so cool, it just has a bit of an input delay. One thing I wish was changed: when AirPlay is being used with a controller on DS games, the “lower-half” of the DS screen is not displayed, which is quite annoying. I think the expected behavior should be to have the “top-half” screen shared to the AirPlay device, while the “bottom-half” touch sensitive screen is present on the phone, so it is still able to be used. Regardless, this app is the best thing to hit the app store and to hit the gaming industry in a really long time, and I’m excited to see how much further the developers can go with it in terms of devices and functionality. I will happily make a Patreon donation to promote the development of this application. :)
Exceptional Emulator with a Slick Interface – Delta!
//1. I've been using the Delta emulator on my device, and I must say, it's an absolute joy. The interface is clean and uncluttered, which makes navigating through settings and games an effortless experience. //2. There are no annoying ads to disrupt the gaming session, and the smooth operation enhances every aspect of gameplay. The convenience of the emulator is top-notch, thanks to its intuitive controls and compatibility with a wide range of game formats. It brings back all those nostalgic moments flawlessly, running classics without a hitch. //3. However, there's one feature that would make Delta even better — expanded cloud sync options. Currently, it supports Google Drive and Dropbox, which works well but integrating iCloud sync would be a game-changer for iOS users. This addition would streamline game data management across all Apple devices, making it much more accessible and secure. //4. In conclusion, Delta is a superb emulator that offers a premium nostalgic gaming experience. If iCloud support were added, it would undoubtedly be the perfect package. Highly recommended for anyone looking to relive their favorite gaming memories on the go!
This is VICTORY embodied.
2014 was a year for emulators on iOS. We had GBA4iOS and iNDS especially. Just a couple from what would be so many emulators later on. The Digital Markets Act finally let Delta release on the App Store recently. This is a victory on every freaking level that basically means Apple’s iron cage is softening up. We need to keep this momentum from legislatures against Apple’s monopoly. This is genuinely the case where fighting the “security” guidelines means we get to have more fun. Delta’s just a Nintendo emulator. Imagine if PPSSPP finally released officially to the App Store? God of War on iOS for everyone? I’m playing DKC 1 and 2 right now on Delta, and I don’t have to worry about stupid revokes every few hours after an install just to enjoy the games I played years ago. This is a victory for all of us. For anyone who wasn’t around so early on when this was the expectation around downloading this kind of app - be grateful to never experience an annoying popup about a certificate from random places in the world isn’t the end of your fun and save states for weeks/months.
App Privacy
The developer, Testut Tech , indicated that the app’s privacy practices may include handling of data as described below. For more information, see the developer’s privacy policy .
Data Not Collected
The developer does not collect any data from this app.
Privacy practices may vary, for example, based on the features you use or your age. Learn More
Information
- Developer Website
- App Support
- Privacy Policy

Game Controllers
Play this game with your favorite compatible controller., you might also like.
Sony Rewards
Paperback - A Komga Client
MyAnimeList Official
Destiny Item Manager
Warzone Loadout CODMunity
Xbox Game Pass
IMAGES
VIDEO
COMMENTS
Select Start > Settings > System > Sound. In Input, select the microphone that you want to test. In Input settings, look at Input volume while speaking into the microphone. If the bar moves while you speak, your microphone is working properly. If don't see the bar moving, go to Test your microphone and select Start test.
Step 1. In some cases you will not see a line before making a relatively loud sound into the microphone. Try that and see if the line appears. Step 2. Reload the page and try again. In many cases that solves it. Step 3. If nothing helped please check if your microphone is connected. If you do see a line but the line isn't moving, then your mic ...
If Your Microphone Still Doesn't Work If your microphone still doesn't work, there may be a hardware problem. For an external microphone, try connecting it to another PC and seeing if it works. If it doesn't, the microphone hardware might be broken. If the microphone does work on another PC but not on your current PC, it's possible there's an ...
To access app permissions, follow the steps below: Open the Start Menu. Type microphone privacy settings and select that result. On the microphone privacy Settings page, make sure the Allow apps to access your microphone option is turned on. (It's called Let apps access your microphone in Windows 11.)
Right click your microphone, and click Properties. Click Levels. If the microphone icon has a crossed out red circle next to it, click it to unmute. If the microphone level and boost are set low in this menu, slide them to full and check to see if that helps. Make sure the correct microphone is set as the default.
In the Sound window, switch to the "Recording" tab to see microphone settings. Select the microphone you want to use and then click the "Configure" button. In the Speech Recognition window that opens, click the "Set Up Microphone" link. And while this tool is geared toward speech recognition, setting up your microphone here can also help ...
In Zoom, click the Gear icon on the right side to open its settings, then switch to the Audio tab. Under Microphone, you should see the Input Level move when you speak. Click Test Mic to record yourself briefly and see how it sounds. Use the dropdown box to swap your mic input to another device if needed.
Change your Windows sound settings. Look under Input in the Windows 10 sound settings to make sure the mic you want to use is selected and enabled. Increase the mic volume. In the sound settings, select Device properties under your mic selection to make sure the volume on your mic is turned on. Disable other Bluetooth devices.
Win 11: Plug in mic and go to Start > Settings > Sound > Microphone. Choose device > select right arrow next to it. Win 10: Plug in mic, right-click speaker icon > Sounds. Set it as a default device under Recording. If you're using a USB mic with driver software, install that first, and then restart your PC.
Step 1: Right-click on the speaker icon in the system tray and click on Sound settings. Step 2: Under the Input section, click on the arrow next to your microphone. Step 3: Click on the drop-down ...
Right-click the speaker icon on the lower right side of your screen, and click Sound settings. Scroll down to Input and select your headset.u000b. On Windows 10, select Device properties instead, then click Test under the Volume slider. Look for Test your microphone and click on Start test.
The good thing about Windows' mic management is that you can allow and deny access to your mic to any app. This way, you can let your trusted apps use the mic while denying access to all other apps. Enable Microphone Access on Windows 10 To start using your mic on Windows 10, first, launch the Settings app by pressing Windows+i.
When you click the "Test my mic" button, your browser will ask permission to start the microphone on this site. Once access is granted, the microphone will start up and you will see the visualizer of sounds captured by your mic. The tester starts to record your voice and any noise captured by your mic.
Microphone not working in Windows 10? This video will show you how to fix mic problems on Windows 10 PC/Computer, including if your mic isn't working, is too...
Do you want to make sure your microphone is working properly before you join an online meeting or chat? Try our easy and fast online microphone test tool that lets you check your mic quality and volume in seconds. No need to download or install anything, just visit test-microphone.com and start testing your mic now.
Go to " System " on your Settings tab. Click on the "Sound" section and select the "Sound Control Panel" option. Sound Control Panel. Click on the "Recording" tab. Select "Microphone" and click on the "Properties" button. Microphone Properties. Click on the "Levels" tab and drag the "Microphone Boost" slider.
Right-click the speaker icon on the Windows taskbar and then select Sound settings. You can also access this through the Windows 11 Settings app. A window will open. Look for the Input section and examine the list of input microphones available. Check that the microphone you want to use is selected. If not, select it.
Here is how you can reset voice settings in Discord: Click on the gear icon at the bottom-left to bring up the app's settings. Navigate to the Voice and Video settings under App Settings. Click on Reset Voice Settings at the bottom of the page. 6. Give Discord Access to Your Microphone.
Head to the 'Settings' app from the Start Menu. Ensure you have selected the 'System' option from the left sidebar. From the right section of the screen, select the 'Sound' option. Select 'Headphone Microphone' under the 'Input devices' section. The Windows shall now capture all the sound from the headset mic.
To test your mic, open another mic-utilizing app on your PC and see if the mic works. If you're on Windows 11, find and launch "Sound Recorder" from the Start Menu. If you're on Windows 10, find and open "Voice Recorder". Then, click Record (a mic icon) or press Ctrl+R and start speaking into your mic.
First, make sure you have plugged a working microphone into your PC. After that, from the Home tab, click on the Dictate tool in the Voice group. You can now start speaking through your microphone ...
First, ensure your audio input and output devices are correctly connected to your computer and detected by your operating system. To check that, go to Settings > System > Sound . Here, select the correct audio output device (if you have more than one connected), click on the device to reveal its settings, and then click Test under Output settings .
In Discord, open the Settings menu by clicking on the cog icon next to your name and avatar in the bottom left. In the Settings menu, under "App Settings", select the "Voice & Video" on the left. This will bring up the menu where you can change the settings for your microphone or headset. To choose which microphone or headset Discord should use ...
Delta is an all-in-one emulator for iOS. Delta builds upon the strengths of its predecessor, GBA4iOS, while expanding to include support for more game systems such as NES, SNES, N64, and DS. FEATURES Supported Game Systems • Nintendo Entertainment System • Super Nintendo Entertainment System • Nin…