- Skip to search form
- Skip to main content
- Go to the homepage
- Skip to service alerts

Important alerts
Mybu student & uis-mainframe/the links downtime.
Please be aware that access to MyBU Students and UIS-Mainframe/The Links will be impacted May 22-29 to support MyBU Student launch activities. Visit the SIS Renewal site for more details about timing and affected functions. We apologize for any inconvenience and appreciate your patience during this cutover…. [read more]

- Home
- ···
- Teaching & Learning Technologies
- Learning Management Systems
- Blackboard Learn
- For Instructors
- Assignments in ... Blackboard Learn
Assignments in Blackboard Learn
Within Blackboard Learn for both Original and Ultra courses, assignments allow instructors to assess student performance just as they would on paper, from open-ended homework assignments to multiple choice quizzes and more.
To learn more about creating, editing, and using other types of content, visit our Developing Course Content page.
Creating and Developing Assignments (Ultra)

Just like other types of content, to add an assignment on the Course Content page, select the plus sign wherever you want to add an assignment. In the menu, select Create to open the Create Item panel and select Assignment . The New Assignment page opens.
You can also expand or create a folder and add an assignment.
When you create an assignment, a gradebook item is created automatically.
After you post assignment grades, students can view their scores on their grades pages or in the activity stream. They can also access an assignment, their submissions, your feedback, rubrics, and their grades from the assignment link on the Course Content page.
You can set the different assignment components to customize your assignment. Provide a descriptive title so students can easily find the assignment among your course content. On the Course Content page, the title appears as the link students select to view the materials. If you don't add a title, "New Assignment" and the date appear in the content list. If you don't add content, the assignment won't appear on the Course Content page.

To then add text, files, and questions, s elect the plus sign to open the menu and make a selection. You can choose a question type, add a question pool, or reuse questions and content from existing assessments. You can add files and text, such as instructions for the assignment. You can also add files from cloud storage, such as OneDrive and Google Drive.
Show or hide the assignment: Students can't see an assignment until you choose to show it. You can create all your content ahead of time and choose what you want students to see based on your schedule. You can also set availability conditions based on date, time, and performance on other items in the course gradebook. To learn more about conditional availability, visit the Conditional Availability section on our Developing Course Content page. On the Course Content page, students can see when you set the assignment to show.
Apply assignment settings: Select the Settings icon to open the panel where you provide the assignment's details and information.
Provide a due date: Due dates appear on the calendar and in the activity stream. Late submissions appear with a Late label in the course gradebook. Encourage students to review what’s due now and what’s ahead so they can ask questions as soon as possible.
View accommodations: You can set accommodations for students and make them exempt from certain course requirements, such as assignment due dates and time limits. To select accommodations, go to the Roster and open a student's menu. The number of accommodations you've made appears on the assignment page in the Assignment Settings section.
Allow class conversations : What if your students have questions about an assignment? You can allow conversations within an assignment, and anyone can contribute. As the conversation develops, it appears only with the relevant assignment.
Collect submissions offline : You may want to grade student work that doesn’t require students to upload a submission. For example, you can add grades to your gradebook for oral presentations, science fair projects, acting performances, and artwork delivered in person.
Randomize questions and answers: You can randomize questions and their answers to support practice/drilling activities and help students avoid academic dishonesty. You can use one or both settings so assignments appear differently for each student. You can only randomize answers for Matching and Multiple Choice questions. If you want to randomize answers for True/False questions, use the Multiple Choice question type with True and False answer choices. You can't randomize questions in an assignment with text blocks or attachments.
Questions appear in order to you but are randomized for students. To prevent confusion, don't add numbers to reference other questions within the assignment.
Change the grade category: You can change the assignment's grade category to be part of one of the custom gradebook categories you set up in your course. You can create new categories to customize how coursework is grouped in your course. Custom categories can be useful when you set up the overall grade.
Determine the number of attempts: You can let your students submit more than one attempt at an assignment. When you allow multiple attempts, you can also choose how the final grade is calculated.
Select the grading schema: From the Grade using menu, select an existing grading schema such as Points . You can change the grading schema at any time and the change will show to students and in your gradebook.
Enable anonymous grading: When you create an assignment without questions, you can enable anonymous grading so student names are hidden while you grade. You may only add text and files to anonymously graded assignments.
Show assessment results: Select the Show correct answers check box to allow students to see the correct answers to automatically scored questions after they submit. If you don't add questions to your assignment, select the check box for Show correct answers during creation.
Enable automated feedback: Provide feedback to students that's released automatically based on your settings.
Add an access code: You can issue an access code to control when students submit an assignment. At this time, access codes are generated randomly by the system. You can't customize the access codes. You can also add an access code to a group assignment.
Enable parallel grading: You can enable parallel grading and assign graders when you create an assignment. You can also enable parallel grading even after students make submissions. The system randomly assigns graders you choose so each student has two graders for the assignment. The grading workload is distributed evenly among the graders. Graders can only open the submissions for the students assigned to them. Instructors or reconcilers determine the final grades for students.
Add a time limit: A time limit can keep students on track and focused on the assignment because each person has a limited amount of time to submit. The assignment attempts are saved and submitted automatically when time is up. You can also allow students to work past the time limit. At this time, you can't add a time limit to group assignments.
Add a grading rubric: Rubrics can help you evaluate student submissions based on key criteria that you define. You can create a new rubric or associate an existing rubric. A rubric is a scoring tool that you can use to evaluate graded work. At this time, you can only add a rubric to as assignment without questions.
Add goals and standards: You can align an assignment to one or multiple goals. You and your institution can use goals to measure student achievement across programs and curriculums. You can also align individual questions to goals.
Make a group assignment: You can create an assignment for one or more groups of students. By default, you assign a grade to each group as a whole, but you can change a group member's individual grade.
Enable SafeAssign: You can use SafeAssign to check for potential plagiarism in student submissions. You can enable the SafeAssign Originality Report any time, even after students have started their submissions, but submissions are only checked when SafeAssign is enabled.
Add an optional description: The description appears with the assignment title on the Course Content page.
Student Activity Tab (Ultra)
Blackboard Ultra recently added a new feature for tracking activity on particular assignments within the assignment instructor interface.
In Ultra, you can access student activity data from the Course Content page. Select an assessment's dropdown menu and select Student Activity .

You can also access student activity data on an assessment’s page by selecting the Student Activity tab.

Student activity details aren’t available for anonymous graded assessments. When you turn off the anonymous grading option, the Student Activity Details Report for Assessments appears again.
The top of the page shows you an overview of information, including the course average submission time and time before due date.

Submission Activity
The Submission Activity section includes the number of students at specific stages in the assessment. The stages include:
- Drafts started
Grade Distribution
The Grade Distribution line graph shows student grades.
The x axis represents grade ranges. Ranges are from the lowest to the maximum possible grade for the assessment.
The y axis is the number of students who received a specific grade.

Select any dot on the line graph to see more information about the students who received a grade in that specific range. Student grades are displayed as columns in a bar graph. Hover over the student’s column to see the student’s name, grade, and percentile.

To return to the Grade Distribution line graph, select the Back button.
Creating and Developing Assignments (Original)
With assignments, you can create coursework and manage the grades and feedback for each student separately. You can create assignments in content areas, learning modules, lesson plans, and folders.
When you create an assignment, a Grade Center column is created automatically. From the Grade Center or Needs Grading page, you can see who has submitted their work and start grading. Students access their grades from their My Grades pages or the assignment's Review Submission History page.
You can also create a group assignment and release it to one or more groups in your course. Each group submits one collaborative assignment and all members receive the same grade. You can create a single assignment and assign it to all groups, or create several unique assignments and assign them to individual groups.
You can create assignments in content areas, learning modules, lesson plans, and folders.
- From the Assessments menu, select Assignment and provide the name, instructions, and the files students need. You can use the functions in the editor to format text and add files. You can also add files in the Assignment Files section.
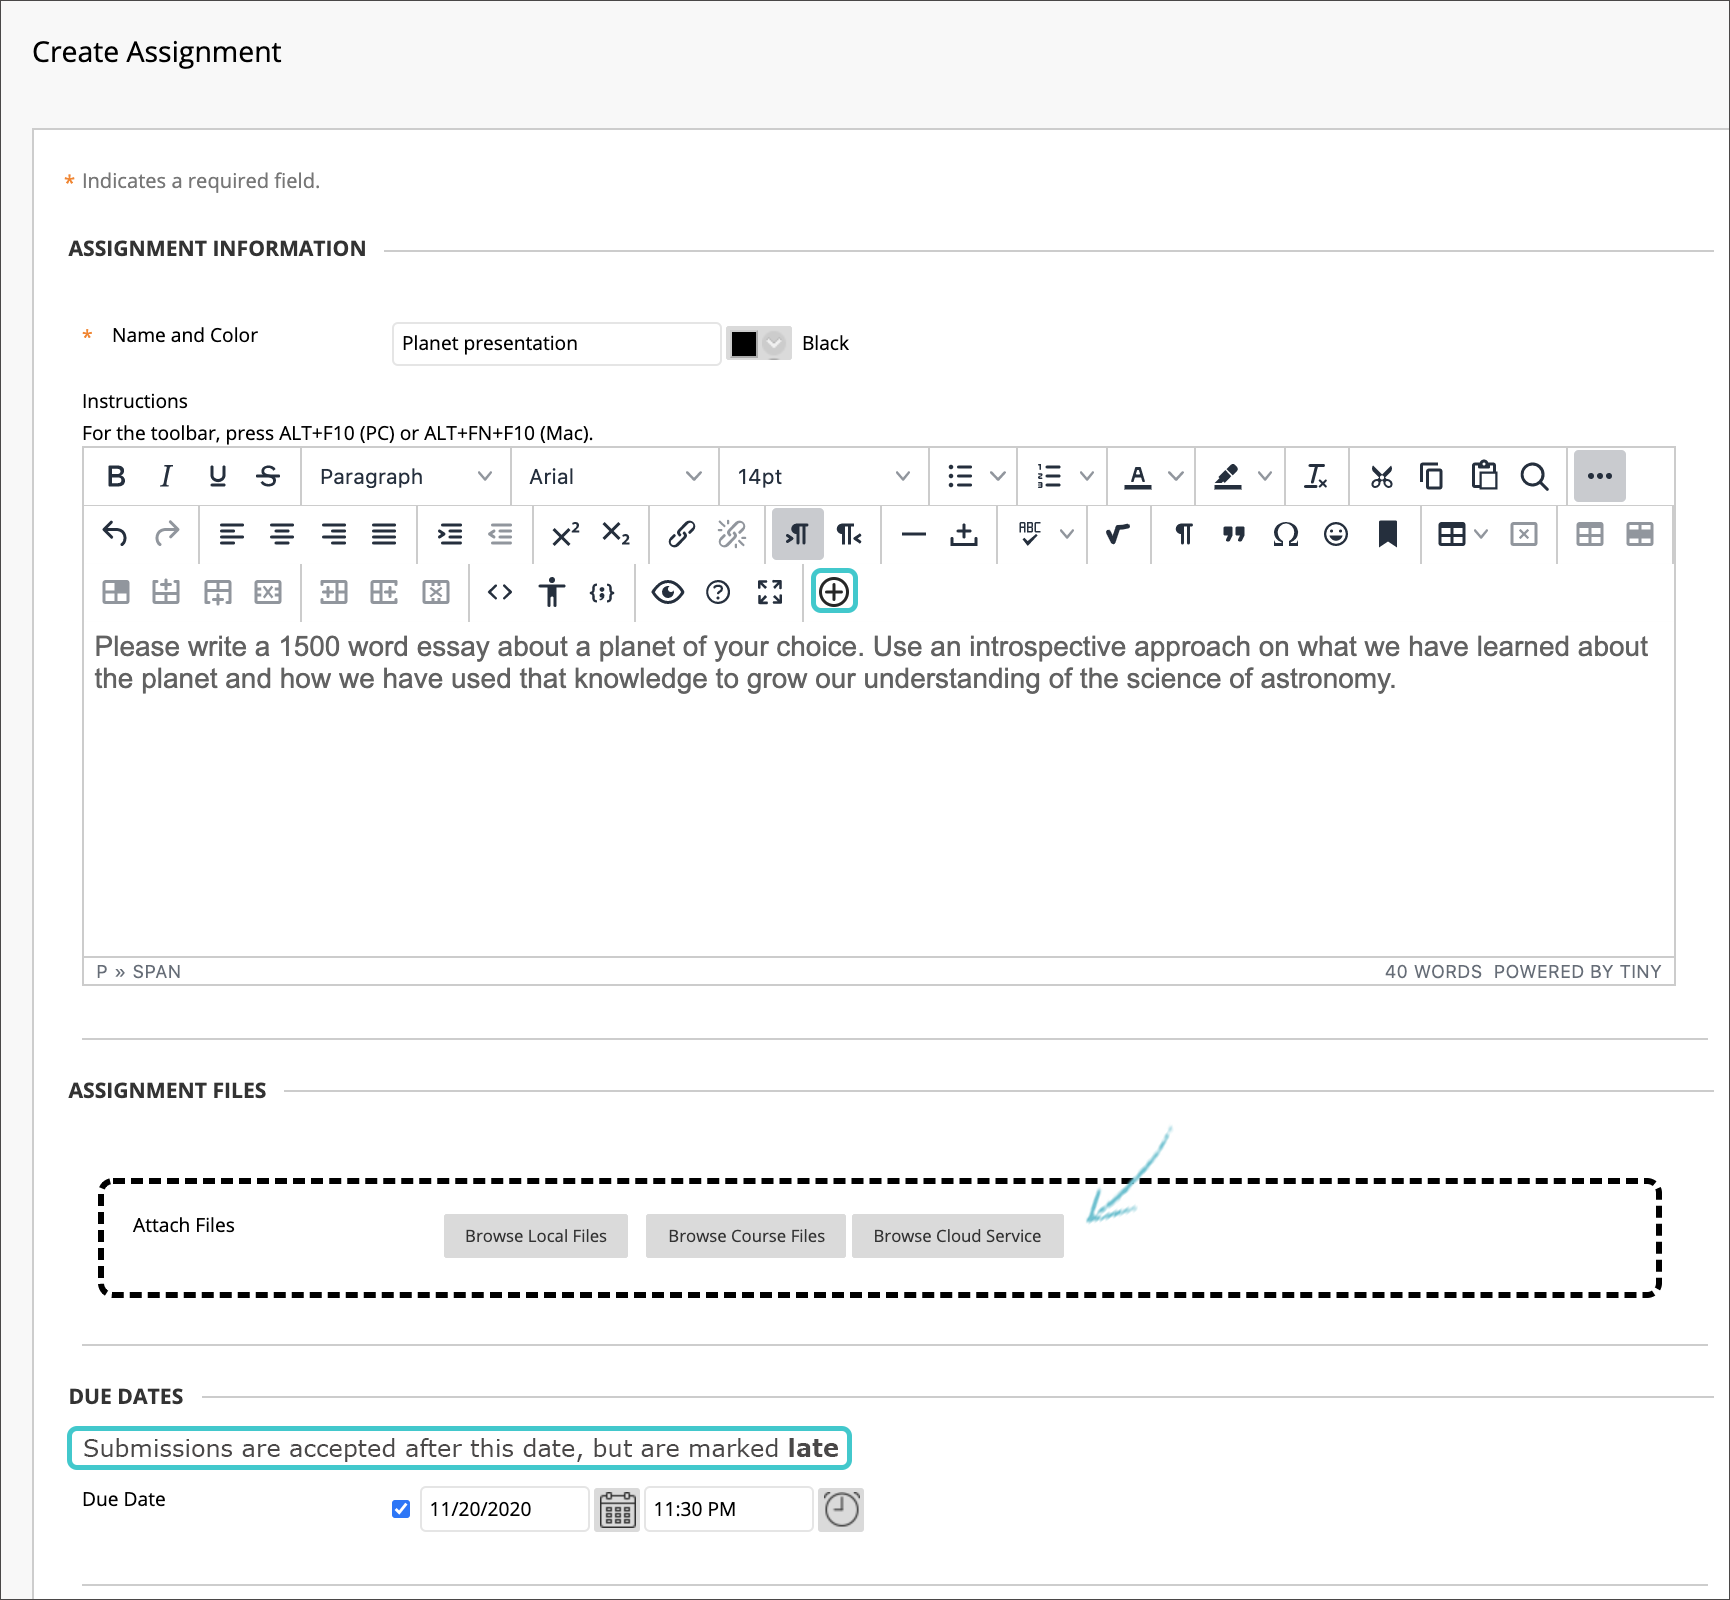
- Optionally, select a Due Date . Assignments with due dates automatically show in the course calendar and in the To Do module. Submissions are accepted after this date but are marked late. If you don’t want students to access an assignment after the due date, choose the appropriate display dates.
- In the Grading section, type the Points Possible . If you set the points possible to a non-whole number, letter grades may not be assigned correctly.
- Optionally, add a rubric. Expand the sections to make selections such as anonymous grading, how the grade is displayed, and the number of attempts. You can allow more than one attempt on an assignment.
- Make the assignment available when you're ready for students to access it. Select the appropriate options for availability, tracking, and display dates. Display dates don't affect an assignment's availability, only when it appears.
- Select Submit .
Your browser is unsupported
We recommend using the latest version of IE11, Edge, Chrome, Firefox or Safari.
Learning Technology Solutions
Office of the vice chancellor for innovation, blackboard assessments & grading.
You can implement effective assessments and equitable grading practices by utilizing the features and tools in Blackboard Learn which is the centrally-supported learning management system used by faculty and students at UIC. There are several types of assessments that you can create in Blackboard Learn, including assignments, discussions, journals, quizzes, tests, and exams.
Please visit Blackboard Learn — Learning Management System to learn more about the features of Original View and Ultra View course sites.
blackboard Heading link Copy link
- Blackboard icon Access Blackboard
- Calendar icon Download App
- Check icon Get Help
more info Heading link Copy link
AVAILABLE TO: Faculty | Students | Staff
FUNDING: University
- UIC Help Center – Knowledge Base
- Blackboard Help
Types of Assessment
Available in both Original View and Ultra View courses
- Assignments
- Discussions
- Quizzes, Tests, and Exams
Please note that blogs, wikis, and surveys are also available in Original View courses.
Grading Tools
- Written Feedback
- Grade Management
Accessibility
Blackboard Learn offers accessibility features that allows users to easily navigate and read the Blackboard Learn web interface. The web interface supports screen readers for all available creator and viewer interfaces. The web interface also supports keyboard access, allowing you to use the tab key to access all available functions. All sessions fully support adding and displaying captions. For additional information on Blackboard Learn’s accessibility features, please visit Blackboard Learn’s Accessibility Conformance Report (WCAG Edition) .
Blackboard provides secure, private, online communication of FERPA-sensitive information in addition to group spaces where students and instructors can interact and exchange information that is not FERPA-sensitive. Restrictions that apply to your classroom teaching also apply in the Blackboard Learn environment, such as not allowing students to see others’ grades or graded work and not using external email to communicate FERPA-sensitive information.
Blackboard does not warrant or provide any assurances that your use of the Products will comply with the Health Insurance Portability and Accountability Act. For more information, visit the Blackboard Terms of Use page or contact us at [email protected].
Original View Course
The following steps will guide you in creating an assignment in an Original View course:
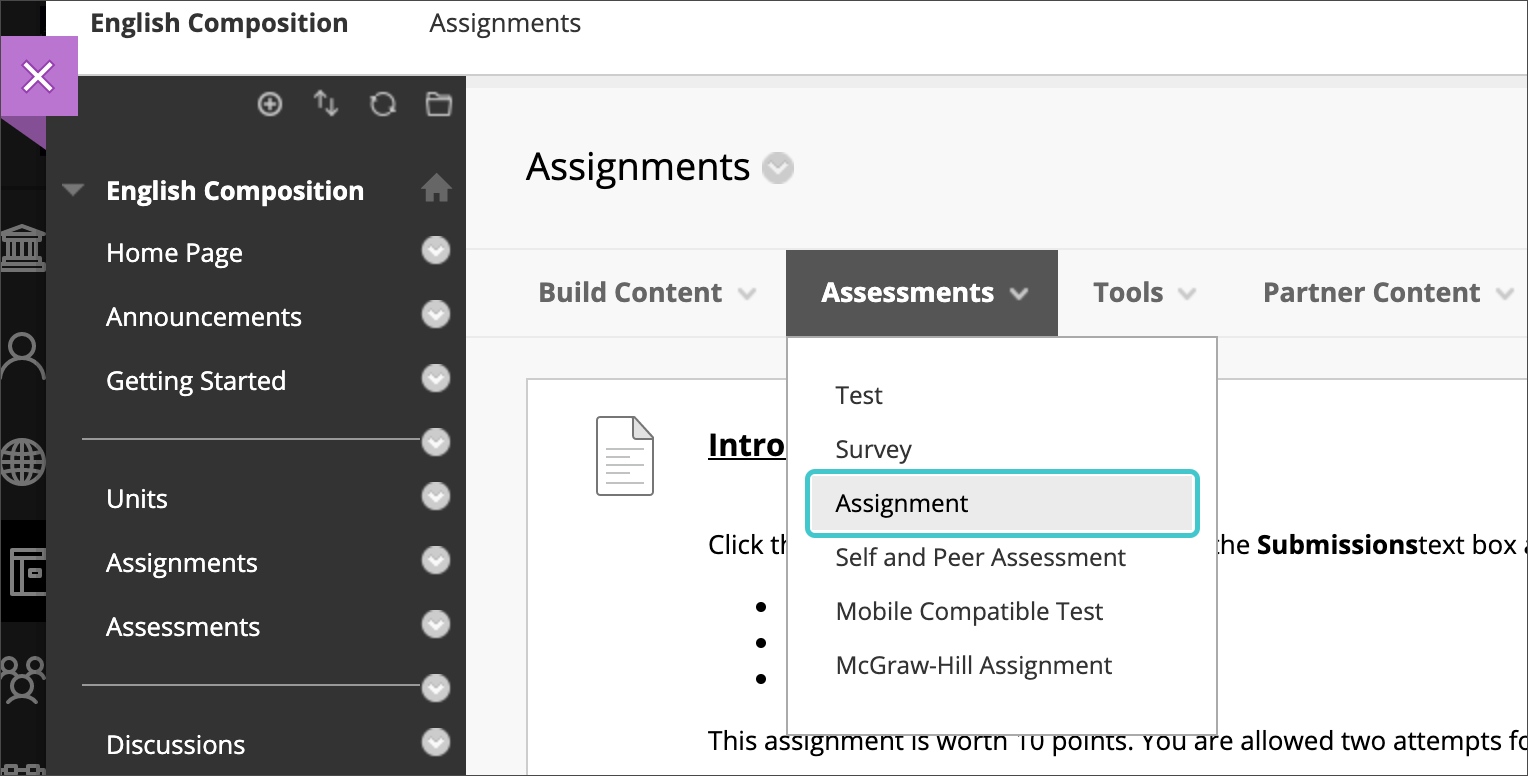
- Select the area in the course site that you want to place the assignment in, and from the Assessments drop-down select Assignment; this will open up a new screen.
- Start by adding a title; recommend using a unique name with Module or Week number referenced (e.g., Module 02 – Learning Theories Assignment).
- Then in the Instructions text box add text for instructions, submission requirements, attachments, etc.
- Next, scroll down to begin editing the assignment settings, including the due date, points, grading rubric, submission details, grading options, display of grades, availability, and more.
- Once the settings are edited select Submit.
Please note that newly created assessments will show up at the bottom of the folder. You will need to move the assessment where you would like it to be placed after it is created.
Original View Tutorials
- Quick Guide — Assignments
- Video — Blackboard Assignments (9:24 minutes)
- Assignment Grade Settings — Blackboard Help
- Quick Guide — SafeAssign
Ultra View Course
The following steps will guide you in creating an assignment in an Ultra View course:
- Hover over the area in the course site that you want to place the assignment in, and a purple line with a plus sign and a circle around it will appear.
- Click the plus sign with the circle.
- Next, select Create from the dropdown menu; this will open a side panel on the right-hand side of the screen.
- Under Assessment select Assignment, this will open up a new screen.
- Start by changing the title (default is New Assignment and date); recommend using a unique name with Module or Week number referenced (e.g., Module 02 – Learning Theories Assignment).
- Select the plus sign with a circle around it to add instructions, submission requirements, text, questions, and attachments.
- Next, select the gears icon on the right side of the screen to edit the assignment settings, including the due date, attempts, adding a rubric, and more.
- Once settings are edited select Save.
Please note that newly created assignments are Hidden from students by default; select the drop-down from the top right to change to Visible to Students or Release Conditions. Scroll down to the Getting Started with Accommodations & Assessment Exceptions section for more information on enabling accommodations and exceptions.
Ultra View Tutorials
- Video — Create an Assignment in the Ultra Course View (1:02 minutes)
- Create and Edit Assignments — Blackboard Help
The following steps will guide you in creating a group assignment in an Original View course:
- First, create the groups for the course under Course Management – Users and Groups.
- Next, create an assignment by following the steps above in Getting Started with Assignments.
- While editing the assignment settings, scroll down in the assignment settings to Submission Details and click on the title to expand submission details.
- Under Assignment Type select Group Submission; this will display all the created groups in the course.
- Under Items to Select, you can use the Select All button or individually select groups.
- Once the groups are highlighted, click the arrow to move the groups to the Selected Items.
- Once completed select Submit.
- Groups — Blackboard Help
Creating Group Assignments — Blackboard Help
The following steps will guide you in creating a group assignment in an Ultra View course:
- Please note that in Ultra View, you do not need to create the groups first.
- First, create an assignment by following the steps above in Getting Started with Assignments.
- While editing the assignment settings, scroll down to Assigned groups under Additional Tools and click on Assign to groups.
- From this new screen you can create your groups and when completed select Save.
- From the assignment screen, you will see the number of groups assigned to the assignment.
You can also access the Course Groups under the Details & Actions section on the left side of the course site.
The following steps will guide you in creating a discussion in an Original View course:
- Select the area in the course site that you want to place the discussion in, and from the Tools drop-down select Discussion Board; this will open up a new screen.
- Link to a Discussion Board page (links to all forums)
- Select a Discussion Board Forum (existing forums)
- Create New Forum
- Select the Create New Forum button, this will open a new screen.
- Start by adding a title; recommend using a unique name with Module or Week number referenced (e.g., Module 03 – Taxonomies Discussion).
- Add any description you want for this forum, including a prompt for the initial post and reply post(s), add any links or attachments, etc.
- Next, scroll down to edit the forum settings, including display, view, grading, and more.
- Once settings are edited select Submit, this will bring you back to the Create Link screen to select the Select a Discussion Board Forum.
- Then click on the forum you just created and select Next; this will open the Link Information screen.
- You can add a description for students in the text box, track views, and add date restrictions then when done click Submit.
- Quick Guide — Discussion Board
- Video — Use Discussions in the Original Course View (2:35 minutes)
- Create Discussions – Blackboard Help
The following steps will guide you in creating a discussion in an Ultra View course:
- Under Participation and Engagement select Discussion; this will open up a new screen.
- Start by changing the title (default is New Discussion and date); recommend using a unique name with Module or Week number referenced (e.g., Module 03 – Taxonomies Discussion).
- Next, add the instructions in the open text box, including a prompt for the initial post and reply post(s), add any links or attachments, and then select Save.
- Next, select the gears icon on the right side of the screen to edit the discussion settings, including how the discussion will be displayed, post first, and grade discussion that opens up the due date, points, adding a rubric, and groups.
Please note that newly created discussions are Hidden from students by default, and select the drop-down from the top right to change to Visible to Students or Release Conditions. Scroll down to the Getting Started with Accommodations & Assessment Exceptions section for more information on enabling accommodations and exceptions.
- Video — Create a Discussion in the Ultra Course View (2:01 minutes)
- Create Discussions — Blackboard Help
The following steps will guide you in creating a journal in an Original View course:
- Select the area in the course site that you want to place the journal in, and from the Tools drop-down select Journals; this will open up a new screen.
- Link to the Journal page (links to all journals)
- Link to a Journal (existing journal)
- Create New Journal
- Select the Create New Journal button; this will open a new screen.
- Start by adding a title; recommend using a unique name with Module or Week number referenced (e.g., Module 01 – Theories Journal).
- Add any description you want for this journal, including a prompt for the journal entry, add any links or attachments, etc.
- Next, scroll down to edit the journal settings, including availability, index entries, grade settings, and more.
- Once settings are edited select Submit; this will bring you back to the Create Link screen to select the Link to a Journal.
- And then click on the journal you just created and select Next; this will open the Link Information screen.
- You can add a description for students in the text box, track views, and add date restrictions then once done click Submit.
- Video — How to Create a Journal (2:39 minutes)
- Journals — Blackboard Help
The following steps will guide you in creating a journal in an Ultra View course:
- Under Participation and Engagement select Journal; this will open up a new screen.
- Start by changing the title (default is New Journal and date); recommend using a unique name with Module or Week number referenced (e.g., Module 01 – Theories Journal).
- Add the instructions in the open text box, including a prompt for the journal entry, add any links or attachments, and then select Save.
- Next, select the gears icon on the right side of the screen to edit the journal settings, including users ability to edit or delete and enable grading of the journal, including due date, points, and adding a rubric.
Please note that newly created journals are Hidden from students by default, and select the drop-down from the top right to change to Visible to Students or Release Conditions. Scroll down to the Getting Started with Accommodations & Assessment Exceptions section for more information on enabling accommodations and exceptions.
- Video — Creating a Journal in the Ultra Course View (1:04 minutes)
The following steps will guide you in creating a quiz, test, or exam in an Original View course:
- Select the area in the course site that you want to place the assignment in, and from the Assessments drop-down select Test; this will open up a new screen Add Test.
- Create a New Test
- Add an Existing Test
- Select the Create button; this will open the Test Information screen.
- Start by adding a title; recommend using a unique name with Module or Week number referenced (e.g., Module 01 – Learning Domains Quiz).
- Add a description and instructions in the text boxes then select Submit; this will open the question building page.
- Create Question (see Question Types article below)
- Reuse Question
- Upload Question
- Once all the questions have been created, select OK; this will bring you back to the Add Test screen.
- Then click on the test you just created and select Submit; this will open the Test Information screen.
- Next, scroll down to begin editing the Test settings, including availability, attempts, timer, due date, results, presentation, and more.
- Quick Guide — Tests and Surveys
- Video — Blackboard Tests (12:25 minutes)
- Question Types — Blackboard Help
The following steps will guide you in creating a quiz, test, or exam in an Ultra View course:
- Under Assessment select Test; this will open up a new screen.
- Start by changing the title (default is New Test and date); recommend using a unique name with Module or Week number referenced (e.g., Module 01 – Learning Domains Quiz).
- Question options: question pool, calculated formula, essay, fill in the blank, matching, multiple choice, true/false, and reuse questions.
- Next, select the gears icon on the right side of the screen to edit the quiz settings, including due date, attempts, adding a rubric, assigning to groups, and more.
Please note that newly created assessments are Hidden from students by default, and select the drop-down from the top right to change to Visible to Students or Release Conditions. Scroll down to the Getting Started with Accommodations & Assessment Exceptions section for more information on enabling accommodations and exceptions.
- Video — Create a Test in the Ultra Course View (1:17 minutes)
- Create Tests — Blackboard Help
The following steps will guide you in creating rubrics in an Original View course:
- Select the assignment, discussion, journal, quiz, test, or exam that you want to add a rubric to and click Edit.
- Once the assessment settings are open, scroll down to the grading section in assignments and click the Add Rubric drop-down.
- Select Rubric (reusing existing rubric – no changes needed)
- Create New Rubric
- Create From Existing (editing existing rubric – changes needed)
- If you need to create a new rubric, select Create New Rubric; this will open a new screen.
- Start by changing the title (default is New Rubric and date), recommend modeling rubric title after specific assignment (e.g., Module 02 – Learning Theories Rubric) or if creating a rubric for one type of assessment then use a general title with course name (e.g., Discussion Rubric for ENG).
- Begin by determining if you want a point-based rubric (recommended) or percentage-based rubric.
- Then add or delete rows or columns on the rubric table to match the assessment needs and grading criteria.
- Next, define the grading criteria, determine total points for each criterion, describe the levels of achievement, and assign points for each level.
- Once the rubric is completed select Submit.
- Video – Rubrics: Make Grading Easier (6:59 minutes)
- Rubrics – Blackboard Help
The following steps will guide you in creating rubrics in an Ultra View course:
- Select the assignment, discussion, journal, quiz, test, or exam that you want to add a rubric to.
- Once the assessment is open, then select the gear icon on the right side of the screen, this will open the assessment settings panel.
- Scroll down to the Additional Tools section and select Add grading rubric.
- Next, determine if you want a point-based rubric (recommended) or percentage-based rubric (from this screen you can also select existing rubrics in your course and add it to the assessment).
- Begin by adding or deleting rows or columns on the rubric table to match the assessment needs and grading criteria.
- Once the rubric is completed select Save.
- Video – Create Rubrics in the Ultra Course View (1:46 minutes)
- Rubrics — Blackboard Help
The following steps will guide you in setting up the grade center in an Original View course:
- After creating all the assessments in the course.
- Under Course Management (left side navigation panel), select Grade Center then Full Grade Center; this will open the Grade Center screen.
- Review your assessments to check that you have correct titles, etc.
- Select the Manage drop-down for Grade Center options, including grading periods, schemas, color codes, categories, smart views, and more.
- You can create additional columns or calculated columns in the Grade Center as well.
- Video – Navigating Grade Center (10:26 minutes)
- Grading Schemas – Blackboard Help
- Grade Columns – Blackboard Help
- Assign Grades – Blackboard Help
- Solutions for Grade Center Problems – Article
The following steps will guide you in setting up the gradebook in an Ultra View course:
- Select Gradebook from the top left of the course; this will open the gradebook screen.
- You can view the gradebook in list or grid view (at the top left-side of the screen).
- Review your assessments to check that you have correct titles, due dates, etc.
- You will see a message at the bottom of the screen “Set up the overall grade!” if you haven’t set up the overall grade information.
- Select how the overall grade is calculated: gradebook item weights (weights each item individually) or grade category weights (weights by category)
- Select how the overall grade is displayed: letter or percentage
- Edit overall grade percentages for either the categories or individual items.
- Once completed select Save.
- Next, select the gears icon on the right side of the screen to edit the gradebook settings, including grading schema, automatic zeros, overall grade, grade categories, course rubrics, and more.
- Hover over the area where you want to add an item, calculation, or attendance and a purple line with a plus sign and a circle around it will appear to add the element to the gradebook.
The following steps will guide you in grading and providing feedback in an Original View course:
- Under Course Management (left side navigation panel), select Grade Center then Needs Grading; this will open the Needs Grading screen.
- Select the submission you want to grade; this will open a new screen showing the assignment, rubric (if created), and originality report (if enabled).
- Now click on the levels of achievement for each grading criterion to assign points and add text feedback in each grading criterion feedback box.
- You can also use the annotation tool to draw, highlight, or comment directly on the submission.
- Assignment Inline Grading — Blackboard Help
The following steps will guide you in grading and providing feedback in an Ultra View course:
- Next, select the assessment you want to grade; this will open a new screen.
- Then select the submission you want to grade; this will open a new screen showing the assignment, rubric (if created), originality report (if enabled), and feedback (displayed on the right-hand side of the screen).
- If you have not created a rubric, then select the pencil next to the Feedback for Student section to add in comments and suggestions.
- Video — Grading Assignments in the Ultra Course View (1:10 minutes)
The following steps will guide you in setting up accommodations & assessment exceptions in an Original View course:
- Determine the Test or Survey that you want to add a test availability exception to.
- Select Edit Test Options, and then scroll down to Test Availability Exceptions.
- Click the Add User or Group button; this will open a new window listing students.
- Select the student(s) you want to enable the test availability exception for, and then click Submit.
- Availability
Please note that if adaptive release items are required, such as Display After/Until then adaptive release needs to be on.
- Test Availability Exceptions (under Tests and Survey Options section) – scroll down to the end of the section in Blackboard Help.
The following steps will guide you in setting up accommodations in an Ultra View course:
- Select the Roster under Details & Actions section on the left side of the course site.
- Find the student you want to enable an accommodation for, then click the three dots by their name, and then select Accommodations; this will open a side panel on the right side of the screen.
- Due date accommodation
- Time limit accommodation: custom percentage or unlimited
- Once completed, select Save.
Please note that an accommodation applies to all due dates or time limits in your course for an individual student.
The following steps will guide you in setting up assessment exceptions in an Ultra View course:
- Select the assessment that you want to add an assessment exception to.
- Once the assessment is open, click on the Submission section on the upper right hand side of the screen; this will open the submission screen.
- Find the student(s) you want to enable an assessment exception for, then click the three dots to the right of their name, and then select Add or edit exceptions; this will open a side panel on the right side of the screen.
- Attempts allowed
Please note that exceptions are different from accommodations you set in the course roster. Exceptions aren’t allowed for due dates and time limits for an individual student or group at this time in Ultra View courses. Exceptions are only allowed for the show on and hide after dates and additional attempts.
- Video – Grant Accommodations in the Ultra Course View (1:14 minutes)
- About Accommodations (under Roster section) – scroll down to the end of the section in Blackboard Help
- Video – Grant Assessment Exceptions in the Ultra Course View (1:19 minutes)
- About Assessment Exceptions (under Test and Survey Options section) – scroll down to the end of the section in Blackboard Help
To attend an upcoming webinar or workshop please visit our Events page to learn more and register.
Real Engagement: Tips on Effective Use of Discussion Boards (52 min) | Alan Schwartz, director and faculty member for UIC’s online Master of Health Professions Education
- Webinar Recording
- Handout 1 – 2-Day Discussion Participation
- Handout 2 – Substantive Discussion Comments
- Chat Transcripts PDF
Using Blackboard Annotate to Effectively Grade Online Students (43 min) | Jamie Chriqui from the UIC School of Public Health’s Division of Health Policy and Administration
- Using Blackboard Annotate Presentation
- Chat Transcript PDF
- Teaching and Learning with Blackboard
Tips for Assessing Student Learning Using Blackboard
The online assessment tools of Blackboard can be utilized to facilitate meaningful and memorable learning activities for students. These online assessment tools include: surveys, test, quizzes, and electronic submission of assignments. What are the most efficient and effective uses of the Blackboard assessment tools? What recommendations exist for reinforcing academic integrity and providing meaningful feedback?
Below is a list of tips and recommended best practices for assessing student learning using Blackboard. Please feel free to add your tip(s) to the list!
General Online Assessment Tips
- Avoid high-stakes objective assessments online When developing online assessments in Blackboard, it is important to consider the security of the exam and to make every effort to remove opportunities for students to cheat. Blackboard does not inherently prevent students from printing the questions of an exam or copying and pasting the questions to word processing application for printing.
- Have students complete a practice version of any required online assessment to become familiar with the technology Your students may or may not have ever completed an online assessment. Don't assume that they are familiar with how to complete an online assessment. Offer a sample or practice version of the type of assessment you plan to require to allow students the opportunity to become familiar with the technology.
- Deploy assessment link(s) in the same folder as unit content For ease of access for students, consider keeping links to assessments with other instructional content for a given unit. Basically, create a folder for each unit and include in that folder all the information items, instructions, and links to the assessments so students easily find them.
- Reuse and re-purpose assessment types once configured in Blackboard While course content changes over time, you may be able to reuse some of the types of assessments you use among courses. For example, a pre-course survey might be able to be reused in multiple Blackboard courses. Whenever possible, look to reuse created assessments by either copying or exporting/importing from one Blackboard course to another.
- Provide meaningful feedback to students Studies have shown that among the most valued elements of any course are the interactions that students have with the faculty member. Providing meaningful feedback to online assessments is a great way to foster teaching presence in an online course.
- Remember there is no guaranteed approach to prevent cheating online When developing online assessments in Blackboard, it is important to consider the security of the exam and to make every effort to remove opportunities for students to cheat. While there are a few tips for making it more difficult to cheat , the current version of Blackboard does not inherently prevent students from printing the questions of an exam or copying and pasting the questions to word processing application for printing.
A survey within Blackboard is a non-graded assessment tool that records answers anonymously. Blackboard will record when the survey is taken but will not associate answers with an individual user; no individual feedback can be provided for a survey.
- Use the Survey tool in Blackboard whenever you want to gather aggregate responses from students The survey tool is a simple way to gather feedback from students at the beginning, middle, or end of the course. Also, if introducing a new pedagogical approach or tool, consider conducting a survey of students to gain their perspective on overall effectiveness.
- Remind students that surveys are anonymous Surveys can be especially useful to gain authentic feedback from students, especially if they are reassured that their feedback is anonymous. Remind students that you can't see their individual responses, just a confirmation of whether or not they completed the survey.
- If the survey is more than 5 questions, consider displaying 1 question at a time For large surveys, they can be more manageable for students if displayed 1 question at a time rather than all at once.
- If desiring to share findings with students, copy/paste results into Word to post in Blackboard While there currently is no easy way to automatically display aggregate results from a survey to students, the results that you see as an instructor can be copied/pasted into a Word document and then posted in Blackboard for students to view if desired.
Tests/Quizzes
The Tests tool in Blackboard is the tool to use for automatically graded assessments. Scores are automatically added to the Blackboard Grade Center. Faculty have several options for creating tests, including typing into the question-by-question format provided by Blackboard, copying and pasting questions into the Blackboard format (which allows one to work offline and take advantage of a word processor's spell check), and uploading questions in a pre-established format. The term "test" is used in Blackboard to refer to any graded assessment (formative or summative) consisting of more than one question.
- Format questions in MS Word and import using CSI's Blackboard Quiz Generator When transferring existing assessment questions from Microsoft Word to Blackboard, consider using Oklahoma Christian University's Blackboard Test Generator . This tool was developed to help you create quizzes for Blackboard. It allows you to type up the quiz offline in a program like Word or Notepad and not have to go through the trouble of making long quizzes via the Blackboard web interface. Simply follow the documentation provided for formatting existing questions and then copy/paste into the generator's text box. Simply type or paste your quiz in the text area and click the Create Quiz button. This will produce a zip file that you can import into the Pool Manager in Blackboard.
- Add test questions to pools for easy reuse and expansion Creating question pools in Blackboard of questions provides added options for question reuse as well as the ability to export questions for reuse or repurpose in other courses.
- Check with your textbook publisher to see if they offer question pools for your textbook Some publishers now offer electronic pools of questions organized by textbook chapter that are pre-formatted for Blackboard.
- Create tests from random blocks of question pools whenever possible To further deter cheating, create online tests that pull questions at random from question pools. This not only further individualizes each student's assessment, but also makes it very easy to expand the possible questions included in future assessments. Faculty can simply add more questions to the question pools to in effect expand the possible questions to be included in the test(s) built from them.
- Pay attention to test options when deploying Creating a test in Blackboard is essentially a 2-step process: 1) Build the test; 2) Deploy the test. After deploying the test, be sure to modify the test options to match the desired assessment experience. (e.g. timed test; 1 attempt, customized feedback)
- Randomize questions Among the many test options, choosing to randomize the questions will ensure that each student will be presented with the quiz questions in a random order.
Discussions
- Provide clear expectations for how discussions will be assessed Asynchronous discussion online via the Blackboard Discussion Board is a very well established approach to assessing student learning online. Be very clear to students at the beginning of the course what the expectations are for the online discussion and how their contributions will be assessed.
- Use Blackboard discussion grader; grade by forum, not thread Blackboard's discussion grading capabilities allows for easy collection of student contributions to a forum and for assigning a score for student posts. When enabling discussion grading, select the option to grade by forum as Blackboard will then only add a single column to the grade center for the forum rather than columns for each thread. It is highly advised to avoid grading by thread unless for a very specific discussion where students can only reply to instructor-created threads.
- After entering scores for contributions, enter comments directly in the Grade Center The discussion grading in Blackboard 8 only allows for faculty to add grade with a score but not enter any comments. However, after entering the scores for contributions, comments can be added to the scores at the corresponding column in the Grade Center.
Assignments
- Use the Assignment Manager in Blackboard for collecting student work electronically The Assignment Manager in Blackboard enables users with the role of Faculty or TA in Blackboard to create Assignments in any content areas and post them for Students to complete. Creating an assignment automatically creates an item in the Grade Center that holds all the submitted student assignments.
- If desiring specific formatting, provide a template with the assignment's instructions When creating an assignment, attach to the assignment any instruction or template files students are to use in completing the assignment. Doing so, students won't need to search other content areas within the course to find the needed files.
- Download submitted assignments for offline viewing/grading View details for viewing and downloading all submitted assignments (PDF).
- Enter feedback electronically in submitted files & return to the students via the Blackboard Assignment There are three approaches to providing feedback to submitted assignments within Blackboard: 1) Enter feedback in the comments box back to the student for the given assignment; 2) Annotate comments on top of the electronic version of the submitted assignmend using the Inline Grading feature; 3) Attach a revised version of the file submitted by the student that includes comments directly in the file. Consider what format of feedback would be most helpful to your students as well as be most efficient for you to provide. Many faculty find that entering feedback directly in submitted files, either using simply a different color of text or an advanced commenting feature such as the Track Changes option is MS Word is the most efficient approach to providing detailed feedback.
- If attaching feedback to assignment, remind students to view attached file(s) It may not be obvious to students that feedback is available in the attached file(s) that have been returned back to them. Simply enter in the comments box back to the student that the attached file contains feedback.
SafeAssignments
SafeAssign is a free plagiarism prevention tool that allows for you to protect the originality of work and ensure a fair playing ground for all your students. SafeAssign is integrated with Blackboard and prevents plagiarism by detecting unoriginal content in students papers within your existing teaching and learning environment. SafeAssign can also further deter plagiarism by creating opportunities to educate students on proper attribution and citations while properly leveraging the wealth of information at their disposal.
- Use SafeAssign for substantial written assignments For any original writing assignments, consider using SafeAssign instead of the Assignment tool. View complete details on SafeAssign .
- Inform students in the syllabus of the requirement to use SafeAssign As the faculty member, you can choose to require the use SafeAssign in your course. Consider including a statement in your syllabus in accordance with your institution's academic integrity policy notifying students that their written work will be checked for plagiarism.
- Create draft version for students to submit to first to self-check their work Draft versions of SafeAssignments are created in nearly the exact same way as regular SafeAssignments are. Faculty can choose to set up SafeAssignments as drafts, allowing students to submit papers without storing them to the institutional document archive. Otherwise, if students were to submit the paper again, it would have a 100% match against itself.
- Make originality reports viewable by students It's helpful to remind students of the benefits to using SafeAssign by ensuring that they are able to view a copy of the originality report that SafeAssign generates for their submitted assignment. They'll be able to see the same originality report as the faculty member should there be any issue.

- Frequently Asked Questions
Login to Blackboard
Technical Support and Student Help
815-753-8100 [email protected]
Teaching Support and Faculty Help
815-753-0595 [email protected]
Weighting Grades
NOTE: Blackboard 9’s performance—especially on the Grade Center—is dependent upon the processing power of the computer you use. For optimal performance, before you login to Blackboard, we suggest that you close any unnecessary programs, tabs, or browser windows. For even greater performance improvements, use a modern, up-to-date web browser and do not use Internet Explorer 7.
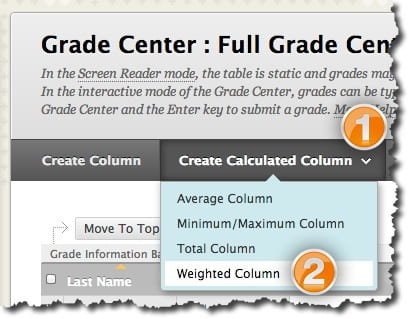
- In Grade Center, on the Action Bar, click Create Calculated Column to access the drop-down list.
- In the Columns to Select box, click a column title to select it. To select multiple columns in a row, hold down Shift and click. To select multiple columns out of sequence, hold down the Control Key and click.
- Click the right-pointing arrow to move columns into the Selected Columns box.
- In the Selected Columns box, enter the weight percentage for each item in the text boxes.
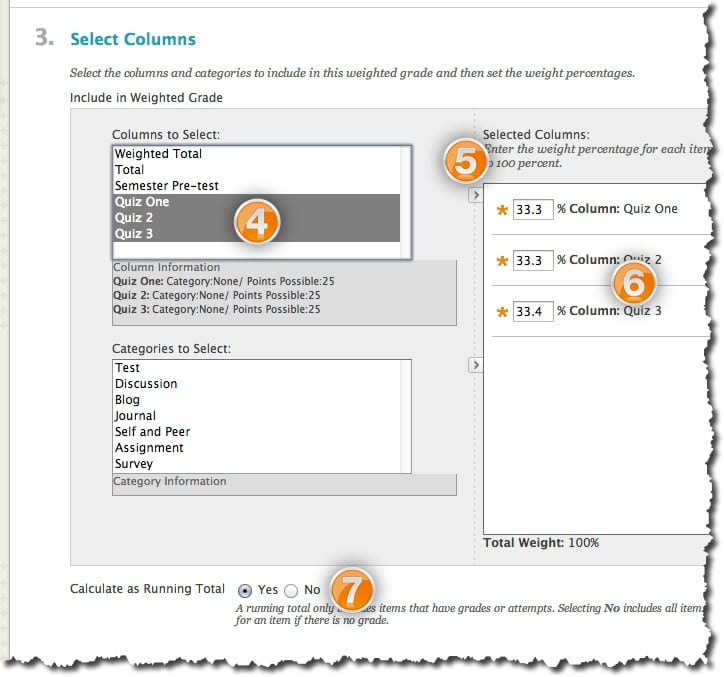
- Select the radio nodes next to the desired Options.
- Click Submit.
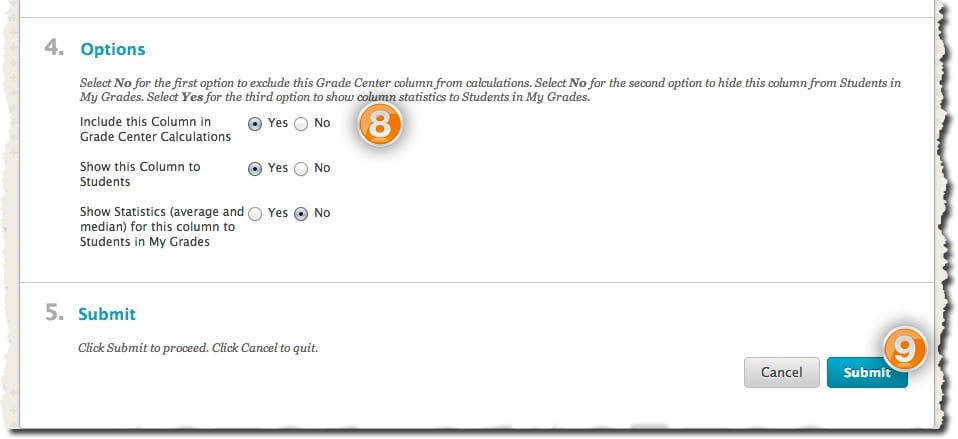
As with other columns, you can choose whether calculated columns are displayed to students.
Table of Contents
Getting started, determining your lti tool version, linking your courses, syncing your roster, setting up your assignments, grading submissions, posting grades, roster-syncing issues, grade-posting issues, embedded window issues.
- LMS Workflow
- Instructor
Using Gradescope with Blackboard as an Instructor
Gradescope integrations with Learning Management Systems (LMSs), such as Blackboard, are available with an institutional Gradescope license . When you access Gradescope through Blackboard, you and your students won't need to create or use a separate Gradescope password, because you will be authenticated via your Blackboard credentials. If you already have a Gradescope account under the email address that's associated with your Blackboard account (e.g., your school email), when you access Gradescope in Blackboard you will be taken to your existing account. If you do end up with multiple accounts under multiple emails, you can merge accounts .
Below is the general process you should follow to be able to use Gradescope with Blackboard. In this guide, you'll find specific details for completing each of these steps and links to other pertinent Gradescope Help Center articles.
- Step 1. Determine your LTI version.
- Step 2. Link your courses.
- Step 3. Sync your roster.
- Step 4. Set up your assignment.
- Step 5. Grade submissions.
- Step 6. Post grades.
An application programming interface (API) is a type of software that allows two apps to communicate with each other. Learning Tools Interoperability (LTI) is a type of software developed by IMS Global Learning Consortium specifically to allow learning systems, such as Blackboard, to communicate with external systems, such as Gradescope. Depending on your institution's configuration, you may be launching Gradescope from Blackboard using LTI version 1.3 or using the older version, LTI 1.0 combined with Blackboard's custom API. Because the process for using Gradescope with Blackboard can differ slightly based on which integration version you have, it's recommended that before you continue on with this page you use one of the methods below to figure out whether your institution is launching Gradescope with LTI 1.0 + API or simply with LTI 1.3.
- Method 1 (recommended): Contact your institution's Blackboard administrator or [email protected] to ask if you're using Gradescope in Blackboard with LTI 1.0 + API or LTI 1.3.
- Method 2: Check your assignment-linking capabilities. To do that in Blackboard Original, go to your course homepage, click Content , click Build Content , and then see if Gradescope is listed as a content option. In Blackboard Ultra, go to your course homepage, click the + button under Course Content, click Content Market , and see if Gradescope Assignment is listed as a content option. If Gradescope is listed as a linkable content option under Build Content or Gradescope Assignment is listed in the Content Market, then your institution is most likely using LTI 1.3. If not, you're most likely using LTI 1.0 + API. Keep in mind that this is not a foolproof method and the best option is to contact either your admin or [email protected] .
- Log in to Blackboard. Click on the Blackboard course you'd like to link to Gradescope. If you don't see the course you need, contact your Blackboard administrator.
- Next, click Tools (Original) or View course & institution tools (Ultra; shown in gif), and then click Gradescope . Depending on your institution's settings, this will launch Gradescope in a new tab or in an embedded window in Blackboard Original/Blackboard Ultra. If Gradescope isn't listed as a tool, contact your Blackboard administrator. Original or Ultra: To figure out if you're using Blackboard Original or Blackboard Ultra course view, check out Blackboard's article on determining your course view .
- Once Gradescope launches, you'll see a dialog box with course-linking options. Choose to link to a new or existing Gradescope course, and then click Link Course to go to the Course Settings page. New Gradescope users: At this point, a new Gradescope account will be created for you if you do not already have one associated with the email address (e.g., your school email) that you use in Blackboard. Existing Gradescope users: If you already have a Gradescope account under the email address that's associated with your Blackboard account (e.g., your school email), a new Gradescope account will not be created for you, and clicking the Gradescope link in Blackboard will take you to your existing account.
- On the Course Settings page, you can update the course title, description, rubric types, and score bounds. Keep in mind that course title and description changes made here will only appear in Gradescope, not in Blackboard.
- When you're finished, click Update Course . Your course is now linked and your students can access this Gradescope course. Now, it's recommended that you sync your roster.
Syncing your roster from Blackboard to Gradescope is slightly different depending on whether you’re using LTI1.0 + API or LTI 1.3. Users of LTI 1.3 may have the option to sync a Blackboard group set to the Sections field in the Gradescope roster.
- Launch your Course Dashboard in Gradescope. If you're continuing from the steps in the section above, you will already be there. If not, log in to Blackboard, click your course, click Tools (Original) or View course & institution tools (Ultra), and then click Gradescope . This will launch your Course Dashboard in Gradescope.
- On your Course Dashboard, expand Gradescope's left sidebar (if it isn't already) and click Roster to get to your Roster page. On your Roster page, click the Sync Blackboard Roster button.

- By default, Gradescope will email users to say that they've been added to the course. If you don't want users to be notified, uncheck "Let new users know that they were added to the course" in the dialog box.
- Click Sync Roster .
- Select your course in Blackboard.
- Select Tools if you are using the Original version of Blackboard or View course & institution tools if you use Ultra.
- Select Gradescope . This will open your course dashboard in the Gradescope view.
- Expand Gradescope’s left sidebar (if it isn’t already) and select Roster .
- Select Sync Blackboard Roster at the bottom of the page. The button may be customized by your institution to reflect whatever you call Blackboard internally. The standard text will display Sync *** Roster .
- Decide whether to allow Gradescope to automatically email users to notify them they have been added to the course.
- The Sections field on the Gradescope roster is used for grading questions by section and is an added column in all data exports.
- Select Sync Roster when you are ready, or Cancel if you change your mind.
View or edit student information by hovering over their name in the roster and selecting Edit . Here you will be shown:
- Email Address
- Section Name (if applicable)
Check out our Adding Students and Staff guide for more tips, like editing your roster or how to add sections manually .
Having issues with your roster sync? See the Troubleshooting section at the end of this page.
Setting up a Gradescope assignment is slightly different depending on whether you're using LTI 1.0 + API or LTI 1.3 in Blackboard. Click the appropriate tab below to see how to complete this part of the process based on which LTI version you're using.
- Navigate to your Assignments page in Gradescope. To do that, log in to Blackboard click your course , click Tools (Original) or View course & institution tools (Ultra), click Gradescope , and then click Assignments once Gradescope launches. If you're already in your course in Gradescope, simply click Assignments in the left sidebar.
- On your Assignments page in Gradescope, click an existing assignment or click Create Assignment to make a new one.
- If you're updating an existing assignment, you can get to your assignment's settings, questions, outline, etc., from Gradescope's left sidebar. Save your updates when you're finished. If you're creating a new assignment, next you'll choose the assignment type and settings . When you're finished, click Create Assignment .
- Based on the type of assignment you chose, you'll then be taken to a screen where you can add your assignment questions, create your outline, upload your autograder file, etc. Check out the suite of guides on the Assignment Workflow if you need help.
- Save your work in Gradescope when you're finished. For student-uploaded assignments, once your release date passes in Gradescope, students will be able to submit work via the Gradescope course link in their Blackboard course under Tools (Original) or View course & institution tools (Ultra).
- If you're using Blackboard Original, go to your course homepage in Blackboard > click Content (left sidebar) > click Build Content (header bar) > select Gradescope . In Blackboard Ultra, go to your course homepage > click the + button under Course Content > click Content Market > you will see two Gradescope buttons > select Gradescope Assignment . This will launch Gradescope. If the Gradescope Assignment button isn't there in Blackboard Ultra: Contact your Blackboard admin. First, verify with them that you're using LTI 1.3. Then ask them what button you should click in the Content Market to link a Gradescope assignment to Blackboard.
- When Gradescope launches, you will see a dialog box about assignment-linking. Decide whether you'd like to create a new Gradescope assignment or link to an existing one (if you have any in this course). Then, click the Link Assignment button.
- If you're updating an existing assignment, you can get to your assignment's settings, questions, outline, etc., from Gradescope's left sidebar. Save your updates when you're finished. If you're creating a new assignment, next you'll choose the assignment type and settings . When you've chosen your settings, click Create Assignment . This will take you to the Content (Original) or Course Content page (Ultra) in Blackboard where you and your students will now see a direct link to this Gradescope assignment.
- In Blackboard, click the assignment link you just created to go back to Gradescope and add or edit your assignment outline, questions, autograder file, etc. Check out the suite of guides on the Assignment Workflow if you need help.
- Save your work in Gradescope when you're finished. For student-uploaded assignments, once your release date passes in Gradescope, students will be able to submit work when they access Gradescope via the assignment link you just created or via the Gradescope course link under Tools (Original) or View course & institution tools (Ultra).
- Launch the Gradescope assignment you'd like to grade. To do that from your Blackboard course homepage, click Tools (Original) or View course & institution tools (Ultra), and then click Gradescope . When Gradescope launches, click your course and then the assignment. Alternatively, if you're using LTI 1.3 and you created a direct assignment link on your Blackboard Content (Original) or Course Content page (Ultra), you can click that link to be taken directly to the assignment in Gradescope.
- When your assignment is open, expand Gradescope's left sidebar (if it isn't already), and click Grade Submissions .

Posting grades is slightly different depending on whether you're using LTI 1.0 + API or LTI 1.3 in Blackboard. Click the appropriate tab below to see how to complete this part of the process based on which LTI version you're using.
- First, make sure you've synced your roster.
- Then to post Gradescope grades to Blackboard as an LTI 1.0 + API user, you need to create or have an existing Blackboard assignment or another type of grade column (Original) or gradebook item (Ultra) in your course that you will connect to your Gradescope assignment. Make sure the overall point value listed in Blackboard for this assignment, grade column, or gradebook item matches the overall point value listed in Gradescope for the assignment. Creating Blackboard assignments, grade columns, and gradebook items: If you need help creating an assignment, see Blackboard's Create and Edit Assignments guide for Original and Ultra users. If you need help understanding or creating grade columns (Original) or gradebook items (Ultra), see Blackboard's Grade Columns guide for Original and Ultra users.

- If you want students to also see their graded, annotated submissions, question-by-question scores, rubrics, and feedback on Gradescope, click the Publish Grades button . If you'd like to, click the Compose Email to Students button at the bottom of the Review Grades page in Gradescope to alert students via email that their grades are now visible. To see what your students will see when they view their grades, check out the article on Using Gradescope with Blackboard as a Student.
- When the dialog box appears, click Post Grades . These grades will now appear in your gradebook in Blackboard. Keep in mind that posting grades to Blackboard will only post the students' final assignment scores from Gradescope to the corresponding Blackboard grade column or gradebook item. Only grades for fully graded submissions (which have a checkmark in the Graded column on the Review Grades page) will be posted. If you don't see a Post Grades button: Go to your Blackboard course. Click your Gradescope assignment link there to launch it. Click Review Grades (left sidebar in Gradescope). The Post Grades button should be in the footer of the Review Grades page now. If that didn't work, contact [email protected] .
Troubleshooting
Was this article helpful, using gradescope with brightspace (d2l) as an instructor, related articles, using gradescope with sakai as an instructor, using gradescope with moodle as an instructor, using gradescope with canvas as an instructor.
Explore how Microsoft's partnership with Khan Academy is enhancing the future of education with AI innovation and tools for teachers >

Watch Reimagine Education and learn what's new with responsible AI in education ›

Empower students and educators with Microsoft Teams for schools
Microsoft Teams for education is a powerful communication app for schools that enhances collaboration and learning. It integrates everyone and everything in one place, and it’s free for students and teachers of all grade levels with a valid email address.
Collaborate seamlessly
Microsoft Teams for schools makes it easy for educators to set up virtual classrooms, keep assignments organized, and collaborate on Word, Excel, and PowerPoint files in real time.
Support inclusivity
Supplement your in-classroom activities with personalized tools designed to accommodate the diverse learning styles of every student, from K-12 to higher education.
Communicate securely
Reach out to students, staff, parents, and guardians in a secure digital environment—including video conferencing and supervised messaging for students.
Connect, collaborate, and educate, all in one place

Encourage independent learning
Access personalized tools that allow students to practice and learn on their own–with help from our AI-assisted digital learning coaches and built-in progress trackers.
- Build literacy confidence with Reading Progress
- Improve public speaking skills with Presenter Coach
- Sharpen professional expertise with Career Coach
- Track each student’s progress with Educational Insight
Develop social skills
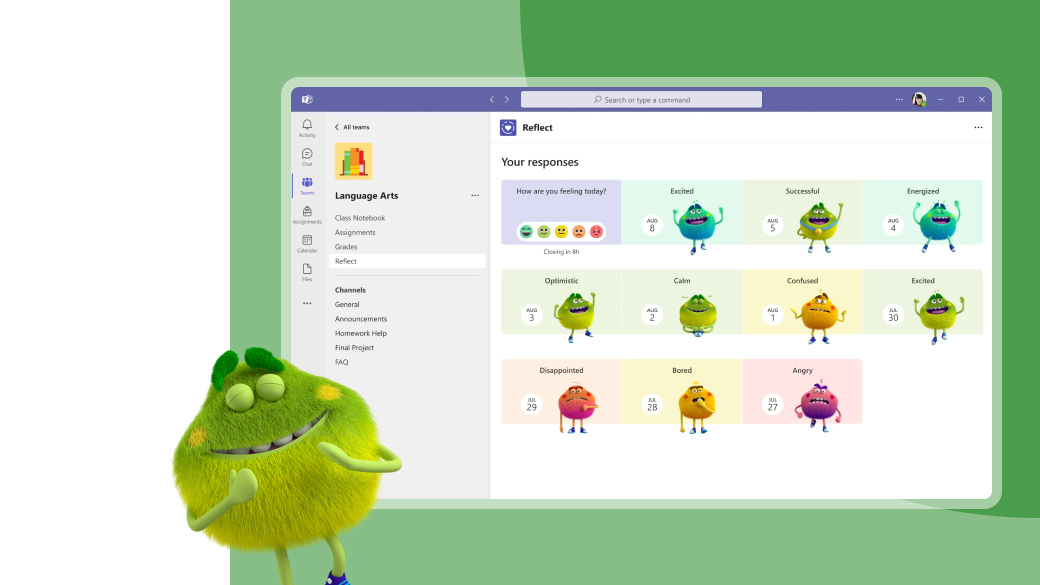
Support students’ emotional and social well-being and provide a safe space to navigate feelings with age-appropriate activities that promote social-emotional learning (SEL).
- Check in on students’ emotional states with Reflect
- Bring emotions to life with the Feelings Monster
- Have fun with ready-to-play SEL games in Kahoot!

Go beyond the classroom
Use Microsoft Teams for education to bridge the gap between educational and professional environments with hands-on learning tools that help students succeed in the classroom and beyond.
- Submit, save, and extract information from handwritten notes and assignments with Office Lens
- Divide students into smaller breakout rooms for ice breakers, exam prep, discussions, or group work
- Use the Assignments and Grades feature to assign tasks, quiz students, use grading rubrics, and track individual and class-wide achievements over time

Address learning barriers
Implement proven techniques that make the educational experience more accessible and inclusive for all students regardless of their age, language, fluency, or abilities.
- Get access to ASL visibility features, text decoding solutions, and much more with Immersive Reader
- Translate lectures or lessons into a student’s language of choice with OneNote Live Captions
Start using Microsoft Teams for education today

Use Teams for free
Students and teachers from K-12 to collegiate level can use Teams for free with an eligible active school email.
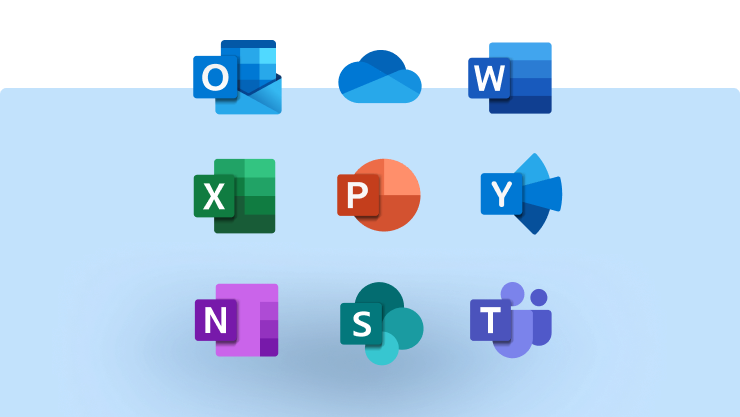
Do more with Microsoft 365
Explore a range of affordable pricing plans and get access to even more of Microsoft’s education tools, services, and apps for schools.

Access files from anywhere
With Teams + Office 365 , you can sync up all your apps for school, documents, and resources in one secure location.
- Co-author Word, Excel, and PowerPoint files on any device
- Get creative and visualize ideas on Whiteboard
- Search and share lesson plans and assignments with OneNote
Integrate into your LMS
Incorporate Microsoft’s suite of educational tools directly into your school’s learning management systems (LMS).
- Bring Office 365 into your workflows with OneDrive LTI
- Manage and join meetings with Teams Meetings LTI
- Sync with Canvas, Blackboard, Moodle, and more

Trusted by 270k+ educational organizations
We have a whole new tool kit with Teams that we can use to do things we’d never considered before, and that opens up possibilities for our students and for our teachers that benefit everyone.
I think that's what Teams does. It's amazing, because we think about how a conversation is carried today and how kids have conversations today.
We were just starting to dabble in Teams, so when we went remote, we turned around and said everyone is using Teams. Now we have teachers saying they will never abandon Microsoft Teams. They say, ‘I cannot imagine what I did before!’ and that has been essential for finding new ways of collaboration for the students.
Make the most of Teams
Learn how to use key Teams features like Whiteboard, polling, Spotlight, and more.

Watch step-by-step tutorials on how to use a range of Teams features.
Interactive demos
Get hands-on experience with all of Microsoft’s Education tools.

Find resources and trainings for how to use Teams to help improve student outcomes.

Getting started guide
Students, teachers, and parents alike can learn how to use Teams in a few simple steps.

Education support center
Get answers to your questions, find best practices, and learn from the Microsoft Education community.
Microsoft support
Find help with all things related to Microsoft products, apps for schools, software, and services.
Microsoft Everyday Real Learning Community
Connect with a global community dedicated to improving distance learning with help from peers and experts.
Frequently asked questions
- Troubleshooting
- Safety and security
- Additional resources
Q: How do I sign in to Microsoft Teams for education?
To access Microsoft Teams for Education, click Sign In and enter the email address and password provided by your school. If your school is already signed up for Office 365 or Microsoft 365 for Education and has turned on access to Microsoft Teams, or if your school is an accredited academic institution, you’ll be able to sign in or sign up. If you’re having trouble, please contact your school’s IT administrator.
Sign in to Teams for students
Q: How do I create class and staff teams?
Learn how to create class and staff teams in Microsoft Teams in just a few simple steps.
Create class team
Create staff team
Q: How do I create, attend, and run meetings in Microsoft Teams for schools?
Get clear guidance for creating, attending, and running meetings—with specific tips for educators, students, and administrators.
Create and run meetings
Q: How do I get support if Teams isn't working?
Need help? Try these troubleshooting tips, email Office Support with your question, visit the Office Support Center, or ask the Microsoft Education community.
Teams troubleshooting guide
Contact support
Visit support center
Ask the community
Q: Where can I propose ideas for new Teams features for schools?
Tell us how we can make Teams better for your classroom and staff with our Teams UserVoice forum.
Suggest new features
Q: What control do educators and school IT have for student safety in online meetings?
Educators and IT administrators have many options to keep students safe before, during, and after classes held in online meetings and in student-to-student interaction. Learn more about how educators can help keep students safe in our Teams guide for IT professionals and educators.
Q: Where can I find more professional development and education training resources for Teams?
Build your remote and hybrid teaching skills with free online training and resources, including live Stores sessions, professional development training, on-demand content, and more.
Get started on Teams Educator training
Go to Teams webinar playlist
Get started with online Teams training course
Q: I'm a parent or guardian. Are there resources to help with distance learning?
Yes! Check out some educational resources for parents to learn more about how to keep distance learning engaging, and find additional activities for your children.
Explore more of Microsoft
Microsoft 365 Go beyond Teams with a suite of solutions.

- SCHOOL STORIES
- MICROSOFT LEARN EDUCATOR CENTER
- CONTACT SALES
Follow this page
- Microsoft Education Facebook page.
- Microsoft Education Twitter page.
- Microsoft Education Instagram.
- Microsoft Education Linked In page.
- Microsoft Education Pintrest page.
Share this page
- Share this page on Facebook.
- Share this page on Twitter.
- Share this page on Linked In.
- Share this page on Pintrest.
COMMENTS
Typically, assignments aren't graded automatically. Your instructor must grade each assignment and post the grade and feedback. If your instructor needs to grade your assignment, Not graded appears in the Grading section in the assignment's side panel. Your instructor may choose not to reveal the correct answers to automatically scored ...
Anonymous grading. On the Review Submission History and My Grades pages, a Graded Anonymously icon appears if your assignment was graded without your name shown. Your instructor may assign multiple graders to grade your assignments to eliminate bias. Your instructor determines if you can see feedback from all graders.
When you access an assignment, the Content and Settings page displays the instructions and files you provided, and details such as the due date. Select the Settings icon to make changes. For example, you can change the grading schema at any time and the change will show to students and in your gradebook. View the rubric.
Grade Assignments. Dig deeper into assignments grading on Learn Ultra. Find how to grade group assignments, inline grading, anonymous grading and parallel grading. Anonymous Grading. On this page. Learn - instructor. ... Blackboard has many products. Let us help you find what you need.
Create an assignment. You can create assignments in content areas, learning modules, lesson plans, and folders. From the Assessments menu, select Assignment and provide the name, instructions, and the files students need. You can use the functions in the editor to format text and add files. You can also add files in the Assignment Files section.. In the Blackboard mobile app, assignment ...
Delegated Grading Examples. Grade Group Assignments. Assignment Inline Grading. Anonymous Grading. Delegated Grading.
This comprehensive overview of the various details in the Assignments tool will help instructors understand all of the most important aspects of managing and...
Grading Assignments in Blackboard. This page explains how to open Assignments in order to grade them and how to handle multiple attempts and late assignment submissions. In Blackboard, Assignments refers to documents or files submitted using the Assignment tool. These can be papers, reports, essays, presentations, Kaltura videos, and so on.
To learn more: https://help.blackboard.com/Learn/Instructor/Ultra/Assignments/Grade_Assignments/Assignment_Inline_Grading
Assignment submissions created through the editor aren't compatible with inline grading. Bb Annotate is supported on current versions of Firefox, Chrome, Edge, and Safari. As part of the responsive design, the menu display changes based on the screen size. On medium and small screens, the Document View settings display the page number you're ...
QUICK STEPS: grading assignments. On the Grade Assignment page, view the submission text, attached files, and comments made by the student. Type a Grade for the assignment. Optionally, type comments in the Feedback to User box and attach a file for the student to review. Use the Text Editor functions to format the text and add files, images ...
Your course will most certainly have multiple assignments in it, requiring students to create and upload a document that you will then review, grade and prov...
Blackboard gathered extensive feedback from faculty to make the new workflow intuitive to use and to eliminate barriers that make grading cumbersome. This tutorial will show you how to use the Flexible Grading workflow to review, annotate, and enter grades for assignments in the Ultra Course View. Learn More
Assignments in Blackboard (v.2) 1 of 13 Office of Faculty Development & Instructional Technology : [email protected] 2/10/2015 ... Word) without having to download the files or leave the Blackboard Grade Assignment" " page. These mark ups will also be viewable in the Grading history. nline Grading will As mentioned above, I work if .
Assignments in Blackboard Learn. Within Blackboard Learn for both Original and Ultra courses, assignments allow instructors to assess student performance just as they would on paper, from open-ended homework assignments to multiple choice quizzes and more. To learn more about creating, editing, and using other types of content, visit our ...
Learn how to set an assignment grade as a checkmark in Grade Center. The checkmark will show when the assignment is submitted as completed work.
Assignment Grade Settings — Blackboard Help; Quick Guide — SafeAssign; Ultra View Course The following steps will guide you in creating an assignment in an Ultra View course: Hover over the area in the course site that you want to place the assignment in, and a purple line with a plus sign and a circle around it will appear. ...
Use the Assignment Manager in Blackboard for collecting student work electronically The Assignment Manager in Blackboard enables users with the role of Faculty or TA in Blackboard to create Assignments in any content areas and post them for Students to complete. Creating an assignment automatically creates an item in the Grade Center that holds ...
About Press Copyright Contact us Creators Advertise Developers Terms Privacy Policy & Safety How YouTube works Test new features NFL Sunday Ticket Press Copyright ...
In Grade Center, on the Action Bar, click Create Calculated Column to access the drop-down list. Select Weighted Column. On the Add Weighted Column page, complete the Column Information. In the Columns to Select box, click a column title to select it. To select multiple columns in a row, hold down Shift and click.
Weighting grades in Blackboard allows you to show your students what their standing is in your class. Weighting grades by category takes into account all the tests, exams, quizzes and assignments, then displays the students standing based on percentages allocated to each category (e.g. - 10% attendance, 15% homework, etc.).
Enable delegated grading for an assignment or test. From the Gradebook, select Edit for an assignment or test. Select Assignment Settings or Test Settings to open the panel. Under Evaluation options, select Delegated Grading . Select Assign graders. From the Delegated Grading page, select a group set. For each group in the set, select the ...
Method 1 (recommended): Contact your institution's Blackboard administrator or [email protected] to ask if you're using Gradescope in Blackboard with LTI 1.0 + API or LTI 1.3. Method 2: Check your assignment-linking capabilities. To do that in Blackboard Original, go to your course homepage, click Content, click Build Content, and then see if ...
• Instructors and Graders will utilize Blackboard and Zoom to interact with teacher participants and grade assignments ELIGIBILITY REQUIREMENTS: • NYCDOE licensed, appointed, and tenured teacher with a minimum of three (3) years of teaching experience;
Use the Assignments and Grades feature to assign tasks, quiz students, use grading rubrics, and track individual and class-wide achievements over time Address learning barriers Implement proven techniques that make the educational experience more accessible and inclusive for all students regardless of their age, language, fluency, or abilities.
MRK620 - Strategic Analysis Course Grading, and Case Assignments Overview & Instructions The debrief and discussion process is an important part of the learning process when cases are used in a course which requires your thoughtful and enthusiastic participation in each of the discussion sessions. Your overall grade on cases (excepting the major group project) can be adjusted +/- 10% of the ...