How to Set Static IP Address on Ubuntu Server 22.04
In this post, we will cover how to set static ip address on Ubuntu server 22.04.
It is highly recommended to have a static ip on linux server because it would be persistent across the reboot. Static IP plays an important role for servers like Mail Server, Web Server and File server etc.

Prerequisites
- Minimal Installed Ubuntu Server 22.04
- Regular User with sudo admin rights
In Ubuntu server 22.04, networking is controlled by netplan utility , so we will use netplan to configure static ip address on Ubuntu server.
Note: we cannot use nmcli utiltity as it is not the part of default installation on Ubuntu server.
Setting up Static IP address on Ubuntu Server 22.04
Login to your Ubuntu server 22.04, look for the netplan configuration file. It is located under /etc/netplan directory.
Run below cat command to view the contents of ‘00-installer-config.yaml’
Note: Name of configuration file may differ as your per setup. As it is an yaml file, so make sure to maintain the indentation and syntax while editing.

As per above output, it says that we have ens33 interface and it is getting ip from dhcp server. Alternate way to view interface name is via ip command.
Now, to configure static ip in place of dhcp, edit netplan configuration file using vi or nano editor and add the following content.
save and close the file.

In the above file we have used following,
- ens33 is the interface name
- addresses are used to set the static ip
- nameservers used to specify the DNS server ips
- routes used to specify the default gateway
Note: Change the IP details and interface name as per your environment.
To make above changes into the effect the apply these changes using following netplan command,
Run following ip command to view the ip address on interface,
To view the default route, run
Output of above commands,

Perfect, above commands’ output confirms that static ip and route has been configured successfully.
That’s all from this post. Kindly do post your queries and feedback in below comments section.
11 thoughts on “How to Set Static IP Address on Ubuntu Server 22.04”
How do I use Netplan to set up a static IP address on WIFI?
change the network device “ens33” to something else, it will be listed when you run “ip a”; it;s probably wlan0 but that’s not guaranteed.
there will be a config file for the wifi interface. look for something like 00-installer-config-wifi.yaml
Hey! thanks I had problems before setting up the DNS and none config would work! This one did and you made this post really simple to follow!
Your text for configuring a static IP address does not work in my Ubuntu 20.04.5 server’s NIC. No matter how I space or tab the indentations, I get “Ivalid YAML: inconsistent indentation: addresses:
I’ve been at the problem for a couple of weeks, with no fix in site; no spacing or tabbing change I make fixes it. Can anyone please advise me? Thanks.
try paste the YAML into here ‘https://www.yamllint.com/’
Copy paste not work here, you should try typing instead or if you paste, try to delete all the space before each line and tab key until the same format
The spacing must be done with the space key. If you try to make spaces in a yaml file with the tab key it will not work. Also you should let yamllint.com correct the file for you
Your article is quite nice and clear! but after followed, following error occurred when ping google.com: “temporary failure in name resolution”, meanwhile localhost can be visited. Is anyone facing this issue as well? I’ll quite appreciate it if can get some advise.
can we use default DHCP ip configuration along with another static ip in ubuntu 22.04 ? i already have ens33 then i added eth0 as static ip , netplan apply did not thrown any errors but unable to see my static ip , when i do ifconfig 🙁 even after reboot its not applying, any suggestions..
i successfully set up my static ip but I cant ping to 192.168.1.1 why
Leave a Comment Cancel reply
How to Configure Static IP Address on Ubuntu 22.04 LTS and 22.10
Switching from dynamic IP allocation to static IP addresses is easy on Ubuntu 22.04 "Jammy Jellyfish" and 22.10.
The IP addresses of most devices today are generated by Dynamic Host Configuration Protocol (DHCP) servers. A DHCP server assigns a dynamic IP address to your device when it's connected to a network. Thus, you have the chance to change this IP address from time to time.
On the other hand, a static IP refers to a fixed, immutable address, different from dynamic IPs. You can set static IP settings for Ubuntu 22.04 LTS and 22.10 in three different ways. Here's how to get started.
Understanding IP Configuration in Ubuntu
Ubuntu's progression in network management has made configuring settings like the static IP more user-friendly. The feature to set a static IP in Ubuntu 22.04, in particular, has advantages in terms of network efficiency and stability.
Unlike dynamic IPs, which might vary over sessions, a static IP in Ubuntu remains consistent. This is especially advantageous for servers where consistent address recognition is paramount. For these servers, static IP configurations can become a necessity.
While the graphical interface offers a more intuitive way to handle IP configurations, using the static IP command line can offer more precision. For users who want granular control over their network configurations, command-line methods are a preferred choice. By mastering this method, users can ensure optimal Ubuntu IP configuration for their needs.
However, the benefits of a static IP in Ubuntu, especially in the 22.04 version, come with responsibilities. Ensuring that these IPs are correctly set up is crucial, as misconfigurations can lead to network vulnerabilities.
So follow the steps below to configure a static IP address on your Ubuntu machine correctly.
Set a Static IP on Ubuntu With the nmcli Command
It's pretty easy to configure Ubuntu 22.04 static IP settings using the nmcli command . nmcli is a text-based utility used to check the status of the wired connections you are using on your device.
With this command, you can access additional networking information such as your connection status, the name of your host device, and general permissions in your network configuration. If you're aiming to set a static IP on an Ubuntu server, this command proves invaluable.
You can get information about your connection with:
The output of this command will be as follows:
Create a static link with the command given below. Then, manually configure the enp0s3 and ipv4 settings with the appropriate parameters in the nmcli command:
If you use the nmcli connection show command again, you can see that the static link has been added.
After this process, add the static connection you created to the DNS IP:
Now use the command below to activate the connection:
If the output displays "connection successfully activated," you've successfully set up a static IP address on your machine.
You can consider using static IP addresses to avoid connection problems caused by dynamic IP addresses. A static IP address allows you to have a fixed identity and location when connected to the internet.
You can verify the static IP you want to assign to your device by running:
Using netplan for Static IP Settings on Ubuntu
Just like nmcli, another command you can use for setting a static IP on Ubuntu is netplan. You can easily make Ubuntu static IP settings using the netplan command in 22.04 LTS and 22.10 versions. To do this, follow the steps below.
First, find out the name of your network interface using:
What you see here is your network interface name. This name may be different on each device.
Now, create a file named 01-netcfg.yaml in the /etc/netplan folder. Edit it with your favorite text editor.
Add the following lines to the file:
As you can see, you have disabled the DHCP IP setting with the dhcp4: no statement. You've then added the IP address and DNS settings assigned by Google.
After saving this file, run the following to apply the changes:
Configure Static IP Settings on Ubuntu Graphically
The graphical network interface in Ubuntu 22.04 is quite useful if you don't want to use the command line. So much so that you can easily set the Ubuntu static IP address using this interface.
To do this, click on the Network icon in the upper right corner of your desktop. Then, select Wired Settings from the drop-down menu. Click on the Gear icon to open the settings window.
Then, switch to the IPv4 tab in the window that opens.
As you can see, DHCP is enabled by default. Change the IPv4 Method to Manual as you want to use a static IP instead of a dynamic one. Next, change your address, netmask, and gateway settings. Finally, modify your DNS setting and click the Apply button.
You must restart this wired connection for all these actions to take effect. To do this, simply toggle the switch next to the network name on and then off.
Why Should You Use Static IP Addresses on Ubuntu?
You've now understood how to configure a static IP in Ubuntu, especially in the "Jammy Jellyfish" 22.04 LTS version and 22.10, using both graphical and command-line methods with nmcli and netplan.
Due to insufficient IP addresses, some service providers may assign the same address to two different users. In this case, connection problems can occur. Using static IP addresses instead does not cause such problems as it is user-specific, but beware as someone can misuse your IP address in several ways.
How to Set a Static IP Address On Ubuntu 22.04
The first task anyone would do after installing Ubuntu is setting an IP address to a system to connect to the network/internet. If the Wi-Fi router, ISP, or network doesn’t provide DHCP services, you must manually assign IP addresses.
Here, we will see how to set a static IP Address on Ubuntu 22.04, using,
- GNOME Control Center
- NetworkManager
You can use any method to set a static IP address on Ubuntu 22.04.
Find Network Interfaces on Ubuntu 22.04
You can run any of the below commands in a terminal to get a list of network interfaces available on the system.
The output of the ifconfig command on a desktop:
The output of the ifconfig command on a laptop:
Here, we will see how to configure a static IP for enp0s3 (Wired) / wl01 (Wi-Fi).
IP Address : 192.168.0.10 Netmask : 255.255.255.0 Gateway : 192.168.0.1 DNS Server 1 : 192.168.0.1 DNS Server 2 : 8.8.8.8 Domain Name : itzgeek.local
Set Static IP Address on Ubuntu 22.04 Desktop
1. using gnome network manager.
Using the GNOME network control center to set a static IP address on In Ubuntu 22.04 desktop is straightforward.
Set IP for Wired Interface using GNOME
Open the Gnome control center using the gnome-control-center network command or go to Activities >> Settings >> Network .
Click on the gear icon on the Wired interface page and then IPv4 tab >> Manual >> Enter IP address, Netmask, Gateway, DNS (Toggle to disable Automatic DNS configuration) >> Apply .

Finally, use the toggle in the Network page to disable and enable the network interface to apply the IP address.
Set IP Address for Wi-Fi using GNOME
Open the Gnome control center using the gnome-control-center wifi command or go to Activities >> Settings >> Wi-Fi .
Click on your Wifi router name and then enter the router’s password to connect. Your laptop will automatically receive an IP address from a Wi-Fi router with a built-in DHCP service on a successful connection.

To assign a static IP address or Wi-Fi interface, click on the gear icon on the Wi-Fi interface page and then IPv4 tab >> Manual >> Enter IP address, Netmask, Gateway, DNS (Toggle to disable Automatic DNS configuration) >> Apply .

Finally, disable and enable the Wi-Fi interface to apply the IP address.
2. Using Netplan
Netplan is a utility for easily configuring networking on a Ubuntu system. It reads the configuration files .yaml present in the /etc/netplan directory.
This utility supports both networkd and Network Manager as backends. However, using Network Manager as a backend renderer: NetworkManager is recommended for the Ubuntu desktop. The remaining configurations are the same as that of the networkd .
3. Using NetworkManager CLI
Set ip for wired interface using nmcli.
First, let us list the available network connections.
Then, configure static IP address to wired interface.
Finally, run the below commands to apply the IP address.
Set IP Address for Wi-Fi using nmcli
First, list the available Wi-Fi access points using the below command.
Next, connect to the Wi-Fi access point.
And then, configure static IP address to Wi-Fi interface.
Finally, run the below commands to apply the IP address
Set Static IP Address Using NetPlan on Ubuntu 22.04 Server
Netplan is a network configuration utility that reads YAML files and generates all network configurations for the renderer tool (NetworkManager or networkd) to configure the network on a system.
Netplan configuration files are found in the /etc/netplan/ directory.
Remove any configuration files .yaml present in the /etc/netplan directory.
Set IP for Wired Interface using Netplan
Now, create a new netplan configuration for the wired network interface.
Then, make changes to the below information and use it for your requirement.
And then generate the required configuration for the renderers.
Finally, apply all network configurations and restart renderers.
Set IP Address for Wi-Fi using Netplan
Wi-Fi Interface Name : wl01 Wireless Access Point Name : Raj Wireless Access Point Password : MyPass
First, create a new netplan configuration for the wired network interface.
Verify Static IP Address on Ubuntu 22.04
Verify the static IP address using the below commands.
Also, verify the DNS server’s entries.
That’s All.
How to Install Brave Browser on Fedora 36 / Fedora 35
How to Install phpMyAdmin with Nginx on Ubuntu 22.04
How to Install MySQL on Ubuntu 22.04
How to Install Cacti on Ubuntu 22.04
How to Install pgAdmin on Ubuntu 22.04 / Ubuntu 20.04
How to Set up DNS Server on Ubuntu 22.04 / Ubuntu 20.04
How to Install PostgreSQL on Ubuntu 22.04
How to Install Plex on Ubuntu 22.04
- CentOS 8 / RHEL 8
- CentOS 7 / RHEL 7
- CentOS 6 / RHEL 6
- LinuxMint 20
- Linux Mint 19
- Linux Mint 18
- Rocky Linux 8
- Ubuntu 22.04
- Ubuntu 20.04
- Ubuntu 18.04
- MySQL / MariaDB
- Other Tools
How to Configure Static IP Address on Ubuntu 22.04
After installing Ubuntu 22.04 the default network interface assigns an IP address using the DHCP server. Also, the wireless network will be active and enable networking over the wifi network.
You can also configure the network interface with static IPv4 addresses. Ubuntu 22.04 uses the Netplan as a network manager.
This tutorial helps you to configure network interfaces on Ubuntu 22.04 Desktop and Ubuntu 22.04 Server editions. The desktop users can use any one of the below methods but the server users that have CLI only access use the second method to edit network interface configuration files.
Method 1: Configuring Static IPv4 Address on Ubuntu 22.04 Desktop
The Ubuntu Desktop editions have a graphical interface for configuring the network interfaces. Follow the below steps to configure a static IP address on Ubuntu 22.04 Desktop system.
- Click the network icon in the upper-right corner.
- Then expand the Wired Connected dropdown.
- Now, click on Wired Setting as shown below image.

- A network settings dialog box will appear.
- Now, click “Network” in left sidebar.
- Under the Wired section, click the Gear icon as showing in below image

- A new Wired dialog box will appear.
- Now, click on “IPv4” tab.
- Set IPv4 Method to Manual
- Input a valid IP address, Netmark and Gateway address
- Set the DNS server (optional)
- Click Apply button to save changes

- All done. Ubuntu Desktop system IP address is now changed.
Method 2: Configuring Static IPv4 Address on Ubuntu 22.04 Server with CLI
Server editions are installed without any graphical interface. In that case, you need to configure the IP address using the command line.
Ubuntu uses the Netplan as a network manager that is responsible for configuring the network interfaces. Follow the below steps:

Add the network configuration in YAML format as below:
In the above configuration:
- eth0 – is the network interface name
- addresses – is used to configure IPv4 address on an interface. Make sure to define CIDR. You can add multiple addresses here
- nameservers – Set the name servers here. 8.8.8.8 and 8.8.4.4 are Google’s name servers
- routes – This is used to set gateway on your system.
In this tutorial, you have learned 2 methods of configuring network interface on Ubuntu 22.04 systems. The first method uses the GUI interface to set up a static IP address. The second method provides you with the instructions to configure the network interface via the command line using Netplan.
You can also configure multiple IP addresses on a single network interface.
Related Posts
Apt configuration file options /etc/apt/apt.conf.

A Step-by-Step Guide to Installing OpenDKIM with Postfix on Ubuntu – Unleash the Power of DKIM!

How to Install and Use Composer on Ubuntu 22.04
10 comments.
**networkctl list** IDX LINK TYPE OPERATIONAL SETUP 1 Io loopback carrier unmanaged 2 eth0 ether routable configured
**route** Destination Gateway Genmask ….. iface default 192.168.178.1 0.0.0.0 …… eth0 192.168.178.0 0.0.0.0 255.255.255.0 …… eth0
**/etc/netplan/000-installer-config.yaml** network: version: 2 renderer: networkd ethernets: eth0: addresses: – 192.168.178.43/24 nameservers: addresses: [8.8.8.8] routes: – to: default via: 192.168.178.1
After this `ip-a` confirms i have ip address 192.168.178.43, but `ping -4 192.168.178.1` says: Destination Host Unreachable
Any ideas on how to change? I only have CLI, no GUI running
Oh man bring back /etc/network/interfaces
If you use the GUI, you need to disable and then enable the connection. Just clicking on ‘Apply’ doesn’t change anything.
I am getting an error: Error in network definition expected mapping (check indentation) network:
Any help would be great!
When I set – to: default via: 192.168.1.1 I get an error : could not find expected ‘-‘ before via and when I add this ‘-‘ before via, then I get : error in network definition: global unicst route must include both ‘to’ and ‘via’ IP.
That’s a nightmarre to configure a simple eth0 using CLI.
I have again verified the configuration file and it works fine for me. Make sure that JSON is properly formatted and any extra or less space may cause syntax issues.
It is warning that gateway4 is depracated and default routes should be used instead.
Thanks, Ken, article is updated accordingly.
gateway4: is no longer allowed as an option in Ubuntu 22.04
Now requires
routes: – to: default via: 192.168.1.1
Thanks, Passerby, gateway4 works but as its deprecated, I have updated the article to routes.
Save my name, email, and website in this browser for the next time I comment.
Type above and press Enter to search. Press Esc to cancel.
How-To Geek
How to set a static ip address in ubuntu.
When static is the way forward.
Quick Links
What is a static ip address, setting a static ip in ubuntu, set a static ip in ubuntu with the gui, connection convenience, key takeaways.
After gathering your connection name, subnet mask, and default gateway, you can set a static IP address in the terminal using the nmcli command. Or, in the GNOME desktop, open your connection settings and click the + icon, then enter the info for your static IP address there.
Your home network relies on IP addresses to route data between devices, and sometimes on reconnecting to the network a device's address can change. Here's how to give an Ubuntu Linux computer a permanent IP address that survives reboots.
Everything on your network home network, whether it's using a wired connection or Wi-Fi, has an IP address . IP stands for Internet Protocol. An IP address is a sequence of four numbers separated by three dots. Each IP address that is unique within that network.
IP addresses act as numeric labels. Your router uses these labels to send data between the correct devices. Usually, your router assigns IP addresses. It knows which IP addresses are in use and which are free. When a new device connects to the network, it requests an IP address and the router allocates one of the unused IP addresses. This is called DHCP, or dynamic host configuration protocol .
When a device is restarted or powered off and on, it may receive its old IP address once more, or it might be allocated a new IP address. This is normal for DHCP and it doesn't affect the normal running of your network. But if you have a server or some other computer that you need to be able to reach by its IP address, you'll run into problems if its IP address doesn't survive power downs or reboots.
Pinning a specific IP address to a computer is called allocating a static IP address . A static IP address, as its name suggests, isn't dynamic and it doesn't change even if the computer is power-cycled .
Nmcli is the command-line network manager tool , and can be used to change your IP address, configure network devices, and --- relevant to our purposes --- set up a static IP in Ubuntu.
We're demonstrating this technique on Ubuntu 22.04 LTS, but it ought to work on any Linux distribution, including Ubuntu 23.04. The nmcli tool was released in 2004, so it should be present on just about any standard distribution.
Let's take a look at the network connections that already exist on the computer. We're using the connection command with the show argument.
nmcli connection show
This displays some information about each connection. We only have a single connection configured.
The output is wider than the terminal window. This is the information that we're shown.
- Name : Our network connection is called "netplan-enp0s3."
- UUID : The universally unique identifier Linux uses to reference this connection internally.
- Type : This is an ethernet connection.
- Device : This connection is using the "enp0s3" network interface. It's the only network card in this computer.
We can use the ip command to discover the IP address this computer is using.
In the output we can see the "enp0s3" entry, and its current IP address, 192.168.86.117. The "/24" is a shorthand way of saying that this network uses a 255.255.255.0 subnet mask . Take a note of this number, we'll need to use it later.
We need to choose the IP address we're going to set as our static IP address. Obviously, you can't use an IP address that is already in use by another device. One safe way to proceed is to use the current IP address assigned to the Ubuntu system. We know for certain that nothing else is using that IP address.
If we want to use a different IP address, try pinging it. We're going to test whether IP address 192.168.86.128 is in use. If everything else on your network uses DHCP and you get no response to the ping command, it should be safe to use.
ping 192.168.86.128
Even if another device had previously used that IP address, it'll be given a new IP address when it next boots up. Nothing responds to the ping requests, so we're clear to go ahead and configure 192.168.86.128 as our new static IP.
We also need to know the IP address of your default gateway , which will usually be your broadband router. We can find this using the ip command and the route option, which we can abbreviate to "r."
The entry that starts with "default" is the route to the default gateway. Its IP address is 192.168.86.1. Now we can start to issue commands to set up our static IP address.
The first command is a long one.
sudo nmcli con add con-name "static-ip" ifname enp0s3 type ethernet ip4 192.168.86.128/24 gw4 192.168.86.1
Taken in small chunks, it's not as bad as it looks. We're using sudo . The nmcli arguments are:
- con : Short for "connection."
- add : We're going to add a connection.
- con-name "static-ip" : The name of our new connection will be "static-ip."
- ifname enp0s3 : The connection will use network interface "enp0s3."
- type ethernet : We're creating an ethernet connection.
- ip4 192.168.86.128/24 : The IP address and subnet mask in classless inter-domain routing notation . This is where you need to use the number you took note of earlier.
- gw4 192.168.86.1 : The IP address of the gateway we want this connection to use.
To make our connection a functioning connection, we need to provide a few more details. Our connection exists now, so we're not adding anything, we're modifying settings, so we use the mod argument. The setting we're changing is the IPv4 DNS settings. 8.8.8.8 is the IP address of Google's primary public DNS server , and 8.8.4.4 is Google's fallback DNS server.
Note that there is a "v" in "ipv4." In the previous command the syntax was "ip4" without a "v." The "v" needs to be used when you're modifying settings, but not when adding connections.
nmcli con mod "static-ip" ipv4.dns "8.8.8.8,8.8.4.4"
To make our IP address static, we need to change the method which the IP address obtains its value. The default is "auto" which is the setting for DHCP. We need to set it to "manual."
nmcli con mod "static-ip" ipv4.method manual
And now we can start or "bring up" our new connection.
nmcli con up "static-ip" ifname enp0s3
We didn't get any error messages which is great. Lets use nmcli to look at our connections once more.
nmcli con show
Here's the output:
Our static-ip connection is active and using device "enp0s3." The existing connection "netplan-enp0s3" is no longer associated with a physical network interface because we've pinched "enp0s3" from it.
Click the icons at the far-right end of the system bar to show the system menu, then click on the "Wired Connected" menu option. If you're using a wireless connection, instead click the name of your Wi-Fi network.
The available connections are displayed. A dot indicates which is in use. Click the "Wired Settings" or "Wi-Fi Settings" menu option. The details of the active connection are displayed.
If you followed our previous instructions the new connection will be the active connection. We can see our new "static-ip" connection has the IP address, default gateway, and DNS servers that we set for it.
To create a new connection using the "Settings" application, click the " + " icon on the "Networks" page, above the list of wired connections.
A dialog appears. We need to provide a name for our new static IP connection.
We're calling our new connection "static-2." Click the "IPv4" tab.
Select the "Manual" radio button, and complete the "Address", "Netmask", and "Gateway" fields. Also complete the DNS field, and then click the green "Apply" button. Note the comma between the DNS entries.
Our new connection is listed in the "Wired" connections pane.
You can swap between the available connections by clicking directly on their names.
If you want to modify a connection after you create it, click the cog icon. In this case, we'll enter the settings for the "static-ip" connection.
A dialog box opens. Click on the "IPv4" tab.
Because we set our new IP address to be static, the "Manual" radio button is selected. You could change this back to DHCP by selecting the "Automatic (DHCP)" radio button, and clicking the green "Apply" button.
Using the nmcli command or the GNOME desktop and apps, you can hop between network connections very easily and very quickly.
It's more convenient to have a selection of connection profiles and move between them as you need to, rather than to have one that you keep editing. If something goes horribly wrong with the connection you're editing or adding, you can always fall back on one of the existing connections.
How to Configure Static IP Address on Ubuntu 22.04

An IP address identifies every device on the internet, and the purpose of the IP address is to handle connections between devices that send and receive information across the network.
It is a string of numbers separated by periods ranging from 0.0.0.0. to 255.255.255.255. The public IP address can be public, private, dynamic, consumer, or static.
In this tutorial, we are going to explain to you how to configure a static IP address on Ubuntu 22.04 OS. Let’s get started!
Table of Contents
Prerequisites
- A server with Ubuntu 22.04 as OS
- User privileges: root or non-root user with sudo privileges
Step 1. Update the System
Before we start with the configuration of static IP address , we need to update the system packages to the latest versions available.
Step 2. What is Netplan?
Netplan is a utility for easily configuring the network on a Linux system. Netplan stores the configuration in YAML files which are mostly written by the system administrators, network engineers or DevOps engineers. Without configuration, Netplan will not do anything. The Yaml files can be created and stored in /etc/netplan directory on the server.
Netplan has a set of commands, such as:
netplan generate: Used for generating the required configuration.
netplan apply: Used for applying the configurations.
netplan try: Used for applyging the configurations and user confirmation. This command will roll back a broken network configuration.
Step 3. Configure a static IP address
To configure a static IP address, first, create a YAML file with the following command:
Once created, open it with your favorite editor and paste the following lines of code:
Now, we will explain all lines in this configuration file:
eth0 is the network interface name.
addresses The static IPv4 address, in this case, the static IP address, is set to 192.168.1.21
nameservers: We need to set the nameservers; in this case, these nameservers belong to Google.
Now just $ 43 .99 /mo
routes: The routes are used for the gateway of the system.
Now, to apply the changes in the configuration file, execute the following command:
To confirm if your static IP address has been added successfully, execute the following command:
The output should look like this:
That’s it. You successfully installed Netplan and configured a static IP address on Ubuntu 22.04.
Of course, if this setup is difficult for you, please contact our technical support. We are available 24/7 and will help you with any aspect of IP address configurations. All you need to do is to sign up for one of our managed hosting plans and submit a support ticket.
If you liked this post on how to configure a static IP address on Ubuntu 22.04, please share it with your friends on social networks using the buttons on the left or simply leave a reply below. Thanks.
Leave a Comment
Save my name, email, and website in this browser for the next time I comment.
Yes, add me to your new blog post notifications list
You are using an outdated browser. Please upgrade your browser or activate Google Chrome Frame to improve your experience.
Begin typing your search above and press return to search. Press Esc to cancel.
Linux Genie

How to Set Static IP Address on Ubuntu 22.04?
An IP address that remains the same is a Static IP address. We often have to deal with the dynamic IP address on Ubuntu (or any other system). The servers acquire the Static IP address to keep their identification the same over the network. To fulfill this, the Internet Service Providers (ISPs) dedicate a specific ID address to that customer (known as Static). Otherwise, the ISPs keep on changing the addresses (Dynamic IP Address) on every restart of the system (whenever a new connection is established).
The Static IP has shown a firm grip while establishing a remote connection, managing the connected devices, troubleshooting the network/device, and providing smooth communication, on Ubuntu and other Linux distros.
So, keeping the importance of Static IP address in view, this post will demonstrate the detailed methods alongside the steps to set the static IP address on Ubuntu 22.04.
How to Set the Static IP Address on Ubuntu 22.04?
The static IP address can be configured on Ubuntu 22.04 via the netplan utility, and the Network Manager (using the nmtui, nmcli, or the GUI). The nmcli and nmtui are used alternatively and have the same purpose (uses the Network Manager to manage the Static IP). Whereas the netplan acts differently from the listed utilities (uses the Networkd to manage Static IP address).
1. How to Set/Configure the Static IP Address Using netplan? | Ubuntu Server/Desktop
The netplan utility is the default network management tool for Ubuntu (after Ubuntu 17.10). The netplan has a configuration file with an extension “ .yaml ”. The “ .yaml ” contains the configurations set by the user (or by the system) which impacts your network accordingly.
Before setting up a Static IP address, let’s first check the IP address of the interface that you are going to change:

The “ enp0s3 ” is the network interface having the IP address “ 192.168.18.88 ”. The “ Broadcast ” in this case is “ 192.168.18.255 ”, which is the last one on the network. So, the IP Address must be chosen between the “ 192.168.18.1 ” and “ 192.168.18.255 ”.
Step 1: Backup the YAML File
First, create the backup of the current configuration ( File Location: “/etc/netplan/*.yaml” ), which helps in dealing with errors in the future:

Step 2: Configure the YAML File for the Static IP Address
The “ .yaml ” file by default might contain very short details as follows:

As there is no network interface or IP address specified it states that the netplan is not managing the network’s configuration on our system.
- What is Renderer in the YAML File?
The renderer represents which utility has to manage the network manager. The “ networkd ” is more suitable for the static IPs and “ NetworkManager ” is suitable for Dynamic connections (DHCP). Moreover, the “networkd” is managed through the command line whereas the NetworkManager can also be used via GUI as well. If the value is not set, then it would consider the “networkd” as the network configuration tool.
Step 3: Set the Static IP Address
Open the file in any editor (nano, vim, or gedit) and write the IP Address, Gateway, and DNS, as we did here:

In the configuration file:
- Use the “ networkd ” as the renderer.
- The enp0s3 denotes the network interface to be configured.
- The IP address we chose is “ 192.168.18.199 ” (Keeping an eye on the Broadcast IP Address, “ 192.168.18.255 ”).
- The DNS is set to “ 8.8.8.8 ”(primary Google’s DNS) or “ 8.8.4.4 ” (secondary) which switches you from your ISP to Google public DNS (which is open and anyone can use).
- The gateway is set to “ 192.168.18.1 ” through which the device communicates to the other computers in the network.
Note: In the case of DHCP, the DNS is provided by the ISP.
Step 3: Apply the Changes
Use the following netplan’s command to apply the changes in debug mode:

Note: If there is any warning, you will get it at the end of the above output.
Now, verify the change by checking the IP address of the interface “enp0s3”:

Note: If you have followed the method correctly and the IP address is not changed, then reboot your system to get the changes.
2. How to Set/Configure the Static IP Address Using nmcli? | Ubuntu Server/Desktop
NMCLI refers to the network manager’s command line interface, i.e., managing the network manager through the commands. Let’s see how the Static IP address is set up using the nmcli:
Identify the Network
Use the following nmcli command to get the device’s status:

The “ Connection Name ” ( wired in our case) would be used in the nmcli to set/configure the Static IP Address. The “ wired ” connection is mapped with the device named “ snp0s3 ”. Now, check the current IP address associated with the device named “ enp0s3 ” using the command:

The interface is enp0s3 containing the IP address “ 192.168.18.88/24 ” whereas the broadcast is “ 192.168.18.255 ” (the range for the last number of the IP address to be set is 1-254).
Before proceeding further, the following are the details that will be set in the upcoming steps:
- IP Address: 192.168.18.150/24 | (as per our Broadcast (192.168.18.255) we could choose between 192.168.18.1 to 192.168.18.254).
- Gateway: 192.168.18.1 | To send information to the other devices outside your network. It is usually set to the lowest IP range as per the broadcast ( 192.168.18.255 ).
- DNS: 8.8.8.8 | (Using Google’s public DNS, as we are choosing the IP address as per our own. If the static IP address is granted by your Internet Service Provider, the value might be changed (as it is granted by the ISP)).
Set the IP Address
Use the following nmcli command to set the IP address for the interface “ enp0s3 ”(may be changed in your case), i.e., “ 192.168.18.150/24 ”:

Set the Gateway

Set the DNS (Preferred is Google’s Public DNS)

Set the IPv4 configuration of enp0s3 to the Manual

Activate the Connection

Verify the Newly Set IP

That’s how the nmcli tool can be used to set the static IP.
3. How to Set/Configure the Static IP Address Using nmtui? | Ubuntu Server/Desktop
NMTUI is an alternative to the nmcli utility. NMTUI manages the network manager through the text-based user interface on the terminal. Let’s exercise NMTUI to set/configure the Static IP:
First, check the current IP address of the connection that you are going to set to static:

Now, run the command “ nmtui ” from the terminal and the following interface appears. Choose “ Edit a Connection ”:

Select the connection and navigate to the “ Edit ” option:

Inside the edit mode, do the following:
- 1: Set the IPv4 configuration to “ Manual ”.
- 2: Select the “ Show ” option to get the fields where the IP address, gateway, etc to be written.
- 3: Set the new IP Address (choose as per your broadcast, i.e., 192.168.18.99).
- 4: Set the Gateway (as per your IP address/Broadcast, i.e., 192.168.18.1).
- 5: Add the DNS (Google’s Primary DNS, i.e., 8.8.8.8).
Finally, scroll down and choose “ OK ”:

Fall back to the main menu of the NMTUI and “ Deactivate/Activate ” the connection:

Once done, verify the newly set IP address using the command:

4. How to Set/Configure the Static IP Address Using GUI? | Ubuntu Desktop Only
Open the Network Settings in Ubuntu 22.04 and then click on the “ Settings ” Gear

Note down the current “ IPv4 ” address, “ i..e, 192.168.18.89” :

Navigate to the IPv4 on the toolbar and do the following:
- Set/Change the IPv4 method to “ Manual ”.
- Add the IP Address, Netmask, and the Gateway (IP Address and Gateway as per your broadcast).
- Turn off the Toggle Button to set/change the DNS “ Manual ”.
- Set the DNS (two addresses are added, one is Google’s primary DNS and the second is Google’s secondary DNS)
- Lastly, click on Apply to make the changes effective.

Refresh the network connection and then verify the newly set IP address from the Details tab, as follows:

That’s how you set the static IP address on Ubuntu Desktop and Server.
Bottom Line
In Ubuntu, wherever the configurations are related to the IP addresses, the administrator does not want the network/IP settings/configurations to be changed frequently. That’s when the static IP address comes into practice. Mostly, the static IP address is granted by the Internet Service Provider. However, this post has explained the steps, of how a user can set the static IP address on Ubuntu 22.04.
The Ubuntu server/desktop supports the nmtui/nmcli and the netplan tools. However, the GUI-based support of Static IP is available on Ubuntu Desktop only. So, you have learned the ways to configure the static IP address on the Ubuntu server and desktop.

- Dedicated Server
- Windows VPS
Mastering the Art of Changing Your IP Address on Ubuntu 22.04

After successfully installing Ubuntu 22.04, your network interface will by default assign an IP address using a DHCP server. A wired network and Wi-Fi network are also activated. The network manager in Ubuntu is Netplan. You can also configure the network interface with IPv4 addresses. This article represents the way of changing your IP address on Ubuntu. You can use two methods to change your IP address. So, keep studying carefully.
Two Simple Methods to Change the IP Address on Ubuntu 22.04
This section will give you two different methods of configuring and changing IP addresses. Desktop users can use any one of these methods, but server users that have CLI can access and use only the second method to configure and make changes.
Prerequisites
- Installed and up-to-date Ubuntu 22.04 on Linux VPS or OS
- Sudo admin rights
Method 1: Change Static IP Address on Ubuntu Via GUI
If you are using the desktop version of Ubuntu, you must know that there is a graphical interface for configuration. So you can follow the steps mentioned in this section above to easily change your IP address.
First, Click on the Network Icon in the right corner of your. Choose the Wired connection menu and Click the Wired settings :

You will encounter a dialog box. Click Network in the sidebar. You will see the Wired section. Click on the Gear Icon to open a new Wired dialog box:

Now, you will see the IPv4 tab. Set the method to Manual and input a valid IP address, Netmask, and Gateway . Now to confirm the changes click the Apply button:

At the final step, disable and again enable the Wired Icon to apply changes:

That’s it! You successfully changed the Ubuntu 22.04 IP address.
Method 2: Change Static IP Address Via CLI
If you are using a server, you should know that server versions are installed without a graphical interface. So, you need to configure your IP address using the command line. The Ubuntu distribution uses Netplan as a network manager for this. To do this, follow the steps below.
In the first step, you need to find the name of the network interface in the system. This name may vary based on the type of installation and system hardware. Use the following command:
As a result of the executed command, you will see that the name of the system network interface is eth0. Of course, this name can be different from your system.
Now, create or edit the network configuration file in the /etc/netplan folder. Use your favorite text editor and create the configuration file:
You must use the YAML template and configure the network as follows:
As you can see in the above configuration, the interpretation of the available items is as follows:
– eth0: Network Interface Name
– addresses: Use for configuring IPv4 address on the interface. You have to be sure to define CIDR. (Here you can add multiple addresses)
– nameservers: Where you can set the nameserver. (8.8.8.8 and 8.8.4.4 are defaults Google nameservers)
– routes: To set the Gateway on your system.
Make sure that the IP gateway address is entered correctly and that v4 belongs to the system network.
Finally, execute the following command to apply the changes:
Well done! Passing these steps, you could change your static IP address on Ubuntu 22.04.
Troubleshooting Some Issues about Changing Ubuntu IP address
1- Changing the IP address may temporarily disrupt network connectivity.
Ensure you have physical or remote access to the machine. Schedule the change during a maintenance window to minimize impact.
2- Manually configuring the IP address with incorrect settings can lead to network issues.
Double-check the configuration settings, including IP address, subnet mask, gateway, and DNS. Update the /etc/network/interfaces or /etc/netplan configuration files accordingly.
3- Changing the IP address may affect existing firewall rules.
Update firewall rules to reflect the new IP address. Adjust settings in UFW or other firewall management tools accordingly.
As you can see in the instructions of this tutorial, there are two different ways to change the IP address, both of which we have mentioned. Now you can safely and without confusion change your IP with the necessary configuration. Please send your queries or feedback in the comment section below.
How useful was this post?
Click on a star to rate it!
Average rating 0 / 5. Vote count: 0
No votes so far! Be the first to rate this post.

A Clever Guide to Install WSL on Ubuntu 20.04
WSL (Windows Subsystem for Linux) on Ubuntu is a feature that allows users to run an Ubuntu terminal...

A Step-by-Step Guide: How to Install RabbitMQ Server on...
Today we want to talk about one of the relational applications, the RabbitMQ message broker, which p...
What is your opinion about this Blog?
Save my name and email in this browser for the next time I comment
Publish Review
- 1- Two Simple Methods to Change the IP Address on Ubuntu 22.04
- 2- Prerequisites
- 3- Method 1: Change Static IP Address on Ubuntu Via GUI
- 4- Method 2: Change Static IP Address Via CLI
- 5- Troubleshooting Some Issues about Changing Ubuntu IP address
- 6- Conclusion

How to Set Static IP Address on Ubuntu 22.04
Hello folks, in this guide, we will cover how to set static ip address on Ubuntu 22.04 (Jammy Jellyfish) step by step.
There are two ways to configure static ip address on Ubuntu 22.04,
- Command line
- GUI (Desktop Environment)
From command line we use either nmcli or netplan command to set static ip address.
Set Static IP address using nmcli command
Open the terminal, run following nmcli commands.
To view the existing connection, run

As we can see above, my system has an existing connection named ‘ Wired connection 1 ’ which is using physical nic ‘ enp0s3 ’. In my case, this interface is getting IP address from DHCP server. So, to set the fixed static ip run,
Note: Replace the IP address and connection name as per your environment.
Add the DNS IP address,
Disable & enable the connection, run
Output of above commands would look like below:

Now this ip address is persistent across the reboot. To verify ip address run following ip commands ,

Alternate way to configure static ip address is via netplan utility .
Create ‘ 01-netcfg.yaml ‘ under the directory /etc/netplan with following content,

Save and close the file.
To make the above changes into the affect, run
View the IP address, run

Perfect, above confirms that static ip address has been assigned to enp0s3 interface.
Setup Static IP address via GUI (Desktop Environment)
If you are not comfortable with command line, then you can set static ip address from desktop GUI.
From the Desktop Activity –>Search Settings –> Go to Network section

Click on the gearbox icon then following window will be shown. Select IPv4 Tab,

Change the IPv4 Method from Automatic to Manual . Specify the IP address details along with DNS IP.

Click on Apply to save the changes.
Now disable and enable the interface by toggling the icon.
Close the settings window and verify the ip address using following commands

That’s all from this guide, I hope you have found it informative. Kindly do post your feedback and queries in below comments section.
Read Also : How to Install Docker on Ubuntu 22.04 / 20.04 (Step by Step)
2 thoughts on “How to Set Static IP Address on Ubuntu 22.04”
sudo netplan apply, not ‘sudo netplan appy’ 🤓
It was a typo, I have correct it now. Thanks
Leave a Comment Cancel reply
Please enter an answer in digits: eleven − seven =

Set Static IP Address on Ubuntu 22.04 From CLI
- Olivia Viera
- April 4, 2024
Share your love

This tutorial intends to teach you to Set a Static IP Address on Ubuntu 22.04 From CLI . A static IP address is an IP address that doesn’t change over time. Let’s see why we should set a static IP address.
What Is the Purpose of a Static IP Address?
- Step 1 - Configure a Static IP on Ubuntu 22 with nmcli Command
- Step 2 - Configure a Static IP on Ubuntu 22 with Netplan
Because of insufficient IP addresses, some service providers may assign the same address to two different users. For this reason, connection problems can happen. Instead of this, you can see the static IP addresses.
Now follow the steps below to see how to configure a static IP address on the Ubuntu 22 server from the command line interface by using the Linux Commands .
Set Static IP Address on Ubuntu 22.04 Server From CLI
To complete this guide, you must have access to your server as a non-root user with sudo privileges. To do this, you can check this guide on Initial Server Setup with Ubuntu 22.04 .
Step 1 – Configure a Static IP on Ubuntu 22 with nmcli Command
The nmcli is a command line tool that can be used to create, edit, activate/deactivate, and delete network connections. So we want to use this command line utility to set a static IP address on our Ubuntu server.
To use this tool, you must install Network Manager on your server. To do this, run the command below:
Then, you can use the nmcli command to get your connection information:
In your output, you will get the following connection information:
Next, you should create a static link. You need to manually configure the device and ipv4 settings with the appropriate parameters in the nmcli command:
When you are done, recheck your connection information and you should see the static link has been added:
At this point, you need to add the static connection you have created to the DNS IP with the command below:
Then, you must activate the static connection on Ubuntu with the following command:
In your output, you should see the “connection successfully activated,” message.
Also, you can use the following IP command to verify your static IP address:
That’s it, you have set a static IP address on your server.
Step 2 – Configure a Static IP on Ubuntu 22 with Netplan
At this step, you can use an alternative command to set your static IP address called Netplan. To do this, you just need to follow the steps below.
First, use the command below to find your desired network interface:
Then, you must create a new file in the /etc/netplan . Here we named it 01-netcfg.yaml and created it by using the vi editor :
Add the following content with your settings to the file:
Here we disabled the DHCP and set DNS settings with Google.
When you are done, save and close the file.
Finally, you must run the command below to apply your configuration:
That’s it, you are done.
At this point, you have learned why it is good to set a static IP and configure it from CLI with Linux Commands such as Netplan and NMCLI on Ubuntu 22.04.
Hope you enjoy it. You may be interested in these articles:
Update Timezone DB in Linux
10 Useful ncat Commands on AlmaLinux
Newsletter Updates
Enter your email address below and subscribe to our newsletter
Related Posts

Best practices to install Apache Guacamole on Ubuntu 22.04
- April 6, 2024

Full Steps To Install Ghost CMS on Ubuntu 22.04
- March 26, 2024

Best Way To Install NoMachine on Ubuntu 22.04
- March 22, 2024
Stay informed and not overwhelmed, subscribe now!
How to Configure Static IP on Ubuntu 22.04

In most network setups, network devices automatically acquire IP addresses from a DHCP ( dynamic host configuration protocol) server which, in most cases, is a router. The router contains a 'pool' of IP addresses that are ready to be leased out. The DHCP client sends an IP request to the router and the router, in turn, assigns a unique IP to each device. In doing so, this avoids an IP conflict.
However, there are a few scenarios that may require you to configure a static IP address. For example, you might want to configure your system to act as a web server or gaming server. This demands that the IP configuration remains unchanged, or else users will not access the server.
In this guide, we learn how to configure a static IP address on Ubuntu 22.04.
Configure Static IP Address on Ubuntu Server
Unlike Ubuntu Desktop, the Ubuntu server does not provide a graphical interface to allow users to make any settings. As such, we are going to make use of the command-line interface to configure a static IP address.
In Ubuntu 22.04, network configuration is handled by the netplan utility. This is the network configuration management tool for modern releases of Ubuntu and was introduced in Ubuntu 17.10. Older releases were using the ifconfig tool and the /etc/network/interfaces file for network configuration.
Netplan configuration files exist in YAML format with a .yaml file extension as we shall see shortly. But first, check the available network interfaces in our system.
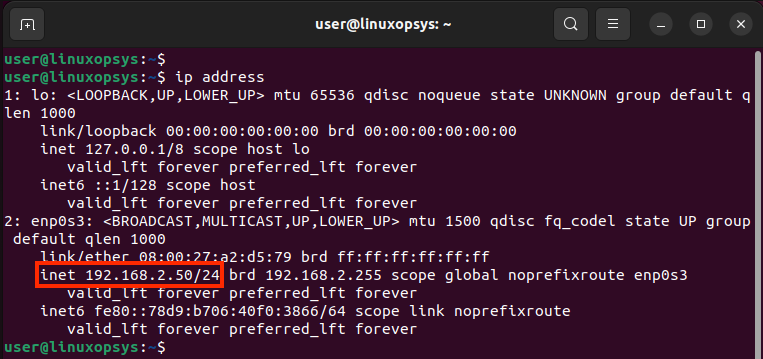
To do so, run the following IP command:
In most systems, IP assignment is automatically handled by a DHCP server. This is the preferred IP assignment method as it averts possible IP conflict cases in a network.
The output below shows the present interfaces on our system. We have the lo interface which is the loopback address and enp0s3 which is the active network interface with the IP 192.168.2.102/24.

We will configure a static ip using the netplan configuration tool. Netplan yaml files are contained in the /etc/netplan directory. In Ubuntu 22.04 server, we need to modify the /etc/netplan/00-installer-config.yaml netplan yaml file.
But before we do so, we need to ensure that cloud-init is not managing the network interface. To achieve this, open the /etc/cloud/cloud.cfg.d/subiquity-disable-cloudinit-networking.cfg file.
Ensure that the “network: {config: disabled}” entry exists as shown.
Next, take a backup of the netplan configuration file before modifying it.
Now, open the netplan configuration file using the following command.
This is what our YAML configuration file looks like:

From the configuration file, you can see that the system is configured to use DHCP for IP address configuration. Now, we are going to set the static ip address of 192.168.2.80 with 8.8.8.8 and 192.168.2.1 as the DNS servers and 192.168.2.1 as the default gateway address.
So, set the 'dhcp' attribute to 'no', and paste the following ip configuration. Be sure to adjust the IP details according to your network subnet.
Once done save the changes made to the configuration file and apply the changes using the following netplan command.
If you are connected to the server via SSH, your connection will close due to the change of the server's IP address. To access the server, start a new SSH session and confirm that your ethernet interface has acquired the new static ip address.

The above output is a confirmation that the static ip address was successfully configured.
Configure static IP address using GUI on Ubuntu Desktop
If your Ubuntu system is a desktop version, then you can easily configure a static ip address using the graphical interface instead of the command-line interface.
To configure a static IP address on Ubuntu desktop, click on the network icon in the top right corner. A drop-down menu appears. Next, click on the arrow down icon on 'Wired Connected' to expand the menu and select 'Wired Settings'.
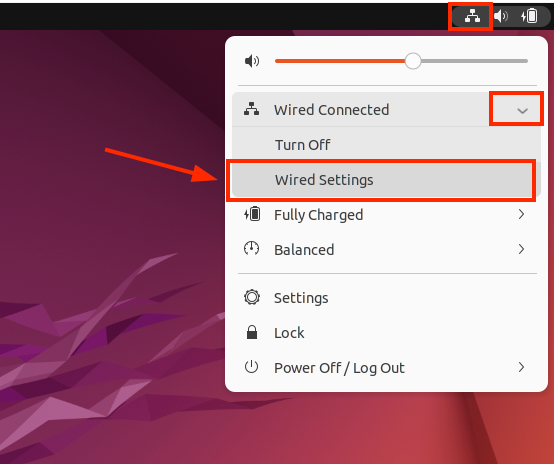
On the 'Network' window as shown. Next, click on the gear icon in the 'Wired' section as indicated.

The new window provides you with your current IP configuration for your active network interface. As mentioned earlier, the network settings are usually dynamically assigned by a DHCP server.

To configure a static ip address, click on the 'IPv4' tab. Next, click on the 'manual' radio button. Then fill out the static ip address, netmask, default gateway, and DNS details as indicated. Then press 'Apply' to save the configuration.

Back to the 'Network' window. Be sure to toggle off and on to restart the networking service or network manager in order to apply the changes made.

To confirm the ip configuration, you can launch the terminal and run the command:
From the output, you can see that the IP address has changed to reflect the static ip address that we configured. The enp0s3 is the network interface name.
We have successfully configured a static IP address on Ubuntu Server 22.04 and Ubuntu desktop.
Thanks for reading, please leave your feedback and suggestions in the comment section below.
If this resource helped you, let us know your care by a Thanks Tweet. Tweet a thanks

Sorry about that.
Nmap to Scan Open Ports – Examples + Screenshots
How to List Network Interfaces in Linux
How to Get IP address in Linux
How to Permanently add Static Route in Linux
Ping IPv6 Address from Windows and Linux CLI
How to Check Ports in Use in Linux (Listening Ports)
Tshark Examples with Cheat Sheet
How to Install Nginx on Ubuntu
How to Install Apache on Ubuntu
How to Install MySQL on Ubuntu
How to Install PHP on Ubuntu
Install Node.js on Ubuntu
Install Python 3 on Ubuntu
Install Laravel 9 on Ubuntu
Install Nmap from Ubuntu Terminal
Set Up a Firewall with UFW on Ubuntu
Install Latest ImageMagick 7 on Ubuntu
Configure Static IP on Ubuntu
Install and Configure StrongSwan VPN on Ubuntu
Setup x11vnc on Ubuntu
Setup OpenSSH sftp Server on Ubuntu
Leave a Reply
Leave a comment cancel reply.

Setting Up a Static IP Address on Ubuntu 22.04 LTS and 22.10

Table of contents
Understanding ip configuration in ubuntu, set a static ip on ubuntu with the nmcli command, using netplan for static ip settings on ubuntu, configure static ip settings on ubuntu graphically, why should you use static ip addresses on ubuntu, tips for managing static ip addresses on ubuntu.
The IP addresses of most devices today are generated by Dynamic Host Configuration Protocol (DHCP) servers. A DHCP server assigns a dynamic IP address to your device when it's connected to a network. Thus, you have the chance to change this IP address from time to time.
On the other hand, a static IP refers to a fixed, immutable address, different from dynamic IPs. You can set static IP settings for Ubuntu 22.04 LTS and 22.10 in three different ways. Here's how to get started.
Ubuntu's progression in network management has made configuring settings like the static IP more user-friendly. The feature to set a static IP in Ubuntu 22.04, in particular, has advantages in terms of network efficiency and stability.
Unlike dynamic IPs, which might vary over sessions, a static IP in Ubuntu remains consistent. This is especially advantageous for servers where consistent address recognition is paramount. For these servers, static IP configurations can become a necessity.
While the graphical interface offers a more intuitive way to handle IP configurations, using the static IP command line can offer more precision. For users who want granular control over their network configurations, command-line methods are a preferred choice. By mastering this method, users can ensure optimal Ubuntu IP configuration for their needs.
Dedicated proxies can also benefit from static IP configurations in Ubuntu, providing a stable and reliable connection for tasks such as web scraping, content aggregation, or accessing geo-restricted content. With a static IP assigned to the dedicated proxy server, users can maintain consistent access to online resources without worrying about IP address changes disrupting their operations.
However, the benefits of a static IP in Ubuntu, especially in the 22.04 version, come with responsibilities. Ensuring that these IPs are correctly set up is crucial, as misconfigurations can lead to network vulnerabilities.
So follow the steps below to configure a static IP address on your Ubuntu machine correctly.
It's pretty easy to configure Ubuntu 22.04 static IP settings using the nmcli command . nmcli is a text-based utility used to check the status of the wired connections you are using on your device.
With this command, you can access additional networking information such as your connection status, the name of your host device, and general permissions in your network configuration. If you're aiming to set a static IP on an Ubuntu server, this command proves invaluable.
You can get information about your connection with:
nmcli connection show
The output of this command will be as follows:
NAME UUID TYPE DEVICE Wired connection 1 12f312a7-f0e7-334a-8ab4-c7b3f8249c7e ethernet enp0s3
Create a static link with the command given below. Then, manually configure the enp0s3 and ipv4 settings with the appropriate parameters in the nmcli command:
sudo nmcli con add type ethernet con-name 'static' ifname enp0s3 ipv4.method manual ipv4.addresses 192.168.1.89/24 gw4 192.168.1.1
If you use the nmcli connection show command again, you can see that the static link has been added.
After this process, add the static connection you created to the DNS IP:
sudo nmcli con mod static ipv4.dns 192.168.*.*
Now use the command below to activate the connection:
sudo nmcli con up id 'static'
If the output displays "connection successfully activated," you've successfully set up a static IP address on your machine.
You can consider using static IP addresses to avoid connection problems caused by dynamic IP addresses. A static IP address allows you to have a fixed identity and location when connected to the internet.
You can verify the static IP you want to assign to your device by running:
Just like nmcli, another command you can use for setting a static IP on Ubuntu is netplan. You can easily make Ubuntu static IP settings using the netplan command in 22.04 LTS and 22.10 versions. To do this, follow the steps below.
First, find out the name of your network interface using:
What you see here is your network interface name. This name may be different on each device.
Now, create a file named 01-netcfg.yaml in the /etc/netplan folder. Edit it with your favorite text editor.
sudo vim /etc/netplan/01-netcfg.yaml
Add the following lines to the file:
network: version: 2 renderer: networkd ethernets: eth0: #Edit this line according to your network interface name. dhcp4: no addresses: - 192.168.1.10/24 gateway4: 192.168.1.1 nameservers: addresses: - 8.8.8.8 - 8.8.4.4
As you can see, you have disabled the DHCP IP setting with the dhcp4: no statement. You've then added the IP address and DNS settings assigned by Google.
After saving this file, run the following to apply the changes:
sudo netplan apply
The graphical network interface in Ubuntu 22.04 is quite useful if you don't want to use the command line. So much so that you can easily set the Ubuntu static IP address using this interface.
To do this, click on the Network icon in the upper right corner of your desktop. Then, select Wired Settings from the drop-down menu. Click on the Gear icon to open the settings window.
Then, switch to the IPv4 tab in the window that opens.
As you can see, DHCP is enabled by default. Change the IPv4 Method to Manual as you want to use a static IP instead of a dynamic one. Next, change your address, netmask, and gateway settings. Finally, modify your DNS setting and click the Apply button.
You must restart this wired connection for all these actions to take effect. To do this, simply toggle the switch next to the network name on and then off.
You've now understood how to configure a static IP in Ubuntu, especially in the "Jammy Jellyfish" 22.04 LTS version and 22.10, using both graphical and command-line methods with nmcli and netplan.
Due to insufficient IP addresses, some service providers may assign the same address to two different users. In this case, connection problems can occur. Using static IP addresses instead does not cause such problems as it is user-specific, but beware as someone can misuse your IP address in several ways.
Keep track of your static IP addresses to ensure they are not being misused or conflicting with other devices on the network. Periodically check network logs for any suspicious activity. Strengthen the security of your Ubuntu system by using firewalls, intrusion detection systems, and security patches to protect against unauthorized access or attacks targeting your static IP addresses.
Maintain detailed documentation of all static IP configurations, including assigned addresses, associated devices, and network settings. This documentation will be invaluable for troubleshooting and network management purposes.
Before making any changes to static IP configurations using tools like nmcli or netplan, ensure to create backups of relevant configuration files. This precaution can prevent accidental misconfigurations and simplify the restoration process if issues arise.
After setting up or modifying static IP addresses, verify network connectivity to confirm that devices can communicate with each other and access external resources without any issues. Conduct periodic tests to ensure consistent performance.
By following these tips, you can effectively manage static IP addresses on Ubuntu systems, enhancing network usage reliability, security, and performance.
Mastering Network Configuration in Ubuntu 22.04: DHCP and Static IP Setup
- February 5, 2024 April 5, 2024
Navigating through network configuration, especially on a versatile platform like Ubuntu 22.04, can be daunting for newcomers. However, understanding how to efficiently manage your network interfaces, whether you’re working with a single NIC (Network Interface Card) or multiple NICs, is crucial for ensuring your system communicates effectively with the rest of the network. In this guide, we’ll break down the essentials of configuring your network using DHCP (Dynamic Host Configuration Protocol) and static IP addresses, making the process accessible even for those new to the networking world.
Understanding DHCP and Static IP
Before diving into the configuration process, let’s clarify the difference between DHCP and static IP addresses:
- DHCP is a protocol that automatically assigns an IP address and other network settings to each device on a network, ensuring no two devices have the same IP address. This method is beneficial for managing a large number of devices efficiently, reducing the likelihood of IP conflicts.
- Static IP , on the other hand, involves manually assigning a specific IP address to a device. This approach is preferred for servers and other critical devices that require a constant IP address for consistent access and communication.
Configuring Network with DHCP
Ubuntu 22.04 leverages Netplan for network configuration, a simple and flexible tool that replaces traditional network configuration utilities.
Step 1: Identifying Your Network Interface
First, identify the network interface you wish to configure. Open your terminal and type:
This command lists all network interfaces available. Identify the one you wish to configure (e.g., eth0 for an Ethernet connection).
Step 2: Configuring Netplan for DHCP
Netplan’s configuration files are located in /etc/netplan/ . Typically, you’ll find a file named 01-netcfg.yaml or similar. Edit this file with your preferred text editor:
For a DHCP configuration, ensure your file looks similar to this:
Replace eth0 with your interface’s name. The dhcp4: true line instructs Netplan to use DHCP for this interface.
Step 3: Applying the Configuration
After saving your changes, apply the configuration with:
Your system should now automatically obtain an IP address and network settings for the specified interface.
Setting Up a Static IP Address
For devices requiring a constant IP address, follow these steps:
Step 1: Identifying Network Details
You’ll need to know the static IP address, gateway, and DNS servers you intend to use. Consult your network administrator or ISP for these details.
Step 2: Configuring Netplan for Static IP
Edit the same Netplan configuration file as before:
This time, configure your file for a static IP:
Ensure you replace the IP addresses and interface name ( eth0 ) with those relevant to your network.
Apply the new settings with:
Your interface should now use the specified static IP address and network settings.
Managing Multiple NICs
Configuring multiple NICs involves repeating the steps above for each interface you wish to configure. Netplan allows you to define settings for as many interfaces as you need within the same configuration file, making it straightforward to manage complex network setups.
Whether you’re configuring a simple home network or managing a server requiring a static IP, Ubuntu 22.04’s use of Netplan simplifies network configuration significantly. By following the steps outlined above, even those new to networking can ensure their Ubuntu system communicates seamlessly within their network environment.
For those seeking robust and reliable hosting solutions, consider Shape.host services, offering Linux SSD VPS with high performance and stability, ensuring your applications run smoothly and efficiently.
By demystifying the network configuration process, we hope to empower users to take full control of their networking needs, fostering a deeper understanding and appreciation for the power of Ubuntu 22.04.

Christian Wells
The difference between hardware vs. software load balancers: an in-depth analysis, network configuration mastery on rocky linux 8: a beginner’s guide, related product, optimizing static route management in expansive networks.
- February 5, 2024 February 5, 2024
Security Considerations for Static Routing
How To Set Static IP Address on Ubuntu 22.04 LTS
In this tutorial, we will show you how to set a static IP address on Ubuntu 22.04 LTS. For those of you who didn’t know, After installing Ubuntu 22.04 the default network interface comes two main options. You can either obtain an IP address automatically with Dynamic Host Configuration Protocol (DHCP), or configure the system to use a static IP address, which never changes.
This article assumes you have at least basic knowledge of Linux, know how to use the shell, and most importantly, you host your site on your own VPS. The installation is quite simple and assumes you are running in the root account, if not you may need to add ‘ sudo ‘ to the commands to get root privileges. I will show you the step-by-step installation of the Zoom on Ubuntu 22.04 (Jammy Jellyfish). You can follow the same instructions for Ubuntu 22.04 and any other Debian-based distribution like Linux Mint, Elementary OS, Pop!_OS, and more as well.
Prerequisites
- A server running one of the following operating systems: Ubuntu 22.04, 20.04, and any other Debian-based distribution like Linux Mint.
- It’s recommended that you use a fresh OS install to prevent any potential issues.
- SSH access to the server (or just open Terminal if you’re on a desktop).
- A non-root sudo user or access to the root user . We recommend acting as a non-root sudo user , however, as you can harm your system if you’re not careful when acting as the root.
Set Static IP Address on Ubuntu 22.04 LTS Jammy Jellyfish
Step 1. First, make sure that all your system packages are up-to-date by running the following apt commands in the terminal.
Step 2. Configuring Static IP Address on Ubuntu 22.04.
Now open the terminal or command line to check the device name by using the following command:
Next, create a new static connection named “ static ip ” for the “ emp0s3 ” device:
Finally, run the below commands to apply the IP address:
Verify the IP assignment to the selected device:
Lastly, verify the internet connectivity with the help of the following “ ping ” command:
Congratulations! You have successfully set up a static IP address. Thanks for using this tutorial to set a static IP address on Ubuntu 22.04 LTS Jammy Jellyfish system. For additional help or useful information, we recommend you check the official Ubuntu website .

IMAGES
VIDEO
COMMENTS
Setting up Static IP address on Ubuntu Server 22.04. Login to your Ubuntu server 22.04, look for the netplan configuration file. It is located under /etc/netplan directory. Run below cat command to view the contents of '00-installer-config.yaml'. Note: Name of configuration file may differ as your per setup.
A DHCP server assigns a dynamic IP address to your device when it's connected to a network. Thus, you have the chance to change this IP address from time to time. On the other hand, a static IP refers to a fixed, immutable address, different from dynamic IPs. You can set static IP settings for Ubuntu 22.04 LTS and 22.10 in three different ways.
To assign a static IP address or Wi-Fi interface, click on the gear icon on the Wi-Fi interface page and then IPv4 tab >> Manual >> Enter IP address, Netmask, Gateway, DNS (Toggle to disable Automatic DNS configuration) >> Apply. Set IP for Wired Wi-Fi. Finally, disable and enable the Wi-Fi interface to apply the IP address.
Follow the below steps to configure a static IP address on Ubuntu 22.04 Desktop system. Click the network icon in the upper-right corner. Then expand the Wired Connected dropdown. Now, click on Wired Setting as shown below image. Edit Wired Interface Settings. A network settings dialog box will appear. Now, click "Network" in left sidebar.
The purpose of this tutorial is to configure a static IP address on Ubuntu 22.04 Jammy Jellyfish Linux. When it comes to IP addresses on Ubuntu 22.04, you have two main options for how you configure your network interfaces.You can either obtain an IP address automatically with DHCP, or configure the system to use a static IP address, which never changes.
Set a Static IP in Ubuntu with the GUI. Click the icons at the far-right end of the system bar to show the system menu, then click on the "Wired Connected" menu option. If you're using a wireless connection, instead click the name of your Wi-Fi network. The available connections are displayed.
Method 1: Set up Static IP Address Using Command Line. Follow the instructions provided below to configure a static IP address on Ubuntu 22.04 using the command line. Step 1: Check Current IP Address. First, open up the terminal using " CTRL+ALT+T" and execute the " ip " command with " a " option to check the current IP address of ...
Prerequisites. A server with Ubuntu 22.04 as OS. User privileges: root or non-root user with sudo privileges. Step 1. Update the System. Before we start with the configuration of static IP address, we need to update the system packages to the latest versions available. sudo apt-get update -y && sudo apt-get upgrade -y. Step 2.
Step 1: Backup the YAML File. First, create the backup of the current configuration ( File Location: "/etc/netplan/*.yaml" ), which helps in dealing with errors in the future: Step 2: Configure the YAML File for the Static IP Address. The " .yaml " file by default might contain very short details as follows:
3) In the "IPV4" Method section, you need to select "Manual" and enter your static IP address, the Netmask, and Gateway. After completing, click on the Apply button. 4) Now, after setting set-up a static IP Address, you should open your terminal using Ctrl+Alt+T a keyboard shortcut or by clicking on the terminal icon.
Choose the Wired connection menu and Click the Wired settings: You will encounter a dialog box. Click Network in the sidebar. You will see the Wired section. Click on the Gear Icon to open a new Wired dialog box: Now, you will see the IPv4 tab. Set the method to Manual and input a valid IP address, Netmask, and Gateway.
If you are not comfortable with command line, then you can set static ip address from desktop GUI. From the Desktop Activity ->Search Settings -> Go to Network section. Click on the gearbox icon then following window will be shown. Select IPv4 Tab, Change the IPv4 Method from Automatic to Manual.
$ ifconfig -a ## OR $ ip addr. If you cannot see ip address, gateway, and netmask info, restart your computer. Just type the command reboot on the terminal. sudo reboot Method 2: Use Netplan YAML network configuration. On Ubuntu 22.04|20.04|18.04, you can use Netplan which is a YAML network configuration tool to set static IP address.
Step 1 - Configure a Static IP on Ubuntu 22 with nmcli Command. The nmcli is a command line tool that can be used to create, edit, activate/deactivate, and delete network connections. So we want to use this command line utility to set a static IP address on our Ubuntu server. To use this tool, you must install Network Manager on your server.
To configure a static IP address on Ubuntu desktop, click on the network icon in the top right corner. A drop-down menu appears. Next, click on the arrow down icon on 'Wired Connected' to expand the menu and select 'Wired Settings'. On the 'Network' window as shown. Next, click on the gear icon in the 'Wired' section as indicated.
You have two options when configuring the IP address on your Ubuntu Server, and that is either a static IP address or DHCP. A static IP address allows you to manually select your IP address by configuring it on the Linux system, whereas DHCP relies on the router or DHCP server to lease you an IP address - either a reserved one or the next available one that is currently free, depending on ...
Click on the Gear icon to open the settings window. Then, switch to the IPv4 tab in the window that opens. As you can see, DHCP is enabled by default. Change the IPv4 Method to Manual as you want to use a static IP instead of a dynamic one. Next, change your address, netmask, and gateway settings.
Step 1: Identifying Your Network Interface. First, identify the network interface you wish to configure. Open your terminal and type: ip link show. This command lists all network interfaces available. Identify the one you wish to configure (e.g., eth0 for an Ethernet connection).
Step 1. First, make sure that all your system packages are up-to-date by running the following apt commands in the terminal. sudo apt update sudo apt upgrade. Step 2. Configuring Static IP Address on Ubuntu 22.04. Now open the terminal or command line to check the device name by using the following command:
Depending on the interface you want to modify, click either on the Network or Wi-Fi tab. To open the interface settings, click on the cog icon next to the interface name. In "IPV4" Method" tab, select "Manual" and enter your static IP address, Netmask and Gateway. Once done, click on the "Apply" button.
Click on the "Back" to go back the menu: Click on the "Activate a connection" to make it active: Again click on "Activate": And click on the "Back" to save the settings: Now Quit as the DHCP is changed to the static IP address: In the terminal run the command to check the new assigned IP address: Another approach to change the ...
To check for the internal IP address, default gateway, MAC address and DNS server settings on Ubuntu 22.04 Jammy Jellyfish desktop first open Settings and click on Network menu and hit the gear wheel of the desired network interface. How to find my IP address, default gateway and DNS server on Ubuntu 22.04 Jammy Jellyfish desktop Closing Thoughts
The OpenVPN server always uses the first usable IP address in the client network and only that IP is pingable. E.g. if you configured a /24 for the client network mask, the .1 address will be used. The P-t-P address you see in the ip addr output above is usually not answering ping requests. Check out your routes:
If you enter your server's IP address into a web browser, you should see the Apache welcome page. Note that you can only install a specific version of software based on the template. If you want to use a newer version, like Ubuntu 23.04, update it later via Terminal. How to Install LAMP on Ubuntu Manually
I am running Ubuntu Server 20.04 on three VMs but am currently only working with one of them before doing the configuration on the other two. I have prepared containerd and disabled swap, but am getting stuck with enabling the required ports. I first configured ufw to only allow incoming traffic from port 22 using the OpenSSH application profile.