
How to Assign a Macro to a Button in Excel (Easy Guide)

While there are many different ways to run a macro in Excel, none of those methods can be as easy and user-friendly as clicking on a button.
And for that to work, you need to assign a macro to a button first.
In this tutorial, I will show you a couple of ways to insert a button in Excel and then assign a macro to that button (or shape). Once done, as soon as a user clicks on the button, the macro VBA code would be executed.
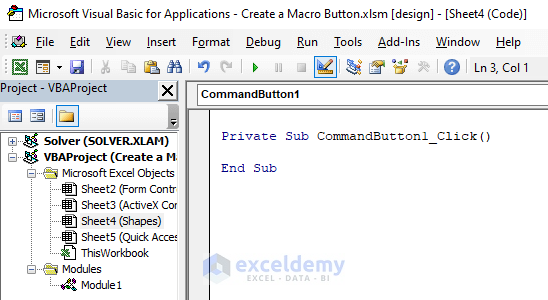
For the purpose of this tutorial, I will be using the below VBA macro code (which simply selects cell A1 in the active sheet and enters the text “Good Morning” in it and colors it red).
The above VBA code is placed in a regular module in the VB Editor

Now let’s dive right in and see how you can assign this macro to a button or shape in Excel!
This Tutorial Covers:
Insert a Shape and Assign Macro to that Shape
While there are dedicated buttons that you can insert in the worksheet and then assign the macro to it, I will first cover how to assign a macro to a shape .
I personally love this method and prefer it over the rest two methods covered later. You can easily insert a shape (square or rectangle) and can make it look like a button.
And since it’s a shape, you can easily format it to look perfect with your existing formatting or brand colors.
Below are the steps to insert a shape in Excel:

- Resize the rectangle and format it (give it a border, color, shade if you want).
After you have done the above steps, you will have a rectangle shape in the worksheet, and now we will assign a macro to this shape.
Now let’s see how to assign a macro to this shape.
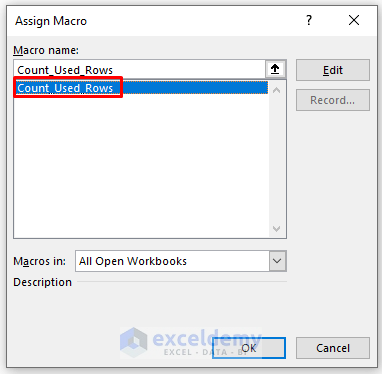
- Right-click on the shape on which you want to assign the macro

- In the Assign Macro dialog box, you will see a list of all the macros that you have in the workbook

- Click on OK
That’s it!
The selected macro has now been assigned to the shape.
Now when you hover the cursor over the shape, it will show the hand icon. which indicates that now this shape has become clickable.

And now if you click on the shape, it will run the assigned macro .
You can type any text within the shape to make it more intuitive (such as ‘Click here to run the macro’). To do this. right-click on the shape and then click on Edit Text. Now you can type within the text box shape.

Note that you won’t be able to click and run the macro when the shape has been selected (i.e., you see a border around the shape that appears when you select it), To make it clickable, hit the Escape key or click anywhere in the worksheet.
Also, when you have assigned the macro to the shape already, you will not be able to select it by using the left mouse key (as it has become clickable and left-click would now execute the macro). In that case, select the shape, hold the control key and then press the left key.
Keeping Shape Visible When you Hide/Resize Rows/Columns
In Excel. when you insert a shape, it sits over the cells – like a chart/object.
This also has a drawback that when you resize or hide rows/columns that have the shape over it, the shape also follows suit.
In the below example, the shape gets hidden when I hide the column on which it’s placed.
If you don’t want this to happen, follow the below steps:
- Right-click on the shape

- In the Format Shape pane (or dialog box in case you’re using Excel 2010 or prior versions), select Size and Properties

- Close the pane (or dialog box)
Now, when you resize rows/columns or hide these, the shape would stay in its place.
Assign a Macro to Form Control Button
If you’re not too concerned with the formatting of the button and are ok with regular gray buttons, you can quickly insert it from form control (or ActiveX control as shown next) and then assign a macro to it.
For this to work, you will need to have the Developer tab in your ribbon. If you don’t have it, here is a detailed step-by-step tutorial on getting the developer tab in the Excel ribbon .
Once you have the developer tab visible, you can use the below steps to quickly insert a button and assign a macro to it:

- Click anywhere on the worksheet. This will insert the button wherever you click and automatically open the ‘Assign Macro’ dialog box.
The above steps would insert a button that has the specified macro assigned to it.
By default, it would be a small button with text such as ‘Button’ written on it. You can change the text to whatever you want and can also change the shape of the button (by dragging the edges).
Since this is an object that is placed over the worksheet (just like shapes/charts), you can drag and place it anywhere in the worksheet.
One drawback of using the Form Control button is that you don’t have much control over the formatting. For example, you can not change the color from gray to something else.
Although there is a little bit of formatting that you can do with a Form control button, it’s nowhere close to what you can do with shapes.
You get these button formatting options when you right-click on the button and then click on Format Control.

This will open the Format Control dialog box where you can change the font type/color, size, alignment, etc.

One good thing about this button is that it doesn’t hide or resize when you hide the rows/columns or resize them. It would, however, move in case you change the height or width or the row/column over which the button is placed.
In case you don’t want the button to stay in its place, you can change the setting by following the below steps:
- Right-click on the button
- Click on Format Control
- Click on the Properties tab

Assign a Macro to an ActiveX Control Button
Apart from the Form Control button, there is also an ActiveX control button to which you can assign a macro.
In most cases, you won’t need to use the ActiveX control button, and I recommend you use it only when you completely understand what it is and you know what you’re doing.
This also, sometimes, make ActiveX a bit glitchy and unpredictable. So, while I cover it in this tutorial, I don’t recommend using ActiveX button and assign a macro to it.
To insert an ActiveX button and then assign a macro to it, follow the below steps:
- Click on the Developer tab
- In the Control group, click on Insert.

- Click anywhere on the worksheet. This will insert the button wherever you click.
- Double-click on the button and it will open the VB Editor backend where you can place the code for the ActiveX button
With ActiveX control, you get a lot more flexibility with a single button. For example, you can specify one macro to be run when you simply click on the button once and another macro when you double-click or even another one when you use the up/down arrow key.
Again, not something you need to be using in your regular work.
Hope you found this tutorial useful. If you’re interested in learning VBA, you can check out more in-depth Excel VBA tutorials here .
You may also like the following Excel tutorials:
- How to Record a Macro in Excel
- Creating a User Defined Function (UDF) in Excel VBA
- Excel VBA MsgBox [Message Box]
- Useful Excel Macro Examples for VBA Beginners
- How to Remove Macros From an Excel Workbook
- How to Enable Macros in Excel?

FREE EXCEL BOOK
Get 51 Excel Tips Ebook to skyrocket your productivity and get work done faster

1 thought on “How to Assign a Macro to a Button in Excel (Easy Guide)”
Following the procedure here, I cannot assign a Macros from an *.xlam workbook (addin). Is there a way to do this? thx
Leave a Comment Cancel reply
BEST EXCEL TUTORIALS
Best Excel Shortcuts
Conditional Formatting
Excel Skills
Creating a Pivot Table
Excel Tables
INDEX- MATCH Combo
Creating a Drop Down List
Recording a Macro
© TrumpExcel.com – Free Online Excel Training
Privacy Policy | Sitemap
Twitter | Facebook | YouTube | Pinterest | Linkedin

FREE EXCEL E-BOOK

How to Add a Button to a Microsoft Excel Worksheet: A Step-by-Step Guide
Adding a button to a Microsoft Excel worksheet is a straightforward process. First, you need to enable the Developer tab on the Excel ribbon. Then, insert a button from the Form Controls and assign a macro to it. A macro is a series of commands that automate tasks in Excel. Once you’ve completed these steps, you’ll have a functional button that can perform various actions when clicked.
After inserting the button and assigning a macro, clicking the button will execute the actions defined in the macro. This can range from simple tasks like sorting data to more complex operations like running custom calculations or opening other programs.
Introduction
Microsoft Excel is a powerhouse when it comes to organizing data and performing complex calculations. But did you know you can also add interactive features like buttons to your Excel worksheets? These buttons can make your spreadsheets more user-friendly and automate repetitive tasks. Imagine having a button that, with just one click, can create a report, send an email, or calculate a specific set of data. That’s the power of adding buttons to your Excel worksheets.
Buttons in Excel are not just for advanced users; they’re for anyone who wants to save time and streamline their workflow. Whether you’re a business professional, a student, or someone who loves to organize personal finances, learning how to add a button to your Excel worksheet can be a game-changer. It’s not rocket science, and with this guide, you’ll be adding buttons like a pro in no time!
How to Add a Button to a Microsoft Excel Worksheet Tutorial
This step-by-step tutorial will guide you through the process of adding a button to your Microsoft Excel worksheet, which will ultimately help you automate tasks using macros.
Step 1: Enable the Developer Tab
First off, you need to access the Developer tab on the Excel ribbon.
After opening Excel, right-click on the ribbon and select “Customize the Ribbon.” In the right pane, check the “Developer” box and click OK. The Developer tab will now be visible on the ribbon, providing access to form controls, including buttons.
Step 2: Insert a Button
Next, click on the Developer tab, then select “Insert” and click on the button icon under Form Controls.
Clicking the button icon will change your cursor into a crosshair, letting you draw a button anywhere on your worksheet. Click and drag to define the size of your button, and then release the mouse button to place it.
Step 3: Assign a Macro
Once you’ve drawn your button, Excel will prompt you to assign it a macro.
If you have pre-written macros, you can select one from the list. If not, you can click “New” to write a new macro in the VBA editor. Macros are scripts that tell Excel to perform certain actions, and they’re essential for making your button functional.
Step 4: Edit Button Text
After assigning a macro, right-click on the button and select “Edit Text” to customize the button’s label.
You can type in any text that describes the button’s function, like “Calculate Total” or “Generate Report.” This label will help users understand what the button does.
Step 5: Format the Button (Optional)
Lastly, you can format your button by right-clicking it and selecting “Format Control” for options like color, font, and size.
This step is optional but recommended for making your button look more integrated with the rest of your worksheet or to make it stand out to users.
Additional Information
Adding a button to your Microsoft Excel worksheet offers a level of sophistication and efficiency that can truly elevate your data management game. But there’s more to it than just the steps outlined above. For instance, you might want to delve into the world of VBA programming to create more complex macros that can be assigned to your buttons. This opens up a whole new realm of possibilities, like creating interactive dashboards or even developing simple games within Excel.
Remember, practice makes perfect. So don’t be discouraged if your first button doesn’t work as expected. Tinker with the macro code, experiment with different form controls, and soon you’ll be adding buttons that not only make your worksheets look professional but also make them function like well-oiled machines.
- Enable the Developer Tab
- Insert a Button
- Assign a Macro
- Edit Button Text
- Format the Button (Optional)
Frequently Asked Questions
Do i need to know how to code to add a button in excel.
Not necessarily. While knowing VBA helps, Excel has a macro recorder that can record simple tasks without coding knowledge.
Can I use buttons in Excel for Mac?
Yes, adding buttons and using macros is also available in Excel for Mac.
Can I add multiple buttons to a single worksheet?
Absolutely. You can add as many buttons as you need, each with its own assigned macro.
Are there any limitations to what a button can do in Excel?
The limitations are generally tied to the scope of VBA programming. If you can code it, you can likely assign it to a button.
How do I share my Excel file with buttons?
Just like any other Excel file, you can share it via email, cloud storage, or other file-sharing methods. Just ensure that macros are enabled in the recipient’s Excel settings to use the buttons.
In the world of spreadsheets, efficiency is king. Adding a button to a Microsoft Excel worksheet is more than just a neat trick; it’s a route to better productivity. It might seem daunting at first, especially if you’re new to Excel or not particularly tech-savvy. But like any skill, it becomes easier with practice. So take the plunge, start small, and soon you’ll be creating macros and adding buttons that save you time and impress your colleagues.
The power of automation is at your fingertips—literally. With a click of a button, tasks that once took minutes or even hours can be completed instantaneously. And as you become more comfortable with Excel’s capabilities, you’ll discover even more ways to streamline your workflows.
So go ahead, give it a try. Add a button to your Excel worksheet today. Who knows what doors it might open?

Matthew Burleigh has been writing tech tutorials since 2008. His writing has appeared on dozens of different websites and been read over 50 million times.
After receiving his Bachelor’s and Master’s degrees in Computer Science he spent several years working in IT management for small businesses. However, he now works full time writing content online and creating websites.
His main writing topics include iPhones, Microsoft Office, Google Apps, Android, and Photoshop, but he has also written about many other tech topics as well.
Read his full bio here.
Share this:
Join our free newsletter.
Featured guides and deals
You may opt out at any time. Read our Privacy Policy
Related posts:
- How to Enable Macros in Excel for Office 365
- How to Show Developer Tab – Excel 2010
- How to Enable the Developer Tab in Excel for Mac
- How to Make All Columns the Same Width in Excel 2013
- What is the Difference Between a Workbook and a Worksheet in Excel 2010?
- How to Center Worksheet Horizontally and Vertically in Excel 2010
- How to Insert a New Worksheet in Excel 2013
- How to Freeze Multiple Rows in Excel 2013
- How to Use the AutoFit Excel Shortcut for Columns and Rows
- Show the Developer Tab in Excel 2011
- How to AutoFit All Columns in Excel 2013 (An Easy 4 Step Guide)
- Can I Convert a Microsoft Word Table to Excel?
- Where is the Developer Tab in Excel 2013?
- How to Change Font in Excel 2013 for a Whole Worksheet
- Can I Repeat Rows in Excel When I Print?
- How to Switch a Row to a Column in Excel 2013
- How to Expand All Rows in Excel 2013
- How to Remove First Character in Excel 2013 Cell
- How to Add a New Worksheet in Excel 2010
- Excel Print Guide – Changing Important Print Settings in Excel 2010
- PRO Courses Guides New Tech Help Pro Expert Videos About wikiHow Pro Upgrade Sign In
- EXPLORE Tech Help Pro About Us Random Article Quizzes Request a New Article Community Dashboard This Or That Game Popular Categories Arts and Entertainment Artwork Books Movies Computers and Electronics Computers Phone Skills Technology Hacks Health Men's Health Mental Health Women's Health Relationships Dating Love Relationship Issues Hobbies and Crafts Crafts Drawing Games Education & Communication Communication Skills Personal Development Studying Personal Care and Style Fashion Hair Care Personal Hygiene Youth Personal Care School Stuff Dating All Categories Arts and Entertainment Finance and Business Home and Garden Relationship Quizzes Cars & Other Vehicles Food and Entertaining Personal Care and Style Sports and Fitness Computers and Electronics Health Pets and Animals Travel Education & Communication Hobbies and Crafts Philosophy and Religion Work World Family Life Holidays and Traditions Relationships Youth
- Browse Articles
- Learn Something New
- Quizzes Hot
- This Or That Game
- Train Your Brain
- Explore More
- Support wikiHow
- About wikiHow
- Log in / Sign up
- Computers and Electronics
- Spreadsheets
- Microsoft Excel
How to Create a Custom Macro Button in Excel
Last Updated: July 28, 2022
wikiHow is a “wiki,” similar to Wikipedia, which means that many of our articles are co-written by multiple authors. To create this article, 13 people, some anonymous, worked to edit and improve it over time. This article has been viewed 485,994 times. Learn more...
Macros in Excel can save a great deal of time with repetitive tasks. By assigning macros to custom buttons, you can save even more time by bringing your macro only one-click from execution.

- Click File → Options → Customize Ribbons
- Find the Developer check box in the Main Tabs section and click it. Press "OK" when you are done.

- Go to Excel → Preferences → Ribbon (Under Sharing and Privacy)
- Under Customize, check the box next to the Developer tab, and press "OK"

- If you are unfamiliar with what macros are or how to record them, read more. You should have a macro already built before you create the button.

Expert Q&A
- Try using the 2003 method for Excel versions earlier than 2003. Thanks Helpful 0 Not Helpful 0
- Alternatively, you may add your macro button to an existing toolbar in versions 2003 and earlier. Thanks Helpful 0 Not Helpful 0
- If you prefer, it will let you assign a shortcut key in the dialog box. This can prevent wrist strain and save time. Thanks Helpful 0 Not Helpful 0

- The user interface on versions earlier than 2003 may be different so the 2003 method may not be exactly the same for those versions. Thanks Helpful 2 Not Helpful 0
- If you want a different button image than what version 2007 offers, you will need to download additional software that specializes in modifying user interfaces for Microsoft Office. Thanks Helpful 2 Not Helpful 0
You Might Also Like

- ↑ http://office.microsoft.com/en-us/excel-help/add-a-button-and-assign-a-macro-to-it-in-a-worksheet-HP010342137.aspx
About This Article
- Send fan mail to authors
Is this article up to date?

Featured Articles

Trending Articles

Watch Articles

- Terms of Use
- Privacy Policy
- Do Not Sell or Share My Info
- Not Selling Info
wikiHow Tech Help Pro:
Level up your tech skills and stay ahead of the curve
How to Create a Macro Button in Excel (3 Quick Methods)
When we frequently use the macro in Excel for particular applications then it’s quite bothering or time-consuming to run the macro by opening the Macros dialog box repeatedly. To overcome these situations Excel offers some amazing ways to make our customized macro button. So, today we are going to show you 3 fast ways to create a macro button in Excel.
How to Create a Macro Button in Excel: 3 Quick Methods
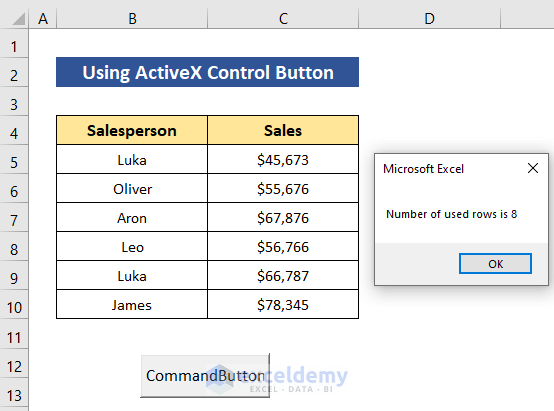
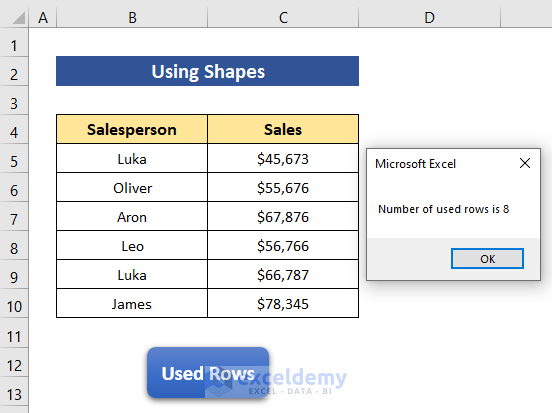
Here’s the dataset that we’ll use to explore the methods, it contains some salespersons’ sales.

And, we’ll use this code to assign to macro buttons which we placed in a module, it will return the used row numbers in our active sheet.

1. Using Control Button to Create a Macro Button
Firstly, we’ll apply the Control buttons from the Developer ribbon to build a macro button. You will get two types of buttons here, the Form Controls button and the ActiveX Controls button. Both perform the same kind of operations but ActiveX Controls provides more customizations, formats, and features.
1.1. Using Form Control Button
From the Form Controls section, we’ll apply the first control button named- Button .
- So, click as follows: Developer > Insert > Form Controls > Button .

Then your cursor will look like this- a plus sign .

- Left-click your mouse and hold, then drag over the sheet where you want to place the button.

- After releasing the left click, the Assign Macro dialog box will appear where you can assign macro to the button .
- Select the M acro name and press OK .

Macro is assigned successfully, you can change the button name too. By dragging the eight circular icons beside the box, we can edit the size of the macro button.
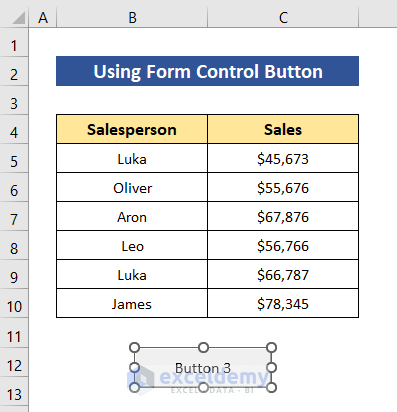
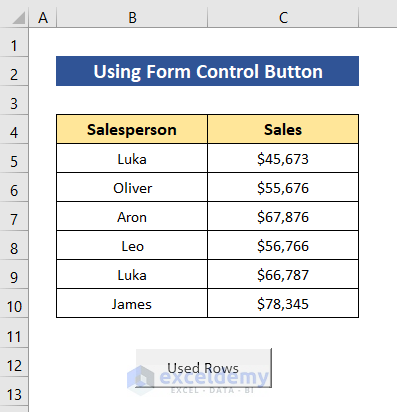
- Double-click on the button and type the name. We named it- Used Rows .
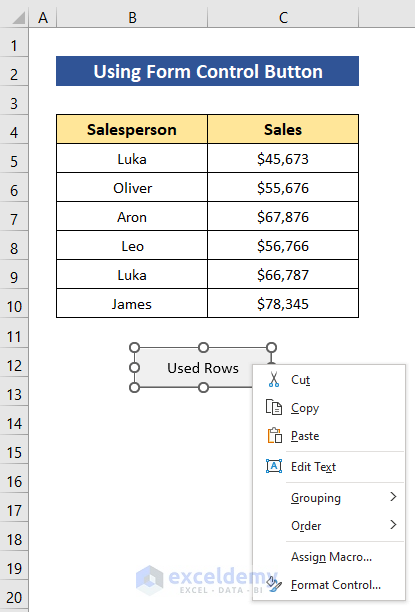
- If you right-click on the button you will get many options to edit the macro button like Cut , Copy , Paste .
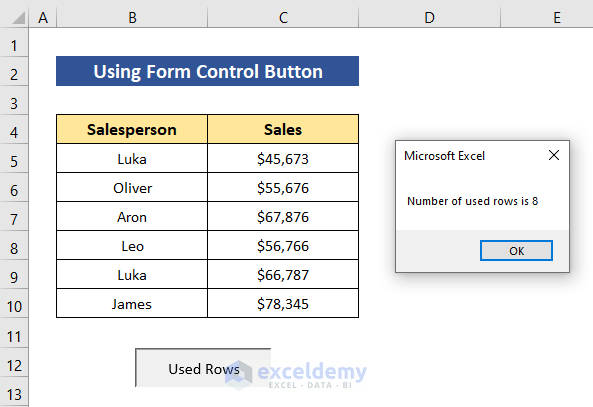
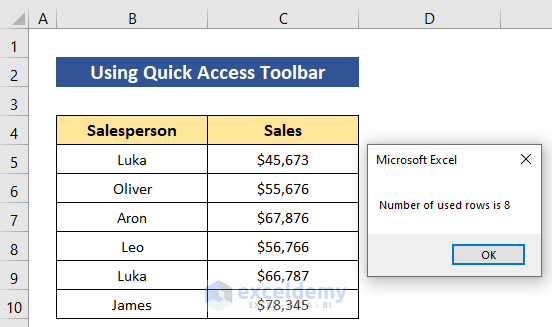
- So now, if we just click on the button it will run the macro and show the output.
See, a notification box is showing the output.
1.2. Using ActiveX Control Button
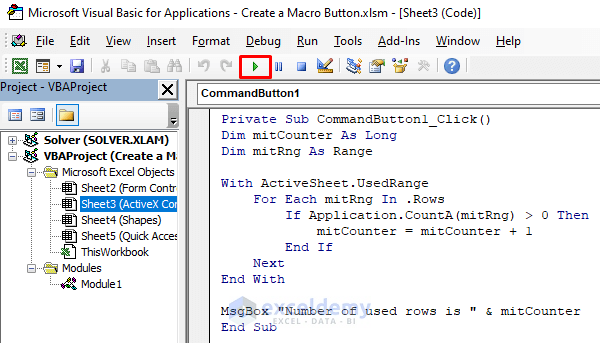
Now we’ll use the Command Button from the ActiveX Controls buttons. But instead of assigning a macro, we’ll have to type the code here.
- Click as follows: Developer > Insert > ActiveX Controls > Button .

- Like the previous section, set the button size using the mouse.

- Next, right-click on the button and select View Code from the context menu .
By using the other menu you can edit the macro button as you require.

- After that, a VBA window will open up like the image below that will have the Sub and End procedures by default. We’ll have to place codes within it.
- Copy the codes from the module and place them here.
- Later, just press the Run icon to activate the codes for the button.
Now just by clicking the button, we’ll be able to run the codes.
2. Inserting Shapes to Create a Macro Button
We know, Excel has a Shapes feature in the Insert ribbon. The amazing part is, we can assign macro with any kind of shape too.
- Go to Insert ribbon, then choose your preferred shape from the Shapes We chose Rectangle with Rounded Corners .

- Again by following the first section, set the button size.
- From the Shape Format ribbon, you can change the shape style too. We chose- Blue, Accent 5 style .

- Next, double-click on the button and type the name.

- After that, right-click on the button and select Assign Macro from the context menu .
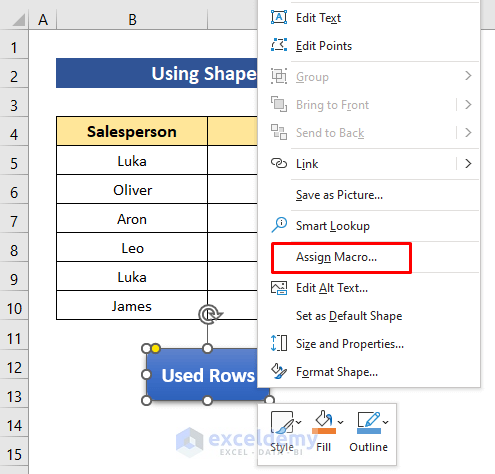
A few moments later, the Assign Macro dialog box will appear.
- Select the macro and press OK .
- Nothing to do more, just click the button to run the macro.
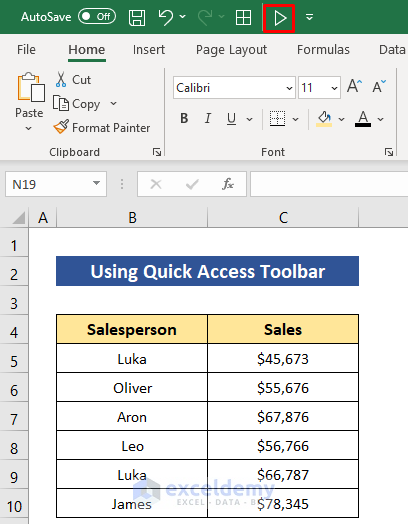
3. Using Quick Access Toolbar to Make a Macro Button
The previous method was to set a button in a sheet but what if we could make a button that we could use anytime for any sheet? Maybe it will be very useful for some particular situations. Here we’ll add this type of button to the Quick Access Toolbar .
- First, click on the Customize Quick Access Toolbar icon from the upper border of the Excel window.
- Then select More Commands .

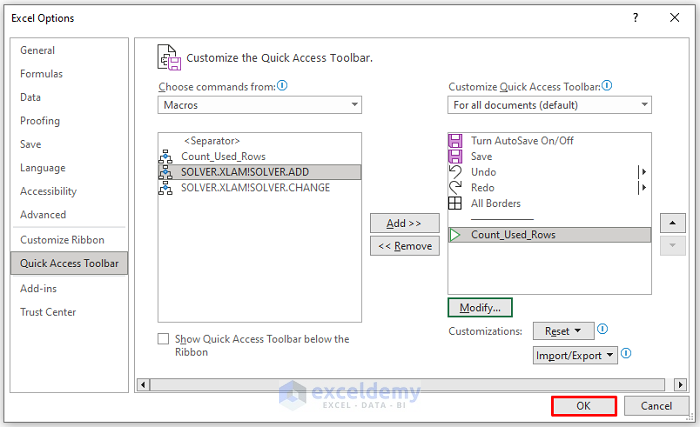
- At this moment, choose Macros from the Choose commands from drop-down box.
- Soon after, the available macros will appear here. Select our inserted macro name and press Add>> .

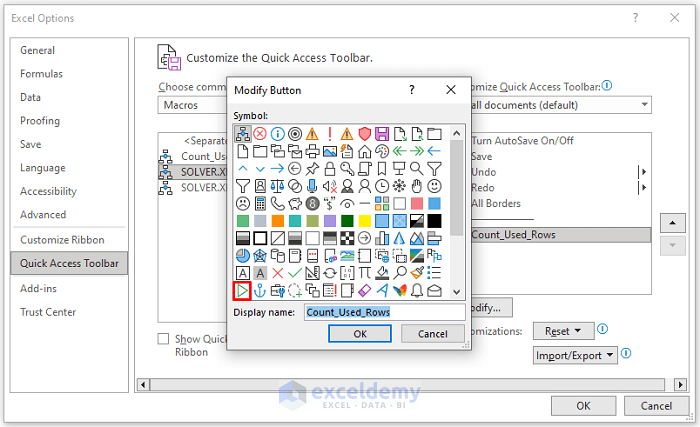
- By clicking on the Modify button we can change the button symbol.

- We used the Play icon for the button.
- Finally, nothing to do more, just press OK .
Have a look, the button is available in the toolbar. Now it doesn’t matter which sheet you are in, you will get it available for any sheet.
- Click on the button and it will work for the active sheet.
The output after clicking on the button.
Download Practice Workbook
You can download the free Excel workbook from here and practice independently.
That’s all for the article. We hope the procedures described above will be good enough to create a macro button in Excel. Feel free to ask any question in the comment section and please give us feedback.
What is ExcelDemy?
Tags: Excel Macro Button

Md. Sourov Hossain Mithun, an Excel and VBA Content Developer at Softeko's ExcelDemy project, joined in October 2021. Holding a Naval Architecture & Marine Engineering degree from BUET, Mithun showcases expertise during his two-year tenure. With over 200 published articles on Excel topics, he earned a promotion to Team Leader, excelling in leading diverse teams. Mithun's passion extends to Advanced Excel, Excel VBA, Data Analysis, and Python programming, contributing significantly to the innovative and dynamic environment of ExcelDemy... Read Full Bio
Leave a reply Cancel reply
ExcelDemy is a place where you can learn Excel, and get solutions to your Excel & Excel VBA-related problems, Data Analysis with Excel, etc. We provide tips, how to guide, provide online training, and also provide Excel solutions to your business problems.
Contact | Privacy Policy | TOS
- User Reviews
- List of Services
- Service Pricing

- Create Basic Excel Pivot Tables
- Excel Formulas and Functions
- Excel Charts and SmartArt Graphics
- Advanced Excel Training
- Data Analysis Excel for Beginners

Advanced Excel Exercises with Solutions PDF
Introduction to Worksheet Macro Buttons
Copy the Navigation Code
Add the buttons, test the macro buttons, get the sample file.
Excel VBA Tutorials
Introduction
Add buttons on a worksheet to run macros that help you navigate -- a Back button and a Next button.
Watch this video to see the steps, and the written instructions are below the video.
Video Timeline:
- 00:00 Introduction
- 00:18 Navigation Macros
- 00:51 Add 1st Worksheet Button
- 01:40 Format Worksheet Button
- 02:20 Add 2nd Worksheet Button
- 02:43 Format 2nd Worksheet Button
- 03:07 Align and Resize Buttons
- 04:11 Copy Buttons to Other Sheets
- 04:41 Test Worksheet Buttons
How the Macros Work
There are two Excel VBA macros in the workbook -- one that takes you to the next sheet in the workbook, and one that takes you to the previous sheet. If you're on the third sheet, click the Next button to go to the fourth sheet. Or, click the Back button to go to the second sheet.
If the next sheet in the chosen direction is hidden, the code keeps going until it finds the next visible sheet. If it reaches the end of the sheet tabs in either direction, it jumps to the other end, and continues from there

First, copy this navigation code to a regular module in your workbook. Save your file as Macro-Enabled (*.xlsm) or Binary (*.xlsb).
Now that the macros have been added to the workbook, you'll add the buttons.
Back Button
Format the Macro Button
Add the next button, align the macro buttons, add a back button.
Now that the macros have been added to the workbook, you'll add the Back button on the first worksheet.
- Select the first sheet in the workbook.
- Note : If the Developer tab isn't visible, click the Office Button, then click Excel Options. Click the Popular category, then add a check mark to Show Developer tab in the Ribbon .
- In the Controls group, click Insert, to see the Form Controls and ActiveX Controls.

- On the worksheet, drag the pointer, to add a button of a specific size, or click to create a default sized button.
- In the Assign Macro window that opens automatically, click on the GoSheetBack macro to select it, then click OK

While the button is still selected, you can change its caption and add some formatting.
- To change the button's caption, select the existing text, and type < Back .

- On the Ribbon's Home tab, use the font formatting buttons, such as Bold and Font Size, to change the appearance of the button. In the screen shot below, the font size has been increased to 14.

Follow the same instructions as above, to add a Next button to the worksheet, with these changes.
- In the Assign Macro window, select the GoSheetNext macro
- For the caption, type Next >
If the Back and Next buttons are not aligned, follow these steps (in Excel 2010) to align them:
- Press the Ctrl key on the keyboard, and click on the Back button
- Continue to press the Ctrl key, and click the Next button
- On the Ribbon, under Drawing Tools, click the Format tab
- Click Align, then click Align Top

Copy Buttons to Other Sheets
After the macro buttons are completed on the first worksheet, follow these steps to copy them onto the remaining worksheets.
- On the Ribbon, click the Home tab, then click Copy
- Select the next worksheet, click cell B1
- On the Ribbon, click Paste (or use the keyboard shortcut, Ctrl + V)
- Select the next worksheet, and paste into cell B1, and repeat for all the remaining sheets.

After you've added all the buttons, you can test them.
To move through the sheets, click either the Back or Next button on any sheet.
You can download a copy of the Excel Worksheet Macro Buttons File to see the worksheet buttons and the worksheet navigation code. The file is in xlsm format, and is zipped. After you unzip the file and open it, enable macros, so you can use the navigation macros.
More Tutorials
Form Control Buttons
Getting Started with Excel Macros
Text Box Macros
FAQs, Excel VBA, Excel Macros
Add Code to Excel Workbook
Adding Code to an Excel Workbook
Last updated: May 18, 2024 3:27 PM

How to add a button in excel
When we mention buttons in Excel, anyone who is not a consistent user will wonder what that means. Yes, Microsoft Excel does have Macros buttons which are the most advanced level of Excel. These buttons are commands initiated by a single click. It is easy to add buttons to excel. A user can simplify and save the time that they will take to navigate between different cells looking for specific information. In short, the buttons are inserted to perform specific tasks for us. The three different types of buttons you can place in a worksheet include;
- Form Control Buttons
This article shows how to add a button in Excel and how to assign Macros to them. With those buttons, navigating through your spreadsheet won't be a nightmare anymore.
Table of Contents
Method 1: Using shapes to create Macro buttons to open a particular sheet
You can create a macros button by using shapes. You can easily create a rounded rectangle; add a hyperlink to it for your worksheet. Here is what you can do; 1. On the main menu ribbon, click on the Insert tab.
2. Go to Shapes, click the drop-down arrow, and select the Rounded Rectangle icon.
3. Draw a rounded rectangle on your worksheet.
5. Format the shape by typing text into it-Right-click on the form and select edit text. Or double-click the shape.
6. To Hyperlink the shape, right-click on it and select Hyperlink from the menu. Right-clicking will display an Insert Hyperlink dialogue box.
- Under the 'Link to' section, select 'Place in This Document.
- Under the 'Type the cell reference' section, type in the destination cell address.
- Under the 'Or select a place in this document box, click to choose the particular sheet name. Click the OK button when done.
When you click the rounded rectangle, it will skip to the specified cell of a specified sheet.
7. To assign the macro, right-click on the table and select Assign Macro. Under the 'Macros in' drop-down arrow, select 'This Workbook'. Here, select the macro from the list of macros in This Workbook.
8. Press OK. When you point your mouse on this shape, it will turn to the hand pointer cursor, and clicking the form will run the macro. Remember to set your shape not to resize with cell changes by right-clicking on it and selecting 'Size and Properties.'
Method 2: Using Developers Form Control Buttons to create buttons in Excel
1. On the main ribbon, click on the Developer tab.
2. Go to the Insert button and click the drop-down arrow.
3. Under Form Control, select the first option called button. Draw a button on your worksheet
4. Next, in the Assign Macro dialogue box, type or select a name for the macro.
5. Click OK when done. You can click on this button to run the macro.
Using ActiveX Controls
Since running a macro in Excel can prove tedious, you can assign a macro to a button to run it faster. In this case, you can follow these steps to add a button in Excel using ActiveX controls easily.
1. Right-click anywhere on the Home ribbon and select Customize the Ribbon option from the pop-up menu.
2. Once the Customize the Ribbon window is open, go to the Main Tabs section and select the Developer option.
3. Click OK. However, if you already have the Developer Tab added to your ribbon, then proceed as follows.
4. Go to the Developer Tab and click on Insert.
5. Next, click on your preferred button under the ActiveX Controls .
You can now drag it anywhere in the Excel worksheet to create a button.
6. Right-click on the newly created button and select the View Code option from the drop-down menu.
7. You can now type this code, which sets the value of cell A6 to Hello :
Range(“A6”).Value = “Hello”
8. If you want to test setting the cell value, ensure the Design Mode option is deselected. You can also click on the button, and the Hello text will be displayed on your screen.
You can further use VBA codes to assign a different task for various operations such as double-clicking, single-clicking, right-clicking, and many more. When you right-click on the button, you can also select the Format Control option. However, the only downside is that the size of the buttons changes every time you make changes on the worksheet or share it.
Adding Macros To Quick Access Toolbar
Adding macros to Quick Access Toolbar also allows you to create buttons in Excel and use them on any sheet in your present workbook. To do this, follow these steps:
1. Right-click on the arrow below the ribbon of the Excel workbook.
2. When the Customize Quick Access Toolbar screen opens, navigate and select More Commands at the bottom.
3. Select Macros in the Choose commands from the section. You can click on the down-facing arrow in the Popular Commands box.
4. Select the HighlightMaxValue option and click on the Add button.
5. You can now click on Modify to customize the symbol of the macro.
6. Select your preferred symbol from the provided list and hit the OK button.
7. Finish by clicking OK to add a button to your Excel workbook. If you want to run the HighlightMaxValue macro, simply click on the icon.
When working with adding buttons to Excel, it is best to keep it easy and straightforward. The above methods portray these as the steps are short and easy to follow. They are not only easy to set up, but they also give you different options for formatting.

Excel: What are macros and what do they do
E xcel macros increase productivity and save time when creating a complex workbook or worksheet. Even if you start with some of the best Microsoft Excel templates , adding macros simplifies using your spreadsheet in the future. Here's an explanation of what Excel macros are, what you can do with a macro, how to write and record macros to customize your workbook, and how to run macros to automate and speed up repetitive tasks.
Excel macros defined
An Excel macro is a series of commands stored in a workbook. A macro can replace actions that are as simple as a few menu choices and mouse clicks. By recording your actions, you can assign macros and replay them again with a tap of a shortcut key.
More complicated macros might be a complete program written in the Visual Basic editor using VBA code. VBA stands for Visual Basic for Applications, a programming language that includes special commands specific to Excel.
When you open macro-enabled workbooks, which are Excel files with an XLSM extension, Microsoft Office alerts you with a security warning. Macros can be dangerous and contain malicious code, so use caution.
If you don't know the origin of a file or are unsure if the creator is trustworthy, don't activate the macros. If you know the file is safe and want to use the VBA macros, choose Enable Content in the security warning.
You can bypass this warning by turning on macros in Microsoft Office Trust Center settings. Make sure you understand the risks if you do so. In the File tab , select Options , then choose Trust Center .
What can I do with Excel macros?
Excel macros are helpful. You can use macros to apply formatting to cells, rows, columns, and worksheets, sort and filter information, and perform data analytics to get a workbook ready for use.
Macros can build charts, graphs, and tables for creating reports. It imports or exports the data from other sources. Excel VBA macros can also generate documents and send emails, cutting your work to a minimum.
How to create, record, and run Excel macros
How to record a macro.
In short, open the Developer tab, select the Record Macro button, and type a macro name. You can store a macro in a Personal Macro Workbook that's available from any worksheet or in This Workbook if you only want to use it on your current worksheets.
Excel records your actions. Perform the steps you want to repeat when you run the macro in the future. Click the Stop Recording button when you're done. That way, you won't add unnecessary steps.
If you don't see the Developer tab, right-click the Excel ribbon and choose Customize the Ribbon from the drop-down menu. Tick the check box for Developer . The Developer tab appears between the View and Help tabs.
How to write VBA code
If you want to learn Visual Basic for Applications, start with our guide to creating Excel macros . If you're a beginner, unfamiliar with VBA, or want to learn more about VBA for Excel, Microsoft's macro tutorial is a good resource.
If you know VBA, open the Developer tab and select Visual Basic from the toolbar to open the VBA Editor. Alternatively, press Alt + F11 to toggle back and forth between the VBA Editor and your Excel workbook.
You can assign a keyboard shortcut to Excel macros written in VBA code, just as you can with recorded macros. Since you're using macros to save time, triggering them with keystrokes is a great idea.
What platforms support Excel macros?
You can only create Excel macros on the desktop version of Excel. The desktop version of Excel is available for Windows PCs and Mac computers. While you can't make new macros in Excel online, you can run macro-enabled workbooks. The Excel mobile app cannot run macros.
You can also use Excel Online to run macros on an inexpensive and long-lasting Chromebook . However, Microsoft didn't make a desktop version for ChromeOS. If you want to record macros or create code for a spreadsheet, you'll need another solution.
More macro options
Google Sheets has macro recording and an Apps Script Editor where you can write custom code. It's hard to beat Microsoft Excel, but Google Sheets is a worthy competitor that might be able to handle most of your needs.
How to use Microsoft 365 (Office) on a Chromebook

How-To Geek
Keyboard macros aren't just for programmers (here's how i use them every day).
These macros require no programming experience to save you time.
Macros are essential to any efficient office setup. You don’t have to have a programming degree in order to create useful macros that can save you time throughout your workweek. Not sure where to get started with macros? Well, let me tell you about a few of my favorite shortcuts.
Copy and Paste Macros Get Daily Usage
We’ll start off with my most used macro of all: copy and paste. You might say, “Patrick, copy and paste are simple keyboard shortcuts that everyone knows, why program it to a macro?” To which I would reply, “A single keypress is more efficient than hitting two keys awkwardly with your hand.”
Copy and paste are two keyboard shortcuts probably every person knows, but it’s honestly a little cumbersome to hit with your left hand. While possible, it’s not always the easiest thing. And, if you switch between macOS and Windows often (like me), then you’re stuck with trying to program your body to do Ctrl+C on Windows, and Command+C on macOS. Well, with a macro, you don’t have to remember any of that.
I use a pretty premium keyboard that has several keys where others only have one, but it’ll work just the same on any keyboard capable of using macros. I simply have one of the buttons below the left spacebar on my Dygma Raise programmed to copy, and then one on the right set to paste. I simply have to click a single button and my computer copies what's highlighted or pastes whatever is on the clipboard. This ties well into the next macro too, as it will paste more than just text. Whatever is in your clipboard will be inserted into the receiving program, just like if you were hitting Ctrl+V or Command+V.
Screenshots With a Single Keystroke
Screenshots used to not be the easiest thing to do on Windows, as you only had the Print Screen function and then would have to dive into Paint or another program to crop it. Well, with Windows 10 and 11 , you have the keyboard shortcut Windows+Shift+S to capture a portion of your screen and copy it to the clipboard. That’s a pretty complicated shortcut to memorize, and requires contorting your fingers in weird ways to hit it properly. While possible, it’s easier to just remember a single keyboard shortcut, and that’s where this macro comes into play.
To the right of my copy macro key on my keyboard, I have a macro that takes a screenshot. It simply mimics me hitting Windows+Shift+S and drops me into the screenshot tool. From there, I use my mouse (which sits between my two keyboard halves like all mice should) and drag it across the portion of my screen that I want to capture. Now, that’s in my clipboard and ready for me to use the paste macro to insert into a program!
macOS users can benefit from the same thing, though on macOS it’s a different shortcut you’ll be programming into the macro. You’ll want to use the Shift+Command+4 shortcut inside the macro to capture a portion of the screen and copy it to your clipboard. However, with macOS, once you’re into the screenshot tool, you can click the spacebar to switch between capturing the entire window you’re hovering over or just a portion of the screen.
Exporting from Photoshop Made Easy
While I don’t use this macro much anymore (as my Photoshop usage over the past year has gone way down), there was a time that this saved me a lot of time. In Photoshop , if you want to “Save for web”, the keyboard shortcut is Alt+Shift+Ctrl+S. That’s a lot to remember, and it used to have me contorting my hand in a very weird way in order to hit it. Then, once you’re at that popup, you have to hit enter in order to actually save. I know there are other methods to save in Photoshop, but because of what I used to do, this was the best way to export for me.
So, what did I do? I created a macro, of course! With two key presses this time (one to switch layers on my keyboard, and one to trigger the macro), I could save a picture from Photoshop simply, without contorting my fingers.
This macro was a bit more complicated, and functions in two stages. First, it does the key press combination to trigger the save function, then it pauses for 100ms, and then it clicks enter. What this does is open the save dialog first, then wait for the dialog to fully open and be ready to interact with, and then click enter so I’m ready to go ahead and save the file.
You could, if you wanted, then program another 100ms pause and click enter again to go ahead and trigger the save function into the folder that it pops up. This would further streamline the process, but also remove the ability for you to rename or choose the destination folder during the save process, which is why I skipped it.
This alone saved me a lot of time every week when I was processing dozens of pictures every day, and sometimes hundreds per week.
Copy a Link and Shorten It in One Move (on macOS)
If you’re constantly shortening (or even affiliating) links on macOS, then this piece of software and macro are exactly what you should be leveraging. Using a piece of software called Short Menu , you can program a keyboard shortcut that will shorten any URL you have in your clipboard.
I used this often when I did deals writing, and had the keyboard shortcut programmed as a macro right next to my copy function. So, when I needed to affiliate or shorten a URL, I would start by using my copy macro, then click the button next to that to shorten or affiliate the URL, then click the next button to paste. I took something that would normally take about 6–10 keystrokes and shortened it to 3. That doesn’t sound like a massive change, but it makes an astronomical difference in your daily workflow for sure.
What Can You Macro?
As you see above, there are quite a few things that I've turned into a macro that you might not have thought of before. So, what can you macro?
There are so many mundane, repetitive things that we do on our computers every day that can be made simpler and faster by turning them into a macro. For me, I have a keyboard that supports multiple layers and allows me to create macros within its own software. For you, you might need third-party programs like AutoHotKey on Windows or HammerSpoon for macOS. Or, you could opt instead for something like Elgato’s Stream Deck, which is a dedicated macro keypad that has mini LCD’s which can be set to show different images to help you remember what each button does.
We reviewed the Stream Deck+ , if you need inspiration as to how to expand your desk setup further.
- Work with macros Video
- Edit a macro Video
- Save your macro Video
- Assign a button to a macro Video

Assign a button to a macro

In this final video, we’ll hook the macro up with a button and make it available in two places: In a custom group on the Developer tab, and on the Quick Access Toolbar.
Create or delete a macro
Edit a macro
Assign a macro to a button
Create and save all your macros in a single workbook
In this final video, we'll hook the macro up with a button and make it available in two places.
In a custom group on the ribbon that I'll create on the DEVELOPER tab, I'll call My Macros , and up here on the Quick Access Toolbar .
First, I'll create a custom group for the DEVELOPER tab.
I click the FILE tab, Options , Customize Ribbon , and then I make sure Developer is checked.
I click New Group and here is our new group.
I click Rename , and call it My Macros .
Now, let's find the macro and add it to this custom group.
I go over here and choose commands from Macros .
I select the "FillDaysRelativeR" macro that's stored in my 'Personal Workbook' and click Add .
Here it is, it's now in the group and I want to rename it.
I click Rename and call this "Fill Days".
You can have spaces in display names.
While I am at it, I'll replace the cryptic icon with this icon that looks a little bit like a calendar.
I click OK , click OK again and here's my macro button in my custom My Macro group.
I click it and it works.
Now I'll show you how to add the same macro to the Quick Access Toolbar , so it'll be up here next to Redo .
Click FILE and Options , and this time, click Quick Access Toolbar .
Again, I choose commands from Macros, and here's the macro in my personal workbook. Click Add .
To rename it, click Modify . Call it "Fill Days" and choose the same grid icon.
I click OK , and click OK again.
Now here it is, up on the Quick Access Toolbar .
I click it, and of course, it works great again.
Now you have a pretty good idea about how to implement macros in Excel.
Of course, there's always more to learn.
So check out the course summary at the end, and best of all, explore Excel 2013 on your own.

Need more help?
Want more options.
Explore subscription benefits, browse training courses, learn how to secure your device, and more.

Microsoft 365 subscription benefits

Microsoft 365 training

Microsoft security

Accessibility center
Communities help you ask and answer questions, give feedback, and hear from experts with rich knowledge.

Ask the Microsoft Community

Microsoft Tech Community

Windows Insiders
Microsoft 365 Insiders
Was this information helpful?
Thank you for your feedback.
- Ablebits blog
Consolidate data in Excel and merge multiple sheets into one worksheet

The tutorial demonstrates different ways to combine sheets in Excel depending on what result you are after - consolidate data from multiple worksheets, combine several sheets by copying their data, or merge two Excel spreadsheets into one by the key column.
Today we will tackle a problem that many Excel users are struggling with daily - how to merge multiple Excel sheets into one without copying and pasting. The tutorial covers two most common scenarios: consolidating numeric data (sum, count, etc.) and merging sheets (i.e. copying data from multiple worksheets into one).
Consolidate data from multiple worksheets in a single worksheet
The quickest way to consolidate data in Excel (located in one workbook or multiple workbooks) is by using the built-in Excel Consolidate feature.
Let's consider the following example. Supposing you have a number of reports from your company regional offices and you want to consolidate those figures into a master worksheet so that you have one summary report with sales totals of all the products.

To consolidate the data in a single worksheet, perform the following steps:
- Each range (data set) you want to consolidate resides on a separate worksheet. Don't put any data on the sheet where you plan to output the consolidated data.
- Each sheet has the same layout, and each column has a header and contains similar data.
- There are no blank rows or columns within any list.

- In the Function box, select one of the summary functions you want to use to consolidate your data (Count, Average, Max, Min, etc.). In this example, we select Sum .
- Check the Top row and/or Left column boxes under Use labels if you want the row and/or column labels of the source ranges to be copied to the consolidation.
- Select the Create links to source data box if you want the consolidated data to update automatically whenever the source data changes. In this case, Excel will create links to your source worksheets as well as an outline like in the following screenshot.

As you see, the Excel Consolidate feature is very helpful to pull together data from several worksheets. However, it does have a few limitations. In particular, it works for numeric values only and it always summarizes those numbers in one way or another (sum, count, average, etc.)
How to merge Excel sheets into one
Overall, there are four ways to merge Excel worksheets into one without copying and pasting:
- Combine sheets with Ultimate Suite
- Power Query for Excel
- Merge two Excel sheets into one by the key column(s)
How to combine Excel spreadsheets with Ultimate Suite
The built-in Excel Consolidate feature can summarize data from different sheets, but it cannot combine sheets by copying their data. For this, you can use one of the merge & combine tools included with our Ultimate Suite for Excel .
Combine multiple worksheets into one with Copy Sheets

With the Copy Sheets added to your ribbon, the 3 simple steps is all it takes to merge the selected sheets into one.
On the Excel ribbon, go to the Ablebits tab, Merge group, click Copy Sheets , and choose one of the following options:
- Copy sheets in each workbook to one sheet and put the resulting sheets to one workbook.
- Merge the identically named sheets to one.
- Copy the selected sheets to one workbook.
- Combine data from the selected sheets to one sheet.

The Copy Sheets wizard displays a list of all the sheets in all open workbooks. Select the worksheets you want to combine and click Next .
If you don't want to copy the entire content of a certain worksheet, make use of the Collapse Dialog icon to select the desired range as shown in the screenshot below.

In this step, you are to configure additional settings so that your worksheets will be combined exactly the way you want.
How to paste the data:
- Paste all - copy all the data (values and formulas). In most cases, it is the option to choose.
- Paste values only - if you don't want formulas from the original sheets to be pasted into the summary worksheet, select this option.
- Create links to source data - this will inset formulas linking the merged data to the source data. Select this option if you want the merged data to update automatically whenever any of the source data changes. It works similarly to the Create links to source data option of Excel Consolidate .
How to arrange the data:
- Place copied ranges one under another - arrange the copied ranges vertically.
- Place copied ranges side by side - arrange the copied ranges horizontally.
How to copy the data:
- Preserve formatting - self-explanatory and very convenient.
- Separate the copied ranges by a blank row - select this option if you want to add an empty row between data copied from different worksheets.
- Copy tables with their headers . Check this option if you want the table headers to be included in the resulting sheet.

Other ways to combine sheets in Excel
Apart from the Copy Sheets wizard, the Ultimate Suite for Excel provides a few more merging tools to handle more specific scenarios.
Example 1. Merge Excel sheets with a different order of columns

Example 2. Merge specific columns from multiple sheets

Merge sheets in Excel using VBA code
If you are a power Excel user and feel comfortable with macros and VBA, you can combine multiple Excel sheets into one by using some VBA script, for example this one .
Combine data from multiple worksheets with Power Query
How to merge two excel sheets into one by the key column(s).

This is how you consolidate data and merge sheets in Excel. I hope you will find the information in this short tutorial helpful. Anyway, I thank you for reading and look forward to seeing you on this blog next week!
Available downloads
You may also be interested in.
- How to merge multiple Excel files into one
- How to merge rows in Excel without losing data
- How to merge two columns in Excel without losing data
- Quick ways to copy and move sheets in Excel
- CONCATENATE in Excel: combine text strings, cells and columns
- Combine ranges in Excel using VSTACK and HSTACK functions
Table of contents
105 comments
I am merging a summary sheet from various excel workbooks into one consolidated workbook sheet. To do this, I have been using power query to merge over 50 workbook summary sheet, but I keep getting a null row with just the source document title in-between each row. Not sure what is going on.
Hi! I don't have your data, so I can't be of any help to you.
Hello Everyone,
I have 3 excel worksheets, I want their data to be auto updated in one sheet with one condition, which is that when I enter a date in the date column of sheet 1/2/3, then that row should go to the master sheet otherwise not. The data of the sheet should be arranged date wise in the master sheet. Not Sheet 1 first and then Sheet 2 & 3.
Hi! Your task can be solved by using a VBA macro. You can also try using the Combine Sheets Wizard tool. Based on column headings, you can merge data from multiple worksheets into a single Excel worksheet. This tool is included in the Ultimate Suite for Excel and can be used in a free trial to see how it works.
I just found this site for Excel and I am impressed. I do have a particular demanding task to perform and not only once but relatively often, more than once a month.
I used to deal with hundreds of CSV file and since i need them as one large file, I used the old DOS command: Copy *.csv Compil.csv Now I am receiving those files as full excel *.xlsx In a worksheet labelled Analyse AA, the rows are composed of headers and assay results in multiple colums and also contains a second worksheet with QAQC data that is not a priority for the moment.
My only method was to use a macro to select the data in the rows I needed and copy/paste them into a compilation master file. There is not hundreds, but thousands files to merge in this project. Browsing for a more efficient methods, I found the VBA macro MergeExcelFiles but this is adding worksheet instead of appending in one worsheet. I did find a promising title: Merge sheets in Excel using VBA code but the suggested VBA example is not accessble anymore. It was removed.
Any suggestions to help me save time? Does the Ultimate Suite for Excel would help?
Best regards
Hi! If I understand your task correctly, our Combine Sheets Wizard may help you solve it in a few clicks. Merge data from multiple worksheets into a single Excel sheet based on column headers using the Combine Sheets Wizard. It is available as a part of our Ultimate Suite for Excel that you can install in a trial mode and check how it works for free . If you have any other questions, please don’t hesitate to ask.
Alex, Good afternoon,
You are the only person I have found that can explain excel challenges easily - thank you.
I have been searching for a simple solution to merge (and automatically update) different sheets.
Specifically - I have a shared "master calendar" spreadsheet which we use to list all of our tasks for our Navy Program. With that, all of the team leads have a individual sheet (all with the same column heads) which they update and I would like to merge them into a separate (master calendar sheet - same workbook). Is there a way to do this in Excel.
Thanks again - appreciate the help. Have a great day. Best regards Eric
Hi! I hope you have studied the recommendations in the tutorial above. I recommend paying attention to the Copy Sheets tool . A single tool, four different methods for merging multiple Excel worksheets. All you have to do is specify how you want to combine the sheets. Copy Sheets add-in does the rest. The tool is included in the Ultimate Suite for Excel and can be used in a free trial to see how it works.
Thank you very much - I will see if our administrator allows for us to download that Suite - it would help out a ton.
Have a great day
Hi Alex! You're my new favorite person I have ever found on the internet!
Disclaimer: I am brand spanking new to Excel - as in, I started fooling with it for the first time about 8 hours ago. I am starting small with my idea for data tracking and only measuring two employees workload.
I currently have 5 sheets I am working with to consolidate data gathered by 2 people. The first sheet for both people includes an array of unique data. Each row is dedicated to one sales order, and the 10-20 columns are for different factors related to that order.
Currently, I only wish to sum / count 6 columns from each base sheet. The problem I am facing is that the data I am looking to measure for these columns is only input as a date. I'm trying to move that info over from the 2 base sheets to 2 summary sheets, and they are the bane of my existence. The summary sheet rows are dates in ascending order, and the columns are headers from the base sheet - thus the cells show the sum of each heading category per day. This will then be consolidated into a final summary sheet (but I have found that much easier as it is a simple sum formula with no unique values)
I have tried using =COUNTIF(Sheet1:Sheet2!A1:A50,"01/01/2024")
This does populate the correct numerical value. HOWEVER, since the quotations indicate a unique value / text, Excel is unable to recognize and automate the pattern. There has to be a better way than me individually inputting the above formula for each of the 6 cells for each corresponding date. That has me manually entering the formula 6x365(2) times.
Please help. I know there's a solution. I just have no idea how to loop it in!
Thank you in advance.
Hi! If I understand the question correctly, you can use a reference to the cell where the date is written in the formula instead of specifying the date explicitly. Use in the formula a reference to the column of the summary sheet in which the dates are written in ascending order. When you copy the formula down the column, the reference to the cell with the date will change. Read more: How to copy formula in Excel: down a column, without changing references . It is my hope that my advice will be of help to you in your task.
Hi Alexander, I am looking to use two separate worksheets. I want to pull in executive contact information from one worksheet and match it with a field like company name or an ID number for a separate worksheet that has quality scoring metrics for those companies. The ultimate goal is merging the contact data with the companies that had poor quality scoring to create a target sales list. It sounds like the Merge tables wizard will do this? Thanks , Kevin
Hello! You are right, your problem can be solved by using Merge Tables Wizard . It is available as a part of our Ultimate Suite for Excel that you can install in a trial mode and check how it works for free .
Awsome loved it.
I need to combine names and addresses for a mailing list. How do I do that?
Hi! If you want to merge data from multiple cells, I recommend using this guide: Excel CONCATENATE function to combine strings, cells, columns . I hope it’ll be helpful.
I’ve read the above methods and still not sure there is a way to do what I want. Let’s say I have three sheets of data that all combine the exact credit card transaction info from different cards (columns/rows same). Is there a way to consolidate the data from the three sheets into a single sheet with the same columns/rows in order to run reports on all the combined credit card data. If I update data in any of the three separate sheets, can the new data automatically be added into the “consolidated” sheet without running some sort of commmand? Thanks
Hi! To combine three sheets into one, you can use any of the methods suggested in the article above. If you want the merged data to be automatically updated, use the Combine sheets tool as described in the article above.
someon can help me how to combine the sheets from one to another with different rows and column?
Hi! For column values to be combined, the columns must have the same headings. If the headings are different, the columns will be added to the merged table as new columns. Read more: Merge two worksheets in Excel .
I manage product registration for cosmetic in 8 countries. Each cosmetic products has a unique number identifier. I keep all IRCs ai nd countries in 1 sheet. How do i avoid creating duplicate entry for the same product in the same country? If it is for just 1 country, I use the condition function on the tool bar to highlight duplicate values but when in 1 excel, the duplicate value for the cosmetic product might be due to 1 in say Australia and the other in New Zealand but what I want to call out is to avoid the cosmetic to appear twice in australia. please help.
Hi! I recommend you pay attention to Remove Duplicates tool . It is available as a part of our Ultimate Suite for Excel that you can install in a trial mode and check how it works for free .
I would like to compile multiple data from excel tabs into a table in 1 master worksheet
Have you tried the ways described in this blog post? If they don’t work for you, then please describe your task in detail.
Post a comment
IMAGES
VIDEO
COMMENTS
Add a Macro Button. In Excel, select the Developer tab, then click on the " Insert " dropdown in the Controls section. There are several types of controls divided into two sections, "Form Controls" and "ActiveX Controls". For now, just click on the Button control under " Form Controls ". Next, move the mouse anywhere over the ...
Add a button (Form control) On the Developer tab, in the Controls group, click Insert, and then under Form Controls, click Button . Click the worksheet location where you want the upper-left corner of the button to appear. The Assign Macro popup window appears. Assign a macro to the button, and then click OK.
Click File > Options > Quick Access Toolbar. In the Choose commands from list, click Macros. Select the macro you want to assign a button to. Click Add to move the macro to the list of buttons on the Quick Access Toolbar. To replace the default macro icon with a different button for your macro, click Modify. Under Symbol, select a button icon ...
To insert an ActiveX button and then assign a macro to it, follow the below steps: Click on the Developer tab. In the Control group, click on Insert. In the options that appear, in the ActiveX Controls options, click on the Command Button option. Click anywhere on the worksheet.
3. Using VBA Macro to Create Excel Button and Assign Another Macro. This macro will create a macro button for the worksheet automatically and will assign the desired code to it.. We can enter the following code in the code editor and click on the Run option.; Sub AddButtonAndAssignMacro() Dim btn As Button Dim rng As Range Set rng = Range("I4:J5") Set btn = ActiveSheet.Buttons.Add(rng.Left ...
Here are the steps to create the macro button: 1. Draw a shape on the sheet (Insert tab > Shapes drop-down > Rectangle shape). 2. Add text to the shape (Right-click > Edit Text | or double-click in the shape). 3. Assign the macro (Right-click the border of the shape > Assign Macro…) 4. Select the macro from the list.
And then, do the following: On the Developer tab, in the Code group, click Macros. Or press the Alt + F8 shortcut. In the dialog box that shows up, select the macro of interest, and then click Run . Tip. If the Developer tab is not added to your Excel ribbon, press Alt + F8 to open the Macro dialog.
Adding Macro Buttons to the Excel Ribbon. To add a button to the ribbon, start by right-clicking anywhere on the ribbon or ribbon tabs. Then select Customize the Ribbon. This will open the Excel Options page, and Customize Ribbon should already be highlighted on the left-hand side. In the right-hand side of the Excel Options page, you will see ...
Step 2: Insert a Button. Next, click on the Developer tab, then select "Insert" and click on the button icon under Form Controls. Clicking the button icon will change your cursor into a crosshair, letting you draw a button anywhere on your worksheet. Click and drag to define the size of your button, and then release the mouse button to ...
7. Select Macros from the list on the left. 8. Click and drag the Custom Button icon from the list on the right to your new toolbar. The new button is represented by a smiley face. 9. Right-click on the newly added button. 10. Rename the button to your liking or leave the default name in the Name: field.
In this video, I demonstrate how to assign a macro to a button in Excel. The video runs you through how to create a simple navigation button that when click...
Sign up for our Excel webinar, times added weekly: https://www.excelcampus.com/blueprint-registration/In this video I explain the 3 ways to create macro butt...
Add or edit a macro for an ActiveX control. If the Developer tab is not available, display it. Click File > Options > Customize Ribbon. Under Customize Ribbon, select the Developer check box, and then click OK. Click the Microsoft Office Button , and then click Excel Options.
Steps: Click as follows: Developer > Insert > ActiveX Controls > Button. Like the previous section, set the button size using the mouse. Next, right-click on the button and select View Code from the context menu. By using the other menu you can edit the macro button as you require.
Open Excel, and on the Ribbon, click the Developer tab (if it's missing, follow these instructions to show it) Click the Add-ins button. In the Add-in dialog box, find the My Macros Custom Ribbon Tab add-in, and add a check mark to its name. Click OK, to close the Add-ins window.
Suppose your function enters data in columns A and B and you want to a custom Userform to appear if the user selects a cell in column C. One way to do this is to use the SelectionChange event:. Private Sub Worksheet_SelectionChange(ByVal Target As Range) Dim clickRng As Range Dim lastRow As Long lastRow = Range("A1").End(xlDown).Row Set clickRng = Range("C1:C" & lastRow) 'Dynamically set cells ...
Choose "Excel macro-enabled workbook" from the "Save as type" drop-down list and click the Save button. Press Alt + Q to close the Editor window and switch back to your workbook. How to run VBA macros in Excel. When you want to run the VBA code that you added as described in the section above: press Alt+F8 to open the "Macro" dialog.
Click File > Options > Quick Access Toolbar. In the Choose commands from list, click Macros. Select the macro you want to assign a button to. Click Add to move the macro to the list of buttons on the Quick Access Toolbar. To replace the default macro icon with a different button for your macro, click Modify. Under Symbol, select a button icon ...
In the Controls group, click Insert, to see the Form Controls and ActiveX Controls. In the Form Controls section, click Button. On the worksheet, drag the pointer, to add a button of a specific size, or click to create a default sized button. In the Assign Macro window that opens automatically, click on the GoSheetBack macro to select it, then ...
On the main ribbon, click on the Developer tab. 2. Go to the Insert button and click the drop-down arrow. 3. Under Form Control, select the first option called button. Draw a button on your worksheet. 4. Next, in the Assign Macro dialogue box, type or select a name for the macro. 5.
Excel macros are helpful. You can use macros to apply formatting to cells, rows, columns, and worksheets, sort and filter information, and perform data analytics to get a workbook ready for use ...
Add or edit a macro for a form control. Right-click the control, and then click Assign Macro. The Assign Macros dialog box appears. To specify the location of an existing macro, select where the macro is located in the Macros in box by doing one of the following: To search for the macro in any workbook that is open, select All Open Workbooks.
macOS users can benefit from the same thing, though on macOS it's a different shortcut you'll be programming into the macro. You'll want to use the Shift+Command+4 shortcut inside the macro to capture a portion of the screen and copy it to your clipboard. However, with macOS, once you're into the screenshot tool, you can click the ...
Now I'll show you how to add the same macro to the Quick Access Toolbar, so it'll be up here next to Redo. Click FILE and Options, and this time, click Quick Access Toolbar. Again, I choose commands from Macros, and here's the macro in my personal workbook. Click Add. To rename it, click Modify. Call it "Fill Days" and choose the same grid icon.
Start the Copy Sheets Wizard. On the Excel ribbon, go to the Ablebits tab, Merge group, click Copy Sheets, and choose one of the following options: Copy sheets in each workbook to one sheet and put the resulting sheets to one workbook. Merge the identically named sheets to one.