How to assign permanent letters to drives on Windows 10
You can assign drive letters manually, and in this guide, we show you how on Windows 10.

On Windows 10, when connecting a removable storage device or an internal hard drive, the system detects and assigns a drive letter automatically to make it usable. However, when reconnecting an external drive (such as a USB flash drive or SD or microSD cards), the system can end up assigning a different letter, which can be annoying.
If you want to see the same drive letter on a particular device, you can manually assign a permanent letter to any drive connected to your computer, and on Windows 10 , you can do this in at least three different ways, using Disk Management, Command Prompt, or PowerShell.
Using this approach will prevent Windows 10 from assigning a new letter or trying to set a letter already in use, which can cause conflicts. Also, it helps to select a drive letter that makes more sense to you.
In this Windows 10 guide, we walk you through several methods to manually assign a permanent letter to a drive, as long as you're connecting the drive to the same device and the letter isn't already in use.

How to assign a drive letter using Disk Management
How to assign a drive letter using command prompt, how to assign a drive letter using powershell.
To manage drive letters with the Disk Management tool, use these steps:
- Open Start .
- Search for Create and format hard disk partitions and click the top result to open the Disk Management experience.
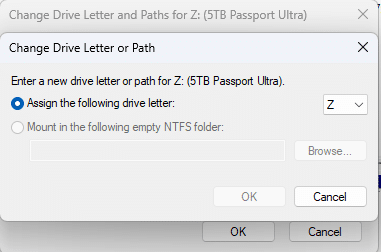
- Right-click the drive and select the Change Drive Letter and Paths option.

- Click the Change button.

- Select the Assign the following drive letter option.
- Use the drop-down menu to assign a new drive letter. Quick tip: To avoid the system trying to assign the same letter to another drive, it's a good idea to start adding letters in backward order. For instance, instead of using D, E or F, it better to start with Z, Y or X when assigning a new letter.

- Click the OK button.
- Click the OK button again.
Once you complete these steps, the drive will permanently retain the assigned letter, even after reconnecting it. However, if you connect the drive to another device, it may receive a different letter.
While the easiest way to assign a new drive letter is to use Disk Management, you can also use DiskPart in Command Prompt to perform the same task.
Get the Windows Central Newsletter
All the latest news, reviews, and guides for Windows and Xbox diehards.
To assign a drive letter using Command Prompt, use these steps:
- Search for Command Prompt , right-click the result, and then select the Run as administrator option.
- Type the following command to start DiskPart and press Enter : diskpart
- Type the following command to list all the available volumes and press Enter : list volume
- Type the following command to select the volume (drive) to assign a new letter and press Enter: select volume 3 In the command, make sure to change "3" to the number that represents the drive on your device.
- Type the following command to assign a new drive letter, and press Enter : assign letter=Z The command assigns the letter "Z" to the drive assuming it's available. However, you need to make sure to change the letter for the one that you want to use.

After completing these steps, similar to Disk Management, every time you reconnect the storage to the same device, Windows 10 should assign the same letter automatically.
Alternatively, you can also use PowerShell to change a drive letter on Windows 10 using these steps:
- Search for PowerShell , right-click the result, and then select the Run as administrator option.
- Type the following command to list the available drives and press Enter : Get-Disk
- Type the following command to assign a permanent letter to the drive and press Enter : Get-Partition -DiskNumber 1 | Set-Partition -NewDriveLetter Z In the command, make sure to change "1" to the number that represents the drive that you want to modify, and change "Z" for the new letter that you want to use.

Once you complete the steps, the drive will be accessible through File Explorer using the letter that you assigned, and Windows 10 won't try to change it.
Updated March 7, 2019: We revised this guide to make sure it's current with the latest version of Windows 10.
More Windows 10 resources
For more helpful articles, coverage, and answers to common questions about Windows 10, visit the following resources:
- Windows 10 on Windows Central – All you need to know
- Windows 10 help, tips, and tricks
- Windows 10 forums on Windows Central

Mauro Huculak is technical writer for WindowsCentral.com. His primary focus is to write comprehensive how-tos to help users get the most out of Windows 10 and its many related technologies. He has an IT background with professional certifications from Microsoft, Cisco, and CompTIA, and he's a recognized member of the Microsoft MVP community.
- 2 Save up to $535 AND get a free 50-inch 4K TV when you preorder a Samsung Galaxy Book4 Edge
- 3 You can score a FREE TV with your brand-new Copilot+ PC (including Surface!), but only for a limited time
- 4 Hands-on with Microsoft's new Surface Pro and Surface Laptop, the company's first Copilot+ PCs
- 5 Game Boy like OLED gaming handheld powered by Snapdragon G3x Gen 2 and other retro devices announced by AYANEO
- Boost Productivity with Essential Windows Tips & Tricks
- Assign permanent drive letters to a removable usb drive in windows
Assign Permanent Drive Letters To A Removable USB Drive In Windows
- User by Fatima Wahab
- Calendar Sep 29, 2015
- Comment 8 Comments
Windows assigns drive letters by progressing through the alphabets. Apart from letters A and B, drives are named C, D, etc. You have no doubt seen that the letters for the partitioned drives on your system do not change. If you have a DVD drive, it’s letter doesn’t change either but the same doesn’t hold true for USB drives. Windows assigns the drive letter to a USB drive dynamically so that a drive that was labeled F drive might later be labeled G if another drive(s) is connected. Normally this isn’t a problem unless you need the USB drive to always be assigned specific letter to keep certain paths functional. Here’s how you can assign a permanent drive letter to a USB drive in Windows.
This trick requires no third party apps and will work in Windows 7 and above. You must have your USB drive connected to your system to assign it a permanent drive letter.
Open the Start Menu and type ‘compmgmt.msc’ in the search bar and open the Computer Management window. In the left pane, expand ‘Storage’. Click on Disk Management and wait for the right pane to populate. Select the USB drive you want to assign a permanent letter to, right-click it, and select ‘Change Drive Letter and Paths…’ from the context menu.

In the dialogue box that opens, click change which should open an action box called ‘Change Drive Letter or Path’. Select the drive letter you want to assign it, and click OK to save the changes.

That’s all takes. This should work so long as the USB drive you’re using is 100% compliant with USB standards.

Fatima has been writing for AddictiveTips for six years. She began as a junior writer and has been working as the Editor in Chief since 2014. Fatima gets an adrenaline rush from figuring out how technology works, and how to manipulate it. A well-designed app, something that solves a common everyday problem and looks
Windows 10 changed my external USB HDD 6TB drive from E: to D: . in order to do that it had to also change my internal 2TB HDD from D to E: .. wtf? I have tested my internal and external drives and they are both fine. All comes back GOOD (drive controller and no bad sectors drive surfaces) . ..so I mean Really??? Just today this happened. Windows 10 2004. I manually reassign them but I mean WTF?
Glad to see this was an easy fix… I play the Quest For Glory games, and Exporting a character always tries to write to the “A” drive, like it used to… I changed USB (E) to read as an “A” drive, so that way I can just let the game export to the default drive, and i’ll be able to retrieve it easily when I import a character in a subsequent game.
NOT PERMANENT
Agree this is not permanent. If I reboot or use a different USB drive and put this one back in, it reverts to the D: instead of the G: that I told it I want it to be.
Is there a way to revert back to its default behavior?
better solution is to use USBDLM, command-line program to assign letters to USB drives… and is permanent…
it is NOT Permanent…. let me repeat that again it is NOT Permanent.
I’ve had to change back the drive letter many of times because windows randomly decides to change the letter.
You are correct – it is not permanent and there are many websites reporting that this very same procedure creates a static letter assignment
Leave a Reply Cancel reply
Your email address will not be published. Required fields are marked *
This site uses Akismet to reduce spam. Learn how your comment data is processed .
Searching for something else?
Chances are, we can find what you're looking for:
- Search Search Search …
- Search Search …
Assign Permanent Drive Letter to USB Devices in Windows
Windows assigns drive letters to external USB devices in the order they are available and connected. If you have two hard disk drives and a disc drive ( ODD ), drive letters C, D, and E respectively would be assigned to them. When you connect a new external device, it is automatically assigned the next free drive letter: ‘F’. Generally it isn’t a problem, but if you have a backup software automatically backing files to an external hard disk or program running from the drive, this can cause issues. One way to fix this problem is by assigning a permanent drive letter to a device. Once assigned, no matter in which order you plug-in your device, it will always mount on the letter you chose.
Assigning a permanent drive letter to USB Devices

- Plug-in your external USB device
- Press Win+R to open the Run dialog, and type in diskmgmt.msc
- All devices currently connected via the USB is listed in the Disk Management Console. Locate your USB drive, right-click on it, and choose “Change Drive Letters and Paths…” from the pop-up menu.
- In the new dialog that opens, click on Change button – this will open another dialog

- “Assign the following drive letter:” option is pre-preselected, in its corresponding dropdown choose one of the unused drive letter. Choose one that’s high enough that it won’t be ever used by Windows.
- Click OK, and confirm the warning that prompts you about the fact that some programs or shortcuts might stop working if you change the disk’s drive letter.
That’s it. You’re all set.
Test if the changes work by removing the USB device. Plug it back in, and then open Computer in Explorer to see the newly assigned drive letter in use with the device.
This method will work with all USB drives, flash drives, memory stick, phones and cameras.
Related tips:
- Encrypt a USB Flash Drive using TrueCrypt on Windows
- Format Your USB Drive as NTFS
- Automatically Back Up Your Flash Drives and Memory Cards
- Windows Experience Index Editor
- Set a Doodle as Your Permanent Google Icon
Technology in terms you understand. Sign up for the Confident Computing newsletter for weekly solutions to make your life easier. Click here and get The Ask Leo! Guide to Staying Safe on the Internet — FREE Edition as my thank you for subscribing!
How can I make an external drive keep its same drive letter?
by Leo A. Notenboom
In this excerpt from Answercast #29 , I show how to assign drive letters to portable devices.
External drive letter
Assuming that you’re talking about installing it on the same machine repeatedly and have it assigned the same drive letter? In that situation… it’s supposed to just work. Windows is supposed to remember the drive letter and give you the same letter again as long as that drive letter isn’t now in use by some other piece of equipment.
If that’s not happening, the one thing that I would suggest you try is:
Go to Drive Manager and assign a drive letter manually: a drive letter of your choice.
In some cases, that seems to have been a little bit stickier in my experience. It seems to do a better job of persisting across the action of the drive being removed from the machine and reinstalled.
Assigning drive letters
I’ve got an article that will show you how to do that (for Windows XP, at least). It’s called, “ Can I reassign my drive letters? ” It’s roughly the same procedure for Windows 7 as well. So it’s not hard at all.
That is where I would suggest you go first.
Across multiple computers
Now, if what you’re asking is how to assign the same drive letter across multiple machines (in other words, you take this drive from machine to machine, and want it to always have the same drive letter on each one of the machines), there’s no automatic way to make that happen that I’m aware of.
The best you can do is use that assigned drive letter functionality on each machine. Assign it the same drive letter and then, presumably, that assignment will persist on each machine. But, you need to go to each machine that you’re connecting this thing to and make that assignment manually – to get the same drive letter across all of them.
Next from Answercast 29 – Why don’t blocked emails stay blocked?
Subscribe to Confident Computing ! Less frustration and more confidence, solutions, answers, and tips in your inbox every week.
I'll see you there!
2 comments on “How can I make an external drive keep its same drive letter?”
You can also use the drive manager to assign a folder to mount the drive to. This has the advantage of not using up one of the letters, which can be useful if you have a lot of network shares leaving to many free. The only disadvantage is if a program EXPECTS a removable drive (a la Picasa) it can be confused by this approach.
A frequent problem at a site I support is occasional drive letter misalignment between their backup Software (Norton 360) and the removeable (USB) backup drive. The backup software is configured to backup to drive ‘F’, but if someone has benn using a memory stick, and maybe downloading pictures from a camera – even if theyse devices have all been disconnected – WinXP sometimes assigns ‘G’ or even ‘H’ to the backup drive when it is connected. Needless to say the backup fails.
The solution so far has been to provide the staff with comic book level instructions on how to monitor the backup, and how to assign a new drive number within Norton. I shudder to think what might happen if they start to reassign drives in the Windows file system.
I’d love a better solution, but it must be plug-and-play transparent to the user.
Leave a reply:
Before commenting please:
- Read the article .
- Comment on the article .
- No personal information .
Comments violating those rules will be removed . Comments that don't add value will be removed, including off-topic or content-free comments, or comments that look even a little bit like spam. All comments containing links and certain keywords will be moderated before publication.
I want comments to be valuable for everyone, including those who come later and take the time to read.

You can do this! Gain more confidence with your technology by subscribing to my Confident Computing weekly email newsletter. Advice, instruction, tips and tricks to stay safe and get more out of your technology ... with confidence!

Subscribe today and get your copy of the FREE edition of my most important book: The Ask Leo! Guide to Staying Safe on the Internet -- Things you can do NOW to keep yourself safe and secure.

Search for: Search Button
Make a consistent drive letter or path to a removable drive
Make the same drive letter or patch appear for the same removable drive, plugged into Windows computers. Keep Microsoft Office Open menus working for external drives.
Jenny N writes:
“ I have a problem with Word when working with documents on my flash drive. If I insert the drive days later and try to use the recently used file list, Word sometimes says it can’t find the document.
I’ve worked out that when I insert the flash drive it’s not always using the same drive letter – it’s F or G drive but occasionally even later in the alphabet.
How can I change the flash drive letter or, even better, make it appear as the same drive letter each time? “
Jenny’s problem isn’t with Word but it does show up a problem with Windows and how it works with plug-in drives.
Migrating drive letters is a problem when programs remember fixed drive letters in paths to documents. All Office programs do that in their MRU (Most Recently Used) list. You can workaround it simply by opening the document directly using Windows Explorer. However some programs don’t let you alter the path once it is set.
Adding to the problem can be network settings that force you to allocate a drive letter/s to shares on the network.
There are some solutions. One is both manual and tedious yet it is the one that you’ll see in many Windows tips columns.
Office Watch suggests two better solutions which work well and gives you a consistent and unchanging drive letter or special path to each external drive.
What Windows does
Each time you insert a removable drive (USB memory ‘key’, digital camera memory or external drive etc) Windows will ‘mount’ the drive and assign it to a drive letter.
Windows automatically assigns the next available drive letter when you insert a drive. For example if the ‘highest’ drive in use is F then the new drive will be assigned ‘G’ and so on. Some devices like memory card readers have multiple slots and will be assigned several drive letters.
The problem comes because there’s no direct way to control the exact drive letter that’s applied when you insert a new drive. Drive letter assignments normally depend on the order in which you insert and remove external drives.
Workaround: for regularly used external drives, manually allocate a ‘high’ drive letter like Z: Y: X: U: etc. Those letters won’t conflict with Windows auto-allocation which starts from D: at the other end of the alphabet.
We have an external backup drive (for File History backups etc) allocated to Drive Z: . That won’t ever conflict with another external drive. It also means that Windows File History will always work after setting Z: as the destination.
Manual assignment
Manually change the drive letter assigned to the external drive though the Disk Management tool. This app has been in Windows for many years and works much the same, albeit with a few interface changes.
Go to Control Panel | Administrative Tools | Computer Management and look on the left under ‘Storage’ for the Disk Management tool. Or search for Disk Management in modern Windows.

Select the external drive, right-click and choose ‘Change Drive Letter and Paths …’ . Use the Change button to assign your preferred letter.
If the drive letter you want is not on the list it means that it’s already been allocated to another drive. If you really want that drive letter, you’ll have to remove the drive linked to that letter or re-assign that drive first.
Warning: don’t do anything with the Disk Management tool unless you’re very certain of what you’re doing. People who decide to ‘play around’ with the Disk Management tool can end up with broken or erased drives.
Windows will remember your drive choice as long as another drive doesn’t take that letter first.
That’s why we recommend assigning ‘high’ letters towards ‘Z’ to drives you want to have a consistent drive letter, because they are less likely to be taken automatically by Windows.
Permanent assignment basics
Drive letters aren’t the only way to reach a file, in fact they are quite old-fashioned. There are better and more flexible ways to point to folders, drives or computers than C: or D: etc.
It sounds strange but we do it already. Even a small network you’ll probably access files by pointing to a machine and folder for example //France/Paris/Eiffel.docx is a document Eiffel.docx in the folder ‘Paris’ on the machine ‘France’ . Similarly on the internet a link like https://office-watch.com/default.aspx is the same (a document called ‘default.aspx’ on the machine office-watch.com) except you also specify the type of transport used across the internet with the ‘https:’ prefix.
When administrators assign drive letters to network computers they often don’t need to. It’s done out of habit, consistency or to deal with old programs that must have a drive letter. Modern networks have clever ways to assign permanent network paths, but that’s beyond the subject of this article.
We’ve mentioned all this hoping you’ll be more comfortable with the idea of dropping the whole idea of drive letters for external devices. That’s the key to unchanging paths to external drives.
Permanently assigning drive paths to external drives
Modern Windows releases will let you allocate a path to an external drive instead of a drive letter. The path looks like a folder on your hard drive but it’s really a re-direction to the external drive.
This path is ‘saved’ by Windows so the same path works for the external drive whenever it is plugged in.
Here’s how to do it:
Go to Control Panel | Administrative Tools | Computer Management and look on the left under ‘Storage’ for the Disk Management tool. This is a really useful tool and we’re just focusing on one element of its power here.
In the example you can see there’s a physical ‘Disk 0’ containing drive C plus a small partition used by the computer maker. Note that Drive C is labelled ‘NTFS’ which is important for this tip. We’re NOT touching Disk 0 at all – hands off!
Disk 1 is an external hard drive plugged in via the USB socket, in this case a cute LaCie device.
Tip: label external drives via the volume label, this makes it easier to work out which drive you’re using when several are plugged in at once. Usually include the capacity as well.
Right-click on the external drive and choose ‘Change Drive Letter and Paths …’
Then click on Add to create an additional path to the device:
The drive letter option is greyed out because a letter is already allocated by Windows. But the option we want is available ‘Mount in the following empty NTFS folder’.
Click on browse to point to an empty folder.
The first time you do this you’ll have to decide where to put the empty folder and probably create some new folders using the ‘New Folder’ button. See below for some tips on that.
Click OK to see a new path to your external drive.
And OK again to confirm the change.
Switch over to Windows Explorer and go to the folder you just created – in this case C:/External Drives
You can see there’s two items – one we just created and the other is for another, currently unattached, device called Wolverine.
Each is called a ‘File Folder’ but have shortcut icons instead of standard folder icons.
The LaCie ‘folder’ has a size (the capacity of the device) because it’s plugged in, the other is zero because it’s not online.
Open Windows explorer and go to the folder you set on the hard drive – for example C:/external drives/LACIE55GB and lo! the contents of the external drive will appear just as if it was part of the hard drive.
All sub-folders appear under the ‘root’ path you’ve created. For example a document in the Paris folder on a flash drive will now appear as C:external drivesflashParis
Now open a Word document from the flash drive, but instead of going to say G:\docs point to C:\external drives\flash\docs . You can work on the document as usual, save and close it then remove the external drive.
Come back later, plug-in the drive, go to the MRU list in Word and open the document normally.
Where to put the empty NTFS folder
You can put the re-direction NTFS folders almost anywhere on your hard drive and call them most anything you want.
We’ve gone for a folder called ‘External Drives’ because its obvious and put it directly off C:/ because these days most people don’t browse around the root folder of hard drives.
You may prefer to put the re-direction folder in /Documents and Settings or /Users (depending on your version of Windows).
Each empty NTFS folder is given the same name as the volume label for device – eg LaCIE55GB but that’s not required. We’ve just done it that way for consistency.
This isn’t magic and it’s not even a new feature. It’s been in Windows for some time but could get more use now that more people have external storage.
- This isn’t caching or copying the contents of the external drive. You’re not taking up space on your hard drive.
- The drive space used by the mounted external drive on the fixed drive is trivial and not linked to the capacity of the plugged-in storage.
- Once you remove the external drive the contents are unavailable. If you try to go to the linked folder you’ll get a ‘refers to a location that is unavailable’ error.
- Any version of Windows with an NTFS hard drive will let you allocate a path to an external drive instead of a drive letter. This includes modern Windows 11/10/8.1 way back to Windows 2000 Workstation, XP and Vista. Chances are good that your fixed drives use NTFS because it’s been the default in Windows for some years.
- Only the fixed drive accepting the mounted path has to be NTFS – the external drive can be in any format accepted by Windows. In fact it’s common that small external devices use FAT32 formatting.
- Because the external drive appears as part of the fixed drive some Explorer defaults will change. If you drag a file between drives, Windows will copy the file unless you choose otherwise. If you drag a file between an external drives folder and a real fixed drive folder if will be moved (not copied) because that’s the standard drag behaviour between folders on the same drive.
- This applies ‘per computer’ – the same external drive in another computer will be assigned a drive letter in the usual way. For true consistency setup mounted external folders on each of your computers so that your external drive shows up in the same ‘folder’ on each of your computers.
- Any ‘new’ external drives you plug in will be assigned a drive letter in the usual way.
Opening Office documents from removable storage
About this author

Office-Watch.com
Office 2021 - all you need to know . Facts & prices for the new Microsoft Office. Do you need it? Office LTSC is the enterprise licence version of Office 2021.
Office 2024 what's known so far plus educated guesses. Microsoft Office upcoming support end date checklist.
Latest from Office Watch
- How to make a Gantt Chart in Excel
- A $125 Billion lesson in why cloud backups are vital
- How Word pastes into your document
- Make monsters and pipes with the Terantopia font
- Avoid the traps when adding Excel info into a Word document
- Circle & Sphere calculations in Excel using Pi 𝜋
- How to list all fonts in a Word document
- Face with rolling eyes 🙄 emoji in Word, Outlook, Office
- Glasses 👓 emoji in Word, Excel, PowerPoint and Outlook
- Calendar extras added to new Outlook
- Changes to PDFs made by Microsoft Office
- It's official - Calibri beats Aptos in font poll
- Vmware Workstation Pro is now free
- A quiet month of security fixes for Microsoft Office
- How Mark of the Web stops bad document infections
- Introducing Reading Coach to enhance Reading Fluency with AI
- Immersive Reader in Word for Windows, Mac and iPad
- Presenter Coach makes for better PowerPoint presentations
- Word changes a Paste Text option
- Paste Text Only gets a Word shortcut and confusion
The Best Windows Disk Partition Manager and PC Optimizer
- Free Partition Software >
How to Permanently Assign Drive Letter with Ease
A permanent drive letter prevents us from being confused with multiple USB drives. Then, how to permanently assign drive letter with ease? This post offers three effective ways to make it.
By Dervish / Updated on November 29, 2023
Solution #1: Assign a persistent drive letter with Disk Management
Solution #2: assign a static drive letter by command prompt.
Solution #3: Assign drive letter permanently with the best freeware
Why need to permanently assign drive letter?
As we know, Windows assigns drive letters to all the drives that are available on the computer, such as internal hard disks, optical drives, SD cards, and external USB drives. Drive letters are alphabetical identifiers for volumes and each drive letter can be used once on one computer.
However, some users discover USB drive letter keeps changing each time they connect it to the same computer . It happens frequently if they use multiple USB drives on one computer. That’s really frustrating! At this time, assigning permanent drive letters to USB drives is needed.
In addition, some users perform regular backup between the USB drive and the computer via a USB hidden copier . With a persistent drive letter, the backup task can be recognized and repeated by the backup utility smoothly. What we need to do is to permanently assign drive letter.
How to permanently assign drive letter with ease?
How do I permanently set a drive letter? There are three efficient solutions I’d like to recommend to you. Learn how to assign a static drive letter in Windows 10 below:
1. Hit Windows Key + X on your keyboard, and select Disk Management from the menu.
2. Right click the USB drive to which you want to assign a persistent drive letter and select “Change Drive Letter and Paths.”
3. In the pop-up window, click “Change”.
4. In the next window, choose a proper drive letter for your USB drive using the drop-down menu and click “OK”.
✐ Tips: You may choose a rarely-used drive letter like M-Z, thus avoiding possible drive letter conflicts.
5. You will get a prompt that some programs might rely on drive letters to run properly. Click “Yes” to continue as long as the drive letter you assign here is not occupied by another drive where the programs are installed.
1. Tap the Search button on the taskbar and type “cmd” in the search box. Right-click “cmd” and select “Run as administrator”.
2. Type diskpart and press Enter.
3. Type list volume and press Enter.
4. Type select volume # (ex: volume 7) and press Enter to select the USB drive to be assigned a static drive letter. You may get indication from the size of the volume.
5. Type assign letter=# (ex: letter=M) and press Enter to assign a new drive letter.
6. Double type exit and press Enter to exit Diskpart and Command Prompt successively.
Solution #3: Assign drive letter permanently with the best freeware
AOMEI Partition Assistant Standard , the best partition manager, can help you assign a permanent drive letter to a USB drive. It can be operated with mouse-clicking and it’s totally free. Besides, it offers many other powerful features to help you manage disks and partitions better such as resizing/moving partitions , deleting partitions, formatting partitions, deleting large files , etc.
Just follow the instructions below to see how to permanently assign drive letter:
Step 1. Download, install, and launch AOMEI Partition Assistant. Right-click the USB drive which you want to give a permanent drive letter to, select “Advanced” and then “Change Drive Letter”.
Step 2. Select a new drive letter in the pop-up window. You are suggested to choose a rarely-used drive letter like M-Z.
Step 3. Click “Apply” to view pending operations and then “Proceed” to commit the operations.
✍ Note : To change partition type ID for MBR disk partitions and change serial number on a certain partition, please upgrade to AOMEI Partition Assistant Professional .
You have learned three exact ways to permanently assign drive letters for USB drives. After you commit one of the solutions, every time you connect the same drive to the same computer, Windows 10 will automatically recognize it and set the same letter. However, if you insert your external drive into another computer, it is likely to get a different drive letter. Apart from assigning a drive letter to a certain drive permanently, you can also repair pen drive not detected and fix the error that C drive is RAW with AOMEI Partition Assistant. Go for this tool and you won’t regret!

Related Articles
How to assign and remove drive letter with diskpart.
This post will show you how to use Diskpart assign drive letter in Windows 11, 10, 8, 7. In addition, another free GUI software will be introduced to assign or remove the drive letters.
Drive Letter Not Available-Why and How to Solve It?
Can’t assign drive letter in Disk Management because a certain drive letter is not available? Follow this article to solve it efficiently.
How to Change Partition Type ID Easily? (2 Ways Included)
Are you in need of changing partition type ID in Windows? Read this article thoroughly to get two efficient methods to modify partition type ID.
Free Download to Try AOMEI Partition Assistant Now
How-To Geek
How to change a drive letter on windows 10 or windows 11.
You can change your drive letters in Windows 10 and 11 using the Disk Management utility.
Quick Links
What changing a drive letter does, how to change a drive letter, how to fix programs broken by changing a drive letter.
Changing the letter of a drive is easy on Windows 10 and Windows 11, but you should do it as soon as you add the drive to prevent future hassles. Find out how to change a drive letter here.
Windows assigns drive letters alphabetically --- starting with C --- when they're initialized. If you want to change a drive letter, you should do it before you install anything on the drive. Changing a drive letter after programs are installed could break them since there will be references to an installation location that is no longer there.
Windows has gotten pretty smart about updating shortcuts so that programs work after changing a drive letter. Most of your applications' shortcuts will probably be automatically corrected. Unfortunately, Windows isn't as good about updating file associations. You'll have to manually set the default apps associated with files to fix file associations if they were broken by changing the drive letter.
It is possible to change the boot drive letter to something else, but we don't recommend it. Changing C:\ to another letter is likely to result in severe issues, like a PC that cannot boot into Windows at all. Even if it were able to boot, there would be a huge number of programs that would not be able to run.
Technically speaking, while they are commonly called drive letters, each letter actually refers to a partition on a disk. If you have multiple partitions on a single disk, you will need to assign a letter to each partition to make them all accessible. If a disk has just a single partition, it will just have a single letter pointing to that partition. (However, you do not have to assign a letter to each partition. Partitions without drive letters will not appear in File Explorer and elsewhere.)
Changing a drive letter is pretty simple. Click the Start button, type "Disk Management" in the search bar, and then hit Enter.
The program name displayed in the search will not be Disk Management. It will be "Create and format hard disk partitions."
You could also hit Windows+X or right-click the Start button, and then click "Disk Management."
Identify the drive you'd like to change in the Disk Management Window. In this example, we'll change the letter of the D:\ drive to J:\. You can right-click the drive on the text list, or on the menu below. Either works.
Select "Change Drive Letter and Paths" in the right-click menu that appears.
In the window that pops up, click "Change."
Select whatever letter you want from the drop-down menu. Then click "Ok."
Two popups will warn you about changing your drive letter. Click "Yes" on both of them, and then restart your computer.
Once Windows has restarted, the drive letter should be changed.
There are a few ways you can fix a program broken by changing the drive letter.
Fix The Shortcut
If you're lucky, the only thing that is broken is the shortcut. Fix a shortcut by right-clicking the shortcut on your desktop, and then click Properties.
You need to change the target of the shortcut to the new drive letter.
For example, if GIMP was previously installed at " D :\GIMP 2\bin\gimp-2.10.exe," and you changed the D drive to J, change the target of the shortcut to " J :\GIMP 2\bin\gimp-2.10.exe."
Finalize the change by clicking "Apply" and then "Ok."
Reinstall the Program
Reinstalling the program will generate new entries in the registry, so everything on the computer will know where to look for the program. Some installers won't like reinstalling directly over existing files, so you may need to rename or delete the old installation first.
Change the Drive Letter Back
If you changed the drive letter of a drive with a lot of programs installed, it might be easier to change the drive letter back. Changing the drive letter back should automatically fix any programs and file associations that were broken.
Edit the Registry
You can break programs, or even Windows itself, by editing the registry. Be careful, and learn about how to edit the registry before you try it. Make sure you backup the Windows registry first. You should not attempt this method unless you have no other options.
Windows, and a lot of programs, track where programs are installed via the Windows registry. It is possible to manually adjust the registry to fix broken programs. Keep in mind that there could be dozens of registry entries you need to edit. A program like GIMP can have registry entries for the context menu, for the "Open With" menu, for any file associations, and for the location of its executables. Other programs may only have a few entries related to where it is installed.
If you're not deterred, here's how you do it.
First, you need to know where the program was previously installed. In this case, the program was installed to the "D:\GIMP 2" folder, and the executables were found the "D:\GIMP 2\bin" sub-folder. It is now located at "J:\GIMP 2" instead.
We need to update the registry to reflect the change in location. Click the Start button, type "regedit" into the search bar, right-click Regedit, and click "Run as administrator."
In Regedit, hit Ctrl+F to bring up a search window. Type in the old location for the program you're trying to fix --- "D:\GIMP 2" for our example --- then click "Find Next."
Once Regedit has found something with "D:\GIMP 2" as part of a path, it'll show it to you. Here is an example from the GIMP search.
To actually change them, double click the name of the registry entry you want to modify. Then change the drive letter to J, or whatever you chose. If you didn't otherwise move the folder, leave the rest of the path alone. Then click "Ok."
You'll need to repeat this multiple times. To find the next result using your search term, you can hit the F3 key. There will be a popup once you've found all of the entries.
Changing drive letters can be a simple way to customize your PC. Do it before you install anything on the drive, however. You'll prevent any problems before they occur, and probably save yourself quite a bit of troubleshooting.
Home » Tech Tips » Windows » How to Assign or Change Drive Letter in Windows 11?
How to Assign or Change Drive Letter in Windows 11?
Windows by default uses C drive (C:) for hosting system and application files. You can choose different drives like D: instead of C: while installing Windows on your computer. Similarly, it is also possible to manually change the installed app’s location , though generally users install apps on C: drive. Did you anytime think of changing the existing drive letters in your system? Here is how you can do that in Windows 11 PC.
Default Drive Name Assignments in Windows 11
Let us say, you have two partitions C: and D: volumes on your hard disk. Here is how the default drive letter assignment in Windows work:
- A: – floppy disk drive for IBM computers (obsolete)
- B: – floppy drive for MS-DOS and Windows computers (obsolete)
- C: – Windows and app installation files
- D: – storage space partition
- E: – the letter after your storage partition for CD drive (if CD/DVD drive is available)
- F: onwards – removable storage disks like USB and external hard disks
When you have more partitions on the hard drive, system will use the next drive letters like E: or F: when you insert an external drive. For example, when you have C: and D: drives on your hard disk and insert an USB drive , it will take the letter E: or later.
Changing Drive Letters in Windows 11
It is not necessary to live with the assigned drive letters forever on your system. You can either reduce / increase the drive’s space and assign new letters or simply change an existing drive’s letter. For example, you have 400GB D: drive which you can simply change to F: drive. Alternatively, you can divide it into 200GB + 200GB drives and name them as G: and H: drives.
Windows 11 makes it easy to change the drive letters from the Settings app without using registry or changing system files. However, you can also do the same from Computer Management as with the case in Windows 10 .
1. Change Drive Letter from Windows 11 Settings
If you want to change the assigned drive letters for any partition on your hard disk except C drive then this is the option you should proceed with.
- Press “Win + I” keys or use Windows Search to find Windows Settings app.
- Once you are in the Settings app, go to “System” tab and then click on “Storage” option.

- Go down to the bottom of the “Storage” settings section and click on “Advanced storage settings” available under “Storage management” section.

- This will expand the section and click on “Disks & volumes” option.

- The “Disks and volumes” section will show all your existing drives and click on the one you want to change the letter name. it will show two buttons – “Explore” and “Properties” and click on the “Properties” button.

- On the next screen, you can see the buttons for “Change label” and “Change drive letter”.

- Click “Change drive letter” button and select your favorite letter from the dropdown to assign.

The dropdown will show all letters except C: and the current volume. In the above example, we want to change the D: drive and the system shows A to Z letters except C and D. Since D is the current volume, it is not shown in the list. But C is not shown because it is a system volume partition and you cannot change the drive letter for C. You will not see “Change drive letter” button when selecting properties of C drive. However, you can assign A and B for drive letters which were once reserved only for floppy disks. Since floppy disk is obsolete Windows allows you to assign those reserved drive letters A and B also.
2. Change Drive Letter from Disk Management in Windows 11
Though changing drive letter is easy with Windows Settings, it does not allow changing C drive letter. You can use Disk Management app for changing any drive letter with additional features.
- Press “Win + R” keys to Run prompt .
- Type compmgmt.msc and press “OK” button.

- This will open Computer Management app and select “Disk Management” from the sidebar available under “Storage” section.
- You will see all the drives available on your computer and select C or D or any drive that you want to assign a new letter.
- Go to “Action > All Tasks > Change Drive Letter and Paths…” menu.

- On the pop-up that appears, click on “Change…” button.

- Click on the dropdown against “Assign the following drive letter:” option.
- Select your favorite letter and click “OK” button.

Here you will see all the drive letters except D which is already assigned to another partition volume on the hard disk. Though it is possible to change drive letter for C, we do not recommend as it can affect the installed programs on your computer. Most programs by default install under “Program Files” section in C drive. Changing the drive letter may affect the installed programs and they may stop working. In such a case, you need to uninstall and reinstall the program on the new drive again. This will be a big task if multiple programs stopped working. Therefore, choose the system drive when you clean install Windows first time and stick with that. If you are using preinstalled Windows on C drive, then continue to use that without changing. You can change all other drives using Disk Management or Windows Settings app.
If you want to create parition, select the volume and right click on it. From the menu, select “Shrink Volume” option and select the reduced size for your volume. The remaining size will become unallocated for which you can assign a new label and letter as explained above. Learn more about how to create disk paritions in Windows computer .
Assigning Drive Letter to Removable Disks
As mentioned, Windows will assign the available drive letter for removable disks after the current partition volumes. The problem is when you have multiple removable disks, the assigned letters will change every time which may confuse you. The good part is that you can assign a drive letter as explained above for your removable USB or external hard disk. Windows will remember the assigned letter and use the same whenever you insert the external drive. However, make sure to use the letters clearly away from the current and CD/DVD drives. For example, you can use X or Y or even A or B which are generally not assigned.
About Editorial Staff
Editorial Staff at WebNots are team of experts who love to build websites, find tech hacks and share the learning with community.
You also might be interested in

How to Use Same External USB or Hard Disk with Mac and Windows?
Data transfer is one of the problems while using Mac[...]

Top 6 Weebly Website Builder Alternatives
We are in the website building field for the past[...]

How to Defragment Hard Disk in Windows 10?
A hard drive is a storage place for your PC[...]
DOWNLOAD EBOOKS
- SEO Guide for Beginners
- WordPress SEO PDF Guide
- Weebly SEO PDF Guide
- Alt Code Emoji Shortcuts PDF
- Free ALT Code Shortcuts PDF
- View All eBooks
TRENDING TECH ARTICLES
- 600+ Windows Alt Codes for Symbols
- Fix Chrome Resolving Host Problem
- Fix Slow Page Loading Issue in Google Chrome
- View Webpage Source CSS and HTML in Google Chrome
- Fix Safari Slow Loading Pages in macOS
- Fix Windows WiFi Connection Issue
- ROYGBIV or VIBGYOR Rainbow Color Codes
- Fix I’m Not A Robot reCAPTCHA Issue in Google Search
- Structure of HTTP Request and Response
POPULAR WEB TUTORIALS
- Move WordPress Localhost Site to Live Server
- Move Live WordPress Site to Localhost
- Move WordPress Media Folder to Subdomain
- Fix WooCommerce Ajax Loading Issue
- Create a Free Weebly Blog
- Edit Weebly Source Code HTML and CSS
- Add Scroll To Top Button in Weebly
- Add Table in Weebly Site
- How to Add Advanced Data Table Widget in Weebly?
- Up to $500 Free Google Ads Coupon Codes
FREE SEO TOOLS
- Webpage Source Code Viewer
- HTTP Header Checker
- What is My IP Address?
- Google Cache Checker
- Domain Age Checker Tool
- View All Free Web and SEO Tools
© 2024 · WebNots · All Rights Reserved.
Type and press Enter to search
Windows OS Hub / Windows 10 / Windows Doesn’t Automatically Assign Drive Letters
Windows Doesn’t Automatically Assign Drive Letters
How to manually assign a permanent drive letter in windows, changing drive letter via cmd or powershell, windows doesn’t save an assigned drive letter for connected usb drives.
If the drive doesn’t appear in Windows Explorer, it will have to manually assign a drive letter through the Disk Management snap-in ( diskmgmt.msc ). To do this, open the Computer Management console (via the Win + X menu) and go to the Storage section -> Disk management . In the list of drives, locate the connected removable USB drive. As you can see, the disk is online, it has one healthy partition with the NTFS, but it is not assigned a drive letter. To assign a drive letter to it, right-click on the partition and select “ Change Drive Letter and Path “.

In the window that appears, click the “ Add ” button, select “ Assign the following drive letter ”, select the letter you want to assign to the drive (for example, H: ) in the drop-down list, and click OK.

Make sure that Windows detects the partition (s) on the connected USB drive and the partition is formatted with the NTFS, FAT32, or exFAT file system. If the file system is detected as RAW, or the disk is not partitioned, most likely the USB flash drive is just a new one, or the partition table is damaged and you have to repair the file system first.
If the disk is new and no partitions have been created on it, it appears in the console as Not initialized with an Unallocated area. To initialize such a disk:

- Select the partition table for your disk: MBR or GPT; You can convert MBR-disk to GPT without data loss .

If the disk is offline, right-click on it and select Online .

You can assign or change a drive letter from the command prompt using the Diskpart tool or using PowerShell.
Open the elevated command prompt and run the command:
List the volumes on the disks:
In this example, the TestDisk volume is not assigned a drive letter (empty in the Ltr column)
Select this volume (Volume 4 in our example):
Assign a drive letter Q: to this volume:
DiskPart successfully assigned the drive letter or mount point.
End the diskpart session:

You can also change or assign a drive letter using the PowerShell cmdlets from the built-in Disk Management module .
List drives:
List partitions on the specified disk:
get-disk 1|Get-Partition
Assign the letter Q: to partition 2 on disk 1:
Get-Partition -DiskNumber 1 -PartitionNumber 2 | Set-Partition -NewDriveLetter Q

After that, the connected USB disk appears in File Explorer with the assigned drive letter.
Sometimes after disconnecting a USB device or restarting the computer, a drive letter is not automatically assigned to it. I have to assign the letter again manually through Disk Management, and that becomes annoying.
It seems that some features of automatic detection and mounting of new partitions on the external storage devices is not working in Windows. How to solve this problem?
First of all, make sure that the Virtual Disk service is running. You can check the status of this service in the services management console ( services.msc ).

In case of the error “ Unable to connect to Virtual Disk Service ” or “ Disk Management could not start Virtual Disk Service (VDS) “, change the service startup type from Manual to Auto.
Also, you can check the service from the command prompt: sc query vds

Or check the service state using PowerShell:
get-service vds

Check if the problem persists. If it does, make sure that the automatic mounting of new volumes is enabled.
Open the command prompt as administrator and run the following commands: diskpart Within diskpart , make sure that the automatic mounting of new volumes is enabled: DISKPART> automount
As you can see, the auto-mounting is disabled. Let’s enable it: DISKPART> automount enable
Exit diskpart DISKPART> exit

You can also enable automatic mounting of new partitions using the command:
MOUNTVOL /E
Make sure the NoAutoMount DWORD parameter (with a value of 1) is not created under the reg key HKLM\SYSTEM\CurrentControlSet\Services\mountmgr . If this registry parameter is created, Windows doesn’t assign drive letters to newly connected devices.

Restart your computer and verify if the drive letters are assigned to the external USB devices.
If not, check if the “hidden” and “do not assign a drive letter” attributes are set for the partition on the USB drive. Run the Diskpart command prompt and enter the following commands:
- List the disks: list disk
- Find the disk number assigned to your USB flash drive (in this example 1) and select it: select disk 1
- List the partitions on the disk: list part
- Select the desired partition: select partition 2
- Check the partition attributes: attributes volume

- End the diskpart session by typing: exit
After that, this partition on the USB flash drive should be automatically assigned a drive letter on any computer.
Please note that the old Windows versions only see the first partition on USB sticks with multiple partitions. The ability to create multiple partitions on removable USB drives appeared only starting from Windows 10 build 1703. Previously, in order to make second and subsequent partitions on the USB flash drive were accessible in Windows, you had to use a trick to make Windows detect removable USB flash drive as an HDD .
If your USB flash drive doesn’t appear in the Disk Management console, try using a different USB port or cable. Try to connect the USB flash drive directly to the computer (without the USB hub), check whether the power is on and whether it is detected on other computers.
Checking Hard Drive Health (SMART) in Windows
Install and configure a read-only domain controller (rodc) on windows server 2019/2022, related reading, automatic outlook user profile configuration with zeroconfigexchange, how to copy/paste to ms word without losing..., check windows 11 hardware readiness with powershell script, create a multi-os bootable usb flash drive with..., hide library and special folders from file explorer..., 26 comments.

Thanks, this worked great!

Finnally something that worked. 4 of my 9 USB keys no longer mount on my computer but worked on my wife’s so I knew it was a Windows problem. Gave up a year ago trying to solve the problem because none of the solutions on the web worked – and there are tons of them. So after loading Win 10 thought I would see if my keys worked they still didn’t so I did a google and this solution pooped up.

This fix worked like charm. Thanks for posting friend.

Great help! Thank a lot!

Very helpful! Thank you very much!

You rock!!!! Been fighting this on a SBS 2011 server. Enabling automount did the trick. Thanks SO much!!

Well done – automount worked like a dream in Windows10 Anniversary edition (on my laptop). Many thanks.

Good Job. Thank you verry much.

Virtual Disk service is running aoutomount is anabled already disk drive is showing in device manger but drives still not shown in my computer
win 7 ultimate service pack 1 fully updated

I had exact problem and this solution helped me.

Thanks a lot! It solved my problem!

every thing checked and correct but nothing is working for me windows 10 64 bit pro and USB flash drive is 16 GB Sandisk 3.0
And USB Drive is showing in Disk Management with its full capacity.

After reinstalling Windows my Data disk for some reason became hidden.. I couldnt figure out why it wouldnt auto mount but this solved it. Literally the only page on the internet that had the solution thanks fellas 🙂

Thank you, mine was fixed in diskpart

Thank you very much! I resolved my issue by setting the attribute of my disk. Thanks!!!

Thanks for the post, the part about the hidden drive attribute helped. No idea how it got set to Yes but I cleared it and it mounts fine again.

Thank you very much!. I was also able to resolve this by changing attributes of the external SSD.

Thank you very much. It solved my issues with the windows media creation tool

Excelent way of dealing with this issue!, Thank you very much!

Thanks, It’s working! It solved my problem!

Widows is the stupidest OS I have ever used. (For some reason I have to use it sometimes.) I formatted a brand new SSD on Windows (NTFS). Then I used this SSD on my Linux Mint without any problem for weeks. My colleague copied some data from it to his MAC. There were no problems. And now I plugged in again to that Windows shit, and it sees RAW fs. Why anybody pays a dollar for this OS, I really do not understand.

Great article! But all the measures above were fine and not the problem with my USB, a S$47 SanDisk 64GB stick (bought in Singapore but no warranty as I don’t live in Singapore and can’t get there at the moment….) My problem was that it just wouldn’t assign a drive letter. I was about to throw it in the bin. It said Healthy in Disk Management, you just couldn’t browse it. I assigned a drive letter and then the stick immediately opened in File Explorer. I restarted the computer, plugged in the stick and it again automatically recognised!

This solution does not work when i connect my tablet (Samsung Galaxy, model SM-T580, Android 7). Windows 10 sees it, I can transfer files between tablet and pc but only manually. If I want to use XCOPY in a .bat file, to copy hundreds of pictures every week, I can’t because there isn’t any Drive letter assigned to tablet. Any thoughts???

Worked fine for Seagate External 1 gb drive accidently formatted.

Thanks for the awesom tips. It worked. My external Hard disk’s volume was “hidden”!!!!
Leave a Comment Cancel Reply
Notify me of followup comments via e-mail. You can also subscribe without commenting.
Current ye@r *
Leave this field empty
How To: Assign Specific Drive Letter to USB Drive
Rich Gates July 27, 2009 USB Tutorials

Tags: assign drive letter , usb how to

Copyright © 2006 +
USB Powered Gadgets and more...
All Rights Reserved
GetUSB Advertising
This is a high value website providing great exposure to your product and brand. Visit our advertising page to learn specifics.
For more information Visit our advertising page.
Nexcopy Provides
USB copy protection with digital rights management for data loaded on USB flash drives.
Contact us learn more
Resources and References Page

Microsoft Learn Q&A needs your feedback! Learn More
May 20, 2024
Microsoft Learn Q&A needs your feedback!
Want to earn $25 for telling us how you feel about the current Microsoft Learn Q&A thread experience? Help our research team understand how to make Q&A great for you.
Find out more!
Contribute to the Windows forum! Click here to learn more 💡
May 10, 2024
Contribute to the Windows forum!
Click here to learn more 💡
Windows 10 Forum Top Contributors: Ramesh Srinivasan - neilpzz - Volume Z - franco d'esaro - _AW_ ✅
Windows 10 Forum Top Contributors:
Ramesh Srinivasan - neilpzz - Volume Z - franco d'esaro - _AW_ ✅
- Search the community and support articles
- Search Community member
Ask a new question
windows 10 does not assign a drive letter to my external USB drive despite it showing in device manager
Report abuse.
Reported content has been submitted
Replies (4)
- Independent Advisor
2 people found this reply helpful
Was this reply helpful? Yes No
Sorry this didn't help.
Great! Thanks for your feedback.
How satisfied are you with this reply?
Thanks for your feedback, it helps us improve the site.
Thanks for your feedback.
- Volunteer Moderator
6 people found this reply helpful
1 person found this reply helpful
Question Info
- Devices and drivers
- Norsk Bokmål
- Ελληνικά
- Русский
- עברית
- العربية
- ไทย
- 한국어
- 中文(简体)
- 中文(繁體)
- 日本語
Stack Exchange Network
Stack Exchange network consists of 183 Q&A communities including Stack Overflow , the largest, most trusted online community for developers to learn, share their knowledge, and build their careers.
Q&A for work
Connect and share knowledge within a single location that is structured and easy to search.
How to limit Drive Letters Windows assigns to new removable USB drives
Currently Windows (all of the versions) assigns the first available letter to the next removable media you insert into your USB drive. Is there a way to go around this to make Windows assign only letters that are in the interval you want (for example S - Z)?
- disk-management
- drive-letter
- removable-media
2 Answers 2
USBDLM is a Windows service that gives control over Windows' drive letter assignment for USB drives. Running as service makes it independent of the logged on user's privileges, so there is no need to give the users the privilege to change drive letters. It automatically solves conflicts between USB drives and network or subst drives of the currently logged on user. Furthermore you can define new default letters for USB drives and much more. It works on Windows XP to Windows 10.
- 3 This is the only reliable solution I've found for controlling what drive letter gets assigned to removable drives. Windows offers no builtin functionality that does this. – I say Reinstate Monica Apr 26, 2019 at 11:37
- 1 @TwistyImpersonator "Windows offers no builtin functionality..." - see my answer. – alephzero Apr 26, 2019 at 21:56
- @alephzero No...sadly doing what you propose doesn't work. Your answer is the closest to what Windows can do, but it falls short of being a reliable solution. – I say Reinstate Monica Apr 26, 2019 at 23:07
Windows has a built in tool to assign a persistent drive letter to an external drive. Of course this may not be a complete solution if you have a large number of removable drives and can't assign a consistent fixed set of drive letters to them.
These instructions are for Windows 10, but earlier versions should be similar.
Mount the external drive you want to assign a permanent letter to.
Click the Windows icon and start typing "format". Select "Create and format hard disk partitons, Control panel" when Windows suggests it. The app opens a window titled Disk Management.
Select the external drive from the list, right-click, and select "Change Drive Letter and Paths..."
and from that point, follow your nose!
- 3 "make Windows assign only letters that are in the interval you want (for example S - Z)?" Your answer does not solve this. – Moab Apr 26, 2019 at 22:26
- 2 It solves it, if you have a fixed enumeration of usb drives. It does not solve it for generic drives. – Mooing Duck Apr 27, 2019 at 0:20
You must log in to answer this question.
Not the answer you're looking for browse other questions tagged windows usb disk-management drive-letter removable-media ..
- The Overflow Blog
- How to train your dream machine
- You should keep a developer’s journal
- Featured on Meta
- Our Partnership with OpenAI
- What deliverables would you like to see out of a working group?
Hot Network Questions
- designing an elven magic system that blends with a WW1-esque world
- Are Fregian abstract objects Kantian noumena?
- A cardinal inequality for finiteness
- "She smashed her finger in the door." — What does this mean? Could you please describe this process?
- Why is zero plural?
- Is it legal to use GPL code in plugins of a proprietary app?
- Chopin Nocturne in F minor Op. 55 No. 1 m.71 accidental and fingering
- How do floating plants get their trace nutrients?
- In the US, is the Social Security benefit negatively affected if you have one or a few low income years?
- How appreciated is "Part III" in the US?
- Interpretation of rejecting the null hypothesis
- Is it an error to read "Ozymandias" as performance art by Shelley?
- What is the fastest static comparison sort? What is the proper term for "static"?
- Best option to install dishwasher in corner and support countertop
- Pythagoras' Theorem used to prove a triangle is right angled
- Visa to Czech republic revoked before travelling
- Pearson correlation as a metric for the quality of regression models
- As of May 2024, does the US state of Georgia "allow water to be available to you while you wait in line to vote in an election"?
- Scientist swaps body with dictator
- What is the name of the grammatical function of "there" in "there is"?
- Why are ND filters used in moon photography
- VT420: How can the five local F keys stop working?
- I want to know the tricks to search for and find old academic journals for free
- Why is time, when viewed objectively, in reverse from when it's viewed subjectively?
IMAGES
VIDEO
COMMENTS
Right-click the drive you want to assign a permanent letter to and then choose Change Drive Letter and Paths from the menu. 4. A dialog box will open up, and here you need to click the Change ...
Now, safely eject the external drive. Launch the Registry Editor ( regedit.exe) Go to the MountedDevices registry branch below: HKEY_LOCAL_MACHINE\SYSTEM\MountedDevices. Rename the \DosDevices\G: value to \DosDevices\R: Exit the Registry Editor. Next time when you connect the same drive, Windows assigns it the R: drive letter if it's free.
The drive letter is stored in the windows registry, not on the device, windows looks at the device ID and checks the windows registry and assigns the drive letter based on that, if there is no pre assigned letter it will assign the first unused drive letter. so no way to do what you want from PC to PC other than assign the same drive letter for each device on each PC.
Windows will scan and then display all the drives connected to your PC in the Disk Management window. Right-click the USB drive to which you want to assign a persistent drive letter and then click "Change Drive Letter and Paths." The "Change Drive Letter and Paths" window the selected drive's current drive letter.
It will also happily assign this letter to a different usb key, if the "owner" is not inserted. So in order to guarantee that a specific usb key always has the same drive letter, use the method described but assign it a letter far down in the alphabet. For example U, like pelms suggests. -
Search for Create and format hard disk partitions and click the top result to open the Disk Management experience. Right-click the drive and select the Change Drive Letter and Paths option. Click ...
Once you are in here, and your flash drive is plugged in, right click on the USB drive and select Change drive letter and paths. From the drop down menu, select the drive letter you want to assign to the drive. Assigning the same drive letter across devices is the closest to persistence that I can think of.
5. The short answer is that there is no way to have a USB drive always get the same drive letter when attached to multiple systems. To get the same drive letter you'd have to use a script to do this on insertion of the drive into the computer. The problem is that Windows has disabled Autorun since late XP days.
1 Open an elevated command prompt. 2 Type diskpart into the elevated command prompt, and press Enter. (see screenshot below) 3 Type list volume into the elevated command prompt, and press Enter. 4 Make note of the volume number (ex: 5) for the drive letter (ex: "F") of the drive (volume) you want to change.
In the left pane, expand 'Storage'. Click on Disk Management and wait for the right pane to populate. Select the USB drive you want to assign a permanent letter to, right-click it, and select 'Change Drive Letter and Paths…' from the context menu. In the dialogue box that opens, click change which should open an action box called ...
If you use multiple USB drives, you've probably noticed that the drive letter can be different each time you plug one in. If you'd like to assign a stat...
There is a way to assign a static drive letter to an external USB drive so you always get the same drive letter for that drive. Go to the following link and follow the steps mentioned to change a drive letter. Change, add, or remove a drive letter.
Follow these steps: Plug-in your external USB device. Press Win+R to open the Run dialog, and type in diskmgmt.msc. All devices currently connected via the USB is listed in the Disk Management Console. Locate your USB drive, right-click on it, and choose "Change Drive Letters and Paths…" from the pop-up menu. In the new dialog that opens ...
Go to Drive Manager and assign a drive letter manually: a drive letter of your choice. In some cases, that seems to have been a little bit stickier in my experience. It seems to do a better job of persisting across the action of the drive being removed from the machine and reinstalled. Assigning drive letters
Step 1. Install and run the partition manager. In the home interface, right-click the partition whose drive letter needs to be changed and go to Advanced > Change Drive Letter. Step 2. In the pop-up window, choose a new drive letter for your USB drive and click OK. Step 3.
Right-click on the external drive and choose 'Change Drive Letter and Paths …'. Then click on Add to create an additional path to the device: The drive letter option is greyed out because a letter is already allocated by Windows. But the option we want is available 'Mount in the following empty NTFS folder'.
2. Right click the USB drive to which you want to assign a persistent drive letter and select "Change Drive Letter and Paths." 3. In the pop-up window, click "Change". 4. In the next window, choose a proper drive letter for your USB drive using the drop-down menu and click "OK". Tips: You may choose a rarely-used drive letter like M ...
Changing a drive letter is pretty simple. Click the Start button, type "Disk Management" in the search bar, and then hit Enter. The program name displayed in the search will not be Disk Management. It will be "Create and format hard disk partitions." You could also hit Windows+X or right-click the Start button, and then click "Disk Management."
Go to "Action > All Tasks > Change Drive Letter and Paths…" menu. Change Drive Letter in Disk Management. On the pop-up that appears, click on "Change…" button. Select Change Button. Click on the dropdown against "Assign the following drive letter:" option. Select your favorite letter and click "OK" button.
[DriveLetters10] ; Aldistick DeviceID1=USB 2.0 Flash Disk USB Device Letter1=T ; many other options are documented in the Help files [DriveLetters20] VolumeSerial=16ED-33C5 Letter=T But I find out that this is not working unless I put the same usbdlm.ini file for every stick/drive into the folder where USBDLM.exe is placed.
To assign a drive letter to it, right-click on the partition and select " Change Drive Letter and Path ". In the window that appears, click the " Add " button, select " Assign the following drive letter ", select the letter you want to assign to the drive (for example, H: ) in the drop-down list, and click OK.
Given that Windows will assign a drive letter as a first-come, first serve basis to removable media it can get frustrating to always try for the same drive letter. Here is one way to assign a specific drive letter to a USB drive. Before you can assign a drive letter to a USB device, take a look at what drive letters you have available. This ...
Windows Key+X > Click Disk Management > If you see your Drive is listed there but there is no Drive Letter > Right Click it > Click Change Drive Letter and Paths > Add > Click Assign the following drive Letter > Click in the Drive Letter List Box > Choose an appropriate Drive Letter > OK > OK. Do let me know if you have any more question or ...
Mount the external drive you want to assign a permanent letter to. Click the Windows icon and start typing "format". Select "Create and format hard disk partitons, Control panel" when Windows suggests it. The app opens a window titled Disk Management. Select the external drive from the list, right-click, and select "Change Drive Letter and ...