Remapping/Reprogramming your Keyboard
If you'd like to change what each key on your keyboard does, this process is called remapping, as you're changing what's called a keymap on your board. There are a few ways this can be done, each with its pros and cons and also varying degree of of difficulty.

What is QMK?
First of all, every board at Keebio is compatible with QMK Firmware and are all pre-flashed with a default QMK Firmware and keymap . QMK Firmware is an open-source keyboard firmware, and most keyboards within the mechanical keyboard community use QMK. QMK also encompasses a suite of other tools, such as QMK Configurator and QMK Toolbox .
QMK Firmware has a lots of features, like supporting multiple layers, macros, Mod-Tap, mouse keys, split keyboards, backlighting, RGB, etc., which makes is a popular choice for hobbyists. There are alternative keyboard firmwares out there, but these are not officially supported by Keebio.
Remapping Options
There are 3 main options for changing your board's keymap, ordered from least difficult to most difficult to use:
- VIA Configurator
- QMK Configurator
- QMK Firmware build environment
Here are some pros and cons of each method:
- Pros: Easist to use, instant keymap updates, no flashing firmware required, live lighting controls, layout option controls, macro editor, can remap encoders for some boards
- Cons: Does not support every board, limit of 4 layers
- Pros: Stays up to date with QMK firmware, all boards in QMK repository are supported
- Cons: Need to reflash board to update keymap, can't remap encoders
- Pros: Can reconfigure encoders, access to more features like tap dance
- Cons: Can be complex to setup, involves editing code and using Git
VIA Configurator

For some older Keebio boards, the VIA firmware pre-flashed to the board does not have encoder remapping enabled, as that feature didn't originally exist. However, new VIA firmware is available now, so check here to see if an update is available for your board: VIA Firmware Upgrades .
For VIA usage instructions, see VIA Usage Guide .
QMK Configurator

For QMK Configurator , see the QMK Configurator Guide
QMK Firmware Build Environment

Setting up a QMK build environment and compiling your own firmware provides the most flexibility in terms of features and control, but it is also the most complicated of the options out there.
Note that not all features of QMK are supported by the VIA Configurator, so if you want to use more advanced features of QMK like Tap Dance, then you'll need to setup a QMK build environment . By default on most VIA-supported keyboards, there is a limit of 4 layers. This can sometimes be increased, but once again, this requires setting up a QMK build environment.
Flashing Your Keyboard
If using either QMK Configurator or a QMK Firmware build environment, you'll need to flash the generated .hex/.bin file to your keyboard. See Flashing Firmware for details about doing this.
- What is QMK?
- Remapping Options
- QMK Firmware Build Environment
- Flashing Your Keyboard
How to configure QMK keyboards using VIA
VIA and QMK streamline keyboard customization, enabling easy remapping, macro setups, and layer management for a tailored typing experience.
Keyboard enthusiasts have always preferred their own bespoke layout, leading to the development of remapping software and custom keyboards. However, there were some limitations with how you can configure these keyboards and save those settings. QMK and VIA are a great solution for this, offering the ability to remap keys, create macros, and adjust settings for different operating systems with ease, even featuring onboard memory in some cases. This article will guide you through configuring a QMK-supported keyboard using VIA, ensuring you can tailor your typing experience without diving too deep into coding.
How analog optical switches differ from mechanical switches
What are qmk and via.
QMK (Quantum Mechanical Keyboard) Firmware is an open-source software that allows you to customize every aspect of your keyboard, from key bindings to macros. However, QMK requires you to flash your keyboard's controller with new firmware every time you make a change, which can be daunting for some and extremely impractical.
Enter VIA, a user-friendly interface that works as a configurator for the QMK firmware, allowing you to make real-time changes to your keyboard without the need to flash firmware constantly. This combination offers a greater level of customization, from backlight effects and macros to custom keycodes and mouse commands across different keymap layers.
Preparing your keyboard
First things first, you need to ensure your keyboard is compatible with QMK and VIA. VIA supports around 1400 keyboards now. Check the VIA website to see if your model is listed. If it's not, you are probably out of luck, but there is always a probability that you might find the correct JSON file in communities and forums. In this guide, I have used a MonsGeek M1 Wired board. I downloaded the JSON file for this keyboard directly from the manufacturer’s website.
There are two types of JSON files available for download. They are V2 and V3 files. V2 JSON files are simpler to code and modify, but depending on the keyboard, it might miss some features like controls for the rotary encoders and OLED panels. On the other hand, V3 JSON files are more advanced and support these newer features, but they are a bit more complex to code and modify. The availability, variant (V2 or V3), and features of the JSON files depend on the source of the file, which is almost always the manufacturer. Note the version you have downloaded (defined by the source or evident from the file name) before moving on to the next steps.
Ensure that the JSON file you are downloading is free from viruses or other malicious software.
How to access VIA
Now, let's get VIA up and running on your computer. VIA is available for Windows, macOS, and Linux, and even as a web app, making it accessible to most users. In this guide, I have used the website, but you can choose to go with the apps for your respective platforms. The steps remain the same, irrespective of the method you choose to access VIA.
- You should now be able to customize your keyboard from the main screen of VIA.
Configuring keybindings using VIA
Now that the setup is complete, you can finally use VIA to change anything about your keyboard, whether keybindings, macros, or lighting.
How to set up and bind Macros using VIA
One of the primary uses of VIA is to design and map Macros. To do so, you have two options. You can record the key strikes to set the macro or code it yourself. If you choose the latter route, you can refer to the QMK website to find out about the key codes. For this guide, I chose to record my keystrokes.
How to manage layers in VIA
Configuring layers in VIA is a clever way to multiply the functionality of your keyboard without adding extra keys. Layers allow a single key to perform multiple functions, depending on the active layer. It's especially useful for compact keyboards that might lack physical space for all desired keys.
Customize lighting using VIA
You can customize the lighting pattern, brightness, and speed from the lighting section.
Saving and loading of customized JSON files
Once you are done with all the customizations, you can also export the settings as a customized JSON file to transfer or backup them. This feature can come in handy if you are working on many mechanical keyboards and prefer having custom settings for all of them. To export the settings, click on the floppy disk-like save button and click on Save. To import a previously saved JSON file, click on the Load button.
Test your configuration
The VIA keyboard tester is an integrated tool that allows users to test each key press in real-time, ensuring all custom configurations are correctly applied and functional. After configuring your keyboard, it's important to test all changes. Type, switch layers, activate macros, and ensure everything works as intended. If something isn't right, VIA makes it easy to adjust settings on the fly.
Final thoughts
With QMK and VIA, customizing your keyboard goes from a daunting task to an intuitive, straightforward process. Whether it's remapping keys, setting up macros, managing layers, or adjusting lighting, VIA equips you with the tools to tailor your keyboard exactly to your needs, without the hassle of constant firmware flashes. The flexibility and real-time customization that VIA offers, combined with QMK's powerful backend, make for a robust setup that caters to both newcomers and seasoned enthusiasts alike. As more people pick up interest in customized keyboards , tools like VIA and QMK stand out for their ability to make personalization accessible and enjoyable for everyone. Remember, the key to a fully optimized typing experience lies in exploring, experimenting, and fine-tuning your setup until it's just right.
Navigation Menu
Search code, repositories, users, issues, pull requests..., provide feedback.
We read every piece of feedback, and take your input very seriously.
Saved searches
Use saved searches to filter your results more quickly.
To see all available qualifiers, see our documentation .
- Notifications
- New Arrival
- Office Supply
- Track Your Order
Frequently Asked Questions
- Keycap Sizes
- Magnetic switches
- Parts and Acccessories
- Wireless Connectivity
QMK certified! How to remap keys on M1/M5 using QMK?
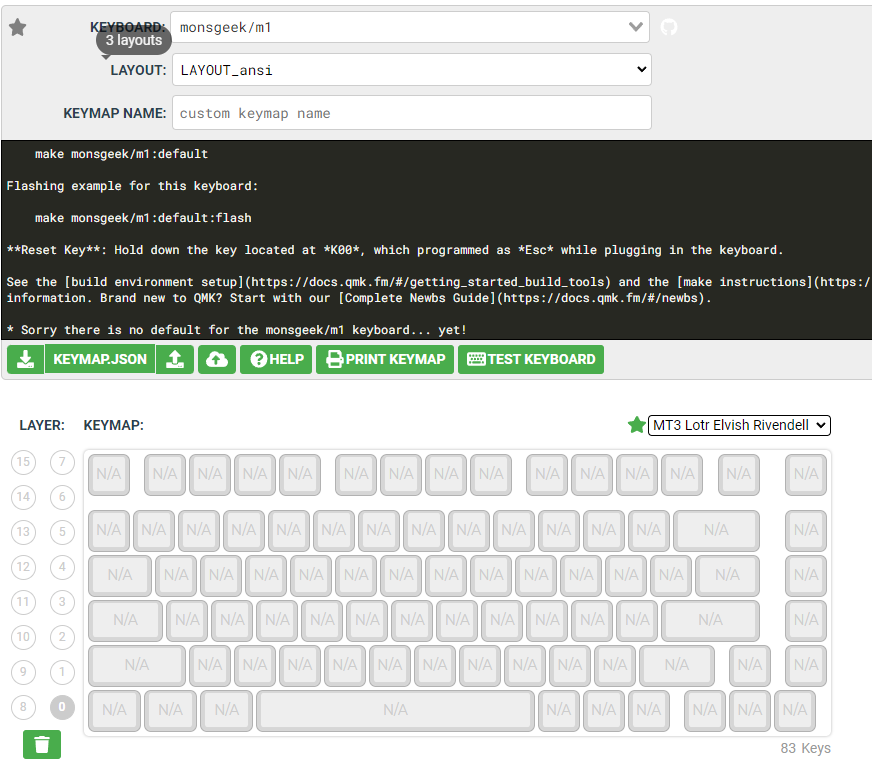
Step 1: Select Your Keyboard : Open the QMK Configurator website at https://config.qmk.fm/#/monsgeek/m1/LAYOUT_ansi .You can find M5 in the list too.
Step 2: Select Your Keyboard Layout : If there is only one layout available, you don’t need to change anything. You could choose ANSI or ISO depending on your keyboard’s layout.
Step 3: Name Your Keymap : Give your keymap a name. If you encounter issues during compilation, consider changing the name to avoid conflicts with existing keymaps in the QMK Firmware repository.
Step 4: Define Your Keymap :
You can enter keycodes in one of three ways:
- Drag and drop the keycodes onto the layout.
- Click on an empty spot on the layout, then select the desired keycode.
- Click on an empty spot on the layout, then press the physical key on your keyboard to assign a keycode.
Hover your mouse over a key to see a short description of the key code. For more detailed information, refer to the Basic Keycode Reference and Advanced Keycode Reference.
If your selected layout doesn’t match your physical build, leave the unused keys blank. If you’re unsure which key is in use, for example, if you have a single backspace key but the LAYOUT_all has 2 keys for backspace, put the same keycode in both locations.
Step 5: Save Your Keymap for Future Changes: Once you’re satisfied with your keymap or want to work on it later, press the “Download this QMK Keymap JSON File” button. This will save your keymap to your computer. You can load this .json file in the future by pressing the “Upload a QMK Keymap JSON File” button.
CAUTION: Note that the .json file used here is not the same as the one used for other tools like kbfirmware.com. Using this file with other tools or vice versa may cause issues.
Step 6: Compile Your Firmware File Press the green “Compile” button. Once the compilation is complete, you can download the firmware file by clicking the green “Download Firmware” button.
Next Steps: Flashing Your Keyboard After downloading the firmware file , you’ll need to flash it onto your keyboard. For detailed instructions on flashing your keyboard with the new firmware, refer to the article provided in the link .
All products will be shipped in 1-2 business days
How To Use VIA To Program Your Keyboard

Please follow the instructions below to program a Keychron keyboard that supports VIA.
How to Remap a Key on VIA?
1. Connect your keyboard with our cable and click here to open the VIA. (Online VIA can only be opened by browsers based on Chromium currently.)
2. Please download the correct keymap JSON file if the VIA fail to authorize your keyboard. Since it takes time for Github to approve our VIA code submission, some keymap JSON files may not be automatically recognized at the moment. You can download the keymap JSON file by searching “keymap working on VIA” on the keyboard product page. Or you can go to this link to locate the JSON file for your keyboard. It can be found in the latter portion of the firmware page.
4. Once you have downloaded the keymap JSON file, please go to the VIA, and turn on the "Show Design tab" in the "Settings" tab. (If it's already on, skip this step.)
5. Drag the JSON file into the “Design” tab on the VIA.
6. On the Configure tab, select the KEYMAP section, and click on the key that you want to program, and the key will then flash slowly. Click on a key you want to remap in the BASIC/MEDIA/MACRO/LAYERS/SPECIAL/QMK LIGHTING/CUSTOM section. And it's done. Here is a video example.
How to create a macro on VIA?
A macro is a series of keys pressed together to perform an action, now, you can program to just use one key to perform the same action, for example, holding Shift+Command+4 (screenshot on macOS) can be done with just one key. Here is how:
1. Go to MACROS on the top left corner of the Configure tab.
2. Search the keycodes that represent the key you want at https://docs.qmk.fm/#/keycodes_basic , then, copy and paste the Aliases on the page onto the VIA.
3. For example, enter {KC_LSFT,KC_LGUI,KC_4} in the Macro 0 box area, and press Save. The M0 key will become Shift+Command+4 (screenshot on macOS).
4. Select the KEYMAP section, click on the key that you want to replace, and the key will then flash slowly on VIA. Go to the MACRO section on the lower-left corner, click the M0 key, and it’s done. Here is a video tutorial:
How to Use Different Layers to Set the Combination Keys
You can customize each key on each layer of your keyboard with VIA, there are two layers for Mac, and two layers for Windows. For example, the Q1 keyboard comes with 81 keys, so you can remap up to 324 keys (81 x 4) you want.

The default layer for the keyboard is layer 0. The button M0(1) = layer 1 The button M0(3) = layer 3
Example: Use the layer function in VIA to set power button = fn + INS on macOS.
1. We have the "fn" key (aka MO(1) on VIA). Now we need to set the power button = "fn" + "upper right corner key".

2. Click LAYER 1. 3. Click the "ins" key on the upper right corner (the key will then flash slowly). Then, find the "power" key on the SPECIAL section, click it.

4. Hold fn and the upper right key to power off your computer.

PS: The shutdown option will normally pop up and let you choose "Shut Down", "Sleep", or "Restart". However, please check if the system has the pop up option on just in case the system shuts down directly and the file is not saved.
Your cart is empty
Subtotal:$0.00 USD
Choose options
Enjoy fast, free delivery, exclusive deals, and award-winning movies & TV shows with Prime Try Prime and start saving today with fast, free delivery
Amazon Prime includes:
Fast, FREE Delivery is available to Prime members. To join, select "Try Amazon Prime and start saving today with Fast, FREE Delivery" below the Add to Cart button.
- Cardmembers earn 5% Back at Amazon.com with a Prime Credit Card.
- Unlimited Free Two-Day Delivery
- Streaming of thousands of movies and TV shows with limited ads on Prime Video.
- A Kindle book to borrow for free each month - with no due dates
- Listen to over 2 million songs and hundreds of playlists
- Unlimited photo storage with anywhere access
Important: Your credit card will NOT be charged when you start your free trial or if you cancel during the trial period. If you're happy with Amazon Prime, do nothing. At the end of the free trial, your membership will automatically upgrade to a monthly membership.
Return this item for free
Free returns are available for the shipping address you chose. You can return the item for any reason in new and unused condition: no shipping charges
- Go to your orders and start the return
- Select the return method

Image Unavailable

- To view this video download Flash Player
Keychron K12 Pro Wireless QMK/VIA Mechanical Keyboard Custom Programmable Macro 60% Compact Layout White Backlit with Hot-Swappable Keychron K Pro Brown Switch Compatible with Mac Windows Linux
Keychron K Pro Brown Switch
Keychron K Pro Red Switch
Purchase options and add-ons
About this item.
- Keychron K12 Pro QMK/VIA Wireless Mechanical Keyboard allows anyone to master any keyboard keys or macro commands through VIA, it has included keycaps for both Windows and macOS, and users can hot-swap with any MX mechanical switch in a breeze. Together with our signature features and upgraded typing sound, the K12 Pro is advancing the typing experience to an entirely new level with endless possibilities.
- Program any Key with QMK/VIA: Anyone can master any keys, macro commands or combination keys through VIA with ease. Simply connect the K12 Pro to your device with a cable, drag and drop your favorite keys or macro commands to remap any key you want on any system (macOS, Windows, or Linux). *Note: User can remap a key on wired mode only. Once it's done, the keymap will work on both wireless and wired modes.
- Hot-Swappable with MX Mechanical Switch: The hot-swappable sockets are mounted on the PCB, so you can hot-swap every switch on the K12 Pro with almost all of the 3pin and 5pin MX style mechanical switches on the market (including Cherry, Gateron, Kailh, Panda, etc.) without soldering. You can customize your own typing experience in seconds.
- Bluetooth 5.1 Wireless & Wired: An excellent solution for multitasking. You can connect the K12 Pro with up to 3 devices wirelessly via its stable Broadcom Bluetooth 5.1 for seamless multitasking across your laptop, phone, and tablet. Switch among them swiftly, and it’s fully compatible with both Mac and Windows. A reliable USB Type-C wired connection is also available when you need it.
- Double-shot PBT Keycaps and Ergonomic Support: The K12 Pro comes with our unique OSA profile (OEM profile with spherical-angle) non-shine through PBT keycaps that aim to provide a more comfortable fingertip feel with excellent oil resistance for long-term use. Three levels of adjustable typing angle and curved OSA-profile keycaps are all working together to provide long-lasting ergonomic support for your wrist.
Top rated similar items

PRODUCT CERTIFICATION (1)
Carbon Neutral Certified by SCS Global Services means the product’s carbon emissions have been measured and reduced, with any remaining emissions offset.

Product information
Warranty & support, product guides and documents, what's in the box.
- Mac and Windows keycaps
- Keycap puller, Hex Key, Switch puller, Screwdriver (on the bottom of the box)
Product Description

Program K12 Pro with QMK & VIA
QMK/VIA literally means endless possibilities for a fluid workflow. Simply connect the K12 Pro to your device with a cable, open online VIA, drag and drop your favorite keys or macro commands to remap any key you want on macOS, Windows, or Linux operating systems, e.g.: create a macro command of a screenshot on macOS. Check our user guide or user manual for more instructions.
Note: User can remap a key on wired mode only. Once it's done, the keymap will work on both wireless and wired modes.

Multi-Device Connectivity
Connect up to 3 devices via the stable Broadcom Bluetooth 5.1 chipset and switch easily.

Support macOS / Windows
Compatible with Mac, Windows and Linux. Includes keycaps for both macOS and Windows.

Hot-swappable
Compatible with almost all of the 3pin and 5pin MX style mechanical switches.

N-Key Rollover
NKRO greatly improves operational efficiency, especially when playing games on wireless/wired mode.

Pre-lubed Keychron K Pro Switch
By optimizing the switch mold, the K Pro switch wobbles less than a standard mechanical switch and feels smoother on each hit. Plus, the factory pre-lubed process on all the K Pro switches, no doubt this will ensure the best smoothness at your fingertips when typing.

Screw-In PCB Stabilizers
Even small part matters for your fingertip feel. We’ve integrated the PCB-mounted screw-in stabilizers for a smoother typing experience with less wobbliness on the big keys such as space bar, shift, enter, and backspace. The Keychron K12 Pro also supports third-party screw-in PCB stabilizers.

White Backlit
The south-facing White LED designs to better illuminate the keyboard backlight from the typist’s angle with the premium non-shine-through PBT keycaps installed.

OSA Profile Double-shot PBT Keycaps
This non-backlight shine-through set provide a more comfortable fingertip feel with excellent oil resistance for long-term use.

Upgraded Typing Experience
The K12 Pro has been upgraded with added sound-absorbing foam, a thick silicone dampening bottom pad, and steel plate provide responsive feedback and a peaceful typing sound.

Ergonomic Support
Three levels of adjustable typing angle (3.5º, 8.5º & 12º) and curved OSA-profile keycaps are all working together to provide long-lasting ergonomic support for your wrist.

From the brand

Keychron was formed in 2017 by a group of keyboard enthusiasts who have extensive experience in keyboard manufacturing. The group consists of designers, marketers, and production experts. We’ve dedicate ourselves to creating the most sophisticated mechanical keyboards with minimalist designs.
We strictly control product quality and strive to provide customers with a good purchase experience. Keychron keyboard will never fail you.

Normal Profile Keyboards
Visit the Store

Low-Profile Keyboards

Custom Keyboards

Wired Keyboards
Compare with similar items, looking for specific info, customer reviews.
Customer Reviews, including Product Star Ratings help customers to learn more about the product and decide whether it is the right product for them.
To calculate the overall star rating and percentage breakdown by star, we don’t use a simple average. Instead, our system considers things like how recent a review is and if the reviewer bought the item on Amazon. It also analyzed reviews to verify trustworthiness.
Reviews with images

- Sort reviews by Top reviews Most recent Top reviews
Top review from the United States
There was a problem filtering reviews right now. please try again later..

Top reviews from other countries
- Amazon Newsletter
- About Amazon
- Accessibility
- Sustainability
- Press Center
- Investor Relations
- Amazon Devices
- Amazon Science
- Sell on Amazon
- Sell apps on Amazon
- Supply to Amazon
- Protect & Build Your Brand
- Become an Affiliate
- Become a Delivery Driver
- Start a Package Delivery Business
- Advertise Your Products
- Self-Publish with Us
- Become an Amazon Hub Partner
- › See More Ways to Make Money
- Amazon Visa
- Amazon Store Card
- Amazon Secured Card
- Amazon Business Card
- Shop with Points
- Credit Card Marketplace
- Reload Your Balance
- Amazon Currency Converter
- Your Account
- Your Orders
- Shipping Rates & Policies
- Amazon Prime
- Returns & Replacements
- Manage Your Content and Devices
- Recalls and Product Safety Alerts
- Conditions of Use
- Privacy Notice
- Consumer Health Data Privacy Disclosure
- Your Ads Privacy Choices

How to remap the Bixby Key on your Samsung Galaxy phone
While AI assistants like Google Gemini are gaining popularity, digital assistants like Bixby and Siri are still the most popular options for smartphone users. While these assistants may have different features that set them apart, they also do plenty of routine tasks. These can include launching apps or actions using your voice, asking questions, or identifying objects with your camera. On the Samsung Galaxy phones and tablets, Bixby is baked in. Most other Android phones ship with Google Assistant . And while Samsung continues to enhance Bixby each year, it has yet to persuade many to use it as their default assistant.
Samsung could draw more of a crowd to their Bixby digital assistant one day, but you can turn it off if you don't use it. Once Bixby is turned off, you can remap the dedicated button that comes on some Galaxy phones, or tweak the power button. From the built-in settings menu to third-party apps, there's a method of remapping the Bixby key that will appeal to everyone.
How to totally disable Bixby on your Samsung Galaxy phone
Samsung galaxy phones that have a dedicated bixby button.
Samsung stopped adding a dedicated Bixby key in 2020 with the release of the Galaxy S20 series. If you have a newer Galaxy, Samsung's virtual assistant is integrated into the power button. If you own one of the phones below, please follow the directions listed under the How to remap Bixby's function on phones with a dedicated Bixby key
Phones with a dedicated Bixby key
How to remap bixby's function on samsung galaxy phones without a dedicated bixby key.
Samsung removed the dedicated Bixby key on newer devices and merged its functionality with the power button, including on the latest Samsung Galaxy S24 and Samsung Galaxy S24 Ultra . To change how Bixby works while using the power button, do the following:
- Go to Settings > Advanced features > Side key . Close
- Tap the Double press switch on the right to enable the option.
- Tap the settings icon next to Open app .
- Select an app you want to launch when double-pressing the power button.
- Choose the Power off menu option under the Press and hold section. Now the power button no longer has anything to do with Bixby, reducing your chances of triggering the digital assistant. Close
How to remap Bixby's function with a dedicated Bixby key
The Samsung Galaxy S10 was the last Samsung phone series with a dedicated Bixby key. Similar to the Samsung Galaxy 20 series and beyond, you can still change how the Bixby key works from your system settings menu. However, you'll have fewer options and functionality here than on the newer devices.
Before changing these Bixby key settings on your device, sign in to your Samsung account. If you don't have or want a Samsung account, you can't remap the Bixby key using this method. However, you still can tap into third-party options as a suitable replacement, such as Tasker.
To check out the few Bixby key settings, do the following:
- Go to Settings > Advanced features > Bixby key .
- Tap the Get started button to log in with your Samsung account as needed.
- Choose the Single press to open Bixby option.
- Select an app to replace the default Bixby key action.
- Choose the Double press to open Bixby option
- Select the app you wish to assign to it.
Once you're finished here, you have successfully replaced your Bixby key's default action for single and double-press gestures. If you weren't using it before, you've now made your Bixby key more helpful by adding new features.
Use Tasker to remap the Bixby key for more options
Many third-party apps on the Google Play Store are designed to tweak your Bixby experience. Some are free, and others need to be purchased. They can help you do more than what the stock settings provide, especially on older Samsung Galaxy phones. In this case, we cover how to tweak your Bixby functionality using Tasker, which requires you to purchase the app. However, Tasker is a powerful tool that allows you to create unique custom Bixby key-press actions, making it more than worth the price.
How to install and set up the Tasker app
- Download the Tasker app from the Google Play Store.
- Tap the Get started button to log in with your Samsung account.
- Tap Double press to open Bixby , then choose Use single press .
- Select Open app , then tap the Settings icon on the right.
- Choose the Tasker Secondary app.
- Open the main Tasker app, then select Tasky to make the process easier. Close
- Accept all the terms and system permissions by checking the boxes.
- Tap the Proceed button at the bottom to continue with Tasker. Close
You can also use Tasker on newer Samsung Galaxy phones that don't have a dedicated Bixby key to customize your Bixby actions. Since Tasker allows you to create unlimited possibilities, you have more flexibility here than relying only on the built-in system settings. All you need to do is set your Open app side key option to the Tasker Secondary app.
How to install the Bixby Remap routine
- Run through the quick tutorial or tap the Skip All button to continue.
- Tap X on the Basics filter at the top to remove it.
- Search for the term bixby , then tap the Enter key.
- From the Bixby Remap entry on the list, tap the Download icon on the right.
- Sign in with the Google account you want to use with Tasker. Close
- Tap Yes to continue the installation for Bixby Remap.
- Bixby Remap is enabled and ready to go for the next part. Close
How to change your Bixby key action with Bixby Remap
- Tap the three-dot menu in the upper-right corner, then choose Switch To Tasker .
- Dismiss the tip that popups up by tapping No .
- Tap the Bixby Remap tab in the lower-left corner, then select the Bixby Remap profile. Close
- Tap Voice Command , then tap the + button in the lower-right corner. Close
- The Select Action Category screen allows you to replace the default Bixby key function with any desired action. For example, if the Google Assistant app is installed, go to App > Launch App > Assistant . This makes it easy to summon Google Assistant on your Samsung phone.
- On the Task Edit page, long-press the Voice Command entry and tap the scissors icon to remove it. This was simply an empty task meant to be replaced with your custom action. Close
- Tap the back arrow , then tap the checkmark to save and activate your profile.
- Pressing the Bixby key now launches your selected custom action. Close
Swapping out Bixby opens up a new world of possibilities
Newer Samsung Galaxy phones rely on the power button to help you customize and extend your Bixby actions. However, the older devices with a dedicated Bixby key have fewer options, which is where Tasker comes into play. If you don't typically use the Bixby digital assistant on your Samsung phone, you can always find a different purpose for its key. Instead, you can quickly launch one of your favorite apps, create custom actions, or summon other digital assistants. No matter the method used, there are multiple options to tweak your Bixby experience.
Samsung Galaxy phones typically come with some unwanted apps you'll likely never use, but learning how to delete Samsung apps from your phone can be beneficial. We cover all the methods you can use to eliminate as many preinstalled apps from your device as possible.


- Video / Graphic Cards
- Computer Cases
- CPUs / Processors
- Case Accessories
- Motherboards
- Video Capture Cards
- Fans & Cooling
- Optical Drives
- Sound Cards
- Power Supplies
- Memory / RAM
- Barebone Computers
- Data Storage
- Internal SSD
- External SSD
- Internal Hard Drives
- External Hard Drives
- USB Flash Drives
- Data Cartridges
- Media (CD, DVD)
- Memory Cards
- Power Extensions
- Tools & Testers
- Memory Card Readers
- Computer Speakers
- Microphones
- UPS Batteries
- Input Devices
- Keyboards & Mice
- Graphic Tablets
- Game Controllers
- HP Desktops
- Dell Desktops
- Apple Desktops
- Asus Desktops
- Acer Desktops
- Lenovo Desktops
- Home & Office
- Gaming Desktops
- Workstations
- All-in-One PCs
- View all Desktops...
- LG Monitors
- Asus Monitors
- Benq Monitors
- Dell Monitors
- Viewsonic Monitors
- MSI Monitors
- Monitor Mounts
- View all Monitors...
- Asus Laptops
- Dell Laptops
- Lenovo Laptops
- Apple Laptops
- MSI Laptops
- Alienware Laptops
- Gaming Laptops
- Workstation
- View all Laptops...
Accessories
- Laptop Chargers
- Laptop Batteries
- Laptop Bags
- Docking Stations
- Security Locks
- Mobile Phones
- Xiaomi Mobiles
- OnePlus Mobiles
- Samsung Mobiles
- View all Mobiles...
- Wearable Technology
- Smartwatches
- iPads & Tablets
- Samsung Tablets
- Microsoft Surface
- View all Tablets...
- Headsets & Earphones
- Cases & Protectors
- Chargers & Cables
- Power Banks
- Portable Bluetooth Speakers
- Selfie Sticks
- Mounts and Holders
- View all Accessories...
- Television & Video
- Televisions
- Projector Screens
- Projector Mounts
- Projector Accessories
- Streaming Media Players
- Cameras & Camcorders
- DSLR Cameras
- Action Cameras
- Portable Audio & Video
- Bluetooth & FM Transmitters
- Two-Way Radios
- MP3 & MP4 Players
- Digital Voice Recorders
- Sound Bar Speakers
- Wireless Audio Adapters
- Turntables & Accessories
- Home Theater Systems
- Surveillance & Security
- Security Cameras
- Security Systems
- Gaming Chairs
- Gaming Desks
- Office Furniture
- Living Room Furniture
- Dining Room Furniture
- Tools & Home Improvement
- Power & Hand Tools
- Small Appliances
- Vacuums & Floor Care
- Irons & Steamers
- Coffee Machines
- Air Purifiers
- Patio, Lawn & Garden
- Large Appliances
- Washing Machines
- Refrigerators
- Dishwashers
- Gaming Consoles
- Gaming Headsets
- Gaming Keyboards
- Gaming Mouse
- VR Headsets
- Laser Printers
- Inkjet Printers
- Dot Matrix Printers
- Fax Machines
- ID Card Printers
- Label Printers
- 3D Printers
- 3D Printer Filaments
- Cartridges & Toners
- Networking Parts
- Wireless Adapters
- Access Points
- KVM Switches
- Network Transceivers
- Server Racks / Cabinets
- Antenna Cables
- Ethernet Cables
- Network Accessories
- Range Extenders
- Network Interface Cards
- Print Servers
- Powerline Adapters
- Dell Servers
- All Servers
- Cash Drawers
- Receipt Printers
- Barcode Scanners
- Pole Displays
- POS & Register Paper Rolls
- Scale Machines
- Money Counting Machines
- Cash Registers
- Magnetic Card Readers
- Office Supplies
- Operating Systems
- Business & Finance
- Antivirus & Internet Security
- Graphic Design
- View all Software...
- Drone Accessories
- Electric Scooters
- Building & Construction Toys
- Kids’ Play Figures & Vehicles
- Exercise & Fitness
- Women's Handbags
- Bags & Luggage
- Travel Accessories
- Hair Styling Irons
- Trimmers & Clippers
- Hair Dryers
- Electric Shavers
- Health Care Products
- Body Weight Scales
- Thermometers
- Collars, Harnesses & Leashes
- Carriers & Travel Products
- Health Supplies
- All Dog Supplies
- Carriers & Strollers
- All Cat Supplies
- Fish & Aquatic Pets
- Reptiles & Amphibians
- Small Animals
- Computer Components
- Computer Accessories
- Desktops & Monitors
- Home & Office PCs
- All in One Desktops
- Laptops & Accessories
- Home & Office Laptops

- Printers & Scanners
- Ink & Toners
- Point of Sale
- Office Electronics

- Televisions & Video
- Television Accessories
- PlayStation 5
- PlayStation 4
- Nintendo Switch
- Virtual Reality
- Drones & Accessories
- Camera Accessories
- DJ Equipment

- Clearance Sale
- Computers & Laptops
Keychron K8 Pro Wireless Custom Mechanical Keyboard, QMK/VIA Programmable, BT / Wired, RGB Backlight Tenkeyless, Hot-swappable, Gateron G Pro Brown Switch, Mac / Windows / Linux Compatible | K8P-H3
- Warranty: 1 Year Effortless warranty claims with global coverage; shipping costs are on us*. Learn more

- Last 2 left in stock
- Condition: New
- Deliver To Moscow Change Delivered by May 27 If you order within 21 Hours, 44 Minutes
Description for Keychron K8 Pro Wireless Custom Mechanical Keyboard, QMK/VIA Programmable, BT / Wired, RGB Backlight Tenkeyless, Hot-swappable, Gateron G Pro Brown Switch, Mac / Windows / Linux Compatible | K8P-H3
- The K8 Pro is the first QMK/VIA-enabled wireless mechanical keyboard paving the way for a new era for mechanical keyboards. The K8 Pro White Backlight version has been re-engineered from the inside out.
- Together with our signature hot-swappable features and upgraded typing sound, the K8 Pro is advancing the typing experience to an entirely new level with endless possibilities.
- With QMK and VIA Support: Keychron K8 Pro allows anyone to remap any key, and create macro commands, shortcuts, or combination keys through VIA.
- Simply connect the K8 Pro to your device with a cable, and drag and drop your favorite keys or macro commands to remap any key you want on any system (macOS, Windows, or Linux). Note: The user can remap a key on wired mode only.
- Once it's done, the keymap will work on both wireless and wired modes.
- Supports Wireless and Wired Mode: You can connect the K8 Pro with up to 3 devices wirelessly via its stable Broadcom Bluetooth 5.1 for seamless multitasking across your laptop, phone, and tablet.
- Switch among them swiftly, and it’s fully compatible with both Mac and Windows.
- The K8 Pro can last up to 100 hours (at the lowest brightness) with a 4000 mAh big battery, which is one of the biggest in mechanical keyboards. It also has a wired mode with a USB Type-C connection.

The K8 Pro is the first QMK/VIA-enabled wireless mechanical keyboard paving the way for a new era for mechanical keyboards. Anyone can intuitively remap any key, and create macro commands, shortcuts, or combination keys through the VIA software. The K8 Pro is designed to be able to assemble easily, so you can customize the hardware and software with endless possibilities.
Note: User can remap a key on wired mode only. Once it's done, the keymap will work on both wireless and wired modes.

Wireless and Wired
An excellent solution for multitasking. You can connect the K8 Pro with up to 3 devices wirelessly via its stable Broadcom Bluetooth 5.1 for seamless multitasking across your laptop, phone, and tablet. Switch among them swiftly, and it’s fully compatible with both Mac and Windows. It also has wired mode with USB Type-C connection. The K8 Pro can last up to 100 hours (at lowest brightness) with a 4000 mAh big battery, which is one of the biggest in mechanical keyboards.
Offers a Mac layout while still being compatible with Windows, the K8 Pro is one of the few on the market that has the same multimedia and function key functions as Apple keyboards for Mac users, but with more tactile feedback. You can even configure different keymaps for both Mac and Windows devices. While VIA software is compatible with macOS, Windows, and Linux.

Program Each Key and Macro with QMK/VIA
Simply connect the K8 Pro to your device with a cable, import the K8 Pro keymap JSON file into the VIA software, drag and drop your favorite keys or macro commands to remap any key you want on macOS, Windows, or Linux operating systems, e.g.: create a macro command of a screenshot on macOS. Check our user guide or user manual for more instructions.
A brand new ultra-low-power Arm Cortex-M4 32-bit STM32L432 MCU which is powerful, and armed with 128K Flash will provide more flexibility for developers.

Upgraded Typing Experience
The K8 Pro has been re-engineered from the inside out to upgrade the typing experience. The added sound-absorbing foam, a thick silicone dampening bottom pad, and steel plate provide responsive feedback and a peaceful typing sound, while added weight will enhance the stability when the K8 Pro lay on the desk.
6-8 Days Delivery in Russia We offer express delivery to Russia, Moscow, Sant Petersburg for Keychron K8 Pro Wireless Custom Mechanical Keyboard, QMK/VIA Programmable, BT / Wired, RGB Backlight Tenkeyless, Hot-swappable, Gateron G Pro Brown Switch, Mac / Windows / Linux Compatible | K8P-H3. Best Price Guarantee We offer the best price for Keychron K8 Pro Wireless Custom Mechanical Keyboard, QMK/VIA Programmable, BT / Wired, RGB Backlight Tenkeyless, Hot-swappable, Gateron G Pro Brown Switch, Mac / Windows / Linux Compatible | K8P-H3 in Russia, Moscow, Saint Petersburg. Buy now with the best price!
Specifications for Keychron K8 Pro Wireless Custom Mechanical Keyboard, QMK/VIA Programmable, BT / Wired, RGB Backlight Tenkeyless, Hot-swappable, Gateron G Pro Brown Switch, Mac / Windows / Linux Compatible | K8P-H3
- 18 August, 2023
- 5.50 cm x 43.00 cm x 16.51 cm
- Computer Mouse

Reviews for Keychron K8 Pro Wireless Custom Mechanical Keyboard, QMK/VIA Programmable, BT / Wired, RGB Backlight Tenkeyless, Hot-swappable, Gateron G Pro Brown Switch, Mac / Windows / Linux Compatible | K8P-H3
Mais verified purchase, report an issue.
Please tell us about the issue.
Select a design for your gift card
Confirm delete.
Are you sure you want to delete your review?
- Track Shipment
- Payment Methods
- Installment Payment
- Hard To Find Parts
- Gift Wrapping Service
- Privacy Policy
- Terms & Conditions
- Advertise with us
- Partner with us
- Sell On Microless

Compare Products
0 of 4 selected
Maximum Limit Reached
Choose your delivery location.
Delivery options and delivery speeds may vary depending on the location.
COMMENTS
Remap allows you to configure key mappings and lighting of your keyboard with QMK firmware in Web Browser. for QMK Firmware .18.17 or lower. Warning: [Sep 11th 2023] The new version of Remap is now available. This environment is for QMK Firmware .18.17 or lower.
Remap allows you to find, build, set up and customize your keyboard quickly and easily in Web Browser. ... Easy key assign. Easily assign complex keycodes including Hold,Tap, and more. Save/Restore Keymaps. Apply one of your saved key mappings, on demand, anytime and easily. ... Remap for QMK 0.18. News & Resources. User Community. Donate ...
Remap team is excited that we can announce to release a new version of Remap which is supporting the latest QMK Firmware version. Since the previous announcement by us on December 2022, many keyboard designers needs to use the QMK Firmware version .18.17 or lower if they needs to support Remap. Because, current Remap is supporting keycodes of ...
QMK Firmware build environment. Here are some pros and cons of each method: VIA Configurator. Pros: Easist to use, instant keymap updates, no flashing firmware required, live lighting controls, layout option controls, macro editor, can remap encoders for some boards. Cons: Does not support every board, limit of 4 layers. QMK Configurator.
The Remap allows you to customize a key mapping of your keyboard which uses QMK Firmware and supports VIA on Chrome and Edge Web browser directly. Also, if the keyboard has backlight/underglow LEDs, of course, you can control the LEDs on the Remap. Today, our Remap team announsed that the new feature "Save/Restore Keymap" has been released so ...
QMK/VIA is literally the Holy Grail of keyboard customization with infinite possibilities. The VIA configurator allows users to intuitively remap any key on the keyboard, and create numerous macro commands, shortcuts, or key combinations for your keyboard. If your keyboard supports multiple layers for different operating systems, such as ...
QMK and VIA are a great solution for this, offering the ability to remap keys, create macros, and adjust settings for different operating systems with ease, even featuring onboard memory in some ...
The product named "Remap" is a keyboard customization app to utilize keyboards more for people who are interested in self-made keyboard kits. The people can find favorite keyboards and can customize the key mapping and others of the keyboard easily, and their features are available from Web browsers directly. Remap Production Site.
One of the most powerful and well used features of QMK Firmware is the ability to use layers. For most people, this amounts to a function key that allows for different keys, much like what you would see on a laptop or tablet keyboard. For a detailed explanation of how the layer stack works, checkout Keymap Overview.
Remap allows you to configure key mappings and lighting of your keyboard with QMK firmware in Web Browser. Keyboard Name. Organization---Organization. Number of Keys---Number of Keys. Integrated/Split---Integrated/Split. Staggered--- Staggered. Lighting---Lighting. Key Switch ...
Unfortunately, Remap does not have an ability to change a layer count dynamically. Instead, it is necessary to build a firmware to change the layer count. The layer count is determined by the DYNAMIC_KEYMAP_LAYER_COUNT macro value, and the default value is 4. For example, if you want to change the layer count to 3, define the macro value with # ...
QMK Configurator is an online tool used for easily creating firmware files for keyboards supported in qmk_firmware / QMK Configurator. API v0.1 Service . Ready. Settings . The average American eats 140 pounds of potatoes per year. ... 77 Keys. Keycodes: Keycodes reference. ANSI ISO/JIS Quantum Keyboard Settings App, Media and Mouse. Esc . F1 ...
They're apparently using the RP2040 as a shim to remap the keyboard layout, using the QMK Firmware tools to do the mappings. So keyboard/device plugs into the RP2040 with USB Host USB A port and then the board USB C port goes to the computer. This provides a way to map the keyboard/device keys to anything. See more on GitHub.
Click on an empty spot on the layout, then press the physical key on your keyboard to assign a keycode. Hover your mouse over a key to see a short description of the key code. For more detailed information, refer to the Basic Keycode Reference and Advanced Keycode Reference.
Remap allows you to configure key mappings and lighting of your keyboard with QMK firmware in Web Browser. Frequently Asked Questions Remap Your Keyboard feature Q. Can a layer count be changed? I want to increase or reduce the layer count. Unfortunately, Remap does not have an ability to change a layer count dynamically. ...
Now we need to set the power button = "fn" + "upper right corner key". 2. Click LAYER 1. 3. Click the "ins" key on the upper right corner (the key will then flash slowly). Then, find the "power" key on the SPECIAL section, click it. 4. Hold fn and the upper right key to power off your computer.
Program K12 Pro with QMK & VIA . QMK/VIA literally means endless possibilities for a fluid workflow. Simply connect the K12 Pro to your device with a cable, open online VIA, drag and drop your favorite keys or macro commands to remap any key you want on macOS, Windows, or Linux operating systems, e.g.: create a macro command of a screenshot on ...
Build: 247. Remap allows you to find, build, set up and customize your keyboard quickly and easily in Web Browser.
QMK/VIA literally means endless possibilities for a fluid workflow. Simply connect the Q4 to your device with a cable, import the Q4 keymap JSON file into the VIA software, drag and drop your favorite keys or macro commands to remap any key you want on macOS, Windows, or Linux operating systems, e.g.: create a macro command of a screenshot on ...
Keychron K8 Pro QMK/VIA Wireless Mechanical Keyboard. The K8 Pro is the first QMK/VIA-enabled wireless mechanical keyboard paving the way for a new era for mechanical keyboards. Anyone can intuitively remap any key, and create macro commands, shortcuts, or combination keys through the VIA software.
Remap team is excited that we can announce to release a new version of Remap which is supporting the latest QMK Firmware version. Since the previous announcement by us on December 2022, many keyboard designers needs to use the QMK Firmware version .18.17 or lower if they needs to support Remap. Because, current Remap is supporting keycodes of ...
Program Each Key and Macro with QMK/VIA. Simply connect the K3 Pro to your device with a cable, import the K3 Pro keymap JSON file into the VIA software, drag and drop your favorite keys or macro commands to remap any key you want on macOS, Windows, or Linux operating systems, e.g.: create a macro command of a screenshot on macOS.
Remap allows you to configure key mappings and lighting of your keyboard with QMK firmware in Web Browser. VID: 0x0000 / PID: 0x0000. for QMK Firmware .18.17 or lower. flash. Unsupported Web Browser. Remap works on Web Browsers which the WebHID API is supported. For example, Google Chrome version 89 ...
Remap supports building a firmware binary file written by QMK Firmware. The benefits are the following: It is unnecessary to prepare the building environment of QMK Firmware by users. There is the environment to build a firmware in the backend of the Remap and it is used at building the firmware. Users don't need to worry about that.
Choose the Single press to open Bixby option. Select an app to replace the default Bixby key action. Choose the Double press to open Bixby option. Select the app you wish to assign to it. Once you ...
Keychron K8 Pro Wireless Custom Mechanical Keyboard, QMK/VIA Programmable, BT / Wired, RGB Backlight Tenkeyless, Hot-swappable, Gateron G Pro Brown Switch, Mac / Windows / Linux Compatible | K8P-H3 model K8 Pro Keyboards