Topographic Map Landforms Activity for Kids
Learn how to make a 3D topographic map with your students using clay and dental floss! This topographic map landforms activity for kids is a great way for students to gain experience building models and the perfect opportunity to add math and map skills to your Landforms & Earth Changes science unit .
What is a topographic map?
Maps are a type of model—they are copies of something real. Maps help us learn about an object or a location.
A topographical map is similar to a physical map. It shows the differences in elevation changes in landscape using contour lines. It is basically a one-dimensional model that shows heights using numbers and curved lines.

In this 3D topographic map activity, students will use clay to make a 3D model, then section it with dental floss to make a topographic map. Students begin by making a simple model of a mountain out of clay. Then, they use dental floss to section their model into equal slices.

Topographic Map Landforms Activity
This video, Understanding Topographical Maps , is a great resource for demonstrating how to use clay and dental floss to make a topographic map.
Introduce the investigation by asking students: How can you map the height of a mountain?
How to make a 3D topographic map

Lab sheet source
- chunk of Crayola Air-Dry Clay (about the size of a lemon)
- approx. 12 inches of dental floss
1. Pass out clay, dental floss, and lab sheets to students.
2. Students will make a mountain with a flat bottom out of their clay.
3. Ask students to visualize where they can make 4 equal cuts in their clay mountain.

4. Using the dental floss, students start at the bottom and cut the first cross-section of their mountain.
5. Students lay the bottom slice on their lab sheet and trace around it with a marker to create the first contour line.

6. Students use the dental floss to continue to make equal-sized, cross-section cuts starting at the bottom of the model and working upward.

Place the cut section in the middle of the previously traced line and trace the bottom of each section. Repeat until all sections have been cut and traced.

7. A dd a scale by labeling the contour lines on their drawings. For simplicity, we will say that each section represents 100 feet.

8. Students answer the questions on the back of the lab sheet by explaining what their map shows, what the lines represent, and comparing the highest and lowest locations on their maps.
More landform activities and lessons
This map a mountain landforms activity and the lab sheet is part of a complete NGSS Landforms & Earth Changes unit for 2 nd grade that is also available in a digital format with narrated audio science lessons.

Click here to see the yearlong 2 nd grade science series.

Making this 3D topographic map is a fun way to incorporate both map skills AND math practices as you teach science. It’s a great activity for deepening students’ understanding of map concepts. Make sure to pin this post so you have it when you plan!

Find more hands-on landforms and Earth changes activities and teaching ideas in this post:

Happy teaching!
Share this:

Back to School
Free Grammar Review Activities!
Start the year in grammar off right! Grab a full week of lesson plans, teaching slides, and printables to review and practice parts of speech!

You May Also Enjoy These Posts

Reader Interactions

May 29 at 7:27 am
Still no link to the lab sheet?

January 30 at 5:31 pm
I can’t find the link to the lab sheet. ???

March 21 at 10:43 am
How do I print the lab sheet?
Leave a Comment Cancel reply
Your email address will not be published. Required fields are marked *
Notify me of new posts by email.
Hello Friends
I’m Linda Kamp, a 20 year primary grade teacher with a passion for creating educational materials that excite students and make learning fun! I'm so glad you're here!

how to make types of a Landform 3D model for a school project for Science exhibition
Introduction.
In this topic, we are going to show you how to build a landform model for your science project or exhibitions.
The landform is a natural feature of the earth’s surface. Topography means landforms made up the terrain and their arrangement in the landscape.
Landforms are made up of canyons, plateaus, valleys, mountains, hills and shoreline such as bays, peninsulas, and seas which includes submerged features such as mid-ocean ridges, volcanoes, and ocean basins.
Landforms are characterized by physical characteristics such as slope, elevation, rock exposure, stratification, orientation and finally soil type.
It includes elements such as hills, ridges, berms, mounds, cliffs, rivers, valleys, volcanoes, and peninsulas, numerous other structural and size-scaled (i.e. ponds Vs. Lakes, hills Vs. mountains) elements.
Oceans and continents form the highest order landforms. Landform elements can be further identified and given cohesive definition such as hill-tops, shoulders, saddles, for slopes and back slopes.
Generic landform elements are: peaks, channels, ridges, pits, passes, pools and plains.
Terrain is the third dimension of the land surface. Study of the terrain is called as Topography.
When relief is underwater it is termed as bathymetry. Many different techniques used to describe relief in cartography are contour lines and triangulated irregular network.
Smallest homogeneous divisions of the land surface are elementary landforms (segments, facets, relief units).
These areas contain homogeneous morphometric properties, bounded by lines of discontinuity.
How to make An Landform Model Step by Step Video
In this video, we will show you the following steps and items that can be used to build a landform model at home by taking help freely from your parents.
Materials Used to make Landform – DIY
- White Chart Paper
- Color Paints
- Sketch Pens
- Plastic trees and animals
- Hot Glue Gun
- Waste Boxes to get cardboard
- Scissor to Cut
Prepare for Science Fair Questions & Answers – Landforms Model
- What are the most common landforms? Most common landforms are vast oceans, plains, high mountains, plateaus, and hills.
- What are the types of landforms? Types of landforms on earth are mountains, valleys, plateaus, glaciers, hills, loess, plains and desserts functionality of garbage disposal.
- What are the 8 landforms? 8 landforms are Mountains, hills, plateaus, plains, buttes, canyons, valleys, and basins.
- What are the types of land we have? Types of lands are: recreational, transport, agricultural, residential, and commercial.
- What are some patterns in landforms on Earth? Different patterns of landforms are mountains, plateaus, shields, valleys, and plains.
Conclusions
Landform helps us to understand various features of the earth surface that are formed naturally. Major landforms like mountains, plateaus, and plains are used to learn the geographical nature of various regions.
https://www.youtube.com/@howtofunda
Leave a Comment Cancel reply
Save my name, email, and website in this browser for the next time I comment.
Teachers are Terrific
So Many Landform Projects!
July 26, 2019 by Carol Davis
A few years ago (when I was teaching third grade) our state standards for Science and Social Studies both included landforms.
It didn’t take long for me to have tons of landform activities since we had to hit those standards with two subjects. At that time we also had a basal reading series that we had to use and it had landform related stories so I just moved those stories to our landform theme week. It just made more sense to do it all together! #right
One thing I discovered is just how fascinated students were in learning about all the shapes of the earth and how some were formed. So, let me help you with some lessons and resources that will save you oodles of time.

“ In this post, for your convenience, you may find Amazon Affiliate links to resources. This means that Amazon will pass on small percentages to me with your purchase of items. This will not create extra costs for you at all! It will help me keep this blog running! “
Lessons about the States
One thing I really worked on with my third graders was learning the states of the USA. We completed map activities weekly and labeled those maps with rivers and oceans and state abbreviations. When I started creating an Escape Room about landforms I made sure to add some information into it – about states!
One task of this Escape Room is to identify landforms and then locate one on a USA map. That leads to a lock code to open the first box.

In the second task, students complete math problems and use a clue to go back to the map for the lock code. For the third task, students read postcards that tell about visiting certain landforms and places in the USA and that leads to the last lock code.
It is such a fun event and students love it! I asked for quotes from one class and got this:
“This was like an adventure!”
STEM Challenge- Yes, Please!

One of the first challenges my third graders completed in the STEM lab was about landforms. They were able to choose from an array of materials with the task of creating a scene that uses many landforms. The landforms must be labeled and resemble the real thing.
This challenge was a big hit- especially since I timed it to occur right at the end of the classroom studies about the topic. By the way, this STEM Challenge is part of the Escape Room or can be purchased separately.
Task Cards, Anyone?
Here is a perfect way to practice and assess the understanding of each landform. If your students need more practice before trying the STEM Challenge these cards will work great!
The set includes 52 task cards that ask students to identify landforms with multiple choice answers and short answers, identify landforms in a photo, and identify famous landmarks. So much fun!

What about Reading?

I was lucky to have stories to add to our study of landforms. These were already in our reader, but what if your reading curriculum doesn’t have stories to match this study? I have you covered, of course!
My Print and Read series is so easy to use. There are 4 reading passages in two levels (3rd-5th grade) and each has a response section with basic comprehension questions or tasks. I also add a sprinkling of text features throughout these resources.
This printable resource is also available in a digital format! This version has the printable files and Google Slides with text boxes for students to use with personal devices!

Links for You!
- Landforms Escape Room
- Landforms STEM Challenge
- Landforms Task Cards
- Landforms Print and Read
Have you started using boom cards yet? No printing, no laminating, no cutting out. And they are self-checking! This digital task card set is perfect for extending your study of landforms!
No matter which one you try – your students will enjoy their study of landforms! Maybe, try them all!

Looking for something?
- Privacy Policy
- Affiliate Links
- Helpful Tips
Keep in Touch
Make it happen.
Grab your FREE Guide: 3 Steps to Success in STEM and weekly lesson plan ideas!
Please go to the Instagram Feed settings page to create a feed.
- PRO Courses Guides New Tech Help Pro Expert Videos About wikiHow Pro Upgrade Sign In
- EDIT Edit this Article
- EXPLORE Tech Help Pro About Us Random Article Quizzes Request a New Article Community Dashboard This Or That Game Popular Categories Arts and Entertainment Artwork Books Movies Computers and Electronics Computers Phone Skills Technology Hacks Health Men's Health Mental Health Women's Health Relationships Dating Love Relationship Issues Hobbies and Crafts Crafts Drawing Games Education & Communication Communication Skills Personal Development Studying Personal Care and Style Fashion Hair Care Personal Hygiene Youth Personal Care School Stuff Dating All Categories Arts and Entertainment Finance and Business Home and Garden Relationship Quizzes Cars & Other Vehicles Food and Entertaining Personal Care and Style Sports and Fitness Computers and Electronics Health Pets and Animals Travel Education & Communication Hobbies and Crafts Philosophy and Religion Work World Family Life Holidays and Traditions Relationships Youth
- Browse Articles
- Learn Something New
- Quizzes Hot
- This Or That Game
- Train Your Brain
- Explore More
- Support wikiHow
- About wikiHow
- Log in / Sign up
- Education and Communications
How to Create a School Project on the Layers of the Earth
Last Updated: December 4, 2023 Fact Checked
This article was co-authored by Meredith Juncker, PhD . Meredith Juncker is a PhD candidate in Biochemistry and Molecular Biology at Louisiana State University Health Sciences Center. Her studies are focused on proteins and neurodegenerative diseases. There are 9 references cited in this article, which can be found at the bottom of the page. This article has been fact-checked, ensuring the accuracy of any cited facts and confirming the authority of its sources. This article has been viewed 325,580 times.
There are 5 layers of the Earth: the crust, the upper mantle, the lower mantle, the liquid outer core, and the solid inner core. [1] X Research source The crust is the thinnest outside layer of the Earth where the continents reside. The next layer is the mantle which is the largest layer and is divided into 2 parts. The core is also composed of 2 layers, the liquid outer core and the solid spherical inner core. [2] X Research source There are many ways to make a model of the layers of the Earth, but the easiest and most common are to use sculpting clay/play dough for a 3D model or make a flat paper representation.
Making a Styrofoam Model

- All of these supplies should be easily found around the house or purchased at a craft supply store.
- Hold a ruler to the point that is about the center.
- Hold the pencil in place above the ruler.
- Have a friend rotate the ball horizontally while you hold the pencil and watch the line form around the center.
- When the ball is back to the starting point, rotate the ball vertically.
- When you’re finished, you should have two pencil lines that dive the ball into quarters.
- Position the foam ball so that one of the lines is facing straight up.
- Place the knife on the line and gently saw back and forth until you reach the center of the ball (the horizontal line).
- Reposition the ball so that the horizontal line is now facing up.
- Gently saw again until you reach the center of the ball.
- Wiggle the quarter until it comes free from the ball.

- You can throw away the quarter that was cut out of the ball.
- Let the globe dry before painting the inside.

- Once each line has been sketched, color them in with the various paints.
- Use yellow for the inner core, orange for the outer core, 2 shades of red for the mantle (1 for the upper and 1 for the lower), and brown for the crust.

- Alternatively, you can write the labels directly on the ball.
Jessie Antonellis-John
Demonstrate Earth's layers using chocolates with different textures. Making Earth layers with chocolate is fun and teaches about states of matter! Different chocolate textures represent the rocky mantle, liquid outer core, and solid inner core. Cutting it open shows the inside structure in a tasty way!
Making a Model with Dough

- When cool, knead the dough for 1-2 minutes.
- Parental supervision is recommended for this step.
- The coarse salt crystals will still be visible within the dough. This is normal.
- Two golf ball sizes: 1 green, 1 red.
- Medium sizes: 1 orange, 1 brown.
- Large sizes: 2 shades of yellow, 1 blue.
- You want the entire model to remain relatively spherical to resemble the shape of the Earth.
- Roll out the dough and then wrap it around the ball, joining all of the sides together into 1 layer. Repeat for the second layer of yellow.
- Finally, shape pieces of the green dough into approximations of the continents. Press them into the ocean approximately where they belong on the globe.

- The 2 halves should show you a clear cross-section of the layers of the Earth.

- Because you have 2 halves of the Earth, you can use 1 half with the layers labeled and exposed and present the other half with the ocean and continents face up, as a “view from the top”.

- The crust is interesting because there are two types of crust: oceanic and continental. This is easily seen by looking at the model and seeing that the crust contains both the oceans and the continents.
- The mantle takes up about 84% of the Earth’s volume. The mantle is mostly solid, but acts like a viscous fluid. Movement within the mantle is responsible for the motion of tectonic plates. [13] X Research source
- The outer core is liquid and is estimated to be 80% iron. It spins faster than the rotation of the planet and is thought to contribute to the magnetic field of the Earth.
- The inner core is also composed mostly of iron and nickel with potential heavier elements such as gold, platinum, and silver present. Because of the massively high pressure the inner core experiences, it is solid.
Using a Paper Model

- The finished size of your paper model depends on how large you want to make it.
- Using a compass to draw the circles is an easy way to make perfect circles and easily vary the sizes.
- If you don’t have a compass, you can find 5 circular shapes to use as stencils for each layer of the Earth.
- Use textured paper to make your model stand out.
- Inner core: diameter of 2 inches
- Outer core: diameter of 4 inches
- Lower mantle: diameter of 7 inches
- Upper mantle: diameter of 8 inches
- Crust: diameter of 8.5 inches
- These dimensions are just suggestions, you can make the circles any size you would like as long as you make the mantle the largest layer and the crust the thinnest layer. [14] X Research source
- Place the brown crust down first, then place the red mantle on top, the orange mantle next, then the blue outer core, followed by the white inner core.
- Use the glue stick to glue each layer down.

- Try to relate your interesting facts to discussions that you may have had during class.
Community Q&A
You Might Also Like

Things You'll Need
With styrofoam.
- One large Styrofoam ball (diameter should be 5-7 inches)
- A long serrated knife
- Acrylic paint (green, blue, yellow, red, orange, and brown)
- A paintbrush
- Four toothpicks
- Small strips of paper
- 2 cups flour
- 1 cup coarse sea salt
- 4 tsp cream of tartar
- 2 tbsp vegetable oil
- 2 cups water
- Cooking pot
- Wooden spoon
- Food coloring: yellow, orange, red, brown, green, and blue (If you don't have a specific color feel free to use what you have)
- Floss or thin string
- 5 pieces of different colored (brown, orange, red, blue, and white) construction paper
- Geometric compass or circle stencils of 5 different sizes
- A large poster board.
- ↑ https://pubs.usgs.gov/gip/interior/
- ↑ http://www.forbes.com/sites/trevornace/2016/01/16/layers-of-the-earth-lies-beneath-earths-crust/#c1e6ddb58e6d
- ↑ https://www.youtube.com/watch?v=8np8dvtNfkU
- ↑ https://www.youtube.com/watch?v=e1V8iyyLY5U
- ↑ https://homeguides.sfgate.com/ideas-for-a-3d-model-of-the-earths-interior-for-kids-12425615.html
- ↑ http://www.education.com/activity/article/layers-of-the-earth-project/
- ↑ https://www.youtube.com/watch?v=mulldXkdm80
- ↑ https://www.coolkidfacts.com/how-to-make-a-model-of-the-earths-layers/
- ↑ http://www.universetoday.com/61200/earths-layers/#
About This Article

You can make a school project on the layers of the earth using either paper or styrofoam to make a model. To make a paper model, you’ll need construction paper of different colors so you can cut out 5 circles of varying sizes. Once you cut out each layer, you can stack them from smallest to largest to illustrate each layer. Then, glue the 5 layers to a larger poster board and label them. To make a styrofoam model, you’ll need to cut a quarter out of a foam sphere with a knife. Then, you can paint the outside of the sphere with the continents and ocean, and use a pencil to sketch the layers inside the quarter that was cut out. Color the layers with different paint colors so you can see them and label each of them with a toothpick so they’re easily identifiable. For tips about how to include interesting facts about each layer, keep reading! Did this summary help you? Yes No
- Send fan mail to authors
Reader Success Stories
Did this article help you?

Nov 15, 2017
Feb 19, 2017
Samantha Bridges
David Lourash
Feb 8, 2022

Featured Articles

Trending Articles

Watch Articles

- Terms of Use
- Privacy Policy
- Do Not Sell or Share My Info
- Not Selling Info
Don’t miss out! Sign up for
wikiHow’s newsletter
3D Pen Lessons
3d geography: my land.
Learners will use their knowledge of landforms to create a paper map with a compass rose and key. The map will include at least one 3D landform, made with the 3Doodler pen.

Had an introduction to landforms
Had experience using the 3Doodler Start pens to create 3D objects
Been introduced to maps, compass roses, and map keys
Gain a deeper understanding of landforms through this project and a discussion
Draw a map with at least one landform that includes a key and compass rose
Create a 3D model of at least one landform on the map they created
Crayons and/or Markers
3Doodler Start Pens
3Doodler Start Filaments (8 Strand limit per student)
Tables with space for creating.
Instructions
Show students one or more of these videos as a refresher on landforms:
Free School: Landform Video
Crash Course Kids: Landforms Video
Periwinkle: Exploring the Landforms of Earth Video
Share the goal: students will create a map including landforms of their choice using paper, pencil, markers and/or crayons, then they will build a 3D representation of their landform(s) on the map using the 3Doodler Start pens.
Have students create a “My Land” map using pencil and paper. Instruct them to put a unique title for their map at the top of the page. Let them know they should include a compass rose and a key that indicates the landform types on their map. While students are creating their paper and pencil map, circle the room to assist students as they work. Once their pencil and paper map is done, pass out markers and/or crayons as needed.
Instruct them to brainstorm on how they will make a landform on their map 3D using the 3Doodler pens.
Demonstrate different ways to create a 3D landform to the students before they begin using the 3Doodler pens. (Draw flat and then attach together to create a 3D design, use some kind of material like a cup or pencil as a “template” to create 3D right away, etc...)
Emphasize the need to create a strong base to hold their designs.
Pass out the 3Doodler pens and filaments. For ease of use, have filaments available on each table space where students are working. Let students know they can only use 8 strands total for their project.
Circle the classroom to assist students as they work.

The teacher may use small dabs of hot glue, if needed, to secure the students' 3D creation to their maps.
Possible Extensions
Free School: Landform Video Lesson and images courtesy of Velvet Holmes
compass rose - a circle showing the principal directions printed on a map or chart.
key - A map key is an essential part of a map. It explains what the symbols on the map mean and allows you to make sense of the map.
landform - a natural feature of the earth's surface.
Educational Standards
Students use critical thinking skills to plan and conduct research, manage projects, solve problems, and make informed decisions using appropriate digital tools and resources: Collect and analyze data to identify solutions and/or make informed decisions
Students research landforms, plan their 3D project, then use the 3Doodler pens to create their 3D landform model. Students can refine their work as needed.
Students communicate complex ideas clearly and effectively by creating or using a variety of technology to create visualizations, models or simulations.
Students create a 3D representation of the landform they selected for their project.
Plan and create a design document to illustrate thoughts, ideas, and stories in a sequential (step-by-step) manner (e.g., story map, storyboard, sequential graphic organizer).
Students will brainstorm ideas and sketch a design that represents their maps and landforms.
Decompose (break down) a larger problem into smaller sub-problems with teacher guidance or independently.
Students will break down the process into brainstorming, designing, building, and discussing their project with the class.
More Lesson Plans

Get Inspiration in Your Inbox
Sign up to be the first to have our latest 3D pen lessons, stencils, deals, and discounts (yay!) deposited directly in your inbox.
You have Successfully Subscribed!
FREE K-12 standards-aligned STEM
curriculum for educators everywhere!
Find more at TeachEngineering.org .
- TeachEngineering
- Landscape Models & Roadways: Carve that Mountain
Hands-on Activity Landscape Models & Roadways: Carve that Mountain
Grade Level: 4 (3-5)
(two 50-minute class periods)
Expendable Cost/Group: US $0.50
Group Size: 2
Activity Dependency: None
Subject Areas: Earth and Space
NGSS Performance Expectations:

Curriculum in this Unit Units serve as guides to a particular content or subject area. Nested under units are lessons (in purple) and hands-on activities (in blue). Note that not all lessons and activities will exist under a unit, and instead may exist as "standalone" curriculum.
- Glaciers, Water and Wind, Oh My!
- Engineering for the Three Little Pigs
| Unit | Lesson | Activity |
TE Newsletter
Engineering connection, learning objectives, materials list, worksheets and attachments, more curriculum like this, introduction/motivation, troubleshooting tips, activity extensions, activity scaling, user comments & tips.

To build infrastructure for transportation, engineers must understand the landforms and the geology of the Earth. Engineers are responsible for deciding where to put roads, highways, train tracks, tunnels and bridges. Engineers are also involved in city planning and determining the locations of water and power resources for cities and communities along the way. This can sometimes be very challenging in areas with mountains, hills, waterways and dense forests.
After this activity, students should be able to:
- Identify the major features of the Earth's surface such as mountains, rivers, plains, canyons and plateaus.
- Describe how engineers need a good understanding of local landforms in order to design transportation systems.
- Explain why engineers build models before final projects.
Educational Standards Each TeachEngineering lesson or activity is correlated to one or more K-12 science, technology, engineering or math (STEM) educational standards. All 100,000+ K-12 STEM standards covered in TeachEngineering are collected, maintained and packaged by the Achievement Standards Network (ASN) , a project of D2L (www.achievementstandards.org). In the ASN, standards are hierarchically structured: first by source; e.g. , by state; within source by type; e.g. , science or mathematics; within type by subtype, then by grade, etc .
Ngss: next generation science standards - science.
| NGSS Performance Expectation | ||
|---|---|---|
| 3-5-ETS1-1. Define a simple design problem reflecting a need or a want that includes specified criteria for success and constraints on materials, time, or cost. (Grades 3 - 5) Do you agree with this alignment? Thanks for your feedback! | ||
| This activity focuses on the following aspects of NGSS: | ||
| Science & Engineering Practices | Disciplinary Core Ideas | Crosscutting Concepts |
| Define a simple design problem that can be solved through the development of an object, tool, process, or system and includes several criteria for success and constraints on materials, time, or cost. Alignment agreement: Thanks for your feedback! | Possible solutions to a problem are limited by available materials and resources (constraints). The success of a designed solution is determined by considering the desired features of a solution (criteria). Different proposals for solutions can be compared on the basis of how well each one meets the specified criteria for success or how well each takes the constraints into account. Alignment agreement: Thanks for your feedback! | People's needs and wants change over time, as do their demands for new and improved technologies. Alignment agreement: Thanks for your feedback! |
International Technology and Engineering Educators Association - Technology
View aligned curriculum
Do you agree with this alignment? Thanks for your feedback!
Each group needs:
- cardboard, 2 ft x 2 ft square piece
- Winding Road Worksheet , one per person
To share with the entire class:
- construction paper, black plus various other colors
- colored markers and/or paint
- cotton balls, for the tops of mountains
- craft sticks, for making bridges
- paper-mâché or clay, for creating landforms
Who has driven on a road before? Do you know of any roads near our school? Who creates these roads? Who decides where they go? Did you know that engineers usually make the plans for the roads that connect our communities? Have you ever driven through a tunnel? Do you know how that tunnel was built? Who decided where to dig that tunnel and how to make it safe for us? Again, engineers! How do engineers know where to put tunnels and bridges? How do engineers determine where to build the roads? We are going to learn more about that today.
The landscape of the Earth is very different from place to place. Have you been somewhere that looks very different from here—maybe to the top of a mountain, near the ocean or an area with a wide river, or a place where the land is very flat or has rolling hills? What different kinds of landscapes do you know about? (List on the classroom board the landforms students mention.) Tell me about the landscape around our school.
Many different types of landforms make up the landscape around us. Can you picture what each of these looks like? (During this explanation, point to the ones on the classroom board list and add any new landforms to the list as you go through them. To help with the explanations, show students any available pictures of the landform types.) Well, hills are a raised mound of land that can be small or large. Mountains are very tall places on Earth, much higher than hills. Plateaus are like mountains except they have large, flat tops. Plains are flat lands with only small changes in elevation—almost no hills there! An ocean is a large body of salt water that surrounds a continent, and a river is a long and more narrow moving body of water that eventually empties into an ocean. What else? Well, a valley is a low point in the Earth's surface, usually between ranges of hills or mountains, and a canyon is a deep narrow valley with steep sides that usually has a stream flowing through it. All these various types of landforms shape the surface of the Earth!
How do engineers know where to build roads, tunnels and bridges across and through these landforms? They know because for many years geologists have studied the landscape and its composition. Geotechnical engineers study the different rocks and soils of the Earth and work with civil and transportation engineers to design and build roads, highways and train tracks to provide safe places for travel. What would happen if a tunnel collapsed or if a road fell off the edge of a mountainside? This rarely happens because engineers have studied and understand the landforms that they are building on to make sure the roads and tunnels are safe. They choose locations where it is safe to build roads, bridges and tunnels, and then create designs and decide on strong materials to build them.
Often, engineers build smaller-sized models of transportation systems before they build the real thing. This helps them experiment with different ideas, create safe designs and explain to other people, like citizens and city planners, their reasons for placing roads or tunnels in certain places. In this activity, you will act like engineers and build landscape models and then decide the best places to put roads across your models. Are you ready?
Before the Activity
Gather supplies and make copies of the Winding Road Worksheet .
With the Students
- Organize the class into groups of two to four student each.
- Explain to students that each team will create a small-scale landscape model of its choosing using a variety of materials. Explain the model requirements: Each model must include at least one body of water and one mountain. The body of water must take up about one-quarter of the cardboard area (~6 x 6 inches) and the mountain must occupy at least 4 inches in diameter. Beyond these requirements, groups may add any other landforms that they like, such as hills, rivers, canyons, plateaus and plains, in any arrangement.
- On the classroom board, make a list or T-chart of the landforms. Next to each listed item, have the class brainstorm materials to use for creating each landform from the available supplies.
- Have groups design plans for their landscape models. Direct them to list on their worksheets the landforms they will create and indicate what materials they will use to make them.
- Have teams build their landscape models and leave them to dry overnight.
- Once the landscape models are built, have students sketch on their worksheets detailed drawings of them, accurately indicating all landform locations as well as elevations, water, forests and open areas. Refer to the Figure 1 map example.
- Next, tell students that they are going to act as if they are civil engineers who are given the job to design a road through the landscape for a new community that is moving in. The new road must go from one corner of the model to the other. Have student teams each draw on their worksheet landform pictures a plan for exactly where they are going to place their roads. Expect that in laying out a road from one corner of the cardboard to the other, the student engineers will run into landforms that require them to adjust the route around the terrain and possibly design some bridge and tunnel structures to enable the road to get to the other corner. What creative ideas do they have to create safe routes?
- Have students add their roads to their models using black construction paper and any bridges using craft sticks.
- When all groups are finished, have teams show their models to the class and explain why they put their roads where they did.
Pre-Activity Assessment
Question/Answer: Ask students questions and have them raise their hands to respond. Write their answers on the classroom board. Students' answers reveal their depth of understanding about landforms.
- Where do we find water?
- Where do we find land?
- What are some types of landforms on our planet?
Activity Embedded Assessment
Worksheet: Have students individually complete the Winding Roads Worksheet as they work in their engineering teams during the course of the activity. Review their answers to gauge their mastery of the subject.
Group Questions: During the activity, ask the groups:
- How is a plateau different from a mountain? (Answer: Plateaus are elevated flat surfaces, while the tops of mountains typically come to points, peaks and jagged ridges.)
- How is ocean water different from river water? (Answer: Ocean water is very salty; river water is usually fresh or not as salty as the ocean. Rivers are usually long and winding through canyons, hills or plains, while oceans and lakes are broader and wider bodies of water.)
Post-Activity Assessment
Class Discussion: Ask students questions and have them raise their hands to respond. Students' answers reveal their engagement and depth of understanding.
- What kinds of landforms did you put in your model?
- What other landforms could you add to your model?
- Why do you think is it important for engineers to build models?
Class Presentations: Working in groups of two to four students each, have teams give class presentations in which they dynamically present the concepts they learned in the unit. Encourage role-playing and creativity by having teams act out the scenario of a civil engineering company that has just been hired to put a road through its model landscape. Other students in the audience can role play people who want the road for travel, people who want to turn that landscape into a park, other engineers, etc. Have teams explain the model landscape and where they would put the road. Also have them talk about any challenges they might face when trying to put a road around or through the various landforms.
Map It! Have students make to-scale maps of their landscape models and the roads they designed and built through them.
Sometimes it helps to have a landscape model built in advance to show students. If you do this, do not put a road running through it, so they cannot entirely copy the example model.
If students have trouble building tunnels through the mountains in their landscapes, simplify the process by having them indicate a mountain tunnel by having the road lead up to the mountain, color black marks for the tunnel entrance and exit, and then continue the road on the other side of the mountain.
If using paper-mâché, it may be difficult to build tunnels through mountains, but the instructor can use a utility knife to make the cuts as long as the paper-mâché is not too thick.
Challenge students to create landscape models that fit and connect next to one or more other teams' models, maybe even the entire class. How might two or more engineering teams work together to design the roads and communities that cover their landscapes?
Have students think about the challenge of designing transportation that does not use a lot of fuel or energy around existing landforms and create a design for an entirely new futuristic city. Or have them describe an alternative idea for energy-saving transportation around their own city. Ideas for innovative energy-saving transportation might include roller coasters everywhere, cities shaped like a bowl with tiny cars rolling down the sides of the bowl to the next destination, or a way to have citizens hang glide to their next locations.
- For lower grades, give students explicit directions on landform locations and sizes. Also, make an example model for them to examine before they begin the activity.
- For upper grades, encourage more creativity in student landscape designs. When building their models, have them practice measuring by requiring them to measure the length of their roads and the sizes of the different landforms, including these measurements on their worksheets.
- Have advanced students design topographic maps of their landscape models that include elevations from the bottom of the cardboard base.

Students learn about major landforms (such as mountains, rivers, plains, valleys, canyons and plateaus) and how they occur on the Earth's surface. They learn about the civil and geotechnical engineering applications of geology and landforms, including the design of transportation systems, mining, ma...

Students are introduced to the primary types of erosion—chemical, water, wind, glacier and temperature. Students investigate examples of each erosion type and discuss how erosion changes the surface of the Earth.

Students investigate how mountains are formed. Students learn that geotechnical engineers design technologies to measure movement of tectonic plates and mountain formation, as well as design to alter the mountain environment to create safe and dependable roadways and tunnels.

Students learn about floods, discovering that different types of floods occur from different water sources, but primarily from heavy rainfall. Students learn what makes floods dangerous and what engineers design to predict, control and survive floods.

USGS topographical map. New Hampshire Cooperative Salt Marsh Projects, Beard's Creek, Durham, NH. Natural Resource Conservation Service, U.S. Department of Agriculture. Accessed August 15, 2006. Originally found at http://www.nh.nrcs.usda.gov/technical/Ecosystem_Restoration/Salt_marsh_projects.html
Contributors
Supporting program, acknowledgements.
The contents of this digital library curriculum were developed under grants from the Fund for the Improvement of Postsecondary Education (FIPSE), U.S. Department of Education and National Science Foundation (GK-12 grant no. 0338326). However, these contents do not necessarily represent the policies of the DOE or NSF, and you should not assume endorsement by the federal government.
Last modified: November 9, 2020
21 Landforms for Kids Activities and Lesson Plans
Learning about landforms can be a lot of fun! Here are plenty of interactive ideas and activities to teach landforms for kids . If you’re working on landform vocabulary , then you’re sure to find these videos, worksheets and even experiments to help.
Be sure to click on each idea to see the original source and get additional information on making these landform lesson plans happen in your classroom.
Landform Activities

Building With Sand – Make an interactive sand tray that is individual sized. Have students use their fingers to push the sand aside to form each landform.

Erosion Experiment – Use some basic materials and a simple setup to explore how erosion is responsible for various types of formations – makes it memorable!

Edible Landforms – This simplified version is edible and memorable.
Salt Dough Landforms – Make and paint salt dough – forming the most popular one. Just in case you’re in need, here’s a good how to make salt dough tutorial .
Naming the Types of Landforms

Matching Real and Illustration Landforms – Real life examples can be tricky to identify. Use these free illustration cards and real world examples to help make connections.

Matching Forms and Descriptions – Match each formation of the Earth to a card with it’s descriptive characteristics. {Free printable}
Smartboard Game – A quick quiz of 25 questions to answer which type of landform is shown on this free smartboard game.
Geographical Landforms

Worksheet Set – Worksheets for first grade with a geographical theme.

Landforms Flipbook – Create a flipbook by coloring pages of landform layers and labeling them.
My Landforms Booklet – Write 3 sentences about each of 5 land forms in this free printable booklet.

Construction Paper Landform Layers – Get the free printable patterns to trace and a vocabulary sheet to paste in the back of this layered craft. You could easily add writing onto the back of each landform or mention a real world example.
Landforms for Kids Videos
Landform Song -Covers waterfall, river, lake, valley, glacier, volcano, cliff, plains, island, and mountain.
Exploring Landforms – What are landforms? Natural features of the earth’s surface.
What is Erosion? – Find out the answers in this guided video.
Landform Crash Course
All Over the World
Songs and simple illustrations from a fellow teacher to help teach land formations.
Types of Landforms

Illustrating the Landforms – When learning the types of land formations, having students illustrate them can be helpful – this one includes a free assessment. Or you could have them make landform posters .

Paper Version – Cut out shapes to create each landform and label in English or Spanish.

Dinosaur Landform Review – Use the image of a dinosaur to help students remember what each type of landform looks like. Clever!

Landforms Freebie – Draw a picture of each landform in this free visual vocabulary worksheet.
See? Teaching geographical features just got a little easier with the help of these fantastic ideas from other teachers. What fun ideas – I’m all about the hands-on lesson plans to make it more interactive.
You should also check out these 15 Fun Activities and Ideas to teach Rocks for Kids .

More Science for Kids
- Clouds Science for Kids: 23 Smart Ideas for the Classroom
- 8 Fast, Free Water Cycle Resources and Activities
- Solids, Liquids and Gases: Fun With Froot Loops

Teach Junkie
Leslie {aka the original Teach Junkie} loves learning new things to make teaching easier and more effective. She enjoys featuring creative classroom fun when she's not designing teacher shirts, making kindergarten lesson plans or planning her family's next trip to Disney World.

- Notebooking
Landforms Unit Study
- Unit Studies
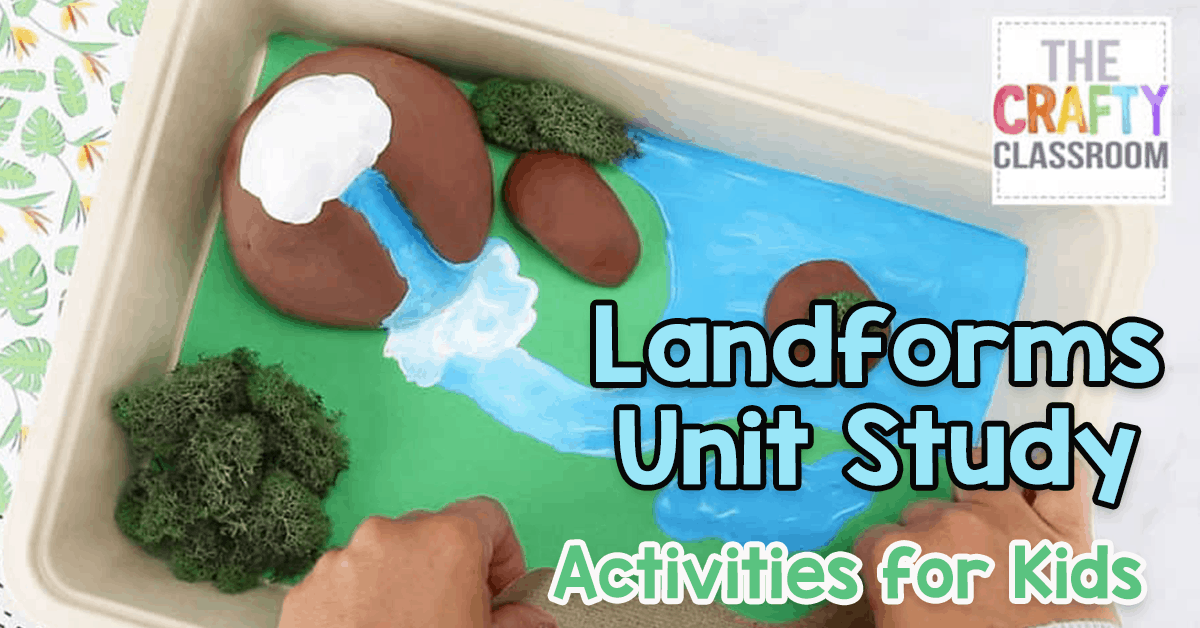
Looking for something different in your homeschool this year? Unit studies provide flexibility, open-ended learning, and a chance to take a break from the usual routine. Whether you want to do an entire year of unit studies, or are just looking for a short term break from your usual schooling, this is the option for you. Not sure where to start? Check out this guide for a Landforms Unit Study that contains resources by subject so you can easily build the perfect plan for your family.
Resources for Reading and Language Arts for a Landforms Unit Study

Coast Article and Resources : Britannica Kids article with photos, videos, and related links.
KiddieMath Landform Worksheets : Includes reading comprehension, matching definitions, and more.
Landform Crossword Puzzle : Have some fun learning the names of landforms with this colorful crossword puzzle.
Landform worksheets : A collection of worksheets on every landform that can be used for copywork or to organize research.
Reading Comprehension Lesson : Read about geographical features and then take a reading comprehension quiz.
Geography and Land Form Art Projects

Landform Diorama Project : With some clay, paint, and paper, you can create a three dimensional and interactive learning tool.
Let’s Draw Landforms : Learn how to draw various landforms with this Youtube video.
Paper Art: Landforms for Kids: Create a beautiful poster for your school room with these easy, paper art techniques.
Grand Canyon Painting Lesson: Get those paint brushes ready and learn more about the world famous Grand Canyon as you paint a stunning masterpiece.
Science Resources for Landforms
Landform Cards : Printable cards for memorizing landforms or playing memory games.
Landform lapbook : Lapbook project that includes printable, full color mini books, and instructions.
Landforms Flashcards and Study Set : An interactive flashcard and quiz on Quizlet.
Exploring Water and Landforms for Kids : An episode on Freeschooling’s Youtube channel.
Landforms Created by Erosion: Youtube video about landforms that are created through erosion.
Earth Science Worksheets for Kids: Various levels and activities for elementary students.
How to Incorporate Math into a Unit Study
Landform Printable Pack : a huge collection of worksheets and activities that include early elementary math.
Landform File Folder Game: Have fun practicing your vocabulary and sorting with this full-color activity.
Contour Activity : Learn how to calculate and draw contour lines for a topographical map.
Above and Below Sea Level : Master the concept of elevation and how it is calculated with this interactive lesson.
Math Activity: Finding My Current Elevation Above or Below Sea Level! : Explore the amazing way that you can calculate your elevation anywhere, at any time.

Landscape, Geography, and History in Unit Studies
World Land Forms : An interactive e-course about land forms around the world.
How the States Got Their Shapes : Part history and part geography, this History Channel series explores the interesting, but sometimes obscure, facts that shaped the 50 states!
History of the Grand Canyon : Discover the history of this impressive and famous landmark.
Landforms Created by Glaciers : Glaciers shaped our landscape and history, learn about the difference these seas of ice made.
Australian Landforms and Their History : Discover the land down under through this fascinating study.
The 15 Most Amazing Landscapes and Rock Formations : Explore the most beautiful landscapes in Britain and learn about their history.
Adding Bible Studies to a Geography Unit Study
What the Bible has to Say about Geography : Memorize verses about geography and hide more of God’s Truths in their hearts.
Antiquity of Landforms : How old is the world, really, and how long did it take for the terrain to form?
55 Bible Verses about Mountains : Enjoy the digital slide show as you read all the Bible has to say about mountains.
Geography and the Bible : A collection of articles and worksheets to teach you about the geography of the Bible.

Share this post

Valerie Mcclintick
Leave a Reply Cancel reply
Your email address will not be published. Required fields are marked *
- Water Cycle
Weather & Climate
Societal applications, models of landforms and bodies of water.

The purpose of this lesson is to provide students with experience creating models of landforms and bodies of water. Before students begin by playing an active game to review the types of characteristics of basic landforms and bodies of water, they look at some images of Earth taken from space. Next they take notes on some key characteristics for classifying landforms and learn how scientists use models. They use paper mache or play dough to create models of landforms and bodies of water in a guided activity. The lesson finishes with small groups of students studying maps of different continents and using either play dough or paper mache to create their group model of the landforms and bodies of water on their part of the world. Students do a gallery walk of the models and provide constructive feedback on the models of their peers. While this is intended to be the second of two lessons (see the first lesson, “Models of Land and Water- Identifying Landforms and Bodies of Water on a Map”)
The students will:
- Increase their understanding of the use of models in science
- Identify the patterns that scientists use to classify landforms and bodies of water
- Create models of landforms and bodies of water
Download Resources:
- Models Presentation (.ppt)
- Teachers Guide (.pdf)
- Student Capture Sheet 1 (.pdf)
- Student Capture Sheet 2 (.pdf)
- Region Maps TR1 (.pdf)
- Landform Pictures TR2 (.pdf)
Please Contact Us to Receive the Answer Keys (please note, we can only provide the answer keys for "GPM Original" lesson plans)
How to Make a Landform Project: Three Ideas
- Faye Angeli Vitan
- Categories : Great ideas for science fair projects
- Tags : Homework help & study guides

Do Your Research
Want to make your landform project creative and interesting? Research the topic thoroughly, and choose a landform that you find most appealing. Next, blow your teacher away with these creative ideas!
Line Art and Landforms
- popsicle sticks
- colorful paper strips
- cardboard or illustration board
1. On a cardboard or illustration board, draw a pencilled outline of the landform you will create. You can create a landform on each piece of cardboard or you can make mini-size landforms on one larger piece.
2. Choose a specific material that you will use in decorating your project - sticks, straws or strips. You can also make a collage and use different materials.
3. Using the glue, paste your materials on the cardboard. Follow the outline that you made. Fill the rest of the space with your chosen material. You can use various hues to make it colorful.
4. Label the landforms you have created.
Clay Landform Diorama
- modeling clay
- cardboard or shoe box
- small toy houses, people trees, etc.
1. Using the modeling clay, make a 3D version of a landform assigned to you. To make it realistic, use green or brown clays in creating the landform. You can also combine various landforms in one diorama such as volcanoes and plains or mountains and valleys.
2. Place your landform on a piece of cardboard or in a shoebox. If you are creating a large landform , model your landform on the cardboard. It is also easier to model the landform on a flat surface (such as the cardboard) than in a shoebox because your hands can move freely.
3. Place some mini-figurines on your diorama to make your project look lively and more realistic. You can use mini toys or paper figures/cut-outs. You can also use clays with other colors to make your designs distinct.
You can also copy a specific landform such as Mt. Everest for your mountan or Chocolate Hills for your hills.
Landform Postcards
- postcards or pictures of natural spots
- pieces of cardboard
- markers and crayons

1. Find a postcard of a landform that is also a natural wonder or a tourist spot. Examples would be the Himalayas, Sahara Desert or the Rockies. You can also download a picture from the internet or cut one out of a magazine.
2. Paste your picture on a piece of cardboard and add some details about the landform, i.e. the exact location. For a deeper discussion, you can also include how it affected the culture and the people of surrounding areas.
3. Another alternative would be to use the picture in a travel brochure . Write a brief paragraph that would entice tourists or explorers to come to the landform you presented. If you have been to the place you will present, add some information on food, festivals and the people’s culture.
Using personal experience (if you have it) when presenting information on landforms will help you to create an even more realistic landform project for kids , parents, and teachers to enjoy.
Photo Credits
Picture 1: https://www.mascavage.com/phps/jjm3/trips/germany/Zugspitze.htm
Picture 2: https://www.stormthecastle.com/diorama/mississippi-diorama/how-to-make-a-mississippi-river-diorama.htm
- Skip to primary navigation
- Skip to main content
- Skip to primary sidebar
Teaching Expertise
- Classroom Ideas
- Teacher’s Life
- Deals & Shopping
- Privacy Policy
29 Activities To Master Learning About Landforms
March 31, 2023 // by Garrett Geissel
The study of landforms is an important step in scientific education for children in early elementary grades and it helps to set the foundation for understanding Earth science. Use these engaging activities to teach students about landforms and bodies of water. With these resources, children will learn about all types of landforms and more with hands-on experiences, cool crafts, and fun ideas for games!
1. Build-an-Island STEM Challenge
Challenge your learners to build an island that will solve a posed problem. Next, children will work to plan and develop their islands using their knowledge of landforms. They will illustrate their island on paper and work to create 3D models using play dough!
Learn More: The First Grade Round Up
2. Sculpt-Arades Game Cards
Print these bright landform cards and grab playdough to teach landforms. Learners will get a card and have to build the designated landform.
Learn More: Andrea Knight Teacher Author
3. Building Landforms with Sand
Use Tupperware and wet sand to ask children to create the desired landform with this interactive idea. Print the landform cards and ask students to create the desired shape in their plastic containers. Hands may get messy here, but the container helps to keep everything contained and clean!
Learn More: Gift of Curiosity
4. Biome Coloring Pages
You will only need crayons and paper for this simple activity. Children will love learning more about biomes that contain the landforms that are being discussed. Use these coloring pages as a brain break in-between learning.
Learn More: Kindergarten Worksheets and Games
5. Exploring Landforms and Bodies of Water Video
Use this informative Earth video to teach students about landforms and bodies of water. This is a great resource to use either before or after a class discussion on the various landforms present on our planet.
Learn More: Free School
6. Do-A-Dot Landforms Book
Perfect for independent practice or centers, these landform dot pages are great to discuss landforms! Landform illustrations are already present and children will simply need a dot marker and a piece of paper to learn more about the various landforms.
Learn More: Preschool Play and Learn
7. Classroom Activity Landforms
This low-prep activity is great for a whole class discussion of landforms or can alternatively be used as an afternoon activity to reinforce an Earth science unit. Use the provided article and images and have children describe each landform to create their original definitions and landform descriptions.
Learn More: Britannica Education
8. Edible Rocks Activity
Take a tasty break and learn more about rock formations with this edible “rocks” activity. Learn about sedimentary, metamorphic, and igneous rocks as part of a discussion of landform layers. You will need Snickers bars to demonstrate the different rock types and children will love eating these at the end!
Learn More: 123 Homeschool 4 Me
9. Paper Plate Nature Island
Gather a paper plate, rocks, playdough, and other household items to create this natural island formation. Learners can paint their ocean first and then create their own island formation using the provided materials.
Learn More: The Pinterested Parent
10. Landform Diorama Project
This landform diorama is perfect for the end of a landform unit. Ask children to select multiple landforms to create a diorama. They can use a large container, playdough, grass, and paint to build their chosen landform. Add toy animals to top it off!
Learn More: The Crafty Classroom
11. Guess My Landform Game
Play “Guess My Landform” using printed pictures, game cards, and playdough. Perfect for partners in class or centers; children will pull a card and create the targeted landform. Next, the second player will guess what landform was created. Children then swap roles and continue to do more.
Learn More: The First Grade Roundup
12. Directed Cutting Activity
Learners will only need paper, glue, and scissors to complete this directed cutting activity. Have children cut out and glue a variety of landforms on a large piece of construction paper. Next, have them label each landform and provide descriptions of the climate, etc. of each.
Learn More: What I Have Learned
13. Erosion Science Lab
Using aluminum food pans and sand, learners can create various landforms. Place a Styrofoam cup filled with water above the landform and poke a small hole in the bottom of the cup. The water will trickle down and erode in different patterns depending on the differing landforms created.
Learn More: Learning Lab Resources
14. Landform Snack: Mountain Ranges
This snack is a great way to demonstrate one of the major landforms on Earth. Use a graham cracker, sprinkles, frosting, and Hershey’s kisses to create this mountain range. Ask students to observe the geographical features of the mountain range before they have a tasty treat!
Learn More: Andrea Knight
15. Landforms Anchor Chart
Create this large anchor chart to display in your classroom. Learners can use chart paper and colored pencils to illustrate the major landforms. This resource is great for students to view and work from as they learn more about natural science.
Learn More: Teacherific Fun
16. Landform Diorama
Use the bottom of a drink holder to create this landform diorama. Perfect for the start of a landform unit- children will create a variety of landforms using the underside of the drink carrier. Just add paper, toothpicks, and paint to create the differing geography.
Learn More: A Little Pinch of Perfect
17. Build a River Model
Use this video to teach children how to build a river model using aluminum pans, rocks, sand, and foil. Children can test major landforms and how bodies of water interact within them.
Learn More: Science Buddies
18. Visual Guide to Landforms
This high-quality resource is a great visual guide to landforms. It’s perfect for interactive notebooks or a larger version on a whiteboard. This visual guide will make it easy to see the various landforms on Earth.
Learn More: Only Passionate Curiosity
19. Paper Art: Landforms for Kids
This is a great project to demonstrate all major landforms! Use paper, glue, and colored pencils to create these fantastic paper landforms. This craft will challenge children to create and label a variety of landforms.
Learn More: Kid World Citizen
20. Printable Landforms Handouts
Add to your children’s knowledge about landforms with these printable resources. Math challenges and sight word worksheets are provided and make lesson prep easy!
21. Landforms Flipbook
This low-prep activity is a good visual resource for teaching your students about the different types of landforms. Cut out the provided pages to create six different landforms and then staple them together to create this fantastic flipbook.
Learn More: Gingersnaps Treats for Teachers
22. Landforms Cards
Use these landform cards to play a variety of games. Simply print out the cards and have students match the illustration with its definition. You can also ask the students to label specific sections of the landforms or describe the elements of each picture.
Learn More: Simple Living Creative Learning
23. Hands-On Landforms Project
Give students paper plates, salt dough, paint, toothpicks, paper, and tape to create this cool project. They will then create and label ten separate landforms on their plates using the provided materials.
Learn More: Frazzled First Year Teacher
24. Salt Dough Landforms Lab
Create salt dough or use playdough in this landforms lab activity. Get a map of your current geographical location and ask children to create a replica of the place with dough. Paint the landform when you are finished to highlight all of the different features.
Learn More: Mama Scouts
25. Edible Landforms Project
Prepare an aluminum pan, rock candy, ice cream cones, frosting, and other basic food objects to create an edible landform. Children will love creating this tasty diorama while they label and learn more about each landform.
Learn More: Pinterest
26. Pizza Box Landform Diorama
Learners will use a pizza box, paper, crayons, and other craft materials to create these pizza box landform dioramas. Children will draw a map of the specific area on the top flap of the pizza box. Then, they can create a 3D diorama of the landform on the bottom of the box.
Learn More: Mrs. Sparks Third Grade
27. U.S. Landforms Edible Project
Create a geographical replica of the United States with this entirely edible project. You can use any edible objects that you have to create mountain ranges, great lakes, great plains, and more.
Learn More: Simply Second Grade
28. Landforms and Bodies of Water Flip-Flap Books
Learners can use paper and colored pencils to create this beautiful flip book for landforms and bodies of water. All of the pages will be stapled together for students to refer back to.
Learn More: Simply Skilled in Second
29. Desert Diorama
A shoe box, paper, sand, rocks, and small toys are all your learners need to create desert diorama boxes. Adaptable to any major landform, these projects will require students to research specific landforms and then create models with a shoebox.
Learn More: The Spruce Crafts
Top 50 Landform Project Ideas [Revised]

Landforms are the natural features that shape the Earth’s surface, from towering mountains to winding rivers and everything in between. Engaging students in learning about landforms can be both educational and exciting. In this blog post, we’ll dive into various landform project ideas that make learning about landforms fun for students of all ages.
What Are The 10 Most Common Landforms?
Table of Contents
Landforms are the natural features that make up the Earth’s surface, shaped by various geological processes over millions of years. Here are 10 of the most common landforms found around the world, along with examples:
#1: Mountains
Mountains are towering landforms characterized by steep slopes and high elevations. They are often formed through tectonic activity, volcanic eruptions, or erosion.
Examples include the Himalayas in Asia, the Rocky Mountains in North America, and the Andes in South America.
#2: Valleys
Valleys are low-lying areas between hills or mountains, often carved out by rivers or glaciers. They can range from narrow, steep-sided canyons to wide, gently sloping plains.
Examples include the Grand Canyon in the United States and the Rift Valley in Africa.
#3: Plateaus
Plateaus are elevated flatlands with steep sides, often formed by the uplift of the Earth’s crust or volcanic activity. They can be found on every continent and vary in size from small tablelands to vast plateaus covering thousands of square kilometers.
Examples include the Tibetan Plateau in Asia and the Deccan Plateau in India.
Plains are extensive flat or gently rolling areas of land with low relief. They are typically formed by the deposition of sediment over time, often by rivers or glaciers. Plains are commonly used for agriculture and are found on every continent.
Examples include the Great Plains of North America and the Eurasian Steppe in Asia.
Hills are landforms with rounded or sloping summits and lower elevations than mountains. They are often formed by erosion or the accumulation of sediment. Hills can be found in various landscapes, from coastal regions to inland areas.
Examples include the Cotswold Hills in England and the Black Hills in the United States.
#6: Plateaus
A plateau is like a big, flat area of land that sits up high, kind of like a giant table. It stands out because it’s much higher than the land around it, with steep edges on at least one side. It is often formed by volcanic activity or tectonic uplift. Plateaus can be found on every continent and range in size from small tablelands to vast plateaus covering thousands of square kilometers.
Examples include the Colorado Plateau in the United States and the Altiplano in South America.
#7: Deserts
Deserts are arid or semi-arid regions characterized by low precipitation levels and sparse vegetation. They can be found on every continent and are often formed by factors such as latitude, prevailing winds, and topography.
Examples include the Sahara Desert in Africa, the Arabian Desert in the Middle East, and the Gobi Desert in Asia.
Rivers are natural watercourses that flow from higher to lower elevations, shaping the landscape through erosion and deposition. They play a vital role in shaping landforms such as valleys, canyons, and deltas.
Examples include the Nile River in Africa, the Amazon River in South America, and the Mississippi River in North America.
Lakes are big water areas surrounded by land, made mostly by things like ice moving, volcanoes exploding, or the Earth’s plates shifting. They come in all sizes, from tiny ponds to huge lakes like oceans, and they’re homes to lots of different plants and animals.
Examples include the Great Lakes in North America, Lake Baikal in Russia, and Lake Victoria in Africa.
#10: Oceans
Oceans are vast bodies of saltwater covering approximately 71% of the Earth’s surface. They play a crucial role in shaping the planet’s climate and supporting life on Earth.
Examples include the Pacific Ocean, the Atlantic Ocean, the Indian Ocean, the Southern Ocean, and the Arctic Ocean.
Top 50 Landform Project Ideas
- Construct a 3D model of a mountain range using clay or papier-mâché.
- Create a relief map of a region showcasing different landforms using salt dough.
- Design a digital presentation exploring the formation and characteristics of various landforms.
- Build a diorama depicting a coastal landscape with cliffs, beaches, and sea stacks.
- Paint a landscape inspired by a specific landform, such as a desert or canyon.
- Sculpt a replica of a famous natural landmark, like the Grand Canyon or Mount Everest.
- Design a board game where players explore different landforms and geological features.
- Make a flipbook animation illustrating the formation of a landform over time.
- Construct a model volcano and simulate an eruption to demonstrate how mountains form.
- Create a multimedia presentation using augmented reality to explore landforms in 3D.
- Build a terrarium representing a wetland ecosystem, complete with marshes and ponds.
- Paint a mural depicting the diverse landscapes of a particular geographical region.
- Design a virtual reality experience allowing users to explore different landforms up close.
- Craft a collage using magazine cutouts to illustrate the variety of landforms around the world.
- Create a stop-motion animation showcasing the erosion process on a coastline.
- Build a model of a river delta using sand, gravel, and miniature trees.
- Design a mobile app that educates users about different landforms through interactive quizzes and games.
- Make a clay model of a cave system and learn about the formation of stalactites and stalagmites.
- Construct a scale model of a glacier and demonstrate how it shapes the landscape through erosion.
- Create a documentary film exploring the geological history and significance of a particular landform.
- Build a LEGO model of a mountain range, complete with peaks, valleys, and rivers.
- Paint a series of landscape portraits inspired by famous landforms around the world.
- Design a tabletop simulation game where players manage a national park and protect its landforms.
- Craft a pop-up book illustrating different landforms and their unique characteristics.
- Create a podcast series interviewing experts on topics related to landforms and geology.
- Build a model of a volcano and demonstrate how lava flows shape the surrounding land.
- Design an infographic showcasing the key features of different landforms and their formation processes.
- Make a terrarium representing a desert ecosystem, complete with sand dunes and cacti.
- Construct a model of a canyon and simulate the erosion process using water and sand.
- Create a series of clay sculptures depicting the stages of erosion on a riverbank.
- Design a role-playing game where players explore a fictional world filled with diverse landforms and geological wonders.
- Paint a series of abstract landscapes inspired by the textures and colors of different landforms.
- Build a model of a coastal estuary and learn about its importance as a habitat for wildlife.
- Craft a miniature diorama of a volcanic island, complete with lava flows and volcanic ash.
- Create a series of digital artworks using digital painting software to depict various landforms.
- Design a trading card game featuring different landforms as collectible cards with unique abilities.
- Make a terrarium representing a rainforest ecosystem, complete with lush vegetation and flowing rivers.
- Construct a model of a sinkhole and learn about the processes that cause them to form.
- Build a scale model of a mountain range using recycled materials like cardboard and paper.
- Create a series of short stories set in different geographical regions, each featuring a unique landform as the backdrop.
- Design a series of interactive learning modules on different landforms for an educational website.
- Craft a model of a river canyon and simulate the effects of erosion using sand and water.
- Paint a series of landscape portraits inspired by the seasons, showcasing how landforms change over time.
- Create a video game where players explore a procedurally generated world filled with diverse landforms and geological features.
- Design a series of trading cards featuring famous landforms from around the world, along with fun facts and trivia.
- Make a terrarium representing a mountainous alpine ecosystem, complete with snow-capped peaks and alpine meadows.
- Construct a model of a fjord and learn about the geological processes that created it.
- Build a scale model of a desert oasis and explore how it sustains life in an arid environment.
- Design a series of nature trails with interpretive signs highlighting different landforms and their ecological significance.
- Create a digital atlas showcasing the diversity of landforms found on each continent, along with interactive maps and multimedia content.
What Are 4 Examples From The Lesson Of Landforms?
- Mountains: These are elevated landforms with peaks and slopes, typically formed through tectonic processes such as folding, faulting, or volcanic activity. Examples include the Himalayas, the Rockies, and the Alps.
- Valleys: Valleys are low-lying areas between hills or mountains, often carved out by rivers or glaciers. They can vary in size and shape, from narrow canyons to wide plains. Examples include the Grand Canyon and the Nile Valley.
- Plateaus: Plateaus are flat, elevated landforms with steep sides. They are usually formed by volcanic activity or the uplift of the Earth’s crust. Examples include the Colorado Plateau and the Deccan Plateau.
- Rivers: Rivers are natural watercourses that flow from higher to lower elevations, shaping the landscape through erosion and deposition. They create various landforms such as valleys, canyons, and deltas. Examples include the Amazon River, the Nile River, and the Mississippi River.
These examples represent just a few of the diverse landforms found on Earth, each with its own unique characteristics and formation processes. Studying them helps us understand the dynamic processes that shape the Earth’s surface.
Engaging students in landform projects not only helps them develop a deeper understanding of the Earth’s surface but also fosters creativity, critical thinking, and collaboration skills.
By incorporating a variety of landform project ideas and technologies, educators can make learning about landforms both educational and enjoyable for students of all ages.
Incorporating interdisciplinary connections with subjects like science, geography, and art further enriches the learning experience, providing students with a holistic understanding of landforms and their significance.
Whether building 3D models, creating digital presentations, or expressing themselves through artistic representations, students can explore the fascinating world of landforms in exciting and meaningful ways.
Related Posts

Step by Step Guide on The Best Way to Finance Car

The Best Way on How to Get Fund For Business to Grow it Efficiently
How to Build a Landform for a School Project

When your child has to create a landform model for a school project, don't just throw some salt dough on top of a sheet of cardboard and call it a day. Help your child take her science project to the next level by creating realistic-looking homemade landforms that have that "wow" factor.
Advertisement
Create the Landform Base
Video of the Day
Find a large cookie sheet, glass casserole dish or a plastic tray as the base for your landforms. This kind of base allows you to have chemical interactions in your landforms on a spill-proof display that you can use again and again. If you do not want to ruin your nice cookie sheet, pick up a cheap one at a thrift store or yard sale. To add a volcano, duct tape a section of PVC pipe upright somewhere on the tray, making sure to seal the bottom of the tube to the tray with tape. Duct tape adheres to metal, glass and plastic and will prevent leakage.
Prepare the Landform Mixture With Flour
In a large bowl, thoroughly mix together two parts flour, one part water and one part salt . Add more water or flour to the mixture until you achieve a spreadable and malleable consistency. Sculpt the mixture on the base of the tray, dish or cookie sheet using your hands to form channels for rivers, recessed areas for lakes, islands, hills and mountains; mold the mixture up the PVC tube to complete the volcano. Keep the top of the PVC tube open. Allow the landform display to dry completely before moving on. Allow it to air-dry for at least 12 hours.
Prepare the Landform Mixture With Clay
If you prefer, create your landform using air-drying clay that you can find at any craft store. After taping the PVC tube onto the tray, dish or cookie sheet, sculpt the air-drying clay into the forms that you want and up the sides of the PVC tube like a volcano if desired. Since air-drying clay will dry and harden very quickly, typically within a couple of hours, plan how you want your landforms to look before you begin sculpting. Once you're satisfied, allow the clay to dry completely before decorating the landform.
Paint and Embellish
Paint the exterior of the dried landform using acrylic or tempera paint . Use natural, muted mixtures of brown, green and tan to make the display look more realistic, and paint the lakes and rivers with shades of blue. Add a little red, orange and yellow paint at the top of the volcano if you prefer, and allow the paint to drip down the sides like flowing lava. While still wet, sprinkle real sand over the tan "beach" and "desert" areas. Sprinkle dried moss over the green grassy areas of the landform. Allow the paint to dry; then dust off any excess sand and moss. Hot-glue realistic model trees around the landform display, which you can find in the model train section of any hobby store.
Prepare Any "Explosions"
If you decide to include a volcano in your landform display, combine 1/2 cup of baking soda and 10 drops of red food coloring in a small bowl, and mix thoroughly with a spoon. Pour all of the baking soda mixture into the PVC pipe. To produce the volcanic eruption, pour 1/2 cup of white vinegar into the PVC pipe and watch red "lava" flow out of the top .
- Montana Bureau of Mines and Geology: Let's Make a Volcano
In order to continue enjoying our site, we ask that you confirm your identity as a human. Thank you very much for your cooperation.
Sciencing_Icons_Science SCIENCE
Sciencing_icons_biology biology, sciencing_icons_cells cells, sciencing_icons_molecular molecular, sciencing_icons_microorganisms microorganisms, sciencing_icons_genetics genetics, sciencing_icons_human body human body, sciencing_icons_ecology ecology, sciencing_icons_chemistry chemistry, sciencing_icons_atomic & molecular structure atomic & molecular structure, sciencing_icons_bonds bonds, sciencing_icons_reactions reactions, sciencing_icons_stoichiometry stoichiometry, sciencing_icons_solutions solutions, sciencing_icons_acids & bases acids & bases, sciencing_icons_thermodynamics thermodynamics, sciencing_icons_organic chemistry organic chemistry, sciencing_icons_physics physics, sciencing_icons_fundamentals-physics fundamentals, sciencing_icons_electronics electronics, sciencing_icons_waves waves, sciencing_icons_energy energy, sciencing_icons_fluid fluid, sciencing_icons_astronomy astronomy, sciencing_icons_geology geology, sciencing_icons_fundamentals-geology fundamentals, sciencing_icons_minerals & rocks minerals & rocks, sciencing_icons_earth scructure earth structure, sciencing_icons_fossils fossils, sciencing_icons_natural disasters natural disasters, sciencing_icons_nature nature, sciencing_icons_ecosystems ecosystems, sciencing_icons_environment environment, sciencing_icons_insects insects, sciencing_icons_plants & mushrooms plants & mushrooms, sciencing_icons_animals animals, sciencing_icons_math math, sciencing_icons_arithmetic arithmetic, sciencing_icons_addition & subtraction addition & subtraction, sciencing_icons_multiplication & division multiplication & division, sciencing_icons_decimals decimals, sciencing_icons_fractions fractions, sciencing_icons_conversions conversions, sciencing_icons_algebra algebra, sciencing_icons_working with units working with units, sciencing_icons_equations & expressions equations & expressions, sciencing_icons_ratios & proportions ratios & proportions, sciencing_icons_inequalities inequalities, sciencing_icons_exponents & logarithms exponents & logarithms, sciencing_icons_factorization factorization, sciencing_icons_functions functions, sciencing_icons_linear equations linear equations, sciencing_icons_graphs graphs, sciencing_icons_quadratics quadratics, sciencing_icons_polynomials polynomials, sciencing_icons_geometry geometry, sciencing_icons_fundamentals-geometry fundamentals, sciencing_icons_cartesian cartesian, sciencing_icons_circles circles, sciencing_icons_solids solids, sciencing_icons_trigonometry trigonometry, sciencing_icons_probability-statistics probability & statistics, sciencing_icons_mean-median-mode mean/median/mode, sciencing_icons_independent-dependent variables independent/dependent variables, sciencing_icons_deviation deviation, sciencing_icons_correlation correlation, sciencing_icons_sampling sampling, sciencing_icons_distributions distributions, sciencing_icons_probability probability, sciencing_icons_calculus calculus, sciencing_icons_differentiation-integration differentiation/integration, sciencing_icons_application application, sciencing_icons_projects projects, sciencing_icons_news news.
- Share Tweet Email Print
- Home ⋅
- Science Fair Project Ideas for Kids, Middle & High School Students ⋅
How to Make a 3D Model of an Ocean Floor for Kids

What Forms When Two Continental Plates Collide?
Oceans cover over 70 percent of the Earth's surface. At the bottom, the ocean floor features tall mountains, expansive plains and deep trenches. Most of these features remained unknown to bathymetrists -- scientists who study the form of the ocean floor -- until the advent of sonar and satellites. Creating a model of the ocean floor out of common household items allows children to visualize a part of the Earth’s surface they cannot actually see or experience first-hand.

Mix 2 cups of flour, 1 cup of table salt and 1 cup of warm water in a large mixing bowl.

Add two or three drops of blue food coloring, and knead the dough to evenly distribute the food coloring.

Place an even layer of dough, approximately 1/2 inch thick, over the bottom of the shoe box. Smooth the dough with a thick piece of plastic. This even layer of dough represents the abyssal plain, a flat expanse of ocean floor.

Take two large handfuls of dough and roll them flat with your rolling pin. Roll the dough until you have a large rectangle approximately 1/4 inch thick. Fold the rectangle in half lengthwise. Keep folding it in half until it is approximately 1/2 inch wide. Place the folded strip of dough along the left-hand wall of the shoe box. If the strip is too long to fit in the box, slice off the extra with your thick plastic. Add dough until it reaches approximately halfway up the side of the box. This side represents the continental shelf, an area of land that lies just under the ocean’s surface near the coast line.

Roll out three more handfuls of dough into two large rectangles, each 1/4 thick. Use two handfuls of dough for one rectangle, and one handful of dough for the other rectangle. Fold each rectangle in half lengthwise. Continue folding the sheets until each is approximately 1/2 inch wide. Place the larger strip to the right of the first strip. Then, place the smaller strip to the far right. Run your piece of thick plastic diagonally down from the top of the continental shelf to the abyssal plain. This creates a steep slope that represents the continental slope -- a steep drop-off that connects the continental shelf with the deep ocean floor.

Take two small handfuls of dough and roll each of them into a rectangle with your rolling pin. With your hands, separately roll each of these rectangles width-wise into a log shape. Place the two rolled logs side-by-side in the center of the box, running from front to back. Run your finger along the crease between the two logs, forming a trench. With the thick plastic, smooth the left and right sides of the rolls so that they slope down to the ocean floor, like the sides of mountains. With your fingers, pinch the dough on either side of the trench. This creates the mid-ocean ridge, a feature of the ocean floor with two mountain chains separated by a valley.

Scrape out some of the dough from the abyssal plain to the right of the mid-ocean ridge with your little finger. This creates an ocean trench. The deep-sea trenches, such as the Marianas Trench, are the ocean’s deepest parts.

Form two mountains out of dough and place them to the right of the trench. To form a mountain, take a golf-ball-sized piece of dough and roll it between the palms of your hands to form a ball. Place the ball on the ocean floor, and push the outer part down against the surface, smoothing the crease with your fingers and leaving the middle part higher. Gently work the dough at the top of the ball until it forms a peak. With the thick plastic, slice off the top of one of the mountains, approximately 1/2 inch from the top. The mountain with the peak is a seamount , an isolated mountain on the ocean floor, while the mountain with the flat top is a guyot -- a seamount with a flat, eroded surface.

Let the dough dry for approximately 5 days.

Cut off one of the long sides of the shoe box with a pair of scissors, allowing you to see the contours of the ocean floor.
Things You'll Need
Related articles, how to make a 3d cone shape, what are the most common landforms, how to build a longhouse for a third grade school project, how to build a watershed for a school project, landforms caused by plate tectonics, what are the landforms of the temperate deciduous forest, landforms of the piedmont, how to build an elbow joint model, what are four major landforms, what are some examples of a coastal plain, list of landforms and slope landforms, three types of convergent boundaries, landforms near chicago, list of natural resources in new york state, fifth grade ocean floor project, what are the 4 main types of landforms, how to make a plateau with clay, what are the physical characteristics of the atlantic....
- University of California Los Angeles Marine Science Center: Sea Floor and Continental Drift Lesson Plan
- The Museum of Science: Looking at the Sea: Physical Features of the Ocean
- Office of Naval Research: Ocean Floor -- Continental Margin and Rise
- Office of Naval Research: Ocean Floor -- Deep Ocean Basin
- Office of Naval Research: Ocean Floor -- Mid-Ocean Range
- National Oceanic and Atmospheric Administration: Mapping the Ocean Floor: Bathymetry
About the Author
Kat Black is a professional writer currently completing her doctorate in musicology/ She has won several prestigious awards for her research, and has had extensive training in classical music and dance.
Photo Credits
Dale Davidson/Demand Media
Find Your Next Great Science Fair Project! GO
IMAGES
VIDEO
COMMENTS
In this video i will teach you "how to make landforms of the earth 3d model".In this school project I will describe different types of landforms.Landforms Of...
2-ESS2-2 . Develop a model to represent the shapes and kinds of land and bodies of water in an area. This lesson focuses on these aspects of NGSS Three Dimensional Learning: Science & Engineering Practices. Developing and Using Models. Develop a model to represent patterns in the natural world. Analyzing and Interpreting Data.
hi friends! this project will help you in making 3 d model of landforms with clay. have coloured with water colours and base is made up of cardboard. dont fo...
How to make 3D landforms model for school project , project for science exhibition,
A topographical map shows the features of the landscape, including landforms like mountains, plateaus, lakes, streams and valleys. Contour lines drawn on the map indicate the elevation of natural features of the terrain. Making a 3-D topographical map provides kids with the opportunity to demonstrate their ...
How to make a 3D topographic map. Materials: Procedure: 1. Pass out clay, dental floss, and lab sheets to students. 2. Students will make a mountain with a flat bottom out of their clay. 3. Ask students to visualize where they can make 4 equal cuts in their clay mountain.
INTRODUCTION In this topic, we are going to show you how to build a landform model for your science project or exhibitions. The landform is a natural feature of the earth's surface. Topography means landforms made up the terrain and their arrangement in the landscape. Landforms are made up of canyons, plateaus, valleys, mountains, hills
One task of this Escape Room is to identify landforms and then locate one on a USA map. That leads to a lock code to open the first box. In the second task, students complete math problems and use a clue to go back to the map for the lock code. For the third task, students read postcards that tell about visiting certain landforms and places in ...
Once each line has been sketched, color them in with the various paints. Use yellow for the inner core, orange for the outer core, 2 shades of red for the mantle (1 for the upper and 1 for the lower), and brown for the crust. 6. Label each layer with a toothpick. Make a small paper tag and wrap it around a toothpick.
Once all projects are completed, hang students' work on the wall to display. For the final wrap-up, circle to discuss landforms. Ask individual students about their landform project and how their 3D shape represents characteristics of the landform it represents. Ask other critical thinking questions as necessary.
Students consider the Earth's major types of landforms such as mountains, rivers, plains, hills, canyons, oceans and plateaus. Student teams build three-dimensional models of landscapes, depicting several of these landforms. Once the models are built, they act as civil and transportation engineers to design and build roads through the landscapes they have created. The worksheet is provided in ...
Learning about landforms can be a lot of fun! Here are plenty of interactive ideas and activities to teach landforms for kids.If you're working on landform vocabulary, then you're sure to find these videos, worksheets and even experiments to help. Be sure to click on each idea to see the original source and get additional information on making these landform lesson plans happen in your ...
Landform Diorama Project: With some clay, paint, and paper, you can create a three dimensional and interactive learning tool.. Let's Draw Landforms: Learn how to draw various landforms with this Youtube video.. Paper Art: Landforms for Kids: Create a beautiful poster for your school room with these easy, paper art techniques. Grand Canyon Painting Lesson: Get those paint brushes ready and ...
Audience: Formal, K - 5. Standards: ESS2.A. Keywords: landforms, bodies of water, models. Summary: The purpose of this lesson is to provide students with experience creating models of landforms and bodies of water. Students review the characteristics of landforms and bodies of water in an active game, and then make models of these.
1. On a cardboard or illustration board, draw a pencilled outline of the landform you will create. You can create a landform on each piece of cardboard or you can make mini-size landforms on one larger piece. 2. Choose a specific material that you will use in decorating your project - sticks, straws or strips.
Learners will use a pizza box, paper, crayons, and other craft materials to create these pizza box landform dioramas. Children will draw a map of the specific area on the top flap of the pizza box. Then, they can create a 3D diorama of the landform on the bottom of the box. Learn More: Mrs. Sparks Third Grade. 27. U.S. Landforms Edible Project
Top 50 Landform Project Ideas. Construct a 3D model of a mountain range using clay or papier-mâché. Create a relief map of a region showcasing different landforms using salt dough. Design a digital presentation exploring the formation and characteristics of various landforms. Build a diorama depicting a coastal landscape with cliffs, beaches ...
There is 5 Model of Landform. You can see Volcano, Forest, River, Desert and Mountain in 3D shape. This Landform is very beneficial for school project in EVS...
Add a little red, orange and yellow paint at the top of the volcano if you prefer, and allow the paint to drip down the sides like flowing lava. While still wet, sprinkle real sand over the tan "beach" and "desert" areas. Sprinkle dried moss over the green grassy areas of the landform. Allow the paint to dry; then dust off any excess sand and moss.
Landform Cookies Project. Students will explore and discuss several types of landforms as they engage in a cookie decorating activity. Length: 30-60 minutes. Materials needed: one cookie per ...
Engage in hands-on learning with these creative landforms model projects. Discover step-by-step instructions and inspiration to create stunning and educational models for your school project.
landform model making using cardboard | 3D model | howtofunda | DIY | still model #landformmodel #howtofunda #3dmodel #modelmaking #diy #scienceexhibition #...
Add two or three drops of blue food coloring, and knead the dough to evenly distribute the food coloring. Place an even layer of dough, approximately 1/2 inch thick, over the bottom of the shoe box. Smooth the dough with a thick piece of plastic. This even layer of dough represents the abyssal plain, a flat expanse of ocean floor.