Set property from custom action?
I’m new to wix, and trying to do the following: I’m converting our current MSI from installing to program files (per machine) to installing in local app data (per user). But, since this MSI can also be deployed to an entire organization, and since this deployment can run in the system session, I need to figure out the console session’s local app data path during the installation process, since I don’t want our app to be installed in the local app data dir of the system session.
I know the usual solution is to schedule the MSI to install on the next logon of the ‘standard’ user, but the demands I received instruct me to install the MSI and run the application afterwards at the same moment, without logging on/off, restarting etc.
So, what I want to do , is to run an immediate custom action which will run another exe I’ll create, this exe will return the path of the console session’s local app data dir, and use this return value in the installer, by storing this value in a property.
From what I read this far:
I can’t get a return value from a custom action. What I need to do is to compile a c# dll (I program mainly in c#), in which I’ll define a custom action which will contain the logic of getting the console session’s local app data dir, and once I have this path, store it inside a property defined in the WXS file. Did I understand correctly? Is there a different way to accomplish what I need? Any tips/tricks/articles/examples to go over?

WIX - accessing properties in script CustomActions
My last post showed how to use VBScript functions as CustomActions. More than often you need to access some of the properties you have defined in your WIX files, for example an installation directory, a connection string etc.To access these properties just use the Session object and it’s a Property property .Here’s an example with two properties used:
The WIX file should contain two properties:
The Property property is read/write so you can manipulate the properties within your code.
SetProperty Element
Get in touch.
Submit feedback about this site to:
- [email protected]
SoftArtisans
Creating and hooking up a custom action in wix.
As mentioned previously , we started using WiX for our own installers. Out of the box, WiX can do pretty much anything you’d like, but sometimes you need to do a little something extra. One avenue we can use is a Custom Action (CA). There are quite a few types, but among the most useful is the Type 1 Custom Action. This style of action is a function call to an external Custom Action Dynamic Link Library.
These types of custom actions can call code from basically anywhere, so they can utilize existing code for things like validating a license key, or determining other requirements. In this tutorial I’ll show you everything you need to create a Type 1 Immediate Custom Action and link it into the installer.
Part 1: Creating and Hooking Up a Custom Action DLL
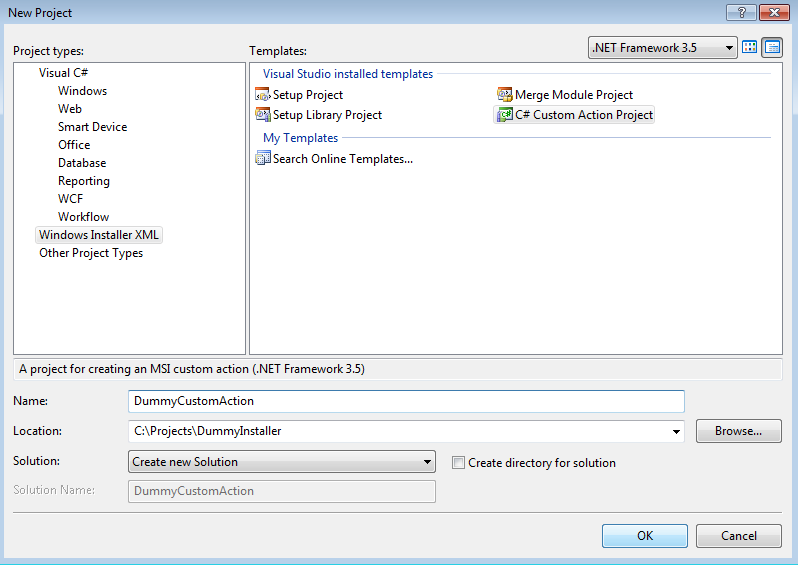
With Votive, setting up a DLL to be a Custom Action DLL is as easy as setting up a new project.

This Custom Action DLL can link in any other kind of DLL to itself, so if third party code is necessary for the Custom Action it can be utilized there. Linking in the Custom Action DLL itself is not done with references, however. Instead, we use the binary tag. When the Custom Action DLL is built, it will produce a .CA.dll file. This is the actual Custom Action DLL we want to link. We can use the Binary tag like so::
The Binary tag should go somewhere within your Product tag. This will setup your Custom Action DLL to be linked to your WiX installer, but it won’t actually declare a custom action for you to call. For that, we need to actually define our custom action, and we need to declare it in our WiX project. If you use Votive to create a new Custom Action project (call it “DummyCustomActions”), you’ll end up with a CustomActions.cs file that looks like this:
Any Custom Action defined needs to possess the CustomAction attribute. It should also have the signature “public static ActionResult CustomActionName(Session session)”. The ActionResult type informs the WiX installer of the success or failure (among others) of this custom action. Currently, our default custom action will always return that it is successful. Depending on how the custom action is declared in WiX, this ActionResult may cause the install to continue or fail, or it may be ignored altogether. The session variable allows one to interact with the current installer session. This is particularly useful for getting and setting properties for the installer, which we will touch more on later. For now, it simply logs “Begin CustomAction1”. This log is extremely useful for debugging. To write the log to a text file, one can use msiexec:
We haven’t actually hooked up our custom action to our actual installer yet, so we won’t see this logged yet.
Part 2: Hooking Up a Custom Action
If we’ve put in the Binary tag from above into our Product, and we’ve created our actual custom action, then we’ve hooked up our Custom Action DLL, but we haven’t yet hooked up the actual custom action. We can do this with the CustomAction tag:
It also goes somewhere within the Product tag. The BinaryKey attribute should point to the same Id as our DummyCustomActions binary, in this case “DummyCustomActions”. The DllEntry refers to the actual custom action to call. The execute attribute determines when, during the install sequence, a particular custom action will be called. “immediate” refers to actions happening during the UI sequence. The UI sequence is a sequence of standard actions that will occur during the user interface setup portion of the install. It is a sequence of actions that primarily perform information gathering steps. One should never schedule any action which will change something on the user’s system during the UI sequence. The other common option for Execute is “deferred.” This refers to actions which will change something, and are capable of being rolled back. They execute during the Install sequence. They also have additional restrictions in what they are able to accomplish. We’ll talk about the differences between the sequences and deferred vs immediate at a later time. For now, we’re simply going to use a simple immediate custom action to illustrate the link up. Lastly, the Return attribute determines what to do with the ActionResult we get back from our custom action. “ignore” will always simply ignore it and proceed on, but “checked” will fail the install if ActionResult.Failure is returned.
Part 3: Scheduling a Custom Action
We’ve hooked up a Custom Action DLL, we’ve hooked up our custom action, but we haven’t yet scheduled it to run. We can schedule an immediate action to run during the UI sequence like this:
It should go within the Product tag. The InstallUISequence tags lets us know this action will occur only during the UI sequence. The Action attribute on the Custom tag specifies which action we should run. The After attribute specifies after what action we should run this custom action. In this case, CostFinalize is the name of a standard action which occurs during any install. It calculates all the disk space necessary for the install. We are simply saying to run our custom action after that step. If we run our installer from the command line with the msiexec command above, we should see this in the log:
In the first line above we see that the CostFinalize action ended, with a return value of 1. This indicates that the custom action completed successfully. The MSI then does some setup for the call to our custom action over the next eleven lines. On the second-to-last line, we see our output from session.Log. Lastly, our custom action returns a value of 1, indicating success. This came from the “return ActionResult.Success” line in our custom action above.
Part 4: Session Properties
The last thing we’re going to take a look at are session properties. Any defined property will be contained within the session variable in the custom action, as an index. This includes properties that were defined with a Property tag in WiX, as well as pre-defined properties. We can use the session variable’s indexer to get and set these properties like so:
The session indexer calls are literally looking for a property with the Id of “DummyProperty” and “DummyProperty2”. They do not need to be created before being accessed, but we’re going to create the first one with a Property tag, which goes somewhere within our Product tag:
If we build and run this with our msiexec command we should see two changes to the output log. The first is back where our custom action is actually called:
Here we now write out the value of the first DummyProperty, which we pulled in from our actual WiX Project. The second bit is that we instantiated a totally new property called DummyProperty2, and set its value to “two”. In this manner we can pass information back and forth between our WiX installer and our custom actions. Another useful piece of information to look at is a large property list, located at the end of the file:
This list at the end will show the last value of every property in the installer. It can be very helpful in debugging complex custom actions. With that, we’ve created a new Custom Action DLL and hooked it up to our installer. We created a new custom action and hooked that up to our installer too. We then scheduled the custom action to run during the UI sequence and looked at changing session properties in the MSI output log. That is only the start of what one can do with custom actions, but the linkup above can be the trickiest part.
The Binary tag should go somewhere within your Product tag. This will setup your Custom Action DLL to be linked to your WiX installer,
Share the post "Creating and Hooking Up a Custom Action in WiX"


Related posts:
Check your inbox and confirm the subscription
- How to pass CustomActionData to a CustomAction using WiX
Written by Horatiu Vladasel · September 9th, 2022
Do you want to transfer CustomActionData to a CustomAction in WiX? We'll show you how in this article.
When adding CustomActions using WiX, there are two elements that you need to use:
- the CustomAction element;
- the Sequence element.
The CustomAction element specifies the custom action that will be added to the MSI CustomAction table.
On the other hand, the Sequence element is used to schedule the CustomAction within the corresponding table (AdminExecuteSequence, AdminUISequence, AdvertiseExecuteSequence, InstallExecuteSequence) and set any condition, if needed.
Each condition is evaluated separately, and the corresponding CustomAction is run only if the condition is set as True. Otherwise, the CustomAction gets skipped. If the condition syntax is invalid, then the sequence ends and returns iesBadActionData .
What is the challenge when you want to pass a property to a Deferred CustomAction ?
A Deferred CustomAction doesn't have any information about the original session handle and property data (Session.Property([PROPERTY])). This is because the script generated for it is executed outside of the installation process. Instead, you will need to use CustomActionData (Session.Property("CustomActionData")) .
How to use CustomActions with WiX?
Let's suppose we need to add a script that takes the value of the SERVERPATH property as an input (passed to the installer via command line) and writes it into the registry. The CustomAction script should look like the one below:
First, we must define our CustomAction elements:
Let’s understand what SetServerPathProperty and SetServerPath CustomAction are:
- The SetServerPath CustomAction is the Deferred CustomAction and it references the VBScript defined above, which is stored in the Binary table.
- The SetServerPathProperty is the SetProperty CustomAction which is used to set the property of interest (SERVERPATH) property to a property with the same name as the Deferred CustomAction (SetServerPath).
We also need to define the Binary element because the VBScript referenced by the SetServerPath CustomAction is stored in the Binary table.
Once the CustomAction and Binary elements are defined, we can set the corresponding InstallExecuteSequence elements – one for each of the two CustomActions.
SetProperty CustomAction ('SetServerPathProperty) is used to set the property of interest to a property with the same name as the Deferred CustomAction.
The complete listing for the WiX source file (.wxs) should look like the one below:
Now, all we need to do is to:
- Pre-process and compile the WiX source file into a WiX object file.
- Process the WiX object file compiled previously and build the Windows Installer (MSI package).
How to configure CustomActions with Advanced Installer?
If you use Advanced Installer to build and create your MSI, there is no need for an extra CustomAction to set the property of interest with the same name as the Deferred CustomAction.
All you need to do is specify the value of the CustomActionData property within the “ActionData” and Advanced Installer does the rest for you.

WiX does not have a GUI and it builds the Windows Installer packages based solely on the information defined within the WiX source file (wxs). This makes it difficult to use, especially for people who have little or no experience.
On the other hand, Advanced Installer comes with a dedicated GUI for adding a CustomAction and passing the CustomActionData property to it which makes the job a lot easier and very intuitive.
Try out Advanced Installer’s dedicated GUI for CustomAction through our 30-day full feature trial .
Advanced Installer #1 alternative to the WiX Toolset
We decided to focus on our main goal to save precious time of our developers.
HANS-LEO TEULINGS PHD – CEO, NEUROSCRIPT, LLC
- CAB Embedding Options in MSI
- Updated installers in WiX Toolset
- Custom Actions In WiX Toolset
- Windows Services with WiX Installer
- Set WiX Installer Version to the Current Build Version
- Remove Files and Folders when Uninstalling with WiX
- How to set a WiX Toolset custom action to run only on uninstall
- How to create non-advertised shortcuts for all users / per machine with WiX Toolset
- How to Remove Files on Uninstall Using WiX Toolset
- How to create major upgrades for MSI packages using WiX Toolset
- How to build an installer without a license page using WiX Toolset
- How to create a WiX KeyPath attribute
- How to Create a Desktop Shortcut using WiX Toolset
- How to Use WiX MSI to Update an Installed Application
- How to correctly set the install folder in Wix
- WiX Toolset Visual Studio Extension
- How to create a custom dialog in WiX for user input
- How to create an MSI installer with WiX
- How to use WIX MSI to do a silent install or uninstall of a web app
Get the most from packaging with Advanced Installer
Try the 30-day fully-featured edition absolutely free!
No credit card required

- Preethi Sam
- May 13, 2024
The Times You Need A Custom @property Instead Of A CSS Variable
- CSS , Animation , Design
- Share on Twitter , LinkedIn
About The Author
Preethi is a web developer and writer. She jots down mostly on front-end development, especially designing with CSS. Preethi is also a chai addict and strongly … More about Preethi ↬
Email Newsletter
Weekly tips on front-end & UX . Trusted by 200,000+ folks.
We generally use a CSS variable as a placeholder for some value we plan to reuse — to avoid repeating the same value and to easily update that value across the board if it needs to be updated.
We can register custom properties in CSS using @property . The most common example you’ll likely find demonstrates how @property can animate the colors of a gradient , something we’re unable to do otherwise since a CSS variable is recognized as a string and what we need is a number format that can interpolate between two numeric values. That’s where @property allows us to define not only the variable’s value but its syntax, initial value , and inheritance , just like you’ll find documented in CSS specifications.
For example, here’s how we register a custom property called --circleSize , which is formatted as a percentage value that is set to 10% by default and is not inherited by child elements.
In this example, a circle() function is used to clip the <div> element into — you guessed it — a circle. The size value of the circle() ’s radius is set to the registered custom property, --circleSize , which is then independently changed on hover using a transition . The result is something close to Material Design’s ripple effect , and we can do it because we’ve told CSS to treat the custom property as a percentage value rather than a string:
See the Pen [CSS @property [forked]](https://codepen.io/smashingmag/pen/PovwepK) by Preethi Sam .
The freedom to define and spec our own CSS properties gives us new animating superpowers that were once only possible with JavaScript, like transitioning the colors of a gradient. “
Here’s an idea I have that uses the same basic idea as the ripple, only it chains multiple custom properties together that are formatted as colors, lengths, and angle degrees for a more complex animation where text slides up the container as the text changes colors.
See the Pen [Text animation with @property [forked]](https://codepen.io/smashingmag/pen/rNgavyb) by Preethi Sam .
Let’s use this demo as an exercise to learn more about defining custom properties with the @property at-rule, combining what we just saw in the ripple with the concept of interpolating gradient values.
The HTML contains Chinese characters we’re going to animate. These Chinese characters are marked up with <ruby> tags so that their English translations can be supplied in <rt> tags. The idea is that .scrolling-text is the component’s parent container and, in it, is a child element holding the sliding text characters that allow the characters to slide in and out of view.
Vertical Sliding
In CSS, let’s make the characters slide vertically on hover. What we’re making is a container with a fixed height we can use to clip the characters out of view when they overflow the available space.
See the Pen [Vertical text transition [forked]](https://codepen.io/smashingmag/pen/pomvVPx) by Preethi Sam .
Setting the .scrolling-text container’s width to min-content gives the characters a tight fit, stacking them vertically in a single column. The container’s height is set 1lh . And since we’ve set overflow: hidden on the container, only one character is shown in the container at any given point in time.
Tip : You can also use the HTML <pre> element or either the white-space or text-wrap properties to control how text wraps.
On hover, the text moves -2lh , or double the height of a single text character in the opposite, or up, direction. So, basically, we’re sliding things up by two characters in order to animate from the first character to the third character when the container holding the text is in a hovered state.
Applying Gradients To Text
Here’s a fun bit of styling:
How often do you find yourself using repeating gradients in your work? The fun part, though, is what comes after it. See, we’re setting a transparent color on the text and that allows the repeating-linear-gradient() to show through it. But since text is a box like everything else in CSS , we clip the background at the text itself to make it look like the text is cut out of the gradient.
See the Pen [A gradient text (Note: View in Safari or Chrome) [forked]](https://codepen.io/smashingmag/pen/BaeyxZJ) by Preethi Sam .
Pretty neat, right? Now, it looks like our text characters have a striped pattern painted on them.
Animating The Gradient
This is where we take the same animated gradient concept covered in other tutorials and work it into what we’re doing here. For that, we’ll first register some of the repeating-linear-gradient() values as custom properties. But unlike the other implementations, ours is a bit more complex because we will animate several values rather than, say, updating the hue.
Instead, we’re animating two colors, a length, and an angle.
We want to update the values of our registered custom properties when the container that holds the text is hovered or in focus. All that takes is re-declaring the properties with the updated values.
To be super clear about what’s happening, these are the custom properties and values that update on hover:
- --c1 : Starts with a color value of rgb(224, 236, 236) and updates to pink .
- --c2 : Starts with a color value of rgb(92, 198, 162) and updates to transparent .
- --l : Starts with length value 5px and updates to 100% .
- --a : Starts with an angle value of 180deg and updates to 90deg .
So, the two colors used in the gradient transition into other colors while the overall size of the gradient increases and rotates. It’s as though we’re choreographing a short dance routine for the gradient.
Refining The Transition
All the while, the .text element containing the characters slides up to reveal one character at a time. The only thing is that we have to tell CSS what will transition on hover, which we do directly on the .text element:
Yes, I could just as easily have used the all keyword to select all of the transitioning properties. But I prefer taking the extra step of declaring each one individually. It’s a little habit to keep the browser from having to watch for too many things, which could slow things down even a smidge.
Here’s the final outcome once again:
See the Pen [Text animation with @property [forked]](https://codepen.io/smashingmag/pen/qBGEYXO) by Preethi Sam .
I hope this little exercise not only demonstrates the sorts of fancy things we can make with CSS custom properties but also helps clarify the differences between custom properties and standard variables. Standard variables are excellent placeholders for more maintainable code (and a few fancy tricks of their own ) but when you find yourself needing to update one value in a property that supports multiple values — such as colors in a gradient — the @property at-rule is where it’s at because it lets us define variables with a custom specification that sets the variable’s syntax, initial value, and inheritance behavior.
When we get to amend values individually and independently with a promise of animation, it both helps streamline the code and opens up new possibilities for designing elaborate animations with relatively nimble code. “
That’s why @property is a useful CSS standard to keep in mind and keep ready to use when you are thinking about animations that involve isolated value changes.
Further Reading On SmashingMag
- “ How To Create Advanced Animations With CSS ,” Yosra Emad
- “ Understanding Easing Functions For CSS Animations And Transitions ,” Adrian Bece
- “ The Path To Awesome CSS Easing With The linear() Function ,” Jhey Tompkins
- “ A Deep CSS Dive Into Radial And Conic Gradients ,” Ahmad Shadeed
Smashing Newsletter
Tips on front-end & UX, delivered weekly in your inbox. Just the things you can actually use.
Front-End & UX Workshops, Online
With practical takeaways, live sessions, video recordings and a friendly Q&A.
TypeScript in 50 Lessons
Everything TypeScript, with code walkthroughs and examples. And other printed books.
🚀 Access 100+ Ready-to-Use Templates and Get Inspired for Your Next Meeting →
9 Prioritization Frameworks + Tools to Help You Use Them

Trying to choose the right prioritization tool or framework for your team is not easy. There are so many to choose from. If you’re feeling stuck or don’t know where to start, this guide is written to help you decide which prioritization system is best for your team and situation.
We’ve rounded up several kinds of prioritization frameworks and then recommended software to prioritize projects, tools to prioritize tasks, tools to perform strategy prioritization, apps to prioritize the product roadmap, productivity tools, and more.
We hope this article helps you hit the ground running and start using these prioritization methods in your work.
What are prioritization frameworks?
A prioritization framework is a structured method or system teams or individuals use to evaluate and rank tasks, projects, or goals based on predefined criteria. It helps individuals and teams make informed decisions about what to tackle next by assigning priorities to items. Great prioritization frameworks allow us to feel good about what we choose to concentrate our efforts on the most important tasks and what work we’ve decided to delay or leave behind.
Whenever we have a list of things to do longer than our ability to execute we must prioritize. Prioritization is the act of making decisions on what to do and what to not do. There are numerous ways to prioritize. However, Deciding how to decide on a priority tool or prioritization framework can be just as difficult as making the decisions itself.
📌 We want to keep this guide up to date. If you have a prioritization framework or prioritization tool you think we should add to this list, please write to us and we’ll consider adding your contribution to this article.
Simple Prioritization Techniques
The simplest prioritization techniques are:
- Stack ranking – also called relative prioritization
- Top-n prioritization
They are simple methods of evaluating and ordering a set of items in a list from best to worst. This can be based on value, impact, or any other metric that is important to the task at hand.
1. Stack Ranking or Relative Prioritization

Stack Ranking is a simple prioritization method in which you rank items according to a scale (for example 1-10). You think about the importance of each item relative to every other item and form a prioritized list in this manner. Imagine your prioritized list as a “stack” of cards, with the most important item on the top and the least important item on the bottom.
Stack ranking involves comparing the relative importance of ideas or tasks to one another to prioritize them. That is why stack ranking is often referred to as relative prioritization.
When to Use Stack Ranking or Relative Prioritization
- When you have a short list of items
- When you can take any two items and easily decide which of the two should be higher on the list (either by a single metric such as revenue potential or customer satisfaction or by intuition)
How to do Stack Ranking or Relative Prioritization
- Start by taking two items from your unordered list and create a new, prioritized list with the most import item at the top
- Take a item from your unordered list and compare it against the top item on the ordered list
- Ask, “is this new item more important?”
- If it is more important, place it above this item, otherwise compare your new item to the next item on the prioritized list
If you’ve run out of items on the prioritized list to compare, put your new item at the bottom of the list.
2. Top-n Ranking

The Top-n method is a more refined version of stack ranking, which involves selecting the top items from a list. This method can be useful when you’re trying to narrow down a long list to a shorter list that can be executed on. For example, you can use Top-n Ranking to narrow down to 5 goals. Or, if your team has a history of being able to work on 12-15 tasks over a given period of time you would take your top 15 tasks from a prioritized task list.
When to use Top-n Ranking
You should consider using Top-n Ranking when you’d consider using Stack Ranking, but your list of items gets too long.
How to do Top-n Ranking
- Decide how many items you’d like to include in your final ranking. For example, if you’re interested in coming up with your top 5 goals, you’ll have 5 items in your final list
- Sort all of your items. To save time when you have many items, it can be helpful to take a quick pass through the list and ask, “might this item possibly make it into our top items when we’re done?” or, “should we put this item into a high-priority, medium-priority, or low-priority pile?”
- Finalize the sort and select your Top-n items. If you find that you don’t have enough items, you can perform a finer-grained sort to any items you may have set aside in lower-priority piles.
🛠️ Prioritization Tools for Stack Ranking or Top-n Ranking

- Notion Kanban Board (free plan available): Similar to Trello, a Kanban board can be created in Notion and be used to facilitate a stack ranking activity

Prioritization Matrices
When a single prioritization metric (such as revenue potential, customer satisfaction, importance, etc.) or intuition won’t do, tasks can be prioritized by scoring them on two dimensions. You can score them by dragging them around a graphical canvas or using a spreadsheet to form a prioritization matrix.
The most common prioritization matrices are the::
- Impact vs. Effort Matrix
- Eisenhower Matrix
These methods are particularly popular for project prioritization.
3. Impact vs. Effort (aka Value vs. Effort)

An Impact vs. Effort matrix (also known as a Value vs. Effort matrix or Effort vs. Value matrix) is a simple two-by-two chart that helps folks figure out which tasks to tackle first. Picture a square divided into four smaller squares. The x-axis (horizontal line) represents a scale for “effort,” and the y-axis (vertical line) represents “impact.”
When to use an Impact vs. Effort Matrix
Impact vs. Effort matrices are helpful for cutting through the noise and bias that may result from stack ranking. They are particularly helpful when you have multiple projects or tasks competing for resources and need to decide which ones to focus on. This matrix helps you identify high-impact, low-effort tasks that should be prioritized, so whatever you prioritize should help you make the biggest impact with the lowest amount of effort.
This prioritization matrix works well for both individuals and teams. It’s super handy for figuring out where to start when everything seems important. It can also show a team where their energy is best spent, ensuring everyone is pulling in the same direction.
How to Read an Impact/Effort Matrix
- Top Left: High impact, low effort. These are your “quick wins.”
- Top Right: High impact, high effort. These are big projects that are worth the time and energy.
- Bottom Left: Low impact, low effort. These tasks aren’t urgent but are easy to do.
- Bottom Right: Low impact, high effort. These are tasks you might want to avoid or rethink.
How to Use an Impact vs. Effort Matrix
- List Tasks : Write down all the tasks or projects you’ve got on your plate.
- Rate Them : Give each task two scores – one for how much impact it will have (high or low) and another for how much effort it will take (high or low).
- Plot Them : Put each task in the relevant box on the matrix.
- Start with the “quick wins” because they’re easy and make a big difference.
- Next, look at the high impact, high effort tasks. Plan these carefully; they’re important but will take time.
- Low impact, low effort tasks can fill in the gaps.
- Seriously reconsider doing the low impact, high effort tasks. They’re usually not worth it.
4. Eisenhower Matrix

The Eisenhower Matrix helps teams focus on prioritizing according to urgency and importance. It’s named after Dwight D. Eisenhower, the 34th President of the United States who was known for his effective management and decision-making skills, which were crucial both in military operations and later in his political career.
The concept is rooted in a principle he is often credited with formulating, goes something like:
“What is important is seldom urgent, and what is urgent is seldom important.”
This idea helps separate tasks based on their urgency and their importance, leading to the four quadrants of the Eisenhower Matrix.
It’s worth noting that while the concept is attributed to Eisenhower, the “Eisenhower Matrix” as a popular tool came about later and was developed by productivity experts and business thinkers who expanded on his principles. So while he didn’t invent the “matrix” per se, the fundamental idea behind it comes from his approach to decision-making and prioritization.
Here’s how the Eisenhower Matrix works: Imagine another square divided into four smaller squares. The x-axis represents “urgency,” and the y-axis represents “importance.”
When to use an Eisenhower Matrix
Use an Eisenhower Matrix when time management is an important component of your prioritization approach. For example, if you’re running up against a deadline and it will be impossible to finish all the tasks, use an Eisenhower Matrix to distinguish between what’s urgent and important to complete vs what’s non-urgent and unimportant.
For individuals , the Eisenhower Matrix helps separate the urgent from the important, so you’re not just putting out fires all day. It helps you make time for tasks that will benefit you in the long run.
For teams , this matrix can help clarify priorities for everyone. Team members can see which tasks are crucial and time-sensitive, and which can be scheduled or delegated. This way, everyone knows what they should be working on and why.How to Understand an Eisenhower Matrix
- Top Left: Urgent and Important. These are the “do it now” tasks.
- Top Right: Important but Not Urgent. These are the “schedule it” tasks.
- Bottom Left: Urgent but Not Important. These are the “delegate it” tasks.
- Bottom Right: Neither Urgent nor Important. These are the “dump it” tasks.
How to Use an Eisenhower Matrix
- List Tasks : Write down all the tasks or projects you have.
- Sort Them : Put each task into one of the four boxes based on how urgent and important it is.
- Do it Now : Tasks that are both urgent and important should be done immediately.
- Schedule it : Important but not urgent tasks should be planned for a later date. These are often bigger-picture tasks.
- Delegate it : Urgent but not important tasks should be handed off to someone else, if possible.
- Dump it : Tasks that are neither urgent nor important should be eliminated or postponed indefinitely.
🛠️ Prioritization Matrix Tools

Scoring Systems for Prioritization in Project Management
Prioritization systems like the RICE Method , MoSCoW Analysis , and Kano Analysis model are used to prioritize items based on a variety of factors, such as reach, impact, confidence, and effort by calculating and comparing prioritization scores. These methods are particularly useful for product teams performing product prioritization or prioritizing features or bug fixes on the product backlog .
5. The RICE Method

The RICE method is a system used to prioritize tasks or projects by considering four key factors:
- Effort
The acronym RICE stands for these four elements. Here’s what each term means:
- Reach : How many people will this task or project affect?
- Impact : If it does reach people, how strongly will it affect them?
- Confidence : How sure are you that the task will succeed and achieve the estimated reach and impact?
- Effort : How much work will the task take to complete?
When to use the RICE Method
The RICE method is useful when you have various tasks or projects you could work on but aren’t sure where to start. For teams, the RICE method offers a structured approach to making decisions. It adds some quantitative reasoning to decision-making, which can help individuals and teams be more objective in their reasoning on the best course of action.
How to use the RICE Method
- List Your Tasks or Projects : Write down all the tasks or projects you’re considering.
- Score Each Element : Give each task a score for reach, impact, confidence, and effort. Scores are generally relative and not absolute. For example, you might rate impact on a scale of 1 to 5, where 5 is extremely impactful.
- Calculate the RICE Score : For each task, multiply Reach, Impact, and Confidence, and then divide by Effort. The formula is.

4. Rank and Prioritize : Once you have the RICE scores, rank the tasks from highest to lowest score. The higher the RICE score, the higher the priority.
5. Take Action : Start with the task that has the highest RICE score and work your way down the list.
6. The MoSCoW Method

The MoSCoW method is a prioritization technique used to sort tasks or requirements into four categories:
- Should-haves
- Could-haves
- Won’t-haves
The capital letters in “MoSCoW” stand for these categories:
- Must-haves (Mo) : These are non-negotiable tasks that are critical to the project or goal. Failure to complete these means the project or task set is unsuccessful.
- Should-haves (S) : These tasks are important but not critical. You should get to them if possible, but they are not deal-breakers.
- Could-haves (Co) : These are nice-to-haves. If you have extra time or resources, these tasks can be done, but they don’t have a significant impact on the project’s success.
- Won’t-haves (W) : These are tasks that are the lowest priority. They are often put off for another cycle or dropped entirely.
When to use the MoSCoW method
The MoSCoW method is a versatile prioritization tool. For personal tasks or everyday to-do lists, it helps individuals zero in on what’s essential, ensuring they don’t waste time on low-priority activities. In a team setting, such as in project management or software development, it provides a framework for stakeholders and team members to align on what tasks are crucial, especially when resources are tight. The MoSCoW method is adaptable to various timeframes – from daily planning to year-long projects.
How to use the MoSCoW method
- List Tasks or Requirements : Write down all the tasks, projects, or requirements that you’re considering.
- Categorize : Sort each task into one of the four MoSCoW categories. Be honest and strict, especially with the “Must-haves.”
- Review and Adjust : Discuss the list with your team (if applicable) or review it yourself to make sure it aligns with your goals and resources.
- Start with the Must-haves, as these are critical.
- Move on to Should-haves if time and resources permit.
- Add in Could-haves where you can.
- The Won’t-haves are either postponed or dropped.
- Execute and Monitor : Execute the tasks based on the set priorities, and adjust as needed. Sometimes a Should-have can become a Must-have depending on the situation.
7. The Kano Model

The Kano Model is a theory for product development and customer satisfaction developed by Japanese professor and customer satisfaction consultant Noriaki Kano . The Kano Model focuses on understanding customer needs and expectations to prioritize features or improvements. It’s particularly popular in the realms of product management, marketing, and customer experience design.. The model categorizes customer preferences into five groups:
- Basic Needs : Features that are expected by the customer. If these are missing or poorly executed, customers will be extremely dissatisfied.
- Performance Needs : Features that customers explicitly desire. The better these features are, the more satisfied customers will be.
- Excitement Needs : These are features that, when present, can delight customers, but their absence won’t cause dissatisfaction because customers aren’t expecting them.
- Indifferent Needs : These features don’t significantly impact customer satisfaction whether they’re present or not.
- Reverse Needs : These are features that can actually lead to dissatisfaction if included because they contradict what some customers want.
When to use the Kano Model
The Kano Model is helpful for understanding how to match customer expectations to product features. Try using this model when you want to make informed decisions about resource allocation, product development, and customer satisfaction. Note that the Kano Model can only be used successfully when you deeply understand the needs of your customers, so it only works in teams that have done extensive customer or user research. With that in mind the Kano Model is a helpful approach to take after polling users on their experience with your product or service.
How to use the Kano Model
- Identify Features or Tasks : List all the possible features, improvements, or tasks that are under consideration.
- Survey and Analyze : Use customer surveys or team brainstorming to classify each feature or task into one of the Kano categories.
- Focus on Basic Needs first, as failing to meet these can result in dissatisfaction.
- Optimize Performance Needs to meet or exceed expectations.
- Consider adding Excitement Needs if resources allow, as these can delight customers or stakeholders.
- Implement and Review : Implement the features based on the set priorities and continuously review customer feedback or performance metrics to update your understanding.
8. Opportunity Scoring

Opportunity Scoring is a prioritization method often used in product management to evaluate the potential value of different features, improvements, or initiatives. Opportunity Scoring excels specifically in performing gap analysis – prioritizing efforts that are underserved by the marketplace.
The idea is to assess opportunities based on two main factors: the importance of a particular problem to customers and how satisfied customers are with current solutions to that problem. The basic premise is that the bigger the problem and the less satisfied customers are with existing solutions, the wider the gap in the marketplace and the higher the opportunity score will be.
When to use Opportunity Scoring
Opportunity Scoring is best used when companies are at a crossroads and looking at bigger features they could build. In that sense, it is a market exploration prioritization method. It can help teams prioritize what problems to tackle first for users, especially when resources are limited. It brings in a more structured, data-informed approach to decision-making.
How to do Opportunity Scoring
- Identify Problems or Features : List down the problems you aim to solve or the features you consider adding to your product.
- Rate Importance : For each problem or feature, rate its importance to your customer base. This could be on a scale of 1 to 10, where 10 means extremely important.
- Rate Satisfaction : Also rate how satisfied customers are with the current solutions to those problems or the existing features. Again, you might use a 1 to 10 scale, where 10 means extremely satisfied.
- Calculate Opportunity Score : For each problem or feature, subtract the Satisfaction rating from the Importance rating. The result is your Opportunity Score.

5. Prioritize : The higher the Opportunity Score, the more valuable that feature or improvement is likely to be. You would generally prioritize the features or improvements with the highest Opportunity Scores.
9. Weighted Scoring Prioritization

Weighted Scoring Prioritization also known as the Weighted Scoring Model is a prioritization method that helps teams decide which projects or tasks to focus on by assigning weights and scores to various criteria that are important for the project’s success.
When to use Weighted Scoring Prioritization
Weighted scoring provides a structured, custom, and quantitative approach to decision-making. It is particularly helpful for teams that want to prioritize items according to some custom indicators. In this sense teams can design their own weighted scoring method. By assigning weights to each criterion, organizations can align priorities with their own strategic goals and objectives, leading to more informed and consistent decision-making.
The weighted scoring method allows teams to take multiple factors into account and make more nuanced, data-driven decisions. It’s especially useful when there are conflicting viewpoints or when you’re dealing with complex projects that have multiple variables to consider. By giving everyone a clear, shared framework for decision-making, Weighted Scoring Prioritization can help align team members and keep everyone focused on the most impactful tasks.
How to do Weighted Scoring Prioritization
Here’s a simple way to do weighted scoring prioritization:
- Identify Criteria : First, list out the product strategy criteria that are important for evaluating tasks or projects. These could include things like cost, impact, time-to-market, and technical feasibility.
- Assign Weights : Give each criterion a weight based on its importance. Make sure all the weights add up to 100%. For instance, if cost is super important, you might give it a weight of 40%, and if time-to-market is less so, maybe it gets a 20% weight.
- List Tasks or Projects : Create a list of tasks or projects you’re considering.
- Score Each Task : For each task or project, give it a score between 1 and 10 for how well it meets each criterion. Often using a simple spreadsheet scorecard is useful for performing weighted scoring.
- Calculate Weighted Scores : Multiply the scores by the weights for each criterion and add them up to get a total weighted score for each task or project.

6. Rank and Prioritize : The tasks or projects with the highest total weighted scores should be your top priorities.
7. Review and Adjust : After you’ve executed the top-priority tasks, or if circumstances change (like a sudden drop in budget), revisit your weighted scores to see if the priorities still hold.
🛠️ 5 Scoring System Prioritization Tools
Finding the right prioritization technique for you
It might take a little experimentation to find the right prioritization technique for your particular scenario. So feel free to experiment with a few and see what feels right. Check out the prioritization frameworks and templates available in Parabol if you need further inspiration.

Jordan Husney
Jordan leads Parabol’s business development strategy and engineering practice. He was previously a Director at Undercurrent, where he advised C-Suite teams of Fortune 100 organizations on the future of work. Jordan has an engineering background, holding several patents in distributed systems and wireless technology. Jordan lives and works in Los Angeles, CA.
All your agile meetings in one place
- WiX Toolset v3 Tutorial
- Events and Actions
At a Later Stage
Many custom actions that set properties, feature or component states, target directories or schedule system operations by inserting rows into sequence tables, can in many cases use immediate execution safely. Other custom actions that require to change the system directly or to call another system service must be deferred to such time when the installation script is executed. The Windows Installer writes these deferred custom actions into the installation script for later execution.
Deferred custom actions are defined in the following way:
The Execute attribute will specify the deferred status of our custom action. We need to refer to the DLL function we need to call using the DllEntry attribute (don't forget the decoration for C++-style names like _MyAction@4 if your compiling environment requires this). And finally, HideTarget will allow us to disable logging the parameters passed to this custom action if security considerations so dictate.
Because the installation script will be executed outside of the normal installation session, this session may no longer exist during the execution of the deferred action; neither the original session handle nor any property data set during the installation sequence will be available to the deferred action. The very limited amount of information the custom action can obtain consists of three properties:
- CustomActionData Value at time custom action is processed in sequence table. This property is only available to deferred execution custom actions, immediate ones do not have access to it.
- ProductCode The unique GUID code for the product.
- UserSID The user's security identifier (SID), set by the installer.
If we need to pass any other property data to the deferred action, we can use a secondary custom action to set this value beforehand. The simplest solution is a property assignment custom action. Set it up in a way that the name of the property set will be the same as the Id attribute of the deferred custom action:
Scheduling the property assignment before the deferred action is important, too:
The data we wanted to pass will appear in the CustomActionData property. Should we need to pass more than one piece of information, we have to devise a way to incorporate them into this single property, for instance, to use a semicolon separated list of Name=Value pairs.
Your browser is not supported for this experience. We recommend using Chrome, Firefox, Edge, or Safari.
PlayList eNewsletter Sign up for biweekly updates on upcoming events, what's new & where to dine.
Inspiration guide request your copy for untold stories, fun round-ups, and what's new in swla..
Metro Exodus Enhanced Edition

- However if you find any inaccuracy or typos, let me know in the comment section. This was a massive project and it has flaws for sure.
Originally posted by Wiki : Moral Points form a hidden system in the Metro video game series that follows Artyom's progress and affects the ending of each game. This system is never explained to the player and its mechanics can only be speculated about. As Metro is about Artyom's journey and him seeking to understand the world around him, the game rewards the player by guiding Artyom through experiences that help him better understand the metro and its strange phenomena. It is commonly understood that every time Artyom gets a moral point, the screen flashes light blue and whispers or the sound of water dripping can be heard. When Artyom loses a moral point, the screen darkens and an ominous sound can be heard. There are more opportunities to gain moral points than to lose them, and moral points that are gained and lost are speculated to vary in severity. Moral points can be gained through making morally correct decisions, being stealthy in certain levels, but can also be awarded for exploring every part of the map to get weapons and supplies. The best way to gain moral points is to knock out enemies and spare lives when possible - doing so will almost always activate the good endings. There is no telling how many moral points are required to get the good ending since the statistics are hidden; however, making wrong choices or going loud in the levels that require stealth will likely cause the player to not gain enough moral points to trigger the good ending. As with the previous games, In Metro Exodus, Artyom is awarded points for doing good deeds or doing certain deeds. Unlike its predecessors, listening in on conversations does not affect moral points, and instead can be used to gain locations to stashes. Moral points are also present in the Sam's Story DLC, but instead of indicating good deeds, they reflect actions taken by Sam to gain the Captain's trust. Completing all actions will gain the A Man of Principle achievement .
- Use stealth and avoid combat whenever possible.
- If needed, use knockout without killing.
- When an enemy surrenders, always spare them
- The Fish is on Volga, where you get the Fisherman achievement. It's i the middle of the boat standing upright against a wall Alt. location : in a shack made out of old train parts below the train tracks east of Duke and on your way to the Gas Station.
- The Sun is on Caspian. It's in the Hermit's ship on a shelf filled with cardboard boxes. Alt. location : at the start of the water trunk with Damir and before you slide down the old village, go left and jump to the area below. I the middle there's a pole with the Sun on it.
- The Bear is on Taiga, in the first schoolhouse at the beginning of the level before the bridge hanging from a window frame. Alt. location : The bear can be also found hanging from a big wall map behind the Admiral, when you to meet him.

- Don't Kill any Fanatics, aka Silantius-mind-washed-followers when visiting their church, or near the end of the chapter when a barge is involved.
- Same goes to friendly ones you encounter in 3 fixed places; the paladins with their ritual, the father and the idiot of his soon, and some prisoners in a camp.
- While being friendly, mind saving the one held captive next to the radio tower, where there's something musical you should take.
- Complete two side quests involving one spartan fond of music and a certain cute girl and her teddy.
- In the last section of the game, go stealthy undetected and confront who you have to confront without alerting the guards.

- 1. Postcard #1 MISSABLE - Church, Children's cove
- 2. Suit Upgrade #7 - Compass - Crashed plane
- 3. Diary #2 - Mouldy Log - Plane crew camp

- 1. Diary #3 - Faded Note - Basement, Building
- 2. Postcard #2 - Krest's place
- 3. Diary #2 - Water-Logged Note - Sealed bunker, storage room

- 1. Suit Upgrade #1 – Battery Charge Controller - small island, torture chamber, south of the tracks
- 2. Diary #13 - Patient Ledger - Half flooded clinic, south.
- 3. Suit Upgrade #2 – Reinforced Helmet - Bandit camp, close to Duke

- 1. Suit Upgrade #6 – Extended Filter - Same Safehouse, box far end of the room
- 2. Diary #11 - Dusty Workbook - Hazardous Safehouse
- 3. Suit Upgrade #4 - Ammo Pouches - Same Camp, by the door entrance
- 4. Diary #4 - Bandit Camp - Table on the ground floor (Don't forget the key given by the prisoners)
- 5. Postcard #3 - Safe house, Inside transport truck, shelve to the right
- 6. Diary #9 - Torn Page - Same as previous, transport truck
- 7. Diary #5 - Sturdy Envelope - Half buried Van
- 8. Suit Upgrade #5 – Throwing Weapons Harness - Gas Station, padlocked room
- 9. Diary #6 - Weathered Notice - Gas Station, green shelve inside
- 10. Diary #8 - Bandit Note MISSABLE - among the corpses.

- 1. Suit Upgrade #8 – Night Vision Goggles - Using the prisoner's key, sealed space in the terminal.
- 2. Diary #10 - Thick Ledger - Last room you visit for the Fisherman trophy
- 3. Postcard #4 - Safe-house , soon you leave the terminal
- 4. Diary #7 - Faded Note - Ruined Structure, wooden shed on top of it
- 5. Diary #12 - Blood-Stained Diary - Same shack, wooden shelf
- 6. Suit Upgrade #3 – Metal Detector - Shore shack right to the Silos
- Postcard #5 MISSABLE - After the gathering of fanatics listening to Silantious, in the next room next to the fire barrel

- Don’t kill any slaves!
- At the start of the Chapter, while checking the radio tower, don’t kill the soldier that ambushes you on the rooftop.
- Complete it the side-quest he gives you LATER (I mean that safe house you need to sleep in order to trigger the interaction in the chapter)
- Use non-lethal take-downs on all the guards at the Mine/Cave even to the ones attacking Giul. You'll gain the point as soon you start the elevator up to the Lighthouse
- Apply the same behavior visiting Shipwreck Slave Camp, only that way you save the slaves.
- Liberate the Prison (another Shipwreck) and release the prisoners. Recover the family photo for Giul in the Coms facility under the lighthouse where her mom used to work.
- Recover the water bowser undetected and with no kills, there's extra points to be gained if you release a couple prisoners guarded by a hound on the ground next to the truck with the water, but may not compensate for the risk of being detected.
- When infiltrating the fortress on the last mission you'll gain a point reaching the surface without killing or being detected. Saving a slave from his punisher midsection will grant you another point but then again, it'll turn, most likely, everyone hostil towards you.

- Don't kill the thug who ambushes you in the top of first building you visit.
- Reach the lighthouse without killing since you enter the caves.
- Recover Giul's family photo from the underground bunker.
- Free the slaves in the prison ship without being detected till you pull the lever.
- Still the water bowser in the oasis, without being detected
- Reaching the Baron's fortress through the sewers, guess what?... don't hget detected till you open the door to outside

- Save the guy tied to a pole, in the beginning.
- Don’t kill the forest tribe members. Sneak past them!
- Don’t attack the unarmed forest tribals or the hermit.
- Don’t kill wounded forest tribe members.
- You'll gain one bright point of moral superiority every time you make past a camp with pristine behavior, sneaky Dalai Lama; no kills and no detection (also useful for the Forest Child achievement)

- Pioneers and pirates camps... are mostly skipable from outside or close to it's walls.
- a couple items are just impossible to pick without a knockout or two, however you can save first, do the thing, pick the item, load back, the item remains, and your achievement remains immaculate.
- From experience, don't use nothing except the bow with regular arrows, and some Molotov's for the bear.
- Some scripted encounters doesn't count, like the guys warning you in the beginning, the alchemist, the trap guys, Olga and the Admiral.
- Looking/being suspicious of you doesn't matter, but if they start shooting, load back.
- Tbh only the boat gate section might take some more tries. Although in my list, only 0,8% of the players have it.

- In the first Chapter save your game after every corner and load every time the the bug or the worms spit on you. Keep your quick-save clean of damage and you'll get to the end of it without much fuss, only a few loads.
- On the station's second chapter, the enemies are humans, but the trick remains the same, save frequently while full health, load if you get hit.
- Last chapter on the bunker has the Blind-one plus lots of mutant rats, make use of your save/load strategy and install all flamethrower upgrades along the way, they are easy to find. When facing the Gorilla make sure you run around him, close but not too close (you prevent his throw attack, also for the next achievement). And drop everything on the canister on him soon you have the chance, It's a two fase battle with some rats in the middle but a good spray or two can defeat him without too many hits

- MAJOR When you first meet the Captain. Put your gun down when he tells you to.
- Help him move the wooden beam
- Spare the sniper (choose punch).
- MAJOR After you and the Captain speak to Tom over the radio. Give him food when he mentions that drinking would be better with something to eat.
- MAJOR. Set all five Molotov traps in the Captain’s hideout after getting drunk with him. This is also required for the Trapper Achievement.
- MAJOR. After stealing the boat from the bandit camp and sailing through the toxic bog, proceed through the left side of the swamp until you find a "question mark on your map". You'll find a tape and some bodies. Follow the path and find two more tapes while speaking to the captain via radio. At the top of a tower you'll uncover what happened to the Captain's crew and you add points to his trust towards you
- MAJOR At the very end of the DLC. You'll need to make a difficult choice, you must choose NOT the flag.

- The first encounter occur after you met the Captain on the ruins of the sky-elevator. you'll fall mid track on a boxcar. Don't rush it or he will push you to a fatal fall, if that happens hit F9 for a quick load before before the dead screen appears. Land a shot or two as soon he appears, hide behind the car on the opposite side from where the shaking trees are, shooting every time he goes up. Repeat 3-5 times till the cut scene where he'll jump on you from the pillar below yours. Don't hit load; it won't kill you
- The second encounter occurs after meeting Tom's scouts while heading to the Firehouse. He will ambush you on a narrow car scrapyard. Don't run or you'll be crushed by falling cars. Make sure you have plenty medkits and ammo. Hide when he's attacking or run in the opposite direction if he's sending his bats, try to prevent being below the higher piles of cars cause he will push them to crush you 3 times, but you'll hear some metal sound before the push, so make sure you identify witch pile he's gonna trash.If you are crushed tho, hit F9 fast before the black screen. It'll save the achievement. Land land some shots in between healing every time it's needed till the next cutscene where he'll fall behind the cars and when you approach it, some of them will fall on you. Don hit load this time tho, it won't kill you.
- The third and final encounter will take place shortly after leaving the fire department with the radiation suit. This one works the same as the other battles. He will fly toward you and you just need to shoot it a few times until it falls and retreats. Keep your eyes on the trees. You’ll be able to see where the attack is going to come from. The trees will move and there will be a dust cloud. Just follow that until it attacks. The bat swarms can be dodged by sprinting away in a different direction. There will be rain and it'll be harder do e'identify the last couple attacks, but even if you get hit, heal your self and keep looking around till you land a few more shots Eventually, it’ll fall on you and a scene will play as you finally defeat this thing. Don't despair if the achievement don't pop up when you kill it. It will ,but only in the end of the chapter after the million dollar choice and the final cutscene rolls up. I know. it sucks.

- Balanced Grip Handle
- Short Barrel and Suppressor
- Reflex Sight
- Long Barrel with Full Auto
- Closed Reflex Sight
- Extended Magazine
- Green Laser
- High-Capacity Magazine
- Burst Fire Barrel
- Standard Magazine
- Semi-Automatic Barrel
- Heavy Stock
- High Capacity Magazine
- Sniper Stock

- 1. Diary Page #1: Note to Korzh Get the boat, drive/sail to the first building, go upstairs, turn left, check the corpse ahead
- 2. Night Hunter Stash #1:Throwing Weapons Harness and Night Vision Goggles(NVG) Same Building, first floor, follow yellow ink on the walls for the NVG. Jump to the planks on the water and follow the path up again to find the suit upgrade. Only the suit upgrade unlocks this stash count on the achievement, however in my modest opinion and regarding the ink on the wall, the NVG should have been the real stash.
- 3. Melody 01 Back to the boat, second rectangular building on the left. Ground floor. Classroom with a Piano
- 4. Diary Page #2: Absence note Same room as previous, on a desk with an old computer
- 5. Melody 02 Big Building on land to the right with the theater, second floor, use planks to reach room. It's pinned on a board. Don't forget to get the tape from the room on the right side of the window with the planks for the Cinephile achievement.
- 6. Night Hunter Stash #2: Rifle Scope Residencial Building with the checkpoint, ground floor, side entry.
- 7. Night Hunter Stash #3: Battery Charge Controller : Same building, 2nd floor, room with a workbench, exit via the porch behind on the opposite side, kick the last door. Shoot the jelly jars.
- 8. Diary Page #3: Survivor's note : Also, same building, top floor on the window to the left BEFORE climbing down the pole to meet the captain.
- 9. Night Hunter Stash #4: Reflex Sights and Magazine mods : While hunting the sniper, first building. Use NVG to find the ink sign. Climb close to the elevator shaft, crawl to the secret room.
- 10. Diary Page #4: A note from Korzh : Same building, second floor
- 11. Melody 03 : Returning to the Captain. Check blue side-door to the left before entering the boat

- 1. Melody 04 : After the drinking night with the Cap, climb down looking for traps to set. Inked wall with a hole. Pillar in the piano room ahead.
- 2. Night Hunter Stash #5: Reinforced Helmet Head forward after the last item. Room with a skull on a wall. Kick wooden plank on the right
- 3. Melody #5 Safe house close in the left border of the central landmass of the map, close to the scouts on the tower
- 4. Ammo Pouch suit upgrade : It's not a Stash Climb the stairs in the building next to the previous safe house.
- 5. Night Hunter Stash #6: Upgraded NVG Goggles and Stallion weapon mods Down the hall from the locked door, find a crawlspace you can use to enter.
- 6. Melody #6 Car dealership, in the office. Access trough a green door behind the cars in the garage
- 7. Diary Page #5: Company Charter : Same building, if you have the two codes from the brothers, open a small room behind the office
- 8. Diary Page #6: Engineer’s Note : Bandit hideout, climb the ladder to enter, first room in the corner
- 9. Melody #7 Same floor, a bit further, after 2 Molotov traps, open door at your right to a room with a piano
- 10. Night Hunter Stash #7: Consumables Suit Upgrade and Stallion weapon parts : Same bandit facility, next building, second floor. Locked door with a 3 switches combination. 3-1-2 is the correct order.

- 1. Diary Page #7: A Note from the Boss : After getting the boat through the area with mandatory mask use. First stop, on the dock where you leave the boat.
- 2. Diary Page #8: Tail’s Diary : Head forward towards the checkpoint. Check a boat on the left with a Clinic sign. The diary is small compartment above its roof
- 3. Melody #8 Access bridge from the previous room. The music sheet is pinned on a unique toilet facility in the end of it.
- 4. Melody #9 After the clinic, head to the dock on the left side from the path to the fire station. The music sheet is pinned on the green car. Congratulations, you're officially a Music Lover
- 5. Diary Page #9: A Guard’s Journal : The journal is on the opposite side to the right inside the car with a workbench.
- 6. Night Hunter Stash #8: Extra-Bright Flashlight and more Stallion weapon mods : Refuel the generator to lift the crane and grant access to the stash. You'll probably unlock the Lord of War achievement here, if you followed this guide.
- 7. Extended Filter mask upgrade - it's no stash After the Protection Suit, climb the stairs and pick the upgrade on a table to the left. look ahead to a small office box for the next diary.
- 8. Diary Page #10: Boss’ Notice : On the desk inside the aforementioned office box
- 9. Diary Page #11: Seryi’s note : After dropping from the Fire-Station zipline. Ruined building ahead. Watch out for mines. This is the last of the last items in the WhoLe GaMe. Congratulations .

Standard Custom Actions
The WiX toolset contains several custom actions to handle configuring resources such as Internet Information Services web sites and virtual directories, SQL Server databases and scripts, user accounts, file shares, and more. These custom actions are provided in WiX extensions.
To get started using standard custom actions, see the Using Standard Custom Actions topic.
For information about specific types of standard custom actions, see the following topics:
- FileShare custom action (located in WixUtilExtension) - create and configure file shares.
- Internet shortcut custom action (located in WixUtilExtension) - create shortcuts that point to Web sites.
- OSInfo custom actions (located in WixUtilExtension) - set properties for OS information and standard directories that are not provided by default by Windows Installer.
- Performance Counter custom action (located in WixUtilExtension) - install and uninstall performance counters.
- Quiet Execution custom action (located in WixUtilExtension) - launch console executables without displaying a window.
- Secure Objects custom action (located in WixUtilExtension) - secure (using ACLs) objects that the LockPermissions table cannot.
- Service Configuration custom action (located in WixUtilExtension) - configure attributes of a Windows service that the ServiceInstall table cannot.
- ShellExecute custom action (located in WixUtilExtension) - launch document or URL targets via the Windows shell.
- User custom actions (located in WixUtilExtension) - create and configure new users.
- WixDirectXExtension - custom action that can be used to check the DirectX capabilities of the video card on the system.
- WixExitEarlyWithSuccess (located in WixUtilExtension) - custom action that can be used to exit setup without installing the product. This can be useful in some major upgrade scenarios.
- WixFailWhenDeferred (located in WixUtilExtension) - custom action that can be used to simulate installation failures to test rollback scenarios.
- WixFirewallExtension - Firewall custom action that can be used to add exceptions to the Windows Firewall.
- WixGamingExtension - Gaming custom action that can be used to add icons and tasks to Windows Game Explorer.
- WixIIsExtension - Internet Information Services (IIS) custom actions that can be used to create and configure web sites, virtual directories, web applications, etc.
- WixNetFxExtension - custom action to generate native code for .NET assemblies; properties to detect .NET Framework install state and service pack levels.
- WixSqlExtension - SQL Server custom actions that can be used to create databases and execute SQL scripts and statements.
- WixVSExtension - custom action to register help collections and Visual Studio packages; properties to detect install state and service pack levels for various Visual Studio editions.
- XmlFile custom action (located in WixUtilExtension) - configure and modify XML files as part of your installation package.
IMAGES
VIDEO
COMMENTS
The final Custom tag mentioned above needs to go into the InstallUISequence section, not the InstallExecuteSequence section, as the custom action needs to be called before the dialog is displayed. As for the implementation of the Custom Action itself, I added a new C# Custom Action library project to the solution.
I created a Custom Action hoping to set a property so that I can use that. Following is the code. ... given my needs were very simple I decided to not have a separate DLL for CustomAction and instead went ahead with a Custom Action in vbscript within the Wix Project. So now the code looks like
Description. Required. Action. String. By default the action is "Set" + Id attribute's value. This optional attribute can override the action name in the case where multiple SetProperty elements target the same Id (probably with mutually exclusive conditions). After. String. The name of the standard or custom action after which this action ...
From what I read this far: I can't get a return value from a custom action. What I need to do is to compile a c# dll (I program mainly in c#), in which I'll define a custom action which will contain the logic of getting the console session's local app data dir, and once I have this path, store it inside a property defined in the WXS file.
This attribute must be used with the Property attribute to set the property as part of a type 51 custom action or with the Directory attribute to set a directory path in that table in a type 35 custom action. The value can be a literal value or derived from a Property element using the Formatted syntax.
More than often you need to access some of the properties you have defined in your WIX files, for example an installation directory, a connection string etc.To access these properties just use the Session object and it's a Property property.Here's an example with two properties used: set adam = GetObject (Session.Property ("ADSERVER ...
We will use the WcaUtil custom action library bundled with WiX to help us accomplish this. This library contains many convenience functions that make it easier to write custom actions in C++. These include functions to get and set properties both in a raw format and formatted, modifying the installer databases or logging to the Windows ...
Description. Required. Action. String. By default the action is "Set" + Id attribute's value. This optional attribute can override the action name in the case where multiple SetProperty elements target the same Id (probably with mutually exclusive conditions). After. String. The name of the standard or custom action after which this action ...
Part 1: Creating and Hooking Up a Custom Action DLL. With Votive, setting up a DLL to be a Custom Action DLL is as easy as setting up a new project. This Custom Action DLL can link in any other kind of DLL to itself, so if third party code is necessary for the Custom Action it can be utilized there. Linking in the Custom Action DLL itself is ...
When scheduling the two CustomAction in the InstallExecuteSequence table, the SetProperty CustomAction ('SetServerPathProperty) should be scheduled before the Deferred CustomAction (SetServerPath).. SetProperty CustomAction ('SetServerPathProperty) is used to set the property of interest to a property with the same name as the Deferred CustomAction.. The complete listing for the WiX source ...
Action (String) : By default the action is "Set" + Id attribute's value. This optional attribute can override the action name in the case where multiple SetProperty elements target the same Id (probably with mutually exclusive conditions). After (String) : The name of the standard or custom action after which this action should be performed.
For example, here's how we register a custom property called --circleSize, which is formatted as a percentage value that is set to 10% by default and is not inherited by child elements. syntax: "<percentage>"; inherits: false; initial-value: 10%; clip-path: circle(var(--circleSize) at center bottom);
The simplest prioritization techniques are: Stack ranking - also called relative prioritization. Top-n prioritization. They are simple methods of evaluating and ordering a set of items in a list from best to worst. This can be based on value, impact, or any other metric that is important to the task at hand. 1.
At a Later Stage. Many custom actions that set properties, feature or component states, target directories or schedule system operations by inserting rows into sequence tables, can in many cases use immediate execution safely. Other custom actions that require to change the system directly or to call another system service must be deferred to ...
Wicks & Wax Candle Lab gives candle connoisseurs the opportunity to come in and customize their very own candles down to the decor. In an upscale environment, you can choose your own vessel and your own fragrance oil, and then, instructors will walk you through the actual candle making process. Once your candle is made, you will be able to decorate it with dried flower petals and glitter to ...
Lux is a WiX extension (and associated tools) that let you write data-driven unit tests for your custom actions. The executive summary: Lux runs your immediate custom actions then validates they set properties to the values you expect. While it ' s a simple approach, if your custom actions are factored as discussed above, validating the ...
This attribute specifies a string value to use in the custom action. This attribute must be used with the Property attribute to set the property as part of a type 51 custom action or with the Directory attribute to set a directory path in that table in a type 35 custom action. The value can be a literal value or derived from a Property element ...
Moral Points form a hidden system in the Metro video game series that follows Artyom's progress and affects the ending of each game. This system is never explained to the player and its mechanics can only be speculated about. As Metro is about Artyom's journey and him seeking to understand the world around him, the game rewards the player by guiding Artyom through experiences that help him ...
To access a WiX property, such as those set with the Property element, use the Session object's indexer. Here is an example: ... Similarly, you can clear a property by setting its value to null. Creating or changing property values from a custom action doesn't stop the installer from displaying those properties in the install log. So, if a ...
The WiX toolset contains several custom actions to handle configuring resources such as Internet Information Services web sites and virtual directories, SQL Server databases and scripts, user accounts, file shares, and more. ... OSInfo custom actions (located in WixUtilExtension) - set properties for OS information and standard directories that ...