How-To Geek
How to change a drive letter on windows 10 or windows 11.
You can change your drive letters in Windows 10 and 11 using the Disk Management utility.

Quick Links
What changing a drive letter does, how to change a drive letter, how to fix programs broken by changing a drive letter.
Changing the letter of a drive is easy on Windows 10 and Windows 11, but you should do it as soon as you add the drive to prevent future hassles. Find out how to change a drive letter here.
Windows assigns drive letters alphabetically --- starting with C --- when they're initialized. If you want to change a drive letter, you should do it before you install anything on the drive. Changing a drive letter after programs are installed could break them since there will be references to an installation location that is no longer there.
Windows has gotten pretty smart about updating shortcuts so that programs work after changing a drive letter. Most of your applications' shortcuts will probably be automatically corrected. Unfortunately, Windows isn't as good about updating file associations. You'll have to manually set the default apps associated with files to fix file associations if they were broken by changing the drive letter.
It is possible to change the boot drive letter to something else, but we don't recommend it. Changing C:\ to another letter is likely to result in severe issues, like a PC that cannot boot into Windows at all. Even if it were able to boot, there would be a huge number of programs that would not be able to run.
Technically speaking, while they are commonly called drive letters, each letter actually refers to a partition on a disk. If you have multiple partitions on a single disk, you will need to assign a letter to each partition to make them all accessible. If a disk has just a single partition, it will just have a single letter pointing to that partition. (However, you do not have to assign a letter to each partition. Partitions without drive letters will not appear in File Explorer and elsewhere.)
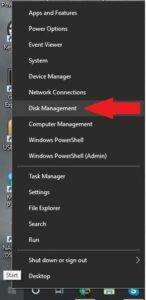
Changing a drive letter is pretty simple. Click the Start button, type "Disk Management" in the search bar, and then hit Enter.
The program name displayed in the search will not be Disk Management. It will be "Create and format hard disk partitions."
You could also hit Windows+X or right-click the Start button, and then click "Disk Management."
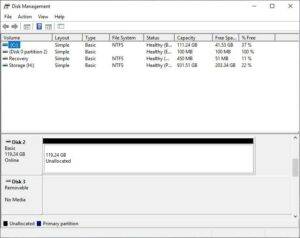
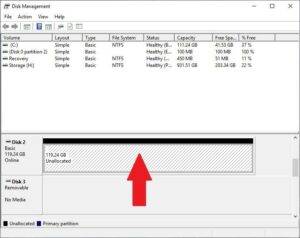
Identify the drive you'd like to change in the Disk Management Window. In this example, we'll change the letter of the D:\ drive to J:\. You can right-click the drive on the text list, or on the menu below. Either works.
Select "Change Drive Letter and Paths" in the right-click menu that appears.
In the window that pops up, click "Change."
Select whatever letter you want from the drop-down menu. Then click "Ok."
Two popups will warn you about changing your drive letter. Click "Yes" on both of them, and then restart your computer.
Once Windows has restarted, the drive letter should be changed.
There are a few ways you can fix a program broken by changing the drive letter.
Fix The Shortcut
If you're lucky, the only thing that is broken is the shortcut. Fix a shortcut by right-clicking the shortcut on your desktop, and then click Properties.
You need to change the target of the shortcut to the new drive letter.
For example, if GIMP was previously installed at " D :\GIMP 2\bin\gimp-2.10.exe," and you changed the D drive to J, change the target of the shortcut to " J :\GIMP 2\bin\gimp-2.10.exe."
Finalize the change by clicking "Apply" and then "Ok."
Reinstall the Program
Reinstalling the program will generate new entries in the registry, so everything on the computer will know where to look for the program. Some installers won't like reinstalling directly over existing files, so you may need to rename or delete the old installation first.
Change the Drive Letter Back
If you changed the drive letter of a drive with a lot of programs installed, it might be easier to change the drive letter back. Changing the drive letter back should automatically fix any programs and file associations that were broken.
Edit the Registry
You can break programs, or even Windows itself, by editing the registry. Be careful, and learn about how to edit the registry before you try it. Make sure you backup the Windows registry first. You should not attempt this method unless you have no other options.
Windows, and a lot of programs, track where programs are installed via the Windows registry. It is possible to manually adjust the registry to fix broken programs. Keep in mind that there could be dozens of registry entries you need to edit. A program like GIMP can have registry entries for the context menu, for the "Open With" menu, for any file associations, and for the location of its executables. Other programs may only have a few entries related to where it is installed.
If you're not deterred, here's how you do it.
First, you need to know where the program was previously installed. In this case, the program was installed to the "D:\GIMP 2" folder, and the executables were found the "D:\GIMP 2\bin" sub-folder. It is now located at "J:\GIMP 2" instead.
We need to update the registry to reflect the change in location. Click the Start button, type "regedit" into the search bar, right-click Regedit, and click "Run as administrator."
In Regedit, hit Ctrl+F to bring up a search window. Type in the old location for the program you're trying to fix --- "D:\GIMP 2" for our example --- then click "Find Next."
Once Regedit has found something with "D:\GIMP 2" as part of a path, it'll show it to you. Here is an example from the GIMP search.
To actually change them, double click the name of the registry entry you want to modify. Then change the drive letter to J, or whatever you chose. If you didn't otherwise move the folder, leave the rest of the path alone. Then click "Ok."
You'll need to repeat this multiple times. To find the next result using your search term, you can hit the F3 key. There will be a popup once you've found all of the entries.
Changing drive letters can be a simple way to customize your PC. Do it before you install anything on the drive, however. You'll prevent any problems before they occur, and probably save yourself quite a bit of troubleshooting.
This browser is no longer supported.
Upgrade to Microsoft Edge to take advantage of the latest features, security updates, and technical support.
Change a drive letter
- 4 contributors
Applies To: Windows 11, Windows 10, Windows Server 2022, Windows Server 2019, and Windows Server 2016
If you want to change a drive letter assigned to a drive, or you have a drive that doesn't yet have a drive letter, use Disk Management to change it. You can also mount the drive in an empty folder so that it appears as a folder. For more information, see Mount a drive in a folder .
If you change the drive letter of a drive that already contains Windows or apps, apps might have trouble running or finding the drive. We suggest not changing the drive letter of a drive that already contains Windows or apps.
The following steps show how to change the drive letter.
Open Disk Management with administrator permissions.
In Disk Management, select and hold (or right-click) the volume on which you want to change or add a drive letter and select Change Drive Letter and Paths .

If you don't see the Change Drive Letter and Paths option or it's grayed out, the volume either isn't ready to receive a drive letter or it's unallocated and needs to be initialized . It might also be that the drive isn't accessible, which is the case with EFI system partitions and recovery partitions. If you've confirmed that your volume is formatted with a drive letter that you can access but you're still unable to change it, that's beyond the scope of this article. We suggest contacting Microsoft Support or the manufacturer of your PC for more help.
To change the drive letter, select Change . To add a drive letter if the drive doesn't already have one, select Add .

Select the new drive letter and choose OK . Then select Yes when prompted about how programs that rely on the drive letter might not run correctly.

Coming soon: Throughout 2024 we will be phasing out GitHub Issues as the feedback mechanism for content and replacing it with a new feedback system. For more information see: https://aka.ms/ContentUserFeedback .
Submit and view feedback for
Additional resources
How to assign permanent letters to drives on Windows 10
You can assign drive letters manually, and in this guide, we show you how on Windows 10.

On Windows 10, when connecting a removable storage device or an internal hard drive, the system detects and assigns a drive letter automatically to make it usable. However, when reconnecting an external drive (such as a USB flash drive or SD or microSD cards), the system can end up assigning a different letter, which can be annoying.
If you want to see the same drive letter on a particular device, you can manually assign a permanent letter to any drive connected to your computer, and on Windows 10 , you can do this in at least three different ways, using Disk Management, Command Prompt, or PowerShell.
Using this approach will prevent Windows 10 from assigning a new letter or trying to set a letter already in use, which can cause conflicts. Also, it helps to select a drive letter that makes more sense to you.
In this Windows 10 guide, we walk you through several methods to manually assign a permanent letter to a drive, as long as you're connecting the drive to the same device and the letter isn't already in use.
How to assign a drive letter using Disk Management
How to assign a drive letter using command prompt, how to assign a drive letter using powershell.
To manage drive letters with the Disk Management tool, use these steps:
- Open Start .
- Search for Create and format hard disk partitions and click the top result to open the Disk Management experience.
- Right-click the drive and select the Change Drive Letter and Paths option.

- Click the Change button.

- Select the Assign the following drive letter option.
- Use the drop-down menu to assign a new drive letter. Quick tip: To avoid the system trying to assign the same letter to another drive, it's a good idea to start adding letters in backward order. For instance, instead of using D, E or F, it better to start with Z, Y or X when assigning a new letter.

- Click the OK button.
- Click the OK button again.
Once you complete these steps, the drive will permanently retain the assigned letter, even after reconnecting it. However, if you connect the drive to another device, it may receive a different letter.
While the easiest way to assign a new drive letter is to use Disk Management, you can also use DiskPart in Command Prompt to perform the same task.
Get the Windows Central Newsletter
All the latest news, reviews, and guides for Windows and Xbox diehards.
To assign a drive letter using Command Prompt, use these steps:
- Search for Command Prompt , right-click the result, and then select the Run as administrator option.
- Type the following command to start DiskPart and press Enter : diskpart
- Type the following command to list all the available volumes and press Enter : list volume
- Type the following command to select the volume (drive) to assign a new letter and press Enter: select volume 3 In the command, make sure to change "3" to the number that represents the drive on your device.
- Type the following command to assign a new drive letter, and press Enter : assign letter=Z The command assigns the letter "Z" to the drive assuming it's available. However, you need to make sure to change the letter for the one that you want to use.

After completing these steps, similar to Disk Management, every time you reconnect the storage to the same device, Windows 10 should assign the same letter automatically.
Alternatively, you can also use PowerShell to change a drive letter on Windows 10 using these steps:
- Search for PowerShell , right-click the result, and then select the Run as administrator option.
- Type the following command to list the available drives and press Enter : Get-Disk
- Type the following command to assign a permanent letter to the drive and press Enter : Get-Partition -DiskNumber 1 | Set-Partition -NewDriveLetter Z In the command, make sure to change "1" to the number that represents the drive that you want to modify, and change "Z" for the new letter that you want to use.

Once you complete the steps, the drive will be accessible through File Explorer using the letter that you assigned, and Windows 10 won't try to change it.
Updated March 7, 2019: We revised this guide to make sure it's current with the latest version of Windows 10.
More Windows 10 resources
For more helpful articles, coverage, and answers to common questions about Windows 10, visit the following resources:
- Windows 10 on Windows Central – All you need to know
- Windows 10 help, tips, and tricks
- Windows 10 forums on Windows Central

Mauro Huculak is technical writer for WindowsCentral.com. His primary focus is to write comprehensive how-tos to help users get the most out of Windows 10 and its many related technologies. He has an IT background with professional certifications from Microsoft, Cisco, and CompTIA, and he's a recognized member of the Microsoft MVP community.
- 2 DesktopGPT brings GPT-3.5 Turbo, GPT-4, and GPT-4 Turbo to Windows 11's backyard, potentially giving Microsoft's Copilot AI a run for its money as the best alternative
- 3 Clippy, the infamous paperclip, is here to debloat Windows 11 and save you from ads
- 4 Microsoft says most company execs won't hire anyone without an AI aptitude, prompting "a 142x increase in LinkedIn members adding AI skills like Copilot and ChatGPT to their profiles"
- 5 World of Warcraft Dragonflight's final major update, Patch 10.2.7 "Dark Heart", is now available
How to assign drive letter to an SSD in Windows
When we install a new SSD it may be not be directly recognized by Windows . If this happens to you, do not worry, it is something that happens frequently and that we can solve in a very simple way.
However, please note that if the unit It is not identified in the BIOS of your motherboard, it is likely that you have a configuration problem, or that the unit is even defective.
In this article we are going to explain how to assign a drive letter to an SSD in Windows , assuming that said unit is properly recognized by the BIOS and that it does not cause any problems. The steps we must follow are very simple:

- We go to the taskbar and right click on the Windows icon. We choose the “Disk Manager” option.
- In the pop-up window that will have appeared, we go to the SSD unit to which we want to assign the drive letter, right-click on it and choose the option “change drive letter and paths”.
- The next step is to click on “change” if we want to change the letter that the SSD drive already had, or “add” in case it still did not have any drive letter assigned.
- We choose the new drive letter that we want to use, accept and that’s it. Keep in mind that a drive letter change may affect the proper functioning of previously installed programs, so we may be forced to reinstall them.
If you have problems and Windows does not recognize your storage unit, do not worry, follow the steps that you will find in this article and that They will help you solve this problem. If none of them work for you, and you have made sure that the configuration is correct, it is most likely that the SSD is defective, and you will have to process the guarantee in case it is still valid.
- Moms carried the wrong baby in their bellies; this is the amazing nightmare story
- “We value the agility, responsiveness and quality that Lenovo offers us.”
- The behavior of workers influences the development of certain skills
- Synology chooses Clara Sauri as new Product Manager for Spain and Portugal
- How can reviews help improve the visibility of your business on the Internet?
- Zscaler strengthens its integrations with CrowdStrike to improve security
Do you like stuff like this?
Subscribe to our mailing list to get the new updates, related articles.

Problems for Meta: Facebook slows its growth and loses daily active users

Meep, Vianova and Dashfactory will launch a pilot project in three European cities

Visa Innovation Program announces the fintech companies that will participate in its first edition in Spain

Microsoft fixes Wi-Fi bugs on Surface Laptop 3 and updates Surface Book 2 and Surface Laptop 2
Leave a reply cancel reply.
Your email address will not be published. Required fields are marked *
Save my name, email, and website in this browser for the next time I comment.

How to format and assign a drive letter to a SSD

You can buy a range of M.2 NGFF SSD Card from https://droix.net/collections/hardware-components
When you purchase a HDD or SSD storage, it will usually be unformatted and unassigned a drive letter. This will result in it not being immediately visible on your PC. You can quickly assign a drive letter and format it to your preferred format by following the below step by step guide.
Install the HDD or SSD as per your motherboard and drive instructions.
Right click on the Windows Start button, and choose Disk Management
You should now see an unallocated/unformatted drive, it may be the second or third drive etc depending on how many storage devices you have on your PC, so you may need to scroll down the list.
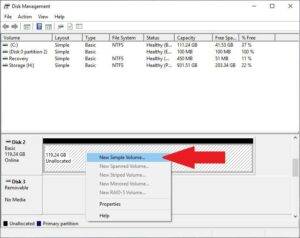
Please be 100% sure you have identified the correct drive. Left click on the unallocated/unformatted area of the drive to highlight it.
Right click the same area to bring up a menu. Choose New Simple Volume .
A pop up window will appear where you can alter the settings if you wish to. In most cases you can leave them as default unless you wish to change the recommended drive letter, or name the SSD by changing the Volume Name. Make any necessary changes and click Finish to begin the format and drive letter assign.
Once the process is complete, your drive will be assigned a drive letter and formatted to your preference.
You can now use your drive.
Continue reading
Home » Tech Tips » Windows » How to Assign or Change Drive Letter in Windows 11?
How to Assign or Change Drive Letter in Windows 11?
Windows by default uses C drive (C:) for hosting system and application files. You can choose different drives like D: instead of C: while installing Windows on your computer. Similarly, it is also possible to manually change the installed app’s location , though generally users install apps on C: drive. Did you anytime think of changing the existing drive letters in your system? Here is how you can do that in Windows 11 PC.
Default Drive Name Assignments in Windows 11
Let us say, you have two partitions C: and D: volumes on your hard disk. Here is how the default drive letter assignment in Windows work:
- A: – floppy disk drive for IBM computers (obsolete)
- B: – floppy drive for MS-DOS and Windows computers (obsolete)
- C: – Windows and app installation files
- D: – storage space partition
- E: – the letter after your storage partition for CD drive (if CD/DVD drive is available)
- F: onwards – removable storage disks like USB and external hard disks
When you have more partitions on the hard drive, system will use the next drive letters like E: or F: when you insert an external drive. For example, when you have C: and D: drives on your hard disk and insert an USB drive , it will take the letter E: or later.
Changing Drive Letters in Windows 11
It is not necessary to live with the assigned drive letters forever on your system. You can either reduce / increase the drive’s space and assign new letters or simply change an existing drive’s letter. For example, you have 400GB D: drive which you can simply change to F: drive. Alternatively, you can divide it into 200GB + 200GB drives and name them as G: and H: drives.
Windows 11 makes it easy to change the drive letters from the Settings app without using registry or changing system files. However, you can also do the same from Computer Management as with the case in Windows 10 .
1. Change Drive Letter from Windows 11 Settings
If you want to change the assigned drive letters for any partition on your hard disk except C drive then this is the option you should proceed with.
- Press “Win + I” keys or use Windows Search to find Windows Settings app.
- Once you are in the Settings app, go to “System” tab and then click on “Storage” option.

- Go down to the bottom of the “Storage” settings section and click on “Advanced storage settings” available under “Storage management” section.

- This will expand the section and click on “Disks & volumes” option.

- The “Disks and volumes” section will show all your existing drives and click on the one you want to change the letter name. it will show two buttons – “Explore” and “Properties” and click on the “Properties” button.

- On the next screen, you can see the buttons for “Change label” and “Change drive letter”.

- Click “Change drive letter” button and select your favorite letter from the dropdown to assign.

The dropdown will show all letters except C: and the current volume. In the above example, we want to change the D: drive and the system shows A to Z letters except C and D. Since D is the current volume, it is not shown in the list. But C is not shown because it is a system volume partition and you cannot change the drive letter for C. You will not see “Change drive letter” button when selecting properties of C drive. However, you can assign A and B for drive letters which were once reserved only for floppy disks. Since floppy disk is obsolete Windows allows you to assign those reserved drive letters A and B also.
2. Change Drive Letter from Disk Management in Windows 11
Though changing drive letter is easy with Windows Settings, it does not allow changing C drive letter. You can use Disk Management app for changing any drive letter with additional features.
- Press “Win + R” keys to Run prompt .
- Type compmgmt.msc and press “OK” button.

- This will open Computer Management app and select “Disk Management” from the sidebar available under “Storage” section.
- You will see all the drives available on your computer and select C or D or any drive that you want to assign a new letter.
- Go to “Action > All Tasks > Change Drive Letter and Paths…” menu.

- On the pop-up that appears, click on “Change…” button.

- Click on the dropdown against “Assign the following drive letter:” option.
- Select your favorite letter and click “OK” button.

Here you will see all the drive letters except D which is already assigned to another partition volume on the hard disk. Though it is possible to change drive letter for C, we do not recommend as it can affect the installed programs on your computer. Most programs by default install under “Program Files” section in C drive. Changing the drive letter may affect the installed programs and they may stop working. In such a case, you need to uninstall and reinstall the program on the new drive again. This will be a big task if multiple programs stopped working. Therefore, choose the system drive when you clean install Windows first time and stick with that. If you are using preinstalled Windows on C drive, then continue to use that without changing. You can change all other drives using Disk Management or Windows Settings app.
If you want to create parition, select the volume and right click on it. From the menu, select “Shrink Volume” option and select the reduced size for your volume. The remaining size will become unallocated for which you can assign a new label and letter as explained above. Learn more about how to create disk paritions in Windows computer .
Assigning Drive Letter to Removable Disks
As mentioned, Windows will assign the available drive letter for removable disks after the current partition volumes. The problem is when you have multiple removable disks, the assigned letters will change every time which may confuse you. The good part is that you can assign a drive letter as explained above for your removable USB or external hard disk. Windows will remember the assigned letter and use the same whenever you insert the external drive. However, make sure to use the letters clearly away from the current and CD/DVD drives. For example, you can use X or Y or even A or B which are generally not assigned.
About Editorial Staff
Editorial Staff at WebNots are team of experts who love to build websites, find tech hacks and share the learning with community.
You also might be interested in

Fix USB Device Not Working in Windows 10?
Most of the consumer electronic devices and the PC are[...]

10 Ways to Improve iPhone Battery Life
One of the biggest problems with smartphones is that they[...]

How to Find and Cleanup Junk Files in Mac Catalina?
Mac will work with blazing speed for few months after[...]
DOWNLOAD EBOOKS
- SEO Guide for Beginners
- WordPress SEO PDF Guide
- Weebly SEO PDF Guide
- Alt Code Emoji Shortcuts PDF
- Free ALT Code Shortcuts PDF
- View All eBooks
TRENDING TECH ARTICLES
- 600+ Windows Alt Codes for Symbols
- Fix Chrome Resolving Host Problem
- Fix Slow Page Loading Issue in Google Chrome
- View Webpage Source CSS and HTML in Google Chrome
- Fix Safari Slow Loading Pages in macOS
- Fix Windows WiFi Connection Issue
- ROYGBIV or VIBGYOR Rainbow Color Codes
- Fix I’m Not A Robot reCAPTCHA Issue in Google Search
- Structure of HTTP Request and Response
POPULAR WEB TUTORIALS
- Move WordPress Localhost Site to Live Server
- Move Live WordPress Site to Localhost
- Move WordPress Media Folder to Subdomain
- Fix WooCommerce Ajax Loading Issue
- Create a Free Weebly Blog
- Edit Weebly Source Code HTML and CSS
- Add Scroll To Top Button in Weebly
- Add Table in Weebly Site
- How to Add Advanced Data Table Widget in Weebly?
- Up to $500 Free Google Ads Coupon Codes
FREE SEO TOOLS
- Webpage Source Code Viewer
- HTTP Header Checker
- What is My IP Address?
- Google Cache Checker
- Domain Age Checker Tool
- View All Free Web and SEO Tools
© 2024 · WebNots · All Rights Reserved.
Type and press Enter to search
TechRepublic
Account information.

Share with Your Friends
How to assign a drive letter in Windows 10
Your email has been sent

When you connect a new drive to your PC, Windows automatically assigns the next available letter after C, which is normally used for your system drive. So an external hard drive or USB thumb drive could end up as D, E, F, or whatever, depending on how many drive letters are already being used.
This is all well and good, but what if you want to assign the drive a letter? Maybe you want to use M for your music files or X for your top-secret X-Files. Here’s how in Windows 10.
- Ensure that the drive you’re relettering isn’t in use and that no files from that drive are open.
- Right-click on the Start button.
- Click Disk Management to open the Disk Management console.
- Right-click the volume that has the drive letter you want to change.
- Click Change Drive Letter And Paths.
- Click the Change button.
- Choose from a list of available drive letters. (Don’t use A or B, which have historically been reserved for floppy drives and can sometime confuse older software.)
- Click Yes if a popup windows appears asking if you really want to do this.
- Close the Disk Management console.
You may need to restart your machine for the change to take effect, but once you do the drive will use the new letter.
More Windows tips…
- How to turn on or off hibernate in Windows 10
- Regain hard disk space by using Windows Update Cleanup in Windows 7 and 8.x
- Restore a Windows XP backup in Windows 8
- How to replace SkyDrive with Libraries in Windows 8.1
- Pro tip: Use an optical Recovery Drive in Windows 8.1
Subscribe to the Developer Insider Newsletter
From the hottest programming languages to commentary on the Linux OS, get the developer and open source news and tips you need to know. Delivered Tuesdays and Thursdays
Create a TechRepublic Account
Get the web's best business technology news, tutorials, reviews, trends, and analysis—in your inbox. Let's start with the basics.
* - indicates required fields
Sign in to TechRepublic
Lost your password? Request a new password
Reset Password
Please enter your email adress. You will receive an email message with instructions on how to reset your password.
Check your email for a password reset link. If you didn't receive an email don't forgot to check your spam folder, otherwise contact support .
Welcome. Tell us a little bit about you.
This will help us provide you with customized content.
Want to receive more TechRepublic news?
You're all set.
Thanks for signing up! Keep an eye out for a confirmation email from our team. To ensure any newsletters you subscribed to hit your inbox, make sure to add [email protected] to your contacts list.
Search Our Support Knowledge Base
Steps to change a drive letter in windows.
Windows will automatically assign a drive letter. Drive letters can be changed using Disk Management.
Windows 11 and 10
- Right-click the Start button.

Disk Management will display a warning Some programs that rely on drive letters might not run correctly. Check other programs and change the drive letter to the new one.. View the Use of Third-Party Software or Websites disclaimer. Western Digital Support cannot help with third-party software or hardware.

Return to Top
Related Answers
- How to Change USB Flash and External Drive Letter Assignment on Windows Guided Assist
- Wireless Flash Drive: Not Detected on Windows
- Instructions to Format a Memory Card on Windows
- My Cloud: Not Working with ipv6 Address Assignment
- Resolve 'Device Has Already Been Setup' Message on My Cloud Home and ibi
Please rate the helpfulness of this answer
How to change drive letter on Windows 11
Here are four ways to assign a different letter to a drive on Windows 11.

On Windows 11 , a “drive letter” is automatically assigned to each internal storage, USB drive, DVD drive, and map network drive to identify the volume and make it available on File Explorer or other applications. However, you can change the drive letter to anything you want without deleting the data on the storage. For instance, if you want a drive to use a specific letter related to the content, or the system tries to assign a letter already in use, preventing the storage from appearing on File Explorer and apps.
Whatever the reason, on Windows 11, you can assign a different drive letter in at least four ways using the Settings app, Disk Management, Command Prompt, and PowerShell.
A drive letter (or device letter) can be any character from the English alphabet. However, you cannot use the “C:” because it’s reserved for the main storage that contains the installation. Also, “A:” and “B:” are reserved letters that used to be assigned automatically to floppy drives.
This guide will teach you how to assign a new drive letter on Windows 11.
Change drive letter on Windows 11
- Change drive letter from Disk Management on Windows 11
Change drive letter from Command Prompt on Windows 11
Change drive letter from powershell on windows 11.
To change the drive letter on Windows 11, use these steps:
Open Settings on Windows 11.
Click on System .
Click the Storage tab.
Under the “Storage management” section, click the “Advanced storage settings” option.
Click on Disks & volumes .

Select the drive with the volume with the letter to change.
Select the volume and click the Properties button.

Click the “Change drive letter” button.

Select the new drive letter for the device connected to Windows 11.

Click the OK button.
Once you complete the steps, the system will change the drive’s letter on Windows 11.
Change drive letter from Disk Management
To change the drive letter with Disk Management, use these steps:
Open Start .
Search for Create and format disk partitions and click the top result to open the Disk Management tool.
Right-click the volume and select the “Change Drive Letter and Paths” option.

Click the Change button.

Select the “Assign the following drive letter” option.
Choose a different letter for the drive.

Click the OK button again.
After completing the steps, the drive will appear in File Explorer with the new letter.
To add a new drive letter with Command Prompt, use these steps:
Search for Command Prompt , right-click the result, and select the Run as administrator option.
Type the following command to launch diskpart and press Enter :
Type the following command to list the volumes and press Enter :
Type the following command to select the volume (drive) to change the letter and press Enter :
In the command, change “2” for the number corresponding to the storage you want to change the letter.
Type the following command to change the drive letter on Windows 11 and press Enter :
In the command, change “H” for the letter you want to use with the drive.

Once you complete the steps, the diskpart tool will assign the new letter to the storage.
To change a Windows 11 drive letter with PowerShell, use these steps:
Search for PowerShell , right-click the result, and select the Run as administrator option.
Type the following command to identify the hard drive to change the letter and press Enter :
Type the following command to assign or change the drive letter to internal or external and press Enter :
In the above command, change “0” with the disk number of the drive you want to format and “F:” with the letter you wish to assign to the storage.

After completing the steps, the drive will have a new letter assignment. If the drive was previously missing, it will appear in File Explorer.

Mauro Huculak is a Windows How-To Expert who started Pureinfotech in 2010 as an independent online publication. He has also been a Windows Central contributor for nearly a decade. Mauro has over 14 years of experience writing comprehensive guides and creating professional videos about Windows and software, including Android and Linux. Before becoming a technology writer, he was an IT administrator for seven years. In total, Mauro has over 20 years of combined experience in technology. Throughout his career, he achieved different professional certifications from Microsoft (MSCA), Cisco (CCNP), VMware (VCP), and CompTIA (A+ and Network+), and he has been recognized as a Microsoft MVP for many years. You can follow him on X (Twitter) , YouTube , LinkedIn and About.me . Email him at [email protected] .
- How to upgrade Windows 7 to Windows 10 using clean install process
- How to reset Settings app on Windows 10
We hate spam as much as you! Unsubscribe any time Powered by follow.it ( Privacy ), our Privacy .
How To Partition A New SSD Windows 10

- How-To Guides
- Tech Setup & Troubleshooting

Introduction
Welcome to the world of SSDs! If you’ve recently purchased a new SSD for your Windows 10 system, you might be wondering how to partition it effectively. Partitioning your SSD allows you to organize and manage your data more efficiently, leading to improved performance and easier file management.
In this article, we will guide you through the process of partitioning a new SSD in Windows 10. We will cover everything from preparing for partitioning, checking SSD compatibility , and backing up your data, to actually partitioning the SSD using Windows’ built-in Disk Management tool.
Partitioning your SSD is a crucial step, as it allows you to divide the storage space into separate sections called partitions. Each partition behaves as its own independent entity, enabling you to store different types of data, install multiple operating systems, or create a dedicated space for system files and programs.
Before we delve into the details of the partitioning process, it is important to emphasize the significance of preparing your system for this task. Partitioning involves modifying disk structures, and it is always recommended to back up your data before proceeding to avoid any potential data loss. Additionally, ensuring compatibility of your SSD with your Windows 10 system is crucial to ensure a smooth partitioning process.
So, without further ado, let’s begin our journey to partitioning a new SSD in Windows 10. By the end of this article, you’ll have the knowledge and confidence to effectively manage the storage space on your SSD.
Preparing for Partitioning
Before diving into the partitioning process, there are a few crucial steps you need to take to ensure a smooth and successful experience. These steps include checking SSD compatibility, backing up your data, and creating a bootable USB.
The first step is to verify the compatibility of your SSD with your Windows 10 system. SSDs are generally compatible with modern operating systems, but it’s always a good idea to double-check. Consult the manufacturer’s documentation or website for specific information about compatibility with Windows 10.
Once you’ve confirmed SSD compatibility, the next step is to back up your data. Partitioning involves modifying disk structures, and there is always a risk of data loss. Creating a backup ensures that your valuable files and documents are safe in case anything goes wrong during the partitioning process.
There are several options for backing up your data. You can use external hard drives, cloud storage services, or even create a disk image. Choose the method that suits your needs and preferences, and make sure to include all the necessary files and folders.
In addition to backing up your data, it’s also essential to create a bootable USB drive. This will allow you to access advanced troubleshooting options and utilities in case any issues arise during the partitioning process.
To create a bootable USB, you’ll need a blank USB drive and a Windows 10 ISO file. You can download the ISO file from the official Microsoft website or use a third-party tool to create it. Once you have the ISO file, use a tool like Rufus to create the bootable USB drive.
With your SSD compatibility checked, your data backed up, and a bootable USB created, you are now ready to proceed with partitioning your new SSD. In the next section, we will guide you through the necessary steps using Windows’ built-in Disk Management tool.
Checking SSD Compatibility
Before you begin partitioning your new SSD in Windows 10, it is essential to ensure that your SSD is compatible with your system. While SSDs are generally compatible with modern operating systems, performing a compatibility check can help you avoid any potential issues or complications during the partitioning process.
To check the compatibility of your SSD, you can start by consulting the manufacturer’s documentation or visiting their website. Look for information specifically related to your SSD model and its compatibility with Windows 10. The manufacturer may provide notes or compatibility lists that detail the supported operating systems for your SSD.
If you’re unable to find the information you need from the manufacturer, you can also look for user forums, online communities, or tech support websites where others might have shared their experiences with your particular SSD model. These resources can offer valuable insights and feedback from users who have already tested the compatibility of the SSD with Windows 10.
Another helpful resource is Microsoft’s official website, where you can find a list of compatible hardware for Windows 10. Check if your SSD model is listed as a compatible device for Windows 10. If it is, you can proceed with confidence knowing that your SSD is officially supported by the operating system.
Additionally, it’s a good idea to ensure that your Windows 10 system is up to date with the latest updates and drivers. This can help ensure optimal compatibility between your SSD and the operating system. Check for updates through the Windows Update settings and install any available updates for your system.
By performing a thorough compatibility check for your SSD and ensuring that your Windows 10 system is up to date, you can proceed with peace of mind, knowing that your SSD is compatible and ready for partitioning. With compatibility confirmed, you can now move on to the next crucial step, backing up your data.
Backing Up Data
Before you embark on the partitioning process for your new SSD in Windows 10, it is crucial to back up your data. Partitioning involves modifying disk structures, and there is always a risk of data loss. By creating a backup of your important files and documents, you can protect yourself from potential mishaps and ensure that your data remains safe throughout the partitioning process.
There are several methods you can use to back up your data, depending on your preferences and available resources. One option is to use an external hard drive or SSD to create a clone or copy of your entire system. This method provides a complete backup, including the operating system, applications, and files.
Another option is to utilize cloud storage services such as Google Drive, Dropbox, or Microsoft OneDrive. These services offer convenient and secure storage for your files, allowing you to access them from anywhere and ensuring that they are safely backed up in case of any unforeseen issues during partitioning.
If you prefer a more manual approach, you can selectively back up your important documents, photos, videos, and other files to an external storage device or cloud storage. This method allows you to choose specific files and folders to back up, saving time and storage space.
In addition to backing up your personal data, it is important to note that you might need to reinstall certain applications after partitioning your SSD. Make a note of the applications you currently have installed on your system to ensure that you can easily reinstall them later.
Regardless of the method you choose, it is essential to verify that your backup is complete and accessible. Double-check that all of your important files and folders are included in the backup and that you can restore them if needed. This step will give you peace of mind and confidence as you move forward with the partitioning process.
Remember, creating a backup of your data is an essential precautionary measure before partitioning your new SSD in Windows 10. By taking the time to safeguard your valuable files and documents, you can minimize the risk of data loss and ensure a smooth transition to your newly partitioned SSD.
Creating a Bootable USB
Creating a bootable USB drive is an important step when preparing to partition your new SSD in Windows 10. This will enable you to access advanced troubleshooting options and utilities in case any issues arise during the partitioning process.
To create a bootable USB drive, you will need a blank USB drive with sufficient storage capacity and a Windows 10 ISO file. You can obtain the Windows 10 ISO file from the official Microsoft website or use a reliable third-party source.
Once you have the ISO file, you can use a variety of tools to create your bootable USB drive. One popular tool is Rufus, a free and intuitive software that simplifies the process.
Here’s a step-by-step guide to create a bootable USB using Rufus:
- Insert your USB drive into your computer.
- Launch Rufus and select your USB drive from the “Device” dropdown menu.
- Choose the Windows 10 ISO file by clicking the “Select” button next to the “Boot selection” section.
- Ensure that the partition scheme is set to “MBR” (Master Boot Record) if your system uses legacy BIOS, or “GPT” (GUID Partition Table) for UEFI-based systems.
- Leave the other settings at their default values, unless you have specific requirements.
- Click the “Start” button to begin the process. Rufus will format the USB drive and copy the Windows 10 ISO file to create a bootable USB.
Once the process is complete, you will have a bootable USB drive ready for use. Before proceeding with the partitioning of your new SSD, make sure to keep the bootable USB drive in a safe and easily accessible place.
By creating a bootable USB drive, you have an additional layer of security and flexibility during the partitioning process. It allows you to access advanced troubleshooting options and utilities if needed, ensuring a smooth partitioning experience with your new SSD.
Partitioning the SSD
Now that you are prepared with a compatible SSD, have backed up your data, and created a bootable USB drive, it’s time to dive into the partitioning process for your new SSD in Windows 10. Windows provides a built-in tool called Disk Management that allows you to partition your SSD easily.
Follow these steps to partition your SSD:
- Connect your new SSD to your computer. Ensure that it is recognized and accessible.
- Open the Windows Start menu and search for “Disk Management”. Click on the “Create and format hard disk partitions” option from the search results.
- In the Disk Management window, locate your SSD. It should be labeled with its total storage capacity.
- Right-click on the SSD and select “Shrink Volume”. This will adjust the existing partition size to create unallocated space that can be used for new partitions.
- In the Shrink dialog, enter the amount of space you want to shrink from the existing partition. This will determine the size of the new partition. Keep in mind that the space is measured in megabytes (MB).
- Click the “Shrink” button to start the shrinking process. Once completed, you will see unallocated space on your SSD.
- Right-click on the unallocated space and select “New Simple Volume”. This will launch the New Simple Volume Wizard.
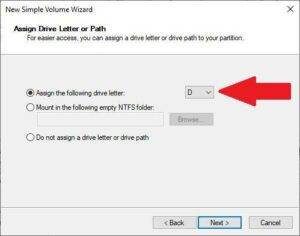
- Follow the prompts in the wizard to specify the size, drive letter, and file system for the new partition. You can choose a drive letter that is not already in use and select the file system as NTFS for optimal compatibility.
- After completing the wizard, the new partition will be created and assigned a drive letter. You can now access and use the partition.
Repeat the above steps if you want to create additional partitions on your SSD. Each partition will have its own allocated space and can be formatted and managed independently.
It is important to note that partitioning your SSD will result in the loss of any data on the drive. Therefore, it is crucial to back up your data before proceeding and ensure that you are partitioning the correct drive.
With the partitioning process complete, you now have a newly partitioned SSD ready to be utilized for your specific needs. The partitions are independent entities, allowing you to organize and store your data more efficiently on your Windows 10 system.
Accessing Disk Management
To begin the partitioning process for your new SSD in Windows 10, you will need to access the Disk Management tool. Disk Management is a built-in utility that allows you to manage and modify disk partitions on your computer.
Follow these steps to access Disk Management:
- Open the Windows Start menu and search for “Disk Management”. Click on the “Create and format hard disk partitions” option from the search results. This will open the Disk Management window.
- In the Disk Management window, you will see a list of all the storage devices connected to your computer, including your new SSD. Each device will be labeled with its total storage capacity.
- Locate your new SSD in the list. It should be displayed with its corresponding drive letter and capacity.
- To view the existing partitions on your SSD, right-click on the SSD and select “Properties”. This will display detailed information about the drive, including the current partition layout and available free space.
Alternatively, you can access Disk Management directly by following this method:
- Press the Windows key + R to open the Run dialog box.
- Type “diskmgmt.msc” into the Run dialog and press Enter. This will open the Disk Management tool directly.
Once you have accessed Disk Management, you can proceed with the partitioning process for your new SSD by following the steps outlined in the previous section.
It’s important to note that you may need administrative privileges to access and make changes in Disk Management. If prompted, provide the necessary permissions to continue.
By accessing Disk Management, you have gained access to a powerful tool that allows you to manage and modify disk partitions on your Windows 10 system. With Disk Management, you can create, delete, resize, and format partitions, all from one convenient interface.
Now that you know how to access Disk Management, you’re one step closer to effectively partitioning your new SSD and taking full control of your storage space in Windows 10.
Shrink the Volume
Before creating new partitions on your new SSD in Windows 10, you need to shrink the existing volume to free up unallocated space. This can be done using the Disk Management tool, allowing you to allocate space for new partitions without affecting the existing data.
Follow these steps to shrink the volume:
- Access the Disk Management tool as described in the previous section.
- In the Disk Management window, locate your SSD with the existing volume you want to shrink. It will be labeled with its drive letter and total storage capacity.
- Right-click on the volume and select “Shrink Volume”. The system will analyze the drive and calculate the maximum amount of space available to shrink.
- In the Shrink dialog box, you will see the total size of the volume and the amount of space that can be shrunk in megabytes (MB).
- By default, the dialog box will show the maximum amount of space available to shrink. However, you can enter a smaller value if desired.
- Review the values and ensure that the space you are shrinking is appropriate for your needs. Keep in mind that this space will become unallocated and can be used for creating new partitions.
- Click the “Shrink” button to start the shrinking process. Windows will adjust the size of the existing volume and create unallocated space.
- After the process is completed, you will see the unallocated space on your SSD. This space is now available for creating new partitions.
It is important to note that the shrinking process may take some time, depending on the size of the volume and the available free space. Be patient and avoid interrupting the process to ensure a successful operation.
By shrinking the existing volume, you have created unallocated space on your SSD that can be used to create new partitions. This will allow you to better organize and manage your data, improving overall performance and storage efficiency.
With the volume shrunk and unallocated space available, you can now proceed to the next steps of creating new partitions using the Disk Management tool.
Create New Partition
After shrinking the volume and generating unallocated space on your new SSD in Windows 10, you can proceed to create new partitions to utilize the available space effectively. The Disk Management tool provides an easy and straightforward method for creating new partitions.
Follow these steps to create a new partition:
- Access the Disk Management tool as described earlier.
- Locate the unallocated space on your SSD. It will be labeled as “Unallocated” and displayed next to your SSD’s drive letter and total storage capacity.
- In the wizard, click the “Next” button to begin the process.
- Specify the size for the new partition. The wizard will show the maximum and default size based on the available unallocated space. You can enter a custom size if desired.
- Assign a drive letter to the partition. Choose a letter that is not currently in use by any other drive on your system.
- Select the file system for the new partition. The default and recommended file system for Windows 10 is NTFS, which provides optimal compatibility and features.
- Enter a volume label for the new partition. This label will be displayed as the name of the partition in Windows Explorer.
- Check the “Perform a quick format” box if desired. This option allows for faster partition formatting but skips the process of scanning the partition for bad sectors.
- Click the “Next” button and review the summary of the new partition settings.
- Click the “Finish” button to create the new partition. The Disk Management tool will format the partition and assign the specified settings.
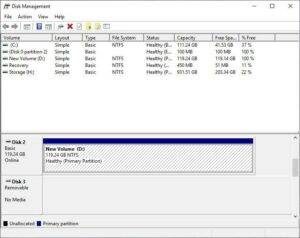
Once the process is complete, the new partition will be visible in the Disk Management tool, along with its assigned drive letter and file system. You can now start using the new partition to store and organize your data.
Repeat the above steps if you want to create additional partitions using the remaining unallocated space on your SSD.
Creating new partitions allows you to divide your SSD’s storage space into separate sections, enabling more efficient organization and management of your files and data. With the newly created partition, you can now proceed to format it and begin utilizing it according to your requirements.
Assign a Drive Letter
After creating a new partition on your SSD in Windows 10, the next step is to assign a drive letter to the newly created partition. A drive letter is a unique identifier that allows you to access and manage the partition easily through Windows File Explorer or any other file management tool.
Follow these steps to assign a drive letter to the partition:
- Launch the Disk Management tool by following the steps outlined earlier.
- In the Disk Management window, locate the newly created partition. It will be labeled as “New Volume” or “Unallocated”.
- Right-click on the partition and select “Change Drive Letter and Paths” from the context menu.
- In the “Change Drive Letter and Paths” dialog box, click the “Add” or “Change” button.
- In the next dialog box, select the “Assign the following drive letter” option if it is not already selected.
- From the dropdown menu, choose an available drive letter to assign to the partition. Make sure to select a letter that is not currently in use.
- Click the “OK” button to save the changes and assign the drive letter to the partition.
Once you have assigned a drive letter, the partition will be accessible through Windows File Explorer, and you can start using it to store and organize your files and data.
It’s worth noting that you can also change the drive letter of a partition at any time if needed. Simply access the “Change Drive Letter and Paths” dialog box again, select the partition, and choose a new drive letter from the dropdown menu.
Assigning a drive letter to your newly created partition allows for easy identification and access. You can now navigate to the partition using its assigned letter, copy or move files to and from it, and perform various operations on the partition through Windows File Explorer.
With the drive letter assigned, the partition is ready for use, and you can proceed to format it to ensure optimal performance and compatibility.
Formatting the Partition
After creating a new partition on your SSD in Windows 10 and assigning a drive letter to it, the next step is to format the partition. Formatting prepares the partition to store data by establishing a file system and organizing the storage space to ensure optimal performance.
Follow these steps to format the partition:
- Ensure that you have access to the Disk Management tool. If not, refer to the previous sections for instructions on accessing Disk Management.
- In the Disk Management window, locate the newly created partition that you want to format. It should be labeled with the assigned drive letter.
- Right-click on the partition and select “Format” from the context menu.
- In the Format dialog box, you can provide a volume label for the partition. The volume label is an optional name that you can assign to the partition for easy identification.
- Choose the desired file system for the partition. The recommended file system for Windows 10 is NTFS, which provides advanced features and compatibility.
- Ensure that the “Quick Format” option is selected. This option speeds up the formatting process by skipping the scanning for bad sectors, assuming that the disk is new and free from errors.
- Click the “OK” button to begin the formatting process. Windows will erase any existing data on the partition and create the new file system.
- Wait for the formatting process to complete. The duration will depend on the size of the partition and the speed of your SSD.
- Once the formatting is finished, you will receive a notification confirming the successful completion.
After formatting, the partition is ready to be used for storing data. You can now transfer files, install applications, and perform any other file operations on the newly formatted partition.
It’s important to note that formatting erases any existing data on the partition. Therefore, make sure to have a backup of any important files before proceeding with the formatting process.
By formatting the partition, you ensure that the file system is optimized for storing data, enhancing performance, and providing compatibility with Windows 10. With the partition now formatted, you can begin utilizing it for your specific needs and enjoy efficient data storage on your SSD.
Verifying the Partition
After creating and formatting a new partition on your SSD in Windows 10, it is important to verify that the partition has been successfully created and is functioning as intended. Verifying the partition ensures that it is accessible, properly labeled, and ready for use.
Follow these steps to verify the partition:
- Access the Disk Management tool by following the methods mentioned earlier.
- In the Disk Management window, locate the newly created partition. It should now be labeled with the assigned drive letter and the volume label, if you had provided one during the formatting process.
- Right-click on the partition and select “Properties” from the context menu to open the Properties dialog box.
- In the Properties dialog box, navigate through the different tabs to review the details of the partition. This includes information such as the file system used, the total capacity, and the amount of free space available.
- Verify that the partition displays the correct label and assigned drive letter. If you had set a volume label during formatting, ensure that it appears correctly.
- Click the “OK” button to close the Properties dialog box.
- Open Windows File Explorer, and navigate to the newly created partition by selecting it from the left sidebar under the “This PC” section.
- Confirm that you can access the partition and that you can perform basic file operations such as creating folders, copying files, and deleting files.
- As an additional verification step, you can transfer a small test file to the partition and then retrieve or modify it to ensure that changes are saved successfully.
Verifying the partition ensures that it has been created correctly and is functioning as expected. It allows you to confirm that the partition is accessible, properly labeled, and ready to be used for your data storage needs.
If you encounter any issues during the verification process, double-check your steps to ensure that you have followed the instructions correctly. If problems persist, you may need to troubleshoot further or seek expert assistance.
By verifying the partition, you can have peace of mind knowing that your new partition on the SSD is ready to store and organize your data efficiently in Windows 10.
Congratulations! You have successfully partitioned your new SSD in Windows 10. By following the steps outlined in this guide, you have transformed your SSD into a more organized and efficient storage solution. Partitioning allows you to divide the storage space into separate sections, giving you the freedom to store different types of data and optimize your system’s performance.
Remember, before starting the partitioning process, it is essential to check the compatibility of your SSD with Windows 10 and to back up your data to ensure its safety. Creating a bootable USB drive adds an extra layer of security, granting you access to troubleshooting options in case any issues arise.
Through Disk Management, you were able to shrink the volume, create new partitions, assign drive letters, and successfully format them. Verifying the partition ensured that everything was set up correctly and functional.
Now that your SSD is partitioned, you can start taking advantage of the benefits. Utilize the partitions to organize your files, separate operating systems, or create dedicated spaces for system files and programs. Remember to maintain regular backups of your important data to prevent any potential loss.
Partitioning your new SSD in Windows 10 has made it easier for you to manage your data, improve performance, and maintain an efficient file system. Enjoy the enhanced storage capabilities that your newly partitioned SSD provides!
Leave a Reply Cancel reply
Your email address will not be published. Required fields are marked *
Save my name, email, and website in this browser for the next time I comment.
- Crowdfunding
- Cryptocurrency
- Digital Banking
- Digital Payments
- Investments
- Console Gaming
- Mobile Gaming
- VR/AR Gaming
- Gadget Usage
- Gaming Tips
- Online Safety
- Software Tutorials
- Tech Setup & Troubleshooting
- Buyer’s Guides
- Comparative Analysis
- Gadget Reviews
- Service Reviews
- Software Reviews
- Mobile Devices
- PCs & Laptops
- Smart Home Gadgets
- Content Creation Tools
- Digital Photography
- Video & Music Streaming
- Online Security
- Online Services
- Web Hosting
- WiFi & Ethernet
- Browsers & Extensions
- Communication Platforms
- Operating Systems
- Productivity Tools
- AI & Machine Learning
- Cybersecurity
- Emerging Tech
- IoT & Smart Devices
- Virtual & Augmented Reality
- Latest News
- AI Developments
- Fintech Updates
- Gaming News
- New Product Launches
How to Use Email Blasts Marketing To Take Control of Your Market
Learn to convert scanned documents into editable text with ocr, related post, how to make stairs planet coaster, how to rotate camera in planet coaster, how to make a good roller coaster in planet coaster, where is the minecraft folder, how to update minecraft windows, how to update minecraft education edition, related posts.

What Partition Style For SSD Windows 10

How To Format SSD For Windows 10 Installation

How To Reformat A Solid State Drive In Windows 10

How To Format A SSD On Windows 10

How To Add A Solid State Drive To Windows 10

How To Partition An SSD Windows 10

How To Format An SSD Windows 10

How To Install Windows 10 On A New SSD Drive
Recent stories.

Top Mini Split Air Conditioner For Summer

Comfortable and Luxurious Family Life | Zero Gravity Massage Chair

Fintechs and Traditional Banks: Navigating the Future of Financial Services

AI Writing: How It’s Changing the Way We Create Content

How to Find the Best Midjourney Alternative in 2024: A Guide to AI Anime Generators

How to Know When it’s the Right Time to Buy Bitcoin
- Privacy Overview
- Strictly Necessary Cookies
This website uses cookies so that we can provide you with the best user experience possible. Cookie information is stored in your browser and performs functions such as recognising you when you return to our website and helping our team to understand which sections of the website you find most interesting and useful.
Strictly Necessary Cookie should be enabled at all times so that we can save your preferences for cookie settings.
If you disable this cookie, we will not be able to save your preferences. This means that every time you visit this website you will need to enable or disable cookies again.
How to Set Up New SSD Windows 11: A Step-by-Step Guide
Setting up a new SSD on Windows 11 is not as daunting as it sounds. In a nutshell, you’ll need to first connect the SSD to your computer, initialize it, create a new volume, format it, and finally install Windows 11. By following these steps, you’ll have your new SSD up and running in no time!
Step by Step Tutorial: Setting up a New SSD on Windows 11
Before diving into the steps, it’s important to understand that this process will prepare your new SSD to host your Windows 11 operating system. It’s like setting up a new home for your digital life – exciting, right? Let’s get started!
Step 1: Connect the SSD to your computer
Connect the new SSD to your computer using a SATA cable or an SSD enclosure if you’re using a laptop.
Connecting your SSD is the first physical step in the process. If you’re using a desktop, you’ll need to open the case and find a spare SATA port on your motherboard. For laptop users, an SSD enclosure that connects via USB will be necessary. Make sure the computer is turned off and unplugged before you start any of this to avoid any electric mishaps.
Step 2: Initialize the SSD
Once the SSD is connected, turn on your computer, go to Disk Management, and initialize the SSD.
After your computer boots up, right-click on ‘This PC’ and click ‘Manage’. In the ‘Computer Management’ window, click on ‘Disk Management’. You should see your new SSD listed there. Right-click on it and select ‘Initialize Disk’. You’ll have the choice between a Master Boot Record (MBR) or a GUID Partition Table (GPT). GPT is the more modern choice and is required for Windows 11.
Step 3: Create a new volume
Right-click on the unallocated space on your new SSD and create a new simple volume.
This step is where you carve out a space on your SSD for Windows 11 to live. The ‘New Simple Volume Wizard’ will guide you through the process. You’ll assign a drive letter, and then you can allocate the size of the volume – usually, you’ll want to use the maximum available space.
Step 4: Format the SSD
During the volume creation process, you will be prompted to format the SSD. Choose ‘NTFS’ as the file system and complete the format.
Formatting wipes the SSD clean and gets it ready for use. Make sure you select ‘NTFS’ – this file system is required for Windows 11. You can also name your drive at this step, so choose something that will make it easy to recognize like ‘Windows11SSD’.
Step 5: Install Windows 11
With the SSD now ready, you can proceed to install Windows 11 either by using a USB installation media or direct download.
You’re at the final stretch! If you have a Windows 11 installation USB, plug it in and reboot your computer. Make sure to boot from the USB by changing the boot order in the BIOS. If you don’t have a USB, you can download Windows 11 directly from Microsoft and run the installation.
After completing these steps, your new SSD should be properly set up with Windows 11 installed and ready to go. You can now enjoy the faster boot times and snappy performance that come with running your operating system on an SSD.
Tips: Getting the Most Out of Your New SSD with Windows 11
- Make sure your BIOS is updated to the latest version before starting the installation process.
- Back up any important data before beginning, as formatting your SSD will erase all data on it.
- Use a SATA 3 interface if available, as it offers faster data transfer rates for your SSD.
- Keep your old hard drive connected as a secondary storage option for files that don’t need the speed boost.
- After installation, go to your system settings and ensure that ‘TRIM’ is enabled to maintain your SSD’s performance over time.
Frequently Asked Questions
What is the difference between mbr and gpt.
MBR and GPT are partition styles. MBR is older and has limitations like a maximum of 4 primary partitions and a 2TB size limit. GPT is newer and allows for more partitions and larger disk sizes. Windows 11 requires GPT for its system disk.
Do I need to change any BIOS settings to install Windows 11?
Yes, you may need to change the boot order to boot from the USB installation media. Also, make sure Secure Boot and UEFI are enabled, as these are requirements for Windows 11.
Can I still use my old hard drive after installing Windows 11 on the SSD?
Absolutely! You can use your old hard drive as a secondary storage device for documents, photos, and other files that don’t need the speed of an SSD.
What should I do if my computer doesn’t recognize the new SSD?
Ensure that all cables are properly connected. If it’s still not recognized, check the BIOS to see if the SSD is listed there. If not, the SSD could be faulty, or the SATA port could be disabled.
How much space do I need on my SSD for Windows 11?
The minimum requirement for Windows 11 is 64GB, but for a comfortable experience, a 128GB SSD or larger is recommended.
- Connect the SSD to your computer.
- Initialize the SSD in Disk Management.
- Create a new volume on the SSD.
- Format the SSD with the NTFS file system.
- Install Windows 11 on the SSD.
There you have it, setting up a new SSD on Windows 11 is not as intimidating as it may initially appear. With the right tools and a bit of patience, you can breathe new life into your computer with a fresh Windows 11 installation on a speedy SSD. Remember, the key is to follow each step diligently, ensure your system’s BIOS is up to date, and double-check all connections. Once you’ve completed the installation, you’ll immediately notice the difference in performance. SSDs are renowned for their quick boot times and rapid data access speeds, making your computing experience more efficient and enjoyable.
As you embark on this journey of upgrading your system, keep in mind that it’s always a good idea to keep a backup of your important files. And don’t forget, with the new SSD, not only will your system be faster, but you’ll also have a more reliable storage solution that’s less prone to mechanical failure compared to traditional HDDs.
For those who are still apprehensive about diving into this process alone, there’s no shame in seeking assistance from a friend who’s more tech-savvy or even a professional. The goal is to ensure that your transition to Windows 11 on a new SSD is seamless and successful.
So, are you ready to take the leap and upgrade your computer with a new SSD running Windows 11? The performance boost is just a few steps away!

Matt Jacobs has been working as an IT consultant for small businesses since receiving his Master’s degree in 2003. While he still does some consulting work, his primary focus now is on creating technology support content for SupportYourTech.com.
His work can be found on many websites and focuses on topics such as Microsoft Office, Apple devices, Android devices, Photoshop, and more.
Share this:
- Click to share on Twitter (Opens in new window)
- Click to share on Facebook (Opens in new window)
Related Posts
- Format SSD from BIOS: A Step-by-Step Guide for Beginners
- Enabling Secure Boot on Asus Systems with Windows 11: A Step-by-Step Guide
- How to Install Windows 11 on New PC Without Operating System
- How to Turn Off Secure Boot Windows 11: A Step-by-Step Guide
- How to Enable Secure Boot Windows 11: A Step-by-Step Guide
- How to Open BIOS Windows 11: A Step-by-Step Guide
- How to Check SSD Size in Windows 10: A Step-by-Step Guide
- How to Turn on Secure Boot Windows 11: A Step-by-Step Guide
- How to Install Windows 11 on New PC: A Step-by-Step Guide
- How to Enter BIOS Without Restarting: A Step-by-Step Guide
- How to Update Your BIOS on Windows 11: A Step-by-Step Guide
- How to Dual Boot Windows 11 and Linux: A Step-by-Step Guide
- Accessing the Boot Menu in Windows 11: A Step-by-Step Guide
- How to Install Windows 11 from USB: A Step-by-Step Guide
- How Big is Windows 11 on USB? A Comprehensive Guide
- How to Install Windows 11 on a New PC: Step-by-Step Guide
- How to Access a USB Drive on the Roku 3: Step-by-Step Guide
- How to Reinstall Windows 11: A Step-by-Step Guide
- How to Clean Install Windows 11: A Step-by-Step Guide
- How to Format a USB Flash Drive to FAT32 in Windows 7: A Step-by-Step Guide
Get Our Free Newsletter
How-to guides and tech deals
You may opt out at any time. Read our Privacy Policy
Stack Exchange Network
Stack Exchange network consists of 183 Q&A communities including Stack Overflow , the largest, most trusted online community for developers to learn, share their knowledge, and build their careers.
Q&A for work
Connect and share knowledge within a single location that is structured and easy to search.
"Assign Drive Letter" v.s. "Assign Path", any differences besides the obvious?
In windows drive management, when you create a new volume you have the choice of mounting that new volume to a drive letter, or you can mount it to a folder. So if you mount it to c:\Foo, then whenever you go to c:\Foo you will be actually accessing the new volume you just created.

- logical-drive
- 1 That's news to me. Apparently real mount points have been around for a while in NTFS, here's a Microsoft Blog from 2005 which mentions - ironically - the "easy old days" when every partition had a drive letter: blogs.msdn.com/b/adioltean/archive/2005/04/16/408947.aspx – msw Jun 24, 2010 at 21:22
2 Answers 2
The situation can be even more interesting, if you choose. Not only can you choose to use a drive letter, or a mount point, you can also choose both . You can mount the partition, or even a CD/DVD, as a drive letter, M: perhaps, and on a mount point, say C:\my_cd_drive . And to really have a field day, you can use multiple mount points for a single volume. So you can mount a volume as D: , as C:\data_disk , and as C:\Users\7wp\extra_data .
There are some "gotchas," however, that can help decide whether to use a drive letter or a mount point. Multiple mount points can be useful, but having one or ten makes no difference in this issue.
The big difference between drive letter and mount point is the behavior of left-drag on files. When mounted on a drive letter, Windows sees it as going from one disk to another, and the default behavior is "copy." When you use a mount point Windows sees it within the same drive, and the default behavior is "move." In either case, when dragging a program file that Windows knows about, the default option is to create a shortcut.
Of course, these behaviors can be modified. Holding the Shift key while dragging causes Windows to move the file, the Ctrl key forces a copy and the Alt key forces Windows to create a shortcut. You can tell which option Windows will do before releasing the mouse button by looking at the icon as it is moving. If Windows will create a shortcut, then it will have the small arrow in the lower-left corner, like any other shortcut does. If it will be copied it will have a little + in the same corner, instead of the shortcut arrow. If it will be moved, nothing will be in that corner. To make life easier, you don't have to hold down the modifier key for the whole drag operation. Instead, you can drag the file, as normal, and before releasing the mouse button, look at the icon to see what it's going to do. If you want it to do something else, you can hold down the proper key before releasing the mouse button. And, you don't have to memorize which modifier key does which operation because you can keep changing the key you press until you see the icon showing the one you want, then release the mouse button.
I guess that it might influence some functionality rarely used on Windows: making hard links (you probably cannot have a hard link spanning between different file systems), moving a file will be slower... these things might be assumed to work inside a single drive letter by software.
But... I am only guessing, I don't have much experience with Windows. These are typical problems on POSIX platforms, but software there is usually written not to assume too much.
I'd be happy to see confirmation from someone more knowledgeable.
You must log in to answer this question.
Not the answer you're looking for browse other questions tagged windows logical-drive ..
- The Overflow Blog
- Reshaping the future of API platforms
- Between hyper-focus and burnout: Developing with ADHD
- Featured on Meta
- Our Partnership with OpenAI
- Imgur image URL migration: Coming soon to a Stack Exchange site near you!
Hot Network Questions
- *Trivial* near-repdigit perfect powers
- Why is the empty set described as "unique" when it is a subset of every set?
- Can someone who isn't flying meet me at my gate for a layover at Istanbul airport?
- Computer not booting after installing Ubuntu next to Windows
- 「西片と夕日 見れたしね」means "saw sunset with him" or "saw both him and sunset"?
- Why is the reliability of Stormy Daniels testimony relevant in Trump's hush money process?
- Does making a ground plane and a power plane on a PCB make the board behave like a large capacitor?
- Is consciousness causally superfluous?
- Correct notation of a Sample space
- Has there ever been a transfer of occupants from one aircraft to another while airborne?
- What should I do when a coauthor suggests I fluff up a manuscript?
- How can I split a receipt from United airlines into per-leg receipts?
- How does the centripetal force change when the radius changes?
- Setting PS1 with site-wide configuration
- Electrolysis experiment with CuSO4
- Could you actually do orbital deployment?
- How can I work with a senior researcher who is less knowledgeable than myself?
- FourierTrigSeries doesn't know Jacobi–Anger expansion?
- What Does the 'Cosɸ' Rating on a DC Relay Indicate?
- Text Based Game about Synthesizing Fuel from Scratch?
- Can I safely customize fingering of arpeggios?
- Find the value of the integral of the real root of an equation
- Ceiling box has two reds and two blacks - how to wire this?
- What is the equation relating the sides and the orthocenter segments of a triangle?
].")
- Troubleshooting
- Windows 8.1
- Microsoft Edge

How to Partition SSD in Windows 11 (2024 guide)
Splitting your SSD in Windows 11 can assist you in organizing your computer’s storage. So, knowing how to partition the SSD correctly is essential. Whether you want to create volumes , for data types or boost your system performance you’re, in the right spot. This detailed guide will walk you through methods to accomplish this task.
Page Contents
1. How to Partition SSD in Windows 11 Using Windows Settings
- Open Windows Settings, go to “System” and click on “Storage”.
- Then, click on “Disk and volumes”.
- Select the system partition and click on “Properties” of “Windows-SSD (C:)”
- Now, click on “change size” and enter the desired storage.
- Click on “OK” to apply the changes.

2. Partition SSD in Windows 11 Using the Disk Management Utility
The Disk Management tool, in Windows 11 makes it simple to divide the SSD into sections. You have the option to tailor your storage configuration by reducing volumes and establishing partitions. Additionally, this utility aids, in partition creation resizing, merging or removal.
a. Reduce the System Partition Volume
- From the Windows search bar, type “partition”. It will open the “Create and Format Hard Disk Partitions” dialogue box and will enable you to use the disk management tool.
- Right-click on the system partition and select the “Shrink volume” button.
- Then, mention the size of the area you will be shrinking in MB and press “Shrink”.
This can run one of the commands that will give unallocated space on the disk.

b. Create a Partition for the Remaining Space for File Storage
- Now, select “New Simple Volume” by right-clicking on unallocated space.
- With the guidance of a wizard, put in the following: the size, drive letter (NTFS is advised), file system, and volume label of the desired partition.
- Then, click “Done” to create the appropriate partition.
c. Deletion and Merge of Partition
- In the Disk Management Utility, right-click the partition you wish to delete or use for extending.
- Choose either the “Delete Volume” or the “Merge Volume” option.
- Afterwards, follow the on-screen instructions related to the chosen option.
3. How to Partition SSD in Windows 11 Using the DiskPart Command
A. create a partition in ssd with unallocated space.
- Press the Windows+S keys, search “diskpart”, and open the DiskPart command prompt tool.
- Tap “Yes” when the administration message pops up.
- In DiskPart, type “list disk” to see all the disks connected to your system. Identify the SSD you want to partition.
- Type “select disk X” (replace X with the disk number of your SSD).
- Type “create partition primary size=X” (replace X with the size in MB you want for the new partition).
- Type “format fs=ntfs” to format the new partition with the NTFS file system.
- Type “assign letter=X” (replace X with the drive letter you want to assign).
- Type “exit” to close DiskPart.

b. Create a Partition in SSD with Allocated Space
- Repeat steps 1-3 from the previous section.
By following these methods, you can effectively partition your SSD in Windows 11, optimising your storage space and improving the organisation of your data. Whether you prefer using Windows Settings, Disk Management, or the DiskPart command, partitioning your SSD can enhance your system’s performance and storage management capabilities.
READ THESE ARTICLES NEXT

How to Enable/Disable Reserved Storage in Windows 11

How to check if disk is MBR or GPT in Windows
Fix: Disk Cleanup not working on Windows 11
How to repair disk errors on Windows 11
Leave a reply cancel reply.
Your email address will not be published. Required fields are marked *
Save my Name and Email in this browser, for the next time I comment.
LATEST ARTICLES
Fix Microsoft Store Keeps Pending Downloads in Windows 11 4 hours ago

Windows 11 Preview Build 26212 Released 2 days ago

Fix: Windows Update Page Blank in Windows 11/10 2 days ago

How to change Remote Desktop port in Windows 11 2 days ago

Fix: UNEXPECTED_KERNEL_MODE_TRAP Error on Windows 11 4 days ago

[Solved] How to Change or Switch Disk Numbers in Windows
Updated on Friday, May 10, 2024

Change Disk Numbers in Windows: Switch disk 0 and disk 1
When your hard drive is detected and recognized, Windows will assign your drive a letter and a numeric disk ID to better identify a certain disk. You can use Disk Management to change a drive letter if you don't like the assigned drive letter or if you have a drive that doesn't have a drive letter yet. How to change disk numbers in Windows ?
This article will introduce how disk enumeration works in Windows and tell you how to change disk ID of a drive , especially switch disk 0 and disk 1 .
How does Windows assign drive numbers?
The location of the SATA port on the motherboard that a drive is plugged into determines the disk number of that drive. Some motherboards have markings right on the board that let you know what port corresponds to what number.

In other words, the number assigned to your SSD , HDD , or other storage devices, also known as disk ID, is the physical address of a SATA port. You can set up a boot order for all SATA ports in BIOS, and then Windows decides master and slave drives by your BIOS boot order.
By default, the first hard drive with a Windows OS will be assigned as C: and Disk 0 in Disk Management because it needs to boot up first. Then other devices will be given disk numbers 1, 2, 3, etc.
However, the story is different for an M.2 SSD with NVMe. Drives connected to SATA ports get priority in numbering order. Therefore, even though your NVMe SSD is the boot drive, it always goes by the last number because it is connected to an M.2 slot. It will display in Disk Management shown below. This is no solution to change the disk number for an NVMe SSD in Windows and nothing to worry about.
- NVMe = Disk 2 (C: )
- SATA1 = Disk 0 (D: )
- SATA2 = Disk 1 (E: )
Is this information helpful? If you nod, please share it.
Why do you need to change disk numbering?
There is usually no need to alter disk numbers because they just signify different physical connections on a motherboard. But one situation is an exception - when your startup disk (not an NVMe SSD) which contains a Windows operating system is not listed as disk0.
Here is an example from the Superuser forum:
A desktop system had two drives (Assigned C and D, which were enumerated in Disk Management as Disk 0 and Disk 1). A new SSD was added as the boot drive, after copying the C drive to the SSD. The SSD was connected to SATA 0 (master) port on the motherboard. The previous C Drive was moved to SATA 2 and is reformatted as a non-booting NTFS partition. The D drive remained on SATA 1.... However, the list in Disk Management is re-ordered. Disk 0 is the previous Disk 2 (D Drive) on SATA 1, Disk 1 is the new Boot Drive (now C) on SATA 0, and Disk 2 is the former C Drive (now assigned E) on SATA 2...Is there any way to re-order the Disk number assignments? What actually does determine the Disk number enumeration?
In this case, after the user added a new boot drive to the SATA 0 port, the boot drive was not assigned the corresponding disk0 but disk1. The user wanted to switch disk1 to disk0.
Can you change disk ID numbers?
The response is a clear negative if you mean that you wish to alter the physical SATA port order on your motherboard. The precise placements or enumeration of these ports cannot be changed.
However, if you want to change the disk numbering of the slave hard drives or assign the boot drive with the correct order which is disk0, it is possible to do so.
Thanks for sharing in advance.
How to change disk numbers in Windows?
There is no need to mess with the disk numbers for average users because it is not easy. You can read the following advice if you have a good cause to.
How to change the disk number of the boot drive from disk1 to disk0:
- Back up data of the current boot drive.
- Reformat the current boot drive to a Windows format - NTFS, FAT, or exFAT.
- Reinstall Windows OS to the drive you want to use as a boot drive.
- Go to BIOS and set up the new boot drive as the first drive to boot. Then the new boot drive will be disk0.
How to change the disk numbers of other slave drives:
- Unplug all secondary drives, also known as slave drives, that don't contain the operating system.
- Connect the drives to your Windows PC in a different order. Then you will find the disk IDs of these disks have changed.
This article helps you understand how disk number enumeration works and if you can change the disk ID of a drive. As long as everything seems fine, most users won't need to change disk numbers or be concerned if the boot drive is not Disk 0.
Your friends may be happy to see this article too.
Jessica Shee is a senior tech editor at iBoysoft. Throughout her 4 years of experience, Jessica has written many informative and instructional articles in data recovery, data security, and disk management to help a lot of readers secure their important documents and take the best advantage of their devices.
No. 308, 3/F, Unit 1, Building 6, No. 1700, Tianfu Avenue North, High-tech Zone
Copyright© 2024 iBoysoft ® . All Rights Reserved.

Contribute to the Windows forum! Click here to learn more 💡
April 9, 2024
Contribute to the Windows forum!
Click here to learn more 💡
- Search the community and support articles
- Search Community member
Ask a new question
How can I change an external SSD letter?
Report abuse.
Reported content has been submitted
1 person found this reply helpful
Was this reply helpful? Yes No
Sorry this didn't help.
Great! Thanks for your feedback.
How satisfied are you with this reply?
Thanks for your feedback, it helps us improve the site.
Thanks for your feedback.
Replies (2)
Question info.
- Files, folders, and storage
- Norsk Bokmål
- Ελληνικά
- Русский
- עברית
- العربية
- ไทย
- 한국어
- 中文(简体)
- 中文(繁體)
- 日本語
- Forums New posts Search forums
- What's new New posts Latest activity
- Members Current visitors
- If you think PCIe 5.0 runs hot, wait till you see PCIe 6.0's new thermal throttling technique
[SOLVED] I cannot assign drive letter to a partition so I can't use it.
- Thread starter diapolical
- Start date Feb 1, 2020
Distinguished
- Feb 1, 2020
I have a 1 tb harddrive I use in my computer for storage, the OS is on a separate SSD. There were 2 partitions on the storage drive, the smaller one was 90gb. I noticed in partition software that there was a space of 3mb unallocated both before and after the 90gb partition. Just to tidy things up in the partition software window I extended the 90gb partition by 6mb, so that there would be no unallocated space before and after it. I did that operation in EaseUS Partition Master. The process went through but there was an error at the end, "update system information failed" .There was a partition created but there was no drive letter assigned. Windows Disk Mangement couldn't assign a drive letter either, the error was "The operation failed to complete because the disk mangement console view is not up to date etc" . I could delete the partition, so it appeared, in Disk Mangement, and then right clicking on the drive gave me the option of "new simple volume" produced the familiar error of "The operation failed to complete because the disk mangement console view is not up to date etc" though the partition seemed to have been created though no drive letter was assigned. The partitions on my other drives in Disk Management are shown graphically with text reporting their size, their file system and the word HEALTHY but the problematic partition was listed only with its size and no mention of HEALTHY nor of the file system. So I decided to clear the whole 1TB of data, and try to create a single partion on the hard drive to get the 90gb back. I deleted the larger partition successfully, creating unallocated space for the whole drive. But now I can't create a useable partion on the hard drive at all. I am runing into all the same problems I had when I tried to recreate the 90gb partition. EaseUS Partition Master Lists the partition as "GPT data partition", "Reserved Sectors-0", "First MFT Cluster-3", "usage 1%", "931.95GB". However the partition software command to "explore partition" does open up a window with the drive shown, just as it did when I was trying to get the 90GB partition working. Once again it seems there is a partition there but not one that windows can work with. Using diskpart in powershell with admin rights can't assign a drive letter. The "list volume" command doesn't even show the partition. "List disk" does show the disk as "disk 1" and I can select the disk, but from what I understand, diskpart assigns letters to partitions rather than disks. I have recently upgraded to win 10 from 8.1. The partition resizing was all attempted in Windows 10. The system is EFI, boots from a reserved system partition on the SSD. The partitions are GPT. There was no loss of power or power surges or shutdowns while I was resizing the partitions. So at the moment the drive is not usable. I don't expect it is physically damaged, it had a very good health report in SMART so far in its life and it never gave me any trouble. I think the problem may be that windows cannot mount the drive but I don't know how to overcome that. How can I get this drive back into action? Your expertise is apprectiated.
- Feb 2, 2020
To be honest, I didn't have to ask experts just to be told to replace the drive, it was what I would have had to do if i hadn't been able to solve the problem. I feel I was being pressurized here into accepting that the drive was faulty and into replacing it, which is in the end not a solution at all, but what you do when there is no solution. I wonder if ANY hard drive would pass all the benchmarks on those exhaustive HD Tune Pro tests?! But I did solve the problem, accidentally it just happens and it wasn't a hardware problem at all. It turns out that the windows driver was incorrect, Device Manger was listing the hard drive as an unknown device and when I updated the driver it was listed as a volume and instantly the 1TB hdd...
SkyNetRising
Can you show screenshot from Disk Management? (upload to imgur.com and post link)
there is a screenshot of the disk management console here

"...space of 3mb unallocated both before and after..." Tiny slivers of unallocated space are best ignored, partitions have to begin at certain places, others can do the geek-speak.
RolandJS said: "...space of 3mb unallocated both before and after..." Tiny slivers of unallocated space are best ignored, partitions have to begin at certain places, others can do the geek-speak. Click to expand...
SkyNetRising said: Create single large partition and show screenshot from HDtune health. Click to expand...
This is a screenshot of the results of tests with HD Tune
Replace cables connecting to this hdd (both - power and data cables). Watch SMART data values for Calibration retry and CRC errors. If those increase after changing cables, then consider replacing the drive.
SkyNetRising said: Replace cables connecting to this hdd (both - power and data cables). Watch SMART data values for Calibration retry and CRC errors. If those increase after changing cables, then consider replacing the drive. Click to expand...
diapolical said: It's a laptop BTW Weren't the tests positive? I would rather not replace it. Is there no software that could correct the problem? Click to expand...
diapolical said: It's a laptop BTW I would rather not replace it. Click to expand...
To be honest, I didn't have to ask experts just to be told to replace the drive, it was what I would have had to do if i hadn't been able to solve the problem. I feel I was being pressurized here into accepting that the drive was faulty and into replacing it, which is in the end not a solution at all, but what you do when there is no solution. I wonder if ANY hard drive would pass all the benchmarks on those exhaustive HD Tune Pro tests?! But I did solve the problem, accidentally it just happens and it wasn't a hardware problem at all. It turns out that the windows driver was incorrect, Device Manger was listing the hard drive as an unknown device and when I updated the driver it was listed as a volume and instantly the 1TB hdd popped up in windows explorer with the 1TB partition intact and the drive letter assigned. I was looking at Device Manager for an unrelated issue when I noticed the Unknown Device listing. I won't be replacing the drive, there isn't a bad sector on it and there has never been any data corruption. It's just fine. I wonder if people here are being advised to replace their hardware far too readily, in the abscence of real problem solving. The thought makes me feel uncomfortable. Perhaps eventually someone would have suggested that I check the driver, so I shouldn't be too aggrieved. Anyway, hopefully now this post will be a useful resource for someone with the same problem, and save them the expense of replacing their hard drives.
One of the issues with things like this is there is only one person with eyes on the situation. The rest of us out here can only go by what you report. And to us (me, at least), it looked like a failing drive.
diapolical said: I feel I was being pressurized here into accepting that the drive was faulty and into replacing it, which is in the end not a solution at all, but what you do when there is no solution. Click to expand...
- Feb 3, 2020
The reason I earlier mentioned ignoring tiny unallocated partitions is that often the effort to reclaim those slivers of unallocated areas is not straightforward, one has to sometimes jump through hoops with the disk partition software to reclaim unallocated areas and to re-size allocated and formatted partitions.
The SMART Write Error Rate attribute looks very bad. In fact it has hit the threshold. The Calibration Retry Count appears to be related to the Load/Unload Retry Count. This suggests that the drive may be having occasional problems with its load/unload ramp. The Read Error Rate attribute is reporting a high raw value, but I don't know how significant this is. In any case, no sectors have been reallocated or are pending reallocation. I would keep an eye on the SMART attributes on a regular basis.
TRENDING THREADS
- Started by Admin
- Wednesday at 2:06 PM
- Replies: 71
- Yesterday at 9:26 AM
- Replies: 38
- Started by Enjou
- Yesterday at 3:35 PM
- Yesterday at 10:20 AM
- Replies: 40
- Sunday at 10:06 AM
- Replies: 58
- Tuesday at 10:35 AM
- Replies: 80
- Saturday at 1:15 PM
- Replies: 24
Latest posts
- Latest: ohio_buckeye
- 7 minutes ago
- Latest: NinjaEule
- Latest: Why_Me
- 10 minutes ago
- Latest: fzabkar
- 19 minutes ago
- Latest: kanewolf
- 21 minutes ago
- Latest: Grobe
- 23 minutes ago
- Latest: JohnBonhamsGhost
- 30 minutes ago
Moderators online
Share this page
- Advertising
- Cookies Policies
- Term & Conditions
IMAGES
VIDEO
COMMENTS
Changing a drive letter is pretty simple. Click the Start button, type "Disk Management" in the search bar, and then hit Enter. The program name displayed in the search will not be Disk Management. It will be "Create and format hard disk partitions." You could also hit Windows+X or right-click the Start button, and then click "Disk Management."
1 Open an elevated command prompt. 2 Type diskpart into the elevated command prompt, and press Enter. (see screenshot below) 3 Type list volume into the elevated command prompt, and press Enter. 4 Make note of the volume number (ex: 5) for the drive letter (ex: "F") of the drive (volume) you want to change.
The following steps show how to change the drive letter. Open Disk Management with administrator permissions. In Disk Management, select and hold (or right-click) the volume on which you want to change or add a drive letter and select Change Drive Letter and Paths. Tip. If you don't see the Change Drive Letter and Paths option or it's grayed ...
Search for Create and format hard disk partitions and click the top result to open the Disk Management experience. Right-click the drive and select the Change Drive Letter and Paths option. Click ...
We go to the taskbar and right click on the Windows icon. We choose the "Disk Manager" option. In the pop-up window that will have appeared, we go to the SSD unit to which we want to assign the drive letter, right-click on it and choose the option "change drive letter and paths". The next step is to click on "change" if we want to ...
Choose New Simple Volume. A pop up window will appear where you can alter the settings if you wish to. In most cases you can leave them as default unless you wish to change the recommended drive letter, or name the SSD by changing the Volume Name. Make any necessary changes and click Finish to begin the format and drive letter assign.
Type "assign letter=X" (replace X with the desired drive letter) and press Enter to assign the letter to your SSD. Once the process is complete, exit the DiskPart utility and your SSD will be assigned the specified drive letter. Method 3: Using PowerShell
Go to "Action > All Tasks > Change Drive Letter and Paths…" menu. Change Drive Letter in Disk Management. On the pop-up that appears, click on "Change…" button. Select Change Button. Click on the dropdown against "Assign the following drive letter:" option. Select your favorite letter and click "OK" button.
Step 2. In the Disk Management window, right-click the volume you want to change or add a drive letter. Then click "Change Drive Letter and Paths". Step 3. Pick "Change" to alter the drive letter. Or pick "Add" to add a drive letter for drives without one. Step 4.
Right-click on the Start button. Click Disk Management to open the Disk Management console. Right-click the volume that has the drive letter you want to change. Click Change Drive Letter And Paths ...
Windows will automatically assign a drive letter. Drive letters can be changed using Disk Management. Windows 11 and 10 Right-click the Start button. ... Click Change. Select a new drive letter. Click Yes. IMPORTANT: Disk Management will display a warning Some programs that rely on drive letters might not run correctly.
Select the "Assign the following drive letter" option. Choose a different letter for the drive. Click the OK button. Click the OK button again. After completing the steps, the drive will appear in File Explorer with the new letter. Change drive letter from Command Prompt on Windows 11. To add a new drive letter with Command Prompt, use ...
Assign a Drive Letter. After creating a new partition on your SSD in Windows 10, the next step is to assign a drive letter to the newly created partition. A drive letter is a unique identifier that allows you to access and manage the partition easily through Windows File Explorer or any other file management tool.
Step 2: Initialize the SSD. Once the SSD is connected, turn on your computer, go to Disk Management, and initialize the SSD. After your computer boots up, right-click on 'This PC' and click 'Manage'. In the 'Computer Management' window, click on 'Disk Management'. You should see your new SSD listed there.
In that case, you can use diskpart to manually assign a drive letter. NOTE: If your drive doesn't get assigned a drive letter, even though you are in a normal Windows environment, this can indicate a problem with the drive. Please back up your files in that case. Procedure. Open up a command prompt (CMD/PowerShell). Type "diskpart" to start up ...
Right-click Computer. Click Manage. Click Disk Management. To assign a drive letter in Disk Management, complete the following: Right-click the drive you would like to change. Click Change Drive Letter and Paths. Click Add. Click the letter you want to use. Click OK.
The big difference between drive letter and mount point is the behavior of left-drag on files. When mounted on a drive letter, Windows sees it as going from one disk to another, and the default behavior is "copy." When you use a mount point Windows sees it within the same drive, and the default behavior is "move."
Disk 1 looks like an old OS drive that was not properly wiped after it was used for WIndows, or else based on having an EFI System partition it held the boot files. There is even a slight chance it still is booting Windows since it was not properly wiped after use, if it was plugged in when you installed Windows to the other drive.
Disconnect the HD containing Windows C drive then connect your SSD to it. Reboot. Your PC should boot and the Windows should have C as the drive letter. NOTE: The procedure above is to backup your Windows to an image file then copy it back to the SSD. This ensures proper cluster size aligment for the SSD.
Select the system partition and click on "Properties" of "Windows-SSD (C:)" Now, click on "change size" and enter the desired storage. Click on "OK" to apply the changes. 2. Partition SSD in Windows 11 Using the Disk Management Utility. The Disk Management tool, in Windows 11 makes it simple to divide the SSD into sections.
When your hard drive is detected and recognized, Windows will assign your drive a letter and a numeric disk ID to better identify a certain disk. You can use Disk Management to change a drive letter if you don't like the assigned drive letter or if you have a drive that doesn't have a drive letter yet. ... Therefore, even though your NVMe SSD ...
Here are the steps you can follow to change the drive letter: - Click Start and type "disk management". - Click on "Create and format drive partitions". - In the list of drives that appears, right-click the drive and choose "Change drive letter and paths". - Here you can modify your drive's letter. Please let me know if you need further support.
Using diskpart in powershell with admin rights can't assign a drive letter. The "list volume" command doesn't even show the partition. "List disk" does show the disk as "disk 1" and I can select the disk, but from what I understand, diskpart assigns letters to partitions rather than disks. I have recently upgraded to win 10 from 8.1.
Right-click the drive you want to assign a permanent letter to and then choose Change Drive Letter and Paths from the menu. 4. A dialog box will open up, and here you need to click the Change ...
The 2.5" SATA SSD drive bay is located on the right side of the CORSAIR ONE i500, and adding another SSD could not be easier. Caution: ... Follow the prompts to assign a drive letter and format the drive. You are ready to use the drive now. PRODUCTS IN ARTICLE. CORSAIR ONE I500 - 14900K, 4080 SUPER, 32GB DDR5 (WOOD DARK)