15 Ways to Run a VBA Macro in Microsoft Excel
Do you want to learn how to run a VBA macro in Microsoft Excel? This guide will show you all the methods you can use to run your VBA code.
Microsoft Excel is a powerful spreadsheet application that offers users a variety of features and capabilities. One of the most popular features of Excel is the ability to create and run VBA macros.
A macro is a small scripts written in the VBA (Visual Basic for Applications) programming language that can be run in your desktop Excel app.
Macros can save you a lot of time and energy when working in Excel. They can be used to automate tedious tasks and save you hours of work each week.
But in order to leverage this time saving tool, you will need to know how to run your VBA macros.
Follow this guide and you’ll be able to start running macros like a pro in no time!

Run VBA Macro from the Developer Tab
The most common method for running a macro is from the Developer tab in the Excel ribbon.
This tab is hidden by default, so you will need to enable the Developer tab in your desktop Excel app first.
Follow these steps to run a VBA macro from the Developer tab.
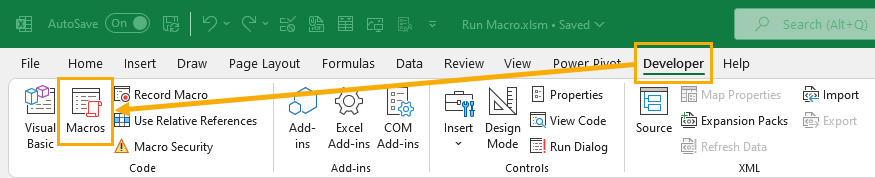
- Go to the Developer tab.
- Press the Macros command in the Code section.
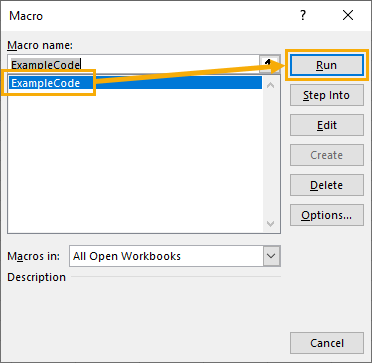
This will open the Macro menu which lists all the macros available to run.
- Select the macro which you want to run.
- Press the Run button.
That’s it! Your chosen macro code will now execute!
💡 Tip : Use the Macros in dropdown option to select the location of macros to run. You can select a specific workbook, All Open Workbooks , or This Workbook .
Run VBA from the View Tab
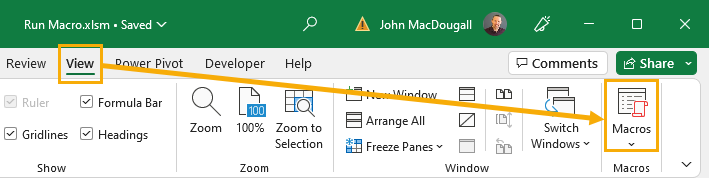
The Macro command is also available in the View tab.
Go to the View tab and press the Macros button to launch the Macros menu.
This opens the same Macro dialog box as before and you can select the macro and press the Run button.
Run VBA Macro from Macro Menu with a Keyboard Shortcut
There is an easier way to open the Macro menu! There’s no need to use the Developer or View tab since there is a dedicated keyboard shortcut to open the Macro menu.
You can use the Alt + F8 keyboard shortcut to open the Macro menu.
Run VBA Macro from a Keyboard Shortcut
You can entirely bypass the Macro dialog box by assigning a keyboard shortcut to your desired Macro.
If this is a macro that you want to use a lot, then assigning a shortcut is a good way to avoid the many clicks needed when running a macro through the Macro menu.
Follow these steps to assign your macro a dedicated keyboard shortcut.
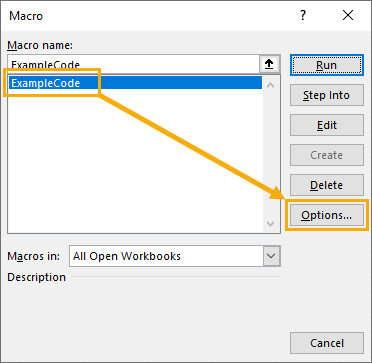
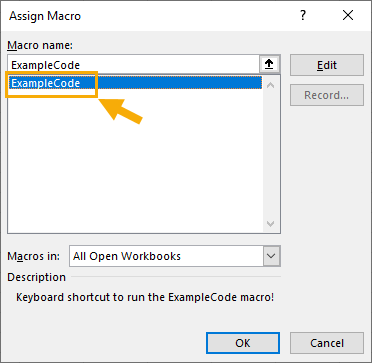
- Open the Macro menu.
- Select the macro to which you want to assign a keyboard shortcut.
- Press the Options button.
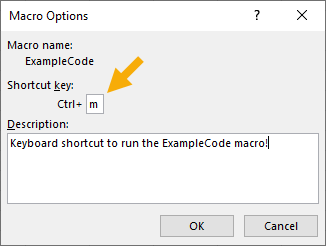
This will open up the Macro Options menu where you can add a description for the macro and assign a keyboard shortcut.
- Add a character into the Shortcut key input box.
- Press the OK button in the Macro Options menu.
- Press the Cancel button in the Macros menu.
⚠️ Warning : This chosen shortcut key will override any existing keyboard shortcut, so you should avoid using keys taken by commonly used shortcuts such as copy, paste etc.
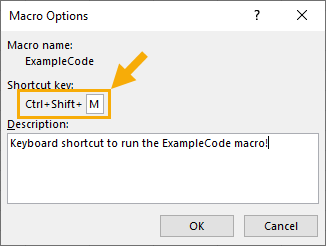
A lot of Ctrl and single key combinations are already taken with commonly used commands, so you might want to create a Ctrl + Shift shortcut instead.
💡 Tip : Hold the Shift key while entering a key in the Shortcut key input to create a Ctrl + Shift shortcut.
Run VBA Macro from a Form Control Button
If other people are using your spreadsheet solution, they might not realise they can run your macros to help complete their work.
This is where a button is the preferred choice to run a macro. It makes the act of running your macro easy and obvious!
You can create a Form Control Button to run the macro when you click the button. This can be placed anywhere in the spreadsheet since is floats over top of the grid. This means it won’t interfere with the rest of your data or formulas.
Follow these steps to insert a Form Control Button and assign a macro to it.
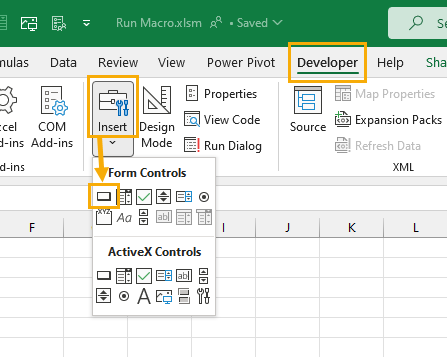
- Click on the Insert command.
- Choose the Button option found in the Form Controls section.
This will not actually insert a button yet. You will notice your cursor has now turned into a small black plus sign. This will allow you to draw a button in your sheet.
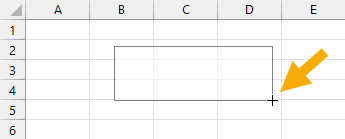
- Left click and drag anywhere in the sheet.
When you release the click and drag action, the Assign Macro menu will immediately pop up and you will be able to assign your macro to the button.
- Select your macro.
- Press the OK button.
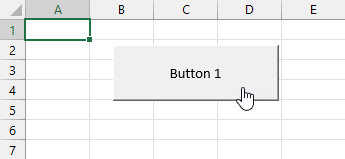
Now you have a button in your sheet which will run your select VBA macro when clicked.
💡 Tip : Righ click on the button and select Edit Text to change the text displayed on the button.
Run VBA Macro from any Shape, Icon, or Image
Form Control buttons are pretty ugly and outdated. They also don’t have many options to customize the look, but thankfully they aren’t the only way to make a button to run your macros!
There are some much more stylish options like using an image, shape, or icon as a button to run your macros.
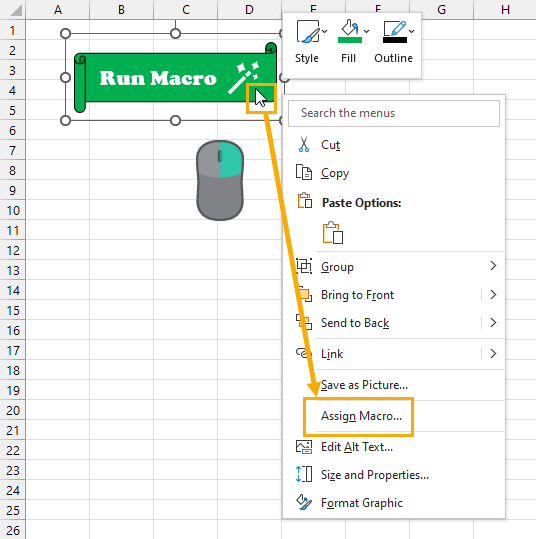
Follow these steps to assign a macro to any object such as an image, shape, or icon.
- Right click on the object.
- Select Assign Macro option from the menu.
- Select the macro from the Assign Macro menu.
Now when you click on the shape, image, or icon it will execute the macro code!
Run VBA Macro from a Quick Access Toolbar Command
Another option is to add your most frequently used macros to the Quick Access Toolbar.
The Quick Access Toolbar is a customizable set of commands that are always visible so you can easily use them at any time. You can even add a macro so it can be run with a click.
Follow these steps to add a macro to your Quick Access Toolbar .
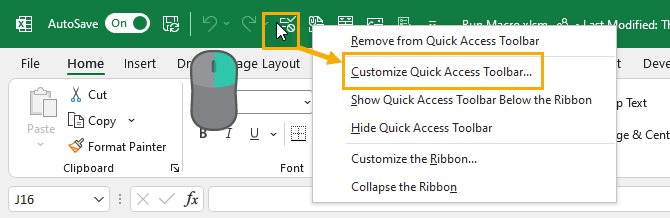
- Right-click anywhere on the Quick Access Toolbar.
- Select the Customize Quick Access Toolbar option from the menu.
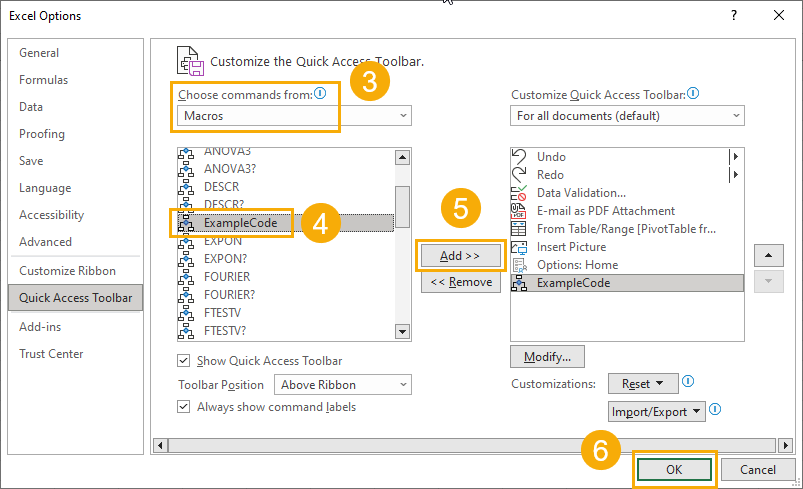
This will open the Excel Options menu on the Quick Access Toolbar section.
- Select Macros from the Choose commands from dropdown.
- Select the macro you want to add to your Quick Access Toolbar.
- Press the Add button.
When you press the Add button you will see the selected macro gets added to your list of commands. You can use the Up and Down arrow buttons to adjust the order this macro will appear in your commands.
💡 Tip : Press the Modify button in the Excel Options to change the icon and label of the macro that will appear in your Quick Access Toolbar!
Now you should have a new icon available in the Quick Access Toolbar. Click on this to run your select macro.
💡 Tip : An easy way to use the commands in your Quick Access Toolbar is with the Alt hotkey shortcuts. In this example, the command is in the 8th position starting from the undo command, so you can press the Alt + 8 to run the macro.
Run VBA Macro from a Custom Ribbon Command
If you have an entire repertoire of macros and you’re running out of room in the Quick Access Toolbar, then adding a custom ribbon tab to organize your macros could be the ideal solution.
Excel allows you to add your own custom ribbons and fill them with your favorite macros as well as any other commands you frequently use.
Follow these steps to add a macro to the Excel ribbon.
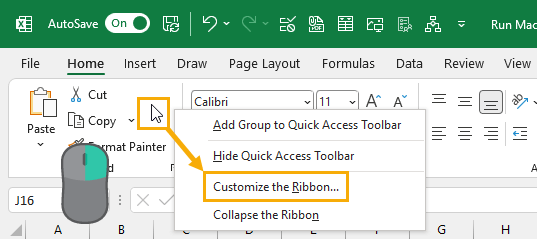
- Right click anywhere on the Excel ribbon.
- Select the Customize the Ribbon option from the menu.
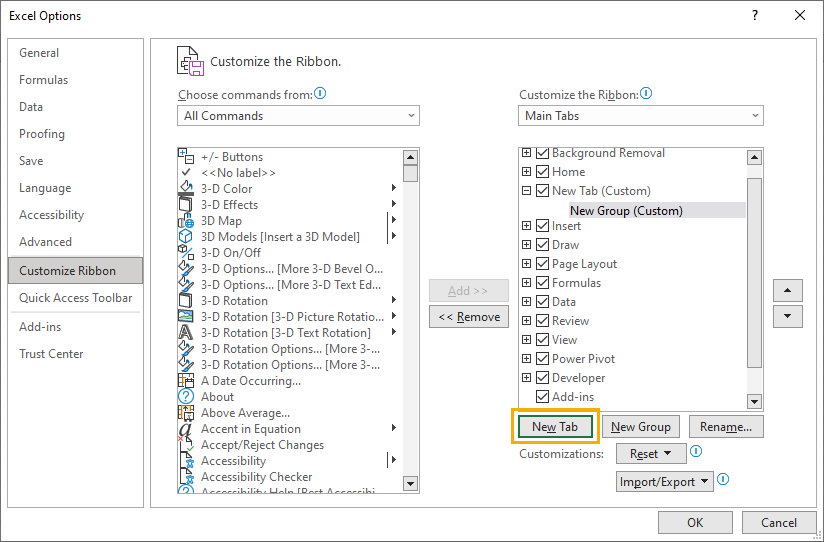
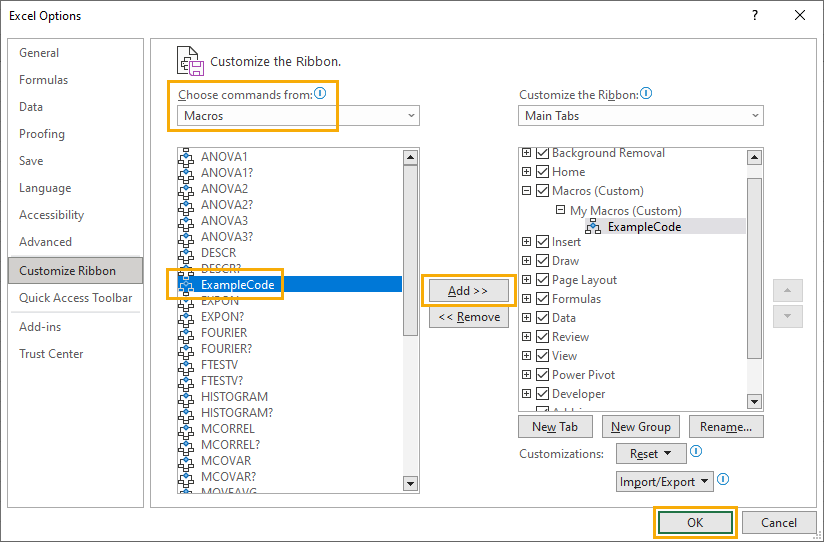
This will open the Excel Options menu on the Customize Ribbon section.
- Press the New Tab button to create your new ribbon tab.
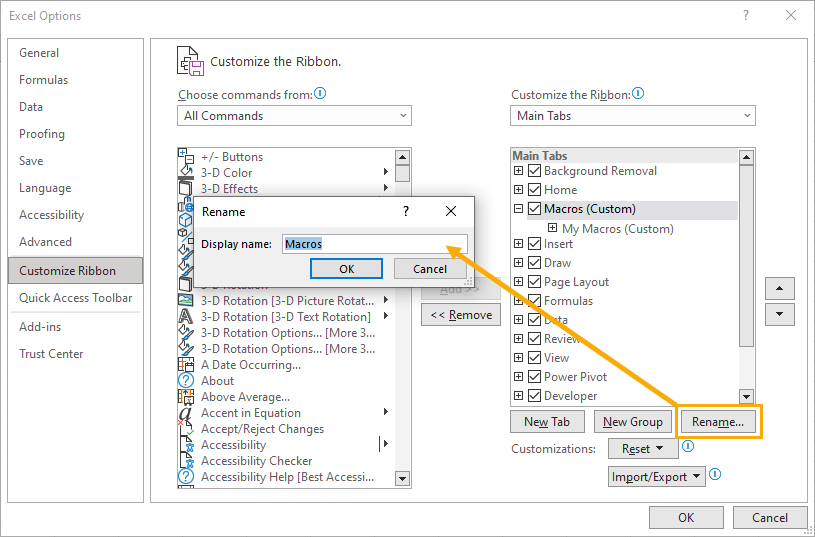
- Press the Rename button to give your tab a name.
Each tab will need at least one group, and this is automatically created when you create a new tab. You can also rename the group. Both of these names will be displayed in your Excel ribbon.
Now you will be able to add a macro into the new tab and group.
- Select the Macros option from the Choose commands from dripdown.
- Select the macro which you want to add into the ribbon.
💡 Tip : Select the tab and use the Up or Down arrow buttons to adjust the position of the new tab in your ribbon.
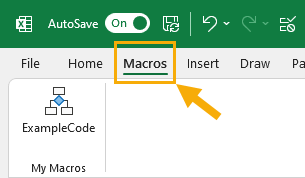
You now have a new custom tab that can hold all your most frequently used macros. 😃
Run VBA Macro from Visual Basic Editor Run Menu
The visual basic editor (VBE) is the environment where you write VBA code, so it makes sense that you should be able to also run your code from it.
A lot of people like to test their code as they develop their solutions and this means frequently running your macros from the the editor. Your current code can always be run from the Run menu in the VBE.
Follow these steps to run your macro from the Run menu in the visual basic editor.
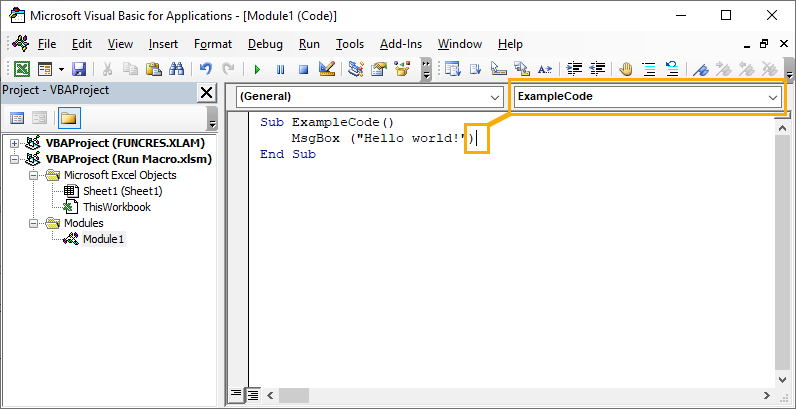
- Select the macro you want to run.
You can select the macro by either placing the cursor in the code or selecting the macro name from the dropdown menu in the top right.
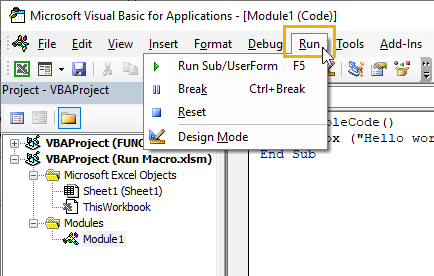
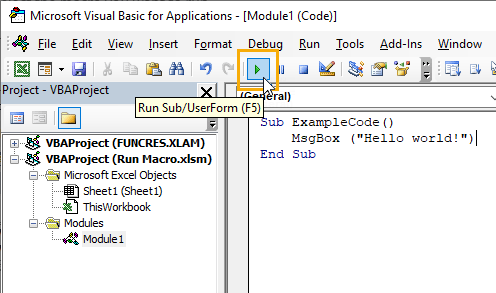
- Go to the Run menu.
- Select the Run Sub/UserForm option from the menu.
This will run your selected macro!
Run VBA Macro from Visual Basic Editor Toolbar
The visual basic editor comes with a toolbar for easy access to the most frequently used commands.
Follow these steps to run your macro from the toolbar.
- Press the Play button in the toolbar.
📝 Note : If you don’t see this toolbar you might need to enable it. Go to the View menu then Toolbars and check the Standard option.
Run VBA Macro from Visual Basic Editor Keyboard Shortcut
There are a lot of very useful keyboard shortcuts for using the visual basic editor .
Running a macro from the VBE is a very common task, so it’s no surprise there is also a keyboard shortcut available for this.
Press the F5 key while in the VBE and the currently selected macro will run!
Run VBA Macro from Another Macro
You can easily run a macro from a macro in Excel.
This is a good practice when it comes to programming. Creating smaller procedures and then reusing them within your main macro can be more efficient to run and easier to maintain the code.
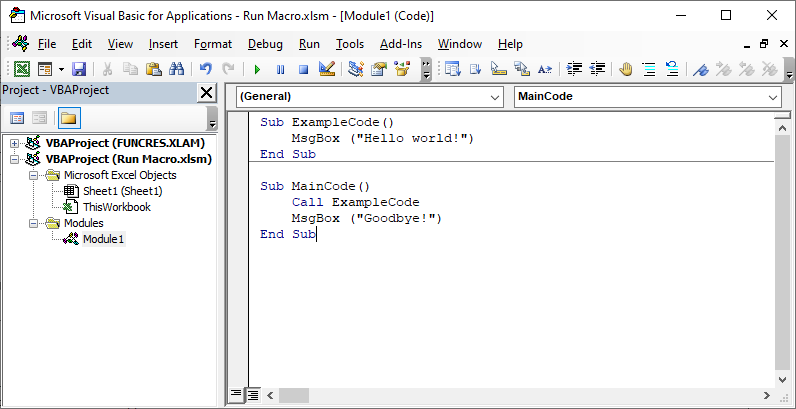
You can easily run any macro from within a macro using a single line of code. The above example will run the ExampleCode macro from the MainCode macro.
Run VBA Macro from a Worksheet Event
Did you know you can automatically run a macro?
You can automatically run a macro based on events that happen in your Excel worksheet!
For example, you can have a macro run anytime someone changes a value in the sheet.
Follow these steps to create a worksheet event-driven macro.
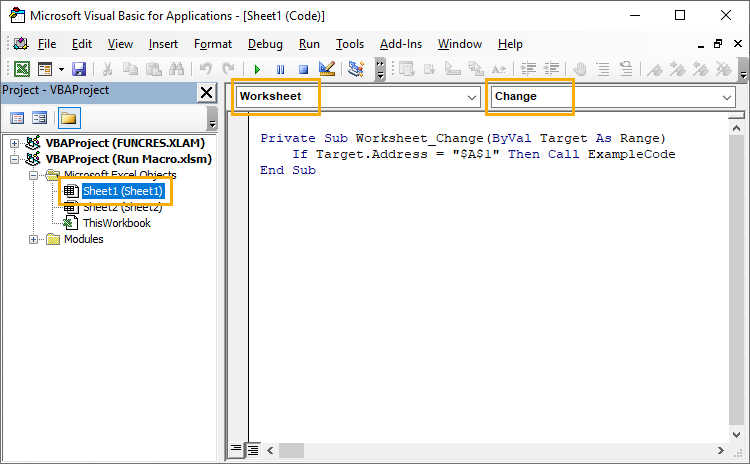
- Select the Sheet in which you want to trigger the macro. All your workbook sheets will be listed in the Microsoft Excel Object folder of the VBE Projects.
- Select the Worksheet options from the dropdown menu.
- Select the event type that should trigger your macro.
When you select the type of event, it will insert a bit of code into the editor. For example, the Change event trigger will insert the above code.
- Place any code you want to run when the event occurs inside the generated code.
If you have an existing macro that you want to run, you can call it using a Call YourMacroName single line of code.
This macro will now run anytime you make changes in any cell within Sheet1 .
You might want to limit the macro to only running when the change event occurs in a particular cell or range. This is possible by setting conditions for the Target in your code.
In the above example, the ExampleCode macro will only be called when changes are made to cell A1 .
Run VBA Macro from a Hyperlink
Did you know you can trigger your macros to run when you click on a hyperlink in Excel?
This is particular worksheet event method is worth its own mention!
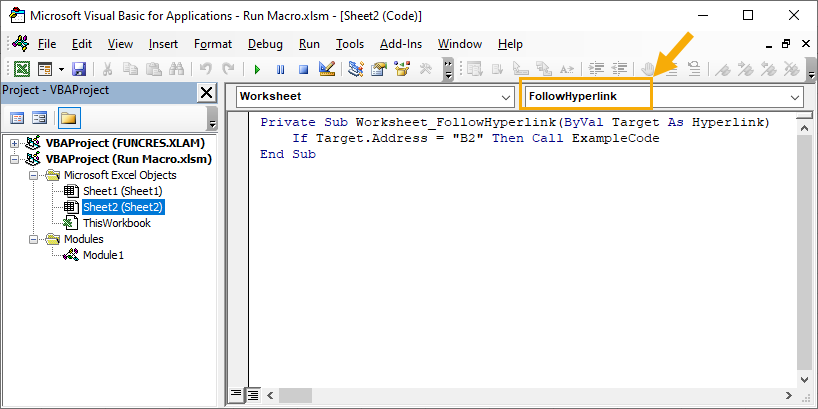
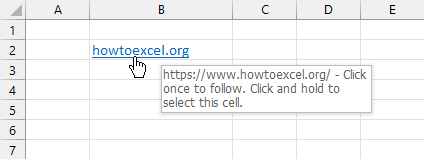
The above code will run every time you click the hyperlink in cell B2 in Sheet2 .
The code will execute and then take you to the hyperlinked address!
Run VBA Macro from a Workbook Event
There is also the possibility to automatically run a macro based on workbook events such as when you open or close the file.
This is a great option to make sure a task is performed before you do anything else in your workbook.
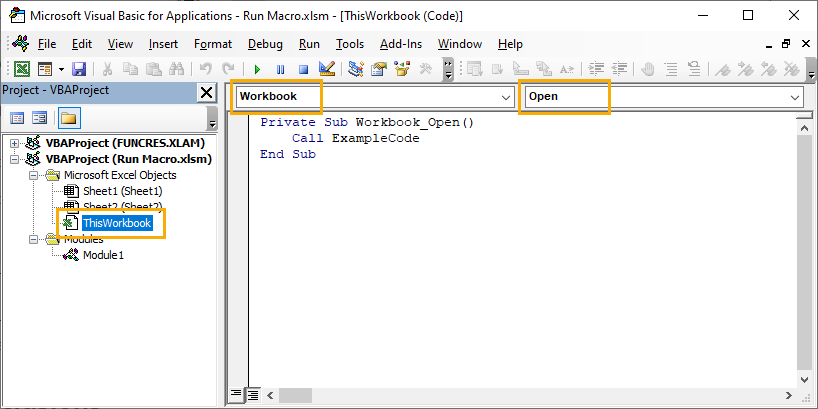
Follow these steps to run a macro automatically when you open your Excel file.
- Select ThisWorkbook found in the Microsoft Excel Object folder of the VBE Projects.
- Select Workbook from the dropdown menu.
- Select Open from the event type dropdown menu.
This will insert the above code into the code editor. You can then add any code inside which you want run when you open the file. You can also call any macro here with the Call YourMacroName single line of code.
Conclusions
VBA macros can be used to automate your tasks in Excel, so it’s important you know how to run them.
There are many methods to run your desired macros depending on your situation.
You can use the Excel ribbon, a keyboard shortcut, or a customized quick access command when you want to manually run a macro. Also, you can attach your macros to run from buttons in the workbook to make it more user friendly.
You might need to occasionally run your VBA macros while developing your solutions to test them. This can be done several ways in the visual basic editor.
You can even trigger your macros based on certain worksheet or workbook events for the ultimate in automation.
Are you using macros in Excel. Did you know all these methods to run your macros? Do you know any others? Let me know in the comments below!
About the Author

John MacDougall
Subscribe for awesome Microsoft Excel videos 😃

I’m John , and my goal is to help you Excel!
You’ll find a ton of awesome tips , tricks , tutorials , and templates here to help you save time and effort in your work.
- Pivot Table Tips and Tricks You Need to Know
- Everything You Need to Know About Excel Tables
- The Complete Guide to Power Query
- Introduction To Power Query M Code
- The Complete List of Keyboard Shortcuts in Microsoft Excel
- The Complete List of VBA Keyboard Shortcuts in Microsoft Excel
Related Posts

7 Ways to Disable Macros in Microsoft Excel
Jan 19, 2024
Excel VBA macros undoubtedly automate repetitive tasks, ensuring swift...

How To Record a VBA Macro in Microsoft Excel
Jan 15, 2024
Do you want to automate highly repetitive yet simple tasks in Microsoft Excel?...

5 Ways to Edit Macros in Microsoft Excel
Aug 11, 2023
Do you start recording a macro from scratch if you need to modify a small...
Get the Latest Microsoft Excel Tips
Follow us to stay up to date with the latest in Microsoft Excel!
How-To Geek
How to enable macros in microsoft excel.
Do more with less effort!
Quick Links
Be smart when enabling macros, how to turn on macros for a specific excel spreadsheet, how to enable macros for all excel spreadsheets.
Using Microsoft Excel macros, you can run a prerecorded set of steps to automate many of your repetitive tasks. You'll have to turn on the feature before you can use it. We'll show you how to activate macros on a per-spreadsheet basis as well as for all spreadsheets in Excel.
Enabling macros is not always safe and you should only use them when you're sure of the source of your spreadsheets. Good macros save you time by automating your tasks, but there are bad macros that can harm your machine.
Related: Macros Explained: Why Microsoft Office Files Can Be Dangerous
For example, if you've got your spreadsheet from an unknown source, you shouldn't trust it to run any macros as you aren't sure what it will end up doing. However, if you know the sender and you trust them, then it should be okay to allow your spreadsheets to execute macros.
To enable macros in a specific spreadsheet and not all spreadsheets, then first, open your spreadsheet with Microsoft Excel.
When your macro-enabled spreadsheet opens, Excel will display a message at the top of the spreadsheet content. To allow this file to run macros, then next to the message, click "Enable Content."
Excel will allow the current file to execute its macros, and you're all set.
Related: How to Disable the Security Warning Message Bar in Microsoft Office Programs
It's not recommended to activate macros for all your spreadsheets, but if you're sure you'll only open safe and trusted files, then you can turn on the option as follows.
Activate Macros in Excel on Windows
If you're a Windows user, first, launch Microsoft Excel on your PC.
In Excel's left sidebar, click "Options." If you're on a spreadsheet screen, then choose File > Options instead.
On the "Excel Options" window, in the left sidebar, click "Trust Center."
On the right pane, click the "Trust Center Settings" button.
You'll see a "Trust Center" window. In the left sidebar of this window, click "Macro Settings."
On the right pane, activate the "Enable VBA Macros (Not Recommended; Potentially Dangerous Code Can Run)" option. Then select "OK" at the bottom.
In the future, to disable macros for all spreadsheets, select an appropriate option on this screen.
Select "OK" at the bottom of the "Excel Options" window.
And that's it. Excel will now allow any spreadsheet to run macros.
Activate Macros in Excel on Mac
To turn on Excel macros on your Mac, first, launch the Excel app.
In Excel, click Excel > Preferences > Security & Privacy. Then, turn on the "Enable All Macros (Not Recommended; Potentially Dangerous Code Can Run)" option.
You're done.
And that's how you allow your spreadsheets to run codes and automate your tedious tasks.
If you'd like to learn more about Excel macros , then check out our dedicated guide on the topic. It will walk you through the process of creating a macro with an example.
Related: Learn How to Use Excel Macros to Automate Tedious Tasks
- Ablebits blog
- Excel macro
How to insert and run VBA code in Excel - tutorial for beginners

This is a short step-by-step tutorial for beginners showing how to add VBA code (Visual Basic for Applications code) to your Excel workbook and run this macro to solve your spreadsheet tasks.
Most people like me and you are not real Microsoft Office gurus. So, we may not know all specificities of calling this or that option, and we cannot tell the difference between VBA execution speed in different Excel versions. We use Excel as a tool for processing our applied data.
Suppose you need to change your data in some way. You googled a lot and found a VBA macro that solves your task. However, your knowledge of VBA leaves much to be desired. Feel free to study this step-by-step guide to be able to use the code you found:
Insert VBA code to Excel Workbook
For this example, we are going to use a VBA macro to remove line breaks from the current worksheet .
- Open your workbook in Excel.

If the code of your VBA macro does not contain the following lines in the beginning:
Application.ScreenUpdating = False Application.Calculation = xlCalculationManual
Then add the following lines to get your macro to work faster (see the screenshots above):
- To the very beginning of the code, after all code lines that start with Dim (if there are no " Dim " lines, then add them right after the Sub line): Application.ScreenUpdating = False Application.Calculation = xlCalculationManual
- To the very of the code, before End Sub : Application.ScreenUpdating = True Application.Calculation = xlCalculationAutomatic
These lines, as their names suggest, turn off screen refresh and recalculating the workbook's formulas before running the macro.

- Press Alt + Q to close the Editor window and switch back to your workbook.
How to run VBA macros in Excel
When you want to run the VBA code that you added as described in the section above: press Alt+F8 to open the " Macro " dialog.

You may also be interested in
- How to count and sum cells by color in Excel - VBA macro
- How to enable macros in Excel
- How to record a macro in Excel
- Two best ways to convert numbers to words in Excel
- How to merge Excel files with VBA
- Custom user-defined functions vs. VBA macros
Table of contents
253 comments
Is there a way to write a Macro that will unfilter a text.
I want to filter out my manager's name, delete the rest of the items, then clear filter to create an entire sheet of just my manager's items.
As it is recorded, the macro will select every other name, but every week the names change. Is there a syntax for "Filter does not equal 'name'?"
Hi! We do not do VBA code creation on request. To filter data by condition, you can use the FILTER function. You can find the examples and detailed instructions here: Excel FILTER function - dynamic filtering with formulas .
hello dears ,
hope you're all doing well and safe , im very keen to know how can i generate VBA script to make my daily tasks easy please
i have an excel file generated from a specific app ( PPS ) , this excel show us where the shortages of products are ,
so we need to filter manual and do some formulas to know where first shortage is
can someone guide me and explain to me how to create VBA easy please ,
PS : i want to share with you the excel file but i didnt see any uploading button here ,
greetings, Z.E
Hi! Your request goes beyond the advice we provide on this blog. We do not do VBA code creation on request.
could you please guide me more or provide me an email box to share with you excel file for more clarification & understanding ,
thanks in advance Dear
You say this is for beginners, but you use language that is for more experienced users. If it is for beginners, you need to include instructions for how to get to the things you are talking about, such as right click, left click, etc.
Hi! Unfortunately, this tutorial is for beginners to VBA, not for beginners to Excel.
Hi, my code was working previously but now isn't. I am not sure why. It gives me runtime error of 13
Sub Get_Plate_A_Data()
Dim FileToOpen As Variant Dim OpenBook As Workbook Application.ScreenUpdating = False
FileToOpen = Application.GetOpenFilename(Title:="Browse for your raw data file to import", FileFilter:="Excel Files (*.xls*), *xls*")
If FileToOpen False Then Set OpenBook = Application.Workbooks.Open(FileToOpen) OpenBook.Sheets(1).Range("C126:AP221").Copy
ThisWorkbook.Worksheets(Sheet1).Range("C39").PasteSpecial xlPasteValues OpenBook.Close False
End If Application.ScreenUpdating = True
Hi! Your request goes beyond the advice we provide on this blog. We don't help with writing VBA code.
this feature is not available how to solve
Hi! I can't see your workbook, but perhaps these instructions will help you: How to enable and disable macros in Excel .
I’d like to take names from a column and have the entire row copied in a separate sheet. Data example: List of names in column D If the name is “Cody Hall” then I want the entire row copied (not deleted) to a sheet named “Cody”
I’ve attempted to use VBA code to accomplish this but to no avail.
Hi! To get a row from the table based on the value in a column, you can try using the FILTER function. Read more: Excel FILTER function - dynamic filtering with formulas .
I want to delete A2 to A35 column using VB in excel, please help me
i'm a registered user of ablebits excel ultimate suite. is there a way to run a certain ablebits tool [in my case, transpose] from vba or in a recorded macro? if it is not possible, this would be great addition to the ultimate suite
Hi! Unfortunately, the capabilities of VBA do not allow you to do this.
Hey, can you tell me about the basis of VBA apply in Excel. I want to make my future in this field.
Hello, thank you for posting this. I'm currently trying to use it and I have followed the steps as written but when I go to the run the macro I get a syntax error on this line:
Set cellsColorSample = Application.InputBox( _ "Select sample color:", "Select a cell with sample color", _ Application.Selection.Address, Type:=8)
Any ideas what I need to change? I'm sorry but I know little of VB Scripting so I'm just trying to follow directions here. This is what I have:
Sub SumCountByConditionalFormat() Application.ScreenUpdating = False Application.Calculation = xlCalculationManual Dim indRefColor As Long Dim cellsColorSample As Range Dim cntRes As Long Dim sumRes Dim cntCells As Long Dim indCurCell As Long
On Error Resume Next
cntRes = 0 sumRes = 0
cntCells = Selection.CountLarge
If Not (cellsColorSample Is Nothing) Then indRefColor = cellsColorSample.Cells(1, 1).DisplayFormat.Interior.Color
For indCurCell = 1 To (cntCells) If indRefColor = Selection(indCurCell).DisplayFormat.Interior.Color Then cntRes = cntRes + 1 sumRes = WorksheetFunction.Sum(Selection(indCurCell), sumRes) End If Next MsgBox "Count=" & cntRes & vbCrLf & "Sum= " & sumRes & vbCrLf & vbCrLf & _ "Color=" & Left("000000", 6 - Len(Hex(indRefColor))) & _ Hex(indRefColor) & vbCrLf, , "Count & Sum by Conditional Format color" End If Application.ScreenUpdating = True Application.Calculation = xlCalculationAutomatic End Sub
I am trying to sum cells that are conditionally formatted red. Any help you can give would be GREATLY appreciated!!!
Hi! Copy the VBA code carefully from the article, or use the sample file linked at the end of the article.
Hi there, thanks for posting this. I'm currently trying to use it and have followed the steps as outlined but when I go to the run the macro there is nothing to select. Any idea why this might be?
Hi! If you have correctly inserted the macro code and saved the file correctly as described in the article above, try these guidelines: How to enable and disable macros in Excel .
Hello everyone, I would like to ask you for help with my problem. I think it's possible to solve it with VBA, but I'm not sure how to do it.
There is an application named Qtest. I want to link it with excel with the help of VBA macros , so that I can upload data from Excel to Qtest automatically.
Hi! Sorry, your request goes beyond the advice we provide on this blog.
I have an RFID reader putting value in active Excel cell. Then nothing more happenes, i want Excel to automaticly move active cell to the cell below and calculate the sheet :-(
Hi! Unfortunately, I cannot reproduce your problem. Set the cursor to move automatically after entering a value in a cell: Options - Advanced - Editing options. Also check in the menu on the ribbon: Formulas - Calculation options - Automatic. Add to VBA code the first executable statement: Application.Volatile.
I was able to do this using Office 2003, but after closing and then opening, i get the message that my VB project was removed. Ive spent hrs googling and experimenting but I cant find the solution. I have no problems if I use Office 2013, unfortunately, the old program im using will not work with newer versions of excel. Any ideas?
Unfortunately, code created in Excel 2013 and later does not work in Excel 2003.
Im not using excel 2013, im trying to get excel 2003 to stop removing my macro after closing/opening. I meant my old lintool program will not work with new versions of excel so im stuck using the 2003 excel.
Unfortunately, your old program doesn't work with modern VBA macros.
Thanks so much Alexander! that is very helpful.
Fails at Step 2. When I Press Alt-F11, I get the editor screen, but not the left-hand panel shown in the image. :-(.
Press Ctrl + R
This is so good & helpful for first time user like me - Thanks so much
Can someone help me with the following script? There is something wrong with the last call function of this.
Sub Admin() ' Defines variables Dim Cell As Range, sRange As Range, Rng As Range ' Defines LastCol as the last column with a header on the Run sheet LastCol = Sheets("SABER").Cells(1, Columns.Count).End(xlToLeft).Column ' Sets the search range as A1 to the last column with a header on the Run sheet Set sRange = Sheets("SABER").Range("A1", Cells(1, LastCol)) ' With the search range With sRange ' Set Rng as the cell where "Admin No." is found Set Rng = .Find(What:="Admin No.", _ After:=.Cells(1), _ LookIn:=xlValues, _ LookAt:=xlWhole, _ SearchOrder:=xlByRows, _ SearchDirection:=xlPrevious, _ MatchCase:=False) ' If Rng exists then If Not Rng Is Nothing Then ' Define LastRow as the last row of data under the Due Date header lastRow = Sheets("SABER").Cells(Rows.Count, Rng.Column).End(xlUp).Row ' Copy from the Systme Consition header down to the last row of that column and paste to A1 of Paste Report Here sheet Sheets("SABER").Range(Rng, Cells(lastRow, Rng.Column)).Copy _ Destination:=Sheets("Status").Range("A1") End If End With End Sub
What I'm trying to accomplish here is to display the "Admin No." Column from sheet 3 "Saber" (no matte where it is in sheet 3) to a sheet called "Status". This works really well HOWEVER The issue is when a row is deleted from Saber and I run the Macro in status the row remains where there like I never deleted it.
Any help would be apricated.
Dose anyone one know if the above process can be accomplished without the Marco? ie. search sheet 2 for a certain column regardless of where it is and populate it in sheet 1.
We apologize, but we cannot offer assistance beyond the scope of this blog.
I am trying to create a macro that will unlock a worksheet and spellcheck the sheet and lock the worksheet again. But I also want to still be able to format rows. When I use the generic macro I found online it defaults to not allowing the worksheet to allow for row formatting? And when I try to use the record macro function to do the same functions it want the password and leaves it protected with no password. Does anybody have a solution?
I want to creat a sequence from 1 to infonity and skip all ending zero number such that 10,20,30,.... Also no skip any indices
Hello can VBA code be inserted into Excel 365? if so how?
Hi! You can record and run VBA macros with all Excel desktop versions. In the online version of Excel, VBA does not work.
I'm trying to add a blank row between every row. After running the VBA code, I get an error 6 - overflow.
When debugging, it looks like there's an issue with the following string: CountRow = rng.EntireRow.Count
Please help me resolve this <3
Hello, I need to use VBA in a worksheet_change event instead of formula, so you can leave the cell empty ready for user interface, or when the conditions are met the value can be put in the cell automatically and protected at the same time. I am looking to autopopulate previously entered data based on the client's unique identifier. This is my formula, which works/allows for the formula to auto-populate/return data BUT it doesn not allow for data entry if there is no match/data to return once the sheet is protected? =IFERROR(INDEX($C$7:C7,MATCH($A$7:$A$6001,$A$7:$A$6001,0))," ")
Hi! Unfortunately, here we can only help you with Excel formulas.
Hi, I'm looking for a solution that create a button to print excel worksheet with print range A2:AA73 from a workbook into pdf and save a copy of pdf in specific file location and file name will be based on each sheet cell value at AD2
Can you help me with how to code that part? I'll be really appreciated your help.
Hi everyone, can you please help me on writing VBA code in excel as per my requirement: Requirement: In Cell: D23 (containing formula value automatically generated on every 15 minutes) In column c23=current time value is showing In Cell "A30:A54" (value started from 9.30, 9.15, 10.00, 10.15, 10.30, 10.45, 12.00, 12.15, 12.30, 12.45, 13.00, 13.15, 13.30, 13.45, 14.00, 14.15, 14.30, 14.45, 15.00, 15.15, 15.30 respecitively each time value in each row)
Now I want to copy cell D23 value and Paste value only inside the Cell Range : B30:B54 where Cell C23=matches with Cell A30:A54).
Kindly help to write code on VBA in excel.
Thank you very much
Hi, I'm looking for a solution that is I created a report on excel and I also created a button to export that report excel file into a pdf and its location is on Sharepoint, not in some folder only on Computer. Can you help me with how to code that part? I'll be really appreciated your help.
Is there a code set or technique to get an excel sheet to read all the documents in a folder, their headers (if they are word documents) and then build a hyperlink list with colums that display data fields from the header like dates/vital-info/etc.
Is this possible?
Hi Is there a code or tool in Excel to enable a cell pop up a number previously entered in another cell immediately that number is deleted?
I've written a whole script which works in extracting all the information from a Questionnaire in word to excel. However, the only problem I've run into is when questions within the Questionnaire has tick box options. My current VB macro script just pulls in the box symbol, but not the words associated with the ticked box/next to the tick boxes. Is there a VB macro script you can recommend I can write which allows me to pick up the text associated with the ticked box instead?
Hello, I need to learn coding in excell. Actually I want to use coding in excell for getting expenditures year wise. In excell sheet im going to fill cells with expenditures pertain to different years but i want excell to use codes and give those expenditures years wise as an easy reporting. Kindly guide me through this how could i get desired results, please.
I have 2 Dropdown List with the same options (Included and Excluded) in different sheets. If I select " Included" in one dropdown list, it should also select "Included" on another dropdown list and vice versa. I need VBA code to crack this.
I have an excel excel workbook .It has four sheets A, B, C, D .A, sheet information .Rowes' information is categorized in C column. VBA code so that the information contained in the Rowes can be found on the B sheet, the information on the C on the C sheet and the information on the D on the D sheet. want to .
Hi I have 3 sheets work book. sheet1 'E,sheet 2 'N anf Sheet 3 'D'. It has 1000 rows in sheet 1. "H" column data catagary 'N' and 'D' two data type .I want to link data by N or D to other two sheets .
this deleted active names as well so my entire excel has #name error now. is there a VBA that only deleted names that are not used
I am having an excel wherein i have done some conditional formatting with color coding and i just want to copy the color codes to another fields, can you suggest a macro VBA so that i can run it?
May I request the expertise of those who are professionals in VBA. I'm planning to improve my procurement monitoring in excel using the VBA wherein I want to simplify the way I can search for the status of purchases. By simply typing the reference number in the search bar then the status would appear. Would that be possible in excel VBA. Thank you in advance for your help
how i can give command in execel
I need a code to color the sheet tab to red if T43 in that sheet is > 0, no change to sheet color for all other cases. I'd like this to run for the entire workbook of 160 sheets automatically. Can someone help?
i like your question as well. Can someone help us on this?
Hi! Unfortunately, we can't help writing a VBA macro. Only Excel formulas.
please can I have a cod to calculate the average for each 29 number of excel column with 184450 row
Hello everyone, I would like to ask you for help with my problem. I think it's possible to solve it with VBA, but I'm not sure how to do it. Also, if there is a way to do it without VBA, even better. I exported the tasks from the Planner to Excel (did some work to filter and format the data I needed, etc.) and finally, I have a list of tasks that belong to a person. For each person, I have to manually enter the approximate time needed to complete the task, during the task that person should enter each week how many hours he spends solving the task and when the task is completed I can compare in the table the time he spends and the time I set for this assignment. This table needs to be used for a long time, and the task list changes almost every week, so I need to export new data from the scheduler every week, but save the data previously entered for some tasks. Each time an export is performed, the order of tasks in Excel changes and this is the point when a problem occurs. The time I need to specify for each task (forecast) is entered manually, for example, for the task "Task1" in A1 the forecast is entered in C1. The next time I export tasks from the Planner, it is possible that "Task 1" will no longer be in A1 (ie I added another task in the Planner and now that task is the first, so "Task 1" moves to A2), but the forecast for " Task 1 "remained in C1 (because column C is not included in exports). How to ensure that cell C1 follows the task in A1, no matter where the data from A1 is transferred? In this case, when a new export is made, the forecast from C1 should be automatically moved to C2, because the task from A1 is now to A2. I hope someone can help me. Thanks in advance, Los
I Want use VBA code flash data on return on blog
Hello, thank you for your help. If possible, could you please help me with an additional problem? I have around 1000+ xml files and I want to convert them to excel or csv file. Is it possible to do that as well? If so, can you show me how?
Thank you for your time.
Hey! I am looking for a little help with a code. I am a beginner it is a little confusing..
Change the application so that now there is no limit.
For EG, if the strategy says to buy 30% more shares but there is not enough cash on hand to do so, the investor will now borrow the cash they need. Now the cash positions in columns H and J of the Model worksheet can be negative, indicating that the investor owes money to the lender.
Capture the maximum the investor ever owes during the year in an extra output cell, keep track of it, and summarize it (including a histogram), just like all of the other outputs, with your VBA code.
Hi Sir i want to count diffent names in coloum wise what is the formula or code?
i am new vb in excel and need some assistance with the following macro. any help greatly appreciated. i need to create a macro which will take value from sheet 1 cell A1 value ,(example: CD-600500 is available in sheet 1 cell A1) then increment the value by 1 in sheet 2 cell range A5:A50,also A5:A50 if the cell is blank try goto next row and increment the value by 1.
I need a code to convert half of my numbers to variables. example if the number is 12345, i need to convert it as ABC45. (A=1, B=2 Etc..) Someone Please help.
hi there, im quite new at programming but uses excel alot so what im looking for would help me quite alot. i would like to create a macro or a button that takes the value i a cell and multiplies it with negative one. Example: i have multiple sheets and plots in a number from sheet one to sheet two, then in sheet two i need the number to be multiplied with negative one, whilst still being traceble to where the value came from. is this possible?
sorry if the explenation is bad, English is my second language.
Post a comment
How to Run a Macro in Excel?
Watch Video – How to Run a Macro in Excel
In Excel, you can create a macro by recording it or by writing code in the VB editor .
Once created, you need to run the macro.
In this tutorial, I’ll show you different ways to run a macro in Excel.
If you’re interested in learning VBA the easy way, check out my Online Excel VBA Training .
This Tutorial Covers:
How to Run a Macro in Excel
For the purpose of this tutorial, let’s say we have a macro named ‘ColorCell’ with the following code:
This one line code would fill the cell A1 of the active sheet with red color.
Now let’s see various ways to run this macro in Excel.
Run the Macro by Clicking on a Shape
One of the easiest ways to run a macro is to have a button in the worksheet and click that button to execute the macro.
It’s easy and intuitive.
The benefit of this method is that it makes it really easy and intuitive for anyone to run the macro. Even if you share the workbook with someone who has no knowledge of VBA, he/she can just click on the button and see the actions take place (without even knowing what happens in the back end).
Something as shown below:
Here are the steps to do this:
- Click the Insert tab.
Run Macro By Clicking a Button
While the shape is something you can format, a button has a standard format.
Here is how it looks:
You can assign a macro to a button and then can run the macro by simply clicking that button.
Here are the steps to assign a macro to a button :
- Click anywhere on the worksheet. As soon as you do this, it will open the Assign Macro dialogue box.
The button inserted using this technique is a standard one and you can’t change the formatting of the button (unlike shapes, where you can change practically everything).
However, you can change the text of the button. To do this, right-click on it and select Edit Text.
Note: You can also assign a macro to other interactive controls, such as a checkbox or scrollbar .
Run a Macro from the Ribbon (Developer Tab)
If you have multiple macros in the workbook, you can see a list of all the macros in the Macros dialogue box. It makes it easy to run multiple macros from a single place.
Here are the steps:
Run a Macro from the VB Editor
If you are the one writing and testing macros, then instead of inserting buttons, you can directly run a macro from the VB Editor.
- Select any line within the code in the code window. If you have multiple macros/subs, make sure your cursor is in the macro that you want to run.
As soon as you do this, the macro would be executed.
If you only have the VB Editor open (and you can’t see the worksheet), you may not see the change happening in the worksheet. You can minimize the VB Editor screen and then run the macro to see the changes in real-time.
You May Also Like the Following Excel VBA Tutorials:
- Working with Cells and Ranges in Excel VBA .
- Working with Worksheets in VBA .
- Working with Workbooks in VBA .
- Using Loops in Excel VBA .
- Using IF Then Else Statement in Excel VBA .
- Creating User-Defined Functions in Excel .
- Excel VBA Events – An Easy (and Complete) Guide.
- How to Create and Use Personal Macro Workbook in Excel .
- 24 Useful Excel Macro Examples .
- How to Create and Use an Excel Add-in .
- Guide to Using For Next Loop in Excel VBA
- How to Enable Macros in Excel?
FREE EXCEL BOOK
Get 51 Excel Tips Ebook to skyrocket your productivity and get work done faster
5 thoughts on “How to Run a Macro in Excel?”
Is there a way to carry comments over week to week
do i able to put a macro for different sheet together to get them print in one click button
Ok, I have an interesting challenge here. I need to run a macro which will link my first columns (A), which is a drop down list of job positions (5 entries), to my 2nd column (B), which are check boxes of skill requirements (10 entries), and my 3rd column (C), which is a list of training activities (50 entries). I’m trying to be able to select a job position which will generate the skill requirements and the related training activities. As an example: If selected Job position “A2” = “skill B1”, “skill B2”, “skill B5” = training activities “C4”, “C7”, “C18”, “C21”, “C37”, “C45”, “C49”. Thanks for your help!
Leave a Comment Cancel reply
BEST EXCEL TUTORIALS
Best Excel Shortcuts
Conditional Formatting
Excel Skills
Creating a Pivot Table
Excel Tables
INDEX- MATCH Combo
Creating a Drop Down List
Recording a Macro
© TrumpExcel.com – Free Online Excel Training
Privacy Policy | Sitemap
Twitter | Facebook | YouTube | Pinterest | Linkedin
FREE EXCEL E-BOOK
How to Create Macros in Excel: Step-by-Step Tutorial (2024)
Get ready to have your mind blown! 🤯
Because in this tutorial, you learn how to create your own macros in Excel!
That’s right! And you don’t need to know VBA (Visual Basic for Applications)!
Instead, you will use the Excel macro recording feature to send your spreadsheet experience into overdrive! 🚀
So, read on and try it out yourself using this practice Excel workbook .
Table of Contents
What are Excel macros?
How to record excel macros, how to run an excel macro, run excel macro from a shortcut key, saving macro-enabled workbooks.
A macro is a small program or set of actions that you can run repeatedly. Excel macros are used to automate repetitive tasks to save a lot of time and hassle.
For example, open and take a look at the practice Excel workbook.
Businesses would often have lists like this one. These are potential customers they might want to reach out to and market their products.
Notice how Columns C to H are just pieces of information extracted from Columns A & B. (Learn how to extract strings from texts in this tutorial !)
To streamline the worksheet, you can hide Columns A & B. You can also hide the rest of the columns on the right starting from Column I.
Let’s do this using Excel macros!
1. Click on the View tab in the Excel ribbon
2. Next, click on the Macros button on the right side of the View ribbon
3. This will open the Macros drop-down.
Click Record Macro .
4. Enter a name for your macro, something like Hide_Columns .
Excel macros can be stored in the Personal Macro Workbook. This is saved in the system files of Microsoft Excel and macros saved here can be used in other workbooks. For this Excel macro tutorial, you only need to save the macros in the current Excel file.
4. Select S tore macro in: This Workbook then click the OK button.
Excel is now recording your actions to create a macro.
5. Select Columns A & B and then right-click on the highlighted Column Bar to Hide them.
6. Then select Column I and press Ctrl + Shift + Right Arrow to include all remaining columns on the right.
7. Right-click on the highlighted Column Bar then click on Hide .
Your worksheet should now look like this:
To end the macro recording:
8. On the View ribbon, click on Macros and select Stop Recording .
Good job! 👏
You have created your first macro in Excel!
But wait, where is the recorded macro?
To view all of the available Excel macros :
1. Select View Macros .
2. This opens the Macro window. Saved macros will be listed here and you can Run whichever one you need.
You can also click on Edit to view the VBA code window.
3. The VBA code editor opens.
Notice the Hide_Columns Sub procedure. You don’t have to write or edit VBA code for the macro.
Excel automatically generated each code line based on the recorded keystrokes and mouse clicks.
The Record Macro feature is powerful enough for general spreadsheet automation needs.
But if you want to customize your own VBA macro, you can learn more about Visual Basic for Applications (VBA) here .
Using the Developer tab
Let’s record another macro to Unhide the hidden columns.
This time, you can record the macro from the Developer tab.
The Developer tab gives you access to a lot of useful Microsoft Excel features such as the Visual Basic Editor . It also allows you to quickly insert form controls such as buttons and checkboxes .
However, the Developer tab is not visible in the Excel ribbon by default.
1. Right-click on the Excel ribbon.
Select Customize the Ribbon .
2. This opens the Customize Ribbon window.
On the right side, check the Developer tab checkbox.
3. You should now see the Developer tab.
To start recording the Unhide macro:
1. Click on the Record Macro button in the Developer tab.
2. Name this macro Unhide_Columns .
3. Click OK .
The recording has started.
4. Press Ctrl + A twice to select all cells.
5. Right-click anywhere on the Column Bar then click Unhide .
6. Click on the Stop Recording macro button to finish up.
Great work! 👌
Now you have two recorded macros that can be executed.
To run your macros:
1. Click on the Macros button from the Developer tab.
2. In the Macro window, select the macro Hide_Columns and click on Run .
The macro executes the actions recorded earlier and hides the unnecessary columns.
You can also run macros from the View ribbon.
Run Excel macro from the View tab
This time, run the Unhide_Columns to show all the columns.
1. On the View ribbon, click the Macros button and select View Macros .
2. Select the Unhide_Columns macro and Run it.
This unhides all the columns in the worksheet.
As you can see, the Macro window allows you to quickly run all the available macros.
But you can execute them even faster by using buttons and shortcuts ❗
Run Excel macro from a button
For this next example, you will assign macros to buttons which will be located on top of the table.
1. Insert 2 rows above the table headers. Select Row 1 then press Ctrl + Shift + Plus Sign(+) twice.
2. To create a button, click on Insert > Illustrations > Shapes .
Then select the Rectangle .
3. Draw a rectangle and format it as you’d like. Label it “HIDE”.
This will be your HIDE button. Place it between columns A & B so it will be hidden with the columns when the macro runs.
4. To assign a macro, right-click the shape and select Assign Macro .
5. In the Assign Macro window, select Hide_Columns and click OK .
The Hide button now works!
Now, do the same for the Unhide_Columns macro.
6. Create another rectangle button and label it “UNHIDE”.
7. Repeat Steps 4 & 5 but this time, assign the Unhide_Columns macro.
Now you can quickly run your macros using the HIDE and UNHIDE buttons.
It is sometimes better to run macros using a keyboard shortcut.
For this next example, you want to quickly highlight people on the list that expressed interest in the business.
To create a macro for this:
1. Select any cell within the table.
2. On the Developer tab, toggle ON the Use Relative References button.
3. Start recording with the Record Macro button on the Developer tab .
Or, you can also click the Record Macro button on the Status Bar .
4. Name the macro Mark_Interested .
Then assign a shortcut key. For example, Ctrl + Q .
Click OK . The recording has now started.
4. Highlight the row of the Active Cell using the keyboard shortcut Shift + Space Bar .
When selecting cells or expanding selections while recording a macro, it is best to use keyboard shortcuts. This is so that Excel can record the selections as relative references . For example, if you select Row 4 by clicking on the Row Bar , Excel will record this as an absolute reference . This means it will always select Row 4 regardless of the currently Active Cell . When you use the Shift + Space Bar shortcut instead, it tells Excel to select the row of the current Active Cell .
5. Apply the formatting:
- Fill using the color Green
- Change font color to White
6. End the macro recording from the Status Bar
Try to use the shortcut Ctrl + Q to quickly apply formatting to entire rows.
If you save the practice workbook, this window will pop up:
This is because the practice workbook is currently saved with the .xlsx file extension which does not support macro features.
To save properly, change it to the .xlsm file extension for macro-enable workbooks.
Keep this in mind when saving your work.
Congratulations! 🤩
You are now familiar with Excel macros.
Try to record your own macros and start saving time ⏱️ on your work!
That’s it – Now what?
The examples above are very useful though they are quite simple.
You can record macros for more complex functions. Such as creating custom charts or selectively copying rows of data to another workbook.
But recording and playing macros is just the tip of the iceberg.
With VBA programming, you get access to a whole different level of Excel automation. 🤖
And while Visual Basic may seem overwhelming at first, you can start slow with basic variables and IF statements. These are much easier than you might think!
Learn all that and much more in my free 30-minute online VBA course here .
Other resources
If you want to know more about the inner workings of the record macro feature, check out my Excel macro tutorial for beginners on YouTube .
You can also dive right into VBA by reading this article or watching this introductory video on VBA and macros !
Hope you enjoyed this article!
Power Spreadsheets
Excel and VBA tutorials and training. Learn how to use Microsoft Excel and Visual Basic for Applications now.
Define Variables In VBA: How To Declare Variables And Assign Them Expressions

This data is generally stored in the computer's memory. For purposes of this Excel guide, we'll distinguish between the following 2 places to store data:
The former topic (objects) is covered in other Excel tutorials within Power Spreadsheets, including here and here . This blog post focuses on the latter topic (VBA variables).
Variables are often used when working with Visual Basic for Applications.
You have a substantial degree of flexibility when declaring VBA variables. This flexibility in declaring VBA variables can lead to poor coding practices. Poor coding practices can lead to potential problems down the road. These problems can lead to big headaches.
My purpose with this Excel tutorial is to help you avoid those headaches. Therefore, in this blog post, I explain the most important aspects surrounding VBA variable declaration . More specifically, this guide is divided in the following sections:
Table of Contents
Let's start by taking a detailed look at…
What Is A VBA Variable
For purposes of this blog post, is enough to remember that a variable is, broadly, a storage location paired with a name and used to represent a particular value .
As a consequence of this, variables are a great way of storing and manipulating data.
This definition can be further extended by referencing 3 characteristics of variables . A VBA variable:
- Is a storage location within the computer's memory.
- Is used by a program.
- Has a name.
In turn, these 3 main characteristics of variables provide a good idea of what you need to understand in order to be able to declare variables appropriately in VBA:
- How do you determine the way in which the data is stored, and how do you actually store the data. These items relate to the topics of data types (which I cover in a separate post ) and VBA variable declaration (which I explain below).
- How do you determine which program, or part of a program, can use a variable. This refers to the topics of variable scope and life.
- How do you name VBA variables.
I explain each of these 3 aspects below.
This Excel tutorial doesn't cover the topic of object variables . This is a different type of VBA variable, which serves as a substitute for an object. I may, however, cover that particular topic in a future blog post.
Since this how-to guide focuses on declaring variables in VBA, and we've already seen what a variable is, let's take a look at…
Why Should You Declare Variables Explicitly In VBA
Before I explain some of the most common reasons to support the idea that you should declare your VBA variables explicitly when working with Visual Basic for Applications, let's start by understanding what we're actually doing when declaring a variable explicitly . At a basic level: When you declare a variable, the computer reserves memory for later use.
Now, the common advice regarding VBA variable declaration says that declaring variables is an excellent habit .
There are a few reasons for this, but the strongest has to do with Excel VBA data types . The following are the main points that explain why, from these perspective, you should get used to declaring variables when working in Visual Basic for Applications:
- VBA data types determine the way in which data is stored in the computer's memory.
- You can determine the data type of a particular VBA variable when declaring it. However, you can also get away with not declaring it and allowing Visual Basic for Applications to handle the details.
- If you don't declare the data type for a VBA variable, Visual Basic for Applications uses Variant (the default data type).
- Despite being more flexible than other data types, and quite powerful/useful in certain circumstances, relying always on Variant has some downsides. Some of these potential problems include inefficient memory use and slower execution of VBA applications.
When you declare variables in VBA, you tell Visual Basic for Applications what is the data type of the variable . You're no longer relying on Variant all the time. Explicitly declaring variables and data types may result in (slightly) more efficient and faster macros.
Even though the above is probably the main reason why you should always declare variables in Visual Basic for Applications, it isn't the only one. Let's take a look at other reasons why you should declare variables when working with Visual Basic for Applications:
Additional Reason #1: Declaring Variables Allows You To Use The AutoComplete Feature
Let's take a look at the following piece of VBA code.

You can see the whole VBA code of the Variable_Test macro further below.
This Excel VBA Variables Tutorial is accompanied by Excel workbooks containing the data and macros I use. You can get immediate free access to these example workbooks by subscribing to the Power Spreadsheets Newsletter .
The next statements in the macro (after those that appear above) are:
MsgBox “the value of Variable One is ” & Variable_One & _ Chr(13) & “the value of Variable Two is ” & Variable_Two
Let's imagine that you're typing these statements and are currently at the following point:

Theoretically, you must type the whole name of the variable: “Variable_One”. However, declaring the VBA variable previously allows you to take advantage of a keyboard shortcut : “Ctrl + Space”. Once you've typed the first few (can be as little as 2 or 3) letters of a declared variable name, you can press “Ctrl + Space” and the Visual Basic Editor does one of the following:
- As a general rule, the VBE completes the entry.
- If there is more than 1 option available, the Visual Basic Editor displays a list of possible matches to complete the entry.
In the case above, using the “Ctrl + Space” shortcut results in the Visual Basic Editor displaying a list of possible matches to complete the entry. This is shown in the following image.

Notice how the list above, in addition to Variable_One and Variable_Two, also includes other reserved words and functions.
This is because the same keyboard shortcut (“Ctrl + Space”) also works for those 2 other elements. However, those are topics for future blog posts.
Now, let's assume that you pressed the “Ctrl + Space” keyboard shortcut at the following point:

In this case, the Visual Basic Editor completes the entry.

Additional Reason #2: Declaring Variables Makes VBA Carry Out Additional Error Checking
Some errors in Visual Basic for Applications may be very difficult to spot, particularly in large or complex VBA applications.
By declaring your VBA variables and defining their data type, you get some additional help from Visual Basic for Applications. When you explicitly declare the data type of your variables, VBA carries out some additional checking when compiling the code. In some of these cases, VBA can identify certain errors while you're working on the code.
The most common type of error that VBA can catch this way is data-typing errors. These errors are caused by incorrectly assigning certain information to a particular variable. More precisely, this usually happens when the assignment results in a mismatch between the following:
- The data type of the variable; and
- The type of the data assigned to the variable.
The following are some examples of how this can occur:
- You declare an Integer or Byte variable, but try to assign a string to it. The Integer and Byte data types are designed to store certain integers, not strings.
- You declare a Boolean variable, but try to assign a large integer to it. Variables of the Boolean data type can only be set to the 2 Boolean values (TRUE and FALSE).
Appropriately declaring your VBA variables (usually) allows you to notice these kind of mistakes as soon as possible after the variable has received an unexpected data type.
Additional Reason #3: Declaring Variables Improves Code Readability, Makes Debugging Easier And Reduces The Risk Of Certain Mistakes
As I explain below, whenever you declare VBA variables explicitly, you generally place all the variable declarations at the beginning of a module or procedure. This improves the readability of your VBA code.
Additionally, declaring variables explicitly makes your VBA code easier to debug and edit.
Finally, getting used to always declaring variables explicitly by following the different suggestions that appear in this Excel tutorial reduces the risk of certain mistakes. Among others, explicitly declaring variables reduces the risk of both:
- Variable naming-conflict errors; and
- Spelling or typographical mistakes.
Naming-conflict errors are quite dangerous. If you don't declare VBA variables, there is a higher risk of accidentally over-writing or wiping out a pre-existing variable when trying to create a new one.
Spelling mistakes can also create big problems. I explain one of the main ways in which taking measures to declare variables always helps you reduce spelling mistakes below.
However, in addition to that particular way, variable declaration also helps reduce spelling mistakes by capitalizing all the lower-case letters (in a variable name) that were capitalized at the point of the declaration statement.
To see how this works, let's go back to the VBA code for the Variable_Test macro. Let's assume that you type the name of Variable_One without capitalizing (as shown below):

Once you complete the statement, the Visual Basic Editor automatically capitalizes the appropriate letters. This looks as follows:

You can, for example, make it a habit to (i) use some capital letters in your VBA variable names but (ii) type the body of your VBA code in only lowercase letters. If the Visual Basic Editor doesn't capitalize a variable name after you've typed it, you may have typed the name wrongly. The VBE (generally) does this automatic capitalization for all keywords (not only VBA variables).
All of the advantages that I list under Additional Reason #3 are, in the end, related to the fact that variable declaration helps you (and VBA itself) have a better idea of what variables exist at any particular time.
So I suggest you save yourself some potential problems by getting used to declaring your VBA variables explicitly.
The Disadvantage Of Declaring VBA Variables Explicitly
Despite the advantages described above, the idea that you should always declare VBA variables explicitly is not absolutely accepted without reservations .
Most VBA users agree that declaring variables explicitly is (usually) a good idea.
However, some VBA users argue that both approaches have advantages and disadvantages. From this perspective, the main disadvantage of explicit variable declaration is the fact that it requires some upfront time and effort. In most cases, these disadvantages are (usually) outweighed by the advantages of explicit variable declaration.
In practice, however, it seems that for several VBA programmers the fact that declaring variables require slightly more time and effort isn't outweighed by the advantages described above. In fact, some developers do not declare variables explicitly.
I provide a general explanation of how to create a VBA variable without declaring it (known as declaring a variable implicitly) below.
However, let's assume for the moment that you're convinced about the benefits of declaring VBA variables. You want to do it always: no more undeclared variables.
In order to ensure that you follow through, you may want to know…
How To Remember To Declare Variables
Visual Basic for Applications has a particular statement that forces you to declare any variables you use . It's called the Option Explicit statement.
Whenever the Option Explicit statement is found within a module, you're prevented from executing VBA code containing undeclared variables .
The Option Explicit statement just needs to be used once per module. In other words:
- You only include 1 Option Explicit statement per module.
- If you're working on a particular VBA project that contains more than 1 module, you must have 1 Option Explicit statement in each module.
Including the Option Explicit statement in a module is quite simple:
Just type “Option Explicit” at the beginning of the relevant module, and before declaring any procedures . The following image shows how this looks like:

Once you've included the Option Explicit statement in a module, Visual Basic for Applications doesn't execute a procedure inside that module unless absolutely all the variables within that procedure are declared. If you try to call such procedure, Excel displays the following compile-time error message:

In addition to the reasons I provide above to support the idea that you should declare your VBA variables, there is an additional advantage when using the Option Explicit statement and having to declare absolutely all of your variables :
The Visual Basic Editor automatically proofreads the spelling of your VBA variable names .
Let's see exactly what I mean by taking a look at a practical example:
Let's go back to the Variable_Test macro that I introduced above. The following screenshot shows the full Sub procedure:

Notice how, at the beginning of the Sub procedure, the variables Variable_One and Variable_Two are declared. I explain how to declare VBA variables below.

Notice, furthermore, how each of these variables appears 2 times after being declared:

Let's assume that while writing the VBA code, you made a typo when writing the name of the VBA variable Variable_One (you typed “Variable_O m e”). In such a case, the code of the Variable_Test macro looks as follows:

Such small typos can be difficult to spot in certain situations. This is the case, for example, if they're present within the VBA code of a large Sub procedure or Function procedure where you're working with several different variables. This may be a big problem…
If you fail to notice these kind of typos within in the names of variables, Excel interprets the different spellings as different variables (for example, Variable_One and Variable_Ome). In other words, Excel creates a new variable using the misspelled name. This leads to having several variables even though you think you only have one and, in certain cases, may end in the macro returning the wrong result .
However, when you misspell the name of a VBA variable while having the Option Explicit statement enabled, Excel warns you about it . The following image shows the error message that is displayed when I try to run the Variable_Test macro with the typo shown above. Notice how the Visual Basic Editor:
- Clearly informs you that there is an undefined variable.
- Highlights the element of the VBA code where the mistake is.

Using the Option explicit statement is (generally) suggested .
Therefore, let's take this a step further by seeing how to ensure that the Option Explicit statement is always enabled:
How To Remember To Declare Variables Always
The Option Explicit statement is not enabled by default . This means that, if you want to use it always, you'd have to enable it for every single module you create.
However, the Visual Basic Editor is highly customizable. One of the customizations you can make is have the VBE always require that you declare your variables . The Visual Basic Editor does this by automatically inserting the Option Explicit statement at the beginning of any VBA module.
Enabling this option is generally recommended . If you want to have the Visual Basic Editor insert the Option Explicit statement in all your future modules, follow these 2 easy steps:
Step #1: Open The Options Dialog
You can get to the Options dialog of the Visual Basic Editor by clicking on the Tools menu and selecting “Options…”.

Step #2: Enable “Require Variable Declaration” And Click On The OK Button
The Visual Basic Editor should display the Editor tab of the Options dialog by default. Otherwise, simply click on the relevant tab at the top of the dialog.
Within the Editor tab, you simply need to enable “Require Variable Declaration” by ticking the box next to it. Then, click the OK button at the lower right corner of the dialog to complete the operation.

Note that enabling Require Variable Declaration option only applies to modules created in the future . In other words, Require Variable Declaration doesn't insert the Option Explicit statement in previously existing modules that were created while the option wasn't enabled.
You can learn more about customizing the Visual Basic Editor through the Options dialog, including a detailed description of the Require Variable Declaration setting, by clicking here .
You already know how to determine the way in which data is stored by using VBA data types. Let's take a look at how you actually store the data or, in other words…
How To Declare A Variable In VBA
The most common way of declaring a variable explicitly is by using the Dim statement . In practice, you're likely to use Dim for most of your variable declarations.
You've already seen this type of statement within the Variable_Test macro shown above. In that particular case, the Dim statement is used to declare the Variable_One and Variable_Two variables as follows:

Both variables are being declared as being of the Integer data type.
3 other keywords (in addition to Dim) may be used to declare a VBA variable explicitly :
As explained below, you generally use these 3 latter statements to declare variables with special characteristics regarding their scope or lifetime.
Regardless of the keyword that you're using to declare a variable, the basic structure of the declaration statement is the same :
Keyword Variable_Name As Data_Type
In this structure:
- “Keyword” is any of the above keywords: Dim, Static, Public or Private. In the following sections, I explain when is appropriate to use each of these.
- “Variable_Name” is the name you want to assign to the variable. I explain how to name VBA variables below.
- “Data_Type” makes reference to the data type of the variable. This element is optional, but recommended.
The question of which is the exact keyword that you should use to declare a particular VBA variable depends, mostly, on the scope and life you want that particular variable to have.
The following table shows the relationship between the 4 different statements you can use to declare a VBA variable and the 3 different scopes a variable can have :
I introduce the Dim, Static, Private and Public statements in the following sections. However, as you read their descriptions, you may want to constantly refer to the section below which covers VBA variable scope.
How To Declare A VBA Variable Using The Dim Statement
The Dim statement is the most common way to declare a VBA variable whose scope is procedure-level or module-level . I cover the topic of variable scope below.
Dim stands for dimension. In older versions of BASIC, this (Dim) statement was used to declare an array's dimensions .
Nowadays, in VBA, you use the Dim keyword to declare any variable, regardless of whether it is an array or not.
The image above shows the most basic way in which you can use the Dim statement to declare VBA variables. However, you can also use a single Dim statement to declare several variables . In such cases, you use a comma to separate the different variables.
The following screenshot shows how you can declare Variable_One and Variable_Two (used in the sample Variable_Test macro) by using a single Dim statement:
Even though this structure allows you to write fewer lines of VBA code, it (usually) makes the code less readable .
Regardless of whether you declare VBA variables in separate lines or in a single line, note that you can't declare several variables to be of a determined data type by simply separating the variables with a comma before declaring one data type . As explained in Excel 2013 Power Programming with VBA:
Unlike some languages, VBA doesn't let you declare a group of variables to be a particular data type by separating the variables with commas.
In other words, the following statement is not the equivalent as that which appears above:
In this latter case, only Variable_Two is being declared as an Integer.
In the case of Variable_One, this piece of code doesn't declare the VBA data type. Therefore, Visual Basic for Applications uses the default type: Variant.
The location of the Dim statement within a VBA module depends on the desired variable scope . I explain the topic of variable scope, and where to place your Dim statements depending on your plans, below.
How To Declare A Variable Using The Static Statement
You can use the Static statement to declare procedure-level VBA variables . It's an alternative to the Dim statement.
I explain the topic of variable scope below. However, for the moment, is enough to understand that procedure-level VBA variables can only be used within the procedure in which they are declared .
The main difference between VBA variables declared using the Dim statement and variables declared using the Static statement is the moment in which the variable is reset . Let's take a look at what this means precisely:
As a general rule (when declared with the Dim statement), all procedure-level variables are reset when the relevant procedure ends. Static variables aren't reset; they retain the values between calls of the procedure .
Static VBA variables are, however, reset when you close the Excel workbook in which they're stored. They're also reset (as I explain below) when a procedure is terminated by an End statement.
Despite the fact that Static variables retain their values after a procedure ends, this doesn't mean that their scope changes. Static variables continue to be procedure-level variables and, as such, they´re only available within the procedure in which they're declared.
These particular characteristics of Static variables make them particularly useful for purposes of storing data regarding a process that needs to be carried out more than 1 time. There are some special scenarios where this comes in very handy. The following are 2 of the main uses of Static variables:
- Storing data for a procedure that is executed again later and uses that information.
- Keeping track (counting) of a running total.
Let's take a quick look at these 2 examples:
Example #1: Toggling
You can use a Static variable within a procedure that toggles something between 2 states.
Consider, for example, a procedure that turns bold font formatting on and off. Therefore:
- The first time the procedure is called, bold formatting is turned on.
- In the second execution, bold formatting is turned off.
- For the third call, bold formatting is turned back on.
Example #2: Counters
A Static variable can (also) be useful to keep track of the number of times a particular procedure is executed. You can set up such a counter by, for example:
- Declaring a counter variable as a Static VBA variable.
- Increasing the value assigned to the Static variable by 1 every time the procedure is called.
How To Declare A VBA Variable Using The Private And Public Statements
You can use the Private statement to declare module-level variables . In these cases, it's an alternative to the Dim statement . I explain the topic of module-level variables in more detail below.
The fourth and final statement you can use to declare a VBA variable is Public. The Public statement is used to declare public variables . I explain public variables below.
At the beginning of this Excel tutorial, we saw that one of the defining characteristics of a VBA variable is that it is used by a program. Therefore, let's take a look at how do you determine which program, or part of a program, can use a determined variable. We start doing this by taking a look at…
How To Determine The Scope Of A VBA Variable
The scope of a VBA variable is what determines which modules and procedures can use that particular variable . In other words, it determines where that variable can be used.
Understanding how to determine the scope of a variable is very important because:
- A single module can have several procedures.
- A single Excel workbooks can have several modules.
If you're working with relatively simple VBA applications, you may only have one module with a few procedures. However, as your work with VBA starts to become more complex and sophisticated, this may change.
You may not want all of VBA variables to be accessible to every single module and procedure. At the same time, you want them to be available for the procedures that actually need them. Appropriately determining the scope of VBA variables allows you to do this.
Additionally, the scope of a VBA variable has important implications in connection with the other characteristics of the variable. An example of this is the life of a variable, a topic I explain below.
Therefore, let's take a look at the 3 main different scopes that you can apply :
Variable Scope #1: Procedure-Level (Or Local) VBA Variables
This is the most restricted variable scope.
As implied by its name, procedure-level variables (also known as local variables) can only be used within the procedure in which they are declared . This applies to both Sub procedures and Function procedures.
In other words, when the execution of a particular procedure ends, any procedure-level variable ceases to exist. Therefore, the memory used by the variable is freed up.
The fact that Excel frees up the memory used by procedure-level variables when the procedure ends makes this type of VBA variables particularly efficient. In most cases there's no reason to justify a variable having a broader scope than the procedure.
This is an important point: as a general rule, you should make your VBA variables as local as possible . Or, in other words: Limit a variable's scope to the level/scope you need them.
Excel doesn't store the values assigned to procedure-level VBA variables for use or access outside the relevant procedure. Therefore, if you call the same procedure again, any previous value of the procedure-level variables is lost.
Static variables (which I explain above) are, however, an exception to this rule . They generally retain their values after the procedure has ended.
Let's take a look at how you declare a procedure-level variable:
As I explain above, the usual way to declare a VBA variable is by using the Dim statement. This general rule applies to procedure-level variables.
You can also use the Static statement for declaring a procedure-level variable. In such a case, you simply use the Static keyword instead of the Dim keyword when declaring the VBA variable. You'd generally use the Static statement instead of Dim if you need the variable to retain its value once the procedure has ended .
The key to making a variable procedure-level is in the location of the particular declaration statement. This statement must be within a particular procedure .
The only strict requirement regarding the location of the variable declaration statement inside a procedure is that it is before the point you use that particular VBA variable . In practice, most VBA users declare all variables at the beginning of the applicable procedure.
More precisely, the most common location of a variable declaration statement within a procedure is:
- Immediately after the declaration statement of the relevant procedure.
- Before the main body of statements of the relevant procedure.
The VBA code of the Variable_Test macro is a good example of how you usually declare a VBA variable using the Dim statement. Notice how the Dim statement used to declare both variables (Variable_One and Variable_Two) is between the declaration statement of the Sub procedure and the main body of statements:

As you can imagine, placing all your VBA variable declaration statements at the beginning of a procedure makes the code more readable.
Since the scope of procedure-level VBA variables is limited to a particular procedure, you can use the same variable names in other procedures within the same Excel workbook or module. Bear in mind that, even though the name is the same, each variable is unique and its scope is limited to the relevant procedure.
I'm only explaining this for illustrative purposes, not to recommend that you repeat VBA variable names throughout your procedures. Repeating variable names in different procedures (inside the same project) can quickly become confusing. This is the case, particularly, when debugging those procedures. As you learn below, a common recommendation regarding variable name choice is to use unique variable names .
Let's see how this works in practice by going back to the module containing the Variable_Test Sub procedure and adding a second (almost identical procedure): Variable_Test_Copy.

Notice how, the only difference between the 2 Sub procedures is in the values assigned to the variables and the text that appears in the message box:

If I run the Variable_Test macro, Excel displays the following message box:

If I run the Variable_Test_Copy macro, Excel displays a very similar message box. Notice in particular how the values of Variable One and Variable Two change:

Let's move on to a wider variable scope:
Variable Scope #2: Module-Level (Also Known As Private) VBA Variables
The ideas behind the concept of module-level (also known as private) VBA variables are, to a certain extent, similar to what you've already seen regarding procedure-level variables (with a few variations).
As implied by their name, module-level variables are available for use in any procedure within the module in which the VBA variable is declared . Therefore, module-level variables survive the termination of a particular procedure. However, they're not available to procedures in other modules within the same VBA project.
As a consequence of the above, Excel stores the values assigned to module-level variables for use or access within the relevant module. Therefore, module-level variables retain their values between procedures, as long as those procedures are within the same module . Module-level variables allow you to pass data between procedures stored in the same module.
Despite the above, module-level variables don't retain their values between procedures (even if they're within the same module) if there is an End statement. As I explain below, VBA variables are purged and lose their values when VBA encounters such a statement.
The most common way to declare module-level VBA variables is by using the Dim statement . Alternatively, you can use the Private statement.
Module-level variables declared using the Dim statement are by default private. In other words, at a module-level, Dim and Private are equivalent. Therefore, you can use either.
However, some advanced VBA users suggest that using the Private statement can be a better alternative for declaring module-level variables . The reason for this is that, since you'll generally use the Dim statement to declare procedure-level variables, using a different keyword (Private) to declare module-level variables makes the code more readable by allowing you to distinguish between procedure-level and module-level variables easily.
Just as is the case for procedure-level variables, the key to determining the scope of a module-level variable is the location of the particular declaration statement . You declare a module-level VBA variable:
- Within the module in which you want to use the variable.
- Outside of any of the procedures stored within the module.
The way to achieve this is simply by including the relevant variable declaration statements within the Declarations section that appears at the beginning of a module.
In the case of the sample Excel workbooks that accompany this tutorial, the Declarations section is where the Option Explicit statement appears.

You can, when working within any VBA module, easily get to the Declarations section within the Visual Basic Environment by clicking on the drop-down list on the top right corner of the Code Window (known as the Procedure Box) and selecting “(Declarations)”.

This same drop-down list continues to display “(Declarations)” as long as you're working within the Declarations section of the relevant module.

Let's see the practical consequences of working with module-level variables by modifying the VBA code above as follows:
- Making Variable_One and Variable_Two module-level variables by declaring them within the Declarations section.
- Deleting the statements that assigned values to Variable_One and Variable_Two in the Variable_Test_Copy macro. The assignment made within the Variable_Test Sub procedure is maintained.
The resulting VBA code is as follows:

The following message box is displayed by Excel when the Variable_Test macro is executed:

And the following is the message box displayed when the Variable_Test_Copy macro is executed. Notice how both variables (Variable_One and Variable_Two):
- Can be used in both of the procedures within the relevant module.
- Have retained the values that were assigned by the Variable_Test macro for use in the Variable_Test_Copy macro.

Now, let's take a look at the third type of variable scope:
Variable Scope #3: Public VBA Variables
The availability of public VBA variables is even broader than that of module-level variables:
- At the basic level, public variables they are available for any procedure within any VBA module stored in the relevant Excel workbook .
- At a more complex level, you can make public variables available to procedures and modules stored in different workbooks .
Variables that are declared with the Public statement are visible to all procedures in all modules unless Option Private Module applies. If Option Private Module is enabled, variables are only available within the project in which they are declared.
When deciding to work with public VBA variables, remember the general rule I describe above: make your VBA variables as local as possible .
Let's start by taking a look at the basic case:
How To Declare Public VBA Variables: The Basics
In order to declare a public VBA variable , the declaration needs to meet the following conditions:
- Be made in the Declarations section, just as you'd do when declaring a module-level variable.
- Use the Public statement in place of the Dim statement.
- The declaration must be made in a standard VBA module.
VBA variables whose declarations meet these conditions are available to any procedure (even those in different modules) within the same Excel workbook .
To see how this works, let's go back to the macros above: the Variable_Test and Variable_Test_Copy macros and see how the variables (Variable_One and Variable_Two) must be declared in order to be public.
For this example, I first store both macros in different modules. Notice how, in the screenshot below, there are 2 modules shown in the Project Explorer.

Module1 stores the Variable_Test macro while Module2 stores the Variable_Test_Copy macro. The variables are declared in Module1.
This Excel VBA Variables Tutorial is accompanied by Excel workbooks containing the data and macros I use (including the macros above). You can get immediate free access to these example workbooks by subscribing to the Power Spreadsheets Newsletter .
Notice how, in the screenshot above, both variables are declared using the Dim statement. Therefore, as it stands, they're module-level variables. If I try to execute the Variable_Test_Copy macro (which now has no variable declaration nor assignment) which is stored in Module2, Excel returns the following error message:

This is exactly the same error message displayed in the example above, when examining the Option Explicit statement and the reasons why you should always declare variables.
Let's go back to Module1, where both Variable_One and Variable_Two are declared, and change the keyword used to declare them. Instead of using Dim, we use Public. The rest of the macro remains unchanged.

If I run again both macros (Variable_Test and Variable_Test_Copy) in the same order I did above, the message boxes displayed by Excel now show the same values. More precisely:

As shown by the screenshots above:
- Both variables are now available to all the procedures within the relevant workbook, even though they are stored in separate modules.
- The variables retain the values assigned by the first macro (Variable_Test) for use by the second macro (Variable_Test_Copy).
This basic method of declaring public VBA variables is, in practice, the only one that you really need to know. However, in case you're curious, let's take a look at…
How To Declare Public VBA Variables Available Across Different Workbooks
In practice, you'll likely only use public VBA variables that are available for all the procedures within the particular Excel workbook in which the variable is declared. This is the method I describe in the previous section.
However, it is also possible to make public VBA variables available to procedures within modules stored in different Excel workbooks. This is rarely needed (or done).
You make a variable that is available to modules stored in Excel workbooks different from that in which the variable is actually declared by following these 2 simple steps:
- Step #1: Declare the variable as Public, following the indications in the previous section.
- Step #2: Create a reference to the Excel workbook where the relevant variable is declared. You can set up a reference by using the References command in the Visual Basic Editor. This command appears in the Tools menu of the VBE.

As a general rule, the scope of a variable determines its lifetime. Therefore, let's take a look at…
What Is The Life Of A VBA Variable And How Is It Determined
The term “life” refers to how long a variable is stored in the computer's memory .
A variable's life is closely related to its scope. In addition to determining where a variable may be used, a variable's scope may (in certain cases) determine the moment at which the variable is removed from the computer's memory.
In other words: The life of a VBA variable (usually) depends on its scope .
Fortunately, the topic of variable life is simpler than that of scope. More precisely, there are 2 basic rules :
- Rule #1: Procedure-level VBA variables declared with the Dim statement are removed from the memory when the relevant procedure finishes.
- Rule #2: Procedure-level Static variables, module-level variables and public variables retain their values between procedure calls.
You can purge all the variables that are currently stored in memory using any of the following 3 methods :

- Method #3: Include an End statement within your VBA code. From a broad point of view, the End statement has different syntactical forms. However, they one I'm referring to here is simply “End”. You can put this End statement anywhere in your code. The End statement can have several consequences, such as terminating code execution and closing files that were opened with the Open statement. For purposes of this Excel tutorial, the most important consequence of using the End statement is that it clears variables from the memory.
Having a good understanding of these 3 variable-purging methods is important, even if you don't plan to use them explicitly. The reason for this is that a variable purge may cause your module-level or public variables to lose their content (even without you noticing) .
Therefore, when using module-level or public variables, ensure they hold/represent the values you expect them to hold/represent .
Now that we've fully covered the topic of how to determine which application or part of an application can use a variable (by looking at the topics of VBA variable scope and life), let's understand…
How To Name VBA Variables
Visual Basic for Applications provides a lot of flexibility in connection with how you can name variables . As a general matter, the rules that apply to variable naming are substantially the same rules that apply to most other elements within Visual Basic for Applications.
The main rules that apply to VBA variable naming can be summarized as follows . I also cover the topic of naming (in the context of naming procedures) within Visual Basic for Applications here and here , among other places.
- The first character of the variable name must be a letter.
- Characters (other than the first) can be letters, numbers, and some punctuation characters. One of the most commonly used punctuation characters is the underscore (_). Some VBA programmers, use it to improve the readability of VBA variable names. For illustration purposes, take a look at the macro names I use in this blog post . Other VBA users omit the underscore and use mixed case variable names (as explained below).
- VBA variable names can't include spaces ( ), periods (.), mathematical operators (for example +, –, /, ^ or *), comparison operators (such as =, < or >) or certain punctuation characters (such as the type-declaration characters @, #, $, %, & and ! that I explain below).
- The names of VBA variables can't be the same as those of any of Excel's reserved keywords. These reserved keywords include Sub, Dim, With, End, Next and For. If you try to use any of this words, Excel returns a syntax error message. These messages aren't very descriptive. Therefore, if you get a strange compile error message, it may be a good idea to confirm that you're not using a reserved keyword to name any of your VBA variables . You can (theoretically) use names that match names in Excel's VBA object model (such as Workbook, Worksheet and Range). However, this increases the risk of confusion Therefore, it is generally suggested that you avoid using such variable names. Similarly, consider avoiding variable names that match names used by VBA, or that match the name of built-in functions, statements or object members . Even if this practice doesn't cause direct problems, it may prevent you from using the relevant function, statement or object member without fully qualifying the applicable reference. In summary: it's best to create your own variable names, and make them unique and unambiguous .
- Visual Basic for Applications doesn't distinguish between upper and lowercase letters. For example, “A” is the same as “a”. Regardless of this rule, some VBA programmers use mixed case variable names for readability purposes. For an example, take a look at the variable names used in macro example #5 , such as aRow and BlankRows. Some advanced VBA users suggest that it may be a good idea to start variable names with lowercase letters. This reduces the risk of confusing those names with built-in VBA keywords.
- The maximum number of characters a VBA variable name can have is 255. However, as mentioned in Excel 2013 Power Programming with VBA , very long variable names aren't recommended.
- The name of each VBA variable must be unique within its relevant scope. This means that the name of a procedure-level variable must be unique within the relevant procedure, the name of a module-level variable must be unique within its module, and so on. This requirement makes sense if you consider how important it is to ensure that Visual Basic for Applications uses the correct variable (instead of confusing it with another one). At a more general level, it makes sense to have (almost) always unique names . As I explain above, re-using variable names can be confusing when debugging. Some advanced VBA users consider that there are some reasonable exceptions to this rule, such as certain control variables.
In addition to these rules, and suggestions related to those rules, you can find a few additional practices or suggestions made by Excel experts below.
For example, one of the most common suggestions regarding VBA variable naming, is to make variable names descriptive .
In some case, you can use comments to describe variables that don't have descriptive names. I suggest, however, that you try to use descriptive variable names. They are, in my opinion, more helpful.
Finally, advanced VBA users suggest that you add a prefix to the names of VBA variables for purposes of identifying their data type . These users argue that adding these prefixes makes the code more readable and easier to modify since all variables can be easily identified as of a specific data type throughout the VBA code.
The following table shows the main tags that apply to VBA variables:
In Excel 2013 Power Programming with VBA , John Walkenbach introduces a similar naming convention. In that case, the convention calls for using a lowercase prefix indicating the data type. The following table shows these prefixes (some are the same as those in the table above):
Walkenbach doesn't use this convention because he thinks it makes the code less readable. However, other advanced VBA users include a couple of letters at the beginning of the variable name to represent the data type.
In the end, you'll develop your own variable-naming method that works for you. What's more important than following the ideas of other VBA users, is to develop and (consistently) use some variable naming conventions . Please feel free to use any of the ideas and suggestions that appear (or are linked to) above when creating your variable-naming system…
And make sure to let me know your experience and ideas by leaving a comment below .
The sections above cover all the main items within the declaration statement of a VBA variable. Let's take a quick look at what happens after you've declared the variable by understanding…
How To Assign A Value Or Expression To A VBA Variable
Before you assign a value to a declared VBA variable, Excel assigns the default value . Which value is assigned by default depends on the particular data type of the variable.
- The default value for numeric data types (such as Byte, Integer, Long, Currency, Single and Double) is 0.
- In the case of string type variables (such as String and Date), the default value is an empty string (“”), or the ASCII code 0 (or Chr(0)). This depends on whether the length of the string is variable or fixed.
- In a numeric context, the Empty value is represented by 0.
- In a string context, it's represented by the zero-length string (“”).
As a general rule, however, you should explicitly assign a value or expression to your VBA variables instead of relying in the default values.
The statement that you use to assign a value to a VBA variable is called, fittingly, an Assignment statement. Assigning an initial value or expression to a VBA variable is also known as initializing the variable.
Assignment statements take a value or expression (yielding a string, number or object) and assign it to a VBA variable or a constant .
You've probably noticed that you can't declare a VBA variable and assign a value or expression to it in the same line. Therefore, in Visual Basic for Applications, assignment statements are separate from variable declaration statements.
This Excel tutorial refers only to variables (not constants) and expressions are only covered in an introductory manner. Expressions are more useful and advanced than values. Among other strengths, expressions can be as complex and sophisticated as your purposes may require.
Additionally, if you have a good understanding of expressions, you shouldn't have any problem with values. Therefore, let's take a closer look at what an expression is.
Within Visual Basic for Applications, expressions can be seen as having 3 main characteristics :
- Element #1: Keywords.
- Element #2: Operators.
- Element #3: Variables.
- Element #4: Constants.
- Item #1: A string.
- Item #2: A number.
- Item #3: An object.
- Purpose #1: Perform calculations .
- Purpose #2: Manipulate characters.
- Purpose #3: Test data.
Expressions aren't particularly complicated. The main difference between formulas and expressions is what you do with them:
- When using worksheet formulas , Excel displays the result they return in a cell.
- When using expressions, you can use Visual Basic for Applications to assign the result to a VBA variable.
As a general rule, you use the equal sign (=) to assign a value or expression to a VBA variable . In other words, the equal sign (=) is the assignment operator.
When used in this context, an equal sign (=) doesn't represent an equality. In other words, the equal sign (=) simply the assignment operator and not a mathematical symbol denoting an equality.
The basic syntax of an assignment statement using the equal sign is as follows:
- On the right hand side of the equal sign: The value or expression you're storing.
- On the left hand side of the equal sign: The VBA variable where you're storing the data.
You can change the value or expression assigned to a variable during the execution of an application .
To finish this section about Assignment statements, let's take a quick look at the assignments made in the sample macros Variable_Test and Variable_Test_Copy. The following image shows how this (quite basic and simple) assignments were made.

Notice the use of the equal sign (=) in both cases. In both the Variable_Test and the Variable_Test_Copy macros, the value that appears on the right side of the equal sign is assigned to the variable that appears on the left side of the sign.
By now we've covered pretty much all the basics in connection with declaring variables in Visual Basic for Applications. You may, however, be wondering…
What if I don't want to follow the suggestions above and don't want to declare variables explicitly?
The following section explains how you can do this…
How To Declare VBA Variables Implicitly (a.k.a. How To Create Variables Without Declaring Them)
The first few sections of this Excel tutorial explain why declaring variables explicitly is a good idea.
However, realistically speaking, this may not be always possible or convenient. In practice, several VBA Developers don't declare variables explicitly. In fact, these Developers tend to (simply) create variables as (and when) required.
Doing this is relatively simple and is known as declaring a variable implicitly. In practical terms, this means using a VBA variable in an assignment statement without declaring explicitly (as explained throughout most of this blog post) first. This works because, when VBA encounters a name that it doesn't recognize (for example as a variable, reserved word, property or method ), it creates a new VBA variable using that name.
Let's take a look at a practical example by going back to the Variable_Test and Variable_Test_Copy macros…
The image below shows the VBA code of both the Variable_Test and Variable_Test_Copy macros without Variable_One and Variable_Two being ever declared explicitly. Notice how there is no Dim statement, as it is the case in the image above. Both VBA Sub procedures begin by simply assigning a value to the relevant variables.

When this happens, Visual Basic for Applications proceeds as follows :
- Step #1: It carries out a check to confirm that there isn't an existing variable with the same name.
- Step #2: If there are no other variables with the same name, it creates the variable. Since the data type of the variable isn't declared, VBA uses the default Variant type and assigns one of its sub-types.
You can, actually, set the data type of an implicitly declared variable by using type-declaration (also known as type-definition) characters . These are characters that you can add at the end of the variable name to assign the data type you want.
As explained by John Walkenbach in Excel 2013 Power Programming with VBA , type-declaration characters are a “holdover” from BASIC. He agrees that it's generally better to declare variables using the methods I describe above .
The following table displays the main type-declaration characters you can use:
For example, in the case of the Variable_Test and Variable_Test_Copy macros that appear above, you can assign the Integer data type to the variables Variable_One and Variable_Two by adding the % type-declaration character at the end of their respective names. The VBA code looks, then, as follows:

As shown above, you only need to include the type-declaration character once . Afterwards, you can use the variable name as usual (without type-declaration character). The following image shows how this is the case in the Variable_Test and Variable_Test_Copy macros:

There are 2 main advantages to declaring variables implicitly as described above :
- Advantage #1: More flexibility: By not declaring variables you are more flexible since, whenever you need a variable, you simply use it in a statement to declare it implicitly.
- Advantage #2: You write less VBA code.
However, before you decide to start declaring your variables implicitly as explained in this section, remember the advantages of always declaring your variables and using the Option Explicit statement, and the potential problems whose origin is the lack of variable declaration.
Variables are a very flexible element that you're likely to encounter constantly while working with Visual Basic for Applications. As a consequence of that flexibility and ubiquity, is important to have a good understanding of how to work with them .
Otherwise, you may eventually run into a lot of problems while debugging your VBA code. Or even worse: your macros may simply not work as intended (without you noticing) and return wrong results.
This Excel tutorial has covered the most important topics related to VBA variable declaration . Additionally, we've seen several different suggestions and best practices regarding work with VBA variables. Some of the most important topics covered by this VBA tutorial are the following:
- What is a VBA variable.
- Why is it convenient to declare VBA variables explicitly.
- How can you remember to declare variables explicitly.
- How to declare VBA variables taking into consideration, among others, the desired scope and life of that variable.
- How to name variables.
- How to assign values or expressions to VBA variables.
Finally, in case I didn't convince you to declare your VBA variables explicitly, the last section of this Excel tutorial covered the topic of implicit variable declaration. This section provides some guidance of how to work with variables without declaring them first.
As you may have noticed, there are a lot of different opinions on the topic of best practices regarding VBA variables. As explained above, I encourage you to develop your own variable naming method .
- See what works for you.
- Formalize it.
- Use it consistently.
Books Referenced In This Excel Tutorial
- Walkenbach, John (2013). Excel 2013 Power Programming with VBA . Hoboken, NJ: John Wiley & Sons Inc.

I publish a lot of Tutorials and Training Resources about Microsoft Excel and VBA . Here are some of my most popular Excel Training Resources:
- Free Excel VBA Email Course
- Excel Macro Tutorial for Beginners
- Excel Power Query (Get and Transform) Tutorial for Beginners
- Excel Keyboard Shortcut Cheat Sheet
- Excel Resources
We are going to continue to explore macros in this article and learn more about creating and working with them.
Formatting with Macros
Formatting cells in workbooks can be a tedious process, especially if you have to format each worksheet in workbooks that you create. To save time and make things easier, you can use macros to format cells and worksheets simply by creating macros that do all the formatting for you. This way, you only apply the formatting once. After that, all you have to do is run the macro.
A macro can contain as many steps as you want it to contain. You can create a macro that changes the font type, color, and size, then also applies cell formatting and row and column sizes. In essence, you can create macros to do all the formatting for you.
We are going to create a macro that does the following things:
1. Changes font type, size, and color.
2. Sets a theme (under the Page Layout tab).
3. Formats the cells to Number with three decimal places.
4. Creates a table in the worksheet.
We are going to call this macro salesWorksheetFormatting.
Notice that we are storing this macro in our personal macro workbook. This way, it is available in all workbooks, and we can use it no matter what workbook we have open.
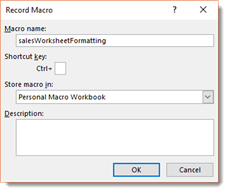
Click OK.
We can then record our macro.
Remember to stop recording when you finish all the steps involved in your macro.
Switching Between Scenarios with Macros
If we go to the Data tab, click the What-If Analysis button, then click on the Scenario Manager, we can see all the scenarios we have created.
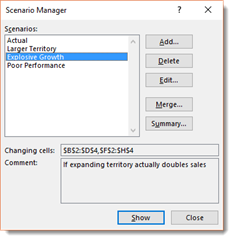
We can select any of these scenarios, then click Show to see the scenario in our worksheet.
If we want to see another scenario, we go back to the Scenario Manager, select the scenario we want to view, then click the Show button again.
This is a lot of clicks.
Instead, we can create a macro for each scenario and add a keyboard shortcut for each macro that we create. That way, we can view a scenario simply by using a keyboard shortcut.
To create a macro for a scenario, go to the Developer tab and select Record Macro.
Name the macro so that you know which scenario it is, then specify a keyboard shortcut.
You will want to store the macro in the workbook.
Click OK, then record yourself opening up the Scenario Manager, selecting a scenario, then clicking the Show button.
Stop recording when you are finished.
You can now view that scenario by running the macro.
Switching Between Custom Views with Macros
In addition to creating macros to view scenarios, you can also create macros to access custom views.
Go to the View tab and select Custom Views.
You will then see the Custom Views dialogue box.
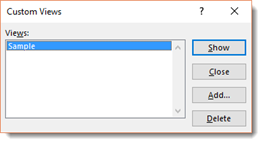
Select a custom view.
If you click the Show button, the custom view will appear in the worksheet.
Instead of having to click the View tab, click the Custom Views button, then click the Show button, you can instead create a macro with a keyboard shortcut that will do all of this for you.
To create the macro, click the Record Macro button under the Developer tab. Name the macro, then assign a keyboard shortcut to it. You will want to store the macro in the workbook.
Click OK, then record yourself going to the View tab, clicking the Custom Views button, then clicking the Show button.
Remember to stop recording when you are finished.
You can now switch to that custom view by simply running the macro.
Using Worksheet Buttons to Trigger Macros
That said, the problem with creating keyboard shortcuts to trigger macros is that, if you have a lot of macros, it can be hard to remember what keyboard shortcut triggers what macro.
Imagine having twenty macros for one workbook, then trying to remember which macro triggers cell formatting. It can be impossible and actually make things more complicated. Macros are supposed to make things easier.
Instead of creating keyboard shortcuts, you can create worksheet buttons instead.
A worksheet button is just as it sounds. It is a button that you place in your worksheet. When you click on that button, it triggers a macro.
To create a worksheet button that will trigger a macro, click in the worksheet where you want to place the button.
Go to the Developer tab. Click the Insert dropdown arrow.
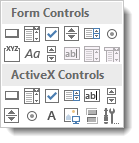
The first icon in the top left corner is a button. Click on the button icon.
Your mouse cursor now is a crosshair.
Click and drag to draw the button.
When you release your mouse, you will see the Assign Macro dialogue box.
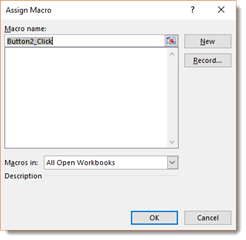
Click on the macro that you want to assign to the button.
The button then appears in the worksheet.
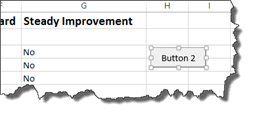
Now you can rename the button. It is recommended that you give the button the same name as the macro or a name that will remind you what the macro actually does.
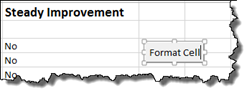
You can also drag on the button handles to resize it.
When you are finished, click in the worksheet.
The button is now clickable.
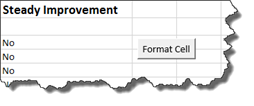
Now, whenever you click on the button, it will run the macro.
Customizing Buttons and Other Shape Triggers
You can apply some customization to worksheet buttons and other shape triggers.
To apply customization, select the button. To do this, you will have to right click on it. If you just left click on it, it will run the macro. Instead, right click on it, then select one of the options in the context menu.
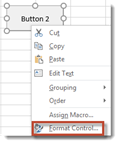
We are going to select Format Control.
This brings up the Format Control dialogue box.

You can click through the tabs to apply different formatting options to your button.
The Font tab gives you options to format the text on your button.
The Size tab allows you to change the size of the button.
The Alignment tab allows you to align the text on the button.
The Protection tab allows you to lock an item or lock the text.
The Properties tab allows you to control the positioning of the button.
The Margins tab allows you to set margins inside the button.
The Alt Text tab shows you the label for the button.
Apply any formatting that you want using this dialogue box, then click OK when you are finished.
If you noticed, the one thing you could not change was the color of the button. When we go to the Developer tab to insert a button, we are left with very few formatting choices. For example, grey is the only color of button we can insert, and it is always going to be either a square or rectangle shape.
If we want to use buttons that have different colors and styles – or even use other shapes as buttons, we need to first create a shape and format it.
Click the Insert tab, then go to Shapes. Select the shape that you want to use, then drag to draw it on your worksheet as we have done below.
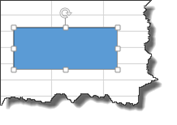
We have chosen to use a rectangle. However, you can use any shape. It does not have to be a rectangle.
The Drawing Tools Format tab is now open on the Ribbon.

Apply a shape style to the shape if you want. You can also change the shape fill and outline colors. In addition, you can add effects such as a drop shadow.
Our shape is shown below.
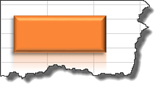
Next, right click on the shape and choose Assign Macro.
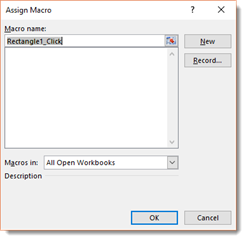
Select the macro that you want to assign to the shape, then click OK.
That macro is then assigned to the button. Whenever you click the button, the macro will be triggered.
Now, right click on the button and choose Edit Text. Add a text label to the button so you know which macro will be triggered when you click on it.
Assign a Macro to a Ribbon Icon
You can also add buttons to the ribbon that will trigger macros. To do this, first go to File>Options.
Click the Customize Ribbon tab on the left hand side of the Excel Options dialogue box.
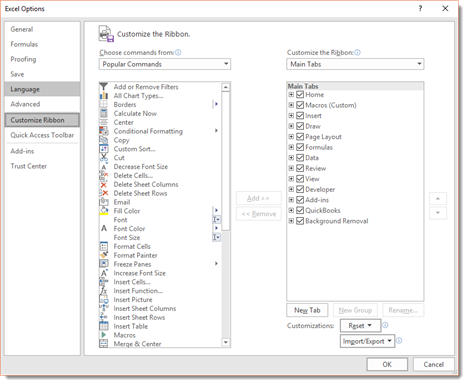
From the Choose Commands From dropdown menu (where it currently says Popular Commands), choose Macros.
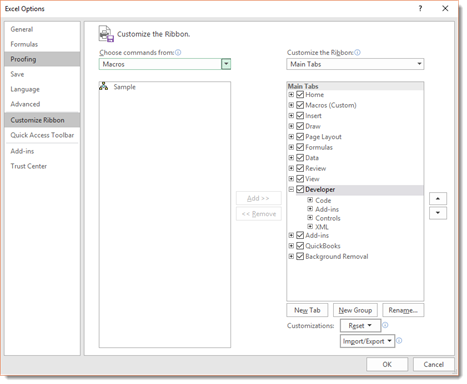
You can now see your macros.
Go to the Customize the Ribbon section of the Excel Options dialogue box. This is on the ride side of the dialogue box.
Choose the tab where you want to place your macros by clicking on it. Do not uncheck the other tabs. This will cause them to not appear on your ribbon.
We are going to choose the Home tab.
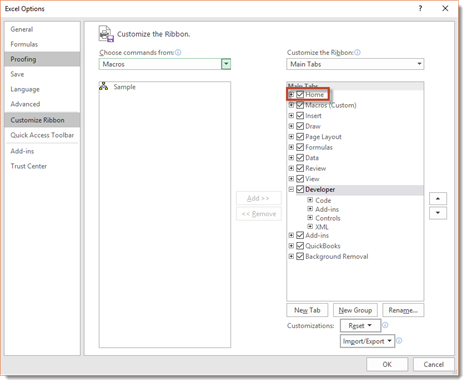
Click on the Home tab to see the groups that are currently under the Home tab. You will have to place your macros in a group under the Home tab. However, you can't place the button in an existing group.
Instead, you have to click the New Group button, as pictured below.
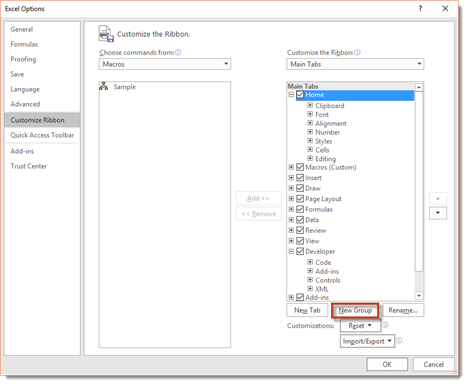
You will then see New Group (Custom), as highlighted below.
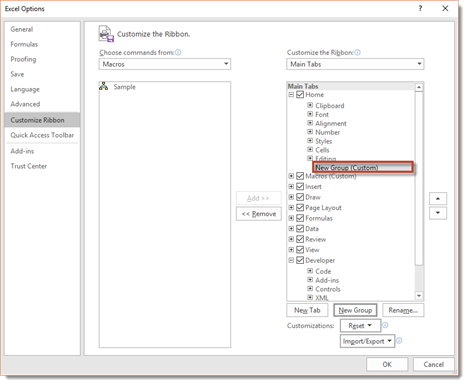
Make sure New Group (Custom) is selected.
Next, click the Rename button that appears to the right of the New Group button.
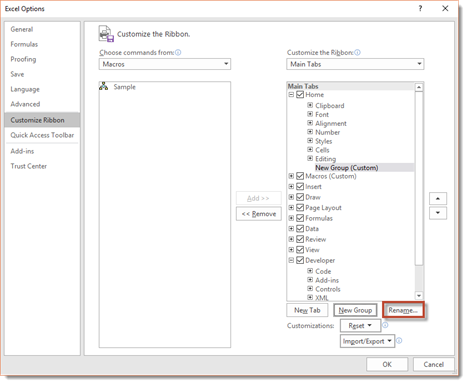
You will then see the Rename dialogue box.
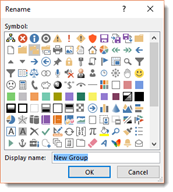
Rename the group. We are naming ours Macros.
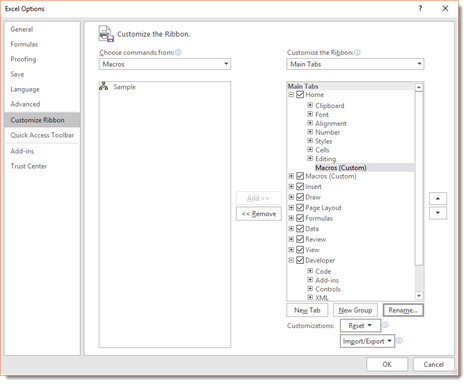
Now, select the macro that you want to add to the group. You will select it from the field on the left, then click the Add button that is between the two fields.
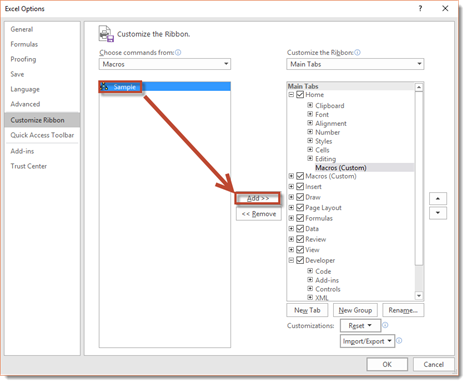
Click the Rename button again.
Click on a symbol to represent the macro. You can also rename it if you want.
When you have added all your macros and selected symbols, you can click OK to leave the Excel Options dialogue box.
Take a look at your Home tab. You can see our new Macros group to the far right on the ribbon.
NOTE: Typically, you will want to use macros that are stored in your personal macro workbook for this. That way, whenever you open Excel, those macros are on your Ribbon and available to you.
Creating Your Own Tab on the Ribbon
In addition to adding macros to an existing tab, such as Home as we did in the last section, you can also create your own tab just for your macros.
To do this, go back to File>Options>Customize Ribbon.
Click New Tab, as shown below.
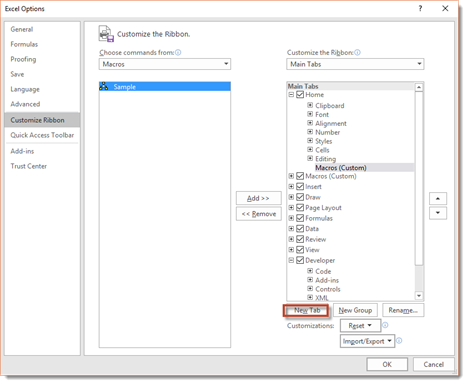
Our new tab is then visible.
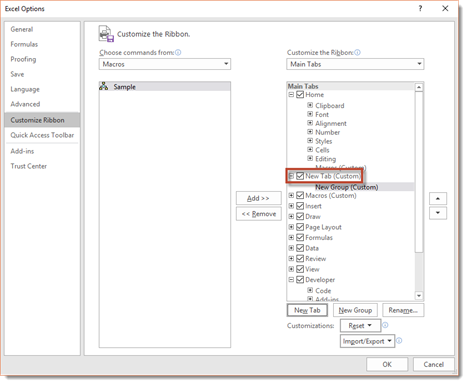
Click the Rename button, as we did in the last section.
Name your new tab, then click OK.
Now you can name the group that is included in the tab by default. Right now, its name is New Group.
You can also add more groups by clicking the New Group button.
Next, add macros to the group.
When you are finished, click OK.
You can then see the Macros tab in the Ribbon.
If we click on the Macros tab, we can see our group.

Editing Macro Code
We do not recommend that you ever attempt to edit the Visual Basic code for your macros. However, just in case you ever need to, we will show you the basics that you need to know in order to be able to make minor changes.
Just be warned, anything outside of the basic editing that we will teach you is a task best left for experienced programmers and not for the typical Excel user. If you mess up the code, you will require the assistance of a programmer to fix it, or you will have to re-record the macro.
To view and edit macro code, go to the Developer tab and click the Macros button.
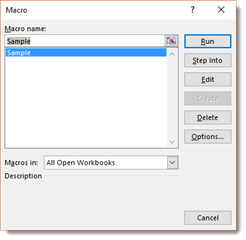
Select the macro that you want to view and edit, then click the Edit button.
NOTE: If you are going to edit code in a macro that is stored in your personal macro workbook, you will need to unhide the workbook first.
Once you click the Edit button, this is what you will see:
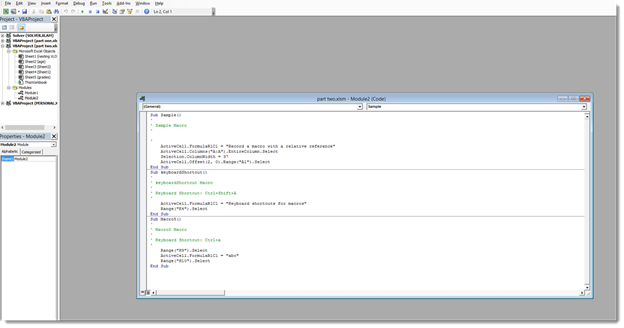
The macro code is shown below.

At the top you see Sub Sample. Sub is for subrooting. Then you see the name of your macro.
At the end you can see that the subrooting is ended. It says End Sub.
Everything in between Sub and End Sub are instructions that the macro will carry out.
Any line where you see an apostrophe at the beginning, followed by green text, are comments. They are not actionable code. You can add more comments if you want. This is very basic, and you are not going to hurt anything by doing this.
Now let's look at the actual code, which is anything in black font that is between Sub and End Sub.

You will see that some of the code appears between quotation marks, such as "Record a macro with a relative reference." This is actually the text that appears in our worksheet when we run the macro. If you want, you can edit text that appears between quotation marks. Again, this is easy enough, and you do not do any damage.
Other things that may appear in your macro that you can easily change are:
Font type . Just type in a new font type, such as Arial.
Font size . Enter a new font size, such as 14.
True/False arguments . You can change an argument from True to False, then vice versa.
Range . If the range is .Range("A1"), you could change it to another cell, such as A2.
Active Cell . Right now, the active cell appears as ActiveCell.FormulaR1C1. R1C1 stands for row one column one. You could change this to R2C2, for example.
If you recognize anything else and feel comfortable changing it, then you can try to do it. Just remember that you may damage the macro in the process and be forced to re-record it.
When you are finished, simply X out of the window by clicking the X in the top right corner. You do not need to do anything to save the changes. You can then run the macro whenever you want.
Adding a Confirmation Box to a Macro
Although it is not advisable that you attempt to edit the code for your macros, there is a circumstance when you will be required to edit that code. If you want to add a confirmation box to a macro, you will have to edit the code in order to create that box.
A confirmation box is a box that will ask you if you are sure that you want to run a specified macro. This is especially helpful to have if you create a macro that deletes cells or data.
Let's show you how to do this.
Go to the Developer tab and click on the Macros button.
Select a macro for which you want to create a confirmation box, then click the Edit button.
You will then see your code.

To create the confirmation box, we need to start out by adding an If statement. Click at the beginning of the first line of code. Push the spacebar a few times. Then, click to put the cursor above the first line of code. The next snapshot will show you what we mean.
Once you have done that, we can start to enter the code.
The first thing we type is "if" then add a space, then type "msgbox" to create the confirmation box.
Add an opening bracket, as shown below. We are then told what we need to enter next, as shown below.
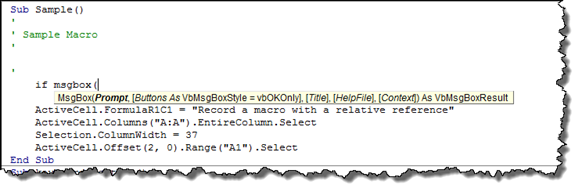
The first thing to enter is a prompt. This is the text that a user will see in the confirmation box that asks them a question.
Type in that question. Any text that will appear inside the confirmation box goes in quotes.

We have customized our prompt to our macro, but your prompt can be anything you need it to be.
Next, select the buttons. We want Yes and No, so we scroll down in the button dropdown menu.
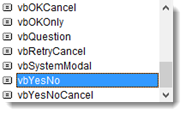
Double click on the button you want to add. It will appear in your IF statement. Add a comma after it.
Next, you can add an optional title to your dialogue box. We are going to enter "Warning."
You do not need the rest of the parameters for a confirmation box.
Add a closing bracket to your IF statement.
We highlighted our IF statement in the snapshot below.
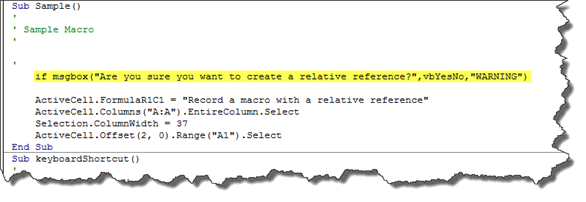
Next, add an equal sign after your closing bracket.
You will see another dropdown menu.
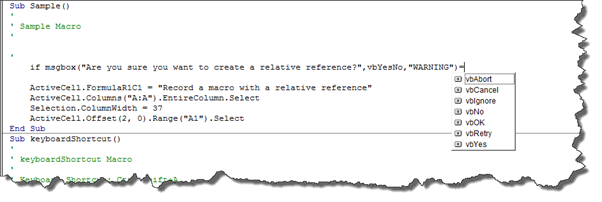
Double click on VBYes in the dropdown menu. This lets Excel know to display the confirmation box. If the answer clicked on in the confirmation box is YES, then to run the macro.
Add a space, then type "then."
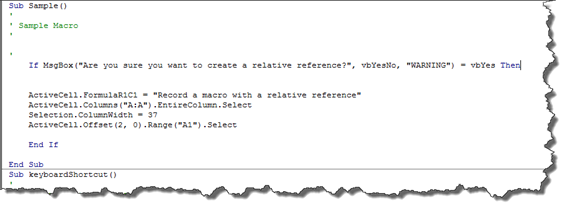
Press Enter.
Next, at the end of your macro, but before the End Sub, type "End If" as we have done above.
You can now X out of the code window.
Go ahead and run the macro for which you created the confirmation box.
You will see the confirmation box appear on your screen. It will read, "Are you sure you want to create a relative reference?"
We are going to click Yes.
When you click Yes, the macro runs.

- Course Catalog
- Group Discounts
- Gift Certificates
- For Libraries
- CEU Verification
- Medical Terminology
- Accounting Course
- Writing Basics
- QuickBooks Training
- Proofreading Class
- Sensitivity Training
- Excel Certificate
- Teach Online
- Terms of Service
- Privacy Policy


Add or edit a macro for a control on a worksheet
You can automate a form control or an ActiveX control by doing the following:
Perform an action or operation when a user clicks a form control by assigning a macro to it.
Run Microsoft Visual Basic for Applications (VBA) code to process any events that occur when a user interacts with an ActiveX control.
For more information about how to create macros, see Create or delete a macro .
Add or edit a macro for a form control
Right-click the control, and then click Assign Macro .
The Assign Macros dialog box appears.
To specify the location of an existing macro, select where the macro is located in the Macros in box by doing one of the following:
To search for the macro in any workbook that is open, select All Open Workbooks .
Note: If the macro that you want to assign to the control is in a separate workbook, open that workbook first so that it will be available in the Macros in list box.
To limit the search for the macro to the workbook that contains the current worksheet, select This Workbook .
To limit the search for the macro to a specific workbook, select that workbook from the list of available open workbook names.
Do one of the following:
Assign a macro Do one of the following:
Assign an existing macro Double-click a macro in the list or enter its name in the Macro name box.
Create a new macro Click New and then, in the Visual Basic Editor, write a new macro.
For more information about how to write macros, see Visual Basic Help.
Modify an assigned macro Do one of the following:
Edit the assigned macro Click the name of the macro in the Macro Name box, and then click Edit .
Assign a different existing macro Double-click a macro in the list or enter its name in the Macro name box.
Add or edit a macro for an ActiveX control
If the Developer tab is not available, display it.
In Excel 2016, 2013, 2010:
Click File > Options > Customize Ribbon .
Under Customize Ribbon , select the Developer check box, and then click OK .
In Excel 2007:
In the Popular category, under Top options for working with Excel , select the Show Developer tab in the Ribbon check box, and then click OK .
Select the control.
For more information, see Select or deselect controls on a worksheet .
Note: You can also edit an existing macro by right-clicking the control, and then clicking View Code .
In the Visual Basic Editor, write a new macro or change the existing macro.
After you finish writing the macro, click Close and Return to Microsoft Excel on the File menu in the Visual Basic Editor.

Need more help?
Want more options.
Explore subscription benefits, browse training courses, learn how to secure your device, and more.

Microsoft 365 subscription benefits

Microsoft 365 training

Microsoft security

Accessibility center
Communities help you ask and answer questions, give feedback, and hear from experts with rich knowledge.

Ask the Microsoft Community

Microsoft Tech Community

Windows Insiders
Microsoft 365 Insiders
Was this information helpful?
Thank you for your feedback.

Microsoft Excel:How to create, record, and run macros
M ost people rely on formulas in Excel, not the automation benefits of macros. Macros allow you to create complex data manipulations, streamline report generation, and more. Whether you're in finance, marketing, or another data-driven field, learning to write Excel macros is a game-changer. This guide demystifies Excel macros, helping you understand and use them. Macros work on PCs and Macs. If you have an affordable Chromebook , use Google Sheets and create similar programs using Google Apps Script.
What are Excel macros?
Macros in Excel are sequences of instructions that automate repetitive tasks. They are written in Visual Basic for Applications (VBA), a programming language developed by Microsoft. When you record a macro, you instruct Excel to remember a series of actions you perform. After being recorded, these actions can be executed automatically with a single command.
This is useful for repeating the same task across multiple datasets, streamlining data entry, and formatting processes. Excel macros can also generate standardized reports with consistent formatting and calculations.
Macros save time and minimize the risk of human errors during repetitive data processing. They handle large volumes of data efficiently, making Excel a robust tool for personal and professional use.
How to create Excel macros
There are two ways to create macros in Microsoft Excel. The first is by recording it. The other involves writing it using VBA language. If you're new to macros, it's easier to record it than it is to write it in VBA.
Macros work on Mac and PC. However, macOS doesn't support ActiveX Controls, which are often found in some macros.
Activate the Developer tab
Before creating a macro, activate the Developer tab in Microsoft Excel. This works on PC and Mac, but the steps to activate the Developer tab differ slightly from one operating system to the other.
Here's how to activate the Developer tab on a PC:
- Open Microsoft Excel .
- Click the File tab , located in the upper-right corner.
- Click Options in the lower-left corner.
- Click the Customize Ribbon tab, located to the left of the window.
- Tick the Developer checkbox .
Here's how to activate the Developer tab on a Mac:
- Open the Excel preferences by pressing the Cmd + Comma ( , ) keys simultaneously on your keyboard. Alternatively, click Excel on your Mac's top menu and select Preferences .
- Click Ribbon & Toolbar .
- Scroll down in the list to the right, and tick the checkbox next to Developer.
After completing these steps, the Developer tab appears in the Excel ribbon, regardless of whether you're on a Mac or PC. You'll need it to use macros.
How to use Microsoft 365 (Office) on a Chromebook
Record an excel macro.
The easiest way to create a new Excel macro is by recording it. When the recording is on, all the tasks you perform are recorded. After you save the tasks, Excel automatically reproduces them for you.
Before you begin, list the tasks you want to perform to avoid mistakes. If you make an error, edit the macro's code or delete it and start over.
- Open a new or existing Microsoft Excel spreadsheet.
- Under the Developer tab , click the Record macro button .
- Give your macro a name.
- Choose where to save it. In addition to the current workbook, you can create a new one.
- Select Personal Macro Workbook to use it in any Excel spreadsheet you open.
- Optionally, assign it a keyboard shortcut and give it a description.
- Click OK to start recording the macro.
- Perform the tasks and actions for the process you want to automate. All clicks, data input, formulas, and formatting are recorded.
- Click Stop Recording to finish. The button is under the Developer tab. It replaces the Record macro button.
- Your macro is saved.
Write an Excel macro
You can write your macro from scratch if you're familiar with VBA. To do this, create a new macro:
- Under the Developer tab , click Visual Basic .
- Write your macro in VBA using the parameters you want.
How to run Excel macros
Now that you've created your Excel macros, let's see how to run them. There are two ways to do it. The first is picking the macro you want to use from the menu, which is a bit complex. If you use it often, assign a macro to a button, making it easier to run.
Access your Excel macros
To access the Excel macros you created and run them using the menus, follow the steps below:
- Under the Developer tab , click Macros .
- Select the macro you want to run.
- Click Run .
Assign a button to an Excel macro
If you plan to use a specific macro often, assign it to a button. Then, place the button anywhere you want.
- Under the Developer tab , click Button .
- Choose the spreadsheet where you want to put the button.
- Select the macro it needs to run.
- To change how the button looks, right click and select Customize controls .
Do more with Microsoft Office
Microsoft Office offers productivity tools that make your day at work easier. OneNote makes note-taking a breeze and helps you keep track of them across devices. PowerPoint offers templates and themes to make presentations consistent and good-looking. If you work with spreadsheets, Excel helps you manage CSV files .


Excel Tutorial: How To Assign A Macro To A Cell In Excel
Introduction.
Excel macros are a powerful tool that allows users to automate repetitive tasks and streamline their workflow. By assigning macros to specific cells, users can easily execute complex commands with a single click, saving time and minimizing the risk of errors. In this tutorial, we will explore how to assign a macro to a cell in Excel, and the importance of doing so in enhancing efficiency and productivity.
Key Takeaways
- Excel macros are a powerful tool for automating repetitive tasks and streamlining workflow.
- Assigning macros to specific cells allows for easy execution of complex commands with a single click.
- Creating, naming, and storing macros in Excel is essential for efficient workflow.
- Choosing the right cell for macro assignment and using descriptive names are best practices for macro assignment.
- Troubleshooting common issues such as error messages and security settings is important for successful macro assignment.
Understanding Macros in Excel
Macros are a powerful tool in Excel that allow users to automate repetitive tasks by recording a sequence of commands and actions. In this chapter, we will explore the definition of macros, how they can automate tasks in Excel, and the different types of macros available.
A macro in Excel is a recorded set of commands and actions that can be executed with a single click. It allows users to automate repetitive tasks and increase efficiency in Excel.
Macros can automate tasks in Excel by recording a sequence of commands and actions. For example, a macro can be used to automatically format a spreadsheet, generate reports, or perform complex calculations with just a single click.
There are two main types of macros in Excel:
- Worksheet macros : These macros are specific to a particular worksheet and can be triggered by specific events, such as when a cell is selected or when the worksheet is activated.
- Personal macros : These macros are stored in a personal macro workbook and can be used in any Excel workbook. They are not tied to a specific worksheet or workbook.
Understanding macros in Excel is essential for automating repetitive tasks and increasing productivity. By recording a sequence of commands and actions, users can create powerful macros that streamline their workflow and save time.
Creating a Macro in Excel
Macros in Excel can help automate repetitive tasks and streamline your workflow. Here's how you can create a macro in Excel:
Now that you have successfully created a macro in Excel, you can assign it to a cell to make it easily accessible for future use.
Assigning a Macro to a Cell
Assigning a macro to a specific cell in Excel can help automate tasks and make your workflow more efficient. Here's how you can do it:
- Open the Excel worksheet where you want to assign the macro to a cell.
- Select the cell where you want the macro to be assigned. This is the cell where the macro will be triggered when clicked.
- Go to the "Developer" tab on the Excel ribbon. If the "Developer" tab is not visible, you can enable it in the Excel options.
- Click on the "Record Macro" button to create a new macro or select an existing macro that you want to assign to the cell.
- Once the macro is created or selected, go back to the cell where you want to assign it and right-click on the cell.
- Choose "Assign Macro" from the contextual menu. This will open the "Assign Macro" dialog box.
- In the dialog box, select the macro that you want to assign to the cell from the list of available macros.
- Click "OK" to assign the macro to the selected cell.
- To test the assigned macro, simply click on the cell where you assigned the macro.
- The macro should now run and execute the actions that you recorded or programmed.
- If the macro does not work as expected, you can go back to the "Assign Macro" dialog box and reassign a different macro to the cell.
Best Practices for Assigning Macros
When it comes to assigning macros to cells in Excel, there are several best practices that can help ensure smooth functionality and organization.
Consider the purpose:
Ensure compatibility:, create a reference document:, use comments:, use meaningful names:, avoid generic names:, troubleshooting common issues.
When working with macros in Excel, it’s not uncommon to encounter some common issues. Here are some tips for troubleshooting these issues:
- Check for typos: Double-check the macro name and make sure it matches exactly with the name of the macro in the VBA editor.
- Verify the macro exists: Ensure that the macro you are trying to assign actually exists in the workbook or in a referenced workbook.
- Verify macro security settings: Sometimes error messages can be related to security settings. Make sure macros are enabled in Excel and that the workbook is trusted.
- Use the VBA editor: If your assigned macro is not working as expected, open the VBA editor to debug and troubleshoot any issues with the macro code.
- Check for conflicts: Make sure that there are no conflicting macros or named ranges that could be causing the issue.
- Step through the code: Use the debugging tools in the VBA editor to step through the macro code and identify any specific lines that may be causing the issue.
- Check Trust Center settings: Go to the Trust Center in Excel and make sure that macro settings are configured to allow macro assignment.
- Enable macros: If macros are not enabled, you will not be able to assign them to cells. Make sure that macros are enabled in the Excel options.
- Trust the workbook: If the workbook is not trusted, Excel may prevent the assignment of macros. Make sure to trust the workbook in the Trust Center settings.
Assigning macros to cells in Excel can greatly enhance your productivity and efficiency in handling repetitive tasks. By simply clicking on a cell, you can execute a sequence of commands, saving you time and effort. It's important to understand the process of assigning macros to cells and the benefits it offers in streamlining your work.
- When assigning macros to cells, ensure that the macro is properly tested and error-free.
- Keep the macro name and description clear and concise for easy identification and utilization.
- Regularly update and modify your macro assignments to adapt to changing needs and processes.
Encouragement to practice and experiment with macro assignment in Excel
As with any new skill, it's important to practice and experiment with macro assignment in Excel. Don't be afraid to try different approaches and customize macros to suit your specific requirements. The more you practice, the more proficient you will become in leveraging the power of macros in Excel.

Immediate Download
MAC & PC Compatible
Free Email Support
Related aticles

The Benefits of Excel Dashboards for Data Analysts

Unlock the Power of Real-Time Data Visualization with Excel Dashboards

Unlocking the Potential of Excel's Data Dashboard

Unleashing the Benefits of a Dashboard with Maximum Impact in Excel

Exploring Data Easily and Securely: Essential Features for Excel Dashboards

Unlock the Benefits of Real-Time Dashboard Updates in Excel

Unleashing the Power of Excel Dashboards

Understanding the Benefits and Challenges of Excel Dashboard Design and Development

Leverage Your Data with Excel Dashboards

Crafting the Perfect Dashboard for Excel

An Introduction to Excel Dashboards

How to Create an Effective Excel Dashboard
- Choosing a selection results in a full page refresh.
- Skip to primary navigation
- Skip to main content
- Skip to primary sidebar
Peltier Tech
Peltier Technical Services - Excel Charts and Programming
How To: Assign a Macro to a Button or Shape
Wednesday, March 12, 2008 by Jon Peltier 124 Comments
In recent posts, I’ve discussed recording macros , fixing recorded macros , and even using someone else’s macros . To run a macro, you have a few choices.
- Tools menu > Macro > Macros, select the Macro, and click Run
- Shortcut Key combo Alt+F8, select the Macro, and click Run
- Run Macro button on the Visual Basic toolbar, select the Macro, and click Run
- Click in the macro with the mouse and press F5
None of these techniques are particularly elegant, and you wouldn’t want to email a file with a few macros to a colleague and tell them, “Okay, go to the Tools menu, select Macro, then select Macro, then click on MyFirstMacro in the list, and click Run.” It would be nice to just tell them, “Click the First Macro button.”
You can assign a macro to a few types of objects:
- Forms Menu Button or Shape
- ActiveX Button
- Menu or Toolbar Button
In this post we’ll look at using a Forms menu button to run our macros. We’ll use this simple macro for our example.
When it is run, we see a simple message.

Forms Menu Controls
First make the Forms toolbar visible. Like so many other things in Excel, there are several ways to accomplish this.
- Tools menu > Customize > Toolbars tab, check the box in front of Forms
- View menu > Toolbars, select Forms from the list
- Right click on the menu and toolbar area, choose Forms from the list
The Forms toolbar will appear.

Select the Button button, then draw a rectangle in the worksheet where you want to place the button (you can move and resize it later). The Assign Macro dialog pops up with a list of macros in the active worksheet for you to select from.

Select a macro and click OK, or Cancel (you can select a macro at a future time). You can edit the text of the button after you dismiss the dialog, or right click on the button any time.
You can assign a macro to any of the Forms toolbar controls.
You can assign a macro to any shape (including any chart) on a worksheet. Right click on the shape, choose Assign Macro, and follow the steps above.

Share this:
- Click to share on Twitter (Opens in new window)
- Click to share on Facebook (Opens in new window)
- Click to share on LinkedIn (Opens in new window)
- Click to share on Tumblr (Opens in new window)
- Click to share on Pinterest (Opens in new window)
- Click to share on Reddit (Opens in new window)
- Click to print (Opens in new window)
- Click to email a link to a friend (Opens in new window)
Posted: Wednesday, March 12th, 2008 under VBA . Tags: buttons , macro . Comments: 124

Reader Interactions
Thursday, March 13, 2008 at 7:39 am
Great post! I am a big fan of assigning macros to a button so the user can easily run ’em without having to go through the menu.
One thing that typically trips people up is the default security setting for Excel. Many times, if you send someone an .xls file with a macro, they either need to approve the sender or set their security lower. Otherwise, they won’t be able to run the macro. I’m sure most readers know this, but I think it’s worth bringing up.
Jon Peltier says
Thursday, March 13, 2008 at 8:59 am
Tony – Good point. One of these days I’ll blog about macro security.
Andras says
Tuesday, March 18, 2008 at 9:41 am
I’m very helpful for your site – it gave me many help in my job. In addition your blog is also very useful – but as you’ve wrote, it took a bit time to find it.
However, please let me ask a question regarding to this blog entry. Is there any way to assign an UDF to a button or to a menu/toolbar item in Excel?.
When I’ve tried to assign to a toolbar some of my UDFs stored in my personal.xls, but only the simple VBA routines appear, not the UDFs.
I’m currently using MS Excel 2002.
I’d be very much appreciated if you could share us your experiences in this.
Thank you for your help in advance
Kind regards, Andras Ujszaszy
Tuesday, March 18, 2008 at 1:41 pm
Hi Andras, By definition a UDF is used in a cell or in another VBA procedure and simply returns a value. When you click on a button you are not so much expecting to get a value as having some action perfomred. How would your UDF work from a button click?
Sergey says
Sunday, December 14, 2008 at 8:57 am
Hi Jon, thank you for making this great blog!
I have a question about assigning macro to control button:
“The Assign Macro dialog pops up with a list of macros in the active worksheet for you to select from.” Issue is it doesn’t pop up in my 2003 excel, moreover in right-click menu there is no command “assign macro”. If I create picture or object (not control button) – I can see this command in menu.
Could you please advise why it doesn’t work with control buttons?
Sunday, December 14, 2008 at 10:06 am
Hi Sergey –
This tip relates to the controls from the Forms toolbar, which behave much like inserted pictures or shapes.
Controls Toolbox objects are a different species altogether. For those you need to follow the procedure in How To: Assign a Macro to an ActiveX Control .
Victor says
Tuesday, December 16, 2008 at 1:03 pm
Hey there Jon, Really appreciate your site. In fact I’ve been using the Button to send selected graphs over into PowerPoint (based on an article by yourself). When one day I ran into some trouble. I thought I’d spice up the buttons by replacing them with a Shape (and some fancy coloring/shading). Trouble is, now I can’t shoot em over to PPT. Think you could tell me what I’m missing? Best regards Victor
Tuesday, December 16, 2008 at 1:54 pm
Victor –
If the button is a Forms toolbar button, it interacts with a macro the same way as a shape (right click > Assign Macro…). If it’s a controls toolbox button, the protocol is different, as described in How To: Assign a Macro to an ActiveX Control .
Or do you mean you added shapes to the chart? If you select the chart, then insert the shape, the shape is part of the chart. If you just added the shape, it’s part of the worksheet, not the chart, and grouping the chart to the shape makes another shape, which the chart objects code will not recognize.
Tuesday, December 16, 2008 at 3:48 pm
Actually, I simply inserted a shape into a worksheet, made a chart just somewhere on the worksheet, assigned a macro to the “Shape” (not button ;) that is supposed to transfer my chart but I get my error alert saying “please select a chart” when I click on the macro associated shape. If I use a button from the form control, everything is a ok . The problem I believe lies with the following ; when I select a chart to transfer, then hit the “Shape” that I’ve assigned a macro to (the macro doing the transferring) I believe excel “deselects” the prior selected chart and instead selects the shape then activates the macro causing the above mentioned error. I would use a button instead of the “shape” but the shape looks cool :).
Tuesday, December 16, 2008 at 4:54 pm
Intriguing. In Excel 2003, I created a column chart and wrote this code:
Then I inserted a Forms button and a shape, and applied this macro to both. If I select the chart and click the button, the chart type changes. If I select the chart, change it back to a column chart, and click on the shape, again the chart type changes. The chart remains selected, though after the macro runs it is selected with white handels, meaning the shape containing the chart is actually what is selected.
Ricardo says
Thursday, January 22, 2009 at 5:48 am
I`d like to assign a macro(MouseMove) to a shape like you show above, but whan i click on the shape and chosse Assign Macro, the event assign is always the click event. So my doubt is, could i assing another event like MouseMove instead of Click ?
Tks for your help.
Thursday, January 22, 2009 at 7:02 am
Excel proposed a default macro name that mimics a click event (e.g., Rectangle1_Click), but it isn’t really an event in the sense that a command button or other ActiveX control has events it can respond to. You can only assign the name of an existing macro.
In the Excel object model, shapes expose no events that your code can respond to. The worksheet itself has a limited set of events you can code against, while charts and AcitveX controls have a rich set of events you can exploit.
Wednesday, March 18, 2009 at 11:46 pm
Hi Jon I encounter sporadic problems when assigning macros to objects – i.e. the macros fail to run when the objects are re-positioned on the same worksheet. Sometimes they work, and sometimes they don’t! There doesn’t seem to be anything wrong with the macros themselves.
Would you happen to know why or have a solution for this?
Many thanks. Mei Malaysia
Thursday, March 19, 2009 at 5:45 am
Mei –
I have never experienced this problem exactly. What version of Excel are you using? There are a couple funny things about assigning macros to shapes in Excel 2007. If that’s your version I would like to try to replicate the problem.
Thursday, March 19, 2009 at 6:59 pm
Hi Jon, Thank you for your reply. Indeed I am using Excel 2007, on a Vista OS.
It’s a simple macro to copy & paste by appending to a columnn of values. I assigned this macro to a shape that I drew somewhere on the worksheet. When I click the enabled shape, it works fine, however, the moment i move the shape to another part of the worksheet – even if it’s near by, the macros become very unstable. They work some of the time, and fail altogether at others.
It’s quite strange.
Many thanks. Mei.
Thursday, March 19, 2009 at 10:23 pm
Could you use a regular button as opposed to a shape for this? I’ve heard that using buttons (use Forms toolbar buttons, which nominally work just like shapes) is more reliable than using shapes.
Thursday, March 19, 2009 at 10:53 pm
Thanks Jon, will try it out and share any further problems if I encounter them.
Wednesday, December 9, 2009 at 9:28 am
Hi I am facing problem to assign macro in bar chart. In fact I am drawing the chart using macro but I need to make some changes such that edit grid lines, lebelling axes, figure name etc. in the bar chart. I tried using assign macro by clicking right on the chart followed by assigning a name and record. After that I did the modifications and stop it. However, it is showing error. I will be grateful if anyone helps.
Wednesday, December 9, 2009 at 9:34 am
Hi I am trying to convert the text cell to number automatically using macro. But it’s not working. In fact, I start as follows. start recording >> select the cells>> right click on error to convert to number>> stop recording. When I ask macro to run it again, it only selects the cells but not converts to number. Hence, I have to do it manually. Moreover, I checked VBA code as well; it doesn’t write anything to convert to number.
Any help will be appreciable.
Wednesday, December 9, 2009 at 9:40 am
Razib –
I don’t understand the question about the chart and macro.
To get a macro that converts text to numbers, select the range then start the macro recorder, change the number format from text to a numerical format (if necessary), then use Columns to Text to do the actual conversion.
Wednesday, December 9, 2009 at 11:22 am
Thank you for the reply. I did the same except the last part, “then use Columns to Text to do the actual conversion” as you mentioned, but it didn’t work. Macro didn’t write anything in VBA and it is not executing the operation when I run the recorded macro. However I don’t understand the last part that you mentioned. What do you mean by use columns to text to get final conversion? I don’t get anything like that.Your suggestion will be appreciated.
For the chart what I want to do is that after making the bar chart I want to lebel the chart automatically using macro e.g., change the grid lines, lebel x & y-coordinate (plant vs yr) ans so on. I tried but I am unable to do that. Can you please suggest?
Thank you again for your help.
Wednesday, December 9, 2009 at 12:17 pm
You did everything except text to columns? Text to Columns is the part that does the conversion.
About the chart, if you’re using Excel 2007 to record your macro, you won’t get much useful code. Microsoft rushed 2007 out the door before they had time to make everything work right. You can either find an earlier version of Excel for recording macros, or wait for Excel 2010 to come out in a half year.
Thursday, December 10, 2009 at 12:41 am
Thank you for your suggestion. I am able to modify the charts using macro in 2003 but not 2007. I am sorry to say that for the first problem to convert string to number, I am unable to find any command to convert “column to text”. I am explaining the fact again. I have selected the cells and click on the command “convert to number”. Then it converts the text to number. Then stop recording the macro. Now if I run the macro, it only selects those cells but does not convert the texts to numbers. However, as you mentioned that I have to select “column to text”; so far I am unable to find that command from excel. I am afraid that it might cause some errors. Can you please tell me that from where can I get that command. I am using excel 2007.
Thursday, December 10, 2009 at 8:29 am
Data tab > Data Tools group (4th from left) > Text to Columns (first item in group).
I recorded a macro, cleaned it up, and here is the function that converts a range of text values to their numeric equivalents:
This is how the function is called:
Wednesday, January 20, 2010 at 11:54 pm
I want to generate an order using conditional randbetween function in excel 2007. For example, I want to generate 2000 orders in between 1 to 730 (randbetween(1,730)). But each number betweeen 1 to 730 can’t be repeated more than three times withinin these 2000 orders. Is it possible? How can I write this function in excel?
Thursday, January 21, 2010 at 12:11 am
There are more effective and relevant places to ask for help. I suggest you read Finding Help for Microsoft Excel .
Shubha says
Saturday, July 31, 2010 at 5:36 pm
Great post ! Thank you. Helped me a lot
Monday, September 6, 2010 at 3:36 am
G8 …. superb … Thanx a lot …..
Alan Horsfield says
Saturday, January 15, 2011 at 4:39 am
I am using Excel 2003 and only a customised toolbar I call ledger. It contains a few of the most useful standard buttons and 10 of my own for specific actions on a ledger account. The special 10 buttons are all assigned to macros which can also be operated using a control command. Everything works fine BUT, if I move the file to another folder and in particular to a CDrom, the buttons no longer work until they are reassigned.
Is there an answer to this problem?
Saturday, January 15, 2011 at 9:31 am
Alan – Do all the buttons no longer work, or just the custom ones?
Saturday, January 15, 2011 at 12:44 pm
Thank you Jon for your interest. Yes, all the standard buttons in my “ledger” toolbar work but the custom ones do not. However, the commands still work via the control keys.
Sunday, January 16, 2011 at 8:38 am
Depending on how you’ve set up those buttons, they might be linked to the whole path of the workbook that contains the macro. Move the file, the workbook doesn’t exist at that path, nothing happens.
A long time ago I stopped using attached toolbars for this reason. I build the toolbar when the workbook opens, and destroy it when the workbook closes. I have some very rudimentary code showing this technique in this text file:
Where it says for example
.OnAction = “Macro1”
I usually change to this:
.OnAction = ThisWorkbook.Name & “!Macro1”
to make sure the macro points to the correct workbook.
Monday, January 17, 2011 at 9:39 am
Thank you again, Jon. I have adapted some code similar to that in your MenuBar.txt and it works well but it deletes my carefully crafted buttons and replaces them with various buttons from the msoControlButtons set which I do not want.
I happen to have a page of instructions in my Excel file with a list of cells containing the buttons. I can assign macros to them and they remain operational if I move the file to another folder. Is there a way of giving these buttons an “id” that can be used in place of “.FaceId” and, instead of using “Type:=msoControlButton”, use some other “Type:=”? These buttons have a name like “Picture6_Click” associated with them but I do not know what it means.
Incidentally, I have an Excel2007 version of my file called ledger.xlsm with a number of subs like:
Callback for customButton1 onAction Sub Macro1(control As IRibbonControl) Run (“Check_R”) End Sub
These enable me to replace the standard ribbon with my own containing my custom buttons plus useful standard ones, and the custom ribbon transports with the file. If I unzip the .xlsm file, there is a whole lot more information there including the .png files of the buttons. So am I asking too much of Excel2003!
Monday, January 17, 2011 at 10:11 am
Alan –
Since the button images reside as pictures in your sheet, copy them, then use .PasteFace to paste the image as the button image.
Tuesday, January 18, 2011 at 12:56 pm
Jon, Thanks to your suggestion to use .PasteFace everything is now
working nicely when copied to a CDrom, so I can give my file to a
friend without having to set up the assignments for him.
When I had all the code in ThisWorkbook, it did not like:
Set myControl = CommandBars(“Ledger”).Controls.Add
So I put the code for making the toolbar in a module as a subroutine
which included the same piece of code and called it up in
ThisWorkbook. It works nicely. Many thanks again. Alan
Anonymous says
Tuesday, June 7, 2011 at 11:54 am
Great info…..saved me a lot of time trying to go through Excel’s help menu and books. Thanks!!
Friday, August 19, 2011 at 4:01 am
Hello Jon I have written a macro in the sheet module. The macro has no parameters. When I try to assign macro to my shape the macro does not appear in the macro list. If I have a macro in a general module I see it. In this particular case I want to pick up a value from the sheet that is calling the macro which is why I put it in the sheet code area. Any ideas, please?
aaron edwards says
Friday, September 2, 2011 at 9:17 am
I often create simple drawings in Excel for the machhine shop to make “quickie” fixtures and illustarte ideas. In one drawing I wanted to animate the movment of a blade shearing off the tops of the balls in Ball Grid Array device to see how many voids were inside after solder reflow. I started a macro and recorded the object as I moved it first to the left and then the right. It looked awsome. I thought I had figured out away to animate my drawing!
No such luck. Even though the VBA code seemed to recorded all by keystrokes, the macro failed saying OBJECT DOES NOT SUPPORT THIS PROPERTY OR METHOD. RUN TIME ERROR 438.
Is there a way to do simple animation of drawing objects in Excel by using a macro?
Friday, September 2, 2011 at 10:07 am
Aaron –
Each drawing object (shape or group) has a .Left and .Top property, which you can vary within a timed VBA procedure.
I’ve covered animation with VBA in these articles: Gapminder for Excel Gapminder for Excel II Gas Prices – Animated Bar Chart for Excel Gas Prices – Animated Bar Chart for Excel 2 Ballistics Animation Rolling Wheel Animation
Friday, September 2, 2011 at 1:59 pm
Thanks Ron for the Cool Chart and data related links that animate the ballistic chart. I’ll surely use these ideas in future applications. But the problem of animating an actual drawn object across the crenn is slighly different. I managed to solve that problem by alternating the rmacro ecorded keystrokes to move the object and then selecting an empty cell, back and forth repeatedly. This worked perfectly when I ran the macro afterward. Once I saw the VBA code, I simply copied the number of intrations required for the full movements I desired.
Simple but effective.
meking says
Thursday, September 15, 2011 at 12:15 pm
I want to change the button image like we could in excel 2003. Looks like we can no longer do this, so all my macro buttons on my ribbon look the same and the only way to know which one is which is to float mouse over it. Or is there a way to draw your own image as before?
Thursday, September 15, 2011 at 1:15 pm
Meking –
You can add a button to the QAT, and while in the “Customize the QAT” dialog, select the new item, then click the Modify button, and you can choose from many button images.
If you want to use your own button image, you need to use code.
paulchiu says
Tuesday, January 3, 2012 at 11:08 am
mysteriously, a button to execute a macro inside an 2010 EXCEL workbook disappeared and the “insert” feature within the “Developer” tab is disabled. Any ideas to get this back for this workbook? The “insert” works for other workbooks.
Tuesday, January 3, 2012 at 12:00 pm
Paul –
Is the workbook or worksheet protected? Are multiple sheets selected? Is the workbook shared?
Tuesday, January 3, 2012 at 12:13 pm
The worksheet is on my local drive and only the sheet where button was located before it disappeared is selected. Not sure about the worksheet being protected.
Thanks, Paul
Tuesday, January 3, 2012 at 12:27 pm
Towards the right of the Home tab, click Format, and look for Protect Sheet or Unprotect Sheet
Tuesday, January 3, 2012 at 12:40 pm
I selected all the sheets and the Protect Sheet selection is faded out.
Tuesday, January 3, 2012 at 11:56 pm
If all sheets are selected, you cannot change the protection of the sheets.
Thursday, January 5, 2012 at 12:00 pm
i gave up. i am running the macros manually.
Mark T says
Wednesday, February 1, 2012 at 5:47 pm
Hi, Jon. I haven’t had much luck finding an answer to this question; maybe you can help.
I currently have a button set up in an Excel 2007 document (let’s call this Spreadsheet A) to execute a macro on our company network (stored in Spreadsheet B). In the “Macro Name” field, the full path of Spreadsheet B is defined alongside the Subroutine. The macro works fine when I leave Spreadsheet A in its original location. The problem arises when I copy & paste Spreadsheet A elsewhere… when I do this, Microsoft automatically resets the path of Spreadsheet B to match the new location of Spreadsheet A.
I do not want to do this. I just want to leave Spreadsheet B alone, and preserve the path within Spreadsheet A. (Interestingly, this path name is preserved when I do a “Save As”, but not when I copy & paste in Windows Explorer).
Do you have any suggestions as to how I might fix this problem? Is there a way to “lock” the path name in place?
Wednesday, February 1, 2012 at 8:32 pm
Mark –
Save the path and sub name in a cell or in a constant in your module. When the button is clicked, have it run this code:
Application.Run(strMacro)
strMacro is either the constant, or a string variable defined by:
strMacro = activesheet.range(cell address containing path/sub).value
Thursday, February 2, 2012 at 3:44 pm
OK, I just tried that… unfortunately, I got an error message telling me that “the macro may not be available in this Workbook, or all macros have been disabled”.
I don’t think this is a macro security issue, as this will work when accessed directly from the “Macro Name” text in the button. Are you still supposed to use an exclamation point between the path name and the macro name?
Friday, February 3, 2012 at 1:33 pm
I think when you use Application.Run, the workbook with the procedure in it has to be open.
Vladimir Niko says
Sunday, December 30, 2012 at 11:28 pm
Dear Sir! Please I need help to resolve problem with record macro in Excel 2007. First I record a simple macro in Excel 2003 and assign it with the shape button. Then I need record a new macro with one of step is use previous recorded assign button – just to pushed it in time of record new macro. In Excell 2003 it worked perfect. I use it many time. But in Excell 2007 it not let me do that. When I need push the previous recorded button during new record macro, it cannot be pushed. How I can made this button pushable during record new macro? Please I will be very appreciate for any help. Thank you.
Monday, December 31, 2012 at 10:17 am
Vladimir –
You want to have the macro click a button? Why not have it run the code that would run if the button were clicked?
Monday, December 31, 2012 at 10:18 am
You want the macro to click a button? Isn’t it easier to have the macro run the code that the button runs when clicked?
vladimir niko says
Monday, December 31, 2012 at 1:33 pm
Thank you for answer to my question. But you don’t understand. I don’t want to macro push the button. During of the new recording macro I need to use manually push the button which already was assigned to other macros. It is more easy to use many assigned macros button and not to found their code in the list of many macros. I do not know why Excel 2007 do not support this. Because in 2003 I did that many time to save the time. Maybe I need to change something in configuration? Thank you for your help.
Monday, December 31, 2012 at 3:58 pm
Dear Sir I try to explain what I need step by step: 1. I have button (A) assign with process macro (A). 2. I need record new macro (B). During the recording process macro (B) I need run process macro (A). It is easy just to click button (A) during recording macro (B), not to go to the list of macros and manualy put code assign with button (A). In Excel 2003 it is work all the time. But in Excel 2007 in process of recording macros all previous assign button not clickable. They clickable again only if I am stop recording macro. How I can made them clickable in process of recording macro, like in Excell 2003? Thank you very much for help.
Wednesday, January 2, 2013 at 9:41 am
Vladimir – I think the answer is “you can’t.” In any case, the code you recorded in 2003 looked something like this at the point where you clicked the button: Application.Run "Book1.xls!MyMacro" where a better way to call the macro (better in most cases for a number of reasons) is simply: MyMacro You’ll have to record your macro piece-wise, and assemble the parts around calls to the various other procedures you’ve written. The VB Editor’s IntelliSense will help select the appropriate procedure as you begin typing its name.
Thursday, January 3, 2013 at 1:54 am
Dear Jon! Thank you for your answer. Probably not always the new version better than the old. It was a very useful feature in Excel 2003. Now I forced to record large macros with clickable buttons in Excell 2003, and then convert the whole file to Excel 2007. It is not comfortable, but what can I do, I need to use this buttons during the process of recording macros. But any way I really appreciate you for your help. Thank you again.
Alan Butler says
Tuesday, June 25, 2013 at 2:23 pm
Jon, I created a spreadsheet using Excel 2003 that allows users to enter the # of rows they wanted to show, tab out of that cell, and click a button to run a macro to shrink or expand the # of rows showing. The macros also unlocked and locked the spreadsheet to allow them to run, print, save, etc. Everything has been working fine for the users for the last few years. Today I was contacted because the buttons that contained the text had shrunk from about 1/2″ x 1″ to 1/8″ x 1/4″ making it impossible to read the text in each button. These buttons have also shifted out of place on their original spreadsheet. I know this user is using Excel 2010 now, (as am I.) Each month when this user entered new information, they would Save As, thus keeping all their previous versions of the tracking/reporting form. I know that Excel 2010 has added new formats that create issues with workbooks that have macros, and from what I can tell, this user is still opening and saving this workbook in .xls format.
Do you know of anything that I can do to recover the original formatting that I had for this workbook? Or, a possible cause for the corruption of this copy that workbook? (My guess is that she will have to re-enter this data on an earlier copy that wasn’t corrupted. But, I would like to help her to keep from having this occur again.)
Thank you for your assistance! Alan
Thursday, July 4, 2013 at 12:54 pm
Alan – I don’t know how new formatting would interfere with workbooks containing macros. Old macros using old formatting syntax might not have the expected results. Also, continuing to use the .xls file format may result in unexpected file formatting. The problem with the shrunken buttons could be alleviated with code that resizes and repositions buttons when a sheet is activated.
Monday, July 8, 2013 at 9:35 am
Thank you Jon! I hadn’t even considered that as a possibility.
David Long says
Wednesday, July 24, 2013 at 11:47 am
My question involves how to handle shape macros that refer to a procedure stored in an Excel Add-In. I have created an add-in that assigns macros via the Shape.OnAction property. However, this appears to create a reference to the add-in on the local machine. This means that if a file is shared via email for example, the recipient has to manually point the reference to his/her add-in in order for everything to work as expected. Is there a common workaround to this type of problem that I have not been able to find yet? Thanks for taking the time to review my question, and I look forward to hearing your thoughts.
Wednesday, July 24, 2013 at 2:36 pm
This is also a problem if a worksheet uses a user defined function written in VBA in an add-in. If the path where the add-in is located is not consistent, then the links fail.
I avoid linking shapes and buttons in a worksheet to code in a different workbook. Instead, I add a button to a custom ribbon tab for the add-in. So if the add-in is absent, there is no button not pointing to it. You may want to add intelligence to the add-in’s code that hides the button if it’s not appropriate on the active sheet, and that exits the procedure if it’s not appropriate but the button still called it.
Friday, July 26, 2013 at 10:50 am
Thanks for the clarification and advice, and sorry in advance for the lengthy post. As you suggested, most of the add-in’s functions are contained in ribbon buttons; however, in my scenario I have created a template grid composed of a series of shapes (squares and small triangles) that users can click on to create basic flowcharts. I think from a user experience perspective I would still like to have the macros execute when a user clicks on the shape. I came across the Workbook LinkSources property and ChangeLink method and have tried to update the link to the currently running add-in when a workbook is opened. Basically, I update any existing link that references the name of the add-in running the code (ThisWorkbook.Name). However, I have realized that by the time the WorkbookOpen event fires users may already be presented with a warning message stating “This workbook contains links to other data sources,” but in the end it looks like even if the user chooses “Do not Update” the code I have in the WorkbookOpen event does successfully modify the data link to the add-in running the code using the ThisWorkbook object. I think that may have to suffice for what I am looking to do unless there are valid concerns/reservations with my approach. Note: I have a custom class cExcelEvents that I found on a website by Chip Pearson that allows my add-in to gain access to the WorkbookOpen event.
Tuesday, January 28, 2014 at 9:15 pm
Congrats on your excellent blog!
I have a simple question.
Is it possible to make a button disappear after being used?
button 1: today’s date button 2: January 01
It would be perfect to have both of them disappearing but just the one that’s clicked would also be nice… :)
I’m thinking that maybe an automatic shape insertion over the buttons might work… but I don’t know how to do this either!! :)
Grateful for your help. Cheers!
Wednesday, January 29, 2014 at 8:19 am
Arg – Application.Caller will return the name of the form button that called the procedure. This will make it disappear:
Wednesday, January 29, 2014 at 7:24 pm
Thank you so much for your quick reply!
In the meantime I found this solution:
Private Sub CommandButton1_Click() DataTermo31Dez2014_01 CommandButton1.Visible = False End Sub
This allows me to use the command button, run the macro I need (DataTermo31Dez2014_01) and then hide the button.
Don’t know your opinion on this but apparently it’s working alright. I just needed to build another macro to show the button while I’m still on testings.
The big question for me now is that my worksheet has 100 buttons and so I had to repeat all the procedures 100x!!!
This resulted in a long code but… As I’m totally ignorant about VBA I decided to just pat myself in the back for even getting it to work. :)
Is there a procedure to replicate “subs”? Something like “Sub my.Macro.01 + 1”?
Sorry if this sounds to ignorant…
Thanks again for your attention!! Cheers!
Wednesday, January 29, 2014 at 8:16 pm
Arg – Oh, so you’ve used the ActiveX buttons. Well, there’s copy-paste. For Form buttons you can assign them all to a single procedure:
Wednesday, January 29, 2014 at 8:28 pm
wow! You’re fast! :)
So there’s no difference in using ActiveX or Form buttons?
And would that code hide the buttons individually? Only after they’re clicked?
By the way, sorry to bother with this too but, is there a way to disable windows privacy warnings “this document contains macros bla-bla-bla…”?
Thank you so much!
Wednesday, January 29, 2014 at 8:47 pm
The two button types are different.
An ActiveX button called Button1 has a unique event procedure called Sub Button1_Click on the code module of its parent worksheet.
A Form button called Button 1 can be assigned to any procedure in a regular module, so multiple buttons can link to the same protocol. This is the example I used, and each button is only hidden after it is clicked.
There is no way in VBA to bypass security warnings. That would defeat the purpose of the security system. On your own computer, if you’re careful, you could select settings that allow any code to be enabled, or better, define certain directories as “safe”, so any code in them would be enabled.
Wednesday, January 29, 2014 at 8:54 pm
Ok! Makes sense.
I have no training in VBA but I’ve now realized that it’s the best way to get jobs done.
Truth is I’m getting fascinated by it’s potential, so, last question (I promise), where could find documents/videos/other to learn about VBA?
And we’re talking about the basics as all that I’ve accomplished so far was by investigating forums and using logic to adapt other codes to my needs.
Again, thank you so much and congratulations on your work!
Ermencarla says
Tuesday, January 10, 2017 at 4:53 am
In MS Word 2013 I have a custom tab created by clicking New Tab in the Customize the Ribbon window. I want to programmatically hide/show this custom tab (named Personal_2) by means of a button in another custom tab, named Personal_1. I know how to use the Custom UI Editor for Office and I am familiar with Word VBA code. I would prefer to operate with Normal.dotm rather than with a specific *.dotm. Can you please help me?
Sunday, February 26, 2017 at 7:10 pm
Hi guys Have a userform excel 2007. Can add shapes and code to a worksheet but I am struggling to find an answer to adding a shape to a userform that is relatively easy. Can anyone assist?
[…] Code to Excel Workbook Learn to debug: Debugging VBA How To: Assign a Macro to a Button or Shape How To: Assign a Macro to a Button or Shape | Peltier Tech Blog | Excel Charts User Form Creation Create an Excel UserForm When To Use a UserForm & What to Use a UserForm […]
[…] Excel's recorder Learn to debug: Debugging VBA How To: Assign a Macro to a Button or Shape How To: Assign a Macro to a Button or Shape | Peltier Tech Blog | Excel Charts User Form Creation Create an Excel UserForm When To Use a UserForm & What to Use a UserForm […]
[…] MS Excel: Cells Learn to debug: Debugging VBA How To: Assign a Macro to a Button or Shape How To: Assign a Macro to a Button or Shape | Peltier Tech Blog | Excel Charts User Form Creation Create an Excel UserForm When To Use a UserForm & What to Use a UserForm […]
[…] to debug: http://www.cpearson.com/excel/debug.htm How To: Assign a Macro to a Button or Shape https://peltiertech.com/how-to-assign-a-macro-to-a-button-or-shape/ User Form Creation http://www.contextures.com/xlUserForm01.html When To Use a UserForm & What […]
[…] would assign the macros to a button or a shape on the worksheet. See How To: Assign a Macro to a Button or Shape | Peltier Tech Blog | Excel Charts for […]
[…] Learn to debug: Debugging VBA How To: Assign a Macro to a Button or Shape How To: Assign a Macro to a Button or Shape | Peltier Tech Blog | Excel Charts User Form Creation Create an Excel UserForm When To Use a UserForm & What to Use a UserForm […]
[…] MS Excel: Cells Learn to debug: Debugging VBA How To: Assign a Macro to a Button or Shape How To: Assign a Macro to a Button or Shape – Peltier Tech Blog User Form Creation Create an Excel UserForm When To Use a UserForm & What to Use a UserForm […]
[…] MS Excel: Cells Learn to debug: Debugging VBA How To: Assign a Macro to a Button or Shape https://peltiertech.com/how-to-assign-a-macro-to-a-button-or-shape/ User Form Creation Create an Excel UserForm When To Use a UserForm & What to Use a UserForm […]
[…] MS Excel: Cells Learn to debug: Debugging VBA How To: Assign a Macro to a Button or Shape How To: Assign a Macro to a Button or Shape – Peltier Tech Blog User Form Creation http://www.contextures.com/xlUserForm01.html When To Use a UserForm & What […]
[…] smuller74, Thanks for the feedback. You are very welcome. Glad I could help. Can you also help me to add a button to start the macro? See the below links: How to insert Buttons, radio buttons and check boxes in Excel How to insert Buttons, radio buttons and check boxes in Excel – Bing Videos How To: Assign a Macro to a Button or Shape How To: Assign a Macro to a Button or Shape – Peltier Tech Blog […]
[…] the latest post, I showed how to assign a macro to a Forms menu control or other shape on a sheet. Macros can also […]
[…] Or you could assign the code to a button in the worksheet. […]
Leave a Reply
Your email address will not be published. Required fields are marked *
Notify me of follow-up comments by email.
Notify me of new posts by email.
This site uses Akismet to reduce spam. Learn how your comment data is processed .
IMAGES
VIDEO
COMMENTS
Add a button (Form control) On the Developer tab, in the Controls group, click Insert, and then under Form Controls, click Button . Click the worksheet location where you want the upper-left corner of the button to appear. The Assign Macro popup window appears. Assign a macro to the button, and then click OK.
To record a new macro and assign it to the button, click "Record…". This brings up the Record Macro dialog, where you specify a name and click "OK". The button will be assigned that macro. Meanwhile, Excel will remain in a recording state until you click "Stop Recording" in the "Code" section of the Developer tab.
To insert an ActiveX button and then assign a macro to it, follow the below steps: Click on the Developer tab. In the Control group, click on Insert. In the options that appear, in the ActiveX Controls options, click on the Command Button option. Click anywhere on the worksheet.
Right-click the control, and then click Assign Macro. The Assign Macros dialog box appears. To specify the location of an existing macro, ... In Excel 2016, 2013, 2010: Click File > Options > Customize Ribbon. Under Customize Ribbon, select the Developer check box, and then click OK.
Follow these steps to run a VBA macro from the Developer tab. Go to the Developer tab. Press the Macros command in the Code section. This will open the Macro menu which lists all the macros available to run. Select the macro which you want to run. Press the Run button. That's it!
Another way to run macros in Excel 2016 is by assigning them to buttons on the ribbon for quick access. Step 1: Customize the ribbon; Right-click on the ribbon and select "Customize the Ribbon". Step 2: Add a new group; In the Excel Options window, choose the tab where you want to add the macro button, then click "New Group".
Running a macro. When working with macros in Excel 2016, it's important to know how to run a macro to automate tasks and save time. Here's a step-by-step guide on how to run a macro: A. Navigating to the Developer tab. To run a macro in Excel 2016, you'll need to first navigate to the Developer tab.
Accessing the Developer tab, recording a new macro, and writing a macro using VBA are important steps in creating a macro in Excel 2016. Running a macro can be done using the macro button, assigning a macro to a shortcut key, or running a macro from the Ribbon. It is important to be aware of the potential risks of running macros, enabling ...
On the "Excel Options" window, in the left sidebar, click "Trust Center." On the right pane, click the "Trust Center Settings" button. You'll see a "Trust Center" window. In the left sidebar of this window, click "Macro Settings." On the right pane, activate the "Enable VBA Macros (Not Recommended; Potentially Dangerous Code Can Run)" option.
Open your workbook in Excel. Press Alt + F11 to open Visual Basic Editor (VBE). Right-click on your workbook name in the " Project-VBAProject " pane (at the top left corner of the editor window) and select Insert -> Module from the context menu. Copy the VBA code (from a web-page etc.) and paste it to the right pane of the VBA editor (" Module1 ...
Run Macro By Clicking a Button. While the shape is something you can format, a button has a standard format. Here is how it looks: You can assign a macro to a button and then can run the macro by simply clicking that button. Here are the steps to assign a macro to a button: Go to the Developer tab -> Controls -> Insert -> Form Controls ...
Click on the View tab in the Excel ribbon. 2. Next, click on the Macros button on the right side of the View ribbon. 3. This will open the Macros drop-down. Click Record Macro. 4. Enter a name for your macro, something like Hide_Columns. Excel macros can be stored in the Personal Macro Workbook.
Adding Macro Buttons to the Excel Ribbon. To add a button to the ribbon, start by right-clicking anywhere on the ribbon or ribbon tabs. Then select Customize the Ribbon. This will open the Excel Options page, and Customize Ribbon should already be highlighted on the left-hand side. In the right-hand side of the Excel Options page, you will see ...
How To Assign A Value Or Expression To A VBA Variable. Before you assign a value to a declared VBA variable, Excel assigns the default value. Which value is assigned by default depends on the particular data type of the variable. The default value for numeric data types (such as Byte, Integer, Long, Currency, Single and Double) is 0.
How To Add A Macro To A Button In Excel 2016In the first episode I taught you how to add a button into Excel. If you need to watch that video first, you can ...
Excel 2016 training video on how to edit a Macro.All 160 of my Excel 2016 training videos contain everything you need to help pass both the Microsoft Office ...
Click the Customize Ribbon tab on the left hand side of the Excel Options dialogue box. From the Choose Commands From dropdown menu (where it currently says Popular Commands), choose Macros. You can now see your macros. Go to the Customize the Ribbon section of the Excel Options dialogue box.
Add or edit a macro for a form control. Right-click the control, and then click Assign Macro. The Assign Macros dialog box appears. To specify the location of an existing macro, select where the macro is located in the Macros in box by doing one of the following: To search for the macro in any workbook that is open, select All Open Workbooks.
To access the Excel macros you created and run them using the menus, follow the steps below: Under the Developer tab, click Macros. Select the macro you want to run. Click Run. If you plan to use ...
Visit our Website www.elearnexcel.com to see all our courses from Beginner to Master. You can also check out our Excel Blog with over 100 handy tips and tric...
Open the Excel worksheet where you want to assign the macro to a cell. Select the cell where you want the macro to be assigned. This is the cell where the macro will be triggered when clicked. B. Using the "Assign Macro" dialog box. Go to the "Developer" tab on the Excel ribbon.
Tools menu > Macro > Macros, select the Macro, and click Run. Shortcut Key combo Alt+F8, select the Macro, and click Run. Run Macro button on the Visual Basic toolbar, select the Macro, and click Run. Click in the macro with the mouse and press F5. None of these techniques are particularly elegant, and you wouldn't want to email a file with a ...