
Download 10000 free Assign to Icons in All design styles.
- User documentation
How to Change Icon of Any File Type in Windows
Don’t like the icon of a specific file type? You can change it. Here is how to change the icon of any file type in Windows 10 and 11.
For most popular file types, Windows has a dedicated file type icon. For application-specific file types, the parent application will automatically assign an icon. If there is no icon for a certain file type, Windows displays a blank file icon.
As you can guess, the file icons make it easy to recognize the file type with just a glance. For example, you can easily identify a text file with its icon. You don’t have to read the file extension or open it.
Generally, the default file type icons are pretty good. Microsoft is even modernizing the majority of them to conform to newer design standards. However, what if you dislike an icon of a specific file type? For example, Windows shows a blank icon for subtitle files (.srt). I generally dislike the blank icon. So, after installing Windows, one of the first things I do is change the file type icon. It gives me a piece of mind.
The good news is that you can do it as well. So, without further ado, let me show you how to change the icon of a file type in Windows 10 and 11 operating systems.
Table of contents:
Requirements
- Steps to change icon of any file type
Before proceeding, I’m assuming you already have an icon in the ICO format. If you don’t have one, you can get one on the internet.
Convert the downloaded icon to ICO if it is in PNG, JPG, or another format. There are numerous free online resources that can convert images to ICO format.
Save the icon in a separate folder as well. For example, I save all of my icons to a dedicated folder to avoid mistakenly deleting them. If you delete the icon after setting it up, the file type will display a blank icon.
Change Icon of a File Type
- Get the FileTypesMan software.
- Extract the zip file.
- Open the extracted folder.
- Double-click the exe file.
- Find the file type you want to edit.
- Right-click on the file type you want to edit.
- Select “ Edit Selected File Type .”
- Click “ … ” next to the “Default Icon” field.
- Press the “ Browse ” button.
- Find and select the .ico icon file.
- Click “ Ok ” in both windows.
- Exit the application.
- Reboot Windows.
- With that, you have changed the icon of a file type .
Download FileTypesMan — https://www.nirsoft.net/utils/file_types_manager.html
Steps with more details:
Unlike the folder icon, there is no built-in option to change the icon of a particular file type in Windows. Generally, you have to edit registry keys to get the job done. However, editing the registry is messy and overly complicated. So we will use FileTypesMan from Nirsoft Utilities, which is free, portable, and lightweight.
First, download FileTypesManager from Nirsoft. Extracted the downloaded ZIP file to a folder and double-click the exe file. Being a portable application, there is no need for installation.
After opening the application, you will see all the file types in your system. Find the file type you want to edit, right-click on it and select the “Edit Selected File Type” option.
Here, click on the “…” button next to the “Default Icon” field.
The above action will open the default Windows Icons list. Since we want to set a custom icon, click on the “Browse” button.
Find the saved icon, select it, and press the “Open” button.
Back in the “Change Icon” window, select the newly added icon and press the “Ok” button.
Click the “Ok” button in the main FileTypeManager window to save changes.
Close the application.
That is it. You’ve changed the icon of the target file type. From now on, you will see the custom icon for that specific file type. In my case, the SRT file type will have a new custom icon than the blank icon.
If you don’t see the changes immediately, restart File Explorer or Windows. Restarting will apply the change and reflect it as intended.
That is all. It is that simple to change the icon of any file type in Windows.
I hope this simple and easy Windows how-to guide helped you.
If you are stuck or need some help, send an email, and I will try to help as much as possible.
If you like this article, check out how to set a custom icon to drives in Windows and how to create an invisible folder in Windows .
3 thoughts on “How to Change Icon of Any File Type in Windows”

Just discovered site and have found some great articles…
I’m hoping you can help with an issue I’ve been having for some time. The problem I am having is that all of my audio extensions get “bulked” together. For example, when I attempt to change the description or the icon for .mp3’s the description and icon changes for all audio extensions (.wav, .au, etc). Not only is this annoying, it’s a bit asinine too! (As a composer I’m constantly adding and removing samples into my DAW… nothing slows the process down more than thinking I’m dropping in a Wav file only to realize it’s Midi… ugh)
I’ve tried both FileTypeMan and ShellExt but no luck… I’m thinking it might be because my “user Choice” application if I simply point and click on a file in explorer is the AIMP app through The Microsoft Store.
Here’s what Appears in FileTypeMan “Notice – Changing the properties of this file type may affect the following extensions: .aac, .aif, .aiff, .flac, .m4a, .mid, .midi, .mka, .mp2, .mp3, .s3m, .wav, .wma, .xm” Then there’s the warning that says “UserChoice overwrites the actions and icon of the file extention.”
Thanks in advance for any assistance

Also running into the same problem like Christopher, in my case problems are coming up with .php, .js, .html and co that are assigned to Visual Code. Is there any way to ungroup them, that any file format can get its own icon?

Actually WindowsXP, Server2003, and WindowsXP64 all came with a file extension manager, Simply named “Extension Manager”. It not only allowed you to quickly search for file extensions, add extensions and manually set file associations, you could indeed also manually set the icon for a given extension, either by selecting supported image files or pointing to a executable or DLL file and choose from an embeded icon within the exe or library.. Why Microsoft chose to remove this very helpful tool from Vista, 7, 8, and 8.1 is quite mind boggling. The windows 10 equivalent has a large clunky view, cannot search to quickly bring you to the extension you’re looking for in the huge list of extensions, and as already known by anyone reading this page, does not allow you to set extension icons. Simply Amazing how frequently companies toss out utility and function purely for things that look new and perform poorly….
Leave a Comment Cancel Reply
Your email address will not be published. Required fields are marked *
Save my name, email, and website in this browser for the next time I comment.
How-To Geek
How to make an icon for windows 10 or 11 out of any image.
Making an icon isn't difficult, and it can add a custom flair to your PC.
Quick Links
Grabbing graphics for custom icons, preparing the image, making an icon.
We've featured a lot of nicely designed icons for Windows, but have you ever wondered how to create your own? Load up a web browser and GIMP (or your favorite photo editor), and we'll show you how to turn any image into an ICO file.
Being able to use high-res icons really goes a long way to making your PC look fantastic, but it's just so annoying when you can't find one that looks the way you want it to. So make them yourself, and really give Windows the custom look you've been craving.
Your new icons can be whatever you want, or whatever you can Google. You can design your own, if you're artistically inclined, but for the sake of demonstration, we'll simply grab something simple from Google Images. If there are multiple versions of the graphic you're looking for, grab the best looking one at the highest resolution, which should be above 256 x 256 pixels. Higher is fine, but smaller could give you a low-resolution icon!
The next step is to remove the parts of the image you don't want in your icon. We'll use GIMP , the popular free and open-source image editor, for this but you can use another image editor if you prefer it. The principles will be the same.
Fortunately, our example image has clean, well-defined black lines around the subject and a plain background. That makes the fuzzy select tool (Magic Wand in Photoshop) the ideal tool for the job. For images with more complex backgrounds, you'll need to use more complex methods .
First, we need to make sure our image has an alpha channel. Alpha channels allow images to have transparency. In the case of our icon, it'll ensure we don't have an unsightly pure white background.
Open your image in GIMP, then go to the right-hand side and look for the layers menu . There will probably only be one layer, unless you've downloaded something like a PSD file . Right-click the layer, and then click "Add Alpha Channel." If the option is greyed out, you're in luck --- the image you downloaded already has an alpha channel.
Related: What's the Difference Between JPG, PNG, and GIF?
Then we need to tweak some settings for the fuzzy selection tool. Activate the fussy selection tool by clicking the icon near the top left, then tick the box that says "Show Mask."
The mask isn't strictly necessary, but it is helpful. It highlights the region being selected in bright pink while left-clicking, making it much easier to see. Once you release left-click, the pink mask will disappear but your region will still be selected. Hit the Delete key to remove the selected region.
In this case, clicking on the white background once isn't enough, since the black lines outlining Mario meet the edge of the image. You have three options:
- Delete the white background piece by piece until it is all gone.
- Shift+Left-Click each region formed by the black outline of Mario (or his plane) meeting the edge of the image, and then delete them all at once.
- Adjust the tolerance of the fuzzy selection wand to select all of the regions in one click, and then delete them simultaneously.
The third method is really convenient for this example. If you have the fuzzy selection tool active, left-clicking once will select a region. If you hold left-click and drag right or down, it increases the tolerance, and dragging left or up decreases the tolerance. Hold left-click in the first region you want to delete, and then drag your cursor right until all of the white regions are selected. Don't drag your cursor into the character or his plane --- then they'll also be selected.
Once you've selected and deleted all of the white background, you should see the pilot and his plane on a grey checkered background.
Click File > Export As and export the image as a PNG. Keep the default save settings and name the image whatever you like.
Once we have our image cleaned up, we need to make it the correct size. Icons come in various sizes, but they're always square. Common sizes for Windows icons are 256x256, 48x48, 32x32, 24x24, and 16x16, but there are plenty of others. Icon files, ICOs, often store multiple versions of the same icon at different resolutions. That way the icon can accommodate being used at different sizes.
Related: Everything You Know About Image Resolution Is Probably Wrong
First, resize the image by hitting Shift + s or by navigating to Tools > Transform Tools > Scale. The box that pops up shows you the width and height of the image you're working with --- change the larger of the two quantities to 256, then click Scale. The other quantity should change correspondingly. If the image isn't perfectly square, don't worry about it.
We now have to resize the canvas so it is 256x256. Go to Image > Canvas Size, set the canvas size to 256x256, and then click resize.
If your starting image wasn't exactly 256x256, it won't be properly centered on either the length or width axis. The easiest way to fix this is just to eyeball it with the move tool.
You can add guidelines to help you get it exactly centered if you'd like to be more precise. Go to Image > Guides > New Guide (By Percent), and place a guide at 50%. If your image is not centered vertically, use a horizontal guide; if it is not centered horizontally, use a vertical guide.
The guide appears as a blue line through the middle of the canvas --- when you click the image with the move tool, a tiny white cross appears in the middle of the image. Click and drag the image with the move tool until the cross is as close to the blue line as possible.
Once that is done, you need to create the other sizes. Right-click the original layer and click "Duplicate Layer", or left-click the layer and hit Ctrl+d. There are four duplicates in this example. Double-click each layer and rename it something descriptive, like 256x256, 48x48, 24x24, etc. Then select each layer and scale it to the correct size using the transform tools, just like you did before.
Creating additional guides for each icon size makes positioning the layers a breeze. For any given icon size you'll want to place guides at half of the total width and height to locate the center point. Once again navigate to Image > Guides, but this time select "New Guide" instead of "Guides by Percent." For example, if you have a 48x48 size, place both the horizontal and vertical guides at 24. Then use the move tool to move each icon into place.
If you don't care what your working file looks like, you don't really need to organize the layers in a specific way like this. The important thing is that each layer is scaled correctly.
Click File > Save, and save the entire project as an XCF. If there is a problem, or you want to change something later, having the working file around is invaluable.
After that, you need to go to File > Export As, click "Select File Type", and search for ".ico" in the file extensions list. Name your icon, then click "Export." Go ahead and keep the default settings in the popup, then click "Export" again.
Creating the icon was the hard part --- all that is left is to use your custom icon . If you want to create a completely new icon, you can also do that in GIMP. Alternatively, you could use a program like Inkscape .
Related: What Is Open Source Software, and Why Does It Matter?
Technology in terms you understand. Sign up for the Confident Computing newsletter for weekly solutions to make your life easier. Click here and get The Ask Leo! Guide to Staying Safe on the Internet — FREE Edition as my thank you for subscribing!
How Do I Set a Custom Icon for a Desktop URL Shortcut?
by Leo A. Notenboom
It’s not that difficult to provide a custom icon for a shortcut at all. In fact, there are a couple of approaches.
I’ll show you both.
Become a Patron of Ask Leo! and go ad-free!
But first, a word from the website…
Websites have the ability to provide a custom icon in the form of a “default icon”, which can be used for several purposes. The icon, often called “favicon.ico”, is placed in the root of the site. For example, Ask Leo!’s favicon is at https://askleo.com/favicon.ico .
When you bookmark a site, or add it to your Favorites, the favicon is typically used as the icon that appears in the Favorites toolbar or menu – hence, the name: fav orites icon . (“ico” is the file format used for icon images.) Some browsers, like Internet Explorer, display the favicon in the browser address bar when you visit a page on that site.

If a site doesn’t provide a favicon, it’s up to the browser to pick one. Usually, it picks its own icon – IE’s ‘E’ icon, Firefox’s fox, and so on.
Pinning a desktop shortcut
When using Internet Explorer in Windows, you can click and hold on the favicon in the address bar and drag it to the desktop to create a shortcut to that page.
Visit the page you want the shortcut to go to, click and hold on the site’s favicon, drag it to the desktop, and release. Windows will create a shortcut using the favicon supplied by the website — or the default browser icon, if the site doesn’t provide one.
What Windows creates in this situation is a special kind of shortcut: a “pinned” shortcut. And while it is possible to change the icon by hand-editing certain files buried in your system, apparently Windows doesn’t provide a user interface for the process.
In other words, there’s no super easy way to change the icon. However, because the icon is that of the site, you may not want or need to change it at this point.
What’s worse about pinned shortcuts is this: if I start Internet Explorer from a pinned shortcut to Ask Leo!, the icon for that run of Internet Explorer becomes the Ask Leo! icon, regardless of the fact that I may browse elsewhere, such as Google.com. The pinned icon is considered the icon of the application it starts, not the content initially shown by the application.
Creating a desktop shortcut another way
Another approach to creating a desktop shortcut is to simply right-click on an empty area on the desktop, click New and then Shortcut .

After that, type or paste in the URL you want the shortcut to go to – say https://askleo.com – click Next and you’re done.

Shortcuts made this way are typically given the custom icon of the program that would open them. In other words, it would be IE’s icon if that’s your default browser, or Firefox’s icon if that’s your default. On more recent versions of Windows, if the web site provides a favicon, then that may also be used.

If you want something else, then the advantage of this method becomes clear: this shortcut’s icon can easily be changed.
Using a custom icon
Right-click the shortcut icon that you created, and click Properties .

In the Web Document tab, there’s a Change Icon… button. Click that. The result is a Change Icon dialog with a number of icons to select from.
Icons are typically stored in .exe or . dll files. In some versions of Windows, the Change Icon dialog will default to display icons contained within your default browser, which usually contains only the familiar icons for that browser. It appears that Windows 10, at least, will instead display icons from the shell32.dll file contained in Windows itself 1 . This file contains hundreds of icons to choose from. Just click on the icon you want, and click OK .
Alternately, you can download or create “.ico” image files, and specify them using the Browse… button.
If you want to display the actual site’s icon and it wasn’t used by default, you’ll need to download it.
Getting a site’s custom icon
Using Ask Leo! as an example, enter https://askleo.com/favicon.ico in your browser; that should display the favicon image. 2

Right-click that image and click Save picture as… . Navigate to the folder where you want to save the file, and save it with the name askleo_favicon.ico.
You can then specify it as the icon for the shortcut.

With 300 icons to choose from in shell32.dll, you may not need to do this, but it’s nice to know you can.
Subscribe to Confident Computing ! Less frustration and more confidence, solutions, answers, and tips in your inbox every week.
I'll see you there!
Podcast audio

Download (right-click, Save-As) (Duration: 6:03 — 5.6MB)
Subscribe: RSS
Footnotes & references
1 : You can select this file manually by entering c:\windows\system32\shell32.dll as the file to open.
2 : Unfortunately, while “favicon.ico” is a common name for the site icon, and probably the most widely used, it’s not required that it be called that. Sadly, you’ll need to be able to decipher the site’s HTML encoding to determine what the actual name might be if you can’t find favicon.ico.
27 comments on “How Do I Set a Custom Icon for a Desktop URL Shortcut?”
Interesting and would be useful but my Win 7 chooses not to display any “Web document tab” in the shortcut’s properties. Is this easily fixed, I wonder?
FYI RE: Icons I’ve found most custom icons and folders to somewhat boring. I’ve come across some excellent ones that are created by artists vs tech people. The difference is worthy of sharing. They are free, and the artist only ask for their recognized due. My FavCons are: http://deleket.deviantart.com/gallery/ The full gallery is: http://browse.deviantart.com/?q=Icons&order=9&offset=48 ** Quite a big difference when icons arise from the minds of artists.
I am familiar with favicon.ico(ns) because I own a few websites. Hadn’t thought about capturing a favicon.ico by simply typing in its address. Doh!
Anyway, I decided to put your website in a desktop shortcut. This was easily accomplished, but in the process I discovered that two of the three major browsers are not displaying your favicon.ico at all!
Now, I’m confused. Conventional wisdom is that the favicon.ico is stored in the root directory of a website, and the server automatically loads it. But when I put in http://ask-leo.com , it loads in Firefox but not in IE nor in Chrome.
You can follow the instructions of setting a custom icon as explained in this article you are commenting on in the section on Getting a site’s custom icon
Re the missing web document tab feature, I found by dropping the url in a folder and then creating a desktop shortcut I got the full ‘change icon’ option in properties. Only a work-around but good enough for me. Found a good selection of Google icons at findicons.com. Sorry to have wasted your web real estate.
I often use http://www.iconarchive.com/ which provides hundreds of icons. You can do a search for a specific icon, such as Computer, and a lot of icons are displayed.
Another .dll file that has a lot of nice icons is c:\windows\system32\imageres.dll.
I am on windows 7.
I just wanted to add that, if you want to make your own icons to customize your folders, it’s really easy. First create a folder in your pictures folder called “My Icons” or something like that. Every time you make an icon, store the image there. That way you can browse to it when you want to customize a folder or shortcut.
Then, using paint (the simplest and quickest image program out there), take a screen shot (prt scr key) of what you want, paste it in the Paint program and trim it so just your icon image is visible. Then save with the name it thus: name.ico and save as a 24-Bitmap bmp (*.bmp) file.
That’s it. now you can use that icon on any folder you wish. IOW, anything you can see on your screen can be print screened into an icon.
Just remember that the path to the icon image must not change. So keep you personal icons folder in the same place, please.
Actually, A. G., whenever I create a custom icon for a program, I store it in that program’s installation directory . This makes it very easy to find the custom icon I’ve made for that particular program, without having to wade through 500 other icons, just to get to the one I actually want to use.
It also means that if I copy that program’s directory (for a backup, or to add that program to some other computer), that custom icon will automatically be transferred along with it.
Leo! I just LOVE this! I tried the 1st way to add a customized desktop icon for 2 different launches, and it worked. I then deleted them, and did it the 2nd way….click > hold > drag favicon from the website to my desktop. And just to make sure they worked, I launched both of them (one at a time, of course) and went into them, just to make sure they would work from my Google Chrome browser, and to make sure that I was doing it correctly…. and I did it.
Years ago, when I bought my Dell laptop using Windows XP OS, I right-clicked on the website and the drop-down window would give me a menu of options. All I had to do was click on the “Send to > Desktop” option, and there would be my shortcut launch. But was unable to do the same thing, or using the same method didn’t work, after my pc tech changed to Windows 7 OS. But now I’ve got the know-how. Thank you, Leo! :D Being a basic newbie, it’s the little things like this that excite me and make me happy. : – )
To everyone wondering why they can’t open webiste shortcuts created on Internet Explorer, try to hold the shift key while dragging to desktop. This occurs because after IE8, the browser create a “pinned site shortcut” instead of a normal shortcut.
So, this way, you can create your shortcuts on IE and they will open on your default browser of choice.
Best whishes, Rafael Romagnoli
18apr2017 problem with win 10 icon display on desktop
up till 15 days ago, my desktop icons were all great icon and name of program icon takes u 2
now, icon and name of program icon takes u 2 shortcut 1.28kb
or icon and name of program icon takes u 2 internet shortcut 1.28kb **************************** can’t figure out how to get rid of the “internet shortcut 1.28kb” or
” shortcut 1.28kb”
please help me
Right click on shortcut –> Rename. Just change it to whatever you want.
This was really helpful and easy to follow. How can I take that custom desktop icon and share it with a small group keeping the link intact? They want a desktop icon to use for a form I created and most of them are not tech savvy enough to even do the simple steps you outlined. I created an image and hyperlinked it, but the link disappears when saved to the desktop. Is there a way to ensure the link stays active when the image is saved to the desktop? Thanks!
When creating a URL Shortcut Firefox always picks the icon that i don’t want. If i check Firefox it contains 7 or 8 icons. It’s the 2nd one that i LOVE and wish it was used ALL the time. Make it the default icon without me having to right-click and choosing from the list. That’s what i want to know how to do.!!
Every Fear Hides A Wish
Unfortunately, that’s just how it works.
Windows shortcuts would be infinitely more useful if you could specify a start-up and/or ending sound for any given shortcut.
ok great but I want to chage the default icon windows uses for “ALL” internet icons
sorry I meant to say change the default icon for all internet shortcuts not a custom one for each shortcut
I don’t believe you can.
Yes, you can!!! Try the utility Types.
Types: https://ystr.github.io/types
I already have a ‘proprietory’ icon on the internet shortcut; trouble is, when it is open, the task bar icon reverts to that of the browser. Can that be modified ?
Not really, no. The icon in the taskbar for a running program is that of the program, not the shortcut that started it. So the running program in this case is your browser.
I think this one needs a little update – the big players have made this easier. Except Firefox, I couldn’t figure out how to do it there.
In Chrome, go to the webpage you want to use the favicon for. Options menu (3 dots top right corner), More tools, Create Shortcut… — puts a shortcut on the desktop using the favicon. Drag the shortcut to your taskbar.
In Chromium based Edge, even easier. Options menu, More tools, Pin to taskbar or Pin to Start.
Edge uses the taskbar icon just like the Edge icon does, so you can click on it to switch if you’ve already opened it.
Chrome isn’t quite as smart and the shortcut will just keep opening a new tab, but eh. Workable.
Ops, I changed the shortcut icon (URL of a website) to custom picture, and now every other shortcut that I make, (with both methods as above), shows that custom picture instead of regular “chrome” or “Firefox” icon. I even deleted that custom picture, but subsequent shortcuts still are created with that picture, and now, I have no idea how to revert it to default (both “chrome and Firefox”). After creating new shortcut, I can change its icon to a different one, but when I click on it, and it opens in a browser, and I drag it to the desktop to make a shortcut, it still shows the custom picture that I previously made ! Please help! Anyone knows how can I change it to default icon when creating subsequent shortcuts?
I forgot to mention, I use Win 8.1 and funny thing, when I created shortcut to “askleo” it is displayed correctly with “askleo” picture, instead of my “custom made”.
Leave a reply:
Before commenting please:
- Read the article .
- Comment on the article .
- No personal information .
Comments violating those rules will be removed . Comments that don't add value will be removed, including off-topic or content-free comments, or comments that look even a little bit like spam. All comments containing links and certain keywords will be moderated before publication.
I want comments to be valuable for everyone, including those who come later and take the time to read.

You can do this! Gain more confidence with your technology by subscribing to my Confident Computing weekly email newsletter. Advice, instruction, tips and tricks to stay safe and get more out of your technology ... with confidence!

Subscribe today and get your copy of the FREE edition of my most important book: The Ask Leo! Guide to Staying Safe on the Internet -- Things you can do NOW to keep yourself safe and secure.
How To Add Icons
You can place Font Awesome icons just about anywhere, and we’ve tried to make it so that icons will take on the characteristics and blend in with surrounding text naturally.
We’ll cover the basics of how to add icons to your project, shorthand class names for different icon styles , how to add icons to HTML, using icons aliases, and more!
To add an icon, you need to know a few bits of information:
- The shorthand class name for the style you want to use
- The icon name , prefixed with fa- (meaning “Font Awesome” naturally!)
- The shorthand class name for the family you want to use (Optional)
Families + Styles
There are three families of Font Awesome icons - each with a unique look, class name, and @font-face font-family. In both Font Awesome Classic and Sharp, there are five styles of Font Awesome icons . Here are some examples:
Classic Family
Sharp family, brands family, add icons to html.
We designed Font Awesome for use with inline elements , and we recommend that you stick with a consistent element in your project. We recommend using <i> element with the Font Awesome CSS classes for the style class for the style of icon you want to use and the icon name class with the fa- prefix for the icon you want to use . Accessibility-minded folks may want to opt for the <span> element instead of <i> .
Here’s an example:
Setting Different Families + Styles
And here’s an example that references different styles and families of icons:
We’ve updated many of our icon names in Version 6 to make them more universal and consistent. But we wanted to make sure not to break your existing code, so we made aliases for renamed icons to allow them to work with either the old or new names.
And you can use the old or new name for styles as well. So you can still use fas , far , fal , fad , and fab . And we’ve also included older prefix versions for our new Thin style ( fat ) and new Sharp family of styles (Sharp Solid is fass while Sharp Regular is fasr ).
Alternate Ways to Add Icons
We also have many other ways to add Font Awesome icons, in case your situation calls for something specific:
When using Web Fonts
- Add icons using just CSS with pseudo-elements .
When using SVGs
- Use SVGs without JS using our SVG Sprites
- Bring-Your-Own style with our bare SVGs
- Use SVG symbols to improve performance with repeating icons
- Use an Icon’s Unicode value
- Use an Icon’s name
- Apps & Plugins
Noun Project
- Submit Icons
- Submit Photos
- Customer Support
- Affiliate Program
Browse Assign To Icons

- Vector Collections
Assign Vectors
Free Assign SVG Vectors and Icons. Assign icons and vector packs for Sketch, Figma, websites or apps. Browse 6 vector icons about Assign term.
No Ads here 🤗
Instead, you can give us a Share on Twitter.
Related Collections
Website content.
Search, explore, edit and share open-licensed SVG vectors
Free Vectors
- Monocolor Vectors
- Multicolor Vectors
- Filled Vectors
- Outlined Vectors
- Icon Vectors
Other Collections
- Glyphs Vectors
- Circular Vectors
- Duotone Vectors
- Flat Vectors
- Submit Assets
Developers / Designers
- vectormaker
Icons Tutorial
Font awesome 5, font awesome 4, how to add icons.
To insert an icon, add the name of the icon class to any inline HTML element.
The <i> and <span> elements are widely used to add icons.
All the icons in the icon libraries below, are scalable vector icons that can be customized with CSS (size, color, shadow, etc.)
Font Awesome 5 Icons
To use the Free Font Awesome 5 icons, go to fontawesome.com and sign in to get a code to use in your web pages.
Read more about how to get started with Font Awesome in our Font Awesome 5 chapter.
Note: No downloading or installation is required!
Font Awesome 4 Icons
To use the Font Awesome 4 icons, add the following line inside the <head> section of your HTML page:
Advertisement
Bootstrap 3 Icons
To use the Bootstrap 3 glyphicons, add the following line inside the <head> section of your HTML page:
Note: Glyphicons are not supported in Bootstrap 4.
For more information about Bootstrap 3 and Glyphicons, visit our Bootstrap 3 Tutorial.
Google Icons
To use the Google icons, add the following line inside the <head> section of your HTML page:
For a complete list of ALL icons (font awesome, bootstrap and google), visit the Icon Reference .

COLOR PICKER

Report Error
If you want to report an error, or if you want to make a suggestion, do not hesitate to send us an e-mail:
Top Tutorials
Top references, top examples, get certified.
- Getting started
- Manage your Personal Tasks
- Manage your Team's Plans
- Plan your day with My Day
- Advanced capabilities with Premium Plans

Manage your Team's plans with Planner in Teams
In the Planner app, you can create shared plans to effectively track work for your team. Shared plans are designed for ease of collaboration to help you get work done faster.
Create a shared plan

Basic plans
Grid – Use grid view to see your tasks in an easy-to-understand list. Here you can easily set task fields, mark tasks complete, and add new tasks.
Board – Use board view to see your tasks in a Kanban style board. Here you can group your tasks by bucket, progress, due date, priority, and labels.
Schedule – Use Schedule view to organize your tasks on calendar. Learn more about schedule view.
Charts – Use Charts view to visually see the status of tasks. Here you can view you can view charts for:
Status – status of tasks.
Bucket – progress of tasks in each bucket.
Priority – progress of tasks by priority.
Members – availability of team members.
Premium plans
Timeline – Use timeline view to see a Gantt chart of your tasks and dependencies.
Charts – Use charts view to visually see the status of tasks. Here you can view you can view charts for:
People –Use people view to see the distribution of tasks among team members and quickly reallocate as needed.
Goals – Use the Goals view to set and track objectives.
Assignments - Use assignments view to granularly manage resources’ efforts on tasks to accurately represent how and when work will be executed.
For full details on the advanced capabilities offered by premium plans, please check out Advanced Capabilities with Premium Plans.
Note: Please note that some views may require different premium licenses. Please reference Microsoft Project for the web service description for more information.
Assign tasks
When you're ready to decide who's doing what, there are several ways you can assign tasks to people in Planner.
You can assign someone when you create a task – Add a task name, and then select Assign to choose a plan member from the list. If the right person isn't listed, type a name or email address in the search box to add someone new.
You can assign a task to more than one person – When a task is being worked on by more than one team member, you can assign it to up to 11 people so that they can all see it in their Assigned to me list. When any team member marks the task complete, it's marked complete for all team members.
Change assignments
You can also change the Board to be grouped by Assigned to , and then drag tasks between the columns for each person on your team.

Need more help?
Want more options.
Explore subscription benefits, browse training courses, learn how to secure your device, and more.

Microsoft 365 subscription benefits

Microsoft 365 training

Microsoft security

Accessibility center
Communities help you ask and answer questions, give feedback, and hear from experts with rich knowledge.

Ask the Microsoft Community

Microsoft Tech Community

Windows Insiders
Microsoft 365 Insiders
Was this information helpful?
Thank you for your feedback.
- Notifications
No notifications to show yet
You’ll see useful information here soon. Stay tuned!
- Animated icons
- Interface icons
Are you sure you want to delete this collection?
We’re sorry you canceled your Premium subscription
You can still enjoy Flaticon Collections with the following limits:
- You can choose only 3 collections to keep
- You can only add up to 100 icons per collection
- You can’t add Premium icons to your collection
The advantages of your collections have changed
Keep making the most of your icons and collections
20% OFF our Annual Premium Plan
Select 3 collections to continue:
You have 8 collections, but can only unlock 3 of them
Report download
Please indicate what problem has been found. Thanks!
Base 64 encoded image
Copy the base64 encoded data and insert it in your HTML or CSS document. Need help? Maybe this link can help you
CSS background
Using it for the web? Copy this link in your website:
How to attribute for other media?
Don’t you want to attribute the author?
Going Premium is easy and it also allows you to use more than 14,826,000 icons without attribution. Find out more information here
Select a color from the icon
Choose a new color
Custom palette
- Remove color
- Remove palette
- You have exceeded the number of color samples for this palette
Select a shape
Stroke width
You can only save 3 new edited icons per collection as a free user. Upgrade to save unlimited icons.
Your collection is locked. You can upgrade your account to get an unlimited collection.
You have reached the icons limit per collection (256 icons)
This feature is only available for registered users. Login or register
This icon has a gradient color and cannot be edited.
Group search results
You can group your results by author style, pack, or see all available icons on your screen.
Assigning Icons
- Delete filters
- Add to collection
- Copy to clipboard. Copying this asset counts as a download Copy to clipboard SVG PNG
Set your own limits
Gain access to over 14,826,000 icons in formats SVG, EPS, PSD & BASE64
Download what you want, cancel when you want
Related tags
Collection:
Over 14,826,000 icons for 8.25 USD /month
- No attribution required
- 14.8M icons & stickers in SVG, EPS, PSD & BASE64
- Unlimited downloads
- Browse ad-free
You must attribute the author
How to attribute for other media? How to attribute?
How likely are you to recommend Flaticon to a friend?
How about giving us a rating on Trustpilot
If you can spare a few minutes to leave us a review, we’d be super grateful 😃
Please visit:
· How to recover a hacked or compromised Microsoft account - Microsoft Support
February 27, 2024
Hello! Are you trying to recover or access your Microsoft Account?
- Search the community and support articles
- Search Community member
Ask a new question
New Outlook assign categories quickstep needs to support Keyboard navigation
When using the assign category quickstep the only option is to use the mouse to click . I can use the arrow key to navigate the list, but not to get to the category button. am i missing something ?
- Subscribe to RSS feed
Report abuse
Replies (3) .
- Microsoft Agent |
Thank you for posting to Microsoft Community. We are glad to assist.
We are looking into your situation, and we will update the thread accordingly.
Appreciate your patience and understanding and thank you for your time and cooperation.
Microsoft Community Moderator.
Was this reply helpful? Yes No
Sorry this didn't help.
Great! Thanks for your feedback.
How satisfied are you with this reply?
Thanks for your feedback, it helps us improve the site.
Thanks for your feedback.
Hi John Bidwell,
Thank you for posting to the Microsoft Community. We are glad to assist.
It seems like you’re looking for a way to use keyboard navigation for the ‘Assign Category’ Quick Step in Outlook. While the default behavior might require using the mouse, there are ways to customize Quick Steps and potentially add keyboard shortcuts.
Here’s a general approach to customizing Quick Steps in Outlook:
In Mail, select the Home tab.
In the Quick Steps group, select the More arrow at the side of the Quick Steps box to open Manage Quick Steps .
In the Quick Step box, select the quick step that you want to change, and then select Edit .
Under Actions, change or add the actions that you want this quick step to do.
If you want, in the Shortcut key box, select a keyboard shortcut that you want to assign to that quick step.
For assigning categories specifically, you can create a Quick Step with the ‘Categorize message’ action and then assign a keyboard shortcut to it. This way, you can use the keyboard to activate the Quick Step without needing to click the category button.
I hope this helps let me know if this is contrary to what you need, I would still be helpful to answer more of your questions .
Best Regards
Community Moderator
Yes, I am aware I can activate a quickstep with the keyboard, but I'm looking to specifically use the quickstep to select and assign a category after I activate the quickstep. From the screen below I need to select category and navigate to the categorize button with the keyboard. The Tab button only cycles through the items in the list and does not navigate to the button.

Question Info
- New Outlook for Windows
- For business
- Norsk Bokmål
- Ελληνικά
- Русский
- עברית
- العربية
- ไทย
- 한국어
- 中文(简体)
- 中文(繁體)
- 日本語

- News and product updates
- Dynamics 365 Field Service
- IT Professionals
Optimize Service Delivery with improved booking capabilities in Dynamics 365 Field Service
- By Valerie Horvath, Program Manager
- Content type
- Tips and guides
- Audience type
- Administrator
Field service management is a complex process that requires seamless coordination among technicians, customers, equipment, and suppliers. To address these complexities, we have introduced two new capabilities in Dynamics 365 Field Service to make this easier.
The first capability, Complete Work Order by Status , allows field service organizations to use a booking status to indicate if further work is required to complete a work order. This feature gives technicians the flexibility to indicate when additional work is needed on a work order, streamlining the process for field service teams to gain better insight into the tasks required to fulfill a work order.
The second capability, Complete Booking While Preserving End-Time , ensures that when a booking is marked as completed by someone other than the assigned resource, the end-time value will no longer automatically update to the current timestamp. Instead, it will retain the end-time value of the booking. This helps ensure accuracy and consistency in the record-keeping process.
These features aim to optimize service delivery, reduce costs, and enhance customer satisfaction. Now, let’s explore each feature in greater detail.
Complete Work Order by Status
Why is it needed.
In the Field Service industry, it’s not uncommon that what begins as a routine service request can morph into a complex task, requiring multiple follow-up visits to finalize a work order.
Consider a scenario where a commercial building is experiencing recurrent refrigerant leaks from its rooftop HVAC unit. Typically, these leaks are addressed by replacing a worn-out seal. However, upon closer examination, it becomes evident that the evaporator coil is corroded and requires replacement. This insight only emerges once the field service technician arrives on site. Typically, when this occurs, technicians find themselves without the required parts for immediate repairs. This results in the need to contact suppliers, procure necessary parts, and schedule follow-up visits—unforeseen tasks not factored into the initial work order creation. In this scenario, the technician would close the booking while still needing to acknowledge the need for a follow-up visit to complete the work order.
Previously, field service teams encountered challenges in accurately reflecting this information without implementing custom logic. However, with the introduction of the “Complete Work Order by Status” feature, these unexpected visits can now be effortlessly marked as requiring follow-up by utilizing a booking status to indicate the need for further work to fulfill the work order.
How it works?
To configure this feature, administrators should access the Resources section within Dynamics 365 Field Service. Navigate to Booking settings and choose Booking Status. Here, administrators can either select an existing completed status or create a new one. Next, administrators should navigate to the Field Service tab within the selected booking status. Within the “Field Service Status” dropdown, update the “Status Completes Work Order” toggle to “off”.

Upon adjusting this setting, technicians can utilize the newly configured booking status to indicate both the completion of a booking and the need for follow-up work on the associated work order. This adjustment optimizes the workflow for field service teams and enhances their understanding of the tasks necessary for work order fulfillment.
Complete Booking while preserving ‘End Time’
Field Service technicians are the backbone, tirelessly striving to meet deadlines, resolve customer issues, and ensure tasks are completed promptly. However, amidst their hectic schedules, oversights may arise, such as neglecting to mark a job as “completed” once finished. In such cases, dispatchers or field service managers step in to manually update the booking status on behalf of the technician.
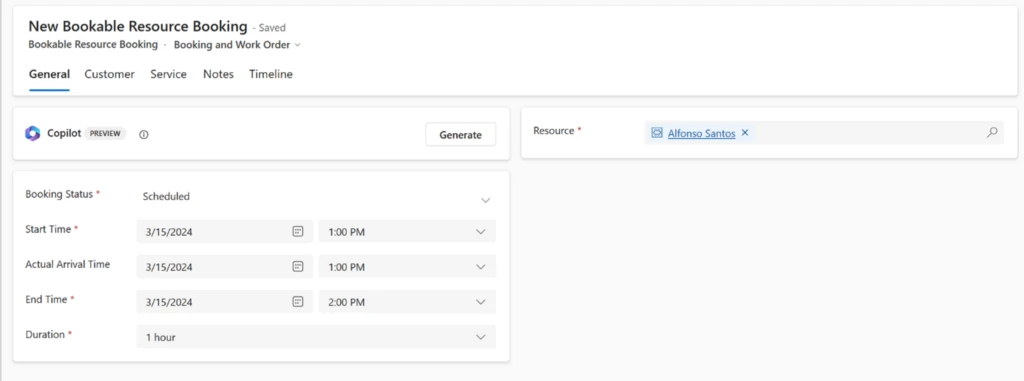
For example, a dispatcher schedules a repair job from 1:00 PM to 2:00 PM. Despite an unforeseen delay, the technician completes the task at 2:00 PM but forgets to update the booking status to “completed.”
The dispatcher later notices the oversight and manually marks the booking as completed at 9:00 AM the following day.
Previously, this would inaccurately reflect a job duration of 19 hours, with the end time value set to 9:00 AM. With the implementation of the new “Complete bookings while preserving end-time” logic, when a user other than the assigned resource updates the booking to complete on behalf of the technician, the original end-time value of 2:00 PM is maintained.

Exciting update : No setup is needed! When a booking is marked as completed by someone other than the assigned resource, the end-time value will no longer automatically update to the current timestamp. Instead, it will retain the end-time value prior to completion. This ensures accuracy and consistency in the record-keeping process.
We’re eagerly anticipating your experience with these new updates! Feel free to share your thoughts with us.
Share Your Feedback for Continuous Improvement
These new capabilities for Dynamics 365 Field Service are designed to simplify tasks for technicians and empower field service teams with enhanced tracking abilities for work orders and bookings. These advancements offer precision and efficiency, driving improvements in service quality, cost reduction, and customer satisfaction.
Explore more on Dynamics 365 Field Service documentation and share your feedback within the Field Service product or via our ideas portal . Your input drives continuous improvement for enhanced operational performance.

Related posts

Introducing the new Work Order Experience in Dynamics 365 Field Service

Forrester study finds 346% ROI when modernizing service operations with Dynamics 365 Field Service

Microsoft named as a worldwide Leader in four IDC MarketScapes for Field Service Management & Service Life-Cycle

Building digital trust in Microsoft Copilot for Dynamics 365 and Power Platform
IMAGES
VIDEO
COMMENTS
Download 10000 free Assign to Icons in All design styles. Get free Assign to icons in iOS, Material, Windows and other design styles for web, mobile, and graphic design projects. These free images are pixel perfect to fit your design and available in both PNG and vector. Download icons in all formats or edit them for your designs.
Vector icons in SVG, PSD, PNG, EPS and ICON FONT Download over 2,117 icons of assign in SVG, PSD, PNG, EPS format or as web fonts. Flaticon, the largest database of free icons.
12,277 Assign Icons. design styles for web or mobile (iOS and Android) design, marketing, or developer projects. These royalty-free high-quality Assign Vector Icons are available in SVG, PNG, EPS, ICO, ICNS, AI, or PDF and are available as individual or icon packs.. You can also customise them to match your brand and color palette!
Download 133 assign icons. Available in PNG and SVG formats. Ready to be used in web design, mobile apps and presentations. Icons. Icons Illustrations 3D illustrations Stickers. Icon sets Staff picks Newest icon sets Popular icon sets Categories Styles. Custom icons. Designers Top selling Most followers Newest designers Most icons Following.
189 Assign Icons Icons. design styles for web or mobile (iOS and Android) design, marketing, or developer projects. These royalty-free high-quality Assign Icons Vector Icons are available in SVG, PNG, EPS, ICO, ICNS, AI, or PDF and are available as individual or icon packs.. You can also customise them to match your brand and color palette!
Find 134 Assign images and millions more royalty free PNG & vector images from the world's most diverse collection of free icons. Love these Assign icons from @NounProject. We use cookies per our Cookie Policy to make your experience better. Manage Accept. We use cookies per our Cookie Policy to make ...
Change Icon of a File Type. Get the FileTypesMan software. Extract the zip file. Open the extracted folder. Double-click the exe file. Find the file type you want to edit. Right-click on the file type you want to edit. Select " Edit Selected File Type .". Click " … " next to the "Default Icon" field.
First, locate the shortcut with the icon you'd like to change in File Explorer or on your Desktop. Right-click the shortcut, and select "Properties." In Properties, make sure you're on the Shortcut tab for an application shortcut, then click the "Change Icon" button. (If the shortcut points to a web page instead of an application, look in the ...
The steps are the same for both Windows 10 and Windows 11. Select the shortcut and press Alt + Enter on your keyboard. Alternatively, you can right-click or press-and-hold on the shortcut, and then click or tap on Properties from its contextual menu. In the Web Document tab, press the Change Icon button.
Click File > Save, and save the entire project as an XCF. If there is a problem, or you want to change something later, having the working file around is invaluable. After that, you need to go to File > Export As, click "Select File Type", and search for ".ico" in the file extensions list. Name your icon, then click "Export."
Right-click the shortcut icon that you created, and click Properties. In the Web Document tab, there's a Change Icon… button. Click that. The result is a Change Icon dialog with a number of icons to select from. Icons are typically stored in .exe or .dll files. In some versions of Windows, the Change Icon dialog will default to display ...
Free vector icon. Download thousands of free icons of interface in SVG, PSD, PNG, EPS format or as ICON FONT #flaticon #icon #assign #task #paper
Basics. To add an icon, you need to know a few bits of information: The shorthand class name for the style you want to use; The icon name, prefixed with fa-(meaning "Font Awesome" naturally!); The shorthand class name for the family you want to use (Optional); Families + Styles. There are three families of Font Awesome icons - each with a unique look, class name, and @font-face font-family.
Find 12 Assign To images and millions more royalty free PNG & vector images from the world's most diverse collection of free icons. Love these Assign To icons from @NounProject. We use cookies per our Cookie Policy to make your experience better. Manage Accept. We use cookies per our Cookie Policy to make your ...
Font Awesome is the internet's icon library and toolkit used by millions of designers, developers, and content creators. Made with and in Bentonville , Boston , Chicago , Grand Rapids , Joplin , Kansas City , Seattle , Tampa, and Vergennes . Tasks icon in the Version 5 Solid style. Make a bold statement in small sizes.. Available now in Font ...
Free transparent Assign vectors and icons in SVG format. Free download Assign SVG Icons for logos, websites and mobile apps, useable in Sketch or Figma. Browse SVG vectors about Assign term.
All the icons in the icon libraries below, are scalable vector icons that can be customized with CSS (size, color, shadow, etc.) Font Awesome 5 Icons. To use the Free Font Awesome 5 icons, go to fontawesome.com and sign in to get a code to use in your web pages.
Assign an icon to a specific file. As stated in the title, I want to assign an icon to a specific file on Windows 10. It's not a shortcut, it is a file in its original directory. And I don't want to assign the same icon to all files of a specific file type, just one specific file and I want my icon to be a JPEG/ PNG/ GIF file from my hard drive ...
Premium plans. Grid - Use grid view to see your tasks in an easy-to-understand list. Here you can easily set task fields, mark tasks complete, and add new tasks. Board - Use board view to see your tasks in a Kanban style board. Here you can group your tasks by bucket, progress, due date, priority, and labels.
Vector icons in SVG, PSD, PNG, EPS and ICON FONT Download over 2,058 icons of assigning in SVG, PSD, PNG, EPS format or as web fonts. Flaticon, the largest database of free icons.
Under Actions, change or add the actions that you want this quick step to do. If you want, in the Shortcut key box, select a keyboard shortcut that you want to assign to that quick step. For assigning categories specifically, you can create a Quick Step with the 'Categorize message' action and then assign a keyboard shortcut to it. This way ...
Dynamics 365 Field Service has introduced two new capabilities in Dynamics 365 Field Service to make this easier. Complete Work Order by Status, allows field service organizations to use a booking status to indicate if further work is required to complete a work order. Complete Booking While Preserving End-Time, ensures that when a booking is marked as completed by someone other than the ...