
How to fix “self-assigned IP address” issue on Mac
Key Takeaways
- The self-assigned IP address error occurs when your Mac assigns itself an IP address instead of getting one from the router.
- This usually happens due to network configuration issues, DHCP server problems, glitches in the firewall settings, unstable Wi-Fi connection, etc.
- To fix the “self-assigned IP address” error on your Mac, renew DHCP lease, restart your network devices , rejoin your Wi-Fi , or check your network settings .
Is your MacBook struggling to access the internet, though your Wi-Fi or Ethernet works fine? This can be due to the self-assigned IP address error on your Mac. Worry not!
Here, I’ll share how to fix the internet not working due to a self-assigned IP address error on your Mac to regain a stable network connection. But before we jump into the troubleshooting steps, let’s understand what a self-assigned IP error is.
What does “self-assigned IP address” mean on Mac?
The “self-assigned IP address” error on Mac refers to a situation where your device assigns an IP address and sets up an ad-hoc network instead of obtaining one from the network router or DHCP (Dynamic Host Configuration Protocol) server.
This self-assigned IP address is not legitimate or acknowledged on the network. That’s why your Mac cannot connect to the internet or other devices on the network, resulting in limited or no network connectivity.
This issue occurs due to several reasons such as:
- Network configuration conflicts
- DHCP server unavailability
- Problems with Mac’s network
- Unstable Wi-Fi connection
- Wrong Firewall settings
- Outdated macOS
But you can fix the issue with a few simple methods. Let’s learn them!
How to fix “self-assigned IP address” error on Mac
There are 12 ways to fix the problem, from simple checks to more advanced changes. It would help if you tried them in the order provided.
1. Check your connection
Before diving into Mac-specific settings, ensure that your router is functioning correctly and located near your Mac to obtain a valid IP address. Besides, if you are using an Ethernet connection, plug in the cable snugly.
I also check to validate that the cable has no fault and is in good condition. Moreover, If you are using an old Wi-Fi router, discard it and get a new one to obtain a smoother connection.
2. Reboot your network devices
Restarting both your modem and router can often resolve temporary network glitches. Power off the devices, unplug the cables, and wait a few seconds. It will help them cool down, as excessive heat can cause malfunctions.
After that, plug all cables, connect them to the power outlet, and turn them back on. In the meantime, restart your Mac once to iron out any bugs in macOS.
- Click the Apple logo .
3. Renew DHCP Lease on macOS
This method is effective when the assigned IP address may have expired or encountered conflicts. When you renew the DHCP Lease, your Mac requests a new IP address from the DHCP server. It ensures a valid configuration and resolves connectivity issues.
- Open the same TCP/IP tab window from Wi-Fi Details, as shown above.

After renewing the lease, check if you can connect to your network. If that doesn’t help, try creating a New Network Location and renewing the lease.
4. Rejoin your Wi-Fi network
Sometimes, simply forgetting and rejoining your Wi-Fi network can solve the self-assigned IP address error on your Mac.
- Turn off Wi-Fi for a few seconds and toggle it on.

5. Check your connection settings
Verify that your Mac’s network settings are configured correctly. You must opt for the appropriate network settings to obtain IP addresses and DNS information automatically.
- Go to your Wi-Fi Details . I have shown the steps above.
- Select TCP/IP from the left panel.

You may also try turning off the IPv6, as some users reported it conflicted with the IP address assigning procedure.
- Click on the drop-down arrow beside Configure IPv6 .

6. Reset your Network Preferences on Mac
Resetting the network preferences can help eliminate IP address misconfiguration, causing the internet to not work. So, you must delete specific network connectivity-related files from your MacBook.
- Launch Finder .

- Enter your Mac password to authenticate the deletion.
- Restart your Mac. It will automatically recreate the deleted files.
- Log in and connect to your Wi-Fi network.
- Go to the TCP/IP setting again and check the router files.
7. Create a new network location
Creating a new network location lets your Mac start fresh with network settings and eliminate a self-assigned IP address.
- Click the Apple logo → System Settings .
- Wait for a few seconds until your Mac connects to your Wi-Fi.
Repeat the steps of renewing the DHCP lease on your Mac, and then try connecting to your network.
When you try to perform configuration changes to the system, your Mac’s firewall experiences configuration issues. Let’s fix this problem by resetting the Firewall.
8. Reset the Firewall on your Mac
- In the menu bar, click Go → Go to Folder .

- Restart your Mac.
After your system boots, it’ll ask you to allow access to numerous programs and services. Enable access depending upon your choice. Then, try connecting to your network and check if the self-assigned IP address error persists.
If you are unsure about deleting the Firewall files, you may temporarily disable it. Toggling off the Firewall on your Mac can help determine if it’s causing conflicts with network connectivity.
- Select Network from the left panel → Choose Firewall .

- Restart your Mac and turn it on again.
9. Set Service Order from Mac’s network settings
Adjusting the service order can prioritize the network interface, ensuring your Mac connects to your preferred network.
- Click the Apple logo → System Settings → Network .

10. Change DNS Servers on macOS
Discarding existing DNS and switching to alternative DNS servers can resolve DNS-related issues that may contribute to the self-assigned IP address error.
- Open System Settings → Wi-Fi → Click Details beside your Wi-Fi name.

- Add these numbers: 8.8.8.8 8.8.4.4 1.1.1.1 9.9.9.9

11. Check for conflicting IP address
Ensure that no other devices on your network use the same IP address as your Mac. Check your router’s DHCP client list and verify that all devices have unique IP addresses assigned.
12. Disable VPN
If you have a VPN service enabled, disable it temporarily to see if it resolves the self-assigned IP address error. Open your Mac’s VPN settings and turn off the VPN connection.
Bonus fixes
You may need to attempt more complex fixes if the troubleshooting techniques outlined above do not fix the self-assigned IP address problem on your Mac:
- Update your Mac to the latest OS version.
- Verify your Mac is not infected with any malware or viruses.
- Ensure your network devices are operating well and there are no hardware problems.
- Restart your router or modem
- Reset NVRAM or PRAM on Mac to clear up the system settings memory.
Tips to prevent self-assigned IP address issues on Mac
Self-assigned IP address error is indeed frustrating as it prevents your Mac from accessing the internet. So, you must take some precautions to avoid such a nuisance in the future.
- Regularly update your Mac
- Try to restart your Mac, router, or other network devices once in a while
- If your router or modem is outdated, replace it with a new one to get optimal performance. Also, configure the network with high-quality equipment.
- Connect your Mac to only one active network. I suggest using an ethernet cable for a stable connection.
- Don’t connect too many devices to your Wi-Fi at a time, as it may create network overcrowding.
Get back your smooth internet access!
Encountering a self-assigned IP address error on your Mac hampers your work, so you should address it ASAP. You can tackle the issue and restore a stable and reliable network connection using these troubleshooting techniques.
If the problem isn’t resolved, contact Apple Support and seek assistance.
Explore more…
- MacBook connects to Wi-Fi but has no Internet? 12 Fixes
- Wi-Fi not working on Mac? 10 Ways to fix!
- How to Run Wi-Fi Diagnostics on Mac for Better Network Connections
- How to fix IP address conflict on Mac: Simple solutions to fix it!
🗣️ Our site is supported by our readers like you. When you purchase through our links, we earn a small commission. Read Disclaimer .

Leave a Reply Cancel reply
Your email address will not be published. Required fields are marked *
Save my name, email, and website in this browser for the next time I comment.
What is Self-Assigned IP and How to Fix it
The self-assigned IP error may prevent your Mac from connecting to the Internet. You may get an Internet connection error messages such as “Wi-Fi has the self-assigned IP address and will not be able to connect to the Internet.” If you investigate this issue further, you will see that the Network pane in System Preferences will also show a notification message saying “Self-Assigned IP” with a yellow dot instead of the regular “Connected” message under the network service, as you can see in the screenshot below. This problem may occur when Mac is connected to a wired, wireless (Wi-Fi), or hotspot connection.

This problem occurs when a self-assigned IP address is issued to network interfaces. When this issue happens, not all computers connected to the same network may be affected. For example, in the same home, one Mac may have this problem while other similarly configured Macs may have no problem at all, even though they all are using the same Wi-Fi connection. This may mean that the root of the problem is how the problem Mac is configured. Several factors may cause this issue, such as:
- Bad cable connections.
- Not getting an IP from the router or modem.
- Failure of the DHCP server.
Follow the steps below to address this problem. Please try the steps in this order. After trying each step, check to see if your problem is fixed. If it is not fixed and if you still see the Self-Assigned IP error, move to the next step.
Self-Assigned error troubleshooting steps
Check your router/modem : If you are connected over Wi-Fi, ensure that your Mac is not too far away from the router/modem.
Restart your router/modem and your Mac : You can do this easily. Simply disconnect the power cable to your router/modem. Wait 30 seconds. Then reconnect. Then restart your Mac. Click the Apple menu and select Restart .
Renew DHCP Lease : On your Mac, open System Preferences and click on Network . Select the network service you want to connect to (e.g., Wi-Fi or Ethernet) and click on Advanced . This will open a new window. Select the TCP/IP tab and click the Renew DHCP Lease . Then click OK .

Check your connection settings : On your Mac, go to System Preferences > Network . Then select the network that shows this error and click Advanced . Select the TCP/IP tab and then make sure that “Configure IPv4” and “Configure IPv6” are set to Using DHCP and Automatically , respectively.

Then click on the DNS tab, and delete any DNS servers that are listed there. Select them one by one and click on the minus button to remove them. Do not forget to click OK and Apply when you are done.
Create a new network location : On your Mac, open System Preferences and Network . Open the Location drop-down menu and select Edit Locations . Click the plus (+) button and add a new location, give it a name and click Done . Now you have two locations: Automatic and your new location. Select this new location and then click Apply .

Now, we will add a new Wi-Fi or Ethernet service, whichever you are using. Click the plus (+) sign under the network services on the left, select the Interface (Wi-Fi, Ethernet, etc.) and name it, then click Create . Then click Apply .

Now select the Self-Assigned IP network and then click the minus (-) button to delete it. Then click Apply . Does this newly created service connect?
Reset the system firewall: We can do that by deleting its preference file . Open a Finder window and then click Go and Go to Folder from the top menu bar. Enter /Library/Preferences/ and click Go .

Once the Preferences folder is open, find the com.apple.alf.plist file. Delete this file (or place it on your Desktop; if you are not happy with what happens, you can put it back). Then restart your Mac.

Related articles
- How To Reset Network Settings On Mac
- How To Use Network Utility on Mac
- Mac Wi-Fi Connected But No Internet Access
- iPhone Will Not Connect To A Known Wi-Fi Network, Fix
Dr. Serhat Kurt worked as a Senior Technology Director specializing in Apple solutions for small and medium-sized educational institutions. He holds a doctoral degree (or doctorate) from the University of Illinois at Urbana / Champaign and a master’s degree from Purdue University. He is a former faculty member. Here is his LinkedIn profile and Google Scholar profile . Email Serhat Kurt .
Similar Posts

How to Fix Black Screen on Apple Watch
Your Apple Watch screen may go black, and this can be frustrating. If you experience this, you won’t be able to use your Apple Watch because it will be unresponsive, and nothing will…
Apple TV Remote Not Working? How to Fix
This article explains how you can fix if our Apple TV remote is not working properly. It is important to fix this issue. You will not be able to use your Apple TV…
How to Restart or Reset the Dock to Fix Problems
Occasionally you may want to restart or reset the Dock on your Mac to fix various issues. If your Mac is showing one of the following behaviors, you may need to restart the…

How to Fix iPhone Green Screen of Death
Your iPhone may show a full green screen covering the whole display. This is called the green screen of death. This iPhone issue can be caused by many different things, such as corrupted…
Messages Indexing Error in the Messages App, Fix
Most of us frequently use the built-in Messages app to send or receive text messages. Through the Messages app, you can easily share links, photos, videos, locations, documents and more with other people….
Mac Mail App: Gmail Not Working? Fix
Several people are experiencing issues with Gmail (especially G Suite) email accounts in Mail on Mac. It seems that the Mail App is not working as expected for some Gmail users. More specifically,…
Leave a Reply Cancel reply
Your email address will not be published. Required fields are marked *
Categories:
How To Connect Xbox Controller To iPhone Or iPad
How to refresh airtag location for improved tracking, iphone unavailable error here’s how to fix it, when did the iphone 15 come out.
- Zip-rar tool
- Zip browser
How To Fix Internet Not Working Due To Self-Assigned IP Address Issue
If your Mac is connected to a working Wi-Fi network but the Internet is still not working, then we have got the solution for you. A lot of times your Mac is issued a self-assigned IP, which causes the Internet to not work on the machine.
Despite the same Wi-Fi network working on other devices, the Mac will simply show no internet connection error and Internet will not work on it. In these situations Wi-Fi has the self-assigned IP address and will not connect to the Internet despite the Internet working on other devices.
On Mac’s Wi-Fi page the Wi-Fi will also show the Self-Assigned IP Address text instead of connected. This is a very annoying problem that can cause Internet to not work on your Mac. Not having a working Internet connection on your Mac due to Mac’s self assigned IP problem can prevent you for doing work and render your Mac useless.
Good thing is self-assigned IP issue on Mac is quite easy to solve. You can fix the self-assigned IP address issue and get the Internet to work again on your Mac by simply deleting a few files on your machine.
Simply follow the steps below from an administrator account and put the mentioned files in trash.
This solution works on all recent versions of macOS including macOS Ventura, macOS Monterey, macOS Big Sur and macOS Catalina.
Fix Self-Assigned IP Address Issue on Mac
You can use to solve the self-assigned IP address issue on your Mac running macOS Ventura, macOS Monterey, macOS Big Sur, macOS Catalina etc.
1. On your Mac launch finder and click on Macintosh HD. (Don’t see Macintosh HD? See here )
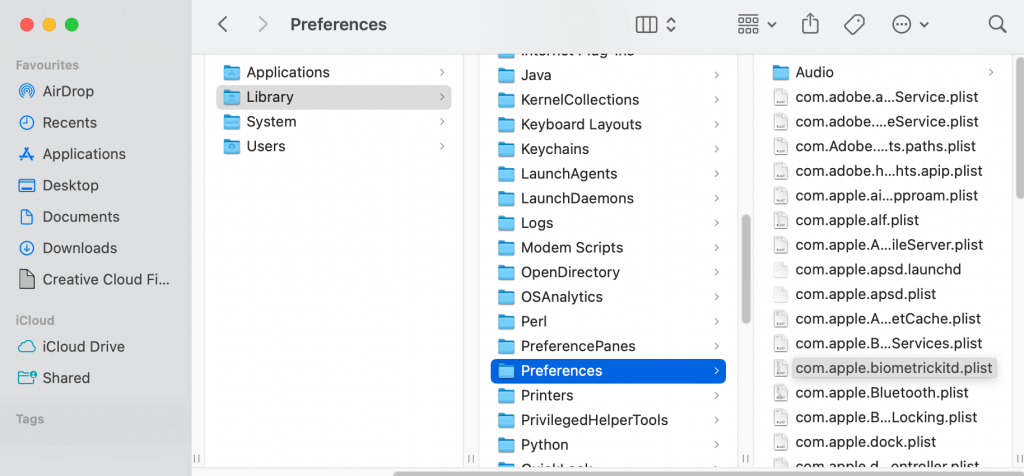
2. Click on the Library folder and go to Preferences.
3. Now click on the SystemConfiguration folder.
4. Next put the following files in trash.
- com.apple.airport.preferences.plist
- com.apple.network.identification.plist
- NetworkInterfaces.plist
5. Restart your Mac.
Once the reboot has taken place the Internet will start working and self assigned IP address issue will be resolved.
If you don’t see all the files mentioned above, then just delete the ones that are present and reboot your machine.
How to Reset Mac’s IP address
In case you’re looking to reset your Mac’s IP address to solve internet connection problems with your computer, then the following instructions will help. If deleting the files mentioned above does not help, then the steps to reset Mac IP address can also prove helpful in fixing self-assigned IP Mac problem.
On macOS Ventura or later
Below you can find instructions on how to reset Mac IP address if you are running macOS Ventura or later.
1. Click on the Apple logo from the top menu bar and then click on System Settings .
2. Now click on Wi-Fi option from the side pane.
3. Make sure your Mac is connected to your Wi-Fi network. Then click on ‘ Details… ‘ located next to Wi-Fi’s name.
4. Now click on TCP/IP button from the left side pane.
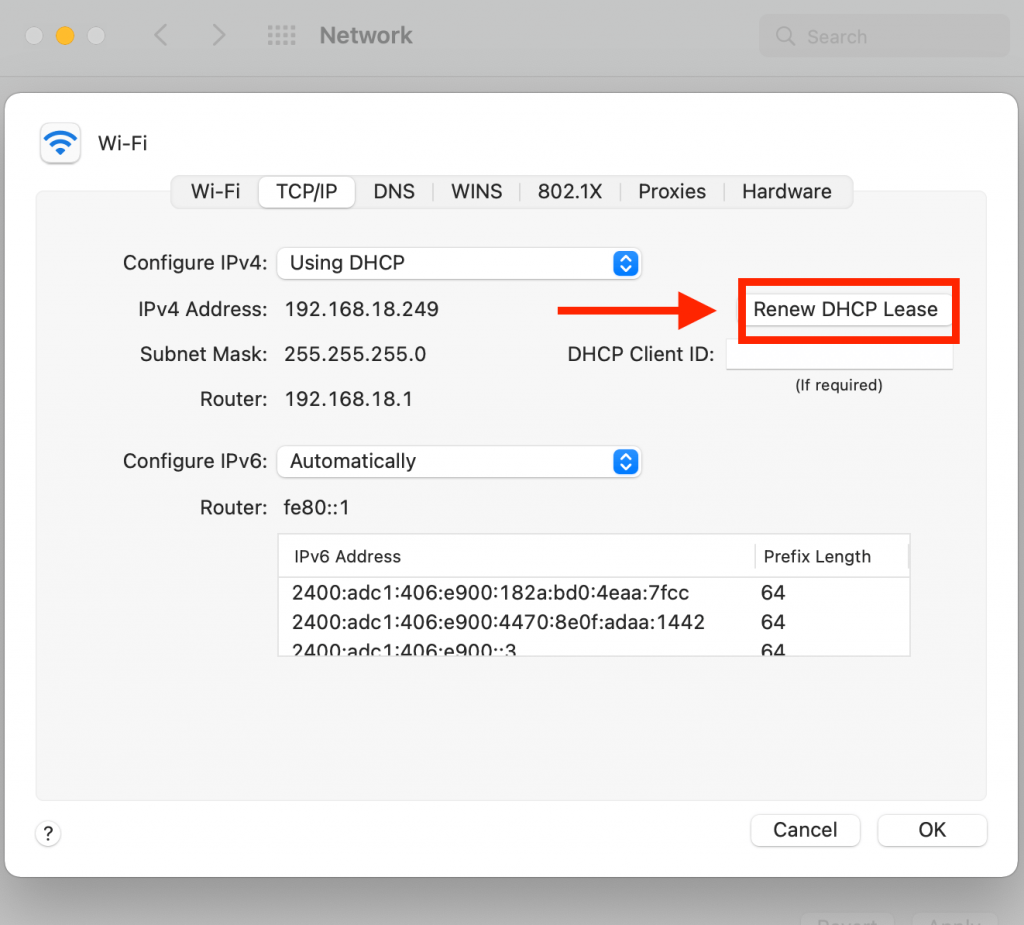
5. Next find the ‘ Renew DHCP Lease ‘ button on the right side of the window and click on it.
6. Click on OK button and using the toggle next to Wi-Fi turn off Wi-Fi and turn it back on after a few seconds.
By performing these steps you should be able to solve self-assigned IP issue on your Mac and Internet should start working once again.
On macOS Monterey or earlier
Here’s how you can reset Mac IP address if you are running macOS Monterey or earlier on your Mac.
1. On your Mac open System Preferences.
2. Click on Network icon.
3. Make sure Wi-Fi is selected from the side pane and then click on ‘Advanced’ button.
4. Now click on TCP/IP from the top navigation bar.
5. Next click on ‘Renew DHCP Lease’ button.
6. Click OK to exit and from the top menu click on the Wi-Fi button and turn off Wi-Fi.
7. After a few seconds turn Wi-Fi back on and connect your Mac to your Wi-Fi network.
8. At this point Self-Assigned IP address issue should get solved and Internet should start working again.
There you have it, this is how you can easily and quickly fix Self-Assigned IP address issue on Mac and get your Internet connection working once again. If you have any questions regarding this tutorial, then feel free to let us know in the comments section below.
- troubleshooting

Hello I recently instakked BIG SUR on my late 2013 macbook pro and I am having trouble tethering my Iphone XR to it. I can tether using wifi, but when I attempt to tether using bluetooth, my phone shows as connected in bluetooth preferences on my macbook and iphone, with the connection/link symbol shown on my iphone, but the internet will not work. In Network the bluetooth Pan shows an orange dot, STATUS: CONNECTED, but underneath it says ‘internet-not-working-self-assigned-ip-address-issue’. Do you have any ideas on how to fix this, I followed your instructions from the link ( https://ioshacker.com/how-to/fix-internet-not-working-self-assigned-ip-address-issue ) on your website, but each time I restart the computer the files that I put into the trash and delete from the trash re-appear in the system configuration folder. Only 2 of the 3 files you suggested to trash are in the folder, – com.apple.network.identification.plist – is not in the folder. Any advice appreciated.
I’m running Monterrey on my MacBook Pro and was having problem with the self-assigned IP and cannot connect to the Internet. I followed what your article suggested, several times, but was still unable to resolve the problem. Are there other suggestions that you think I should try? Thank you.
I just had the same issue and none of the fixes found online worked. I have McAfee Security software installed and there was a service running called McAfeeSystemExtensions. I deactivated the service within the Network settings and problem resolved.
Leave a Reply Cancel reply
Your email address will not be published. Required fields are marked *
Notify me of follow-up comments by email.
Notify me of new posts by email.
This site uses Akismet to reduce spam. Learn how your comment data is processed .
Sign Up for Our Newsletters
Related posts, forgot apple id password here’s how to find it it on iphone, ipad and mac.

Press ESC to close

How to Fix the Self Assigned IP Address Issue on Mac
At times macOS users face the self-assigned IP address malfunction on their computer. Your Mac will keep alerting you to the ‘internet not working’ pop-up even if you have a Wi-Fi network connection.
It allows the network interface to make a malfunctioning ad-hoc network. There can be many reasons for network issues like a broken cable, DHCP server problem, network location, etc. But, it gets better if you know the correct way to troubleshoot the issue.
Table of Contents
Fixes for the self-assigned IP address issue
Self-assigned IP issues can frustrate users and cause internet issues. But, fret not, you can fix self-assigned IP address malfunction using any of the methods mentioned below:
- Restart your modem
Before trying any other method to fix the internet issue restart your modem to see if it works. Click the ‘Wi-Fi’ button from the top menu on the Mac to turn it off. Please wait for a few minutes and then turn it back on. Check to see if the issue is fixed.
If this hack works, you will see the Wi-Fi connection running on your Mac with a proper IP address.
- Re-enable the network preferences
To reset network preferences on your computer, follow these steps:
- Open Mac, launch ‘Finder,’ and in the top menu bar, tap on ‘Go to Folder’ from the drop-down menu of the ‘Go’ bar
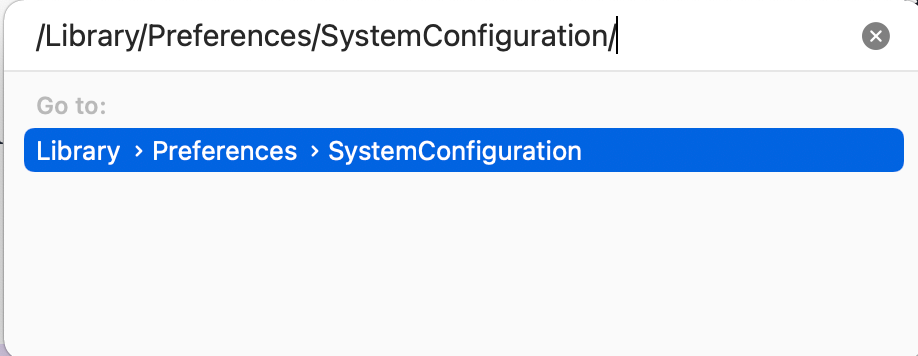
- A new window will appear, type ''/Library/Preferences/SystemConfiguration/'' and press enter
- The System Configuration window will open. Then delete the following commands: ‘ com.apple .airport.preferences.plist, Networkinterface.plist and preferences.plist’ to reset network configurations
- Please only delete the files if you have no issue losing the network configuration
- Please switch off the Mac and then switch it back on; try and link to the Wi-Fi again
- Open TCP/IP settings again and look for the files that you deleted
- You will find the removed files back in the old folder

- Renew DHCP lease
One of the most common fixes to the ‘self-assigned IP issue’ is to renew the DHCP lease. A DHCP lease temporarily assigns an IP address to a device connected to the internet.
If the internet connection is malfunctioning, follow these steps to renew your DHCP lease:
- Tap the Apple logo on the top-left menu bar, then visit the ‘System preferences’ section
- Then click on ‘Network settings’ and click ‘Advanced’ in the Wi-Fi section
- Then select the ‘TCP/IP’ section and tap on the ‘Renew DHCP lease’ button and select OK
- After renewing the lease, check if you can connect to your Wi-Fi
- Make a different network location/ new location
One way to fix self-assigned IP is to set up new network locations on your Mac. Follow the steps below to make a new network location:
- Tap on the Apple logo from the menu bar and select ‘System preferences’
- Enter the ‘Network settings’ then tap on ‘Drop-down menu’ near the Location tab
- Then tap on ‘Edit locations’ and tap on the ‘+’ button and add a ‘new network location’ and tap on done
- Choose ‘Wi-Fi’ or Ethernet; if not selected automatically
- Then press on ‘Advanced’ button and again press the ‘Renew DHCP lease button’ and enter
- This will set a ‘new location’ on the device
- Reset Firewall
Primarily self-assigned IP address malfunction occurs when the system’s Firewall undergoes configuration problems. If you have performed significant configuration changes on a Mac, settings may not migrate properly. It causes a Firewall issue and might disrupt the network connection.
To fix the firewall configuration issue, follow these steps:
- Click the ‘Finder’ icon to launch it, then select ‘Go to folder’ in the ‘Go’ menu bar
- In the pop-up window, enter the following command /Macintosh HD/Library/Preferences/
- In the new window, delete the ‘com.apple.alf.plist’ command
- After the Mac restarts, reboot it and check if the Wi-Fi connects
Note that after the system boots, you would have to allow connections for the numerous programs temporarily.
- Setup the service order in network settings
If your Mac has a self-assigned IP address issue, try resetting the service order of Wi-Fi in the network settings.
To set ‘Service order’ on Mac, follow these steps:
- Select the Apple logo on the screen and click ‘system preferences’
- Click on ‘Network icon and then press on the gear icon
- Then tap ‘Set service order,’ and drag the services you are using at the start of the file
- For example, if you are utilizing Wi-Fi, select ‘Wi-Fi’ and put it on the first number

- Change DNS servers
DNS servers change the domain name to IP addresses. Try changing the DNS servers to see if the issue fixes. Follow these steps:
- Select the Apple logo and click ‘system preferences,’ then click on the ‘Network’ icon
- Select the Wi-Fi icon or Ethernet you use (if not selected already)
- Then choose the ‘DNS’ tab in the ‘Advanced’ section and press ‘+.’
- Add the following numbers to the DNS server list: ‘8.8.8.8, 8.8.4.4, 1.1.1.1, 9.9.9.9’ and click ‘OK’
- It will most likely fix the self-assigned IP address problem in your Mac

Contact an Apple support team tech. If the above methods do not fix your Mac’s self-assigned IP address issue.
What does self-assigned IP mean on Mac?
Self-assigned IP is one of the reasons why you are unable to use the internet on your device. It mainly occurs when your network router does not provide your device’s IP address, causing internet connection issues.
How do I give my Mac a static IP address?
You can give your Mac a static IP by following the steps below:
- Select the Apple logo and click ‘System preferences’
- Click on the ‘Network’ tab and then select the ‘Advanced button’
- ON TCP/IP section, open the configure IPv4 list and select ‘manually’
- Enter your IP settings in the field, and the static IP address will the assigned
Conclusion
By now, you must have learned how to fix self-assigned IP on your computer. Though it is not a huge problem, it does cause a lot of frustration among users. Hopefully, you found the article helpful and learned how to fix network malfunctions on your mac OS.
Share Article:
Marid is a lifelong tech enthusiast and is the lead editor of Macdentro.com. An expert on all things Apple and a lifelong Mac user. Marid has over 10 years of experience using Apple products including the Apple watch, Ipad and etc
How to Set Alarm On Mac? 6 Methods
Restoring trash on mac – a guide for mac trash recovery to recover deleted files, leave a reply cancel reply.
Save my name, email, and website in this browser for the next time I comment.
How to Fix Self-assigned IP Address Error on Mac

The self-assigned IP address error on a MAC is a common issue when the device cannot obtain an IP address from the router or DHCP server. It can cause Internet connectivity problems and make it difficult to access local network resources.
In this article, you will learn the causes of this error and provide troubleshooting steps to resolve it.
Content Table
What Does it Mean When It Says WiFi Has a Self-Assigned IP Address?

When a device says it has a “ self-assigned IP address ” on a WiFi network, it cannot obtain a valid IP address from the router. It can happen for various reasons, such as a conflict with another device on the network with the same IP address or an issue with the router’s DHCP (Dynamic Host Configuration Protocol) settings.
Without a valid IP address, the device cannot access the internet or communicate with other devices on the network. To fix this issue, try restarting the device and router, checking for firmware updates, or manually changing the IP address.
What Are The Reasons for Self-Assigned IP Address Errors?
Several reasons for a self-assigned IP address error can occur on a MAC . Some of the most common causes include:
- Incorrect network settings: The network settings on the MAC may be configured incorrectly, which can prevent it from obtaining an IP address from the router or DHCP server.
- DHCP server issues: The DHCP server may be down or not working properly, which can prevent the MAC from obtaining an IP address.
- Router issues: The router may malfunction or not be configured properly, which can prevent the MAC from obtaining an IP address.
- Malware or viruses: Malware can infect the MAC and cause it to assign itself an IP address, preventing it from connecting to the internet or local network resources.
Troubleshooting Steps to Fix a Self-Assigned IP Address Error on a Mac
To fix a self-assigned IP address error on a MAC , you can try the following troubleshooting steps:
- Check network connection: Ensure that the MAC is connected to the network and that the network cable is securely plugged in.

- Renew DHCP lease: Try renewing the DHCP lease on the MAC by going to the “ System Preferences ” > “ Network ” > “Select Network” >” Advanced ” > “ TCP/IP ” tab, then click on the “Renew DHCP Lease” button.

- Reset the router: Try resetting it by unplugging it for 30 seconds, then plugging it back in.

- Check for updates: Make sure the MAC runs the latest software updates.

- Disable VPN: If you are using a VPN, disable it and see if it helps.
- Check for conflicting IP addresses: Make sure that no other devices on the network use the same IP address as the MAC.
- Disable IPv6: Some users have reported disabling IPv6 on the MAC can fix the issue.

Some Bonus Fixes:
If the troubleshooting steps above do not resolve the self-assigned IP address error on your MAC , you may need to try some advanced solutions:
- Check for malware or viruses: Make sure that the MAC is not infected with malware or viruses which can cause this issue.
- Reinstall network adapter driver: Try reinstalling the network adapter driver on the MAC.
- Check for hardware issues: Make sure that the network adapter on the MAC is functioning properly and that there are no hardware issues.
- Reset NVRAM or PRAM: Try resetting the NVRAM or PRAM on the MAC.

- Contact technical support: If none of the above steps resolves the issue, contact technical support for further assistance.
It’s important to note that maintaining a stable network connection is crucial for the smooth operation of any device. A self-assigned IP address error can be a frustrating problem to deal with, but by following the steps outlined in this blog post, you should be able to resolve it quickly and get back to using your MAC as usual.
Additionally, it is always a good practice to keep your MAC updated, regularly check for malware and viruses, and ensure that the network adapter is working properly. It can help prevent self-assigned IP address errors and other network-related issues from occurring in the future.
How do I Fix the 169.254 IP Address on Mac?
If you’re experiencing an IP address of 169.254 on your Mac, your computer cannot obtain an IP address from your router. Various issues, such as a malfunctioning router or a conflict with another device on your network, can cause it.
To fix this, you can restart your router and Mac and check for any conflicting devices on your network. Depending on whether the problem persists, you may need to configure your IP address settings on your Mac manually.
You can do it by going to System Preferences > Network > Advanced > TCP/IP . Consult your router’s manual or contact your internet service provider for specific instructions.

How do I Fix DHCP on Mac?
Dynamic Host Configuration Protocol, or DHCP, is a crucial network component in most networks. The device assigns IP addresses to devices connected to the network. Without it, devices may be unable to connect to the internet or communicate with other devices on the network. If you are experiencing issues with DHCP on your Mac, there are a few steps you can take to fix the problem.
The first step is to check your network settings. Make sure that your Mac is set to obtain an IP address automatically and that DHCP is enabled. If these settings are incorrect, you may need to enter them manually. If this does not fix the issue, try restarting your router or modem. Sometimes, a simple reboot can resolve DHCP issues.
Another solution is to clear your DHCP lease. It will force your Mac to request a new IP address from the DHCP server. To do this, open the Terminal app on your Mac, then type in “ sudo dhclient -r ,” followed by your admin password. It will release the current DHCP lease, and your Mac will request a new one.

If none of the above solutions works, your router may malfunction, or you might have a problem with your modem. Try contacting your internet service provider for assistance or checking for firmware updates for your router.
Various issues, including incorrect network settings, DHCP server issues, and router problems, can cause a self-assigned IP address error on a MAC. To fix this issue, you can try troubleshooting steps such as renewing the DHCP lease, resetting network settings, and resetting the router.
In case these steps fail, you can try advanced solutions such as checking for malware or viruses, reinstalling the network adapter driver, and checking for hardware issues. If the problem persists, you may need to contact technical support.
Read : How to Fix if Mac Keyboard Not Working Properly?

- Skip to primary navigation
- Skip to main content
- Skip to primary sidebar
Technology Simplified.
Self-Assigned IP Address Error on Mac: How to Fix?
By: Waseem Patwegar | Filed Under: Mac
If Wi-Fi or Ethernet is not working on your MacBook due to “Self-Assigned IP Address” error, you can find below the steps to restore network connectivity on your Mac.

Self-Assigned IP Address on Mac
In a typical case of this nature, the MacBook appears to be connected to the Network (WiFi or Ethernet), but it fails to load webpages and comes up with “Self-Assigned IP” error.
As indicated by the wordings (Self-Assigned IP Address), the reason for this problem is due to your Mac Assigning itself an IP Address that is not valid or not recognized on the network.
Luckily, in most cases the problem of No Internet connectivity due to “Self-Assigned IP Address” can be fixed by rebooting the modem.
1. Power Cycle Modem/Router
Before going ahead with other methods, simply disconnect the Modem/Router from its power supply source > wait for 60 seconds and reconnect the Modem/Router back to its power supply.
After this, you should find internet working properly on your Mac, as it starts using a valid IP Address on both WiFi and Ethernet to connect to the network.
2. Renew DHCP Lease
1. Click on Apple Logo in the top menu-bar and select System Preferences… in the drop-down menu.

2. On System Preferences screen, click on the Network Icon.

3. On Network screen, select your Network ( Ethernet or WiFi ) in the side-menu and click on Advanced .

4. On the next screen, switch to TCP/IP tab and click on Renew DHCP Lease button.

5. Click on OK to save the revised settings.
After the DHCP lease is renewed, you should be able to connect to internet
3. Delete PLIST Files
The problem of No Internet on Mac due to Self-assigned IP Address can be fixed by removing certain files related to network connectivity on your computer.
1. Click on the Finder Icon in taskbar > click on the Go tab in top-menu bar and select Go to Folder option in the drop-down menu.

2. In Go-to window, Type /Library/Preferences/SystemConfiguration/ and click on the Go button.

4. In System Configuration folder, delete the following folders (right-click on the Folders and move them to trash).
- com.apple.airport.preferences.plist
- com.apple.network.identification.plist
- NetworkInterfaces.plist
- Preferences.plist
Note: Your Mac will automatically recreate above Folders when it restarts.
5. Shutdown the MacBook > Wait for 30 seconds and Restart the Mac again and see if you can now connect to the internet.
4. Set Service Order
Make sure that your MacBook is always connecting to your preferred network type (WiFi or Ethernet).
1. Click on Apple Logo > System Preferences > Network > On the Network screen, click on the Gear icon and select Set Service Order option in the drop-down menu.

2. On Service Order window, drag your preferred Network (WiFi or Ethermet) to the top position.

3. Once you are done, click on OK to save the changes.
5. Create New Network Location
If you are still unable to connect to Internet, create a New Network Location on your Mac and renew its DCHP lease.
1. Click on Apple Logo > System Preferences > Network > On the Network screen, open the Location menu and select Edit Locations option.

2. On the next screen, click on the Plus icon to Add New Location.

3. On the next screen, type a Name for the New Network Location and click on Done .

4. After creating new location, select either WiFi or Ethernet in the side menu and click on Advanced .
5. On the next screen, switch to TCP/IP tab and click on Renew DHCP Lease .
6. Click on OK to save the new settings.
This should certainly fix “Self-Assigned IP Address problem and restore network connectivity on your Mac.
6. Switch to Google DNS
If your Mac is frequently struggling from Network connectivity issues, the problem might be due to the DNS Servers of your Internet Service provider being busy and clogged up.
To fix this issue, you can consider switching the DNS servers on your Mac to Google DNS or Open DNS.
- Tips to Speed Up Slow MacBook, Mac Mini and iMac
- How to Speed Up Slow Safari Browser on Mac
Resolve "Self-Assigned IP" Errors for Apple Mac
Authored by: Support.com Tech Pro Team
1. Introduction: Apple Mac: Resolve Self-Assigned IP Address
One possible result of the inability to get online is that you have what is referred to as a self assigned IP address. This usually happens when your router (which normally provides you an IP address) does not provide you an IP address to talk to other computers.

This guide will help you to troubleshoot self assigned IP addresses.
2. Network: Reboot
One of the main causes with the inability to get on the Internet is that your networking equipment could have malfunctioned. Sometimes performing a reboot will resolve this issue.
Your network may consist of one or more of the following networking devices.
This is the primary device used to get you on the Internet.
- Has either a coaxial cable, fiber cable, or phone cord plugged into it.
- Typically has 1 or 2 Ethernet ports which connect to a router.
This is an all-in-one device that has both a modem and a router built in. It is a primary device used to get you on the Internet.
- Typically has 3 or 4 Ethernet ports which connect to a your computers and smart devices.
- Typically has Wi-Fi built into it
This device allows you to connect multiple devices to your Internet connection using a single external IP address.
- Typically has Wi-Fi built into it.
This device helps to extend the wired functionallity of devices by provuding your additional Ethernet ports.
- These are typically plug and play.
- This device is not a router.
AccessPoint
This device will provide wireless access to your existing network.
- Used to extend the range of your network
- Usually plugged into a router/gateway via Ethernet connection.
RangeExtender
This device will extend the range of your existing Wi-Fi network by rebroadcasting your Wi-Fi network.
- Standalone device plugged into a power source.
- Usually located 15-30 feet from the router.
Next we will want to power cycle the networking devices.
Modem / Gateway
- Unplug the power from the device.
- Wait 30 seconds.
- Plug the power back into the device.
- Wait for the device to go online.
Access Point / Range Extender
3. macos: restart.
- From the menu bar across the top of the screen, select the Apple menu (1), then select Restart... (2).

Any unsaved work will be lost.
4. Network: Determine Connection Type
Next we need to know how your device connects to the Internet.
- Wireless - You connect using a wireless router or access point.
- Wired - You use an Ethernet cable plugged into your gateway/router/switch and the other end is plugged into your device.
5. macOS: Renew DHCP
- Click the Apple Menu and then click on System Preferences .

- Click on Network .

- Click the connection you are having a problem with on the left.

- Make sure Configure IPV4 is Using DHCP .

- Click on Advanced .

- Click Renew DHCP lease .

6. macOS: Forget Network
- Click the Wi-Fi icon in the menu bar. By default it will be in the upper right corner near the time and date.

- If Wi-Fi is off, choose Turn Wi-Fi on .

- Select Open Network Preferences .

- Select Advanced within the Network window.

- In the Preferred Networks list, select the network you wish to forget. Tap the minus icon ( - ) to forget the network.

- Your device will no longer join this Wi-Fi network unless you reconnect once again.
7. macOS: Connect to Wi-Fi
- The strength of each nearby network is shown next to its name. More darkened bars indicate a stronger network connection.

- Select the Wireless Network Name (SSID) of the network you want to connect to.

- Networks that have a lock icon next to their name require a password. After you select your network, enter the network password when you're prompted. If you don't know the network password, check with the owner of the Wi-Fi network you're trying to join.
8. macOS: Reset Firewall
- Open the Finder from the dock.

- Click on the Go menu.

- Click on Go To Folder.. .

- Type " /Library/Preferences " in the box.

- Click the Go button.

- Find the file named " com.apple.alf.plist " and drag it to the trash .

9. macOS: Restart
10. check other devices.
To help troubleshoot the problem we should check if other devices can connect to the wireless network.
11. What's next?
12. what's next, 13. macos: renew dhcp, 14. network: ethernet troubleshooting.
While Ethernet connections are typically the most reliable connection to the Internet, there are still some issues that can arise. Test your connection after each of these steps.
- Plug your Ethernet cable into another port on your Gateway/Router/Switch.
- Try using another Ethernet cable.
- If you are plugged into a switch, try plugging directly into your Gateway or Router.
15. macOS: Reset Firewall
16. macos: restart, 17. check other devices, 18. what's next, 19. what's next, privacy matters.
Support.com is committed to your privacy We do not share or sell your data to third parties. We do use cookies and other third-party technologies to improve our site and services. The California Consumer Privacy Act (CCPA) gives you the ability to opt out of the use of cookies, third-party technologies and/or the future sale of your data. Do not sell my personal information .
Support.com is committed to your privacy Read our Privacy Policy for a clear explanation of how we collect, use, disclose and store your information
- Digital Marketing
- Privacy Policy
- Term And Conditions
Troubleshooting Self-Assigned IP Address Issues On Mac

Many macOS users encounter a common problem where their devices assign themselves a self-assigned IP address, leading to the creation of an ad-hoc network connection when needed. Consequently, self-assigned IP address Mac users may continuously receive ‘Internet not working’ messages despite having a functional Wi-Fi connection.
In the event that hardware is detected but communication with the DHCP server to acquire an IP address encounters difficulties, ad-hoc network formation occurs. The underlying problem in this scenario stems from Firewall configuration issues within the system, self-assigned IP address mac and there exist multiple methods for addressing this challenge.
What Does The Term “Self-Assigned IP Address” Error Mean?
The issue known as the ‘Self-Assigned IP Address’ occurs when a device is unable to establish a connection with a Dynamic Host Configuration Protocol (DHCP) server, resulting in the device assigning an IP address to itself. In these situations, users commonly face an error notification that reads, self assigned ip address mac ‘Wi-Fi has automatically assigned an IP address and is unable to establish an Internet connection.'”
In most cases, self-assigned IP addresses Mac computers and smartphones depend on DHCP servers to acquire an IP address when connecting to a network. Nevertheless, when these devices encounter difficulties in reaching a DHCP server or when the server is unresponsive, macOS initiates the formation of an ad-hoc network, assigning itself a self-generated IP address through the Automatic Private IP Addressing (APIPA) mechanism. This action enables the device to communicate with other devices within the same network segment using link-local addressing, self self-assigned IP address Mac but it restricts internet access and communication with devices outside of the network’s range.
Factors Leading To The Occurrence Of The “Self-Assigned IP Address” Error
Here are the primary reasons for encountering the “self-assigned ip address error” on your mac:.
- Challenges with DHCP Server: When a device seeks to establish a connection with the server, it initiates a DHCP request. Nevertheless, in instances where the server is offline, non-responsive, or inaccessible, self-assigned IP address Mac the device may autonomously allocate an IP address.
- Challenges Arising from Network Configuration Issues. Disruptions in Network Infrastructure or Incorrectly Set Network Preferences can Compromise Device Connectivity with DHCP Servers. Moreover, Inaccurate IP Address Allocations and IP Address Conflicts can Arise from DHCP Servers with Incorrect Configurations when Multiple Devices Seek to Connect to the Same IP Address.
- Challenges with Wi-Fi Connectivity: When a device struggles to maintain a reliable link to the Wi-Fi network or router, a self-assigned IP address mac it might encounter difficulties in connecting to DHCP servers to request an IP address.
- Using an Older MacOS Version: When employing an antiquated macOS iteration, compatibility issues with contemporary Wi-Fi standards and network protocols may arise, hindering the establishment of a stable connection. Consequently, a self-assigned IP address Mac can result in communication failures with DHCP servers and the inability to acquire a valid IP address.
- Issues with Network Interface Hardware and Software: Connectivity problems stemming from outdated network drivers, self-assigned IP address Mac network interface card malfunctions, or software configuration issues can lead to conflicts between your device and DHCP servers, resulting in a lack of a valid IP address allocation.
Addressing The “Self-Assigned IP Address” Issue: Troubleshooting And Resolution:
The “Self-Assigned IP Address” error can manifest due to multiple causes, yet there are several effective methods to address this issue. Here’s a sequential list of potential solutions to assist you in resolving it. Please remember to attempt them in the specified order.
Initiate A Reboot Of Your Mac And Router:
- You have the option to initiate a Mac restart by clicking on the Apple icon and choosing “Restart.”
- To initiate a router reset, the self-assigned IP address Mac first turns off the device pauses for approximately 30 seconds, and then proceeds to power it back on.
Renewing A DHCP Lease:
- Navigate to the Apple logo and access ‘System Preferences’.
- Please select the “Network” option and pick the currently connected network.
- Select “Details” to open a new window.
- Navigate to the “TCP/IP” tab and select the option to “Refresh DHCP Lease.
- Press “Apply” to confirm.
Verify Your Network Configuration:
- Please access the “System settings” menu and then choose the “Network” option.
- Choose the network associated with the self-assigned IP address.
- Navigate to the “TCP/IP” section and confirm that “IPv4 Configuration” is set to “DHCP” and “IPv6 Configuration” is set to “Automatic.
- Navigate to the “DNS” tab and remove the DNS servers listed by tapping the minus button.
- Please select ‘OK’ to confirm and save the modifications.
Establishing A Fresh Network Location:
- Select the Apple icon, access the ‘System Preferences’ menu, and then choose ‘Network.
- Click on the dropdown menu situated in the lower right-hand corner of the window, opt for “Locations,” and then choose “Edit locations.”
- Press the addition symbol (+) to create a new location entry, assign a name to the location, and then select “Done.”
- Choose the newly created location over “Automatic” when deciding between the two options.
Resetting The Application Layer Firewall On macOS:
- Access the ‘Finder’ window, navigate to the ‘Go’ menu, and select ‘Go to folder.
- Input “Library/Preferences/” into the dialog box.
- Select the “com.apple.alf.plist” file located within the “Preferences” directory and either remove it entirely or relocate it to your desktop if you wish to retain the option to restore the modifications later.
- Initiate a system reboot on your Mac.
Strategies For Avoiding IP Errors In The Future:
Preventing IP Address Acquisition Problems Made Easy: Maintaining Vigilance Over Your Software and Hardware for a Smooth Experience. Here are some helpful tips to steer clear of IP address errors in the future:
- Ensure your macOS remains current at all times.
- Regularly reboot your router or modem.
- Utilize a single active network connection at a given moment to prevent network configuration conflicts.
- Ensure that your network drivers are current and fully updated.
- Consider employing premium-grade networking hardware.
- Whenever feasible, utilize an ethernet cable to establish a more dependable connection between your Mac and the modem.
What Causes My MacBook To Acquire A Eelf-Assigned IP Address?
Typically, this issue arises from either a faulty cable connection or a Router/Modem’s self-assigned IP address mac reluctance to assign IPs through DHCP. “Revise Network Settings Using Network Locations in Mac OS X to Establish a New Network Configuration.”
Why Is My Mac Displaying The Message That There Is No IP Address For My WiFi Connection?
Alternatively, you can manually refresh the IP address, a process commonly referred to as renewing the DHCP lease. When the lease has expired and the assigned IP address is already in use by another device, the self-assigned IP address mac your Mac will be allocated a new address.
What Is The Reason For Receiving A 169.254 IP Address?
When encountering a 169.254.x.x address, it indicates an unreachable DHCP server, resulting in the PC’s inability to function due to the absence of a connection to or from a router. To resolve this issue, self assigned Ip address Mac diagnose the reason behind the PC’s inability to establish communication with the DHCP server.
How Can You Resolve An Issue Where Ethernet Displays A Self-Assigned IP Address And Cannot Establish An Internet Connection?
To access System Preferences and choose the “Network” option, follow these steps. Within the active network account (either Ethernet or Wi-Fi), access the Location toggle at the top of the screen. Opt for a different Location and follow the brief checklist provided. Finally, the self-assigned IP address Mac set it as the Active Location to restore your internet connection.
For more information click here :
RELATED ARTICLES MORE FROM AUTHOR
Password managers: guide to master all your passwords, 3 best social media girls forums: connecting, empowering, and inspiring women worldwide, unveiling openai’s sora: redefining text-to-video generation, leave a reply cancel reply.
Save my name, email, and website in this browser for the next time I comment.
Recent Posts
Troubleshooting Guide: How To Fixing iPhone Not Receiving Android Text
Download The Modern App Ltd App For iOS And Android Devices In 2023.
Fanyi Baidu: Navigating Multilingualism from Words to Worlds
Unlocking Joy: How To Easily Apple Redeem Gift Card For A World Of Possibilities
Latest posts.
The Ultimate Guide to 7 Best Games for Toddlers: Educate with Fun
MyFlixer: A Comprehensive Guide to Safe and Enjoyable Online Streaming
Best 2 Player Games to Play With Your Friends: Get Ready for Hours of...
Editor picks.
Mastering The Art Of How To DND One Person: Your Comprehensive Guide
SEO Copywriting: The Ultimate Handbook
Navigating Communication Barriers: How To Call Someone Who Blocked You
- Technology 28
- Digital Marketing 3
Newsletters
- Our sponsors
- Watch Store
- Hot topics:
- Apple legal battles
- Apple deals
- Editor’s picks
- Buying guides
How To Fix Self-Assigned IP Addresses In Mac OS X [Video How-To]
By Michael Steeber • 6:06 am, March 5, 2011

Not being able to get online can be a frustrating problem. It can cost hours of time and test your patience. See, Mac OS X doesn’t always work properly all of the time, and will occasionally assign itself an IP address, which will result in you being unable to connect to the internet. Luckily, there is an easy solution. You can use System Preferences to set a new Network Location, as well as renew your DHCP lease to fix the problem. This video will show you how to quickly fix the problem of self assigned IP addresses through System Preferences.
Daily round-ups or a weekly refresher, straight from Cult of Mac to your inbox.

Cult of Mac Today
Our daily roundup of Apple news, reviews and how-tos. Plus the best Apple tweets, fun polls and inspiring Steve Jobs bons mots. Our readers say: "Love what you do" -- Christi Cardenas. "Absolutely love the content!" -- Harshita Arora. "Genuinely one of the highlights of my inbox" -- Lee Barnett.

The Weekender
The week's best Apple news, reviews and how-tos from Cult of Mac, every Saturday morning. Our readers say: "Thank you guys for always posting cool stuff" -- Vaughn Nevins. "Very informative" -- Kenly Xavier.
Popular This Week
How to take solar eclipse photos with iphone, these are the best games on apple arcade, iwork 14 brings useful tweaks to pages, numbers and keynote, here’s the new batch of classic movies on apple tv+ in april, share passwords with your family on iphone, bodycam, dashcam, security camera: this tiny gadget can do it all [deals], big logitech sale: up to half off keyboards, mice, webcams and more [deals], ‘best of tech’ sale pushes surprising apple items [deals], ios 17.5 beta 1: all the new features and changes, apple opens the iphone app store to retro game emulators.
Hand-Picked Top-Read Stories

6 Best Ways to Fix CAA30194 Error Code on Microsoft Teams
8 Best Ways to Fix Arrow Keys Not Working on Microsoft Teams

5 Best Ways to Fix Microsoft Teams Stuck on Offline Status
Trending tags, how to fix self assigned ip address error on mac.
Need to Fix Self Assigned IP Address Error on Mac?
There can be various reasons why the internet on your Mac isn’t working properly. One example is the Self Assigned IP Address error, which many Mac users have reported . In this error, although your device is connected to a network, the internet stops working.
In order to recognize this error, simply look below your network connection to find “Self Assigned IP Address”. This issue can arise due to several factors, such as poor internet connection or corrupted Plist files.
The good news is you can easily fix self assigned IP address error on Mac by many practical methods. To help you out, we have gathered some of the most effective solutions below. However, before opting for any troubleshooting fixes, identify the main cause first.
So, let’s begin!
1. Power Cycle Modem/Router.
Before you jump to some serious fixes, determine if the problem is related to your internet connection. Check to see if the Wi-Fi works fine on other devices connected to the same network. If all of them are experiencing poor connectivity or similar issues, we recommend you power cycle the modem.
To do so, follow the steps below:
- Start by unplugging the modem from the power supply.
- Wait for a while.
- Then, reconnect the modem to the power source and press the power button.
This should fix the self assigned IP address error on Mac.
2. Renew the DHCP Lease.
A DHCP lease is an IP address assigned to a device on a network for only a limited period of time. Every time you connect to a wireless network, the DHCP server assigns a new IP address.
So, when you encounter the self assigned IP address error on Mac , you can manually renew the DHCP lease.
Here’s how to do it:
- Go to the Apple menu from the top-right corner.
- Next, click on System Preferences .

- From the new window that appears, select Network .

- From the left sidebar, click on your connected Wi-Fi or Ethernet network and select Advanced .

- Now, go to the TCP/IP tab and select Renew DHCP Lease .

- Finally, click on OK to save these changes.
Once done, the self assigned IP address error on Mac should be solved. If not, follow the next solution from this guide.
3. Create New Network Location.
If directly renewing the DHCP lease was of no use and you’re still encountering the Self assigned IP address error on Mac, then this method is for you. Just create another network location and then reset your Mac’s IP address.
Each network location includes settings for a specific network port. That way, you can easily switch between various network locations without having to reconfigure every time.
Below are the steps you must follow:
- From System Preferences , select Network .
- After that, click on the drop-down menu icon next to Location .
- Click on Edit Locations .

- Then, click on the + icon and enter the name of your network in the text field.
- Click on Done and choose your Wi-Fi network from the left pane.
- Now, choose Advanced .
- Click on the TCP/IP tab and select Renew DHCP Lease .
- At last, select OK to confirm these changes.
4. Delete the PLIST Files.
The Plist files or Preference files contain important data related to configuring apps and services within your macOS environment. Occasionally, these files can become corrupt, damaged, or even get attacked by malware or a virus.
To handle such situations, you can discard the Plist files to eliminate the error. This method will not harm any program or your computer so it is safe to follow.
Use the instructions below to do it:
- Launch Finder from the taskbar.
- After that, click on Go from the top bar and select Go to Folder .

- Now, copy and paste the following in the text field and click on Go :
- From System Configuration , right-click on these folders and select Move to Trash :
- Finally, reboot your device and check if you’re able to connect to the internet now.
5. Set Service Order.
At times, you may be connected to more than one type of network interface. If you’re getting the self assigned IP address error on Mac when connected to one of them, you can change the service order to prioritize another network type.
Here’s how:
- Head over to the Apple logo and click on System Preferences .
- From there, click on Network .
- Next, click on the gear icon from the bottom-left corner and choose Set Service Order .

- From the new window that shows up, drag your network to the top.
- Lastly, click on OK .
6. Switch to Google DNS.
Your ISP server could be unreliable when it comes to keeping their servers up and running. It’s also possible that they have restricted access to certain web pages. In this case, you may experience slow service and even encounter self assigned IP address error on Mac.
Switching to a Google DNS might be a good option, not only to load pages faster but to access geo-restricted content.
Follow the steps below to do it:
- From the System Preferences window, go to Network .
- After that, click on the lock icon .
- Provide your login credentials.
- Now, click on your network from the left pane and select Advanced .
- Click on the DNS tab from the top and select ‘ + ’ from the bottom-left corner.

- Type in 8.8.8.8 and 8.8.4.4 in the DNS servers field and select OK .
- Lastly, reboot your Mac.
7. Reset the Firewall on Your Mac.
If you’ve not properly looked into the Firewall settings, it’s high time you do so. This protection program can sometimes show extreme behavior and block sites for safety. When that happens, you may receive the self assigned IP address error on Mac.
To resolve this, simply reset the Firewall to bring back the default configuration of the program. Hopefully, this will allow you to access content that wasn’t visible earlier.
Here’s what you need to do:
- Go to Finder and select Go from the top.
- Click on Go to Folder .
- Next, type in the following in the text field and click on OK :
- Now, delete the com.apple.alf.plist file.

- Restart your computer, and hopefully, this method will resolve your issue.
That was it! You’ve now made it to the end of our guide on how to fix self assigned IP address error on Mac. for more tips or suggestions, head over to the comment section below and help fellow readers.
If this guide helped you, please share it. 😊

Aimen Choudhry is an architecture student who has always been fascinated by science. She now finds her therapy researching and writing about the latest technology and the issues that come alongside. Otherwise, you’ll find her playing video games, listening to music, or watching fantasy/sci-fi movies.
View all posts
Leave a Reply Cancel reply
Your email address will not be published. Required fields are marked *
macOS User Guide
- What’s in the menu bar?
- Work on the desktop
- Search with Spotlight
- Quickly change settings
- Get notifications
- Open apps from the Dock
- Organize your files in the Finder
- Connect to the internet
- Browse the web
- Preview a file
- Take a screenshot
- Change your display’s brightness
- Adjust the volume
- Use trackpad and mouse gestures
- Use Touch ID
- Print documents
- Keyboard shortcuts
- Apps on your Mac
- Work with app windows
- Use apps in full screen
- Use apps in Split View
- Use Stage Manager
- Get apps from the App Store
- Install and reinstall apps from the App Store
- Install and uninstall other apps
- Create and work with documents
- Open documents
- Mark up files
- Combine files into a PDF
- Organize files on your desktop
- Organize files with folders
- Tag files and folders
- Back up files
- Restore files
- Change System Settings
- Choose your desktop wallpaper
- Add and customize widgets
- Use a screen saver
- Add a user or group
- Add your email and other accounts
- Automate tasks with Shortcuts
- Create Memoji
- Change your login picture
- Change the system language
- Make text and other items on the screen bigger
- Set up a Focus to stay on task
- Set up Screen Time for yourself
- Use Dictation
- Send emails
- Send text messages
- Make a FaceTime video call
- Edit photos and videos
- Use Live Text to interact with text in a photo
- Start a Quick Note
- Get directions
- Work across devices using Continuity
- Use iPhone as a webcam
- Use iPhone with Desk View
- Stream audio and video with AirPlay
- Use one keyboard and mouse to control Mac and iPad
- Hand off between devices
- Unlock your Mac with Apple Watch
- Make and receive phone calls on your Mac
- Sync music, books, and more between devices
- Manage Apple ID settings
- Set your Apple ID picture
- What is iCloud?
- What is iCloud+?
- Store files in iCloud Drive
- Share and collaborate on files and folders
- Manage iCloud storage
- Use iCloud Photos
- What is Family Sharing?
- Set up Family Sharing
- Set up Screen Time for a child
- Share purchases with your family
- Watch and listen together with SharePlay
- Share a Photo Library
- Collaborate on projects
- Find content shared with you
- Find your family and friends
- Play games with your friends
- Listen to podcasts
- Watch TV shows and movies
- Read and listen to books
- Read the news
- Track stocks and the market
- Apple Music
- Apple Arcade
- Apple News+
- Podcast shows and channels
- Manage subscriptions in the App Store
- View Apple family subscriptions
- Guard your privacy
- Use Mail Privacy Protection
- Control access to your camera
- Use Sign in with Apple for apps and websites
- Set up your Mac to be secure
- Keep your data safe
- Create a passkey
- Understand passwords
- Keep your Apple ID secure
- Find a missing device
- Get started with accessibility features
- Connect an external display
- Use the built-in camera
- Connect a Bluetooth device
- Use AirPods with your Mac
- Optimize your Mac battery life
- Optimize storage space
- Burn CDs and DVDs
- Control accessories in your home
- Use Windows on your Mac
- Resources for your Mac
- Resources for your Apple devices
Resolve IP address conflicts on Mac
If you’re connected to a network using TCP/IP, and you are having problems connecting your Mac to other computers or services, there may be a conflict with your computer’s IP address and the IP address of another device on the network.
Depending on the way your IP address is provided, there are several things you can try to resolve the conflict.
If you receive an IP address automatically using DHCP, there could be another device on the network that is already using that IP address. In most cases, the DHCP server will provide your Mac with another IP address in a few minutes. Try connecting again.
Close the app that is using the connection (such as Safari or Messages), then open the app again.
Put your computer to sleep, wait a few minutes, then wake it from sleep. Try connecting again.
Close all open apps and restart your computer.
If you entered your IP address manually, make sure you entered the correct address. If you’re connecting to a network that’s managed by an administrator, check with the administrator. See Enter TCP/IP settings .
If you’re on a home network, and none of these suggestions fix the problem, try disconnecting from the network and turning off all the devices that are connected to it (for example, your router and modem). Wait a few minutes, then turn the devices back on. See Restart an external device .
Want to highlight a helpful answer? Upvote!
Did someone help you, or did an answer or User Tip resolve your issue? Upvote by selecting the upvote arrow. Your feedback helps others! Learn more about when to upvote >
IP address over ethernet is self-assigned when using a gigabit adapter
I'm using a MacBook Air, M2, running Sonoma 14.1.2.
It connects OK to the internet over Wi-Fi but cannot connect over ethernet when using a gigabit adapter in an outbuilding in the garden.
This is the situation:
The garden is small, and we have an office there, but the wi-fi is unreliable as the office has thick walls; therefore, I need to be able to use the ethernet connection we have from the living room in the house to the office .
- Macbook can connect on wi-fi everywhere in the house and office (but unreliably in the office).
- Macbook can connect on ethernet in the living room , straight from the router, using a Belkin USB-C LAN adapter.
- Macbook cannot connect on ethernet in the office , using same Belkin USB-C LAN adapter. It gets a self-assigned IP address, or a green light, but no data comes through.
- Husband's iMac can connect on ethernet in the office. His iMac doesn't need an adapter, it has an ethernet port.
- Husband's iMac cannot connect on ethernet in the office if ethernet cable is coming out of a TP-Link TL-SG1005D, 5 Port Gigabit Ethernet Network Switch.
Troubleshooting (none of this solved the problem, apart from number 4 temporarily)
- Re-started router, laptop.
- Contacted my internet provider to check there were no issues with our line.
- Started Macbook on safe mode.
- Created new user in Macbook with admin rights and connected succesfully in the office. This happened only once and hasn't happened again.
- Re-installed previous operating system MacOS Ventura after using repair utility.
- Upgraded to Sonoma.
- Renewed DHCP lease.
- Added DNS servers: 8.8.8.8, 8.8.4.4, 1.1.1.1, 9.9.9.9
Summary: MacBook air would only connect to the internet if straight from the router (with the Belkin adapter, as it does not have an ethernet port). If I need to add another step to this physical connection (through the CAT5e socket at the wall in the office, or the TP-Link switch) it self-assigns an address. This is the case for husband's iMac too, it would only work if there are no extra physical steps in the office, i.e. not through the TP-Link switch.
I have tried everything I can think of, and I have read many threads with no solution.
If anyone can crack this horrible puzzle, I would be SO grateful. Thanks!
MacBook Air, macOS 14.1
Posted on Dec 2, 2023 11:17 AM
Loading page content
Page content loaded
Dec 3, 2023 2:59 AM in response to John Galt
John, thank you very much for taking the time to read my post and answer it. I really appreciate it, as it has been such a frustrating experience to make any sense of the situation with not much knowledge of any of the parts.
I think you're on the right track, and your suspicion is probably correct, based on your explanation of how Gigabit Ethernet is unforgiving of faults.
I did spot two new things after I wrote this post, which may corroborate your suspicion:
The iMac (which is connecting to the ethernet in the office) is doing the following:
- The speed at which it connects to the internet is so much slower than when connecting a computer to the ethernet straight from the router in the living room.
- The speed at which the hardware (from System Settings -> Ethernet -> Details -> Hardware -> Configure -> Automatic -> Speed) is 10baseT , which is super slow but, interestingly, automatically chosen as such by the iMac.
I'll let you know what I find once I isolate where the problem is!

Dec 2, 2023 2:54 PM in response to srome21
The extensive troubleshooting you performed seems to indicate the problem lies somewhere between the CAT5e socket at the wall in the office and the router. I realize the iMac was able to connect using that same office socket, but only without the Belkin adapter. Introducing the Belkin adapter causes it to fail. You know the adapter itself is ok though, because you can successfully use it when you connect directly to the router in the living room.
If my understanding is correct, the explanation may be that the Belkin adapter is unable to negotiate a connection through that office socket and the router. What that suggests is a Cat5e connection that is not actually meeting the rigorous Cat5e standards. The Belkin adapter itself may be ok but the connection isn't good enough.
The fact the TP-Link switch causes the same failure may be another indication of that substandard office connection. You didn't say whether it was involved in it or not though, or if you tried a different cable.
Lacking some independent testing equipment, the most expedient way of confirming my suspicion is to completely bypass that office socket with a sufficiently long Ethernet cable. Gigabit Ethernet is unforgiving of substandard connectors or wiring. Not enough twists per inch, or a broken / intermittent connection, and things won't work.
Try bypassing that office Ethernet port. I think you will find the culprit will be in the office connections or cables you had been using, and your challenge is to isolate the cause.
Dec 3, 2023 11:43 AM in response to srome21
The following is paraphrased from my notes regarding a discussion I had with an Apple engineer several years ago. The subject of the discussion was the amount of time it took to establish a fast and reliable Ethernet connection. It was taking on the order of 30 seconds or so, and I was wondering why it took so long to establish compared to a comparably fast wireless connection.
"The minimum protocol required to enable an Ethernet connection is 10Base-T.
"When you connect a 1000Base-T (1 GigE) switch, adapter, or other device, the protocol that communicates the Speed / Duplex / Flow Control between the devices is known as Auto-Negotiation. Auto-Negotiation requires only 2 pairs of conductors. The maximum available capability is subsequently shared between the devices.
"If the maximum shared speed for both sides is agreed to be 1 G then the link needs 4 pairs of conductors to sustain that speed. If only 2 conductor pairs are available, both devices will conclude the 4 pair connection is unreliable in way, and will then enter a search mode to find a speed that will work on any available 2 pairs of conductors."
The conclusion we reached was that "search mode" is not as fast as wireless due to that negotiation. If the hardware implemented to test that link is determined to be sufficiently compromised, it will abandon that 4 pair operation and revert to a lower speed which is sustained for the duration of the connection.
From that discussion I learned that the apparently simple Ethernet connection is not so simple after all, and yes it confirms our suspicion that your office-to-router link is not conforming to Gigabit Ethernet requirements. It may not even be conforming to 100Base-T requirements. I suspect you will ultimately find one or more broken or intermittent conductors or connections, and that repairing them will solve the problem. The required number of twists per inch is specified. Exceeding even the maximum length of any particular un-twisted pairs of conductors can affect its negotiated speed.
Since that discussion I learned a lot more about Gigabit Ethernet. The paraphrased notes I created at the time are exceedingly brief.
Dec 3, 2023 11:49 AM in response to John Galt
Thanks again, John. I have decided to get a tradesman to have a look, as I think it is likely to be something I cannot easily fix myself, as I don't have the equipment or the knowledge to test the sockets or the cable from the house to the office. Your responses and all the troubleshooting I've done really point to that. As soon as I find out what is going on, I'll share!
Dec 15, 2023 5:26 AM in response to John Galt
Hi John, I wanted to thank you again and tell you how my problem got solved. I'm writing to you from the office, connected to the ethernet from the computer, which couldn't go online before :)
An electrician came today. He worked out that pair 2 was failing (when he connected his tester). This was a simple fix, as one of the ends of the cable in the office was loose. However, I couldn't still use a switch, and the speeds in the officer were 9mbps. We get 65 Mbps in the house.
I mentioned your thoughts, and he went ahead and tidied up the connection in the office by shortening the bits of cable in the socket. At this point, he realised some of the cables were brittle and cut enough of them off to get rid of them and reconnect them again.
As a result, things got fixed; I'm using a switch and getting the same speed as in the house.
I'm so grateful for your patience in reading all my troubleshooting and recommending the next steps for me. I'm so happy things are fixed now! It took so much time and effort, and when you responded, I was at the end of my tether with this problem, so hearing your thoughts and recommendations was very valuable. Thank you.
Dec 15, 2023 7:41 AM in response to srome21
Great! Glad to hear it.
Thank you for the explanation of the reason. When you find an intermittent connection due to brittle conductors it's very likely all them are in need of attention, so the electrician did it right.
I imagine it didn't cost very much.
Dec 3, 2023 12:01 PM in response to srome21
A reasonably qualified electrician should be able to diagnose the problem in no time. Don't go crazy searching for a network engineer or something.
Stack Exchange Network
Stack Exchange network consists of 183 Q&A communities including Stack Overflow , the largest, most trusted online community for developers to learn, share their knowledge, and build their careers.
Q&A for work
Connect and share knowledge within a single location that is structured and easy to search.
Determining the self-assigned IP address of a directly-connected counterpart
I have connected two computers, A and B, NIC-to-NIC using an ethernet cable. They have self-assigned their IP addresses—at least, I can see that A has done so, so I infer that B must have also done so. Computer A is a laptop running Windows 10, but I have no keyboard and mouse available for B. From A, how can I determine B's IP address?
On A, this is what I see:
What I've tried (based on https://serverfault.com/a/30742 ):
...which just says "Host is up" and doesn't report anybody else being on the network. I don't claim to understand what nmap is doing (for example, I have no idea what's special about the number 24) but I do know that the same command with 192.168.1.0/24 successfully finds devices on the wireless network to which A is also attached.
for example, I have no idea what's special about the number 24
It's a short way of writing the "255.255.255.0" netmask. (Also called "CIDR syntax" from its origins, or "prefix length" because it indicates that the network is specified by the first 24 bits. If you convert 255.255.255.0 from decimal to binary, you'll see it begins with exactly 24 'one' bits.)
However, your actual netmask is not 255.255.255.0 – it's 255.255.0.0, as shown in the ifconfig output. That's a /16. The whole "self-assigned" range is in fact 169.254.0.0/16.
Hosts will send out a few ARP probes as part of the self-assignment process (to ensure that the address isn't already in use). If you connect the computers while Wireshark or tcpdump is already running a capture on the Ethernet interface, you should see both of them revealing their addresses this way.
- Relative to everything else I had so far stumbled across, this is a stunningly intelligible explanation of the /24 - thanks. So I conclude that nmap -sn 169.254.0.0/16 would be the way to go. I actually managed the equivalent of that in the end by adapting one of the nmap --help examples to nmap -sn 169.254.0-255.0-255 and found the IP by letting it run for 45 minutes. In future I'll bear in mind the tcpdump tip. I presume there's no way of unilaterally configuring A to say "hey, let's self assign, but with a 24-bit prefix"? That would make it a lot quicker to find... – jez Apr 1, 2021 at 15:39
- No, this autoconf mechanism (APIPA) is defined to always use this specific /16 prefix. However, the idea was that it would be accompanied by other Zeroconf services such as mDNS for dynamic discovery. (For example, Windows has mDNS and a few similar alternatives, so as long as both computers run Windows and have the network mode set to “private” you should be able to reach the other computer by its name without needing the exact address. Same goes for macOS and (to some extent) Linux.) – u1686_grawity Apr 1, 2021 at 16:18
- But to answer the question, if you specifically wanted to change the prefix, you would have to run DHCP in order to do that instead of relying on autoconf. (And once you have DHCP you no longer need nmap nor tcpdump, as you can just look in the DHCP server’s “lease” table to find the address...) – u1686_grawity Apr 1, 2021 at 16:22
You must log in to answer this question.
Not the answer you're looking for browse other questions tagged windows networking ..
- The Overflow Blog
- Want to be a great software engineer? Don’t be a jerk.
- Climbing the GenAI decision tree sponsored post
- Featured on Meta
- New Focus Styles & Updated Styling for Button Groups
- Upcoming initiatives on Stack Overflow and across the Stack Exchange network
- Google Cloud will be Sponsoring Super User SE
Hot Network Questions
- What's the name of the room where you watch a movie inside the movie theater?
- Extreme anxiety before boarding a plane
- What is this glyph on Feb 23 1940 in a Finnish military calendar?
- What happens when an automatic transmission completely fails?
- Is this formula already known?
- Post-apocalyptic movie from the 1980's; mutants live in a wasteland and are assigned color-codes that dictate who they can mate with
- Compactification of rigid-analytic varieties
- Why did Nicaragua file a case against only Germany at the ICJ?
- How can I make a custom header in less? Or alternatively, how can I open two files simultaneously in less?
- Am I in my rights to ask a colleague to not take notes on everything I say outside a meeting?
- Almost sure probability in convergence, versus 0 probability in reality
- When discharging a capacitor, why would a resistor make a difference if it is situated after ground?
- Do batteries have capacitance?
- Taxicab Geometry
- Do continued fractions always converge?
- Why does one airliner fly along the coast and the other doesn't?
- Can anyone explain this sacrifice?
- What is the correct formulation of Newton's Second Law of Motion?
- How do I properly exit a program and return to the CCP in CP/M?
- As of 2024, how can Russia escalate the war in Ukraine?
- AirBnB: cancel confirmed booking with low price as a host
- Re-selecting best sales forecasting model each month. Is this overfitting?
- A small REPL in Python
- Do you say "my car is high on fuel" as a counterpart of "my car is low on fuel"?
How To Fix Common Connection Wi-Fi Issue: Self-assigned IP On MacBook
Most of the time, WiFi works very well. It’s fast, and it’s convenient. But sometimes, you might experience some issues with connecting to your WiFi network, like your WiFi connection dropping out for no apparent reason. In this article, we’re going to talk about how to fix a common WiFi issue — one that’s related to how your Mac assigns itself an IP address.
Most wireless internet connections require a unique IP address to allow users to access their network remotely. These are typically assigned by a router or other networking equipment via DHCP, a protocol that hands out IP addresses. Some users have reported errors with their network connections when this process is interrupted. These issues are usually easy to fix, but they can cause frustration if you don’t know how.
Apple laptops are known for their reliability, but that doesn’t mean they never have any problems. From common issues like wi-fi dropping out, to more serious problems such as hard drive failure, Apple is renowned for producing solid hardware that is generally quite reliable, and doesn’t break down as much as PCs.
In this article, you will find some solutions that will help you solve the Wi-Fi problem on your MacBook. We use a MacBook as one of our mobile devices to increase productivity. Sometimes in a new place we need to connect our MacBook to the local Wi-Fi network to access the Internet. See also: To recover the Mac 36 error code Sometimes the Wi-Fi is already connected, but we still can’t access the Internet while our friends can, usually with their MacBooks. In this case, first check your MacBook’s Wi-Fi icon in the menu bar. Source: technobezz If you see an exclamation mark (! ) next to the Wi-Fi icon in the menu bar, as in the image above, it means that there is a network problem. Click on the Wi-Fi icon and you will probably see the following. Source: technobezz
To solve a common Wi-Fi connection problem Self-assigned IP on MacBook
There are many causes for not being able to connect to the Internet, and the automatically assigned IP is one of them. We will troubleshoot and repair the self-assigned IP on the MacBook. I would like to propose a solution to this problem. If you are using Mac OS X 10.5 or higher and experience this problem, try the following.
First thing: Checking network settings
Tap the Apple menu > System Preferences > Network In this section, make sure that the Location (1) option is set to Automatic, as shown in the figure below, and then click Advanced (2). Source: technobezz After clicking on the Advanced button (2), a new window will appear as shown in the figure below. Click on the TCP/IP tab and you will see this screen. Source: technobezz You have to pay attention to two things: Configure IPv4 (1) and configure the router (2). If you encounter a basic problem where Configure IPv4 is set to Use DHCP but no IP is set on the router, try the following steps to resolve the issue.
Troubleshooting steps
- Click on the Finder icon, and then click Go > Go to folder on the menu bar.
Source: technobezz
- After clicking the Go to Folder button, enter : /Library/Preferences/SystemConfiguration/
Source: technobezz Message: This resets all network configurations. If you have no problem losing your network configuration, you can continue with the following steps.
- Delete the files I highlighted in the image below. You will be prompted to enter the administrator password.
- Reboot your MacBook. After logging in, try to connect to the same WLAN. Check and make sure the advanced window displays the router’s IP address.
Source: technobezzWi-Fi is simple to set up, but many users have reported connection issues, where their computer cannot connect to the internet over Wi-Fi. There are a number of reasons why this happens, and we have put together a list of the most common ones.. Read more about self-assigned ip address iphone and let us know what you think.
Frequently Asked Questions
How do i fix self-assigned ip address on mac wifi.
So, you’ve changed your Wi-Fi network name or password, but can’t seem to connect your MacBook to the network. You’ve tried everything, but you get the dreaded message: “This computer has a self-assigned IP address.” The good news is that this is a fixable problem. If it’s not too late, you can get your MacBook online and start browsing the Web again. When you self-assign an IP address on your Mac, it means that there is a conflict with the existing IP address on your network. This is not an issue, but it can be if you want to connect to the internet. Here are some steps you can take to fix this issue.
Why does my Mac say self-assigned IP address?
The Wi-Fi icon on your Mac displays the IP address of the computer. The IP address can be assigned by a router or DHCP server. Your Mac’s IP address is self-assigned if your Mac has not communicated with a DHCP server or used the built-in DHCP server on your router. Mac users that have enabled the “Airport” feature on their Mac have a built-in DHCP server. While the self-assigning IP address is not an error, it can be problematic if you are not using a DHCP server. If your router or network does not have a DHCP server configured, the self-assigned address can prevent you from connecting to the Internet. The self-assigned IP address might appear when you are connecting your Mac to a network. The IP address comes from a private range of IP addresses, called an RFC1918 range. These addresses are not approved for Internet use, but are often used on local area networks. Self-assigned addresses indicate the computer is set up incorrectly and needs to be reconfigured so that it will use a publicly-reserved IP address.
What is self-assigned IP address for MacBook Pro?
This is a common problem with Macbook pro users. When you connect your Macbook Pro to a Wi-fi network, the IP address gets assigned to your Macbook by the router. But there are cases when the IP address assigned to your Macbook is ‘self assigned’ and that’s not a good thing. If you are a Mac User and you have set your Mac laptop to use a specific IP address then you can change it. However, if you don’t know what is self-assigned IP address and you want to know how to change it, then you are reading the right article.
Related Tags:
mac self-assigned ip 2020self-assigned ip address iphoneself-assigned ip address mojaveself-assigned ip address rangewifi has self-assigned ip address mac 2020self-assigned ip address ethernet mac catalina , People also search for , Feedback , Privacy settings , How Search works , wifi has self-assigned ip address mac 2020 , self-assigned ip address ethernet mac catalina , mac self-assigned ip 2020 , self-assigned ip address iphone , self-assigned ip address mojave , wifi has the self-assigned ip address 169 mac , wifi has the self assigned ip address reddit , self-assigned ip address range
- 10 Most Common Security Challenges For Cloud Services
- How to measure and test the speed of your internet connection
- How to share the Internet connection (4G / 5G) of a smartphone
- Wi-Fi disconnects when downloading – Fix this issue
- What are the most common versions of Android on smartphones?
- This pack comprising a MacBook Air M1 and AirPods 2 is a real good back-to-school deal
Do you like stuff like this?
Subscribe to our mailing list to get the new updates, related articles.
Looking for Moon Knight costume? This guy has the perfect mask
How to improve security with Windows 11 Sandbox

Cheap smartwatches: smart watches at the best price

Web browsers August 2022: Chrome maintains its lead followed by Edge
Leave a reply cancel reply.
Your email address will not be published. Required fields are marked *
Save my name, email, and website in this browser for the next time I comment.
The Federal Register
The daily journal of the united states government, request access.
Due to aggressive automated scraping of FederalRegister.gov and eCFR.gov, programmatic access to these sites is limited to access to our extensive developer APIs.
If you are human user receiving this message, we can add your IP address to a set of IPs that can access FederalRegister.gov & eCFR.gov; complete the CAPTCHA (bot test) below and click "Request Access". This process will be necessary for each IP address you wish to access the site from, requests are valid for approximately one quarter (three months) after which the process may need to be repeated.
An official website of the United States government.
If you want to request a wider IP range, first request access for your current IP, and then use the "Site Feedback" button found in the lower left-hand side to make the request.
IMAGES
VIDEO
COMMENTS
Enter your Mac password to authenticate the deletion.; Restart your Mac. It will automatically recreate the deleted files. Log in and connect to your Wi-Fi network.; Go to the TCP/IP setting again and check the router files. 7. Create a new network location. Creating a new network location lets your Mac start fresh with network settings and eliminate a self-assigned IP address.
Fill in everything as needed. System Preferences>Network>choose interface>Advanced>Proxies Tab, make sure none are set, like for HTTP & HTTPS. System Preferences>Network, unlock the lock if need be, highlight the Interface you use to connect to Internet, click on the advanced button, click on the DNS tab, click on the little plus icon, then add ...
A self-assigned IP address is essentially a private IP address within three number ranges reserved for the computers or devices in local networks. These private addresses are assigned to the computers in the network by the DHCP server and aren't visible on the internet.
Then click on the DNS tab, and delete any DNS servers that are listed there. Select them one by one and click on the minus button to remove them. Do not forget to click OK and Apply when you are done.. Create a new network location: On your Mac, open System Preferences and Network.Open the Location drop-down menu and select Edit Locations.Click the plus (+) button and add a new location, give ...
Click "Network" and select the network you're connected to. Click on "Details" — you'll open a new window. Go to the "TCP/IP" tab, click on "Renew DHCP lease.". Tap "Apply" to confirm. 3. Check your network settings. Go to "System settings" and tap on "Network.". Select the network connected to the self ...
Click on the Library folder and go to Preferences. 3. Now click on the SystemConfiguration folder. 4. Next put the following files in trash. 5. Restart your Mac. Once the reboot has taken place the Internet will start working and self assigned IP address issue will be resolved.
One way to fix self-assigned IP is to set up new network locations on your Mac. Follow the steps below to make a new network location: Tap on the Apple logo from the menu bar and select 'System preferences'. Enter the 'Network settings' then tap on 'Drop-down menu' near the Location tab. Then tap on 'Edit locations' and tap on ...
When a device says it has a "self-assigned IP address" on a WiFi network, it cannot obtain a valid IP address from the router.It can happen for various reasons, such as a conflict with another device on the network with the same IP address or an issue with the router's DHCP (Dynamic Host Configuration Protocol) settings.
After creating new location, select either WiFi or Ethernet in the side menu and click on Advanced. 5. On the next screen, switch to TCP/IP tab and click on Renew DHCP Lease. 6. Click on OK to save the new settings. This should certainly fix "Self-Assigned IP Address problem and restore network connectivity on your Mac.
7. macOS: Connect to Wi-Fi. Click the Wi-Fi icon in the menu bar. By default it will be in the upper right corner near the time and date. If Wi-Fi is off, choose Turn Wi-Fi on. The strength of each nearby network is shown next to its name. More darkened bars indicate a stronger network connection.
Method 4. Reset the Firewall. Method 5. Set Service Order. Method 6. Change DNS Servers. Video on Fix Self-Assigned IP Address Issue on Mac. Download Computer Malware Repair Tool. It is recommended to run a free scan with Combo Cleaner - a tool to detect malware and fix computer errors.
Issues with Network Interface Hardware and Software: Connectivity problems stemming from outdated network drivers, self-assigned IP address Mac network interface card malfunctions, or software configuration issues can lead to conflicts between your device and DHCP servers, resulting in a lack of a valid IP address allocation.
Luckily, there is an easy solution. You can use System Preferences to set a new Network Location, as well as renew your DHCP lease to fix the problem. This video will show you how to quickly fix ...
Video showing how to fix issue - Self-Assigned IP address MacDetailed instructions - https://blog.pcrisk.com/mac/13307-fix-self-assigned-ip-address-issue-on-mac
1: Restart Your Mac and Router. The first and simplest solution is to restart your Mac and your router. Sometimes, a temporary glitch can cause the self-assigned IP address problem. By restarting ...
0. Connecting using the plain WEP password was allowing me to connect (to a link sys Wi-Fi) but DHCP didn't work and I got the dreaded self-assigned address. To fix it we logged in using the HEX version of the same key (which we found by looking on the router via a wired connection). On network preferences, select Network Name Join Other ...
Assuming you added a switch because you have a large number of devices to plug in. Try this, unplug/shut down all devices from the switch and Belkin. Leave just the switch plugged in to the Belkin. Now, reboot the Belkin. Once it is online, plug in the Mac to the switch. See if you get a valid IP address.
It reports as "Self Assigned IP" with yellow in Network preferences. This presents as the computer having no internet and showing an assigned IP outside of the range of the DHCP server. I've tried: reboot all devices including router and switch. manual IP address. assigning random number value in "DHCP Client ID" in the TCP/IP ...
One example is the Self Assigned IP Address error, which many Mac users have reported. In this error, although your device is connected to a network, the internet stops working. In this error, although your device is connected to a network, the internet stops working.
Close the app that is using the connection (such as Safari or Messages), then open the app again. Put your computer to sleep, wait a few minutes, then wake it from sleep. Try connecting again. Close all open apps and restart your computer. If you entered your IP address manually, make sure you entered the correct address.
Macbook can connect on ethernet in the living room, straight from the router, using a Belkin USB-C LAN adapter. Macbook cannot connect on ethernet in the office, using same Belkin USB-C LAN adapter. It gets a self-assigned IP address, or a green light, but no data comes through. Husband's iMac can connect on ethernet in the office.
That's a /16. The whole "self-assigned" range is in fact 169.254../16. Hosts will send out a few ARP probes as part of the self-assignment process (to ensure that the address isn't already in use). If you connect the computers while Wireshark or tcpdump is already running a capture on the Ethernet interface, you should see both of them ...
Tap the Apple menu > System Preferences > Network In this section, make sure that the Location (1) option is set to Automatic, as shown in the figure below, and then click Advanced (2). Source: technobezz After clicking on the Advanced button (2), a new window will appear as shown in the figure below. Click on the TCP/IP tab and you will see ...
IP Codes. IP Codes are special provisions that are assigned to specific commodities and applicable when that commodity is transported in IBCs. Table 2 in § 172.102 specifies the requirements corresponding to the IP Code indicated in column (7) of the HMT. In this final rule, PHMSA is amending the text of IP15 and adding a new IP Code, IP22. IP15