How to Set a Static IP Address on Raspberry Pi
Make sure your Pi has the same IP every time you boot.

If you're trying to access a Raspberry Pi on your local network, there are times when you'll really need its IP address. Sure, you can usually SSH or VNC into a Pi by using its hostname, but for something like port forwarding on a router (which you'll use to create an externally-accessible Minecraft server or web server), an actual IP v4 address may be needed. The problem: every time you reboot your Pi, the IP address can change, based on what the router decides to assign at the moment.
Fortunately, there's a simple way to make sure that your Raspberry Pi always gets the same IP address on your local network or, at least, always tries to get the same address on your local network. It almost goes without saying that if, at the time it boots, another device that's powered on is already using the address in question, your Pi will either have no IP v4 address at all or (if you configured it as such) it will choose an alternative one. So keep that in mind.
Note that this tutorial assumes you already have a Raspberry Pi that's connected to your network. If not, please see our tutorials on how to set up a Raspberry Pi and how to set up a headless Raspberry Pi (no monitor required).

How to Assign a Static IP to a Raspberry Pi
1. Determine your Raspberry PI's current IP v4 address if you don't already know it. The easiest way to do this is by using the hostname -I command at the command prompt. If you know its hostname, you can also ping the Pi from a different computer on the network.

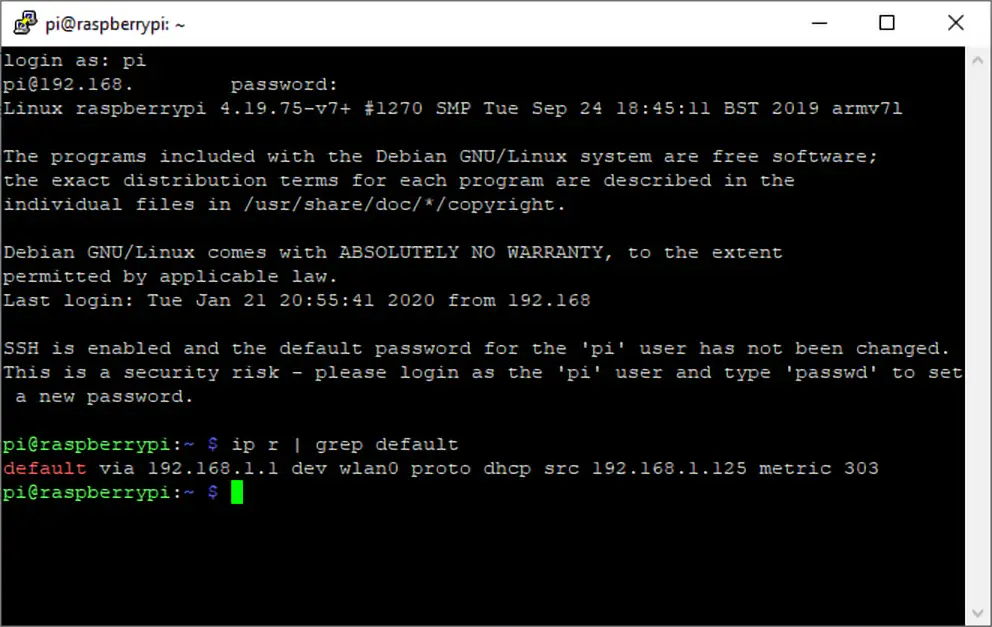
2. Get your router's IP address if you don't already know it. The easiest way to do this is to use the command ip r and take the address that appears after "default via."

3. Get the IP address of your DNS (domain name server) by enter the command below. This may or may not be the same as your router's IP.

Now that you have the IP address your Pi is currently using, the router's IP address and the DNS IP address, you can edit the appropriate configuration file.
Stay on the Cutting Edge
Join the experts who read Tom's Hardware for the inside track on enthusiast PC tech news — and have for over 25 years. We'll send breaking news and in-depth reviews of CPUs, GPUs, AI, maker hardware and more straight to your inbox.
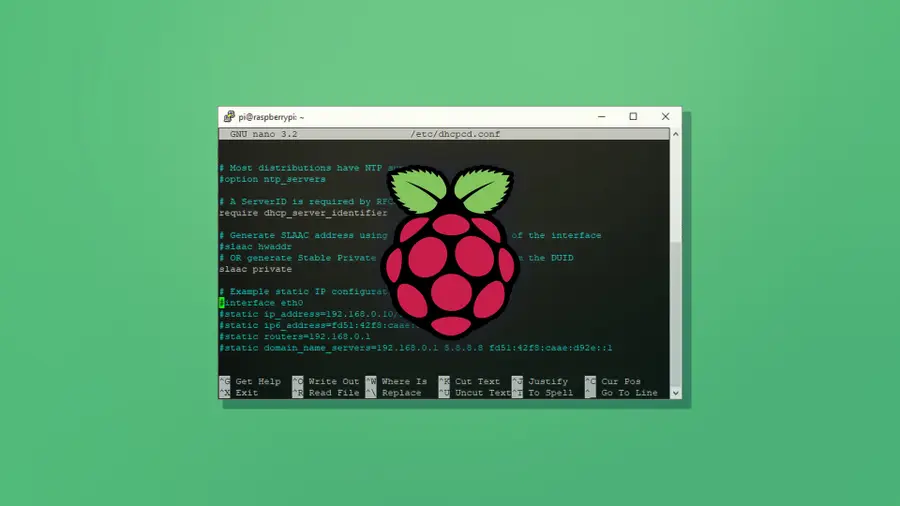
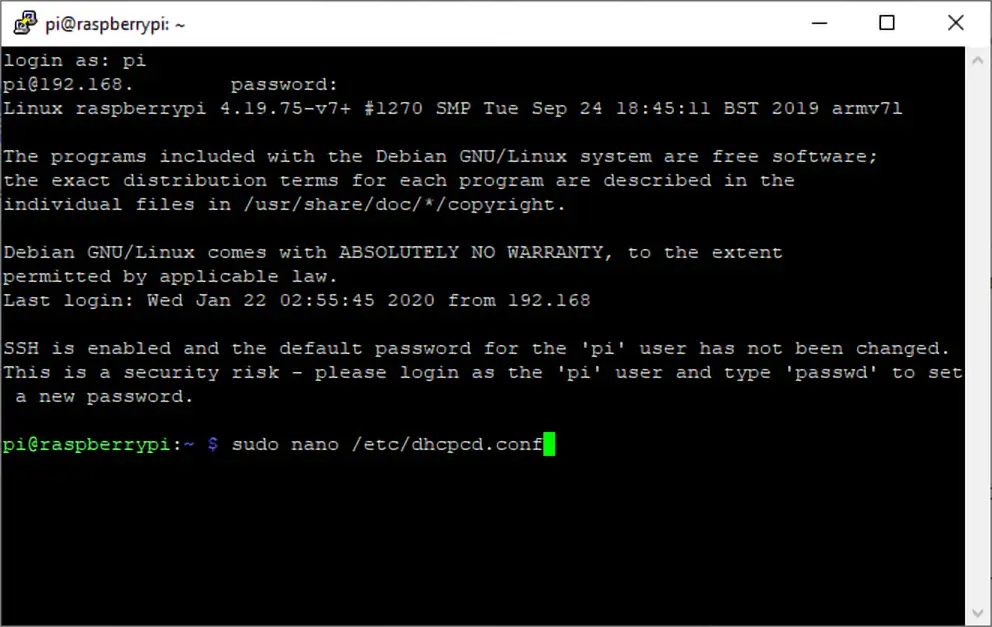
4. Open /etc/dhcpcd.conf for editing in nano.
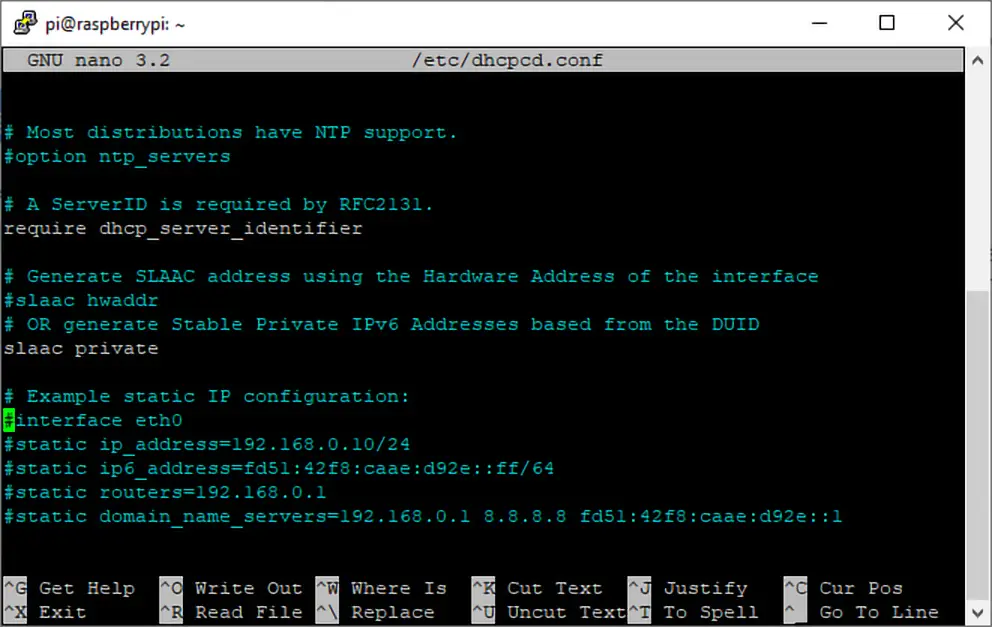
5. Add the following lines to the bottom of the file. If such lines already exist and are not commented out, remove them.
Replace the comments in brackets in the box below with the correct information. Interface will be either wlan0 for Wi-Fi or eth0 for Ethernet.
In our case, it looked like this.
You may wish to substitute "inform" for "static" on the last line. Using inform means that the Raspberry Pi will attempt to get the IP address you requested, but if it's not available, it will choose another. If you use static, it will have no IP v4 address at all if the requested one is in use.
6. Save the file by hitting CTRL + X and reboot .
From now on, upon each boot, the Pi will attempt to obtain the static ip address you requested.
Using the Raspberry Pi OS Guide to Set a Static IP
If you already have all the information about your router's IP and DNS IP, you can configure the static IP address using the Network Preferences menu instead of editing the dhcpcd.conf file.
1. Right click on the network status icon and select the Wireless & Wired Network Settings.

2. Select the appropriate interface . If you're configuring a static IP for Wi-FI, choose wlan0. For Ethernet, choose eth0.

3. Enter the IP addresses into the relevant fields. Your desired IP address will be in the IPv4 field, followed by a /24. Your router's IP and DNS server's IP will be in the fields named after them.

4. Click Apply , close the window and reboot your Pi.
Your Pi will now attempt to use your desired IP address at each boot. However, the Network Preferences menu sets this as a preference, not an absolute. So, if the IP address you asked for is not available, it will use another.

DeSalvo Systems Galactic Case for Raspberry Pi 5 Review: Out of this world
Raspberry Pi powers a five-foot magic mirror that doubles as a retro gaming console
Battery-powered AIO workstation forged from Framework laptop and 3D printed components — the Flying Lotus takes off
- AusMatt Typo: grep "namesever" /etc/resolv.conf Should read: grep "name r sever" /etc/resolv.conf Reply
- alan tracey wootton With an Arduino that is serving a web page one can use mDns instead of keeping track of the local IP address. Add this to your Setup(): if (MDNS.begin("esp32")) { MDNS.setInstanceName("count server demo"); MDNS.addService("http", "tcp", 80); MDNS.addServiceTxt("http","tcp","counter","true"); }Then that webpage is available locally in chrome and safari as: http://esp32.local./I didn't test the other browsers. I'm sure this works for a Pi also even though I haven't tried it yet. mDns might be on by default. The url would be http:// raspberrypi .local./To check, try this command: dns-sd -B _http._tcpWhen I do that I find that both of my printers are serving http (a supply level page) in addition to the microcontroller. Reply
- wl84 When I run the nameserver command I get two results back - 192.168.11.1 and 192.168.68.1. I tried both in the config and I can't connect to anythign with either. I'm trying to setup pihole Reply
- View All 3 Comments
Most Popular
By Les Pounder February 28, 2024
By Les Pounder February 26, 2024
By Sammy Ekaran February 24, 2024
By Les Pounder February 19, 2024
By Avram Piltch February 18, 2024
By Sammy Ekaran February 12, 2024
By Sammy Ekaran February 11, 2024
By Avram Piltch February 06, 2024
By Sammy Ekaran February 04, 2024
By Avram Piltch February 03, 2024
By Les Pounder January 24, 2024

3 Easy Ways To Set A Static IP Address On Raspberry Pi
When you plug a Raspberry Pi into the network and boot it, it will generally get a “random” IP from the DHCP server. This IP address might change almost every time you use it, which is not convenient at all. Let’s see how to set a fixed IP address, so the Raspberry Pi always use the same one.
There are three ways to set a static IP address on Raspberry Pi: assign an IP address to your Raspberry Pi in the router configuration, set a static IP in the desktop environment, or change the network configuration manually to always use the same IP.
We’ll explore these 3 methods, but first, let’s make sure you understand your current network, it’s an important prerequisite to avoid any IP address conflicts or network malfunctions.
If you’re looking to quickly progress on Raspberry Pi, you can check out my e-book here . It’s a 30-day challenge where you learn one new thing every day until you become a Raspberry Pi expert. The first third of the book teaches you the basics, but the following chapters include projects you can try on your own.
Prerequisites: Understand the network configuration
I put the word “random” in quotation marks in my introduction because there is nothing truly random with computers. Before picking an IP address and trying to configure it on the Raspberry Pi, we need to take a few minutes to study the current network.
Get the IP address of your router
On most networks, especially at home, the main router is your Internet provider box. It provides Internet access for all devices and is often the DHCP server too (the main equipment in charge of assigning IP addresses to all devices).
By accessing its web interface, you can generally get a clearer overview of the network configuration.
The IP address of the router is mentioned as the gateway when you check the network configuration of any device connected to it.
From a Raspberry Pi or Linux computer, you can use this command to find the IP address: route -n

Join Our Community!
Connect, learn, and grow with other Raspberry Pi enthusiasts. Support RaspberryTips and enjoy an ad-free reading experience. Get exclusive monthly video tutorials and many other benefits.

In my case, my router IP address is 192.168.222.1 (because I configured it). But in most cases, it will be 192.168.1.1 or 192.168.1.254.
On Windows, you can use the system settings, or start a command prompt, and type: ipconfig

Once you have the IP address, you can try to access the web interface via your web browser. It will be password protected, so you may need to find your Internet provider documentation to access it.
Once connected, I recommend doing two things to make sure you don’t do anything wrong by using one of the three methods mentioned in the article:
- Find the DHCP range for the clients , meaning the list of IP addresses that can be assigned automatically by your router (if possible, your static IP should be outside this range).
- Find the already used IP addresses , to avoid any conflict.
I’ll show you how to do this now.
Get the DHCP range
First, you need to find the DHCP range. In general, you have a network that goes from 192.168.1.1 to 192.168.1.254, but the DHCP range is maybe only from 1.100 to 1.150. This will be useful to avoid any conflict.
We don’t want to set the Raspberry Pi IP address to 1.110 if the DHCP may assign it to your computer.
You can also find this information in your DHCP server configuration (so your Internet provider router in most cases). For me, it looks like this:
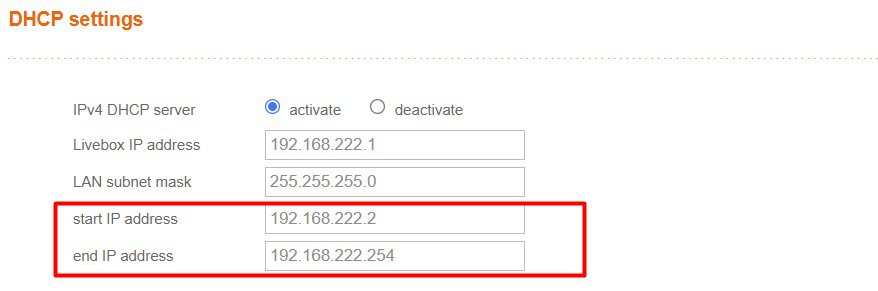
Well, I guess my configuration is not typical, as it covers all the IP addresses, probably because I changed it. A smart move, if you have something similar, would be to reduce the range (from 222.2 to 222.100 for example).
If you find that your DHCP range is from 1.100 to 1.150 for example, we’ll just avoid picking an IP address in this range. You can, for example, use 1.160 if it’s not taken by another device with a static IP.
How do you know? That’s the last step before changing the Raspberry Pi configuration.
Get a list of the currently used IP addresses
To be safe, it’s a good practice to get a list of the IP addresses that are currently used on the network. This can be done from the router interface directly, or via a network scan.
On the router configuration page, you may have access to a list of all the computers and other devices connected to your network, with their current IP addresses. Not only the one assigned by the DHCP server but all of them.
This will give a good overview of the current state of the network. If you can’t find this, don’t worry, you can also do a network scan.
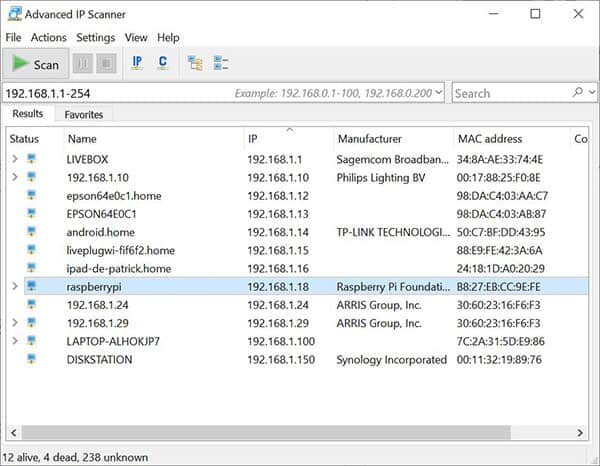
From a Windows computer, you can also use the Advanced IP Scanner tool, which will give you something like:
And on Linux, you can install nmap with: sudo apt install nmap And use it to do a network scan: nmap -sP <network> | grep report So, for example:
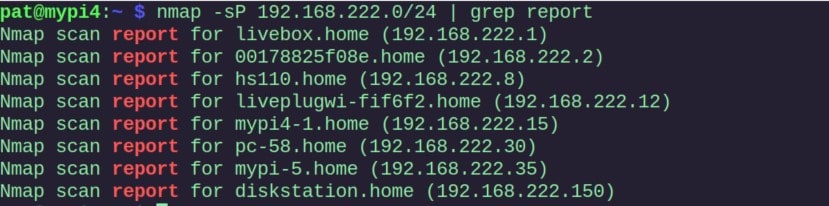
The grep command is used as a filter, to only show the lines we are interested in ( more details here ).
In most cases, your DHCP server assigns IP addresses at the beginning of the range . In both examples, all IP addresses are given between 2 and 40. IP addresses 100 and 150 are static IPs. So, if I pick something like 200 for my Raspberry Pi, it should be safe (192.168.222.200).
At this point, you should know which IP address you’ll configure on your Raspberry Pi. I’ll give you 2 methods, one from the desktop environment, and the other one in the command lines.
Are you a bit lost in the Linux command line? Check this article first for the most important commands to remember and a free downloadable cheat sheet so you can have the commands at your fingertips.
Set a static IP for the Raspberry Pi on the router
The easiest way to set a static IP address for the Raspberry Pi is to assign it a static lease in the DHCP server configuration (most likely your Internet router).
The interface will be slightly different for each provider and router brand, but in my case, it looks like this:
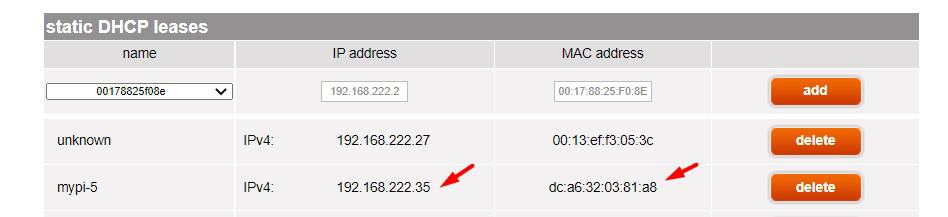
I can pick the name of any device on my network, and set a static IP address. I can also enter a MAC address if the device is not listed (here is how to find the MAC address on Raspberry Pi ).
If you can find something similar on your router, it would be the easiest solution. Nothing to change on the Raspberry Pi, and even when you reinstall the Raspberry Pi, it will stay with the same IP address.
It will also avoid most issues as it’s configured directly on the DHCP server.
Set a static IP on Raspberry Pi OS Desktop
On Raspberry Pi OS Desktop, a static IP address can be set manually by editing the wireless and wired network settings. Click on the network icon in the top-right panel, open the settings and fill the configuration manually.
Here are the exact steps:
- Click on the network icon in the right corner of the top panel.
- Take a free IP address to put in the “Address” field. If possible, try to pick something outside the DHCP range. But in general, DHCP servers are smart enough to not assign an IP address that is already taken. The network mask (“netmask”) is generally 24 on most networks.
- The gateway is the router IP address we got earlier with: route -n
- And the DNS server is often the same for a home network. You can either check your current configuration with: cat /etc/resolv.conf And use the same IP. Or use a public DNS server, like the one offered by Google (8.8.8.8) or OpenDNS (208.67.222.222). If you use Pi-Hole or AdGuard , you obviously need to adjust this and set it to the other Raspberry Pi IP address.
- Click “Save” to apply the changes , and then close everything.
To really apply the changes, you need to restart the network by using one of these methods: reboot the Raspberry Pi (main menu > Shutdown > Reboot), unplug/plug the network cable, or disable/enable the Wi-Fi interface.
After the reboot or reconnection, you can put your mouse over the network icon to find out if your IP address has changed to the configured static IP address ( more details here ).
Note : This tutorial has been updated for Raspberry Pi OS Bookworm, the steps might be slightly different on older versions. And the next section, via the command line, is not working with older versions (you have to edit /etc/dhcpcd.conf in this case).
Set a static IP via the command line
If you don’t have access to the desktop interface, or want to use command lines, you can do the same thing via the network manager configuration tool.
Here are the steps to follow:
- Open Network Manager UI with: sudo nmtui
- Choose “Edit connection”
- On the next window, scroll the cursor to the “IPv4 Configuration” line and select “Automatic” .
- Scroll to the bottom of the form to find the “Ok” button to save and exit the tool (press “ESC” several times after that).
As with the previous solution, the change will only apply on the next connection. You can either disconnect/reconnect your network cable, Wi-Fi or simply reboot the Raspberry Pi: sudo reboot
And that’s it. Once the network is reconnected, the IP address should now be the new one you just set:

Once, you have a good idea of your network configuration and know where to change the Raspberry Pi configuration, it’s not that complicated.
I hope this article was useful, and if you want to learn more about network administration, you should check these other tutorials on the website:
- How to use Raspberry Pi to monitor network?
- Network Boot With Raspberry Pi: Everything you need to know
- How to use your Raspberry Pi as a DNS Server (And Speed Up Internet)
Want to chat with other Raspberry Pi enthusiasts? Join the community , share your current projects and ask for help directly in the forums.
- 25 awesome Raspberry Pi project ideas at home
- 15 best operating systems for Raspberry Pi (with pictures)
- My book: Master your Raspberry Pi in 30 days
Does a Raspberry Pi need a static IP?
Using a static IP on Raspberry Pi is convenient, but not mandatory. Its utility is minimal for desktop use. For servers, a unique hostname serves the same purpose as a static IP address in most cases.
For specific network servers (DNS, DHCP, ad-blocker, etc.) where you use the IP address in the clients configuration, it’s recommended to set a static IP. But when the hostname can be use, or a quick scan done, it’s not mandatory.
How to set a static IP address before booting?
The easiest way to set a static IP address before booting is to assign a reserved IP address in the DHCP server configuration. The MAC address is the only information required, the system doesn’t matter.
You can follow the instructions given in the first method listed in this article to know how to do this on your router.
What’s the difference between a public and private IP addresses?
Public IP addresses identify devices on the internet, enabling global access to the Raspberry Pi. Private IP addresses are used within local networks, like home setups, allowing communication with devices such as your main computer.
If your goal is to give access to your Raspberry Pi via Internet from anywhere in the world, you should probably read this: How to Install and Use No-IP on Raspberry Pi? (Dynamic DNS) .
Whenever you’re ready, here are other ways I can help you: The RaspberryTips Community : If you want to hang out with me and other Raspberry Pi fans, you can join the community. I share exclusive tutorials and behind-the-scenes content there. Premium members can also visit the website without ads. Master your Raspberry Pi in 30 days : If you are looking for the best tips to become an expert on Raspberry Pi, this book is for you. Learn useful Linux skills and practice multiple projects with step-by-step guides. The Raspberry Pi Bootcamp : Understand everything about the Raspberry Pi, stop searching for help all the time, and finally enjoy completing your projects. Master Python on Raspberry Pi : Create, understand, and improve any Python script for your Raspberry Pi. Learn the essentials step-by-step without losing time understanding useless concepts. You can also find all my recommendations for tools and hardware on this page .

I'm the lead author and owner of RaspberryTips.com. My goal is to help you with your Raspberry Pi problems using detailed guides and tutorials. In real life, I'm a Linux system administrator with web developer experience.
Similar Posts

How to Boot from SSD on Raspberry Pi: A Detailed Walkthrough
Raspberry Pi devices use SD cards by default, but a USB boot is now an option. Using an SSD drive with a USB adapter can then drastically increase the performance of your Raspberry Pi at a relatively low cost. Here is how to try this on your setup. As a whole, the process of booting…

Install HOOBS on Your Raspberry Pi in 10 Minutes or Less
Home automation projects are the perfect fit for a Raspberry Pi home server, as it doesn’t require a lot of resources to run all the time. HOOBS is one software you can use for this, it’s compatible with a Raspberry Pi and provides a nice interface. Let’s learn how to install it on your device….

How to turn a Raspberry Pi into a file server?
Have you always dreamed of having a family NAS with your backups and movies? But you do not necessarily have the budget for that?Raspberry Pi allows you to do that at a lower cost, and I will give you all the details in this post. How to turn your Raspberry Pi into a file server?To…

How Do I Know if My Raspberry Pi Camera is Working?
When you get your shiny new Raspberry Pi camera installed, the first thing you’ll want to do is take a test image to ensure it works. I’ll walk you through the basics, but if you need more details on getting the camera installed, check out this article on camera basics. To check that your camera…

How to Install a Headless Raspberry Pi (No Monitor) In 2024
While Raspberry Pis can be used as a desktop, they are also often used in projects without a monitor or keyboard plugged into it. In these projects, a bit of pre-configuration to skip the welcome wizard can help get access to them directly after the first boot. The easiest way to pre-configure a Raspberry Pi…

Magic Mirror on Raspberry Pi: Complete Installation Guide
Building a Magic Mirror is one of the most popular projects on Raspberry Pi, but that doesn’t necessarily mean that it’s better documented. After trying it myself, I noticed that the official documentation is a bit complex for beginners to follow, and other guides don’t help that much. This is why I decided to write…
Every Raspberry Pi User’s Secret? This Downloadable Linux Command Cheat Sheet!
Set up a static IP-address on the Raspberry Pi
By default, the Raspberry Pi will get a dynamically allocated IP-address, meaning it changes as you restart it or potentially when new devices are added to the network. To make it easier to connect and have a more stable connection I recommend to set up a static IP address.
Table of contents
Get a static ip-address, setting-up using the desktop, setting-up with the terminal, prioritising internet interface, disabling static ip-address.
To get a static IP-address that works, it will need to be within the range provided by the router. We will therefore first need to find the router’s ip address. This tends to be written on the bottom of the router. If not, simply open a terminal window and type in netstat -nr . Now look under Gateway :

You can also use the command ip route | grep default | awk '{print $3}' .
In this example it is 192.168.0.1 . Using the router’s ip address we can choose a static ip address in the range between 1 and 255, which will become the last number of your ip-address, e.g. 192.168.0.40 .
Determine if you want a static ip address over WiFi or Ethernet. The interfaces are called respectively wlan0 and eth0 .
It is very simple to set up your static ethernet address. Simply right-click on the Wi-Fi icon in the menu bar (top-right on the left of the speaker icon) and select the Wireless & Wired Network Settings .
Now click the empty dropdown menu and select the network interface you want to configure. Now for IPv4 Address enter your chosen ip address, for Router the IP address of the router. AS DNS Servers add 8.8.8.8 . When wanting to add multiple DNSs make sure to add them one after another separate by a space. Finally, click the Disable IPv6 option.
One can also set up a static IP-address via the terminal. For this we need to change the dhcpcd.conf file:
Now scroll to the bottom, and add the following text:
replacing the words in capital by what is desired. Now save the file by pressing ctrl+x then y to exit.
When you are using multiple internet interfaces, such as Ethernet over Wifi, it is important to make sure the internet interface has priority over the other such that you get a working internet connection. To do so, we need to add a metric number to each, with the higher metric being prioritised first. Open the dhcpcd.conf file:
And add the metrics. For example:
Now finally reboot your Raspberry Pi for the changes to be incorporated:
Once your raspberry pi has finished restarting, connect to it locally to verify the static IP address hostname -I or ping from it on a networked computer ping YOURSTATICIP .
In many cases you may not want your Raspberry Pi set to use a static IP address. You can change the network configuration back by editing dhcpcd.conf again ( sudo nano /etc/dhcpcd.conf and removing all the lines you added in the previous steps.
Set Static IP Address on Raspberry Pi

Recently, I set up Jellyfin media server on my Raspberry Pi. My Pi is wirelessly connected to the router and one problem I faced with this setup is accessing the media server on the TV or other devices.
Why? Because the Pi got assigned a random IP address at times between reboots. And since I was trying to access the media server running on Raspberry Pi though the IP address, it became an issue.
I had to manually enter the IP address on the TV every time the IP address changed. Finding the IP address of the Raspberry Pi was another challenge.
This is where static IP comes into play. If you Pi uses static IP, the IP address remains the same between the reboots.
This is one of the many scenarios where you are better off with a static IP assigned to your Pi. And in this tutorial, I'll discuss how you can achieve that.
Assigning static IP on Pi device vs on the router
Yes! There are two approaches for your Pi to have a static IP.
- You can set static IP on the Raspberry Pi itself
- You can have your router assign a static IP to the Pi
Both methods have their pros and cons.
Let's say you set the static IP on the Raspberry Pi . Your Pi will always seek the same IP address from the router (let's say 192.168.1.51). That's fine as long as the router remains the same. If you change your router and the new router insists on using a different subnet (let's say in the 172.16.12.0/32 range), then your PI won't be connected to WiFi like before. You'll have to manually update the network settings on the Pi again to use the new IP range. This could work when you just a couple of Pi devices and you can directly login to them (instead of SSH) or connect to them via Ethernet cable. For a fleet of Pis in random locations in the house.
Let's say you want to assign the Pi a static IP from the router . This way, you are changing nothing on the Pi. If you change the router, the Pi will get an IP address assigned automatically through the DHCP server. The problem is that it's not easy to assign static IP to devices on all the routers. Some internet companies provide routers with very little scope of configuration changes.
I cannot show how to assign static IP to different devices on the router, as it depends on what kind of router you have. So, I'll discuss how you can set static IP on the Raspberry Pi itself.
Setting static IP on Raspberry Pi
The procedure comprises the following four steps:
- Get the current IP address of the Pi (if you want to use this one as static IP)
- Get the gateway IP (router's IP)
- Get the DNS server address (optional)
- Use the above information to change network configuration
The first three steps can be easily done in the command line. The third step can be done easily in both the command line and GUI.
Step 1: Get the IP address of Pi
If you want to use the current IP address as the static IP,
This is very simple. In the terminal, type the following command:
You may also use this command:
Both will give you the current IP address of the Raspberry Pi.

As you can see in the screenshot above, my Raspberry Pi's IP address is 192.168.1.34.
Step 2: Get the gateway IP
This is also quite simple. To get the gateway IP address (your router's IP address), use this command:
As you can see in the screenshot below, the gateway IP in my case is 192.168.1.1.

Step 3: Get the DNS server details (optional)
Some people like to keep the same DNS server which is currently being used on the system. I think you can do without that as well. Most home users have the DHCP server handle it automatically anyway.
Still, if you want, you can get the DNS server address with:

Step 4 (Terminal Method): Change network configuration to set static IP
If you are accessing Raspberry Pi via SSH or if you prefer the command line, you can use the nmtui (network manager in terminal) tool.
Run this command:
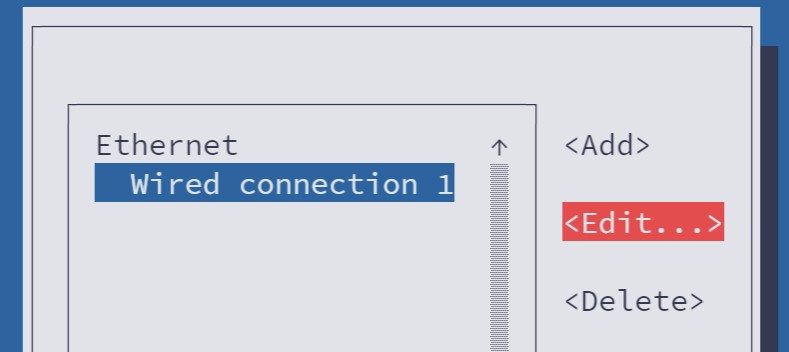
You'll see an interface like this. Here, select Edit a connection and press Enter.

It will show the connections you have had in the past on your Pi. I believe you want to set the static IP for the currently connected network. Move down to the appropriate network. Now press tab a couple of times to select the Edit option and press enter.

Use the arrow key to scroll down to the IPv4 CONFIGURATION option. Change it from Automatic to Manual .

Next, select the Show option of IPv4 CONFIGURATION line.

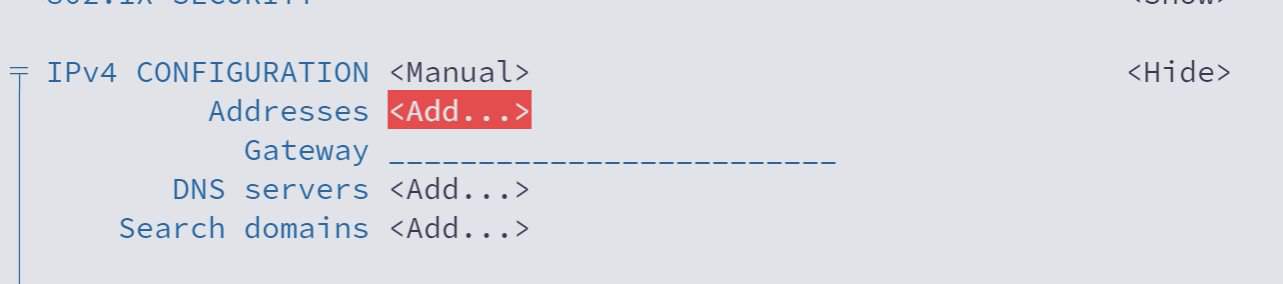
Use the arrow keys to move down again and reach the IPv4 CONFIGURATION section again. This time you'll see option to add Address, Gateway and DNS servers.

Go to the Addresses line and click enter key. It may take you to the beginning. Scroll down back again.

Fill all the details such as IP address with mask, Gateway IP and DNS.

If you notice above, I used the gateway IP in DNS too. I also added 1.1.1.1, DNS of Cloudflare as an alternative.
After filling all the details, scroll down to the bottom, select OK and press enter.
Your changes are saved. You can exit the nmtui interface the same way (press Back and then Quit options).
Restart your Pi for the changes to take effect. You have successfully set up static IP on Raspberry Pi.
Step 4 (GUI Method): Change network configuration to set static IP
The same can be achieved from the graphical interface of Raspberry Pi OS.
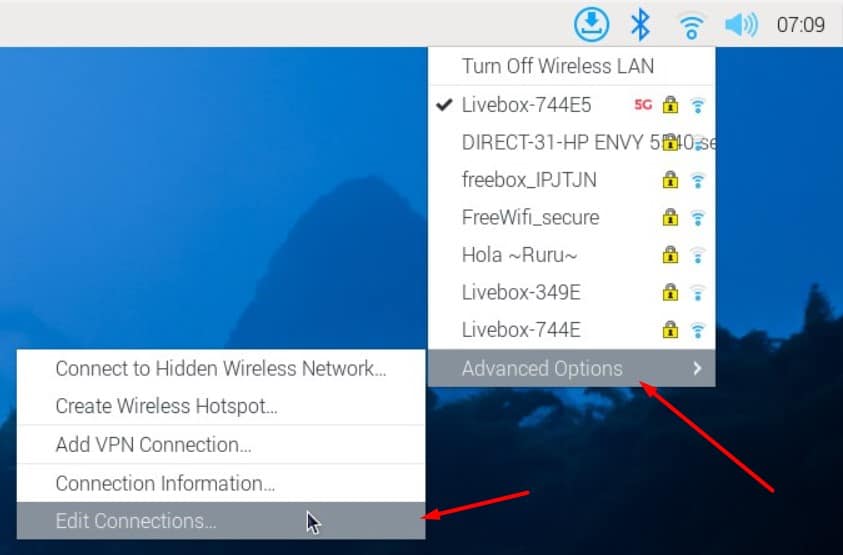
First, click on the network icon and then go to the Advanced options and click Edit connections.

Here you go to IPv4 Settings, set it to manual and then add all the details such as IP address, mask, gateway IP, DNS server etc. You have all the details.

Restart your system and you can see that the static IP is now set on your Pi.
Going back to non static IP
If you don't want to use static IP anymore on Raspberry Pi, you can easily revert the steps and go back to dynamic IP.
How? Simply edit the network connection in question again. This time, change the IPv4 configuration to 'automatic' and save your changes. And that's it. You don't have to provide IP address, gateway IP etc anymore.
As I mentioned at the beginning of this tutorial, you should use a static IP from the router end specially if your Pi won't be easily accessed physically.
But if your device is in your hands all the time, you have the liberty of accessing and changing its configuration.
I hope you find this tutorial on setting a static IP on Raspberry Pi helpful. Please let me know if you have any questions.
Abhishek Prakash
Created It's FOSS 11 years ago to share my Linux adventures. Have a Master's degree in Engineering and years of IT industry experience. Huge fan of Agatha Christie detective mysteries 🕵️♂️
How to Install Ubuntu Desktop on Raspberry Pi 4
How to install raspberry pi's raspbian os with pixel desktop on any computer, behold here is a $89 open source laptop running linux, run llms locally on raspberry pi using ollama ai, raspberry pi 3 vs 4: which one should you get, become a better linux user.
With the FOSS Weekly Newsletter, you learn useful Linux tips, discover applications, explore new distros and stay updated with the latest from Linux world

Great! You’ve successfully signed up.
Welcome back! You've successfully signed in.
You've successfully subscribed to It's FOSS.
Your link has expired.
Success! Check your email for magic link to sign-in.
Success! Your billing info has been updated.
Your billing was not updated.
How Do I Set a Static IP Address on Raspberry Pi?
If you're using your Raspberry Pi as a media or game server, setting a static IP address will make things far easier.
If you’re using your Raspberry Pi as a home server or often need to access it remotely from another device, setting a static IP address for it is a very good idea. This means you’ll be able to find it at the same Raspberry Pi static IP address every time, rather than a new address being set dynamically whenever it is rebooted. This is also useful to avoid confusion when you have multiple Raspberry Pi devices connected to your network.
Fortunately, once you know how, it's a fairly simple and quick process to set a Raspberry Pi static IP address. We’ll show you how to change the IP address in Raspberry Pi OS / Raspbian to make it permanent.
What Is an IP Address?
An Internet Protocol (IP) address is used to uniquely identify each device on a computer network, or the network itself on the internet – more on that later. The IP address is normally written in ‘dot-decimal’ notation: four decimal numbers, each ranging from 0 to 255, separated by dots. An example is 192.168.1.107 .
By default in Raspberry Pi OS, which is a Linux-based operating system, your Raspberry Pi’s IP address is reconfigured automatically each time you reboot it, so it may well change. Naturally, this is not ideal when you need a reliable address at which to connect to the Raspberry Pi from another device, such as when using it as a server. So it’s better to set a static IP address on Raspberry Pi.
Private vs. Public IP
A public IP address is used to identify your local network on the wider internet. This typically changes every time your router connects to the internet, although you may be able to make it static depending on your internet service provider.
You can find the public IP address on a Linux system such as Raspberry Pi OS by entering a special Terminal command, or simply by doing a web search for "What's my IP?". It is only required if you intend to connect to a device from outside your network, which we won’t cover here.
Instead, we are looking at the private IP addresses used to identify each device on your own local network. While it may be possible to reserve a certain IP address for your Raspberry Pi in your wireless router’s settings for the same purpose, here we’ll be showing you how to set a static IP from the Raspberry Pi itself.
1. DHCP Configuration
Raspberry Pi OS (formerly known as Raspbian) uses DHCP (Dynamic Host Configuration Protocol) to assign an IP address to the Raspberry Pi automatically whenever it is rebooted. You can find out more in our guide to DHCP .
To change Raspberry Pi OS's behavior so that it uses the same static IP address each time, you will need to modify the configuration file for the DHCP client daemon, dhcpcd.conf .
Before that, you will need some information on your current network setup so that you can add the required details to the configuration file. You will require the following info:
• Type of network connection: This is either wlan0 if your Raspberry Pi is connected to the router wirelessly, or eth0 if it’s connected using an Ethernet cable.
• Raspberry Pi’s currently assigned IP address: it’s safest to reuse this for the Raspberry Pi static IP so that you can be sure the latter hasn’t already been to another device on the network. If not, make sure another device isn't already using it.
To find the Raspberry Pi’s current IP address, enter the following command in a Terminal window:
• Your router’s gateway IP address: this is the one used to contact it from the local network, not its public IP. It varies depending on the router model, but typically starts with 192.168.
To find it, enter the following command and note the first IP address given:
• Your router’s DNS (Domain Name System) IP address: This is typically the same as its gateway address, but may be set to another value to use an alternative DNS – such as 8.8.8.8 for Google, or 1.1.1.1 for Cloudflare.
To find the current DNS IP address, enter the command:
Note the IP address after nameserver – that's the DNS address – and then press Ctrl + X to close the file.
2. Add Static IP Settings
Now you have found all your network connection information, it’s time to edit the dhcpcd.conf configuration file to add the settings you need to set up a static IP address for your Raspberry Pi:
If you haven’t edited the file previously, it will mainly contain various comment lines preceded by a hash (#) symbol. At the bottom, add the following lines, replacing the emboldened names with your own network details:
Replace the emboldened names as follows:
- NETWORK – your network connection type: eth0 (Ethernet) or wlan0 (wireless).
- STATIC_IP – the static IP address you want to set for the Raspberry Pi.
- ROUTER_IP – the gateway IP address for your router on the local network.
- DNS_IP – the DNS IP address (typically the same as your router’s gateway address).
Here is an example configuration to set the static IP to 192.168.1.120 with a wireless connection to a router at 192.168.1.254:
Once you have entered the settings, press Ctrl + X and then Y and ENTER to close and save the modified configuration file.
3. Reboot the Raspberry Pi
With the dhcpcd.conf configuration file modified, restart your Raspberry Pi to effect the changes and set the static IP address for it:
Rather than using an address assigned automatically by DHCP, the Raspberry Pi will now attempt to connect to the router using the new static IP address that you set in the dhcpcd.conf file.
To check that it is working correctly, enter the following command:
You should now see the static IP address that you set in the dhcpcd.conf configuration file.
Set a Static IP Address: Success
Congratulations: you have set up a static IP address on your Raspberry Pi, and it should now retain that address automatically whenever it boots up. Now you can go ahead and use your Pi system as a NAS, media or game server, and connect to it reliably at the same Raspberry Pi static IP address every time.
You'll Need 1
How to Configure a Static IP Address on the Raspberry Pi
What you'll need

Posted in these interests:

Raspberry Pi
The network capabilities on the Raspberry Pi make it possible to create some really fun projects. Once in a while, you’ll come across a project that could benefit from a static IP address. If you’re using your Raspberry Pi for storage as a NAS device, an FTP server—or any other kind of server for that matter—a static IP address can be a big help.
1 – Update Raspberry Pi OS

This guide should work with any Raspberry Pi using Raspberry Pi OS (formerly Raspbian). Make sure your copy of is up to date. If you’re not sure where to begin, visit our guide on how to update Raspberry Pi OS .

How to Install Raspberry Pi OS on Your Raspberry Pi Get the new official Raspberry Pi OS on your Pi.
2 – Find your router IP address
We’ll need both your router IP address and name server IP. We can find this information by running a few commands in a terminal on the Pi. Remote into the Pi using SSH or open a terminal window from within Raspberry Pi OS.

How to Connect to a Raspberry Pi Remotely via SSH The preferred (and most common) method of connecting to your Pi to run commands.
To find your router IP address, enter the following command:
The router IP address will appear after the text “default via”—take note of it. The name server can be found in the resolv.conf file. Open it using the following command.
Take note of the name server IP address and close the file with CTRL + X .
3 – Edit the dhcpcd file on the Raspberry Pi
The static IP is set by adding it to a file on the Raspberry Pi. In the terminal window, run the following command to edit the dhcpcd.conf file.
4 – Set the static IP address
This document has a few lines of code that can be activated by removing the # to the left of each line. Use the following ledger to properly set your static IP address.
- Network = If you’re using a wired connection, set this to eth0 . If you’re using a wireless connection, set this to wlan0 .
- Static_IP = This is the static IP address you want to assign to the Raspberry Pi.
- Router_IP = This is the IP address for the router.
- Name_Server = This is the name server address. You can use another DNS IP here if you’d like.
Enter your information into the file, be sure to remove the <> brackets. Check the screenshot for an example.
When that’s completed, save the file using CTRL + X .
5 – Test the static IP address
When the changes have been made, restart the Raspberry Pi. Now is a good time to test your project and make sure the IP address isn’t changing. Disconnect and reconnect your Pi from the network. If the IP address changes, verify the information in the previous step saved properly. If it stays the same, congratulations! You’ve set a static IP on the Raspberry Pi.
How to Run a Minecraft Server on the Raspberry Pi

There are several ways to go about running a Minecraft server on the Raspberry Pi. In this guide, I’ll cover how to install Nukkit—a cross-platform Minecraft server that’s super easy to set up on the Raspberry Pi. This server should work with PCs, consoles, and tablets running Minecraft 1.14. I’ll be using a Raspberry Pi
In these interests
Raspberry pi pi • 92 guides, share this guide.
467 guides
Introducing Howchoo, an enigmatic author whose unique pen name reflects their boundless curiosity and limitless creativity. Mysterious and multifaceted, Howchoo has emerged as a captivating storyteller, leaving readers mesmerized by the uncharted realms they craft with their words. With an insatiable appetite for knowledge and a love for exploration, Howchoo's writing transcends conventional genres, blurring the lines between fantasy, science fiction, and the surreal. Their narratives are a kaleidoscope of ideas, weaving together intricate plots, unforgettable characters, and thought-provoking themes that challenge the boundaries of imagination.
Related to this guide:
There are several ways to go about running a Minecraft server on the Raspberry Pi. In this guide, I&

HeaterMeter: Control your Grill Using a Raspberry Pi!
With summer right around the corner, it’s time to fire up the grill! But who will watch the gr

How to Set Up a New Raspberry Pi
So you just got your brand new Raspberry Pi. Awesome! This guide will show you how to set up a brand

RetroPie scrapers: what they are and how to use them
You’ve put so much work into setting up RetroPie or EmulationStation. You load it up

Power Your Raspberry Pi Zero with a Battery Using the JuiceBox Zero
The Raspberry Pi Zero is an incredible tool for building a wide variety of IoT devices. And until la
How do I connect my Raspberry Pi to my computer?
There are many reasons you may want to connect your Raspberry Pi to your computer, and there are a f

How to Set Up Homebridge on a Raspberry Pi
Home automation is growing in popularity, but one of the biggest hurdles is compatibility betwe

Build Your Own Raspberry Pi Car Computer, or “Carputer”, with AutoPi
Have you ever wanted to add an entertainment system to your car, only to find that most units are ex

The Best Raspberry Pi HATs for Your Next Project (2022)
There are so many cool HAT extensions for the Raspberry Pi to make your next project literally sing

How to Choose the Best Camera for OctoPrint (including USB)
OctoPrint is a platform designed for the Raspberry Pi that makes it possible to monitor and control
Discover interesting things!
Explore Howchoo's most popular interests.
Home » Linux » Raspberry Pi » Raspberry Pi Static Ip

Setting a Static IP Address on a Raspberry Pi [With Screenshots]
If you followed our article on how to SSH to your Raspberry Pi so that you can control it over a network, you might be tired of having to run the commands to find out what its current IP address is on your network.
Most networks assign IP addresses dynamically , which means each device on the network is assigned an IP address from a pool of available IP addresses. The address for a specific device may change over time if it is rebooted or the address is automatically reassigned for some reason. This is called DHCP – Dynamic Host Configuration Protocol .
Giving your Raspberry Pi a static IP address on your network means that it will always have the same address for you to connect to.
This article assumes you are running Raspberry Pi OS.
Step 1 – SSH to Your Raspberry Pi (or Attach a Screen & Keyboard)
If you don’t have a screen and keyboard attached to your Raspberry Pi, you will need to SSH to get things set up.
It’s highly recommended that you set a static IP address using a screen and keyboard just in case you make a mistake – you may not be able to reconnect if the network configuration isn’t valid.
Step 2 – Find Out Which Interface is Connected
The ip command can tell us all we need to know about the current state of the network on your Raspberry Pi.
Run the following in your terminal to see what interfaces are connected:
Which will output something that looks like this:

Here you can see the connected network interfaces . Each entry in the above output represents an interface – each entry taking the format
The interface named lo is the LOOPBACK interface, used for the computer to communicate with itself. It’ll always be there on most systems.
Below is the only other connected network interface wlan0 , the wireless network connection on this Raspberry Pi. We can tell it is connected as it says UP in the block of information next to it!
If the wired ethernet connection were connected rather than the wireless, you’d see eth0 instead of wlan0 . It’s possible but unlikely on a default installation of Raspberry Pi OS that your network interfaces will have different names than those shown here.
Step 3 – Finding your Network and Gateway
You will probably want to assign your Raspberry Pi an IP address on the network it’s already connected to. To do so, we will need to know what network addresses we should use to talk to other devices already there.
Finding the Network
This current IP address assigned to your Raspberry Pi is visible in the previous step’s output.
The IP address following inet will tell you the current IP. Yours will be different but will be for a local IP address range.
To find out more about IP addresses, check out our article on IP Addresses and Subnets.
Finding the Gateway
For your Raspberry Pi to talk to the outside world, it will also need to know the address of your gateway – your internet modem/router. Run the following to do so:
This will output the current network routes configured on your system:

We are interested in the default route on the first line. This tells us that by default, traffic is routed via 192.167.1.254 – now we know the gateway’s address.
Finding Your DNS Servers
You will also need to know what DNS servers you are currently using (if any) if you wish to access the internet. These can be found by running:
Which will output the contents of the resolv.conf file as generated by your system.

Here you can see the default nameserver assigned is your router – 192.168.1.254 .
Step 4 – Finding an Available IP Address
This step is dependent on the brand and configuration of the router you have.
When DHCP assigns an IP address automatically, your router will choose one from a range of IP addresses defined in its configuration. We should not assign the Raspberry Pi a static address that falls into that range, as otherwise, it may conflict if another device receives that address automatically.
You’ll have to check your router configuration or user manual to find out what this range is so that you can make sure you avoid using an address from it.
Step 5 – Assigning the IP Address to the Connected Interface
My network has a DHCP range of 192.168.100 to 192.168.200, from which addresses will be automatically assigned, so I will assign my Raspberry Pi the address:
This is to make sure that it doesn’t conflict with an existing IP (or the router’s IP address, which is 192.168.1.254).
Assigning a Static IP Address Temporarily
To assign a static IP address until the next reboot, just run:
Replacing 192.168.1.201 with the IP address you wish to assign and wlan0 with the interface’s name to assign it to.
To find out more about IP addresses and the format they are displayed above, check out our article on IP Addresses and Subnets.
Assigning a Static IP Address Permanently
The network configuration will need to be edited to assign an address permanently. Edit the relevant configuration file by running:
The configuration file(s) which you will need to edit will differ depending on your Linux distribution – this method is tested on Raspberry Pi OS in its default state
Add the following lines to the end of the file:
- Lines beginning with # are comments and are not read as configuration entries
- interface is the name of the connected interface and tells the configuration that the configuration lines following it will be applied to that interface – for this example, it is wlan0
- static ip_address is the static IP address you wish to assign to this interface – 192.168.1.201 in this case
- static routers is the IP address of the gateway/router on your network. 192.168.1.254 is the IP address of the router for this example.
- static domain_name_servers are the DNS servers we wish to use for this network. As seen above, mine is 192.168.1.254 as my router acts as the DNS server. I’ve added a second DNS server separated from the first by a single space. 8.8.8.8 is Google’s DNS server, which will act as a second/fallback DNS server.
To apply these changes, save the document by pressing CTRL + X and pressing Y to save. Then, reboot.
Your Raspberry Pi now has a Static IP!
- Setting up a LAMP Stack on Ubuntu 20.04 (And Raspberry Pi)
- TwisterOS For Raspberry Pi Does It All [Screenshots/Review]
- How to Install Ubuntu MATE 2020.10 on a Raspberry Pi (With…
- How to Install OSMC Media Center on Raspberry Pi…

1 thought on “Setting a Static IP Address on a Raspberry Pi [With Screenshots]”
I gave this a shot on ubuntu server 20.04, adapting it a bit where needed, and I just couldn’t get it to stick between restarts. Ended up using netplan with success so far.
Either way, great guide! I had fun tinkering, and I’ll back back in a few weeks when I grab a pi.
Leave a Comment Cancel reply
Save my name, email, and website in this browser for the next time I comment.
Privacy Overview
- Entertainment
- Beebom Gadgets
How to Set a Static IP Address on Raspberry Pi
Set a Static IP Address on Raspberry Pi
Set a static ip address using raspberry pi’s terminal.

3. After that, execute the below command to open the dhcpcd.conf file via Nano editor. Keep in mind that Nano is a keyboard-based editor , so you can’t use your mouse to move between lines and edit the file.

8. That’s it. You have assigned a static IP address to your Raspberry Pi in a few easy steps. Now, your router will only use the static IP address you have set for your Raspberry Pi.
Using the Router Settings to Set Static IP on Raspberry Pi

4. Click on “Add” and enter the IP address of Raspberry Pi in the “Reserved IP Address” field. You can find the IP address of your RPi board by entering hostname -I in the Terminal. To find the MAC address of your RPi , scroll down and look for the client list mentioned on the same admin page. Next, give a name in the “Description” field and turn on the “Enable This Entry” checkbox. Finally, click on “Save”. It will reserve Raspberry Pi’s current IP address, making it a static IP.

Assign a Static IP Address to Raspberry Pi in a Few Easy Steps!

Passionate about Windows, ChromeOS, Android, security and privacy issues. Have a penchant to solve everyday computing problems.
WTF… This is all WIFI! What if I have my RPi connected to my router via a 1000MHz ethernet cable? You shd be more general, and not assume everyone connects thru ther wifi.
Add new comment

How to set a static IP address on a Raspberry Pi
The Raspberry Pi is a fine addition to your home for a crazy number of reasons, but you'll probably need a static IP for it first.

The Raspberry Pi continues to be one of the most impressive computers on the planet. Not for its power, but for the possibilities. This thing can be programmed with a mind-boggling number of purposes, from small servers and NAS to controlling your home automation or even just a small Linux computer to learn some new IT skills.
Whatever you want to use it for, it's a pretty solid bet that you'll need a static IP for it. Unless you're using something like the Raspberry Pi 400 hooked up to a display, you're likely using it headless. That is, without a GUI. In the case of the Raspberry Pi Zero, this is even more likely.
Setting a static IP for your Pi is really easy, and doesn't have to involve your home router which sometimes can mess it up anyway. Case in point, the last Raspberry Pi I set up on my home network I assigned a static IP in the router settings, and it just sort of forgot about it and assigned a totally different IP to my ad blocker so it didn't actually work properly. That's why you should follow these steps and set it up on the Pi itself for the best results.
Setting up your Raspberry Pi

This guide assumes that your Raspberry Pi is already set up and you've flashed it with the Raspberry Pi OS already. If you haven't and need a helping hand, we have a guide on setting up a headless Raspberry Pi using nothing but your Windows PC.
Before you can set a static IP for your Raspberry Pi you will need to know what IP address it's currently on. At this point, the quickest method is probably to log into your router's software and grab it there, especially if you're doing a headless setup. You'll need the IP address to connect over SSH and do the rest.
With the IP address in hand, open a terminal (WSL or PowerShell is fine), and connect with the following command:
Accept the fingerprint by typing yes and hitting enter. If this is the first boot you'll need to log in with the default password, which is raspberry . It's a good idea to change this, but for the purposes of what we're doing here you don't need to and can just carry on with the next step.
Get the Windows Central Newsletter
All the latest news, reviews, and guides for Windows and Xbox diehards.
How to set a static IP on your Raspberry Pi
To set the static IP properly you'll need a few things. The first is the current IP of the Pi which you've already got, the next is your router's gateway IP and the current DNS IP address. We can get these last two from the Raspberry Pi terminal.
Router gateway IP address
Enter this command into the terminal:
Note down the first IP address given as this is the one you want.
Router DNS IP address
Again in the terminal, enter this command:
This will open a file in the nano text editor and the IP address you're looking for is immediately after nameserver . Note this down and press Ctrl + X to close out.
Setting the static IP address

The final step is to set the static IP address for your Raspberry Pi. It involves appending some details to the end of a configuration file. You must make sure you either use the IP address already given to your Raspberry Pi or that you're using an address that is currently vacant.
To begin, enter this command:
This will open up the dhcpcd.conf file in the nano text editor. Use your cursor keys to navigate all the way to the bottom.
Make sure not to change any of the existing items in this file, then at the bottom, you'll be entering a block of text following this template:
You'll replace the terms in capitals with the following:
- NETWORKTYPE — Type either eth0 for ethernet or wlan0 for wireless.
- YOURSTATICIP — Whatever static IP you want to assign to the Raspberry Pi.
- YOURROUTERIP — The gateway IP address acquired above.
- YOURDNSIP — The DNS IP address acquired above.
When finished you'll end up with something that looks a bit like this:
Now, press Ctrl + X followed by Y to close and save the file. You'll need to reboot the Pi for the changes to take effect, which you can do with this command.
Give it a minute to reboot, reconnect over SSH, and then use this command.
This will confirm the IP address matches what you set above. It should match, and now your Raspberry Pi should retain this IP any time it boots. Ensure you don't assign anything to this IP address, either manually or through your router settings, and you should be good to go!

Richard Devine is a Managing Editor at Windows Central with over a decade of experience. A former Project Manager and long-term tech addict, he joined Mobile Nations in 2011 and has been found on Android Central and iMore as well as Windows Central. Currently, you'll find him steering the site's coverage of all manner of PC hardware and reviews. Find him on Mastodon at mstdn.social/@richdevine
- 2 Prime Video's Fallout TV series is ready to step out of the Vault a little earlier than expected
- 3 Surface Pro 10 for Business vs. Dell Latitude 7350 Detachable: Which 2-in-1 should you buy?
- 4 Forza Motorsport's seventh update brings back the Brands Hatch Grand Prix and Indy Circuits
- 5 The best action game of 2023 is 50% off right now — here's why I love it, and why you will too
- Raspberry Pi
- DIY Electronics
- Programming
Select Page
How to Set Up a Static IP on the Raspberry Pi
Posted by Scott Campbell | Raspberry Pi | 31

Have you ever tried logging in to your Raspberry Pi via SSH and were denied because the IP address couldn’t be found? Do you have to scan your network every time you connect to find your local IP address? If the IP address of your Raspberry Pi changes all the time, it’s because you’re using a dynamic IP address . If you want your Pi to have an IP address that doesn’t change automatically, assign it a static IP address . With a static IP, you can be sure that the same IP will work each and every time.

In this tutorial, I’ll show you how to configure a static IP address using a clean installation of Raspbian Jessie and Raspbian Jessie Lite. There are pros and cons to each type of IP though, so let’s first talk about why you would want a static IP over a dynamic IP.
Static IP vs. Dynamic IP
Dynamic IP’s are good to use if you’re concerned about security. If a hacker gets access to your IP address, you’ll be less vulnerable to attack since your IP changes frequently. A dynamic IP can change every time you log in, or only at certain intervals. A program installed on your network router called the dynamic host configuration protocol (DHCP), automatically changes and assigns new dynamic IP addresses to computers on your network.
A static IP (as you could probably tell by the name) is one that doesn’t change. This makes it more reliable when using services that depend on a stable internet connection, like online gaming, VOIP, or remote desktop applications. With a static IP, you’ll be able to use the same IP address every time you connect to your Pi.
Setting up a Static IP on the Raspberry Pi
Before starting, make sure you’ve already set up and configured a way to access the command prompt. Check out our tutorials How to Set Up WiFi on the Raspberry Pi and How to Set Up a Raspberry Pi Without a Monitor or Keyboard to see how to do that if you haven’t already.
In this tutorial we’ll set up static IP’s for both WiFi and ethernet connections. If you only need one or the other, just omit the code below for the connection you don’t need.
Find Out Your Network Information
The first step is to find out your default gateway IP . This is the local IP address of your network router. The computers on your network use it to communicate with the router and access the internet. If you already know what it is, just skip this step. If not, do continue…
Power up and log into your Raspberry Pi via WiFi or ethernet, then enter route -ne at the command prompt to see your network routing information:

Under the “Gateway” column, you can see your default gateway IP (10.0.0.1 in my case). The “Iface” column lists the names for each connection – ethernet (eth0) and WiFi (wlan0). Write down your default gateway IP, we’ll need it in a minute.
Now we need to find out the IP addresses of your domain name servers. Your Pi sends the domain names you enter into your browser (i.e. www.google.com) to domain name servers, which convert the domain names to IP addresses (i.e. 8.8.8.8). Your Pi then uses the IP address to access the website’s server.
Enter cat /etc/resolv.conf at the command prompt to find the list of domain name servers:

Copy these IP addresses to a text editor on your PC or write them down for later.
Configure the Network Settings
Now we’re ready to configure the network settings. By default the Pi is configured with a dynamic IP address. To assign it a static IP address, you need to add your static IP, default gateway IP, and domain name servers to the dhcpcd.conf file.
At the command prompt, enter sudo nano /etc/dhcpcd.conf to edit the dhcpcd.conf file:

Now, without changing anything else in the file, add this code at the bottom of the dhcpcd.conf file, replacing the IP addresses with your own IP addresses found above:
- static ip_address : This is the static IP address you’ll use to SSH or remotely connect to your Pi. Take your default gateway IP (found in the steps above), and change the last number to any other number between 0 and 255.
- static routers : This is your default gateway IP address.
- static domain_name_servers : These are the IP’s we found in the resolv.conf file above. Separate each IP with a single space.
For example, my default gateway IP address is 10.0.0.1. To get the static ip_address for my ethernet connection (eth0), I replaced the 1 with 100 to get 10.0.0.100. To get the static ip_address for my WiFi connection (wlan0), I replaced the 1 with 99 to get 10.0.0.99. I’ll use these IPs to log in to my Pi from now on.
The file should look like this (with your own IP addresses):

Once you’ve replaced the IP addresses in the example code with your own IP addresses, press Ctrl-X and Y to exit and save the dhcpcd.conf file. Now enter sudo reboot to reboot the Pi. Log in with your new static ethernet IP or static WiFi IP:

To check that everything is working correctly and the Pi has access to the internet, let’s ping Google. Enter sudo ping www.google.com at the command prompt:

Press Ctrl-C to stop the pinging. If the connection is successful, you’ll see the packets that have been sent and received. If your connection isn’t successful, you will get a “Network is unreachable” error:

You should probably test the connection by pinging Google with both ethernet and WiFi static IP’s.
You can watch me set this up step by step in this video:
Now that you have a static IP set up, your Pi’s connection to the internet will be a lot more reliable. But another really useful way to connect to your Pi is with a direct ethernet connection to your laptop or desktop. A direct connection is extremely fast and stable. If you connect to your Pi via SSH a lot, I would definitely recommend setting this up. Check out our article, How to Connect to a Raspberry Pi Directly with an Ethernet Cable to learn how.
Thanks for reading! Let me know in the comments if you have any questions about setting up your static IP, and I’ll do my best to help. And be sure to subscribe! We send out a quick email each time we publish new articles.

Related Posts

How to Send Sensor Data to the Cloud With a Raspberry Pi
December 3, 2020

Use PuTTY to Access the Raspberry Pi Terminal from a Computer
September 7, 2020

How to Use a Switch to Turn On and Off the Raspberry Pi
October 19, 2020

How to Control the Raspberry Pi’s GPIO Pins Remotely
May 24, 2021
31 Comments
Great article. Just a few weeks too late for me as I finally figured it out…
It can be as simple. Lots of articles about fixed ip on the web, read at least 10 of them. All of them wrong or at least outdated (no jessie). Yours worked in no time. Mni thanks for that!
Thanks a Lot on How to setup static ip address, I looked few web site and most had wrong information.
Thank you, many “so called current” info on this on the web but all seem outdated, this is 100% correct. Thank you again.
works fine in setting static address but when trying to ping Google I get “unknown host http://www.google.com ” If I comment out the added lines the ping works fine I use TightVNC to connect to the PI – router address is 192.168.1.1
@JarJarGeek Very nice guide, I would use this for server, but for general Pi;s I find avahi-deamon more flexible.
When i type in the cat for either files or even sudo nano it either says that te file or directory doesn’t exist or the document comes up blank (implying that it doesn’t exist).
i am using a raspberry pi 3 and am using the latest raspbian os as of may 15th 2016.
please help that way i don’t end up having to set my pi up every time i want to use it.
nevermind. got it working.
had to share this on my @RebelMouse. Thank you! https://t.co/6mLwym7uQO
When I tried this it fails to connect. I think the problem is in the static router address. As per your instructions I came up with 0.0.0.0…
pi@VIDraspberrypi:~ $ route -ne Kernel IP routing table Destination Gateway Genmask Flags MSS Window irtt Iface 0.0.0.0 192.168.1.1 0.0.0.0 UG 0 0 0 wlan0 169.254.0.0 0.0.0.0 255.255.0.0 U 0 0 0 eth0 192.168.1.0 0.0.0.0 255.255.255.0 U 0 0 0 wlan0
Oops… rebooted a second time and now ALL works! THANK YOU FOR WRITING (AND VIDEO RECORDING) SIMPLE, CONCISE AND UP TO DATE INSTRUCTIONS!!!!!!!!!!!
will this allow graphics from a python program running on pi like pygame? or is the screen functionality merely a window into the terminal?
How will you ensure that the DHCP won’t assign this address to another device?. If my understanding is correct the DHCP does not know about this static IP and can therefore assign it to something else. If this happens there will be an IP conflict. is there anyway out of this ?
Most dhcp servers will try to ping address before assigning it to a client. But if your static IP device is switched off, the address still may be used by dhcp, and conflict will happen when you switch it on.To avoid this, you have to exclude address from your dhcp server’s address distribution range. Or you can make a reservation for that address in dhcp. In some cases reservation is even an alternative to static IP.
How can I set network mask to? Because this way it gives me mask of 255.0.0.0 which is not correct in my case, Also I need to set additional classless route for 10.10.0.0/16 via another gateway.
In fact I don’t need static address. If I do, I’d rater prefer to setup a dhcp reservation. I came to your article finding solution to a problem I have: My raspbian jessie / pi3B does not get default gateway from DHCP. It receives normaly everything else – IP address, default domain, dns and ntp servers, additional classless routes but not default gateway! What can be wrong? The DHCP server is Windows 2012 R2, if that does mater.
With Raspian Jessie (2016/09/23) a need to add “routers” and “domain_name_servers” BOTH under eth0 and wlan0:
interface eth0 static ip_address=192.168.x.x/24 static routers=192.168.x.x static domain_name_servers=x.x.x.x
interface wlan0 static ip_address=192.168.x.x/24 static routers=192.168.x.x static domain_name_servers=x.x.x.x
Thanks for the update! I’ll add this to the post.
i share with you a video on youtube how to configure your ip from dhcp to static. https://www.youtube.com/watch?v=3uixbMXZeNs&t=4s
When i run “sudo ifdown wlan0, sudo ifup wlan0” i get “ifdown: interface wlan0, not configured”. what is the fix for this ?
Amazing! Its truly amazing article, I have got much clear idea concerning from this piece of writing.
wicd-curses
Hi, we have the products of raspberry pi and arduino components, and very interest in working with you.
How do i make it so the ip is the same on any network?? Working on a project and need a way to ping the pi on any network it goes to.
Great article, thank you so much for explaining each of the lines in the dhcpcd.conf file. so many articles tell you to “just add this” without explaining what it means and why. Led to me following several and losing SSH access to the pi until I reverted it.
Doesn’t get much easier that that. Thanks.
Thanks, confirming this worked for me using Raspbian Buster in January 2019
Thank you so much, this helped me a lot. May 2020
I have set static IP in Pi and check by ping and it is working fine but when I enter static IP in putty for ssh getting network error connection time out. I have checked SSH is enabled in pi as well. Can anyone please help me why getting this error?
Worked like a charm. Thank you!
Hello Your tutorial is really helpful. But I have a problem. It seems that I have mistype my static IP address so I can’t connect with my RPi. The static ip_address should be “192.168.1.xxx” but I typed it “192.168.201.xxx” Is there any way I could fix it? Thank you
I am having a strange issue where my resolve.conf file keeps resetting upon reboot or shutdown and I have to do the setup again!!! The requirement for the static IP is because I am running my own VPN server with OpenVPN and the client I am using on the other end for connecting is Orbot for PC. I don't want to start from scratch hence the reset is not a choice. I did try changing the user and also chmod to 775 giving full permissions or locking it down, without much luck. Any guidance is appreciated.
Leave a reply Cancel reply
Your email address will not be published. Required fields are marked *
Save my name, email, and website in this browser for the next time I comment.
Notify me of follow-up comments by email.
Notify me of new posts by email.
For security, use of Google's reCAPTCHA service is required which is subject to the Google Privacy Policy and Terms of Use .
I agree to these terms (required).
Get new tutorials sent to your inbox!

Quick Start Guide for Setting Up a Static IP on the Raspberry Pi
Enter your name and email and I'll send it to your inbox:
Consent to store personal information: I agree to let Circuit Basics store my personal information so they can email me the file I requested, and agree to the Privacy Policy
Email me new tutorials and (very) occasional promotional stuff: Yes No
Check your email to get the PDF!
- Compute Module 4
- Kits & Bundles
- Flash Drives
- Card Readers
- Accessories
- Power Supplies
- Power over Ethernet (PoE)
- Breakout Garden
- GPS, GSM & LoRa
- Motor & Servo Control
- Port Expanders
- Power Management
- Prototyping
- Real Time Clock
- Serial & I2C
- Raspberry Pi 5
- Raspberry Pi 4
- Raspberry Pi 3
- Raspberry Pi 3A+
- Raspberry Pi Zero
- Case Accessories
- DIN & Rack
- Display/Screen
- Media Centre
- Retro Gaming
- Heatsinks & Fans
- Cooling Cases
- Camera Modules
- USB Cameras
- Mini Displays
- Medium Displays
- Large Displays
- Touchscreen Displays
- ePaper Displays
- GPIO Connection
- HDMI Connection
- Display Accessories
- Adapters & Accessories
- Game Controllers
- Keyboards & Mice
- Remote Controls
- WiFi & Ethernet
- Buttons & Joysticks
- HATs & Control Boards
- Merch & Accessories
- Wires & Connectors
- Merch & Clothing
- Notepads & Pens
- Peripherals
- Stickers & Badges
- Amplifiers & Modules
- Cables & Connectors
- Microphones
- Speakers & Headphones
- ADC & DAC
- Flat Cable (FFC/FPC)
- GPIO Expanders
- GPS & GSM
- Logic Level
- DIY Cables & Connectors
- Buttons & Switches
- Component Kits
- Integrated Circuits
- Oscillators
- Transistors
- Circuit Playground
- QT Py & XIAO
- Trinkey & Trinket
- Kits & Projects
- DotStar & APA102
- NeoPixels & WS2812
- Standard LEDs
- Strips & Sticks
- Battery Holders
- Boost Converters
- Power over Ethernet
- Regulators & Buck Converters
- Breadboards
- Crocodile Clips
- Jumper Wires
- PCBs & Perfboard
- SMT Breakouts
- Wire & Heat Shrink
- Motor Drivers
- Mounting Hubs
- Stepper Motors
- Wheels & Tracks
- Accelerometers
- Body & Muscle
- Environment & Air Quality
- Fingerprint
- Force & Weight
- Hall, Reed & Magnet
- IMU & Gyro
- Light & Colour
- Line Following
- Liquid & Moisture
- NFC & RFID
- Temperature
- Tilt & Vibration
- Voltage & Current
- Filament & Resin
- The micro:bit
- Add-ons & Extensions
- Cables & Accessories
- Official Arduino Boards
- Compatible Boards
- GPS & GSM Shields
- Input & Button Shields
- LED Shields
- Prototyping Shields
- Relay Shields
- Robotics Shields
- Sensor Shields
- Serial Shields
- Other Shields
- Raspberry Pi Gifts
- Maker Gifts
- Micro:bit Gifts
- Arduino Gifts
- Gifts Under £10
- Gifts Under £20
- Gifts Under £50
Login / Signup
from just £2.99
147,000+ reviews
support portal
order by 2pm*
Your cart is empty

How to setup a static IP address on your Raspberry Pi
So, you want to connect remotely to your Raspberry Pi? For that you’ll need its IP address! There are two main forms of IP address, dynamic and static. By default, your Raspberry Pi will have a dynamic IP address. This means that the IP address can change at any time - not ideal if you want to run your Raspberry Pi headless, as you’ll need to keep checking and updating the IP address in your system. A static IP address however will not change, it assigns your Raspberry Pi a permanent address on your network - so you know exactly where it is at all times. Setting up a static IP address on your Raspberry Pi can seem like a daunting task, but fear not, we’ll walk you through it one step at a time in this tutorial. For this guide, we’re going to assume that you are running the latest version of the Raspbian operating system as it is the most common amongst Raspberry Pi owners. Step 1. Check your connection! First up we’ll need to double check that your Raspberry Pi is happily connected to your network. A great way to do this is to run sudo ifconfig

- Destination
run sudo reboot to restart your Raspberry Pi with its new static IP address. The changes we have made will only take effect after a reboot.
Featured Products

Leave a comment
All comments are moderated before being published.
This site is protected by reCAPTCHA and the Google Privacy Policy and Terms of Service apply.
Sign up for our daily newsletter
- Privacy Policy
- Advertise with Us
How to Use a Static IP Address and Setup SSH on a Raspberry Pi

Like most Linux systems, the Raspberry Pi allows you to connect to it over SSH and although it is possible to make a SSH connection to a Pi with a dynamically allocated IP address, it is much easier to configure the device with a static IP address. By default, the Raspberry Pi is set up to get its IP address dynamically using DHCP. This is great for many situations, however where the Pi is acting as a server (which it does when you connect over SSH) then having a fixed IP address means you always know the address of your Pi without having to log in and run ipconfig to obtain the current address.
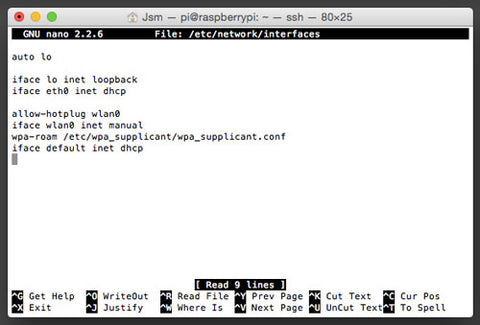
The IP address is configured in the file /etc/network/interfaces and we will need to edit this file to change the configuration from dynamic to static. But before we do that, we need to discover what address range is being used on your network. A typical home network uses one of the following ranges of IP address: 192.168.1.1 – 192.168.1.255 or 10.1.1.1 to 10.1.1.255. There are other variations as in fact all the addresses between 192.168.0.0 – 192.168.255.255 and 10.0.0.0 – 10.255.255.255 are designated for use on private networks.
To discover your current IP address use the following command:

In the eth0 section, the second line displays the Internet address, the Broadcast address and the Netmask. Note down the Internet address and the Netmask for later on.
Most networks have a default gateway (often the router or modem from your Internet Service Provider) where all traffic is routed if it can’t be resolved locally. This is normally configured via DHCP when the IP address is assigned, but for a static address it needs to be defined manually. To discover the current default gateway type:

The default gateway is listed on the line with the G flag, in my case 192.168.1.1 which is actually the router from my ISP. Note down the default gateway for later on.
Before editing the /etc/network/interfaces file, you need to decide what IP address you want to use as the permanent address for your Pi. On your network the .1 or .254 addresses are probably taken by your router, modem or wireless access point. There will also be a range of addresses assigned for DHCP, normally by your router or modem. If you don’t know what that range is and you don’t know how to use your router’s web interface to check, then the easiest thing to do is pick an address far away from the dynamic one your Pi currently has. For example, my Raspberry Pi has an IP address of 192.168.1.164. Since there are a few PCs and the odd tablet in my house I could take a guess that the DHCP address range defined by my router starts at 192.168.1.160, which it does. Therefore a good IP address for my Pi would be somewhere far from that range, say 192.168.1.20. By picking an address away from the DHCP range and away from .1 or .254 then I am limiting the chances of there being an address clash. Of course, the correct way to do this is discover how your router or modem is configured and then plan your network accordingly, don’t ever tell a real network engineer that you did it by guessing!
If you want a better picture of your network, try installing the nmap package and use nmap -sn 192.168.1.* to find which devices are on your network. Where 192.168.1.* is the first three parts of the network address you are using plus an asterisk.
Once you have picked an IP address edit the /etc/network/interfaces file:
Find the line which reads iface eth0 inet dhcp and replace it with:
But put the address, netmask and gateway that you noted down previously. Press “Ctrl + X” to leave the nano editor and type “Y” to confirm that the file should be saved. Press ENTER to keep the current filename (i.e. /etc/network/interfaces). Now reboot.
Now that your Pi has a static IP address you can configure the SSH server. This is done via raspi-config .

From within raspi-config , select option 8 ( Advanced Options ) and then option A4 ( SSH ). When asked “Would you like the SSH server enabled or disabled”, select “Enable” and finally select “OK”.
You can now connect to your Pi using SSH. If you have another Linux machine, simply use the ssh command. For Windows try the popular PuTTY program or alternatively use the SSH extension for Chrome.
Image credit: Regular Raspberry Pi
Our latest tutorials delivered straight to your inbox

Gary has been a technical writer, author and blogger since 2003. He is an expert in open source systems (including Linux), system administration, system security and networking protocols. He also knows several programming languages, as he was previously a software engineer for 10 years. He has a Bachelor of Science in business information systems from a UK University.

How to Set a Static IP Address on a Raspberry Pi 5
This tutorial explains how to set a static IP address on a Raspberry Pi 5 using nmcli
nmcli vs. dhcpcd
Setting the static ip, my ip address changed but ping 8.8.8.8 doesn't work.
Ideally you already have your Raspberry Pi set up and connected to a network that has assigned you an IP address using DHCP. In my case, the network I will be modifying was set up when I imaged the Raspberry Pi OS to my SD card (the Wi-Fi connection).
A lot of tutorials you may find for setting a static IP address on a Raspberry Pi will mention dhcpcd. As discussed here , dhcpcd was replaced with nmcli in the newer releases.
First, we need to find the name of the configuration to update. Run nmcli con show to show all connections, this will output something like this:
I want to update the configuration associated with Wi-Fi which is device wlan0 - this means the configuration I need to update is "preconfigured".
Next set the the IPv4 address, you will need to substitute your configuration name and IPv4 address in CIDR notation in this command: nmcli con mod <configuration name> ipv4.addresses <ip address> . So I would run,
Next set the IPv4 gateway, for a lot of people, this will be the IP address of your router,
Next set the DNS, again, you could use your router but you could also use another like 8.8.8.8 ,
Next set the addressing from DHCP to static,
Restart the connection to pick up these changes,
Check your new IP address with ip addr show wlan0 (or whatever device you are using). Lastly check your network connectivity by doing a quick ping using ping 8.8.8.8 .
Potential Issues
If you can see the Raspberry Pi has the new IP address but it cannot talk to the internet, you may have forgotten to set the DNS or have set it to something that isn't a DNS.
- Feature image
Set a static IP address with nmtui on Raspberry Pi OS 12 'Bookworm'
Old advice for setting a Raspberry Pi IP address to a static IP on the Pi itself said to edit the /etc/dhcpcd.conf file, and add it there.
But on Raspberry Pi OS 12 and later, dhcpcd is no longer used, everything goes through Network Manager, which is configured via nmcli or nmtui . If you're booting into the Pi OS desktop environment, editing the IP settings there is pretty easy .
But setting a static IP via the command line is a little different.
First, get the interface information—you can get a list of all interfaces with nmcli device status :
In my case, I want to set an IP on eth0 , the built-in Ethernet.
I can get all the current information about that port with nmcli device show eth0 , and I can edit the connection using the terminal UI ( nmtui ):
This brings up a connection editor, where you can highlight "IPv4 CONFIGURATION" and change it from <Automatic> to <Manual> , and then use <Show> to show all the settings.
Go through each setting adding in at least an IPv4 address, Gateway, and DNS Server, for example:

Then go down to the bottom and select 'OK'.
This saves the static IP configuration, but doesn't apply it immediately. To apply the changes, you need to restart NetworkManager:
Then if you run nmcli device show eth0 , you should see the new IP address (the old one might still be attached to the interface at the same time until you reboot):
You can also configure a static IP entirely via nmcli without using the UI; see this article on nmcli` from Cyberciti.biz.
For bonus points, you can easily automate changes to network interfaces with Ansible, for example:
Further reading
- Resolving 'Temporary failure in name resolution' on Pi OS 12 Bookworm
- Setting up a Raspberry Pi with 2 Network Interfaces as a very simple router
- Network interface routing priority on a Raspberry Pi
- Add new comment
You can also replace the 'restart networkmanager' part with reactivating the specific connection. But of course only if you're logged in locally or via a different connection :)
I tried that too, actually—but it didn't seem to pick up the new IP for some reason, until I restarted all of networkmanager. Might've just been too impatient.
NetworkManager is the new systemd-like borg only worse. Ugh. Such a step backward from old-school especially with wpa_supplicant being removed.
dhcpcd > networkmanager
How to find your Raspberry Pi IP Address
You must know your Raspberry Pi's IP address to connect it to the network. Here are a few ways you can find it.
The Raspberry Pi is one of the greatest SBCs (single-board computers) you can buy right now. Thanks to the gigantic community and its growing popularity, setting up and using this development board is easier than ever before. After you finish the initial setup process, the next step is to find your Raspberry Pi's IP address if you want to connect it with other devices over your network — establishing an SSH for remote access into Windows would be one such example.
Fortunately, there are plenty of ways to find the IP address on your Raspberry Pi. Some of these methods will even work for a headless setup.
How to find the Raspberry Pi IP Address from the desktop
If you're using a desktop version of Pi OS, finding the IP address of your Raspberry PI only takes a couple of clicks. This is by far the simplest method out there, and it even works with headless setups so long as you don't mind hooking the Pi up to a monitor for a little bit. Either way, here's how you can find the IP address from the desktop:
- Click the Wi-Fi or Ethernet icon.
This process is about the same even if you're using a different OS such as Ubuntu. Most Linux distributions have an Ethernet or Network icon in the menu bar at the top of the desktop. For example, here's how you can find the IP address on Ubuntu:
- Click the Network or Wi-Fi icon in the system tray.
How to find the Raspberry Pi IP address from the terminal
Another easy way of finding your Raspberry IP's address is through the terminal. A simple single-line command will give you the IPv4 address, and there are a few commands that can give you even more information.
How to find the IP address using your router's web interface
Log in to your router.
For those of you who are running a headless Raspberry Pi, finding the IP address involves a few more steps. Assuming you can't or don't want to connect your Pi to a monitor, you'll need to find the IP address using your router's web interface. To log into the web interface of your router, you first need to know the IP address of the router itself.
To find the router IP address on Windows, open the Command Prompt app, type ipconfig into the terminal, and take note of the Default Gateway address. You can use the same command in the Linux terminal if you're on Linux instead of Windows.
You can also try common login URLs for various routers to access the web interface. For example, http://tplinkwifi.net for TP-Link routers, routerlogin.net for Netgear, and http://www.asusrouter.com for Asus.
Finding the IP address
After landing on the web interface for your router, enter your admin username and password on the login page. You can find these credentials at the back of your router. From here, the specific steps will vary depending on the interface and your router. However, you can usually find the IP address for your Raspberry Pi by finding the address table of connected devices. This will usually be labeled something along the lines of Clients or Connected Devices .
The IP address that you're looking for will be labeled raspberrypi , and if you're using the RetroPie games emulation system, it will show up as retropie .
Setting up your Raspberry Pi
Now that you've found out the IP address of your Raspberry Pi, you're ready to start some cool projects. You could SSH into it from Windows, set up virtual network computing, or use your Pi as a media server. There are a ton of guides out there on creating cool stuff with the Raspberry Pi, so you shouldn't have a problem turning this tiny SBC into a powerful and versatile tool.
How to turn your Raspberry Pi into a media server

Neurobionics Lab
The latest version of our raspberry pi imaging tool has been released.
Published on April 9, 2024
Robot builders: If you develop using a Raspberry Pi to control your robots, we’ve made getting these systems up and running super easy. This is for people who use the RPi as a microprocessor and connect remotely from your PC.
Using our tool, you can build an RPi OS image that will automatically connect to known wifi networks and email you its IP address to SSH. If no known networks are available, it falls back to an access point with a static IP. It can connect to school / enterprise wifi networks, and log in automatically using encrypted credentials. All info on how to build using this tool is provided in the documentation, and it works with the RPi v4 and v5.
We’re sharing it to help people get started building robots!
初代ラズパイでPocket Wifi専用クレードルを代用
- RaspberryPi
- 余っているRaspberry Pi B(初代)の活用(イヤホンジャック「青」)
- Softbank Pocket Wifi 809SHの最大接続台数を増やす
使用するデバイス(自宅にある古い余りものの機器)
- Softbank Pocket Wifi 809SH (クレードル別売、2024年には入手困難)
- ELECOM WRC300FEBK (無線LANブロードバンドルーター)
- Raspberry Pi B(初代イヤホンジャックコネクタ青)
- USB Type-C ケーブル
- Pocket Wifiへの給電は、Raspberry PiのUSBポートからでも(なぜか)いけそう
- WRC-300FEに無線LAN接続で、インターネットの速度は 30Mbps 前後
- でも、WRC-300FEに無線接続をテストしたPCでNetflixの映画鑑賞が普通にできた
- Pocket Wifiの無線LANポート10個に加えて、WRC-300FEの無線LANポートがたくさんと有線LANポートが4つ使える
- Pocket Wifiは3A電源から給電する仕様なので、きっとラズパイは壊れる
- 初代Raspberry pi BはUSB3.0接続に対応していないので、データ通信速度が上がらない
raspberry pi 作業
- 809SHとRaspberry piはUSBケーブルで接続します
- ラズパイ上の操作をSSHでアクセスして行えるようにします
- OSバージョンを確認しておきます
- ブリッジユーティリティのパッケージをインストールします
- Raspberry piのUSBとLANポート間に仮想ネットワークブリッジを設定します
- Raspberry Pi、ELECOM WRC300FE、Pocket Wifiも電源を落とす
- Pocket Wifi とRapberry pi をUSBケーブルで接続する
- ELECOM WRC300FEの底面のRT/APモード切り替えスイッチをRTモードに切り替える
WRC300FE に対して Raspberry pi を終端装置として設定する
- Raspberry Pi と WRC300FE をLANケーブルで接続する
- PC を WRC300FE にLANポートで接続する
- Pocket Wifi、Rapberry pi、WRC300FE の順で電源をいれて起動する
- Rapberry pi にユーザログインして、 ip a で eth0 と USB0 のブリッジ状態を確認する
- PC から WRC300FE にインターネット接続設定をする(マニュアル通り)
Pocket Wifi の USB接続用IPアドレスが WRC300FE のWAN側IPとして使用されます。
Rapberry Pi をスイッチングハブ化する 【bridge-utils】 ラズパイ(RaspberryPi3)をDHCPサーバーにしてみた
Pocket Wifiにスイッチングハブを付けるにはクレードルの方がRaspberry Pi分の電力消費が節約できるので理想的(かもしれない)。専用クレードルの方が本来のPocket Wifiの機能を生かせる(かもしれない)。Raspberry pi をこの目的だけに使うのは流石に勿体ない。無線LAN のドングルも余っているので、wlan0からWRC300FEに接続すれば何かのサーバーとして使用することもできなくないかもしれない。
Pocket Wifi はデータ通信量が一目でわかるのだが、一晩、何気なくPCに無線LAN接続したままでネット動画を見たりしていたら、朝起きて、使用量が3000GBを超えていたのを見てビビッてしまった。一体、こんなにたくさんのデータ量を何に使ったのだろう。
Register as a new user and use Qiita more conveniently
- You get articles that match your needs
- You can efficiently read back useful information
- You can use dark theme
IMAGES
VIDEO
COMMENTS
How to Assign a Static IP to a Raspberry Pi. 1. Determine your Raspberry PI's current IP v4 address if you don't already know it. The easiest way to do this is by using the hostname -I command at ...
Learn three easy ways to assign a fixed IP address to your Raspberry Pi, either in the router configuration, the desktop environment, or the command line. Find out how to avoid IP conflicts and network issues with your current network configuration.
Learn how to configure a static IP-address for your Raspberry Pi using the desktop or the terminal. Find out how to prioritise internet interface, disable static IP-address and troubleshoot common issues.
Step 1: Get the IP address of Pi. If you want to use the current IP address as the static IP, This is very simple. In the terminal, type the following command: hostname -I. You may also use this command: ip a. Both will give you the current IP address of the Raspberry Pi.
3. Reboot the Raspberry Pi With the dhcpcd.conf configuration file modified, restart your Raspberry Pi to effect the changes and set the static IP address for it: . sudo reboot. Rather than using an address assigned automatically by DHCP, the Raspberry Pi will now attempt to connect to the router using the new static IP address that you set in the dhcpcd.conf file.
Learn how to modify the DHCP configuration file and the router settings to assign a static IP address to your Raspberry Pi. Follow the step-by-step instructions and examples for Ethernet or WiFi connection.
Learn how to configure a static IP address on Raspberry Pi using the command-line interface or the GUI. A static IP ensures the device's private IP address does not change and facilitates access and management.
Learn how to set a static IP address on your Raspberry Pi using Raspberry Pi OS. Follow the steps to find your router IP address, edit the dhcpcd.conf file, and test the static IP.
Learn how to assign a fixed IP address to your Raspberry Pi device on your network, using screenshots and commands. Find out how to identify your interface, network, gateway, and DNS settings.
4. Click on "Add" and enter the IP address of Raspberry Pi in the "Reserved IP Address" field. You can find the IP address of your RPi board by entering hostname -I in the Terminal. To find the MAC address of your RPi, scroll down and look for the client list mentioned on the same admin page.Next, give a name in the "Description" field and turn on the "Enable This Entry" checkbox.
Learn how to configure a static IP address for your Raspberry Pi device via command line or desktop GUI. A static IP address ensures that the device can always be accessible at the same IP address on your network.
You must make sure you either use the IP address already given to your Raspberry Pi or that you're using an address that is currently vacant. To begin, enter this command: sudo nano /etc/dhcpcd ...
By default the Pi is configured with a dynamic IP address. To assign it a static IP address, you need to add your static IP, default gateway IP, and domain name servers to the dhcpcd.conf file. At the command prompt, enter sudo nano /etc/dhcpcd.conf to edit the dhcpcd.conf file: Now, without changing anything else in the file, add this code at ...
However, this can change whenever you remove the Pi from the network e.g. turn it off. Having a static IP isn't essential, however it will make repeated access to the Raspberry Pi via SSH much simpler, as you'll always know that the Raspberry Pi has the same address. Imagine how much trouble your postman would have if your house constantly changed
A static IP address however will not change, it assigns your Raspberry Pi a permanent address on your network - so you know exactly where it is at all times. Setting up a static IP address on your Raspberry Pi can seem like a daunting task, but fear not, we'll walk you through it one step at a time in this tutorial.For this guide,
Setup a Static IP Address. Questions about setting Static IP Address are among the most common on this site. There are very many tutorials (many wrong, obsolete or incomplete). If the reason you are contemplating a Static IP Address is you want your Pi to be assigned a predictable IP Address you can request the DHCP server to assign one.
SSH. Now that your Pi has a static IP address you can configure the SSH server. This is done via raspi-config. From within raspi-config, select option 8 ( Advanced Options) and then option A4 ( SSH ). When asked "Would you like the SSH server enabled or disabled", select "Enable" and finally select "OK". You can now connect to your ...
Next set the addressing from DHCP to static, nmcli con mod preconfigured ipv4.method manual. Restart the connection to pick up these changes, nmcli con up preconfigured. Check your new IP address with ip addr show wlan0 (or whatever device you are using). Lastly check your network connectivity by doing a quick ping using ping 8.8.8.8.
To assign an IP address to Raspberry Pi, use the command ' static ip_address= ' followed by the desired IPv4 address and the suffix ' /24 ' (an abbreviation of the subnet mak 255.255.255. ). For example, if you want to link a computer with the IPv4 address 192.168..4, then you need to use the command 'static ip_address=192.168..4 ...
Old advice for setting a Raspberry Pi IP address to a static IP on the Pi itself said to edit the /etc/dhcpcd.conf file, and add it there.. But on Raspberry Pi OS 12 and later, dhcpcd is no longer used, everything goes through Network Manager, which is configured via nmcli or nmtui.If you're booting into the Pi OS desktop environment, editing the IP settings there is pretty easy.
Plug the SD card back to the raspberry pi board. Now the device (with username "pi", here) is accessible through ssh from the system. $ sudo ssh [email protected]` (My system was set with static IP of 10.0.0.200) I found this example of how to do headless IP address setup for raspibian on raspberry pi with ubuntu in the following link.
The Wi-Fi interface of the Raspberry Pi will be used as the access point for other devices to connect to. Like any router, it needs to have a static IP address. To configure a static IP address for the Wi-Fi interface, we will use nano or another text editor to open the following file with administrative privileges: $ sudo nano /etc/dhcpcd.conf
From the Pi OS desktop, click the Terminal icon at the top. To find the IP address, enter the following command: hostname -I. This command is case-sensitive, so make sure you're using a capital I ...
Using our tool, you can build an RPi OS image that will automatically connect to known wifi networks and email you its IP address to SSH. If no known networks are available, it falls back to an access point with a static IP. It can connect to school / enterprise wifi networks, and log in automatically using encrypted credentials.
Pocket Wifiにスイッチングハブを付けるにはクレードルの方がRaspberry Pi分の電力消費が節約できるので理想的(かもしれない)。. 専用クレードルの方が本来のPocket Wifiの機能を生かせる(かもしれない)。. Raspberry pi をこの目的だけに使うのは流石に勿体ない ...