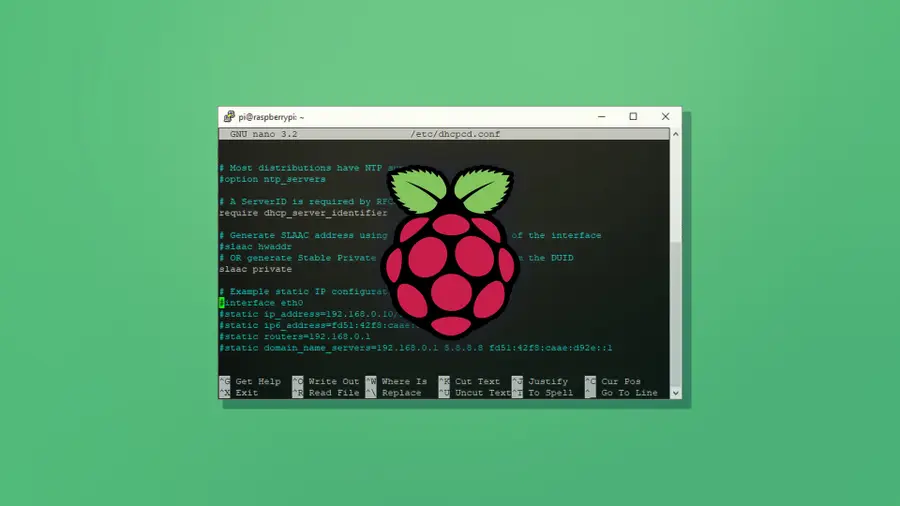
How to Set a Static IP Address on Raspberry Pi
Make sure your Pi has the same IP every time you boot.

If you're trying to access a Raspberry Pi on your local network, there are times when you'll really need its IP address. Sure, you can usually SSH or VNC into a Pi by using its hostname, but for something like port forwarding on a router (which you'll use to create an externally-accessible Minecraft server or web server), an actual IP v4 address may be needed. The problem: every time you reboot your Pi, the IP address can change, based on what the router decides to assign at the moment.
Fortunately, there's a simple way to make sure that your Raspberry Pi always gets the same IP address on your local network or, at least, always tries to get the same address on your local network. It almost goes without saying that if, at the time it boots, another device that's powered on is already using the address in question, your Pi will either have no IP v4 address at all or (if you configured it as such) it will choose an alternative one. So keep that in mind.
Note that this tutorial assumes you already have a Raspberry Pi that's connected to your network. If not, please see our tutorials on how to set up a Raspberry Pi and how to set up a headless Raspberry Pi (no monitor required).

How to Assign a Static IP to a Raspberry Pi
1. Determine your Raspberry PI's current IP v4 address if you don't already know it. The easiest way to do this is by using the hostname -I command at the command prompt. If you know its hostname, you can also ping the Pi from a different computer on the network.

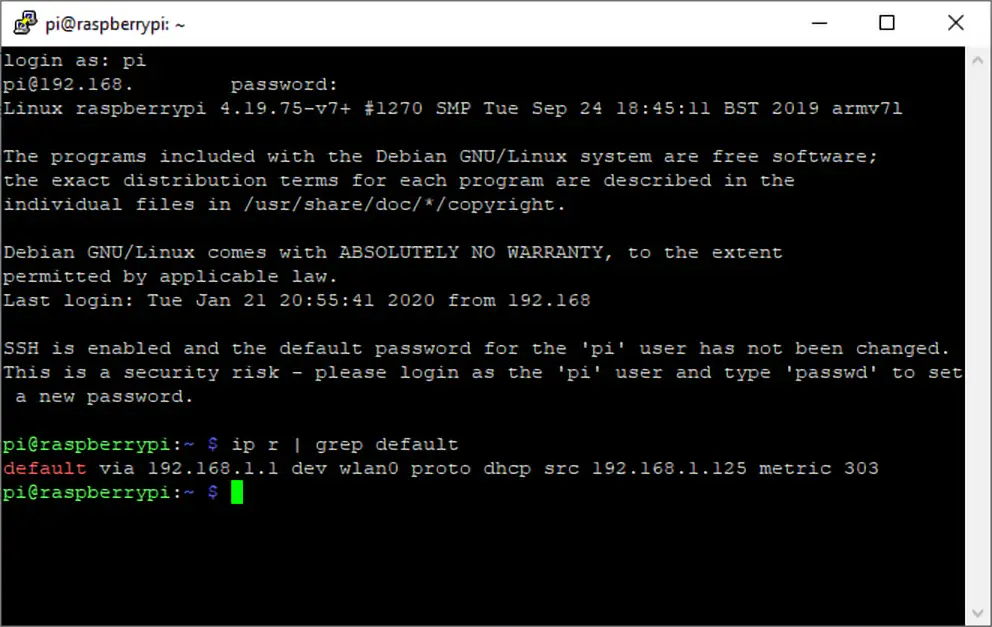
2. Get your router's IP address if you don't already know it. The easiest way to do this is to use the command ip r and take the address that appears after "default via."

3. Get the IP address of your DNS (domain name server) by enter the command below. This may or may not be the same as your router's IP.

Now that you have the IP address your Pi is currently using, the router's IP address and the DNS IP address, you can edit the appropriate configuration file.
Stay On the Cutting Edge: Get the Tom's Hardware Newsletter
Get Tom's Hardware's best news and in-depth reviews, straight to your inbox.
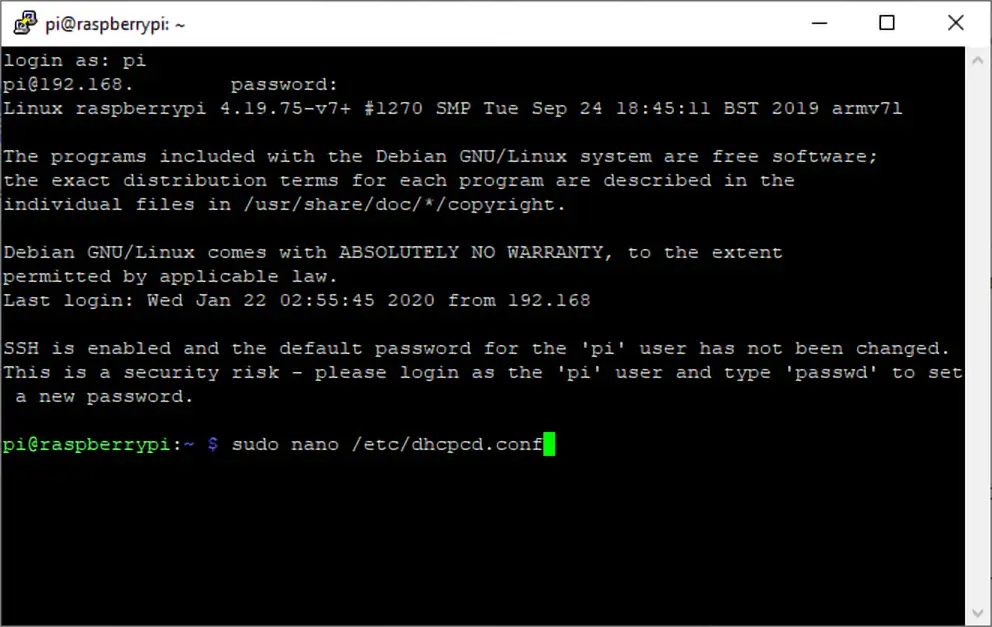
4. Open /etc/dhcpcd.conf for editing in nano.
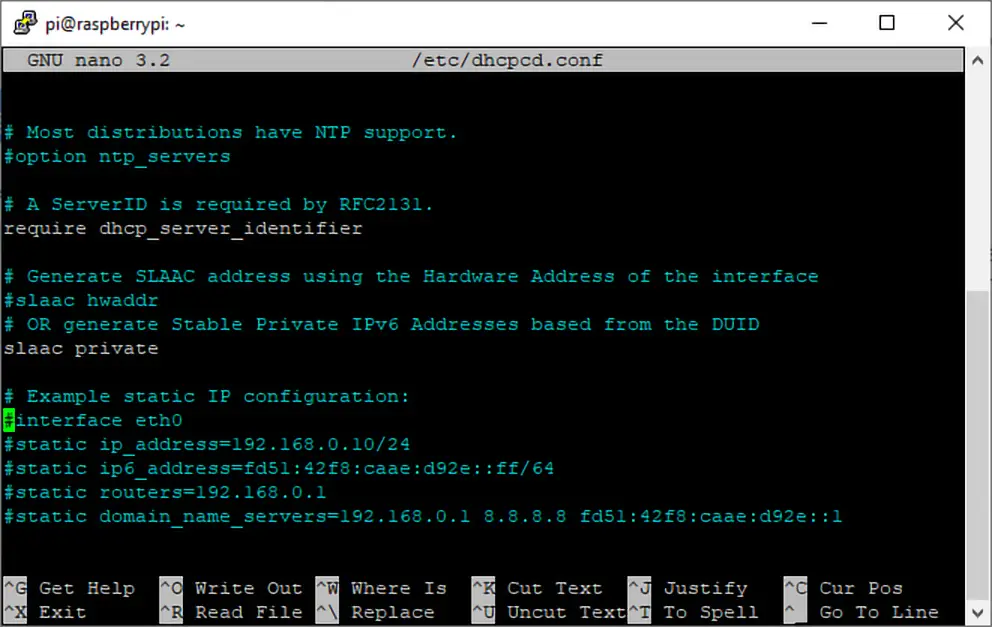
5. Add the following lines to the bottom of the file. If such lines already exist and are not commented out, remove them.
Replace the comments in brackets in the box below with the correct information. Interface will be either wlan0 for Wi-Fi or eth0 for Ethernet.
In our case, it looked like this.
You may wish to substitute "inform" for "static" on the last line. Using inform means that the Raspberry Pi will attempt to get the IP address you requested, but if it's not available, it will choose another. If you use static, it will have no IP v4 address at all if the requested one is in use.
6. Save the file by hitting CTRL + X and reboot .
From now on, upon each boot, the Pi will attempt to obtain the static ip address you requested.
Using the Raspberry Pi OS Guide to Set a Static IP
If you already have all the information about your router's IP and DNS IP, you can configure the static IP address using the Network Preferences menu instead of editing the dhcpcd.conf file.
1. Right click on the network status icon and select the Wireless & Wired Network Settings.

2. Select the appropriate interface . If you're configuring a static IP for Wi-FI, choose wlan0. For Ethernet, choose eth0.

3. Enter the IP addresses into the relevant fields. Your desired IP address will be in the IPv4 field, followed by a /24. Your router's IP and DNS server's IP will be in the fields named after them.

4. Click Apply , close the window and reboot your Pi.
Your Pi will now attempt to use your desired IP address at each boot. However, the Network Preferences menu sets this as a preference, not an absolute. So, if the IP address you asked for is not available, it will use another.
The new MultiPi console sports a Raspberry Pi CM4 and GPIO cartridge slot
Best Raspberry Pi Accessories of 2024
Ukraine war fuels rise of killer AI robots — report details rapid evolution using consumer drones and Raspberry Pi
- AusMatt Typo: grep "namesever" /etc/resolv.conf Should read: grep "name r sever" /etc/resolv.conf Reply
- alan tracey wootton With an Arduino that is serving a web page one can use mDns instead of keeping track of the local IP address. Add this to your Setup(): if (MDNS.begin("esp32")) { MDNS.setInstanceName("count server demo"); MDNS.addService("http", "tcp", 80); MDNS.addServiceTxt("http","tcp","counter","true"); }Then that webpage is available locally in chrome and safari as: http://esp32.local./I didn't test the other browsers. I'm sure this works for a Pi also even though I haven't tried it yet. mDns might be on by default. The url would be http:// raspberrypi .local./To check, try this command: dns-sd -B _http._tcpWhen I do that I find that both of my printers are serving http (a supply level page) in addition to the microcontroller. Reply
- wl84 When I run the nameserver command I get two results back - 192.168.11.1 and 192.168.68.1. I tried both in the config and I can't connect to anythign with either. I'm trying to setup pihole Reply
- View All 3 Comments
Most Popular
Set Static IP Address on Raspberry Pi

Recently, I set up Jellyfin media server on my Raspberry Pi. My Pi is wirelessly connected to the router and one problem I faced with this setup is accessing the media server on the TV or other devices.
Why? Because the Pi got assigned a random IP address at times between reboots. And since I was trying to access the media server running on Raspberry Pi though the IP address, it became an issue.
I had to manually enter the IP address on the TV every time the IP address changed. Finding the IP address of the Raspberry Pi was another challenge.
This is where static IP comes into play. If you Pi uses static IP, the IP address remains the same between the reboots.
This is one of the many scenarios where you are better off with a static IP assigned to your Pi. And in this tutorial, I'll discuss how you can achieve that.
Assigning static IP on Pi device vs on the router
Yes! There are two approaches for your Pi to have a static IP.
- You can set static IP on the Raspberry Pi itself
- You can have your router assign a static IP to the Pi
Both methods have their pros and cons.
Let's say you set the static IP on the Raspberry Pi . Your Pi will always seek the same IP address from the router (let's say 192.168.1.51). That's fine as long as the router remains the same. If you change your router and the new router insists on using a different subnet (let's say in the 172.16.12.0/32 range), then your PI won't be connected to WiFi like before. You'll have to manually update the network settings on the Pi again to use the new IP range. This could work when you just a couple of Pi devices and you can directly login to them (instead of SSH) or connect to them via Ethernet cable. For a fleet of Pis in random locations in the house.
Let's say you want to assign the Pi a static IP from the router . This way, you are changing nothing on the Pi. If you change the router, the Pi will get an IP address assigned automatically through the DHCP server. The problem is that it's not easy to assign static IP to devices on all the routers. Some internet companies provide routers with very little scope of configuration changes.
I cannot show how to assign static IP to different devices on the router, as it depends on what kind of router you have. So, I'll discuss how you can set static IP on the Raspberry Pi itself.
Setting static IP on Raspberry Pi
The procedure comprises the following four steps:
- Get the current IP address of the Pi (if you want to use this one as static IP)
- Get the gateway IP (router's IP)
- Get the DNS server address (optional)
- Use the above information to change network configuration
The first three steps can be easily done in the command line. The third step can be done easily in both the command line and GUI.
Step 1: Get the IP address of Pi
If you want to use the current IP address as the static IP,
This is very simple. In the terminal, type the following command:
You may also use this command:
Both will give you the current IP address of the Raspberry Pi.

As you can see in the screenshot above, my Raspberry Pi's IP address is 192.168.1.34.
Step 2: Get the gateway IP
This is also quite simple. To get the gateway IP address (your router's IP address), use this command:
As you can see in the screenshot below, the gateway IP in my case is 192.168.1.1.

Step 3: Get the DNS server details (optional)
Some people like to keep the same DNS server which is currently being used on the system. I think you can do without that as well. Most home users have the DHCP server handle it automatically anyway.
Still, if you want, you can get the DNS server address with:

Step 4 (Terminal Method): Change network configuration to set static IP
If you are accessing Raspberry Pi via SSH or if you prefer the command line, you can use the nmtui (network manager in terminal) tool.
Run this command:
You'll see an interface like this. Here, select Edit a connection and press Enter.

It will show the connections you have had in the past on your Pi. I believe you want to set the static IP for the currently connected network. Move down to the appropriate network. Now press tab a couple of times to select the Edit option and press enter.

Use the arrow key to scroll down to the IPv4 CONFIGURATION option. Change it from Automatic to Manual .

Next, select the Show option of IPv4 CONFIGURATION line.

Use the arrow keys to move down again and reach the IPv4 CONFIGURATION section again. This time you'll see option to add Address, Gateway and DNS servers.

Go to the Addresses line and click enter key. It may take you to the beginning. Scroll down back again.

Fill all the details such as IP address with mask, Gateway IP and DNS.

If you notice above, I used the gateway IP in DNS too. I also added 1.1.1.1, DNS of Cloudflare as an alternative.
After filling all the details, scroll down to the bottom, select OK and press enter.
Your changes are saved. You can exit the nmtui interface the same way (press Back and then Quit options).
Restart your Pi for the changes to take effect. You have successfully set up static IP on Raspberry Pi.
Step 4 (GUI Method): Change network configuration to set static IP
The same can be achieved from the graphical interface of Raspberry Pi OS.
First, click on the network icon and then go to the Advanced options and click Edit connections.

Here you go to IPv4 Settings, set it to manual and then add all the details such as IP address, mask, gateway IP, DNS server etc. You have all the details.

Restart your system and you can see that the static IP is now set on your Pi.
Going back to non static IP
If you don't want to use static IP anymore on Raspberry Pi, you can easily revert the steps and go back to dynamic IP.
How? Simply edit the network connection in question again. This time, change the IPv4 configuration to 'automatic' and save your changes. And that's it. You don't have to provide IP address, gateway IP etc anymore.
As I mentioned at the beginning of this tutorial, you should use a static IP from the router end specially if your Pi won't be easily accessed physically.
But if your device is in your hands all the time, you have the liberty of accessing and changing its configuration.
I hope you find this tutorial on setting a static IP on Raspberry Pi helpful. Please let me know if you have any questions.
Abhishek Prakash
Created It's FOSS 11 years ago to share my Linux adventures. Have a Master's degree in Engineering and years of IT industry experience. Huge fan of Agatha Christie detective mysteries 🕵️♂️
Can You Use Raspberry Pi 5 as a Desktop Computer?
Turn your raspberry pi into a nas using samba (smb) server, setting up jellyfin media server on raspberry pi, using a usb serial adapter (uart) to help debug your raspberry pi, run llms locally on raspberry pi using ollama ai, become a better linux user.
With the FOSS Weekly Newsletter, you learn useful Linux tips, discover applications, explore new distros and stay updated with the latest from Linux world

Great! You’ve successfully signed up.
Welcome back! You've successfully signed in.
You've successfully subscribed to It's FOSS.
Your link has expired.
Success! Check your email for magic link to sign-in.
Success! Your billing info has been updated.
Your billing was not updated.
Set up a static IP-address on the Raspberry Pi
By default, the Raspberry Pi will get a dynamically allocated IP-address, meaning it changes as you restart it or potentially when new devices are added to the network. To make it easier to connect and have a more stable connection I recommend to set up a static IP address.
Table of contents
Get a static ip-address, setting-up using the desktop, setting-up with the terminal, prioritising internet interface, disabling static ip-address.
To get a static IP-address that works, it will need to be within the range provided by the router. We will therefore first need to find the router’s ip address. This tends to be written on the bottom of the router. If not, simply open a terminal window and type in netstat -nr . Now look under Gateway :

You can also use the command ip route | grep default | awk '{print $3}' .
In this example it is 192.168.0.1 . Using the router’s ip address we can choose a static ip address in the range between 1 and 255, which will become the last number of your ip-address, e.g. 192.168.0.40 .
Determine if you want a static ip address over WiFi or Ethernet. The interfaces are called respectively wlan0 and eth0 .
It is very simple to set up your static ethernet address. Simply right-click on the Wi-Fi icon in the menu bar (top-right on the left of the speaker icon) and select the Wireless & Wired Network Settings .
Now click the empty dropdown menu and select the network interface you want to configure. Now for IPv4 Address enter your chosen ip address, for Router the IP address of the router. AS DNS Servers add 8.8.8.8 . When wanting to add multiple DNSs make sure to add them one after another separate by a space. Finally, click the Disable IPv6 option.
One can also set up a static IP-address via the terminal. For this we need to change the dhcpcd.conf file:
Now scroll to the bottom, and add the following text:
replacing the words in capital by what is desired. Now save the file by pressing ctrl+x then y to exit.
When you are using multiple internet interfaces, such as Ethernet over Wifi, it is important to make sure the internet interface has priority over the other such that you get a working internet connection. To do so, we need to add a metric number to each, with the higher metric being prioritised first. Open the dhcpcd.conf file:
And add the metrics. For example:
Now finally reboot your Raspberry Pi for the changes to be incorporated:
Once your raspberry pi has finished restarting, connect to it locally to verify the static IP address hostname -I or ping from it on a networked computer ping YOURSTATICIP .
In many cases you may not want your Raspberry Pi set to use a static IP address. You can change the network configuration back by editing dhcpcd.conf again ( sudo nano /etc/dhcpcd.conf and removing all the lines you added in the previous steps.
How Do I Set a Static IP Address on Raspberry Pi?

Your changes have been saved
Email Is sent
Please verify your email address.
You’ve reached your account maximum for followed topics.
How to Clean Up Your Facebook Home Feed
6 smartphone camera apps that will lead to better photos, the easiest ways to add music to videos on iphone and android.
If you’re using your Raspberry Pi as a home server or often need to access it remotely from another device, setting a static IP address for it is a very good idea. This means you’ll be able to find it at the same Raspberry Pi static IP address every time, rather than a new address being set dynamically whenever it is rebooted. This is also useful to avoid confusion when you have multiple Raspberry Pi devices connected to your network.
Fortunately, once you know how, it's a fairly simple and quick process to set a Raspberry Pi static IP address. We’ll show you how to change the IP address in Raspberry Pi OS / Raspbian to make it permanent.
What Is an IP Address?
An Internet Protocol (IP) address is used to uniquely identify each device on a computer network, or the network itself on the internet – more on that later. The IP address is normally written in ‘dot-decimal’ notation: four decimal numbers, each ranging from 0 to 255, separated by dots. An example is 192.168.1.107 .
By default in Raspberry Pi OS, which is a Linux-based operating system, your Raspberry Pi’s IP address is reconfigured automatically each time you reboot it, so it may well change. Naturally, this is not ideal when you need a reliable address at which to connect to the Raspberry Pi from another device, such as when using it as a server. So it’s better to set a static IP address on Raspberry Pi.
Private vs. Public IP
A public IP address is used to identify your local network on the wider internet. This typically changes every time your router connects to the internet, although you may be able to make it static depending on your internet service provider.
You can find the public IP address on a Linux system such as Raspberry Pi OS by entering a special Terminal command, or simply by doing a web search for "What's my IP?". It is only required if you intend to connect to a device from outside your network, which we won’t cover here.
Instead, we are looking at the private IP addresses used to identify each device on your own local network. While it may be possible to reserve a certain IP address for your Raspberry Pi in your wireless router’s settings for the same purpose, here we’ll be showing you how to set a static IP from the Raspberry Pi itself.
1. DHCP Configuration
Raspberry Pi OS (formerly known as Raspbian) uses DHCP (Dynamic Host Configuration Protocol) to assign an IP address to the Raspberry Pi automatically whenever it is rebooted. You can find out more in our guide to DHCP .
To change Raspberry Pi OS's behavior so that it uses the same static IP address each time, you will need to modify the configuration file for the DHCP client daemon, dhcpcd.conf .
Before that, you will need some information on your current network setup so that you can add the required details to the configuration file. You will require the following info:
• Type of network connection: This is either wlan0 if your Raspberry Pi is connected to the router wirelessly, or eth0 if it’s connected using an Ethernet cable.
• Raspberry Pi’s currently assigned IP address: it’s safest to reuse this for the Raspberry Pi static IP so that you can be sure the latter hasn’t already been to another device on the network. If not, make sure another device isn't already using it.
To find the Raspberry Pi’s current IP address, enter the following command in a Terminal window:
• Your router’s gateway IP address: this is the one used to contact it from the local network, not its public IP. It varies depending on the router model, but typically starts with 192.168.
To find it, enter the following command and note the first IP address given:

• Your router’s DNS (Domain Name System) IP address: This is typically the same as its gateway address, but may be set to another value to use an alternative DNS – such as 8.8.8.8 for Google, or 1.1.1.1 for Cloudflare.
To find the current DNS IP address, enter the command:

Note the IP address after nameserver – that's the DNS address – and then press Ctrl + X to close the file.
2. Add Static IP Settings
Now you have found all your network connection information, it’s time to edit the dhcpcd.conf configuration file to add the settings you need to set up a static IP address for your Raspberry Pi:
If you haven’t edited the file previously, it will mainly contain various comment lines preceded by a hash (#) symbol. At the bottom, add the following lines, replacing the emboldened names with your own network details:
Replace the emboldened names as follows:
- NETWORK – your network connection type: eth0 (Ethernet) or wlan0 (wireless).
- STATIC_IP – the static IP address you want to set for the Raspberry Pi.
- ROUTER_IP – the gateway IP address for your router on the local network.
- DNS_IP – the DNS IP address (typically the same as your router’s gateway address).
Here is an example configuration to set the static IP to 192.168.1.120 with a wireless connection to a router at 192.168.1.254:

Once you have entered the settings, press Ctrl + X and then Y and ENTER to close and save the modified configuration file.
3. Reboot the Raspberry Pi
With the dhcpcd.conf configuration file modified, restart your Raspberry Pi to effect the changes and set the static IP address for it:
Rather than using an address assigned automatically by DHCP, the Raspberry Pi will now attempt to connect to the router using the new static IP address that you set in the dhcpcd.conf file.
To check that it is working correctly, enter the following command:
You should now see the static IP address that you set in the dhcpcd.conf configuration file.

Set a Static IP Address: Success
Congratulations: you have set up a static IP address on your Raspberry Pi, and it should now retain that address automatically whenever it boots up. Now you can go ahead and use your Pi system as a NAS, media or game server, and connect to it reliably at the same Raspberry Pi static IP address every time.
- Raspberry Pi
You'll Need 1
How to Configure a Static IP Address on the Raspberry Pi
What you'll need

Posted in these interests:

Raspberry Pi
The network capabilities on the Raspberry Pi make it possible to create some really fun projects. Once in a while, you’ll come across a project that could benefit from a static IP address. If you’re using your Raspberry Pi for storage as a NAS device, an FTP server—or any other kind of server for that matter—a static IP address can be a big help.
1 – Update Raspberry Pi OS

This guide should work with any Raspberry Pi using Raspberry Pi OS (formerly Raspbian). Make sure your copy of is up to date. If you’re not sure where to begin, visit our guide on how to update Raspberry Pi OS .

How to Install Raspberry Pi OS on Your Raspberry Pi Get the new official Raspberry Pi OS on your Pi.
2 – Find your router IP address
We’ll need both your router IP address and name server IP. We can find this information by running a few commands in a terminal on the Pi. Remote into the Pi using SSH or open a terminal window from within Raspberry Pi OS.

How to Connect to a Raspberry Pi Remotely via SSH The preferred (and most common) method of connecting to your Pi to run commands.
To find your router IP address, enter the following command:
The router IP address will appear after the text “default via”—take note of it. The name server can be found in the resolv.conf file. Open it using the following command.
Take note of the name server IP address and close the file with CTRL + X .
3 – Edit the dhcpcd file on the Raspberry Pi
The static IP is set by adding it to a file on the Raspberry Pi. In the terminal window, run the following command to edit the dhcpcd.conf file.
4 – Set the static IP address
This document has a few lines of code that can be activated by removing the # to the left of each line. Use the following ledger to properly set your static IP address.
- Network = If you’re using a wired connection, set this to eth0 . If you’re using a wireless connection, set this to wlan0 .
- Static_IP = This is the static IP address you want to assign to the Raspberry Pi.
- Router_IP = This is the IP address for the router.
- Name_Server = This is the name server address. You can use another DNS IP here if you’d like.
Enter your information into the file, be sure to remove the <> brackets. Check the screenshot for an example.
When that’s completed, save the file using CTRL + X .
5 – Test the static IP address
When the changes have been made, restart the Raspberry Pi. Now is a good time to test your project and make sure the IP address isn’t changing. Disconnect and reconnect your Pi from the network. If the IP address changes, verify the information in the previous step saved properly. If it stays the same, congratulations! You’ve set a static IP on the Raspberry Pi.
How to Run a Minecraft Server on the Raspberry Pi

There are several ways to go about running a Minecraft server on the Raspberry Pi. In this guide, I’ll cover how to install Nukkit—a cross-platform Minecraft server that’s super easy to set up on the Raspberry Pi. This server should work with PCs, consoles, and tablets running Minecraft 1.14. I’ll be using a Raspberry Pi
In these interests
Raspberry pi pi • 92 guides, share this guide.
467 guides
Introducing Howchoo, an enigmatic author whose unique pen name reflects their boundless curiosity and limitless creativity. Mysterious and multifaceted, Howchoo has emerged as a captivating storyteller, leaving readers mesmerized by the uncharted realms they craft with their words. With an insatiable appetite for knowledge and a love for exploration, Howchoo's writing transcends conventional genres, blurring the lines between fantasy, science fiction, and the surreal. Their narratives are a kaleidoscope of ideas, weaving together intricate plots, unforgettable characters, and thought-provoking themes that challenge the boundaries of imagination.
Related to this guide:
There are several ways to go about running a Minecraft server on the Raspberry Pi. In this guide, I&

HeaterMeter: Control your Grill Using a Raspberry Pi!
With summer right around the corner, it’s time to fire up the grill! But who will watch the gr

How to Set Up a New Raspberry Pi
So you just got your brand new Raspberry Pi. Awesome! This guide will show you how to set up a brand

RetroPie scrapers: what they are and how to use them
You’ve put so much work into setting up RetroPie or EmulationStation. You load it up

Power Your Raspberry Pi Zero with a Battery Using the JuiceBox Zero
The Raspberry Pi Zero is an incredible tool for building a wide variety of IoT devices. And until la
How do I connect my Raspberry Pi to my computer?
There are many reasons you may want to connect your Raspberry Pi to your computer, and there are a f

How to Set Up Homebridge on a Raspberry Pi
Home automation is growing in popularity, but one of the biggest hurdles is compatibility betwe

Build Your Own Raspberry Pi Car Computer, or “Carputer”, with AutoPi
Have you ever wanted to add an entertainment system to your car, only to find that most units are ex

The Best Raspberry Pi HATs for Your Next Project (2022)
There are so many cool HAT extensions for the Raspberry Pi to make your next project literally sing

How to Choose the Best Camera for OctoPrint (including USB)
OctoPrint is a platform designed for the Raspberry Pi that makes it possible to monitor and control
Discover interesting things!
Explore Howchoo's most popular interests.
How to Setup a Raspberry Pi Static IP Address
In this tutorial, we will show you how to configure your Raspberry Pi to utilize a static IP address.

We will force the Pi to use a static IP by modifying the Raspberry Pi’s DHCP client daemon or using the network tools. The network software controls the way the operating system handles IP addresses.
By modifying the DHCPCD config file, we can tell the software the local IP address to use when connecting to a network. In modern Raspberry Pi OS versions, we will need to use network tools instead of editing the DHCPCD file.
In addition to defining the static IP address on your Raspberry Pi, we recommend that you also set it on your router. Setting it on the router helps ensure that your router doesn’t assign the IP address to a different device before your Raspberry Pi connects.
You can also change the MAC address of the Raspberry Pi . This change can be handy in a variety of scenarios.
In this tutorial, we use the Raspberry Pi operating system. You may or may not be able to set a static IP on other operating systems using these instructions.
As of Raspberry Pi OS Bookworm, you are unable to use the DHCP method and will need to set a static IP using the network manager instead. So, if you are using Bookworm, follow our network manager section otherwise follow the DHCP section .
Equipment List
Here is a list of all the pieces of equipment that I made use of for this Raspberry Pi Static IP address tutorial.
Recommended
- Raspberry Pi ( Amazon | SunFounder )
- Micro SD Card ( Amazon | SunFounder )
- Power Supply ( Amazon | SunFounder )
- Ethernet Cable ( Amazon ) or Wi-Fi ( Amazon | SunFounder )
- HDMI Cable ( Amazon | SunFounder )
- Monitor ( Amazon | SunFounder )
- USB Keyboard ( Amazon | SunFounder )
- USB Mouse ( Amazon | SunFounder )
- Raspberry Pi Case ( Amazon | SunFounder )
Retrieving the Router IP Address
1. Before we begin setting up a static IP address on our Raspberry Pi, we will first need to retrieve some information about our current network setup.
Let’s first retrieve the currently defined router for your network by running the following command.
Using this command, you should get a result similar to the one we have below.
Make a note of the first IP mentioned in this string.
For example, the IP that we will make a note of from this command is 192.168.0.1 . This IP address is the current router address.
You may also want to get the current DNS server, which you can do by following the next section. Otherwise, move on to using network tools for Raspberry Pi OS Bookworm or DHCP for old versions of the OS.
Retrieving the Current DNS Server
1. Let us retrieve the current DNS server.
We can do this by opening the resolv.conf configuration file by running the following command.
Below is the output that you should see from the above command.
Make a note of the IP next to nameserver .
Exit the nano editor by pressing CTRL + X .
You should now have the router IP and the nameserver IP. You can now move to network tools for Raspberry Pi OS Bookworm or DHCP for old versions of the OS.
Static IP Address Using the Network Manager CLI
This section will go through the steps of setting a static IP address on your Raspberry Pi if you are running the latest version of Raspberry Pi OS. If you have an older version of the OS, please use the old DHCP method .
1. To begin, you will need to retrieve the router IP address and the current DNS server IP address if you haven’t already done so.
2. You can use either nmcli or nmtui to access the network manager tools on your Raspberry Pi. We will use nmtui as it offers a text-based GUI that is a bit easier to understand and navigate than the nmcli (Command Line) version.
Enter the following command to bring up the network tools in your terminal.
3. On the first screen, you will be greeted with three options. Select edit a connection.

4. On this page, you will see all your possible network connections.
Navigate to the one that you wish to have the static IP. In our case, it is HOME_LINK , which is a Wi-Fi connection.

5. You will now see a range of information about the connection you selected. To set a static IP address, you will want to navigate to <Automatic> next to IPv4 CONFIGURATION and change this to <Manual> .

Now navigate across to <SHOW> and press enter .
You should see a range of fields that you need to fill out. We will cover each of these fields in the next step.

6. You will need to fill in the following fields with the relevant information.
Addresses (1): Enter the IP address you want to assign to your Raspberry Pi. Ensure this is not an IP that could be easily attached to another device on your network.
Gateway (2): Enter the router IP address you retrieved earlier in this tutorial.
DNS Servers (3): Enter the IP of the domain nameserver you want to utilize. This address is the nameserver IP you wrote down from earlier in this tutorial. Alternatively, you can use a third-party one such as Google’s “ 8.8.8.8 ” or Cloudflare’s “ 1.1.1.1 “.

7. Navigate down the edit connection and select <OK> .

8. Now select the <BACK> option.

9. On the last page, you will want to select Quit .

10. For our changes to take effect, you will need to restart the network manager. Luckily, this is as simple as running the following command.
You will lose the network connection for a few seconds, but the connection should recover.
11. You can now proceed to testing the static IP address .
Static IP Address using DHCP
If you use Raspberry Pi OS 12, please follow the network manager section .
1. To begin, we will need to first retrieve the router IP address and the current DNS IP address .
2. Now that we have retrieved both our current “ router ” IP and the nameserver IP, we can proceed to modify the “ dhcpcd.conf ” configuration file by running the command below.
This config file allows us to modify the way the Raspberry Pi handles the network.
3. Within this file, enter the following lines.
First, you have to decide if you want to set the static IP for your “ eth0 ” (Ethernet) connector or your “ wlan0 ” (Wi-Fi) connection. Decide which one you want and replace “ <NETWORK> ” with it.
Ensure you replace “ <STATICIP> ” with the IP address that you want to assign to your Raspberry Pi. Make sure this is not an IP that could be easily attached to another device on your network.
Replace “ <ROUTERIP> ” with the IP address that you retrieved earlier in this tutorial
Finally, replace “ <DNSIP> ” with the IP of the domain nameserver you want to utilize. This address is either the IP you got earlier in this tutorial or another such as Google’s “ 8.8.8.8 ” or Cloudflare’s “ 1.1.1.1 “.
Now save the file by pressing CTRL + X , then Y , followed by ENTER .
4. Now that we have modified our Raspberry Pi’s DHCP configuration file to utilize a static IP address, we need to go ahead and restart the Raspberry Pi.
Restarting the Raspberry Pi will allow our configuration changes to be loaded in and the old ones flushed out.
Upon rebooting, the Raspberry Pi will attempt to connect to the router using the static IP address we defined in our “ dhcpd.conf ” file.
Run the following command to restart your Raspberry Pi.
Testing the Static IP
1. Once your Raspberry Pi has rebooted, you should be able to connect using the IP address you specified.
If you are connecting locally and want to verify that the static IP address is set correctly, you can run the hostname command .
From this command, you should now be able to see your new static IP address. If it is the IP you expected, you have successfully set up a static IP address on your Raspberry Pi.
Using a static IP will come in handy when you need to remember the IP, such as when using FTP or setting it up to act as a NAS .
I hope this Raspberry Pi static IP tutorial has helped you achieve your task. If you have any feedback on this tutorial, please don’t hesitate to leave a comment.
Receive our Raspberry Pi projects, coding tutorials, Linux guides and more!
Thank you for subscribing

26 Comments
Hi – I have a raspberry pi4 with a recent (may 2024) install of debian and all updates. I have used the raspberry pi installer to do this. However, when I follow the nmtui method, it will not take due to permissions. But i created the install with my credentials on the setup function for the card and it will not work. Anyway to get around this? I want to use the the Pi for piHole
Try using sudo with the nmtui method, this should avoid any permission errors. sudo nmtui
I don’t think this is how to change DHCP reservation anymore.
I’ve now tried it on 2 different Pi’s (4B and 5) on two types of OS and this never works as dhcpcd.conf is always empty.
I’ve seen another way using mtui command
Thank you for pointing this issue out. We have updated the tutorial so that it covers using the nmtui (Network Manager) to set a static IP. Please let us know if you have any issues!
Hi, thank you for this tutorial. Can I set up two different Static IPs at the same time. One to access via wlan0 and one via eth0? or would that create a conflict?
I can’t see how this will a problem if each interface has a unique static IP address.
Step #3 does not work for me? I don’t get a file with the list of items that i need to changes in step #4.
Is the file completely empty? If so, what operating system are you running on your Raspberry Pi?
If it’s not empty then that should be correct, you will be adding lines to the bottom of this file rather than changing ones inside it.
Cheers, Emmet
Excellent tutorial, simple and accurate. Thankyou.
Chalk me up also to a BIG Thanks! Very nicely done and very easy to follow along! No more IP changes to the Pi now at random intervals!
Thanks for your work in providing this and other tutorials. It is greatly appreciated!
thank you really much, i needed to check 3 tutorials and yours finally say that it should be “wlan0” and not “wlan” like by other tutorials
I have a R Pi 4 with 8G ram and loaded with 64 bit OS. I have just run these steps and it still works great with 64 bit.
A lot has changed recently on Rasbian OS & Buster. This is no longer the way to configure the network, but I don’t understand the new way yet!
These steps should continue to function with Raspberry Pi OS (Raspbian) Buster.
There has been no major changes in the way OS handles its DHCP client.
I did this on the new raspberry pi os (raspberry pi 4 4gb ram) and it worked perfectly fine
Thank you very much for this easy to understand tutorial! The vertical bar was some search for my azerty windows keyboard (on the pi) lol. For anyone interested you have to hold down “altgr” and press the “& 1” key.
Great guide, easy to follow and fixed my issue. Thanks!
Great tutorial, worked immediately! Thanks
hello, How can i get back to DHCP.
Remove the lines we added in step 4 from the dhcpcd.conf file, and reboot. That should revert you back to your original settings.
At step Nr 2 for the command ‘sudo nano /etc/resolv.conf’ I get: # Generated by resolvconf nameserver 104.145.255.226 nameserver 104.145.255.227 I did not get “domain home” as the first line (after # Generated…) Which IP address to use? Or does it matter? Can you explain why two IP addresses? –Thank you and regards, Larry
All you need is the two IP’s mentioned next to nameserver. There is two defined as one is used as a fallback if the first fails.
In Step 7 when replacing you are able to add multiple IP’s as long as they are seperated by a space. So for your case you would end up with.
Something I have to do all the time and never remember. Thanks for the easy to follow tutorial!
I noticed quite a few different angels of the same Pi case on here. Could you tell me where to get that case?
That is the Raspberry Pi 3 case from KKSB cases . They’re pretty cool designs, and their new Pi 4 case is nice as well.
Leave a Reply Cancel reply
Your email address will not be published. Required fields are marked *
- PHOENIXNAP HOME
- Colocation Overview
- Data Center as a Service Solutions for Digital Transformation
- Hardware as a Service Flexible Hardware Leasing
- Meet-Me Room The Interconnectivity Hub
- Schedule a Tour Guided Virtual Data Center Tour
- Data Center Locations Global Data Center Footprint
- Platform Overview
- Rancher Deployment One-Click Kubernetes Deployment
- Intel Xeon E-2300 Entry-Level Servers
- 4th Gen Intel Xeon Scalable CPUs Boost Data-Intensive Workloads
- Alliances Technology Partnerships
- Object Storage S3-Compatible Storage Solution
- Dedicated Servers Overview
- FlexServers Vertical CPU Scaling
- Intel Xeon-E Servers Intel Xeon 2200 Microarchitecture
- GPU Servers Servers with NVIDIA Tesla GPUs
- Dedicated Servers vs. BMC Compare Popular Platforms
- Promotions See Available Discounts
- Buy Now See All Servers
- Managed Private Cloud (MPC) Highly Customizable Cloud
- Data Security Cloud Secure-By-Design Cloud
- Hybrid Cloud Multi-Platform Environment
- Edge Computing Globally Distributed Servers
- Object Storage S3 API Compatible Storage Service
- Bare Metal Cloud API-Driven Dedicated Servers
- Alternative Cloud Provider Overcome Public Cloud Limitations
- Backup Solutions Veeam-Powered Services
- Disaster Recovery VMware, Veeam, Zerto
- Veeam Cloud Connect Backup and Replication
- Managed Backup for Microsoft 365 Veeam-Powered Service
- Data Security Cloud Secure-by-Design Cloud
- Encryption Management Platform (EMP) Cryptographic Key Management
- Confidential Computing Data-in-Use Encryption
- Ransomware Protection Data Protection and Availability
- DDoS Protection Network Security Features
- CONTACT SUPPORT
- Network Overview Global Network Footprint
- Network Locations U.S., Europe, APAC, LATAM
- Speed Test Download Speed Test
- Blog IT Tips and Tricks
- Glossary IT Terms and Definitions
- Resource Library Knowledge Resources
- Events Let's Meet!
- Newsroom Media Library
- Developers Development Resources Portal
- APIs Access Our Public APIs
- GitHub Public Code Repositories
- Search for:
How to Set Up Static IP Address for Raspberry Pi
Home » Networking » How to Set Up Static IP Address for Raspberry Pi
Introduction
Setting up a static IP address on Raspberry Pi facilitates access and management (e.g., over SSH ) by ensuring the device's private IP address does not change. Since most networks use DHCP to dynamically assign IP addresses to clients, setting up a static IP on Raspberry Pi is necessary to avoid access issues.
This tutorial shows you how to set up a static IP address on Raspberry Pi.

Setting Up Static IP for Raspberry Pi
Raspberry Pi runs the Debian-based Raspberry Pi OS, so the network configuration options are similar to those in other Debian-based Linux distributions .
Follow the steps below to collect the necessary information about the network and configure a static IP address on a Raspberry Pi system.
Step 1: Obtain Current IP Address
Using the system's current private IP address as a new static IP is the easiest way to prevent conflicts with other network devices. To find out the current IP address of the Raspberry Pi system, use the hostname command with the -I option.
Write down the IP address displayed in the command output.

Note : Skip this step if you want to use another private IP address.
Step 2: Identify Default Network Interface
Computers can have multiple network interfaces active at the same time. To properly configure a static IP address, you must identify the default interface .
1. Use the ip command to find out the IP address of the default interface.
The output displays the router's address.

2. To obtain the name of the network interface, use the following command:
The command uses grep regex to extract the interface name from the larger output.

Step 3: Obtain DNS Address
The last necessary piece of information is the router's Domain Name System (DNS ) address. Find it in the resolv.conf file located in the / etc directory .
Open the file in a text editor, such as Nano :
Look for the line that starts with the word nameserver and write down the DNS IP address.

Step 4: Edit Network Settings
Once you have all the necessary information, set up a static private IP address on your Raspberry Pi by employing one of the two methods described below.
Set up Static IP Address via CLI
The command-line interface method for static IP setup involves editing the DHCP configuration file.
1. Open the dhcpcd.conf file in a text editor .
2. Scroll to the bottom of the file and add the lines below with the information you obtained in the previous steps of this tutorial.
The screenshot below shows an example configuration.

Save the file and exit.
3. Reboot Raspberry Pi by typing:
Set up Static IP Address via GUI
You can also set the static private IP address for your system through the Raspberry Pi OS GUI. The steps below demonstrate the GUI procedure.
1. Right-click the network adapter icon on the right side of the top panel.
2. Select the Wireless & Wired Network Settings item to open Network Preferences .

3. Select the default network interface in the drop-down menu.
4. Type in the desired static IP address in the IPv4 Address field. Follow the address with the CIDR suffix.
5. Enter the router's IP address in the Router field.
6. Type the DNS address in the DNS Servers section.
7. Select Apply .

8. Reboot the system.
Testing the Static IP
After the system boots up, test the configuration by executing the hostname command.
Check if the IP address in the output is the address you configured as the static IP.

Note: Refer to our article on how to monitor network traffic on Raspberry Pi that features two different methods.
The article provided the command-line and GUI methods for IP configuration on the Raspberry Pi operating system. After you complete the tutorial, your Raspberry Pi system will be configured to use a static IP address for communication with the rest of the network.

Home » Linux » Raspberry Pi » Raspberry Pi Static Ip

Setting a Static IP Address on a Raspberry Pi [With Screenshots]
If you followed our article on how to SSH to your Raspberry Pi so that you can control it over a network, you might be tired of having to run the commands to find out what its current IP address is on your network.
Most networks assign IP addresses dynamically , which means each device on the network is assigned an IP address from a pool of available IP addresses. The address for a specific device may change over time if it is rebooted or the address is automatically reassigned for some reason. This is called DHCP – Dynamic Host Configuration Protocol .
Giving your Raspberry Pi a static IP address on your network means that it will always have the same address for you to connect to.
This article assumes you are running Raspberry Pi OS.
Step 1 – SSH to Your Raspberry Pi (or Attach a Screen & Keyboard)
If you don’t have a screen and keyboard attached to your Raspberry Pi, you will need to SSH to get things set up.
It’s highly recommended that you set a static IP address using a screen and keyboard just in case you make a mistake – you may not be able to reconnect if the network configuration isn’t valid.
Step 2 – Find Out Which Interface is Connected
The ip command can tell us all we need to know about the current state of the network on your Raspberry Pi.
Run the following in your terminal to see what interfaces are connected:
Which will output something that looks like this:

Here you can see the connected network interfaces . Each entry in the above output represents an interface – each entry taking the format
The interface named lo is the LOOPBACK interface, used for the computer to communicate with itself. It’ll always be there on most systems.
Below is the only other connected network interface wlan0 , the wireless network connection on this Raspberry Pi. We can tell it is connected as it says UP in the block of information next to it!
If the wired ethernet connection were connected rather than the wireless, you’d see eth0 instead of wlan0 . It’s possible but unlikely on a default installation of Raspberry Pi OS that your network interfaces will have different names than those shown here.
Step 3 – Finding your Network and Gateway
You will probably want to assign your Raspberry Pi an IP address on the network it’s already connected to. To do so, we will need to know what network addresses we should use to talk to other devices already there.
Finding the Network
This current IP address assigned to your Raspberry Pi is visible in the previous step’s output.
The IP address following inet will tell you the current IP. Yours will be different but will be for a local IP address range.
To find out more about IP addresses, check out our article on IP Addresses and Subnets.
Finding the Gateway
For your Raspberry Pi to talk to the outside world, it will also need to know the address of your gateway – your internet modem/router. Run the following to do so:
This will output the current network routes configured on your system:

We are interested in the default route on the first line. This tells us that by default, traffic is routed via 192.167.1.254 – now we know the gateway’s address.
Finding Your DNS Servers
You will also need to know what DNS servers you are currently using (if any) if you wish to access the internet. These can be found by running:
Which will output the contents of the resolv.conf file as generated by your system.

Here you can see the default nameserver assigned is your router – 192.168.1.254 .
Step 4 – Finding an Available IP Address
This step is dependent on the brand and configuration of the router you have.
When DHCP assigns an IP address automatically, your router will choose one from a range of IP addresses defined in its configuration. We should not assign the Raspberry Pi a static address that falls into that range, as otherwise, it may conflict if another device receives that address automatically.
You’ll have to check your router configuration or user manual to find out what this range is so that you can make sure you avoid using an address from it.
Step 5 – Assigning the IP Address to the Connected Interface
My network has a DHCP range of 192.168.100 to 192.168.200, from which addresses will be automatically assigned, so I will assign my Raspberry Pi the address:
This is to make sure that it doesn’t conflict with an existing IP (or the router’s IP address, which is 192.168.1.254).
Assigning a Static IP Address Temporarily
To assign a static IP address until the next reboot, just run:
Replacing 192.168.1.201 with the IP address you wish to assign and wlan0 with the interface’s name to assign it to.
To find out more about IP addresses and the format they are displayed above, check out our article on IP Addresses and Subnets.
Assigning a Static IP Address Permanently
The network configuration will need to be edited to assign an address permanently. Edit the relevant configuration file by running:
The configuration file(s) which you will need to edit will differ depending on your Linux distribution – this method is tested on Raspberry Pi OS in its default state
Add the following lines to the end of the file:
- Lines beginning with # are comments and are not read as configuration entries
- interface is the name of the connected interface and tells the configuration that the configuration lines following it will be applied to that interface – for this example, it is wlan0
- static ip_address is the static IP address you wish to assign to this interface – 192.168.1.201 in this case
- static routers is the IP address of the gateway/router on your network. 192.168.1.254 is the IP address of the router for this example.
- static domain_name_servers are the DNS servers we wish to use for this network. As seen above, mine is 192.168.1.254 as my router acts as the DNS server. I’ve added a second DNS server separated from the first by a single space. 8.8.8.8 is Google’s DNS server, which will act as a second/fallback DNS server.
To apply these changes, save the document by pressing CTRL + X and pressing Y to save. Then, reboot.
Your Raspberry Pi now has a Static IP!
- Setting up a LAMP Stack on Ubuntu 20.04 (And Raspberry Pi)
- TwisterOS For Raspberry Pi Does It All [Screenshots/Review]
- How to Install Ubuntu MATE 2020.10 on a Raspberry Pi (With…
- How to Install OSMC Media Center on Raspberry Pi…

1 thought on “Setting a Static IP Address on a Raspberry Pi [With Screenshots]”
I gave this a shot on ubuntu server 20.04, adapting it a bit where needed, and I just couldn’t get it to stick between restarts. Ended up using netplan with success so far.
Either way, great guide! I had fun tinkering, and I’ll back back in a few weeks when I grab a pi.
Leave a Comment Cancel reply
Save my name, email, and website in this browser for the next time I comment.
Privacy Overview

Set static IP on Raspberry Pi
Setting a static IP address for your Raspberry Pi will ensure that the device can always be accessible at the same IP address on your network, since it will never change. This is ideal for a Raspberry Pi being used to host a service such as a gaming server, web server, etc. It makes it more convenient when applying network configurations, since you know that the Raspberry Pi can always be found at the same, predictable IP address. The opposite of a static IP address would be a dynamic IP address. A dynamic IP address is handed out from the DHCP server (typically the router in most home networks), and has a tendency to change frequently. If you ever tried to check the IP address on your Raspberry Pi before, and noticed that it changes after system reboot, then you have the device configured to receive a dynamic IP address.
In this tutorial, you will see how to set a static IP address on a Raspberry Pi. This can be done via both command line and desktop GUI on the Raspberry Pi OS , without installing any extra software. Follow along with our step by step instructions below to get started.
In this tutorial you will learn:
- How to set a static IP address on Raspberry Pi via command line
- How to set a static IP address on Raspberry Pi via desktop GUI

| Category | Requirements, Conventions or Software Version Used |
|---|---|
| System | Raspberry Pi |
| Software | N/A |
| Other | Privileged access to your Linux system as root or via the command. |
| Conventions | – requires given to be executed with root privileges either directly as a root user or by use of command – requires given to be executed as a regular non-privileged user |
How to set static IP on Raspberry Pi step by step instructions
We will cover two methods below, both command line and GUI. If you are currently remotely connected to your Raspberry Pi, such as with a VNC connection or an SSH connection, then you may lose the connection to your Raspberry Pi, at least temporarily, when configuring a new IP address. Therefore we recommend being physically in front of the Raspberry Pi when carrying out this type of configuration.
Set Static IP Address via Command Line
Follow the steps below to set a static IP address on your Raspberry Pi via commmand line:
Find current IP address of Raspberry Pi:
Find the default gateway (the IP address of the router, on home networks):
Find the IP address of the DNS server:

- Next, edit the following file with root permissions. We will use nano but feel free to use a different editor of your choice: $ sudo nano /etc/dhcpcd.conf
We have used interface eth0 above. If, instead, you need to configure a static IP address for the wireless interface, then use wlan0 . We have chosen an IP address that is on the same /24 network as the router / default gateway so that the Raspberry Pi will be able to access it, and then filled out the default gateway and DNS info with the same that we retrieved earlier.
- After making your edits to the file, save changes and exit the file. Then reboot your Raspberry Pi for the changes to take effect: $ sudo reboot
- When the device reboots, you can check to make sure the changes were successful: $ hostname -I 192.168.198.20
Set Static IP Address via Desktop GUI

Closing Thoughts
In this tutorial, we saw how to set a static IP address on a Raspberry Pi system. This included a command line method and GUI desktop method, depending on whether you use your device as command line only or usually have a monitor connected. It is always a good idea to be physically next to the Raspberry Pi when configuring network settings, since a slight mishap could lead to losing connection.
Related Linux Tutorials:
- Best Linux Distro for Gaming
- Cloud Gaming with GeForce NOW on Ubuntu / Debian Linux
- Reviving Retro Games: Using Raspberry Pi for Emulation
- Decoding Raspberry Pi: Which OS to Choose?
- An Introduction to Linux Automation, Tools and Techniques
- Raspberry Pi as Minecraft Server
- Raspberry Pi Kali Linux headless setup
- Things to do after installing Ubuntu 22.04 Jammy…
- Mastering Bash Script Loops
- How to configure static IP address on Ubuntu 22.04…
- Raspberry Pi
- DIY Electronics
- Programming
Select Page
How to Set Up a Static IP on the Raspberry Pi
Posted by Scott Campbell | Raspberry Pi | 31

Have you ever tried logging in to your Raspberry Pi via SSH and were denied because the IP address couldn’t be found? Do you have to scan your network every time you connect to find your local IP address? If the IP address of your Raspberry Pi changes all the time, it’s because you’re using a dynamic IP address . If you want your Pi to have an IP address that doesn’t change automatically, assign it a static IP address . With a static IP, you can be sure that the same IP will work each and every time.

In this tutorial, I’ll show you how to configure a static IP address using a clean installation of Raspbian Jessie and Raspbian Jessie Lite. There are pros and cons to each type of IP though, so let’s first talk about why you would want a static IP over a dynamic IP.
Static IP vs. Dynamic IP
Dynamic IP’s are good to use if you’re concerned about security. If a hacker gets access to your IP address, you’ll be less vulnerable to attack since your IP changes frequently. A dynamic IP can change every time you log in, or only at certain intervals. A program installed on your network router called the dynamic host configuration protocol (DHCP), automatically changes and assigns new dynamic IP addresses to computers on your network.
A static IP (as you could probably tell by the name) is one that doesn’t change. This makes it more reliable when using services that depend on a stable internet connection, like online gaming, VOIP, or remote desktop applications. With a static IP, you’ll be able to use the same IP address every time you connect to your Pi.
Setting up a Static IP on the Raspberry Pi
Before starting, make sure you’ve already set up and configured a way to access the command prompt. Check out our tutorials How to Set Up WiFi on the Raspberry Pi and How to Set Up a Raspberry Pi Without a Monitor or Keyboard to see how to do that if you haven’t already.
In this tutorial we’ll set up static IP’s for both WiFi and ethernet connections. If you only need one or the other, just omit the code below for the connection you don’t need.
Find Out Your Network Information
The first step is to find out your default gateway IP . This is the local IP address of your network router. The computers on your network use it to communicate with the router and access the internet. If you already know what it is, just skip this step. If not, do continue…
Power up and log into your Raspberry Pi via WiFi or ethernet, then enter route -ne at the command prompt to see your network routing information:

Under the “Gateway” column, you can see your default gateway IP (10.0.0.1 in my case). The “Iface” column lists the names for each connection – ethernet (eth0) and WiFi (wlan0). Write down your default gateway IP, we’ll need it in a minute.
Now we need to find out the IP addresses of your domain name servers. Your Pi sends the domain names you enter into your browser (i.e. www.google.com) to domain name servers, which convert the domain names to IP addresses (i.e. 8.8.8.8). Your Pi then uses the IP address to access the website’s server.
Enter cat /etc/resolv.conf at the command prompt to find the list of domain name servers:

Copy these IP addresses to a text editor on your PC or write them down for later.
Configure the Network Settings
Now we’re ready to configure the network settings. By default the Pi is configured with a dynamic IP address. To assign it a static IP address, you need to add your static IP, default gateway IP, and domain name servers to the dhcpcd.conf file.
At the command prompt, enter sudo nano /etc/dhcpcd.conf to edit the dhcpcd.conf file:

Now, without changing anything else in the file, add this code at the bottom of the dhcpcd.conf file, replacing the IP addresses with your own IP addresses found above:
- static ip_address : This is the static IP address you’ll use to SSH or remotely connect to your Pi. Take your default gateway IP (found in the steps above), and change the last number to any other number between 0 and 255.
- static routers : This is your default gateway IP address.
- static domain_name_servers : These are the IP’s we found in the resolv.conf file above. Separate each IP with a single space.
For example, my default gateway IP address is 10.0.0.1. To get the static ip_address for my ethernet connection (eth0), I replaced the 1 with 100 to get 10.0.0.100. To get the static ip_address for my WiFi connection (wlan0), I replaced the 1 with 99 to get 10.0.0.99. I’ll use these IPs to log in to my Pi from now on.
The file should look like this (with your own IP addresses):

Once you’ve replaced the IP addresses in the example code with your own IP addresses, press Ctrl-X and Y to exit and save the dhcpcd.conf file. Now enter sudo reboot to reboot the Pi. Log in with your new static ethernet IP or static WiFi IP:

To check that everything is working correctly and the Pi has access to the internet, let’s ping Google. Enter sudo ping www.google.com at the command prompt:

Press Ctrl-C to stop the pinging. If the connection is successful, you’ll see the packets that have been sent and received. If your connection isn’t successful, you will get a “Network is unreachable” error:

You should probably test the connection by pinging Google with both ethernet and WiFi static IP’s.
You can watch me set this up step by step in this video:
Now that you have a static IP set up, your Pi’s connection to the internet will be a lot more reliable. But another really useful way to connect to your Pi is with a direct ethernet connection to your laptop or desktop. A direct connection is extremely fast and stable. If you connect to your Pi via SSH a lot, I would definitely recommend setting this up. Check out our article, How to Connect to a Raspberry Pi Directly with an Ethernet Cable to learn how.
Thanks for reading! Let me know in the comments if you have any questions about setting up your static IP, and I’ll do my best to help. And be sure to subscribe! We send out a quick email each time we publish new articles.

Related Posts

How To Detect Keyboard and Mouse Inputs With a Raspberry Pi
November 19, 2020

How to Control an Arduino from a Raspberry Pi
December 17, 2020

Introduction to the Raspberry Pi
November 11, 2021

How to Access the Raspberry Pi Desktop with a Remote Desktop Connection
January 29, 2015
31 Comments
Great article. Just a few weeks too late for me as I finally figured it out…
It can be as simple. Lots of articles about fixed ip on the web, read at least 10 of them. All of them wrong or at least outdated (no jessie). Yours worked in no time. Mni thanks for that!
Thanks a Lot on How to setup static ip address, I looked few web site and most had wrong information.
Thank you, many “so called current” info on this on the web but all seem outdated, this is 100% correct. Thank you again.
works fine in setting static address but when trying to ping Google I get “unknown host http://www.google.com ” If I comment out the added lines the ping works fine I use TightVNC to connect to the PI – router address is 192.168.1.1
@JarJarGeek Very nice guide, I would use this for server, but for general Pi;s I find avahi-deamon more flexible.
When i type in the cat for either files or even sudo nano it either says that te file or directory doesn’t exist or the document comes up blank (implying that it doesn’t exist).
i am using a raspberry pi 3 and am using the latest raspbian os as of may 15th 2016.
please help that way i don’t end up having to set my pi up every time i want to use it.
nevermind. got it working.
had to share this on my @RebelMouse. Thank you! https://t.co/6mLwym7uQO
When I tried this it fails to connect. I think the problem is in the static router address. As per your instructions I came up with 0.0.0.0…
pi@VIDraspberrypi:~ $ route -ne Kernel IP routing table Destination Gateway Genmask Flags MSS Window irtt Iface 0.0.0.0 192.168.1.1 0.0.0.0 UG 0 0 0 wlan0 169.254.0.0 0.0.0.0 255.255.0.0 U 0 0 0 eth0 192.168.1.0 0.0.0.0 255.255.255.0 U 0 0 0 wlan0
Oops… rebooted a second time and now ALL works! THANK YOU FOR WRITING (AND VIDEO RECORDING) SIMPLE, CONCISE AND UP TO DATE INSTRUCTIONS!!!!!!!!!!!
will this allow graphics from a python program running on pi like pygame? or is the screen functionality merely a window into the terminal?
How will you ensure that the DHCP won’t assign this address to another device?. If my understanding is correct the DHCP does not know about this static IP and can therefore assign it to something else. If this happens there will be an IP conflict. is there anyway out of this ?
Most dhcp servers will try to ping address before assigning it to a client. But if your static IP device is switched off, the address still may be used by dhcp, and conflict will happen when you switch it on.To avoid this, you have to exclude address from your dhcp server’s address distribution range. Or you can make a reservation for that address in dhcp. In some cases reservation is even an alternative to static IP.
How can I set network mask to? Because this way it gives me mask of 255.0.0.0 which is not correct in my case, Also I need to set additional classless route for 10.10.0.0/16 via another gateway.
In fact I don’t need static address. If I do, I’d rater prefer to setup a dhcp reservation. I came to your article finding solution to a problem I have: My raspbian jessie / pi3B does not get default gateway from DHCP. It receives normaly everything else – IP address, default domain, dns and ntp servers, additional classless routes but not default gateway! What can be wrong? The DHCP server is Windows 2012 R2, if that does mater.
With Raspian Jessie (2016/09/23) a need to add “routers” and “domain_name_servers” BOTH under eth0 and wlan0:
interface eth0 static ip_address=192.168.x.x/24 static routers=192.168.x.x static domain_name_servers=x.x.x.x
interface wlan0 static ip_address=192.168.x.x/24 static routers=192.168.x.x static domain_name_servers=x.x.x.x
Thanks for the update! I’ll add this to the post.
i share with you a video on youtube how to configure your ip from dhcp to static. https://www.youtube.com/watch?v=3uixbMXZeNs&t=4s
When i run “sudo ifdown wlan0, sudo ifup wlan0” i get “ifdown: interface wlan0, not configured”. what is the fix for this ?
Amazing! Its truly amazing article, I have got much clear idea concerning from this piece of writing.
wicd-curses
Hi, we have the products of raspberry pi and arduino components, and very interest in working with you.
How do i make it so the ip is the same on any network?? Working on a project and need a way to ping the pi on any network it goes to.
Great article, thank you so much for explaining each of the lines in the dhcpcd.conf file. so many articles tell you to “just add this” without explaining what it means and why. Led to me following several and losing SSH access to the pi until I reverted it.
Doesn’t get much easier that that. Thanks.
Thanks, confirming this worked for me using Raspbian Buster in January 2019
Thank you so much, this helped me a lot. May 2020
I have set static IP in Pi and check by ping and it is working fine but when I enter static IP in putty for ssh getting network error connection time out. I have checked SSH is enabled in pi as well. Can anyone please help me why getting this error?
Worked like a charm. Thank you!
Hello Your tutorial is really helpful. But I have a problem. It seems that I have mistype my static IP address so I can’t connect with my RPi. The static ip_address should be “192.168.1.xxx” but I typed it “192.168.201.xxx” Is there any way I could fix it? Thank you
I am having a strange issue where my resolve.conf file keeps resetting upon reboot or shutdown and I have to do the setup again!!! The requirement for the static IP is because I am running my own VPN server with OpenVPN and the client I am using on the other end for connecting is Orbot for PC. I don't want to start from scratch hence the reset is not a choice. I did try changing the user and also chmod to 775 giving full permissions or locking it down, without much luck. Any guidance is appreciated.
Leave a reply Cancel reply
Your email address will not be published. Required fields are marked *
Save my name, email, and website in this browser for the next time I comment.
Notify me of follow-up comments by email.
Notify me of new posts by email.
For security, use of Google's reCAPTCHA service is required which is subject to the Google Privacy Policy and Terms of Use .
I agree to these terms (required).
Get new tutorials sent to your inbox!

Quick Start Guide for Setting Up a Static IP on the Raspberry Pi
Enter your name and email and I'll send it to your inbox:
Consent to store personal information: I agree to let Circuit Basics store my personal information so they can email me the file I requested, and agree to the Privacy Policy
Email me new tutorials and (very) occasional promotional stuff: Yes No
Check your email to get the PDF!
- Helldivers 2
- Dragon’s Dogma 2
- Wuthering Waves
- Genshin Impact
- Counter Strike 2
- Honkai Star Rail
- Lego Fortnite
- Stardew Valley
- NYT Strands
- NYT Connections
- Apple Watch
- Crunchyroll
- Prime Video
- Jujutsu Kaisen
- Demon Slayer
- Chainsaw Man
- Solo Leveling
- Beebom Gadgets
How to Set a Static IP Address on Raspberry Pi
Set a Static IP Address on Raspberry Pi
Set a static ip address using raspberry pi’s terminal.

3. After that, execute the below command to open the dhcpcd.conf file via Nano editor. Keep in mind that Nano is a keyboard-based editor , so you can’t use your mouse to move between lines and edit the file.

8. That’s it. You have assigned a static IP address to your Raspberry Pi in a few easy steps. Now, your router will only use the static IP address you have set for your Raspberry Pi.
Using the Router Settings to Set Static IP on Raspberry Pi

4. Click on “Add” and enter the IP address of Raspberry Pi in the “Reserved IP Address” field. You can find the IP address of your RPi board by entering hostname -I in the Terminal. To find the MAC address of your RPi , scroll down and look for the client list mentioned on the same admin page. Next, give a name in the “Description” field and turn on the “Enable This Entry” checkbox. Finally, click on “Save”. It will reserve Raspberry Pi’s current IP address, making it a static IP.

Assign a Static IP Address to Raspberry Pi in a Few Easy Steps!

Passionate about Windows, ChromeOS, Android, security and privacy issues. Have a penchant to solve everyday computing problems.
WTF… This is all WIFI! What if I have my RPi connected to my router via a 1000MHz ethernet cable? You shd be more general, and not assume everyone connects thru ther wifi.
Add new comment

Stack Exchange Network
Stack Exchange network consists of 183 Q&A communities including Stack Overflow , the largest, most trusted online community for developers to learn, share their knowledge, and build their careers.
Q&A for work
Connect and share knowledge within a single location that is structured and easy to search.
How do I set up networking/WiFi/static IP address on Raspbian/Raspberry Pi OS?
I have followed (any one of hundreds) tutorial, and it does not work.
How do I set up networking/WiFi/static IP address on the Raspberry Pi?
After the Foundation introduced the dhcpcd networking system to Raspbian in May 2015 there were hundreds of questions (partly because the Foundation didn't produce any documentation). After answering dozens of questions I decided to produce a canonical answer. This proved to be more difficult than anticipated - especially as the implementation keeps changing - hopefully I have continued to keep it up-to-date.
(Originally I referred to this as a Dorothy Dixer , but this is apparently an Australian idiom.)
- raspbian-buster
- raspberry-pi-os
- raspberry-pi-os-bullseye
- 2 FYI: You are probably aware of this, but ICYI the RPi PTB have decided to dump dhcpcd in favor of NetworkManager – Seamus Commented Sep 14, 2022 at 0:58
7 Answers 7
Raspberry pi os bookworm uses network manager by default so this answer is no longer current..
This tutorial describes how to setup networking using the default network manager dhcpcd included in Raspbian since 2015-05-05 and Raspberry Pi OS . It applies to the Foundation releases of Raspberry Pi OS -Bullseye , Raspberry Pi OS -Buster , Raspbian Buster , Raspbian Stretch , Raspbian Jessie and the last Raspbian Wheezy . Bullseye & Buster settings are identical to Stretch.
How to setup Raspbian Networking
If you are using an Ethernet connection with a router there should be no configuration required and it should work out of the box. The Pi3B+ and Pi4 have Gigabit Ethernet interfaces and will only work on a Gigabit Ethernet (1000BASE-T) router if a 8 wire CAT 5E cable is used. Earlier Pi models which only supported 100BASE-T work over 6 wire cable.
NOTE The Pi3/Pi Zero W inbuilt WiFi does not support 5GHz networks, and may not connect to Ch 12,13 on 2.4GHz networks until wireless regulatory domain is set.
WiFi on 5GHz enabled devices is disabled until wireless regulatory domain is set (Pi4B, Pi3B+, Pi3A+)
The domain can be set through Raspberry Pi Configuration (rc_gui), raspi-config or by setting country= to an appropriate ISO 3166 alpha2 country code in /etc/wpa_supplicant/wpa_supplicant.conf .
If you use the latest Raspberry Pi Imager there are advanced options, invoked by the magic key sequence: Ctrl-Shift-X . These enable you to set many initial options; hostname, username, password, ssh, WiFi Country Code etc during imaging. This should enable you to setup a headless system, without the need to edit any files.
If you are using WiFi and the GUI set up by following Using the Desktop
If you are using WiFi from the Command Line set up by following Using the Command Line This is the only way to set up a network which does not broadcast SSID .
This can also be used to setup a 'Headless' system e.g. using a serial console cable, but it MUCH easier if you can borrow a monitor and keyboard for setup. See below for another possible method using an Ethernet cable to a PC.
For most users READ NO FURTHER
The following are advanced options, headless raspbian wifi setup.
Raspbian , since May 2016, checks the contents of the boot directory for a file called wpa_supplicant.conf , and will copy the file into /etc/wpa_supplicant , replacing any existing wpa_supplicant.conf file that may be there. The file in the boot directory is then removed. This can be used to enable headless setup, using the wpa_supplicant.conf settings detailed below or Setting up a Raspberry Pi headless (You will probably want to enable ssh as well.)
NOTE the links to raspberrypi.org suggest using ifconfig - this is deprecated use ip a; ip r instead.
NOTE If you use the latest Raspberry Pi Imager the advanced options Ctrl-Shift-X make the above unnecessary.
What is my IP Address?
If you just want to know the IP Address your Pi is using enter hostname -I on the command line.
As of the November 2016 release, Raspbian has the SSH server disabled by default. You will have to enable it manually.
Enter sudo raspi-config in the terminal, first select advanced options , then navigate to ssh , press Enter and select Enable or disable ssh server.
For headless setup, SSH can be enabled by placing a file named 'ssh', without any extension, onto the boot partition of the SD card.
Networking Files
If you are running a recent Raspbian /etc/network/interfaces should be as below. If you have changed it PUT IT BACK. (Or on Stretch just delete it - it effectively does NOTHING.)
The file /etc/wpa_supplicant/wpa_supplicant.conf will be created/modified by the recommended setup methods, but can be setup by hand. Recent Raspbian have an option in raspi-config to enter SSID and Password. It should contain something like the following:-
If you need to connect to a private network (i.e. no broadcast SSID ) include the line scan_ssid=1 inside network={⋯} .
NOTE If you want to connect to different networks (e.g. at work or home) you can include multiple network={⋯} entries.
If you have access to multiple networks and want to connect to a specific network, include the line priority=100 inside the network={⋯} entry. You can select a different priority for each network, the highest priority accessible network will be selected; the default is 0.
There are many other options which can be used see man wpa_supplicant.conf .
Notes on obsolete Operating Systems
Jessie does not include the 10-wpa_supplicant hook to manage WiFi interfaces, so links to wpa_supplicant are needed. These settings are incompatible with Predictable Network Interface Names.
The /etc/network/interfaces used by Jessie should be:-
NOTE calling dhcp in /etc/network/interfaces will disable dhcpcd .
Predictable Network Interface Names
Stretch introduced 1 predictable network interface names which have been used in other distributions for some time.
Network interfaces will have names formed from a prefix en — Ethernet or wl — wlan followed by x indicating MAC and the MAC e.g. enxb827eb123456 or wlx00c140123456 . The onboard WiFi of the Pi4, Pi3 and PIZeroW which is connected over sdio will however use the name wlan0
This can be beneficial to those using multiple network interfaces, however for most Pi users, with a single Ethernet and WiFi interface will make little difference. The previous names eth0 and wlan0 can be restored if you pass net.ifnames=0 on the kernel command line in /boot/cmdline.txt .
There is an option in raspi-config to enable predictable network interface names.
1. For some incomprehensible reason the Foundation decided to "Disable predictable network interface names for Ethernet devices" only 3 weeks after introducing the long-awaited feature. There is an option under Advanced Options of raspi-config to toggle this setting.
Setup a Static IP Address
If you want your Pi to be assigned a predictable IP Address you can either reserve one in your router OR request the DHCP server to assign one. E.g. the following will request an address on wlan0 .
request [address] Request the address in the DHCP DISCOVER message. There is no guarantee this is the address the DHCP server will actually give. If no address is given then the first address currently assigned to the interface is used.
If you request an IP Address within the range managed by the DHCP server which is available this should be honoured, otherwise the DHCP server will allocate an address as normal.
If you want an IP Address outside the range managed by the DHCP server e.g. if you have a range of addresses reserved use the inform directive.
inform address[/cidr[/broadcast_address]] This does not get a lease, just notifies the DHCP server of the address in use. You should also include the optional CIDR network number in case the address is not already configured on the interface.
If you REALLY need a static IP Address see separate answer Static IP Address
Advanced dhcpcd Configuration
Raspbian, by default, uses dhcpcd to manage network interfaces. This is automatic, and most users need do no more than specify the SSID and password for wireless networks.
It is possible to configure how dhcpcd works by entering options in /etc/dhcpcd.conf ; see man dhcpcd.conf .There is a good article on dhcpcd at https://wiki.archlinux.org/index.php/dhcpcd
The following describe some of the more common configurations:-
Fallback profile
It is possible to configure a static profile within dhcpcd and fall back to it when DHCP lease fails. This is useful particularly for headless machines, where the static profile can be used as "recovery" profile to ensure that it is always possible to connect to the machine. The static profile is setup as any other Static IP Address
Prevent dhcpcd from configuring an interface
This is often done to enable the Pi to act as an Access Point ( link removed from raspberrypi.com ) (which needs to be configured using other files), while allowing normal DHCP configuration on other interfaces.
Add denyinterfaces wlan0 to the end of the file (but above any other added interface lines).
Prevent dhcpcd from configuring a gateway on an interface
If you want an interface to not install any default routes (often used in conjunction with a static IP address) specify
Host Specific Configuration
dhcpcd can configure interfaces dependent on the host network. This uses the Address Resolution Protocol (ARP) to probe hosts based on MAC or IP address before attempting DHCP resolution.
You can speed up DHCP by disabling ARP probing if you are not using these features and have a simple network.
Use different wpa_supplicant files
It is possible to configure dhcpcd to use different wpa_supplicant.conf files for a specific wireless interface.
Create a file named wpa_supplicant-"$interface".conf in /etc/wpa_supplicant/ e.g. wpa_supplicant-wlan0.conf will only be used by wlan0
/etc/wpa_supplicant/wpa_supplicant.conf will be used for any other wireless interfaces.
Connecting a Computer to the Pi
Recent versions of Raspbian (which use dhcpcd ) allow ssh to work over a link-local address and avahi (which is a zeroconf implementation) enables programs to discover hosts running on a local network.
This means you can plug the Pi into a Computer (with an Ethernet cable) or a local network router and connect without knowing the IP address.
You can easily connect from Linux and OS X with ssh [email protected] (Prior to 2020-04-04 version of Bullseye the default username was 'pi', hostname raspberrypi . This is now set on initial boot.) This should work with popular GUI ssh programs. This is sometimes problematic with some versions of Windows and networks which use .local in a non-standard way. (See https://en.wikipedia.org/wiki/.local )
NOTE .local resolution does not always work e.g. in rsync . The following should resolve IP (and can be included in bash scripts) RemotePi=$(getent hosts hostname.local | awk '{ print $1 }')
If your system does not have getent to query the hosts e.g. macOS you can use the following:- RemotePi=$(arp -n hostname.local | awk '{x = $2; gsub(/[()]/, "", x); print x }')
If you have multiple Pi you need to make sure each Pi has a unique hostname.
You can use a crossover cable, but you don't need one (most modern interfaces automatically detect).
One drawback of direct connection is that the Pi will have no Internet access and the date will not be set. You can copy the date from the host by running ssh [email protected] sudo date -s$(date -Ins) before connection.
This tutorial is about setting up a normal Raspbian/Raspberry Pi OS installation to access the internet using the included software. It also covers connections to other computers on the same network.
It is primarily aimed at helping new users struggling to get their Pi (especially WiFi) working .
It does NOT cover:- Other Network Managers. Running advanced networking on the Pi (e.g. DHCP servers, Tunnelling, VPN, Access Point). Use of ipv6 (although if you have an ipv6 network this should work). Alternate networking setups. (There are many different ways of setting up networking.)
- 2 I got confused by the "this is NOT something you would type into the file". If I'm not mistaken, what Milliways means here is that you wouldn't replace the entire file with this bit of text. However, it's perfectly fine to add this bit at the end (modifying the parameters to your liking, of course). Also, the routers and domain_name_servers lines are optional if you don't want to set up routing through that interface. – Mark Commented Dec 4, 2015 at 18:34
- 4 So, now, to configure your ip address, you need to have the DHCP client installed and use its configuration to set a static ip?! It doesn't work if I want a DHCP server on my Raspbian! The DHCP client is run after the DHCP server launch, so the ip is not yet set, making the DHCP server (isc-dhcpd) complain. – Luc Stepniewski Commented Dec 23, 2015 at 10:31
- 24 Where is this officially documented? – Alastair McCormack Commented Jan 16, 2016 at 14:13
- 7 Where IS this documented? I mean, WTF. I have followed these directions as well as many others and cannot get connected. I can happily see and scan networks, but it will never connect or associate. I'm so cranky about this. – AaronJAnderson Commented Feb 4, 2016 at 1:09
- 4 @MikeD. See raspberrypi.org/blog/… – Milliways Commented Aug 6, 2016 at 6:34
How to setup Raspbian Networking - Preliminaries
The Pi3B+ and Pi4 have Gigabit Ethernet interfaces and will only work on a Gigabit Ethernet (1000BASE-T) router if a 8 wire CAT 5E cable is used. Earlier Pi models which only supported 100BASE-T work over 6 wire cable.
If you use the latest Raspberry Pi Imager there are advanced options, invoked by the magic key sequence: Ctrl-Shift-X . These enable you to set many initial options; hostname, password, ssh, WiFi Country Code etc during imaging.
Questions about setting Static IP Address are among the most common on this site. There are very many tutorials (many wrong, obsolete or incomplete).
If the reason you are contemplating a Static IP Address is you want your Pi to be assigned a predictable IP Address you can request the DHCP server to assign one. E.g. Adding the following to /etc/dhcpcd.conf will request an address on wlan0 and on eth0 .
Disclaimer Before proceeding I feel obliged to state that setting up a static address is NOT recommended. Telecommunications Engineers do not do this. Static IP Addresses can be the bane of a Network Administrator's life. There are situations where Static IP Addresses are necessary e.g. if you are running a DHCP server, or running on an isolated network with no DHCP server. If you want to have a known IP Address it is preferable to reserve one on your DHCP server - preferably outside the range served by DHCP (I do this for my network printers). This avoids the complication of determining gateways etc.
If you are determined to proceed anyway you should make sure you get it right.
Find the Settings of your local Network
This is most easily done with the Pi itself, using DHCP, but can be done on any computer on your network, although the commands may differ on other systems.
The above assumes IPV4 addressing - if your ISP uses IPV6 omit the "-4" parameter.
which should give an output like:
The first address is the IP address of your Pi on the network, and the part after the slash is the network size. It is highly likely that yours will be a /24.
The second address is the brd (broadcast) address of the network.
Find the address of your router (or gateway)
Finally note down the address of your DNS server, which is often the same as your gateway.
Then follow ONE of the following methods. (There are other methods not documented here. These are the most common on Raspbian.) ( In either method substitute the appropriate network interface name for eth0 , wlan0 or predictable network interface names . )
If you want to find the interface names, even if not connected, run the following command ls /sys/class/net/
In either method you should choose IP addresses which are not in use; ideally outside the range used by your DHCP server, within the same sub-network.
dhcpcd method
Leave /etc/network/interfaces at its default (as above).
Edit /etc/dhcpcd.conf as follows:-
ip_address is the address and size from the command above (or another unused address on the same network), routers is the address of your router (or gateway). domain_name_servers is the DNS address(es) from /etc/resolv.conf. (see man dhcpcd.conf )
There is a good article on dhcpcd at https://wiki.archlinux.org/index.php/dhcpcd The Fallback profile is an alternative to static IP
Network Interfaces method
NOTE This method is NOT recommended (and only works if you disable the DHCP client daemon), particularly if you plan to use both interfaces.
Configure a static network adddress on your Pi in /etc/network/interfaces
address is the address from the command above (or another unused address on the same network), netmask 255.255.255.0 corresponds to network size /24 . gateway is the address of your router (or gateway).
You can also specify dns-nameservers , but this is generally not necessary. The broadcast is automatically derived from address and netmask and need not be specified. For more detail see https://wiki.debian.org/NetworkConfiguration
You can set either or both eth0 , wlan0 or one of the predictable network interface names
Then disable the DHCP client daemon and switch to standard Debian networking :
Reboot for the changes to take effect:
- 3 What are the pros and cons of these two methods you mention? – Elliott B Commented Jun 24, 2018 at 23:51
- 2 I did read that, I'm just wondering about the two methods dhcpcd vs networking. I want to see if a static IP lets it boot faster, because I see a 15s delay for dhcpcd in systemd-analyze . – Elliott B Commented Jun 25, 2018 at 4:42
- 1 I don't use either - this is only there because so many people try (for whatever reason - which eludes me) BUT get it wrong, because they don't understand networking. There is no simple answer because it depends on what else you are doing. NOTE setting a static IP is unlikely to have ANY impact on boot time, unless you have a very slow DHCP server. If you have questions you should ask a Question - this is not a discussion forum. – Milliways Commented Jun 25, 2018 at 5:11
- 2 Performance is better disabling dhcpd I just tested the second non recommended approach, and it speeds up the boottime by 7 seconds on my RasPI Zero W. – Stefan Profanter Commented Oct 28, 2019 at 17:22
- 3 network administrators do not like this. That is not a reason to have dhcp addresses on rapsberry pi's and orange pi's and local printers. Almost everybody who reads this is is a home user, and is not served by smug comments about what "professionals" do. Albert – Albert van der Horst Commented Nov 13, 2019 at 21:29
For a static IP address on an Ethernet connection:
- sudo nano /etc/dhcpcd.conf
Type in the following lines on the top of the file:
sudo reboot
This needs to be done for the recent Jessie update. /etc/network/interfaces should be left alone . Open your browser and enter your router address (192.168.1.1 for most) and check your home network to make sure the Raspberry Pi shows up as 'Static'.
- 6 If you are going to copy parts of the answer at least you should get it right. – Milliways Commented Dec 15, 2015 at 23:37
- 2 It probably did work in your case, but not in general because dhcpcd inferred the netmask, which it cannot for other address ranges. Read the man pages. – Milliways Commented Dec 17, 2015 at 0:58
- 1 You assert that /etc/network/interfaces should be left alone, but you do not say why. In fact, quite the opposite is true. See my answer below. – JayEye Commented May 12, 2016 at 23:10
- 2 If you want to restart networking services without reboot, make sure you have auto eth0 above iface eth0 inet manual line in your /etc/network/interface file. Restart network via sudo service networking restart command – Barmaley Commented Nov 2, 2016 at 4:21
- 4 This can be a copied answer but has everything you need to setup a static ip on raspberry, the accepted answer is unnecessarily long. – Pedro Lobito Commented May 31, 2017 at 3:57
Short and foolproof method how to do this with:
Raspbian Jessie, Stretch, Buster
This will set a fixed IP and enable the ssh daemon:
- Stick the sd card in your pc and find that it has two partitions; mount the smallest partition as /boot/
- Open /boot/cmdline.txt and add ip=192.168.1.20 to the end of the line.
- Create an empty file /boot/ssh
- Unmount the sd card from the pc, insert in the Pi and boot your Raspberry Pi
- On Linux start ssh [email protected] the password is raspberry . Use Putty on Windows to connect via ssh.
- On the Pi, configure settings to enable SSH, e.g. with GUI or raspi-config, because /boot/ssh is automatically removed at first boot
I'm using to this to access my Raspbian Jessie and Stretch which boots without a attached monitor, with power and ethernet only. After accessing it with a ssh shell I can continue my setup.
After this treatment the Raspberry PI had two IPs: One from the fixed IP you specified and one from the dhcp-client running on the Raspberry Pi.
ifconfig will show you the fixed IP. Whereas the blue arrow-Icon on the top-right shows the dhcpd-IP.
- 2 Please do NOT suggest disabling IPv6. There are NO need for that. – Anders Commented Sep 7, 2017 at 21:25
- Why would I need 2 IPs? – user42000 Commented Oct 20, 2017 at 14:04
- @SiXandSeven8ths There is no need for 2 IPs. I have observed the behavior and am describing it here to minimize surprises. I would improve my answer, but hadn't time to do that. – MadMike Commented Oct 20, 2017 at 14:42
- 1 @SiXandSeven8ths I'm sorry to hear that. It worked fine for me. Also this was the only way to do without attaching any monitor and keyboard to the raspberry pi. so I figured it could be useful to someone else. – MadMike Commented Oct 20, 2017 at 15:08
- 1 I found out what I did wrong. I tried to configure static IP after booting, with attached monitor mouse and keyboard. I edited your answer. If the edit gets accepted, I will remove my comments. +1 – Roland Commented Apr 16, 2020 at 22:45
First thing you should do is make your Raspberry pi's IP static. So that whenever you power up your Raspberry pi it should connect to your access point(Hotspot).
Connect to your Access point. Type ifconfig in raspberry pi's terminal and enter that IP address below, in my case it was 192.168.43.233
Start by editing the dhcpcd.conf file
Scroll all the way to the bottom and add this lines at the end as per your connection (wired or wireless).
Press Ctrl+x to save and reboot. Now power up your raspberry pi and it will automatically connect to your access point.
- Readers should do their homework before adopting the static ip configuration advocated by this answer. For example, the author of dhcpcd discourages use of static ip !! In man dhcpcd.conf he states, For IPv4, you should use the inform ipaddress option instead of setting a static address. Ask yourself why you should follow the recommendation in this answer when the author of dhcpcd says otherwise? – Seamus Commented Apr 3, 2022 at 14:13
SystemdNetworkd
Raspbian / Raspberry Pi OS initially used Debian Networking which was replaced by dhcpcd in 2015. dhcpcd is the current default networking system.
Raspbian is now based on systemd which includes systemd-networkd , a system service that manages networks. It detects and configures network devices as they appear, as well as creating virtual network devices.
This tutorial describes how to setup basic networking using systemd-networkd . NOTE only basic networking using the in-built interfaces eth0 and wlan0 is described.
It is assumed you are familiar with networking and reasonably competent configuring Linux. It is NOT a method recommended for beginners; it is more complex to setup. Each interface needs to be explicitly configured. WARNING this will disable the Networking tool on the Desktop Panel.
Ethernet Networking
You need to define a network by creating a file in /etc/systemd/network . This can be given any name with the extension .network
The following example tells systemd-networkd to use eth0 (which is set up by udev ) and assign it an address using DHCP.
An alternative using static IP Addresses
Wireless Networking
In order to connect to a wireless network with systemd-networkd , a wireless adapter configured with another application such as WPA supplicant is required. To use wlan0 You should create a suitable /etc/wpa_supplicant/wpa_supplicant-wlan0.conf e.g.
(If you have existing WiFi setup you can copy the file /etc/wpa_supplicant/wpa_supplicant.conf .)
Create a .network file in /etc/systemd/network .
Having created the appropriate configuration files you NEED to disable existing networking and enable systemd-networkd services. NOTE there is NO NEED to purge existing network services. If disabled they will not interfere, and can be easily re-enabled if required.
You can check the status using the following:-
Simplified Systemd-Networkd setup
Configuring networking using systemd-networkd requires multiple steps, and it is easy to get things wrong. The following 3 scripts simplify the process and enable swapping between systemd-networkd and dhcpcd .
The setup below is more general than that described above and should work with multiple interfaces (although if you have reason to have multiples you will probably want to customise the setup).
This should offer similar functionality to the dhcpcd setup (except this will disable the Networking tool on the Desktop Panel).
Step1 installs necessary files, and only needs to be run once. The other scripts activate/deactivate systemd-networkd but do not delete anything merely changing which services are running - Reboot REQUIRED! All script MUST be run by root or with sudo .
SetupSystemdNetworkd.sh
Activatesystemdnetworkd.sh, deactivatesystemdnetworkd.sh.
- Debian Wiki
- The ArchLinux Wiki provides a comprehensive set of documentation.
NetworkManager
See How do I set up networking on Raspberry Pi OS - Bookworm for NetworkManager detail instructions.
The Sep 2022 Update to Raspberry Pi OS added the option to use NetworkManager in Raspberry Pi OS.
This has been standard in many other Linux distributions for several years, and while dhcpcd remains the default for Raspberry Pi OS in earlier Raspberry Pi OS in Bookworm NetworkManager has become the default.
NetworkManager offers similar basic WiFi & Ethernet capability to dhcpcd and it is now simple to switch between the two. (See the link above for discussion of extra features.)
Fresh installations of Bullseye include NetworkManager, but it can be added to existing installations without loss of customisation or installed packages.
To load the new taskbar plugins launch Appearance Settings from the Preferences section of the main menu. On the Defaults tab select the size you prefer then reboot.
If you prefer not to update Appearance Settings (this messes up all my carefully crafted customisation) it is possible to add the Controller for Network Manager to the Panel. This can be added next to Control for dhcpcd network interface .
To switch to NetworkManager run sudo raspi-config
- Option 6 Advanced Options
- Option AA Network Config
- Choose option 2 NetworkManager then reboot when prompted.
NetworkManager should now be running.
Open the networking menu on the taskbar. This should show any Ethernet connection and available WiFi networks (similar to dhcpcd ).
An additional sub-menu at the bottom, Advanced Options allows you
- to connect to a hidden network
- create a hotspot or
- set up VPN connections (you need to install the relevant VPN plugin)
You can use raspi-config to go back to dhcpcd – just enter the Network Config option as described above and choose Option 1 dhcpcd
You can use the nmcli command to manage NetworkManager from the command line e.g.
Each WiFi network has a separate config file in /etc/NetworkManager/system-connections/
- Just a comment - no need to reply - but IMHO, your answer omits the fact that (at least at the command-line interface), NetworkManager is incredibly more complex/arcane than dhcpcd5 . Again IMHO, that makes NetworkManager perhaps not the best choice for tiny systems such as Raspberry Pis. I know that you didn't have a say in choosing to replace dhcpcd with NetworkManager , but, by omission, your answer may suggest that they are comparable in complexity/ease-of-use. – Seamus Commented May 27 at 20:19
- @Seamus I tend to agree with you but the complexity comes with more features. I expect most users will use the GUI interface which is much simpler (at least for the most common use cases) although I know you don't use it. Incidentally when dhcpcd was introduced (with minimal documentation) I found myself answering similar questions dozens of times so decided to write a comprehensive answer. – Milliways Commented May 28 at 2:46
Not the answer you're looking for? Browse other questions tagged networking raspbian-buster raspberry-pi-os static-ip raspberry-pi-os-bullseye or ask your own question .
- The Overflow Blog
- Community Products Roadmap Update, July 2024
- Featured on Meta
- We spent a sprint addressing your requests — here’s how it went
- Upcoming initiatives on Stack Overflow and across the Stack Exchange network...
- Please do not put SOLVED in question titles
Hot Network Questions
- Geometry Nodes: How to select the result of Merge by Distance node?
- Guessing whether the revealed number is higher
- How fast does the number of "fixed" points grow compared to the size of the ball in the following group?
- What's the history of Spell Slots in D&D?
- Mathematical expression of controlled Ry gate
- Don't make noise. OR Don't make a noise
- Airtight beaks?
- Why danach instead of darüber?
- Is there a generalization of factoring that can be extended to the Real numbers?
- Should "as a ..." and "unlike ..." clauses refer to the subject?
- Why do some JFETs oscillate and others don't?
- Inconsistent result for NUMA node memory usage in SQL Server
- Measure by mass vs. 'Spooned and Leveled'
- Who first promoted the idea that the primary purpose of government is to protect its citizens?
- How shall I find the device of a phone's storage so that I can mount it in Linux?
- Why does redirecting stderr interfere with bash's handling of $COLUMNS and the `checkwinsize` option?
- Old SF story about someone who detonated an atomic bomb, sacrificing self to save society from an evil government
- My previously healthy avocado plant was pruned bare and has since been turning brown on top
- When Canadian citizen residing abroad comes to visit Canada
- Did any attendees write up accounts of pre-1980 Homebrew Computer Club meetings?
- 为什么字形不同的两个字「骨」的编码相同(从而是一个字)?
- Is a desert planet with a small habitable area possible?
- する時 referring to one-time actions/events in progress
- What is the "closest approximation" to fields by an equational variety?
- How to Assign Static IP to Raspberry Pi
- Raspberry Pi Howtos
Network Configuration Basics on Raspberry Pi OS
Assign static ip address to raspberry pi ethernet interface using dhcpcd command.

This article will introduce several methods for assigning a static IP address to Raspberry Pi OS.
Usually, before you configure a static IP address for the network interface, you’d need to find out what interfaces are available in the system and their names. In this case, we will focus on Ethernet interfaces and IPv4 addresses first.
You can list all available interfaces using the ip a command from CLI. It will display the output as demonstrated below, where each interface is numbered and named with names such as lo , eth0 , etc. eth0 denotes the first Ethernet interface and currently has an IP address ( 192.168.0.24 ) assigned to it.
Note that it also has the standard netmask 255.255.255.0 . Remember that we essentially need the eth0 part from this command output in the following steps to configure a static IP address.
Sample Output:
Alternatively, you can run the ifconfig command to display currently active interfaces in the system. The output includes similar information to the previous command. Note that we have contracted output texts in this article and only focus on the parts relevant to the task at hand.
Raspberry Pi OS utilizes the dhcpcd client to configure TCP/IP for all its interfaces. dhcpcd is a daemon process always running in the background. Still, it also denotes the command line tool which can interact with the daemon process.
At first, we will need to deconfigure the eth0 interface since it has already been configured using dynamic allocation, as we saw in the previous outputs. However, this might not be the case for you if you don’t have the Raspberry Pi connected to the network where the router is running a DHCP server.
You can skip this step in the latter case, but verify that your Ethernet interface is not configured first using the previous commands.
The given interface (e.g. eth0 ) can be deconfigured using dhcpcd -k [interface] command or alternatively using dhcpcd --release [interface] .
Note that you must specify interface argument to either of these commands, or dhcpcd will exit as no interfaces are left running.
Also, you will likely need to include the sudo prefix to elevate privileges for all dhcpcd commands if you are logged in as the default pi user.
Next, you can confirm that the eth0 has been deconfigured by executing the ip a or ifconfig command. If the previous operation was successful, we could specify the static IP configuration in the dhcpcd.conf file, located in the /etc directory.
This file usually includes sample static IP configuration lines, so you might need to uncomment those and modify only addresses. Otherwise, insert the following lines at the end of the configuration file and specify the local addresses based on your local network settings.
Notice that the command DHCP configuration includes the default gateway address and DNS servers in addition to the static IP address/netmask. In the previous snippet, we assigned 192.168.0.111 static IP address to the eth0 interface. Now, we need these changes to take effect immediately, so we run the following command.
This command will force the dhcpcd process to reload its configuration file and rebind the eth0 interface. If you don’t specify the interface name to the previous command, it will rebind all interfaces.
Another scenario for setting a static IP address for the Raspberry PI involves modifying the dhcpcd.conf file and then restarting the system, which will work. Still, you waste some time waiting for a reboot. Also, mind that if you’re connected to the Raspberry Pi using SSH or other remote connection, the dhcpcd -k command will render your session unusable.

Founder of DelftStack.com. Jinku has worked in the robotics and automotive industries for over 8 years. He sharpened his coding skills when he needed to do the automatic testing, data collection from remote servers and report creation from the endurance test. He is from an electrical/electronics engineering background but has expanded his interest to embedded electronics, embedded programming and front-/back-end programming.
Related Article - Raspberry Pi
- How to Setup a Raspberry Pi File Server
- How to Setup MySQL in Raspberry Pi
- DNS Server on Raspberry Pi
- How to Use Dropbox on Raspberry Pi
- How to Use Plex Media Player on Raspberry Pi
- Chromium OS on Raspberry Pi
Related Article - Raspberry Pi IP
- How to Find IP Address of Your Raspberry Pi
How to Set a Static IP Address on a Raspberry Pi 5
This tutorial explains how to set a static IP address on a Raspberry Pi 5 using nmcli
nmcli vs. dhcpcd
Setting the static ip, my ip address changed but ping 8.8.8.8 doesn't work.
Ideally you already have your Raspberry Pi set up and connected to a network that has assigned you an IP address using DHCP. In my case, the network I will be modifying was set up when I imaged the Raspberry Pi OS to my SD card (the Wi-Fi connection).
A lot of tutorials you may find for setting a static IP address on a Raspberry Pi will mention dhcpcd. As discussed here , dhcpcd was replaced with nmcli in the newer releases.
First, we need to find the name of the configuration to update. Run nmcli con show to show all connections, this will output something like this:
I want to update the configuration associated with Wi-Fi which is device wlan0 - this means the configuration I need to update is "preconfigured".
Next set the the IPv4 address, you will need to substitute your configuration name and IPv4 address in CIDR notation in this command: nmcli con mod <configuration name> ipv4.addresses <ip address> . So I would run,
Next set the IPv4 gateway, for a lot of people, this will be the IP address of your router,
Next set the DNS, again, you could use your router but you could also use another like 8.8.8.8 ,
Next set the addressing from DHCP to static,
Restart the connection to pick up these changes,
Check your new IP address with ip addr show wlan0 (or whatever device you are using). Lastly check your network connectivity by doing a quick ping using ping 8.8.8.8 .
Potential Issues
If you can see the Raspberry Pi has the new IP address but it cannot talk to the internet, you may have forgotten to set the DNS or have set it to something that isn't a DNS.
- Feature image
How to set a Raspberry Pi with a static ip adress?
- Share on Facebook
- Share on Twitter
- Share on LinkedIn
A static IP address , as opposed to a dynamic IP address, doesn’t change. The single-board computer Raspberry Pi always needs a static IP address if you want to access it with other devices over a long period of time. This refers to the private IP address of the Raspberry IP that is located by a computer within the local network as well as the public IP address of the network via which the Raspberry Pi is accessible on the internet (for example, if it’s being used as a server). But how do you provide Raspberry Pi with an IP address that always remains the same? This guide explains which options you have for linking a static IP address to your Raspberry Pi.
Register great TLDs for less than $1 for the first year.
Why wait? Grab your favorite domain name today!
Addressing Raspberry Pi via a static IP address
For many projects with the small computer, it’s either useful or necessary to provide Raspberry Pi with a static IP address. But before we talk more specifically about the use of such a static IP address with Raspberry Pi, we’ll first outline the differences between addressing a computer in a private (local) network or on the publicly accessible internet . Private and public IP addresses are not to be confused with each other.
Addressing Raspberry Pi in the LAN via a private IP address
Within a local network (also called a Local Area Network, or LAN for short), a router distributes data to various devices. The router is also responsible for IP address assignment – more specifically, the DHCP server integrated in the router is responsible. For example, the DHCP (Dynamic Host Configuration Protocol) automatically assigns free IP addresses to the corresponding devices. Computers, smart TVs, smartphones, or a Raspberry Pi each receive such an address via which they can communicate with other devices. Therefore, all devices are uniquely identifiable via their so-called MAC address .
Since IP addresses in a private network are individually assigned by the DHCP and the coupling of devices to an IP address is only valid within your local network, here we’re talking about private IP addresses . In the default settings, Raspberry Pi also receives its IP address via the DHCP server. The private IP addresses of individual devices can change though, depending on the configuration of the DHCP server.
To be able to reach Raspberry Pi on the same address in your own LAN, you have to provide it with a static, private IP address . One such static IP address for Raspberry Pi can be used, for example, for the remote maintenance of a computer within the network protocol SSH (Secure Shell): If you have an SSH program installed, you can control the Raspberry Pi via another computer using the SSH client. This has the advantage that you don’t have to connect a monitor and input device separately for operation anymore. But if the minicomputer only has a dynamic private IP address, then you have to reselect the current IP address for every SSH access and link it to the SSH client – you bypass this step with a static private IP address.
A static private IP address is essential for your Raspberry Pi if you want to set it up as a server in the LAN . If the Raspberry Pi server is also to continue being available outside of the local network, then you have to assign it another static address via which the server can be accessed on the internet. For example, an internet connection with a static public IP address or a DDNS service.
Addressing the Raspberry Pi on the internet via a public IP address or DDNS
If the Raspberry Pi is to be used as a server accessible over the internet, then the public IP address of your internet connection comes into play. Most internet access is available via dynamic IP addresses that are changed every time they start and at the latest every 24 hours. This changes the public IP address with which the Raspberry Pi server can be reached.
If you want to set up your Raspberry Pi as an ownCloud server or in another server form, the following problem occurs: As soon as the server receives a new IP address, it can only be traced in the LAN. If you want to be found outside of the local network, you no longer know which address the server can be reached on. The solution to this is a fixed IP address. The simplest variation here would be to use an internet connection with a static public IP address . But this is usually quite expensive, and isn’t offered by all internet service providers.
Another solution is the application of dynamic DNS (DDNS) . This links your dynamic public IP address with a domain name. Every time, as soon as your IP address changes, a program redirects the new address to the domain name and makes it permanently available on the internet. Now if you link a server on Raspberry Pi with the domain name, it’s permanently accessible online.
There are both free and paid DDNS services. Before you decide on one for yourself, you should first test which DDNS providers your router supports, and whether it supports any at all .
Assign a static private IP address to Raspberry Pi with a router
Many routers support the ability to provide individual devices within the local network with a static IP address. With a Linksys router, the Linksys app allows you to manage multiple devices and handle all of the router assignments remotely. Various other routers also support similar functions, and so can be used for linking Raspberry Pi with a static IP address.
A static IP address for Raspberry Pi is set up somewhat differently for each router. The basic principle is always the same, though: You open the user interface of the router in your browser; Link the MAC address of Raspberry Pi with your LAN’s IPv4 address via the manual IP configuration. Most of the time, a checkbox exists for this in the router interface. This enables you to always automatically use the IP address assigned to you.
Assign a static private IP address to Raspberry Pi with DHCPCD
Raspbian Jessie, or Jessie Lite – the current Raspbian operating systems at the moment – have a DHCP client daemon (DHCPCD) that can communicate with the DHCP servers from routers. The configuration file of a DHCP client daemon allows you to change the private IP address of a computer and set it up in the long term. The following instructions will assign a static IPv4 address with 32 bits (not to be confused with an IPv6 address , which has 128 bits available) to the Raspberry Pi. Before you begin with the assignment of a private IP address for Raspberry Pi, check whether DHCPCD is already activated using the following command:
In case it’s not, activate DHCPCD as follows:
Now make sure that the configuration of the file /etc/network/interfaces has the original status . For this, the ‘iface’ configuration needs to be set at ‘manual’ for the interfaces.
For the editing of the activated DHCPCDs, start by opening the configuration file /etc/dhcpcd.conf and running the following command:
You’ll now carry out the configuration of the static IP address. If your Raspberry Pi is connected to the internet via an Ethernet or network cable, then enter the command ‘interface eth0’; if it takes place over Wi-Fi, then use the ‘interface wlan’ command.
To assign an IP address to Raspberry Pi, use the command ‘ static ip_address= ’ followed by the desired IPv4 address and the suffix ‘ /24 ’ (an abbreviation of the subnet mak 255.255.255.0 ). For example, if you want to link a computer with the IPv4 address 192.168.0.4 , then you need to use the command ‘static ip_address=192.168.0.4/24’. It goes without saying that the address used here is not yet used anywhere else. As such, it also can’t be located in the address pool of a DHCP server.
You still then need to specify the address of your gateway and domain name server (usually both are the router). Raspberry Pi turns to the gateway address if an IP address to which it wants to send something is outside of the subnet mask (in the example, this would mean outside of the range 192.168.0). In the following command, the IPv4 address 192.168.0.1 is used as an example as both the gateway and DNS server. The complete command looks like this in our example (where a network cable is used for the internet connection):
The command lines above match the IPv4 addresses that you want to use for your Raspberry Pi, or where your router is assigned. Save the changes with ‘Ctrl + O’ and then press the enter key. Close the configuration file with ‘Ctrl + X’. Restart to adopt the newly assigned static IP address in the network:
Now use a ping command to check whether the Raspberry Pi is accessible in the network with its new IP address:
If the connection of the IP address was successful, you’ll see that you can reach it under the new IP address with a ping.
Static IP addresses for Raspberry Pi are sometimes vital
In summary, it should be noted that there are basically two different IP addresses that are relevant for Raspberry Pi (and projects using it): the private IP address of the Raspberry Pi within the local network, and the public IP address of its internet connection.
A static private IP address is primarily necessary if you want to use Raspberry Pi as a server . But if you access the minicomputer via SSH more frequently, you should assign in a static address in the same way. The possibilities outlined above detail how this can be achieved with relatively simple means.
Assigning a fixed public address that allows your Raspberry Pi to be accessed via the internet is somewhat more complicated. This is necessary, for example, when attempting to make your server installed on Raspberry Pi remain constantly available online. Most internet access is available only via a dynamic public IP address, which isn’t possible here. Since a static address isn’t offered by all internet providers (and if it is, then it’s usually relatively expensive), a DDNS service presents the best solutions. But for this, you have to know which forms of dynamic DNS are supported by your router.
Build or host a website, launch a server, or store your data and more with our most popular products for less.

- Compute Module 4
- Kits & Bundles
- Flash Drives
- Card Readers
- Accessories
- Power Supplies
- Power over Ethernet (PoE)
- Breakout Garden
- GPS, GSM & LoRa
- Motor & Servo Control
- Port Expanders
- Power Management
- Prototyping
- Real Time Clock
- Serial & I2C
- Raspberry Pi 5
- Raspberry Pi 4
- Raspberry Pi 3
- Raspberry Pi 3A+
- Raspberry Pi Zero
- Case Accessories
- DIN & Rack
- Display/Screen
- Media Centre
- Retro Gaming
- Heatsinks & Fans
- Cooling Cases
- Camera Modules
- USB Cameras
- Mini Displays
- Medium Displays
- Large Displays
- Touchscreen Displays
- ePaper Displays
- GPIO Connection
- HDMI Connection
- Display Accessories
- Adapters & Accessories
- Game Controllers
- Keyboards & Mice
- Remote Controls
- WiFi & Ethernet
- Buttons & Joysticks
- HATs & Control Boards
- Merch & Accessories
- Wires & Connectors
- Merch & Clothing
- Notepads & Pens
- Peripherals
- Stickers & Badges
- Amplifiers & Modules
- Cables & Connectors
- Microphones
- Speakers & Headphones
- ADC & DAC
- Flat Cable (FFC/FPC)
- GPIO Expanders
- GPS & GSM
- Logic Level
- DIY Cables & Connectors
- Buttons & Switches
- Component Kits
- Integrated Circuits
- Oscillators
- Transistors
- Circuit Playground
- QT Py & XIAO
- Trinkey & Trinket
- Kits & Projects
- DotStar & APA102
- NeoPixels & WS2812
- Standard LEDs
- Strips & Sticks
- Battery Holders
- Boost Converters
- Power over Ethernet
- Regulators & Buck Converters
- Breadboards
- Crocodile Clips
- Jumper Wires
- PCBs & Perfboard
- SMT Breakouts
- Wire & Heat Shrink
- Motor Drivers
- Mounting Hubs
- Stepper Motors
- Wheels & Tracks
- Accelerometers
- Body & Muscle
- Environment & Air Quality
- Fingerprint
- Force & Weight
- Hall, Reed & Magnet
- IMU & Gyro
- Light & Colour
- Line Following
- Liquid & Moisture
- NFC & RFID
- Temperature
- Tilt & Vibration
- Voltage & Current
- PETG Filament
- PLA Filament
- The micro:bit
- Add-ons & Extensions
- Cables & Accessories
- Official Arduino Boards
- Compatible Boards
- GPS & GSM Shields
- Input & Button Shields
- LED Shields
- Prototyping Shields
- Relay Shields
- Robotics Shields
- Sensor Shields
- Serial Shields
- Other Shields
- Raspberry Pi Gifts
- Maker Gifts
- Micro:bit Gifts
- Arduino Gifts
- Gifts Under £10
- Gifts Under £20
- Gifts Under £50
Login / Signup
from just £2.99
150,000+ reviews
support portal
order by 2pm*
Your cart is empty

Tutorial - How to give your Raspberry Pi a Static IP Address
If you are using the latest Raspbian Jessie, click here to read our updated guide.
To log in to your Raspberry Pi remotely, you'll need the IP of the Raspberry Pi – this is basically like your house address and tells the host computer where to look for it on the network. By default, the Raspberry Pi will be given an IP automatically by the router (called Dynamic IP and denoted by DHCP) when you connect to a network. However, this can change whenever you remove the Pi from the network e.g. turn it off.
Having a static IP isn't essential, however it will make repeated access to the Raspberry Pi via SSH much simpler, as you'll always know that the Raspberry Pi has the same address. Imagine how much trouble your postman would have if your house constantly changed location :)
This task assumes that you have the official Raspian OS release installed. This is available in the NOOBS distribution and can be downloaded from http://www.raspberrypi.org/downloads . This guide also assumes that you've connected your Pi to a network via Ethernet. If you're going to be logging into your Pi remotely for most tasks, then I recommend it's easiest and fastest to plonk it next to your router, and use ethernet to access the internet anway!
A. Checking Set Up
Boot into Raspian and log in (Username. pi, Password. raspberry), this will all be command line stuff, so no need to log in to the GUI.
First, we need to list the network interface we currently have available:
cat /etc/network/interfaces

The line . . . .
iface eth0 inet dhcp
Implies that we're currently getting out IP address via DHCP, meaning it's being dynamically registered by the router. This is what we want to change!
B. Gathering Information
Fist of all we need to grab some information from our router and Pi. There's a couple of command we need to run to get this info. Have a pen and paper handy! . . .

This reveals your router information, the bit you want is after eth0 (the ethernet connection). . . .
eth0 Link encap:Ethernet HWaddr b8:27:eb:b3:fc:2c
inet addr:192.168.1.81 Bcast:192.168.1.255 Mask:255.255.255.0
Write down the following information. . .
inet addr – 192.168.1.81 (Pi's Current IP Address)
Bcast – 192.168.1.255 (The Broadcast IP Range)
Mask – 255.255.255.0 (Subnet Mask Address)
We need a little more information before we proceed. Use the command. . .
netstat -nr
(route -n will give you the same info.)

' Gateway ' Address – 192.168.1.254
' Destination ' Address – 192.168.1.0
C. Editing Network Configuration
We now need to plug this information into the Pi's network configuration file using a text editor. I always use nano text editor. . .
sudo nano /etc/network/interfaces

Simply change the line that reads:
iface eth0 inet static
Then directly below this line enter the following (Please Note. You will need your own addresses we gathered in Part B, more details below ). . . .
address 192.168.1.81
netmask 255.255.255.0
network 192.168.1.0
broadcast 192.168.1.255
gateway 192.168.1.254
To clarify what each part means. . . .
address – The address you want to give your Pi, this can be any IP in the network range, but it's usually advisable to go higher rather than lower, or you could end up logging different devices to the same IP! I've selected 192.168.1.81, as we're already registered to that address (denoted by ' inet addr '), but this can be any IP address from the range192.168.1.1 to 192.168.1.255.
netmask – The ' Mask ' address we wrote down earlier.
network – The router IP address, this is the ' Destination ' Address was found earlier. You can also grab this off your router, it will say on the side somewhere.
broadcast – The ' Bcast ' address we wrote down earlier.
gateway – This is the ' Gateway ' address we found earlier.

So, it should look something like the above, but with your values! Remember to save before exit, CTRL+X (exit) then yes to save changes!
D. Re-check Static IP Configuration
UPDATE: Remove any existing leases
sudo rm /var/lib/dhcp/*
Then we'll need to reboot and check your changes. . .
sudo reboot
Log back in and run
Which should reveal your new settings. .

To double checks all is working as it should, ping your ' Gateway ' Address. . .
ping 192.168.1.254 -c 10
(the -c 10 command simply denotes that you want to ping it 10 times, if you forget to add this, it will ping the address continuosly. To stop it press CTRL+C)

This should ping successfully and all packets should be received. If something's not right double check through all your IP addresses, and make sure you're pinging the right address too. Remember you can always revert back to DHCP by reversing the steps. The 'network' router IP address is sometimes a little fiddly, so check that if you're still having issues!
Hopefully however, your Raspberry Pi is now set up with a static IP address!
Popular posts

How do I configure a static IP with gnu nano 7.2? The field returns empty space. I also have no clue what I’m doing so bear with me.
Leave a comment
All comments are moderated before being published.
This site is protected by reCAPTCHA and the Google Privacy Policy and Terms of Service apply.
Installing Pi-Hole and PiVPN on a VPS
Knowledge base.
- knowledgebase
Table of Contents
- Introduction
- Prerequisites
- Disable Passphrase Authentication
- (Optional) Install Mosh
- (Optional) Configure Pi-Hole
- Install PiVPN
- Network Adjustments
- Acquiring the certificate
- Configure the Redirect
Introduction #
The purpose of this guide is to document the steps I take to set up Pi-Hole and PiVPN on a VPS, from companies such as LogicWeb. The ultimate goal is to have an ad-blocker that will work both on my home network and on any device connected to the VPN.
Almost every tutorial I found was focused on installing Pi-Hole and PiVPN on a local Raspberry Pi instead of on a VPS. The steps are mostly the same but there are some extra steps involved in securing the VPS to deny access from bad actors.
After completing this tutorial, you will have:
- A Pi-Hole accessible from anywhere
- A VPN that will provide an encrypted connection when using public Wi-Fi, via PiVPN
Prerequisites #
In order to follow this tutorial you will need to have a VPS with at least 512 MB of memory, although I would personally recommend at least 1 GB if you plan on having a large number of blocklists. This guide assumes that you are using Ubuntu 18.04 and Pi-Hole Version 4.2. Other distros will mostly likely work, but I have only tested the steps covered in this tutorial on Ubuntu 18.04.
Initial Server Setup #
We will be using ssh to remotely log into the VPS and configure it. If you are on a Unix-based operating system, it should already be installed. If you are Windows, you will need to install PuTTY. Make sure you know your server’s IP address and login credentials.
root Login #
When you have your server’s IP address and root passphrase, log into the server as the root user
You will be asked to create a new passphrase. Although we will be disabling password authentication, be sure to create or generate a secure passphrase anyway.
Create new user pi
Grant root privileges to pi
Public Key Authentication #
Public Key Authentication provides an alternative method of identifying yourselve to a remote server and increases the overall security of your server.
If you do not already have an SSH key, you will need to create one on your local computer
Save your key in the default file (where $user is your user)
Create a secure passphrase. You will need to enter this passphrase each time you utilize your SSH key
Copy the public key from your local machine to your remote server with ssh-copy-id
- If you opted to add SSH during the server creation process anyway, this method will not work.
You should repeat these steps for each device you want to access the server, including desktops, laptops, tablets, and mobile phones.
Disable Passphrase Authentication #
Once you have added SSH keys from all of your devices, we can disable passphrase authentication.
Log into your server as root , if you are not already logged in
Open the SSH daemon configuration file
- Find the line containing PasswordAuthentication and uncomment it by deleting the preceeding # . Change it’s value to no
- Find the line containing PubkeyAuthentication and ensure it’s value is set to yes
- Find the line containing ChallengeResponseAuthentication and ensure it’s value is set to no
Save your changes and close the file
While still logged in as root , open a new terminal window and test logging in as pi and verify that the public key authentication works
(Optional) Install Mosh #
Mosh , or mobile shell, is a remote terminal application that allows roaming and intermittent connectivity. It’s intended as a replacement for SSH but both can be used on the same server.
Set up ufw #
We will set up a basic firewall, ufw , that will restrict access to certain services on the VPS. Specifically, we want to ensure that only ports needed for SSH, Pi-Hole , and PiVPN are open. Additional ports can be opened later depending on your specific needs.
We will be opening ports for secure FTP so that .ovpn files needed for connecting to our VPN later can be retrieved via a FTP application such as Filezilla or Transmit.
To set up ufw , enter the following commands:
Install Pi-Hole #
Now that our server has been set up and is secure, we will now install the Pi-Hole software. The installation is fairly simple and requires a small amount of configuration on our part.
Please note that on a Raspberry Pi we would be asked to set a static IP address. This is important because we do not want the IP address of a DNS server to be constantly changing. However, since we are using a VPS, the static IP address has already been set for us. The networking interface will also be automatically selected as well since only one interface, eth0 , will be available to us at the time of installation.
Run the official Pi-Hole installer:
- When asked about which protocols to use for blocking ads, select both IPv4 and IPv6 , even if you cannot use IPv6 yet on your home network. The justification is that more ads are now being served via IPv6 and we want to ensure all ads are blocked
- On the very last screen, you will be presented various information about your new Pi-Hole installation. Your Pi-Hole ‘s IP address should match your server’s IP address.
Once you have completed the Pi-Hole installation script, you should change the passphrase to the admin panel:
(Optional) Configure Pi-Hole #
Pi-Hole allows you to customize what websites you want to block and allows to you whitelist any false positives (e.g., unblocking Netflix or Facebook). Pi-Hole developer WaLLy3K provides a popular collection of blocklists that you can add to your own blocklists. Another blocklist collection is provided by the Block List Project.
I would also recommend checking out this GitHub repository that will load commonly whitelisted domains (e.g., Facebook, Instagram, XBox Live) into your Pi-Hole.
Finally, I would suggest following this guide from the official Pi-Hole documentation to set up unbound as your own recursive DNS server (rather than using a public DNS server such as Google DNS or Cloudflare). This will help to further increase the privacy of your DNS queries.
Install PiVPN #
Installing PiVPN will be just as easy as installing Pi-Hole , although there is a bit more configuration required on our part for PiVPN . PiVPN automatically installs an OpenVPN server for us as well as any additional required software. The script will also automatically open ports in ufw so that an OpenVPN client can communicate with our VPS.
Please note that on a Raspberry Pi, we would be asked to select a network interface, but since we are on a VPS the only available interface is eth0 and that is automatically selected for us as well as the static IP address.
Start by running the PiVPN installer
- When asked to choose a local user to hold your .ovpn configuration files, select the user pi
- When asked about enabling UnattendedUpgrades , pick yes
- When asked to select the protocol, pick UDP
- When asked to select the port, either accept the default 1194 or enter a random port (e.g., 11948 )
- Generating the encryption key will take a few minutes
- When asked to select a Public IP or DNS, select your server’s IP address
- When asked to select a DNS provider, select the custom option and enter the IP address of your server
Once the installer is finished, allow it to reboot your VPS
Configure Pi-Hole and PiVPN #
Now that both Pi-Hole and PiVPN are installed, there are a couple of critical steps we must take before we can start generating .ovpn configuration files and connecting to our VPS. Specifically we want to ensure that PiVPN uses Pi-Hole as it’s DNS server and that we can connect using an OpenVPN client.
First we will create a configuration file for dnsmasq , the DNS service that powers Pi-Hole
Log into your server as pi if you are not logged in already:
Create a new configuration file called 02-pivpn.conf :
Add the following line to the file:
Save and exit the file, and restart Pi-Hole ‘s FTL service:
Network Adjustments #
We will start by modifying the sysctl.conf file to allow IP forwarding:
Look for the line that contains net.ipv4.ip_forward . If there is a # character prepended, remove it to uncomment the line. Ensure that it is set to 1 and not 0 .
Save and close the file. Then instruct sysctl to reload it.
Then we will modify ufw to allow masquerading of client connections. Before we can modify any rules, we need to find the public network interface of our VPS:
Your public interface will follow the word “ dev ” in the output. For example:
If your public interface is not eth0 , make note of what it is. We will be using that interface to modify a ufw file that loads rules before regular rules are loaded. We will be adding a rule that will masquerade any traffic comming in from the VPN.
Open the before.rules file:
Towards the top of before.rules add the following text, starting with # START OPENVPN RULES :
Save and close the before.rules .
Finally, we need to tell ufw to allow forward packets by default. Open the /etc/default/ufw file:
Fine the line containing DEFAULT_FORWARD_POLICY . Change the value to ACCEPT if necessary:
Save and close /etc/default/ufw .
Enter the following commands to restart ufw and OpenVPN :
Let’s Encrypt #
The following section is optional and requires you to have your own domain name , but it will configure your Pi-Hole’s web interface to use https courtesy of Let’s Encrypt and Certbot. It can be considered overkill just for Pi-Hole, but it certainly doesn’t hurt. First we will acquire the certificate and then we will configure lighttdp to automatically redirect any http requests to https . The steps are based on this reddit post.
Acquiring the certificate #
- Log into your remote server again either as root or with root privileges.
- Go to this Certbot page (for Ubuntu 18.04) and following the Install commands to install Certbot on your server.
- Perform a dry run to acquire a certificate for your domain. For example: certbot certonly –webroot -w /var/www/html -d example.com –dry-run
- If acquiring the certificate was successful, run the same command again without --dry-run . For example: certbot certonly –webroot -w /var/www/html -d example.com
- Edit the file /etc/lighttpd/conf-available/10-ssl.conf . Replace example.com with your own domain name: ssl.pemfile = “/etc/letsencrypt/live/example.com/combined.pem” ssl.ca-file = “/etc/letsencrypt/live/example.com/chain.pem”
- Run the following commands, replacing example.com with your domain name: ln -s /etc/lighttpd/conf-available/10-ssl.conf /etc/lighttpd/conf-enabled/10-ssl.conf cd /etc/letsencrypt/live/example.com/ cat privkey.pem cert.pem > combined.pem
- Restart lighttpd : sudo systemctl restart lighttpd https should now be enabled on your web interface.
- Add a cron job to automatically renew the certificate every 90 days. Open /etc/crontab and add the following line: 47 5 * * * root certbot renew –quiet –no-self-upgrade –renew-hook “cat $RENEWED_LINEAGE/privkey.pem $RENEWED_LINEAGE/cert.pem > $RENEWED_LINEAGE/combined.pem;systemctl reload-or-try-restart lighttpd”
Configure the Redirect #
Open the lighttpd configuration file, /etc/lighttpd/lighttpd.conf , and add the following block of code:
Restart lighttpd again:
Your web interface should now automatically redirect any http requests to https .
source: https://github.com/nledford/Pi-Hole-VPS-Tutorial
Tags: dns security , free adblock , free dns adblocker , free vpn , install pihole , install pivpn , vpn security
Install OpenVPN On CentOS
Linux bash commands: a-z (beginner's cheat sheet), leave a reply cancel reply.
Your email address will not be published. Required fields are marked *
Save my name, email, and website in this browser for the next time I comment.
Search results for
Affiliate links on Android Authority may earn us a commission. Learn more.
How to turn DAS into NAS using a Raspberry Pi and OpenMediaVault
Published on June 28, 2024
Direct-attached storage (DAS), consisting of hard drives or SSDs connected directly to a PC, offers quick access to your files. However, there are scenarios where you might want that storage accessible over a network, especially if you’re building a smart home . Whether you need access from another room or wish to share it among multiple computers, transitioning from DAS to network-attached storage (NAS) becomes necessary.
Recently, I reviewed the TerraMaster Hybrid D8 , a versatile DAS unit that supports up to eight drives and offers RAID capabilities. It can connect SSDs, NVMe drives, and traditional hard drives, making it a robust storage solution. But what if you want to make such a device and its storage available on your network?
This guide details converting a DAS unit into a NAS using a Raspberry Pi 5. I’ll explore the differences between DAS and NAS, the required software, and the step-by-step process to network your storage.
To follow along, you’ll need a laptop or computer, a Raspberry Pi 5 (or Pi 4) , a microSD card , and external storage (preferably with a dedicated power supply or a Raspberry Pi power supply that can provide enough power to both). The microSD card will be the Pi’s boot device, while the external storage is the actual storage bank. You’ll also need to install OpenMediaVault, but that step comes later.
For more detailed steps, be sure to watch my in-depth explainer video above.
Preparing the Raspberry Pi
First, you’ll need to initialize and set up your Raspberry Pi.

- First, use Raspberry Pi Imager on your laptop or PC to install Raspberry Pi OS Lite 64-bit on your microSD card. I opt for this version of the OS because it’s lightweight, and a heavier build isn’t needed for our purpose.
- Once the OS is installed, insert the SD card into the Raspberry Pi, boot it up, and complete the initial setup (which includes picking a keyboard, selecting a username, and confirming a password).
- Next, you’ll need to install OpenMediaVault. To do so, run the following command:
wget -O - https://github.com/OpenMediaVault-Plugin-Developers/installScript/raw/master/install | sudo bash
- Wait a few minutes for OpenMediaVault to install. During this time, your Raspberry Pi will reboot. After this, you will be shown your Raspberry Pi’s IP address and the default username and password for OpenMediaVault. Make a note of these details.
- Next, grab your laptop or computer. Open your browser and point it to the IP address you just noted. When the OpenMediaVault login screen appears, log in using the provided username and password.
- Once logged in, you can head to Network > Interfaces within OpenMediaVault, change the network preference from DHCP to Static , and assign a dedicated IP address. This will ensure your Pi remains accessible at the same IP address every time you log in.
- Once you’ve updated the network settings, apply the changes. To reaccess OpenMediaVault, point your browser to the IP address you set. You can also change the device’s hostname to something more familiar. You can find these settings in Network > General > hostname .
Configuring OpenMediaVault storage
Once installed, you’ll need to configure OpenMediaVault to manage your NAS.

- To make your NAS visible to Windows machines, you must enable SMB/CIFS support. To do so, go to Services > SMB/CIFS > Settings > select the Enabled checkmark and click Save .
- Next, you’ll need to create a user. Click Users > Users > click the + icon to create a new user or the pen icon to edit an existing user. Ensure you set a password to ensure that Shares are accessible and secure.
- Before creating an accessible share, you must create a file system. Head to Storage > Disks. Identify the disk you want to use, wipe any existing data if necessary, and create a new file system using the format of your choice. I opted for ext4. Once formatted, you can then mount the drive.
- Next, create a Shared Folder. Access this facility through Storage > Shared Folders > click the + icon to create a new Shared Folder. Name the folder, select the file system you created, and select the desired privileges.
- Now that you’ve created a file system and a Shared Folder, you can create a Share. Go to Services > SMB/CIFS > Shares > click the + icon to create a new Share. Select the Shared Folder you just created and set your configuration preferences.
- Finally, to check if you’ve configured your OpenMediaVault NAS properly, navigate to the IP address of your Raspberry Pi from File Explorer on a Windows machine, log in with the user credentials, and access your shared folder.
- You can now read and write files to your NAS.
Transforming a DAS unit into a NAS using a Raspberry Pi is a practical solution for making your storage accessible across a network. While there are speed trade-offs, the convenience and flexibility of networked storage make it worthwhile. It’s also an incredibly cost-effective alternative to traditional NAS devices.
You might like
Navigation Menu
Search code, repositories, users, issues, pull requests..., provide feedback.
We read every piece of feedback, and take your input very seriously.
Saved searches
Use saved searches to filter your results more quickly.
To see all available qualifiers, see our documentation .
- Notifications You must be signed in to change notification settings
Have a question about this project? Sign up for a free GitHub account to open an issue and contact its maintainers and the community.
By clicking “Sign up for GitHub”, you agree to our terms of service and privacy statement . We’ll occasionally send you account related emails.
Already on GitHub? Sign in to your account
Connecting to Raspberry Pi #2
Tissy commented Jun 29, 2024
| Hi, Do you have any experience with connecting the SDR to a RaspberryPi please? I am using a USB RJ45 dongle which I have fixed the IP to 192.168.1.2, however I cannot ping the ANTSDR on IP 192.168.1.10. Any suggestions please as I cannot find any suitable resources to assist. Thank you for your help. |
| The text was updated successfully, but these errors were encountered: |
alphafox02 commented Jun 29, 2024
| Use the PIs native Ethernet port vs the external one. Are you using the firmware here specific to the dji piece? |
Sorry, something went wrong.
| Hi, thank you very much for your reply, much appreciated. I've been trying to resolve this for 2 days now, so your help is appreciated. I have tried connecting it to the main CAT5 port, but then I loose remote access (SSH) to the Pi if I am connecting via the external adapter. Do you perhaps have any details of how the IP addresses should be configured and whether or not to use DHCP or fixed IPs. I currently have: Thank you again, Steve |
| Depending on your network setup, I’d use eth0 as the connection to the AntSDR and use the usb for Ethernet and assign it static, but something like 192.168.2.100 and then your laptop 192.168.2.101. I’m not sure what you’re using the WiFi interface for, is it setting up an access point for you to connect to? If so, I’d put it on a different range. You should then be able to ssh the pi at 192.168.2.101 and the pi in turn would be able to communicate with the AntSDR as needed. |
| That's really helpful, thank you. I feel I am getting somewhere with this. Is there a reason that the Ethernet adapter (USB - RJ45) needs to be on a different subnet to the main Pi RJ45, which will be on 192.168.1.X. Changing the Ethernet adapters fixed IP to the 192.168.2.X subnet is preventing outgoing traffic to the TAK server (as my gateway is on 192.168.1.254), so trying to figure out best options. Thank you once again. |
alphafox02 commented Jun 30, 2024
| Might be best to eliminate the USB adapter all together and plug the AntSDR and Pi Eth port into your network together. Or if you have a switch, that’d work too. Then you can put everything on the same network since you happen to have the same IP scheme. I’m not totally sure you’d have to change the IPs as I suggested, it just had me thinking it may be an issue to have them all setup like that. |
- 👍 1 reaction
vasmane commented Jul 1, 2024 • edited Loading
| U have to disable ipv6 and set ip on ipv4, that resolves the problem on both rpi and dragon os. Sometimes with different adapters i cannot ping ant e200, depends on the adapter. Also u can try connecting via wifi over vnc viewer and try to use the native eth on the rpi |
Tissy commented Jul 3, 2024 • edited Loading
| Hi , thank you for your comment, much appreciated. It's very frustrating trying to figure out what is causing the issue. I have tried two different USB-RJ45 adaptors and unable to ping the AntSDR if that is plugged into the adapter, but can access the Pi via its normal RJ45 port. If I swap over and connect the AntSDR to the main RJ45 connector and the LAN to the adapter, I cannot access the Pi. Using a LAN viewer, I can see each of the ports on the Pi, but they all appear to have the same MAC address which is weird. (see below) This is what shows. Any suggestions please? |
vasmane commented Jul 3, 2024
| What kind of power supply are you using? The rpi 5 needs 25 wats, otherwise it goes into low power mode, that is probably causing the problem. Im using a usb a dongle with rj45 connector and the original 5v 5a power supply with no issues whatsoever. Its mandatory that you disable ipv6 to the adapter, otherwise it will disconnect every minute or so. |
Tissy commented Jul 3, 2024
| Thank you. I am using a proper Pi 5v 3A (15.3w) PSU and it's actually a Pi4 I am using. Looking at ifconfig, I have disabled IPv6 using the and then adding to the file. |
Tissy commented Jul 4, 2024
| Which USB adapters have you used and know work please |
No branches or pull requests
How to set a Raspberry Pi with a static ip address?
- Share on Facebook
- Share on Twitter
- Share on LinkedIn
A static IP address , as opposed to a dynamic IP address, doesn’t change. The single-board computer Raspberry Pi always needs a static IP address if you want to access it with other devices over a long period of time. This refers to the private IP address of the Raspberry IP that is located by a computer within the local network as well as the public IP address of the network via which the Raspberry Pi is accessible on the internet (for example, if it’s being used as a server). But how do you provide Raspberry Pi with an IP address that always remains the same? This guide explains which options you have for linking a static IP address to your Raspberry Pi.
Domains as original as your ideas. What are you waiting for?
Make your project a success with the perfect domain extension!
Addressing Raspberry Pi via a static IP address
For many projects with the small computer, it’s either useful or necessary to provide Raspberry Pi with a static IP address. But before we talk more specifically about the use of such a static IP address with Raspberry Pi, we’ll first outline the differences between addressing a computer in a private (local) network or on the publicly accessible internet . Private and public IP addresses are not to be confused with each other.
Addressing Raspberry Pi in the LAN via a private IP address
Within a local network (also called a Local Area Network, or LAN for short), a router distributes data to various devices. The router is also responsible for IP address assignment – more specifically, the DHCP server integrated in the router is responsible. For example, the DHCP (Dynamic Host Configuration Protocol) automatically assigns free IP addresses to the corresponding devices. Computers, smart TVs, smartphones, or a Raspberry Pi each receive such an address via which they can communicate with other devices. Therefore, all devices are uniquely identifiable via their so-called MAC address .
Since IP addresses in a private network are individually assigned by the DHCP and the coupling of devices to an IP address is only valid within your local network, here we’re talking about private IP addresses . In the default settings, Raspberry Pi also receives its IP address via the DHCP server. The private IP addresses of individual devices can change though, depending on the configuration of the DHCP server.
To be able to reach Raspberry Pi on the same address in your own LAN, you have to provide it with a static, private IP address . One such static IP address for Raspberry Pi can be used, for example, for the remote maintenance of a computer within the network protocol SSH (Secure Shell): If you have an SSH programme installed, you can control the Raspberry Pi via another computer using the SSH client. This has the advantage that you don’t have to connect a monitor and input device separately for operation anymore. But if the minicomputer only has a dynamic private IP address, then you have to reselect the current IP address for every SSH access and link it to the SSH client – you bypass this step with a static private IP address.
A static private IP address is essential for your Raspberry Pi if you want to set it up as a server in the LAN . If the Raspberry Pi server is also to continue being available outside of the local network, then you have to assign it another static address via which the server can be accessed on the internet. For example, an internet connection with a static public IP address or a DDNS service.
Addressing the Raspberry Pi on the internet via a public IP address or DDNS
If the Raspberry Pi is to be used as a server accessible over the internet, then the public IP address of your internet connection comes into play. Most internet access is available via dynamic IP addresses that are changed every time they start and at the latest every 24 hours. This changes the public IP address with which the Raspberry Pi server can be reached.
If you want to set up your Raspberry Pi as an ownCloud server or in another server form, the following problem occurs: As soon as the server receives a new IP address, it can only be traced in the LAN. If you want to be found outside of the local network, you no longer know which address the server can be reached on. The solution to this is a fixed IP address. The simplest variation here would be to use an internet connection with a static public IP address . But this is usually quite expensive, and isn’t offered by all internet service providers.
Another solution is the application of dynamic DNS (DDNS) . This links your dynamic public IP address with a domain name. Every time, as soon as your IP address changes, a programme redirects the new address to the domain name and makes it permanently available on the internet. Now if you link a server on Raspberry Pi with the domain name, it’s permanently accessible online.
There are both free and paid DDNS services. Before you decide on one for yourself, you should first test which DDNS providers your router supports, and whether it supports any at all . Find the DDNS support tutorial for whichever individual router your DDNS server is intended to operate on, such as this tutorial for Linksys routers.
Assign a static private IP address to Raspberry Pi with a router
Many routers support the ability to provide individual devices within the local network with a static IP address. With a Linksys router, the Linksys app allows you to manage multiple devices and handle all of the router assignments remotely. Various other routers also support similar functions, and so can be used for linking Raspberry Pi with a static IP address.
A static IP address for Raspberry Pi is set up somewhat differently for each router. The basic principle is always the same, though: You open the user interface of the router in your browser; Link the MAC address of Raspberry Pi with your LAN’s IPv4 address via the manual IP configuration. Most of the time, a tick box exists for this in the router interface. This enables you to always automatically use the IP address assigned to you.
Assign a static private IP address to Raspberry Pi with DHCPCD
Raspbian Jessie, or Jessie Lite – the current Raspbian operating systems at the moment – have a DHCP client daemon (DHCPCD) that can communicate with the DHCP servers from routers. The configuration file of a DHCP client daemon allows you to change the private IP address of a computer and set it up in the long term. The following instructions will assign a static IPv4 address with 32 bits (not to be confused with an IPv6 address , which has 128 bits available) to the Raspberry Pi. Before you begin with the assignment of a private IP address for Raspberry Pi, check whether DHCPCD is already activated using the following command:
In case it’s not, activate DHCPCD as follows:
Now make sure that the configuration of the file /etc/network/interfaces has the original status . For this, the ‘iface’ configuration needs to be set at ‘manual’ for the interfaces.
For the editing of the activated DHCPCDs, start by opening the configuration file /etc/dhcpcd.conf and running the following command:
You’ll now carry out the configuration of the static IP address. If your Raspberry Pi is connected to the internet via an Ethernet or network cable, then enter the command ‘interface eth0’; if it takes place over Wi-Fi, then use the ‘interface wlan’ command.
To assign an IP address to Raspberry Pi, use the command ‘ static ip_address= ’ followed by the desired IPv4 address and the suffix ‘ /24 ’ (an abbreviation of the subnet mak 255.255.255.0 ). For example, if you want to link a computer with the IPv4 address 192.168.0.4 , then you need to use the command ‘static ip_address=192.168.0.4/24’. It goes without saying that the address used here is not yet used anywhere else. As such, it also can’t be located in the address pool of a DHCP server.
You still then need to specify the address of your gateway and domain name server (usually both are the router). Raspberry Pi turns to the gateway address if an IP address to which it wants to send something is outside of the subnet mask (in the example, this would mean outside of the range 192.168.0). In the following command, the IPv4 address 192.168.0.1 is used as an example as both the gateway and DNS server. The complete command looks like this in our example (where a network cable is used for the internet connection):
The command lines above match the IPv4 addresses that you want to use for your Raspberry Pi, or where your router is assigned. Save the changes with ‘Ctrl + O’ and then press the enter key. Close the configuration file with ‘Ctrl + X’. Restart to adopt the newly assigned static IP address in the network:
Now use a ping command to check whether the Raspberry Pi is accessible in the network with its new IP address:
If the connection of the IP address was successful, you’ll see that you can reach it under the new IP address with a ping.
Static IP addresses for Raspberry Pi are sometimes vital
In summary, it should be noted that there are basically two different IP addresses that are relevant for Raspberry Pi (and projects using it): the private IP address of the Raspberry Pi within the local network, and the public IP address of its internet connection.
A static private IP address is primarily necessary if you want to use Raspberry Pi as a server . But if you access the minicomputer via SSH more frequently, you should assign in a static address in the same way. The possibilities outlined above detail how this can be achieved with relatively simple means.
Assigning a fixed public address that allows your Raspberry Pi to be accessed via the internet is somewhat more complicated. This is necessary, for example, when attempting to make your server installed on Raspberry Pi remain constantly available online. Most internet access is available only via a dynamic public IP address, which isn’t possible here. Since a static address isn’t offered by all internet providers (and if it is, then it’s usually relatively expensive), a DDNS service presents the best solutions. But for this, you have to know which forms of dynamic DNS are supported by your router.
Get the flexible infrastructure you need to meet any demand, from fully virtualised VPS to scalable cloud solutions.

We may receive a commission on purchases made from links.
Few do-it-yourself computing products have taken the world by storm like the Raspberry Pi, after it was first released in 2012. As single-board computers (or SPCs for short) go, the Pi, with its focus on maximizing computing power for the most affordable price possible, was eye-catching at its launch price of $35. As Raspberry Pi has evolved and upgraded to include features like the ability to emulate increasingly complex classic game consoles , its price has risen too. The latest iteration, the Raspberry Pi 5, currently retails for about $80.
As the flagship Raspberry Pi grew, older chips and shrinking technology made it possible for the company to provide even smaller and more affordable computers. Enter the Raspberry Pi Zero series , which launched in 2015. It's not as powerful as its more expensive counterpart, but it can still do a lot for a $10 board that's about the size of a large pack of chewing gum. Because it's not quite as powerful, it's not necessarily the best fit for some of the projects that the regular Pi is most often recommended for, but because it's tiny and inexpensive, a lot of alternative use cases are opened up for it, as well. Let's take a look at some projects that can make the most of Raspberry Pi's bargain board.
Playing 2D era classic video and computer games
The Raspberry Pi Zero is a lot less powerful than the flagship Raspberry Pi board, but it can still pack a punch. Standard Raspberry Pi boards can emulate console games into the "sixth generation" that includes the PlayStation 2 . The Raspberry Pi Zero, meanwhile, is able to handle games from pretty much every console and arcade system from before polygon-heavy 3D graphics became the norm.
On a more granular level, this means that you can use a Raspberry Pi Zero to emulate consoles as powerful as the Sega 32X and SNK Neo Geo, handhelds as recent as the Nintendo Game Boy Advance, personal computers as late as the 386 PC, and arcade games that don't rely on 3D graphics. That's still a heck of a lot of classic gaming content that you can run on a tiny $10 SPC. If you were a child of the '80s or '90s, or aspire to appreciate games from that time, then a Raspberry Pi Zero running RetroPie can get you pretty far. And the Zero is tiny enough that if you're a particularly sophisticated DIYer or are willing to buy a case/screen combo like the $79.99 Retroflag GPi , you can build your own handheld console around it.
A print server to turn an old printer into a wireless one
These days, people don't have much of a use for a printer very often. What was once a must-buy for most PC owners is now largely optional in a mostly-digital world. However, there are times when we still need one, such as when printing return labels for stuff we buy online. Maybe you don't want to spend $60 or more for a new wireless printer you'll occasionally use, but you have access to an older, hardwired printer. In that case, there is a way to modernize it into a wireless printer: Using a Raspberry Pi Zero as a wireless print server.
Parts-wise, this just requires the basics of the Pi Zero board, a microSD card with the operation system on it, and a USB cable. On the software side, you do need to know your way around a terminal window if you connect the Pi Zero to a monitor at first, and be comfortable with SSH if you run it "headless". Still, this is the kind of DIY project where that kind of thing is to be expected. Once you have the Common Unix Print System (CUPS) installed on the Pi Zero, you can log into it using another computer's web browser.
Smart speaker and/or networked music system
One popular way to harness the power of a Raspberry Pi Zero is to use it as the heart of a smart speaker, akin to an Amazon Echo or Sonos networked music speaker . Exactly how impressive you want to make it and how neat you want it to look depends on how much money and energy you want to put into it, but there are a lot of possibilities here.
Getting sound out of a Pi Zero requires some extra hardware, as it doesn't include its own audio output hardware to keep costs down. On the board itself, you have the option of buying the Speaker Bonnet add-on , a tiny 3W amplifier. Alternatively, you can use USB to feed a digital to analog converter (DAC for short), the likes of which come at many levels of quality and price points. There are also Raspberry Pi-specific DACs available from companies like HiFiBerry , so there are a lot of options regardless of how much you're able to spend.
Putting together a networked music system is fairly straightforward , but a smart speaker can be more complicated because it needs a microphone and programming for voice controls as well. Just how much more complicated it would be depends on how professional you want the end result to look in terms of case design, indicator lights, or other bells and whistles.
Streaming stick for your TV
An HDMI streaming stick for your TVs is an area where the prepackaged options run inexpensive enough that you're most likely not going into the project with the goal of saving money by using a Raspberry Pi Zero. In a world where the Google TV sticks and boxes from Onn, a Walmart house brand , start at less than $15 , there isn't much money to save by going the DIY route. But if you want to use the project as a way to learn how to make use of these $10 boards, then this is a relatively simple and inexpensive way to start.
The good news is that once you have the hardware working, there are a lot of different media center apps ranging from VLC to Plex that are available on Raspberry Pi OS , a Linux distro built for Pi boards. You could also pick a media-center-centric OS, like OSMC which is a Kodi-like Debian Linux, opening the DIY stick up to both your personal media library as well as whatever online content you can access via Kodi's add-on system.
Running Google's Android software on the Zero's aging chip is less likely, especially since nobody has appeared to have ported Google TV to the Zero. Maybe that's for the best, though. After all, the point is to tinker with a Raspberry Pi Zero, not duplicate a retail product. Maybe you're better off with something different, instead of duplicating the functionality of a $15 streaming stick.
Security system
One product category that's gotten really popular among smart home enthusiasts is security systems. Harnessing the power of the internet has made many security systems easier to use, thanks to features like cloud video storage and the ability to answer your door when you're not home. And with camera modules available for the Raspberry Pi Zero, a smart home security system is also something you can easily build if you're into DIY tech.
Camera modules compatible with the Raspberry Pi Zero start at about $10 , so this project won't break the bank, although just as with TV streaming sticks, you can get network-connected cameras for nearly the same price as the combined price of a zero and camera.
Software-wise, you can go with the free MotionEyeOS . You don't necessarily need a monitor attached to help set up the camera, but it might be worth using one at first boot to make sure everything is working correctly and to make it easier to determine the camera's IP address. The security software itself is accessed through a web interface, and once it's set up, it's relatively easy to use.
IMAGES
VIDEO
COMMENTS
How to Assign a Static IP to a Raspberry Pi. 1. Determine your Raspberry PI's current IP v4 address if you don't already know it. The easiest way to do this is by using the hostname -I command at ...
Choose "Edit connection". Pick the connection you want to set to static, and select "Edit…" on the right. Use the arrows on your keyboard to select the connection and the action button. Press Enter to confirm the selection. On the next window, scroll the cursor to the "IPv4 Configuration" line and select "Automatic".
Step 1: Get the IP address of Pi. If you want to use the current IP address as the static IP, This is very simple. In the terminal, type the following command: hostname -I. You may also use this command: ip a. Both will give you the current IP address of the Raspberry Pi.
It is very simple to set up your static ethernet address. Simply right-click on the Wi-Fi icon in the menu bar (top-right on the left of the speaker icon) and select the Wireless & Wired Network Settings. Now click the empty dropdown menu and select the network interface you want to configure. Now for IPv4 Address enter your chosen ip address ...
3. Reboot the Raspberry Pi With the dhcpcd.conf configuration file modified, restart your Raspberry Pi to effect the changes and set the static IP address for it: . sudo reboot. Rather than using an address assigned automatically by DHCP, the Raspberry Pi will now attempt to connect to the router using the new static IP address that you set in the dhcpcd.conf file.
If you're using your Raspberry Pi for storage as a NAS device, an FTP server—or any other kind of server for that matter—a static IP address can be a big help. 1 - Update Raspberry Pi OS. This guide should work with any Raspberry Pi using Raspberry Pi OS (formerly Raspbian). Make sure your copy of is up to date.
Upon rebooting, the Raspberry Pi will attempt to connect to the router using the static IP address we defined in our "dhcpd.conf" file. Run the following command to restart your Raspberry Pi. sudo reboot Testing the Static IP. 1. Once your Raspberry Pi has rebooted, you should be able to connect using the IP address you specified.
You can also set the static private IP address for your system through the Raspberry Pi OS GUI. The steps below demonstrate the GUI procedure. 1. Right-click the network adapter icon on the right side of the top panel. 2. Select the Wireless & Wired Network Settings item to open Network Preferences. 3.
Step 5 - Assigning the IP Address to the Connected Interface. My network has a DHCP range of 192.168.100 to 192.168.200, from which addresses will be automatically assigned, so I will assign my Raspberry Pi the address: 192.168.1.201. This is to make sure that it doesn't conflict with an existing IP (or the router's IP address, which is ...
For that you'll need its IP address! There are two main forms of IP address, dynamic and static. By default, your Raspberry Pi will have a dynamic IP address. This means that the IP address can change at any time - not ideal if you want to run your Raspberry Pi headless, as you'll need to keep checking and updating the IP address in your ...
Then, click on Wired and Wireless Network Settings. Right clicking on the Raspberry Pi task bar to access networking settings. In the Network Preferences window that shows up, select the interface you want to configure, then type your desired IP address, the IP address for your default gateway and DNS server, then click on Apply, followed by ...
By default the Pi is configured with a dynamic IP address. To assign it a static IP address, you need to add your static IP, default gateway IP, and domain name servers to the dhcpcd.conf file. At the command prompt, enter sudo nano /etc/dhcpcd.conf to edit the dhcpcd.conf file: Now, without changing anything else in the file, add this code at ...
4. Click on "Add" and enter the IP address of Raspberry Pi in the "Reserved IP Address" field. You can find the IP address of your RPi board by entering hostname -I in the Terminal. To find the MAC address of your RPi, scroll down and look for the client list mentioned on the same admin page.Next, give a name in the "Description" field and turn on the "Enable This Entry" checkbox.
If the reason you are contemplating a Static IP Address is you want your Pi to be assigned a predictable IP Address you can request the DHCP server to assign one. E.g. Adding the following to /etc/dhcpcd.conf will request an address on wlan0 and on eth0 .
Assign Static IP Address to Raspberry Pi Ethernet Interface Using dhcpcd Command. Raspberry Pi OS utilizes the dhcpcd client to configure TCP/IP for all its interfaces. dhcpcd is a daemon process always running in the background. Still, it also denotes the command line tool which can interact with the daemon process.
Next set the addressing from DHCP to static, nmcli con mod preconfigured ipv4.method manual. Restart the connection to pick up these changes, nmcli con up preconfigured. Check your new IP address with ip addr show wlan0 (or whatever device you are using). Lastly check your network connectivity by doing a quick ping using ping 8.8.8.8.
To assign an IP address to Raspberry Pi, use the command ' static ip_address= ' followed by the desired IPv4 address and the suffix ' /24 ' (an abbreviation of the subnet mak 255.255.255. ). For example, if you want to link a computer with the IPv4 address 192.168..4, then you need to use the command 'static ip_address=192.168..4 ...
However, this can change whenever you remove the Pi from the network e.g. turn it off. Having a static IP isn't essential, however it will make repeated access to the Raspberry Pi via SSH much simpler, as you'll always know that the Raspberry Pi has the same address. Imagine how much trouble your postman would have if your house constantly changed
YOURSTATICIP — Whatever static IP you want to assign to the Raspberry Pi. YOURROUTERIP — The gateway IP address acquired above. YOURDNSIP — The DNS IP address acquired above.
Almost every tutorial I found was focused on installing Pi-Hole and PiVPN on a local Raspberry Pi instead of on a VPS. The steps are mostly the same but there are some extra steps involved in securing the VPS to deny access from bad actors. ... However, since we are using a VPS, the static IP address has already been set for us. The networking ...
Once logged in, you can head to Network > Interfaces within OpenMediaVault, change the network preference from DHCP to Static, and assign a dedicated IP address. This will ensure your Pi remains ...
I have changed the IP address from DHCP to Static IP address into "/etc/dhcpcd.conf" and then simply I did a Reboot to the system to let the changes take effect, and unfortunately, that does not work, always, until I restart the the dhcpcd service by writing the command "sudo systemctl restart dhcpcd".
I am using a USB RJ45 dongle which I have fixed the IP to 192.168.1.2, however I cannot ping the ANTSDR on IP 192.168.1.10. ... Connecting to Raspberry Pi #2. Tissy opened this issue Jun 29, 2024 · 6 comments ... I'd use eth0 as the connection to the AntSDR and use the usb for Ethernet and assign it static, but something like 192.168.2.100 ...
To assign an IP address to Raspberry Pi, use the command ' static ip_address= ' followed by the desired IPv4 address and the suffix ' /24 ' (an abbreviation of the subnet mak 255.255.255. ). For example, if you want to link a computer with the IPv4 address 192.168..4, then you need to use the command 'static ip_address=192.168..4 ...
The Raspberry Pi Zero is a lot less powerful than the flagship Raspberry Pi board, but it can still pack a punch. Standard Raspberry Pi boards can emulate console games into the "sixth generation ...