- Advertising
- Privacy Policy
- Become an Author


How to set a static IP address on CentOS 8/ RHEL 8 / Oracle Linux 8

The entire ecosystem of the Red Hat Linux Enterprise family is used extensively on servers. Whether enterprise, small, or medium, RHEL-based distributions copy that segment along with Debian and Ubuntu. And in server management, it is common and frequent to use configurations over IP addresses. In this case, you will learn to establish a static IP address on CentOS 8, RHEL 8 and Oracle Linux 8.
How to set a static IP address on Centos 8 / RHEL 8 / Oracle Linux
Linux is a fairly flexible system and this results in several ways of doing the same process. In this case, it is the same, we will be able to establish a static IP address in several ways. To avoid unnecessarily lengthening the post, I will only show one single way.
It is advisable to read about static and dynamic IP addresses. This is because it is not always good to have them, although in an internal network it helps a lot to manage the services of that server. Even, at cluster level and related things, it is necessary to assign a specific address to a node .
So, let us start.
Using the Network scripts to set a static IP address
I think this is the most basic way to set a static IP address in CentOS 8, RHEL 8 and Oracle Linux 8. Because this way we will not have to install or use third-party tools to do the configuration. On the other hand, it is a bit rough for newbies.
First of all, you have to know what the network interfaces you have active are called. Let us suppose that we are going to define a static IP address to the ethernet wired network.
So, open a terminal and run the following:

In the screen output of the command, you will notice that they open several interfaces. In my case, there are only two. The local and another one called enp0s3 . That is the one we want to change.
Now open the configuration file of that network interface. I will use nano for it, if you do not have it installed you can do it.
The content of the file is quite explicit. However, to configure the static IP, it is enough to modify these elements:
Posted on TYPE="Ethernet" BOOTPROTO="none" NAME="eth0" IPADDR=192.168.250.105 NETMASK=255.255.255.0 GATEWAY=192.168.1.1 BROADCAST=192.168.255.255 DEVICE="eth0" ONBOOT="yes"
Also, if you want to use DNS, add these two options.
Next, save the changes and close the file.

It is now necessary to reload the networks profile so that the system knows that there have been changes.
Finally, restart the connection.
Now, check the new IP address with this command:

So, everything is OK.
In this post, you have learned to set a static IP address in CentOS 8, RHEL 8 and Oracle Linux 8. This way you will be able to manage some servers a little better and it is a very used network function. On the other hand, if you use any of these distributions as a personal system it is probably not useful.
You can also read How to set a static IP address on Debian 10 Buster?
Please share this post and join our Telegram channel.
- Oracle Linux
LEAVE A REPLY Cancel reply
Save my name, email, and website in this browser for the next time I comment.
Latest article
Create and administer student networking projects on linux, the use of linux in the field of artificial intelligence, linux commands for checking how much space is left on deck.
The "/etc/sysconfig/network-scripts/ifcfg-eth0" file holds the network configuration for the "eth0" adapter. If you have multiple network adapters, you would expect additional configuration files (eth1, eth2 etc.). The following example contains the configuration for a DHCP adapter.
The following example is for a static IP address.
The "/etc/hosts" file contains information for local name resolution.
The "/etc/resolv.conf" file is used to configure the location of the DNS servers to be used for name resolution. There can be multiple "nameserver" lines, one for each nameserver.
The current network settings are displayed using the ifconfig command.
The system-config-network-tui and system-config-network commands start a text-based network configuration tool.

Navigate using the "tab", "arrow" and "return" keys. The "Device configuration" option gives a list of network devices.

Selecting the device allows you to edit the adapter's network configuration, which is saved to the "/etc/sysconfig/network-scripts/ifcfg-eth0" file.

The "DNS configuration" option on the first screen allows you to modify the configuration in the "/etc/sysconfig/network" and "/etc/resolv.conf" files.

The network configuration can also be initiated using the setup command.
The "Network Connections" dialog is available from the menu (System > Preferences > Network Connections) at the console.

Highlighting the device and clicking the "Edit" button allows you to view or alter the configuration of a device.

For more information see:
- RHEL6 Documentation
- Linux man pages
- RHCSA and RHCE
Hope this helps. Regards Tim...
Back to the Top.
Created: 2012-03-24 Updated: 2019-07-31
Home | Articles | Scripts | Blog | Certification | Videos | Misc | About
About Tim Hall Copyright & Disclaimer
- This tutorial is available in an Oracle-provided free lab environment .
- It uses example values for Oracle Cloud Infrastructure credentials, tenancy, and compartments. When completing your lab, substitute these values with ones specific to your cloud environment.
Create VLANs on Oracle Linux
Introduction
VLANs or Virtual Local Area Networks allow the network to be divided into smaller logical sections, or broadcast domains, to better manage the amount of traffic being generated by the attached systems.
A VLAN separates multiple network devices into logical groups that can communicate as though they are attached to the same network, regardless of their actual physical location on the broadcast LAN.
VLAN tags are used to identify the separate VLAN networks, with network switches deciding how to route traffic within and between systems based on the VLAN tags.
This lab, demonstrates how to:
- Create a VLAN interface using the nmcli command
- Delete a VLAN interface using the nmcli command
- Create a VLAN interface using the ip command
- Delete a VLAN interface using the ip command
Prerequisites
- A cloud instance system with current release Oracle Linux installed
View Available Network Interfaces
Follow the instructions in Oracle Linux Lab Basics to see how to establish an SSH connection and log in to the ol-node01 instances.
The two relevant sections are:
- Copy Public IP Address
- Connect to Oracle Linux Instance
Use the nmcli device command to view available network interfaces.
Command output:
DEVICE TYPE STATE CONNECTION ens3 ethernet connected ens3 ens5 ethernet disconnected -- ens6 ethernet disconnected -- ens7 ethernet disconnected -- lo loopback unmanaged --
The output show four devices ens3 , ens5 ens6 , and ens7 . These network devices are currently disconnected (unused) and available. The next step is to create parent devices for the VLAN interfaces on some of these devices.
Create VLAN Interface Using nmcli
This task uses the nmcli command to create and manage VLANs.
Note: VLAN interfaces created with the NMCLI utility will still be present after a system reboot,
Use the sudo nmcli connection add type vlan command to create a VLAN connection.
Supply the following options:
- con-name : vlan10-con
- ifname : vlan10-if
- VLAN tag id : 10
Connection 'vlan10-con' (25152b16-aee2-4d99-90ad-e44b9c02eb40) successfully added.
Use the sudo nmcli device command to view the new VLAN connection.
DEVICE TYPE STATE CONNECTION ens3 ethernet connected ens3 vlan10-if vlan connecting (getting IP configuration) vlan10-con ens5 ethernet disconnected -- ens6 ethernet disconnected -- ens7 ethernet disconnected -- lo loopback unmanaged --
The output shows a new vlan10-if interface and a new vlan10-con connection using device ens5 with a vlan ID 10 . Output also shows its state as ‘connecting’. This is the default for the new VLAN interface because Dynamic Host Configuration Protocol, or DHCP, is used to acquire its IP settings.
Use the sudo nmcli connection command to view the UUID of the new vlan10-con connection.
Example output:
NAME UUID TYPE DEVICE vlan10-con 25152b16-aee2-4d99-90ad-e44b9c02eb40 vlan vlan10-if ens3 17b6d01f-368c-4628-8ed1-134c0f0f410d ethernet ens3
Assign an IP Address Using nmcli
This task configures a static IPv4 address to the vlan10 connection. When configuring manual IPv4 or IPv6 address settings, you can set static IP addresses, network masks, default gateways, and DNS servers.
Use the sudo nmcli connection modify command and supply the following values:
- The connection to modify: vlan10-con
- The ipv4.addresses command option
- The IP address and netmask: '192.168. 10.10./24'
Use the command ` sudo nmcli connection modify vlan10-con ipv4.method manual` to change the default DHCP setting.
Use the ip addr command to view the addresses assigned to the network interfaces.
Example partial output:
... ... 3: ens5: <BROADCAST,MULTICAST,UP,LOWER_UP> mtu 1500 qdisc mq state UP group default qlen 1000 link/ether 02:00:17:0a:15:4c brd ff:ff:ff:ff:ff:ff 4: ens6: <BROADCAST,MULTICAST,UP,LOWER_UP> mtu 1500 qdisc mq state UP group default qlen 1000 link/ether 02:00:17:0e:25:14 brd ff:ff:ff:ff:ff:ff 5: ens7: <BROADCAST,MULTICAST,UP,LOWER_UP> mtu 1500 qdisc mq state UP group default qlen 1000 link/ether 02:00:17:0a:d4:70 brd ff:ff:ff:ff:ff:ff 5048: vlan10-if@ens5: <BROADCAST,MULTICAST,UP,LOWER_UP> mtu 1500 qdisc noqueue state UP group default > > qlen 1000 link/ether 02:00:17:0a:15:4c brd ff:ff:ff:ff:ff:ff inet 192.168.10.10/24 brd 192.168.10.255 scope global noprefixroute vlan10-if valid_lft forever preferred_lft forever inet6 fe80::d4f3:8725:9352:d6ac/64 scope link noprefixroute valid_lft forever preferred_lft forever
Note: If the address does not appear for ‘vlan10-if@ens5’, run the ‘ip addr’ command again.
Change the State of VLAN Connections
Next, change the state of VLAN connections and their parent links. This task demonstrates the dependency between VLAN connections and parent links by changing the state of both.
Note: The output from the ip addr command in the previous task showed both the VLAN connection and its interface link as UP .
Run the command sudo nmcli connection down vlan10-con to deactivate the VLAN connection.
Connection 'vlan10-con' successfully deactivated (D-Bus active path: /org/freedesktop/> NetworkManager/ActiveConnection/12236)
Run the sudo nmcli connection command to view connections.
NAME UUID TYPE DEVICE System ens3 17b6d01f-368c-4628-8ed1-134c0f0f410d ethernet ens3 vlan10-con 25152b16-aee2-4d99-90ad-e44b9c02eb40 vlan --
The output shows the vlan10-con connection without an interface device listed.
Run the ip addr command again to view the state of the interfaces.
... ... 3: ens5: <BROADCAST,MULTICAST,UP,LOWER_UP> mtu 1500 qdisc mq state UP group default qlen 1000 link/ether 02:00:17:0a:15:4c brd ff:ff:ff:ff:ff:ff 4: ens6: <BROADCAST,MULTICAST,UP,LOWER_UP> mtu 1500 qdisc mq state UP group default qlen 1000 link/ether 02:00:17:0e:25:14 brd ff:ff:ff:ff:ff:ff 5: ens7: <BROADCAST,MULTICAST,UP,LOWER_UP> mtu 1500 qdisc mq state UP group default qlen 1000
The output still shows the ens5 parent link UP , but vlan10-if@ens5 is gone.
Run the sudo ip link set ens5 down command to change the state of ens5 .
The command does not return any output.
Run the command sudo nmcli connection up vlan10-con to activate the VLAN Connections.
Error: Connection activation failed: The device could not be readied for configuration Hint: use 'journalctl -xe NM_CONNECTION=25152b16-aee2-4d99-90ad-e44b9c02eb40 + NM_DEVICE=vlan10-if' to get more details.
Note: When the parent device is DOWN , it prevents the VLAN device from coming up.
Run the command sudo ip link set ens5 up to bring the VLAN parent device up.
Rerun the command sudo nmcli connection up vlan10-con to bring the VLAN device up.
Connection successfully activated (D-Bus active path: /org/freedesktop/NetworkManager/ActiveConnection/12249)
View VLAN Configuration Files
The /proc/net/vlan directory stores files containing configuration information about the configured VLAN interfaces.
Run the command ls -l /proc/net/vlan to list the configuration files in the directory.
total 0 -rw------- 1 root root 0 May 10 13:33 config -rw------- 1 root root 0 May 10 13:33 vlan10-if
Run the command sudo cat /proc/net/vlan/config to view the contents of the ‘config’ file.
VLAN Dev name | VLAN ID Name-Type: VLAN_NAME_TYPE_RAW_PLUS_VID_NO_PAD vlan10-if | 10 | ens5
The contents of config contains the VLAN name, its VLAN ID and associated device.
Run the command sudo cat /proc/net/vlan/vlan10-if to view its contents.
Configuration text:
vlan10-if VID: 10 REORDER_HDR: 1 dev->priv_flags: 1021 total frames received 0 total bytes received 0 Broadcast/Multicast Rcvd 0 total frames transmitted 18 total bytes transmitted 1248 Device: ens5 INGRESS priority mappings: 0:0 1:0 2:0 3:0 4:0 5:0 6:0 7:0 EGRESS priority mappings:
The contents of vlan10-if shows counts for transmitted and received frames and bytes, and any traffic priority settings for traffic in and out of this device.
Delete VLAN Interface Using nmcli
Next deactivate the connection.
Run the command sudo nmcli connection down vlan10-con to deactivate the connection.
Run the command ip addr to verify the device is no longer listed.
The VLAN connection is no longer listed.
Run the command sudo nmcli connection to list available connections.
The VLAN connection information is still present.
Run the command sudo nmcli connection delete vlan1-con to delete the connection.
Connection 'vlan10-con' (25152b16-aee2-4d99-90ad-e44b9c02eb40) successfully deleted.
The output shows the connection was successfully deleted. This can be verified by running sudo nmcli connection .
Create VLAN Interface Using ip
This task, uses the ip command to create and manage a VLAN.
Note: VLAN interfaces created using the ip command do not persist after a reboot of the system.
Run the ip link command to identify the existing network devices.
1: lo: <LOOPBACK,UP,LOWER_UP> mtu 65536 qdisc noqueue state UNKNOWN mode DEFAULT group default qlen 1000 link/loopback 00:00:00:00:00:00 brd 00:00:00:00:00:00 2: ens3: <BROADCAST,MULTICAST,UP,LOWER_UP> mtu 9000 qdisc mq state UP mode DEFAULT group default qlen 1000 link/ether 02:00:17:08:b9:1a brd ff:ff:ff:ff:ff:ff 3: ens5: <BROADCAST,MULTICAST,UP,LOWER_UP> mtu 1500 qdisc mq state UP mode DEFAULT group default qlen 1000 link/ether 02:00:17:0a:15:4c brd ff:ff:ff:ff:ff:ff 4: ens6: <BROADCAST,MULTICAST,UP,LOWER_UP> mtu 1500 qdisc mq state UP mode DEFAULT group default qlen 1000 link/ether 02:00:17:0e:25:14 brd ff:ff:ff:ff:ff:ff 5: ens7: <BROADCAST,MULTICAST,UP,LOWER_UP> mtu 1500 qdisc mq state UP mode DEFAULT group default qlen 1000 link/ether 02:00:17:0a:d4:70 brd ff:ff:ff:ff:ff:ff
Use ens6 to create a VLAN interface.
Run the command sudo ip link add and set ens6 as the physical device to use, vlan11-if as the interface name, vlan as the connection type, and set the VLAN I to 11 .
Rerun the ip link command to view the new VLAN.
1: lo: <LOOPBACK,UP,LOWER_UP> mtu 65536 qdisc noqueue state UNKNOWN mode DEFAULT group default qlen 1000 link/loopback 00:00:00:00:00:00 brd 00:00:00:00:00:00 2: ens3: <BROADCAST,MULTICAST,UP,LOWER_UP> mtu 9000 qdisc mq state UP mode DEFAULT group default qlen 1000 link/ether 02:00:17:08:b9:1a brd ff:ff:ff:ff:ff:ff 3: ens5: <BROADCAST,MULTICAST,UP,LOWER_UP> mtu 1500 qdisc mq state UP mode DEFAULT group default qlen 1000 link/ether 02:00:17:0a:15:4c brd ff:ff:ff:ff:ff:ff 4: ens6: <BROADCAST,MULTICAST,UP,LOWER_UP> mtu 1500 qdisc mq state UP mode DEFAULT group default qlen 1000 link/ether 02:00:17:0e:25:14 brd ff:ff:ff:ff:ff:ff 5: ens7: <BROADCAST,MULTICAST,UP,LOWER_UP> mtu 1500 qdisc mq state UP mode DEFAULT group default qlen 1000 . link/ether 02:00:17:0a:d4:70 brd ff:ff:ff:ff:ff:ff 5114: vlan11-if@ens6: <BROADCAST,MULTICAST> mtu 1500 qdisc noop state DOWN mode DEFAULT group default qlen 1000 link/ether 02:00:17:0e:25:14 brd ff:ff:ff:ff:ff:ff
Assign an IP Address Using ip
Now assign a static IP address to the VLAN.
Run the command sudo ip addr add to assign the ip address and netmask to the interface.
Run the command sudo ip link set vlan11-if up to change the state to UP
The command changes the state of the VLAN interface ( vlan11-if ) to UP .
Use the following commands to verify the VLAN connection state, and its assigned IP address.
Run the sudo nmcli connection :
NAME UUID TYPE DEVICE System ens3 17b6d01f-368c-4628-8ed1-134c0f0f410d ethernet ens3 vlan11-if 8da0b0b8-c72b-437b-b2ec-62670187d39e vlan vlan11-if
Run the ip addr command:
Partial command output:
... ... 4: ens6: <BROADCAST,MULTICAST,UP,LOWER_UP> mtu 1500 qdisc mq state UP group default qlen 1000 link/ether 02:00:17:0e:25:14 brd ff:ff:ff:ff:ff:ff 5: ens7: <BROADCAST,MULTICAST,UP,LOWER_UP> mtu 1500 qdisc mq state UP group default qlen 1000 link/ether 02:00:17:0a:d4:70 brd ff:ff:ff:ff:ff:ff 5114: vlan11-if@ens6: <BROADCAST,MULTICAST,UP,LOWER_UP> mtu 1500 qdisc noqueue state UP group default qlen 1000 link/ether 02:00:17:0e:25:14 brd ff:ff:ff:ff:ff:ff inet 192.168.11.11/24 scope global vlan11-if valid_lft forever preferred_lft forever inet6 fe80::17ff:fe0e:2514/64 scope link valid_lft forever preferred_lft forever
Delete a VLAN Using ip
Complete the steps to delete the VLAN device.
Run the command sudo ip link set vlan11-if down to bring the device connection down.
Run the command sudo nmcli device to view the state of the device.
DEVICE TYPE STATE CONNECTION ens3 ethernet connected ens3 ens5 ethernet disconnected -- ens6 ethernet disconnected -- ens7 ethernet disconnected -- lo loopback unmanaged -- vlan11-if vlan unmanaged --
The output shows the VLAN is present and unmanaged .
Run the sudo ip link delete command to delete the VLAN device.
Verify the connection is gone with the sudo nmcli device command.
The VLAN device is gone.
Run the sudo cat /proc/net/vlan/config file to view its contents.
VLAN Dev name | VLAN ID Name-Type: VLAN_NAME_TYPE_RAW_PLUS_VID_NO_PAD
The file shows all VLANs are gone.
For Additional Information
See other related resources:
- Oracle Learning Library
- Oracle Documentation
- Video: Create VLANs in Oracle Linux with the NMCLI and IP Utilities
More Learning Resources
Explore other labs on docs.oracle.com/learn or access more free learning content on the Oracle Learning YouTube channel . Additionally, visit education.oracle.com/learning-explorer to become an Oracle Learning Explorer.
For product documentation, visit Oracle Help Center .
Copyright © 2022, Oracle and/or its affiliates.
How to Set Static IP Address and Configure Network in Linux
If you are a Linux system administrator, time will come when you will need to configure networking on your system. Unlike desktop machines where you can use dynamic IP addresses, on a server infrastructure, you will need to setup a static IP address (at least in most cases).
Read Also: How to Set or Change System Hostname in Linux </p
This article is meant to show you how to configure static IP address on most frequently used Linux distributions.
For the purpose of this tutorial, we will use the following Internet Protocol version 4 (IPv4) details:
Configure Static IP Address in RHEL/CentOS/Fedora:
To configure static IP address in RHEL / CentOS / Fedora , you will need to edit:
Where in the above "ifcfg-eth0" answers to your network interface eth0 . If your interface is named “ eth1" then the file that you will need to edit is "ifcfg-eth1" .
Let’s start with the first file:
Open that file and set:
Note : Make sure to open the file corresponding to your network interface. You can find your network interface name with ifconfig -a command .
In that file make the following changes:
You will only need to edit the settings for:
- DNS1 and DNS2
Other settings should have already been predefined.
Next edit resolve.conf file by opening it with a text editor such as nano or vi :
Once you have made your changes restart the networking with:
Set Static IP Address in Debian / Ubuntu
To setup static IP address in Debian / Ubuntu , open the following file:
You may see a line looking like this:
Change it so it looks like this:
Save the file and then edit /etc/resolv.conf like this:
Restart the networking on your system with:
Your static IP address has been configured.
Conclusion:
You now know how to configure a static IP address on a Linux distro. If you have any questions or comments, please do not hesitate to submit them in the comment section below.
Previous article:
Next article:

Each tutorial at TecMint is created by a team of experienced Linux system administrators so that it meets our high-quality standards.
Related Posts

How to Set GRUB2 Password in RHEL-based Systems

How to Assign Multiple IPs to a Single Network Interface in Linux

The Power of Linux “History Command” in Bash Shell

Ncdu – A Powerful NCurses-Based Disk Usage Analyzer for Linux

How to Add Text to Existing Files in Linux

How to Check How Long a Process Has Been Running in Linux
32 thoughts on “How to Set Static IP Address and Configure Network in Linux”
The time will come when you will need to configure networking on your system. Unlike desktop machines where you can use dynamic IP addresses, on a server infrastructure, you will need to set up a static IP address (at least in most cases).
Terrible – and my ‘ linux distro ‘ isn’t the same as yours, there’s no ‘ /etc/sysconfig/ ‘ folder.
In Ubuntu 20.04 there is no interfaces file they switch to netplan . If you can update this article to include the new change it will help a lot.
thanks Raouf
Well, this isn’t correct. Just trashed my Linux mint distro
Is it public Static IP? or can I use to access data from other networks?
Failed to restart network.service: Unit network.service not found.
I’m asking a question on a fairly old thread, but just in case, is it possible to do this on a WIFI network?
For example, when using the first command (# nano /etc/network/interfaces ) in Ubuntu, the result I see is:
There isn’t an “ eth0 ” on my server because it is connected by WIFI only. Will it still work using another option?
Yes it will work I think so, just change the settings in the interfaces file as explained in this article.
I set the static IP in ifcfg-eth0, added HWADDR and UUID, but on reboot system does not associate the IP to eth0.
This is VM. Any idea why its happening and steps to troubleshoot.
I think you need to make sure that you select “ manual ” and the correct IP address, subnet mask, and gateway and save the configuration as explained in the article. Also, I personally would select a new and different IP address, so that you can really check if it has been saved by opening the terminal and typing:
after a restart.
If i set ip address as static am not able to ping google.com why and also packages are not installed.
Please give me reply as soon as possible.
@Rajeshkar,
Please add the DNS Name servers in your /etc/resolv.conf file..
@Ravi Saive thanks for your reply , yes i did /etc.resolv.conf also but getting the same problem
@Rajesekar,
The file is /etc/resolv.conf , in this file add your DNS name servers for example.
When I enter the /etc/resolv.conf file, what is it supposed to look like? And when you say “edit” do you mean delete what’s there and write what you’ve provided, or just add new lines?
Hello Marin, Thank you very much for this article. It was a major help in my class project. This is my first time using a vm and it is an awesome learning experience. I’m really glad I ran into this article, it was well written and easy to follow.
Just wanted to say a million thank you’s for this well-written, comprehensive and easily-understood article! Awesome stuff! A real lifesaver too, as I had to quickly configure a static IP for myself to get access to remote computing. Thank you! :-D
A question from a linux newbie. Does this instruction apply for both ubuntu running on my desktop PC as well as debian linux on an embedded board?
Yes, the instructions will works on any Debian/Ubuntu based distribution without any issues..have you tried on your embedded board? does these instructions worked? let us know.
Hi Ravi, thanks for your reply.
Default the folder /etc/sysconfig does not exist on my embedded system. Of Course i could create it as well as the files mentioned, but it would be out of the context of this instructions.
Thanks, Rob
I found here very good stuff! You are doing an excellent job and I like your site! Thanks!
Thanks for finding this site very useful and thanks for appreciating our work, Keep visiting for more such useful articles…
Great job, I was I actually looking for an article like this one. So thank you so very much. Keep up the good work.
Thanks for appreciating and finding this article useful, keep connected to Tecmint for such wonderful articles…:)
What if I have 2 NICs on my server one for LAN & one for WAN and I want to set one of them (WAN) as default gateway? How to configure this server as gateway and as a router.
The easiest way to add default gateway using route command as shown:
Don’t forget to replace the gateway IP address and interface-name in the above command.
One can also use following command to setup static IP on eth0 interface for example. # ifconfig eth0 192.168.1.1 netmask 255.255.255.0 up # route add default gw 192.168.0.1 # service network restart
Thanks for the tip, but I think setting IP address directly from the commandline using ifconfig and route will only allow you to set temporarily, once you reboot, these settings disappears. So, the best option to set static IP address permanently in network configuration files only….
wipe on reboot, so that best option is to set permannetly
Hello Ravi, What is difference between the service “NetworkManager” and “network”
@Augustine,
This article will help you to understand the difference between and NetworkManager and Network: http://askubuntu.com/questions/1786/what-is-the-difference-between-network-manager-and-ifconfig-ifup-etc
Why do we need to specify DNS in both ifcfg-eth0 and resolvlf.conf?
Hello Augustine,
Actually if you have added the DNS servers in the ifcfig-eth0 file the DNS servers will be automatically added to /etc/resolv.conf. You can skip defining the DNS servers in the ifcfig-eth0 file, but then you will need to have them set in /etc/resolv.conf manually. It’s a good practice to make sure that the DNS servers are specified correctly in both files, this is why the article says to set them in both files.
Got something to say? Join the discussion. Cancel reply
Thank you for taking the time to share your thoughts with us. We appreciate your decision to leave a comment and value your contribution to the discussion. It's important to note that we moderate all comments in accordance with our comment policy to ensure a respectful and constructive conversation.
Rest assured that your email address will remain private and will not be published or shared with anyone. We prioritize the privacy and security of our users.
Save my name, email, and website in this browser for the next time I comment.
Stack Exchange Network
Stack Exchange network consists of 183 Q&A communities including Stack Overflow , the largest, most trusted online community for developers to learn, share their knowledge, and build their careers.
Q&A for work
Connect and share knowledge within a single location that is structured and easy to search.
VirtualBox host only adapter interface doesn't get an IP address in Oracle Linux 8
I have configured two VMs with Oracle Linux 8 on VirtualBox. Each VM:
- Adapter 1 : NAT, each has connectivity to the internet
- Adapter 2 : Host only adapter, Which doesn't shows a IP address!
Each configured with the same Hhost only adapter DHCP server.

- Host only adapter interface is enp0s8
- Nat interface is enp0s3

What am I missing here? Why does interface enp0s8 has no IP addres and why doesn’t the manual IP assignment work?
- oracle-linux
- I think this is an old bug in VirtualBox. Try to exchange the adapters, so Adapter 1 is the Host Only. – harrymc May 17, 2022 at 19:36
- @harrymc , Well I tried to do so , But then I didn't had an IP address for my Adapter 2 , which is the NAT interface , so I didn't had internet connectivity. Very strange... Thanks – Arik Jordan Graham May 18, 2022 at 20:05
- If the DHCP of the host-only network isn't working, static IPs might be the solution. Try perhaps to reinstall VB, hopping you're using the latest version. – harrymc May 18, 2022 at 20:31
3 Answers 3
There's been ongoing discussion on the answer posted by John . But I didn't find those answers/discussions working towards a plausible resolution. May be I missed something? But surely I read tons of articles/posts by now.
So here's my answer which should resolve the issue of the main question relating to assigning IP address while using Host Only Network Adapter.
When I spin-up a virtual machine with a Host Only Network Adapter by default, the VM doesn't get an IP on an interface called enp0s8 . This interface is valid for Debian 10. But, I am able to see an IP is assigned to enp0s3 interface. Yes, all the preceding comments are correct mentioning IP does not get assigned! However, the idea of assigning a VM to a Host Only Adapter is to be able to communicate to this new VM from host machine. And since, there's no IP assigned to this VM, host machine simply will not be able to connect to it.
For Debian/Ubuntu OS, you need to edit this file /etc/network/interface .
Then update the file with below contents. Note, there are 4 spaces for address and netmask directives.
Please note, I set up static instead of dhcp . This we should be able to assign a static IP to a particular VM. Now, perform restart on the VM.
Do a ping test from host machine with VM static IP: 192.168.56.11 . You should be able to ping success result. As such, you should be able to connect to this VM using SSH login as well i.e., ssh [email protected] . Use the username and password of your VM OS.
Hope this helps someone!
- 1 thanks a lot. After a few hours of trying, this is what worked for me – Allan Vital Dec 9, 2022 at 11:29
Simply, request a new IP from DHCP server:
Virtualbox host only adapter interface doesn't get an IP
That is entirely normal.
A Host Only Adapter is isolated and does not include Internet. The Host Only machine should be able to communicate with the Physical Host Machine, and then would have an IP on the Host Machine.
Change the Host Only Adapter to NAT if you wish it to have Internet Access.
To avoid confusion, here is a decent article on connecting a Host Only VM to a Host machine
Connect a Host Only VM to Host
Create the Virtual Network First, you must set up a virtual network that the host-only adapter(s) will communicate through. In the VirtualBox window, click File > Host Network Manager > Create. Check Enable under the DHCP Server column of the network you just created. Select your network and click Properties. In the Adapter Tab, select Configure Adapter Manually and use the following settings: IPv4 Address: 192.168.56.1 IPv4 Network Mask: 255.255.255.0 In the DHCP Server Tab, make sure that Enable Server box is checked, and use the following settings: Server Address: 192.168.56.100 Server Mask: 255.255.255.0 Lower Address Bound: 192.168.56.3 Upper Address Bound: 192.168.56.254 Click Apply and then Close Add a Host-Only Adapter to the Guest Machine For each guest you want to communicate with using the network from the previous step, you need to add a host-only adapter. Select the appropriate guest machine Click Settings > Network Under the Adapter 2 tab, input the following settings: Enable Network Adapter: Checked Attached to: Host-Only Adapter Name: vboxnet0 (NOTE: this should be the name of the network you created in the previous steps) Click OK
- 1 Having an IP address is not related to having Internet access. VirtualBox has a built-in DHCP server which is supposed to issue IP addresses to VM guests in this case. – u1686_grawity May 17, 2022 at 18:48
- This is not correct , the VM should have been assigned a ip address from the DHCP pool. I have tried it on another VM before and It did assigned me an IP address , But this time I am not sure what I'm missing. Thanks anyway – Arik Jordan Graham May 18, 2022 at 20:00
- A Host Only VM does not have Internet access, and only talks to its host. So it should not be part of a general DHCP pool. That would defeat the purpose of a Host Only machine – John May 18, 2022 at 20:21
- I amended my answer to illustrate how to connect an isolated Host Only VM to its host – John May 18, 2022 at 22:19
- DHCP pool does not required to be an Internet feature , It's a network feature. Anyway , How would you recommend to setup a VM with a internet connection and with a connection to other VMs. Thanks – Arik Jordan Graham May 20, 2022 at 8:29
You must log in to answer this question.
Not the answer you're looking for browse other questions tagged networking virtualbox oracle-linux ..
- The Overflow Blog
- Want to be a great software engineer? Don’t be a jerk.
- Climbing the GenAI decision tree sponsored post
- Featured on Meta
- New Focus Styles & Updated Styling for Button Groups
- Upcoming initiatives on Stack Overflow and across the Stack Exchange network
- Google Cloud will be Sponsoring Super User SE
Hot Network Questions
- Why does one airliner fly along the coast and the other doesn't?
- Why does a 1:1 transformer preserve voltage?
- Was Eliphaz in Genesis related to Eliphaz in Job?
- Where is the large cook promotion?
- Concentration of probability in reinforcement learning algorithms
- Colorbar to illustrate the change of a specific parameter
- python cprofile decorator
- How do I deal with crying in front of my supervisor?
- Suitable closed form for the A079501
- difference between 開発元 and 開発者
- Post-apocalyptic movie from the 1980's; mutants live in a wasteland and are assigned color-codes that dictate who they can mate with
- Clifford group without the phase gate
- Is this formula already known?
- What is the most efficient way to find the area of a circle given three points on the rim
- Painting wood cabinets. Do I have to start over?
- What is the purpose of this "add with carry" adc instruction (x86)?
- How could Venus be partially terraformed?
- How can I get unicode-math to print ⩽ when I type ≤?
- "Entrance exam" homework assignment for 3rd-year algorithms?
- NSF grant proposal not reviewed despite being received
- SRID in PostGIS -> ST_SRID !== Find_SRID
- Are wider tires on a road bike a good idea?
- Efficient Algorithm for Scheduling 140 Predefined 1:1 Meetings with Variable Participant Constraints Over 7 Slots?
- Am I in my rights to ask a colleague to not take notes on everything I say outside a meeting?
- Install App
Infrastructure Software
For appeals, questions and feedback, please email [email protected]
How to configure IP addresses on Oracle Linux
I am trying to install Oracle Linux 7 on a VirtualBox 4.1.3. However I am a core DBA and not a sysadmin and am facing many difficulties. While trying to configure IP addresses I am getting following error:
cannot find device eth0
This is only one issue. I have to do many things such as installing rpms required for Oracle 11gR2 RAC, configure shared storage, etc which will also pose many problems. Do I need to master all these sysadmin activities by reading concepts manuals, etc. or there is a easier workaround? My aim is to install 11gR2 RAC and Grid Infrastructure.
- PRO Courses Guides New Tech Help Pro Expert Videos About wikiHow Pro Upgrade Sign In
- EDIT Edit this Article
- EXPLORE Tech Help Pro About Us Random Article Quizzes Request a New Article Community Dashboard This Or That Game Popular Categories Arts and Entertainment Artwork Books Movies Computers and Electronics Computers Phone Skills Technology Hacks Health Men's Health Mental Health Women's Health Relationships Dating Love Relationship Issues Hobbies and Crafts Crafts Drawing Games Education & Communication Communication Skills Personal Development Studying Personal Care and Style Fashion Hair Care Personal Hygiene Youth Personal Care School Stuff Dating All Categories Arts and Entertainment Finance and Business Home and Garden Relationship Quizzes Cars & Other Vehicles Food and Entertaining Personal Care and Style Sports and Fitness Computers and Electronics Health Pets and Animals Travel Education & Communication Hobbies and Crafts Philosophy and Religion Work World Family Life Holidays and Traditions Relationships Youth
- Browse Articles
- Learn Something New
- Quizzes Hot
- This Or That Game New
- Train Your Brain
- Explore More
- Support wikiHow
- About wikiHow
- Log in / Sign up
- Computers and Electronics
- Operating Systems
How to Assign an IP Address on a Linux Computer
Last Updated: July 28, 2022 Tested
Debian, Ubuntu, & Linux Mint
Red hat, centos, & fedora.
This article was co-authored by wikiHow staff writer, Jack Lloyd . Jack Lloyd is a Technology Writer and Editor for wikiHow. He has over two years of experience writing and editing technology-related articles. He is technology enthusiast and an English teacher. The wikiHow Tech Team also followed the article's instructions and verified that they work. This article has been viewed 728,433 times. Learn more...
This wikiHow teaches you how to assign a new IP address to your computer when using Linux. Doing so can prevent connection issues for the item in question.

- Press Ctrl + Alt + T or Ctrl + Alt + F1 (if you're on a Mac, substitute the ⌘ Command key for Ctrl .
- Click the text box at the top or bottom of the screen if possible.
- Open the Menu window and find the "Terminal" application, then click on it.

- A "root" account is the Linux equivalent of an Administrator account on a Windows or Mac computer.

- The top item should be your current router or Ethernet connection. This item's name is "eth0" (Ethernet) or "wifi0" (Wi-Fi) in Linux.

- In most cases, this is the "eth0" or "wifi0" item.

- To assign an IP of "192.168.2.100" to your ethernet connection ("eth0"), for example, you'd enter sudo ifconfig eth0 192.168.0.100 netmask 255.255.255.0 here.

- If you have a different DNS server address that you would rather use, enter that in the place of 8.8.8.8 .

- 5 Find the network connection that you want to change. This will normally be the Ethernet or Wi-Fi connection, which has an IP address currently listed on the right side of the window.

- For a network named "eno12345678", for example, you'd enter vi ifcfg-eno12345678 here.

- BOOTPROTO - Change dhcp to none
- Any IPV6 entry - Delete any IPV6 entries entirely by moving the cursor to the I on the left and pressing Del .
- ONBOOT - Change no to yes

- For example: to use "192.168.2.23" as your IP address, you'd type in IPADDR=192.168.2.23 and press ↵ Enter .
- Type in PREFIX=24 and press ↵ Enter . You can also enter NETMASK=255.255.255.0 here.
- Type in GATEWAY=192.168.2.1 and press ↵ Enter . Substitute your preferred gateway address if different.

Expert Q&A
- Some very specific Linux distributions will require you to go through a different process to assign an IP address. To see your specific distribution's specifications, check online. Thanks Helpful 0 Not Helpful 0
- Don't forget to switch back to the regular (non-root) user account when you're done. Thanks Helpful 1 Not Helpful 1
You Might Also Like

- ↑ https://danielmiessler.com/study/set_ip/
- ↑ https://www.youtube.com/watch?v=oQd5eG9BZXE&t=
About This Article
- Send fan mail to authors
Reader Success Stories
Buddy HaDagi
Jan 27, 2017
Is this article up to date?

Dmitry Ugay
Oct 10, 2017

Featured Articles

Trending Articles

Watch Articles

- Terms of Use
- Privacy Policy
- Do Not Sell or Share My Info
- Not Selling Info
Keep up with the latest tech with wikiHow's free Tech Help Newsletter
Set Static IP Address on Raspberry Pi

Recently, I set up Jellyfin media server on my Raspberry Pi. My Pi is wirelessly connected to the router and one problem I faced with this setup is accessing the media server on the TV or other devices.
Why? Because the Pi got assigned a random IP address at times between reboots. And since I was trying to access the media server running on Raspberry Pi though the IP address, it became an issue.
I had to manually enter the IP address on the TV every time the IP address changed. Finding the IP address of the Raspberry Pi was another challenge.
This is where static IP comes into play. If you Pi uses static IP, the IP address remains the same between the reboots.
This is one of the many scenarios where you are better off with a static IP assigned to your Pi. And in this tutorial, I'll discuss how you can achieve that.
Assigning static IP on Pi device vs on the router
Yes! There are two approaches for your Pi to have a static IP.
- You can set static IP on the Raspberry Pi itself
- You can have your router assign a static IP to the Pi
Both methods have their pros and cons.
Let's say you set the static IP on the Raspberry Pi . Your Pi will always seek the same IP address from the router (let's say 192.168.1.51). That's fine as long as the router remains the same. If you change your router and the new router insists on using a different subnet (let's say in the 172.16.12.0/32 range), then your PI won't be connected to WiFi like before. You'll have to manually update the network settings on the Pi again to use the new IP range. This could work when you just a couple of Pi devices and you can directly login to them (instead of SSH) or connect to them via Ethernet cable. For a fleet of Pis in random locations in the house.
Let's say you want to assign the Pi a static IP from the router . This way, you are changing nothing on the Pi. If you change the router, the Pi will get an IP address assigned automatically through the DHCP server. The problem is that it's not easy to assign static IP to devices on all the routers. Some internet companies provide routers with very little scope of configuration changes.
I cannot show how to assign static IP to different devices on the router, as it depends on what kind of router you have. So, I'll discuss how you can set static IP on the Raspberry Pi itself.
Setting static IP on Raspberry Pi
The procedure comprises the following four steps:
- Get the current IP address of the Pi (if you want to use this one as static IP)
- Get the gateway IP (router's IP)
- Get the DNS server address (optional)
- Use the above information to change network configuration
The first three steps can be easily done in the command line. The third step can be done easily in both the command line and GUI.
Step 1: Get the IP address of Pi
If you want to use the current IP address as the static IP,
This is very simple. In the terminal, type the following command:
You may also use this command:
Both will give you the current IP address of the Raspberry Pi.

As you can see in the screenshot above, my Raspberry Pi's IP address is 192.168.1.34.
Step 2: Get the gateway IP
This is also quite simple. To get the gateway IP address (your router's IP address), use this command:
As you can see in the screenshot below, the gateway IP in my case is 192.168.1.1.

Step 3: Get the DNS server details (optional)
Some people like to keep the same DNS server which is currently being used on the system. I think you can do without that as well. Most home users have the DHCP server handle it automatically anyway.
Still, if you want, you can get the DNS server address with:

Step 4 (Terminal Method): Change network configuration to set static IP
If you are accessing Raspberry Pi via SSH or if you prefer the command line, you can use the nmtui (network manager in terminal) tool.
Run this command:
You'll see an interface like this. Here, select Edit a connection and press Enter.

It will show the connections you have had in the past on your Pi. I believe you want to set the static IP for the currently connected network. Move down to the appropriate network. Now press tab a couple of times to select the Edit option and press enter.

Use the arrow key to scroll down to the IPv4 CONFIGURATION option. Change it from Automatic to Manual .

Next, select the Show option of IPv4 CONFIGURATION line.

Use the arrow keys to move down again and reach the IPv4 CONFIGURATION section again. This time you'll see option to add Address, Gateway and DNS servers.

Go to the Addresses line and click enter key. It may take you to the beginning. Scroll down back again.

Fill all the details such as IP address with mask, Gateway IP and DNS.

If you notice above, I used the gateway IP in DNS too. I also added 1.1.1.1, DNS of Cloudflare as an alternative.
After filling all the details, scroll down to the bottom, select OK and press enter.
Your changes are saved. You can exit the nmtui interface the same way (press Back and then Quit options).
Restart your Pi for the changes to take effect. You have successfully set up static IP on Raspberry Pi.
Step 4 (GUI Method): Change network configuration to set static IP
The same can be achieved from the graphical interface of Raspberry Pi OS.
First, click on the network icon and then go to the Advanced options and click Edit connections.

Here you go to IPv4 Settings, set it to manual and then add all the details such as IP address, mask, gateway IP, DNS server etc. You have all the details.

Restart your system and you can see that the static IP is now set on your Pi.
Going back to non static IP
If you don't want to use static IP anymore on Raspberry Pi, you can easily revert the steps and go back to dynamic IP.
How? Simply edit the network connection in question again. This time, change the IPv4 configuration to 'automatic' and save your changes. And that's it. You don't have to provide IP address, gateway IP etc anymore.
As I mentioned at the beginning of this tutorial, you should use a static IP from the router end specially if your Pi won't be easily accessed physically.
But if your device is in your hands all the time, you have the liberty of accessing and changing its configuration.
I hope you find this tutorial on setting a static IP on Raspberry Pi helpful. Please let me know if you have any questions.
Abhishek Prakash
Created It's FOSS 11 years ago to share my Linux adventures. Have a Master's degree in Engineering and years of IT industry experience. Huge fan of Agatha Christie detective mysteries 🕵️♂️
How to Install Ubuntu Desktop on Raspberry Pi 4
How to install raspberry pi's raspbian os with pixel desktop on any computer, behold here is a $89 open source laptop running linux, run llms locally on raspberry pi using ollama ai, raspberry pi 3 vs 4: which one should you get, become a better linux user.
With the FOSS Weekly Newsletter, you learn useful Linux tips, discover applications, explore new distros and stay updated with the latest from Linux world

Great! You’ve successfully signed up.
Welcome back! You've successfully signed in.
You've successfully subscribed to It's FOSS.
Your link has expired.
Success! Check your email for magic link to sign-in.
Success! Your billing info has been updated.
Your billing was not updated.
By continuing to use our website, you agree with our use of cookies in accordance with our Cookie Policy . You can reject cookies by changing your browser settings.

VeeamON 2024 | #BounceForwardThrowback (Win Custom Shoes!)
- Blogs and Podcasts
Announcing Support for Oracle Linux KVM!
- 7 days ago 2 April 2024
- Not a newbie anymore
Hot off the presses! Today, we’re announcing the general availability of the newest entry to our long list of supported hypervisors, with the addition of Oracle Linux KVM. As some of you may be aware, Veeam Backup & Replication has been supporting Red Hat Virtualization for several years now, which runs oVirt and KVM under the hood. Although Red Hat has stopped development on RHV in favor of OpenShift, Veeam Backup & Replication will continue supporting RHV as a source until December 2026 .
But let’s focus on what’s new: Oracle Linux KVM support as a source. The process to get up and running is straightforward: just download the oVirt KVM plug-in and install it on your VBR server. Once completed, you can head back into the console and go to Inventory à Add Server, and you’ll now see Oracle Linux KVM listed as an option.
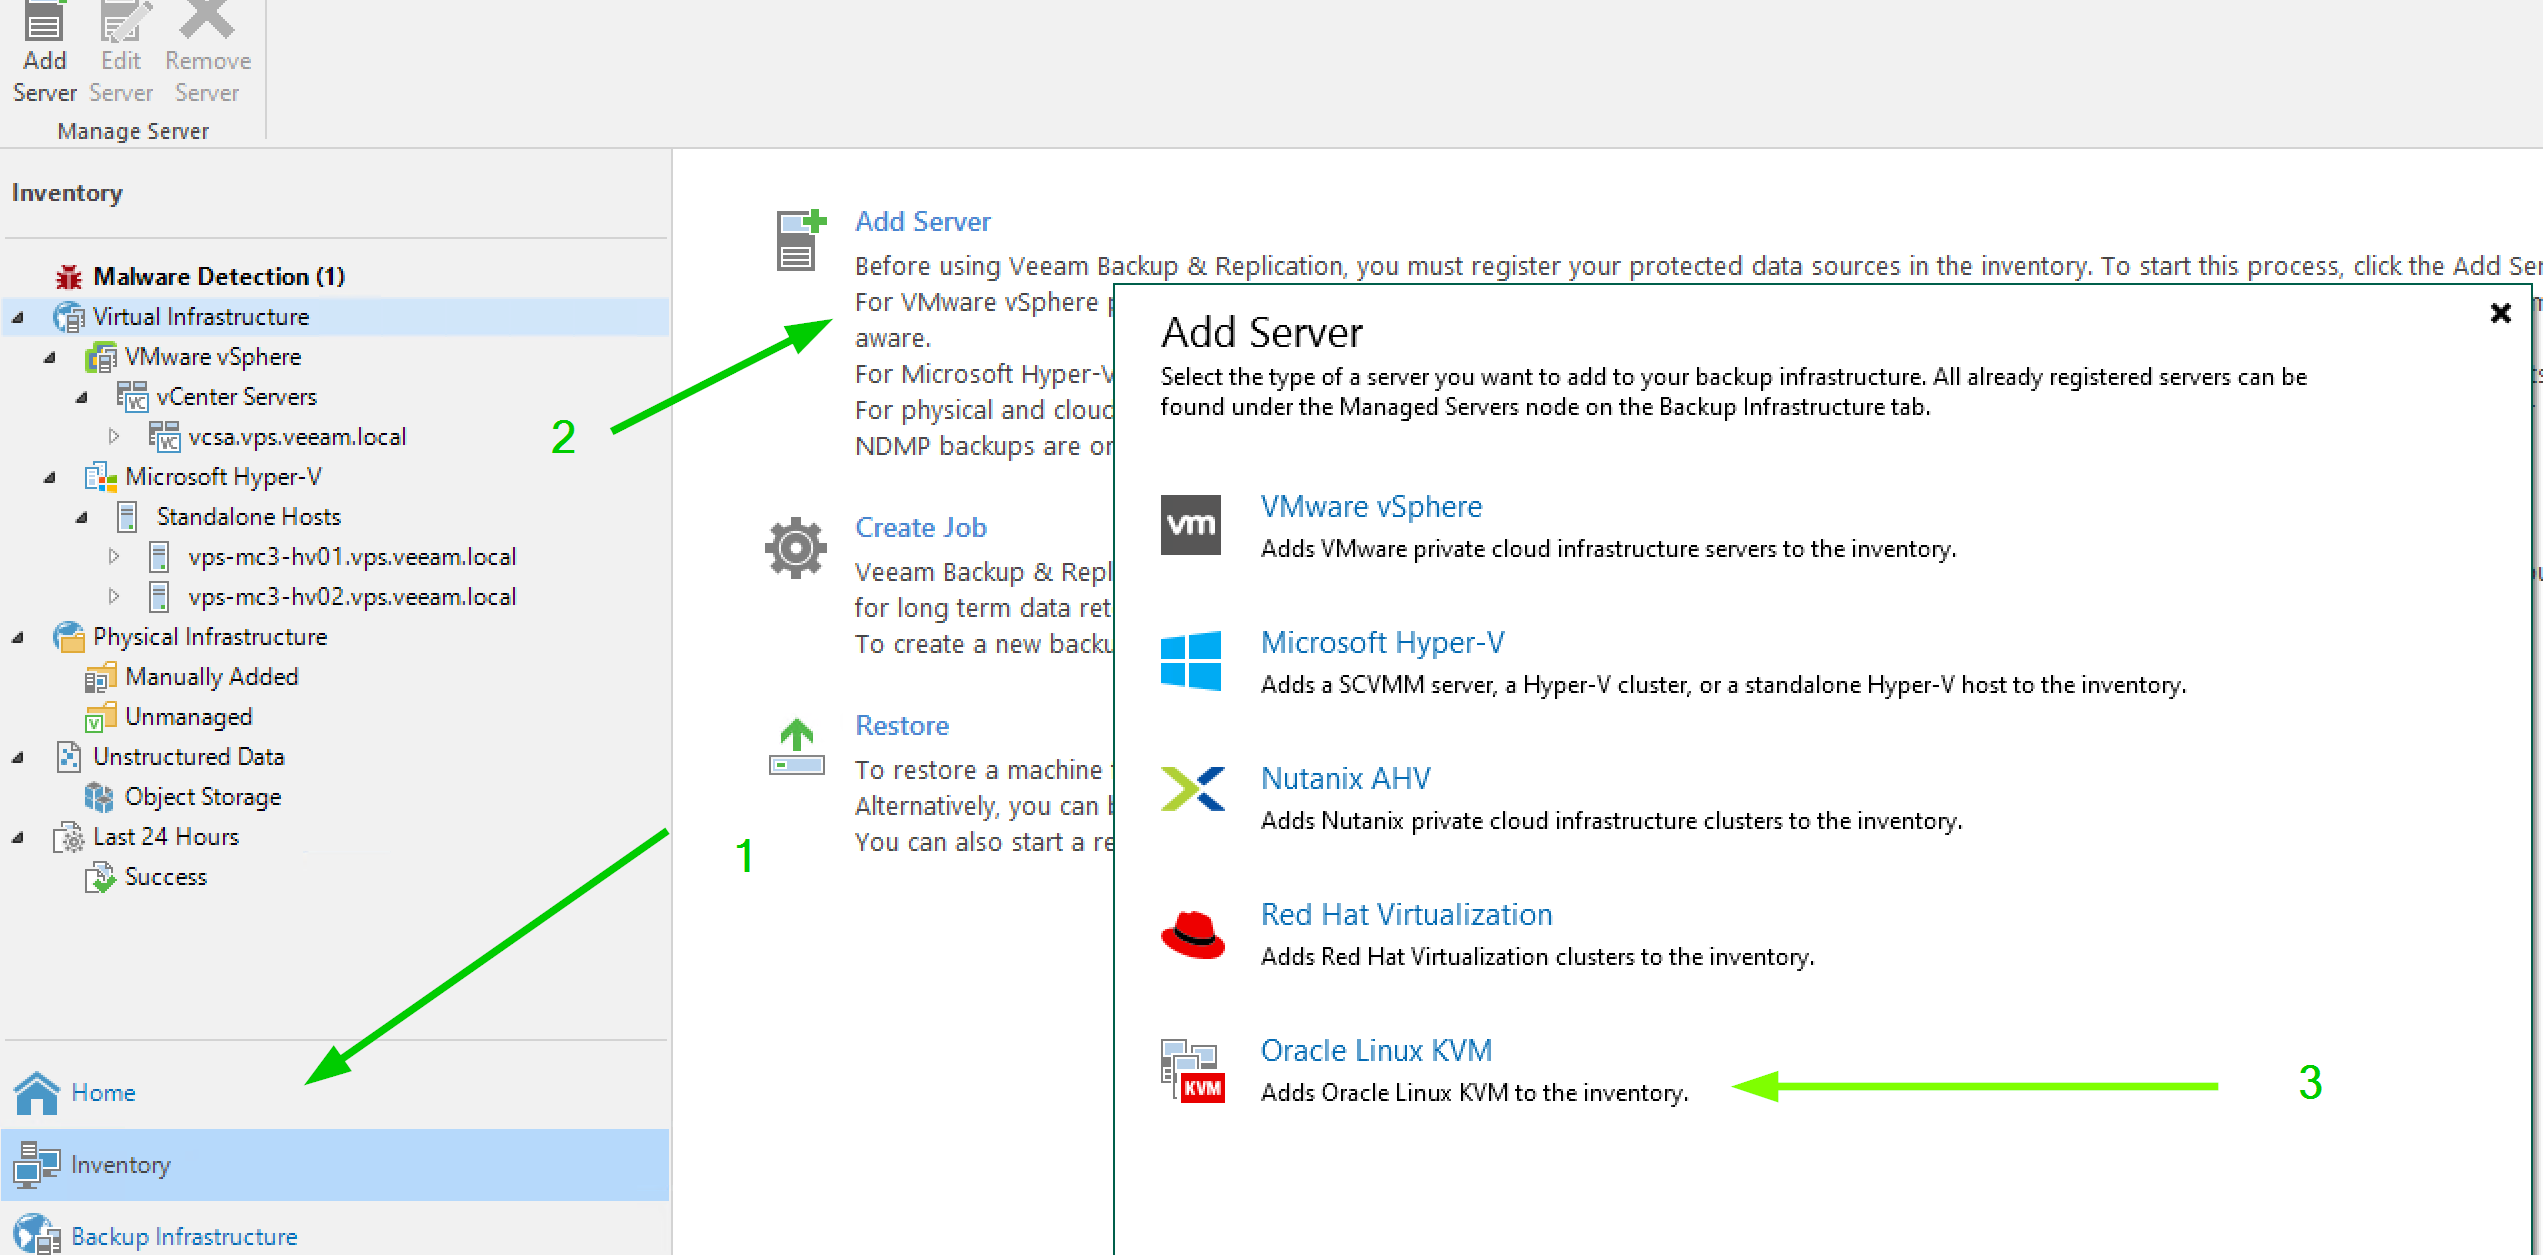
The experience of adding a server is very similar to what Veeam users have come to expect: Just provide a DNS name or IP address, followed by credentials, and then you’ll be ready to start protecting workloads. But, as we all know, protecting workloads is only helpful if you can actually perform a restore.
One quick note: Previously, an account such as admin@internal would work, but after some digging, I found that as of oVirt 4.5.1 the authentication engine was changed to Keycloack. If you run into trouble when it comes to credentials, try the username format of admin@ovirt@internalsso.
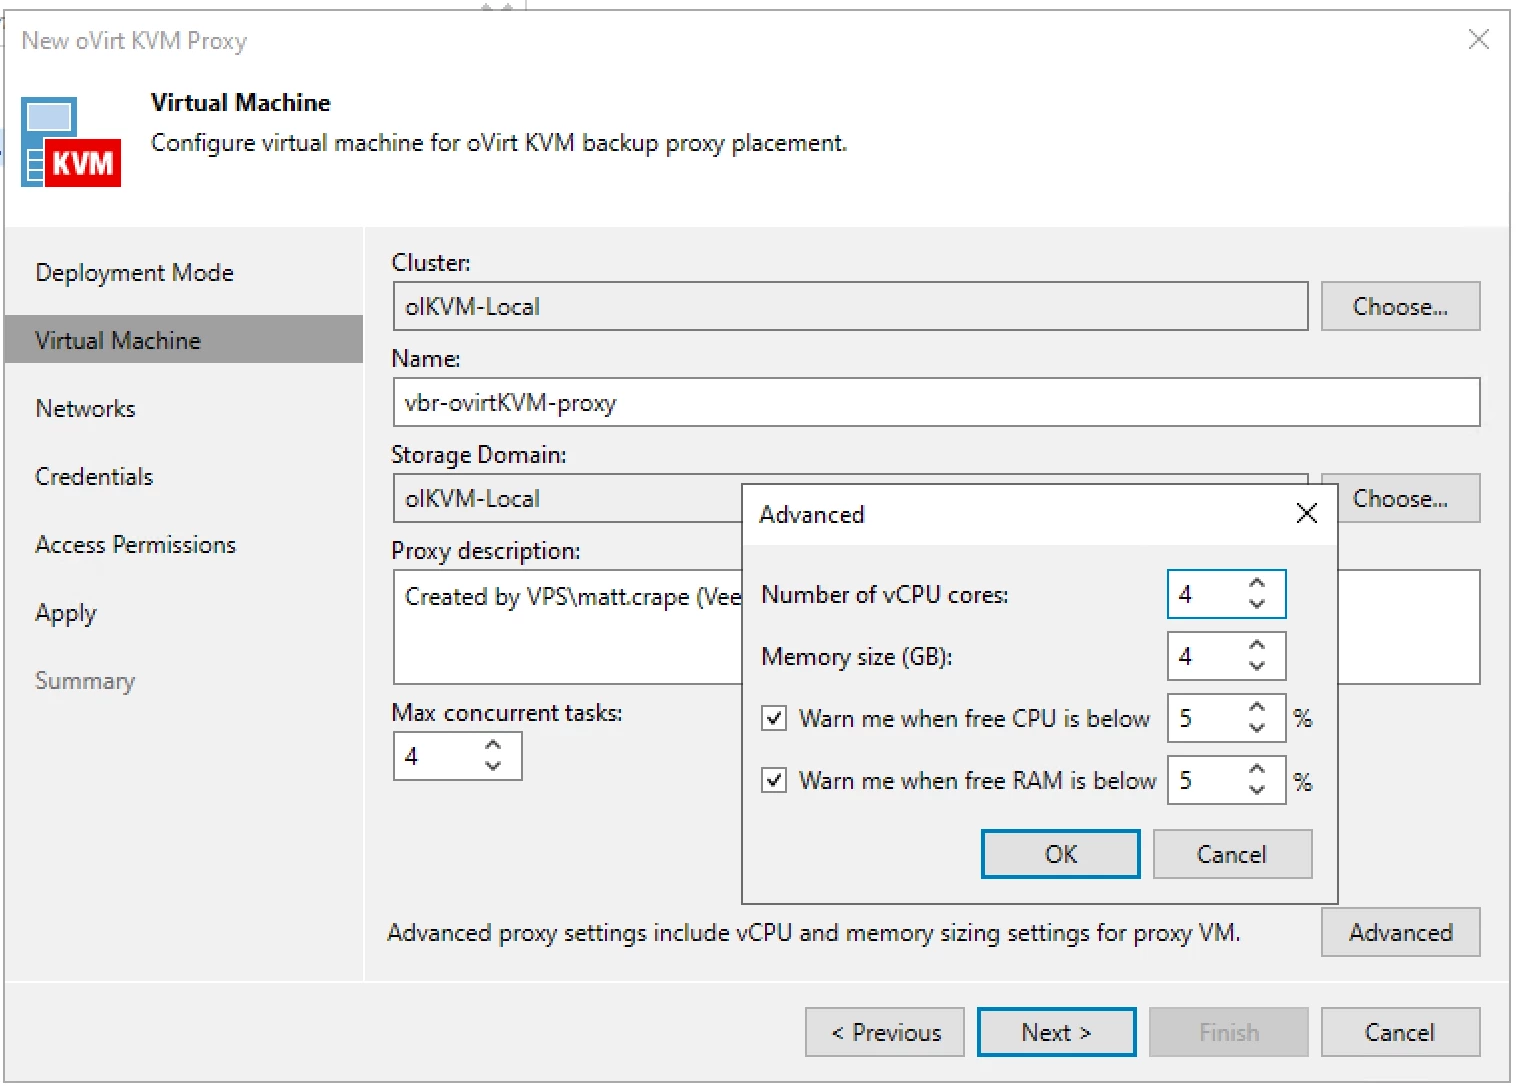
With the server added you will now be prompted to deploy a backup proxy. This is required for VBR to interact with the hypervisor. The wizard will walk you through the straightforward process of either deploying a new proxy or connecting to an existing one. In this case, I opted to go through the Wizard and create a new oVirt KVM proxy. As part of the setup, you can assign specific networks, define an admin account for the proxy, as well as restrict which backup repositories can used.
Once all is said and done, you should be good to go to start creating backup and restore jobs. When it comes to restoring data, you definitely have a lot of flexibility. Backups can be restored back to Oracle Linux KVM, or you can choose to restore them to the public cloud (Microsoft Azure, Amazon Web Services (AWS) and Google Cloud environments), or even perform an Instant Recovery to another hypervisor (Nutanix AHV, VMware vSphere and Microsoft Hyper-V).
Looking to learn more? Be sure to check out the following resources:
- Download Veeam Backup for Oracle Linux KVM and Red Hat Virtualization
- Help Center documentation
- Veeam R&D oVirt KVM forum
- Chris.Childerhose
- Veeam Legend, Veeam Vanguard
- 6100 comments
If only I had Oracle Linux KVM to test with. Thanks for sharing Matt.
- wolff.mateus
- Veeam Vanguard
- 514 comments
Thinking about doing a homelab with that. Thanks for sharing @Matt Crape
- Geoff Burke
- 1216 comments
Thanks @Matt Crape Does it support SOSApi?
- TylerJurgens
- Veeam Legend
- 80 comments
Glad to see Veeam pushing for more hypervisor diversity. Even though I’m not an Oracle KVM user (today anyway), additional support for KVM based hypervisors is pretty awesome for many reasons. Looking forward to seeing what Veeam supports next.
Thanks @Matt Crape Does it support SOSApi?
I just was told not yet.
- 1169 comments
- 5 days ago 4 April 2024
Looks awesome….wish I had some time to play around with this. Looking forward to additional hypervisor support as well? ::fingers crossed::
- 4 days ago 5 April 2024
@Matt Crape Were you getting the “Failed to get certificate from Virtualization Manager ‘……. ‘ Message at the credential stage before you found that they had switched to keycloak?
- 4 days ago 6 April 2024
Thanks for sharing!!
- 1 day ago 8 April 2024
Hey Geoff - I was actually receiving a “Cannot authenticate user No valid profile found in credentials..” error message.
Already have an account? Login
Login to the community
Enter your username or e-mail address. We'll send you an e-mail with instructions to reset your password.
Scanning file for viruses.
Sorry, we're still checking this file's contents to make sure it's safe to download. Please try again in a few minutes.
This file cannot be downloaded
Sorry, our virus scanner detected that this file isn't safe to download.
IMAGES
VIDEO
COMMENTS
Oracle Linux implements a consistent naming scheme for all network interfaces through the udev device manager. The scheme offers the following advantages: ... For example, to manually configure an IP address, selecting Show displays an address field, where you would enter an IP addresses for the interface, ...
And in server management, it is common and frequent to use configurations over IP addresses. In this case, you will learn to establish a static IP address on CentOS 8, RHEL 8 and Oracle Linux 8. How to set a static IP address on Centos 8 / RHEL 8 / Oracle Linux. Linux is a fairly flexible system and this results in several ways of doing the ...
Again, we start by briefly looking at the network setup files in RedHat, SUSE, openSUSE, Fedora, CentOS, Oracle Linux, and other RPM-based Linux versions: $ tree /etc/sysconfig -P 'network' /etc/sysconfig ├── network └── network-scripts ... to configure a static IP address for eth1 on Slackware-based distributions, we can simply ...
11.3 Command-line Network Configuration Interfaces. If the NetworkManager service is running, you can use the nm-tool command to display a verbose listing of the state of the system's physical network interfaces, for example: You can also use the ip command to display the status of an interface, for debugging, or for system tuning. For example ...
NIC Channel Bonding in RHEL 5 & 6 (CentOS & Oracle Linux) Routing IP Traffic on Linux; Use iptables to Implement Packet Filtering and Configure Network Address Translation (NAT) Networking Files. The "/etc/sysconfig/network" file holds top-level networking configuration, including the hostname and gateway settings.
Assign an IP Address Using nmcli. This task configures a static IPv4 address to the vlan10 connection. When configuring manual IPv4 or IPv6 address settings, you can set static IP addresses, network masks, default gateways, and DNS servers. Use the sudo nmcli connection modify command and supply the following values: The connection to modify ...
In this video we are going to see how to set static ip address using nmcli command on Oracle Linux 8.#oraclelinux8 #oraclelinux #OL8 #linuxadministrator #lin...
In this video we are going to see how to set static ip address manually on Oracle Linux 8.#oraclelinux8 #oraclelinux #OL8 #linuxadministrator #linux #linuxco...
For setting an IP address, use it like this: ip addr add [ip_address] dev [interface] For example, add an IP address to the eth1 interface as: sudo ip addr add 192.168.56.21/24 dev eth1. You now have two IP addresses: one from the old configuration and one from the new command: Changing IP address in Linux.
Unlike desktop machines where you can use dynamic IP addresses, on a server infrastructure, you will need to setup a static IP address (at least in most cases). Read Also: How to Set or Change System Hostname in Linux</p. This article is meant to show you how to configure static IP address on most frequently used Linux distributions.
To change your IP address on Linux, use the "ifconfig" command followed by the name of your network interface and the new IP address to be changed on your computer. To assign the subnet mask, you can either add a "netmask" clause followed by the subnet mask or use the CIDR notation directly.
So here's my answer which should resolve the issue of the main question relating to assigning IP address while using Host Only Network Adapter. Context. When I spin-up a virtual machine with a Host Only Network Adapter by default, the VM doesn't get an IP on an interface called enp0s8. This interface is valid for Debian 10.
While trying to configure IP addresses I am getting following error: cannot find device eth0. This is only one issue. I have to do many things such as installing rpms required for Oracle 11gR2 RAC, configure shared storage, etc which will also pose many problems. Do I need to master all these sysadmin activities by reading concepts manuals, etc ...
Type in sudo ifconfig name ipaddress netmask 255.255.255. up —making sure to replace name with your item's name and ipaddress with your preferred IP address—and press ↵ Enter . To assign an IP of "192.168.2.100" to your ethernet connection ("eth0"), for example, you'd enter sudo ifconfig eth0 192.168..100 netmask 255.255.255. here. 7 ...
In this video we are going to see how to set static ip address using GUI on Oracle Linux 8.#oraclelinux8 #oraclelinux #OL8 #linuxadministrator #linux #linuxc...
Step 1: Get the IP address of Pi. If you want to use the current IP address as the static IP, This is very simple. In the terminal, type the following command: hostname -I. You may also use this command: ip a. Both will give you the current IP address of the Raspberry Pi.
The process to get up and running is straightforward: just download the oVirt KVM plug-in and install it on your VBR server. Once completed, you can head back into the console and go to Inventory à Add Server, and you'll now see Oracle Linux KVM listed as an option. The experience of adding a server is very similar to what Veeam users have ...