- PRO Courses Guides New Tech Help Pro Expert Videos About wikiHow Pro Upgrade Sign In
- EDIT Edit this Article
- EXPLORE Tech Help Pro About Us Random Article Quizzes Request a New Article Community Dashboard This Or That Game Popular Categories Arts and Entertainment Artwork Books Movies Computers and Electronics Computers Phone Skills Technology Hacks Health Men's Health Mental Health Women's Health Relationships Dating Love Relationship Issues Hobbies and Crafts Crafts Drawing Games Education & Communication Communication Skills Personal Development Studying Personal Care and Style Fashion Hair Care Personal Hygiene Youth Personal Care School Stuff Dating All Categories Arts and Entertainment Finance and Business Home and Garden Relationship Quizzes Cars & Other Vehicles Food and Entertaining Personal Care and Style Sports and Fitness Computers and Electronics Health Pets and Animals Travel Education & Communication Hobbies and Crafts Philosophy and Religion Work World Family Life Holidays and Traditions Relationships Youth
- Browse Articles
- Learn Something New
- Quizzes Hot
- This Or That Game
- Train Your Brain
- Explore More
- Support wikiHow
- About wikiHow
- Log in / Sign up
- Computers and Electronics
- Computer Networking
- Networking Hardware
- Router Networking Devices

How to Forward a Port on Any Router: Easy Guide
Last Updated: June 16, 2023 Fact Checked
This article was co-authored by wikiHow staff writer, Travis Boylls . Travis Boylls is a Technology Writer and Editor for wikiHow. Travis has experience writing technology-related articles, providing software customer service, and in graphic design. He specializes in Windows, macOS, Android, iOS, and Linux platforms. He studied graphic design at Pikes Peak Community College. This article has been fact-checked, ensuring the accuracy of any cited facts and confirming the authority of its sources. This article has been viewed 10,239,021 times. Learn more...
Are you playing a game or using an app that requires certain ports to be open? If you are using apps like BitTorrent clients , or multiplayer servers for games, they may require you to set up port forwarding. You may also need to set up port forwarding if you are trying to connect a server, or are using your computer as a server. While making changes to your router might sound intimidating, it's actually quick and easy! This wikiHow article teaches you how to set up port forwarding on your router.
Things You Should Know
- Most routers have a firewall that blocks unwanted traffic to your network.
- Port forwarding creates a special path that allows devices and apps to connect to the internet through the firewall.
- You can create special rules for port forwarding using your router's web interface.
Setting Up Port Forwarding

- For example, if you wanted to find the port forwarding section on a Linksys router, you would search for linksys port forwarding and look for your router's model number from there.
- Be prepared to think outside the box when looking for router page items; for example, if you don't see "Advanced" listed somewhere on your router's page, keep looking—don't just give up there.

- If you are not sure how to find the default gateway address and access your router's user interface, see Accessing Your Router on Windows or Accessing Your Router on Mac .

- Linksys — Click the Applications & Games (or Apps & Games ) tab, and then click Single Port Forwarding to open a single port or Port Range Forwarding to open a range of multiple ports. .
- Netgear — Click Advanced Setup and then click Port Forwarding/Port Triggering or Ports - Custom Services .
- Belkin — Click Virtual Servers below the "Firewall" header in the menu to the left.
- Asus — Click WAN in the menu to the left and then click Virtual Server/Port Forwarding .

- For example, Minecraft is a common program for which people forward ports, so you might find a Minecraft setting here.

- Name or Description — Enter a name for the service (e.g., "Minecraft"). This isn't usually required, but it will help you keep track of your various port forwarding rules.
- Type or Service Type — This can be TCP, UDP, or both. If you aren't sure of which one to use, select Both or TCP/UDP .
- Inbound or Start — The first port number goes here. You should research your selected port number to make sure it isn't already taken by a specific application.
- Private or End — The second port number goes here. If you only want to open one port, enter the same port number here; if you wish to open a range of ports, type the number of the port at the end of the range into this text field (e.g., entering "3570" in the first field and "3580" in the second field would open ports 3570 through 3580).

- Depending on your router, this text field may already be filled with your computer's IP address. If so, skip this step.

- You may also have to check an "Enabled" or "On" box next to the forwarded port row.
Accessing Your Router on Windows

- These steps will work in both Windows 10 and Windows 11.

- The icons that have a red "x" next to them are not active connections. Ignore these connections.

- For example, if the default gateway number is "192.168.1.1", you would type 192.168.1.1 into the address bar.

- D-Link — Username: admin Password: leave blank.
- Netgear — Username: admin Password: password
- Linksys — Username: admin Password: admin
- Asus — Username: admin Password: admin
- DrayTek — Username: admin Password: admin
- ZyXel — Username: admin Password: 1234
- TP-Link — Username: admin Password: admin
- TRENDnet — Username: admin Password: admin
- Belkin — Username: admin Password: leave blank.
Accessing Your Router on Mac

Community Q&A
- Disable any extra desktop firewalls if you have problems. The firewalls for Norton Internet Security and similar products can be especially problematic; your Windows or Mac Firewall should be used instead. Thanks Helpful 0 Not Helpful 1
- Make sure you type all numbers correctly. A wrong port will cause the program to not work properly, so double-check everything. Thanks Helpful 0 Not Helpful 1
- Some routers (such as D-Link's) have a "trigger port" feature that can allow some games to work without changing the IP address . This feature works by monitoring the game's outbound connections and automatically setting up the specific port forwarding rule to the game's IP address. The trigger port feature usually needs to be manually enabled in the router's user interface. Thanks Helpful 0 Not Helpful 0

- Do not open all ports on your router. This allows hackers access to your computer. Thanks Helpful 3 Not Helpful 0
- Always use anti-virus software, anti-spyware, anti-adware, and Firewall protection when modifying your router's settings. Thanks Helpful 2 Not Helpful 0
- If you find your router has a default password, be sure to set a new one. A default password is a security risk. Thanks Helpful 1 Not Helpful 0
You Might Also Like

- ↑ https://www.noip.com/support/knowledgebase/general-port-forwarding-guide/
About This Article

1. Find the IP addresses of your router and computer. 2. Go to the router’s IP address in a web browser. 3. Log in to your router's user interface. 4. Go to the Port Forwarding/Applications section. 5. Create a new entry. 6. Enter a name and select a service type. 7. Enter the starting and ending ports. 8. Enter your computer’s IP address. 9. Save your changes. Did this summary help you? Yes No
- Send fan mail to authors
Reader Success Stories
Apr 18, 2016
Is this article up to date?

Akash Tripathi
Aug 29, 2017
Sep 16, 2017
Sep 21, 2017

Featured Articles

Trending Articles

Watch Articles

- Terms of Use
- Privacy Policy
- Do Not Sell or Share My Info
- Not Selling Info
wikiHow Tech Help Pro:
Level up your tech skills and stay ahead of the curve
Port Forwarding – How to set it up
Port Forwarding is used to allow external devices (PlayStation network for example) to connect to your internal devices (PS4). With port forwarding, we can tell the router where to forward the packets that are meant for your PS4 for example.
By default, our firewall will block all incoming traffic, which is good. Otherwise, a hacker could gain easily access to your network. By opening and forwarding specific ports in your firewall you can safely run a web server or FTP server on your computer or host or join an online game.
What is Port Forwarding
With port forwarding, you can make a computer or other network device (the security camera for example) accessible from the internet. You only allow specific traffic (that comes through a port number) to travel into your network to the network device (or computer). This is commonly used for security camera’s, gaming, hosting a (web)server or making you NAS accessible from the internet.
Let say we have the network below. The router/modem has a built-in firewall. Let’s say we want to host a game on our PlayStation for example. Our friends need to be able to connect to our PlayStation for that.

By default, the firewall in the router will block all unknown incoming traffic. If our friends try to join our game, a package is sent through port 3074. But our firewall has no idea who needs that, so it will drop the package.

By setup a port forwarding rule in our router, we can tell the router to forward all data package that is sent through port 3074 to forward it to our game console. The PlayStation will handle the data further.

Making multiple devices accessible
Every network device in your network has it’s own IP Address. But to connect to the internet all devices share one public IP Address (in the examples above it’s 85.84.83.82) that is supplied by your ISP. Now every application uses there own port number, for example, webservers are accessible over port 80 and an Unifi Security Camera can be accessed over port 7080.
With Port Forwarding we can forward every port to the correct network device. So we can send the traffic for our website that comes in over port 80 to our server that is listing on port 80 and the traffic for the PlayStation to the console itself.

Now let’s say you have two Unifi security camera’s that you want to access directly from over the internet. Both camera only responds to a request over port 7080. So internally you can access camera 1 on Ip Address 192.168.0. 100:7080 and camera 2 on 192.168.0. 120:7080.
To access the camera from the internet you would need to connect to your public Ip Address, for example, 85.84.83.82 followed by the port number: http://85.84.83.82:7080. But if you forward this port to both camera’s it wouldn’t work.
With most routers, you can change the destination port, so this allows you to make camera 1 accessible on http://85.84.83.82:7081 and camera 2 on http://85.84.83.82:7082. In the forwarding rule, you would forward the traffic to another port number, simply 7080.
How to setup Port Forwarding
Now setting up Port Forwarding might seem complicated, but it really isn’t. We are going to give the computer, network device or game console to which you want to forward the port to a static Ip Address, next we are going to login into the router and forward the port to the network device. Sounds simple right?
Setting up a static Ip Address
By default, most network devices get an Ip Address from the DHCP server. This server is built-in your router and assigns the internal network devices an Ip Address. But when you turn the device off and on again it might get another Ip Address. This way you port forwarding will only work until you turn it off.
To setup a static Ip Address you will need to go to the network settings page of your device. Change the Ip Address settings (or IPv4) from automatic DHCP mode to manual . Next, you will need to specify an Ip Address. You can look up the DHCP scope in your router to see which range is used by the router. Or you can try to find an Ip Address that is not used, most of the time setting IP which ends with a number between the 200 and 250 is pretty safe.
Log into your router
Next, we need to login to the router. To find your router you can lookup the gateway address on your computer.
- Press Windows Key + R
- In the run dialogue type cmd and press enter
- Type ipconfig and press enter
- Note Ip Address on the line Default gateway
- Enter that Ip Address in your browser
Now you need to login to your router. If you didn’t change the password and don’t know it, you can try some of the following common combinations. If none works, then look it up in the manual or on Google:
- admin / admin
- admin / password
- admin / <blank>
Setting up the Port Forwarding
Ones logged in to your router you will need to find the port forwarding section. Now it depends on your router brand where you can find this, but the most common places are:
- Advanced and then Port Forwarding
- Applications and Gaming
- Advanced and then virtual server
- Firewall and then Port Forwarding
When you found the correct page on your router you will add a new forwarding rule. Below is a screenshot of the Edge Router X ( my personal favourite ). Most routers will have a similar layout, you enter the Original port , this is the port number as listed by the application, then you required protocol , when in doubt, just set it to both .
The forward-to address or Ip Address is the network device you want to give access, in this case, the Ip Address of the PlayStation and the internal port number (which you can leave the same as the original in general)

If you need to open multiple ports you can, depending on your router, open a range, by entering 3074-3080 or multiple by separating them with a comma (3074,3075 etc). If your router doesn’t support it, then you will have to create multiple forwarding rules.
Port Forwarding Test
When you created the port forwarding rules you will need to test it to see if the settings are correct. One way is to just simply open the application and check if you can gain access. If that isn’t possible you can use one of the many online port forwarding checkers.
A good one is for example Canyouseeme.org . With this tool, you can test if your port forwarding rules are set up successfully.
Port Forwarding for PS4
To setup port forwarding for PS4, we first need to give it a static Ip Address. Because otherwise, it will get a new Ip address every time you turn the PS4 off and on, braking the forwarding rules.
To give the PS4 a static address you will need to do the following:
- From the Main menu open the settings
- Select Network
- Select Set up Internet Connection
- Depending on how you connected the PS4, choose Wifi or Lan Cable
- Choose Custom
- In the screen Ip Address Settings, choose Manual
- Select the IP Address , press X
- Change the last part of the IP Address to another number, let’s say 205 . So you Ip address may look like 192.168.0. 205
- You can leave Subnet Mask, Gateway and DNS as they where.
- Leave the MTU on Automatic
- Select Do Not Use for the Proxy Server
- And finally select Test Internet Connection
The PS4 should be able to connect to the internet. So we can now set up the port forwarding rules in our router. Login to your router and go to your Port Forwarding page.
We need to forward the following ports to our PS4:
- TCP: 80, 443, 3478, 3479, 3480
- UDP: 3478, 3479
Now depending on your router, you need to create the following rules forwarding rules:

If your router doesn’t support a range (3478-3480), then you will need to create multiple rules for each port number. On some routers, you don’t need to or can’t enter the Forward-to port. That isn’t necessary, by default the port forwarding rule will use the same port number.
As you can see setting up port forwarding rules isn’t really difficult. Al you need to do is give your internal device a static Ip Address and forward the correct port numbers to the new Ip Address.
If you have devices that require the same port number you can use different ones on the external side and map the correct port number internally.
Always make sure you open only the required port number for the device, otherwise, you will make your network vulnerable for hackers. If you have any questions, just drop a comment below.
You may also like the following articles

New UniFi Gateway Max Released

UniFi G5 Turret Ultra Review

UniFi Protect 3.0.x Update
26 thoughts on “port forwarding – how to set it up”.
I have been having problems with the game : NBA 2k23 because i have been getting error code : 56d85bb8. I have found on the internet that i have to port forward some ports and asign a static IP adres what i have done, now it still isn’t working for a couple weeks maybe a month and have been wondering if if done it right and i see that i cant fill in an – or a , for example i need to forward port 3478-3480 i cant fill in the – when i do so it gets removed same goes for ( , ) . I have tried doing multiple rules so one for 3478 one for 3479 and one for 3480 but that doesn’t seems to work. Does anyone know what i can do if been struggling for weeks.
You will need to open ports 3478 to 3480. So 3478, 3479, and 3480
Thanks for the answer. I have done that but it still doesn’t seem to work i have a zyxel T-50 modem and router in one could that be the problem that the router doesn’t allow port forwarding ?
The zyxel can forward ports, so that shouldn’t be the problem.
Is there something that could stop the port forwarding from working ? If done it for a game called nba 2k23 maybe you know it.
Do you have any firewalls running on your computer maybe? That could still block the connection.
I have IPv4 active and IPv6 is not, it also says firewall is on medium.
You could temporary disable the firewall to check if the firewall is the issue.
So i just put it on low ?
Yes or off, and then test if it works or not. If it works, then you should check if you can create an exclusion in the firewall for the application.
Yesterday i tried doing it on low but it still didn’t work. I will try it today 1 more time but i do not think it will work.
Hi Rudy, It didn’t work on the game and on the port check sites it says the port is still closed. Anything else you can advise me ?
It’s hard to say from here. Clearly a firewall is still blocking the ports. This guide , in Dutch, explains how to configure port forwarding on the Zyxel T50. Make sure that you also allow the ports in your Windows firewall, or turn the Windows firewall completely off.
I understand dutch so that’s perfect but how do i alow windows firewall or turn it off because i am doing this on my phone.
Ik heb die al eerder gelezen via the community maar ik snap niet hoe pas ik alle tussenligende routings aan en hoe weet ik wat bij start en eidn poort moet staan, een van de poorten die ik moet forwarden is 3478 tcp hoe kan ik deze dan invoeren ?
Om enkel poort 3478 te forwarden vul je bij start, eind en vertalingspoort start/eind 3478 in.
dat heb ik en bij de IP adres heb ik de IP van de playstation dus waarvoor de poort is. Als u tijd heeft kunt u even snel op het internet zoeken naar port forwarding 2k23 en de eerste site dan de poorts van playstation 4. Die moet ik hebben wat ik allemaal heb gedaan maar werkt maar niet. Er staat ook 3478-3480 kon de – niet invoeren dus heb meerdere rules een voor 3478 een voor 3479 etc.
It is an Older DIR655 Router, I have a few of them and was also wondering if I could place all cams on one router and leave the other used for apps etc. Really looking for any options as there is a lot of hardware that require open ports.
You can’t combine routers in that way. Only use them as a network switch, but not for expanding your port forwarding.
But I checked the manual and I don’t see any options to assign an IP Range in the port forwarding. So you are unfortunately limited to 24 forwarding rules.
This is old but I’ll try anyway… I have much hardware (Net Cam’s are the issue) that needs access to my internal network. While I have everything set up and working fine, I am out of forwarding slots in the router. 1. Is there a way to forward to a “Range” of IP’s and ports or 2. Is it possible to create a subnet for all the Net Cams and open the port range for the subnet ?
I get a little lost sometimes, and have a hard time explaining things well. lol Thanks
Opening a range of IP Addresses or a complete subnet is only possible if your router supports it. What is the brand and model of your router?
Wow this is exactly what I needed and you did any amazing job explaining it! Thank you!
Hi Rudy I am a novice so bare with me. my network router at home is a Linksys EA9500. I wish to access my devices from anywhere. The steps to do this were fairly straight forward after setting up my host account with NOIP. However, port forwarding has got me stumped. Your tutorial is amazing and I get the process but the piece of the puzzle that is missing for me is how to you come to the point of choosing a port number to tag to your internal IP device. Is it a random choice that gets created when you choose it? is it a pre-defined range of numbers that are set within the confines of the internet? if you could clarify where the numbers come from, it would very helpful. Thanks in advance
The internal numbers are defined by the application or device that you use. So for example, for your router, you can access the configuration page by going to http://192.168.1.1 . Webpages are served over port 80 by default. So if you want to access your router from the internet you have to forward an external port (and yes external that can be any number) to port 80 internal.
So external could by: :8080 and internal :80.
Thank you so much Author for such great Info on the topic. However I am still confused to use which services to get this feature while paying LOL 2 and Pubg. Someone recommended me to use pure vpn as they provide the same feature. While I have seen other Providers too like Express. SO Do you guys recommend the same?
A VPN isn’t required to set up port forwarding. It might only make it easier for you. But are you running in any trouble while playing those games? In general, you don’t need to open any ports to play a game. Only if you are hosting a game your self for your friends. Forwarding ports won’t lower your latency.
For LOL 2 you will need to forward the following ports: TCP: 2099,5222-5223,8088,8393-8400 UDP: 5000-5500,8088
And for Pubg on a pc:
TCP: 27015-27030,27036-27037 UDP: 4380,27000-27031,27036
Leave a Comment Cancel reply
Notify me of followup comments via e-mail. You can also subscribe without commenting.

So, about that AdBlocker... Will you consider disabling it?
Yes, ads can be annoying. But they allow me to keep writing content like this. You can also support me by Buying Me a Coffee ☕ or visit the shop to get some Tech-Inspired merchandise | Read more about disabling AdBlockers
Sign up for our daily newsletter
- Privacy Policy
- Advertise with Us
How to Open Ports and Set Up Port Forwarding on Your Router

We’ve all been faced with messages telling us that we need to “open ports” or “forward ports” for one reason or another. Whether it’s an Internet security feature, remote desktop access, or an online-based game, there may be good reasons for you to set up port forwarding on your router. Before taking the plunge, you should be aware of what this means exactly, the (relatively small) risks involved, and how to keep control over this process.
Also read: How to Check for Ports in Use in Windows 10
What Are Ports?
Think of ports as virtual passages inside your router which control traffic moving between your computer and the Internet. Only specific ports are kept open at all times, ensuring you don’t get any unwanted or harmful traffic piling up on your computer.
Certain ports have fixed roles, such as delivering website data to your computers (ports 80 and 443), in most cases. Others, meanwhile, are kept free and can be used by other applications (whose developers assign ports for these apps to run on). You can find a full list of router ports and what they’re assigned to here .
First, Set Up a Static IP Address
In order for port forwarding to work, you’ll need to set a static internal IP address (ipv4) for your device. By default, your ipv4 address is probably dynamic, which means it’s always changing, so the port forwarding won’t be able to pin down your device on your home network.
Go to “Control Panel -> Network and Sharing Center -> Change adapter settings.”
Right-click “Local Area Connection” and click Properties. Under the Networking tab, select “Internet Protocol Version 4” from the list and click Properties.

In the new box, select “Use the following IP address.” What you enter here will depend on your IP settings. To check your IP settings, go to the command prompt and enter ipconfig /all .

IP address: this needs to have the same subnet as your default gateway, so only change the numbers after the final dot. For example, our default gateway is “192.168.0.1,” and we made our IP address “192.168.0.100.”
Subnet mask: enter the same number as what is shown in ipconfig.
Default gateway: again, same numbers that you see in ipconfig.
Preferred DNS server: same as the DNS servers in your ipconfig.

When you’re finished, click OK, and you should have a functioning static IP address.
How to Open Ports and Set up Port Forwarding in Windows 10
First, remember that it might not be your router blocking ports but your firewall, so before digging in to your router, we need to go into the firewall settings and make sure all the relevant ports that you want to forward are open.
If you’re just using Windows Defender Firewall (the default firewall in Windows 10), then click Start, type “firewall” and open Windows Defender Firewall.
In the new window, click “Advanced settings” in the pane on the left.

Now in the Windows Firewall advanced security window, click “Inbound Rules” in the pane on the left, then “New Rule” over on the right.

In the new window, click Port, Next, then choose whether you want the port to use TCP or UDP forwarding. (TCP tends to be more popular as it error-checks.) Select “Specific local ports” and the port or range of ports you want to open.

On the next screen, click “Allow the connection,” keep clicking next until you can give your new rule a name and description, then click Finish.
The open port(s) will now appear as a rule in your Inbound Rule list, and those ports are ready to be used for forwarding.

Port Forwarding on Your Router
Once you’ve done that, and you still need to open up the ports, move on to the router. Again, this process will vary from router to router, but the general gist of it is the same. Here, we do it on a Virgin Hub 3.0.
1. Log in to your router through your web browser. Our router address (default gateway) is 192.168.0.1, but this may be 192.168.1.1 for you or something else altogether. (Check out the cheatsheet for the list of IP addresses for your router .) There’s a good chance your router address (and password) is written on your actual router, so check that.
2. Once you’ve logged in to your router, head over to “Port Forwarding.” For us, this is under “Advanced -> Security,” but it may vary slightly for you.
3. Now, the important bit. You’ll be presented with a scary-looking list of boxes to fill with numbers. It’s not so bad.
- Local IP: enter the number of the static IP address you set up earlier.
- Local start and end point: In most cases, these can be the same as the “external start point and external end point.” It can be a range of ports (8035-8040, for example), or it can just be one port in which case you put the same number into the start and end point boxes. If you have multiple devices connecting to the same application, then you may want to make the “local” port number different from the fixed “external” one.
- External start point and end point: this is dictated by the port used by your given application. Refer to the list we linked to earlier to find the application.
- Protocol: the application should specify what kind of protocol it uses. Most are TCP and some are UDP, but if you’re unsure, select “Both.”
- Enabled: switches the port forwarding on or off.
Below is the port forwarding setup we created to run a private Minecraft server using the port numbers assigned by Minecraft.

Port forwarding has many uses, and while most applications are set up to do the job for you, it’s good to be prepared should you need to take control of the situation. Now you are, so happy forwarding!
If you’re having problems connecting to the Internet or are getting strange “No Internet, Secured” messages, then head over to our guide for fixing this problem . Also, check out our guide on testing your hard drive health in Windows 10 .
Our latest tutorials delivered straight to your inbox

Tech writer at Make Tech Easier. Enjoys Android, Windows, and tinkering with retro console emulation to breaking point.

- Stream Your Favorite Sports
- Where to Watch WNBA Games
How to Set Up Port Forwarding
Some games and programs only work if you open a specific port
:max_bytes(150000):strip_icc():format(webp)/tim-fisher-5820c8345f9b581c0b5a63cf.jpg "port mapping settings")
- Emporia State University
:max_bytes(150000):strip_icc():format(webp)/ryanperiansquare-de5f69cde760457facb17deac949263e-180a645bf10845498a859fbbcda36d46.jpg "port mapping settings")
- Western Governors University
In This Article
Jump to a Section
How Do You Set Up Port Forwarding?
- Give Device a Static IP Address
Set Up Port Forwarding
- Extra: More Open Port Tips
- Frequently Asked Questions
Specific ports must be open on your router for some video games and programs to work properly. Although the router has some ports open by default, most are closed and only usable if you manually open these ports. When your online video games, file server, or other networking programs don't work, access the router and open the specific ports that the application needs.
Maddy Price / Lifewire
The traffic that passes through your router does so through ports. Every port is like a special pipe made for a specific kind of traffic. When you open a port on a router, it allows a particular data type to move through the router.
The act of opening a port, and choosing a device on the network to forward those requests to, is called port forwarding. Port forwarding is like attaching a pipe from the router to the device that needs to use the port—there's a direct line-of-sight between the two that allows data flow.
For example, FTP servers listen for incoming connections on port 21 . If you have an FTP server set up that nobody outside your network can connect to, open port 21 on the router and forward it to the computer you use as the server. When you do this, that new, dedicated pipe moves files from the server, through the router, and out of the network to the FTP client that's communicating with it.
The same is true for other scenarios like video games that need the internet to communicate with other players, torrent clients that require specific ports to be open for uploading files, and instant messaging applications that only send and receive messages through a specific port.
Every networking application needs a port to run on, so if a program or application isn't working when everything else is set up correctly, open the port on the router and forward requests to the right device (for example, a computer, printer, or game console).
Port range forwarding is similar to port forwarding but is used to forward an entire range of ports. A certain video game might use ports 3478 through 3480, for example, so instead of typing all three into the router as separate port forwards, forward that whole range to the computer running that game.
Below are two primary steps you need to complete to forward ports on a router. Because every device is different, and because there are many router variations, these steps are not specific to any device. If you need additional help, refer to the user manual for the device, for example, the user guide for your router.
Give the Device a Static IP Address
The device that will benefit from the port forward needs to have a static IP address . This way, you don't have to change the port forwarding settings each time it obtains a new IP address.
For example, if your computer runs torrenting software, assign a static IP address to that computer. If your gaming console uses a specific range of ports, it needs a static IP address.
There are two ways to do this: from the router and from the computer. When you set up a static IP address for your computer, it's easier to do it there.
Use Your Computer to Set Up a Static IP Address
To set up a Windows computer to use a static IP address, first identify which IP address it's using currently.
Open Command Prompt on the computer.
Type this command, then select Enter :
Record the following: IPv4 Address , Subnet Mask , Default Gateway , and DNS Servers .
If you see more than one IPv4 Address entry, look for the one under a heading like Ethernet adapter Local Area Connection, Ethernet adapter Ethernet, or Ethernet LAN adapter Wi-Fi. Ignore anything else, like Bluetooth, VMware, VirtualBox, and other non-default entries.
Now, you can use that information to set up the static IP address.
Open the Run dialog box with the WIN + R keyboard shortcut, enter ncpa.cpl , and select OK to open Network Connections.
Right-click or tap-and-hold the connection that has the same name as the one you identified in Command Prompt. For example, Ethernet0 .
Select Properties from the menu.
Choose Internet Protocol Version 4 (TCP/IPv4) from the list, then select Properties .
Select Use the following IP address .
Enter the details you copied from Command Prompt: IP address, subnet mask, default gateway, and DNS servers.
Choose OK when you're done.
If you have several devices on your network that get IP addresses from DHCP , don't reserve the same IP address you found in Command Prompt. For example, if DHCP is set up to serve addresses from a pool between 192.168.1.2 and 192.168.1.20, configure the IP address to use a static IP address that falls outside that range to avoid address conflicts . For example, use 192.168.1. 21 or above. If you're not sure what this means, add 10 or 20 to the last digit in your IP address and use that as the static IP in Windows.
You can also set up a Mac to use a static IP address , as well as Ubuntu and other Linux distributions.
Use Your Router to Set Up a Static IP Address
Another option is to use the router to set up a static IP address. Do this when a non-computer device needs an unchanging address (like a gaming console or a printer).
Access the router as admin .
Locate a Client List, DHCP Pool, DHCP Reservation, or similar section of the settings. The section lists the devices currently connected to the router. The IP address of the device is listed along with its name.
Look for a way to reserve one of those IP addresses to tie it with that device so that the router always uses it when the device requests an IP address. You might need to select the IP address from a list or choose Add or Reserve .
The above steps are generic since static IP address assignment is different for each router, printer, and gaming device. Instructions differ if you need to reserve IP addresses for NETGEAR routers , edit DHCP settings on Google devices, or configure DHCP reservation on Linksys routers .
To make your public IP address static so that you can access your devices from an outside network, pay for a static IP. A workaround involving setting up a dynamic DNS service is just as helpful.
Now that you know the device's IP address and configured it to stop changing, access the router and set up the port forwarding settings.
Log in to the router as admin. You need to know the router's IP address , username, and password.
Locate the port forwarding options. These are different for every router but might be called something like Port Forwarding, Port Triggering, Applications & Gaming, or Port Range Forwarding. These might be buried within other categories of settings like Network, Wireless, or Advanced.
Type the port number or port range that you want to forward. If you're forwarding one port, type the same number under both the Internal and External boxes. For port ranges, use the Start and End boxes.
Most games and programs indicate which ports must be open on the router. If you don't know what numbers to type here, PortForward.com has a list of common ports.
Choose a protocol, either TCP or UDP ports . Choose both, if needed. This information should be available from the program or game that explains the port number.
Type the static IP address you chose.
If asked, name the port trigger anything that makes sense to you. If it's for an FTP program, call it FTP . Call it Medal of Honor if you need the port open for that game.
Enable the port forwarding rule with an Enable or On option.
Here's an example of what it looks like to forward ports on a Linksys WRT610N:
Some routers have a port forward setup wizard that makes it easier to configure. For example, the router might first give you a list of devices already using a static IP address and then let you choose the protocol and port number from there.
More port forwarding instructions:
- D-Link port forwarding
- Belkin port forwarding
- Google Nest Wi-Fi or Google Wi-Fi port forwarding
More on Open Ports
If forwarding a port on your router doesn't allow the program or game to work on your computer, find out if a firewall program blocked the port. The same port needs to be open on the router and your computer for the application to use it.
To see if the Windows Firewall is blocking a port that you opened on the router, temporarily disable the firewall and then test the port again. If the port is closed on the firewall, edit some firewall settings to open it .
When you open a port on the router, traffic can flow in and out of it. When you scan the network for open ports, you should see everything that's open from the outside. There are websites and tools build specifically for this.
Here are some reasons why you would check for open ports:
- To avoid getting into the router to check.
- To make sure the port opened correctly when a program or game isn't working.
- To make sure a port you closed is actually closed.
Several places offer a free open port checker. PortChecker.co and NetworkAppers have online port checkers that scan a network from the outside. Another option is to download Advanced Port Scanner or FreePortScanner to scan devices within your private network.
Only one port forward can exist for every instance of that port. For example, if you forward port 3389 (used by the Remote Desktop remote access program) to a computer with the IP address 192.168.1.115, that same router can't also forward port 3389 to 192.168.1.120.
In cases like this, the only solution, if possible, is to change the port the program uses. This may be possible from the software settings or through a registry hack. In the RDP example, if you edit the Windows Registry on the 192.168.1.120 computer to force Remote Desktop to use a different port like 3390, you could set up a new port forward for that port and use Remote Desktop on two computers within the same network.
Log in to your router and navigate to its port forwarding section. Enter your computer or gaming console's IP address and Minecraft's TCP and UDP ports. Minecraft on a PC uses 25565 (TCP) and 19132-19133, 25565 (UDP).
Go to Settings > Network > Advanced Settings and note your console's IP address. Log in to your router and enter the console's IP address. On your console, go to Settings > Network > Test Network Connection and follow the connection prompts. Go to your router's port forwarding tools and open 88, 500, 3544, 4500 (for UDP), and 3074 (TCP). Go back to Settings > Network and select Test NAT type .
Get the Latest Tech News Delivered Every Day
- How to Set Up a Router
- UltraVNC 1.4.3.6
- How to Fix It When There's No Internet Connection
- How to Set up a Home Wi-Fi Network
- Port Numbers Used for Computer Networks
- How to Connect to Your Home Router as an Administrator
- 17 Best Free Remote Access Software Tools (2024)
- What Is a Static IP Address?
- What Is a Router and How Does It Work?
- How to Find Your Xbox Series X or S IP Address
- Xbox Network TCP and UDP Port Numbers
- How to Open a Port on a Windows or Mac Firewall
- How to Check If a Port Is Open in Windows 10
- What Is Port Forwarding? How Do I Set My Own?
- What Is a Private IP Address?
- How Does 'Port Forwarding' Speed up My Downloads?
Windows OS Hub / Windows 10 / Configuring Port Forwarding in Windows
Configuring Port Forwarding in Windows
In the Linux world, port forwarding is configured quite simply using iptables or firewalld rules. On Windows Server hosts, the Routing and Remote Access Service (RRAS) is typically used to configure port redirections. However, there is an easier way to enable port forwarding using netsh portproxy mode, which works on all versions of Windows from Win XP to current builds of Windows 11 and Windows Server 2022.
How to Enable Port Forwarding on Windows with Netsh Portproxy?
Configuring firewall rules for port forwarding mode in windows, managing netsh port forwarding rules in windows, port forwarding with nat rules on hyper-v virtual switch.
You can configure port forwarding in Windows using the Portproxy mode of the Netsh command.
The command syntax is as follows:
- listenaddress –is a local IP address to listen for incoming connection (useful if you have multiple NICs in different subnets/ VLANs or multiple IP addresses on one interface );
- listenport – a local TCP port number to listen on (the connection is waiting on);
- connectaddress – is a local or remote IP address (or DNS name) to which you want to redirect the incoming connection;
- connectport – is a TCP port to which the connection from listenport is forwarded to.
Let’s suppose your task is to make the RDP service respond on a non-standard port, for example 3340 (of course, this port number can be changed in the Windows settings, but we are using RDP to make it easier to demonstrate the port forwarding technique). To do this, we need to redirect incoming traffic from TCP port 3340 to another local port 3389 (this is the default RDP port number ).
netstat -na|find "3340"
Alternatively, you can check that the port is not listening locally using the PowerShell cmdlet Test-NetConnection :
Test-NetConnection -ComputerName localhost -Port 3340

netsh interface portproxy add v4tov4 listenport=3340 listenaddress=10.1.1.110 connectport=3389 connectaddress=10.1.1.110

Where 10.10.1.110 – the current IP address of your computer on which port forwarding is configured.
Now, use the netstat tool to check that Windows is now listening on local port 3340:
netstat -ano | findstr :3340

Check the status of the service in the services.msc console or using the PowerShell command:
Get-Service iphlpsvc
IPv6 support must be enabled on the network interface for which the port forwarding rule is being created.

These are the prerequisites for the correct operation of port forwarding in Windows. Without the IP Helper service and without IPv6 support enabled, the port redirection won’t work.
Set-ItemProperty -Path HKLM:\system\CurrentControlSet\services\Tcpip\Parameters -Name IpEnableRouter -Value 1
You can identify the process that is listening on the specified port by its PID (in our example, the PID is 636):
tasklist | findstr 636
Now try to connect to the new port from a remote computer using any RDP client. You need to specify 3340 as the RDP port number. It is specified after the colon following the RDP host address. For example, 10.10.1.110:3340

The RDP connection should be established successfully.
Portproxy port forwarding rules are permanent and are not cleared when you restart Windows. These rules are stored in the registry. You can list the netsh forwarding rules in the registry using PowerShell:
Get-ItemProperty -Path HKLM:\SYSTEM\CurrentControlSet\Services\PortProxy\v4tov4\tcp

If you want to forward an incoming TCP connection to a remote computer, use the following command:
netsh interface portproxy add v4tov4 listenport=3389 listenaddress=0.0.0.0 connectport=3389 connectaddress=192.168.100.101
This rule will redirect all incoming RDP traffic (from local TCP port 3389) from this computer to a remote host with an IP address 192.168.1.100.
Note that the portproxy mode in Windows doesn’t support saving the source IP in a forwarded network packet. Those, if you forward port 443 port from a Windows device to an internal web server, then all incoming connections will appear on the target server as coming from the same IP address (from your Windows host with netsh portproxy enabled). If you need to use source IP forwarding, you need to use NAT on an external firewall or on Hyper-V (described below).
Ensure that your firewall (Microsoft Windows Defender or a third-party firewall, which is often part of the anti-virus software) allows incoming connections to the new port. You can add a new allow rule to Windows Defender Firewall with the command:
netsh advfirewall firewall add rule name="forwarded_RDPport_3340" protocol=TCP dir=in localip=10.1.1.110 localport=3340 action=allow
Or using the New-NetFirewallRule PowerShell cmdlet : New-NetFirewallRule -DisplayName "forwarder_RDP_3340" -Direction Inbound -Protocol TCP –LocalPort 3340 -Action Allow
When creating an inbound firewall rule for TCP/3340 port via the Windows Defender Firewall graphical interface, you don’t need to associate a program or process with the rule. This port is only listened on by the network driver.
If you disable the portproxy rule, be sure to remove the remaining firewall rule as follows:
netsh advfirewall firewall del rule name="RDP_3340"
or remove the firewall rule with PowerShell:
Remove-NetFirewallRule -Name RDP_3340
You can create any number of port forwarding rules in Windows. All netsh interface portproxy rules are persistent and remain after a Windows restart.
To display a list of all enabled TCP port forwarding rules on Windows, run the command:
netsh interface portproxy show all
In our case, there is only one forwarding rule from local port 3340 to 3389:

netsh interface portproxy dump

If you need to change the settings of an existing portproxy rule, use the following command:
netsh interface portproxy set v4tov4 listenport=3340 listenaddress=10.10.1.110 connectport=3300 connectaddress=10.10.1.110
In this example, we have changed the portproxy target port number to 3300.

To remove a specific port forwarding rule:
netsh interface portproxy delete v4tov4 listenport=3340 listenaddress=10.1.1.110
To remove all existing port mapping rules and completely clear the port forwarding rules table:
netsh interface portproxy reset
You can use Windows Server with the RRAS (Routing and Remote Access Service and NAT) role installed to enable port forwarding for UDP traffic. You can configure port forwarding between server network interfaces using the graphical snap-in ( rrasmgmt.msc ) or with the command:
netsh routing ip nat add portmapping Ethernet1 udp 0.0.0.0 53 192.168.100.100 53
The list of NAT port forwarding rules in Windows Server can be listed as follows:
netsh routing ip nat show interface
If you have WSL (Windows Subsystem for Linux) installed on your computer, you can create a simple PowerShell script to create a port forwarding rule to the WSL 2 virtual machine (a WSL2 VM has its virtual ethernet adapter with a unique IP address):
wsl --shutdown; netsh interface portproxy reset; $wsl_ipaddr = wsl -d Ubuntu-20.04 hostname -I; netsh interface portproxy add v4tov4 listenport=443 listenaddress=0.0.0.0 connectport=443 connectaddress=$wsl_ipaddr ; netsh interface portproxy show all; exit;
Another implicit feature of portproxy is the ability to make any remote network service look like it runs locally. For example, you want to forward the connections from local port 9090 to a remote HTTPS server ( google.com:443 )
netsh interface portproxy add v4tov4 listenport=9090 connectport=443 connectaddress=google.com protocol=tcp
Now, the Google search page will open if you go to http://localhost:9090/ in your browser (you need to ignore SSL_ERROR_BAD_CERT_DOMAIN errors). So despite the browser accessing the local computer address, it opens a page from an external web server.

Windows cannot forward a range of TCP ports. If you need to forward multiple ports, you will have to manually create multiple portproxy redirecting rules.
Port forwarding rules can also be used to redirect a port from the external IP address of a physical NIC to a port of a virtual machine running on the same host. In Hyper-V, you can configure port forwarding on a Virtual Switch level (see below).
When using the Hyper-V role on your computer (it can be installed on both Windows 10/11 and Windows Server, or as a free Hyper-V Server ), you can configure DNAT port forwarding rules using PowerShell. Suppose you want to redirect all HTTPS traffic that your Hyper-V host receives to the IP address of the virtual machine running on the host. To do this, use the Hyper-V StaticMapping commands.
Create a Hyper-V virtual switch:
New-VMSwitch -SwitchName NAT_Switch -SwitchType Internal

Set the IP address for the new virtual switch:
New-NetIPAddress -IPAddress 192.168.100.1 -PrefixLength 24 -InterfaceAlias "vEthernet (NAT_Switch)"
Enable NAT for this network:
New-NetNat -Name NATNetwork -InternalIPInterfaceAddressPrefix 192.168.100.0/24
Connect the VM to your NAT_Switch and assign it a static IP address (for example, 192.168.10.80). Set the Hyper-V virtual switch IP address (192.168.100.1 in this case) as the default gateway for the virtual machine’s network connection.
You can now enable port forwarding from the Hyper-V host to the virtual machine:
Add-NetNatStaticMapping -NatName NATNetwork443 -Protocol TCP -ExternalIPAddress 0.0.0.0/24 -ExternalPort 443 -InternalIPAddress 192.168.10.80 -InternalPort 443
After executing these PowerShell commands, all HTTPS traffic that comes to the TCP/443 port of the Hyper-V host will be forwarded to the private IP address of the virtual machine.
If you want to create a port forwarding rule for a non-standard port, don’t forget to open it in Windows Firewall:
New-NetFirewallRule -DisplayName "HyperV_Nat_444" -Direction Inbound -LocalPort 444 -Protocol TCP -Action Allow -Enabled True
You can display a complete list of NAT/PAT port forwarding rules on a Hyper-V host like this:
Get-ADComputer: Find Computer Properties in Active Directory with PowerShell
Invoke-webrequest: perform http requests, download files, parse web with powershell, related reading, check windows 11 hardware readiness with powershell script, create a multi-os bootable usb flash drive with..., read, modify, and parse json file (object) with..., configure dns scavenging to clean up stale dns..., how to read outlook emails with powershell, 34 comments.
[…] In Microsoft Windows, starting from Windows XP, there is a built-in ability to set up network ports forwarding (port forwarding). Due to it, any connection […]

Man you saved my life! I have spent literally weeks for several sites that we host, trying everything. Looks like Windows Server 2016 isn’t best suited for hosting files outside .asp file domain (Node.js for example).

Hi, this is a good article. I would like to ask if there is any mechanism to not only forward but also to copy data? For example, my server listen to TCP port 8845 and will do something when data comes in. I want to keep the original structure but in addition, to copy all coming data and then forward to another server via TCP port 8844. I know to write some codes can do it, but is there any built-in function in Windows Server 2012 can perform this? Thank you. George

Do you mean that some application on server processes some way the incoming network data and sends them over the network to another host or modified data is stored locally?
My scenario is: I have a server A to listen TCP 8845 port. There is a program installed in server A to process data when it detects data comes in. What I want to do is to keep the structure in server A, but make a copy to the original incoming data and then send it to server B using TCP 8844 port from server A. I know we can just write a program to do it, but I want to know if there is any built-in functions in Windows Server 2012 can fulfill my demands. Thanks.

You have to use rewrites. The easiest way I could do this was to set up an IIS server, download and install ARR, then configure AAR and “URL Rewrite” in the IIS Manager. Took about a day for a software engineer (sys admin novice) to do it and get everything straightened out.

Great write up!!! Do you know if connections going through the forwarded ports count towards the Windows 7 client connection limit of 20 concurrent connections? I’m looking to forward some traffic on my network so I can easily run scripts to redirect it if a downtime occurs but I need to know if I’m going to hit an upper limit of concurrent connections. THANKS!

thank you so so so so so much youjust saved me 8 hours of driving back to a computer i forgot

Excellent article. I would like to isolate all incoming traffic destined for port 80 to say port 8080. But all locally originated traffic for port 80 as it is. Could you please let me know how this is possible (if at all) in WINDOWS server ?
Try to use the following command: netsh interface portproxy add v4tov4 listenport=80 listenaddress=127.0.0.1 connectport=8080 connectaddress=127.0.0.1

You create a proxy for the LAN IP as the listenaddress and listenport=80 and then set the destination connectaddress=localhost connectport=8080
Then whenever you connect via localhost:80 you will go through to localhost:80 but if you connect externally via the LAN IP port 80 you will be connected to localhost:8080

Hi , i don’t understand how to forward the port ( 80 for examble ) to any ip and port .
Use following sintax:
netsh interface portproxy add v4tov4 listenaddress=[ your_local_ip_adress] listenport= 80 connectaddress=[ any_ip_adress] connectport=[ any_tcp_port]
For example,
netsh interface portproxy add v4tov4 listenaddress= 192.168.1.100 listenport= 80 connectaddress= 192.168.120.120 connectport= 8080

Thanks for this write-up! Been trying to figure out a particularly problematic issue with a legacy application and hoping maybe this can help. Can this be used to redirect traffic originating on the local machine and directed to a particular IP address to instead send it to a different IP? For example, I have an application that is hard-coded to seek data in an archive at IP x.x.x.10, but the data has been moved and now resides at x.x.x.20 (and I can’t just re-IP the new archive location to make it x.x.x.10). Any thoughts on how to get the application’s requests, even though coming out of the application addressed to x.x.x.10, to instead be redirected and sent to x.x.x.20? Hope this makes sense…

Thanks for the quick and nice article. The double quotes in the firewall command appear unicode not ascii. My command line shell accepts both but makes the two names different.

THIS IS A GREAT WRITEUP! However, question: 1) Does this work with IPv6? 2) When I’m connected to my VPN (w/ IPv6 enabled, all the ports that I have opened at my router and Win Firewall are now closed, eventho it says “listening on 0.0.0.0”. So, do I need to forward the ports from 0.0.0.0 to the Local LAN adapter, or from the IP address of the VPN adapter to the local LAN adapter? Kinda confused about this. Thanks!

Hi, regarding the second question, have you resolved it yet ? If it helps, my setup is a vpn and then trying to redirect to a virtualbox vm. Locally on the host server it works, but incoming traffic from vpn, is not connecting. Any suggestions?
UDP ports are commonly used for VPN traffic. You cannot forward UDP port using netsh interface portproxy...

Is there any effective way to adjust Windows Firewall to whitelist IP addresses to the ports created with portproxy? My WF rules seem to have no effect.

i want to redirect traffic that goes from a local app to a specific remote address and force it to go to a specific port: i tried something like: netsh interface portproxy add v4tov4 listenaddress=[remote_address] connectport=[port_i_want_to_forward_to] connectaddress=[remote_address] can i do something like this?

Very good post !! Thank you

Hi Could I redirect 80 or 53 to other server? Ex. My oficial site is hosted in a linux server with the same DNS name at AD server. If I use primary DNS from AD server on stations, I can’t open my site and applicatons throug DNS hosted on second server.
Hi I did not understand, do you want to forward HTTP connections for internal clients from AD server to Linux?
PS. You can forward this way only TCP connections (DNS work over UDP potocol).

You are a legend. Thanks for the great article worked like a charm!
[…] Windows Port Forwarding Example […]

Thanks . This is very useful.
It worked for me

Excellent article on the topic. We have In The Netherlands static IP addresses so a DNS is not necessary. But with some routers here (KPN Experia box) . you need to port forward on 2 different places within the router and that can be a real challenge.

Hello i cant enter pc remotely with any domain accaunt, when i wanna try show error, “Logon attemp failed, or incorrect user amd password” but username and password are correct

Thanks so much for this amazing article! I got the necessary insight into the way port forwarding works in Windows. I’m used to work with firewalld rules in Linux and now I was faced with a Windows (19 Server) installation… didn’t quite know where to start or what to do. I appreciate it.

Do you know if the client’s original source IP/port is maintained when portproxy is used?
Many proxies I’ve worked with in the past will source-NAT the traffic so that the return path is maintained, but this can play havoc with fail2ban-type systems that block IPs on failed authentications (because the receiving service sees the proxy as the client, and so blocks the proxy IP, effectively blocking all future connections).
Was wondering if proxyport suffered from this (and, if so, what IP/port does it translate source to)?

you save my live !

Hi, thank you for your article. I’ve a new situation. usually I used this logic to redirect connections from my internal LAN to my website (running outside) that is the same as my internal domain, as example here, test.com
So, my AD domain is: test.com. My local AD IP Address is: 10.0.0.10 My website running outside are running under the ip, as example, 200.200.200.200 Because in the LAN, if someone pings test.com, the return is not 200.200.200.200 but 10.0.0.10, as that is the IP Address of the Domain Controller.
So, usually I used this rule to redirect the requests:
netsh interface portproxy add v4tov4 listenport=80 listenaddress=10.0.0.10 connectport=80 connectaddress=200.200.200.200 netsh interface portproxy add v4tov4 listenport=443 listenaddress=10.0.0.10 connectport=443 connectaddress=200.200.200.200
For some reason, in 2 different networks, with 2 different domains, this rule is not working anymore.
Also, I did this but this, not working: New-NetFireWallRule -DisplayName ‘Redirect 80-443′ -Direction Outbound -LocalPort @(’80’,’443′) -Action Allow -Protocol TCP New-NetFireWallRule -DisplayName ‘Redirect 80-443′ -Direction Inbound -LocalPort @(’80’,’443′) -Action Allow -Protocol TCP
suggestions

Hi I want to forward pptp port for a vpn with my company public ip.
How to do it ? Thanks
Leave a Comment Cancel Reply
Notify me of followup comments via e-mail. You can also subscribe without commenting.
Current ye@r *
Leave this field empty
- Help Center

The Ultimate Guide to Port Forwarding Your Router
A port forward is a way of allowing specific traffic to enter your network through your router. It is useful in gaming, torrenting, security cameras, home automation, and many other applications. Any time that you want to connect to something inside your network from the internet, you need a port forward.

Many games and applications require a port forward to operate correctly. A port forward is a way of allowing specific traffic through your router. By default, routers allow traffic to leave your network without any problems. They also act as a firewall and prevent unwanted traffic from coming into your network from the internet. A port forward is a rule in your router that directs specific incoming traffic to a computer or device on your network.

What is a Port Forward?
Forwarding a port is a way to allow a connection from the internet, through your router, to a device on your network. You can think of forwarding a port as putting the device on the outside of your router. Your router blocks all incoming connection requests making it impossible for some services to work correctly. A port forward overcomes this limitation. In order to forward ports, you will need to know the ports that the application uses and the IP address of the device that you are forwarding ports to.
All network traffic has a port number attached to it. You can think of the port number like an inbox in an office. Once the network traffic gets to your computer or device, it is sent to the application that needs it. The port number of the traffic is what takes care of this last step.

For many things, the port number is an industry-standard. Common industry standard port numbers are 80 for web traffic and 443 for secure web traffic. In other cases, the port number is random per installation, which is the case with many torrent clients. In yet other cases, the port number is made up by the application vendor, which is common for independent games and smaller application developers.
Common Port Numbers
Here is a sample of some of the common, industry standard port numbers: Application Ports Web servers 80 TCP & 443 TCP Cameras Frequently 8080 TCP Xbox Live 3074 TCP & UDP Plex Media Server 32400 TCP & UDP SSH 22 TCP OpenVPN 1194 TCP & UDP Remote Desktop (RDP) 3389 TCP & UDP More ports...
We have a List of All Known Ports that shows the ports that are used by specific games and applications.
Throughout this article, we refer to computers and devices. You can think of them as the same. For instance, there is no difference between forwarding a port to your Xbox and forwarding a port to your computer. The steps for testing if a port has been forwarded are different for computers and devices, but the process for setting up the port forward in your router is the same.
Why You Need a Port Forward
Some of the most common reasons to forward a port include:
- Multiplayer games that have a lobby, such as Call of Duty or Battlefield
- PC gaming including Steam, GOG Galaxy, and Epic
- Game networks such as PlayStation Network and Xbox Live
- Peer-to-peer sharing software, such as torrent or LimeWire
- Home automation such as Home Assistant, HomeKit, openHAB, and SmartThings
- Hosting a service from home, such as TeamSpeak, SQL, or a website
- Accessing security cameras from a remote location
- Sharing files with OwnCloud, SeaFile, or NextCloud
- Remotely accessing media using Plex, Emby or Jellyfin
- Relaying ham radio with EchoLink
Anytime a connection to your network needs to be created from the outside, you need a port forward. Surfing the web does not require a port forward because your web browser contacts a web server and starts the communications. This connection originates on the inside of your network, and your router allows it without any additional configuration.
However, if you want to connect to your security cameras from outside your network, you need to forward a port. The reason for this is because a connection to your cameras must be created from outside your network. By default, routers do not allow any incoming connections. The same is true if you want to host a web server, a TeamSpeak server, or any other service inside your network.

Video games benefit from a port forward as well. Gaming services such as Xbox Live and PSN tend to prioritize consoles that have a port forwarded to them. When this happens, your console is the host in a multiplayer match. As the host console, you have a better experience because you will have the least amount of lag compared to everyone else in the game. In this case, a port forward can significantly increase your gaming experience.
Which Ports Do You Forward?
The vast majority of software has a predefined port that you need to forward. You can use our List of Ports to find which ports you need to forward for your application.
Ports are listed as either a list, a range, or a combination of both. A list of ports has commas separating the values, while a range has a hyphen. For instance, the following range:
This port list can also be written as individual ports:
Some routers accept a mixed list that includes ranges, while others do not. There are even some poorly designed routers out there that will only take a single port at a time. If you have one of those, we suggest you upgrade.
NOTE: Network ports are listed as either TCP or UDP. Generally speaking, it's fine to open both. So if your router has an option of TCP, UDP, or BOTH, you can choose BOTH. While troubleshooting port forwards, it is best to open more ports than you think you need. Then, once your application is working, you can go back and pair it down to a shorter list of only the ports that are required.
Many torrent programs, on the other hand, choose a random port at application installation. This makes it so that each user has a different port to forward. If you are forwarding a port for one of those applications, you need to find the random port your application uses.
For instance, if you are forwarding a port for qBitTorrent, you will find the port to be forwarded by clicking on Tools, Options, and choosing the Connection tab. Your port is listed next to "Port used for incoming connections".
How To Set Up a Port Forward
Setting up a port forward involves a few detailed network terms. Be prepared to write down a few notes as you go through the process.
There are 4 major steps to setting up a port forward.
The major steps of port forwarding are: Assign a static IP address to your computer or device Log in to your router Forward ports to your computer or device and create a rule in your computer firewall (not necessary for devices like Xbox, PlayStation, or cameras) Test that your port is forwarded properly (not always possible with some devices)
We offer software to forward your ports for you. If you want to spend your time doing other things instead of figuring this out, check out our Network Utilities software.
Step 1: Assign a static IP address
Assigning an IP address to your device is an often overlooked step that can save you a lot of frustration in the long run. All devices on your network have an IP address assigned to them by your router from a pool of available IP addresses.
The first thing you need to know is that IP addresses can be either static or dynamic. Dynamic IP addresses are also referred to as DHCP addresses. The "D" means dynamic. Dynamic addresses can change, and that's a problem.

A port forward directs a port on your router to an IP address on your network. The destination of a port forward is the IP address on your network. If this IP address changes, then the port forward breaks. We see this happen all the time.
When your device or computer reboots, it asks your router for an IP address. A well-designed router hands the same IP address to your computer or device each time that device connects to your network or boots up. Unfortunately, most routers do not do this and hand out IP addresses at random from the pool each time a device asks for one. When this happens, it can potentially point a working port forward at the wrong device. An example is if your Xbox Live port forward is pointing at your computer, then it's completely useless.
For much more information about static IP addresses read our Static Vs. Dynamic IP Address guide.
To solve this problem, we need to assign a static IP address to each device on your network that will be the target of a forwarded port. There are 3 different ways we can do this:
- Manually using the command prompt and windows built-in network settings (hardest)
- Manually by using your router's DHCP reservation system (easier)
- Automatically with software (easiest)
Assign a Static IP Address By Hand
While this is a possible solution to the static IP address problem mentioned above, it has a few issues. The biggest problem with this solution is that without knowing your exact DHCP pool in your router, it's easy to create an IP address conflict accidentally. Another problem is that it can create a distributed management situation where you have to visit each device on your network to make changes.
It can be incredibly annoying if the device does not have an easy-to-use interface for changing settings. For instance, this is a poor choice for a WiFi printer, thermostat, or other WiFi-connected devices. It is a reasonable method for setting up a static IP address on a computer or gaming console. Just make sure that you know your DHCP pool before proceeding.
Find Your Current IP Address, Gateway, and DNS Servers
Before we can set up a static IP address, we need to know your current network settings. You are going to want to write these down, so get a pencil and paper handy. For this step, we are going to use the command prompt.
Open up a command prompt any way that you know. The most common ways are:
- Windows Key, then start typing the phrase "cmd", then press Enter when you see "Command Prompt" highlighted.
- Windows Key +R (opens the Run dialog box), followed by 'cmd', then Enter
- Right-click the Windows Key, then choose 'Windows PowerShell' (white text on blue background)

Once you are in the command prompt, type the following command:
You will see a lot of data. If you have virtual network adapters or multiple network adapters, then you will see even more data. It is common to see many virtual adapters if you have either Hyper-V or Docker installed.

Most of the network adapters listed from ipconfig will not work for this step. We need to find an adapter that has valid settings. Scroll through the list of adapters and find one that has a Default Gateway assigned. Many of the virtual adapters will not have a Default Gateway. You need to find a Default Gateway that has a similar IP address to the IPv4 address listed for the adapter.
For instance, if you find an adapter with an IPv4 address that is 192.168.0.100, and the Default Gateway is 192.168.0.1, this is a suitable adapter for this step.
Write down the following information from the adapter that you choose:
- IPv4 Address (most likely 192.168.0.x or 192.168.1.x, where x is a number above 0)
- Subnet Mask (most likely 255.255.255.0)
- Default Gateway (most likely 192.168.0.1 or 192.168.1.1)
- DNS Servers (not strictly necessary)
To assign a static IP address by hand, we need to find one that is available. There are many ways to do this, but we will use the currently assigned IP address for this guide.
NOTE: This will not always work. It is better to choose an IP address outside of your current DHCP pool. You can automate this process using the software solution below.
You can also choose another IP address that is far away from your current address. For instance, if your IP address is:
Then choose something like:
Just do not choose 192.168.0.1 or 192.168.1.1 as those are usually gateway addresses. Keep the last number under 254 as well.
For the remainder of this guide, use the IP address that you choose here.
Modify Ethernet Adapter Settings
Now we need to change the settings on your network card or ethernet adapter. To get to the settings for your network, the fastest method is:
- Single tap the Windows key
- Type the phrase network connections until you see View network connections .
- Press the Enter key

You should see a list of network connections on your computer. If you have Hyper-V or Docker installed, there can be many. Look for any adapters that are not named "Hyper-V".

Right-click on your adapter and choose properties. If Internet Protocol Version 4 is not checked, then this is the wrong adapter. Choose a different one.

Double click on Internet Protocol Version 4 . Change Obtain an IP address automatically to Use the following IP address .
Fill out the IP address , Subnet mask , Default gateway , and Preferred DNS server with the information from above.
Alternatively, instead of using your DNS servers, you can use either the CloudFlare or Google DNS servers:
- CloudFlare DNS: 1.1.1.1
- Google DNS: 8.8.8.8

Click Ok , then click Ok again, and your adapter is now changed from DHCP to static . Surf the web to make sure that you still have internet connectivity. If you do not, then change your settings back to Obtain an IP address automatically .
Set Up a Static IP Address Using DHCP Reservations
A better way to set up a static IP address is to use your router's DHCP reservations feature. Not all routers have this feature, so this may not be an option for you.
However, if your router does have this feature, it is an excellent choice for reserving a static IP address for all of the devices in your home. DHCP reservations allow you to centrally manage all of your home IP addresses from a single interface and will enable you to change settings on devices that you may otherwise not be able to edit. DHCP reservations are a fantastic option for game consoles, home automation, security cameras, phones, tablets, and more.
Set Up a Static IP Address Automatically
Another simple option for setting up a static IP address is to use our free Static IP Setter, which is a part of our Network Utilities software bundle. The Static IP Setter is free to use and automates all of the steps listed above.
The Static IP Setter will find your current settings, then scan your network for IP address conflicts, and help you choose an IP address to use on your computer.
Step 2: Log in to your router
Now that you have a static IP address (or DHCP reservation) on your device, you are ready to forward a port.
To start, we need to log in to your router. Earlier, one of the settings that you wrote down is your Default Gateway. That is the IP address of your router.
Routers use a locally hosted web page for management. To view your router's menu and settings:
- Open up a web browser. Firefox, Chrome, Edge, or Opera should work fine.
- In the address bar, type your Default Gateway IP address, such as 192.168.0.1 or 192.168.1.1
- Press Enter
You should now see your router's login screen. Not all routers require a login, but most do. You need to know your router's username and password. If you have never logged in before, your username and password are most likely set to the factory default values. You can find a list of all factory default router usernames and passwords, or you can take a few educated guesses.
Some of the most common factory usernames and passwords are listed here: Username Password admin admin admin password {blank} admin {blank} password Try various combinations of admin, password, and leaving the entries blank. *Where it says blank, try leaving the value blank.*
For an extensive list of passwords for your router, choose your manufacturer from our Router List and try all of the combinations listed.
If you have changed your router's username and password but cannot remember it, you have a few options, including:
- Factory reset your router (warning: this can cause a lot of frustration)
- Run our Router Login tool, part of Network Utilities , to help you guess your forgotten password
- Follow our How to Reset a Router Password guide
Step 3: Create port forwards
Find the port forwarding section in your router menu. Navigate around in your router by clicking the tabs or links at the top or left of each page. Most routers list the port forwarding section under Network , Advanced , or LAN . Look for the following keywords to help you find it:
- Port Forwarding
- Port Range Forwarding
- Virtual Servers
- Apps & Gaming
Here are a few examples of what the port forwarding section looks like in some routers.
Linksys Routers
Most Linksys routers call the port forwarding section Apps and Gaming , and they have a blue interface that resembles the following:

TP-Link Routers
TP-Link routers are usually light blue and yellow, and you can find the port forwarding section under the NAT Forwarding tab, called Virtual Servers .

Netgear Routers
Netgear routers have the port forwarding section in the Advanced Setup tab, in a link called Port Forwarding / Port Triggering :

DD-WRT Firmware
If you have the aftermarket dd-wrt firmware installed, then you can find the port forwarding section under the NAT QoS tab:

For detailed instructions on how to forward ports in your specific router visit our router guides .
Enter the ports and destination IP address
Once you find your router's port forwarding (or virtual servers) section, you are ready to enter the necessary information.
A port forward points TCP and UDP numbers at an internal IP address. In other words, you need to forward a port to an IP address. Source: Port numbers Destination: IP address
Your router will have a place to enter the ports to be forwarded and the destination IP address to point those forwarded ports. If your router lists both Internal and External ports, make them the same. This is a feature called Port Translation that not all routers offer. In the protocol selection, choose TCP or UDP depending on what your application requires. Remember, you can always select both if you do not know.
For detailed port forwarding guides specific to your router visit our router guides .
Most routers have a Save button, and many routers require a restart or reboot for the changes to take effect. When in doubt, click the Save button and then reboot your router.
Open port in Windows Firewall
Normally when you launch an application that needs a port forward, Windows asks you if it is ok to add a rule in the firewall automatically. As long as you know which application you just launched, it is generally a good idea to choose yes and let Windows create this rule for you. If you do not create a rule in the firewall, then even if you forward your ports correctly, your application will not work as it should.
If you have already launched your application and told Windows no , meaning do not create a rule in the firewall, then you must go create a rule in your Windows Firewall manually. This rule will use the same TCP and UDP ports that you forward in your router, but it will not require a destination IP since the destination IP is your computer.
Step 4: Test port forwarding
Once you've set up your port forward, it's a good idea to test it. Testing a port forward is complex, and the best test is to see if it solves the problem you are having.
If you are forwarding a port to your computer, then you can use the Port Checker tool in our Network Utilities software to test if the port is open. Our port checker is the only checker that can test with 100% accuracy if your port is forwarded or not. You can use it to test UDP and TCP ports, something most other port checkers cannot do.
When you first attempt to test a forwarded port with our Port Checker, the Windows Firewall should pop up a prompt asking if you want to create a rule allowing traffic in on that port. Always allow this traffic, or else the forwarded port will not work correctly.
Sometimes while troubleshooting a forwarded port, it's a good idea to forward a test port to your computer so that you know that the software you are forwarding for is not getting in the way. We usually suggest testing forwarding port 1,000 TCP and UDP to your computer. You can then use the Port Checker to see if port 1,000 is open or not. If the test forward is not open, then you can start troubleshooting the Windows Firewall.
There are a few ISPs out there that do not allow incoming traffic to connect to your network. It is a common problem with 4G and 5G cellular internet providers. They typically hide your internet connection behind a NAT, which means that they would need to set up a forward in their NAT identical to what you set up in your router for you to receive an incoming packet. It is uncommon for them to do this.
Is Port Forwarding Safe?
You're probably wondering how safe it is to forward ports. How safe it is to forward ports depends on the application and device that you are forwarding ports for. Be aware that you are allowing an incoming connection to your network, so it does come with some risks. For details about how to safely forward ports visit Is port forwarding safe?

Forwarding a port to a gaming console such as an Xbox or PlayStation is entirely safe.
Forwarding a port to a personal web server may be less safe unless you know how to secure your web server.
The forwarded port will only allow specific traffic to make it to one particular device on your network. You are not tearing down your firewall as much as you are creating a pinhole through it.
To get started with forwarding ports in your router visit our router guides .
To port forward the easy way, check out our Network Utilities software that configures your router for you.
More From Portforward

How to Forward Ports in Your Router for Sniper Elite 5
Forwarding some ports in your router for Sniper Elite 5 can help improve your online multiplayer connections.

Forwarding Ports in Your Router for Madden NFL 23
Forwarding ports can help improve online connections in Madden NFL 23 and enable you to connect with others more easily.

How To Open Ports in Your Router for PUBG: Battlegrounds
Help ensure you have the best connections possible for PUBG: Battlegrounds by forwarding some ports for it in your router.

Opening Ports for Pokémon Trading Card Game Live using Your Router
Forwarding some ports in your router for Pokémon Trading Card Game Live can help improve your online connections.

How to Port Forward League of Legends
If you are having League of Legends connection issues then you might want to consider opening up some ports in your router.

How to Port Forward Street Fighter V in Your Router
Forward some ports in your router to connect with others more easily and improve online connections in Street Fighter V

How to Forward Ports in Your Router for Doom Eternal
Have a smoother and overall better multiplayer experience in Doom Eternal by forwarding some ports in your router.

Forwarding Ports for Madden NFL 24 on Your Router.
Forward some ports in your router to help improve connections and connect with more players in Madden NFL 24.

Nice to meet you.
Enter your email to receive our weekly G2 Tea newsletter with the hottest marketing news, trends, and expert opinions.
What Is Port Forwarding? - A Beginner's Guide
January 1, 2021
by Zack Busch

For most people, networking is a complex, nuanced knowledge space; the only thing more abundant than the general state of confusion is the sheer volume of acronyms.
It’s not an easy topic to understand, and frankly, there’s so much going on within that space that it’s hard to have in-depth knowledge without decades of study and experience.
We don’t all have that kind of time on our hands. What we need is a simpler way to understand the basics and easily visualize a concept so that we can better understand networking impacts. We’re here to help you with that. Specifically, let’s explore the concept of port forwarding, check out some applications, and hopefully, by the end of the journey, you’ll feel a just little more comfortable with this acronym fiesta of a concept.
What is port forwarding?
Before we dive too deep, let's define it.
Port forwarding defined
Port forwarding, sometimes called port mapping, allows computers or services in private networks to connect over the internet with other public or private computers or services.
Port forwarding achieves by creating an association called a map between a router’s public, wide area network (WAN) internet protocol (IP) address and a private, local area network (LAN) IP address for a device on that private network.
The mouthful of acronyms is a little confusing, so let’s give ourselves a simpler frame of reference.
The video above from Issac's Computing Tips does a great job of explaining port forwarding and mapping.
Your internet’s port forwarding auto-attendant
Think of the router for your private network like a switchboard, or, maybe a little more up to today’s speed, an auto-attendant. The voice you hear when you call somewhere that gives you options for whom to speak with...
- “Press zero to speak to a representative.”
- “If you know your party’s extension, please enter it now.”
...that’s an auto-attendant.

When a call comes into the auto-attendant, it has to be redirected. The auto-attendant uses your input, the extension, as an identifier to help redirect the call to the correct target. Once that extension is received, the call is passed through to that extension’s phone.
Likewise, if you want to place an outbound call from within the switchboard network to a different number, the switchboard can display your internal phone number as the main switch’s phone number instead. This is called an external phone number mask and is used to protect the internal phone number and extension from being shared. After the internal number is masked, the call goes out, and the receiver sees only the switchboard number.

Port forwarding, explained
A “private LAN” could be your home Wi-Fi, your office Wi-Fi, or even the free Wi-Fi at a coffee shop. It typically (but not always) requires a password or some form of authentication to connect. Once connected, your device — laptop, cell phone, tablet, etc. — is assigned an IP address on that network through a process called DHCP (Dynamic Host Configuration Protocol). That IP address is unique to your device on the network, which is important for the router in identifying the device.
When you’d like to connect to the internet — say, to check your email, visit social media, or access cloud file storage — a connection request gets sent from your device to the router , detailing your device’s IP address and an associated port for the request. Your device is the host or source for the connection. The router then reads the request and masks ( maps ) your device’s IP address and port with the router’s public-facing IP address and a relevant port. (If you’re particularly curious, here’s the full ICANN port registration list .) After masking your host IP address with the router’s public-facing IP address, it sends the connection request forward to its destination.
There’s an important detail involved in sending that connection request: The router has to remember how it mapped your device’s IP address and port to its own. This is where a Network Address Translation (NAT) table comes into play. NAT tables store information about what maps are made during a connection.

Once a request reaches its destination, that destination is going to need to send information back to your device so you can see it. The destination makes a connection request back to the router with the router’s IP address and a specified port . The router checks the NAT table for the specific IP address/port combination to see if there’s an open connection . If there is, the request is then passed along to the correct device on the internal network. Once that connection closes, the connection’s entry on the table is deleted.

Why is port forwarding important?
Port forwarding is critical for remote access to items on private networks. Since firewalls exist to keep unwanted visitors out, the visitors you want to get in are going to need a way to do so. Knowing the IP address isn’t enough: Requests need to be directed to the correct port as well. This extra required information helps keeps unwanted visitors out and adds a further layer of security against DDoS (direct denial of service) attacks.
Port forwarding functions incredibly well alongside various identity management software . Multi-factor authentication software, single sign-on solutions, and the like create an extra layer of security towards allowing visitors into particularly secure areas like file servers and databases.
Where is port forwarding used?
While the below examples are far from comprehensive, they should give you a good idea of some areas where port forwarding adds to efficacy and improves daily function for both clients and your company.
Whether files, servers or hard drive clones, there’s something to be said for being able to access your backups from anywhere with an internet connection. Port forwarding makes it so even some of your harder-to-reach backups can be accessed from anywhere by those with proper authentication.
Virtual desktops
Not all computer desktops are stored locally. In large-scale technical implementations like hospitals or universities, computer desktops are more effectively stored in cloud environments. Port forwarding helps users access their own virtual desktops or VDI from any computer they need on-site.
CCTV and security
Port forwarding lets you keep your eye on things from anywhere. Business or residential, you can easily access your private security feeds from any location.
Game servers
Port forwarding isn’t just for business. Who says we can’t have a little fun? Check out the auto-complete for “port forwarding” in search engines.
Yes, you’re reading that correctly. One of the most popular uses of port forwarding is in gaming. There, port forwarding is advantageous for hosting private game servers.
While this is mainly in a casual sense for having private games or maps among a group of friends, companies can also take advantage of this to host charity benefit games or tournaments .
Ready to learn more about network servers and other IT topics?
Check out our web server vs. application server comparison guide for beginners.

Zack is a former G2 senior research analyst for IT and development software. He leveraged years of national and international vendor relations experience, working with software vendors of all markets and regions to improve product and market representation on G2, as well as built better cross-company relationships. Using authenticated review data, he analyzed product and competitor data to find trends in buyer/user preferences around software implementation, support, and functionality. This data enabled thought leadership initiatives around topics such as cloud infrastructure, monitoring, backup, and ITSM.
Recommended Articles

Productivity
How to Utilize Employee Self Service: Your HR Team Will Thank You
Day in and day out, HR managers are inundated with requests.
by Mara Calvello

A Beginner's Guide to Facebook Analytics: Understanding Your Audience
Understanding your audience is a key factor in running successful marketing campaigns.
by Alexa Drake

Contributor Network
How to Use Generative AI in Fintech to Optimize Your CX
From creative fields to e-commerce and software engineering, there’s no limit in sight for how...
by Sandra Nikolov
Never miss a post.
Subscribe to keep your fingers on the tech pulse.
By submitting this form, you are agreeing to receive marketing communications from G2.
Smartphones, Laptops & Tablets, Wearables and More
About Huawei, Press&Event, and More
Products, Solutions and Services for Enterprise
Products, Solutions and Services for Carrier

- Asia Pacific
- Latin America
- Middle East
- North America
How do I configure port mapping rules on my HUAWEI router
Port mapping allows you to map a port on your router's WAN IP address to a computer within a LAN. When you use the Internet to access a specific port on the WAN IP address (for example, in order to access a webcam on a home network), the router will check the port value against the port mapping rules, then map your service request to the specific port on the local IP of the computer.
To configure port mapping rules:
- For routers that feature self-adaptive ports, you do not need to distinguish between WAN and LAN ports.
- Routers currently support setting 32 port mapping rules.
The internal port and external port can only be specified, the port range cannot be specified.
- Email Feedback
- Service Center Location
How-To Geek
How do i open a port on windows firewall.
Firewalls keep your PC safe, but they can also get in the way.
Quick Links
What do ports do, how to open a port on windows 10, key takeaways.
- Firewalls block unsolicited traffic from the internet by default, but you may need to open a port to allow specific traffic through for programs like game servers.
- To open a port on Windows 10, search for "Windows Firewall" and go to "Windows Defender Firewall." Click on "Advanced Settings" and create a new inbound rule for the specific port number.
- You can choose when the rule applies (domain, private, public) and give it a name and description. If needed, you can disable the rule or repeat the steps to open ports for different programs.
Firewalls are there to protect you from threats on the internet (both traffic from the internet and from local applications trying to gain access when they shouldn't). Sometimes, though, you'll want to allow otherwise restricted traffic through your firewall. To do so, you'll have to open a port.
When a device connects to another device on a network (including the internet), it specifies a port number that lets the receiving device know how to handle the traffic. Where an IP address shows traffic how to get to a particular device on a network, the port number lets the receiving device know which program gets that traffic. By default, most unsolicited traffic from the internet is blocked by Windows Firewall. If you're running something like a game server, you might need to open a port to allow that specific kind of traffic through the firewall.
This article shows you how to open a port on a particular PC's firewall to let traffic in. If you have a router on your network (which you likely do), you will also need to allow the same traffic through that router by forwarding the port there.
Clicking Start, type "Windows Firewall" into the search box, and then click on "Windows Defender Firewall."
Once Windows Firewall opens, click on "Advanced Settings."
This launches Windows Defender Firewall with Advanced Security. Click the "Inbound Rules" category on the left. In the far right pane, click the "New Rule" command.
If you need to open a rule for outgoing traffic, instead of clicking "Inbound Rule," you'd click "Outbound Rule." Most apps are pretty good about creating their own outbound rules when you install them, but you might occasionally run into one that cannot.
On the Rule Type page, select the "Port" option and then click "Next."
On the next screen, you'll have to choose whether the port you're opening uses the Transmission Control Protocol (TCP) or User Datagram Protocol (UDP). Unfortunately, we can't tell you specifically which to use because different apps use different protocols. Port numbers can range from 0-65535, with ports up to 1023 being reserved for privileged services. You can find an unofficial list of (most) TCP/UDP ports on the Wikipedia page , and you can also search for the app you're using. If you can't determine the specific protocol to use for your app, you can create two new inbound rules — one for TCP and one for UDP.
Select the "Specific Local Ports" option and then type the port number into the field provided. If you're opening more than one port, you can separate them by commas. If you need to open a range of ports, use a hyphen (-).
Click "Next" when you're done.
On the next page, click "Allow the Connection" and then click "Next."
For this guide, we'll be using the "Allow the Connection" option, as we trust the connection for which we're creating a rule. If you want a little more piece of mind, the "Allow the connection if it is secure" rule uses Internet Protocol security (IPsec) to authenticate the connection. You can try that option, but many apps do not support it. If you try the more secure option and it doesn't work, you can always come back and change to the less secure one.
Next, choose when the rule applies and click "Next." You can choose one or all of the following:
- Domain: When a PC is connected to a domain controller that Windows can authenticate access to the domain.
- Private: When a PC is connected to a private network, like a home network or a network that you trust.
- Public: When a PC is connected to an open network, like a cafe, airport, or library where anyone can join, and the security is unknown to you.
In the final window, give your new rule a name and an optional, more detailed description. Click "Finish" when you're done.
If you want to disable the rule at any point, locate it in the list of Inbound or Outbound Rules, right-click it, and then click "Disable Rule."
That's all there is to it. If you need to open any other ports for a different program or with a different rule, repeat the steps above using a different set of ports to open.
162.248.224.4
Check a port's status by entering an address and port number above.
Use Connected to monitor your ports.
The open port checker is a tool you can use to check your external IP address and detect open ports on your connection. This tool is useful for finding out if your port forwarding is setup correctly or if your server applications are being blocked by a firewall. This tool may also be used as a port scanner to scan your network for ports that are commonly forwarded. It is important to note that some ports, such as port 25, are often blocked at the ISP level in an attempt to prevent malicious activity. For more a comprehensive list of TCP and UDP ports, check out this Wikipedia article .
- 139 NetBIOS
- 3389 Remote Desktop
- 5632 PCAnywhere
- 25565 Minecraft
- Scan All Common Ports
©2009 Kirk Ouimet Design . All rights reserved. Privacy Policy . Hosted by VPSServer.com .
CanYouSeeMe.org
Open port check tool.
This is a free utility for remotely verifying if a port is open or closed. It is useful to users who wish to verify port forwarding and check to see if a server is running or a firewall or ISP is blocking certain ports.
Port Forwarding
Port forwarding or port mapping allows remote computers to connect to a specific computer or service on a private network. This allows you to run a web server, game server or a service of your choosing from behind a router.
In a typical network the router has the public IP address and computers/servers obtain a private IP address from the router that is not addressable from outside the network. When you forward a specific port on your router, you are telling your router where to direct traffic for that port. This utility can verify the success of that process.
Please refer to your routers manual or manufacturer for assistance in setting up port forwarding.
Blocked Ports
Most residential ISP's block ports to combat viruses and spam. The most commonly blocked ports are port 80 and port 25.
Port 80 is the default port for http traffic. With blocked port 80 you will need to run your web server on a non-standard port.
Port 25 is the default port for sending and receiving mail. ISPs block this port to reduce the amount of spam generated by worms on infected machines within their network.
©2004-2021 • Canyouseeme.org • All Rights Reserved. Privacy Policy
LEGAL DISCLAIMER THE INFORMATION ON THIS PAGE IS STRICTLY FOR INFORMATIONAL PURPOSES ONLY. IT IS YOUR RESPONSIBILITY TO OBEY ALL APPLICABLE LOCAL, STATE AND FEDERAL LAWS. WE ASSUME NO LIABILITY AND ARE NOT RESPONSIBLE FOR ANY MISUSE OR DAMAGE CAUSED BY THE USE OF THE INFORMATION ON THIS PAGE.
- Skip to content
- Skip to search
- Skip to footer
Configure VLAN Mapping on a Switch
Available languages, download options.
- PDF (917.2 KB) View with Adobe Reader on a variety of devices
- ePub (1.0 MB) View in various apps on iPhone, iPad, Android, Sony Reader, or Windows Phone
- Mobi (Kindle) (684.4 KB) View on Kindle device or Kindle app on multiple devices
Bias-Free Language
The documentation set for this product strives to use bias-free language. For the purposes of this documentation set, bias-free is defined as language that does not imply discrimination based on age, disability, gender, racial identity, ethnic identity, sexual orientation, socioeconomic status, and intersectionality. Exceptions may be present in the documentation due to language that is hardcoded in the user interfaces of the product software, language used based on RFP documentation, or language that is used by a referenced third-party product. Learn more about how Cisco is using Inclusive Language.
This article provides instructions on how to configure the Virtual Local Area Network (VLAN) mapping settings on your switch.
Applicable Devices | Firmware Version
- Sx350 Series | V 2.3.0.130 ( Download latest )
- SG350X Series | V 2.3.0.130 ( Download latest )
- Sx550X Series | V 2.3.0.130 ( Download latest )
Introduction
To establish Service Provider Virtual Local Area Networks (S-VLANs), you can configure VLAN mapping or VLAN ID translation on trunk ports that are connected to a customer network. This will map customer VLANs to service provider. Packets entering the port are mapped to S-VLAN based on the port number and the original customer VLAN-ID (C-VLAN) of the packet.
In a typical metro deployment, VLAN mapping takes place on user network interfaces (UNIs) or enhanced network interfaces (ENIs) that face the customer network. However, you are not prevented from configuring VLAN mapping on network node interfaces (NNIs).
The image below displays an example of a network where a customer uses the same VLANs in multiple sites on different sides of a service provider network.
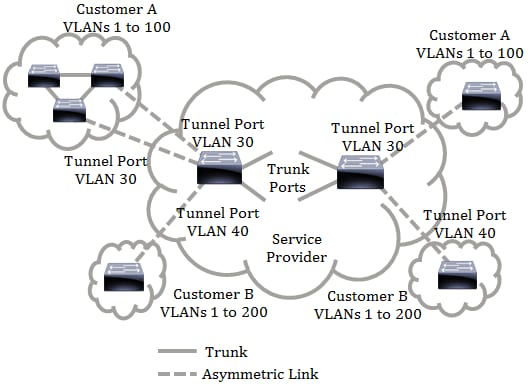
You can map the C-VLAN IDs to S-VLAN IDs for packet travel across the service provider backbone. The C-VLAN IDs are retrieved at the other side of the service provider backbone for use in the other customer site. You can configure the same set of VLAN mappings at a customer-connected port on each side of the service provider network.
VLAN Tunneling
VLAN tunneling is an enhancement of the QinQ or Nested VLAN or the Customer mode VLAN feature. It enables service providers to use a single VLAN to support customers who have multiple VLANs, while preserving customer VLAN IDs and keeping traffic in different customer VLANs segregated. This feature is known as double tagging or QinQ because in addition to the regular 802.1Q tag, which is also known as the C-VLAN, the switch adds a second ID tag known as the S-VLAN, to forward traffic over the network. On an edge interface, which is an interface where a customer network is connected to the provider edge switch, C-VLANs are mapped to S-VLANs and the original C-VLAN tags are kept as part of the payload. Untagged frames are dropped.
When a frame is sent on a non-edge tagged interface, it is encapsulated with another layer of S-VLAN tag to which the original C-VLAN-ID is mapped. Therefore, packets transmitted on non-edge interfaces frames are double-tagged, with an outer S-VLAN tag and inner C-VLAN tag. The S-VLAN tag is preserved while traffic is forwarded through the network infrastructure of the service provider. On an egress device, the S-VLAN tag is stripped when a frame is sent out on an edge interface. Untagged frames are dropped.
The VLAN tunneling feature uses a different set of commands than the original QinQ or Nested VLAN implementation, and adds the following functionality in addition to the original implementation:
- Provides multiple mappings of different C-VLANs to separate S-VLANs per edge interface.
- Allows the configuration of a drop action for certain C-VLANs received on edge interfaces.
- Allows the configuration of the action for C-VLANs which are not specifically mapped to an S-VLAN (drop or map to certain S-VLANs).
- Allows the global configuration and per NNI (backbone ports) which is the Ethertype of the S-VLAN tag. In the previous QinQ implementation, only the Ethertype of 0x8100 was supported for an S-VLAN tag.
You must create and specify the S-VLAN on the device before configuring it on an interface as an S-VLAN. If this VLAN does not exist, the command fails.
The IPv4 or IPv6 forwarding and VLAN tunneling are mutually exclusive. Meaning that if either IPv4 or IPv6 forwarding are enabled, an interface cannot be set to VLAN tunneling mode. And if any interface is set to VLAN tunneling mode, both IPv4 and IPv6 forwarding cannot be enabled on that device.
The following features are also mutually exclusive with the VLAN tunneling feature:
- Auto Voice VLAN
- Auto Smartport
The IPv4 and IPv6 interfaces cannot be defined on VLANs containing edge interfaces.
The following Layer 2 features are not supported on VLANs containing edge interfaces:
- Internet Group Management Protocol (IGMP) or Multicast Listener Discovery (MLD) snooping
- Dynamic Host Configuration Protocol (DHCP) Snooping
- IPv6 First Hop Security
The following features are not supported on edge interfaces or UNI:
- Remote Authentication Dial-In User Service (RADIUS) VLAN assignment
- 802.1x VLAN
- Switch Port Analyzer (SPAN) or Remote SPAN (RSPAN) — As a destination port with the network keyword or as a reflector port destination port with the network keyword or reflector port.
The original QinQ implementation (customer mode-related commands) continues to exist alongside the new implementation of VLAN tunneling. The customer port mode is a particular case of VLAN-mapping tunnel port mode, and does not require allocation of TCAM resources.
VLAN One-to-One Mapping
In addition to VLAN tunneling, the switch supports VLAN One-to-One Mapping. In VLAN One-to-One Mapping, on an edge interface, C-VLANs are mapped to S-VLANs and the original C-VLAN tags are replaced by the specified S-VLAN. Untagged frames are dropped.
When a frame is sent on non-edge tagged interface, it is sent with a single VLAN tag, namely that of the specified S-VLAN. The S-VLAN tag is preserved while traffic is forwarded through the infrastructure network of the service provider. On the egress device, the S-VLAN tag is replaced with the C-VLAN tag when a frame is sent to an edge interface.
In the VLAN mapping one-to-one mode, an interface belongs to all S-VLANs for which mapping on this interface is defined as an egress-tagged interface. The interface port VLAN ID (PVID) is set to 4095.
Prerequisites in configuring VLAN Mapping on your switch:
Note: Applying VLAN tunneling on an interface requires the use of router TCAM rules. There should be four TCAM entries per mapping. If there is not a sufficient number of router TCAM resources, the command will fail.
1. Create the VLANs. To learn how to configure the VLAN settings on your switch, click here .
2. Disable IP routing on the switch. To learn how to configure IP routing settings on your switch, click here .
3. Configure Ternary Content Addressable Memory (TCAM) allocations on your switch. To learn how to configure router TCAM resources allocation for VLAN tunneling and mapping purposes, click here .
Note: Applying VLAN tunneling on an interface requires the use of router TCAM rules. There should be four TCAM entries per mapping. If there is not a sufficient number of router TCAM resources, the command will fail.
4. Disable Spanning Tree Protocol (STP) on the interfaces that you want to configure. For instructions on how to configure the STP interface settings on your switch, click here .
5. Configure the interface as trunk ports. For instructions, click here .
6. Disable Generic Attribute Registration Protocol (GARP) VLAN Registration Protocol (GVRP) on the interface. To learn how to configure the GVRP settings on your switch, click here .
Configure VLAN Mapping
Configure tunnel mapping.
Configuring VLAN Tunnel Mapping on the switch performs the following actions:
- Creates an Access Control List (ACL) for mapping VLANs from VLAN List to Outer VLAN ID.
- Adds to the ACL one rule for each VLAN from the VLAN List.
- Reserves the place into Tunnel Termination and Interface (TTI) for this ACL. If there is not enough free place into TTI, the command fails.
Note: The ACL can be bound on the interface later through the configuration of One-to-One VLAN Mapping.
- Adds the edge interface to the VLAN specified in the Outer VLAN ID.
- The ACL contains V+1 rules, where V is the number of specified C-VLANs.
Follow these steps to configure tunnel mapping on a specific interface or interfaces of your switch:
Step 1. Log in to the web-based utility of the switch then choose VLAN Management > VLAN Translation > VLAN Mapping .
Note: The available menu options may vary depending on the device model. In this example, SG350X-48MP is used.

Step 2. (Optional) To display the pre-configured Tunnel Mapping on the switch, choose Tunnel Mapping from the Mapping Type drop-down list.
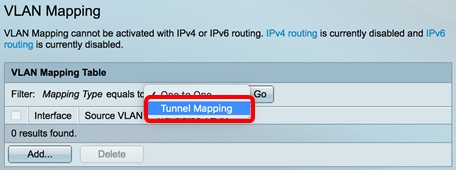
Step 3. Click Go to bring up a list of pre-configured VLAN Tunnel mapping entries. In this example, there is no pre-configured Tunnel mapping entry.
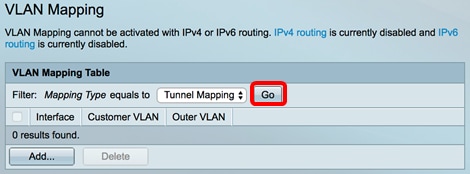
Step 4. Click Add to add a new entry.
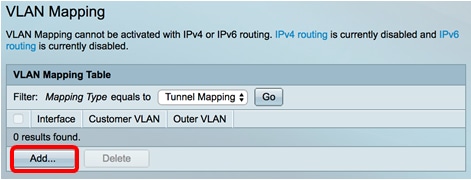
Step 5. Choose an interface from the Unit and Port or Link Aggregation Group (LAG) from the LAG drop-down lists.

Note: In this example, Port GE48 of Unit 1 is chosen. You can configure a few VLAN tunnel mapping settings on the same interface.
The Interface VLAN Mode area displays the current VLAN mode of the port.
Step 6. Click the Tunnel Mapping radio button to configure the tunnel VLAN mapping settings.
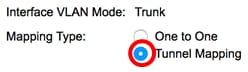
Step 7. In the Customer VLAN area, click Default to define the required action for C-VLANs not specifically specified or click on VLAN List to specifically define VLAN tunnel behavior for listed VLANs in the VLAN List field.
Note: You can define a few switchport configurations on the same interface, only if the VLAN List arguments do not contain common VLAN IDs.

Step 8. In the Tunneling area, click the Drop radio button to drop the untagged frames or click Outer VLAN ID to specifically define the Outer VLAN ID in the Outer VLAN ID field.

Note: This example shows how to configure selective tunneling on the GE48 port so that the traffic with a C-VLAN ID of 30 and 40 would be tunneled with S-VLAN ID of 10.
Step 9. Click Apply .
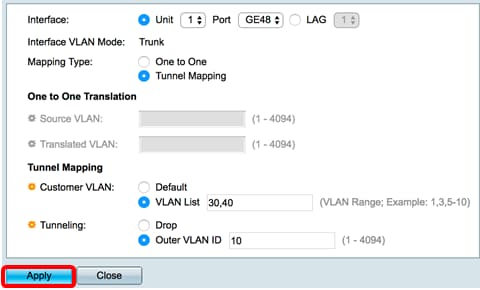
Step 10. (Optional) Repeat steps 5 to 9 to configure more Tunnel Mapping settings on the port or to configure other ports.
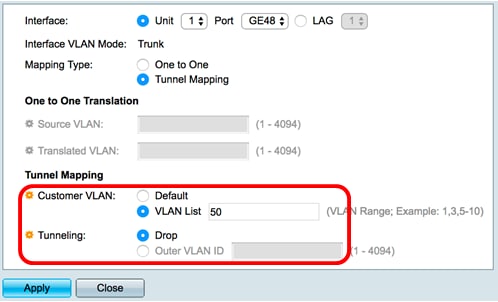
Note: In this example, the traffic entering port GE48 of unit 1 from VLAN 50 will be dropped.
Step 11. Click Close .
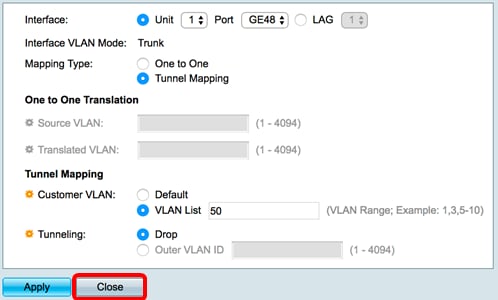
Step 12. (Optional) Click Save to save settings to the startup configuration file.
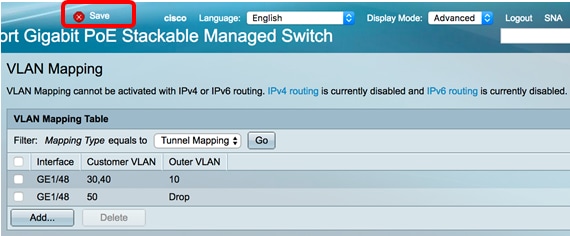
You should now have successfully configured the VLAN Tunnel Mapping settings on a specific port or ports on your switch.
Configure One to One VLAN Mapping
In One-to-One VLAN Mapping, you can configure the C-VLAN ID entering the switch from the customer network and the assigned S-VLAN ID on a specific port on your switch. In the VLAN mapping One-to-One mode, an interface belongs to all S-VLANs for which mapping on this interface is defined as egress tagged interface. The interface PVID is set to 4095.
In the VLAN Mapping One-to-One mode, an interface uses one ingress ACL and one egress ACL. The One-to-One VLAN Mapping adds rules to these ACLs. These ACLs are applied in order to:
- Ingress ACL (in TTI):
- Replace specified C-VLAN-ID by S-VLAN-ID.
- Drop frames with unspecified C-VLAN-IDs.
- Drop untagged input frames.
- Egress ACL (in TCAM):
- Replace S-VLAN-ID by C-VLAN-ID.
The VLAN One-to-One mapping adds rules to these ACLs and they are bound on the interface only if its mode is VLAN Mapping One-to-One. The ingress ACL contains V+1 rules and the egress ACL contains V rules, where V is the number of specified C-VLANs.
Follow these steps to configure One-to-One VLAN mapping on a specific interface or interfaces of your switch:
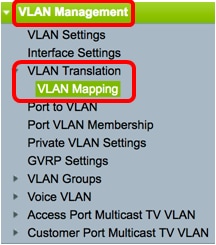
Step 2. (Optional) To display the pre-configured One to One mapping on the switch, choose One to One from the Mapping Type drop-down list.
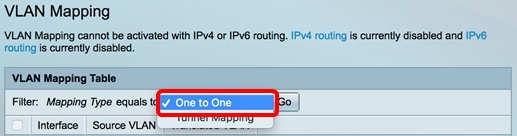
Step 3. (Optional) Click Go to bring up a list of pre-configured VLAN One to One mapping entries. In this example, there is no pre-configured One to One mapping entry.

Note: In this example, Port GE25 of Unit 1 is chosen.You can configure a few One-to-One VLAN Translation settings on the same interface.
Step 6. Click the One to One radio button to define one-to-one VLAN mapping settings.
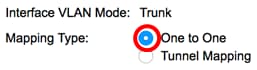
Step 7. Enter the VLAN ID of the C-VLAN that will be translated to S-VLAN in the Source VLAN field. The range is from one to 4094.

Note: In this example, VLAN 10 is entered as the Source VLAN.
Step 8. Enter the VLAN ID of the S-VLAN that will replace the specified C-VLAN in the Translated VLAN field. The range is from one to 4094. This will be the ingress ACL which will drop untagged input frames and unspecified C-VLAN IDs.
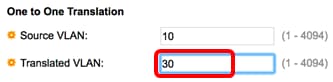
Note: In this example, VLAN 30 is used as the Translated VLAN.
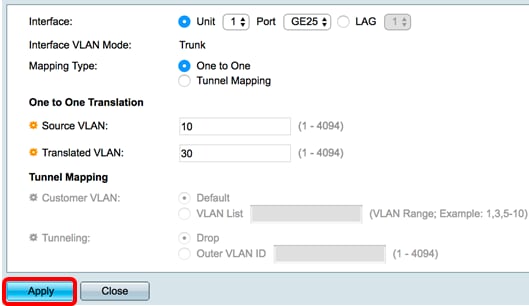
Step 10. (Optional) Repeat steps 5 to 9 to configure more One-to-One translation settings on the port or to configure other ports.
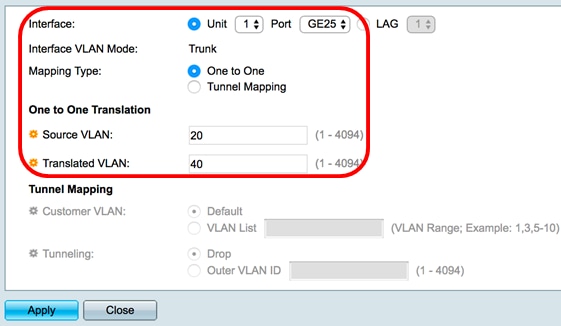
Note: In this example, new source and translated VLAN IDs are configured on the same GE25 interface.

You have now successfully configured the VLAN One-to-One mapping settings on a specific port or ports on your switch.
View a video related to this article...
Was this Document Helpful?

Industry Solutions
Training & certification.
- Contact Sales
Online Exhibition Center
Resource center, become a partner.
- H3C MSR Routers Configuration Examples(Web)-R6728-6W100
- 01-Web login Configuraiton Examples
- 02-Administrator Account Configuration Examples
- 03-Static Routing Configuration Examples
- 04-Cloud Connection Configuration Examples
- 05-Software Upgrade Examples
- 06-Port Mapping Configuration Examples
- 07-IPsec VPN Configuration Examples
- 08-L2TP VPN Configuration Examples
- 09-WLAN AC Configuration Examples
Introduction · 1
Prerequisites · 1
Software versions used · 1
Example: Configuring port mapping · 1
Network configuration · 1
Restrictions and guidelines · 1
Procedures · 2
Connecting the router to the Internet 2
Configuring port mapping · 3
Verifying the configuration · 4
Introduction
This document provides examples for configuring port mapping on routers.
Port mapping enables external users (for example, traveling employees) to access the servers on the enterprise internal network.
Prerequisites
This document is not restricted to specific software or hardware versions. Procedures and information in the examples might be slightly different depending on the software or hardware version of the device.
The configuration examples were created and verified in a lab environment, and all the devices were started with the factory default configuration. When you are working on a live network, make sure you understand the potential impact of every command on your network.
This document assumes that you have basic knowledge of NAT port mapping.
Software versions used
This configuration example was created and verified on Release 6728P22 of the MSR3610-X1 router.
Example: Configuring port mapping
Network configuration.
As shown in Figure 1 :
· The router acts as the enterprise egress gateway and connects to the Internet through interface WAN1. Interface WAN1 uses the fixed IP connection mode, and its IP address and gateway address are 20.1.1.2/24 and 20.1.1.1, respectively.
· The server uses TCP, IP address 192.168.1.2 , and local port 80.
· Configure port mapping on the router to allo w traveling employees to access the server on the internal network.
Figure 1 Network diagram

Restrictions and guidelines
In this example, port mapping only applies to Web services of the server. Configure the router to use a user-defined port as its global port. Make sure the start and end global port numbers are the same. As a best practice, set both the start and end global port numbers to 10000 or a larger number. In this example, set both the start and end global port numbers to 10000.
Connecting the router to the Internet
In this example, select the single-WAN scenario for the router, and set the connection mode of the selected WAN interface to fixed IP.
To connect the router to the Internet:
1. From the navigation pane, select Network > WAN Settings .
2. On the Scene tab, select Single-WAN scenario , and then click Apply .
Figure 2 Configuring the WAN scenario

3. Click the WAN Settings tab.
4. Click the Edit icon for interface WAN 1 . On the page that opens, perform the following tasks:
a. Select Fixed IP from the Connection mode list.
b. Enter 20.1.1. 2 in the IP address field.
c. Enter 255.255.255.0 in the Subnet mask field.
d. Enter 20.1.1. 1 in the Gateway field.
e. Select Enable from the NAT function list .
f. Use the default settings for the other parameters.
g. Click Apply to save the configuration.
Figure 3 Connecting interface WAN1 to the Internet

Configuring port mapping
In this example, configure the router to use a user-defined port as its global port, and set both the start and end global port numbers to 10000.
To configure port mapping:
1. From the navigation pane, select Network > NAT Settings .
2. On the Port m apping tab, click Add . On the page that opens, perform the following tasks:
a. Select WAN1(GE1) from the Interface list.
b. Select TCP for the Protocol Type field.
c. Select Current IP a ddress for the Global IP address field.
d. Select User-defined p ort s from the Global port number list . Set both the s tart and e nd port number s to 10000.
e. Enter the server IP address in the Local IP address field. In this example, enter 192.168.1.2 .
f. Set the start port number t o 80 f or the Local port number field.
g. Click Apply .
Figure 4 Adding a NAT port mapping

Verifying the configuration
Verify that external users can access the website of the enterprise OA system ( http://20.1.1.2:10000/ ).
- InterConnect
Intelligent Computing
Smb products, intelligent terminal products.
- Cloud Computing
- Computing Virtualization
- Distributed Storage
- Virtual Desktop
H3C Workspace Cloud Desktop
H3C UIS 3000 G5 HCI
Intelligent Connection
- Application-Driven Data Center (AD-DC)
- Application-Driven Wide Area Network (AD-WAN)
- Application-Driven Campus Network (AD-Campus)
- Network Management
- Operating System
- Moblie Communication
- UniServer Series
- Server Intelligent Management Platform
H3C UniServer R4900 G5 Server
- Boundary Security
- Application Security
- Security Management
Situational Awareness
Zero Trust Security Solution
- Home Router
- MagicSwitch
- Commercial PC
- Star Products
- Whole-House Wi-Fi
- Manufacturing
- Hospitality
- Transportation
- TV Solution
The Government Cloud “1+N+N+1” Innovation Model Becomes a Template
Strong Support for the G20 Hangzhou Summit
Product Support Services
Technical service solutions.
- Maintenance Service
- Product Deployment Services
- Support Service For Cloud Software
- Unified Operations
- Cloud Computing Services
- Security Services and Operations
- H3C IC7000 Prefabricated Container Data Center
Online Help
- Software Download
- Technical Documents
- Service Bulletin
- Product Life Cycle Management Strategy
- Star-rated Service Certification
- Service and Warranty
- License Service
- Warranty Query
- H3C Product Anti-Counterfeit Query
- Service Hotlines
- Web to Case
- Repair & Replace
- H3C Support APP
- Security Vulnerability Announcement
- Knowledge Base
- Software License Validity Update
- Certification Programs
- Product Training
- College Services
- Certificate Query
- Online E-Books
- Become A Partner
Partner Policy & Program
- Global Learning
Partner Sales Resources
Partner business management, service business.
- T1 Partner Application
- T2 Partner Application
- Star-rated Service Certification Application
- Service Partnership Application
- Find H3C Partners
- Partner Business Structure
- Partnership Qualification Requirments
- Partner Incentive Program
- SMB Run Rate
- H3Club Deal Registration
- H3C Configurator
- H3C Product Specifications
- Product Marketing Resources
- Place H3C Order (OOS)
- Find Your Order
- CHIP Report Submission
- Business Profiie Management
- Partner Access Management
- Sales Performance Inquiry
- Marketing Developing Funding
- Star-rated Service Certification Application Partner
- Service Qualification Query
News & Events
- Company Information
- President´s Message
- Success Stories
- Navigator Culture
- Corporate Social Responsibility
- Ethics & Compliance

Stack Exchange Network
Stack Exchange network consists of 183 Q&A communities including Stack Overflow , the largest, most trusted online community for developers to learn, share their knowledge, and build their careers.
Q&A for work
Connect and share knowledge within a single location that is structured and easy to search.
How to check COM ports in Windows 10?
Just like we can check COM ports in windows 7 or lower , by going to
Control Panel >> Device Manager >> Ports

How should we check it in Windows 10?
- 2 By going to device manager? What makes you think it changed? You could do this in Windows 8 and Windows 8.1 – Ramhound Mar 31, 2016 at 2:50
- 4 It's in exactly the same place. Just checked. Downvote: Little research effort. (Darn, the assoc bonus is only 100) – SIGSTACKFAULT Dec 16, 2016 at 14:58
- 1 @Ramhound: By seeing the change. – Mahmood Dehghan Jan 31, 2017 at 18:31
- 2 Still not answered for me. The ports do not show up even as hidden devices. This may be a policy issue. – benJephunneh Feb 28, 2019 at 16:40
- 1 Definitely not there on my Windows 10. – Turkeyphant Aug 17, 2020 at 17:01
3 Answers 3
I had the same question and I found this page. And the answer is in @zipzit's comment. So I post it as answer here:
To see "Com Ports" in Device Manager in Windows 10 you should select "Show hidden devices" in View menu.
- 7 still not visible – Blue Clouds Sep 23, 2018 at 4:53
- 1 @BlueClouds maybe it is shown as Ports (COM & LPT) – Mahmood Dehghan Sep 23, 2018 at 8:24
- 2 Nope, Ports not shown even after "Show hidden devices". – Klitos Kyriacou Jul 19, 2020 at 11:03
- Same here, no Ports shown after "Show hidden devices". – Turkeyphant Aug 17, 2020 at 16:58
The Device Manager still exists in Windows 10 and should show this. It has not really changed at all between versions.
Open your Start Menu and just type in Device Manager , and it will come up.

- 9 Device manager is just fine. But that's not the question. Where are the COM ports called out? I can't see them in Win10... Oops... found them. Device manager has a thing "View Hidden Devices" You have to specifically select that before the Ports (COM & LPT) are even visible. – zipzit Oct 26, 2016 at 3:00
- The proper path to Device Manager is: Open RESOURCE EXPLORER (Win+E), right click on THIS COMPUTER, click on DEVICE MANAGER Anyway on my Windows 10 the number of each port is NOT shown here. – jumpjack May 8, 2017 at 7:07
- @jumpjack Why do you think that is the "proper path"? What about Win-R, devmgmt.msc ? – Jamie Hanrahan May 31, 2017 at 22:28
- The win+R is a shortcut for advanced users knowing what an executable is. A standard user "just clicks". :-) – jumpjack Jun 8, 2017 at 7:34
- 3 Even easier is Win+x, m. – benJephunneh Feb 28, 2019 at 16:44
I am using Windows 10 21H2 and before @Mahmood Dehghan's answer, I had to go to Device Manager's "Advanced" menu and "add legacy hardware" for communication ports. Then the View->"Show hidden devices" answer would work.
You must log in to answer this question.
Not the answer you're looking for browse other questions tagged windows-10 com ..
- The Overflow Blog
- Spreading the gospel of Python
- OverflowAI and the holy grail of search
- Featured on Meta
- Our Partnership with OpenAI
- What deliverables would you like to see out of a working group?
Hot Network Questions
- How deep to plant ginger rhizomes that have existing shoots and stems?
- How do I use the 'Show don't tell' rule with a blind character?
- Can a slanted magnetic field be created with this insulated stranded wire arrangement?
- Why exempt gold bullion coins from capital gains tax?
- USA - Do I need to apply for ESTA if I have B1/B2 visa?
- Once a year, invading aliens attempt to teleport the Earth to their home star
- How many Friends are there in the circle?
- Node in a middle of a line strange behaviour
- How do I randomize filenames recursively?
- Having a hard time finding classical examples of eo (the verb)
- Create item with Chinese and Japanese character
- Why are the Lion Air and Ethiopian Airlines crashes being litigated in the US?
- How do I speedup this simulation program
- Are 96V lead acid batteries a thing?
- Does Sutta Nipata say this quote?
- How should one decide the author order
- Is it illegal for a company to cross out the "To the order of" line on a check and change companies being paid?
- Unison via cron, how to deal with one job still running as the next one starts
- Why did the writers of Pokemon decide that Pikachu shouldn't go in the pokeball?
- Where does Thomas say this?
- Started new role in company, coworker believes they are my boss but they are not
- Move circles from initial positions such that they do not overlap and total shift is minimized
- How to track PBKDF2 progress?
- Is this idea for secure password storage a good one?
How to access router settings
Discover the power of network customization

Tools and requirements
- Step-by-step guide
How to find your IP address
Final thoughts, you might also like....
Do you want to take control of your home or office network? Accessing your router settings opens up a world of possibilities, allowing you to customize and manage various aspects of your network experience.
By navigating through your router's configurations, you can fine-tune wireless settings, strengthen security, troubleshoot issues, and create a network tailored to your needs. In this guide, we'll walk you through the steps to access your router settings, including how to find your IP address. Are you ready to optimize your network for peak performance? Let's dive in!
- A router
- A device connected to the router via Ethernet or Wi-Fi
- Your IP address
You can find your IP address by looking at the router itself or checking your computer or mobile phone. We'll cover seven of the most common options: Router, Windows, Linux, Chromebook, Mac, Android, and iPhone.
Step-by-step guide for how to access router settings
1. find password.

Next, you'll need your username and password. If you haven't changed these, the default credentials are usually found in the router's manual or on a sticker on the router itself.
Some routers also use a WPS (Wi-Fi Protected Setup) PIN as a security feature to facilitate connecting devices to a Wi-Fi network. If your router has this, make a note of this as well.
If you can't find your username, password, or PIN, there are a few other options you can try.
You can visit the official website of the router manufacturer. Many manufacturers provide default login information for their routers on their websites. If you can't find the information online, contact the manufacturer's customer support, who may be able to provide you with the default login credentials.
If all else fails, you can perform a factory reset on your router. Keep in mind that this will erase all custom configurations, and you'll need to set up your router again. To reset the router, locate the reset button on your router. It is usually a small button that may require a paperclip or a similar tool to press. Press and hold the reset button for about 10-15 seconds until the router lights flash. Release the reset button, and the router will reboot to its factory settings.
3. Open your router settings page

Open a web browser like Chrome, Firefox, or Safari, and type the router's IP address into the address bar of your web browser.
You should now see the login page for your router. The example in the screenshot shows the Virgin Media Super Hub. You will see the router access page for your provider.
Enter your password and username or PIN.
4. Access router settings and make changes

Once logged in, you will have access to the router's settings. The layout and options may vary, but common settings include wireless settings, security options, and network configurations.
You can configure various settings, such as Wi-Fi passwords, security protocols, port forwarding, and more. Be cautious while making changes, as incorrect settings can affect your network's functionality.
After making any changes, remember to log out of the router's interface for security reasons.

Check on your router itself to see if it displays the router IP address we need to access the settings page. You should also make a note of the password and PIN, as we're going to need that later on.

You can find your router IP address on a Windows device in the command prompt window.
To open the Windows Command Prompt, click the Start button (Windows icon) in the bottom-left corner of your screen. Type Command Prompt or cmd into the search bar. Select Command Prompt from the search results.
Type ipconfig /all and press enter. Under the heading Wireless LAN or similar, you'll see an IP address next to Default Gateway. This is your router IP address.

To find out your Router IP address, you'll need to open the terminal.
Methods for opening the terminal vary slightly depending on which Linux distro you're using, but you should be able to access it from your applications or by entering Ctrl + Alt + T.
Once inside the terminal, type ip r and hit return. The first IP address returned will be your Router IP address.
4. Chromebook

To get your router's IP address on a ChromeOS device, click the clock at the bottom right of your screen and select the gear icon. Click Network, then Wi-Fi. Select your Wi-Fi router. You'll find the router's IP address next to Gateway.

If you're using a MacOS device, go to System Settings and Network: Wi-Fi. Click Details on your connection, and you'll find the address next to Router.

Open the Settings app on your Android device and select the Wi-Fi or Network and Internet option. Find the connected Wi-Fi network and tap on it, then look for an option like Network details. The exact wording may vary depending on your device. Your router IP address will be displayed here. It may be called the Gateway or Router IP.

Open the Settings app on your iPhone and navigate to Wi-Fi Settings. Find the connected Wi-Fi network and tap the (i) icon next to its name. This icon is typically located on the right side of the network name. In the network details, look for the Router or Gateway field. This field contains the IP address of your router.
Now that you've successfully accessed your router settings, you can take a closer look at your network settings and modify them to suit your preferences and requirements.
You can strengthen your network's security by updating Wi-Fi passwords, changing security protocols, and enabling features like MAC address filtering. You can also keep an eye on the list of connected devices to your network. This enables you to detect unauthorized devices and troubleshoot any connectivity issues.
You can also set up port forwarding, check firmware, and prioritize network traffic using Quality of Service (QoS) settings.
However, you should remember that making changes to your router settings should be approached with caution. Incorrect configurations can impact your network's functionality. Always refer to your router's documentation for guidance, and if in doubt, consult your router manufacturer's support. After making adjustments, ensure you log out of the router's interface to uphold security measures.
Get daily insight, inspiration and deals in your inbox
Get the hottest deals available in your inbox plus news, reviews, opinion, analysis and more from the TechRadar team.
- What is an IP address?
- The best Wi-Fi routers
- How to build a VPN router

Emma Street is a freelance content writer who contributes technology and finance articles to a range of websites, including TechRadar, Tom's Guide, Top10.com, and BestMoney. Before becoming a freelance writer, she worked in the fintech industry for more than 15 years in a variety of roles, including software developer and technical writer. Emma got her first computer in 1984 and started coding games in BASIC at age 10. (Her long, rambling, [and probably unfinishable] Land of Zooz series still exists on a 5-inch floppy disk up in her parents' loft somewhere.) She then got distracted from coding for a few decades before returning to university in her thirties, getting a Computing Science degree, and realizing her ambition of becoming a fully-fledged geek. When not writing about tech and finance, Emma can be found writing about films, relationships, and tea. She runs a tea blog called TeaFancier.com and holds some very strong opinions about tea. She has also written a bunch of romance novels and is aided at work by a tech-savvy elderly cat who ensures Emma fully understands all the functions of the F keys so she can quickly undo whatever the cat has just activated while walking over the keyboard.
Apple's next accessibility features let you control your iPhone and iPad with just your eyes
LG's new super-bright OLED panel could give the next Meta Quest an edge over the Apple Vision Pro
iOS 17.5 is reportedly resurfacing once deleted photos for some users
Most Popular
- 2 Microsoft launches generative AI model designed exclusively for US intelligence services — air-gapped system for spies aims to avoid potential security leaks
- 3 Google Maps is getting two helpful new features in its latest update
- 4 Memorial Day preview: save up to $1,000 on stunning OLED TVs at Best Buy
- 5 Forget projectors – TCL’s 115-inch mini-LED TV has 6.2.2-channel Dolby Atmos speakers and 5,000 nits brightness
- 2 Forget projectors – TCL’s 115-inch mini-LED TV has 6.2.2-channel Dolby Atmos speakers and 5,000 nits brightness
- 3 Capture amazing images every single day
- 4 Sennheiser has slashed prices on some of its best headphones for Click Frenzy
- 5 You can now play PS1 games in iOS on your iPhone – here’s how
Networking overview
Container networking refers to the ability for containers to connect to and communicate with each other, or to non-Docker workloads.
Containers have networking enabled by default, and they can make outgoing connections. A container has no information about what kind of network it's attached to, or whether their peers are also Docker workloads or not. A container only sees a network interface with an IP address, a gateway, a routing table, DNS services, and other networking details. That is, unless the container uses the none network driver.
This page describes networking from the point of view of the container, and the concepts around container networking. This page doesn't describe OS-specific details about how Docker networks work. For information about how Docker manipulates iptables rules on Linux, see Packet filtering and firewalls .
User-defined networks
You can create custom, user-defined networks, and connect multiple containers to the same network. Once connected to a user-defined network, containers can communicate with each other using container IP addresses or container names.
The following example creates a network using the bridge network driver and running a container in the created network:
The following network drivers are available by default, and provide core networking functionality:
For more information about the different drivers, see Network drivers overview .
Container networks
In addition to user-defined networks, you can attach a container to another container's networking stack directly, using the --network container:<name|id> flag format.
The following flags aren't supported for containers using the container: networking mode:
- --dns-search
- --dns-option
- --mac-address
- --publish-all
The following example runs a Redis container, with Redis binding to localhost , then running the redis-cli command and connecting to the Redis server over the localhost interface.
Published ports
By default, when you create or run a container using docker create or docker run , the container doesn't expose any of its ports to the outside world. Use the --publish or -p flag to make a port available to services outside of Docker. This creates a firewall rule in the host, mapping a container port to a port on the Docker host to the outside world. Here are some examples:
Important Publishing container ports is insecure by default. Meaning, when you publish a container's ports it becomes available not only to the Docker host, but to the outside world as well. If you include the localhost IP address ( 127.0.0.1 ) with the publish flag, only the Docker host can access the published container port. ]\s+/gm, '')); copying = true; setTimeout(() => copying = false, 2000);"> $ docker run -p 127.0.0.1:8080:80 nginx Warning Hosts within the same L2 segment (for example, hosts connected to the same network switch) can reach ports published to localhost. For more information, see moby/moby#45610
If you want to make a container accessible to other containers, it isn't necessary to publish the container's ports. You can enable inter-container communication by connecting the containers to the same network, usually a bridge network .
IP address and hostname
By default, the container gets an IP address for every Docker network it attaches to. A container receives an IP address out of the IP subnet of the network. The Docker daemon performs dynamic subnetting and IP address allocation for containers. Each network also has a default subnet mask and gateway.
You can connect a running container to multiple networks, either by passing the --network flag multiple times when creating the container, or using the docker network connect command for already running containers. In both cases, you can use the --ip or --ip6 flags to specify the container's IP address on that particular network.
In the same way, a container's hostname defaults to be the container's ID in Docker. You can override the hostname using --hostname . When connecting to an existing network using docker network connect , you can use the --alias flag to specify an additional network alias for the container on that network.
DNS services
Containers use the same DNS servers as the host by default, but you can override this with --dns .
By default, containers inherit the DNS settings as defined in the /etc/resolv.conf configuration file. Containers that attach to the default bridge network receive a copy of this file. Containers that attach to a custom network use Docker's embedded DNS server. The embedded DNS server forwards external DNS lookups to the DNS servers configured on the host.
You can configure DNS resolution on a per-container basis, using flags for the docker run or docker create command used to start the container. The following table describes the available docker run flags related to DNS configuration.
Nameservers with IPv6 addresses
If the /etc/resolv.conf file on the host system contains one or more nameserver entries with an IPv6 address, those nameserver entries get copied over to /etc/resolv.conf in containers that you run.
For containers using musl libc (in other words, Alpine Linux), this results in a race condition for hostname lookup. As a result, hostname resolution might sporadically fail if the external IPv6 DNS server wins the race condition against the embedded DNS server.
It's rare that the external DNS server is faster than the embedded one. But things like garbage collection, or large numbers of concurrent DNS requests, can sometimes result in a round trip to the external server being faster than local resolution.
Custom hosts
Your container will have lines in /etc/hosts which define the hostname of the container itself, as well as localhost and a few other common things. Custom hosts, defined in /etc/hosts on the host machine, aren't inherited by containers. To pass additional hosts into a container, refer to add entries to container hosts file in the docker run reference documentation.
Proxy server
If your container needs to use a proxy server, see Use a proxy server .
PortMapping
Port mappings allow containers to access ports on the host container instance to send or receive traffic. Port mappings are specified as part of the container definition.
If you use containers in a task with the awsvpc or host network mode, specify the exposed ports using containerPort . The hostPort can be left blank or it must be the same value as the containerPort .
Most fields of this parameter ( containerPort , hostPort , protocol ) maps to PortBindings in the Create a container section of the Docker Remote API and the --publish option to docker run . If the network mode of a task definition is set to host , host ports must either be undefined or match the container port in the port mapping.
You can't expose the same container port for multiple protocols. If you attempt this, an error is returned.
After a task reaches the RUNNING status, manual and automatic host and container port assignments are visible in the networkBindings section of DescribeTasks API responses.
The application protocol that's used for the port mapping. This parameter only applies to Service Connect. We recommend that you set this parameter to be consistent with the protocol that your application uses. If you set this parameter, Amazon ECS adds protocol-specific connection handling to the Service Connect proxy. If you set this parameter, Amazon ECS adds protocol-specific telemetry in the Amazon ECS console and CloudWatch.
If you don't set a value for this parameter, then TCP is used. However, Amazon ECS doesn't add protocol-specific telemetry for TCP.
appProtocol is immutable in a Service Connect service. Updating this field requires a service deletion and redeployment.
Tasks that run in a namespace can use short names to connect to services in the namespace. Tasks can connect to services across all of the clusters in the namespace. Tasks connect through a managed proxy container that collects logs and metrics for increased visibility. Only the tasks that Amazon ECS services create are supported with Service Connect. For more information, see Service Connect in the Amazon Elastic Container Service Developer Guide .
Type: String
Valid Values: http | http2 | grpc
Required: No
The port number on the container that's bound to the user-specified or automatically assigned host port.
If you use containers in a task with the awsvpc or host network mode, specify the exposed ports using containerPort .
If you use containers in a task with the bridge network mode and you specify a container port and not a host port, your container automatically receives a host port in the ephemeral port range. For more information, see hostPort . Port mappings that are automatically assigned in this way do not count toward the 100 reserved ports limit of a container instance.
Type: Integer
The port number range on the container that's bound to the dynamically mapped host port range.
The following rules apply when you specify a containerPortRange :
You must use either the bridge network mode or the awsvpc network mode.
This parameter is available for both the EC2 and AWS Fargate launch types.
This parameter is available for both the Linux and Windows operating systems.
The container instance must have at least version 1.67.0 of the container agent and at least version 1.67.0-1 of the ecs-init package
You can specify a maximum of 100 port ranges per container.
You do not specify a hostPortRange . The value of the hostPortRange is set as follows:
For containers in a task with the awsvpc network mode, the hostPortRange is set to the same value as the containerPortRange . This is a static mapping strategy.
For containers in a task with the bridge network mode, the Amazon ECS agent finds open host ports from the default ephemeral range and passes it to docker to bind them to the container ports.
The containerPortRange valid values are between 1 and 65535.
A port can only be included in one port mapping per container.
You cannot specify overlapping port ranges.
The first port in the range must be less than last port in the range.
Docker recommends that you turn off the docker-proxy in the Docker daemon config file when you have a large number of ports.
For more information, see Issue #11185 on the Github website.
For information about how to turn off the docker-proxy in the Docker daemon config file, see Docker daemon in the Amazon ECS Developer Guide .
You can call DescribeTasks to view the hostPortRange which are the host ports that are bound to the container ports.
The port number on the container instance to reserve for your container.
If you specify a containerPortRange , leave this field empty and the value of the hostPort is set as follows:
For containers in a task with the awsvpc network mode, the hostPort is set to the same value as the containerPort . This is a static mapping strategy.
For containers in a task with the bridge network mode, the Amazon ECS agent finds open ports on the host and automatically binds them to the container ports. This is a dynamic mapping strategy.
If you use containers in a task with the awsvpc or host network mode, the hostPort can either be left blank or set to the same value as the containerPort .
If you use containers in a task with the bridge network mode, you can specify a non-reserved host port for your container port mapping, or you can omit the hostPort (or set it to 0 ) while specifying a containerPort and your container automatically receives a port in the ephemeral port range for your container instance operating system and Docker version.
The default ephemeral port range for Docker version 1.6.0 and later is listed on the instance under /proc/sys/net/ipv4/ip_local_port_range . If this kernel parameter is unavailable, the default ephemeral port range from 49153 through 65535 (Linux) or 49152 through 65535 (Windows) is used. Do not attempt to specify a host port in the ephemeral port range as these are reserved for automatic assignment. In general, ports below 32768 are outside of the ephemeral port range.
The default reserved ports are 22 for SSH, the Docker ports 2375 and 2376, and the Amazon ECS container agent ports 51678-51680. Any host port that was previously specified in a running task is also reserved while the task is running. That is, after a task stops, the host port is released. The current reserved ports are displayed in the remainingResources of DescribeContainerInstances output. A container instance can have up to 100 reserved ports at a time. This number includes the default reserved ports. Automatically assigned ports aren't included in the 100 reserved ports quota.
The name that's used for the port mapping. This parameter only applies to Service Connect. This parameter is the name that you use in the serviceConnectConfiguration of a service. The name can include up to 64 characters. The characters can include lowercase letters, numbers, underscores (_), and hyphens (-). The name can't start with a hyphen.
For more information, see Service Connect in the Amazon Elastic Container Service Developer Guide .
The protocol used for the port mapping. Valid values are tcp and udp . The default is tcp . protocol is immutable in a Service Connect service. Updating this field requires a service deletion and redeployment.
Valid Values: tcp | udp
For more information about using this API in one of the language-specific AWS SDKs, see the following:
AWS SDK for C++
AWS SDK for Java V2
AWS SDK for Ruby V3

To use the Amazon Web Services Documentation, Javascript must be enabled. Please refer to your browser's Help pages for instructions.
Thanks for letting us know we're doing a good job!
If you've got a moment, please tell us what we did right so we can do more of it.
Thanks for letting us know this page needs work. We're sorry we let you down.
If you've got a moment, please tell us how we can make the documentation better.
IMAGES
VIDEO
COMMENTS
Port Forwarding (or port mapping) allows external traffic from the internet to connect to a device, like a computer, on a private network. ... > Advanced Settings > Port Forwarding, and tap, "Add Port Forward." Select the device or local IP you'd like to make a rule for, then pick a port and select between TCP, UDP, or TCP/UDP. Then tap "Next ...
Netgear — Click Advanced Setup and then click Port Forwarding/Port Triggering or Ports - Custom Services. Belkin — Click Virtual Servers below the "Firewall" header in the menu to the left. Asus — Click WAN in the menu to the left and then click Virtual Server/Port Forwarding. 4. Find a port forwarding preset.
We need to forward the following ports to our PS4: TCP: 80, 443, 3478, 3479, 3480. UDP: 3478, 3479. Now depending on your router, you need to create the following rules forwarding rules: If your router doesn't support a range (3478-3480), then you will need to create multiple rules for each port number.
Windows. Go to "Control Panel -> Network and Sharing Center -> Change adapter settings.". Right-click "Local Area Connection" and click Properties. Under the Networking tab, select "Internet Protocol Version 4" from the list and click Properties. In the new box, select "Use the following IP address.". What you enter here will ...
On your console, go to Settings > Network > Test Network Connection and follow the connection prompts. Go to your router's port forwarding tools and open 88, 500, 3544, 4500 (for UDP), and 3074 (TCP). Go back to Settings > Network and select Test NAT type.
To create a port forwarding rule on Windows, open a command prompt as an administrator and run the following command: netsh interface portproxy add v4tov4 listenport=3340 listenaddress=10.1.1.110 connectport=3389 connectaddress=10.1.1.110. Where 10.10.1.110 - the current IP address of your computer on which port forwarding is configured.
To forward ports on your router, log into your router and go to the port forwarding section. Next, enter the port numbers and your device's IP address. Choose a forwarding protocol and save your changes. Note: If you don't see a port forwarding option in your router's settings, you might have to upgrade. Check out our list of the best ...
How To Set Up a Port Forward. Step 1: Assign a static IP address. Step 2: Log in to your router. Step 3: Create port forwards. Step 4: Test port forwarding. Many games and applications require a port forward to operate correctly. A port forward is a way of allowing specific traffic through your router.
Port forwarding defined. Port forwarding, sometimes called port mapping, allows computers or services in private networks to connect over the internet with other public or private computers or services. Port forwarding achieves by creating an association called a map between a router's public, wide area network (WAN) internet protocol (IP ...
1. Find your settings to port forward. (Image credit: Future) For a file-sharing client such as BitTorrent you need to find out a few settings before entering the rules into the router admin panel ...
Port forwarding presets you specify will appear in the Port mapping presets box. Select a preset and click the Use button to activate it. Clicking this button forwards the ports on your router - they'll appear in the Port mappings box at the top of the window. You can remove port mappings by selecting them and clicking the Remove button.
Routers currently support setting 32 port mapping rules. Go to More Functions > Security Settings > NAT Services and click the icon in the upper right corner of Port Forwarding to add a new port mapping service. In Service name, enter a custom name for the port mapping service. In Device name, select the computer resource that you want to ...
Port forwarding via NAT router. In computer networking, port forwarding or port mapping is an application of network address translation (NAT) that redirects a communication request from one address and port number combination to another while the packets are traversing a network gateway, such as a router or firewall.This technique is most commonly used to make services on a host residing on a ...
To open a port on Windows 10, search for "Windows Firewall" and go to "Windows Defender Firewall." Click on "Advanced Settings" and create a new inbound rule for the specific port number. You can choose when the rule applies (domain, private, public) and give it a name and description. If needed, you can disable the rule or repeat the steps to ...
Use Connected to monitor your ports. The open port checker is a tool you can use to check your external IP address and detect open ports on your connection. This tool is useful for finding out if your port forwarding is setup correctly or if your server applications are being blocked by a firewall. This tool may also be used as a port scanner ...
Port forwarding or port mapping allows remote computers to connect to a specific computer or service on a private network. This allows you to run a web server, game server or a service of your choosing from behind a router. ... Please refer to your routers manual or manufacturer for assistance in setting up port forwarding. Blocked Ports.
Step 10. (Optional) Repeat steps 5 to 9 to configure more Tunnel Mapping settings on the port or to configure other ports. Note: In this example, the traffic entering port GE48 of unit 1 from VLAN 50 will be dropped. Step 11. Click Close. Step 12. (Optional) Click Save to save settings to the startup configuration file.
Configuring port mapping. In this example, configure the router to use a user-defined port as its global port, and set both the start and end global port numbers to 10000. To configure port mapping: 1. From the navigation pane, select Network > NAT Settings. 2. On the Port mapping tab, click Add. On the page that opens, perform the following tasks:
Device manager has a thing "View Hidden Devices" You have to specifically select that before the Ports (COM & LPT) are even visible. The proper path to Device Manager is: Open RESOURCE EXPLORER (Win+E), right click on THIS COMPUTER, click on DEVICE MANAGER Anyway on my Windows 10 the number of each port is NOT shown here.
Open the Settings app on your iPhone and navigate to Wi-Fi Settings. Find the connected Wi-Fi network and tap the (i) icon next to its name. This icon is typically located on the right side of the ...
While running a new Docker container, we can assign the port mapping in the docker run command using the -p option: $ docker run -d -p 81:80 --name httpd-container httpd. The above command launches an httpd container, and maps the host's port 81 to port 80 inside that container. By default, the httpd server listens on port 80.
Published ports. By default, when you create or run a container using docker create or docker run, the container doesn't expose any of its ports to the outside world.Use the --publish or -p flag to make a port available to services outside of Docker. This creates a firewall rule in the host, mapping a container port to a port on the Docker host to the outside world.
To add port forwardings, I always follow these steps, stop running container. docker stop test01. commit the container. docker commit test01 test02. NOTE: The above, test02 is a new image that I'm constructing from the test01 container. re- run from the commited image. docker run -p 8080:8080 -td test02.
For containers in a task with the bridge network mode, the Amazon ECS agent finds open host ports from the default ephemeral range and passes it to docker to bind them to the container ports. The containerPortRange valid values are between 1 and 65535. A port can only be included in one port mapping per container.