Continue to site >>>

About | Contact | Advertise

450+ DIY Arduino Projects with Code & Circuit Diagram
Arduino is a popular open-source development board used by engineers, hobbyists, and makers to develop electronic projects and prototypes easily.
The below list consists of a large collection of free Arduino Projects from Circuit Digest. All projects consist of neatly illustrated Arduino circuit diagrams and detailed explanations, the relevant Arduino code is also provided for a complete do-it-yourself tutorial. If you want more projects you can also check out our collection of IoT Projects , ESP32 Projects , Robotics Projects , and Raspberry Pi Projects .

Join 100K+ Subscribers
Your email is safe with us, we don’t spam.
Be a part of our ever growing community.
Copyright © 2023 Circuit Digest . All rights reserved.
- All Electronics Projects
- Premium DIY Electronics Projects
- Community Projects
- NEW | DIY Webinars
- Submit Your Project
- Mini Projects
- College Projects
- Advanced Projects
- AI/ML Projects
- Reference Designs
- S/W Projects
- Tech Trends
- Tech updates
- Aerospace & Defence
- Communication & Networks
- Energy & Power
- LEDs & Lighting
- Testing Times
- Thought Leaders
- Industry Powered Content
- NEW @ Electronicsforu.com
- New Products
- Innovative Components
- Components Corner
- Tech Updates
- Press Releases
- Electronics Calculators
- NEW | Events
- Premium Content
- Startup Contests
- Design Contests
- Explore Components on DigiKey

Awesome Arduino Projects for Engineers and Beginners
Are you looking for some cool ideas for Arduino projects? We’ve got you covered! Here, we have a list of exciting and unique project ideas that you can explore with Arduino . These projects cover a wide range of applications, such as automating your home, creating smart gardening systems, building robots, designing IoT devices, and even making wearable technology.
Whether you’re a beginner or an experienced maker, these Arduino projects provide a great opportunity to learn programming, electronics, and problem-solving skills.
Previously we covered the 45+ mini-project s . This time let’s explore specifically Arduino projects.
So, let your imagination run wild and bring your ideas to life with these Arduino projects!
List of Arduino Projects
So let us check out these cool Arduino projects below:
1. Automated Washroom Light Using IR Sensors

This project is based on Arduino Uno and IR sensors and is used to automatically switch on and switch off a washroom’s light that works on AC mains. Whenever a person enters the washroom, the light bulb (or tube light) will automatically turn on. When the person leaves the bathroom, the light will turn off.
You can check the step-by-step guide to make this project here: Arduino-based Automated Washroom Light Using IR Sensors
2. Joystick-Controlled Industrial Automation System

This project can control up to four industrial electrical appliances with the help of a joystick and an Arduino Nano board.
This Arduino project is available at Make This Joystick-Controlled Industrial Automation System
3. Arduino Based Real-Time Digital Clock With Temperature Display

This project demonstrates how to build a real-time clock (RTC) with a temperature display using Arduino, DS3231 RTC chip, and SSD1306 OLED display (128×64 pixel).
Check the step-by-step guide to make this DIY Arduino clock: Arduino-Based Real-Time Clock With Temperature Display
4. Smart GPS Tracker Using Arduino

In this project, we build a smart tracker that can keep track of a child. Besides this, the device can also be used to track your vehicle location and other objects.
You can find all the details related to this project here: Arduino-based GPS Tracker
5. Flash Twenty LEDs Using Arduino

Presented here is the circuit that drives twenty LEDs in a random manner. This flasher has a chip that controls the random flashing rate of the LEDs.
Complete Circuit connection is available here: Flash Twenty LEDs Using Arduino
6. Alarm Clock Radio Using Arduino

This project describes how to make an alarm clock radio in Arduino. The main feature of this project is that it will display the date and time and will Alarm at the desired time and it has a radio function too.
Here you can check the complete project details: Alarm Clock with Radio Using Arduino
7. Arduino-Based Wireless Frequency Meter

This project describes an Arduino-based wireless frequency meter designed to measure the frequency of sinusoidal AC signals in the range of 50Hz to 3kHz.
This project is available at: Make An Arduino-Based Wireless Frequency Meter
8. Arduino-Based Window Alarm Annunciator

Presented here is a window alarm annunciator based on an Arduino Uno board. An annunciator is mainly used in process plants, power plants, and industries to monitor various plant conditions to alert operators about abnormal conditions or parameter deviations.
Make this Arduino Uno-Based Window Alarm Annunciator
9. Noise Detector with Automatic Recording System
Introducing a Noise Detector System with an automatic recording feature! Tackle noise pollution in offices, libraries, and classrooms. This device alerts you to loud noises, records them, and can be a game-changer for productivity.
This project is available at Noise Detector with Automatic Recording System Using Arduino With IoT
10. Temperature-Based Fan Speed Control and Monitoring Using Arduino

This project is an automatic fan speed control and monitoring that controls the speed of an electric fan according to the requirements using Arduino.
This project is available at Temperature Based Fan Speed Control And Monitoring Using Arduino
11. ESP8266 Wireless Web Server
This ESP8266-based wireless web server project is built around an Arduino.

ESP8266 contains a built-in 32-bit low-power CPU, ROM, and RAM. It is a complete and self-contained Wi-Fi network solution that can carry software applications as a stand-alone device or connected with a microcontroller (MCU).
This project is available at ESP8266 wireless web server
12. Digital IC Tester With Embedded Truth Table

This article represents an Arduino-based digital IC tester that is highly capable, highly reliable as well as cost-effective. Here, we develop a program with different functions for checking different ICs.
This project is available at Digital IC tester with the embedded truth table
13. Arduino Based RF Controlled Robot

Here we present a simple Arduino-based RF-controlled robot that can be driven remotely. This robot can be built very quickly on a small budget. The RF remote control provides the advantage of a good controlling range (up to 100 meters with proper antennae) besides being omnidirectional.
This project is available at Arduino based RF controlled robot
14. Fancy Lights Controller

The fancy lights controller described here is built around the Arduino (an Open Source single-board microcontroller) platform that can be purchased in pre-assembled hardware form. The circuit is nothing but a portable four-channel, multi-mode digital light controller, realized using very few external components. Four LEDs are made to glow in different sequences and patterns, controlled from the Arduino board.
This project is available at Fancy Lights controller
15. PC-based Oscilloscope
Here we describe how you can make your own oscilloscope at a very low cost using your PC and an Arduino board as the hardware for signal acquisition. You can use this oscilloscope to capture frequency signals up to 5kHz. The Arduino board, the heart of the oscilloscope, reads the values from its inbuilt analog-to-digital converter (ADC) and pushes these to the PC via a USB port.
The project is available at PC-based oscilloscope
16. Humidity & Temperature Monitoring

The IoT using Arduino microcontroller (MCU) is easy and fun for those who are new to the field. Presented here is humidity and temperature monitoring using Arduino. In this article, humidity and temperature information from the DHT-11 Humidity and Temperature sensor is analyzed graphically on the ThingSpeak platform using Arduino MCU and ESP8266 Wi-Fi module.
This project is available at Humidity & temperature monitoring
17. Fingerprint Sensor

Once you have all this electronic stuff around, you can’t let just about anybody into your workshop. This Fingerprint door lock helps you keep unwanted people away from your workshop. If you want some engineer to access the workshop, you can add his credentials to the database and he would also have access.
This project is available at Fingerprint Lock
18. Automated Plant Watering System

This project is a simple and exciting plant watering system that you can build yourself in just a few hours. With efficient use of a moisture sensor and downloadable component layouts and source code, this could fit in perfectly for potted plants, be it on your terrace or the balcony, or the front lawn. It works everywhere.
You can check the step-by-step guide to make an Automatic Plant Watering System
19. Earthquake Sensor

In this project, we will be constructing an earthquake indicator. A highly sensitive ADXL335 accelerometer is presented that can indicate vibrations.
If the motion is violent enough during an earthquake and crosses a certain threshold, a local alarm light (LED) glows, a buzzer sounds and a relay energizes. With certain modifications, this can be turned into a knock-and-shake detector for ATMs, vehicles, or door-break alarms as well.
Build your own Earthquake Detector Project
20. GPS Clock

Here we describe a GPS clock based on Arduino Uno R3—an AVR ATmega328-based microcontroller board with six analog input pins and 14 digital input/output (I/O) pins.
This project is available at GPS Clock Using Arduino
21. Home Automation Using an Android Device

This project is based on Interfacing an Android application to an Arduino Uno board using Bluetooth. The result is a home automation system with minimal electronic basic components without complex soldering and a simple and flexible design.
This project is available at Home Automation Using Arduino Through Android Device
22. Inverter Circuit
How much does an inverter cost? A basic with a single battery costs about 20-25K INR. How about you just go about buying the battery and use this next Arduino project for your inverter?
You can make your own DIY Inverter .
23. Build A Clap and Gesture-Controlled Robot

This is a two-in-one project to control a robot in four directions (forwards, backward, right, and left) either by clapping or through simple gestures. It explains how a robot can be controlled using sound or gesture.
This project is available at Gesture-Controlled Robot
24. DC Motor Starter Using Arduino Uno Board

Here we describe an electronic DC motor starter using an Arduino Uno board. This circuit controls both soft-start and soft-stop timings through pulse-width modulation (PWM).
This project is available at DC Motor Starter Using Arduino Uno Board
25. Home Automation Arduino Projects

This project is based on the Android app and Arduino Uno using Bluetooth as the wireless communication medium. It is a simple and flexible home automation system with only a few electronic components, without complex soldering. This project is designed to control three appliances but can be extended to six or more using an Android Phone.
26. IoT-Based Smart Camera Using Android And Raspberry Pi
Presented here is a project that lets your Raspberry Pi (RPi) turn into an IoT-based smart camera and then control and watch the live video being captured by this camera on your smartphone from anywhere on the planet.
This project is available at IoT-Based Smart Camera Using Android And Raspberry Pi
The list of interesting Arduino projects ends here…..But!
If you are still looking for unique electronics project ideas, then you can check the interesting DIY Projects .

Network Consists of Further Focused Websites (Channels)

Inspired by our flagship publication
Electronics for you.

- Sample For Free
- Subscribe For Print
- Subscribe For Ezine
CHECKED OUT EFY EXPRESS?

- READ E-ZINE
© Copyright 2024 - EFY Group

Random Arduino Projects: Unleashing Creativity
by Sami Hamdi | Nov 9, 2023 | Arduino Uno projects
Table of Contents
Introduction to Random Arduino Projects

In a digital era where the only limit is our imagination, Arduino stands out as a tool that democratizes invention. For the uninitiated, Arduino is an open-source electronics platform based on easy-to-use hardware and software.
Its boards can read inputs – light on a sensor, a finger on a button, or a Twitter message – and turn it into an output – activating a motor, turning on an LED, publishing something online.
You can tell your board what to do by sending instructions to the microcontroller on the board.
Why not embrace the randomness of creativity and use the Arduino to make something unexpected?
With Random Arduino as our keyword and muse, we’ll explore how you can harness the power of these flexible boards to execute projects that are as functional as they are whimsical.
Whether you are a seasoned maker or a curious beginner, the random Arduino projects you’ll discover here will ignite your imagination and may even solve some of your most random problems.
Exploring the Concept of Random Arduino
What Does Random Arduino Mean?
The phrase Random Arduino could be interpreted in various ways:
- A random project idea that utilizes an Arduino
- A project that uses Arduino to generate random outputs
- An unplanned, spontaneous creation with Arduino at its heart
The Appeal of Randomness
Why go random? Randomness can:
- Spark creativity
- Lead to unique problem-solving
- Break the monotony of structured learning
Generating Ideas for Random Arduino Projects
Embracing spontaneity in project planning.
- Keep a journal of random thoughts and ideas
- Use a random word generator for inspiration
- Combine unrelated concepts for something truly unique
Project Examples to Kickstart Your Imagination
- Weather Predictor Dice
- Mood-Dependent Room Lighting
- Random Acts of Kindness Generator
Realizing Random Arduino Creations
The basics you’ll need.
- An Arduino board (Uno, Mega, Nano, etc.)
- Input devices (sensors, buttons, etc.)
- Output devices (LEDs, motors, etc.)
- Power sources
- Connection cables and breadboard
Step-by-Step Guide to Bringing Your Random Idea to Life
- Sketch your concept
- Gather your materials
- Program your Arduino
- Test and troubleshoot
- Enjoy and share your random creation
Expanding the Horizons with Advanced Random Arduino Projects
From simple to complex: scaling your projects.
- Integrate wireless modules for remote control
- Add internet connectivity for IoT applications
- Incorporate machine learning for smart random outputs
Community Inspiration: How Others Have Used Random Arduino
- Highlight of community-led projects
- Forums and social media groups for idea exchange
- Arduino Project Hub as a resource
Append: Expanding the Horizon of Random Arduino Projects
The horizon is ever-expanding in the creative realm of Random Arduino. The beauty lies in that new ideas tend to sprout from your accomplishments as you complete one project, leading to an endless cycle of innovation. Let’s delve deeper into how you can keep the momentum going and continue to append new layers to your Random Arduino adventure.
Finding Inspiration in Everyday Life
- Look Around : Inspiration for your next Arduino project could come from anywhere. Maybe you want to automate a mundane task at home or create an interactive art piece.
- Challenge Yourself : Try to solve a problem you encounter daily with an Arduino solution. Even if it seems trivial, the challenge often leads to impressive innovation.
Advanced Integration for Random Arduino Projects
Adding complexity.
- Sensor Diversity : Incorporate different sensors to make your project interact with a wider range of environmental factors.
- Modular Design : Build your projects with expansion in mind, so you can easily append new features.
Connectivity is Key
- Bluetooth Modules : Add Bluetooth to control your projects with a smartphone.
- Wi-Fi Shields : Connect your Arduino to the internet to send or receive data, making it part of the IoT.
Artificial Intelligence and Machine Learning
- Smart Responses : Utilize AI to make your project respond intelligently to varying inputs.
- Data Analysis : Apply machine learning algorithms to help your Arduino project learn and adapt over time.
Collaborate and Expand Your Knowledge Base
- Join a Community : Online forums and local clubs can provide new perspectives and ideas.
- Hackathons and Competitions : Participate in events to push the boundaries of what you can do with Arduino.
Random Arduino as Art and Expression
Interactive art.
- Use sensors and outputs to create art that changes with its environment or the audience’s input.
Music and Sound
- Create random music generators or sound-reactive light shows that turn your room into an audiovisual experience.
Sustainable and Green Random Arduino Projects
Energy efficiency.
- Design projects that help reduce energy consumption, like a smart thermostat or an automatic plant watering system.
Renewable Energy
- Harness solar or wind power for your Arduino projects to promote sustainability.
Frequently Asked Questions About Random Arduino

How Do I Start with Random Arduino Projects?
Research, plan, and dive in. There’s no wrong way to start!
Are There Any Precautions When Dealing with Random Arduino Projects?
Always follow electronic project safety protocols.
Can Random Arduino Projects be Educational?
Absolutely! They’re excellent for learning coding, electronics, and problem-solving.
What’s the Next Step After Mastering Basic Random Arduino Projects?
Learn about advanced electronics, PCB design, or embedded system programming to expand your capabilities.
How Can I Make My Random Arduino Project More User-Friendly?
Focus on the user interface and experience. Simple additions like an LCD screen for output or a well-designed case can make a big difference.
Conclusion: The Endless Journey with Random Arduino
As we append new knowledge and skills to our maker toolkit, the journey with Random Arduino becomes even more thrilling. Every completed project is a stepping stone to something greater—a more complex, refined, or creative endeavor.
The world of Random Arduino is boundless, and as we continue to append to our experiences, the innovation potential is truly infinite. Whether your next project is whimsically random or meticulously planned, may it bring learning, joy, and a sense of accomplishment. Let’s keep building, learning, and creating—after all, the next Random Arduino project could be the one that changes the world.
Recent Posts
- Mastering Arduino Nano PWM Pins for Dynamic Projects!
- Unleashing Creativity with Arduino Mega 2560: A Comprehensive Guide
- Unleashing Creativity with the Arduino Mini: A Compact Powerhouse for Innovators
- Unlocking the Power of uint8_t in Arduino Projects
- Mastering uint8_t in C++: A Comprehensive Guide
Recent Comments
Privacy overview, pin it on pinterest.

Digital Dice With Arduino

Introduction: Digital Dice With Arduino

Have you ever tried to play a game only to find out you don't have any dice? That's not a problem anymore! Now you can create your very own digital dice using LEDs and your Arduino board. This is a beginner-level project. This project will allow you to push a button and randomly generate a number between 1 and 6, shown with the number of LED lights.
Credits to:
EvdS. (n.d.). Led dice . Arduino Project Hub. Retrieved May 14, 2022, from https://create.arduino.cc/projecthub/EvdS/led-dice-885cf1?ref=tag&ref_id=led&offset=8
6 220 ohm resistors
1 push button
1 k-ohm resistor
1 Arduino Uno
1 breadboard
jumper wires
Step 1: Set Up the LEDs and Button

- Place the 6 LEDs in the breadboard as shown. They should go in rail E with two spaces in between each LED. You should place the Anode end (long end) of the LED in the first of the two spaces and the Cathode end (short end) in the second space. Place your LED Anode ends in rows 3, 7, 11, 15, 19, and 23.
- Place your button in the breadboard as shown. The left side should go in rail E, space 59 and 61, and the right side should go in rail F, space 59 and 61.
Step 2: Attach the Resistors

- Place a 220 ohm resistor in the row with the Cathode end of the LED. It should reach from rail D to the ground rail (-, blue) in each of the LEDs (rows 4, 8, 12, 16, 20, and 24).
- Place a 1 k-ohm resistor near your button. It should go from the bottom left of the button (row 61) to row 64.
Step 3: Wire the LEDs

- Take one jumper wire and attach it from the Anode end of the first LED (row 3) and attach it to the digital output on the Arduino at space 2.
- Take the next jumper wire and attach it from the Anode end of the second LED (row 7) and attach it to the digital output on the Arduino at 3.
- Take the next jumper wire and attach it from the Anode end of the third LED (row 11) and attach it to the digital output on the Arduino at space 4.
- Take the next jumper wire and attach it from the Anode end of the fourth LED (row 15) and attach it to the digital output on the Arduino at space 5.
- Take the next jumper wire and attach it from the Anode end of the fifth LED (row 19) and attach it to the digital output on the Arduino at space 6.
- Take the next jumper wire and attach it from the Anode end of the sixth LED (row 23) and attach it to the digital output on the Arduino at space 7.
Step 4: Wire the Button

- Take one jumper wire and attach it on the bottom right (row 61, rail G) by the button. Attach the other end of the wire to the digital output on the Arduino at space 12.
- Take another jumper wire and attach it next to the resistor in the space at row 64, rail C. Attach the other end to the ground rail (-, blue).
- Take another jumper wire and attach it to the top left side of the button (row 59, rail D). Attach the other end to the positive rail.
Step 5: Attach the Ground and 5V Wire

- Take a jumper wire and attach it to the Ground port on the Arduino. Attach the other end to the ground rail on the breadboard.
- Take another jumper wire and attach it to the 5V port on the Arduino. Attach the other end to the positive rail.
Step 6: Load the Sketch Into Arduino Create and Connect to Computer
- Load the following sketch into the Arduino Create software.
// set to 1 if we're debugging
#define DEBUG 0
// 6 consecutive digital pins for the LEDs
int first = 2;
int second = 3;
int third = 4;
int fourth = 5;
int fifth = 6;
int sixth = 7;
// pin for the button switch
int button = 12;
// value to check state of button switch
int pressed = 0;
void setup() {
// set all LED pins to OUTPUT
for (int i=first; i<=sixth; i++) {
pinMode(i, OUTPUT);
// set buttin pin to INPUT
pinMode(button, INPUT);
// initialize random seed by noise from analog pin 0 (should be unconnected)
randomSeed(analogRead(0));
// if we're debugging, connect to serial
#ifdef DEBUG
Serial.begin(9600);
void buildUpTension() {
// light LEDs from left to right and back to build up tension
// while waiting for the dice to be thrown
// left to right
if (i!=first) {
digitalWrite(i-1, LOW);
digitalWrite(i, HIGH);
delay(100);
// right to left
for (int i=sixth; i>=first; i--) {
if (i!=sixth) {
digitalWrite(i+1, LOW);
void showNumber(int number) {
digitalWrite(first, HIGH);
if (number >= 2) {
digitalWrite(second, HIGH);
if (number >= 3) {
digitalWrite(third, HIGH);
if (number >= 4) {
digitalWrite(fourth, HIGH);
if (number >= 5) {
digitalWrite(fifth, HIGH);
if (number == 6) {
digitalWrite(sixth, HIGH);
int throwDice() {
// get a random number in the range [1,6]
int randNumber = random(1,7);
Serial.println(randNumber);
return randNumber;
void setAllLEDs(int value) {
digitalWrite(i, value);
void loop() {
// if button is pressed - throw the dice
pressed = digitalRead(button);
if (pressed == HIGH) {
// remove previous number
setAllLEDs(LOW);
buildUpTension();
int thrownNumber = throwDice();
showNumber(thrownNumber);
- Then attach the Arduino board to your computer and load the sketch onto the board.
Step 7: Test Your Digital Dice Roller

- Try out the dice roller by pressing the button. The LEDs will blink and then stay steady when the roll has been decided.

Recommendations
![Tim's Mechanical Spider Leg [LU9685-20CU]](https://content.instructables.com/FFB/5R4I/LVKZ6G6R/FFB5R4ILVKZ6G6R.png?auto=webp&crop=1.2%3A1&frame=1&width=306 "random arduino projects")
Paper and Cardboard Contest

Remake It - Autodesk Design & Make - Student Contest

Make it Resilient

Using Random Numbers with Arduino [SOLVED]
Are you trying to use random numbers with Arduino?
This article tutorial talks about using the random() and randomSeed() functions with Arduino. It is pretty straight forward, but there are some intricacies worth noting.
Creating truly random numbers in Arduino is harder than you might think. The closest we can get in Arduino, and just about anywhere else, is using pseudo random numbers .
Pseudo random numbers mimic randomness, but in fact do have a pattern if analyzed for a long enough period.
Why are Random Numbers with Arduino All the Same?
The most important thing to understand when using the random() function with Arduino is that it will generate the exact same list of pseudo random numbers every time.

So if you build a slot machine, and the first crank of the handle is a winner, then you can be sure that if you reset the Arduino board and pull the handle again – it will still be a winner the first time.

The easy way to overcome this is using the randomSeed() function.
randomSeed(), our solution to the random problem
This function takes a value (an integer for example), and uses the number to alter the random list generated by the random() function. The number you pass to the randomSeed() function is called a ‘seed’.
You might put randomSeed() in the setup, and then use the random() function in the loop. Something like this:
But there is still an issue – even though the sequence of random numbers is different when using the randomSeed() function – it will still be the same every time the sketch is run. It is just a different list of pseudo random numbers!
This doesn’t seem quite the random numbers with Arduino we were trying to achieve.
So, what to do?
Programming Electronics Academy members, use the coding challenges in the Bread and Butter: I/O section of the Arduino Course for Absolute Beginners to drive home these basic coding skills.
Not a member yet? Sign up here.
analogRead() to the random rescue!
Lucky for us the Arduino reference has a great solution. Use the analogRead() function to read a value from an unused analog pin. Since an unused pin that has no reference voltage attached to it is basically floating , it will return a “noise” value.
This noise value can seed the randomSeed() function to produce differing sequences of random numbers every time the sketch is run.
Below is the sketch from the video using analogRead() and randomSeed() in unison:
If you compare the output when using the randomSeed from one run of the sketch to another, you’ll see it varies in the sequence.
Random numbers with Arduino is not as hard as you might have thought. Of course, this is still an approximation of randomness, but hey, to get this close to random in a couple lines of code is pretty impressive!

Arduino BLE Library, Pointers, and Bitwise Operators – An unlikely combination!

Installing Arduino Libraries | Beginners Guide

Pumping poo! An IoT sewage project

Control your ESP32 with an Infrared TV Remote Control

How to update ESP32 firmware using web OTA [Guide + Code]
- Next »
There's a better way to select your ESP32 pins

Which Arduino IDE should I use?

What happens when chatGPT and Arduino have a baby?

Is the Arduino UNO R4 for you? Find out here.

Serial Communication with Arduino

The Arduino Simulator you’ve been looking for!

What is Arduino?
23 comments.

Of course, you could always use the method “ERNIE” uses…and has done (or did) for over 50 years… Wire up a zener to the analog pin without a capacitor-just resistor. 3.3V zeners are hellishly noisy!

Awesome tip! Thanks for Andy.
Hi Michael Is there a code available for an arduino single digit 7 segment display number generator. That can be operated push button.
Thanks, it really helped with the random numbers. Exactly what i needed.

Great – glad it could help!
Hi guys, one nice thing, when you need partial randomness and you are having all analog pins used, is… to use first human-interfaced action as seed. For example, you can use millis() of first keypress, micros() of it, duration of button pressing… In some systems, where you have no free analogs, this is good solution. Or when analogs have bigger sink current and they reads full-zeros or full-ones for almost whole time. The less noise, the more reproducible randoms:)

Thanks for adding this Franta – great points!
Very bad solution. analogRead returns integer nubmer between 0 and 1023, so, you will have only 1024 lists of sequences which is extremly low.

Suppose you read A1 too and multiply A0 by it for seeding. That should be a large enough pool.
I created an electronic dice. This tutorial helped a lot. Thank you!
Great! Glad it could help.
Haha, I thought I was paranoid noticing that my robot’s eyes always start “randomly” moving in the same pattern 😀
If you want TRULLY random numbers with Arduino you can use the clock drift between the two clocks of an Arduino, I explain it in the video: https://www.youtube.com/watch?v=oXMzqBsz6Dw there are also links to the original code by endolith.
Thanks for sharing!
Really useful

Is there a way to use this method to have an ON/ON toggle switch actuate a random LED as defined during the setup? And have that be a different random LED after reset?
Great question Glen,
So you’re saying could you have a button and when someone presses the button, it turns on a random LED? Yes this would be possible.
You could try using digitalRead() to detect the button press, and then an “if statement” to turn off the LED that is currently on, and then randomly select another one and turn it on using the method above, or one of the methods shared in the comments.
Great stuff! Im actually here because of the same question Glen brought up. And your suggestion Micheal is something I will try. I tried using arrays and index calling but cant fund what I need. I wull try this if statement approach and share results. Aj
I’ll have to spin up a video lesson about that use case Autelio!
HOW TO SEND THE RANDOM NUMBER DISPLAY ON THE SERIAL MONITOR TO THE MOBILE APP THROUGH BLUETOOTH HM10 . if (BTSerial.available()) // read from Hm-10 and send to Arduino Serial Monitor Serial.write(BTSerial.read());
if (Serial.available()) // Keep reading from Arduino Serial Monitor and send to HC-05 BTSerial.write(Serial.read()); THIS CODE WILL HELPS TO SEND DATA TYPED ON THE SERIAL MONITOR TO APP AND RECIVE THE DATA FROM THE APP
BUT I WANT TO SEND THE DATA (RANDOM NUMBER) DISPLAYING ON THE SERIAL MONITOR TO THE APP
Hi Michael The random lighting of the three LED’s was just what I was looking for but now, for (the new game I am trying) I want to create a random time of between 2 or 10 seconds delay between the outputs of any of the three LED’s is this possible?
Hi Bob, yes, totally possible. For example, you could create another random variable between 2000 and 10000, and pass that to the delay function (assuming you are using delay for this program).
Could you show it with an example
Leave a Comment Cancel Reply

Ready to start coding Arduino with confidence ?
Follow our process for learning to program Arduino ➜

6 Easy Arduino Projects For Beginner Coders
We may receive a commission on purchases made from links.
If you have an interest in electronics and have been hanging around DIY tech forums for a while now, chances are you already know what an Arduino is . This microcontroller is at the heart of countless impressive projects like RFID door locks, automated plant watering systems, and even robot cars.
Compared to single-board computers like Raspberry Pis and ODROIDs, which might be too overwhelming and complex for beginners, Arduinos are relatively easier to understand. You simply connect your components to the board, use a software called Arduino IDE to create your code, upload the code, and you're essentially done. No need for complicated OS installations and setups.
That makes Arduinos the perfect tool for practicing your programming skills. With the thousands of Arduino projects you can find online, which ones are the ideal starting point for beginners? We've compiled six of the best projects you can take on as a beginner coder.
Read more: Major Motherboard Brands Ranked Worst To Best
Lie Detector
While lie detectors aren't as useful in real-life crime scenes as they are in movies and TV shows, they're pretty fun to have for less serious reasons. However, if you're mainly using it for kicks and giggles, you probably don't want to spend as much as $100 for commercial models, especially when you can just build one yourself.
This DIY lie detector project costs you only around $20 to make. Save for the Arduino Nano , it requires pretty basic electronic components you might already have on hand, including three different colored LEDs (green, orange, and red), a 10k-ohm resistor, and a few cables.
The principle behind the project is the fact that the skin reacts to our emotions. Changes in what you're currently feeling can also mean changes in the skin's conductivity, which is then measured and analyzed by the Arduino Nano. These fluctuations in skin conductivity are displayed on the Arduino IDE's Serial Plotter, and indicated by the three LEDs. The green lights up when the conductivity is in the person's normal range, orange when it's starting to spike up, and red when it hits a level that can suggest the person's nervousness.
On the software end, the Arduino code is pretty simple, with only less than 50 lines and basic functions used. Beginners can readily understand and tweak the code to more accurately set the different conductivity ranges.
Laser Tripwire Alarm
Aside from the dramatic car chases and fighting scenes, another cool thing about spy and action movies is the laser tripwire alarm. Sure, it might look like an overly complex system on screen, but there's actually a basic version you can easily build right at home, even without extensive coding experience.
Powered by an Arduino Uno, this laser tripwire alarm project works much like those in movies. There's a tripwire — made up of a laser directed at a light sensor — that's placed somewhere the intruder can easily trigger, such as a door or hallway. As soon as the light from the laser to the sensor is blocked, the sensor will detect a drop in light intensity and subsequently activate the buzzer. The alarm only stops when you press the push button connected to the Arduino.
For this setup, the program uses only 27 lines, and you'll mostly be dealing with "if" statements, perfect for when you're just starting out with Arduino programming. If, however, you find this too basic, there's a second version of the project with twice as many lines of code.
In this version, you'll be using a keypad instead of a simple push button to deactivate the alarm. After the buzzer goes off, you need to press the star (*) button on the keypad before inputting your four-digit code. As you type the passcode, the buzzer's tone switches to a continuous but still equally annoying sound. If you enter the right code, the alarm will deactivate. Otherwise, it will start blaring again.
Solar Tracker Sunflower
Sunflowers, particularly the younger ones, like following the sun as it crosses the sky. This DIY solar tracker project mimics this behavior using three simple main components: An Arduino UNO board, a servo motor (with a sunflower paper decoration attached), and two photoresistors facing the opposite direction.
Each of the photoresistors monitors the light inputs coming from the direction they're facing. Once one detects a spike in light intensity, it sends a signal to the microcontroller, which in turn triggers the servo motor to twist toward that light source. If the other photoresistor senses light coming from its respective direction, the board then adjusts the angle of the servo accordingly to point in that new direction. And that's pretty much all there is to it.
The code for the project is self-explanatory and easy for beginners to understand, too. You'll be working with analog readings from the input (photoresistor) and an Arduino library for the output (servo motor). The entire program is just 33 lines long, and you can opt to modify it to add more photoresistors to monitor for light sources from other directions.
Trash Bin Waste Level Detector
Making an Arduino-powered automatic trash bin that opens and closes the lid for you is a great way to get started with electronics and sensors. If you're looking to make your garbage can even smarter, you might want to take on this trash bin waste level detector as an easy weekend project.
What this project does is pretty straightforward. It continuously monitors the inside of the trash bin and tells you how full it already is by displaying the waste level (measured in centimeters) on the Arduino IDE's serial monitor. It also has a convenient feature that automatically opens the lid once it senses a presence within a 10-centimeter range (about four inches), and closes the lid after a brief interval of four seconds.
Hardware-wise, the garbage can is outfitted with a servo inside the bin for opening and closing the lid, an ultrasonic sensor in front of the bin for sensing approaching people, and another ultrasonic sensor on the inside of the lid for detecting the trash level.
On the software side, things are just as straightforward. The code includes two Arduino libraries: one for the servo and another for the ultrasonic sensors. The main code is a simple 14-line piece with a simple if-else statement you can readily modify. As an upgrade to the project, you can add an LCD monitor to the setup and change the code to display the waste level on the LCD instead of just the Arduino IDE's serial monitor.
Bluetooth-Controlled Car With LEDs
Probably one of the coolest Arduino projects out there is a remote-controlled car, but they're also one of the most daunting projects for beginners to undertake. However, you'll be glad to know that there are RC car versions that don't require being a coding expert.
This Bluetooth-controlled car may seem too ambitious for a beginner project at first glance, but it's actually an easy build. It's run by an Arduino UNO board, and includes several key components: four gear motors with wheels for moving the car, four LEDs for signaling the active status of each motor, a motor driver for operating all the motors, a Bluetooth module for remote control, and a battery for powering the car.
Upon powering up, the car automatically becomes visible to external Bluetooth devices like your phone. You can then connect it to your device using the project developer's Android app , and start controlling the car with the joystick. Press one direction, and the motors for that particular direction will be activated. The LEDs connected to those motors will also light up to show which ones are in action.
Unlike the other projects in this list, the code for this setup is a little over 100 lines, but it's an excellent introduction to working with custom functions that can be called within other functions, like the loop function. You generally wouldn't need to modify anything in the code, except perhaps to change the pin configuration of the motors if they happen to run opposite to your command.
Light-Dependent Bulb
Smart devices are everywhere these days, and when it comes to smart bulbs in particular, they're readily available off Amazon for as cheap as $8 . However, they might be a bit overkill if you're only after something like a bulb that automatically switches on and off depending on the ambient light at certain times of day. In that case, this Arduino-based smart light might be more your cup of tea.
The idea behind this project is to build a lightbulb controller using a light-dependent resistor (LDR). The LDR continuously monitors the intensity of light in the room. When it's dark like at night, or when the blackout curtains are drawn, it triggers the bulb to switch on. In contrast, when the room is well-lit, say during the day, the bulb is kept off.
Aside from the Arduino UNO microcontroller, LDR, and the bulb itself, the hardware for this setup is pretty minimal: a relay for the bulb, a resistor for the LDR, and some wires to connect everything together.
As for the code, it's really straightforward and easy to understand. You have less than 30 lines, with the main code sporting a simple "if-else" logic. You can readily use the project developer's code as is or change the pin configuration and the LDR's threshold to better suit your needs.
Read the original article on SlashGear .

My news and weather scroller project

Here's my completed news and weather scroller, using the Arduino Uno R3, an ESP 8266, and two MAX7219 panels. I made the case from red oak beadboard, cut and engraved with a diode laser cutter, as was the grill, which is 1/8" thick Baltic Birch plywood. The surrounding lights are run by the Arduino board (running several different random light patterns), and the scroller is controlled by the ESP 8266. The lights are surplus Soviet panel lights from old aircraft, salvaged by a supplier from Ukraine. Thanks to Marco for help with the project!
Related Topics
5 Common Mistakes Beginners Make With Arduino Projects

Diving into the world of DIY electronics can be quite daunting and overwhelming. There's the matter of picking the right components to use, learning the hand tools, and understanding the software. Thankfully, Arduino projects can ease you into electronics and programming. These nifty microcontroller boards have been around for a couple of years now, but they continue to be one of the go-to platforms for most hobbyists and makers, especially when it comes to developing beginner-friendly projects.
While Arduinos are relatively easy to use for newbies, they still come with a learning curve like any other tool. As you start practicing connecting components and creating sketches, you're bound to make some mistakes along the way. Some of these mistakes are manageable and easy to fix, but others can cost you your board. So before you go ahead and get started with Arduino , it's wise to be familiar with these errors first so you can avoid them.
Using the wrong power supply
In the early stages of your learning process, you won't need to worry much about how to supply power to your board. Most beginner-friendly projects can be conveniently powered by simply connecting the Arduino board to your computer, so picking an external power supply isn't a concern just yet. However, if you do come to the point where your project requires one, always make sure your supply has the right power rating suited for your type of Arduino board.
The recommended input for most Arduino models when powered via non-USB means is 7 to 12V, with a limit of 20V. It's always a good idea to read the specification sheet, though, just to make sure. This is especially true when you're buying Arduino clones: Sometimes, they don't replicate the exact technical attributes of the genuine Arduinos, so always go back to the spec sheet to confirm.
When you use the incorrect voltage rating, it can lead to problems with your board and circuit. A voltage lower than the required rating might not be enough to produce 5V and 3.3V at the power pins. On the other hand, using a voltage higher than necessary can harm your board and potentially kill it.
In addition to choosing the right voltage rating, it's important to ensure that you connect the external power supply to the Arduino the right way. This shouldn't be a problem when you're using the USB connection with a power bank or standard charger. But if you're connecting to the VIN pin, take note of the supply's polarity: Positive of the supply to be connected to VIN, and negative to GND. There's no reverse polarity protection on this pin, so a wrong connection can cause serious damage to your board.
Not using a resistor
Resistors may be small and cheap, but they're far from being a minor component in your circuit. In fact, they actually serve two major roles: protecting your components from too much current, and making sure your component works as intended. The first purpose is typically found in any circuit that uses LEDs. Without a resistor, LEDs tend to shine too brightly, overheat, and potentially blow up if left for an extended duration. You also need resistors to protect other electronic components, such as buzzers, transistors, and motors.
Aside from offering protection, resistors are also used to make sure that your input components function as expected. In such cases, the resistors (typically 10K Ohm with a resistor color code of brown-black-orange) are known as either pull-up or pull-down. A pull-up resistor connects your input directly to a positive voltage (5V or 3.3V). This keeps the input signal HIGH when the component is inactive, and switches it to LOW when you do trigger it. Conversely, a pull-down resistor directs your input to GND, making its default signal LOW, and sending a HIGH signal when the input is activated. If you don't use any pull-up or pull-down resistors, your pin's signal will randomly fluctuate due to interference and cause your circuit to misbehave.
Likely the only time you won't need to worry about resistors is when using sensor modules. Since they're essentially designed to be plug-and-play, most of them already come with all necessary components built in. However, if you're still unsure, you can always check the module's datasheet. SparkFun or Adafruit also includes specific example tutorials, complete with wirings and code, that demonstrate how to use the sensor modules with your Arduino board.
Unintentionally shorting the board or circuit
The fastest way to kill your Arduino board or make one, if not all, of your pins/components blow is by unintentionally shorting something in the board or circuit. Shorts happen when two pins that shouldn't be connected come into contact with each other.
There are a number of ways you can accidentally create a short. One is by connecting any of the power pins to the GND, consequently shutting down your board and even potentially killing it. While this may seem like a pretty obvious and easy mistake to avoid, it typically happens when wiring your connections on a breadboard. You may have unwittingly placed your 5V input and GND on the same line, effectively shorting the two pins. That's why it's important to familiarize yourself with how a breadboard works before you even start using it.
You can also produce a short in a circuit even when you're not using a breadboard. For instance, if you solder your LEDs, resistors, sensors, and other whatnot with a wire, and don't properly insulate the pins with heat-shrink tubing or electrical tape, they might end up touching other pins. You'll also face the same dilemma when soldering pin headers to boards. With the small space between the headers, it's easy to accidentally solder them together. It's best to practice using the soldering iron and desoldering pump with cheap printed circuit boards first if you're still not comfortable with these tools.
Another common cause of shorts is leaving conductive materials, such as stray jumper wires, precision screwdrivers, or solder droplets lying around your board. These materials can mistakenly connect two or more pins, so always ensure that your board and circuit are free of such debris before connecting a power supply to your Arduino project .
Code issues
So you already have your circuit set up and the Arduino sketch uploaded, but nothing seems to be working. More often than not, the issue lies in the code. This is particularly common while you're still getting the hang of programming nuances, but nothing a quick review won't fix. Some of the frequent oversights in the sketch include the following:
- A missing semicolon or curly brace: It's important to end your lines with a semicolon wherever appropriate, and double-check whether your curly braces are by pairs. Otherwise, you'll run into a compiler error. If this error message is unclear, it's probably because you're missing a semicolon or curly brace somewhere.
- Adding a semicolon to #include and #define: These two elements don't use semicolons unlike most of the other elements.
- Using the wrong I/O pin: To get the expected results, make sure the pin specified in the code is the same pin your component is connected to.
- Calling digitalRead() or analogRead() on an unconnected pin: This will generate randomly fluctuating values, messing up how your program operates. Always ensure that the circuit connection matches your program.
- Using the wrong duration in delay(): This element measures time in milliseconds, not seconds. If you need a 10-second delay, multiply it by 1000, and don't simply use delay(10).
- Assigning the wrong data type to a value: For instance, if you assign int to a value with a decimal, it won't produce a decimal number as you may expect. This will only leave you with the whole number.
- Using the wrong baud rate: In Serial communication, baud rates in the code and the device you're talking to need to match in order to establish proper communication.
If you're unsure about the syntax of your code, always consult the Arduino Language Reference .
Misuse of special I/O pins
The thing about Arduino's I/O pins is that they come with special functions (and corresponding limitations) that beginners are generally unaware of. For instance, in the Uno board, pins D0 and D1 can be used as standard digital pins where you can connect common components like LEDs, ultrasonic sensors, and motors. However, they also double as Serial pins (RX on D0 and TX on D1) that enable the board to communicate with your computer.
Unfortunately, the pins can only be used for one function at a time, so that means that when you're communicating with the computer — such as when printing data to the Serial monitor with Serial.print() — you can no longer use D0 and D1 as standard digital pins. If, however, you don't have any Serial elements in the code, you can use these pins for whatever digital purpose you need. Remember, you still have to disconnect the components every time you upload a new code (which is a process that essentially communicates with the computer). Otherwise, your components would be in conflict with the Serial communication, and the sketch upload can fail.
Another common I/O pin misuse among beginners is using pins A4 and A5 on the Uno as regular analog input pins while also having an I2C device connected to the SCL and SDA pins (the unlabeled pins next to AREF on the Uno board). While there are physically four pins, they're actually connected internally (SDA to A4 and SCL to A5). That said, you can't use them at the same time. If you need to use an I2C device with more than four analog components, it's best to switch to a different board with more analog pins, such as a Nano or a Mega.
- Blog Home >
ardEEG is an Arduino UNO R4 WiFi shield for measuring biosignals
GLEWBOT scales buildings like a gecko to inspect wall tiles
Control your Raspberry Pi GPIOs with Arduino Cloud using Python | Part II
As a Python developer, you’re probably eager to control and monitor your Raspberry Pi GPIOs remotely. Well, you have landed in the right place.
This article builds upon our previous introduction to “ Visualize your Raspberry Pi data with Arduino Cloud | Part I.” Now, we’ll explore using Python to configure Raspberry Pi GPIOs, a fundamental step for many IoT projects that is usually considered as the “hello world” of IoT applications. Whether you’re controlling relays or monitoring digital inputs, managing GPIOs is crucial.
But IoT applications need to be accessed remotely with a dashboard that allows you to visualize your device data both in real time and its historical evolution, as well as acting remotely over your device.
Well, let’s deep dive into how we can achieve all that!
Physical setup
In this blog post, we show a very simple but comprehensive example. We will see how to use an Arduino Cloud dashboard to act remotely over your Raspberry Pi digital GPIOs. In a nutshell, we will see how to:
- switch on and off an LED that is connected to your Raspberry Pi
- detect when a push button that is connected to your Raspberry Pi is pressed
- visualize the real time and historical value of an integer variable
First, let’s connect our Raspberry Pi to an LED and a push button as shown in the following diagram.
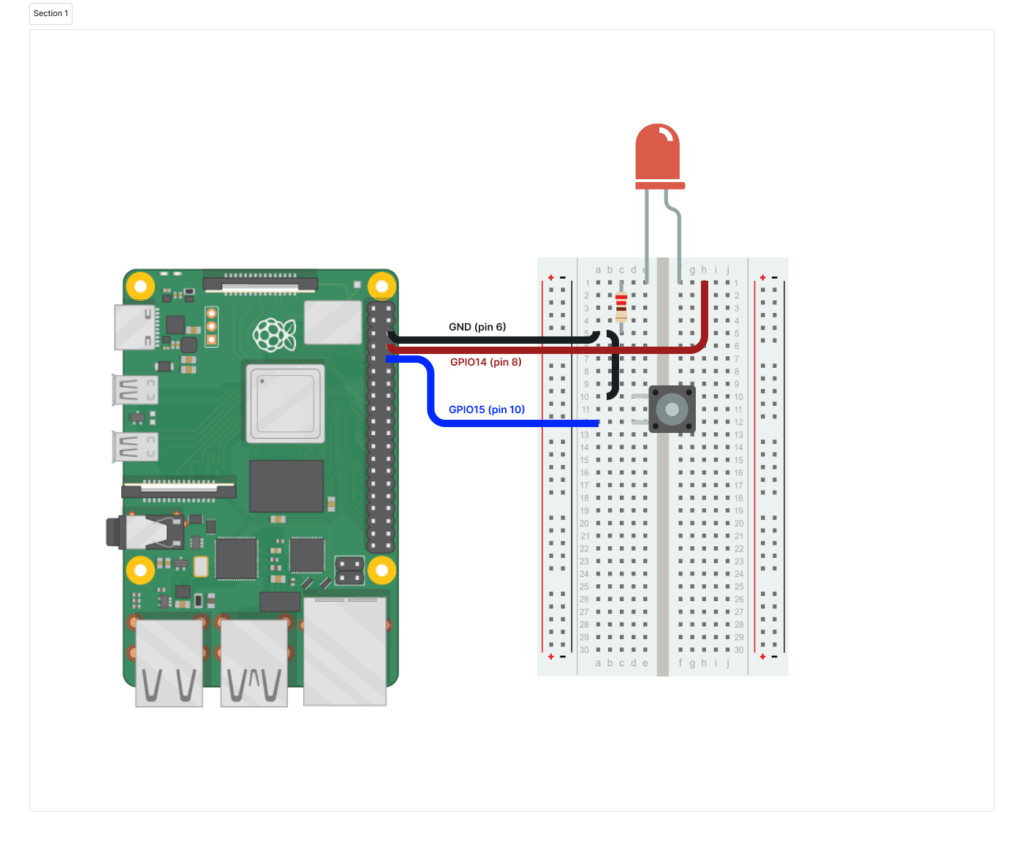
It’s a very simple setup. Now that we have everything ready, let’s get started!
Create the Device and Thing in Arduino Cloud
To send your Raspberry Pi data to the Arduino Cloud, you have to follow these simple steps:
1. Set up an Arduino Cloud account if you didn’t have one before. 2. Create your Device as a Manual device.
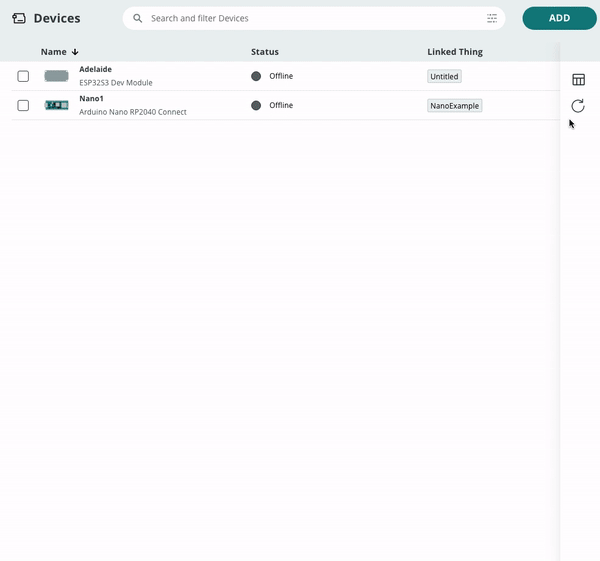
Note: Note down your Device ID and Secret , as we will need them later.
3. Create your Thing and add your variables.
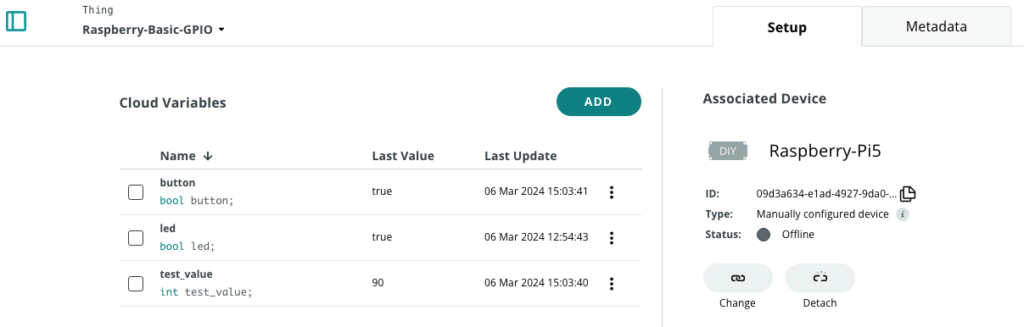
In the example shown in this blog post, we use the following three variables:
- test_value : We will use this integer variable to show an integer value generated periodically in our Raspberry Pi application in our Arduino Cloud dashboard.
- button : We will use this boolean variable to send the information to the Cloud when the push button is pressed.
- led : We will use this boolean variable to switch on and off the LED from the Arduino Cloud dashboard.
4. Create an Arduino Cloud dashboard for data visualization:
- Create a switch widget (name: LED) and a LED widget (name: LED) and linke them to the led variable
- Create a chart widget (name: Value evolution) and a Value widget (name: Value) and link them to the test_value variable.
- Create a Push button (name: Push Button) and a Status widget (name: Button) and link them to the button variable.
With the dashboard, you will be able to:
- Switch ON and OFF the LED using the switch widget.
- Visualize the status of the LED with the LED widget.
- Visualize the real time value of the variable test_value with the Value widget.
- Visualize the evolution over time of the variable test_value with the chart widget.
- Visualize on the Push Button and Button widgets when the push button has been pressed on the board.
Note: You can find more detailed info about the full process in our documentation guide .
Program your IoT device using Python
Now it’s time to develop your Python application.
Create a file called credentials.py with your Device ID and secret.
This code can be used across all the various Raspberry Pi flavors and it should work also in any Linux-based machine. Just beware that you need to use the right gpiochip and set the right GPIO lines in the following code section:
You can get more information about the project in Project Hub and all the code and more details in the GitHub repository . Additionally, you can find a full python guide in the following article
Tutorial: Connect your Raspberry Pi to Arduino Cloud
Start with Arduino Cloud for free
Connecting your Raspberry Pi to the Arduino Cloud couldn’t be easier. All you need to do is create your free account and you are ready to go. It’s ready to use and it is free. You can explore the premium features for enhanced functionality.
So, if you’re looking to streamline data visualization of your Raspberry Pi applications using Python, give the Arduino Cloud a try and leverage its full potential for your projects.
Stay tuned for Part III and IV of our Raspberry Pi GPIO basic control blog post series in the Arduino Cloud.
160+ ESP32 Projects, Tutorials and Guides with Arduino IDE
Learn ESP32
ESP32 Introduction
ESP32 Arduino IDE
ESP32 Arduino IDE 2.0
VS Code and PlatformIO
ESP32 Pinout
ESP32 Inputs Outputs
ESP32 Analog Inputs
ESP32 Interrupts Timers
ESP32 Deep Sleep
ESP32 Web Server
ESP32 BLE Client-Server
ESP32 Bluetooth
ESP32 ESP-NOW
ESP32 Wi-Fi
ESP32 WebSocket
ESP32 ESP-MESH
ESP32 Email
ESP32 Text Messages
ESP32 HTTP GET POST
HTTP GET Web APIs
HTTP POST Web APIs
Server-Sent Events
Web Servers
Output Web Server
PWM Slider Web Server
PWM Multiple Sliders Web Server
Async Web Server
Relay Web Server
Servo Web Server
DHT Web Server
BME280 Web Server
BME680 Web Server
DS18B20 Web Server
LoRa Web Server
Plot/Chart Web Server
Chart Multiple Series Web Server
SPIFFS Web Server
Thermostat Web Server
Momentary Switch Web Server
Physical Button Web Server
Input Fields Web Server
Images Web Server
RGB LED Web Server
Timer/Pulse Web Server
HTTP Auth Web Server
MPU-6050 Web Server
MicroSD Card Web Server
Stepper Motor Web Server
Stepper Motor WebSocket
Gauges Web Server
ESP32 Weather Station
Control GPIOs
View Sensor Readings
ESP32 MySQL
ESP32 PHP Email
ESP32 SIM800L
Cloud Node-RED Dashboard
Cloud MQTT Broker
ESP32 Cloud MQTT
ESP-NOW Introduction
ESP-NOW Two-Way
ESP-NOW One-to-Many
ESP-NOW Many-to-One
ESP-NOW + Wi-Fi Web Server
Firebase Realtime Database
Firebase Web App
Firebase Authentication
Firebase BME280
Firebase Web App Sensor Readings
Firebase ESP32 Data Logging
ESP32 Relay Module
ESP32 DC Motors
ESP32 Servo
ESP32 Stepper Motor
ESP32 MicroSD Card
ESP32 MicroSD Card Data Logging
ESP32 HC-SR04
ESP32 I2C Multiplexer
ESP32 DHT11/DHT22
ESP32 BME280
ESP32 BME680
ESP32 DS18B20
ESP32 Multiple DS18B20
ESP32 BMP180
ESP32 BMP388
MQTT DHT11/DHT22
MQTT BME280
MQTT BME680
MQTT DS18B20
ESP32 MPU-6050
OLED Temperature
ESP32 Features
ESP32 Hall Sensor
ESP32 Touch Sensor
ESP32 Flash Memory
ESP32 Dual Core
Useful Guides
ESP32 Troubleshooting
ESP32 Access Point
ESP32 Fixed IP Address
ESP32 MAC Address
ESP32 Hostname
ESP32 OTA Arduino
ESP32 OTA VS Code
ESP32 Solar Panels
ESP32 Alexa
ESP32 Install SPIFFS
ESP32 Time and Date
ESP32 Epoch Time
ESP32 Google Sheets
ESP32 Email Altert
ESP32 ThingSpeak
Weather Station Shield
ESP32 IoT Shield
ESP32 Weather Station PCB
ESP32 Wi-Fi Manager
VS Code SPIFFS
VS Code Workspaces
Save Data Preferences Library
Reconnect to Wi-Fi
Useful Wi-Fi Functions
Other Projects
Telegram Control Outputs
Telegram Sensor Readings
Telegram Detect Motion
Telegram Group
ESP32 Status PCB
ESP32 BMP388 Datalogger
ESP32 Web Serial
ESP32 Door Monitor
ESP32 Door Telegram
ESP32 NTP Timezones
ESP32 Boards
ESP32 Camera
Learn ESP8266
Learn ESP32-CAM
Learn MicroPython
Learn Arduino
Build Web Servers eBook
Smart Home eBook
Firebase Web App eBook
ESP32 Premium Course »

Arduino IDE 2: Install ESP32 LittleFS Uploader (Upload Files to the Filesystem)

ESP32: TFT Touchscreen On/Off Button – 2.8 inch ILI9341 240×320 (Arduino IDE)

ESP32 Touchscreen On/Off Button – Cheap Yellow Display (ESP32-2432S028R)

ESP32 Wi-Fi Provisioning via BLE (Bluetooth Low Energy) – Arduino IDE

ESP32: TFT LCD Touchscreen Display – 2.8 inch ILI9341 240×320 (Arduino IDE)

Getting Started with ESP32 Cheap Yellow Display Board – CYD (ESP32-2432S028R)

ESP32: Send Messages to WhatsApp using SIM Card – LILYGO T-SIM7000G

Install ESP32/ESP8266 USB Drivers – CP210x USB to UART Bridge (Mac OS X)

Install ESP32/ESP8266 USB Drivers – CP210x USB to UART Bridge (Windows PC)

ESP32: Make HTTPS Requests using SIM Card – LILYGO T-SIM7000G

ESP32 Servo Motor Web Server with Arduino IDE

ESP32: How to Log Data (10 Different Ways)

ESP32: I2C Scanner (Arduino IDE) – Finding the Address of I2C Devices

ESP32 with DC Motor and L298N Motor Driver – Control Speed and Direction

ESP32 Datalogging to Google Sheets (using Google Service Account)

ESP32 with Bluetooth and Bluetooth Low Energy: The Ultimate Guide

ESP32 Web Bluetooth (BLE): Getting Started Guide

ESP32 BLE Peripheral (Server): Environmental Sensing Service

ESP32: Write Data to a File (LittleFS) – Arduino IDE

ESP32 with RCWL-0516 Microwave Radar Proximity Sensor (Arduino IDE)

ESP32: 26 Free Guides for Sensors and Modules

ESP32 WebSocket Server: Display Sensor Readings

ESP32 Send Emails using an SMTP Server: HTML, Text, and Attachments (Arduino IDE)

ESP32: Upload Files to LittleFS using Arduino IDE

ESP32: Send Pushover Notifications (Arduino IDE)

Control ESP32 and ESP8266 GPIOs from Anywhere in the World

DIY Cloud Weather Station with ESP32/ESP8266 (MySQL Database and PHP)

ESP32/ESP8266 Send Email Notification using PHP Script

Visualize Your Sensor Readings from Anywhere in the World (ESP32/ESP8266 + MySQL + PHP)

ESP32/ESP8266 Insert Data into MySQL Database using PHP and Arduino IDE

ESP32: Erase Flash Memory (Factory Reset)

ESP32/ESP8266: Send BME280 Sensor Readings to InfluxDB

ESP32: Getting Started with InfluxDB

7 Different Ways to Send Notifications with the ESP32

Send SMS with the ESP32 (Twilio)

ESP32 HTTPS Requests (Arduino IDE)

ESP32/ESP8266 with HTTPS and SSL/TLS Encryption: Basic Concepts

ESP32: Send Messages to WhatsApp

Getting Started with the ESP32 Development Board

Enroll in Learn ESP32 with Arduino IDE
About random nerd tutorials, random nerd tutorials is an online resource with electronics projects, tutorials and reviews. creating and posting new projects takes a lot of time. at this moment, random nerd tutorials has approximately 700 free blog posts with complete tutorials using open source hardware and software that anyone can read, remix and apply to their own projects. to keep free tutorials coming, there’s also paid content or what i call “premium content”. to support random nerd tutorials you can get premium content above..
IMAGES
VIDEO
COMMENTS
Get started with Arduino: we have more than 60 free Arduino Tutorials and Project ideas and a premium eBook with 25 great projects: Arduino Step-by-step Projects.Using the next quick links, you'll find all our Arduino Guides with easy to follow step-by-step instructions, circuit schematics, source code, images and videos.
25+ Arduino Projects with step-by-step instructions. Arduino For Beginners ( VALUE: $10 FREE) Ultimate Guide For Arduino Sensors/Modules ( VALUE: $10 FREE) Electronics For Beginners ( VALUE: $11 FREE) Source code, full schematics, and unlimited updates. Exclusive access to the Private Facebook group where you can ask me for help and interact ...
>>Explore the full project. 4. Arduino Nano BLE 33 Sense Game Controller. PRABEEN made this game controller by using Arduino Nano BLE 33 Sense which has an onboard proximity sensor. As you can see is a fun and easy Arduino project! Components: Arduino Nano BLE 33 Sense / XIAO nRF52840 Sense; USB Cable Assembly, USB Type A Plug to Micro USB Type ...
This time I put together a list of 19 different robots built with an Arduino. Some of them are really straightforward, others are a bit advanced. So, let's start: 1. Cat Laser Entertainer Robot. Endless fun for your cat. Entertain your cat with this laser robot. It is very cheap and easy to build, only requires two servos, a laser, and an ...
450+ DIY Arduino Projects with Code & Circuit Diagram. Arduino is a popular open-source development board used by engineers, hobbyists, and makers to develop electronic projects and prototypes easily. The below list consists of a large collection of free Arduino Projects from Circuit Digest.
Jumper Wires. LEDs. Resistors. Push Buttons. Add to Cart for Later. In addition to the push-button sequence project, here are some additional projects using LEDs. Arduino Hanukkah Menorah. Arduino Dice. Random LED Generator.
Build projects with Circuit Playground in a few minutes with the drag-and-drop MakeCode programming site, learn computer science using the CS Discoveries class on code.org, jump into CircuitPython to learn Python and hardware together, TinyGO, or even use the Arduino IDE.
The 30 Most Useful Arduino Projects in 2024. by Aman Garg, Raphael Bertasius, Gloria E. Magarotto. Updated Apr 16, 2024. There's plenty you can do with a microcontroller, including useful projects. Simplify your life with these great Arduino project ideas! Advertisement. There's plenty you can do with a microcontroller, including useful projects.
Step 2: LED Blink. The "LED Blink" is for the Arduino the equivalent of the "Hello world" in computer programming, where you will need to write a code to have the sentence "Hello world" displayed in the console of a computer. Not really exciting, but it gives a hint on the inner workings of the Arduino board.
IoT-Based Smart Camera Using Android And Raspberry Pi. So let us check out these cool Arduino projects below: 1. Automated Washroom Light Using IR Sensors. This project is based on Arduino Uno and IR sensors and is used to automatically switch on and switch off a washroom's light that works on AC mains.
Introduction to Random Arduino Projects. In a digital era where the only limit is our imagination, Arduino stands out as a tool that democratizes invention. For the uninitiated, Arduino is an open-source electronics platform based on easy-to-use hardware and software. Its boards can read inputs - light on a sensor, a finger on a button, or a ...
In this video, I'll show you how to build an Arduino project for beginners with multiplexed 7 segment displays - Random Number Generator. 📺Subscribe to the...
If you want to learn how to build a complete Home Automation System using Arduino, ESP8266 and the Raspberry Pi, consider taking a look at our course: Build a Home Automation System for $100. Here is a list with +30 free home automation projects and tutorials: Home automation. Hack a PIR Motion Sensor with an ESP8266.
Step 4: Light It Up. Time to light up the breadboard with some Leds. There are 7 leds in all but their leads (+/-) need to be put into different ports in the breadboard. The way to do this on a breadboard is to have 3 Leds with their positive leads going into holes that are side by side, 1 led that needs to have the "positive" leads long enough ...
That's not a problem anymore! Now you can create your very own digital dice using LEDs and your Arduino board. This is a beginner-level project. This project will allow you to push a button and randomly generate a number between 1 and 6, shown with the number of LED lights. Credits to: EvdS. (n.d.). Led dice. Arduino Project Hub.
Blinking LED's is a staple example of beginner Arduino programming. In this tutorial, we're going to step it up a notch and use both arrays and the random() method to determine which LED to turn on and off for a duration. Materials for Random LED project Arduino Uno (or similar controller) Breadboard 4X LED's in […]
Gaming is one of the many uses for Arduino microcontrollers. Check out these Arduino game projects that you can recreate at home!
analogRead() to the random rescue! Lucky for us the Arduino reference has a great solution. Use the analogRead() function to read a value from an unused analog pin. Since an unused pin that has no reference voltage attached to it is basically floating, it will return a "noise" value. This noise value can seed the randomSeed() function to produce differing sequences of random numbers every ...
This DIY lie detector project costs you only around $20 to make. Save for the Arduino Nano, it requires pretty basic electronic components you might already have on hand, including three different ...
Here's my completed news and weather scroller, using the Arduino Uno R3, an ESP 8266, and two MAX7219 panels. I made the case from red oak beadboard, cut and engraved with a diode laser cutter, as was the grill, which is 1/8" thick Baltic Birch plywood. The surrounding lights are run by the Arduino board (running several different random light patterns), and the scroller is controlled by the ...
The ESP8266 is an affordable development board that combines control of outputs/inputs and Wi-Fi capabilities. It is one of the cheapest solutions on the market for DIY IOT and Home Automation projects. It supports the following peripherals: I/O, SPI, I2C, I2S, SPI, UART and ADC. Additionally, the ESP8266 NodeMCU can be programmed using the ...
The code generates random numbers and displays them. long randNumber; void setup() {. Serial.begin(9600); // if analog input pin 0 is unconnected, random analog. // noise will cause the call to randomSeed() to generate. // different seed numbers each time the sketch runs. // randomSeed() will then shuffle the random function.
The recommended input for most Arduino models when powered via non-USB means is 7 to 12V, with a limit of 20V. It's always a good idea to read the specification sheet, though, just to make sure.
This project will show how to do a simple LED Dice and a button, using the "random()" function on Arduino IDE. Enjoy!
In this tutorial we've shown you how you can perform daily tasks with the Arduino. The example provided is simple so that you can easily adapt it to your projects. Here's some ideas of tasks you can automate using this technique: Turn on/off lights at a specific time. Close your window blinds.
In the example shown in this blog post, we use the following three variables: test_value: We will use this integer variable to show an integer value generated periodically in our Raspberry Pi application in our Arduino Cloud dashboard.; button: We will use this boolean variable to send the information to the Cloud when the push button is pressed.; led: We will use this boolean variable to ...
160+ ESP32 Projects, Tutorials and Guides with Arduino IDE. The ESP32 is the ESP8266 successor loaded with lots of new features. The ESP32 is a development board that combines Wi-Fi and Bluetooth wireless capabilities, and it's dual core. It supports a wide variety of peripherals such as: capacitive touch, ADC, DAC, I2C, SPI, UART, I2S, PWM ...
There's pages for overview, pinouts, Arduino, bootloader mode and resources for download. Read more at Adafruit CH552 QT Py Adafruit publishes a wide range of writing and video content, including interviews and reporting on the maker market and the wider technology world.