How-To Geek
How to change a drive letter on windows 10 or windows 11.
You can change your drive letters in Windows 10 and 11 using the Disk Management utility.

Quick Links
What changing a drive letter does, how to change a drive letter, how to fix programs broken by changing a drive letter.
Changing the letter of a drive is easy on Windows 10 and Windows 11, but you should do it as soon as you add the drive to prevent future hassles. Find out how to change a drive letter here.
Windows assigns drive letters alphabetically --- starting with C --- when they're initialized. If you want to change a drive letter, you should do it before you install anything on the drive. Changing a drive letter after programs are installed could break them since there will be references to an installation location that is no longer there.
Windows has gotten pretty smart about updating shortcuts so that programs work after changing a drive letter. Most of your applications' shortcuts will probably be automatically corrected. Unfortunately, Windows isn't as good about updating file associations. You'll have to manually set the default apps associated with files to fix file associations if they were broken by changing the drive letter.
It is possible to change the boot drive letter to something else, but we don't recommend it. Changing C:\ to another letter is likely to result in severe issues, like a PC that cannot boot into Windows at all. Even if it were able to boot, there would be a huge number of programs that would not be able to run.
Technically speaking, while they are commonly called drive letters, each letter actually refers to a partition on a disk. If you have multiple partitions on a single disk, you will need to assign a letter to each partition to make them all accessible. If a disk has just a single partition, it will just have a single letter pointing to that partition. (However, you do not have to assign a letter to each partition. Partitions without drive letters will not appear in File Explorer and elsewhere.)
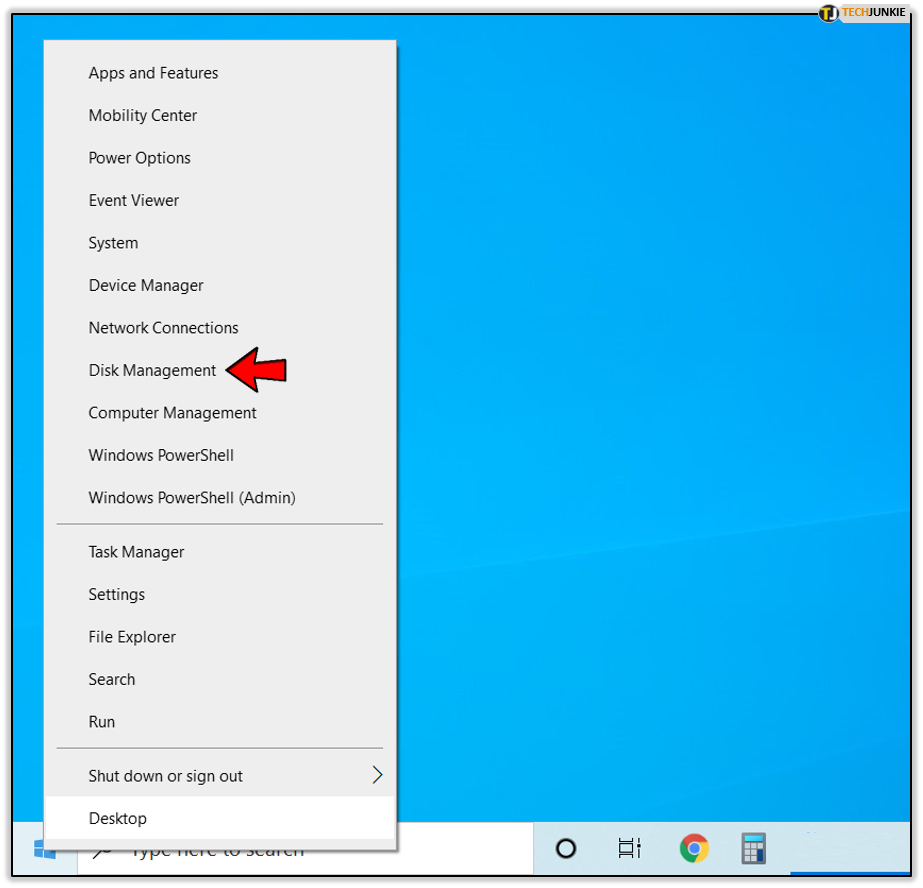
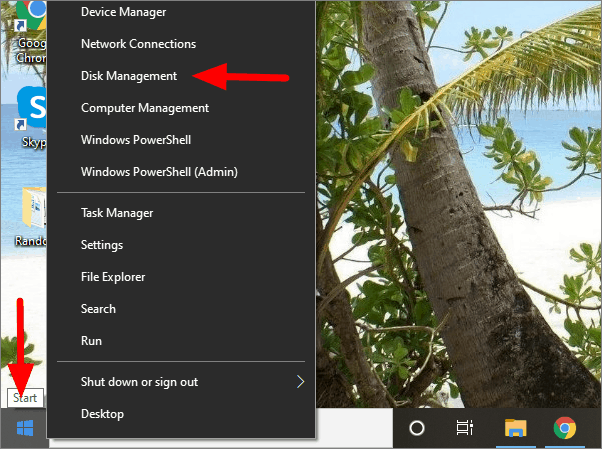
Changing a drive letter is pretty simple. Click the Start button, type "Disk Management" in the search bar, and then hit Enter.
The program name displayed in the search will not be Disk Management. It will be "Create and format hard disk partitions."
You could also hit Windows+X or right-click the Start button, and then click "Disk Management."
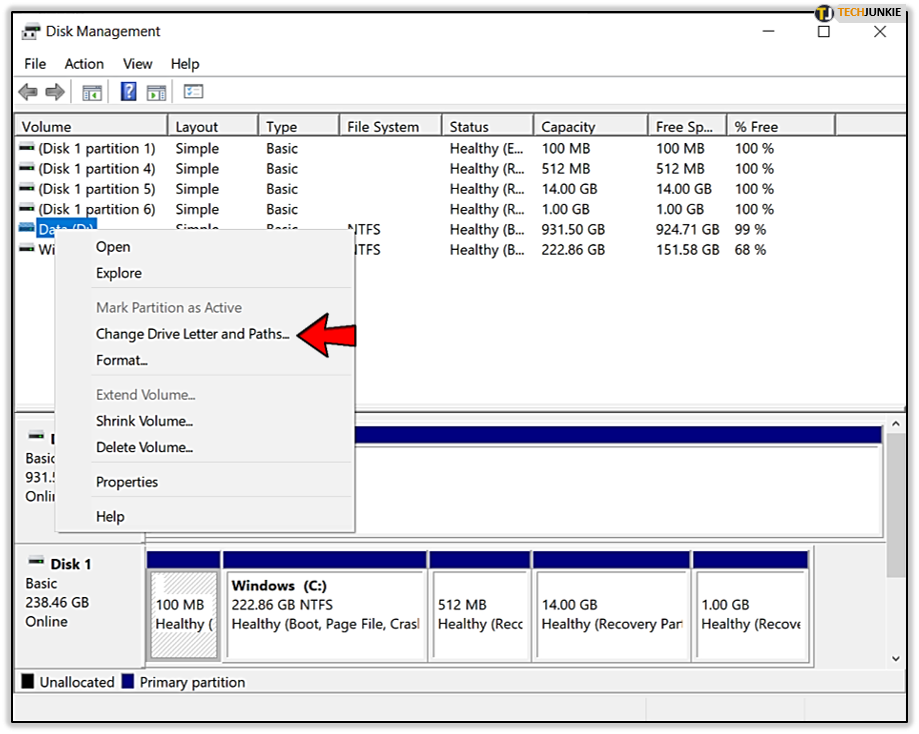
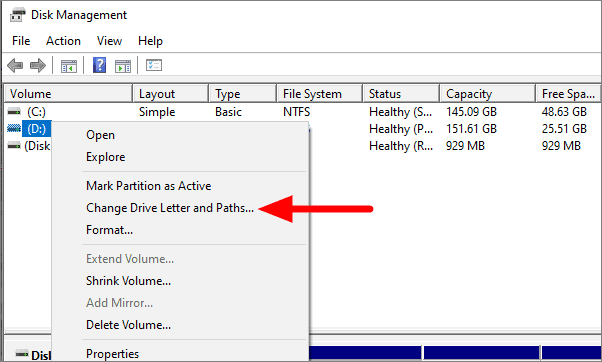
Identify the drive you'd like to change in the Disk Management Window. In this example, we'll change the letter of the D:\ drive to J:\. You can right-click the drive on the text list, or on the menu below. Either works.
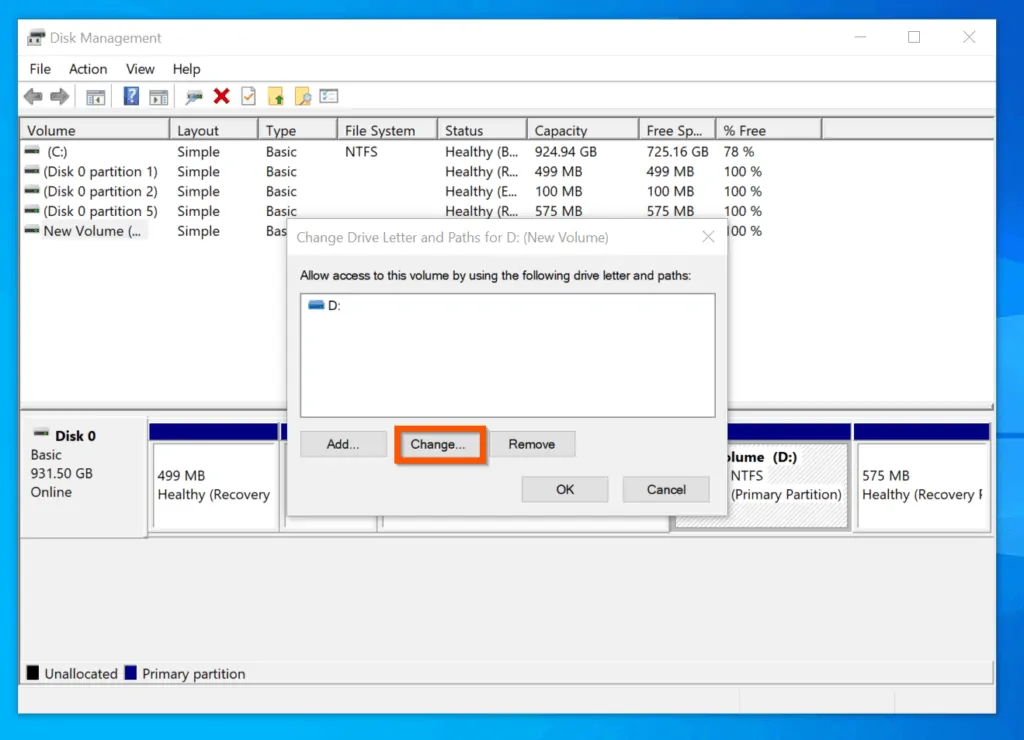
Select "Change Drive Letter and Paths" in the right-click menu that appears.
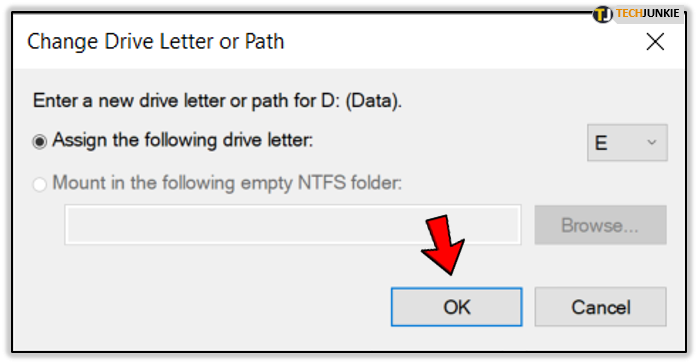
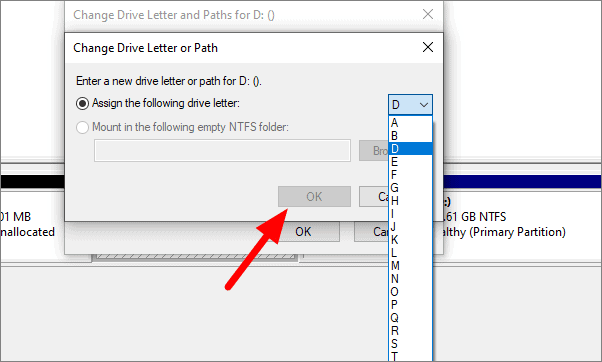
In the window that pops up, click "Change."
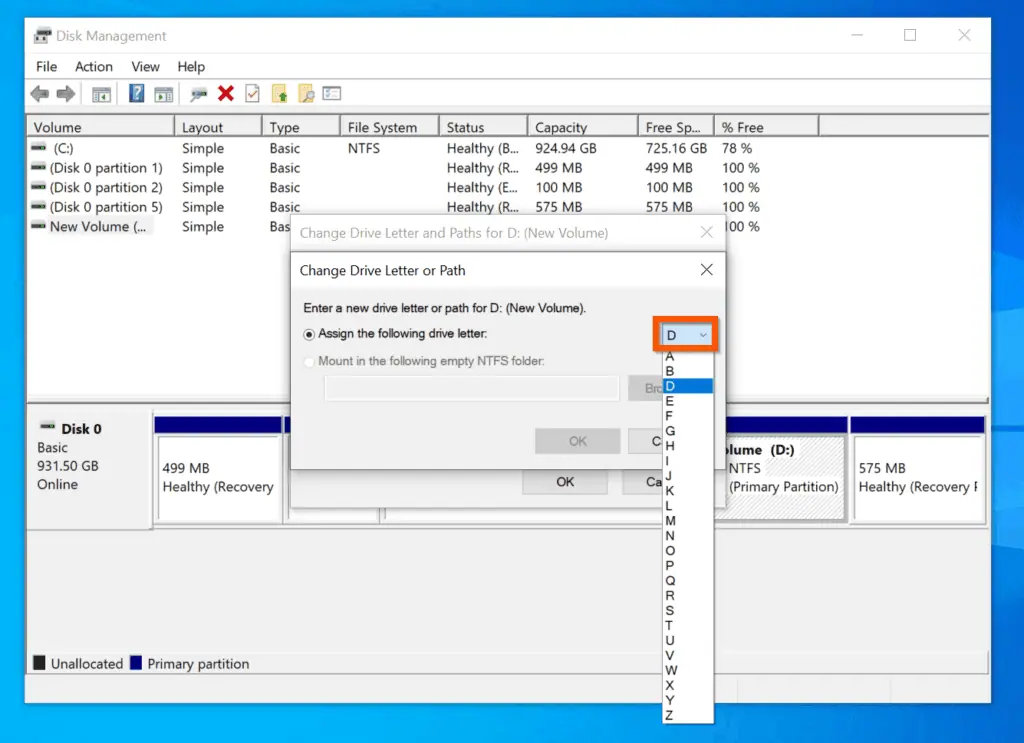
Select whatever letter you want from the drop-down menu. Then click "Ok."
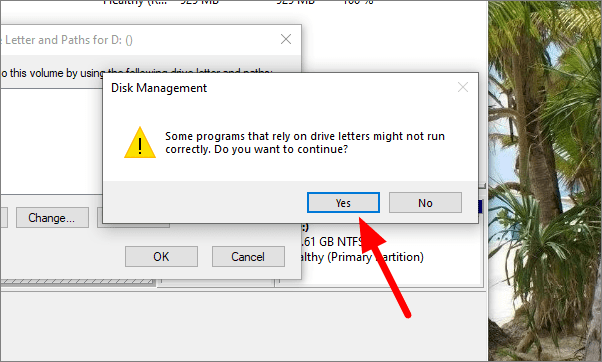
Two popups will warn you about changing your drive letter. Click "Yes" on both of them, and then restart your computer.
Once Windows has restarted, the drive letter should be changed.
There are a few ways you can fix a program broken by changing the drive letter.
Fix The Shortcut
If you're lucky, the only thing that is broken is the shortcut. Fix a shortcut by right-clicking the shortcut on your desktop, and then click Properties.
You need to change the target of the shortcut to the new drive letter.
For example, if GIMP was previously installed at " D :\GIMP 2\bin\gimp-2.10.exe," and you changed the D drive to J, change the target of the shortcut to " J :\GIMP 2\bin\gimp-2.10.exe."
Finalize the change by clicking "Apply" and then "Ok."
Reinstall the Program
Reinstalling the program will generate new entries in the registry, so everything on the computer will know where to look for the program. Some installers won't like reinstalling directly over existing files, so you may need to rename or delete the old installation first.
Change the Drive Letter Back
If you changed the drive letter of a drive with a lot of programs installed, it might be easier to change the drive letter back. Changing the drive letter back should automatically fix any programs and file associations that were broken.
Edit the Registry
You can break programs, or even Windows itself, by editing the registry. Be careful, and learn about how to edit the registry before you try it. Make sure you backup the Windows registry first. You should not attempt this method unless you have no other options.
Windows, and a lot of programs, track where programs are installed via the Windows registry. It is possible to manually adjust the registry to fix broken programs. Keep in mind that there could be dozens of registry entries you need to edit. A program like GIMP can have registry entries for the context menu, for the "Open With" menu, for any file associations, and for the location of its executables. Other programs may only have a few entries related to where it is installed.
If you're not deterred, here's how you do it.
First, you need to know where the program was previously installed. In this case, the program was installed to the "D:\GIMP 2" folder, and the executables were found the "D:\GIMP 2\bin" sub-folder. It is now located at "J:\GIMP 2" instead.
We need to update the registry to reflect the change in location. Click the Start button, type "regedit" into the search bar, right-click Regedit, and click "Run as administrator."
In Regedit, hit Ctrl+F to bring up a search window. Type in the old location for the program you're trying to fix --- "D:\GIMP 2" for our example --- then click "Find Next."
Once Regedit has found something with "D:\GIMP 2" as part of a path, it'll show it to you. Here is an example from the GIMP search.
To actually change them, double click the name of the registry entry you want to modify. Then change the drive letter to J, or whatever you chose. If you didn't otherwise move the folder, leave the rest of the path alone. Then click "Ok."
You'll need to repeat this multiple times. To find the next result using your search term, you can hit the F3 key. There will be a popup once you've found all of the entries.
Changing drive letters can be a simple way to customize your PC. Do it before you install anything on the drive, however. You'll prevent any problems before they occur, and probably save yourself quite a bit of troubleshooting.
This browser is no longer supported.
Upgrade to Microsoft Edge to take advantage of the latest features, security updates, and technical support.
Change a drive letter
- 4 contributors
Applies To: Windows 11, Windows 10, Windows Server 2022, Windows Server 2019, and Windows Server 2016
If you want to change a drive letter assigned to a drive, or you have a drive that doesn't yet have a drive letter, use Disk Management to change it. You can also mount the drive in an empty folder so that it appears as a folder. For more information, see Mount a drive in a folder .
If you change the drive letter of a drive that already contains Windows or apps, apps might have trouble running or finding the drive. We suggest not changing the drive letter of a drive that already contains Windows or apps.
The following steps show how to change the drive letter.
Open Disk Management with administrator permissions.
In Disk Management, select and hold (or right-click) the volume on which you want to change or add a drive letter and select Change Drive Letter and Paths .

If you don't see the Change Drive Letter and Paths option or it's grayed out, the volume either isn't ready to receive a drive letter or it's unallocated and needs to be initialized . It might also be that the drive isn't accessible, which is the case with EFI system partitions and recovery partitions. If you've confirmed that your volume is formatted with a drive letter that you can access but you're still unable to change it, that's beyond the scope of this article. We suggest contacting Microsoft Support or the manufacturer of your PC for more help.
To change the drive letter, select Change . To add a drive letter if the drive doesn't already have one, select Add .

Select the new drive letter and choose OK . Then select Yes when prompted about how programs that rely on the drive letter might not run correctly.

Coming soon: Throughout 2024 we will be phasing out GitHub Issues as the feedback mechanism for content and replacing it with a new feedback system. For more information see: https://aka.ms/ContentUserFeedback .
Submit and view feedback for
Additional resources
How to change drive letter using Settings on Windows 10
You can now change the drive letter for a partition using the “Manage Disks and Volumes” tools in Settings, and here's how on Windows 10.

On Windows 10, each drive you connect to the computer gets assigned a letter automatically to identify the device and make it accessible. However, sometimes, you may need to change the drive letter manually for many reasons.
For example, if you connect a drive (USB flash drive, external hard drive, or secondary hard drive) that was formatted on another device, the drive letter may conflict with another storage device on your computer. You prefer using a specific letter for a drive. Or you’re trying to organize the letters in a specific order.
Whatever the reason it might be, starting with build 20175 (Dev Channel) , Windows 10 introduces a new experience to manage disks and volumes from within the Settings app, which also includes the ability to change the letter of a drive. (Technically, the partition inside the drive receives the letter, not the device. Since if the drive doesn’t have a formatted partition, no letter will be assigned and won’t be accessible.)
In this guide , you’ll learn the steps to change the drive letter using the “Manage Disks and Volumes” tools available on Windows 10 .
Change drive letter on Windows 10
To change the drive letter with Manage Disks and Volumes in the Settings app, use these steps:
Open Settings on Windows 10.
Click on System .
Click on Storage .
Under the “More storage settings” section, click the Manage Disks and Volumes option.

Select the drive with the partition you want to change the letter.
Select the partition.
Click the Properties button.

Click the Change drive letter button.

Use the drop-down menu and select the new letter.

Click the OK button.
Once you complete the steps, the drive’s partition will now start using the new letter.
Just remember that you can’t change the letter of the partition where Windows 10 is installed, which is usually labeled as “C”, and you shouldn’t try to assign a letter to the system reserved partitions.
If the settings are not available, it’s because you are not running the version of the operating system that includes the tool. The Manage Disks and Volumes settings are available starting with Windows 10 build 20175 or higher releases.
In the case that you’re using an older version or an older release, such as Windows 8.1 or Windows 10, then you’ll need to use the Disk Management console, or Command Prompt or PowerShell to change the drive letter.

Mauro Huculak is a Windows How-To Expert who started Pureinfotech in 2010 as an independent online publication. He has also been a Windows Central contributor for nearly a decade. Mauro has over 14 years of experience writing comprehensive guides and creating professional videos about Windows and software, including Android and Linux. Before becoming a technology writer, he was an IT administrator for seven years. In total, Mauro has over 20 years of combined experience in technology. Throughout his career, he achieved different professional certifications from Microsoft (MSCA), Cisco (CCNP), VMware (VCP), and CompTIA (A+ and Network+), and he has been recognized as a Microsoft MVP for many years. You can follow him on X (Twitter) , YouTube , LinkedIn and About.me . Email him at [email protected] .
- Windows Terminal picks up new features with version 1.4
- Surface Pro X, Laptop 3, and others picked up September firmware update
We hate spam as much as you! Unsubscribe any time Powered by follow.it ( Privacy ), our Privacy .
TechRepublic
Account information.

Share with Your Friends
How to assign a drive letter in Windows 10
Your email has been sent

When you connect a new drive to your PC, Windows automatically assigns the next available letter after C, which is normally used for your system drive. So an external hard drive or USB thumb drive could end up as D, E, F, or whatever, depending on how many drive letters are already being used.
This is all well and good, but what if you want to assign the drive a letter? Maybe you want to use M for your music files or X for your top-secret X-Files. Here’s how in Windows 10.
- Ensure that the drive you’re relettering isn’t in use and that no files from that drive are open.
- Right-click on the Start button.
- Click Disk Management to open the Disk Management console.
- Right-click the volume that has the drive letter you want to change.
- Click Change Drive Letter And Paths.
- Click the Change button.
- Choose from a list of available drive letters. (Don’t use A or B, which have historically been reserved for floppy drives and can sometime confuse older software.)
- Click Yes if a popup windows appears asking if you really want to do this.
- Close the Disk Management console.
You may need to restart your machine for the change to take effect, but once you do the drive will use the new letter.
More Windows tips…
- How to turn on or off hibernate in Windows 10
- Regain hard disk space by using Windows Update Cleanup in Windows 7 and 8.x
- Restore a Windows XP backup in Windows 8
- How to replace SkyDrive with Libraries in Windows 8.1
- Pro tip: Use an optical Recovery Drive in Windows 8.1
Subscribe to the Developer Insider Newsletter
From the hottest programming languages to commentary on the Linux OS, get the developer and open source news and tips you need to know. Delivered Tuesdays and Thursdays
Create a TechRepublic Account
Get the web's best business technology news, tutorials, reviews, trends, and analysis—in your inbox. Let's start with the basics.
* - indicates required fields
Sign in to TechRepublic
Lost your password? Request a new password
Reset Password
Please enter your email adress. You will receive an email message with instructions on how to reset your password.
Check your email for a password reset link. If you didn't receive an email don't forgot to check your spam folder, otherwise contact support .
Welcome. Tell us a little bit about you.
This will help us provide you with customized content.
Want to receive more TechRepublic news?
You're all set.
Thanks for signing up! Keep an eye out for a confirmation email from our team. To ensure any newsletters you subscribed to hit your inbox, make sure to add [email protected] to your contacts list.
How to assign permanent letters to drives on Windows 10
You can assign drive letters manually, and in this guide, we show you how on Windows 10.

On Windows 10, when connecting a removable storage device or an internal hard drive, the system detects and assigns a drive letter automatically to make it usable. However, when reconnecting an external drive (such as a USB flash drive or SD or microSD cards), the system can end up assigning a different letter, which can be annoying.
If you want to see the same drive letter on a particular device, you can manually assign a permanent letter to any drive connected to your computer, and on Windows 10 , you can do this in at least three different ways, using Disk Management, Command Prompt, or PowerShell.
Using this approach will prevent Windows 10 from assigning a new letter or trying to set a letter already in use, which can cause conflicts. Also, it helps to select a drive letter that makes more sense to you.
In this Windows 10 guide, we walk you through several methods to manually assign a permanent letter to a drive, as long as you're connecting the drive to the same device and the letter isn't already in use.
How to assign a drive letter using Disk Management
How to assign a drive letter using command prompt, how to assign a drive letter using powershell.
To manage drive letters with the Disk Management tool, use these steps:
- Open Start .
- Search for Create and format hard disk partitions and click the top result to open the Disk Management experience.
- Right-click the drive and select the Change Drive Letter and Paths option.

- Click the Change button.

- Select the Assign the following drive letter option.
- Use the drop-down menu to assign a new drive letter. Quick tip: To avoid the system trying to assign the same letter to another drive, it's a good idea to start adding letters in backward order. For instance, instead of using D, E or F, it better to start with Z, Y or X when assigning a new letter.

- Click the OK button.
- Click the OK button again.
Once you complete these steps, the drive will permanently retain the assigned letter, even after reconnecting it. However, if you connect the drive to another device, it may receive a different letter.
While the easiest way to assign a new drive letter is to use Disk Management, you can also use DiskPart in Command Prompt to perform the same task.
Get the Windows Central Newsletter
All the latest news, reviews, and guides for Windows and Xbox diehards.
To assign a drive letter using Command Prompt, use these steps:
- Search for Command Prompt , right-click the result, and then select the Run as administrator option.
- Type the following command to start DiskPart and press Enter : diskpart
- Type the following command to list all the available volumes and press Enter : list volume
- Type the following command to select the volume (drive) to assign a new letter and press Enter: select volume 3 In the command, make sure to change "3" to the number that represents the drive on your device.
- Type the following command to assign a new drive letter, and press Enter : assign letter=Z The command assigns the letter "Z" to the drive assuming it's available. However, you need to make sure to change the letter for the one that you want to use.

After completing these steps, similar to Disk Management, every time you reconnect the storage to the same device, Windows 10 should assign the same letter automatically.
Alternatively, you can also use PowerShell to change a drive letter on Windows 10 using these steps:
- Search for PowerShell , right-click the result, and then select the Run as administrator option.
- Type the following command to list the available drives and press Enter : Get-Disk
- Type the following command to assign a permanent letter to the drive and press Enter : Get-Partition -DiskNumber 1 | Set-Partition -NewDriveLetter Z In the command, make sure to change "1" to the number that represents the drive that you want to modify, and change "Z" for the new letter that you want to use.

Once you complete the steps, the drive will be accessible through File Explorer using the letter that you assigned, and Windows 10 won't try to change it.
Updated March 7, 2019: We revised this guide to make sure it's current with the latest version of Windows 10.
More Windows 10 resources
For more helpful articles, coverage, and answers to common questions about Windows 10, visit the following resources:
- Windows 10 on Windows Central – All you need to know
- Windows 10 help, tips, and tricks
- Windows 10 forums on Windows Central

Mauro Huculak is technical writer for WindowsCentral.com. His primary focus is to write comprehensive how-tos to help users get the most out of Windows 10 and its many related technologies. He has an IT background with professional certifications from Microsoft, Cisco, and CompTIA, and he's a recognized member of the Microsoft MVP community.
- 2 Microsoft Bing is under the EU scrutiny again for its generative AI risks on electoral processes, months after being exempted from DMA regulation for not being 'dominant enough'
- 3 Arkane Austin's vampire shooter Redfall will get offline mode update despite Microsoft shuttering the Xbox studio
- 4 Microsoft's 4.5-rated performance optimization tool bizarrely recommends using Bing as the default search engine to 'repair' Windows 11
- 5 Microsoft will put Call of Duty 2024 on Xbox Game Pass, reveal planned for Games Showcase
How to Change Drive Letter in Windows 10 & 11
Drive or partition letters are not fixed. You can change them. Here is how to change a drive letter in Windows 10 & 11 operating systems.
Windows automatically assigns a unique drive letter for all the drives, partitions, and plugged-in USB drives. Generally, the assigned letters are in incremental order starting with the letter C. For the most part, you don’t have to change the drive letter as it is pretty inconsequential in most cases. However, there might be times when you need to manually modify the drive letter of a drive, partition, or plugged-in USB drive to meet certain requirements.
For example, I want to use the drive letter X for one of my partitions because one of my older scripts requires it. The script won’t work as intended if it doesn’t have that specific drive letter. Since these are older files, and there are many of them, in typical Windows fashion, I tend to swap the drive letter rather than making the necessary changes to the script files.
Thankfully, Windows has several ways to change the drive letter . You can use the built-in partition manager or execute a few commands in the terminal. I will show both ways, follow the method you like.
Table of contents:
Change drive letter using partition manager
Commands to change drive letter.
Note: Close all active programs except your browser before proceeding with the below steps. It will reduce potential conflicts between programs and the drives.
Important: Do not change the drive letter of system volume or boot partition (C drive).
The steps below work the same in Windows 10 and 11.
Though most don’t know, Windows has a built-in partition manager called Disk Management. You can use it to quickly and easily change the drive letter. All you have to do is go to the drive options and choose the new drive letter.
Here is how to do it:
- Press “ Win + R ” to open Run .
- Type “ diskmgmt.msc ” and click “ Ok .”
- Find the drive you want to modify.
- Right-click on the drive.
- Choose the “ Change drive letter and paths ” option.
- Click the “ Change ” button.
- Select the “ Assign the following drive letter ” radio option.
- Choose a drive letter from the dropdown.
- Click “ Ok .”
- Click “ Yes ” in the warning window.
- Again, click “ Yes ” in the second warning window.
- Close the main disk management window.
- You have successfully changed the drive letter in Windows 10 and 11.
Steps with more details:
First, search and open “Create and format hard disk partitions” from the Start menu. You can also use the “diskmgmt.msc” Run (Win + R) command.
After opening the Disk Management tool, find the drive you want to change the drive letter, right-click on it, and choose the “Change drive letter and paths” option.

Now, click the “Change” button.

Select the “Assign the following drive letter” radio option, choose a drive letter from the dropdown menu, and press “Ok.”

You will see a couple of warning prompts. Press the “Yes” button in both prompts.

Finally, close the Disk Management tool, and you are done.
That is all. You’ve successfully changed the drive letter in Windows. To make the changes take full effect, reboot the system.

You can use the diskpart command to change the drive letter of any drive, partition, or USB drive in Windows. Here’s how to use the command to modify the drive letter.
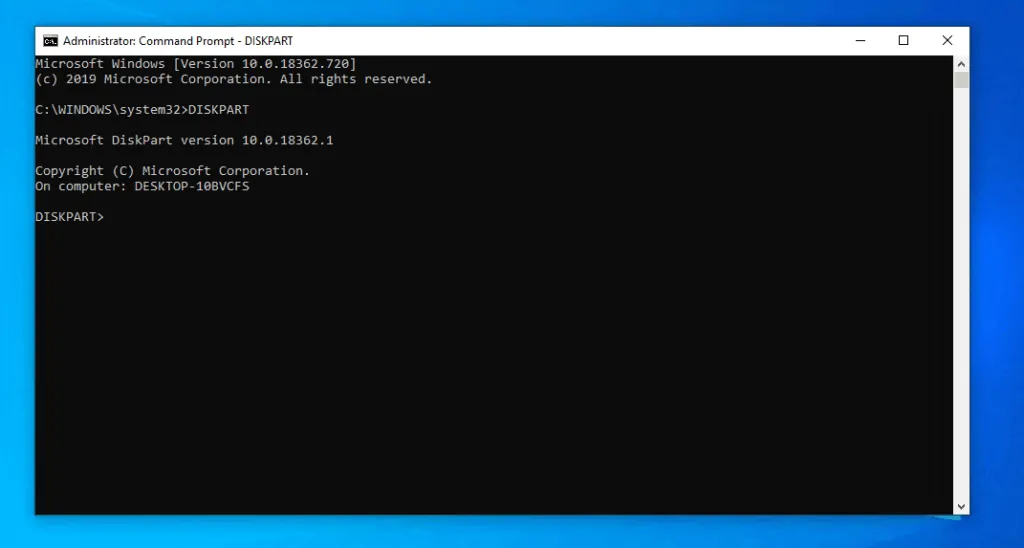
Press the Windows Key to open the Start menu . Type “ Command Prompt ,” right-click on the result, and select the “ Run as administrator ” option. You can also right-click the Start menu, choose “Windows Terminal (Admin),” and open the Command Prompt tab in it.
After opening the cmd window, type “ diskpart ” and press Enter. This will launch the diskpart program in the cmd window.

Type “ list volume ” and press Enter.
The above command will list all partitions and their volume numbers. Take note of the volume number of the drive you want to modify.
Next, execute the “ select volume #number ” command. Don’t forget to replace the #number with the actual volume number.

After selecting the volume, execute the “ assign letter=NewDriveLetter ” command. Replace “ NewDriveLetter ” with the actual drive letter you want to assign.

Once assigned, close the cmd window.
That is all. Once the diskpart commands are executed successfully, the drive letter is changed instantly. To make the changes take full effect, reboot Windows.
I hope this simple and easy Windows how-to guide helped you.
If you are stuck or need some help, send an email, and I will try to help as much as possible.
Did you know you can change a drive icon to anything you want? Follow the linked article to understand how to do it.
About The Author

Leave a Comment Cancel Reply
Your email address will not be published. Required fields are marked *
Save my name, email, and website in this browser for the next time I comment.

- I Tried Both: Apple Watch 9 vs Fitbit Charge 6
- Best Places to Print Photos Online
How to Change a Drive Letter
Don't like the letters assigned to your drives in Windows? Change them!
:max_bytes(150000):strip_icc():format(webp)/tim-fisher-5820c8345f9b581c0b5a63cf.jpg "how to change external drive letter windows 10")
- Emporia State University
:max_bytes(150000):strip_icc():format(webp)/image-5e6611aebe974bb7886a24b5070c834f.jpg "how to change external drive letter windows 10")
- The Ultimate Laptop Buying Guide
What to Know
- Open Disk Management. Locate the drive you want to change. Right-click and choose Change Drive Letter and Paths > Change .
- Select the drive letter you want to assign from Assign the following drive letter . Then select OK and choose Yes .
The letters assigned to your hard drives, optical drives, and USB drives in Windows are not fixed. Use the Disk Management tool in Windows to change drive letters. These steps apply to Windows XP and newer versions of Windows .
How to Change Drive Letters in Windows
Follow these steps to change the driver letters in any version of Windows.
You can't change the drive letter of the partition that Windows is installed onto. On most computers, this is usually the C drive.
Open Disk Management , the tool in Windows that lets you manage drive letters, among [many] other things.
In Windows 11/10/8, Disk Management is also available from the Power User Menu ( WIN + X keyboard shortcut) and is probably the quickest way to open it. You can also start Disk Management from the Command Prompt in any version of Windows, but starting it via Computer Management is probably best for most of you.
Locate from the list at the top, or from the map at the bottom, the drive you want to change the drive letter of.
If you're not sure that the drive you're looking at is really the one you want to change the drive letter for, you can right-click or tap-and-hold the drive and then choose Explore . If you need to, look through the folders to see if that's the right drive.
Right-click or tap-and-hold the drive and choose Change Drive Letter and Paths .
Select Change .
If you've selected the primary drive by accident, some versions of Windows will display a message that reads Windows cannot modify the drive letter of your system volume or boot volume.
Choose the drive letter you want Windows to assign to this storage device by selecting it from the Assign the following drive letter drop-down box.
You don't need to worry if the drive letter is already being used by another drive because Windows hides any letters you can't use.
Select OK .
Choose Yes to the Some programs that rely on drive letters might not run correctly. Do you want to continue? question.
If you have software installed to this drive, it might stop working properly after changing the drive letter. See details on this in the section below.
Once the drive letter change is complete, which usually only takes a second or two, you're welcome to close any open Disk Management or other windows.
The drive letter is different from the volume label. You can change the volume label using similar steps .
If You Have Programs Not on the Main Drive
Changing drive letter assignments for drives that have software installed to them may cause the software to stop working. This isn't quite as common with newer programs and apps but if you have an old program, especially if you're still using Windows XP or Windows Vista, this is likely to be a problem.
Fortunately, most of us don't have software installed to drives other than the primary drive (typically the C drive), but if you do, consider this your warning that you might need to reinstall the software after changing the drive letter.
No Changes for the Operating System Drive
You cannot change the drive letter of the drive that the Windows operating system is installed on. If you'd like Windows to exist on a drive other than C , or whatever it happens to be now, you can make that happen but you'll have to complete a clean install of Windows to do it. Unless you have a pressing need to have Windows exist on a different drive letter, we don't recommend going through all that trouble.
Change, Don't Switch
There's no built-in way to switch drive letters between two drives in Windows. Instead, use a drive letter that you don't plan on using as a temporary "holding" letter during the drive letter change process.
For example, let's say you'd like to swap Drive A for Drive B . Start by changing Drive A's letter to one that you don't plan on using (like X ), then Drive B's letter to Drive A's original one, and finally Drive A's letter to Drive B's original one.
Using the Command Prompt
You can also change the drive letter from Command Prompt . It's not as easy as using Disk Management and you can't see right away which letters are available to choose, but it is completely doable with the diskpart command.
Get the Latest Tech News Delivered Every Day
- The 34 Best Free Data Destruction Tools of 2024
- 10 Best Free Disk Partition Software Tools
- How to Open Disk Management
- How to Format a Hard Drive in Windows
- What Is a Volume Label of a Drive?
- How to Back Up Your iPhone to an External Hard Drive
- How to Partition a Hard Drive (Windows 11, 10, 8, 7, +)
- How to Burn an ISO File to a USB Drive
- How to Properly Reboot (Restart) a Windows Computer
- How to Use the Format Command to Write Zeros to a Hard Drive
- AOMEI Partition Assistant Standard Edition v10.4.0 Review
- What Is the NTFS File System?
- How to Open Disk Management From Command Prompt
- Disk Management
- What Is a Partition?
- How to Find a Drive's Volume Label or Serial Number
How to Change a Drive Letter in Windows
Sometimes when you plug in a USB device, it doesn't show up
A task you will most likely have to perform a few times in Windows is changing the drive letter for an external hard drive, mapped network drive, or DVD drive. Sometimes when you plug in a USB flash drive, it doesn’t automatically get a drive letter assigned to it and it may not show up on your computer.
In those types of cases, you have to change the drive letter for the device and it will normally pop right up. In this article, I’ll show you how to change the drive letter for these devices using the GUI and also via the command prompt.
Change Drive Letter via Disk Management
You can open disk management on a Windows PC by either right-clicking on the Computer or This PC icon on the desktop and choosing Manage or by clicking on Start and typing in diskmgmt.msc .

You’ll see a list of volumes at the top and the disks and partitions at the bottom. Any partition that has a drive letter will be shown in the white area. If you connected a USB drive and you see it listed, but it doesn’t have a drive letter, you can now assign one.
To assign or change the drive letter for a disk or partition, simply right-click on it and choose Change Drive Letter and Paths .

A window will pop up with the current drive letter, if there is one, and a couple of options. Here you want to click on Change .

Next, you will choose the new drive letter from the dropdown list. You can pick from the letters A to Z.

That’s about it. Click OK to close out all the dialogs and the drive should now show up in Windows with the new drive letter. If you’re having issues using the GUI interface or you simply feel more comfortable using the command prompt, read the instructions below on how to use diskpart.
Use DiskPart to Assign Drive Letter
If you need to change or assign a drive letter via the command prompt, you have to use the diskpart command. I’ve written a bit on how to use diskpart , which is really useful for many disk management tasks.
To get started, open an administrator command prompt in Windows by clicking on Start, typing in CMD and then right-clicking and choosing Run as Administrator .

Now type in the following commands, each followed by the Enter key.
Above, you’ll replace x with the volume number in the list that corresponds to the drive you want to change and with the letter you want to assign to the drive. Here are the commands I ran for an external USB drive:

You’ll also notice that under the Type column, external drives will show up as Removable . That’s a good way to check before you select a volume. You can also figure out which drive is correct by looking at the size and also looking at the Info column. Volume 0 in my case is the system partition, so I wouldn’t want to mess with that by accident.
Overall, it’s a fairly simple process and hopefully you won’t run into any problems. There are times, however, when things don’t work properly. Below are some possible reasons.
Troubleshoot Can’t Change Drive Letter in Windows
One problem that I have seen is that the Change Drive Letter option is simply greyed out. This can occur for a few reasons. One of the main reasons is the volume is not formatted in FAT or NTFS format. For example, if you are attaching a disk from a Mac computer, you will not be able to change the drive letter unless you format the drive into a compatible format.
Another reason is if the drive is set to read-only. If so, you’ll have to Google the steps to change the drive to allow read/write access.

Also, if you don’t need any of the data on the volume in question, a simple solution is to delete the volume, which is normally never greyed out. Once you delete the volume, you can right-click again and create a new simple volume. Now you will be able to change the drive letter.

Founder of Help Desk Geek and managing editor. He began blogging in 2007 and quit his job in 2010 to blog full-time. He has over 15 years of industry experience in IT and holds several technical certifications. Read Aseem's Full Bio
Read More Posts:

- Best Video Converters
- The Best Video Downloaders for Windows

“Downloading Do Not Turn OFF The Target!” Error In Samsung
- The Best Network Monitoring Tools
- The Best TVs for Xbox Series X

‘IP address conflict’ – How To Manage & Fix
- Best Laptops Under $300
- Best Laptops Under $500

10 Alternatives to Trapcall
- Social Media
- Cut the Cord
TechJunkie is a BOX20 Media Company
Home PC Windows Windows 10 How To Change the Drive Letter in Windows 10
How To Change the Drive Letter in Windows 10

“I would love to keep my drives organized. Perhaps labeling my new drive as ‘M’ for music and the other ‘V’ for videos. So How do I go about doing it?”
Changing the drive letter in Windows 10 works the same as it does for Windows versions 8, 7, Vista, and XP. No drive letter (save for C:) is set in stone. Even C is technically changeable but definitely not recommended. You’d have to repartition your PC in order to do so and that’s a whole new can of worms better left unopened.
The Disk Management Tool found in Windows makes altering drive letters a breeze, even for individuals who are not familiar with drive editing. You can have everything completed in just a few minutes. Follow the guide below for instruction on how to change your drive letters.
Changing The Drive Letters in Windows 10
When first connecting a new drive to your PC, be it optical, hard drive, or USB, Windows will automatically assign it the next available drive letter following C. Which letter is assigned is determined by how many other drives you already have connected.
In order to change the letter to something you believe to be more suitable to your taste or needs, you’ll have to open up Disk Management .
- First, ensure that the letter you want to assign to the drive is not currently in use.
- You can look through the available folders to see if the correct drive has been chosen.
- You should avoid A and B as these particular letters have been historically reserved for floppy drives and could confuse older software by being altered.
- Any software that is currently installed to this drive may stop working properly once the letter has been changed. If this is the case, you’ll need to reinstall the software onto the new drive. This issue is more common in older programs and apps, especially if using Windows XP or Vista.
- To change your system drive from C: (or whatever you currently have it set as) to another letter will require a clean install of the Windows OS. As stated earlier, this is not something that I can recommend.
- Swapping drive letters can get a bit tricky. There isn’t any built-in way to do so in Windows. You would need to create a temporary drive letter for the drive letter you don’t intend on using. An example would be changing the D drive to the E drive. Begin by changing the D drive to something you don’t plan on using like ‘X’. Now you have an X drive and E drive. Next, change the E drive to ‘D’ and then finish up by changing X into ‘E’.
- It’s possible that you may need to restart your machine for the change to take effect. Once rebooted, the drive will display the newly assigned letter.
How To Turn Windows 10 into a Hotspot
One thought on “How To Change the Drive Letter in Windows 10”
Leave a Reply Cancel reply
Your email address will not be published. Required fields are marked *

Jun 13, 2021
76 Articles Published
You May Like

How to Use 2 Computers Within One Monitor

Ronil Thakkar
Aug 26, 2023

How to Enable Your Keyboard Backlight in Windows 10
Jun 16, 2023

The Best Twitter Desktop Clients for Mac and Windows [October 2022]

Oct 6, 2022
The Best 2-in-1 Laptops

William Sattelberg
Jul 10, 2022

The Five Best Budget Laptops

Jessie Richardson
Jun 28, 2022

How to Deactivate Chat With Gemini in Chrome

Ashish Mohta
May 16, 2024

Instagram Stuck on “Sending Message” Notification After Sending Media
May 14, 2024

How to Take Screenshots of Microsoft Edge Copilot Chat on Android and iOS
May 9, 2024

How to Change Your Name in Zoom

May 31, 2021

How To Filter By Color in Google Sheets

Robert Hayes
Jan 15, 2020
Copyright @2024 TechJunkie
Sign up for our daily newsletter
- Privacy Policy
- Advertise with Us
6 Ways to Change the Drive Letter in Windows

If your PC suddenly stops showing one of your internal drives in the file explorer or not list your external drive, it could be due to the OS getting confused with the drive letters. Simply changing your assigned drive letters can help you bypass this conflict. Here are six ways to change the drive letter.
1. Change the Drive Letter Using Settings
2. using command prompt, 3. disk management, 4. registry editor, 5. windows powershell, 6. drive letter changer software, frequently asked questions.
Also read: How to Clean Up and Make Space on Your Windows “C” Drive
Is It Safe to Change a Drive Letter in Windows?
Changing the drive letter is not entirely harmless and can cause significant problems based on the contents of your drive. If you have applications and software installed on your drive, those applications may cease to work.
For example, if you change the name of your D: drive to an F: drive, then the software installed in the D drive will still search for code in the D: file. While you can still access the data inside, there may be errors that will cause a nuisance in your day-to-day usage.
However, you may safely change the letter of some drives. If a partition simply includes data files that you rarely use, changing the drive letter may cause minor inconvenience, but nothing serious. The letters of external drives can almost always be changed without any problems.
- Press Win + I to open the Settings app, then select the “System” tab. Scroll down and click on “Storage.”

- Scroll down on the right side and click on “Advanced storage settings.”

- Under Advanced storage settings, click on “Disks & Volumes.”

- Select the drive whose letter you want to change, then click on the “Properties” button for that drive.

- In the Drive Properties, you will find the option to change the drive letter of the selected drive.

- Once you click on the option to change the drive letter, you will find a drop-down menu that will allow you to change the drive letter.

- Click on the letter you want to assign.

- Once you have selected your preferred letter, click on “OK” to confirm your choice.

Also read: How to Format a Drive in FAT32 in Windows
- Search for the command prompt on the start menu by typing cmd , right-click on it, and select “Run as administrator”.

- On the command prompt home screen, type:

- Press Enter , then type:

- Press Enter. You’ll see a list of your system’s drives. Make a note of the volume number of the drive. In the example pictured, it’s “Volume 3”.

- Type the following code:
- Type the following code to assign the new letter:
Instead of “new drive letter,” type the letter you want. For example: assign letter=S

The drive letter will be changed to your preferred letter.
Also read: 8 Ways to Customize Windows Terminal
- Right-click on the Windows button and open “Disk Management.”

- Under the “Volume” column, you will find the various partitions of your storage. You need to find the drive whose letter you’ll change and right-click on it.

- In the dialog box that appears, click on “Change.”

- Click the drop-down menu next to “Assign the following drive letter,” then select your letter and press “OK.”

- A warning message will pop up. Click “Yes” if you are sure about your decision to change the drive letter.

Also read: Which Allocation Unit Size Is Best for Your Drive?
- To change the drive letter through registry editor, first press Win + R to open the Run dialog and type regedit .

- Type in the following address at the top of the application:
and press Enter .

- Navigate to the list of binary keys. Select the key that corresponds to the drive letter that you want to change. For example, if we want to change the letter of the D: drive, we would look for “\DosDevices\D:”
- Right-click on the selected registry and rename the drive letter to what you want, just as you would rename any other file.You will have to restart your computer for the effects to take place.

Also read: 16 Useful Windows Registry Hacks to Optimize Your Experience
- Using the search button on the taskbar, search for “Powershell” and run it as administrator.

- Type the following command:

- A screen will show you your disk partitions. Make a note of what drive letter you want to change.

- To change the drive letter, type the following command:
Make sure to substitute “current drive letter’ and “new drive letter” with the actual drive letters, then press Enter .

Also read: How to Map a WebDAV Drive in Windows
If you are looking for a tool that can help you manage your partition and drives, these software will help you change your drive letter.
- MiniTool Partition Wizard
- AOMEI Partition Assistant
- EaseUS Partition Master
These tools are easy to use and have GUI interfaces that make them simple to use and also a one-stop destination for you to manage your storage devices. For the purposes of the demonstration, we are using MiniTool Partition Wizard to change the drive letter.
- Download MiniTool Partition Wizard. (It is a direct download link.)

- Run the installer and launch the app. You will get a listing of all your drive partitions mentioned below.

- Right-click on the target drive partition and select “Change Letter.”

- Open the drop-down list and select a new drive letter for your target drive.

- Click on “Apply” to save the changes.

- You will receive a warning pop-up asking you to close all background applications. Click “Yes.”

- You will now receive a confirmation message telling you that the new changes have been applied.Click “OK.”

Also read: How to Format Your USB Drives in Windows
1. How are drive letters assigned in Windows?
Drive letters are assigned to every new drive in alphabetical order. Traditionally, the A: and B: drives were used for floppy disks, and the system drive on which Windows is installed is named C: by default.
2. Can I change the drive letter for the System Drive?
No, changing the drive letter on the system drive is not possible, as Windows is installed on the system drive. If that was changed, the system drive would not be found and the computer would cease working.
3. Can I switch drive letters among two drives?
No, there is no functionality in Windows to switch drive letters directly between two drives. If you want to switch the drive letters between the D: drive and the E: drive, you will have first change the D: drive to another letter (so as to free up the D:), change the E: to D:, then change the first one to E:.
Image credit: Plastic magnetic letters by 123RF
Our latest tutorials delivered straight to your inbox

Ojash has been writing about tech back since Symbian-based Nokia was the closest thing to a smartphone. He spends most of his time writing, researching, or ranting about Bitcoin. Ojash also contributes to other popular sites like MakeUseOf, SlashGear, and MacBookJournal.

How to Change Drive Letter in Windows 10

If you are a Windows user, you must have at some point wanted to change the drive letter assigned to a particular drive. Windows 10 offers this feature for all the drives, namely hard disk drive, USB drive, and CD drive.
It is very simple to change the drive letter in Windows 10. It can be done in many ways but some are a bit technical, therefore we will guide you through the simplest one.
Changing Drive Letters in Windows 10
Click on the Windows icon on the left corner of the Taskbar and then select ‘Disk Management’ from the menu.
You will now see the list of all the drives on your system. Right-click on the drive name you want to change and select ‘Change Drive Letter and Paths..’.
Click on ‘Change’ on the next window to change the drive letter.

Click on the box next to ‘Assign the following drive letter’ and select the drive letter of your choice. After you select the drive letter, click on ‘OK’ at the bottom.
A warning will be displaced on the screen saying that some programs that rely on drive letters might not run correctly. Click on ‘Yes’.
Some applications and software might not function properly after changing the drive name. Therefore, it is advised not to change the drive name of the drive on which you have installed any applications.

How to Use Gemini Code Assist in VS Code

How to Code Using AI

Microsoft Copilot Pro Review: There is a lot of Unrealized Potential
Get all the latest posts delivered straight to your inbox., member discussion.

Why You Should Consider Switching to Linux After Windows 10 Support Ends

What to Do After Microsoft Ends Support for Windows 10?

How much will Windows 10 Updates Cost from Next Year?

How to Use AI Eraser in Photos App on Windows 11 and 10

How to Fix Windows 10 Update KB5034441 Error 0x80070643
- All about AI
- Google Gemini AI
- Inflection AI Pi Chatbot
- Anthropic Claude
- Multimodal AI
- Generative AI
- AI Image Generation
- AI VIdeo Generation
- AI Coding Assistants
- AI Regulation
- AI Research
- Large Language Models (LLM)
- Surface Pro
- Surface Laptop
- Surface Book
- Surface Duo
- Surface Neo
- Surface Studio
- Surface Hub
- Surface Pen
- Surface Headphones
- Surface Earbuds
- About WinBuzzer
- Follow Us: PUSH, Feeds, Social
- Join our Team
- Cookie Policy and Privacy Policy
- Terms of Service
How to Assign / Change Drive Letter in Windows 10
We show you how to change the drive letter in CMD, DIsk Management, PowerShell, and Registry editor in Windows 10.

Table of Contents:
Windows 10 helpfully assigns drive letters to disks as they're added, but they aren't always the most logical choices. While we all know that C: is the system drive, it doesn't make quite as much sense to have D: as your games drive or E: as your media drive. Luckily it's quite easy to change a drive letter in Windows 10, and we're going to walk you through the process today.
How does Windows 10 drive letter assignment work?
For the most part, Windows 10 automatically assigns letters to drives as they're connected, in alphabetical order. However, there are a few exceptions to this rule that may leave some users confused.
As mentioned earlier, C: is always reserved for the system drive, but A: and B: are reserved too, for rarely used floppy drives. Because of Windows automatic assignment, you may have also noticed that Windows changes the drive letter of your USB stick if you've connected another before it.
If you want letters that are easier to identify in bios or don't want your USB letters jumping around, it's quite easy to permanently change a drive letter in Windows 10 to something of your choosing. We're going to cover a few different ways today, including how to change the drive letter in CMD.
How to Change Drive Letter in Windows 10 via Disk Management
The most user-friendly way to assign drive letters in Windows is through the Disk Management interface, which is relatively easy to use.

How to Change Drive Letter in CMD using a DISKPART Disk Management Command
Though it's not quite as user-friendly, it can be much faster to change a drive letter with Command Prompt.

How to Change Drive Letter in Windows 10 with a PowerShell Disk Management Command
Those more familiar with PowerShell can use this method instead to achieve the same result.

How to Change / Assign a Drive Letter via the Registry Editor
Alternatively, if none of the above methods worked or you're just feeling brave, you can modify the drive letter via the registry. Just be sure to read our safe registry editing guide first.

If you enjoyed this guide, you may want to consider enabling or disabling disk caching or turning on BitLocker for your newly customized drives.
- Assign drive letter
- assign drive letter windows 10
- Change boot drive letter Windows 10
- Change drive letter windows 10
- change usb drive letter Windows 10
- DIsc Management
- Disk management command
- how to change drive letter Windows 10
- powershell change drive letter
- win 10 change drive letter

Recent News

Fake Download Sites for Putty and WinSCP used to Spread Ransomware
Google DeepMind Introduces AI Safety Evaluation Framework
Subscribe to WinBuzzer on Google News

The Best Windows Disk Partition Manager and PC Optimizer
- Free Partition Software >
Three Easy Ways to Change USB Drive Letter in Windows 11, 10, 8 or 7
Top three ways about how to change USB drive letter are listed in this post. You can pick the one that you like.
By Bryce / Updated on May 12, 2023
The reasons for changing drive letter for USB device
You may want to change USB drive letter in Windows 11, 10, 8, or 7 under the following conditions:
☞ The USB device, like external hard drive is not recognized in Window Explorer out of drive letter conflict. To resolve the problem, you can reassign drive ☞ letter to the USB drive. ☞ T he USB drive letter keeps changing every time it was connected to your PC. You can assign a permanent drive letter to the USB drive . ☞ You just don’t like the drive letter that has been assigned automatically to the USB drive and want to change it .
How to: Change USB drive letter in Windows 11/10/8/7 easily
Next, there are three ways about how to change drive letter for USB flash drive, USB external hard drive, etc. will be displayed. Pick up one way as you like.
Method 1. Change USB drive letter via Disk Management
Method 2. change usb drive letter using cmd, method 3. change usb drive letter with a free 3rd party gui tool.
Disk Management is a Windows built-in tool, allowing you to manage disk and partitions conveniently. Follow the steps given below to change drive letter of USB drive in Disk Management.
Step 1. Press Windows + R in Windows 11/10/8/7, input “ d iskmgmt.msc ” and hit Enter key to open Disk Management.
Step 2. Right-click the USB partition that you want to change the drive letter and choose Change Drive Letter and Paths... .

Step 3. In the pop-up window, click Change… . If your USB drive is not showing up in drive out of drive letter missing, you can click Add to assign a drive letter to it.

Step 4. Choose a new drive letter from the list and click OK .

Note: If the USB drive is formatted with a file system incompatible with Windows OS, like Ext4 or is write-protected, you can find that “ Change Drive Letter and Paths ” option greyed out.

To resolve the problem, you can format your USB drive with a file system recognized by Windows 10 /11 or remove write protection at first. Or you can try Method 2 or Method 3 to change the drive letter for your USB drive.
You can also change drive letter for USB drive from Command Prompt through the following steps:
Step 1. Pres s Windows + R simultaneously, input cmd, and click OK .
Step 2 . Type diskpart and hit Enter .
Step 3. Run commands listed below in order.
▪ list volume ▪ select volume n ▪ assign letter= m ▪ exit ▪ exit

If you find out Change Drive Letter and Paths greyed out and are unfamiliar with Command Prompt, you can try a 3 rd party partition manager for Windows PC, AOMEI Partition Assistant Standard. It can change drive letter for USB drive even when it is write-protected or not formatted with NTFS or FAT file system. Now, free download it and take a closer look at how it works.
Step 1. Install and run the partition manager. In the home interface, right-click the partition whose drive letter needs to be changed and go to Advanced > Change Drive Letter .

Step 2. In the pop-up window, choose a new drive letter for your USB drive and click OK .

Step 3. You’ll go back to the main interface automatically. Click Apply and Proceed to commit the operation.

✍ Notes: ✌ You can get more functions, like quick partition, partition recovery, etc., if you upgrade to AOMEI Partition Assistant Professional . ✌ To more easily identify USB drive, like external hard drive, you can also choose to change name of USB drive.

Related Articles
How to rename external hard drive [four ways included].
Four valid & simple ways about how to rename external hard drive will be demonstrated in this post. Read it and you can choose one way to change its volume label.
How to Create UEFI Boot USB of Windows 10?
To create UEFI boot USB of Windows 10 or Windows 11 for installation, you can use CMD. If you want to make bootable USB with UEFI support for repair, you can use AOMEI Partition Assistant Professional instead.
How to Restore USB Drive to Original State in Windows 10/8/7?
Try to restore USB drive to original state as you want to restore it back to full capacity or delete all files on it? Refer to this article to get detailed steps to perform this operation.
Free Download to Try AOMEI Partition Assistant Now
How to Change Drive Letter on Windows 10
By Victor Ashiedu
Published May 6, 2020
On this page...
This Itechguide teaches you how to change drive letter on Windows 10.
Option 1: Change Drive Letter with Disk Management
- Right-click Windows 10 Start menu and select Disk Management .

- Then, right-click the partition you want to change drive letter for and select Change Drive Letter and Paths…

- On the Change Drive Letter and Paths pop-up, click Change .
- Then, on the Change Drive Letter or Path pop-up, click the Assign the following drive letter drop-down and select a new drive letter.
- Finally, to change drive letter on Windows 10 with Disk Management, after selecting a new drive letter, click OK.
- Then, on the confirmation pop-up, note the warning and if you want to proceed, click OK.

Option 2: Change Drive Letter with DISKPATH
- Type command prompt in the Windows 10 search box. Then, from the search results, right-click Command Prompt and select Run as Administrator .

- You will receive a User Access Control (UAC) confirmation, requesting you to allow the “app to make changes to your PC”. On the UAC prompt, click Yes .

- On the command Prompt, to open the DISKPART, type the command below and press enter.
The DISKPART prompt will open.
- On the DISKPART prompt, to list all available disks – type this command and press enter.
The command will list all disks on your computer. The next step is to select a disk.
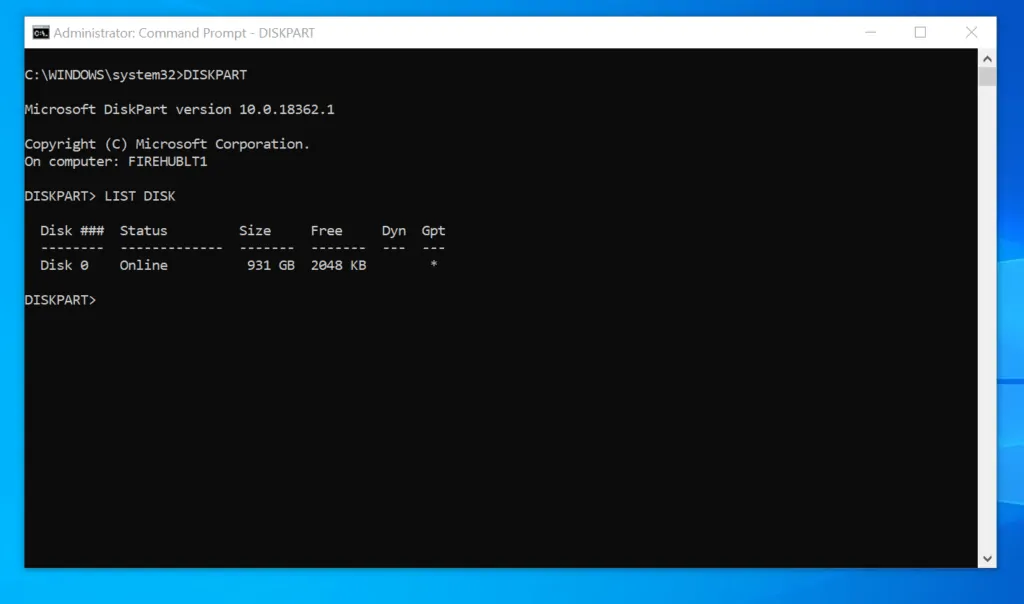
- To select a disk, enter the command below and press enter.
The command will return “Disk # is now the selected disk.” The next step is to list all available partitions on the selected disk.

- To list all partitions on the selected disk, enter the LIST PARTITION command and press enter.
Before you proceed to the next step, note the partition # of the partition you want to change drive letter for.
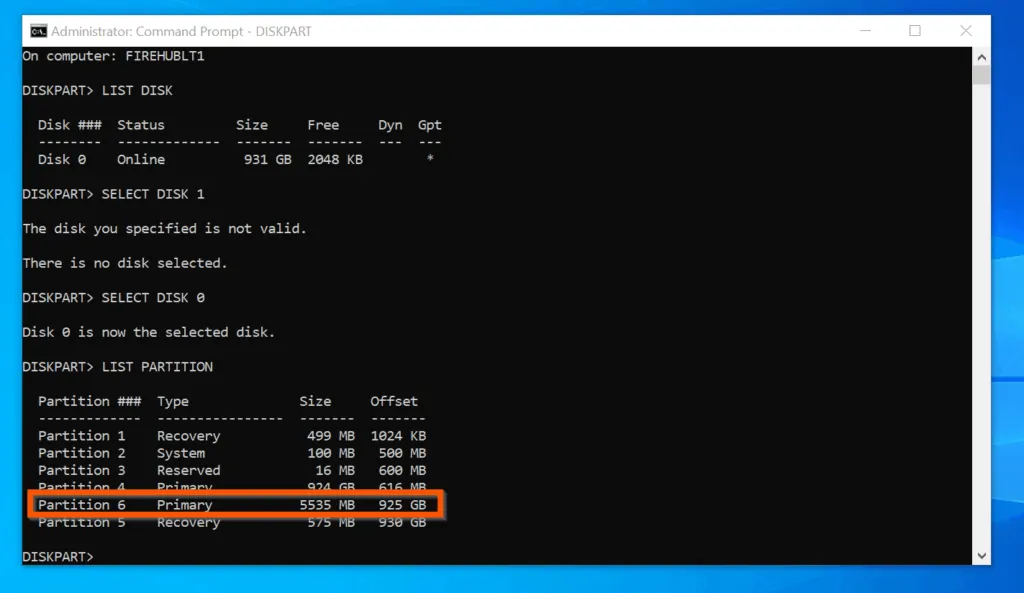
- Then, to select the partition, enter the SELECT PARTITION command followed by the partition # and press enter.
Change 6 to the partition number for the partition you want to change its drive letter.
- Finally, to change drive letter on Windows 10 with DISKPART, use the ASSIGN LETTER command. In this example, I want to assign driver letter D to the partition.
If the drive letter is available, DISKPPART will assign the drive letter and return a confirmation message.

However, if the drive letter is already assigned to another partition, DISKPPART will return an error message. If you receive an error message, try another drive letter.
Option 3: Change Drive Letter with PowerShell
- Type PowerShell in search bar. Then click Run as administrator .

- To identify the disk with the partition you want to assign drive letter, type the Get-Disk cmdlet and press enter.
The command will display information about all disks on the computer. Note the Disk number (first column) – from the screenshot below, mine is disk number 0. The next step is to get the partitions on the disk.

- To list all partitions on a disk, enter the Cmdlet below and press enter
All partitions on the disk will be displayed. Note the partition number of the partition you want to change its drive letter. From the screenshot below, mine is partition 6.
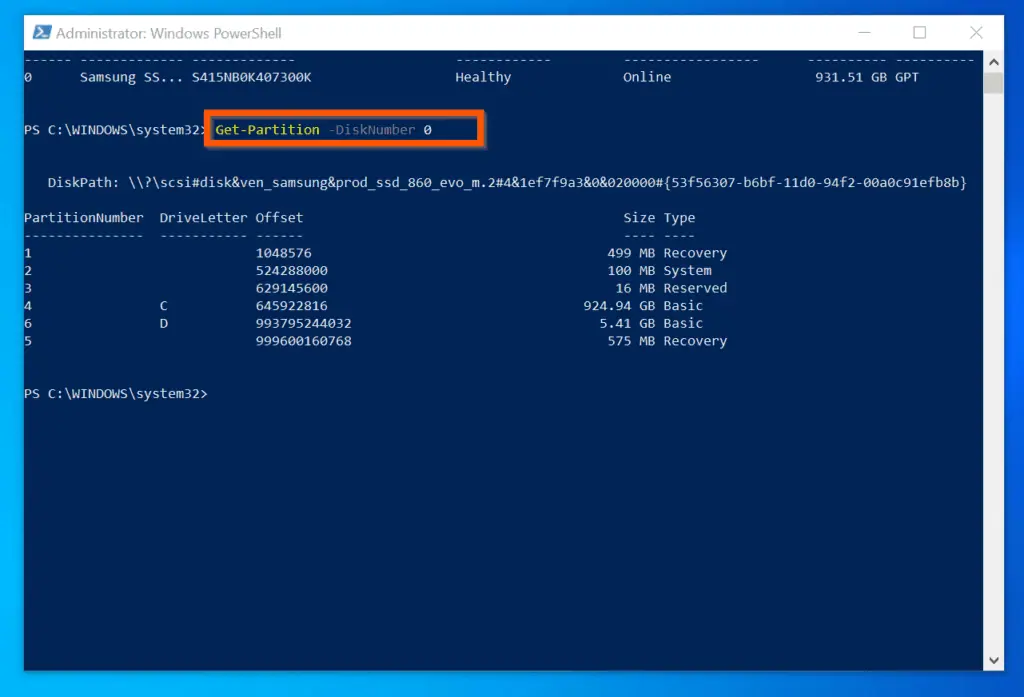
- Finally, to change drive letter on Windows 10 with PowerShell, enter the Cmdlet below and press enter.
Change 0 , 6 and E to your disk number, partition number and drive letters respectively.
You can use the methods covered in this Itechguide to change drive letter Windows 10!
I hope you found this Itechguide helpful. If you did, click on “Yes” beside the “Was this page helpful” question below.
You may also express your thoughts and opinions by using the “Leave a Comment” form at the bottom of this page.
Finally, for more Windows 10 Itechguides, visit our Windows 10 How – To page. You may also find our Work from Home page very helpful.
- Was this page helpful?
- Yes (0) No (0)
About the Author

Victor Ashiedu
Related Articles

How to Create, Rename, Delete Files or Folders in Windows

How to Set Paging File Size in Windows 11 or Windows 10

How to Download and Install Windows 10 22H2 Update Manually
Get in Touch
We're committed to writing accurate content that informs and educates. To learn more, read our Content Writing Policy , Content Review Policy , Anti-plagiarism Policy , and About Us .
However, if this content does not meet your expectations, kindly reach out to us through one of the following means:
- Respond to "Was this page helpful?" above
- Leave a comment with the "Leave a Comment" form below
- Email us at [email protected] or via the Contact Us page.
Leave a comment Cancel reply
Save my name, email, and website in this browser for the next time I comment.

What the UK Energy Price Cap Means and How it Works
- PC & Mobile
How to Change a Drive Letter in Windows 10
Lee Stanton Lee Stanton is a versatile writer with a concentration on the software landscape, covering both mobile and desktop applications as well as online technologies. Read more November 19, 2022
Changing drive letters in Windows certainly has its benefits. You can hide a specific drive from all apps on your computer, thus preventing these apps from writing on a specific partition or edit the drive letter after adding a new HDD or SSD.

If you’re looking to change drive letters in Windows 10, you’ve come to the right place. In this article, we’ll provide you with detailed steps on how to change or remove various drive letters.
There are a couple of different ways to change a drive letter in Windows 10. Below, we’ll show you how to do so with Disk Management. This is the most straightforward way to apply changes to your drive letters in Windows 10.

You have now successfully changed a drive letter in Windows 10.
How to Change Drive Letter in Windows 10 Using Command Prompt
Another way to change drive letters in Windows 10 is using Command Prompt. This process is relatively simple:
- Make sure you’re running your PC in Admin mode.

You have now changed your drive letter in Windows 10.
How to Remove a Drive Letter in Windows 10
If you want to remove a drive letter in Windows 10, you can do so from Desk Management. Just follow these simple steps:

- Click OK to confirm the operation.
You have now successfully removed a drive letter in Windows 10. After removing a drive letter, you won’t be able to see it in your File Explorer any longer. Also, to remove a letter, you must sign in as the administrator.
How to Change a Network Drive Letter in Windows 10
Changing a network drive letter in Windows is a pretty straightforward process. Just follow these steps, and you’ll be good to go:

Additional Steps if You Receive an Error Message:

You’ll now see your network share in the This PC screen.
How to Change a USB Drive Letter in Windows 10
You might want to change a USB drive letter in Windows 10 if Window Explorer doesn’t recognize the external hard drive. For this or any other reason, just follow the simple steps shown above for an HDD/SSD to change your USB drive letter.
How to Change DVD Drive Letter in Windows 10
Changing a DVD drive letter in Windows 10 can be done easily through Disk Management. Just follow the steps shown above to also change the DVD drive letter.
You have now successfully changed your DVD drive letter in Windows 10.
How to Change Recovery Drive Letter in Windows 10
Changing your recovery drive will only take a few seconds. Just as before, follow the directions shown previously to quickly change your recovery drive letter.
How to Change Boot Drive Letter in Windows 10
Unfortunately, changing your boot drive letter in Windows is not possible through Desk Management.
We only recommend changing your boot drive in case of an emergency. Otherwise, you shouldn’t make any changes to your boot drive. If you make a wrong step, you might not be able to run your system properly. For that reason, please follow the steps we’ve provided carefully. You should also make a system backup before proceeding any further.
Below, we’ll explain how to swap drive C and D letters. To assign your C drive with another letter, you should rename the \DosDevice\letter: value to another letter that’s not already in use.
Also, before you mess with the Register, it’s a good idea to create a copy of the Register before it’s been edited.

- Close the Registry Editor, wait a few seconds, and then open it back up.

- Click Rename .
- Rename the file to a new drive letter \DosDevices\Z:. This will empty your C partition.
- Locate the drive you wish to change the letter of. Find \DosDevice\D:. Right-click on it and click Rename .
- Change the name to the new drive letter \DosDevice\C:.
- Choose the appropriate value for \DosDevices\Z: and click Rename .
- Change the name to \DosDevices\D:.
- Close Regedit and open it back up.
- Change the Admin permission settings to Read Only .
- Restart your PC.
You have now successfully changed your boot drive letter in Windows 10.
Additional FAQs
Is it safe to change drive letters.
Changing drive letters is not a problem in itself. But if your computer needs to run a file that’s written in that very drive, you might have an issue. It’s not just for any reason that Windows warns you before changing a drive letter.
Generally, it’s not recommended to change drive letters unless that would help solve a specific issue. For example, if your Windows Explorer doesn’t recognize an external device under a certain driver, it’s okay to change its name.
There are some drives you can change the letters of without consequences. For example, to a partition that has files you rarely use. Also, you can change an external drive’s letter without problems.
Changing Drive Letters in Windows 10
In this article, we’ve provided you with some useful tips on how to change drive letters in Windows 10. Remember, only do this if strictly necessary, as it might cause some apps on your computer to not run properly.
Have you ever had to change your drive letters for a specific reason? Did you run into any problems? Share your experiences in the comments section below.
Related Posts

Disclaimer: Some pages on this site may include an affiliate link. This does not effect our editorial in any way.

Lee Stanton March 14, 2024

Digvijay Kumar March 8, 2024

Aman Kumar March 7, 2024
Send To Someone
Missing device.
Please enable JavaScript to submit this form.
At the edge of tweaking
Advertisement
Change the drive letter in the command prompt
- Open an elevated command prompt .
- Type diskpart .

You are done.
Change the drive letter in PowerShell
- Open an elevated PowerShell instance .

For example, the command can look as follows:

Winaero greatly relies on your support. You can help the site keep bringing you interesting and useful content and software by using these options:
If you like this article, please share it using the buttons below. It won't take a lot from you, but it will help us grow. Thanks for your support!
Author: Sergey Tkachenko
Sergey Tkachenko is a software developer who started Winaero back in 2011. On this blog, Sergey is writing about everything connected to Microsoft, Windows and popular software. Follow him on Telegram , Twitter , and YouTube . View all posts by Sergey Tkachenko
One thought on “How to Change Drive Letter in Windows 10”
Really thank you this steps very helpful
Leave a Reply Cancel reply
Your email address will not be published. Required fields are marked *

Privacy Overview

3 Ways to Change Drive Letter in Windows 10
3 Ways to Change Drive Letter in Windows 10: When you re-install Windows or have started your PC for the first time, you will notice that all your drives or volumes are by default assigned drive letter by Windows 10, well in future you might want to change these letter and in this post we will cover how to do that. Even when you connect an external drive such as hard disk, or a simple USB, you will notice that Windows 10 will automatically assign a drive letter to these connected drives.

The process of Windows is quite simple, it progresses through the alphabet from A to Z to assign the available drive letters to devices as connected. But there are some letters which are exceptions such as A & B are reserved for floppy drives, whereas the drive letter C can only be used for the drive which has Windows installed on it. Anyway, without wasting any time let’s see How to Change Drive Letter in Windows 10 with the help of the below-listed tutorial.
Table of Contents
Make sure to create a restore point just in case something goes wrong.
Method 1: How to Change Drive Letter in Windows 10 using Disk Management
1.Press Windows Key + R then type diskmgmt.msc and hit Enter to open Disk Management.

2.Now right-click on the drive for which you want to change the drive letter for and then select “ Change Drive letters and Paths ” from the context menu.

3.On the next screen, select the currently assigned drive letter then click on the “ Change ” button.

4.Make sure to select or check “ Assign the following drive letter ” then select any available drive letter you want to assign for your drive and click OK.

5.Click Yes to confirm your actions.
6.Once finished, you can close Disk Management.
Method 2: How to Change Drive Letter in Command Prompt
1.Press Windows Key + X then select Command Prompt (Admin).

2.Type the following command into cmd and hit Enter after each one:
diskpart list volume (Note down the number of the volume for which you want to change the drive letter for) select volume # (Replace the # with the number which you noted above)

assign letter=new_drive_letter (Replace new_Drive_letter with actual drive letter which you want to use for example assign letter=G)

Note: If you selected an already assigned drive letter or the drive letter is not available then you will receive the error message indicating the same, again use a different drive letter to successfully assign a new drive letter for your drive.
3.Once finished, you can close the command prompt.
Method 3: How to Change Drive Letter in Windows 10 using Registry Editor
1.Press Windows Key + R then type regedit and hit Enter to open Registry Editor.

2.Navigate to the following registry key:
HKEY_LOCAL_MACHINE\SYSTEM\MountedDevices

3.Make sure to select MountedDevices then in right window pane right-click on the binary (REG_BINARY) value (ex: “\DosDevices\F:”) for the drive letter (ex: “F”) of the drive you want to change the drive letter for and select Rename.
4.Now rename only the drive letter part of the above Binary value with an available drive letter for example. “ \DosDevices\G: ” and hit Enter.

5.Close Registry Editor and reboot your PC.
Recommended:
- How to Change Monitor Refresh Rate in Windows 10
- How to Fix Scaling for Blurry Apps in Windows 10
- Enable or Disable Domain Users Sign in to Windows 10 Using Biometrics
- How to Change Drive Icon in Windows 10
That’s it you have successfully learned How to Change Drive Letter in Windows 10 but if you still have any questions regarding this tutorial then feel free to ask them in the comment’s section.
About The Author

Aditya Farrad

How to Turn Down Skype Volume in Windows 10

How to Open MDF File in Windows 10

How to Check TLS Version in Windows 10

How to Display Date and Time on Desktop in Windows 10

How to Compare Two Folders in Windows 10

Where are Themes Stored in Windows 10?
Leave a comment cancel reply.
Your email address will not be published. Required fields are marked *
This site uses cookies to store information on your computer. Some are essential to make our site work; others help us improve the user experience. By using the site, you consent to the placement of these cookies. Read our privacy policy to learn more.
- TECHNOLOGY Q&A
How to change drive letters in Windows 10
Q. How difficult is it to change drive letters in Windows 10?
A. Changing a drive letter in Windows 10 is relatively easy, as follows. Right - click the Windows 10 Menu button and select Disk Management to display a list of all available hard drives. Right - click the specific hard drive letter you want to change, and select Change Drive Letter and Paths . Click the Add button, select a new drive letter, and then click the Change button, as pictured below.

- Letters A and B are reserved for floppy drives.
- The drive letter for the system volume or boot partition (usually drive C) cannot be modified or changed.
- Any letter between C and Z can be assigned to a hard disk drive, CD drive, DVD drive, portable external hard disk drive, or USB flash memory key drive.
- If you change the drive letter for drives where applications or programs are installed, those applications or programs may or may not function properly after the change because they might refer to the original path used to install those products. In this case, you would likely need to reinstall those applications or programs for them to work properly.
About the author
J. Carlton Collins ( [email protected] ) is a technology consultant, a conference presenter, and a JofA contributing editor.
Submit a question
Do you have technology questions for this column? Or, after reading an answer, do you have a better solution? Send them to [email protected] . We regret being unable to individually answer all submitted questions.
Where to find May’s flipbook issue

The Journal of Accountancy is now completely digital.
SPONSORED REPORT
Manage the talent, hand off the HR headaches
Recruiting. Onboarding. Payroll administration. Compliance. Benefits management. These are just a few of the HR functions accounting firms must provide to stay competitive in the talent game.
FEATURED ARTICLE
2023 tax software survey
CPAs assess how their return preparation products performed.
Home > News Tips
[Solved] How to Change or Switch Disk Numbers in Windows
Updated on Monday, May 13, 2024

Change Disk Numbers in Windows: Switch disk 0 and disk 1
When your hard drive is detected and recognized, Windows will assign your drive a letter and a numeric disk ID to better identify a certain disk. You can use Disk Management to change a drive letter if you don't like the assigned drive letter or if you have a drive that doesn't have a drive letter yet. How to change disk numbers in Windows ?
This article will introduce how disk enumeration works in Windows and tell you how to change disk ID of a drive , especially switch disk 0 and disk 1 .
How does Windows assign drive numbers?
The location of the SATA port on the motherboard that a drive is plugged into determines the disk number of that drive. Some motherboards have markings right on the board that let you know what port corresponds to what number.

In other words, the number assigned to your SSD , HDD , or other storage devices, also known as disk ID, is the physical address of a SATA port. You can set up a boot order for all SATA ports in BIOS, and then Windows decides master and slave drives by your BIOS boot order.
By default, the first hard drive with a Windows OS will be assigned as C: and Disk 0 in Disk Management because it needs to boot up first. Then other devices will be given disk numbers 1, 2, 3, etc.
However, the story is different for an M.2 SSD with NVMe. Drives connected to SATA ports get priority in numbering order. Therefore, even though your NVMe SSD is the boot drive, it always goes by the last number because it is connected to an M.2 slot. It will display in Disk Management shown below. This is no solution to change the disk number for an NVMe SSD in Windows and nothing to worry about.
- NVMe = Disk 2 (C: )
- SATA1 = Disk 0 (D: )
- SATA2 = Disk 1 (E: )
Is this information helpful? If you nod, please share it.
Why do you need to change disk numbering?
There is usually no need to alter disk numbers because they just signify different physical connections on a motherboard. But one situation is an exception - when your startup disk (not an NVMe SSD) which contains a Windows operating system is not listed as disk0.
Here is an example from the Superuser forum:
A desktop system had two drives (Assigned C and D, which were enumerated in Disk Management as Disk 0 and Disk 1). A new SSD was added as the boot drive, after copying the C drive to the SSD. The SSD was connected to SATA 0 (master) port on the motherboard. The previous C Drive was moved to SATA 2 and is reformatted as a non-booting NTFS partition. The D drive remained on SATA 1.... However, the list in Disk Management is re-ordered. Disk 0 is the previous Disk 2 (D Drive) on SATA 1, Disk 1 is the new Boot Drive (now C) on SATA 0, and Disk 2 is the former C Drive (now assigned E) on SATA 2...Is there any way to re-order the Disk number assignments? What actually does determine the Disk number enumeration?
In this case, after the user added a new boot drive to the SATA 0 port, the boot drive was not assigned the corresponding disk0 but disk1. The user wanted to switch disk1 to disk0.
Can you change disk ID numbers?
The response is a clear negative if you mean that you wish to alter the physical SATA port order on your motherboard. The precise placements or enumeration of these ports cannot be changed.
However, if you want to change the disk numbering of the slave hard drives or assign the boot drive with the correct order which is disk0, it is possible to do so.
Thanks for sharing in advance.
How to change disk numbers in Windows?
There is no need to mess with the disk numbers for average users because it is not easy. You can read the following advice if you have a good cause to.
How to change the disk number of the boot drive from disk1 to disk0:
- Back up data of the current boot drive.
- Reformat the current boot drive to a Windows format - NTFS, FAT, or exFAT.
- Reinstall Windows OS to the drive you want to use as a boot drive.
- Go to BIOS and set up the new boot drive as the first drive to boot. Then the new boot drive will be disk0.
How to change the disk numbers of other slave drives:
- Unplug all secondary drives, also known as slave drives, that don't contain the operating system.
- Connect the drives to your Windows PC in a different order. Then you will find the disk IDs of these disks have changed.
This article helps you understand how disk number enumeration works and if you can change the disk ID of a drive. As long as everything seems fine, most users won't need to change disk numbers or be concerned if the boot drive is not Disk 0.
Your friends may be happy to see this article too.
Jessica Shee is a senior tech editor at iBoysoft. Throughout her 4 years of experience, Jessica has written many informative and instructional articles in data recovery, data security, and disk management to help a lot of readers secure their important documents and take the best advantage of their devices.
No. 308, 3/F, Unit 1, Building 6, No. 1700, Tianfu Avenue North, High-tech Zone
Copyright© 2024 iBoysoft ® . All Rights Reserved.

Contribute to the Windows forum! Click here to learn more 💡
May 10, 2024
Contribute to the Windows forum!
Click here to learn more 💡
Windows 11 Forum Top Contributors: Ramesh Srinivasan - Kapil Arya MVP - neilpzz - RAJU.MSC.MATHEMATICS - _AW_ ✅
Windows 11 Forum Top Contributors:
Ramesh Srinivasan - Kapil Arya MVP - neilpzz - RAJU.MSC.MATHEMATICS - _AW_ ✅
- Search the community and support articles
- Search Community member
Ask a new question
Changed drive letter on EFI partition, and now it's gone
So, yesterday I decided to try and Dual-Boot windows with a Linux Distro. I couldn't get the installer USB to work because I was using the installer version instead of a Live version. I formatted the USB in Windows to try and install the new distribution, and restarted my device for some reason... It told me that windows was unable to boot, and I figured it was because the Linux distro was missing. I went into Bios and reset my load order so that Windows Boot Manager was first instead of the USB. Well, windows still wouldn't boot, so I tried using BCD to fix it. Well, I assigned a drive letter to the EFI partition as part of this solution, but it was late at night and i'd forgotten to take the letter off. Now, my bios does not detect WBM, nor does it detect my internal storage. C: has been replaced by a repair USB I made to access WinRE, and the only other storage devices that show up is an external SSD I use for games and a DVD burner. Reinstalling windows doesn't work either, as it only detects the ExSSD, and not the internal. BIOS recognizes it, though, so i'm not sure why it wont detect the partitions. Is there a way for me to remove the drive letter from the partition, or even a way to get my system to recognize it? This is what DiskPart gives me;
- Subscribe to RSS feed
Report abuse
Reported content has been submitted
Replies (1)
- Microsoft Agent |
Welcome to Microsoft Community.
In your description, you tried to boot Windows using a Linux distribution, and in the process, you encountered a problem with your USB not working properly. Then you formatted your USB, then after rebooting the device, you chose to give Windows boot manager priority, but it still failed, after that you tried to repair the BCD, and then during the process of assigning a drive letter, you forgot what letter you assigned. And at the moment, you can't reinstall Windows because you can only detect the ExSSD,but not the internal storage device.
I'm sorry to say that since booting Windows in Linux is a rather specialized behavior , even though you have since formatted the USB and set Windows boot priority at the same time, the reason for the problem you're experiencing is most likely related to your earlier attempt to install a dual system . And your actions of repairing the BCD and setting the disk drive letter could also prove that you are a professional user , regarding this part of the problem, which is beyond the scope of our community's support . At the same time with my knowledge level, I can't provide you more professional and accurate help. But don't worry, I will guide you to the right place.
Since your question is very specialized, it would be more appropriate for you to post your question on Microsoft Learn , where many of the more specialized questions are posted. Here, there will be a more specialized team and support staff who will provide you with more professional and targeted help .
I hope the above can help you, if you have any other questions please continue to contact me, thank you for your support and understanding.
Best regards,
Zev - MSFT | Microsoft Community Support Specialist
Was this reply helpful? Yes No
Sorry this didn't help.
Great! Thanks for your feedback.
How satisfied are you with this reply?
Thanks for your feedback, it helps us improve the site.
Thanks for your feedback.
Question Info
- Recovery and backup
- Norsk Bokmål
- Ελληνικά
- Русский
- עברית
- العربية
- ไทย
- 한국어
- 中文(简体)
- 中文(繁體)
- 日本語
Change the size of text in Windows
Here's how to change the size of text, images, and apps in Windows.
To change your display in Windows, select Start > Settings > Accessibility > Text size . To make only the text on your screen larger, adjust the slider next to Text size . To make everything larger, including images and apps, select Display , and then choose an option from the drop-down menu next to Scale .

To zoom in or zoom out on parts of your screen in Windows, use Magnifier. To turn on Magnifier, press the Windows logo key + Plus (+) . Zoom in by continuing to press the Windows logo key + Plus (+) . Zoom out by pressing the Windows logo key + Minus (-) . To turn off Magnifier, press the Windows logo key + Esc .
To change your display in Windows, select Start > Settings > Ease of Access > Display . To make only the text on your screen larger, adjust the slider under Make text bigger . To make everything larger, including images and apps, choose an option from the drop-down menu under Make everything bigger .

Need more help?
Want more options.
Explore subscription benefits, browse training courses, learn how to secure your device, and more.

Microsoft 365 subscription benefits

Microsoft 365 training

Microsoft security

Accessibility center
Communities help you ask and answer questions, give feedback, and hear from experts with rich knowledge.

Ask the Microsoft Community

Microsoft Tech Community

Windows Insiders
Microsoft 365 Insiders
Was this information helpful?
Thank you for your feedback.
IMAGES
VIDEO
COMMENTS
Changing a drive letter is pretty simple. Click the Start button, type "Disk Management" in the search bar, and then hit Enter. The program name displayed in the search will not be Disk Management. It will be "Create and format hard disk partitions." You could also hit Windows+X or right-click the Start button, and then click "Disk Management."
The following steps show how to change the drive letter. Open Disk Management with administrator permissions. In Disk Management, select and hold (or right-click) the volume on which you want to change or add a drive letter and select Change Drive Letter and Paths. Tip. If you don't see the Change Drive Letter and Paths option or it's grayed ...
Open Settings on Windows 10. Click on System. Click on Storage. Under the "More storage settings" section, click the Manage Disks and Volumes option. Manage Disks and Volumes. Select the drive with the partition you want to change the letter. Quick note: You may need to click the arrow button in the top right corner of the drive to see all ...
1 Open an elevated PowerShell. 2 Type Get-Partition into the elevated PowerShell, and press Enter. (see screenshot below) 3 Make note of the drive letter (ex: "G") of the drive you want to change. 4 Type the command below into the elevated PowerShell, and press Enter.
Right-click on the Start button. Click Disk Management to open the Disk Management console. Right-click the volume that has the drive letter you want to change. Click Change Drive Letter And Paths ...
Right-click the drive you want to assign a permanent letter to and then choose Change Drive Letter and Paths from the menu. 4. A dialog box will open up, and here you need to click the Change ...
Search for Create and format hard disk partitions and click the top result to open the Disk Management experience. Right-click the drive and select the Change Drive Letter and Paths option. Click ...
Press " Win + R " to open Run. Type " diskmgmt.msc " and click " Ok .". Find the drive you want to modify. Right-click on the drive. Choose the " Change drive letter and paths " option. Click the " Change " button. Select the " Assign the following drive letter " radio option. Choose a drive letter from the dropdown.
Right-click and choose Change Drive Letter and Paths > Change. Select the drive letter you want to assign from Assign the following drive letter. Then select OK and choose Yes. The letters assigned to your hard drives, optical drives, and USB drives in Windows are not fixed. Use the Disk Management tool in Windows to change drive letters.
To assign or change the drive letter for a disk or partition, simply right-click on it and choose Change Drive Letter and Paths. A window will pop up with the current drive letter, if there is one, and a couple of options. Here you want to click on Change. Next, you will choose the new drive letter from the dropdown list.
Type in diskmgmt.msc and hit Enter to pull up Disk Management. From the Disk Management console window, right-click on the volume that has the drive letter you want to change. To ensure it is the correct drive, tap and hold down the left-click button over the drive and then choose Explore. You can also right-click the drive and choose Explore ...
Press Win + I to open the Settings app, then select the "System" tab. Scroll down and click on "Storage.". Scroll down on the right side and click on "Advanced storage settings.". Under Advanced storage settings, click on "Disks & Volumes.". Select the drive whose letter you want to change, then click on the "Properties ...
Changing Drive Letters in Windows 10. Click on the Windows icon on the left corner of the Taskbar and then select 'Disk Management' from the menu. You will now see the list of all the drives on your system. Right-click on the drive name you want to change and select 'Change Drive Letter and Paths..'. Click on 'Change' on the next ...
Press "Ctrl+ X", and click "Disk Management". Open the Windows 10 Change Drive Letter interface. Right-click the drive that you want to change or free the letter from and click "Change ...
In the Disks & volumes section, scroll down and click the drive you want to change. Next, click the Properties button. Under the Volume Data section, click the Change drive letter button. When the ...
Step 1. Install and run the partition manager. In the home interface, right-click the partition whose drive letter needs to be changed and go to Advanced > Change Drive Letter. Step 2. In the pop-up window, choose a new drive letter for your USB drive and click OK. Step 3.
Right-click Windows 10 Start menu and select Disk Management. Then, right-click the partition you want to change drive letter for and select Change Drive Letter and Paths…. On the Change Drive Letter and Paths pop-up, click Change. Then, on the Change Drive Letter or Path pop-up, click the Assign the following drive letter drop-down and ...
Right-click on the drive you want to change a letter for and choose Change Drive Letter and Paths from the menu. Click Change. Windows will now ask you to assign a new name for your drive. You can ...
Let's review them. To change the drive letter in Windows 10, do the following. Press the Win + X keys together. In the menu, select Disk Management. In Disk Management, right-click on the partition whose drive letter you would like to change. Select Change Drive Letter and Paths in the context menu.
1.Press Windows Key + R then type diskmgmt.msc and hit Enter to open Disk Management. 2.Now right-click on the drive for which you want to change the drive letter for and then select " Change Drive letters and Paths " from the context menu. 3.On the next screen, select the currently assigned drive letter then click on the " Change " button.
In this video I am going to show How to assign permanent letters to drives on Windows 10 . I will also show Change or Modify the Drive Letter and Paths in W...
With that said, the settings method is extremely simple. Here are the necessary steps: Press Win + I and select System > Storage > Advanced storage settings > Disks & volumes. Select the drive whose letter you'd like to change and click on Properties. Click on Change drive letter, select an available drive letter, and press OK.
A. Changing a drive letter in Windows 10 is relatively easy, as follows. Right - click the Windows 10 Menu button and select Disk Management to display a list of all available hard drives. Right - click the specific hard drive letter you want to change, and select Change Drive Letter and Paths. Click the Add button, select a new drive letter ...
How to change the disk number of the boot drive from disk1 to disk0: Back up data of the current boot drive. Reformat the current boot drive to a Windows format - NTFS, FAT, or exFAT. Reinstall Windows OS to the drive you want to use as a boot drive. Go to BIOS and set up the new boot drive as the first drive to boot.
Changed drive letter on EFI partition, and now it's gone. So, yesterday I decided to try and Dual-Boot windows with a Linux Distro. I couldn't get the installer USB to work because I was using the installer version instead of a Live version. I formatted the USB in Windows to try and install the new distribution, and restarted my device for some ...
Here's how to change the size of text, images, and apps in Windows. To change your display in Windows, select Start > Settings > Accessibility > Text size.To make only the text on your screen larger, adjust the slider next to Text size.To make everything larger, including images and apps, select Display , and then choose an option from the drop-down menu next to Scale.