How To Set Up Ethernet On Ps5

- How-To Guides
- Tech Setup & Troubleshooting


Introduction
In today’s digital age, a strong and reliable internet connection has become a necessity for gaming enthusiasts. While many gamers opt for a wireless internet connection, there are several advantages to setting up an Ethernet connection for your PlayStation 5 (PS5) console.
An Ethernet connection provides a more stable and faster connection compared to Wi-Fi, reducing any latency or lag during gameplay. This can significantly enhance your online gaming experience, allowing you to play games seamlessly without any interruptions.
In this guide, we will walk you through the process of setting up an Ethernet connection on your PS5 console. Whether you’re a seasoned gamer or a beginner, don’t worry, as the steps are straightforward and easy to follow.
We will start by explaining how to physically connect the Ethernet cable to your PS5 console. Next, we will delve into configuring the network settings to ensure a successful connection. Finally, we will address some common troubleshooting tips to help you overcome any Ethernet connection issues you might encounter.
By the end of this guide, you will be well-equipped to enjoy a stable and lightning-fast internet connection for your gaming adventures on the PS5.
Connecting the Ethernet Cable
Before getting started, make sure you have an Ethernet cable and a free Ethernet port on your modem or router. Follow these steps to connect the Ethernet cable to your PS5:
- Locate the Ethernet port on the back of your PS5 console. It is labeled with an Ethernet icon.
- Take one end of the Ethernet cable and insert it into the Ethernet port on your PS5 console. Make sure it is securely and fully inserted.
- Next, take the other end of the Ethernet cable and connect it to an available Ethernet port on your modem or router. Again, ensure a secure connection.
- Once both ends of the Ethernet cable are securely connected, power on your modem or router if it is not already powered on.
- Now, turn on your PS5 console and wait for it to boot up.
The Ethernet cable is now successfully connected to your PS5 console. The next step is to configure the network settings to establish a connection.
It’s important to note that the PS5 also supports a feature called “Wired LAN connection” which allows you to connect your console directly to your modem or router using the Ethernet cable. This feature can be enabled if you prefer a direct connection without going through a router.
Now that the physical connection is complete, let’s move on to the network configuration process on your PS5 console.
Configuring Network Settings on the PS5
Once the Ethernet cable is connected to your PS5 console, you need to configure the network settings to establish a successful connection. Follow the steps below:
- On your PS5 console, go to the main menu and select the “Settings” option.
- In the settings menu, scroll down and select “Network” to access the network settings.
- Under the Network settings, select “Settings” again to proceed to the network setup.
- Choose “Set Up Internet Connection” and select “Use a LAN Cable” as your preferred connection method.
- The PS5 will now automatically detect the Ethernet connection. If the connection is successful, you can proceed to the next step. If not, make sure the Ethernet cable is securely connected at both ends.
- On the next screen, you will be prompted to choose the IP address settings. It is recommended to select “Automatic” to let the PS5 obtain the IP address automatically from your router or modem. However, if you prefer to set a manual IP address, you can choose the “Manual” option and enter the details provided by your internet service provider.
- After selecting the IP address settings, the PS5 will perform a network connection test to verify the setup. If the test is successful, you will see a confirmation message indicating that the connection is complete.
At this point, the network settings on your PS5 console are configured for the Ethernet connection. You can now enjoy a stable and fast internet connection for your gaming sessions.
If you encounter any issues during the network setup process, refer to the troubleshooting section of this guide for possible solutions.
Now that your Ethernet connection is established and the network settings are configured, it’s time to check the connection and ensure everything is working correctly.
Checking the Ethernet Connection
After setting up the Ethernet connection and configuring the network settings on your PS5 console, it’s essential to check if the connection is working properly. Follow these steps to verify the Ethernet connection:
- On your PS5 console, navigate to the main menu and select the “Settings” option.
- Under the Network settings, choose “Connection Status” to view the status of your network connection.
- Under the “Connection Status” section, you will see information about your Ethernet connection, including the IP address, internet status, and network speed. Ensure that the connection status displays as “Connected” and the network speed is satisfactory.
If the connection status shows as “Connected,” congratulations! Your Ethernet connection is successfully established. You can now enjoy a stable and fast internet connection for your gaming experience on the PS5.
If the connection status does not indicate “Connected” or you are experiencing slow network speeds, there might be some troubleshooting steps you can follow to improve the connection. Check the next section for troubleshooting tips to address potential Ethernet connection issues.
Remember, a reliable Ethernet connection not only enhances your gaming experience but also allows for smoother and faster downloads, updates, and online interactions. If you encounter any persistent issues, it may be worth reaching out to your internet service provider for further assistance.
Now that you’ve checked the connection, let’s explore some troubleshooting tips for Ethernet connection issues.
Troubleshooting Ethernet Issues
While setting up an Ethernet connection on your PS5 console is generally a straightforward process, you might encounter some issues along the way. Here are some troubleshooting tips to help you resolve common Ethernet connection issues:
- Check the physical connections: Ensure that the Ethernet cable is securely connected to both your PS5 console and the modem or router. Sometimes, a loose connection can result in an unstable or nonexistent connection.
- Try a different Ethernet cable: If you are experiencing connection issues, it’s worth trying a different Ethernet cable to rule out any potential cable defects.
- Restart the modem and router : Power cycling your modem and router can help resolve temporary network issues. Try turning off the devices, waiting for a few seconds, and then turning them back on.
- Update firmware: Check if there are any firmware updates available for your modem or router. Keeping the firmware up to date can address compatibility issues and improve overall network performance.
- Disable any VPN or proxy settings: Virtual Private Networks (VPNs) and proxy servers can sometimes interfere with the Ethernet connection. Try disabling these settings temporarily to see if it resolves the issue.
- Adjust the MTU settings: In some cases, adjusting the Maximum Transmission Unit (MTU) settings on your PS5 console can improve network stability. Try lowering the MTU value to see if it resolves the connection problem.
- Check for IP conflicts: Ensure that there are no IP address conflicts within your network. If multiple devices have the same IP address, it can cause connectivity issues. Assigning a static IP address to your PS5 console can help avoid conflicts.
- Contact your internet service provider: If you have tried all the troubleshooting steps and are still experiencing Ethernet connection issues, it may be necessary to reach out to your internet service provider for further assistance. They can help diagnose any larger network problems that may be affecting your connection.
By following these troubleshooting tips, you should be able to resolve most Ethernet connection issues on your PS5 console. However, if the problem persists, it’s advisable to consult professional technical support for further guidance.
Now that you have an understanding of troubleshooting Ethernet connection issues, let’s wrap up this guide.
Setting up an Ethernet connection on your PS5 console can greatly enhance your gaming experience by providing a stable and fast internet connection. In this guide, we walked you through the process of connecting the Ethernet cable, configuring network settings, checking the connection, and troubleshooting common Ethernet issues.
By physically connecting the Ethernet cable to your PS5 console and ensuring a secure connection to your modem or router, you have taken the first step towards a reliable network connection. Configuring the network settings on your PS5, such as choosing the IP address settings, further ensures a seamless connection.
Remember to regularly check the network status to confirm that the Ethernet connection is working correctly. If you encounter any issues, utilize the troubleshooting tips provided to address common Ethernet connection problems. Restarting the modem and router, checking physical connections, and updating firmware are just a few of the steps you can take to resolve these issues.
By following these steps and troubleshooting tips, you can enjoy uninterrupted online gaming sessions, faster downloads and updates, and a smoother overall gaming experience on your PS5 console.
If you encounter persistent issues despite troubleshooting, don’t hesitate to reach out to your internet service provider or seek professional technical support for further assistance. They will be able to provide more specialized guidance to resolve any network-related problems.
We hope this guide has been helpful in setting up and troubleshooting your Ethernet connection on your PS5. Now, go ahead and immerse yourself in the world of online gaming with a fast and reliable internet connection!
Leave a Reply Cancel reply
Your email address will not be published. Required fields are marked *
Save my name, email, and website in this browser for the next time I comment.
- Crowdfunding
- Cryptocurrency
- Digital Banking
- Digital Payments
- Investments
- Console Gaming
- Mobile Gaming
- VR/AR Gaming
- Gadget Usage
- Gaming Tips
- Online Safety
- Software Tutorials
- Tech Setup & Troubleshooting
- Buyer’s Guides
- Comparative Analysis
- Gadget Reviews
- Service Reviews
- Software Reviews
- Mobile Devices
- PCs & Laptops
- Smart Home Gadgets
- Content Creation Tools
- Digital Photography
- Video & Music Streaming
- Online Security
- Online Services
- Web Hosting
- WiFi & Ethernet
- Browsers & Extensions
- Communication Platforms
- Operating Systems
- Productivity Tools
- AI & Machine Learning
- Cybersecurity
- Emerging Tech
- IoT & Smart Devices
- Virtual & Augmented Reality
- Latest News
- AI Developments
- Fintech Updates
- Gaming News
- New Product Launches
How to Use Email Blasts Marketing To Take Control of Your Market
Learn to convert scanned documents into editable text with ocr, related post, how to make stairs planet coaster, how to rotate camera in planet coaster, how to make a good roller coaster in planet coaster, where is the minecraft folder, how to update minecraft windows, how to update minecraft education edition, related posts.

How To Make Your PS5 Download Faster

How To Download Saved Data From PS4 To PS5

How To Get PS5 To Download Faster

How To Use Remote Play PS5

Why Wont My Ps5 Connect To Playstation Network

How To Make Your PS5 Games Download Faster

How Many HDMI Ports Does PS5 Have

How To Deactivate Primary PS5
Recent stories.

Top Mini Split Air Conditioner For Summer

Comfortable and Luxurious Family Life | Zero Gravity Massage Chair

Fintechs and Traditional Banks: Navigating the Future of Financial Services

AI Writing: How It’s Changing the Way We Create Content

How to Find the Best Midjourney Alternative in 2024: A Guide to AI Anime Generators

How to Know When it’s the Right Time to Buy Bitcoin
- Privacy Overview
- Strictly Necessary Cookies
This website uses cookies so that we can provide you with the best user experience possible. Cookie information is stored in your browser and performs functions such as recognising you when you return to our website and helping our team to understand which sections of the website you find most interesting and useful.
Strictly Necessary Cookie should be enabled at all times so that we can save your preferences for cookie settings.
If you disable this cookie, we will not be able to save your preferences. This means that every time you visit this website you will need to enable or disable cookies again.
Port Forwarding for PS5 Made Easy: A Step-by-Step Guide

Bisma Farrukh

If you have finally scored a PS5 and you’re ready to start gaming online with your friends, the only problem is you’re stuck with a strict NAT type and laggy multiplayer. Port forwarding your PS5 is actually pretty straightforward and will open up your connection in no time.
In just a few steps, you’ll be dominating the leaderboards with lightning fast speeds and know how to port forward PS5. Grab your PS5 controller and router info, then follow along as we walk you through how to get the best online experience possible. By the end of this guide, you’ll be port forwarding with the best of them.
Table of Contents
What Is Port Forwarding and Why Does the PS5 Need It?
Port forwarding is a way to open up ports on your router so your PS5 can communicate properly with servers to play online. Without it, you’ll run into issues like lag, disconnects, and unable to join multiplayer games.
To enable port forwarding on your router, you’ll need to log into your router’s admin page, usually by entering its IP address into your web browser. The default is often 192.168.1.1 or 192.168.0.1.
- Find the port forwarding section, which may be under “Applications and Gaming,” “Port forwarding/triggering,” or a similar name.
- Enter the port numbers for the PS5: TCP 80, 443, 3478, 3479, 3480. UDP 3478, 3479.
- Choose your PS5’s IP address from the list of connected devices. If it’s not there, you may need to assign your PS5 a static (unchanging) IP address first before enabling port forwarding.
- Save your settings.
With port forwarding set up properly, you’ll be racking up wins, collecting loot, and chatting with teammates in no time. No more worrying about connection issues – just focusing on the fun stuff!
How to Find Your PS5’s IP Address?
To set up port forwarding for PS5, you’ll first need to find its IP address. Here’s how:
- On your PS5’s home screen, select Settings -> Network.
- Select View Connection Status. This will show you details about your current network connection.
- Look for the IP Address listing. It will likely start with 192.168.1. or 10.0.0. and end in a number between 2 and 254. Write this number down.
- If your router has a web interface, enter your router’s IP address into the address bar of your web browser. If not, check your router manual for the default IP address, username and password.
- Once logged in, look for Port Forwarding, Port Mapping, or Virtual Servers. The naming may differ slightly depending on your router brand.
- Select Add Custom Service or Add Port Forwarding Rule and input the following:
Service Name: Enter a name like “PlayStation 5”
Protocol: Select Both or TCP/UDP
External/Internal Port Range: Enter the ports required for PlayStation Network (you may need to enable some additional ports beyond the default for certain games).
Internal IP Address: Enter the IP address you wrote down for your PS5.
7. Save your new port forwarding rule. Your PS5 should now have open NAT and better connectivity.
With a few simple steps, you’ve opened up your PS5 to the outside world and ensured seamless online play.
Configuring Port Forwarding for Playstation5
To play online with your PS5, you’ll need to configure port forwarding on your router. This allows your PS5 to connect to the PlayStation Network through your router’s firewall.
- Log in to your router’s admin page. This is usually accessed by entering your router’s IP address into a web browser. The default IP for most routers is 192.168.1.1 or 192.168.0.1.
- Locate the port forwarding section. This may be under “Applications & Gaming,” “Port Range Forwarding” or a similar name. The options may vary between router brands and models.
- Enter the port numbers for PS5: TCP 80, 443, 1935, 3478-3480. UDP 3478, 3479, 3658. These allow functions like matchmaking, friends lists, and chat.
- Assign these ports to the static IP you set up for your PS5. This links the ports to your PS5 so data is forwarded properly.
- Save the port forwarding configuration.
- Restart your PS5 to pull the new IP and port information.
- Check your PS5’s NAT type under Network Settings. It should now display as “Type 2” or “Moderate” NAT which means port forwarding is working!
With port forwarding set up, your PS5 will have an open pathway to connect to PSN and play online.
Testing Your PS5 Port Forwarding Setup
Now that you’ve port forward for PS5 on your router, it’s time to test it out. This ensures the ports are properly opened, and your PS5 has the access it needs.
To verify your port forwarding is working, you’ll need to check two things:
- Sign in to your PS5 and go to Settings > Network > View Connection Status.
- Check that your PS5’s IP address matches the one you entered when setting up port forwarding. If it’s different, you’ll need to update the forwarding rule with the current IP address .
- Run a port check tool to scan for open ports on your network.
- Enter the port number you opened, like 80, 443 or 1935.
- If the tool shows the port as open, your forwarding was successful. If not, double check that you entered the correct port number and PS5 IP address in your router.
- You may need to disable and re-enable port forwarding to refresh the settings.
- Once port forwarding is working properly, your PS5 will have an open pathway for gaming , streaming and more.
- You’ll experience faster connection speeds , less lag and fewer issues when playing with friends or streaming gameplay. Be sure to repeat this test if you change your PS5’s IP address or the opened port numbers to keep everything running smoothly.
How Port Forwarding Improves PS5 Gaming Performance?

Port forwarding is a handy way to optimize your PS5’s network performance, especially for online gaming. It helps get rid of latency and lag , providing a smooth multiplayer experience.
How Does It Work?
Port forwarding opens up ports on your router so data can get to your PS5. Normally, your router blocks incoming connections for security. When you port forward, you’re telling your router to direct specific types of traffic to your console.
For PS5, you’ll want to forward ports 80, 443, 3478-3480, and any additional ports for the games you play. Doing so will open up a direct channel of communication between your router and PS5, improving download speeds, reducing lag, and stabilizing your ping.
Log into your router and find the port forwarding or virtual server section. Add custom service ports for your PS5’s IP address. The IP should be static or reserved so it doesn’t change. Enable UPnP on your router and PS5 as an extra measure.
With port forwarding set up properly, you’ll notice gameplay is more responsive in online matches, patches and DLC download faster, and streaming apps have less buffering. While it can seem complicated, port forwarding your PS5 is worth it for the performance gains. The steps are easy to follow for tech novices and pros alike.
Troubleshooting Common PS5 Port Forwarding Issues

Troubleshooting any technical issue with your PS5 can be frustrating, but port forwarding problems are often easy to resolve. Here are some common solutions to try:
Double check your router settings
Go back through the port forwarding setup process and confirm all the details are correct – the right ports are open, your PS5’s IP address is accurate, etc. Even a small typo can cause problems.
Reset your router
Resetting your router can refresh its memory and fix any software issues. Unplug the power cable for a few minutes, then plug it back in. Once the router is back online, set up port forwarding for your PS5 again.
Ensure your PS5 has a static IP address
If your PS5’s IP address changes, the port forwarding rules won’t work. Assign your PS5 a static or fixed IP address in your router’s settings. Then update the port forwarding to use that static IP.
Check for firmware updates
Outdated router firmware can sometimes cause connectivity problems. Visit your router manufacturer’s website to download and install the latest update. After updating, reconfigure port forwarding for your PS5.
Disable your firewall (temporarily)
Your router’s built-in firewall or a third-party firewall on your PS5 may be blocking the ports. Temporarily disable any firewalls, test if your PS5 connectivity improves, then re-enable them. You may need to create firewall rules to allow the ports.
Benefits of using AstrillVPN for port forwarding
Using a VPN service like AstrillVPN for port forwarding your PS5 has some key benefits:
A VPN helps mask your IP address and encrypts all data going between your PS5 and the internet. This hides your online activities and protects you from snoopers. For gaming, it prevents DDoS attacks that could disrupt your connectivity.
Access Restricted Content
Some games have region-locked servers and content that is only available in certain countries. A VPN lets you spoof your location to access this restricted content. You can play games earlier and get DLC not yet released in your region.
Reduced Lag
With a VPN, your gaming data is sent through an encrypted tunnel to a VPN server, then out to the internet. This can sometimes provide a faster, more stable connection resulting in less lag and a better online gaming experience. The VPN may route your traffic in a more optimal way.
Appear Closer to Game Servers
By connecting to a VPN server closer to the physical location of game servers, you can lower your ping and latency for faster performance. If game servers are located across the country or world, using a nearby VPN server puts you virtually closer to the action.
Using a reputable VPN service provides benefits for security, access, performance, and an enhanced online experience. For PS5 gaming, a VPN like AstrillVPN checks all the boxes and helps you get the most out of your console. By properly setting up port forwarding, you can keep your connection speed fast while gaining all the advantages of a VPN.
Port forwarding vs. a VPN: which should you prioritize?

When it comes to securing your PS5 for online play, you’ll need to decide between port forwarding and using a VPN. Both have their pros and cons, so which should you focus on first?
Port forwarding
Port forwarding opens specific ports on your router so your PS5 can communicate with other devices. It’s a good first step for improving connectivity and reducing lag. However, port forwarding alone won’t hide your IP address or encrypt your network traffic.
A VPN, or virtual private network , encrypts all the data sent between your PS5 and the internet. It also masks your real IP address, hiding your location and activity from prying eyes. The downside is that a VPN may slightly increase latency which can impact gaming performance. For the best security and connectivity, you’ll want to enable both port forwarding and a VPN.
In summary, enabling port forwarding should be your top priority to optimize your PS5’s network connection. A VPN provides essential security and privacy for online gaming. For peak performance and protection, utilize them together. With some router configuration, you’ll be dominating the leaderboards in no time!
Port forwarding itself is not inherently unsafe, but it can introduce vulnerabilities if not configured correctly. As long as you only open ports for devices you trust and use strong passwords, the risks are minimal for most home networks. However, you should never open ports without understanding why they need to be open and how to properly secure them.
UPnP stands for Universal Plug and Play. It’s a network protocol that automatically opens ports in your router’s firewall for certain applications. The PS5 uses UPnP to open ports it needs to connect online. While convenient, UPnP also introduces risks since it opens ports without your direct control or permission. It’s best to disable UPnP on your router and manually forward only the ports the PS5 requires.
Some tips to keep your network secure when port forwarding: ● Only open ports for trusted devices like your PS5 ● Use a strong, unique password for your router ● Change your router’s default SSID and password ● Disable remote management on your router ● Enable firewall protection on your router ● Frequently check for router firmware updates
These were the straightforward set of instructions for port forwarding your PS5. Now you can open up your network and connect with friends to game online together. No longer will NAT Type 2 or 3 errors get in your way and prevent you from joining multiplayer matches. With some simple router tweaks, you’ve unlocked a whole new world of connectivity and taken your PS5 experience to the next level. What are you waiting for? Grab your DualSense controller, pick a game, and start playing with friends near and far. Port forwarding might sound complicated but as you’ve seen, it’s easier than you think.
About The Author
No comments were posted yet, leave a reply cancel reply.
Save my name, email, and website in this browser for the next time I comment.
How to Get a Static IP Address on the PS5
- February 29, 2024
If you want a constant IP address on your PlayStation 5 that doesn’t change, then you have come to the right place. This guide will show you how to get a static IP address on your PlayStation 5. You need to configure your internet settings to do so.
Copy addresses
In this section, we will take you through the steps to copy network addresses on a device. The steps include accessing the device’s Settings menu, and navigating “View Connection Status” to copy the address.
- The first thing you will need to do is access the Settings on your device. Once in the Settings menu, navigate to the Network section.
- Within the Network settings, search for an option called “ Connection Stats ” and click on it. After that, tap on “ View Connection Status “.
This will open a screen displaying detailed network information and statistics.

- Scroll down until you find the information related to the IPv4 address , subnet mask , and default gateway .
- Copy the IPv4 address , subnet mask , and default gateway by selecting the respective values and choosing the copy option.
Configure internet settings
This section describes how to configure internet settings on a device. By following the steps below, you will be able to configure your internet settings to get a constant IP address on your PlayStation 5.
- Once you have copied the necessary network information, go back to the main menu and access the Network settings .
- After that, tap on tap on Set Up Internet Connection .
This option allows you to configure your internet connection settings.

- Identify and select the internet connection that you are currently connected to.
This could be your home Wi-Fi network or a wired Ethernet connection .
- Once you have selected your currently connected internet, press the “Options” button on it and select Advanced settings .

- Click on IP address settings and change it to Manual .
- Paste the addresses you copied earlier in the Subnet Mask and Default Gateway . After that, input 192.168.1.2 in IPv4 address .
- You need to change the Primary DNS to 8.8.8.8 , the Secondary DNS to 8.8.4.4 and MTU changes to 1472 .

Now you will have a static IP address on your PlayStation.

The Best Router Settings for PlayStation Gaming [PS4/PS5]
Earlier to writing this I wrote an article where I published a list of recommended routers for gaming on PS4/PS5 and a lot of my readers requested me to post some router settings that can improve/boost their Playstation gaming experience on their existing router.
While you always can upgrade to one of the high-end gaming routers for a seamless or lag-free gaming experience, but it’s quite expensive. Besides, if you’ve decided not to upgrade, then you can surely follow the settings listed below to improve your Playstation gaming.
Table of Contents
1. QoS Prioritization
2. enable gaming features.
- Steps to Enable UPnP:
How to Get your PlayStation’s MAC Address from Router?
How to setup a static ip for your playstation, 5. port forwarding, 6. connecting on the 5ghz band for ps4 slim/pro or ps5, best router settings for playstation gaming [ps4/ps5].
The section covers a bunch of router settings that will improve your Playstation gaming performance in multiple ways. Ranging from gaming dedicated routers to generic wireless routers, the list includes instructions for QoS Prioritization, using gaming VPNs, enabling plug and play, using static IP, and port forwarding to your advantage.
Most routers, including entry-level sub $100 routers , feature the ability to prioritize the internet for a particular type of content or a specific device. A few gaming routers have a dedicated gaming port to plug in your gaming console. The data communication via the gaming port gets the top priority.
Step 1 : Enter your router login, go to the advanced tab, click on setup.

Step 2 : Move to the QoS setup tab.

Step 3 : Click on the enable Upstream QoS to prioritize your gaming traffic.

Few routers come with a dedicated gaming port, where the router automatically prioritizes the traffic from the ethernet port. If your router has one such port, connect your Playstation via Ethernet cable to the gaming port for an improved gaming experience.
Step 4 : Connect your Playstation via Ethernet cable to your router.
Routers with dedicated features can make a difference to your gaming experience. The features including access to Gamers private network, Geo-fencing to improve the ping rates, mobile gaming modes.
Note: If you have one of the Netgear routers, then it comes with a dedicated Duma OS dashboard for an enhanced gaming experience. Some ASUS routers, also come with a dedicated gaming mode which can be activated when you play games.
3. Enabling UPnP
Universal Plug and Play is a protocol that allows the devices (compatible with UPnP) connected to a network to recognize and communicate with each other with ease. Enabling UPnP establishes direct channels for communication via the internet. You can enable universal plug and play in logging into your router admin page.
Steps to Enable UPnP :
Step 1: Enter your router login and choose the advanced tab.
Step 2 : In the advanced tab, select the advanced setup menu.

Step 3 : Under the Advanced Setup, choose the UPnP menu. Click the turn UPnP on the checkbox and enter the default values 30 and 4 in the circled boxes.

4. Setting Static IP
A static IP address is a fixed address. Assigning a fixed address to your gaming device makes it easier to find your device on the network.
Configure your PS4 or PS5 using the manual mode to enable using Static IP. Once you have connected your Playstation to the internet, obtain the IP and MAC address and store it for later use.
Step 1) Go to settings in PS4/PS5 and Select Network.

Step 2) Click on View Connection Status.

Step 3) Collect your IP and MAC Address from the Connection status page. Ensure the NAT Type is set in Type 2.

Step 1 : Enter your router login.
Step 2 : Click on the advanced tab and Setup Menu.
Step 3 : Click on LAN Setup, and under Address reservation, click Add.
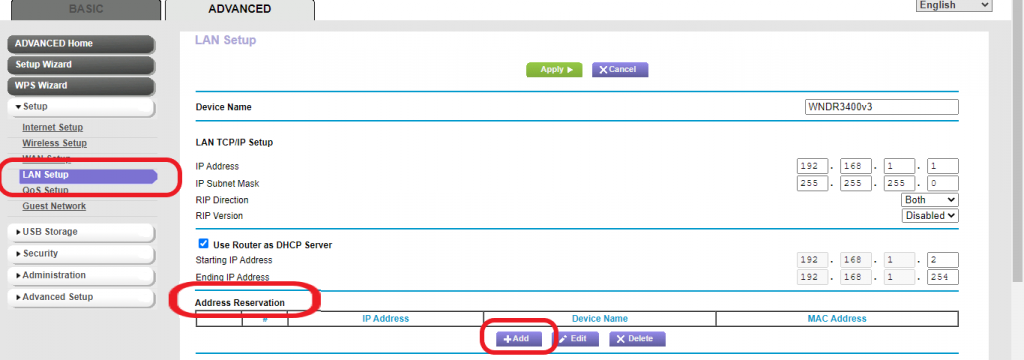
Once you click add, you can input the IP address, MAC address, save the details and restart the router.
Once you create a static IP for your gaming console, you can enable port forwarding in your router admin page. Open up a few ports 80, 443, 3478, 3479, 3480 with TCP/UDP protocols such that your console can establish better communication channels.
Step 1 : Go to the Router admin page and click the advantage tab.
Step 2 : Click the Advanced tab and click on the Port Forwarding menu.

Step 3 : Enable port forwarding by clicking on the Port forwarding check box and click on add custom services.

Step 4 : Enter all the TCP/UDP port details one by one and click apply.

You can configure your gaming console to connect to the 5GHz band signal in your router if you are using a PS4 Slim, PS4 Pro or the PS5. Unfortunately, PS4 lacks the feature.
Connecting your gaming console to the 5GHz band and placing it within the vicinity of the router enables faster internet speeds and higher bandwidth to your gaming console, resulting in seamless, uninterrupted gaming.
Step 1 : Go to your Settings and Choose Network.

Step 2 : Click Setup up internet connection.

Step 3: Choose Use Wi-Fi.

Step 4 : Choose Easy mode.

Step 5: Your Playstation will scan for internet connections. Choose the one with 5GHz and Click Okay.

Step 6 : Playstation notifies of a successful internet connection.

Irrespective of all the PS4/PS5 router settings/tweaks mentioned in the last section, you can always improve the internet performance with a couple more simple tricks.
- Router Placement: Placing the router a few feet above the ground and in the vicinity of your Playstation will ensure the gaming console gets a high-quality signal and avoid any major congestion or interference. Additionally, you can read my article on best location for routers , that explains how to get strong signals throughout your house.
- Wired connections : Connecting your gaming devices to the router via Ethernet Port enables stable high-speed connectivity for priority devices and your Playstation. Wired connections circumvent most of signal related stability, interference, and latency issues
The gaming router enhances your gaming by giving you additional control in establishing secure channels, choosing gaming servers, and resource allocation. It gives you an edge in competitive gaming.
The optimization in the settings is not only limited to gaming routers. Even without a dedicated gaming router, one can easily optimize your internet to improve your gaming experience through the steps mentioned above.

Chris loves technology, specifically smart home technology! With both hands-on and executive leadership experience in his corporate career, Chris stays abreast of emerging technology and solutions and immerses himself in BCCA when not in the office.
How To Set Static IP On PlayStation 5


There are lots of different reasons you might want to have a statis IP on your PS5. This can range from things like wanting to get an open NAT for online gaming to other port forwarding requirements. To do this, you will need to check out the guide for your router as all manufacturers have a different process behind how they allow port forwarding. This guide will show you the specific PS5 side of things to cover how to set a static IP
Other Videos By NerdBurglars Gaming Guides
Other statistics, efootball pes 2020 statistics for nerdburglars gaming guides.
NerdBurglars Gaming Guides currently has 169 views spread across 1 video for eFootball PES 2020. His channel published less than an hour of eFootball PES 2020 content, making up less than 0.03% of the total overall content on NerdBurglars Gaming Guides's YouTube channel.
- PS Store & Refunds
- Tiered Services
- Hardware & Repairs
- Online Safety
- Connectivity
How to fix NW-102417-5
The connection to the network has timed out.
An error has occurred while connecting to the PlayStation™Network.
- Check the PSN™ status page if there is any server failure or maintenance going on.
- Restart your PlayStation®5 console, and connect to the Internet using a wired connection as much as possible. And configure the network settings again.
- When using a wireless connection, review the installation location such as bringing your PS5® console closer to your router or removing anything interrupting the connection between the devices.
- Turn off your router and modem, and wait at least 5 minutes, then restart it.
- Update the firmware of your router. (For details on how to update, please contact the router vendor.)
- If possible, try opening these ports. TCP: 80, 443, 3478, 3479, 3480 and UDP: 3478, 3479, 49152~65535. For help with port opening and router settings, please contact your ISP (Internet service provider).
- In the network settings, set up a static IP address manually to improve it.
- It could be improved by changing DNS settings temporarily. Go to DNS settings in the Network Settings, and configure your network settings with the number of the public DNS that is free and open to the public by companies or organizations. If the above does not solve the problem, the line is likely to be temporarily busy. Please leave it for a while and try again later.
Was this article helpful?
What went wrong.
Your feedback will help us to keep improving.
Need help?
Contact our support specialists
NW-102417-5
Enter your date of birth.
Sorry, you are not eligible to view this content.
For an easier viewing experience, scan to visit page on mobile
How to Configure Static IP Addresses on Windows and PlayStation 5

In the modern digital landscape, configuring static IP addresses on devices like Windows computers and PlayStation 5 gaming consoles is crucial for ensuring consistent and reliable network connections. As a webmaster, blogger, or marketer, understanding the intricacies of IP address configuration can play a significant role in enhancing online experiences, from gaming to web hosting and beyond.
The Importance of Static IP Addresses
Static IP addresses are fixed addresses that are manually assigned to a device on a network. Unlike dynamic IP addresses that change periodically, static IP addresses remain constant, providing numerous benefits for network stability, port forwarding, and easier troubleshooting.
Network Stability
A static IP address minimizes the risk of IP conflicts within a network, ensuring seamless communication between various devices. This stability is crucial for online gaming, where a consistent connection is necessary for optimal performance.
Port Forwarding
A static IP address facilitates efficient port forwarding, directing external connections to the appropriate device within a network. This feature is essential for online servers and gaming consoles to ensure that they are accessible from outside the network.
Easier Troubleshooting
With a constant IP address, identifying and resolving network issues becomes more streamlined, allowing for quick and effective troubleshooting.
Configuring Static IP on Windows

Access Network and Sharing Center
Navigate to the Network and Sharing Center by opening the Control Panel and selecting Network and Internet. This center provides a comprehensive overview of network connections and settings.
Change Adapter Settings
In the Network and Sharing Center, select “Change adapter settings” to view and modify network connections. This step allows you to access the properties of the relevant network connection for IP configuration.
Modify IP Settings
Within the network connection properties, select “Internet Protocol Version 4 (TCP/IPv4)” to manually input the desired IP address, subnet mask, and default gateway. Ensuring accurate information in these fields is paramount for successful IP configuration.
DNS Configuration
Optionally, specify the preferred DNS server addresses to enhance domain name resolution, contributing to faster and more reliable internet browsing.
Configuring Static IP on PlayStation 5

Access Network Settings
Navigate to the network settings on the PlayStation 5 by selecting Settings > Network > Settings > Advanced Settings. This pathway provides access to advanced network configuration options.
Choose Manual IP Settings
Within the network settings, select IP Address Settings and opt for “Manual.” This choice allows you to manually enter IP address information for the console.
Enter IP Details
Input the desired IP address, subnet mask, and default gateway to successfully configure the static IP address on the PlayStation 5. Ensure that the information is accurate to avoid potential network issues.
Effectively configuring a static IP address on Windows systems and PlayStation 5 consoles is paramount for ensuring network stability and optimizing online experiences. The detailed steps outlined in this guide offer a systematic approach to IP address configuration, contributing to enhanced network reliability and performance for various online applications, including gaming.
The table below provides a concise overview of the steps involved in configuring a static IP address on Windows and PlayStation 5.
Can I set a static IP address on other gaming consoles apart from PlayStation 5?
Yes, you can configure a static IP address on other gaming consoles such as Xbox and Nintendo Switch. The steps for configuration might differ. For detailed instructions, refer to the console’s official support website or user manual.
What should I do if I encounter connectivity issues after setting a static IP address?
If you face connectivity issues after configuring a static IP address, ensure that the IP address, subnet mask, and default gateway are correctly entered. Avoid using an IP address that is in the range of dynamically assigned IP addresses for other devices on the network. Consulting your network administrator or referring to online forums and community discussions can also offer insights and solutions to resolve connectivity issues.
Is it necessary to configure a static IP address for online gaming?
Configuring a static IP address for online gaming is not always necessary but is generally recommended for enhancing gaming experiences. A static IP address ensures a stable connection, which is crucial for online gaming. For more information, you can refer to various online gaming forums and communities to gather insights from experienced gamers.
Author: Brandon Perry Published: 1 October 2023
- 1.1 Overview
- 1.2 Network Stability
- 1.3 Port Forwarding
- 1.4 Easier Troubleshooting
- 2.1 Access Network and Sharing Center
- 2.2 Change Adapter Settings
- 2.3 Modify IP Settings
- 2.4 DNS Configuration
- 3.1 Access Network Settings
- 3.2 Choose Manual IP Settings
- 3.3 Enter IP Details
- 4 Conclusion
- 5.1 Can I set a static IP address on other gaming consoles apart from PlayStation 5?
- 5.2 What should I do if I encounter connectivity issues after setting a static IP address?
- 5.3 Is it necessary to configure a static IP address for online gaming?

Related posts:
- How to set up a proxy server on the Android device and a separate program
- Why Use VBA for Web Scraping?
- 5 Reasons to Buy and Use Proxies from Algeria
- Looking for Bright Data? Consider FineProxy as Your Better Alternative
- Hard Data vs Soft Data: Navigating the Data Spectrum
Recent Posts
- What is a Dedicated Proxy?
- 10Proxy: How Many Do You Really Need?
- Why Am I Banned from Facebook? Understanding and Preventing Account Suspensions in 2024
- FineProxy vs 10proxy.com: Choosing the Best Proxy Service
- Proxies and Privacy: Navigating the Future of AI and IoT
Choose and Buy Proxy
Datacenter proxies, rotating proxies, udp proxies, trusted by 10000+ customers worldwide.

- Help Center

Static IP Address for PS4
You may need to assign a permanent IP address to your PlayStation 4 in order to get a NAT Type 2 connection. Assigning a permanent IP address to your PlayStation 4 ensures that your console always has the same internal IP address even after it is rebooted. Some routers allow you to manually assign an IP address, so you should check to see if that is an option in your router. If your router does not allow manual assignments, you can set up a static IP address in your PlayStation 4 console.
This guide is divided in to two parts. You should follow it from top to bottom.
How to Manually Assign a Static IP Address to Your PS4 in Your Router
In your router, look for a way to manually assign an IP address. Not all routers support this. This process will differ depending on the specific router that you have. If you find this feature in your router, simply assign a permanent IP address to your PlayStation 4 (in your router) and no changes are required in your PS4 console. Your router will take care of always assigning your PS4 the same internal IP address which will function the same as a static IP.
If you have a router that does not allow you to manually assign IP addresses, you will need to set up a static IP address within your PS4 console .
Follow these steps to assign an IP address in your router:
1. You can try to permanently assign your PS4 to the IP address that it is currently using. To find the IP address , power up your PS4 console and follow these steps:
- In the PlayStation 4 main menu select Settings

- Select Network

- Select View Connection Status .

- You should see the IP address listed.

- Write down the IP address and also the MAC address of your PS4. You should also write down your router's IP address which is listed as Default Gateway.
2. Login to your router (through your computer) and permanently assign your PlayStation 4 to the IP address you found in step 1. For help logging in to your router visit our login guides .
Here is an example of a router that allows you to manually assign IP addresses.

In this Asus router, there is a box to type the IP address into and then a drop down menu for the MAC address . Use the numbers that you wrote down in step 1 of this guide. In this example, after typing in the addresses there is an "Add" button to click.
Some routers do not allow you to assign IP addresses within the DHCP range of the router (the range of addresses that your router automatically assigns to devices on your network.) If this is the case with your router, you will need to choose an IP address to assign that is outside the DHCP range of your router. See steps 2 through 4 of the following guide ("How to set-up a static IP address in your PlayStation 4 console") for help with choosing an IP address that is outside your router's DHCP range.
3. After you have assigned your PlayStation 4 to a specific IP address, test the connection from your PS4 console to make sure it is working. To test the connection:
- In the PS4 from the main menu, select Settings
- Select Test Internet Connection . Wait while the test runs.

- When your connection is working properly you should see "Internet Connection Successful."
4. Forwarding ports, or opening ports, in your router points all traffic coming in on certain ports to a specific internal IP address. To get a connection with NAT Type 2, you will want to forward the following ports to the IP address of your PS4:
- TCP: 80, 443, 1935, 3478-3480
- UDP: 3478-3479
For help with forwarding ports you can visit these port forwarding guides .
5. After you have assigned a permanent IP address to your PS4 console and forwarded the correct ports in your router, you can test your internet connection. To test the connection from the PS4 console:
- In the PS4 main menu, select Settings
This a common networking problem that can be quite difficult to solve. Your connection should now be set at NAT Type 2. Good job making it through the guide and optimizing your network.
If you are not able to get a NAT Type 2 connection, check to see that you have entered in the correct information. Double check the data that you entered for the IP address and MAC address.
If you are still having difficulty getting a NAT Type 2 connection, check to see that your network is set up properly. You may have more than one router on your network. To determine if there is more than one router on your network you can run our free Router Detector software. It is important to only have one router on your network otherwise it is difficult to configure your network without running into problems.
How to Setup a Static IP Address in Your PS4
If you have a router that does not allow you to manually assign internal IP addresses, follow these instructions to set up a static IP address in your PlayStation 4 console:
1. Find out what IP address, subnet mask, gateway, and DNS settings your PS4 console is currently using. To find this info:
- Select View Connection Status
- Write down your IP address, subnet mask, default gateway, primary DNS and secondary DNS settings. You will need to enter these numbers into your console later.

2. Next, login to your router (through your computer).
- To access your router, type your router's IP address into your browser. You should be able to find your router's IP address in the list of settings that you wrote down for step 1 of this guide. Your router is listed as your Default Gateway.
- For help logging-in to your router visit our login guides .
- Find the DHCP range your router uses. The DHCP range is the group of numbers that your router uses to assign internal IP addresses to devices on your network.
Here is a screenshot of a Linksys router. The DHCP range is circled in red.

3. You will need to pick a number between 2 and 254 that is outside of your router's DHCP range to assign to your PS4.
In the example above, this Linksys router uses the range 100-149 to assign IP addresses to devices on the internal network. I chose to assign my PS4 to 31 . The IP address that I assigned to my PS4 is 192.168.0.31 . (Be sure to use the first three numbers that are in your router's IP address, also known as gateway.) Here are a few more examples for you:
- If your router's DHCP range is 200-254 you could choose a number between 2 and 50 to try.
- If your router uses 50-200, you could try a number between 2 and 49.
4. To find out if this number is available ping the address using the Windows Command Prompt.
To open the Command Prompt:
- Click on the Windows Start menu
- Type cmd into the dialog box (in the Windows start menu)

- Then click on cmd.exe (which should be listed over the dialog box). A black window with white text should open.

To check whether or not the IP address is available for you to assign:
- Hit the space bar
- Then type in the IP address you want to check. Hit Enter .

If you ping an address and do not receive a reply, then the IP address is available for you to assign. (See example above.) If you do receive a reply then that IP address is in use and you will have to try a different one. Below is an example showing an address that is already in use.

5. Next, go to your PS4 console to set the internal IP address to the number you have chosen.
- From the main menu, choose Settings
- select Network
- select Set Up Internet Connection

- Choose Wifi or LAN Cable depending on how your local network is set up.

- On the screen titled "How do you want to set up the Internet connection?," choose Custom

- On the IP Address Settings screen, choose Manual

- Select IP Address

- Enter the number that you have chosen for the IP address. Select Done

- Select Subnet Mask . Enter the number from the list of settings you wrote down for step 1 of this guide. Select Done
- Select Default Gateway , enter your router's IP address. Select Done
- Select Primary DNS , enter the number from the list you wrote down for step 1. Select Done
- Select Secondary DNS , enter the number step 1. Select Done
- Select Next

- On the MTU Settings screen, choose Automatic

- On the Proxy Server screen, choose Do Not Use

- Select Test Internet Connection . Wait while the connection is tested.

- Your PS4 should now have a static IP address. If you are having problems, make sure that you have entered in the correct information. To double check your numbers, from the main menu of your PS4, select Settings , Network , View Connection Status .
6. Forwarding ports, or opening ports, in your router points all traffic coming in on certain ports to a specific internal IP address. To get a connection with NAT Type 2, you will want to forward the following ports (in your router) to the IP address of your PS4:
For help with port forwarding you can visit our port forwarding guides .
7. After you have assigned a permanent IP address to your PS4 console and forwarded the correct ports in your router, you can test your network connection. To test the connection from the PS4:
- In the main menu of your PS4, select Settings
- Select Test Internet Connection
Your console should now have a NAT Type 2 connection. This a common networking problem that can be quite difficult to solve. Good job making it through the guide and optimizing your network.
If you are not able to get a connection with NAT Type 2, check to see that you have entered in the correct information. Double check the data that you entered for the IP address, subnet mask, gateway, and DNS addresses.
More From Portforward

How to Create a Port Forward in Your Router for Super Mario Party
Forwarding some ports for Super Mario Party can help improve your online connections and make it easier to play with others.

How to Port Forward Monster Hunter Rise in Your Router
Forwarding some ports in your router for Monster Hunter Rise can help improve your online multiplayer connections.

How to Port Forward in Your Router for Animal Crossing: New Horizons
Forward some ports for Animal Crossing: New Horizons in your router for a better online mutiplayer experience.

Port Forwarding on Your Router for Valheim
If you want to host your own Valheim servers you'll need to forward some ports for it in your router.

Create a Port Forward for BlazBlue: Central Fiction in your Router
You can help improve your online multiplayer connections in BlazBlue: Central Fiction by forwarding some ports.

Forwarding Ports in Your Router for Football Manager 2020
You can help improve your online connections in Football Manager 2020 by forwarding some ports in your router.

How to Forward Ports in Your Router for Farming Simulator 22
Forwarding some ports in your router for Farming Simulator 22 can help you connect with more farmers.

Port Forwarding on Your Router for Minecraft Dungeons
Minecraft Dungeons is more fun with friends. Help improve connections and connect with them more easily by forwarding some ports.
IMAGES
VIDEO
COMMENTS
Manually Set Static IP For PS5. Navigate to Settings->Network->Set Up Connection->Options button on Active Connection->Advanced Settings. It is advised you use a wired connection if possible as this offers the fastest and most stable possible connection to the internet. Select the "Advanced Settings" option from the active connection and ...
Do you want to know how to get a STATIC IP Address on the PS5! To do this, go to settings and then network. View your connection and write down the IPV4 Addr...
#Solvetic_eng video-tutorial for See how to put static IP on PS5 or put fixed IP on PS5. ⭐ 𝗠𝗢𝗥𝗘 𝗩𝗜𝗗𝗘𝗢-𝗧𝗨𝗧𝗢𝗥𝗜𝗔𝗟𝗦 𝗔𝗡𝗗 ...
Set up a static IP address for your PlayStation 5 and play Ubisoft games with better connectivity and performance. This article shows you how in a few steps.
There are lots of different reasons you might want to have a statis IP on your PS5. This can range from things like wanting to get an open NAT for online gam...
Ports to Forward for PlayStation 5. Step-by-Step Guide to Port Forwarding on PlayStation 5. Step 1: Setup a Static IP for the PS5. Step 2: Access Your Router's Settings. Step 3: Locate the Port Forwarding Settings. Step 4: Set Up Port Forwarding Rules. Step 5: Restart Your Router and PS5. Step 6: Test Your PS5's Network Connection.
Fortunately, there's an easy way to get both. From the PlayStation menu, go to Settings and then scroll down to Network. On the Network screen choose "View Connection Status". This will show you both your PS5's IP address and your Default Gateway address. PlayStation 4 connection status ip address with circle.
Learn how to set up a static IP address for your PlayStation 5 and improve your connectivity and performance in Ubisoft games. Follow the simple steps in this article and enjoy a smoother gaming experience. Whether you play XDefiant, Prince of Persia, Rainbow Six Siege or any other Ubisoft title, this guide will help you optimize your network settings.
On your PS5 console, go to the main menu and select the "Settings" option. In the settings menu, scroll down and select "Network" to access the network settings. Under the Network settings, select "Settings" again to proceed to the network setup. Choose "Set Up Internet Connection" and select "Use a LAN Cable" as your ...
The default is often 192.168.1.1 or 192.168..1. Find the port forwarding section, which may be under "Applications and Gaming," "Port forwarding/triggering," or a similar name. Enter the port numbers for the PS5: TCP 80, 443, 3478, 3479, 3480. UDP 3478, 3479. Choose your PS5's IP address from the list of connected devices.
Find out how to set up a static IP address for your PlayStation 5 and enhance your gaming experience with Ubisoft games. This article will guide you through the easy steps.
Click on IP address settings and change it to Manual. Paste the addresses you copied earlier in the Subnet Mask and Default Gateway. After that, input 192.168.1.2 in IPv4 address. You need to change the Primary DNS to 8.8.8.8, the Secondary DNS to 8.8.4.4 and MTU changes to 1472. Now you will have a static IP address on your PlayStation.
Most of the time the login details are printed on a sticker underneath the router. Google search " {router name/model} port forwarding". This should give you the exact guide you need for your model of router. You need to open the following ports in order to get NAT type 1 wth the PS5. TCP: 1935,3478-3480.
10 minutes. TOOLS. Windows 10 or 11. Step 1: Open the Command Prompt. Your first step should be to track down your computer's current IP address, subnet mask, and default gateway. Do this by ...
Once you have connected your Playstation to the internet, obtain the IP and MAC address and store it for later use. Step 1) Go to settings in PS4/PS5 and Select Network. Step 2) Click on View Connection Status. Step 3) Collect your IP and MAC Address from the Connection status page. Ensure the NAT Type is set in Type 2.
On your Playstation use a single cable and manually set the IP address to the following: IP 192.168.137.5 (this might be different but check if your computer's second ethernet port has 192.168.137.1 as the address) Gateway 255.255.225. DNS 1.1.1.1, 192.168.137.1 MTU 1500 Proxy - No
Setting up static IP on PS5. First of all, turn on your PS5. Then go to Settings. Proceed to Set up internet connection. Now, choose WiFi or LAN (depends on the type of connection your PS5 uses), Pick Custom > Manual. Enter all of the information from the View Connection Status menu and a static IP address. Good job!
There are lots of different reasons you might want to have a statis IP on your PS5. This can range from things like wanting to get an open NAT for online gaming to other port forwarding requirements. To do this, you will need to check out the guide for your router as all manufacturers have a different process behind how they allow port forwarding.
Learn how to set up a static IP address for your PS5 and improve your online gaming experience with Ubisoft Help.
In the network settings, set up a static IP address manually to improve it. It could be improved by changing DNS settings temporarily. Go to DNS settings in the Network Settings, and configure your network settings with the number of the public DNS that is free and open to the public by companies or organizations.
The Playstation itself should have a static IP. This is something you can either assign on the console itself or if your router supports it, you can set an IP reservation for the Playstation on the router, and leave the PS console settings as auto. Then, when the Playstation talks to your router to get an IP, it will get the same assigned IP ...
PlayStation 5. Access Network Settings. Open Control Panel, navigate to Network and Internet. Go to Settings > Network > Settings > Advanced Settings. Change Adapter Settings. Click on "Change adapter settings". Not Applicable. Modify IP Settings. Right-click network, select Properties, enter IP details.
Follow these steps to assign an IP address in your router: 1. You can try to permanently assign your PS4 to the IP address that it is currently using. To find the IP address, power up your PS4 console and follow these steps: In the PlayStation 4 main menu select Settings. Select Network.
There is a more detailed breakdown with images below and you can check out the video to quickly find out what you need to do to change DNS settings on PS5. Settings->Network->Settings->Set up Internet Connection->Select Active Connection->Press Options on controller -> Advanced settings -> DNS Settings -> Manual -> Enter custom DNS IP.