You are using an outdated browser. Please upgrade your browser to improve your experience.
You must assign a license to a vCenter Server system before its evaluation period expires or its currently assigned license expires. If you upgrade, combine, or divide vCenter Server licenses in Customer Connect, you must assign the new licenses to vCenter Server systems and remove the old licenses.

Prerequisites
- To view and manage licenses in the vSphere environment, you must have the Global . Licenses privilege on the vCenter Server system, where the vSphere Client runs.
- In the vSphere Client , navigate to the vCenter Server instance.
- Select the Configure tab.
- Under Settings , select Licensing .
- Click Assign License .
- In the vSphere Client , select an existing license or select a newly created license.
The license is assigned to the vCenter Server system, and one instance from the license capacity is allocated for the vCenter Server system.
Adding a vCenter 6.7 license
Hello, it’s me again.
From my recent blog post regarding setting up vCenter, I had difficulties locating the area to apply the vCenter license. From what I found on the internet, it was referenced that you should go to the Host that contains the vCenter/VCSA VM, click on the VM and click on Configure. Maybe VMware changed it in version 6.7 but I could not find the same area for license registration under the VM itself.
Under the VCSA VM –> Configure –> Settings, I should see a ‘License’ section. I could not find anything of that sort. I logged in as my admin account and my personal admin account, both that have the license role and that feature was still not available.

Frustrated, I did some looking around within the vSphere client and I found the area to do this.
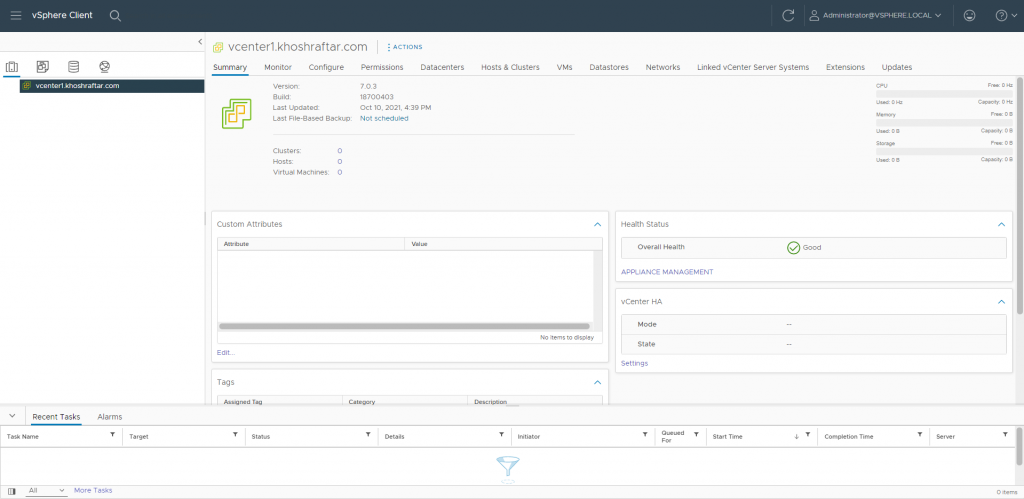
You need to click on the ‘top’ FQDN vCenter identifier on the left hand side of the window, which houses your Datacenter and the nodes inside.

Once you click on it, you will see the following,

As you see, now selecting the VCSA and going to the Configure section and under Settings , we now see Licensing as an option. Now in my case, I’ve already applied the license but I’m going over where I went to do this.
You would select the Assign License button to proceed with entering your key into vCenter.

Under the Assign License window, you will have two options. To select an existing license or new license. You can import the license from your License section from the admin page or you can type in your license if you haven’t already done so. I’ve already uploaded my licenses to the Administration License section, which I will show next.
Now what I have done initially was gone into the Administration section –> Licensing –> Licenses and typed in the VMware vCenter Server 6 Essential vCenter license key. When I did this, the usage of the vCenter license was set to 0 and capacity was set to 1. This was because I never assigned the license to the vCenter itself. I did this in the Assign License window as seen above.

The last and final screenshot above shows the Administrator License window which identifies my License(s) and their state and capacity.
To note: When I was in the process of importing each host, the license for those hosts registered automatically here. I did not have to enter the VMware vSphere 6 Essentials Plus License. Those just followed with each host/node into vCenter.
Share this:
- Click to share on Twitter (Opens in new window)
- Click to share on Facebook (Opens in new window)
Leave a comment
Leave a reply cancel reply.
Your email address will not be published. Required fields are marked *
Notify me of follow-up comments by email.
Notify me of new posts by email.
Khoshraftar.com
My daily works, how to assign license to the vcenter 7.0 update3.
Hi, After install vCenter 7.0 Update 3 in my last post , You need to assign license to your vCenter.
For this purpose, You need to buy a license from VMware company.
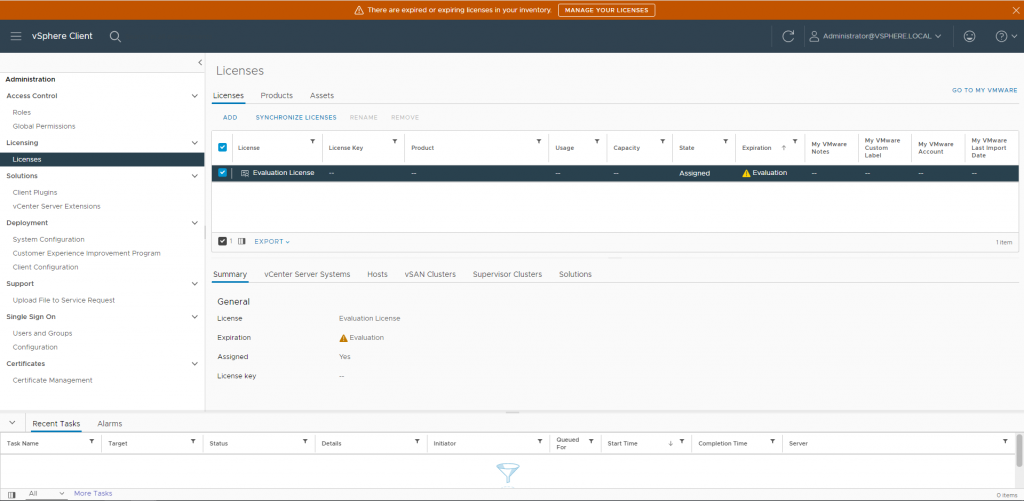
Login to your vCenter Server, You see a warning on your screen. Click on Manage Your Licenses button.

Your vCenter license is on Evaluation License. CLick ADD
Enter your License Key
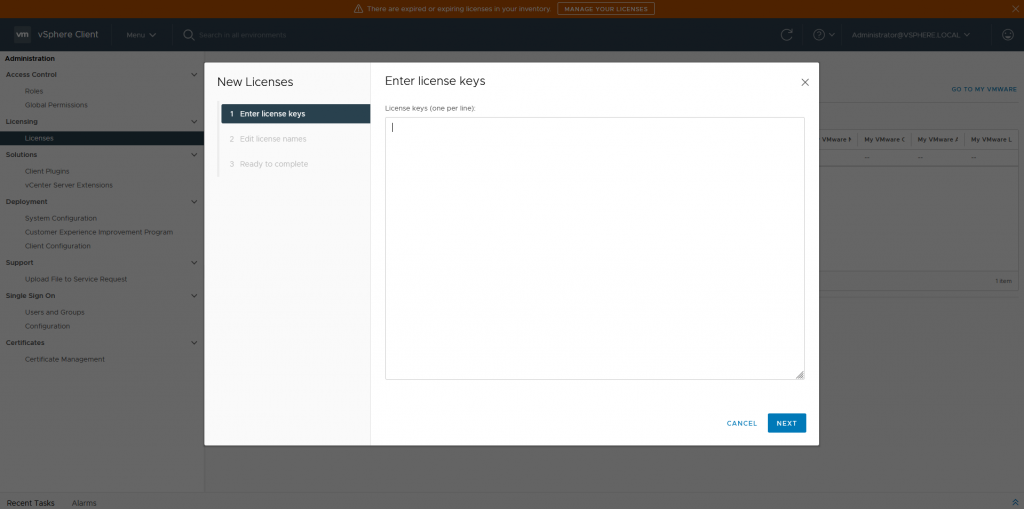
Enter your License Name, NEXT
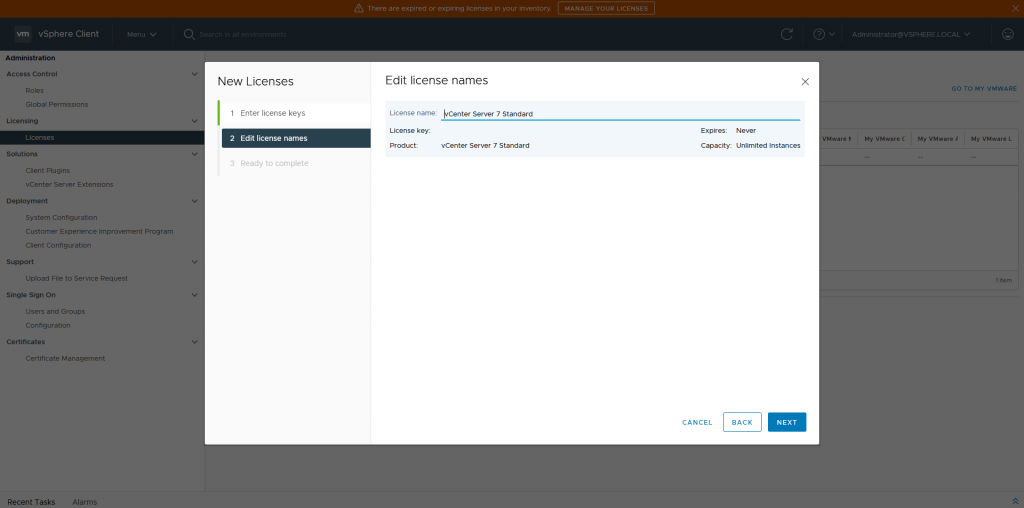
Your License import in to the vCenter repositry, Now you need assign your License to an asset. Click on Assets tab and choose VCENTER SERVER SYSTEMS
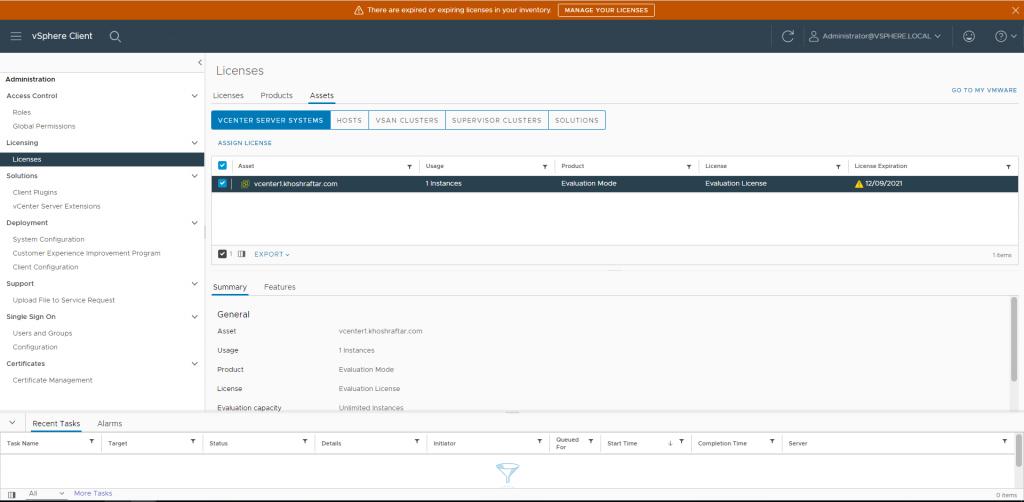
Select your vCenter License and click OK .
Now, Refresh your page, The alert message disappears .
Leave a Reply
Your email address will not be published. Required fields are marked *
Explore top-rated data protection at an affordable price
- Customer stories
Learn how organizations of all sizes and industries successfully protect data with NAKIVO
- Product Datasheet
- Backup Solution for MSPs
- Backup for Virtualization
- Microsoft 365 Backup
- Ransomware Protection
- Real-Time Replication BETA

Enterprise Backup and Recovery Solution
- Virtual: VMware | Hyper-V | Nutanix AHV | Proxmox
- Physical server: Windows | Linux
- Workstations: Windows | Linux
- SaaS: Microsoft 365
- Cloud: Amazon EC2
- File Share: NAS | File Server
- Apps: SQL | Active Directory | Exchange | Oracle DB
- Virtual: VMware | Hyper-V
- MSP SOLUTION
- DISASTER RECOVERY
- VMware Disaster Recovery
- REAL-TIME REPLICATION beta
- IT MONITORING
- Backup Malware Scan
- SMB | Enterprise | Education Remote Office Backup Hybrid Cloud Backup
- Raspberry Pi
- Western Digital
- Backblaze B2
- S3-Compatible Storage
- EMC Data Domain
- HPE StoreOnce
- NEC HYDRAstor
- Backup from HPE Storage Snapshots
- Pricing and Editions
- Pricing Calculator
- Get a Quote
- Find a Reseller
- Find an MSP
- Renew License
More growth opportunities with the NAKIVO Partner Program
- Why Partner
- Solution Partner Signup
- Deal Registration
Grow your customer base with powerful BaaS and DRaaS
- MSP Partner Signup
- Technology Partners
- Storage Certification Program
- Log In to the Partner Portal
- SUPPORT RESOURCES
Find answers to your questions in our technical documentation
- Knowledge Base
- Release Notes
- API Reference Guide
- SUPPORT CENTER
Reach out to our highly-rated support team about any issues
- Send Support Bundle
- How-to Videos
VMware vCenter Server Licensing Options
VMware is one of the leading virtualization vendors today. The number of customers using VMware vSphere is growing every day. There are different license editions in VMware vSphere, and new VMware users should know about them to choose the license that is optimal for their organization and their needs. This blog post covers VMware vCenter licensing to clarify vCenter Server licensing options and understand the differences between licenses.

NAKIVO for VMware vSphere Backup
Complete data protection for VMware vSphere VMs and instant recovery options. Secure backup targets onsite, offsite and in the cloud. Anti-ransomware features.
General vCenter Server Licensing Information
In the blog post about Free ESXi , we explained how to use the free ESXi license for the VMware vSphere hypervisor. Yes, you can use a free license on a standalone ESXi host but with significant limitations. These limitations affect data backup methods because special APIs cannot be used. Free ESXi cannot be managed by the vCenter Server.
If you use paid licenses, you will need to buy a VMware vSphere license that covers the appropriate number of ESXi hosts and a vCenter Server license. The VMware vSphere license allows you to use vCenter Server to manage vSphere environments, including centralized ESXi hosts. VMware vCenter Server allows you to manage ESXi hosts, virtual machines, and other items in vSphere from a single interface. ESXi hosts are licensed with vSphere licenses on a per-processor basis, and vCenter is licensed on a per-instance basis. ESXi licensing allows you to run ESXi in the following modes: trial, free, and VMware vSphere license of the appropriate paid edition.
VMware vCenter Licensing
VMware vCenter can run in the evaluation (trial) mode and licensed mode. The trial mode for vSphere and vCenter is 60 days. During the trial period, you can use all the features in the top license edition (vSphere Enterprise Plus and vCenter Server Standard). If you assign a license for vCenter, you can switch back to the evaluation mode within 60 days from installing the vCenter Server. The evaluation license expires after 60 days. For example, if you install vCenter and use vCenter in the evaluation mode for 30 days, then buy and assign the license, you have 30 days remaining during which you can switch from the licensed mode to the evaluation mode. When the evaluation license expires, and there is no other license, all ESXi hosts added to vCenter inventory are disconnected from vCenter. If you assign a vCenter Server license after the evaluation license expires, ESXi hosts that were added to vCenter previously are reconnected to vCenter Server automatically.
A license key provided for VMware vSphere and VMware vCenter Server is a 25-character alphanumeric string that is not tied to hardware. A license key contains encrypted information about the product edition and doesn’t contain any server-specific information. If you have a vCenter Server, it is recommended that you assign vSphere licenses for ESXi hosts from the web interface of vCenter. VMware vSphere licenses and vCenter licenses have no time limitation on using the appropriate VMware products. There’s no limit on the number of running VMs.
VMware vCenter Server Editions
There are three editions of VMware vCenter 7.0 depending on the used license: vCenter Server for Essentials, vCenter Server Foundation, and vCenter Server Standard. Let’s explore each edition in more detail.
vCenter Server for Essentials supports up to 3 ESXi hosts that have vSphere Essentials and Essential Plus licenses. This edition is intended for use by organizations that have small virtual environments and is a good solution for small/medium businesses. This vCenter license is included in VMware vSphere Essential and Essential Plus kits (that are all-in-one solutions), unlike vSphere Standard and vSphere Enterprise licenses. VMware vMotion and vSphere High Availability are not available with vSphere Essential. You can create datacenters and clusters, but VMs can be migrated only when powered off (no live migration). If you use vSphere Essential Plus and vCenter Server for Essentials, VM live migration with vMotion and High Availability are available.
vCenter Server Foundation manages up to 4 ESXi hosts that have vSphere Standard, vSphere Enterprise Plus, and VMware vCloud Suite licenses. vCenter Server Foundation is sold as a separate license on a per-instance basis. There is no vRealize Orchestrator, vCenter Server High Availability, Enhanced Linked Mode, or vCenter Server Migration Tool. VMware vCenter Server Foundation is intended primarily for smaller environments.
vCenter Server Standard supports an unlimited number of ESXi hosts that are licensed with vSphere Standard, vSphere Enterprise Plus, and vCloud Suite licenses. The VMware vCenter Server Standard license contains all available vCenter features. This is the top edition of vCenter. You can use vRealize Orchestrator to automate key tasks, vCenter Server High Availability, Enhanced Linked Mode, and the vCenter Server Migration Tool. The VMware vCenter Server Standard license is sold separately from the VMware vSphere license (on a per-instance basis).
vCenter Upgrade
Customers can always pay and upgrade an existing license of vSphere and vCenter to a higher edition. In case of an upgrade, a new license key is issued, and the old (original) key is deactivated. You should replace the existing license with a new one. If you upgrade vCenter Server to a newer version that starts with the same number, your license is preserved, and vCenter continues to work with the assigned license (for example, if you upgrade vCenter 6.0 to 6.7). If you upgrade vCenter to a major version that starts with a different number, the evaluation mode restarts, and you need to assign a new license (for example, if you upgrade vCenter 6.7 to vCenter 7.0). Keep in mind that VMware vCenter 7.0 can manage ESXi 7.0, ESXi 6.5, and ESXi 6.7 hosts but cannot manage ESXi 6.0 or hosts of earlier versions. VMware vCenter 6.7 cannot manage ESXi 7.0 hosts.
How to Assign a License for vCenter
Let’s look at how to assign a VMware server license for vCenter. The workflow of assigning a license for vCenter 6.7 and vCenter 7.0 is similar. You should assign a vCenter license before the trial period expires.
Open a web browser and open VMware vSphere Client by entering the IP address of your vCenter Server. Lon in to vCenter as an administrator or other user that has the Global.Licenses privilege.
Go to the Configuration tab, and click Licensing in the Settings section to configure vCenter Server licensing.
On the Licensing page, you see the current license assigned to your vCenter, such as an Evaluation license or other license. You can also see information about the product, number of used instances, license expiration, and licensed features.
In order to assign a license, click the ASSIGN LICENSE button.

A new window opens in the web interface of VMware vSphere Client.
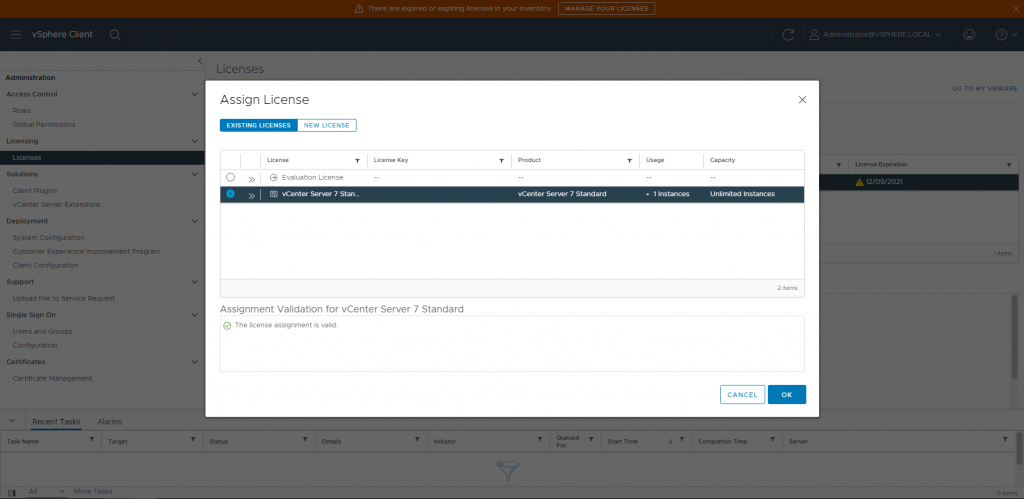
In order to add a new license, click NEW LICENSE , enter your license key, and define a custom license name for convenience. The license name is displayed in the list of available licenses in vCenter. On the screenshot below, you can see that we have entered a license key for VMware vCenter Server 6 Standard (Instances). Click the (i) icon to see the features that are available for your license. If the license is valid, you should see the appropriate message in the Assignment Validation section at the bottom of the window. Hit OK to save the settings.

Now you can go to the Existing licenses tab and verify that your license has been assigned. On this page, you can see all the licenses that you have added to your vCenter Server before. In our example, 60 days have passed since the installation of vCenter, and the Evaluation license is inactive. You can select any available license in this list, then hit OK to apply this license, save settings, and close the Assign License window.

This blog post has covered VMware vCenter Server licensing to understand how vCenter is licensed and the differences between vCenter editions. Organizations having small virtual environments might choose vCenter Server for Essentials or vCenter Server Foundation. Organizations having large virtual environments, including a large number of ESXi hosts with higher demands such as clustering, high availability, fault tolerance, and live migration, should consider using the VMware vCenter Server Standard license that includes all available features.
Even if your VMs run in a High Availability cluster, you must remember to protect your VMs and back them up. NAKIVO Backup & Replication is a universal data protection solution that supports VMware vSphere 7.0 with features designed specifically to improve backup performance and simplify data protection administration of VMware vSphere VMs. In addition to VMware vSphere, the solution supports data protection for other virtual, cloud, physical and SaaS platforms.

1 Year of Free Data Protection: NAKIVO Backup & Replication
Deploy in 2 minutes and protect virtual, cloud, physical and SaaS data. Backup, replication, instant recovery options.
People also read

- Interview Questions
- Advertise here
Two Steps to Manage this Licensing for vCenter. Please note the same we can do for ESXi Hosts.
- Step#1 Add License Key to Virtual Center
- Step#2 Assign License to Virtual Center
Manage License Key for Virtual Center Server:-
Step#1 - add license key to virtual center.
- Login to Virtual Center using Web or vSphere Client. Here we have logged in thrugh Web Client.
- On top of console, you can see the note saying that licenses in our inventory either expired or not available.
- Go to Home > Click on Licenses under Administration Tab
- Click on Manage your Licenses in Getting Started Tab or Go to Licenses Tab.
- Click on + icon to Create New Licenses .
- Enter the vCenter Server 6.x Standard license key and press Enter to add a new line.
- Enter the vSphere 6.x Standard license key(For ESXi), and click Next.
- Label the license keys as per your convinient. Click on Next .
- Your Licenses have been added here. Now let's move to Step#2 to Assign Licenses.
Step#2 - Assign License to Virtual Center
- Go to Licenses Option and and Click on Manage Your Assets under Getting Started tab. It will redirect you to Assets Tab.
- Under Assets Tab > Go to vCenter Server Systems (To Assign License to Virtual Center). Do the same for ESXi Host in Hosts Tab if you want to assign License to ESXi Host.
- Click on Firts Icon -> to Assign License
- Select License and Click on OK .
- vCenter Server is Licensed Now. Enjoy Managing the Inventory.
Share this on Social Media
About the author.
Public profile: user/profile/99900000
* Name
* email id, subscribe us, get emails on latest blogging tips and news from vmwareinsight.
VMware Insight
Bytes of virtualization with bits of other technology.
How to assign vsphere 7 licenses, april 14, 2020 virtuadmin.
Quick byte today – Here is a tutorial on how to assign VMware vSphere 7 licenses.
When you first install ESXi (or vCenter), you will have a 60-day evaluation license to dive into the full set of features. These evaluation features are equivalent to that of a vSphere Enterprise Plus license which includes vSphere vMotion, High Availability (HA), Distributed Resource Scheduler (DRS), Virtual Machine Encryption, Distributed Switches, etc. Durng this time, the Licenses tab will indicate you are Evaluation Mode. When you are ready to assign your official license, it just takes a few steps. Below we will walk through how to assign licenses through ESXi and vCenter.
How to Assign VMware Licenses From ESXi
Under Navigator , select Host and then Manage. From Manage, select the Licensing tab and click Assign License.
From Assign License, add your License Key and click Check License.
If successful, the license will indicate it is valid for the pertinent version. Click Assign License.
Once the license is installed, navigate back to Licensing to verify your license was validated.
How to Assign VMware Licenses From vCenter
Licenses can also be applied from vCenter. If you have a license in evaluation mode or an expiring license, there will be a notification banner indicating there are expired or expiring licenses in you inventory.
To assign a license click Manage Your Licenses from the aforementioned banner or click the Menu drop-down and select Administration.
Next, click Licenses and select the Assets tab. In this instance we will be assigning a license to a single asset (e.g. vCenter); however, if you need to assign multiple licenses you can do that from the Licenses tab. Under Assets, select the pertinent asset and click Assign Asset.
Click the New License tab. Enter the License Key and click Ok .
That’s it! The asset will reflect the license and new expiration date.
Related Posts
- Install or Upgrade VMware ESXi from HP iLO
- How to Downgrade/Rollback ESXi 6.5
- Manually Configure ESXi Syslog Location
One thought on “ How to Assign vSphere 7 Licenses ”
thank you for your post
Comments are closed.
- Connect Virtually - Wear Mask, Stay Home, Stay safe
- VMWare, PowerCLI, DevOps, Kubernetes
- Microsoft Azure, PowerShell, Ansible, Terraform
#header_text h1#site_heading a, #header_text h1#site_heading{ } @media (min-width: 650px) { #header_text h1#site_heading a, #header_text h1#site_heading{ } } Virtual Geek
#header_text h2#site_subheading a, #header_text h2#site_subheading{ } @media (min-width: 650px) { #header_text h2#site_subheading a, #header_text h2#site_subheading{ } } tales from real it system administrators world and non-production environment, adding and assigning vsphere licenses in vcenter server and esxi.
This article focuses on how to add licenses to vCenter and ESXi server. For more detailed information on pricing and licensing VMWare has provided nice WhitePaper pdf . Its worth reading this official vmware document. On my newly deployed vsphere Productions in the office I was keep getting warning message, On the vSphere web client there was message in yellow rectangle at the top, There are vCenter Server Systems with expired or expiring licenses in your inventory and by default it will be evaluation mode for next 60 days, To add licenses click on Manage your licenses . it lands on the Administration>Licenses tab. Here select Licenses tab, click on Green Plus + button to add licenses. Here I can add multiple licenses for ESXi and vCenter server at once, as shown License keys should be one per line. and it will be 25 digit key. Deploy install VCSA (vCenter server appliance 6.5) on VMWare Workstation
Once next button is pressed it detects and shows what is the licenses key is for. In my case it is showing entered license key is for vmware vsphere server 6 standard (instances). Type some name for license it can be a company or project name (purchased for according to my company).
On the next ready to complete screen, I finished this wizard to add this new license into the vcenter server inventory now I can assign this licenses to vSphere suite.
Now all licenses has been added, Its time for assigning licenses to the trial mode vCenter server by selecting Assets tab then vCenter Server Systems, check vCenter server and assign licenses, (It's in evaluation mode)
Same way we can assign licenses to the ESXi Server navigating to Administration>Licenses>Assets>Hosts>Select Esxi Server> click assign license> choose appropriate licenses from the list and press Ok
Once I press ok I Esxi server is no more in trial evaluation mode. Same procedure can be used against cluster when assigning licenses, Also Solutions tab is for other vmware products, we can assign licenses to Site Recovery Manager, NSX and other vsphere softwares. Once I assign all the licenses warning message will go away.
Other useful info PART 2 : VCENTER SERVER 6.0 INSTALLATION ON WINDOWS 2012 R2
Blog Search
1 1 3 2 1 1 7 1
Subscribe to our email newsletter & receive updates right in your inbox (550+ Users).
- April 2024 (2)
- November 2023 (1)
- September 2023 (6)
- July 2023 (15)
- June 2023 (5)
- May 2023 (9)
- April 2023 (4)
- March 2023 (7)
- February 2023 (1)
- January 2023 (1)
- December 2022 (10)
- November 2022 (15)
- October 2022 (15)
- September 2022 (14)
- March 2022 (8)
- December 2021 (9)
- November 2021 (6)
- October 2021 (12)
- September 2021 (10)
- August 2021 (8)
- July 2021 (9)
- June 2021 (9)
- May 2021 (11)
- April 2021 (8)
- March 2021 (13)
- February 2021 (9)
- January 2021 (5)
- November 2020 (7)
- October 2020 (3)
- September 2020 (4)
- August 2020 (7)
- July 2020 (8)
- June 2020 (10)
- May 2020 (10)
- April 2020 (5)
- March 2020 (4)
- February 2020 (3)
- January 2020 (3)
- December 2019 (11)
- November 2019 (2)
- October 2019 (3)
- June 2019 (1)
- May 2019 (5)
- April 2019 (11)
- March 2019 (5)
- February 2019 (2)
- December 2018 (1)
- September 2018 (4)
- July 2018 (3)
- June 2018 (7)
- May 2018 (12)
- April 2018 (9)
- March 2018 (13)
- February 2018 (4)
- January 2018 (10)
- December 2017 (11)
- November 2017 (10)
- October 2017 (11)
- September 2017 (7)
- August 2017 (10)
- July 2017 (12)
- June 2017 (4)
- May 2017 (3)
- February 2017 (1)
- January 2017 (3)
- December 2016 (7)
- November 2016 (8)
- October 2016 (13)
- September 2016 (7)
- August 2016 (9)
- July 2016 (11)
- June 2016 (17)
- May 2016 (7)
- Maas How to install Ansible AWX on Ubuntu using Kubernetes K8S March 9, 2024 02:13AM
- bazs VMware vCenter server vcsa Setting IP IPv6 configuration failed, IP configuration not allowed February 22, 2024 07:48PM
- nilanjan375 PowerShell HTML Server Racks Cabinet Live Diagram maker Demo February 22, 2024 12:36AM
- nilanjan375 PowerShell HTML Server Racks Cabinet Live Diagram maker Demo February 20, 2024 06:13PM
- debby Solved Visual studio Code make sure you configure your user.name and user.email in git February 19, 2024 07:51PM
Disclaimer: All the steps and scripts shown in my posts are tested on non-production servers first. All the scripts provided on my blogs are comes without any warranty, The entire risk and impacts arising out of the use or performance of the sample scripts and documentation remains with you. Author is not liable for any damages whatsoever arising out of the use of or inability to use the sample scripts or documentation. Warning: Everything I say and do in these blogs or videos are subject to mistake and criticism. please do everything in your power to correct me if I saying or doing something wrong, or inform me of what I could be doing better. I am a man made out of my environment, and you are the ones creating who I am. Please don't let me fall to stupidity or ignorance, I expect the absolute best in each and every one of you and I hope you expect the same of me. Thank you. Usage of cookies: In order to optimize the website and for continuous improvement vcloud-lab.com uses cookies. You agree to the usage of cookies when you continue using this site.
© 2016 - 2020 vcloud-lab.com
Instantly share code, notes, and snippets.
PannuHacker / vmware.md
- Download ZIP
- Star 1 You must be signed in to star a gist
- Fork 0 You must be signed in to fork a gist
- Embed Embed this gist in your website.
- Share Copy sharable link for this gist.
- Clone via HTTPS Clone using the web URL.
- Learn more about clone URLs
- Save PannuHacker/2ff06ad6447576ecd4245f162491bd1b to your computer and use it in GitHub Desktop.
Free VMware license keys, they should work. It works for all cores on your host system(ESXi).
vCenter Server 8 Standard
Esxi 7 enterprise plus, esxi 6 enterprise plus, workstation 17, workstation 16, fusion 13 pro.
GPU Manager for VMware vCenter User Guide
Documentation for administrators that explains how to install, configure, and use NVIDIA GPU Manager for VMware vCenter.
1. Introduction to the NVIDIA GPU Manager for VMware vCenter
NVIDIA GPU Manager for VMware vCenter enables you to manage NVIDIA GPUs from the vSphere client of VMware vCenter Server.
When NVIDIA GPU Manager for VMware vCenter is installed and configured, you can download and install NVIDIA GPU drivers by using a web-based tool integrated with the vSphere web client user interface instead of running a set of commands on the hypervisor. NVIDIA GPU Manager for VMware vCenter extends the capabilities of VMware vCenter Server by providing additional features and functions to manage NVIDIA GPUs for VMware vCenter clusters, VMware vSphere Hypervisor (ESXi) hosts, and guest VMs.
- NVIDIA GPU Manager application, which is used for registering NVIDIA GPU Manager for VMware vCenter
- NVIDIA GPU Manager drivers repository , which is used for storing downloaded drivers
- Web-based management interface, which is used for accessing the NVIDIA GPU Manager application on the appliance
- The vSphere client plugin contains the user interface resources, which are copied from the virtual appliance when NVIDIA GPU Manager for VMware vCenter is registered. These resources are deployed on the vSphere client after registration.
2. Installing and Configuring the NVIDIA GPU Manager for VMware vCenter Virtual Appliance
To simplify the installation and administration of the NVIDIA GPU Manager for VMware vCenter , it is distributed as a virtual appliance image to be installed on a supported release of VMware vSphere . This appliance is a secure, hardened environment in which access to the application software is strictly controlled.
Each NVIDIA GPU Manager for VMware vCenter appliance is configured with a single user account. You cannot modify this user account or add other user accounts to the appliance.
2.1. Platform Requirements for the NVIDIA GPU Manager for VMware vCenter Virtual Appliance
Before proceeding, ensure that you have a platform suitable for hosting the NVIDIA GPU Manager for VMware vCenter virtual appliance.
- The hosting platform must be a physical host running a supported release of VMware vSphere .
- Number of vCPUs: 2
- RAM: 4 Gbytes
- Disk Size: 35 Gbytes
- The platform must have a fixed (unchanging) IP address. The IP address may be assigned dynamically by DHCP or statically configured, but must be constant.
- The platform’s date and time must be set accurately. NTP is recommended. For information about how to configure NTP on an ESXi host, refer to VMware Knowledge Base Article: Configuring Network Time Protocol (NTP) on an ESXi host using the vSphere Client (57147) .
2.2. Host Name Resolution Requirements for an NVIDIA GPU Manager for VMware vCenter Virtual Appliance
The platform that hosts an NVIDIA GPU Manager for VMware vCenter virtual appliance must be identified by its IP address or its fully qualified domain name. If you want to identify the platform by its fully qualified domain name, ensure that the required DNS entries are set before installing the virtual appliance. If you want to identify the platform by its default host name, you must set a DNS entry that maps the default host name to the fully qualified domain name.
The process for setting these DNS entries is separate from the process for installing the virtual appliance. Use the standard interfaces of the name resolution service that you are using to set the required DNS entries.
For each mapping between a domain name and an IP address, ensure that you set both the forward pointer and reverse pointer DNS entries.
To determine whether the forward pointer and reverse pointer DNS entries have been set correctly, type the following commands in a command or shell window on any host on the same network as the NVIDIA GPU Manager for VMware vCenter virtual appliance:
For the forward pointer entry, type:
If the DNS entry has been set correctly, the command displays the IP address that is mapped to the domain name.
For the reverse pointer entry, type:
If the DNS entry has been set correctly, the command displays the domain name that is mapped to the IP address.
2.3. Firewall Rules for NVIDIA GPU Manager for VMware vCenter
To enable communication through a firewall, firewall rules that allow traffic on specific URLs must be defined. To set these rules, use the standard interfaces of the firewall that you are using, for example Zscaler Firewall.
To enable communication between NVIDIA GPU Manager for VMware vCenter and NVIDIA Licensing Portal through a firewall, firewall rules that allow traffic on the URLs in the following table must be defined.
2.4. Installing the NVIDIA GPU Manager for VMware vCenter Virtual Appliance
The NVIDIA GPU Manager for VMware vCenter image is distributed as a ZIP archive that contains an Open Virtual Appliance (OVA) file. You use standard interfaces of VMware vSphere to install the virtual appliance.
The virtual appliance image specifies the minimum configuration for the VM as listed in Platform Requirements for the NVIDIA GPU Manager for VMware vCenter Virtual Appliance . You are not required to specify the VM configuration when you install the virtual appliance. After installing the NVIDIA GPU Manager for VMware vCenter virtual appliance, you can use standard interfaces of the hypervisor to change the configuration of the VM if necessary.
Use the VMware vSphere Client to perform this task on the ESXi server on which you want to run the NVIDIA GPU Manager for VMware vCenter virtual appliance.
- Log in to vCenter Server by Using the vSphere Web Client
- Deploy an OVF or OVA Template
- Download the ZIP archive that contains the OVA file that contains the NVIDIA GPU Manager for VMware vCenter image.
- Extract the contents of the ZIP archive that you downloaded.
- Log in to vCenter Server by using the VMware vSphere Client .
- From the VMware vSphere Client Actions menu, choose Deploy OVF Template .
- Select the Local file option, browse for and select the downloaded OVA file, and click Next .
- Enter the your choice of virtual machine name, select a location for the virtual machine, and click Next .
- Select a compute resource where the virtual machine will be created and click Next .
- Review the details of the template that you are deploying and click Next .
- Accept the NVIDIA Software License Agreement and click Next .
- Select the storage for the virtual appliance configuration and disk files and click Next .
Provide the network settings for a static IP address as follows.
- In the IPv4 Address text-entry field, type the IP address that you want to assign to the virtual appliance. This address must be an unused IP address in the subnet range of the VM's virtual network.
- In the Netmask Prefix text-entry field, type the subnet mask of the virtual appliance's network in classless inter-domain routing (CIDR) format without the leading slash character (/) . To get a subnet mask in CIDR format from its decimal equivalent, refer to the table on page 2 of IETF RFC 1878: Variable Length Subnet Table For IPv4 . For example, the subnet mask in CIDR format of the decimal equivalent 255.255.255.0 is 24.
- In the Gateway text-entry field, type the IP address of the virtual appliance's default gateway.
- In the DNS Server 1 text-entry field, type the IP address of the first DNS server to be used for name resolution.
- Optional: In the DNS Server 2 text-entry field, type the IP address of the second DNS server to be used for name resolution.
- Review all the details of the virtual machine that you are creating and click Finish .
- Start the VM that you created.
2.5. Registering the NVIDIA GPU Manager for VMware vCenter Administrator User
Each NVIDIA GPU Manager for VMware vCenter virtual appliance is configured with a user account specifically for administering the NVIDIA GPU Manager for VMware vCenter . This account provides access through a web-based management interface to the NVIDIA GPU Manager application on the appliance. Before administering the NVIDIA GPU Manager for VMware vCenter virtual appliance, you must register this user to be able to access this management interface.
You can get the IP address from the management console of your hypervisor.
The password must be at least eight characters long, and must contain at least one uppercase letter, one lowercase letter, one number, and one of the special characters ~ , # , ? , ! , @ , $ , % , ^ , & , * , - , + , = , and _ .
- Click Register . The Register User Account page is refreshed to confirm that the user has been registered and displays a local reset secret to enable you to reset the user's password.
- Copy the local reset secret and store it securely, for example, by clicking the clipboard icon and pasting the local reset secret into a plain text file that is readable only by you. Note: You will need this key to reset a forgotten NVIDIA GPU Manager for VMware vCenter administrator user's password. If you lose this secret, you will not be able to reset a forgotten NVIDIA GPU Manager for VMware vCenter administrator user's password.
- Click Continue to Login .
- On the login page that opens, provide the password that you set for the vcp_admin user, and click Login .
2.6. Changing the NVIDIA GPU Manager for VMware vCenter Administrator Password
For enhanced security, change the password for the NVIDIA GPU Manager for VMware vCenter administrator user periodically after this user is registered.
- On the login page that opens, provide the user credentials for the NVIDIA GPU Manager for VMware vCenter administrator user on the NVIDIA GPU Manager for VMware vCenter virtual appliance and click Login .
- At the top right of the page in the NVIDIA GPU Manager application on the NVIDIA GPU Manager for VMware vCenter appliance that opens, click Change Password .
- In the Current Password text-entry field, type the current password for the NVIDIA GPU Manager for VMware vCenter administrator user.
- In the Confirm New Password text-entry field, type the password that you typed in the New Password text-entry field.
- Click Change Password .
2.7. Resetting a Forgotten NVIDIA GPU Manager for VMware vCenter Administrator Password
If you have forgotten the NVIDIA GPU Manager for VMware vCenter administrator password, you can use its local reset secret to reset it.
- On the login page that opens, follow the Forgot Password? link.
- In the Local Reset Secret text-entry field, type the local reset secret that was created when the NVIDIA GPU Manager for VMware vCenter administrator user was registered.
- In the Confirm Password text-entry field, type the password that you typed in the Password text-entry field.
- Click Reset Password .
2.8. Logging in to the NVIDIA GPU Manager for VMware vCenter Virtual Appliance
Each NVIDIA GPU Manager for VMware vCenter virtual appliance is configured with a user account specifically for administering NVIDIA GPU Manager for VMware vCenter . This account provides access through a web-based management interface to the NVIDIA GPU Manager application on the appliance.
2.9. Configuring an NVIDIA GPU Manager for VMware vCenter Virtual Appliance with a Third-Party Signed SSL Certificate
By default, an NVIDIA GPU Manager for VMware vCenter virtual appliance is configured with a self-signed SSL certificate that is generated when the virtual appliance is started. If necessary, you can replace the self-signed certificate with an SSL certificate that is signed by a third party, such as a certificate authority (CA).
When NVIDIA GPU Manager is registered with VMware vCenter Server , the SSL certificate with which the virtual appliance is configured is imported into VMware vCenter Server . Therefore, try to configure the virtual appliance with a new SSL certificate before registering NVIDIA GPU Manager with VMware vCenter Server .
Otherwise, you must confirm that you can use vSphere Lifecycle Management (vLCM) to synchronize the new SSL certificate on all VMware vCenter Server instances with which NVIDIA GPU Manager is registered. This confirmation is required because VMware vCenter Server must be able to trust the new certificate before it allows any communication that is authenticated by the certificate.
To configure an NVIDIA GPU Manager for VMware vCenter virtual appliance with a third-party signed SSL certificate, follow this sequence of instructions:
- Obtaining a Third-Party Signed SSL Certificate for an NVIDIA GPU Manager for VMware vCenter Virtual Appliance
- Installing a Third-Party Signed SSL Certificate on an NVIDIA GPU Manager for VMware vCenter Virtual Appliance
2.9.1. Obtaining a Third-Party Signed SSL Certificate for an NVIDIA GPU Manager for VMware vCenter Virtual Appliance
Obtain a third-party signed SSL certificate by submitting a certificate signing request (CSR) to a suitable third party, such as a certificate authority (CA).
For each certificate that you require, submit a certificate signing request (CSR) to a CA.
- The certificate must be a PEM text file ( not in Java keystore format) and secured with a private key.
- The certificate and the private key must be in separate files.
- To ensure that web browsers trust the domain, the domain name must be part of the Subject Alternate Name (SAN) attribute, not the Common Name (CN) attribute of the CSR.
If a fully qualified domain name is not assigned to the NVIDIA GPU Manager for VMware vCenter , specify its IP address as the DNS in the CSR.
- The certificate must use RSA, DSA, and DH keys that are at least 2048 bits long.
- Domain name certificate
- Intermediate certificates
- Root certificate
- The keyUsage extension must have Certificate Sign usage for all the certificates in the chain.
If necessary, contact the CA that will provide your certificate for information about how to request a certificate that meets these requirements or convert an existing certificate to meet these requirements.
2.9.2. Installing a Third-Party Signed SSL Certificate on an NVIDIA GPU Manager for VMware vCenter Virtual Appliance
- Log in to the NVIDIA GPU Manager for VMware vCenter virtual appliance on which you are installing the SSL certificate.
- In the left navigation pane, click SETTINGS .
- On the SETTINGS page that opens, in the SSL Configuration section, click Update .
- Click Choose File adjacent to Certificate and in the file browser that opens, navigate to the folder that contains the SSL certificate and select the file.
- Click Choose File adjacent to Private Key and in the file browser that opens, navigate to the folder that contains the SSL certificate's private key and select the file.
- Click Update .
- From the vSphere Client menu, choose Lifecycle Manager , click the Settings tab, choose Administration > Patch Setup , and confirm that the download source is set correctly.
- Confirm that the Sync updates operation in vSphere Lifecycle Management (vLCM) succeeds.
2.10. Updating the Network Settings for the NVIDIA GPU Manager for VMware vCenter Virtual Appliance
If necessary, you can change the network settings for an NVIDIA GPU Manager for VMware vCenter virtual appliance any time after the virtual appliance has been installed.
Try to update the network settings of the virtual appliance before registering NVIDIA GPU Manager with VMware vCenter Server .
Otherwise, you must confirm that all VMware vCenter Server instances with which NVIDIA GPU Manager is registered reflect the updated network settings. This confirmation is required because the NVIDIA GPU Manager plugin and driver repository on VMware vCenter Server are linked to the IP address or fully qualified domain name of the NVIDIA GPU Manager for VMware vCenter virtual appliance.
- Log in to the NVIDIA GPU Manager for VMware vCenter virtual appliance for which you are updating network settings.
- On the SETTINGS page that opens, in the Network Settings section, click Update .
- Ensure that the Static option is selected.
- In the IP Address text-entry field, type the IP address that you want to assign to the virtual appliance. This address must be an unused IP address in the subnet range of the VM's virtual network.
- Optional: In the DNS Server 1 text-entry field, type the IP address of the first DNS server to be used for name resolution.
- Click Update . Your browser will be disconnected from the instance after the update is complete.
- Log in to the NVIDIA GPU Manager for VMware vCenter virtual appliance again by connecting to the URL https:// vcenter-gpu-mgr-vm-static-ip-address . vcenter-gpu-mgr-vm-static-ip-address The static IP address that you set for the NVIDIA GPU Manager for VMware vCenter virtual appliance.
- Confirm that the vSphere client shows the correct IP address or fully qualified domain name of the NVIDIA GPU Manager for VMware vCenter .
2.11. Accessing the NVIDIA GPU Manager for VMware vCenter Virtual Appliance from the vCenter Web Console
If the NVIDIA GPU Manager for VMware vCenter virtual appliance network is incorrectly configured, you might not be able to access the web-based management interface to the NVIDIA GPU Manager application on the appliance. In this situation, you can reconfigure network settings and download log files for troubleshooting through the web console option of the vCenter web client. The virtual appliance is configured with a user account specifically for this purpose. This user account has access only to the directories and scripts necessary for reconfiguring network settings and downloading log files.
2.11.1. Downloading Log Files from an NVIDIA GPU Manager for VMware vCenter Virtual Appliance from the Hypervisor
- Use the web console option of the vCenter web client to log in as the user vcp_cli_user to the VM that hosts the NVIDIA GPU Manager for VMware vCenter virtual appliance. The first time you log in as vcp_cli_user , you are prompted to set a password for this user.
- Run the generate-log-bundle.sh script with sudo user privileges. $ sudo ./generate-log-bundle.sh A ZIP archive named log_bundle.zip that contains the log files is created on the virtual appliance.
- Enter the user name of the user that will log in to the remote host, for example, vcp_root .
- Enter the IP address of the remote host. Note: The IP address must be an IPv4 address. IPv6 addresses are not supported.
- Enter the full path to the directory on the remote to which you want the log_bundle.zip file to be copied, for example, /home/vcp_root .
- Enter the password of the user that you specified previously will log in to the remote host.
2.11.2. Assigning the IP Address of an NVIDIA GPU Manager for VMware vCenter Virtual Appliance by Using DHCP from the Hypervisor
- Run the set-dhcp-cli.sh script with sudo user privileges. $ sudo ./set-dhcp-cli.sh
2.11.3. Setting the IP Address of an NVIDIA GPU Manager for VMware vCenter Virtual Appliance from the Hypervisor
- Run the set-static-ip-cli.sh script with sudo user privileges. $ sudo ./set-static-ip-cli.sh
- Enter the IP address that you want to assign to the NVIDIA GPU Manager for VMware vCenter virtual appliance.
- Enter the IP address of the NVIDIA GPU Manager for VMware vCenter virtual appliance's default gateway.
- Enter the IP address of the first DNS server to be used for name resolution.
- Enter the IP address of the second DNS server to be used for name resolution.
- Enter the subnet mask of the NVIDIA GPU Manager for VMware vCenter virtual appliance's network in classless inter-domain routing (CIDR) format without the leading slash character (/) . To get a subnet mask in CIDR format from its decimal equivalent, refer to the table on page 2 of IETF RFC 1878: Variable Length Subnet Table For IPv4 . For example, the subnet mask in CIDR format of the decimal equivalent 255.255.255.0 is 24.
2.11.4. Setting the Host Name of an NVIDIA GPU Manager for VMware vCenter Virtual Appliance
- Run the set-hostname-cli.sh script with sudo user privileges. $ sudo ./set-hostname-cli.sh
- When prompted, enter your choice of new host name for the virtual appliance.
2.11.5. Since 1.2.0: Resetting the SSL Certificate on an NVIDIA GPU Manager for VMware vCenter Virtual Appliance
- Run the reset-ssl-cert.sh script with sudo user privileges. $ sudo ./reset-ssl-cert.sh
2.12. Since 1.2.0: Configuring NVIDIA GPU Manager for VMware vCenter with a Proxy Server
NVIDIA GPU Manager for VMware vCenter supports communication through the Squid proxy server with entities such as NVIDIA Licensing Portal and vCenter Server instances.
- A transparent proxy server identifies itself to the server and does not modify client requests and responses.
- A non-transparent proxy server does not reveal the IP address of the client and modifies client requests and responses.
2.12.1. Verifying the Correct Operation of the Proxy Server
Before configuring NVIDIA GPU Manager for VMware vCenter with a proxy server, ensure that the proxy server is reachable, the port on which the proxy server listens for client requests is open, and the proxy service is running on it.
- Use the netcat ( nc ) command to scan the port on which the proxy server listens for client requests in verbose mode with a connection timeout of 10 seconds. $ nc -zvw10 proxy-server-address port proxy-server-address The fully qualified domain name or IP address of the proxy server. port The port on which the proxy server listens for client requests.
2.12.2. Configuring NVIDIA GPU Manager for VMware vCenter with an Unauthenticated Proxy Server
- Log in to the NVIDIA GPU Manager for VMware vCenter virtual appliance for which you configuring a proxy server.
- On the SETTINGS page that opens, in the Proxy Server Settings section, click Update .
- Select the NO AUTH authentication type.
- Specify the fully qualified domain name or IP address of the proxy server and the port on which the proxy server listens for client requests.
2.12.3. Configuring NVIDIA GPU Manager for VMware vCenter with a Basic-Authenticated Proxy Server
- Select the BASIC authentication type.
- Provide the user name and password of the user that will log in to the proxy server.
2.12.4. Configuring NVIDIA GPU Manager for VMware vCenter with a Kerberos-Authenticated Proxy Server
- Use the web console option of the vCenter web client to log in as the user vcp_cli_user to the VM that hosts the NVIDIA GPU Manager for VMware vCenter virtual appliance.
- Ensure that the /etc/hosts file contains entries for the fully qualified domain names of the KDC and the administration server.
If Kerberos is already configured on another server in your network, you can copy the file from that server. The default path to this file is /etc/krb5.conf . Otherwise, create the file in the format shown in the following example.
- Select the KERBEROS authentication type.
- Click Choose File adjacent to Kerberos Configuration File and, in the file browser that opens, navigate to the folder that contains the krb5.conf that you created in Step 2 and select the file.
3. Registering and Unregistering NVIDIA GPU Manager for VMware vCenter
By registering NVIDIA GPU Manager for VMware vCenter , you can download and manage NVIDIA GPU drivers from vSphere client. Unregister NVIDIA GPU Manager for VMware vCenter when you no longer require to be able to download and manage NVIDIA GPU drivers from the vSphere client.
3.1. Privileges Required for Registering and Unregistering NVIDIA GPU Manager for VMware vCenter
Registering and unregistering NVIDIA GPU Manager for VMware vCenter requires the privileges for installing and managing extensions, configuring the vSphere Lifecycle Manager service, managing depots and remediation policies, and managing certificates on VMware vCenter.
Users with vCenter Server administrator privileges have all the privileges required for registering and unregistering NVIDIA GPU Manager for VMware vCenter .
- Register extension
- Unregister extension
- Update extension
- Configure Service
- Create/Delete (Admins priv)
- Create/Delete (below Admins priv)
3.2. Registering NVIDIA GPU Manager for VMware vCenter
Registering NVIDIA GPU Manager for VMware vCenter creates a repository where downloaded NVIDIA GPU drivers are stored. After registering NVIDIA GPU Manager for VMware vCenter , you can download and manage NVIDIA GPU drivers from the vSphere client.
- Log in to the virtual appliance for the NVIDIA GPU Manager for VMware vCenter that you want to register.
- In the left navigation pane, click REGISTRATION .
- On the REGISTRATION page that opens, click REGISTER .
- In the vCenter Server text-entry field, type the fully qualified domain name or IP address of the vCenter Server host.
- In the Username text-entry field, type the username of the user that will log in to the vCenter Server host.
- In the Password text-entry field, type the password of the user that will log in to the vCenter Server host.
3.3. Verifying the Registration of NVIDIA GPU Manager for VMware vCenter
After registering NVIDIA GPU Manager for VMware vCenter , confirm that it is listed on the Client Plugins and Patch Setup pages of the vSphere client.
- Log in to vCenter Server by using the VMware vSphere Client . For additional information, refer to Log in to vCenter Server by Using the vSphere Web Client on the VMware Docs site.
- From the vSphere Client menu, choose Administration > Solutions > Client Plugins and confirm that NVIDIA GPU Manager appears in the Client Plugins table.
- From the vSphere Client menu, choose Lifecycle Manager , click the Settings tab, choose Administration > Patch Setup , and confirm that the NVIDIA GPU Manager drivers repository appears in the table.
3.4. Unregistering NVIDIA GPU Manager for VMware vCenter
Unregister NVIDIA GPU Manager for VMware vCenter when you no longer require to be able to download and manage NVIDIA GPU drivers from the vSphere client. Unregistering NVIDIA GPU Manager for VMware vCenter removes the URL to the repository where downloaded NVIDIA GPU drivers were stored. The driver repository, including and downloaded driver files it contains, remains unchanged and can be accessed again by re-registering NVIDIA GPU Manager for VMware vCenter .
- Log in to the virtual appliance for the NVIDIA GPU Manager for VMware vCenter that you want to unregister.
- On the REGISTRATION page that opens, click UNREGISTER for the vCenter Server host from which you want to unregister NVIDIA GPU Manager for VMware vCenter .
3.5. Verifying the Unregistration of NVIDIA GPU Manager for VMware vCenter
After unregistering NVIDIA GPU Manager for VMware vCenter , confirm that it is no longer listed on the Client Plugins and Patch Setup pages of the vSphere client.
- From the vSphere Client menu, choose Administration > Solutions > Client Plugins and confirm that NVIDIA GPU Manager no longer appears in the Client Plugins table.
- From the vSphere Client menu, choose Lifecycle Manager , click the Settings tab, choose Administration > Patch Setup , and confirm that the NVIDIA GPU Manager drivers repository no longer appears in the table.
4. Managing NVIDIA GPU Drivers from the vSphere Client
After registering NVIDIA GPU Manager for VMware vCenter , you can use the vSphere client to download drivers from NVIDIA Licensing Portal to the NVIDIA GPU Manager drivers repository. After synchronizing the downloaded drivers with vSphere Lifecycle Management (vLCM), you can then install a downloaded driver on an ESXi host. To free storage space in the NVIDIA GPU Manager drivers repository, delete any downloaded drivers that are no longer used.
4.1. Privileges Required for Managing NVIDIA GPU Drivers from the vSphere Client
Managing NVIDIA GPU drivers from the vSphere client requires the privileges for configuring the vSphere Lifecycle Manager service, managing depots and remediation policies, and managing baselines and baseline groups on VMware vCenter.
Users with vCenter Server administrator privileges have all the privileges required for managing NVIDIA GPU drivers from the vSphere client.
- Attach Baseline
4.2. Creating a Software Downloads API Key
Automated downloads of NVIDIA software from the NVIDIA Licensing Portal require a software downloads API key for authentication. This key is required for downloading NVIDIA GPU drivers or NVIDIA GPU Manager for VMware vCenter virtual appliance updates.
- If you are not already logged in, log in to the NVIDIA Enterprise Application Hub and click NVIDIA LICENSING PORTAL to go to the NVIDIA Licensing Portal .
- In the left navigation pane of the NVIDIA Licensing Portal dashboard, click API KEYS .
- In the API Key Management window that opens, click CREATE API KEY .
- In the Key name text-entry field, type your choice of name for the key.
- From the Access type drop-down list, select Software Downloads .
- Accept the NVIDIA Software License Agreement for use of the vGPU software.
- In the Days until expiration text-entry field, type the lifetime of the key in days or, if you don't want the key to expire, deselect the Expire this key after a specified number of days? option.
- When you're ready to use the software downloads API key follow the view api key link and copy the key to the clipboard.
4.3. Configuring the vSphere Client with a Software Downloads API Key
After creating a software downloads API key, configure the vSphere client with the key before using the client to download and manage NVIDIA GPU drivers. For any NVIDIA GPU Manager for VMware vCenter virtual appliance, you need to configure the API key only once. The key is applied to the vSphere client of every vCenter Server instance with which the appliance is registered.
- From the vSphere Client menu, choose NVIDIA GPU Manager .
- Ensure that you have copied the software downloads API key to the clipboard.
- On the Driver Download tab, paste the copied API key into the NVIDIA Licensing Portal API Key text-entry field and click Apply .
4.4. Downloading and Synchronizing NVIDIA GPU Drivers
The NVIDIA GPU drivers that you can download from the NVIDIA Licensing Portal depend on the terms of your NVIDIA software entitlements. After downloading the drivers and synchronizing them with vSphere Lifecycle Management (vLCM), you can install a downloaded driver on an ESXi host.
If necessary, click Refresh Catalog to update the list of drivers that you can download from the NVIDIA Licensing Portal .
Because each download is large, you cannot start a new download while another download is in progress.
- From the vSphere Client menu, choose Lifecycle Manager .
- On the Lifecycle Manager page, from the ACTIONS menu, choose Sync updates .
- On the Image Depot tab of the Lifecycle Manager page, click COMPONENTS and confirm that the downloaded drivers appear in the table.
- Using vSphere Lifecycle Manager Images
- Using vSphere Lifecycle Manager Baselines and Baseline Groups
4.5. Deleting Downloaded NVIDIA GPU Drivers
On the NVIDIA GPU Manager for VMware vCenter virtual appliance, 15 GB of storage is reserved for the NVIDIA GPU Manager drivers repository. To free some storage space, delete unused drivers from the repository.
The Manage Drivers tab shows the total number of drivers downloaded to the NVIDIA GPU Manager drivers repository and the total size of the drivers in GB.
5. Maintaining the NVIDIA GPU Manager for VMware vCenter Virtual Appliance
Maintaining the NVIDIA GPU Manager for VMware vCenter virtual appliance involves updating the virtual appliance in place with minor changes and upgrading the virtual appliance with major changes when a new version of the virtual appliance software is released.
5.1. Updating the NVIDIA GPU Manager for VMware vCenter Virtual Appliance
NVIDIA periodically releases updates to the NVIDIA GPU Manager for VMware vCenter that contain minor changes such as security updates and bug fixes. You install these updates in place on the existing virtual appliance. The NVIDIA GPU Manager for VMware vCenter automatically checks for new updates on the NVIDIA Licensing Portal .
Ensure that an API key has been configured for the vSphere client of a vCenter Server instance with which the appliance is registered. For more information, refer to Configuring the vSphere Client with a Software Downloads API Key .
To prevent loss of data if an update fails, create a snapshot of the virtual appliance before updating it as explained in Take Snapshots of a Virtual Machine . If an update fails, you can restore the virtual appliance from the snapshot as explained in Revert a Virtual Machine Snapshot .
- Log in to the virtual appliance for the NVIDIA GPU Manager for VMware vCenter that you want to update.
- In the left navigation bar, click MAINTENANCE .
If the virtual appliance is up to date, the MAINTENANCE page displays a message that no new updates are available. The INSTALL UPDATES button is deactivated and dimmed.
- Confirm that the vSphere client shows the correct version of the NVIDIA GPU Manager for VMware vCenter virtual appliance.
5.2. Upgrading the NVIDIA GPU Manager for VMware vCenter Virtual Appliance
NVIDIA distributes major upgrades, including new features, in new releases of the NVIDIA GPU Manager for VMware vCenter virtual appliance software. You install these upgrades side by side on a new virtual appliance and then migrate data from the existing virtual appliance to the new virtual appliance.
- Configuration files
- Registered vCenter Server instances
- Downloaded drivers
- Install the new release of the NVIDIA GPU Manager for VMware vCenter virtual appliance software on a new virtual machine. For instructions, refer to Installing the NVIDIA GPU Manager for VMware vCenter Virtual Appliance .
- Register the NVIDIA GPU Manager for VMware vCenter administrator user on the NVIDIA GPU Manager for VMware vCenter virtual appliance that was created in the previous step. For instructions, refer to Registering the NVIDIA GPU Manager for VMware vCenter Administrator User .
- Log in to the existing virtual appliance that you want to upgrade.
- On the MAINTENANCE page that opens, click MIGRATE DATA .
- In the Virtual Appliance text-entry field, type the fully qualified domain name or IP address of the new virtual appliance.
- In the Password text-entry field, type the password of the vcp_admin user that you registered on the new virtual appliance.
- Log in to the new NVIDIA GPU Manager for VMware vCenter virtual appliance and confirm that it is registered with all vCenter Server instances with which the old virtual appliance was registered.
For instructions, refer to Verifying the Registration of NVIDIA GPU Manager for VMware vCenter .
If the fully qualified domain name or IP address of the NVIDIA GPU Manager drivers repository for the old virtual appliance appears in the table, delete it.
- Use the standard interfaces of your hypervisor software to delete the old virtual appliance from the hypervisor host.
- Confirm that the vSphere client shows the correct version and IP address or fully qualified domain name of the NVIDIA GPU Manager for VMware vCenter virtual appliance.
6. Troubleshooting NVIDIA GPU Manager for VMware vCenter
6.1. downloading log files from the nvidia gpu manager for vmware vcenter virtual appliance.
To help NVIDIA Enterprise Support with troubleshooting, you can download the log files in the /var/log directory from an NVIDIA GPU Manager for VMware vCenter virtual appliance.
- Log in to the NVIDIA GPU Manager for VMware vCenter virtual appliance from which you want to download log files.
- In the left navigation bar, click EVENTS .
- On the EVENTS page that opens, click EXPORT EVENTS . A file named log_bundle.zip is saved to your default downloads folder.
6.2. The NVIDIA GPU Manager Management Interface Cannot be Accessed with Firefox or Safari
The NVIDIA GPU Manager for VMware vCenter virtual appliance provides a web-based management interface to the NVIDIA GPU Manager application on the appliance. The appliance's date and time are synchronized with the date and time on the ESXi host on which the appliance is deployed. If the ESXi host’s date and time are not set accurately, the management interface cannot be accessed with the Firefox or Safari web browsers because of their strict security requirements on the expiration of cookies.
Ensure that the ESXi host’s date and time are set accurately, for example, by using NTP. For information about how to configure NTP on an ESXi host, refer to VMware Knowledge Base Article: Configuring Network Time Protocol (NTP) on an ESXi host using the vSphere Client (57147) .
6.3. The Virtual Appliance VM Was Deleted While NVIDIA GPU Manager for VMware vCenter Was Still Registered
NVIDIA GPU Manager for VMware vCenter is unregistered from the NVIDIA GPU Manager application on the virtual appliance. If the virtual appliance VM has already been deleted, use the vCenter Managed Object Browser (MOB) interface in a web browser to delete the NVIDIA GPU Manager for VMware vCenter extension manually.
- Open a web browser and connect to the URL https:// vcenter-server-ip-address /mob/?moid=ExtensionManager&method=unregisterExtension . vcenter-server-ip-address The IP address or, if defined, the fully qualified domain name of your vCenter Server instance.
- When prompted, sign in with the username and password of a vCenter Server administrator user on the vCenter Server instance. The void UnregisterExtension page opens.
- In the text box for the extensionKey value, type com.nvidia.gpu.manager .
- Follow the Invoke Method link.
- Delete the entry for the NVIDIA GPU Manager drivers repository manually as explained in Modify a Download Source on the VMware Docs site.
6.4. NVIDIA GPU Manager for VMware vCenter Could Not Be Registered
To communicate with NVIDIA GPU Manager , VMware vCenter Server must trust the SSL certificate on the NVIDIA GPU Manager for VMware vCenter appliance. When you register NVIDIA GPU Manager for VMware vCenter , VMware vCenter Server first imports the SSL certificate into its truststore. If the SSL certificate cannot be imported, registration of NVIDIA GPU Manager for VMware vCenter might fail.
- Import the certificate manually. For instructions, refer to VMware Knowledge Base Article: Adding a new online depot to vCenter Server 7.0 U2C and above vCenter Life Cycle Manager fails due to "self signed certificate" error (85819) .
- Try to register NVIDIA GPU Manager for VMware vCenter again. For instructions, refer to Registering NVIDIA GPU Manager for VMware vCenter .
This document is provided for information purposes only and shall not be regarded as a warranty of a certain functionality, condition, or quality of a product. NVIDIA Corporation (“NVIDIA”) makes no representations or warranties, expressed or implied, as to the accuracy or completeness of the information contained in this document and assumes no responsibility for any errors contained herein. NVIDIA shall have no liability for the consequences or use of such information or for any infringement of patents or other rights of third parties that may result from its use. This document is not a commitment to develop, release, or deliver any Material (defined below), code, or functionality.
NVIDIA reserves the right to make corrections, modifications, enhancements, improvements, and any other changes to this document, at any time without notice.
Customer should obtain the latest relevant information before placing orders and should verify that such information is current and complete.
NVIDIA products are sold subject to the NVIDIA standard terms and conditions of sale supplied at the time of order acknowledgement, unless otherwise agreed in an individual sales agreement signed by authorized representatives of NVIDIA and customer (“Terms of Sale”). NVIDIA hereby expressly objects to applying any customer general terms and conditions with regards to the purchase of the NVIDIA product referenced in this document. No contractual obligations are formed either directly or indirectly by this document.
NVIDIA products are not designed, authorized, or warranted to be suitable for use in medical, military, aircraft, space, or life support equipment, nor in applications where failure or malfunction of the NVIDIA product can reasonably be expected to result in personal injury, death, or property or environmental damage. NVIDIA accepts no liability for inclusion and/or use of NVIDIA products in such equipment or applications and therefore such inclusion and/or use is at customer’s own risk.
NVIDIA makes no representation or warranty that products based on this document will be suitable for any specified use. Testing of all parameters of each product is not necessarily performed by NVIDIA. It is customer’s sole responsibility to evaluate and determine the applicability of any information contained in this document, ensure the product is suitable and fit for the application planned by customer, and perform the necessary testing for the application in order to avoid a default of the application or the product. Weaknesses in customer’s product designs may affect the quality and reliability of the NVIDIA product and may result in additional or different conditions and/or requirements beyond those contained in this document. NVIDIA accepts no liability related to any default, damage, costs, or problem which may be based on or attributable to: (i) the use of the NVIDIA product in any manner that is contrary to this document or (ii) customer product designs.
No license, either expressed or implied, is granted under any NVIDIA patent right, copyright, or other NVIDIA intellectual property right under this document. Information published by NVIDIA regarding third-party products or services does not constitute a license from NVIDIA to use such products or services or a warranty or endorsement thereof. Use of such information may require a license from a third party under the patents or other intellectual property rights of the third party, or a license from NVIDIA under the patents or other intellectual property rights of NVIDIA.
Reproduction of information in this document is permissible only if approved in advance by NVIDIA in writing, reproduced without alteration and in full compliance with all applicable export laws and regulations, and accompanied by all associated conditions, limitations, and notices.
THIS DOCUMENT AND ALL NVIDIA DESIGN SPECIFICATIONS, REFERENCE BOARDS, FILES, DRAWINGS, DIAGNOSTICS, LISTS, AND OTHER DOCUMENTS (TOGETHER AND SEPARATELY, “MATERIALS”) ARE BEING PROVIDED “AS IS.” NVIDIA MAKES NO WARRANTIES, EXPRESSED, IMPLIED, STATUTORY, OR OTHERWISE WITH RESPECT TO THE MATERIALS, AND EXPRESSLY DISCLAIMS ALL IMPLIED WARRANTIES OF NONINFRINGEMENT, MERCHANTABILITY, AND FITNESS FOR A PARTICULAR PURPOSE. TO THE EXTENT NOT PROHIBITED BY LAW, IN NO EVENT WILL NVIDIA BE LIABLE FOR ANY DAMAGES, INCLUDING WITHOUT LIMITATION ANY DIRECT, INDIRECT, SPECIAL, INCIDENTAL, PUNITIVE, OR CONSEQUENTIAL DAMAGES, HOWEVER CAUSED AND REGARDLESS OF THE THEORY OF LIABILITY, ARISING OUT OF ANY USE OF THIS DOCUMENT, EVEN IF NVIDIA HAS BEEN ADVISED OF THE POSSIBILITY OF SUCH DAMAGES. Notwithstanding any damages that customer might incur for any reason whatsoever, NVIDIA’s aggregate and cumulative liability towards customer for the products described herein shall be limited in accordance with the Terms of Sale for the product.
VESA DisplayPort
DisplayPort and DisplayPort Compliance Logo, DisplayPort Compliance Logo for Dual-mode Sources, and DisplayPort Compliance Logo for Active Cables are trademarks owned by the Video Electronics Standards Association in the United States and other countries.
HDMI, the HDMI logo, and High-Definition Multimedia Interface are trademarks or registered trademarks of HDMI Licensing LLC.
OpenCL is a trademark of Apple Inc. used under license to the Khronos Group Inc.
NVIDIA, the NVIDIA logo, NVIDIA GRID, NVIDIA GRID vGPU, NVIDIA Maxwell, NVIDIA Pascal, NVIDIA Turing, NVIDIA Volta, Quadro, and Tesla are trademarks or registered trademarks of NVIDIA Corporation in the U.S. and other countries. Other company and product names may be trademarks of the respective companies with which they are associated.
© 2023 - 2024 NVIDIA Corporation. All rights reserved.
IMAGES
VIDEO
COMMENTS
Task Steps; Select an existing license: Select an existing license from the list and click OK.: Select a newly created license: Click the New License tab. ; In the Assign License dialog box, type or copy and paste a license key and click OK.; Enter a name for the new license and click OK.. Details about the product, product features, capacity, and expiration period appear on the page.
Connect to the vCenter Web Console as administrator. Click Hosts and Clusters. Right click on the system (vCenter/vSphere ESXi - Host) you want to license to. Select Assign license. If the license is not in the vCenter Server: Click NEW LICENSE Tab. Enter the License key. Enter the License name. Click Next.
Click ASSIGN LICENSE hyperlink. In the Assign License Wizard, Under Existing Licenses choose the correct license key just added (Some features will become unavailable based on the licenses, check details for more information). Click OK. Verify ESXi server is assigned with a new license and not in Evaluation mode (60 day trial) now.
In this video we take a look at how to add and assign a vCenter, vSphere license to our home lab. If you have a license a free license you can use it here.
From the Windows Start menu, select Programs > VMWare > VMware vSphere Web Client > vSphere Web Client. In the vSphere Web Client, navigate to the host in the vSphere inventory. Click the Manage tab. Under System, select Licensing. Click Assign License Key. In the dropdown menu, select one of the options in this table to assign a license key to ...
The Assign License window opens in the web interface. If you added multiple license keys to vCenter, click Existing licenses and select a license that has unused CPUs. In my example, I will assign a new ESXi license to the vCenter server. Click New license. Enter your license key and a license name that is convenient for you, for example ...
You need to click on the 'top' FQDN vCenter identifier on the left hand side of the window, which houses your Datacenter and the nodes inside. Once you click on it, you will see the following, As you see, now selecting the VCSA and going to the Configure section and under Settings, we now see Licensing as an option.
Hi, After install vCenter 7.0 Update 3 in my last post, You need to assign license to your vCenter. For this purpose, You need to buy a license from VMware company. Login to your vCenter Server, You see a warning on your screen. Click on Manage Your Licenses button. Your vCenter license is on Evaluation License. CLick ADD. Enter your License Key
The workflow of assigning a license for vCenter 6.7 and vCenter 7.0 is similar. You should assign a vCenter license before the trial period expires. ... Go to the Configuration tab, and click Licensing in the Settings section to configure vCenter Server licensing. On the Licensing page, you see the current license assigned to your vCenter, such ...
Enter the vCenter Server 6.x Standard license key and press Enter to add a new line. Enter the vSphere 6.x Standard license key(For ESXi), and click Next. Label the license keys as per your convinient. Click on Next. Your Licenses have been added here. Now let's move to Step#2 to Assign Licenses. Step#2 - Assign License to Virtual Center
Quick byte today - Here is a tutorial on how to assign VMware vSphere 7 licenses. When you first install ESXi (or vCenter), you will have a 60-day evaluation license to dive into the full set of features. These evaluation features are equivalent to that of a vSphere Enterprise Plus license which includes vSphere vMotion, High Availability (HA), Distributed Resource Scheduler (DRS), Virtual ...
This video covers steps to add and assign new license to VMware vCenter.For demo I have covered vCenter 6.7 installation.VMware vCenter installation on windo...
This article focuses on how to add licenses to vCenter and ESXi server. For more detailed information on pricing and licensing VMWare has provided nice white paper pdf. Its worth reading. On my newly deployed vsphere Production I was keep getting warning message, On the vSphere web client there was message in yellow rectangle at the top, There are vCenter Server Systems with expired or ...
Select Assets and vCenter Server Systems to Assign your vCenter license. If you have not added it yet , you will be able to select "New License" in the next screen. Jason. After you have licensed the vCenter, you should be able to right click on the disconnected Hosts and choose "Connect". Jason.
This article provides additional details on vSphere for Desktop licensing, usage and enforcement for vSphere versions 5.5, 6.x, 7.x, and 8.x. vSphere for Desktop licensing is a special vSphere licensing designed for VDI usage. This article specifically addresses use cases where VMware Horizon and Citrix customers have the vSphere for Desktop ...
Fusion 13 Pro. Key. Tested. 4A4RR-813DK-M81A9-4U35H-06KND. . VMware ESXi 8 / vCenter 8 / Workstation 17 8 license key 2024 - vmware.md.
Upgrading vCenter Server from 6.5 to 6.7 - ... Configure a Centralized VMware Tools Installation Repository Overview of 3 Types of Tools Updating Tools in a vSphere environment Correlating Tools versions with ESXi releases ... Licensing Interoperable Solutions Networking Storage
NVIDIA GPU Manager for VMware vCenter enables you to manage NVIDIA GPUs from the vSphere client of VMware vCenter Server.. When NVIDIA GPU Manager for VMware vCenter is installed and configured, you can download and install NVIDIA GPU drivers by using a web-based tool integrated with the vSphere web client user interface instead of running a set of commands on the hypervisor.
Assign license to vCenter. Assign licenses to all ESXi hosts. Assign licenses to vSAN; Reconnect those that were disconnected during this process; 6. Delete the GW VM. Do not power it back on. 7. Script will only remove the subscription of vCenter Server with vSphere+. We will need to manually remove all the CloudGateway service accounts (with ...