How to Create a Glass Effect in Photoshop
Glass effect may be quickly and easily added to any layer or text object in Photoshop, as well as saved as a layer style preset or copied and pasted into additional layers.
Creating a glass effect on your image in Photoshop is a great way to add eye-catching detail to your project. The best thing is, it’s so simple even a beginner can do this!
My name is Aly, I have over five years of Photoshop experience and I’m Photoshop certified . In this tutorial, I will show you how to create a glass effect in Adobe Photoshop.
You can add a realistic-looking glass effect to an image by using the Photoshop filter known as the “glass” effect.
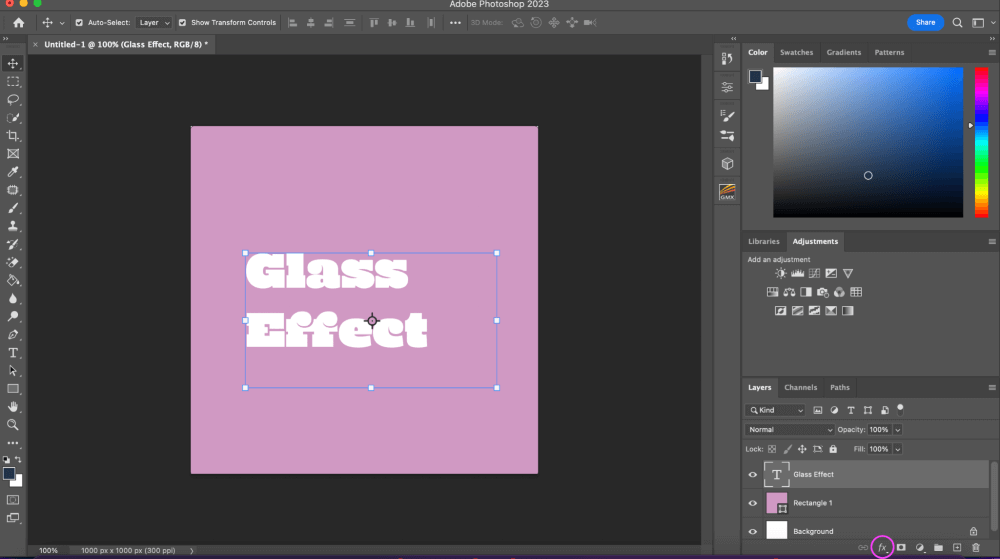
Step 1: Add the image or text you want to add to the glass effect. For example, I am going to be using text over a background. So I’ll use the Type Tool to add text .
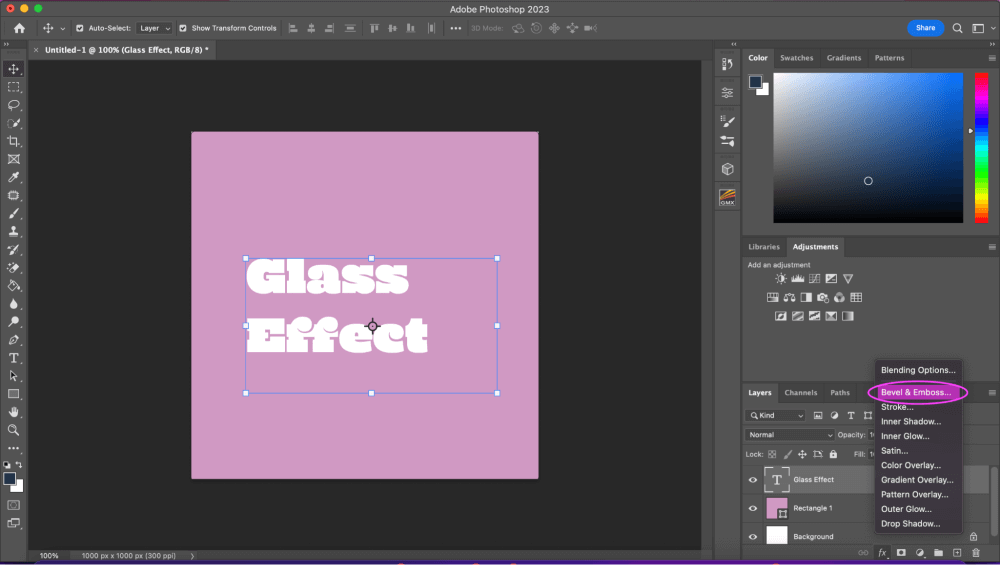
Step 2: Once you have your text or image up, go to the bottom right-hand corner and find the effect (fx) icon otherwise known as Layer Style .
Step 3: Select Bevel and Emboss from the list of choices.
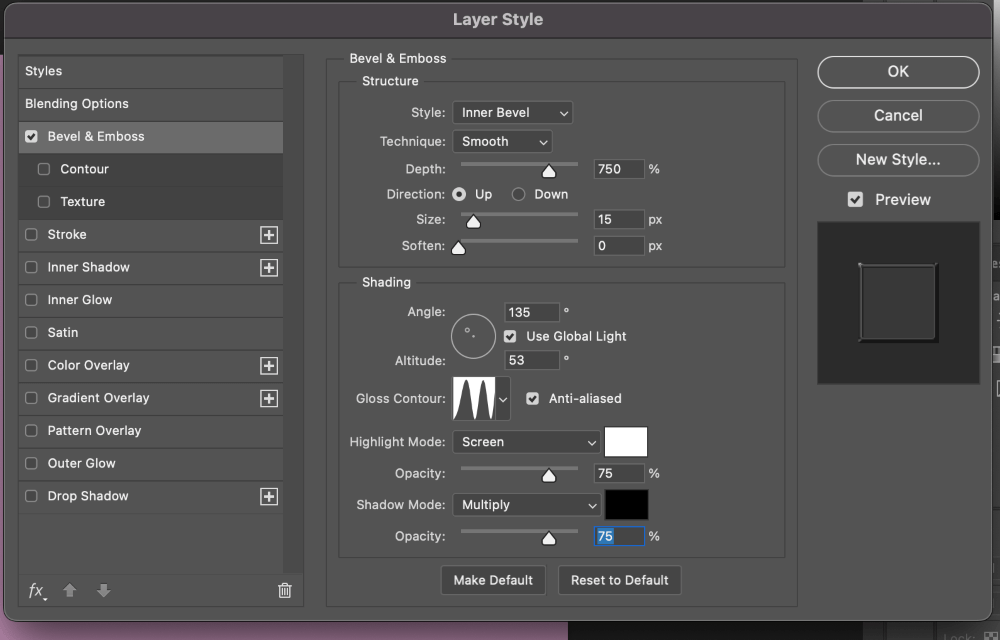
Step 4: Make sure Global Light is off before using the settings we’ve specified here. Select the Double Ring option under Gloss Contour and make sure Anti-aliased is checked. Don’t click OK quite yet.
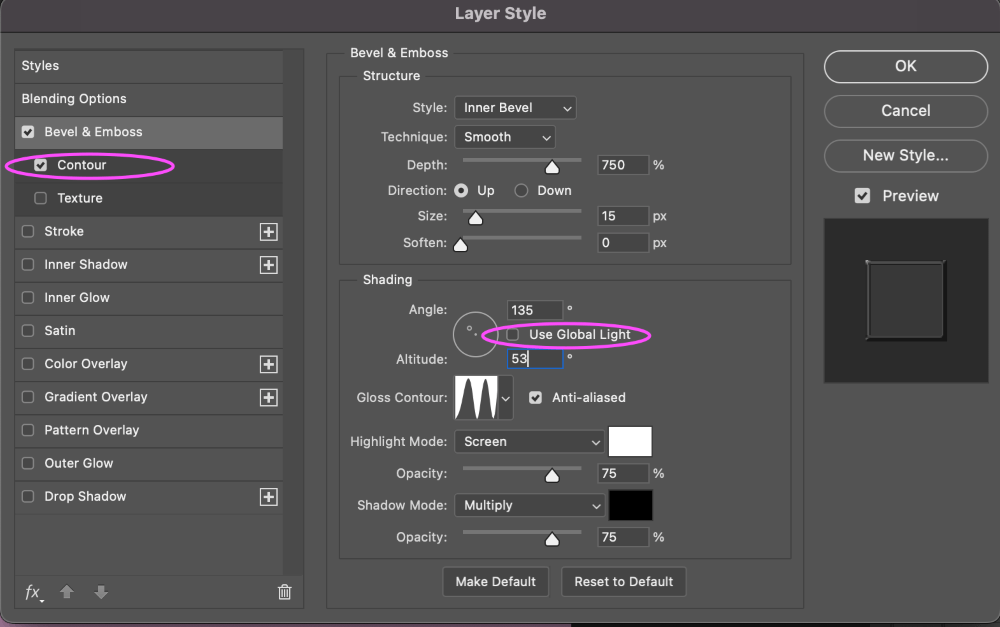
Step 5: Click Contour under Bevel and Emboss on the left menu. Select the same Double Ring Contour Gloss effect and make sure Anti-Aliasing is also selected.
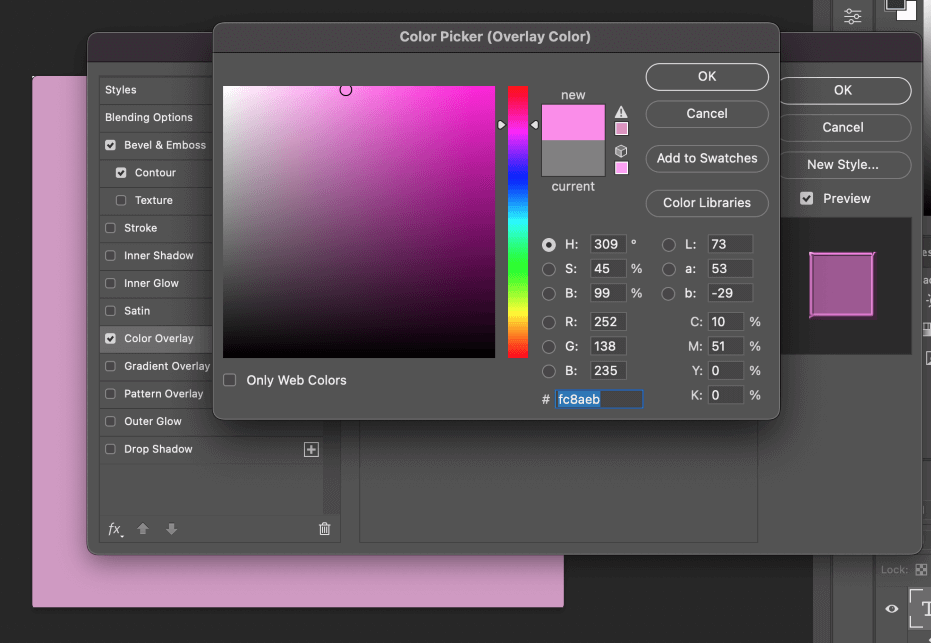
Step 6: From the option on the left, select Color Overlay . With an Opacity of 15%, we have selected a light pink color.
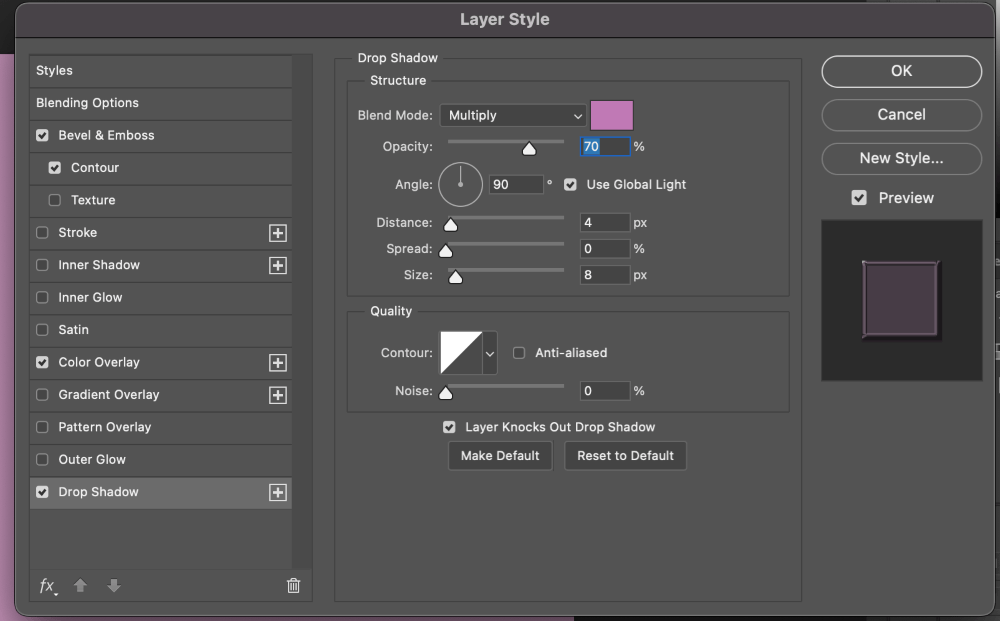
Step 7: We’ll then add a small drop shadow after that. To do this, select Drop Shadow from the menu on the left’s bottom. Once more, we’ve gone with a pink color and decreased the opacity to about 70%.
You can now experiment with the shadow’s size, spread, and distance until it appears appropriate and natural for your image. When you’re ready, click OK.
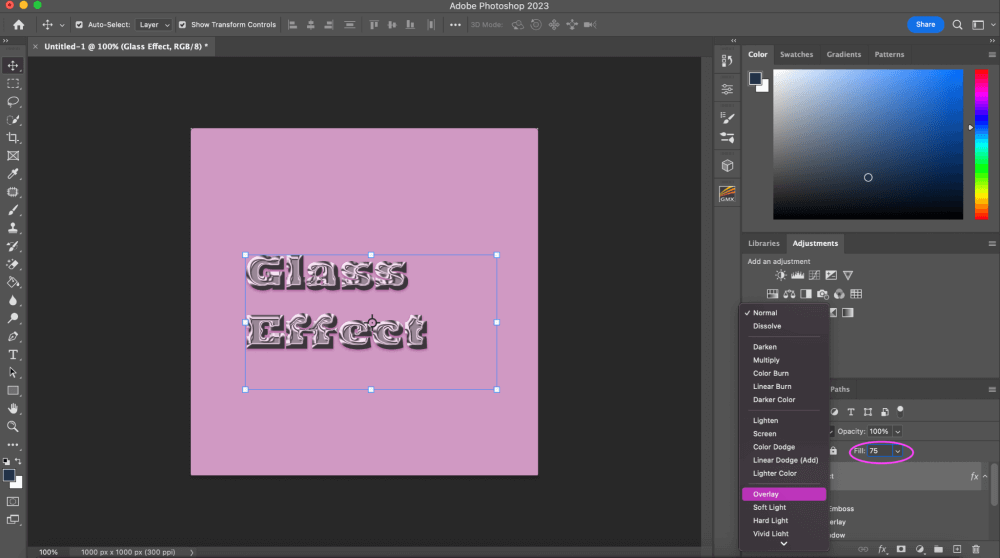
Step 8: Reduce the Fill after changing the Layer mix to Overlay . You can experiment with the number to determine what works best for your image; I’ve decreased mine to 75%.
And that’s all there is to it! As I said it’s a pretty simple tool to use and very personalized to
your liking.

Final Thoughts
Using the glass effect, you may make your pictures or text appear more realistic. Additionally, it’s a wonderful opportunity to play with various hues and textures. Therefore, don’t be reluctant to experiment with the Glass filter until you find a style that you enjoy!
Any questions about creating a glass effect in Photoshop? Leave a comment and let me know.

Leave a Reply Cancel Reply
Your email address will not be published. Required fields are marked *
Sign up to our newsletter!
Photoshop is a design software made by Adobe Inc. This site is not supported or associated with Adobe in any way.
- Photoshop Tutorials
- Photoshop Freebies
- Privacy Policy
Photoshop » Effects » How To Create A Glass Effect In Photoshop (6 Easy Steps)
How to create a glass effect in photoshop (6 easy steps).
With the help of some layer styles, you can make shapes or text look like glass in Photoshop. With the steps outlined here, you’ll know the exact settings to use for every step of the process.
So, let’s get started and create this glass effect from scratch!
Table of Contents
How To Create A Glass Effect In Photoshop
Step 1: convert your text to a smart object.
Place the text you want to add the effect to in Photoshop and convert the text layer to a Smart Object by right-clicking on it and selecting Convert To Smart Object.
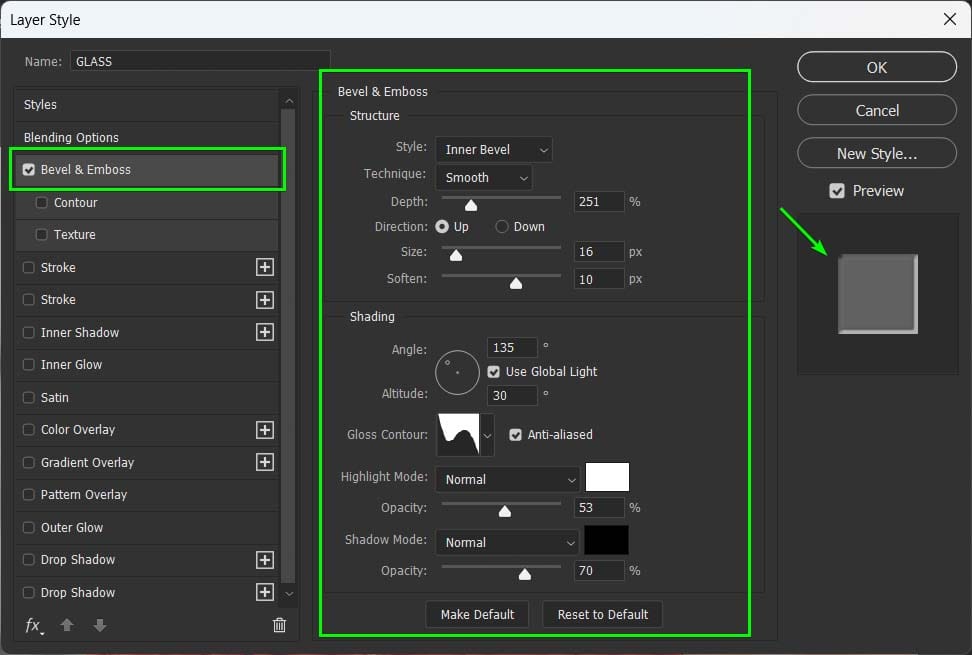
Step 2: Apply The Bevel And Emboss Effect
Double-click the text layer to open the Layer Style panel. Then, click the Bevel and Emboss checkbox. Here is what each setting does and a base guide for the glass effect. You can slightly adjust these settings for a more customized look.
- In Style , choose Inner Bevel
- Select Smooth for Technique
- Adjust Depth to your liking. The higher the depth, the harsher the bevel effect
- In Direction , choose between Bevel up or down in the text. Either option works
- In Size, you can control how much bevel effect is applied to your text. If you increase the size too much, your text will be filled with the bevel effect, which will look more like a gradient than a bevel
- In Soften , you can make the bevel effect look more subtle because it applies a slight blur to your bevel, blending it more with the text color
- In Angle , you can determine the direction of the light source
- Gloss Contour options for different shading styles for the Bevel. In my case, I chose Rolling Slope Descending
- Adjust the Opacity to set the intensity of the effect
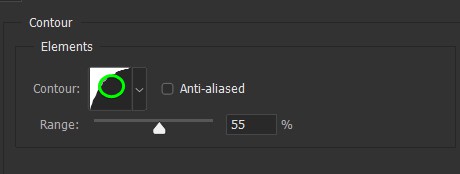
Step 3: Adjust The Contour In The Layer Styles Panel
In Contour, you can modify the appearance of your text contour. In my case, I chose Half Round . By adjusting the Range , you can make the contour look more or less highlighted in certain areas. In my case, I chose 55% .
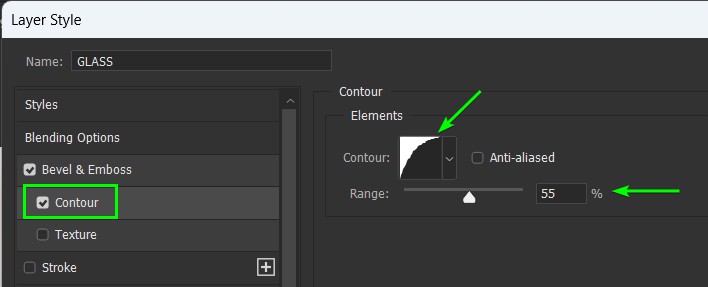
You can open the Contour Editor by double-clicking the contour box, where you can further personalize the contour shape by adjusting its curve points. You can also choose one of the preset curves within the preset curves drop-down menu.
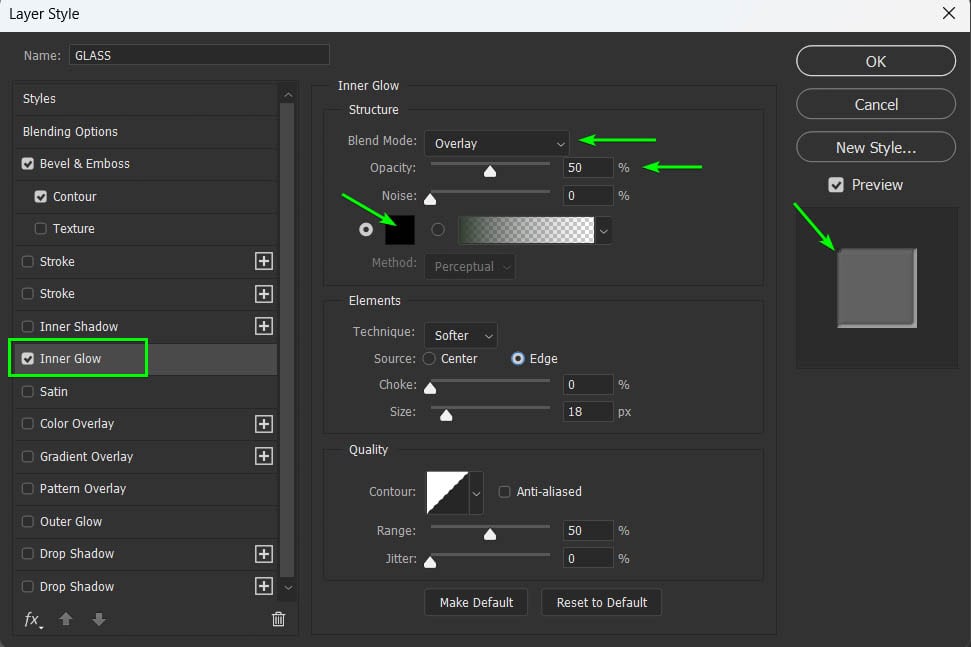
Step 4: Apply An Inner Glow In The Layer Styles Panel
Now click the Inner Glow option. This effect will fill your text after you finish applying the glass effect.
- Change the Blend Mode to Overlay .
- Change the Opacity to 50% .
- Change the Gradient color to black.
Leave the other Inner Glow settings as they are.
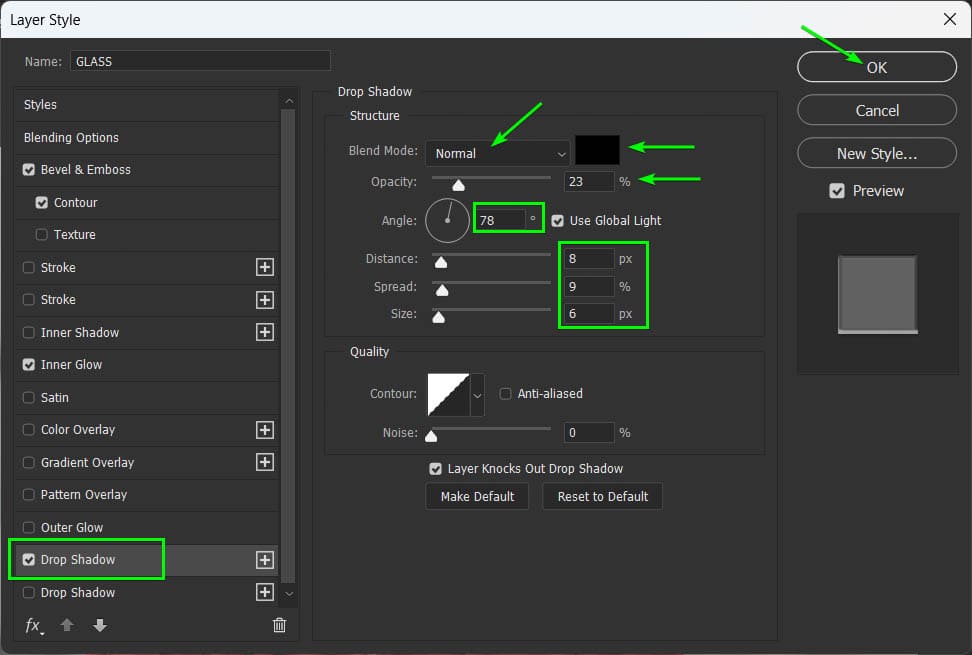
Step 5: Apply A Drop Shadow In The Layer Styles Panel
Next, click the Drop Shadow option. That allows you to cast a shadow for your text/shape, making it look more detached from the background surface. Choose the following values for the Drop Shadow settings:
- Blend Mode : Normal
- Color: Black
- Opacity: 23%
- Distance : 8, Spread : 9, and Size : 6
When you are done applying all the above effects, click OK to exit the Layer Style menu.
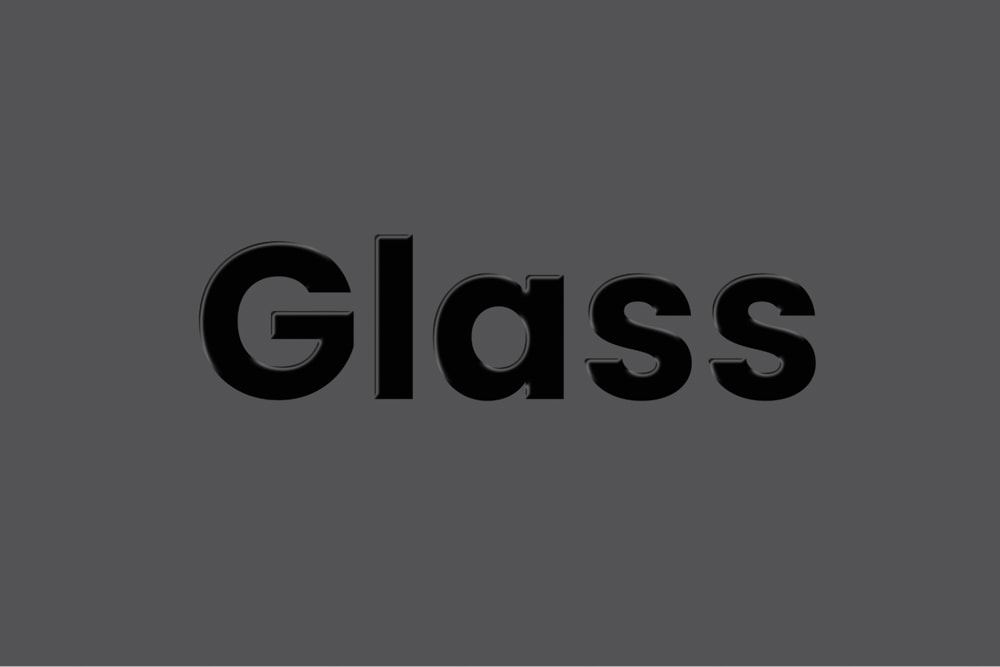
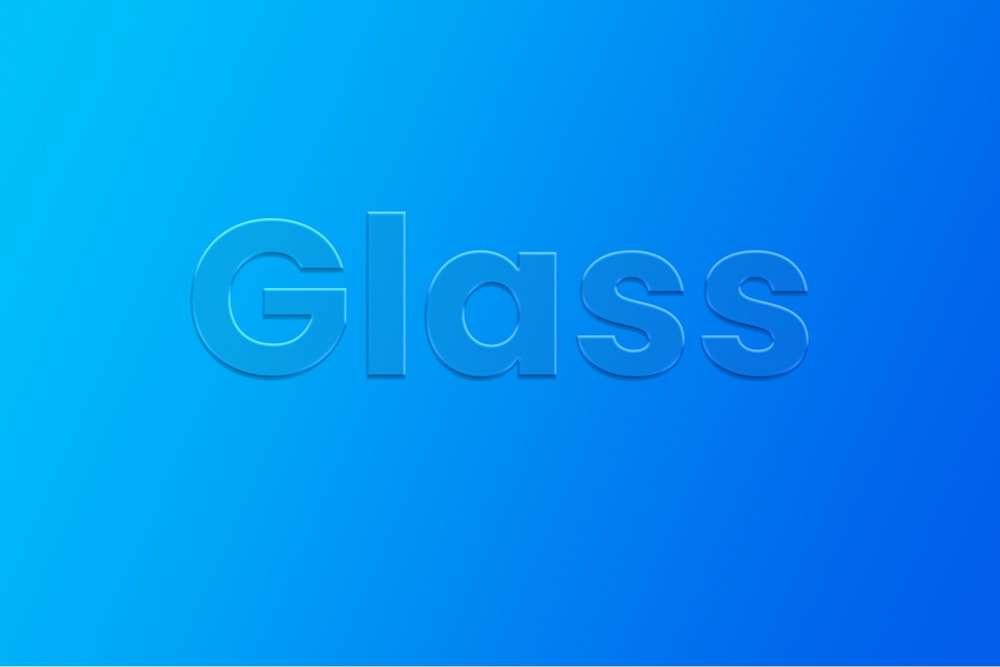
Your text should resemble something like mine below.
Step 6: Reduce The Fill Of The Text Layer
Within the Layers Panel , click the text layer. Then, turn the Fill down, making the inner part of your text transparent or semitransparent. In my case, I turned it down to 14% .
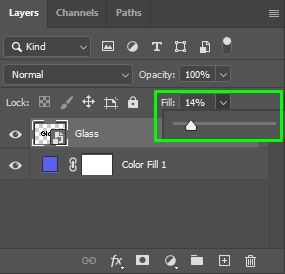
That will make the text blend with the background, making it look like glass. You can change the background color and even add a gradient fill layer for a more creative effect.
The glass effect is a unique and fun effect to apply to text and shapes in Photoshop. Give these steps a try and see what you can create for yourself!

Continue Reading:

How To Use The Marquee Tool In Photoshop

How To Crop A Layer In Photoshop (3 Simple Methods)

How To Fill A Selection In Photoshop (5 Best Ways)

What Are Embedded Previews In Lightroom + How To Use Them

Adobe Lightroom System Requirements For Mac & PC

How To Add A Watermark In Lightroom Classic & CC

How To Outline An Image In Canva

How To Add A Border In Canva (To Images, Shapes & Text!)
How To Make A Background Transparent In Canva

Products & Courses
Email: [email protected]
As an Amazon Affiliate, I earn from qualifying purchases. Brendan Williams Creative also participates in affiliate programs with Impact, Clickbank, CJ, ShareASale, and other sites. Brendan Williams Creative is compensated for referring traffic and business to these companies . Keep in mind that we may receive commissions when you click our links and make purchases. However, this does not impact our reviews and comparisons. We try our best to keep things fair and balanced, in order to help you make the best choice for you.
IMAGES
VIDEO